


Short Seam Automat 2110-4 / 2111-4 Working Instructions |
Working Instructions |
Short Seam Automat 2110-4 / 2111-4 |
- A 1 - |

Beisler Automated Sewing Equipment |
Short Seam Automat 2110-4 / 2111-4 Working Instructions |
|
|
Contents of the working instructions
The working instructions are divided into four sections:
AGeneral notes: page A 1 - A 10
Safety instructions for the operating and service personnel and for the operator of the machine.
BOperating instructions: page B 11 - B 26
Instructions for the personnel operating and handling the machine.
CService instructions: page C 27 - C 55
Instructions for the personnel in charge of the initial start-up, setting up and service of the machine.
DProgramming instructions: page D 56 - D 88
Instructions for the service personnel in charge of preparing and setting up the machine.
Scope of the working instructions
These working instructions describe the SHORT SEAM AUTOMAT 2110-4 / 2111-4 of Beisler GmbH and apply only to those machine parts and components that are contained in the scope of delivery of the SHORT SEAM AUTOMAT 2110-4 / 2111-4.
They do not apply to accessories or machine parts (e.g. sewing head) from third parties that the machine is equipped or retrofitted with. For those components, the working instructions of the respective manufacturer or supplier apply.
- A 2 -

Short Seam Automat 2110-4 / 2111-4 Working Instructions |
Beisler Automated Sewing Equipment |
|
|
Section A General notes
- A 3 -

Beisler Automated Sewing Equipment |
Short Seam Automat 2110-4 / 2111-4 Working Instructions |
Section A |
General notes |
Contents |
|
A.1 Safety instructions .............................................................................................................. |
5 |
A.1.1 Symbols used in the working instructions ..................................................................... |
8 |
A.1.2 Symbols used on the machine ...................................................................................... |
8 |
A.1.3 General safety instructions ............................................................................................ |
9 |
A.2 Notices ................................................................................................................................ |
10 |
- A 4 -

Short Seam Automat 2110-4 / 2111-4 Working Instructions Beisler Automated Sewing Equipment
A.1 Safety instructions
Important information for the operator!
This machine has been manufactured in keeping with the latest technological developments and is operationally safe. However, it may present potential hazards, particularly if it is operated by inadequately trained personnel or if it is not used correctly:
•For personnel operating and handling the machine, the operator must prepare written instructions in a reasonable form and in the language of the operating personnel based on these working instructions (Germany: Accident Prevention Regulations UVV VBG 1 § 7.2).
•Use the operating instructions to familiarize the operating personnel with the functions, operation, and care of the machine and check to see if the operating personnel fully understands these instructions.
•Use the service instructions to familiarize the service personnel with the setting up and maintenance of the machine.
•For any modifications of the machine that have not been approved by Beisler GmbH in writing, the operator is fully responsible.
•The contents of the working instructions are subject to change without further notice.
•Concerning translations into foreign languages, the German version of these working instructions is binding.
•Should you encounter problems that are not mentioned in these working instructions, please contact your supplier immediately for your own safety. Please do not hesitate to contact Beisler if you have any suggestions that help to improve this product.
•Keep these working instructions close to the machine so that safety instructions and information on operation, setting-up, and maintenance are always accessible.
Warranty
Beisler GmbH warrants the safety, operatability, and repair without charge of the short seam automat 2110-4 / 2111-4 for a period of 6 months under the condition that:
•the machine is used exclusively for the intended purpose and serviced in accordance with the information in these working instructions,
•modifications of the machine are carried out only with prior written approval of Beisler GmbH,
•only original spare parts or accessories approved by Beisler GmbH are used. For
a complete list of all approved spare parts, please contact Beisler GmbH.
If the machine is used for more than 10 hours per day (shift operation), the warranty period is reduced to 3 months.
The warranty period starts with the delivery of the machine to the operator.
- A 5 -

Beisler Automated Sewing Equipment Short Seam Automat 2110-4 / 2111-4 Working Instructions
A.1 Safety instructions
Exclusion of liability
Beisler GmbH warrants the faultlessness of the product as set forth by their advertisement, product information and these working instructions. Other product characteristics are not warranted.
Beisler GmbH is not responsible for the profitability or for the correct function of the short seam automat 2110-4 / 2111-4 if it is used for other purposes than those defined in section „Correct use“.
Beisler GmbH is not responsible for damage that arises from the use of nondefined and non-approved spare parts or accessories.
Copyright
© 2005 Beisler GmbH, Hösbach; 07/2005
Short seam automat
The short seam automat 2110-4 / 2111-4 and all related parts are protected by copyright. Any reproduction of the machine will be prosecuted.
Working instructions
These working instructions are protected by copyright. No part of the working instructions, including figures and tables, may be reproduced or translated in any form or by any means, electronic or mechanical, without the express written permisson of Beisler GmbH.
Beisler GmbH
Frohnradstr. 10
63768 Hösbach
Germany
Phone: ++ 49 / 6021 / 50 19 0
Fax: ++ 49 / 6021 / 50 19 10
eMail: vertrieb@beisler-gmbh.de
- A 6 -

Short Seam Automat 2110-4 / 2111-4 Working Instructions Beisler Automated Sewing Equipment
A.1 Safety instructions
Important information for the operating personnel!
Please note that any work to the SHORT SEAM AUTOMAT 2110-4 / 2111-4 must be carried out only by trained operating personnel:
•Operating personnel means persons:
that have been given initial instructions for sewing automats and that have been trained for the operation and handling of the SHORT SEAM AUTOMAT 2110-4 / 2111-4 on the basis of these operating instructions, that have been informed about potential risks arising from their work with the machine,
that are capable of assessing their work with the machine due to occupational experience and instruction of the safety regulations and of recognizing potential hazards during work.
•Cleaning of the machine or of machine parts must be performed only by personnel that has been informed about potential hazards arising during the cleaning work.
•Prior to the initial operation of the SHORT SEAM AUTOMAT 2110-4 / 2111-4, read the operating instructions carefully so that you can make full use of the advantages of the machine and to prevent damage.
Important information for the service personnel!
Please note that service work to the SHORT SEAM AUTOMAT 2110-4 / 2111-4 must be carried out only by authorized and adequately trained expert personnel:
•Expert personnel means persons:
that have aquired their expertise by a special training in machine technology or electrical engineering or by a special advanced training or a comparable qualification,
that have acquired the knowledge required to perform all works for setting up and servicing the SHORT SEAM AUTOMAT 2110-4 / 2111-4 from a training by Beisler GmbH,
that are capable of assessing their work with the machine due to occupational experience and instruction of the safety regulations and of recognizing potential hazards during work.
•Prior to carrying out any service work to the SHORT SEAM AUTOMAT 2110-4 / 2111-4, read the entire working instructions carefully so that you can make full use of the advantages of the machine and to prevent damage.
- A 7 -

Beisler Automated Sewing Equipment Short Seam Automat 2110-4 / 2111-4 Working Instructions
A.1 |
Safety instructions |
||
|
|
|
|
A.1.1 Symbols used in the working instructions |
|
A.1.2 Symbols used on the machine |
|
|
|
|
|
 WARNING!
is used if non-observance may cause serious or even lethal injuries.
 CAUTION!
is used if non-observance may cause medium to minor injuries or damage.
 NOTE!
NOTE!
is used for hints and useful information.
 WARNING: DANGER!
Caution! Observe working instructions.
 WARNING: HIGH VOLTAGE!
Caution! Prior to opening, pull out power plug.
- A 8 -

Short Seam Automat 2110-4 / 2111-4 Working Instructions Beisler Automated Sewing Equipment
A.1 Safety instructions
A.1.3 General safety instructions
Correct use
•The SHORT SEAM AUTOMAT 2110-4 / 2111-4 is a sewing machine. It is to be used for crimping over pokket edges.
For this purpose, the machine 2110-4 is equipped with a chain stitch top, and the machine2111-4 is equipped with a lock stitch top.
•The maximum length of the pocket edge to be processed is 300 mm.
If the machine is equipped with an optional, oversized crimping over and insertion station, the maximum length of the pocket edge to be processed is 400 mm.
•The machine can be used for processing all conventional materials for outerwear.
•The machine has been designed for permanent operation in industry.
•The SHORT SEAM AUTOMAT 2110-4 / 2111-4 has been tested for electromagnetic compatibility and is
suited for installation in industrial operating rooms.
Incorrect use
•The SHORT SEAM AUTOMAT 2110-4 / 2111-4 must not be operated in rooms that do not comply with the location requirements.
•The SHORT SEAM AUTOMAT 2110-4 / 2111-4 must not be operated in the vicinity if devices or systems that produce strong magnetic fields as otherwise the correct function of the program control may be impaired.
Safety requirements
•DIN EN, Part 1:1991-11, Part 2:1995-06 Safety of machines
•DIN EN 60601, Part 1:1994-05
Safety regulations for electrically operated measuring and control installations, general requirements.
•DIN EN 50178 (VDE 0160): 1998-04
Equipment of power systems with electronic devices
•DIN EN 50082 (VDE 0839) Part 2:1997-11 Electromagnetic compatibility, basic specification, immunity to interference.
Part 1: Domestic, business and commerce, small enterprises.
Part 2: Industry.
•DIN EN 60204 (DIN VDE 0113): 1993-06 Electrical equipment of industrial machines
Safety devices
The SHORT SEAM AUTOMAT 2110-4 / 2111-4 is equipped with a circuit-breaker (program stop switch) that stops all machine movements and the sewing process when actuated manually.
Power supply connection
The power supply of the machine is established with a properly grounded power supply connection with:
•230 V ± 10 %, 50/60 Hz, grounding plug.
•Fusing: 16 A
•Power consumption: 1.3 kW
Compressed air supply
The machine must be supplied by an on-site compressed air source.
•Operating pressure: 6 bar.
•Compressed air quality: oil-free
•Compressed air consumption: 12 NL
Location and storage requirements
Installation in sheltered, closed rooms.
•Room temperature: +10 °C to 45 °C
•Relative humidity: 80 % max.
Disposal
•Please discard the packaging material in accordance with existing disposal directives. Section C1, Delivery of the machine, contains a list of the packaging materials used.
•The machine contains reusable materials. Therefore, when discarding the machine, ask your local magistrate or community office about the possibilities of recycling.
- A 9 -

Beisler Automated Sewing Equipment |
Short Seam Automat 2110-4 / 2111-4 Working Instructions |
|
|
A.2 Notices
- A 10 -
Short Seam Automat 2110-4 / 2111-4 Working Instructions |
Beisler Automated Sewing Equipment |
|
|
Section B Operating Instructions
- B 11 -

Beisler Automated Sewing Equipment |
Short Seam Automat 2110-4 / 2111-4 Working Instructions |
|
Section B |
Operating instructions |
|
Contents |
|
|
B.1 Discription of the machine ............................................................................................... |
13 |
|
B.1.1 |
Functional units ........................................................................................................... |
13 |
B.2 Functions of the machine ................................................................................................. |
14 |
|
B.2.1 |
Functional sequence ................................................................................................... |
14 |
B.2.2 |
Line-up and alignment ................................................................................................ |
14 |
B.2.3 |
Transport and sewing .................................................................................................. |
16 |
B.2.4 |
Switches ...................................................................................................................... |
17 |
B.2.5 |
Operating panel ........................................................................................................... |
18 |
B.3 Operation ............................................................................................................................ |
19 |
|
B.3.1 |
Safety instructions for operation ................................................................................. |
19 |
B.3.2 |
Preparing the machine ................................................................................................ |
20 |
B.3.3 |
Selecting the sewing program .................................................................................... |
21 |
B.3.4 |
Activating additional seam numbers ........................................................................... |
22 |
B.3.6 |
Operating the stacker .................................................................................................. |
22 |
B.3.7 |
Setting the thread clamp manually ............................................................................. |
22 |
B.3.8 |
Resetting the day counter to zero ............................................................................... |
22 |
B.3.9 |
Aligning sewing pieces ................................................................................................ |
23 |
B.3.10 |
Quick stitch width setting ............................................................................................ |
24 |
B.3.11 |
Starting machine cycle ................................................................................................ |
25 |
B.3.12 |
Resetting line-up process ........................................................................................... |
26 |
B.3.13 |
Moving machine to zero position ................................................................................ |
26 |
B.3.14 |
Stopping a sewing program ........................................................................................ |
26 |
B.3.15 |
Turning the machine off .............................................................................................. |
26 |
B.3.16 |
Periodic cleaning of the machine ................................................................................ |
26 |
- B 12 -

Short Seam Automat 2110-4 / 2111-4 Working Instructions Beisler Automated Sewing Equipment
B.1 Description of the machine
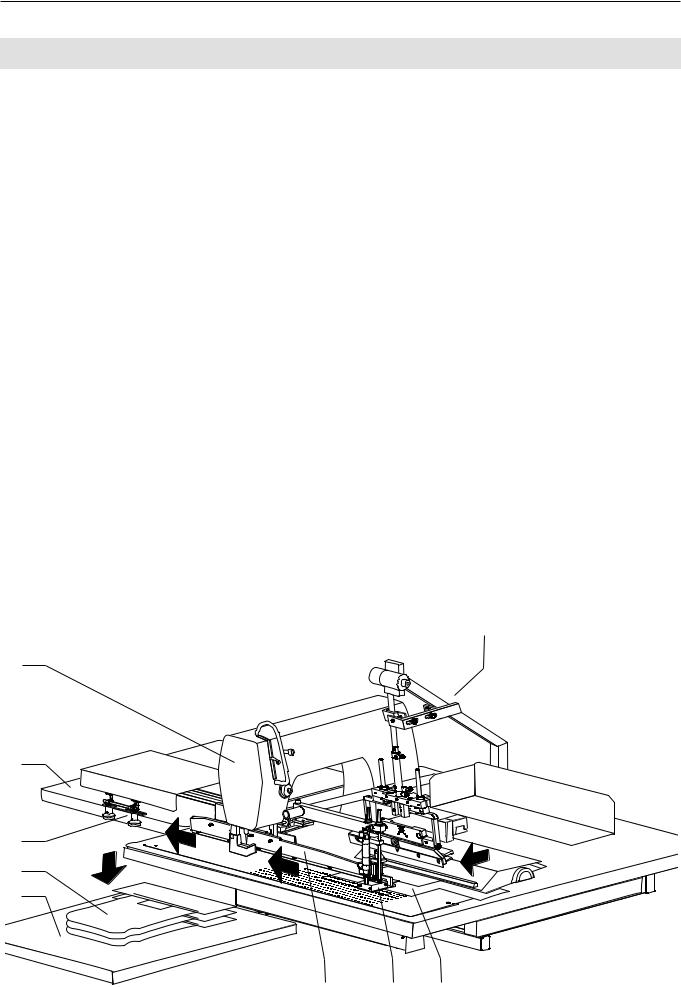
B.1.1 Functional units
All functional units of the SHORT SEAM AUTOMAT 2110-4 / 2111-4 are mounted to the height-adjustable table frame and freely accessible.
Transport and sewing unit m Main clamp
3 Transport stamp
4 Stacker, with sliding table 5 und lift table 2 with lifting unit 1
6 linear rail (under the cover)
7 Sewing head
8 Thread holder
9 Folder with quick stitch width setting d Pick-up plate
e Pocket bag clamp
Control unit
b Operating panel c Memory-Card
Fig. 1
Worktable
k Height-adjustable table leg l Working plate
Emergency switch
a Program stop switch
Power supply system
f Main switch, emergency off switch g Control box
h Sewing motor control
Operating switches
i Footswitch for machine operation
j Footswitch for automatic label feed system
Fig. 1 |
9 |
a b |
c |
8
7
6
5
|
d |
4 |
|
3 |
e |
2
f
1 |
|
g |
|
|
|
|
|
h |
|
|
i |
m l |
k |
j |
- B 13 -

Beisler Automated Sewing Equipment Short Seam Automat 2110-4 / 2111-4 Working Instructions
B.2 |
Functions of the machine |
||
|
|
|
|
B.2.1 Functional sequence |
|
Fig. 2/3 |
|
The short seam automat 2110-4 / 2111-4 allows the au- |
Fig. 2 |
||
tomatic crimping over of pocket edges and the tucking of |
|
||
pocket edges to pocket bags. The complete machine ope- |
|
||
ration is performed using the following operational steps: |
|
||
•Pocket edge and pocket bag are positioned manually.
•The pocket edge is crimped over and picked up.
•The folder transports the pocket edge to the pocket bag.
• |
The transport system automatically transports the pok- |
|
|
ket edge and the pocket bag to the sewing head where |
|
|
they are tucked. |
|
• |
The finished piece is transported to the stacking table |
1 |
|
by the stacking system and put down. |
|
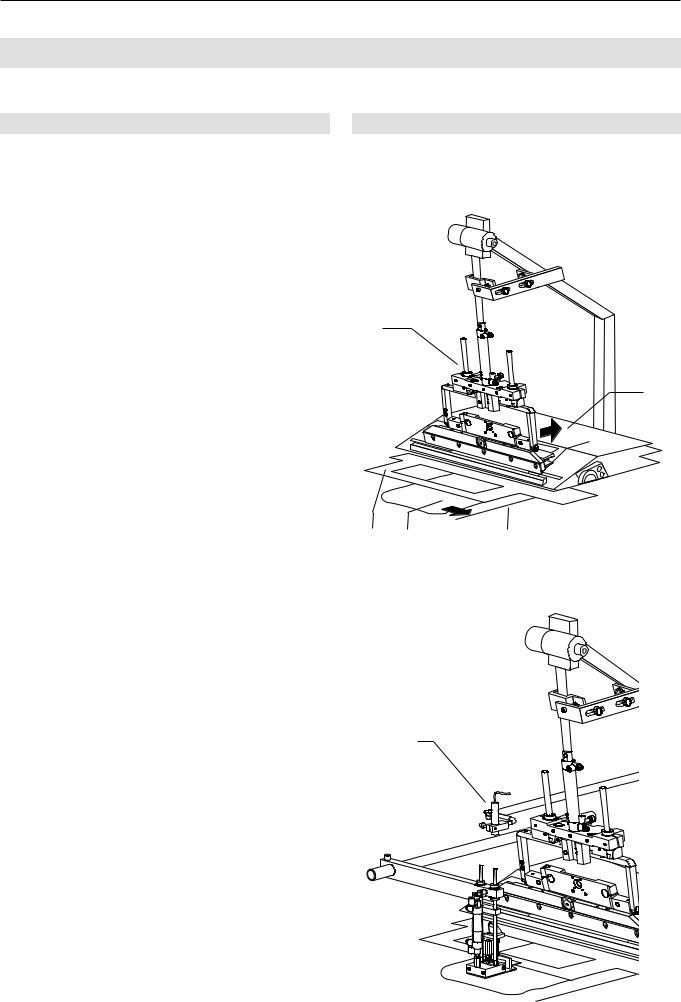
B.2.2 Line-up and alignment
Fig. 3
Depending on how the pocket edge and the pocket bag are to be sewn to one another, the two pieces must be aligned at the line-up positions. The exact line-up position of the edge to the bag can be marked at the working plate or at the pick-up plate using tape or pen. Please note that the pocket bag must be lined up within the operating range of the pocket bag clamp (Fig. 3, 4).
Handwheel for stitch width, Fig. 2: |
|
|
||
The handwheel |
1 |
is used to set the correct stitch width |
1 |
2 |
|
||||
for the pocket edge. The stitch width depends on the thickness of the fabric. The thicker the fabric, the larger the stitch width.
Line-up position for pocket edge, Fig. 3:
The pocket edge 1 is lined up at the stop rail 3 of the pick-up plate. The exact alignment to the pocket bag is marked by a marking 2 at the pick-up plate.
3
- B 14 -
Short Seam Automat 2110-4 / 2111-4 Working Instructions Beisler Automated Sewing Equipment
B.2 Functions of the machine
B.2.2 Line-up and alignment
Crimping over and picking up pocket edge, Fig. 4: The folder 1 moves to the right to the pick-up
plate 5. The pocket edge is crimped over and picked up. During this time, the pocket bag is positioned.
Pocket bag line-up position, Fig. 4:
The pocket bag 3is lined up within the operating range of the pocket bag clamp 2. The exact position is determined by a marking 4 at the working plate.
Manual labeling, Fig. 5:
Single labels are positioned manually with the pocket bag. The exact line-up position of the labels is marked with the reticle of the guide laser 1.
Automatic label feed system, Fig. 5:
The short seam automat can be equipped with an automatic label feed system 2for folded labels. This system is activated with a footswitch, the magazine is supplied manually. The label feed system is an integral part of the machine operation and is controlled by the selectable operating mode.
Fig. 4/5
Fig. 4
1
5
2 3 |
4 |
Fig. 5
1
2
- B 15 -
Beisler Automated Sewing Equipment Short Seam Automat 2110-4 / 2111-4 Working Instructions
B.2 |
Functions of the machine |
|
||
|
|
|
|
|
B.2.3 Transport and sewing |
|
|
Fig. 6 |
|
|
|
|
|
|
Folder
The folder 6 moves to the left with the pocket edge, is lowered and puts the pocket edge onto the pocket bag.
Pocket bag clamp
The pocket bag clamp 7 fixes the pocket bag to the working plate until the main clamp picks up the sewing pieces and transports them to the sewing head. The pocket bag clamp closes while the folder moves to the left.
Automatic label feed system (optional)
The automatic label feed system 8 positions folded labels on the pocket edge.
Main clamp
The main clamp 9moves to the inserting station and picks up the sewing pieces. The folder moves back up to its start position.
The main clamp pushes the sewing piece on the working plate from the inserting station to the sewing head.
Fig. 6
Sewing head
The sewing head 5 performs only the functions sewing stitch and thread cutting. All other functions, such as seam length or determining the beginning and the end of the seam, are acquired by the sensor system and controlled by the program control unit in accordance with the set values.
Threads
The thread stock and the thrad supply of the sewing head are monitored by sensors (top thread monitor and spool residual thread monitor).
The thread holder can hold two thread spools.
Transport stamp
After tucking, the sewing piece is blown even and transferred by the transport stamp 3 to the stacker.
Stacker
The stacker consists of a sliding table 4 and a
lift table 1. The sewing pieces are put down on the sliding table of the stacker. The sliding table then moves backward, and the sewing pieces 2 fall onto the lift table where they are stacked.
The lift table is lowered automatically (photocell control) or is lowered in preset steps in accordance with the input numbers.
6
5
4
3
2
1
9 8 7
- B 16 -
Short Seam Automat 2110-4 / 2111-4 Working Instructions Beisler Automated Sewing Equipment
B.2 |
Functions of the machine |
||
|
|
|
|
B.2.4 Switches |
|
|
Fig. 7 |
|
|
|
|
The short seam automat is equipped with three different |
|
types of switches: |
Fig. 7 |
•Emergency switch for stopping a sewing program,
•supply switches for current,
•control switches for controlling the machine operation.
Emergency switch:
Program stop switch
When the program stop switch 1is pressed, all machine movements and the sewing process are stopped immediately.
The switch engages when pressed. Rotating the switch in the clockwise direction will release the switch, and it moves back into its original position.
The control program performs a reset.
Supply switches:
Main switch
The main switch 2 is used to turn the power supply of the machine on or off. For safety reasons, the machine must be turned off using the main switch when it is standing still for an extended period; in this case, all functional units are deactivated. The main switch also serves as an additional emergency off switch.
Control switches:
Footswitch for machine operation
This footswitch 3is used to control the individual operating steps of the machine or for starting the fully automatic machine operation.
Footswitch for automatic label feed
When this footswitch 4 is depressed, the automatic label feed system is activated.
1
2
3
4
- B 17 -
Beisler Automated Sewing Equipment Short Seam Automat 2110-4 / 2111-4 Working Instructions
B.2 |
Functions of the machine |
||
|
|
|
|
B.2.5 Operating panel |
|
|
Fig. 8 |
|
|
|
|
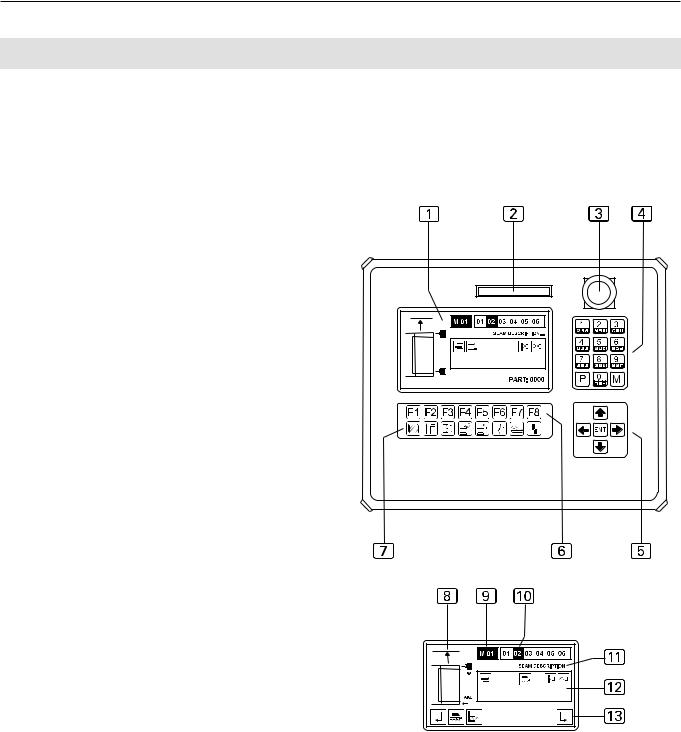
Display
During the operation of the machine, the display 1 shows the values of the selected sewing program. If menus were requested, the menu symbol or the corresponding parameters of the function are displayed.
Indicator panel
8 Seam symbol
9 Sewing program description (a sewing program may consist of several seams)
a Sewing program seam number b Seam description
c Display field for the enabled seam functions d Bar for requestable submenus
Memory card slot 2
The memory card is the medium for storing the bakkup copies of all program control data. Programs can be copied to and stored on the memory card and reloaded into the machine control when required.
Program stop switch
If the program stop switch 3 is pressed during the operation of the machine, all movements and the sewing process are stopped.
Numeric keypad
The numeric keypad 4is used to enter all changable number values.
By pressing the M key, you can request the desired sewing programs.
By pressing the P key, you can request submenus, confirm inputs and exit the programming mode.
Arrow keys
By pressing the UP or DOWN arrow key 5, you can move the cursor in the selected menu one line up or down.
By pressing the RIGHT or LEFT arrow key, you can mark the desired parameter in the selected menu using the cursor or browse forward or backward if the parameter list consists of several pages.
Function keys
You can use the function keys 6 to request the menus for setting or changing machine functions on the selected level.
Fig. 8
Symbol bar
The symbol bar 7indicates menus that can be requested using the function keys 6directly from the start menu.
All other functions of the machine can be set or changed by selecting the corresponding menus on the different program levels. The corresponding symbols appear on the display of the operating panel.
- B 18 -

Short Seam Automat 2110-4 / 2111-4 Working Instructions |
Beisler Automated Sewing Equipment |
|
|
B.3 Operation
B.3.1 Safety instructions for operation
Machine operation:
 WARNING - Machine operation intervention!
The machine is driven by electric motors and by compressed air. Any attempt to stop the moving parts of the machine or to tamper with the movements by hand may cause severe injuries.
•Keep hands away from machine during machine operation!
•During the sewing process, keep hands away from the operating range of the needle!
•If a failure is encountered during machine operation, press the program stop switch immediately!
Clothing:
 CAUTION - Unsuited work clothing!
The moving parts of the machine may catch and draw in loose clothing which may cause severe injuries.
•When operating the machine, do not wear wide or open clothing!
•Make sure that sleeves are tight-fitting and properly closed!
Handling the guide laser:
 CAUTION - Damage of the retina!
If the eye is directed toward the laser beam for some time, the retina may be damaged.
•Do not look directly into the laser beam!
•Do not direct laser beam into eyes!
 CAUTION - Laser beam change!
An optical change of the laser beam may increase its luminous intensity and cause eye injuries.
•If the direction of the laser beam is changed, if the laser beam is misadjusted or if the laser optics are damaged, turn the machine off and shut it down.
•Do not allow optical equipment (burning glasses or lenses) to interfere with the laser beam path.
- B 19 -

Beisler Automated Sewing Equipment |
Short Seam Automat 2110-4 / 2111-4 Working Instructions |
|
|
B.3 Operation
B.3.2 Preparing the machine
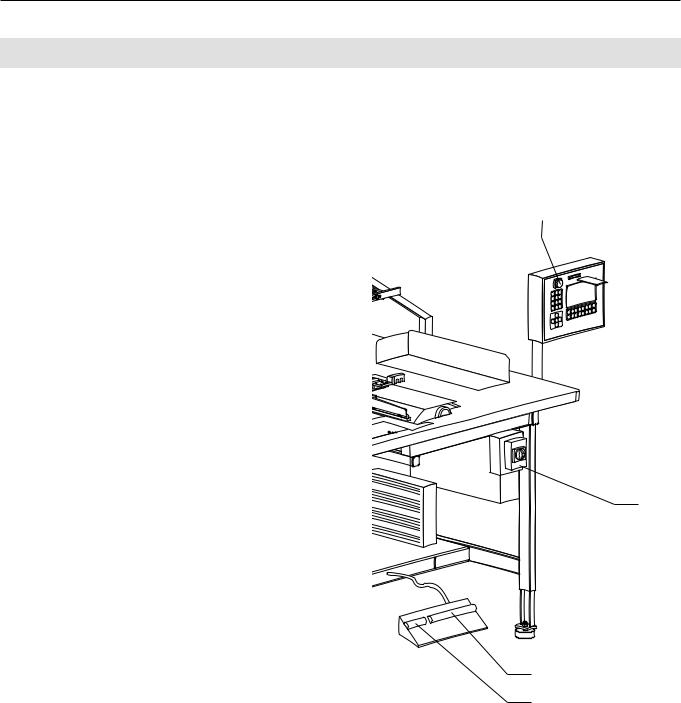
Prior to the production start, check the supply connections, connect the machine to the compressed air and power supply systems and prepare the sewing head.
1.Insert needle, pass top thread through needle and insert spool for bottom thread into sewing head (see working instructions of sewing head manufacturer or supplier).
2.Fig. 9: Connect machine to compressed air supply by inserting the plug-in connector 2of the compressed air supply hose into the compressed air receptacle in the operating room. The pressure of the compressed air is reduced to the required operating pressure of 6 bar by a pressure reducer 1. Check manometer 3 to see if the correct operating pressure is set. The pressure reducer is installed at the side mounting wall of the worktable.
3.Connect machine to power supply system.
 WARNING - Electric shock:
Contact with current-carrying components may cause a lethal electric shock. Check plug and cable before connecting machine to power supply system.
•Do not use damaged plugs, sockets or cables to connect the machine to the power supply system!
•The machine is connected to a power source of 230 V ±10 % at 50/60 Hz.
•Before connecting the machine to the power supply system, check to see if the ratings of the power supply system in the operating room correspond with the ratings on the nameplate at the rear of the machine.
•If the ratings for voltage (V) and maximum current (A) do not match, the machine must not be connected.
•Insert the grounding plug into a properly grounded and fused power socket.
•Make sure that the power supply cable is not subject to tensile or pressure forces.
4.Turn machine on by moving the main switch into the position I.
The machine is ready for operation.
Fig. 9
1
2
2
Fig. 9
3
- B 20 -
Short Seam Automat 2110-4 / 2111-4 Working Instructions |
Beisler Automated Sewing Equipment |
|
|
B.3 Operation
B.3.3 Selecting the sewing program
After the machine has been turned on and the control program has been activated, the sewing program that had been selected last is set.
Sewing programs 1 are stored in the memory (M). The program control memory can store up to 50 sewing programs (M 01-M 50).
Fig. 10: For each sewing program, up to six seam numbers 2 (01, 02, 03, 04, 05, 06) can be assigned.
The program control of the machine is equipped at the factory with a standard program:
•Sewing program M 01 with six different seams for automatic crimping over of pocket edges and the tucking of pocket edges to pocket bags.
1. Select sewing program at operating panel.
Request memory:
•Press key.
Select sewing program number, e.g. 01:
•Press and keys.
The selected program is activated immediately.
2. Select seam number of desired seam.
Move cursor to seam number:
•Press or key. Confirm selection:
•Press key.
Fig. 11: Display during seam number selection:
1 Active seam number
2 Passive seam number
3Seam number is selected
Fig. 10/11
Fig. 10
Fig. 11
- B 21 -

Beisler Automated Sewing Equipment |
Short Seam Automat 2110-4 / 2111-4 Working Instructions |
|
|
B.3 Operation
B.3.4 Activating additional seam numbers
1. Select seam number of desired seam.
Move cursor to seam number:
•Press or key. Confirm selection:
•Press key.
The seam number of the activated seam appears blackened.
B.3.5 Deactivating a seam number
1. Select seam number of desired seam.
Move cursor to seam number:
•Press or key. Confirm selection:
•Press key.
The seam number of the deactivated seam is no longer blackened.
B.3.6 Operating the stacker
To ensure easy access to the sewing pieces on the stacker, the lift table can be lowered, and the sliding table can be moved backward.
1. Lower or raise the lift table.
• Press key.
2. Move sliding table forward or backward.
• Press key.
B.3.7 Setting the thread clamp manually
Before the first start of a sewing program, the top thread clamp must be activated to protect the top thread from being pulled out of the needle when the machine starts.
• Press key.
B.3.8 Resetting the day counter to zero
Use this function to reset the day counter for a program cycle or for a completed working cycle to zero.
1.Move to level 1. Press key.
The display shows the symbols for selectable functions on this level.
2. Request the day counter reset function.
•Press key.
The day counter is now reset to zero.
3.Return to start level. Press key.
Display: PART: 0000
- B 22 -

Short Seam Automat 2110-4 / 2111-4 Working Instructions |
Beisler Automated Sewing Equipment |
|
|
B.3 Operation
B.3.9 Aligning sewing pieces
The line-up positions of pocket edge, pocket bag and label must be aligned to one another.
1.Fig. 12: Mark the exact position 7 of the pocket bag 8 at the line-up station with tape or pen.
2.Align the line-up position of the pocket edge with the position of the pocket bag.
Mark the line-up position 3of the pocket edge 2on the pick-up plate with tape or pen.
3.Align the reticle 5of the guide laser 1with the desired position of the label 6.
Fig. 13: If the machine is equipped with the optional automatic label feed system 1, a folded label 3must be inserted into the magazine 2.
4.Set the desired stitch width on the pocket edge using the handwheel 4.
 NOTE - Stitch width!
The stitch width depends on the thickness of the fabric. The thicker the fabric, the larger the stitch width. The correct stitch width for the fabric used is determined by performing several machine cycles.
Fig. 12/13
Fig. 12
1
2
3
4
8 |
7 |
6 5 |
Fig.13
2
1
3
- B 23 -
Beisler Automated Sewing Equipment |
Short Seam Automat 2110-4 / 2111-4 Working Instructions |
|
|
B.3 Operation
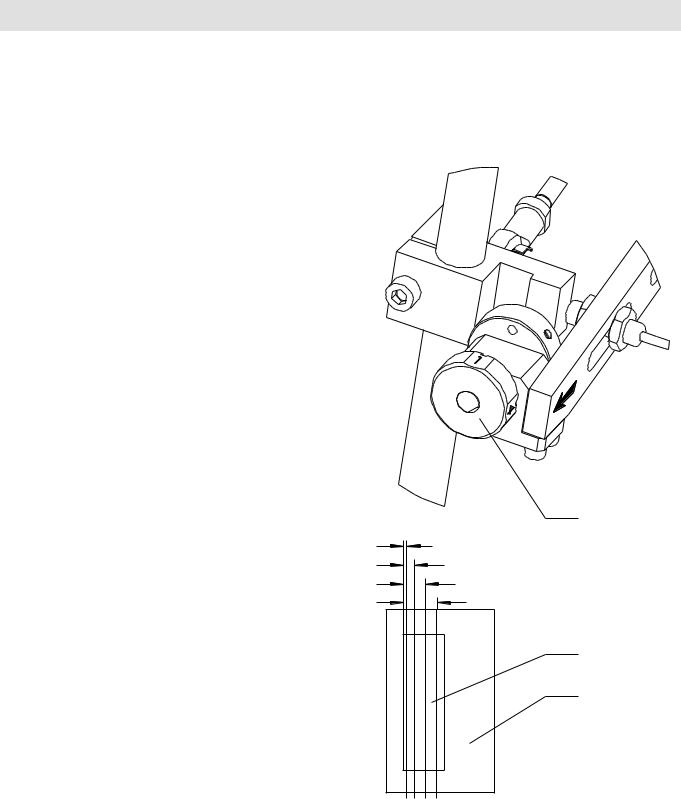
B.3.10 Quick stitch width setting |
|
Fig. 14 |
The quick stitch width adjustment makes the selection of |
Fig. 14 |
|
4 preadjusted different stitch widths possible. |
|
|
•Fig. 14: Use the handwheel 1 to adjust the stitch width to the required range.
•pocket edge 2
•pocket bag 3
1
1 |
2 |
3 |
4 |
2
3
- B 24 -

Short Seam Automat 2110-4 / 2111-4 Working Instructions |
Beisler Automated Sewing Equipment |
|
|
B.3 Operation
B.3.11 Starting machine cycle
A machine cycle can be started in four different sequences (mode 00, mode 01, mode 02, mode 03). The factory default is mode 01 which allows a largely fully automatic machine cycle.
Controlling machine cycle in mode 00:
1.Line up pocket edge.
2.Depress footswitch for machine cycle and keep depressed:
•The folder picks up the pocket edge.
3.Line up pocket bag (and label if desired).
4.Release footswitch:
•Further machine cycle is fully automatic: The pocket bag clamp closes.
The folder puts the pocket edge onto the pocket bag.
The (optional) automatic label feed system positions the folded label on the pocket edge.
The main clamp picks up the sewing pieces and transports them to the sewing head.
The sewing pieces are tucked, then the transport stamp transports them to the stacker and puts them down.
The main clamp returns to its original position. The next machine cycle starts.
 NOTE - Supplying sewing pieces!
If the fully automatic machine cycle was started, the next sewing pieces can be lined up.
The footswitch for machine cycle remains deactivated until the main clamp reaches its start position; after that, the next machine cycle can be started.
Controlling machine cycle in mode 01:
1.Line up pocket edge.
2.Depress, then release footswitch for machine cycle:
•The folder picks up the pocket edge.
3.Line up pocket bag (and label if desired).
4.Release footswitch for machine cycle:
•The pocket bag clamp closes.
5.Depress, then release footswitch for machine cycle:
•The folder moves to the left and puts the pocket edge down.
•The (optional) automatic label feed system positions the folded label on the pocket edge.
6.Depress, then release footswitch for machine cycle:
•The main clamp picks up the sewing pieces and moves to the sewing head.
7.Depress, then release footswitch for machine cycle:
•The sewing pieces are tucked.
8.Depress, then release footswitch for machine cycle:
•The transport stamp transports the sewing pieces to the stacker and puts them down. The main clamp returns to its start position. The next machine cycle starts.
 NOTE - Supplying sewing pieces!
When the sewing pieces are at the sewing head, the next pocket edge can be lined up.
The footswitch for machine cycle remains deactivated until the main clamp reaches its original position; after that, the next machine cycle can be started.
Controlling machine cycle in mode 02:
1.Line up pocket edge.
2.Depress footswitch for machine cycle and keep depressed:
•The folder picks up the pocket edge.
3.Line up pocket bag (and label if desired).
4.Release footswitch for machine cycle:
•The pocket bag clamp closes.
•The folder moves to the left and puts the pocket edge down.
•The (optional) automatic label feed system positions the folded label on the pocket edge.
•The main clamp picks up the sewing pieces.
5.Depress, then release footswitch for machine cycle: •Further machine cycle is fully automatic.
 NOTE - Supplying sewing pieces!
When the sewing pieces are at the sewing head, the next pocket edge can be lined up.
The footswitch for machine cycle remains deactivated until the main clamp reaches its start position; after that, the next machine cycle can be started.
- B 25 -

Beisler Automated Sewing Equipment |
Short Seam Automat 2110-4 / 2111-4 Working Instructions |
|
|
B.3 Operation
B.3.14 Stopping a sewing program
Controlling machine cycle in mode 03:
After each working step the following machine cycle can be continued automatically. Therefore:
1.Depress, then release footswitch for machine cycle:
•Further machine cycle is fully automatic:
B.3.12 Resetting line-up process
This function depends on the selected machine cycle mode. It only refers to machine movements that can be executed before the start of the automatic process.
The machine movements will be reset to start position immediately.
1.Press program stop switch.
When this switch is pressed, all machine movements and the sewing process are stopped immediately. The switch engages when pressed.
To restart the machine after a program stop, all functions must be reset, and the machine must be returned to zero position by unlocking the program stop switch.
2.Unlock program stop switch.
Slightly rotate switch in the clockwise direction. The switch returns to its original position.
The control program performs a reset.
B.3.15 Turning the machine off
•Press key (several times if required).
For extended work intermissions, the machine must be turned off completely.
1. Turn power supply off by moving main switch to 0 po-
B.3.13 Moving machine to zero position |
sition. |
Prior to starting the production, after machine tests or after corrections to sewing programs, the machine must be returned to zero position for starting the machine cycle:
1.Press program stop switch.
2.Unlock program stop switch.
(See Section B.3.13, Stopping a sewing program)
B.3.16 Periodic cleaning of the machine
The machine must be cleaned after large production series or at least once a day, whichever occurs first.
 CAUTION - Danger of injuries!
If the machine is put in motion accidentally, persons in its direct vicinity may be caught by moving parts which may cause injuries.
Prior to any cleaning work, disconnect the machine from the power supply!
•Turn the machine off using the main switch.
•Remove the power plug from the socket and protect it from accidental reconnection.
Periodic cleaning:
1.Remove fabric residues.
2.Using compressed air, blow off dust and thread residues at the sewing head, at the working plate, at the main clamp and at the linear rail.
- B 26 -

Short Seam Automat 2110-4 / 2111-4 Working Instructions |
Beisler Automated Sewing Equipment |
|
|
Section C Service Instructions
- C 27 -
 Loading...