


|
1281/5 |
|
|
|
|
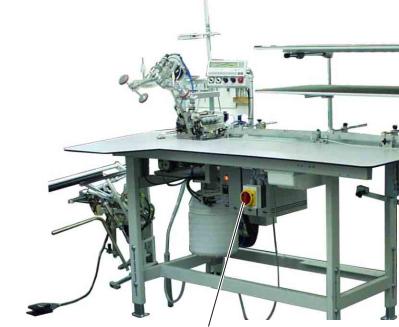
Sewing unit for closing seams |
|
||
|
for trousers and skirts |
|
||
|
|
|
|
|
|
Operating instructions |
1 |
||
|
|
|||
|
|
|
|
|
|
Installation instructions |
2 |
||
|
|
|
|
|
|
Service instructions |
3 |
||
|
|
|
|
|
|
|
|
|
|
|
|
|
|
|
|
|
|
|
|
Frohnradstraße 10, D-63768 Hösbach
Telefon Service +49 (0) 60 21/ 50 19 40 Telefax +49 (0) 60 21/ 54 00 61 E-mail: Vertrieb@beisler-gmbh.de
Ausgabe / Edition: 06/2005 |
Printed in Federal Republic of Germany |
Teile-Nr.:/Part-No.:DOC000050 |

General safety instructions
The non-observance of the following safety instructions can cause bodily injuries or damages to the machine.
1.The machine must only be commissioned in full knowledge of the instruction book and operated by persons with appropriate training.
2.Before putting into service also read the safety rules and instructions of the motor supplier.
3.The machine must be used only for the purpose intended. Use of the machine without the safety devices is not permitted. Observe all the relevant safety regulations.
4.When gauge parts are exchanged (e.g. needle, presser foot, needle plate, feed dog and bobbin) when threading, when the workplace is left, and during service work, the machine must be disconnected from the mains by switching off the master switch or disconnecting the mains plug.
5.Daily servicing work must be carried out only by appropriately trained persons.
6.Repairs, conversion and special maintenance work must only be carried out by technicians or persons with appropriate training.
7.For service or repair work on pneumatic systems, disconnect the machine from the compressed air supply system (max. 7-10 bar). Before disconnecting, reduce the pressure of the maintenance unit.
Exceptions to this are only adjustments and functions checks made by appropriately trained technicians.
8.Work on the electrical equipment must be carried out only by electricians or appropriately trained persons.
9.Work on parts and systems under electric current is not permitted, except as specified in regulations DIN VDE 0105.
10.Conversion or changes to the machine must be authorized by us and made only in adherence to all safety regulations.
11.For repairs, only replacement parts approved by us must be used.
12.Commissioning of the sewing head is prohibited until such time as the entire sewing unit is found to comply with EC directives.
It is absolutely necessary to respect
the safety instructions marked by these signs.
Danger of bodily injuries !
Please note also the general safety instructions.
Index |
Page: |
Preface and general safety instructions
Part 1: Operating instructions cl. 1281/5
1.Description of product
1.1 |
Description of proper use . . . . . . . . . . . . . . . . . . . . . . . . . . . . . . . . . . . . . . . . . |
2 |
1.2 |
Brief description . . . . . . . . . . . . . . . . . . . . . . . . . . . . . . . . . . . . . . . . . . . . . . . |
2 |
1.3 |
Technical data . . . . . . . . . . . . . . . . . . . . . . . . . . . . . . . . . . . . . . . . . . . . . . . . |
3 |
2. |
Optional equipment . . . . . . . . . . . . . . . . . . . . . . . . . . . . . . . . . . . . . . . . . . . . |
4 |
3.Switching on - Switching off - Program stop
3.1 |
Switching on . . . . . . . . . . . . . . . . . . . . . . . . . . . . . . . . . . . . . . . . . . . . . . . . . |
5 |
|
|
1 |
||||
3.2 |
Switching off . . . . . . . . . . . . . . . . . . . . . . . . . . . . . . . . . . . . . . . . . . . . . . . . . |
5 |
||
3.3 |
Program stop |
6 |
|
|
|
||||
3.4 |
Restart after program stop . . . . . . . . . . . . . . . . . . . . . . . . . . . . . . . . . . . . . . . . |
6 |
|
4.Operation of the sewing machine head
4.1 |
General notes . . . . . . . . . . . . . . . . . . . . . . . . . . . . . . . . . . . . . . . . . . . . . . . . |
7 |
4.2 |
Recommended threads . . . . . . . . . . . . . . . . . . . . . . . . . . . . . . . . . . . . . . . . . . |
8 |
4.3 |
Removing/ Putting on the fabric sliding sheet . . . . . . . . . . . . . . . . . . . . . . . . . . . . . |
9 |
5.Operation of the sewing unit
5.1 |
Preparation table and worktable . . . . . . . . . . . . . . . . . . . . . . . . . . . . . . . . . . . . . |
10 |
5.2 |
Mouse with guide rail and return mechanism . . . . . . . . . . . . . . . . . . . . . . . . . . . . . |
11 |
5.3 |
Feeding the workpieces and starting the sewing process . . . . . . . . . . . . . . . . . . . . . . |
13 |
5.4 |
Adjusting the blowing air for the nozzles in the table top . . . . . . . . . . . . . . . . . . . . . . |
14 |
5.5 |
Setting the return speed of the mouse . . . . . . . . . . . . . . . . . . . . . . . . . . . . . . . . . |
15 |
5.6 |
Adjusting the fullness of needle and bottom feed . . . . . . . . . . . . . . . . . . . . . . . . . . . |
16 |
5.7 |
Setting the pressure of the puller. . . . . . . . . . . . . . . . . . . . . . . . . . . . . . . . . . . . . |
17 |
5.8 |
Stacker . . . . . . . . . . . . . . . . . . . . . . . . . . . . . . . . . . . . . . . . . . . . . . . . . . . . |
18 |
6. Operation of the control |
|
|
6.1 |
Operator terminal . . . . . . . . . . . . . . . . . . . . . . . . . . . . . . . . . . . . . . . . . . . . . . |
19 |
6.2 |
User interface . . . . . . . . . . . . . . . . . . . . . . . . . . . . . . . . . . . . . . . . . . . . . . . . |
21 |
6.2.1 |
Menu structure of the sewing and setting programs. . . . . . . . . . . . . . . . . . . . . . . . . |
21 |
6.3 |
Seam program . . . . . . . . . . . . . . . . . . . . . . . . . . . . . . . . . . . . . . . . . . . . . . . . |
23 |
6.4 |
Adjusting the control . . . . . . . . . . . . . . . . . . . . . . . . . . . . . . . . . . . . . . . . . . . . |
25 |
6.4.1 |
Altering seam-specific parameters. . . . . . . . . . . . . . . . . . . . . . . . . . . . . . . . . . . . |
26 |
6.4.2 |
Altering global parameters . . . . . . . . . . . . . . . . . . . . . . . . . . . . . . . . . . . . . . . . |
32 |
6.4.3 |
Input - Output test. . . . . . . . . . . . . . . . . . . . . . . . . . . . . . . . . . . . . . . . . . . . . . |
33 |
6.4.4 |
Creation of seam programs . . . . . . . . . . . . . . . . . . . . . . . . . . . . . . . . . . . . . . . . |
35 |
6.4.5 |
Deleting a seam program . . . . . . . . . . . . . . . . . . . . . . . . . . . . . . . . . . . . . . . . . |
36 |
6.4.6 |
Altering seam programs (Changing/Completing the sequence) . . . . . . . . . . . . . . . . . . |
36 |
Index |
Page: |
7. |
Error messages . . . . . . . . . . . . . . . . . . . . . . . . . . . . . . . . . . . . . . . . . . . . . . |
37 |
8.USB stick
8.1 |
General notes . . . . . . . . . . . . . . . . . . . . . . . . . . . . . . . . . . . . . . . . . . . . . . . . |
38 |
8.2 |
Formatting of the USB stick . . . . . . . . . . . . . . . . . . . . . . . . . . . . . . . . . . . . . . . . |
38 |
8.3 |
Plugging the USB stick in the control . . . . . . . . . . . . . . . . . . . . . . . . . . . . . . . . . . |
38 |
8.4 |
USB functions . . . . . . . . . . . . . . . . . . . . . . . . . . . . . . . . . . . . . . . . . . . . . . . . |
39 |
8.4.1 |
Storing data on the USB stick . . . . . . . . . . . . . . . . . . . . . . . . . . . . . . . . . . . . . . . |
41 |
8.4.2 |
Loading data from the USB stick . . . . . . . . . . . . . . . . . . . . . . . . . . . . . . . . . . . . . |
41 |
8.4.3 |
Data comparison . . . . . . . . . . . . . . . . . . . . . . . . . . . . . . . . . . . . . . . . . . . . . . |
42 |
8.4.4 |
Deleting data from the USB stick . . . . . . . . . . . . . . . . . . . . . . . . . . . . . . . . . . . . . |
43 |
8.4.5 |
Loading software version from the USB stick . . . . . . . . . . . . . . . . . . . . . . . . . . . . . |
44 |
8.5 |
Removing the USB stick . . . . . . . . . . . . . . . . . . . . . . . . . . . . . . . . . . . . . . . . . . |
45 |
9.Maintenance
9.1 |
Cleaning and checking . . . . . . . . . . . . . . . . . . . . . . . . . . . . . . . . . . . . . . . . . . . |
46 |
9.2 |
Oil lubrication . . . . . . . . . . . . . . . . . . . . . . . . . . . . . . . . . . . . . . . . . . . . . . . . |
48 |

1.Description of product
1.1 Description of proper use
The 1281/5 is a sewing unit which can properly be used for sewing light to medium-weight material. Such material is, as a rule, made of textile fibres. These materials are used in the garment industry.
In general only dry material must be sewn on this machine. The material must not contain any hard objects.
The seam is generally made with core thread, polyester fibre or cotton threads.
The dimensions for needle and hook threads can be taken from the table in chapter 4.2.
Before using any other threads it is necessary to estimate the consequential dangers and to take the respective safety measures, if required.
This sewing unit must only be installed and operated in dry and well-kept rooms. If the sewing unit is used in other rooms, which are not dry and well-kept, further measures to be agreed upon may become necessary (see EN 60204-31 : 1999).
We, as a manufacturer of industrial sewing machines, assume that at |
1 |
least semi-skilled operating personnel will be working on our products |
so that all usual operations and, where applicable, their risks are presumed to be known.
1.2 Brief description
The Beisler 1281/5 is a sewing unit for closing long seams, as e.g.
trousers side seams and crotch seams,
side seams without vent in upper fabric and lining in skirt parts.
According to the machine head it is possible to sew
double-chainstitch seams (401),
4-thread safety seams (515) or 5-thread safety seams (516).
All sewing station components are mounted on a stand welded of square steel tubes and controlled by a microprocessor system.
The sewing station is operated via a control panel. Here it is possible to call up various control programs, to define new programs and to check all inlets and outlets for maintenance and repair purposes.
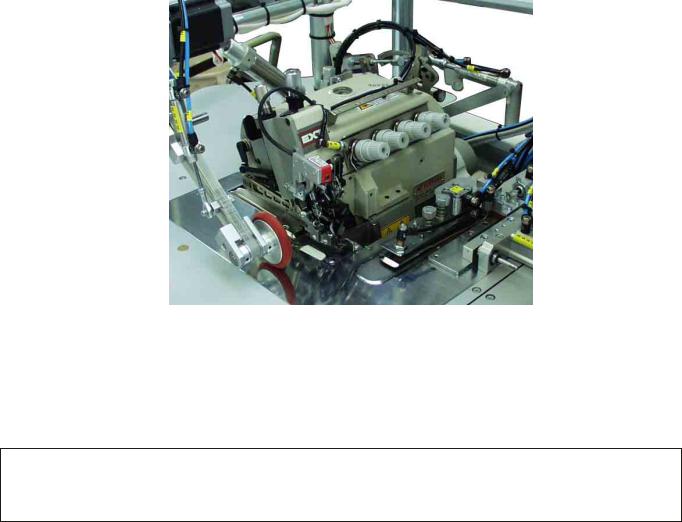
Machine head
–Pegasus overlock machine EXT 3216-03
–Direct drive Efka Type DC 1500 /AB 221
–Microprocessor control, freely programmable
–Light barrier for recognizing the seam beginning and seam end for the automatic sewing start and stop
–Programmable edge guide for different material thicknesses, moving cross-line
3
–External control panel Efka V850 with:
-Menu navigation
-Freely programmable parameters for “Differential bottom feed (optional)”, “Needle feed
(optional)”, “Ejector roller”, “Puller”, “Machine parameters”, “Global parameters”, “Program sequences”
-Input and output tests
-Check routine for step motors
-20 program storage locations
-up to 7 seam programs per program storage location
–Vertical cutter with suction for overlocking and serging in one operation
–Chain separator with suction, programmable
–Adjustable blowing nozzles in the table top for supporting the material feed, mechanical regulation of the blowing intensity by an adjusting knob, duration of table blowing programmable
–Preparation table with mouse and reverse device for the workpieces; for a uniform material guide and higher productivity
–Special sewing equipment for trousers side seams with side seam pockets and wing pockets
–Narrow sewing tools incl. narrow sewing foot for trouble-free guiding / sewing of the pocket openings
–Automatic contour modulation by programmable puller
–Height-adjustable stand, infinitely variable from 850 mm to 1200 mm
–Automatic fullness distribution by step motor-controlled needle and bottom feed (optional). Within a seam program the fullness of the needle and bottom feed can be programmed at the control panel via 3 freely selectable lines. User-friendly adjusting possibility of the fullness in one line via each one controller.
–Integrated stacking device
–Manual stacking via shortcut key
1.3 Technical data:
Machine head: |
Pegasus EXT 3216-03/233-K 5x5-KH-021A |
Stitch type: |
401, 515, 516 |
Number of needles: |
1 or 2 |
Needle system: |
B27 |
Needle size: |
Nm 80 to Nm 110 |
Hook type: |
Chainstitch hook, cross-line, overlock hook |
Threads: |
see table chapter 4.2 |
Speed: |
6500 r/ min |
Speed upon |
|
delivery: |
6500 r/ min |
Stitch length min. : |
0.5 mm |
max.: |
3.5 mm |
Seam width: |
10 mm |
Optional: |
8 - 12 mm |
Material: |
Light to medium-weight material |
Operating pressure: |
6 bar |
Air consumption: |
20 NL per working cycle |
Rated voltage: |
1 x 230 V 50/60 Hz |
Rated load: |
1.00 kVA |
4

Dimensions: |
2300 x 1300 x 1500 mm (L x W x H) |
Working height: |
850...1200 mm |
|
(upper table top edge) |
Weight: |
125 kg |
Noise level: |
LC = 81dB (A) |
Workstation-specific emission value according to DIN 45635-48-B-1
Stitch length: |
2.6 mm |
Seam length: |
1000 mm |
Speed: |
6500 r/min |
Material G1 DIN 23328: |
2 layers |
Measuring point according to |
|
DIN 4895 Part 1 |
X = 550 mm Y = 350 mm Z = 600 mm |
x - axis = at right angles to the feeding direction y - axis = main feeding direction
z - axis = height
1
2.Optional equipment
See annex
5
3.Switching on - Switching off - Program stop
1
3.1 Switching on
–Switch on main switch 1 (turn in clockwise direction). The control loads the machine program.
The basic display appears in the display of the control panel.
3.2 Switching off
–Switch off main switch 1 (turn counter-clockwise).
6
3.3 Program stop
2 |
2 |
1 |
1
For an immediate stop in case of operating errors, needle breakage etc. the safety system of the 1281/5 provides the following measures:
–Press program stop switch 2 at the control panel. The running operations are stopped immediately.
–Turn main switch 1 counter-clockwise. The sewing unit drops out immediately;
all movements of the sewing unit stop immediately.
3.4Restart after program stop
Caution: Risk of injury!
Switch the main switch off.
Clear the fault only with the sewing unit switched off.
Only restart the sewing unit after the fault has been cleared.
–Switch on main switch 1 (turn in clockwise direction).
–Unlock the program stop switch.
The control loads the machine program.
The basic display appears in the display of the control panel. The sewing unit is ready for operation again.
7
4.Operation of the sewing machine head
4.1 General notes
The operation of the sewing machine head (needle insertion, threading of needle thread and hook thread etc.) is described in the attached separate Pegasus operating instructions.
The instruction manual is included in the accessories of the sewing unit.
Attention: Risk of injury!
Please read the operating instructions of the sewing machine head carefully and observe all notes on safety.
8
4.2Recommended threads
Needle system: |
B27 |
Recommended |
|
needle size: |
Nm 80 for very thin material |
|
Nm 90 for thin material |
|
Nm 100 for medium-weight material |
High sewing security and good sewability are achieved with the following core threads:
–Two-ply polyester endless polyester core-spun (e.g. Epic Poly-Poly, Rasant x, Saba C, ...)
–Two-ply polyester endless cotton core-spun (e.g. Frikka, Koban, Rasant, ...)
|
|
If these threads are not available, the polyester fibre or cotton threads |
|||||
|
|
listed in the table can also be sewn. |
|
|
|
||
|
|
Often two-ply core threads are offered by the thread manufacturers |
|||||
|
|
with the same designation as three-ply polyester fibre threads |
|||||
|
|
(3cyl.-spun).This causes uncertainty with regard to twisting and thread |
|||||
|
|
thickness. |
|
|
|
1 |
|
|
|
When in doubt, unravel the thread and check whether it is twisted 2- or |
|||||
|
|
|
|||||
|
|
3-ply. |
|
|
|
|
|
|
|
The label no. 120 on the thread reel of a core thread corresponds e.g. |
|||||
|
|
to the thread size Nm 80/2 (see table values in brackets). |
|||||
|
|
In case of monofilament threads you can use needle threads and hook |
|||||
|
|
threads of the same thickness. The best results are achieved with soft |
|||||
|
|
and elastic threads (software) of the thread thickness 130 Denier. |
|||||
|
|
Recommended thread thicknesses: |
|
|
|
||
|
|
|
|
|
|
|
|
Needle size |
|
Core thread |
Core thread |
|
|
||
Nm |
|
|
|
|
|
|
|
|
Needle thread |
|
Hook thread |
Needle thread |
Hook thread |
|
|
|
Polyester |
|
Polyester |
Polyester |
Cotton |
|
|
|
endless |
|
core-spun |
endless |
core-spun |
|
|
|
Label No. |
|
Label No. |
Label No. |
Label No. |
|
|
|
|
|
|
|
|
|
|
80 |
|
|
|
|
|
|
|
90 |
120 (Nm 80/2) |
|
120 (Nm 80/2) |
120 (Nm 80/2) |
120 (Nm 80/2) |
|
|
100 |
100 (Nm 65/2) |
|
100 (Nm 65/2) |
100 (Nm 65/2) |
100 (Nm 65/2) |
|
|
|
|
|
|
|
|
||
Needle size |
Polyester fibre thread |
Cotton thread |
|
|
|||
Nm |
|
(3cyl.-spun) |
|
|
|
|
|
|
Needle thread |
|
Hook thread |
Needle thread |
Hook thread |
|
|
|
|
|
|
||||
|
|
|
|
|
|
|
|
80 |
Nm 120/3 |
|
Nm 120/3 |
NeB 60/3-80/3 |
NeB 60/3-80/3 |
|
|
90 |
Nm 80/3-120/3 |
|
Nm 80/3-120/3 |
NeB 50/3-70/3 |
NeB 50/3-70/3 |
|
|
100 |
Nm 70/3-100/3 |
|
Nm 70/3-100/3 |
NeB 40/3-60/3 |
NeB 40/3-60/3 |
|
|
|
|
|
|
|
|
|
|
|
|
|
|
|
|
|
|
9
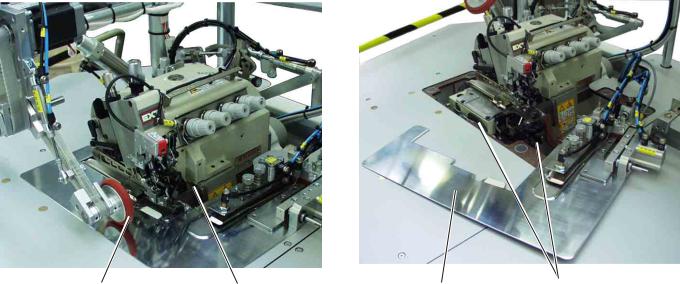
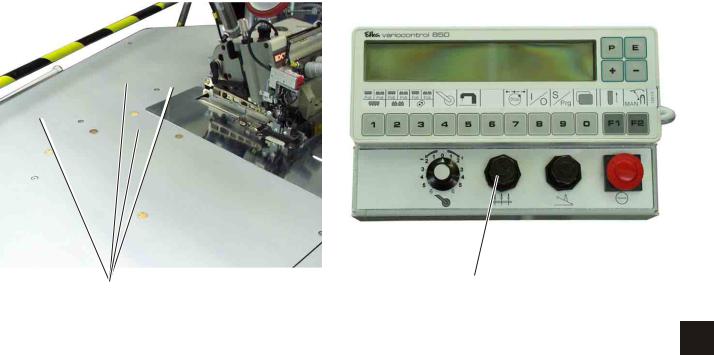
4.3 Removing / Putting on the fabric sliding sheet
2 |
3 |
2 |
1 |
The fabric sliding sheet 2 is held in the gap of the table top by the magnets 1.
The edge guide 3 is fastened on the fabric sliding sheet.
Removing the fabric sliding sheet
–Carefully remove the edge guide 3 from the magnets in upward direction.
–Swivel the fabric sliding sheet aside.
The lower section of the sewing machine head is accessible now.
Putting on the fabric sliding sheet
–Push the fabric sliding sheet into the gap of the table top and insert in downward direction.
10

5.Operation of the sewing unit
5.1 Preparation table and worktable
2 |
1 |
4 |
3 |
1 |
|
||||
|
|
|
|
|
The sewing unit is equipped with two preparation tables 1 and 2. The skirt parts or trousers parts are positioned on them.
On the worktable 4 the trousers parts or skirt parts are fed and clamped with the mouse 3.
11
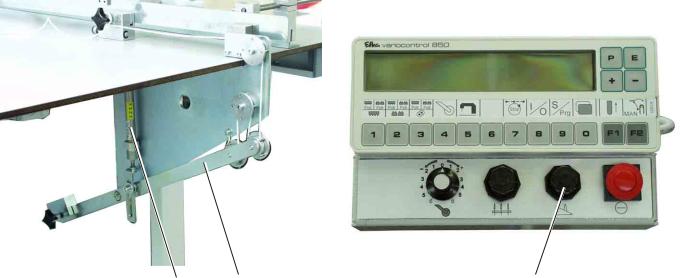
5.2 Mouse with guide rail and return mechanism
3 |
2 |
1 |
7 |
6 |
5 |
4 |
The mouse is used for clamping the trousers and skirt parts to avoid their sliding away.
The guide rail 3 is flexible and adaptable to the contour of the workpiece.
Caution: Risk of injury !
Do not reach into the open mouse.
Inserting the workpiece
–Place the workpiece between mouse plate 2 and clamping arm 1.
–Close the mouse.
During the sewing process the mouse is drawn along the guide rail 3 until the opening of the clamping arm 1 is released by a limit switch.
Then the mouse is pulled back by the return mechanism 4 until the adjustable stop 5 is touched.
12

9 |
3 |
9 |
8 |
|
|
Aligning the guide rail 3 |
|
|
|
|
|
1 |
||
|
– |
Place the workpiece 8 on the worktable opposite to the sewing |
||
|
– |
direction. |
|
|
|
|
|
||
|
Loosen toggle screws 9. |
|
|
|
|
– |
Place the guide rail 3 close to the contour of the workpiece. |
|
|
|
– |
Tighten toggle screws 9 again. |
|
|
Opening the mouse manually
10
–Actuate lever 10. The mouse opens.
13

5.3 Feeding the workpieces and starting the sewing process
The sewing unit for closing seams 1281/5 works semi-automatically at high speed.
The operator of the sewing unit has to do the following:
call up the desired seam program;
feed and align the workpiece precisely;
sew the first seam section manually;
start the automatic sewing process;
supervise the sewing process of the unit;
remove the finished parts from the stacker.
2 |
1 |
6 |
5 |
4 |
3 |
Feeding the workpieces and starting the sewing process
1)Select the seam program at the control panel.
2)Place the workpieces 2 on the worktable and align them.
3)Position the workpieces in the mouse 1.
4)Close the mouse.
5)Push both workpieces under the sewing foot 6 and directly in front of the needle.
6)Step the foot pedal forward and sew over the pocket and the hip bow manually.
7)Separate the trousers or skirt parts with three fingers. Hold one finger under, one between and one above the workpieces.
8)Step the foot switch back. The contour guide moves between the parts. The feeding puller lowers.
9)Step the foot pedal forward. The automatic sewing process starts.
10)The finished workpieces are stacked.
11)The mouse returns to the feeding position.
14
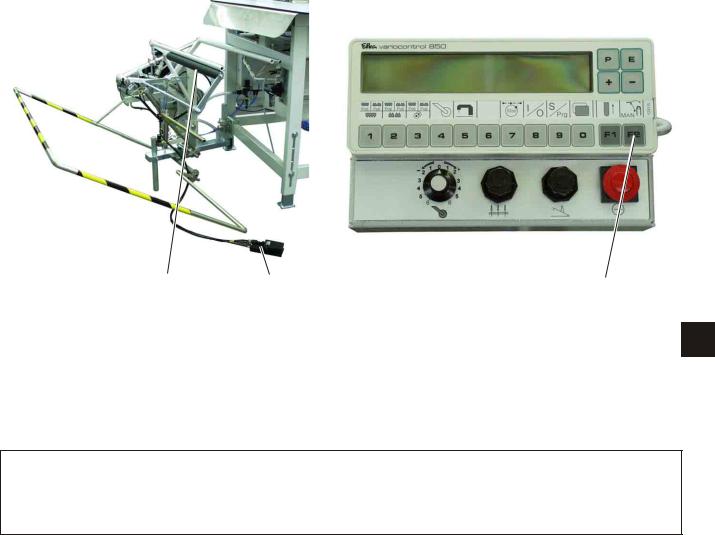
5.4 Adjusting the blowing air for the nozzles in the table top
1 |
2 |
1
The blowing nozzles 1 in the table top support the precise stacking of the workpieces.
–Set the intensity of the air blast by dial 2 at the control panel.
Turn the dial to the right = increase the intensity of air blast
Turn the dial to the left = reduce the intensity of air blast
15
5.5 Setting the return speed of the mouse
2 |
1 |
3 |
The cylinder 2 presses the mouse mechanics 1 down. Thus, the mouse is pulled back to the feeding position.
The return speed can be set.
–Set the speed by dial 3 at the control panel.
Turn dial to the right |
= higher speed |
Turn dial to the left |
= less speed |
16
5.6 Adjusting the fullness of needle and bottom feed
Operator terminal in case of fullness adjustment |
Operator terminal in case of fullness |
adjustment |
via step motors |
via cylinder |
(optional equipment) |
1
1 |
2 |
1 |
Needle feed, bottom feed and puller feed can be adapted to the sewing conditions with the dials 1 and 2.
Via the control parameters you can determine which feed is changed with the dial 2.
Adjusting the puller feed
–Set the dial 1 correspondingly.
Setting range: |
+ 0 to 6 right |
|
- 0 to 6 left |
Adjusting the needle and bottom feed
–Make the corresponding settings in the control in the menu “Seam-specific parameters”.
–Set the dial 2 correspondingly.
Setting range: |
+ 0 to 6 right |
|
- 0 to 6 left |
17

5.7 Setting the pressure of the puller
2
1
The pressure of the puller rollers 1 can be influenced via turning knob 2.
–Turn knob 2 to the right. The pressure is increased.
–Turn knob 2 to the left. The pressure is reduced.
18
5.8 Stacker
2 |
1 |
3 |
1
The finished workpieces are stacked on the throw-over stacker 2.
The stacked and clamped workpieces can be removed by actuating the foot switch 1.
The stacker is accessed by a control pulse. The pneumatic functions can be taken from the pneumatic wiring diagram.
Caution: Risk of injury!
Do not reach into the working area of the throw-over stacker during the stacking operation.
Manual stacking
–Press key 3 at the control panel. A stacking process is carried out.
Removing stacked parts
–Actuate foot switch 1 and keep it actuated.
–Remove the stacked parts.
19

6.Operation of the control
6.1 Operator terminal
For the input and output of data an operator terminal with an LCD display and function keys is used.
Display |
Enter keys |
Keys 1 - 0 |
Function keys |
Potentiometer |
Program stop |
Key Function
Seam program 1 to program 99
Sewing stop within the seam
Move the contour guide back to the basic position
Manual stacking
Menu selection/ Store data
Needle feed, seam lines and quantities adjustable
Differential feed, seam lines and quantities adjustable
Adjust the ejector roller
Adjust the puller
Set the machine parameters
Switch the potentiometer on / off in the individual lines (optional equipment)
Adjust seam line
Input-/ Output test
20

Key Function
Program the sequence (S)
Creation of programs (Prg)
Setting the global parameters
Enter key
Select parameter / scroll
Alter parameter values
1
21
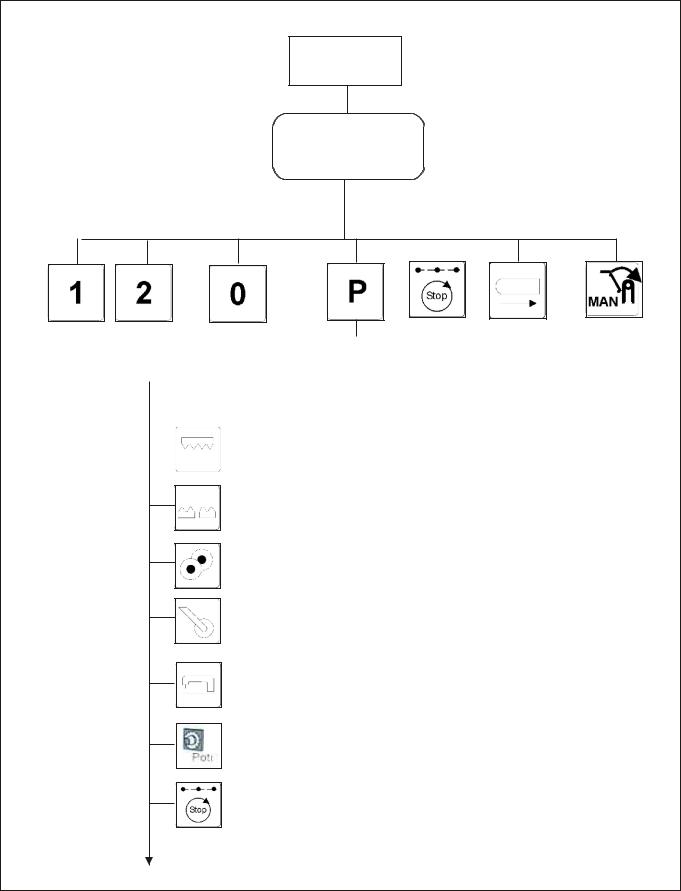
6.2User interface
6.2.1Menu structure of the sewing and setting programs
Switch on main switch
Main screen
Call up sewing programs |
Menu selection |
7 |
F1 |
F2 |
||||
|
|
|
|
|
|
sewing stop |
Mouse back |
Manual |
|
|
|
|
|
|
|||
|
|
|
|
|
|
within the |
to basic |
stacking |
|
|
|
|
|
|
|||
|
|
|
|
|
|
seam |
position |
|
|
|
|
|
Key 1 Set needle feed via potentiometer |
|
|||
|
|
|
|
|
||||
|
|
|
|
|
||||
|
|
|
|
|
|
|
|
|
Key 2 Set bottom feed via potentiometer
Key 3 Set puller feed via potentiometer
Key 4 Adjust the puller
Key 5 Set machine parameters
Key 6 Switch the potentiometer on / off (optional equipment)
Key 7 Set seam line
22
 Loading...