

Page 1
Quick Start Guide
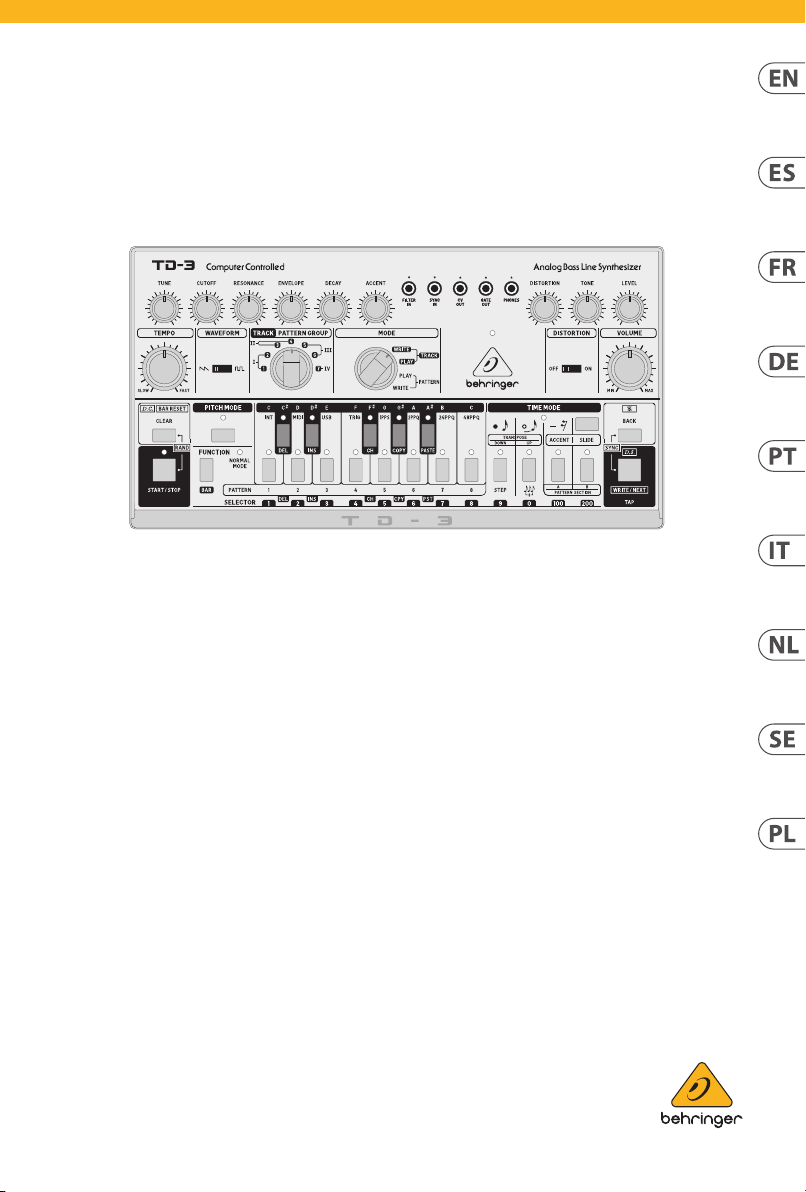
TD-3
Analog Bass Line Synthesizer with VCO, VCF, 16-Step Sequencer,
Distortion Eects and 16-Voice Poly Chain
V 3.0
Page 2
1. Read these instructions.
15. The ap paratus shall be connec ted
your coopera tion in the correct di sposal
more information about where you can
2 3Quick Start GuideTD -3
are subjec t to change without notice.
Atención
contacto s: dos polos y la puesta a
contacto, respectivamente, son los que
mesa especicados
tormentas o s i no va a utilizarlo durante
Important Safety
Instructions
Terminals marked with
this symbol carry
electr ical current of
sucient magnitude to constitute risk
of elect ric shock. Use only high- quality
professio nal speaker cables with ¼" TS
or twist-locking plugs pre -installed.
Allother installation or modication
should be performed only by
qualiedpersonnel.
This symbo l, wherever it
appears, ale rts you to the
presence of uninsulated
dangerous voltage inside the enclosure
- voltage that may b e sucient to
constitu te a risk ofshock.
This symbo l, wherever it
appears, ale rts you to
important operating and
maintenance instructions in the
accompanying literature. Please read
themanual.
Caution
To reduce the risk of
electr ic shock, do not
remove the top cover (or the r ear
section). No user serviceable parts inside.
Refer servicing to qualiedpersonnel.
Caution
To reduce the risk of
re or elec tric shock, do
not expos e this appliance to rain and
moisture. Th eapparatus shall not
be expose d to dripping or splashing
liquids and no ob jects lled with
liquids, such as v ases, shall be placed
on the apparatus.
Caution
These service instruc tions
are for use by qua lied
service p ersonnel only. Toreduce
the risk of ele ctric shock do not
perform any servicing other than that
contained in the operation instructions.
Repairshave to b e performed by
qualied servicepersonnel.
2. Keep these instructions.
3. Heed all warnings.
4. Follow all instruc tions.
5. Do not use this apparatus
near water.
6. Clean only w ith dry cloth.
7. Do not block any venti lation
openings. Install in accordance with the
manufacturer ’s inst ructions.
8. Do not ins tall near any heat
sources such a s radiators, heat regis ters,
stoves, or othe r apparatus (including
ampliers) that produce heat.
9. Do not defeat the sa fety purpose
of the polari zed or grounding-typ e
plug. A polari zed plug has two blades
with one wider than the other.
A grounding -type plug has two blad es
and a third grounding prong. The wide
blade or the third prong are provided
for your saf ety. Ifthe provided plug
does not t into y our outlet, consult
an elect rician for replacement of th e
obsolete outlet.
10. Protect the power cord f rom being
walked on or pinc hed particularly
at plugs, convenience receptacles,
and the point wh ere they exit from
the apparatus.
11. Use only attachments/accessories
specie d by themanufacturer.
12. Us e only with
the cart , stand,
tripod, bracket, or
table spec ied by
the manufacturer,
orsold with
the apparat us. When a cart is used,
use caution when moving the cart/
apparatus combination to avoid injury
from tip -over.
13. Unplug this apparatu s during
lightning storms or when unused for
long periods of time.
14. Refer all ser vicing to qualied
service personnel. Servicing is require d
when the appa ratus has been damaged
in any way, such as power suppl y cord
or plug is damage d, liquid has been
spilled or obje cts have fallen into the
apparatus, t he apparatus has been
expose d to rain or moisture, does not
operate nor mally, or has beendr opped.
to a MAINS socket ou tlet with a
protective earthing connection.
16. Where th e MAINS plug or an
appliance coup ler is used as the
disconnect device, the disconnect
device shall remain readily operable.
17. Correc t disposal of
this product: This
symbol indicates that
this product must not
be disposed of with
household waste, according to the
WEEE Direc tive (2012 /19/EU) and you r
national law. This prod uct should be
taken to a collec tion center licensed for
the recyc ling of waste electr ical and
electronic equipment (EEE).
The mishandlin g of this type of waste
could have a possib le negative impact
on the environment and human health
due to potentially hazardous
substances that are generally
associate d with EEE. At the same time,
of this produc t will contribute to the
ecient use of natural resources. For
take your waste equipment for
recycli ng, please contact your lo cal city
oce, or your household waste
collection se rvice.
18. Do not ins tall in a conned space,
such as a book c ase or similar unit.
19. Do not place naked ame
sources, suc h as lighted candles,
on the apparatus.
20. Please keep the environmental
aspect s of battery dispo sal in mind.
Batteri es must be disposed- of at a
battery collection point.
21. This apparatus may be used i n
tropical an d moderate climates up
to 45°C.
LEGAL DISCLAIMER
Music Tribe accepts n o liability for
any loss which may b e suered by
any person who relies either wholly
or in part u pon any description,
photograph, or statement contained
herein. Technical specications,
appearances and other information
All trademar ks are the propert y
of their respective owners. Midas,
Klark Teknik, Lab G ruppen, Lake,
Tannoy, Turbosound, TC Electronic,
TC Helicon, Behringer, Bugera,
Oberheim, Auratone and Coolaudio are
trademarks or registered trad emarks
of Music Tribe Global B rands Ltd.
© Music Tribe Global B rands Ltd.
2021 All rights rese rved.
LIMITED WARRANTY
For the applic able warranty terms a nd
conditions and additional information
regarding Music Tribe’s Limited
Warranty, please see complete details
online at musictribe.com/warranty.
Instrucciones de
seguridad
Las terminales marcadas
con este símb olo
transportan corr iente
eléctr ica de magnitud sucie nte como
para const ituir un riesgo de desc arga
eléctr ica. Utilicesolo cable s de altavoz
profesionales y de alta calidad con
conecto res TS de 6,3 mm o de bayoneta
prejados. Cualquier otra instalación o
modicación debe ser realizada
únicamente p or un técnicocualicado.
Este símbolo, siempre que
aparece, leadv ierte de la
presencia de voltaje
peligroso si n aislar dentro de la caja;
estevoltaj e puede ser suciente par a
constitu ir un riesgo dedescarga .
Este símbolo, siempre que
aparece, leadv ierte sobre
instrucciones operativas y
de mantenimiento que aparecen en la
documentación adjunta. Por favor,
leaelmanual.
Para reducir e l riesgo de
descarga e léctrica, no
quite la tapa (olapar te posterior).
Nohay piezas en e l interior del equipo
que puedan ser r eparadas por el
usuario. Sies ne cesario, póngase en
contacto con personal cuali cado.
Atención
Para reducir e l riesgo
de incendio o des carga
eléctr ica, no exponga este ap arato a la
lluvia, humeda d o alguna otra fuente
que pueda sal picar o derramar algún
líquido sobr e el aparato. Nocoloque
ningún tipo de recipiente para líquidos
sobre elapar ato.
Atención
Las instrucciones
de servicio deben
llevarlas a cabo exclusivamente
personal c ualicado. Paraevitar el
riesgo de una d escarga eléctr ica,
no realice reparaciones que no se
encuentren d escritas en el manual de
operaciones. Lasreparaciones deben
ser realizadas exclusivamente por
personalcualicado.
1. Lea las instrucciones.
2. Conserve e stas instruccion es.
3. Pres te atención a todas
las advertencias.
4. Siga todas las instrucciones.
5. No use e ste aparato cerca
del agua.
6. Limpie es te aparato con un
paño seco.
7. No bloquee las aberturas
de ventilación . Instale el equipo
de acuerdo con las instrucciones
del fabricante.
8. No instal e este equipo cerca de
fuentes de calor tales como radiadores,
acumuladore s de calor, estufas u otros
aparatos (incluyendo amplicadores)
que puedan producir calor.
9. No elimine o deshabilite nunca
la conexión a ti erra del aparato o del
cable de alimentación de corriente.
Unenchufe po larizado tiene dos polo s,
uno de los cuale s tiene un contacto
más ancho que el ot ro. Una clavija
con puest a a tierra dispone de tres
tierra. El con tacto ancho y el tercer
garantizan una mayor seguridad. Si el
enchufe suministrado con el equipo
no concuerda co n la toma de corriente,
consulte con un el ectricista par a
cambiar la toma d e corriente obsoleta.
10. Coloque el cable de suminis tro de
energía de manera que no pueda ser
pisado y que es té protegido de objetos
alados. As egúrese de que el cable de
suministro de energía esté protegido,
especialm ente en la zona de la clavija y
en el punto dond e sale del aparato.
11. Use únicamente los dispositivos
o accesorio s especicados por
el fabricante.
12. Use
únicamente la
carretilla,
plataforma,
trípode, soporte o
por el fabricante o suministrados junto
con el equipo. Alt ransportar el equi po,
tenga cuidado p ara evitar daños y
caídas al tropezar con algún obstác ulo.
13. Desenchufe el equipo durante
un periodo largo.
14. Confíe las reparaciones
únicamente a servicios técnicos
cualicados. La unidad requiere
mantenimiento siempre que haya
sufrido al gún daño, si el cable de
suministro de energía o el enchufe
presenta ran daños, sehubiera
derramado un líquido o hubieran caído
objetos dent ro del equipo, si el aparato
hubiera es tado expuesto a la hume dad
o la lluvia, si ha dejado d e funcionar de
manera norma l o si ha sufrido algún
golpe o caída.
15. Al con ectar la unidad a la toma de
corriente el éctrica asegúr ese de que
la conexión disponga de una unión
atierra.
16. Si el enchu fe o conector
de red sirve c omo único medio
de desconexión, éste debe ser
accesiblefácilmente.
Page 3

4 5Quick Start GuideTD -3
17. Cómo debe
de sus respectivos dueños. Midas,
choc élec trique, ne pas ouvrir le c apot
mentation f ourni ne correspond pa s à
17. Mise au rebu t
respec tifs. Midas, Klark Teknik,
Behringer, Bugera, Oberheim, Auratone
Global Brands Ltd. © Music Tribe Global
Pour connaître les termes et conditions
deshacers e de este
aparato: Es te símbolo
indica que es te aparato
no debe ser tratado
como basura or gánica, según lo
indicado en la D irectiva WEEE (2012/19/
EU) y a las normativa s aplicables en su
país. En lugar de el lo deberá llevarlo al
punto limpio más cercano para el
reciclaje de s us elementos eléctr icos/
electr ónicos (EEE). Al hacer esto estar á
ayudando a preve nir las posibles
consecuencias negativas para el medio
ambiente y la salu d que podrían ser
provocadas por una gestión inadecuada
de este tipo d e aparatos. Además,
el reciclaje d e materiales ayudará a
conservar los recur sos naturales. Para
más informa ción acerca del reciclaj e de
este aparat o, póngase en con tacto con
el Ayuntamiento d e su ciudad o con el
punto limpio local.
18. No instale esta unidad en un
espacio muy r educido, tal como
encastrada en una librería o similar.
19. No coloque objetos con
llama, como una vela ence ndida,
sobre este aparato.
20. Tenga presente s todas las
advertenc ias relativas al reciclaj e
y correcta eliminación de las pilas.
Las pilas deben ser siempre eliminadas
en un punto limpio y n unca con el resto
de la basura org ánica.
21. Puede usar este aparato e n
lugares con cli mas tropicales y
moderados que soporten temperaturas
de hasta 45°C.
NEGACIÓN LEGAL
Music Tribe no admite ningún tipo
de responsabilidad por cualquier
daño o pérdida que pudiera sufrir
cualquier persona por conar total
o parcialmente en la descripciones,
fotografías o armaciones
contenidas en este documento.
Las especicaciones técnicas,
imágenes y otras informaciones
contenidas en este documento están
sujetas a modicaciones sin previo
aviso. Todas las marcas comerciales
que aparecen aquí son propiedad
Klark Teknik, Lab G ruppen, Lake,
Tannoy, Turbosound, TC Electronic,
TC Helicon, Behringer, Bugera,
Oberheim, Auratone y Coolaudio
son marcas comerciales o marcas
registr adas de Music Tribe Global
Brands Ltd. © Music Tribe G lobal
Brands Ltd. 2021 Reser vados todos
los derechos.
GARANTÍA LIMITADA
Si quiere conocer los detalles y
condiciones aplicables de la garantía
así como información adicional sobre
la Garantía limi tada de Music Tribe,
consulte online toda la información en
la web musictribe.com/warranty.
Consignes de sécurité
Les points r epérés par ce
symbole portent une
tension électrique
susante po ur constituer un risque
d’électrocution. Utilisez uniquement
des câbles d’enceintes professionnels
de haute qualité ave c ches Jack mono
6,35 mm ou ches à verr ouillages déjà
installée s. Touteautre ins tallation ou
modication doit être eectuée
uniquement par un personnel qualié.
Ce symbole aver tit de la
présence d’une tension
dangereuse e t non isolée à
l’intérieu r de l’appareil - elle p eut
provoquer des chocs électriques.
Attention
Ce symbol signale les
consignes d’utilisation
et d’entre ! Tienimp ortantes dans
la document ation fournie. Lisez les
consignes de sécurité du manuel
d’utilisatio n del’appareil.
Attention
Pour éviter tout r isque de
de l’appareil ni démo nter le panneau
arrière. L’intérieur de l’appareil ne
possède aucun élément réparable par
l’utilisateur. Lais sertoute réparation à
un professionnelqualié.
Attention
Pour réduire le s risques
de feu et de cho c
électrique, n’exposez pas cet appareil
à la pluie, à la moisissu re, auxgouttes
ou aux éclabo ussures. Ne posez pas
de récipient contenant un liquide sur
l’appareil (unvase par e xemple).
Attention
Ces consignes de
sécurité et d’entretien
sont destinées à un personnel
qualié. Pour évi ter tout risque de
choc électrique, n’eectuez aucune
réparation sur l’appareil qui ne soit
décrite p ar le manuel d’utilisation.
Les éventuelle s réparations doivent
être eectuées uniquement par un
technicienspécialisé.
1. Lisez ces consignes.
2. Conserve z ces consignes.
3. Respe ctez tous les aver tissements.
4. Respectez toutes les
consignes d’utilisation.
5. N’utilisez jamais l’appareil à
proximité d’un liquide.
6. Nettoy ez l’appareil avec u n
chion sec.
7. Veillez à ne pas empêcher la
bonne ventilat ion de l’appareil via ses
ouïes de ventila tion. Respectezles
consignes du fabricant concernant
l’install ation del’appareil.
8. Ne placez pas l ’appareil à
proximité d ’u ne source de chaleur telle
qu’un chauage, une cuisinière ou tout
appareil dégageant de la chaleur (y
compris un amp li depuissance).
9. Ne supprimez jamai s la sécurité
des prise s bipolaires ou des prise s
terre. Les pri ses bipolaires possè dent
deux contacts de largeur diérente.
Leplus large es t le contact de sécur ité.
Les prises te rre possèdent deux
contact s plus une mise à la terre
servant d e sécurité. Si la prise du blo c
d’alimentation o u du cordon d’ali-
celles de votre i nstallation élect rique,
faites app el à un électricien po ur
eect uer le changement de prise.
10. Installez le cordon d’alimentation
de telle façon qu e personne ne puisse
marcher dess us et qu’il soit protégé
d’arêtes coupantes. Assurez-vous
que le cordon d’alimentation est
sufsamment protégé, notamment
au niveau de sa pr ise électrique et
de l’endroit où il es t relié à l’appareil;
cela est égale ment valable pour une
éventuelle rallonge électrique.
11. Utilisez exclusivement
des accessoi res et des appareils
supplémentaires recommandés par
lefabricant.
12. Utilisez
exclusivement des
chariots, des
diables,
desprésentoirs,
despieds et d es
surface s de travail recommandés p ar le
fabrica nt ou livrés avec le produit.
Déplacezprécautionneusement tout
chariot ou dia ble chargé pour éviter
d’éventuelles bles sures en cas dechute.
13. Débranchez l’appareil de la
tension sec teur en cas d’orage ou si
l’appareil reste inutilisé pendant une
longue période de temps.
14. Les travaux d’entretien de
l’appareil doiven t être eectués
uniquement par du personnel qualié.
Aucunentret ien n’est nécess aire sauf si
l’appareil est endommagé de quelque
façon que ce soi t (dommagessur le
cordon d’aliment ation ou la prise par
exemple), siun liquide ou un objet
a pénétré à l ’intérieur du châssis, si
l’appareil a été ex posé à la pluie ou
à l’humidité, s’il ne fonctionne pas
correc tement ou à la suite d’une chute.
15. L’appareil doit être co nnecté à une
prise secteur dotée d’une protection
par mise à la terr e.
16. La pri se électrique ou la pr ise
IEC de tout appar eil dénué de bouton
marche/arrêt doit rester accessible
enpermanence.
appropriée de ce
produit: Ce symbole
indique qu’en accord
avec la direc tive DEEE
(2012/19/ EU) et les lois en vigueur dans
votre pays, ce pro duit ne doit pas être
jeté avec les déc hets ménagers.
Ce produit doi t être déposé dans un
point de collec te agréé pour le
recyclage des déchets d’équipements
électriques et élect roniques (EEE).
Une mauvaise man ipulation de ce type
de déchets pourrait avoir un impact
négatif sur l’environnement et la santé
à cause des su bstances potentiellem ent
dangereuses généralement associées à
ces équipements. En même temps,
votre coopér ation dans la mise au rebut
de ce produit contribuera à l’utilisation
ecace des ressources naturelles.
Pour plus d’informations sur l’endroit
où vous pouvez d époser vos déchets
d’équipements pour le recyclage,
veuillez conta cter votre mairie ou votr e
centre loca l de collecte des déche ts.
18. N’installez pas l’appareil dans un
espace conné tel qu’une bibliothèque
ou meuble similaire.
19. Ne placez jamais d’objets
enammés, tels que des bougies
allumées, sur l’appareil.
20. Gardez à l ’e sprit l’impact
environnemental lorsque vous mettez
des piles au reb us. Les piles usées
doivent être d éposées dans un point de
collecte adapté.
21. Cet appareil peut être utilisé sous
un climat trop ical ou modéré avec des
températures de 45°C maximum.
DÉNI LÉGAL
Music Tribe ne peut êt re tenu pour
responsable pour toute perte pouvant
être subie pa r toute personne se
ant en part ie ou en totalité à
toute description, photographie
ou armatio n contenue dans ce
document. Les caractéristiques,
l’apparence et d’autres informations
peuvent fair e l’objet de modi cations
sans notic ation. Toutes les marques
appartiennent à leurs propriétaires
Lab Grupp en, Lake, Tannoy,
Turbosound, TC Elec tronic, TC Helicon,
et Coolaudio so nt des marques ou
marques dép osées de Music Tribe
Brands Ltd. 2021 Tous droits ré servés.
GARANTIE LIMITÉE
de garantie applicables, ainsi que
les informations supplémentaires et
détaillée s sur la Garantie Limitée de
Music Tribe, consultez l e site Internet
musictribe.com/warranty.
Wichtige
Sicherheitshinweise
Vorsicht
Die mit dem Symbo l
markierten Anschlüsse
führen so vi el Spannung, dassdie
Gefahr eines Stromschlags besteht.
Verwenden Sie nur hochwertige,
professionelle Lautsprecherkabel
mit vorinstallierten 6,35 mm
MONO-Klinkensteckern oder
Lautsprecherstec ker mit
Drehverriegelung. Alle anderen
Installationen oder Modikationen
sollten nur von qualiziertem
Fachpersonal ausgeführt werden.
Achtung
Um eine Gefährdung
durch Stromschlag
auszuschließen, darf die
Geräteabdeckung bzw.
Geräterückwandnicht abgenommen
werden. ImInnern des Geräts benden
sich keine vom Benutzer reparierbaren
Teile. Reparaturarbeiten dürfen
nur von qualiziertem Personal
ausgeführtwerden.
Page 4
Achtung
entsprechend ausgetauscht wird.
zusammen mit Ihren Haushaltsabf ällen
Stellen Sie keine Gegenstände mit
eingetragene Warenzeichen der
exposto à c huva nem à humidade.
Verique particularmente nas chas,
dispositivo para evitar danos provocados
terem caído pa ra dentro do dispositivo;
Direct iva REEE (2012/19/EU) e a legislação
para um centr o de recolha licenciado para
6 7Quick Start GuideTD -3
Um eine Gefährdung
Stromschlag auszuschließen, darf
durch Feuer bzw.
dieses Gerät weder Regen oder
Feuchtigkeit ausgesetzt werden
noch sollten Spritzwasser oder
tropfende Flüssigkeiten in das Gerät
gelangen können. Stellen Sie keine
mit Flüssigkeit gefüllten Gegenstände,
wie z. B. Vasen, aufdasG erät.
Achtung
Die Service-Hinweise sind
nur durch qualiziertes
Personal zu b efolgen. Umeine
Gefährdung durch Stromschlag zu
vermeiden, führen Sie bitte keinerlei
Reparatur en an dem Gerät durch,
dienicht in der Bedienungsanleitung
beschrieben sind. Reparaturen
sind nur von qualiziertem
Fachpersonaldurchzuführen.
1. Lesen Sie diese Hinweise.
2. Bewahren Sie diese Hinweise auf.
3. Beachten Sie alle Warnhinweise.
4. Befolgen Sie alle
Bedienungshinweise.
5. Bet reiben Sie das Gerät nicht in
der Nähe vonWasser.
6. Reinigen Sie das Gerät mit einem
trockenen Tuch.
7. Blockieren Sie nicht die
Belüftungsschlitze. Beachten
Sie beim Einbau de s Gerätes die
Herstellerhinweise.
8. Stellen Sie das Ger ät nicht in der
Nähe von Wärmeq uellen auf. Solche
Wärmequellen sind z. B. Heizkörper,
Herde oder andere Wärme erzeugende
Geräte (auch Verstärker).
9. Entfernen Sie in keinem Fall
die Sicherheitsvorrichtung von
Zweipol- oder geerdeten Steckern. Ein
Zweipolstecker hat zwei unterschiedlich
breite Steckkontak te. Ein geerdeter
Stecker hat zwei Steckkontakte
und einen dritten Erdungskontakt.
Derbreitere Ste ckkontakt oder der
zusätzliche Erdungskontakt dient
Ihrer Sicherheit. Falls das mitgelieferte
Steckerformat nicht zu Ihrer Steckdose
passt, wend en Sie sich bitte an
einen Elektriker, damit die Steckdose
10. Verlegen Sie das N etzkabel so,
dass es vor Tritte n und scharfen Kanten
geschützt ist und nicht beschädigt
werden kann. Ach ten Sie bitte
insbesondere im Bereich der Stecker,
Verlängerungskabel und an der Stelle,
an der das Net zkabel das Gerät verläss t,
aufausreichendenSchutz.
11. Das Gerät muss jeder zeit mit
intaktem Schutzlei ter an das Stromnetz
angeschlossen sein.
12. So llte der Hauptnetzstecker
oder eine Gerätesteckdose die
Funktionseinheit zum Abschalten sein,
muss diese immer zugänglich sein.
13. Verwenden Sie nur Zusatzgeräte/
Zubehörteile, dielaut Hersteller
geeignet sind.
14. Verwenden
Sie nur Wagen,
Standvorrichtungen, Stative,
Halter oder Tische,
die vom Hersteller
benannt oder im Lieferumfang des
Geräts enthalten sind. Falls Sie einen
Wagen benutzen, seien Sie vorsichtig
beim Bewegen der
Wagen- Gerätkombination,
umVerletzungen durch Stolpern
zuvermeiden.
15. Ziehen Sie den Netzs tecker bei
Gewitter oder wenn Sie das Gerät
längere Zeit nicht benutzen.
16. Lassen Sie alle Wartungsarbeiten
nur von qualiziertem ServicePersonal ausführen. EineWartung
ist notwendig, wenn das Gerät in
irgendeiner Weise beschädigt wurde
(z. B. Beschädigung des Netzkabels
oder Steckers), Gegenstände oder
Flüssigkeit in das Geräteinnere gelangt
sind, das Gerät Regen oder Feuchtigkeit
ausgesetzt wurde, das Gerät nicht
ordnungsgemäß funktioniert oder auf
den Boden gefallen ist.
17. Korrekte
Entsorgung dieses
Produkts: Dieses Symbol
weist darauf h in, das
Produkt entsprechend
der WEEE Direk tive (2012 /19/EU) und
der jeweiligen nationalen Gesetze nicht
zu entsorg en. DiesesProdukt s ollte bei
einer autorisierten Sammelstelle für
Recycling elektrischer und
elektronischer Geräte (EEE) abgegeben
werden. Wegen bedenklicher
Substanzen, diegenerell mit
elektrischen und elektronischen
Geräten in Verbindung stehen, könnte
eine unsachgemäße Behandlung dieser
Abfallart eine negative Auswirkung auf
Umwelt und Gesundheit haben.
Gleichzeitig gewährleistet Ihr Beitr ag
zur richtigen Entsorgung dieses
Produkt s die eektive Nut zung
natürliche r Ressourcen. Fürweitere
Informationen zur Entsorgung Ihrer
Geräte bei einer Recycling-Stelle
nehmen Sie bitte Kontakt zum
zuständigen städtischen Büro,
Entsorgungsamt oder zu Ihrem
Haushaltsabfallentsorgerauf.
18. Installieren Sie das Gerät nicht
in einer beengten Umgebung, zum
Beispiel Bücherregal oder ähnliches.
19.
oenen Flammen, etwa brennende
Kerzen, auf das Ge rät.
20. Beachten Sie bei der Entsorgung
von Batter ien den UmweltschutzAspekt. Batterien müssen bei einer
Batterie -S ammelstelle entsorgt
werden.
21. Dieses Gerät ist in tropischen
und gemäßigten Klimazonen bis
45° C einsetzbar.
HAFTUNGSAUSSCHLUSS
Music Tribe übernimmt keine Haftung
für Verluste, die Personen entstanden
sind, die sich gan z oder teilweise auf
hier enthaltene Beschreibungen,
Fotos oder Aussagen verlassen haben.
Technische Daten, Erscheinungsbild
und andere Informationen können
ohne vorherige Ankündigung
geändert werden. Alle Warenzeichen
sind Eigentum der jeweiligen
Inhaber. Midas, Klark Teknik, Lab
Gruppen, L ake, Tann oy, Turbosound,
TC Electron ic, TC Helicon, Behringer,
Bugera
, Oberheim, Auratone
Coolaudio sind Warenzeichen oder
und
Music Tribe Global Brands Ltd.
© Music Tribe Global B rands Ltd.
2021 Alle Rechte vorbehalten.
BESCHRÄNKTE GARANTIE
Die geltenden Garantiebedingungen
und zusätzliche Informationen
bezüglich der von Music Tribe
gewährten beschränkten
Garantie nden Sie online unter
musictribe.com/warranty.
Instruções de
Segurança Importantes
Aviso!
Terminais marcados
com o símbolo c arregam
corrente elétrica de magnitude
suciente pa ra constituir um risco d e
choque elétrico. Use apenas cabos
de alto-falantes de alta qualidade
com plugues TS de ¼" ou plugues
com trava de torção pré-instalados.
Todas as outras ins talações e
modicaçõ es devem ser efetuadas p or
pessoasqualicadas.
Este símbo lo, onde quer
que o encontre, ale rta-o
para a leitur a das
instruções de manuseamento que
acompanham o equipamento. Por favor
leia o manual deinstruções.
Atenção
De forma a dimi nuir
o risco de choq ue
eléctr ico, nãoremover a cobertur a
(ouasecção de trá s). Não e xistem peças
substitu íveis por parte do utili zador no
seu interior. Para es se efeito recorrer a
um técnicoqualicado.
Atenção
Para reduzir o r isco de
incêndios ou choques
eléctr icos o aparelho não deve ser
Alémdisso, não deve s er sujeito a
salpicos, nem d evem ser colocados em
cima do aparel ho objectos contendo
líquidos, taiscomojarras.
Atenção
Estas ins truções de
operação devem ser
utilizada s, emexclusivo, por técnicos
de assistência qualicados. Para evitar
choques elé ctricos não proce da a
reparações ou intervenções, que
não as indicad as nas instruções
de operaçã o, salvo se poss uir as
quali-cações necess árias. Para evitar
choques elé ctricos não proce da a
reparações ou intervenções, que
não as indicad as nas instruções de
operação. S ó o deverá fazer se possuir
as qualicaçõesnecessárias.
1. Leia estas in struções.
2. Guarde estas instruções.
3. Pres te atenção a todos os avisos.
4. Siga todas as in struções.
5. Não utilize este dispositivo perto
de água.
6. Limpe ape nas com um pano seco.
7. Não obstrua as e ntradas de
ventilação. Ins tale de acordo com as
instruções do fabricante.
8. Não instale perto de quaisquer
fontes de cal or tais como radiadores,
bocas de ar qu ente, fogões de sala
ou outros aparelhos (incluindo
amplicadores) que produzam calor.
9. Não anule o object ivo de
seguranç a das chas polarizadas ou
do tipo de ligaç ão à terra. Uma cha
polariza da dispõe de duas palhetas
sendo uma mais lar ga do que a outra.
Uma cha do tipo li gação à terra dispõe
de duas palhet as e um terceiro dente
de ligação à ter ra. A palheta larga ou
o terceiro dente são fornecidos para
sua seguranç a. Se a cha fornecida
não encaixar na sua tomada, consulte
um elect ricista para a subst ituição da
tomada obsoleta.
10. Proteja o cabo de alimentaç ão de
pisadelas ou apertos, especialmente
nas chas, ex tensões, e no local de
saída da unidade. Certique-se de
que o cabo elé ctrico está prote gido.
nos receptá culos e no ponto em que o
cabo sai doap arelho.
11. O aparelho tem de estar s empre
conect ado à rede eléctric a com o
condutor de pr otecção intacto.
12. Se u tilizar uma cha de
rede princ ipal ou uma tomada de
aparelhos para desligar a unidade
de funciona mento, esta deve estar
sempre acessível.
13. Utilize apena s ligações/acessórios
especic ados pelofabrican te.
14. Utilize apenas
com o carrin ho,
estrutura, tripé,
suporte, ou m esa
especicados pelo
fabricante ou
vendidos com o dis positivo.
Quandoutili zar um carrinho, tenha
cuidado ao mover o conjunto carrinho/
pela terpidação.
15. Desligue este dispositivo durante
as trovoadas ou q uando não for
utilizado durante longos períodos
detempo.
16. Qualquer tipo de reparação
deve ser sempr e efectuado por
pessoal qualicado. É necessária uma
reparação sempre que a unidade tiver
sido de alguma forma danicada,
como por exemp lo: no caso do cabo de
alimentação ou cha se encontrarem
danicados; naeventualidade de
líquido ter sido derramado ou objectos
no caso da unid ade ter estado expos ta
à chuva ou à humid ade; seesta
não funcionar normalmente, ou se
tiver caído.
17. Correcta eliminação
deste prod uto: este
símbolo indi ca que o
produto não de ve ser
eliminado juntamente
com os resíduos domésticos, segundo a
nacional. Es te produto deverá ser lev ado
a reciclage m de resíduos de
equipamentos eléctricos e elec trónicos
(EEE). O tratamento inc orrecto deste ti po
de resíduos po de ter um eventual
Page 5

impacto negativo no ambiente e na
elettr iche, non esporre ques to
esclusivamente a personale qualic ato.
lame, una più larga dell'altra. Una spina
12. Utilizzare
eciente del le risorse naturali. Per
Aansluitingen die gemerkt
op belangrijke bedienings
8 9Quick Start GuideTD -3
saúde humana devido a substâncias
potencialmente perigosas que estão
geralmente associadas aos EEE. Ao
mesmo tempo, a sua col aboração para a
eliminação co rrecta deste p roduto irá
contribuir para a utilização eciente dos
recurs os naturais. Paramais info rmação
acerca dos loc ais onde poderá deixa r o
seu equipamento usado para reciclagem,
é favor contactar os serviços municip ais
locais, a enti dade de gestão de resídu os
ou os serv iços de recolha de
resíduosdomésticos.
18. Não inst ale em lugares
connados, ta is como estantes ou
unidades similares.
19. Não coloque fontes de
chama, tais como ve las acesas,
sobre o aparelho.
20. Favor, obedecer os asp ectos
ambientais de d escarte de bateria.
Baterias deve m ser descartadas e m um
ponto de coletas de baterias.
21. Esse aparelho pode se r usado em
climas tropi cais e moderados até 45°C.
LEGAL RENUNCIANTE
O Music Tribe não se resp onsabiliza
por perda algu ma que possa ser
sofrida por qualquer pessoa que
dependa, seja de maneira completa
ou parcial, de qualquer descrição,
fotograa, ou declaração aqui
contidas. Dados técnicos, aparências
e outras informações est ão sujeitas
a modicações sem aviso prévio.
Todas as marcas são p ropriedade
de seus respectivos donos. Midas,
Klark Teknik, Lab G ruppen, Lake, Tannoy,
Turbosound, TC Elec tronic, TC Helicon,
Behringer, Bugera
, Oberheim, Auratone
e Coolaudio são marcas ou marcas
registr adas do Music Tribe Global Brands
Ltd. © Music Tribe Global B rands Ltd.
2021 To dos direitos reservados.
GARANTIA LIMITADA
Para obter os ter mos de garantia
aplicáveis e cond ições e informações
adicionais a respeito da garantia
limitada do Mus ic Tr ibe, favor vericar
detalhes na í ntegra através do website
musictribe.com/warranty.
Informazioni importanti
Attenzione
I terminali contrassegnati
con il simbolo conducono
una corrente el ettrica sucien te a
costitui re un rischio di scossa el ettrica.
Usareunicam ente cavi per altoparlanti
(Speaker) d’elevata qualità con
connetto ri jack TS da ¼"pre-installati.
Ognialtra in stallazione o modic a deve
essere eett uata esclusivamente da
personale tecnico qualicato.
Attenzione
Questo simbolo, ovunque
appaia, avver te della
presenza di una tensione pericolosa
non isolata all'i nterno dello chassis,
tensione che può essere suciente per
costitui re un rischio di scossa el ettrica.
Attenzione
Questo simbolo,
ovunque appaia, segnala
import anti istruzioni oper ative e di
manutenzione nella documentazione
allegata. Si invita a leggere il manuale.
Attenzione
Per ridurre il r ischio di
scosse elettriche, non
rimuovere il coperchio superiore (o la
sezione posteriore). All'interno non ci
sono par ti riparabili dall'utente. Per la
manutenzione rivolgersi a perso nale
qualicato.
Attenzione
Per ridurre il rischio
di incendi o scos se
apparecch io a pioggia e umidità.
L'apparecch io non deve essere espos to
a gocciolio o schizzi di liquidi e nessun
oggetto contenente liquidi, come vasi,
deve essere co llocato sull'apparecchio.
Attenzione
Queste istruzioni di
servizio sono destinate
Per ridurre il r ischio di scosse
elettriche non eseguire interventi
di manutenzione diversi da quelli
contenuti nel manuale di istruzioni. Le
riparazioni devono essere eseguite da
personale di assistenza qualic ato.
1. Leggere queste istruzioni.
2. Conservare queste istruz ioni.
3. Pres tare attenzione a tut ti gli
avvisi.
4. Applicare tutte le istru zioni.
5. Non utilizzare questo dispositivo
vicino l'acqua.
6. Pulire esclusivamente con un
panno asciutto.
7. Non bloccare le ap erture di
ventilazione. Installare in conformità
con le istru zioni del produttor e.
8. Non installare vicino a fonti di
calore come radiatori, termoregolatori,
stufe o alt ri apparecchi (inclusi
amplicatori) che producono calore.
9. Non escludere la sic urezza fornit a
dalla spina polar izzata o con messa
a terra. Una spina p olarizzata ha due
con messa a ter ra ha due lame e un
terzo polo di m essa a terra. La lama
larga o il terzo p olo sono forniti per
la vostra sic urezza. Se la spina for nita
non si adatt a alla presa, consultare un
elettr icista per la sostit uzione della
presa obsoleta.
10. Proteggere il cavo di
alimentazione dal calpestio o essere
schiacciato in particolare alle spine,
prese di cor rente e il punto in cui esce
dall'apparecchio.
11. Utilizzare esclusivamente
dispositivi/accessori specic ati dal
produttore.
solo carrelli,
supporti, treppiedi,
stae o tavo li
indicati dal
produttore o
venduti con l'apparecchio. Utilizzando
un carrello, prestare attenzione quando
si sposta la combinazione carrello/
apparecchio per evitare lesioni dovute
al ribaltamento.
13. Scollegar e questo apparecchio
durante i tempo rali o se non è utilizzato
per lunghi periodi di tempo.
14. Per t utte le riparazioni r ivolgersi a
personale qualicato. La manutenzione
è necessaria quando l'apparecchio
è danneggiato in qualsiasi modo,
come danneggiamento del cavo
di alimentazione o della spina,
versamento di liquido o oggetti caduti
nell'apparecchio, se l'apparecchio è
stato espo sto a pioggia o umidità, se
non funziona normalmente o è caduto.
15. L'apparecchio deve essere
collegato a una pr esa di corrente
elettr ica con messa a terra di
protezione.
16. e la spina o una p resa del
dispositivo è utilizzata come dispositivo
di disconnessione, deve essere
facilmente utilizzabile.
17. Smaltimento
corretto di ques to
prodotto: questo
simbolo indica che
questo dispositivo non
deve essere sma ltito
insieme ai riuti domestici, secondo la
Dirett iva RAEE (2012/19 / UE) e la vostra
legislazione nazionale. Questo prodot to
deve essere p ortato in un centro di
raccolta autorizzato per il riciclaggio di
riuti di apparecchiature elettriche ed
elettroniche (RAEE). La cattiva gestione
di questo tip o di riuti potrebbe aver e
un possibile impatto negativo
sull'ambiente e sulla salute umana a
causa di so stanze potenzialmente
pericolose che sono generalmente
associate alle apparecchiature
elettriche ed elettroniche. Nello stesso
tempo la vostra collaborazione al
corretto smaltimen to di questo
prodotto contribuirà all'utilizzo
ulteriori informazioni su dove è
possibile trasportare le apparecchiature
per il ricic laggio vi invitiamo a
contattare l'ucio comunale locale o il
servizio di raccolta dei riuti domestici.
18. Non installare in uno spazio
ristret to, come in una libreria o in una
struttura simile.
19. Non collocare sul dispositivo fonti
di amme libere, co me candele accese.
20. Per lo smaltimento delle batterie,
tenere in considerazione gli aspetti
ambientali. Le batterie devono essere
smaltite in un pu nto di raccolta delle
batterie es auste.
21. Questo apparecchio può essere
usato in climi t ropicali e temperati
no a 45°C.
DISCLAIMER LEGALE
Music Tribe non si assum e alcuna
responsabilità per eventuali danni
che posson o essere subiti da chiunq ue
si adi in tut to o in parte a qualsiasi
descrizione, fotograa o dichiarazione
contenuta qui. Speciche tecniche,
aspetti e altre informazioni sono
soggette a modiche senza preavviso.
Tutti i marchi son o di proprietà
dei rispet tivi titolari. Midas, K lark
Teknik, Lab Grup pen, Lake, Tannoy,
Turbosound, TC Elec tronic, TC Helicon,
Behringer, Bugera, Oberheim, Auratone
e Coolaudio sono marchi o marchi
registr ati di Music Tribe Global Brands
Ltd. © Music Tribe Global B rands Ltd.
2021 Tutti i diritti r iservati .
GARANZIA LIMITATA
Per i termini e le cond izioni di garanzia
applicabili e le informazioni aggiuntive
relative alla gar anzia limitata di Music
Tribe, consultare online i dettagli
completi su musictribe.com/warranty.
Belangrijke
veiligheidsvoorschriften
Waarschuwing
zijn met het s ymbool
voeren een zodanig hoge spanning dat
ze een risico vor men voor elektrisc he
schokken. Gebruikuitsluitend
kwalitatief hoogwaardige, in de
handel verkrijgbare luidsprekerkabels
die voorzie n zijn van ¼"TS stekkers.
Laatuitsluitend gekwaliceerd
persone el alleoverige installatie - of
modicatiehandelingenuitvoeren.
Dit symbo ol wijst u altijd
- en
onderhoudsvoorschrif ten in de
bijbehorende documenten. Wijvragen
u dringend de handleiding te lezen.
Attentie
Verwijder in geen
geval de bovens te
afdekking (vanhet achterste gedeelte)
anders be staat er gevaar voor een
elektrische schok. Hetapparaat bevat
geen te onderhouden onderdelen.
Reparatiewerkzaamheden mogen
uitsluitend door gekwaliceerd
personeel uitgevoerdworden.
Attentie
Om het risico o p brand
of elektrische schokken
te beperken, dient u te voorkomen
dat dit apparaat wordt blootgesteld
aan regen en voc ht. Hetapparaat
mag niet worden b lootgesteld aan
neerdruppelend of opspattend water
en er mogen geen met water gevulde
voorwer pen – zoals een vaas – op het
apparaat wordengezet.
Attentie
Deze
onderhoudsinstructies
zijn uitsluitend bedoeld voor
gekwaliceerd onderhoudspersoneel.
Omelektrische schokken te
voorkomen, mag u g een andere
Page 6
10 11Quick Start GuideTD-3
onderhoudshandelingen verrichten dan
13. Gebr uik uitsluitend door de
bij aan een doelmatiger gebruik van de
1. Läs dessa anvisningar.
15. Dra ur anslutningskontakten und
kommit in i appar aten, eller när den har
människors hälsa, påverkas negativt på
Placera inte källo r med öppen eld,
in de bedieningsinstructies vermeld
staan. Reparatiewerkzaamheden
mogen alleen uitgevoerd worden door
gekwaliceerd onderhoudspersoneel.
1. Lees deze voorschriften.
2. Bewaar deze voorschriften.
3. Neem alle waarschuwingen
in acht.
4. Volg alle voorschriften op.
5. Gebr uik dit apparaat niet in de
buurt vanw ater.
6. Reinig het uitsluitend met een
drogedoek.
7. Let erop geen van de ve ntilatieopeningen te bedekken. Plaats en
installee r het volgens de voor- schriften
van de fabrikant.
8. Het appar aat mag niet worden
geplaats t in de buurt van radiatore n,
warmte-uitlaten, kachels of andere
zaken (ook verste rkers) diewarmte
afgeven.
9. Maak de veiligheid waarin door
de polarisatie- of aardingsstekker
wordt voorzien, niet ongedaan.
Eenpolarisa tiestekker heef t twee
bladen, waar vaner een breder is dan
het andere. Een aardingsstekker heeft
twee blade n en een derde uitsteek sel
voor de aarding . Het bredere blad of
het derde uit steeksel zijn er vo or uw
veiligheid. Moc htde geleverde stekker
niet in uw stop contact passen, laat
het contac t dan door een elektr icien
vervangen.
10. Om beschadiging te voorkomen,
moetde str oomleiding zo gelegd
worden dat er nie t kan worden over
gelopen en dat ze b eschermd is
tegen scherpe kanten. Zorg zeker
voor voldoende bescherming aan de
stekkers, d everlengkabels en het punt
waar het netsnoer het apparaat verlaat.
11. Het toestel met altij d met een
intacte aarddraad aan het stro omnet
aangeslotenzijn.
12. Wanneer de stekker
van het hoofdnetwerk of een
apparaatstopcontac t de functionele
eenheid voor het uitschakelen is,
dientdeze alti jd toegankelijk te zijn.
producent gespeci- ce erd toebehoren
c.q. onderdelen.
14. Gebruik
het apparaat
uitsluitend in
combinatie met de
wagen, hetstatief,
dedriepoot , de
beugel of taf el die door de producent
is aangegeven, of die in combinatie
met het appar aat wordt verkocht. Bij
gebruik van een wagen dient men
voorzich tig te zijn bij het verrijden va n
de combinatie wagen/apparaat en
letsel do or vallen tevoorkomen.
15. Bij onwe er en als u het apparaat
langere tijd niet gebruikt, haalt u de
stekker uit he tstopcontact.
16. Laat alle voorkomende reparatie s
door vakkundig en bevoegd personeel
uitvoeren. Reparatiewerk-zaamheden
zijn nodig als he t toestel op enige wijze
beschadigd is geraakt, bijvoorbeeld
als de hoofd-stroomkabel of -stekker
is beschadi gd, als er vloeistof of
voorwerpen in terecht zijn gekomen,
als het aan regen o f vochtigheid
heeft bloot-ges taan, niet normaal
functioneer t of wanneer het
isgevallen.
17. Correcte a fvoer van
dit product: dit symbool
geef t aan dat u dit
produc t op grond van de
AEEA-richtlijn
(2012/19/ EU) en de
nationale wetgeving van uw land niet
met het gewone huishoudelijke afval
mag weggooie n. Dit product moet na
aoop van de nut tige levensduur naar
een ociële inzamelpost voor
afgedankte elektrische en elektronische
apparatuur (AEEA) worden gebracht,
zodat het kan wor den gerecycleerd .
Vanwegede potentieel gevaarlijke
stoen die in elektrische en
elektronische apparatuur kunnen
voorkomen, kane en onjuiste afvoer va n
afval van h et onderhavige typ e een
negatieve invl oed op het milieu en de
menselijke gezondheid hebben.
Eenjuiste af voer van dit produc t is
echter niet alleen beter voor het milieu
en de gezondhe id, maardraagt tevens
natuurlijke hul pbronnen. Voormeer
informati e over de plaatsen waar u uw
afgedankte apparatuur kunt inleveren,
kunt u contac t opnemen met uw
gemeente of de
plaatselijkereinigingsdienst.
18. Installeer niet in een kleine
ruimte, zoals ee n boekenkast of iets
dergelijks.
19. Plaats geen open vlamme n, zoals
brandende kaarsen, op het apparaat.
20. Houd rekening met de
milieuaspecten van het afvoeren van
batterijen. Batterijen moeten bij een
inzamelpunt voor batterijen worden
ingeleverd.
21. Dit apparaat kan worden geb ruikt
in tropische en gematigde klimaten
tot 45 ° C.
WETTELIJKE ONTKENNING
Music Tribe aanvaardt geen
aansprakelijkheid voor enig verlies
dat kan worden geleden door een
persoon die geheel of gedeeltelijk
vertrouwt op enige beschrijving,
foto of verklaring hierin. Technische
specicaties, verschijningen en
andere informatie kunnen zonder
voorafgaande kennisgeving worden
gewijzigd. Alle handelsmerken zijn
eigendom van hun respectievelijke
eigenaren. Midas, Klark Teknik, Lab
Gruppen, Lake, Tannoy, Turbosound,
TC Electronic, TC Helicon, Behringer,
Bugera, Oberheim, Auratone en
Coolaudio zijn handelsmerken of
gedeponeerde handelsmerken
van Music Tribe Global Brands Ltd.
© Music Tribe Global Brands Ltd.
2021 Alle rechten voorbehouden.
BEPERKTE GARANTIE
Voor de toepasselijke
garantievoorwaarden en aanvullende
informatie met betrekking tot de
beperkte garantie van Music Tribe,
zie de volledige details online op
musictribe.com/warranty.
Viktiga
säkerhetsanvisningar
Varning
Uttag markerade med
symbolen leder elekt risk
strömst yrka som är tillräck ligt stark för
att utgör a en risk för elchock. Anv änd
endast högkvalitativa, kommersiellt
tillgängliga högtalarkablar med
förhandsinstallerade ¼"TSkontakter. Allannan installering eller
modikation bör endast utföras av
kompetentpersonal.
Den här symbolen
hänvisar till viktiga
punkter om användning
och underhå ll i den medfölljande
dokumentationen. Varvänlig och läs
bruksanvisningen.
Försiktighet
Minska risken för
elektriska stötar genom
att aldri g ta av höljet upptill på
apparaten (ellerta av b aksidan).
Inuti appar aten nns det inga delar
som kan repar eras av användaren.
Endastkvalicerad pers onal får
genomföra reparationer.
Försiktighet
För att minsk a risken
för brand och elektriska
stötar ska apparaten skyddas mot
regn och f ukt. Apparaten går inte
utsät tas för dropp eller spill o ch
inga vattenbehållare som vaser etc.
fårplaceras p å den.
Försiktighet
Serviceinstruktionen
är enbart avsedd
för kvalicerad serviceper sonal.
Föratt undvika risker genom
elektriska stötar, genomför inga
reparationer på apparaten, vilka inte
är beskriv na i bruksanvisninge n.
Endast kvalicerad fack personal får
genomförareparationerna.
2. Spara dessa anvisningar.
3. Beakt a alla varningar.
4. Följ alla anvisningar.
5. Använd i nte apparaten i närheten
av vatten.
6. Rengör end ast med torr trasa.
7. Blockera inte
ventilationsöppningarna.
Installeraenligt tillverkarens
anvisningar.
8. Installera aldrig intill värmek ällor
som värme- element, varmluf tsintag,
spisareller an nan utrustning som avger
värme (inklus iveförstärkare).
9. Ändra aldrig en polariserad
eller jordad kon takt. Enpolariserad
kontakt har t vå blad – det ena bredare
än det andra. En j ordad kontakt har
två blad oc h ett tredje jords tift. Det
breda blade t eller jordstifte t är till för
din säkerhet . Omden medföljande
kontakten i nte passar i ditt ut tag,
skadu kontak ta en elektriker fö r att få
uttaget bytt.
10. Förlägg elkabeln så, at t det inte
är möjligt at t trampa på den och att
den är skydda d mot skarpa kanter och
inte kan skadas . Ge i synnerhet akt på
områdena omkring stickkontakterna,
förlängningskablarna och på det
ställe, där elkabeln lämnar apparaten,
ärtillräckligtskyddade.
11. Apparaten måste alltid
vara ansluten till elnätet med
intaktskyddsledare.
12. O m huvudkontakten, ellere tt
apparatuttag, fungerar som
avstängningsenhet måste denna alltid
varatillgänglig.
13. Använd endas t tillkopplingar och
tillbehör som angetts av tillverkaren.
14. Använd
endast med vagn,
stativ, trefot,
hållareeller bor d
som angetts
av tillverkaren,
ellersom sål ts till-sammans med
apparaten. O m du använder en
vagn, var för siktig, när du för yttar
kombinationen vagn-apparat, för att
förhindra olycksfall genomsnubbling.
åskväder e ller när apparaten inte ska
användas under någon längre tid.
16. Låt kvalicer ad personal utföra
all servi ce. Serviceär nödvändig
när apparaten har skadats, t.ex.när
en elkabel elle r kontakt är skadad,
vätskaeller främmande föremål har
fallit i golve t.
17. Kassera produkten
på rätt s ätt: den här
symbolen indikerar att
produkten inte ska
kastas i
hushållssoporna,
enligtWEEE dire ktivet (2012/19/EU)
ochgällande, nationell lagstiftning.
Produkte n ska lämnas till ett
auktoriserat återvinningsställe för
elektronisk och elektrisk utrustning
(EEE). Om den här sor tens avfall
hanteras på fe l sätt kan miljön, och
grund av potentiella risksubstanser
som ofta associeras med EEE.
Avfallshanteras pro dukten däremot på
rätt sät t bidrar detta til l att naturens
resurse r används på ett bra sät t.
Kontakta kommun, ansvarig
förvaltning eller
avfallshanteringsföretag för mer
information om återvinningscentral
där produk ten kanlämnas.
18. Insta llera inte i ett trångt
utrym me, t.ex. i en bokhylsa eller
liknande enhet.
19.
t.ex. tända lju s, på apparaten.
20. Tänk på miljöaspekterna
vid kassering av batterier.
Batteri er måste kasseras på et t
batteriuppsamlingsställe.
21. Denna apparat kan användas
i tropiska och måttliga klimat
upp till 45 ° C.
Page 7
prądem nie należy wykony wać
uziemieniem. Wtyczka dwubiegunowa
posiada dwa w tyki kontakto we o różnej
urządzenia nie odpowiada standardowi
wktór ym kabel sieciowy pr zymocowany
12 13Quick Start GuideTD -3
sieciowe w urządzeniu pełnią funkcję
substanc ji niebezpiecznych z aliczanych
zapoznaj się ze w szystkimi szc zegółami
FRISKRIVNINGSKLAUSUL
Music Tribe tar inget ansvar för någon
förlust som kan drabbas av någon
person som helt eller delvis förlitar
sig på någon beskrivning, fotogra
eller uttalande som nns här.
Tekniska specikationer, utseenden
och annan information kan ändras
utan föregående meddelande. Alla
varumärken tillhör respektive ägare.
Midas, Klark Teknik, Lab Gruppen,
Lake, Tannoy, Turbosound, TC
Electronic, TC Helicon, Behringer,
Bugera, Oberheim, Auratone och
Coolaudio är var umärken eller
registrerade varumärken som tillhör
Music Tribe Global Brands Ltd.
© Music Tribe Global Brands Ltd.
2021 Alla Rättigheter reserverade.
BEGRÄNSAD GARANTI
För tillämpliga garantivillkor och
ytterligare information om Music
Tribes begräns ade garanti, se
fullständig information online på
musictribe.com/warranty.
Ważne informacje o
bezpieczeństwie
Uwaga
Terminale oznaczone
symbolem przenoszą
wystarczająco wysokie napięcie
elektr yczne, aby stwor zyć ryzyko
porażenia prądem. Używaj
wyłącznie wysokiej jakości
fabryc znie przygotowanyc h kabli
z zainstalowanymi wt yczkami
¼"TS. Wszystkie i nne instalacje lub
modyk acje powinny być wykonyw ane
wyłąc znie przez wykwalikowany
personel techniczny.
Ten symbol informuje o
ważnych wskazówkach
dotycz ących obsługi i
konserwacji urządzenia w dołączonej
dokumentacji. Proszę przeczytać
stosowne informacje w instrukcji
obsługi.
Uwaga
W celu wyeliminowania
zagrożenia por ażenia
prądem zabrania się zdejmowania
obudowy lu b tylnej ścianki urz ądzenia.
Elementyz najdujące się we wnętrzu
urządzen ia nie mogą być naprawiane
przez uż ytkownika. Napraw ymogą
być wykony wane jedynie przez
wykwalikowanypersonel.
Uwaga
W celu wyeliminowania
zagrożenia por ażenia
prądem lub za palenia się urządzenia
nie wolno wy stawiać go na działanie
deszczu i wilgotności oraz dopuszczać
do tego, aby do wnęt rza dostała się
woda lub inna ciecz. Nie należy st awiać
na urządze niu napełnionych cie czą
przedmiotów takich jak np. wazony lub
szklanki.
Uwaga
Prace serwisowe mogą
być wykony wane jedynie
przez wykwalikowany personel.
Wcelu uniknięcia zagrożenia porażenia
żadnych manipulacji, które nie
są opisane w instrukcji obsługi.
Naprawyw ykonywane mogą być
jedynie przez wykwalikowany
personeltechniczny.
1. Proszę przeczytać
poniższewskazówki.
2. Proszę przechowywać
niniejsząinstrukcję.
3. Należy pr zestrzegać wszystkich
wskazówek os trzegawczych.
4. Należy p ostępować zgodnie z
instrukcjąobsługi.
5. Urz ądzenia nie wolno uży wać w
pobliżuwody.
6. Urządzenie można cz yścić
wyłąc znie suchąszmatką.
7. Nie zasłaniać otworów
wentylac yjnych. Wczasie pod łączania
urządzenia należy pr zestrzegać
zaleceńproducenta.
8. Nie stawia ć urządzenia w pobliżu
źródeł c iepła takich, jak gr zejniki,
piecelub urz ądzenia produkujące
ciepło (np.wz macniacze).
9. W żadnym wypa dku nie należy
usuwać zabe zpieczeń z wtyc zek
dwubiegun owych oraz wtyc zek z
szerokości. Wtyczkaz uziemieniem ma
dwa wt yki kontaktowe i trzec i wtyk
uziemienia. Szerszy wtyk kontak towy
lub dodatkowy wtyk uziemienia służą
do zapewnienia bezpieczeńst wa
użyt kownikowi. Jeśli format w tyczki
gniazdka, proszę zwrócić się do
elektryka z prośbą o wy mienienie
gniazda.
10. Kabel sieciow y należy ułożyć
tak, aby nie by ł narażony na deptanie i
działanie o strych krawędzi, c o mogłoby
doprowadzić do jego uszkodzenia.
Szczególną uwagę zwró cić należy na
odpowiednią ochronę miejsc w pobliżu
wtyc zek i przedłużac zy oraz miejsce,
jest dour ządzenia.
11. Urządzenie musi być zaw sze
podłąc zone do sieci sprawnym
przewodem z uziemieniem.
12. Jeżeli w tyk sieciowy lub gniazdo
wyłąc znika, tomuszą one być zawsze
łatwodos tępne.
13. Uż ywać wyłąc znie sprzętu
dodatkowego i akce soriów zgodnie z
zaleceniami producenta.
14. Używa ć
jedynie zalecanych
przez producenta
lub znajdujących
się w zestawi e
wóz ków,
stojaków, stat ywów, uchwytów i
stołów. Wprzypadku posługiwania
się wózkiem należy zachować
szczególną ostrożność w trakcie
przewożenia zes tawu, abyuniknąć
niebezpieczeńst wa potknięcia się i
zranienia.
15. W trakcie burzy oraz na
czas dłuż szego nieużywania
urządzen ia należy wyjąć wt yczkę z
gniazdkasieciowego.
16. Wykonywanie wszelkich
napraw należy zlecać jedynie
wykwali kowanym pracownikom
serwisu. Przeprowadzenie przeglądu
technicznego staje się konieczne, jeśli
urządzenie zostało uszkodzone w
jakikolwiek s posób (dotyczy to tak że
kabla siecio wego lub wtyczki), jeś li
do wnętrz a urządzenia dost ały się
przedmioty lub ciecz, jeśli urządzenie
wyst awione było na działanie d eszczu
lub wilgoci, jeśli urządzenie nie
funkcjonuje poprawnie oraz kiedy
spadło napodłogę.
17. Prawidłowa
utylizacja produktu:
Tensymbol wskaz uje,
żetego produk tu nie
należy wyr zucać razem
ze zwykłymi odpadami
domowymi, tylko zgodnie z dyrektywą
w sprawie zuż ytego sprzętu
elektrycznego i elektr onicznego
(WEEE) (2012/19/EU) oraz przepisami
krajowymi. Niniejsz y produkt należy
przekazać do autoryzowanego punktu
zbiórki zużytego sprzętu elektr ycznego
i elektronicznego. Niewłaściwe
postępowa nie z tego typu odpadami
może wywo łać szkodliwe dział anie na
środowisko naturalnej i zdrowie
człowie ka z powodu potencjalnych
jako zuży ty sprzęt elekt ryczny i
elektroniczny. Jednocześnie, Twój
wkład w prawidłową utylizację
niniejszego p roduktu przyc zynia się do
oszczędn ego wykorzyst ywania
zasobów naturalnych. Szczegółowych
informacj i o miejscach, w któr ych
można oddawać zu żyty sprzęt d o
recyklingu, udzielają urzędy miejskie,
przedsiębiorstwa uty lizacji odpadów
lub najbliższ y zakład utylizacji
odpadów.
18. Nie instaluj w ograniczonej
przestrzeni, takiej jak pó łka na książki
lub podobny zes taw.
19. Nie stawiaj na urządzeniu źróde ł
otwartego ognia, takich jak zapalone
świece.
20. Należy pamiętać o
środowiskowych aspektach utylizacji
baterii. Baterie należy utylizować w
punkcie zbiórki baterii.
21. To urządzenie może być
używane w klimacie tropikalnym i
umiarkowanym do 45 ° C.
ZASTRZEŻENIA PRAWNE
Music Tribe nie ponosi
odpowiedzialności za jakiekolwiek
straty, które mogą ponieść osoby,
które polegają w całości lub w części
na jakimkolwiek opisie, fotograi lub
oświadczeniu zawart ym w niniejszym
dokumencie. Specykacje techniczne,
wygląd i inne informacje mogą
ulec zmianie bez powiadomienia.
Wszystkie znaki towarowe są
własnością ich odpowiednich
właścicieli. Midas, Klark Teknik,
Lab Gruppen, Lake, Tannoy,
Turbosound, TC Elec tronic, TC Helicon,
Behringer, Bugera, Oberheim,
Auratone i Coolaudio są znakami
towarowymi lub zas trzeżonymi
znakami towarowymi rmy Music
Tribe Global Brands Ltd. © Music Tribe
Global Brands Ltd. 2021 Wszystkie
prawa zastrzeżone.
OGRANICZONA GWARANCJA
Aby zapoznać si ę z obowiązującymi
warunkami gwarancji i dodatkowymi
informacjami dotyc zącymi
ograniczonej gwarancji Music Tribe,
w trybie online pod adresem
musictribe.com/warranty.
Page 8
Desktop Computer HeadphonesStudio Monitors
14 15Quick Start GuideTD -3
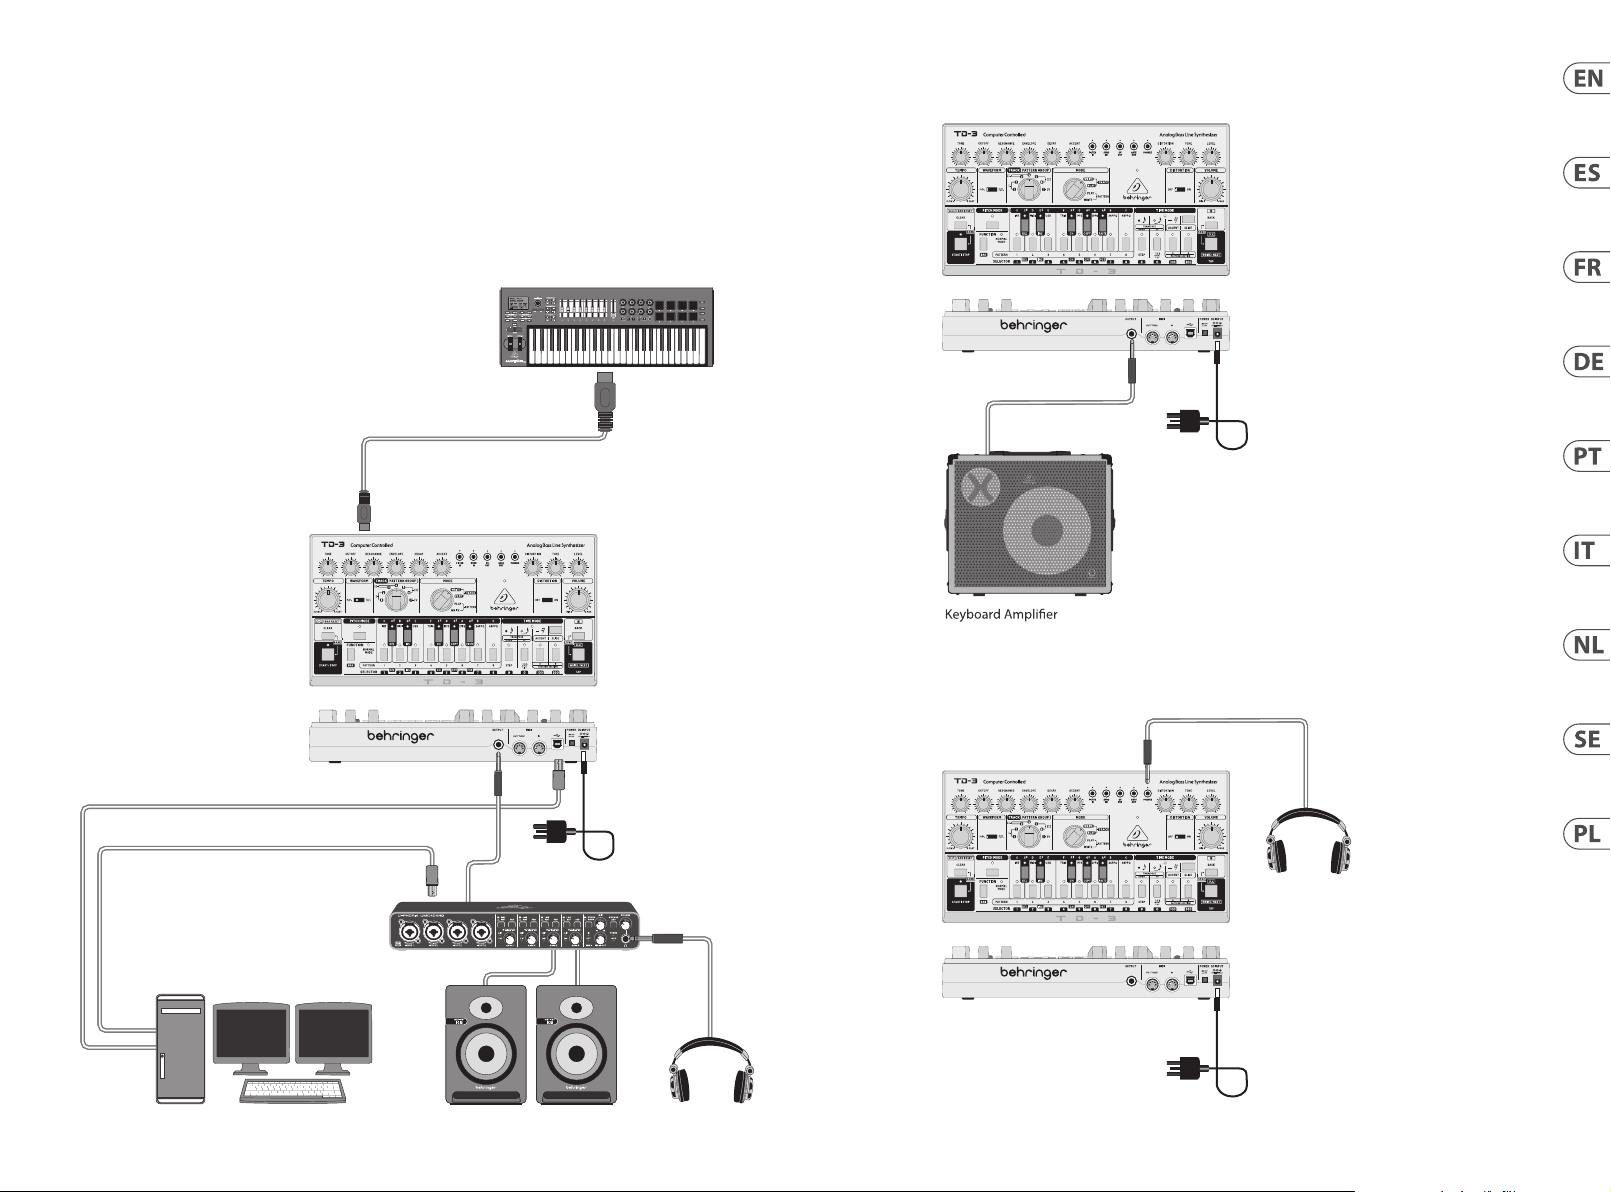
TD-3 Hook-up
(EN) Step 1: Hook-Up
(ES) Paso 1: Conexión
(FR) Etape 1 : Connexions
(DE) Schritt 1: Verkabelung
(PT) Passo 1: Conexões
(IT) Passo 1: Allacciare
(NL) Stap 1: Hook-Up
(SE) Steg 1: Anslutning
(PL) Krok 1: Podłączeni
MIDI IN
Sistema para estudio de grabación
MIDI Keyboard
MIDI OUT
Studio System
Système de studio
Studio-System
Sistema de Estúdio
Studio System
Studio-systeem
Studio-systemet
Studio System
Band / Practice System
Sistema para un g rupo/ensayos
Système pour répétition
Band/Proberaum-System
Sistema Banda/Prática
Sistema band / p ratica
Band / oefensysteem
Band / övningssystem
Zespół / syste m ćwiczeń
Power
Adapter
USB B
Audio Interface
USB A
USB A
USB B
Power
Adapter
Practice System
Sistema para un e nsayos
Système pour répétition
Proberaum-System
Sistema Prática
Sistema di prat ica
Oefensysteem
Övningssystem
System ćwiczeń
Headphones
Power
Adapter
Page 9
16 17Quick Start GuideTD -3
Active Loudspeakers
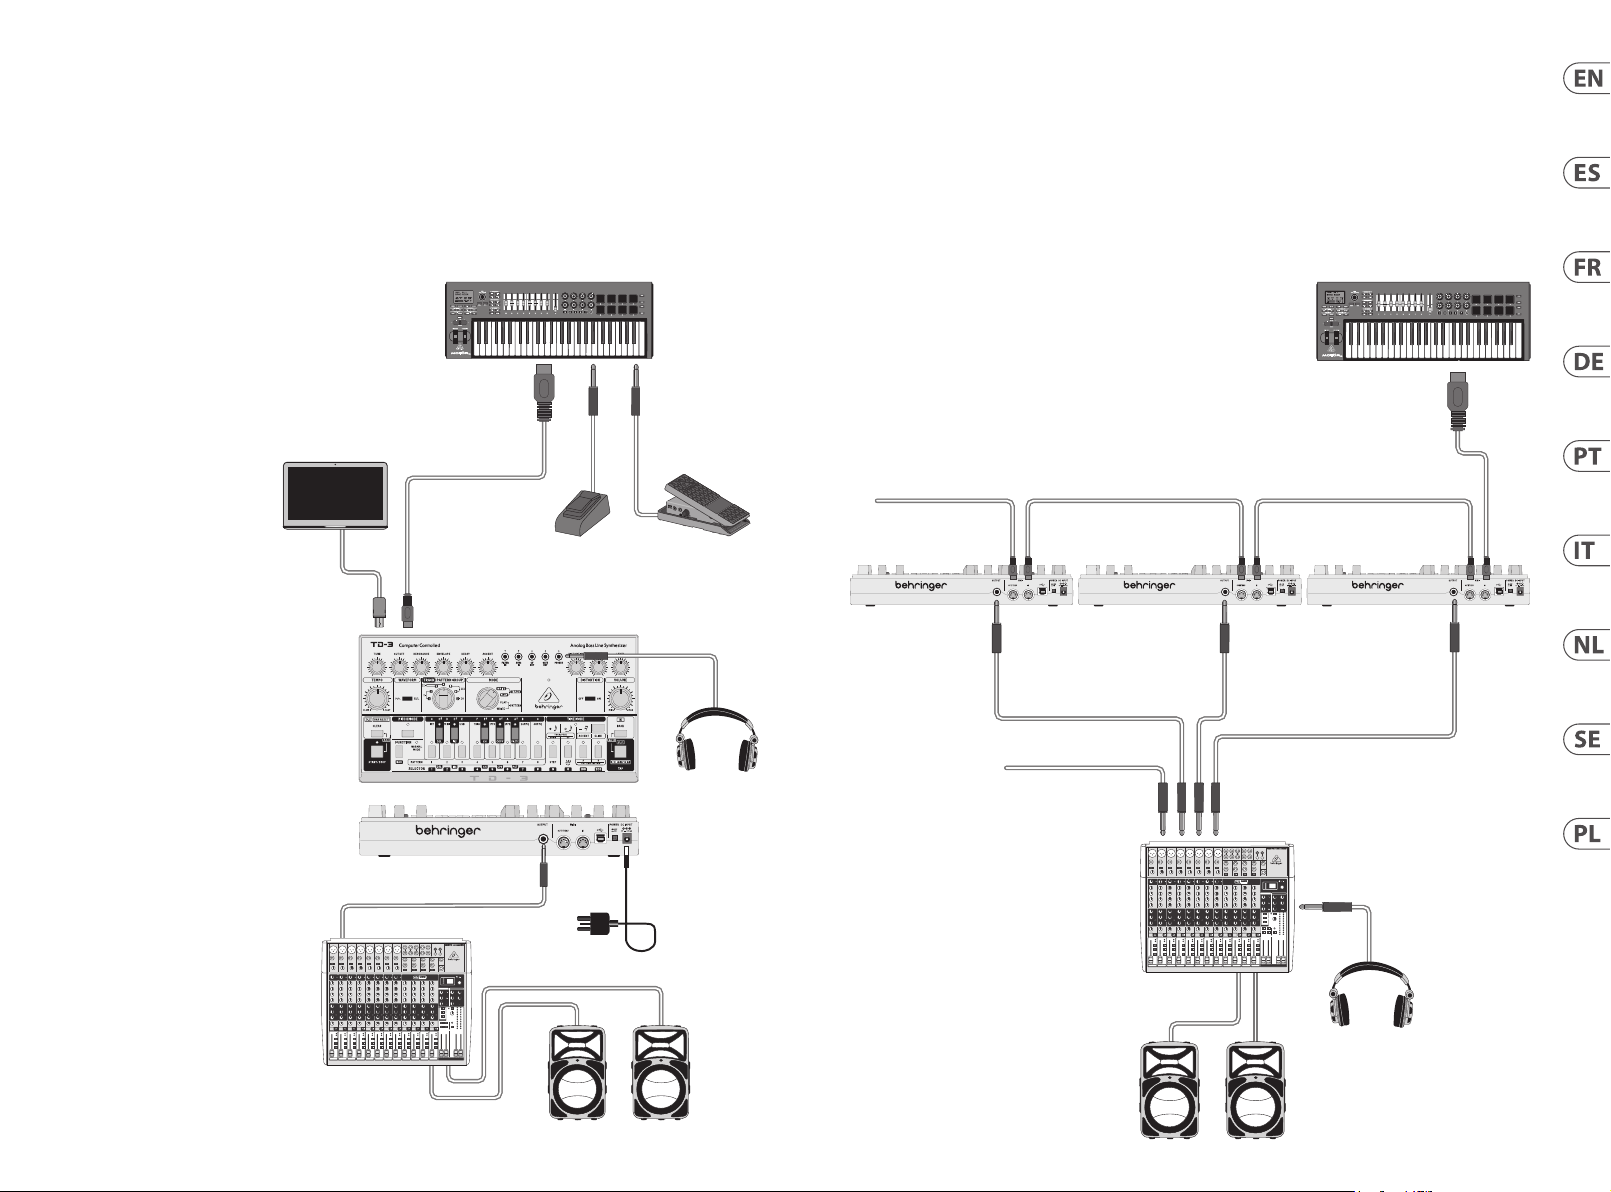
TD-3 Hook-up
(EN) Step 1: Hook-Up
(ES) Paso 1: Conexión
(FR) Etape 1 : Connexions
(DE) Schritt 1: Verkabelung
(PT) Passo 1: Conexões
(IT) Passo 1: Allacciare
Laptop Computer
(NL) Stap 1: Hook-Up
(SE) Steg 1: Anslutning
(PL) Krok 1: Podłączeni
USB B
MIDI Keyboard
MIDI IN
MIDI OUT
Sistema para ac tuación en dire cto
Footswitch
Live System
Système pour représentation
Live-System
Sistema Ao Vivo
Sistema live
Live-systeem
Live-system
System na żyw o
O
U
T
U
P
T
2
O
U
T
P
U
T
1
C
V
M
N
I
N
V
O
O
R
L
M
0
1
0
Expression Pedal
To next TD-3
Sistema de cadena de polietileno
Poly Chain Syste m
Système de chaîne poly
Poly Chain Syste m
Poly Chain Syste m
Sistema Poly Cha in
Poly Chain-systeem
Poly kedjesystem
Poly Chain Syste m
MIDI Keyboard
MIDI THRUMIDI THRU
MIDI THRU
MIDI OUT
MIDI INMIDI INMIDI IN
MIDI IN
Mixing console
Power
Adapter
Active Loudspeakers
Headphones
To next TD-3
Mixing console
Headphones
Page 10
18 19Quick Start GuideTD -3
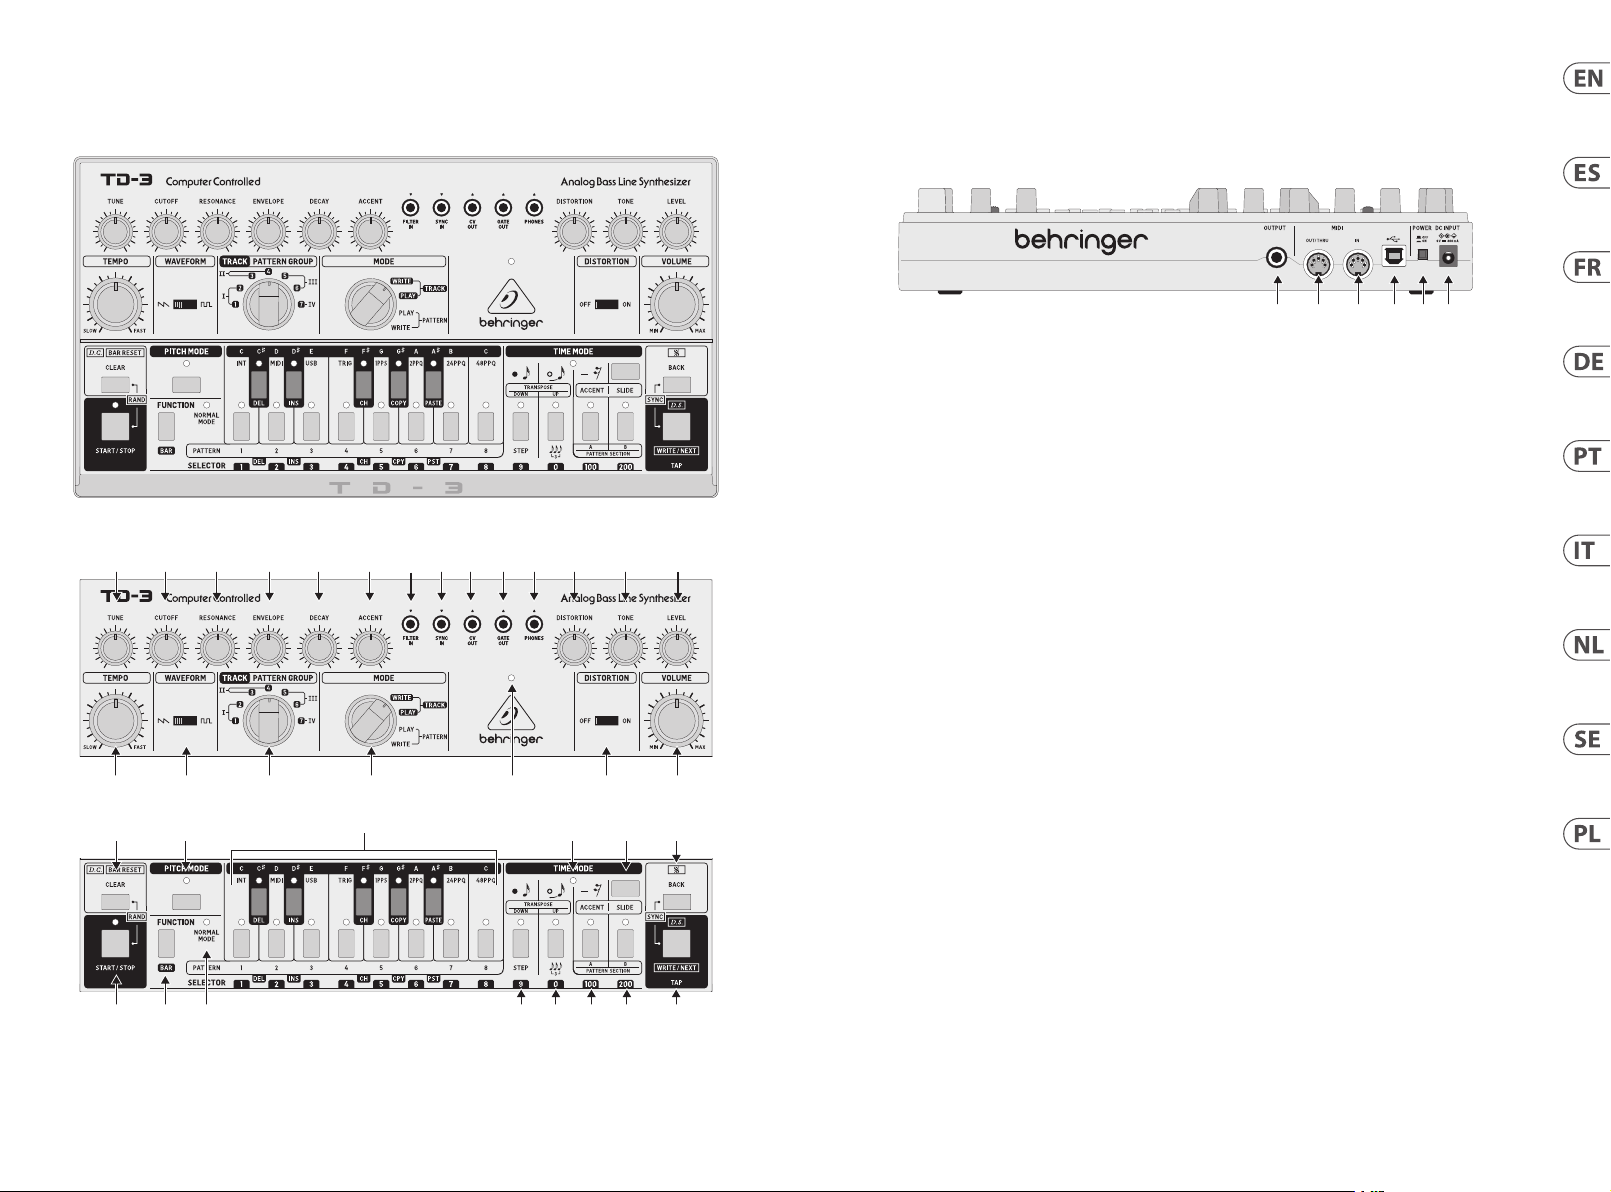
TD-3 Controls
(36) (37) (38) (39) (40) (41)
(11)
(1) (2) (4) (8)
(15) (16) (17) (18) (19) (20) (21)
(22) (23) (25) (26) (27)
(28) (29) (30) (31) (32) (33) (34) (35)
(3) (6)(5) (9)
(7)
(24)
(10) (14)
(13)(12)
Page 11

20 21Quick Start GuideTD -3
TD-3 Controls
(EN) Step 2: Controls
Synthesizer Section
(1) TUNE - adjust th e frequency of t he internal VCO oscilla tor,
approxim ately one octave ei ther side of center.
(2 ) CUTOFF - adjust the c uto frequenc y of the low-pass VCF
lter. Frequen cies above the cuto will be attenuate d,
such as the higher-order harmonics.
(3 ) RESONANCE - adjus t the amount of emphas is given to the
signal leve l at the cuto frequ ency.
(4 ) ENVELOPE - sel ect the depth of mo dulation applie d by the
envelope ge nerator to the VCF cuto frequency.
(5 ) DEC AY - control the amou nt of time taken for th e envelope
to decay f rom the current lev el to minimum.
(6 ) ACCENT - adjust the am ount of accent given to t he output
for any note s programmed wit h an accent.
Patchbay (3.5 mm TS input and output
connections)
(7 ) FILTER IN - this input al lows the connect ion of an externa l
audio signa l instead of the inter nal VCO oscillator.
(8 ) SYNC IN - thi s input allows the us e of an external cl ock
and start/stop signal.
(9 ) CV OUT - con trol voltage out put of 1V/octave.
(10) GATE O UT - gate outpu t.
(11) PHONES - connect yo ur headphones to th is 3.5 mm
TRS outp ut. Make sure the volum e is turned down
before putting on headphones.
Distortion Section
These con trols only have an ee ct when the DISTORT ION switch
(20) is ON. The cir cuit is located in t he signal path just b efore the
volume cont rol and the nal audi o output.
(12 ) DRIVE - adjust the amo unt of distorti on.
(13 ) TONE - adjust t he tone.
(14) LEVEL - adjust the distortion output level.
General Controls
(15) TEMPO - adjust th e rate at which the pat tern and
track s play, from slow to fast.
(16) WAVEFOR M - select the wav eform of the inter nal VCO
oscillat or from reverse s awtooth or pulse.
(17) TRACK/PATTERN GROUP - selec t from TRACK 1 to 7 when
writin g or playing track s, and PATTERN GROU P I, II, III, IV
when wri ting or playing pat terns. Pattern s in group I are
only availab le for use in track 1 o r 2, patterns in gro up II
for trac ks 3 or 4, group III for tr acks 5 or 6, and group I V
for trac k 7.
(18) MODE - select f rom Track Write, Track Play, Patte rn Play,
Patter n Write.
(19 ) POWER LED - indicate s that power is suppli ed to the unit
and the rear- panel power switch i s on.
(20) DISTORTION ON/OFF - when OFF, the distor tion is
bypasse d, and the DRIVE, TONE, an d LEVEL controls have
no eect.
(21 ) VOLUME - adjust t he output level fr om the rear-panel
output an d the headphones ou tput. Make sure the vo lume
is turned down before putting on headphones.
Sequencer Section
(22 ) D.C./BAR RESET/CLEAR - this i s used to clear a pat tern
from mem ory, to return a trac k to the beginning, a nd to
signal that t he last pattern i s being added to a trac k.
(23 ) PITCH MODE - selec ts the pitch mode o n or o. The LED
will light w hen in pitch mode. This m ode is used to enter
the notes when creating patterns.
(24) 13-NOTE KEYBOARD - these sw itches are laid out as a
13-note keybo ard, allowing notes to b e selected whe n
creatin g patterns. The lo wer eight switche s are also used
when creating, saving, and selecting patterns and tracks.
(25) TIME MODE LED - the LED will li ght when in TIME MODE.
(26) TIME MODE ON/OFF - selec t the TIME MODE on or o.
This mode is used when entering the timing (note, tie,
or rest) af ter the notes have be en entered in PITCH MODE .
(27 ) BACK - when steppi ng through a patt ern, this allows
you to selec t the last played no te, so it can be edited .
This swit ch and WRITE/NEX T (35) are used to view and
change SYNC and CLOCK settings.
(28) START / STOP - this allows you to s tart or stop pla ying the
patter ns and tracks. T he LED will turn on when p laying.
(29 ) FUNCTION - this multipu rpose switch is u sed to return
the TD-3 to nor mal mode from PITCH MOD E and TIME
MODE, and fo r various operat ions during patt ern and
track writing.
(30) NORMAL MODE LED - this LED will light wh en the unit is
in normal m ode.
(31 ) TRANSPOSE DOWN/NOTE/S TEP - this is used to
transpo se the octave down wards in PITCH MODE, enter a
note in TIME MO DE, and to enter the numb er of steps in
a patter n.
(32 ) TRANSPOSE UP/TIE/TRIPLET - this i s used to transpos e
the oct ave upwards in PITCH MODE, e nter a tie in TIME
MODE, and se t the pattern to tr iplet mode.
(33 ) ACCENT / PATTERN A - this allows a n accent to be added
to notes in PITCH M ODE, and to select “A” pat terns such as
1A, 2A, to 8A.
(34) SLIDE / PATTERN B - this allows a SLID E to be added to
notes in PITCH MO DE, and to select “ B” patterns, suc h as
1B, 2B, to 8B.
(35) D.S./WRITE/NE XT/TAP - this allows a patt ern to be
writt en to a track, to sele ct the next not e in a pattern,
and to add manu al timing by tapping . This switch
and BACK (27) are use d to view and change SY NC and
CLOCK settings.
Rear Panel
(36) OUTPUT - connect this ¼" TS ou tput to the line-l evel
audio inpu t of your system. Mak e sure the volume
is turne d down and the syste m is turned o befo re
making connections.
(37 ) MIDI OUT/THRU - this 5-pin D IN jack is used to outp ut
MIDI OUT data , and pass through MID I data received at
the MIDI INPUT.
(38) MIDI IN - this 5-pin D IN jack receives MIDI d ata from an
exter nal source. This will co mmonly be a MIDI keybo ard,
an exter nal hardware seq uencer, a computer equip ped
with a MIDI in terface, etc.
(39 ) USB PORT - this USB t ype B jack allows conn ection
to a compute r. The TD-3 will sh ow up as a class-comp liant
USB MIDI device, c apable of suppor ting MIDI in and out .
USB MIDI IN - accept s incoming MIDI data
from an application.
USB MIDI OUT - send s MIDI data to an applic ation.
(40) POWER - turn the sy nthesizer on or o. Make sur e all the
connec tions are made bef ore turning on the u nit.
(41) DC INPUT - connect t he supplied 9V DC power a dapter
here. The pow er adapter can be plug ged into an AC outlet
capable o f supplying fro m 100V to 240V at 50 Hz /60 Hz.
Use only the p ower adapter suppli ed.
Page 12

22 23Quick Start GuideTD-3
TD-3 Controles
(ES) Paso 2: Controles
Sección de sintetizador
(1) TUNE - este man do ajusta la frec uencia del oscila dor
VCO interno, apr oximadamente una oc tava a cada lado
del centro.
(2 ) CUTOFF - este mando aj usta la frecuen cia de corte del
ltro VCF pa sabajos. Las fr ecuencias que es tén por encima
de la de cor te serán atenuadas.
(3 ) RESONANCE - este ma ndo ajusta la canti dad de énfasis
aplicado a l nivel de la señal en la fr ecuencia de cor te.
(4 ) ENVELOPE - es to elige la profund idad de la modulación
aplicada p or el generador de en volvente a la frecue ncia de
corte de l VCF.
(5 ) DEC AY - este mando cont rola la cantidad de ti empo que
tarda la envo lvente en decaer de sde el nivel activo h asta
el mínimo.
(6 ) ACCENT - esto ajust a la cantidad de acent o aplicado a la
salida par a cualquier nota p rogramada con un acen to.
Patchbay (conexiones de entrada y salida en
TS de 3.5 mm)
(7 ) FILTER IN - permite la co nexión de una señal a udio
exter na en lugar del oscila dor VCO interno.
(8 ) SYNC IN - pe rmite el uso de una señ al de inicio/parada y
reloj externos.
(9 ) CV OUT - sa lida de control por vo ltaje de 1 V/octava.
(10) GATE O UT - salida de pu erta.
(11) PHONES - conecte su s auriculares a es ta salida TRS de
3,5 mm. Aseg úrese de que el volume n esté al mínimo
antes de col ocarse los auri culares.
Sección de distorsión
Estos co ntroles solo tie nen un efecto c uando el interrup tor
DISTORTIO N (20) esté en ON. Este cir cuito está colo cado en la ruta
de señal jus to antes del contr ol de volumen y de la sali da audio nal.
(12 ) DRIVE - ajusta la can tidad de distorsi ón.
(13 ) TONE - ajusta e l tono.
(14) LEVEL - ajusta e l nivel de salida de la di storsión.
Controles generales
(15) TEMPO - esto ajus ta la velocidad a la que s e reproducirá el
patrón y las pistas, desde lento a rápido.
(16) WAVEFOR M - este mando elige l a forma de onda del
oscilador VCO interno entre diente de sierra inverso
o pulso.
(17) TRACK/PATTERN GROUP - elija entr e TRACK 1 y 7 a la hora
de regis trar o reproduci r pistas y PATTERN GROUP I, II, III, IV
a la hora de re gistrar o repro ducir patrones . Los patrones
del grupo I s olo pueden ser us ados en las pistas 1 ó 2 , los
del grupo I I en las pistas 3 ó 4, los pat rones del grupo I II en
las pista s 5 ó 6 y los del grupo IV en la pi sta 7.
(18) MODE - elija entre Trac k Write, Track Play, Pattern Play,
Patter n Write.
(19 ) PILOTO POWER - indica q ue la unidad está con ectada a
la corrie nte y que el interrupt or de encendido del pa nel
traser o está activad o.
(20) DISTORTION ON/OFF - cuando es te interruptor e stá en
OFF la disto rsión está anula da o en bypass y los contr oles
DRIVE, TONE y LE VEL no tienen efec to.
(21 ) VOLUME - este man do ajusta el nivel de s alida de la
salida del p anel trasero y de la s alida de auricular es.
Asegúr ese de que este mand o de volumen esté al mí nimo
antes de col ocarse los auri culares en los oído s.
Sección de secuenciador
(22 ) D.C./BAR RESET/CLEAR - es te interruptor se u sa para
borrar u n patrón de la memori a, para hacer que una pis ta
vuelva al p rincipio y para se ñalizar que el últim o patrón
sea añadid o a una pista.
(23 ) PITCH MODE - esto ac tiva o desact iva el modo de tono.
El piloto se i luminará cuando es te modo de tono
esté ac tivo. Este modo se u sa para la introdu cción de notas
a la hora de cr ear patrones.
(24) TECLADO DE 13 NOTAS - estos inte rruptores es tán
colocad os como un teclado de 13 not as, lo que permite
elegir no tas a la hora de crear pa trones. Los ocho
interru ptores de abajo se us an también durant e
la creació n, almacenamiento y se lección de patron es
y pistas.
(25) PILOTO TIME MODE - este pilo to se iluminará cuan do
TIME MODE es té activo.
(26) TIME MODE ON/OFF - le permi te elegir si TIME MODE e stá
activo o n o. Este modo se usa d urante la introducc ión de la
tempori zación (nota, ligadu ra o silencio) una vez que las
notas han si do introducidas e n el modo PITCH MODE.
(27 ) BACK - cuando se vaya d esplazando por e l patrón, esto
le permit irá elegir la últim a nota reproduci da para que
pueda edi tarla. Este inte rruptor y WRITE/ NEXT(35) se usan
para visualizar y cambiar los ajustes SYNC y CLOCK.
(28) START / STOP - esto le perm ite poner en marcha o de tener
la reprod ucción de los patro nes y pistas. El pilo to se
iluminará c uando la reproduc ción esté en marcha .
(29 ) FUNCTION - este interr uptor multiuso s se utiliza para
hacer que el TD -3 vuelva al modo nor mal desde los modos
PITCH MODE y TIME MO DE, y para divers as funciones
durante la grabación de patrones y ritmos.
(30) PILOTO NORMAL MODE - este piloto se ilumi nará cuando
la unidad es té en el modo normal.
(31 ) TRANSPOSE DOWN/NOTE/S TEP - esto transpone la
octava h acia abajo en el modo PI TCH MODE, introduce
una nota en el m odo TIME MODE e intro duce el número de
pasos en un patrón.
(32 ) TRANSPOSE UP/TIE/TRIPLET - es to transpone la oc tava
hacia arr iba en el modo PITCH MODE, i ntroduce una
ligadura e n el modo TIME MODE y ajus ta el patrón al modo
de tresill o.
(33 ) ACCENT / PATTERN A - esto añad e un acento a las notas
en el modo PITCH M ODE y elige patrone s “A” como pueden
ser 1A, 2A hast a 8A.
(34) SLIDE / PATTERN B - esto añade un d eslizamiento o SLID E
a las notas en e l modo PITCH MODE y elige lo s patrones “B”
como pued en ser 1B, 2B hasta 8B.
(35) D.S./WRITE/NE XT/TAP - esto registr a un patrón en
una pista , elige la siguiente not a de un patrón y añade
temporización manual al hacer una pulsación rítmica
y repetid a. Este interrup tor y BACK(27) se usan para
visualizar y cambiar los ajustes SYNC y CLOCK.
Panel trasero
(36) OUTPUT - conecte est a salida en clavija TS d e 6,3 mm a
la entrada a udio de nivel de línea de s u sistema audio.
Asegúr ese de que el contro l del volumen esté al mí nimo
y que su siste ma audio esté apaga do antes de realizar
ninguna conexión.
(37 ) MIDI OUT/THRU - esta toma D IN de 5 puntas se usa pa ra
dar salida a l os datos MIDI OUT y pasa r sin modicación l os
datos MIDI re cibidos a través de l a entrada MIDI INPUT.
(38) MIDI IN - esta toma D IN de 5 puntas recib e los datos MIDI
emitido s desde una fuente e xterior. Esta f uente externa
suele ser un t eclado o secuenc iador externo M IDI, un
ordenado r equipado con un int erface MIDI, etc.
(39 ) PUERTO USB - esta toma USB tip o B permite la conex ión a
un ordenad or. El TD-3 aparecerá como u n dispositivo USB
MIDI class- compliant, con ca pacidad de admiti r entrada
y salida MIDI .
USB MIDI IN - acepta l os datos MIDI entrant es recibidos
desde una aplicación.
USB MIDI OUT - da salida a datos MIDI a una aplicación.
(40) POWER - este interr uptor le permite e ncender y apagar
el sintetizador. Asegúrese de que todas las conexiones
estén he chas antes de encende r la unidad.
(41) DC INPUT - conecte aq uí el adaptador de cor riente de
9V DC inclui do. Puede conect ar el otro extre mo de este
adaptado r a cualquier salida d e corriente alter na con
salida de en tre 100 y 240 V a 50/60 Hz. Use única mente el
adaptador de corriente incluido.
Page 13

24 25Quick Start GuideTD-3
TD-3 Réglages
(FR) Étape 2 : Réglages
Section du Synthésiseur
(1) TUNE - permet d e régler la fréque nce du VCO interne
jusqu’à ap proximativemen t une octave plus hau te ou plus
basse à par tir de la positio n centrale.
(2 ) CUTOFF - permet de ré gler la fréquenc e de coupure du
ltre pas se-bas. Les fr équences supér ieures à la fréque nce
de coupure sont atténuées.
(3 ) RESONANCE - réglag e de l’amplication d u signal à la
fréquence de coupure.
(4 ) ENVELOPE - per met de régler l’im portance de la
modulati on appliquée à la fr équence de coupure d u ltre
par le génér ateur d’enveloppe.
(5 ) DEC AY - réglage du temps n écessaire pour q ue le niveau
du signal atteigne le minimum.
(6 ) ACCENT - réglage de l ’importance de l ’accentuat ion pour
toutes le s notes programmé es avec une accentuat ion.
Panneau de connexions (entrées et sorties
minijack mono)
(7 ) FILTER IN - permet de c onnecter une so urce externe à la
place de l’osci llateur interne.
(8 ) SYNC IN - pe rmet d’utiliser un e horloge et un génér ateur
de signal start/stop externes.
(9 ) CV OUT - so rtie de la tension de c ontrôle d’1 V/octave.
(10) GATE O UT - sortie g ate.
(11) PHONES - connecte z votre casque à cet te sortie
minijack s téréo. Assurez- vous que le volume est a u
minimum ava nt de placer le casque s ur vos oreilles.
Section Distortion
Ces réglag es n’ont d’eet que si l’inter rupteur DISTORTI ON (20) est
en positi on ON. Le circuit se si tue dans le chemin du si gnal juste
avant le rég lage de volume et la sor tie audio nale.
(12 ) DRIVE - réglage de la qua ntité de distors ion.
(13 ) 1TONE - réglage de la tonali té.
(14) LEVEL - réglage d u niveau de la distors ion.
Réglages généraux
(15) TEMPO - permet d e régler la vitesse d e lecture des
patter n (tournez vers la gauc he pour ralentir, ver s la droite
pour accélérer).
(16) WAVEFOR M - sélection d e la forme d’onde de
l’oscillateu r interne : dent de sci e inversée ou puls ation.
(17) TRACK/PATTERN GROUP - choisis sez l’un des 7 TRACKS
(morceaux) lorsque vous enregistrez ou jouez un morceau,
et l’un des gro upes de PATTERNS I, II, III ou IV lor sque vous
enregis trez ou jouez un pa ttern. Les pat terns du groupe I
sont dispo nibles uniqueme nt pour les pistes 1 o u 2, ceux
du groupe II p our les pistes 3 ou 4, ce ux du groupe III pour
les piste s 5 ou 6 et le groupe IV pou r la piste 7.
(18) MODE - sélectio nnez l’un des 4 modes: Track Wr ite, Track
Play, Pattern P lay ou Pattern Write.
(19 ) LED DE MISE SOUS TENSION - s ’allume lor sque l’appareil
est sous t ension.
(20) DISTORTION ON/OFF - en positi on OFF, l a distorsion es t
désac tivée et les régla ges DRIVE, TONE et LEV EL n’ont
aucun eet.
(21 ) VOLUME - perme t de régler le niveau de la s ortie située
sur la face ar rière et de la sor tie casque. Assu rezvous que
le volume es t au minimum avant de pla cer le casque sur
vos oreilles.
Section Séquenceur
(22 ) D.C./BAR RESET/CLEAR - per met d’eacer un pat tern
de la mémoir e de l’appareil, de reveni r au début d’un
morceau et d e signaler que le dern ier pattern est a jouté à
un morceau.
(23 ) PITCH MODE - permet d ’activer/désacti ver la fonction
PITCH MODE. La L ED adjacente s’allume lor sque cette
fonct ion est activé e. Ce mode est utilis é pour entrer les
notes lor s de la création d’un pat tern.
(24) CLAVIER 13 TOUCHES - ces boutons s ont disposés comm e
un clavier à 13 touc hes pour entrer de s notes lors de la
créatio n de patterns. Les 8 t ouches du bas per mettent
égalemen t de créer, sauvegard er et sélection ner les
patter ns et les morceaux.
(25) LED TIME MODE - cette LED s ’allume lor sque la fonctio n
TIME MODE es t activée.
(26) INTERRUPTEUR TIME MODE ON/OFF - permet
d’activer/dés activer la fonc tion TIME MODE. Cet te fonction
permet d e régler le ryt hme (note, maintien ou sile nce) une
fois les no tes entrées en mod e PITCH.
(27 ) BACK - lorsque vou s faites déler le s notes d’un patter n,
cette fonction permet de sélectionner la dernière note
jouée an d e l’éditer. Ce bou ton, ainsi que le bouto n
WRITE/N EXT (35) sont utilisé s pour sélect ionner et
modier l es réglages SYNC e t CLOCK.
(28) START / STOP - ce bouton per met de lancer/arrêter la
lectu re des patterns e t des morceaux. La L ED s’allume lors
de la lect ure.
(29 ) FUNCTION - ce bouton mult ifonction ut ilisé pour
quitte r les modes PITCH et TIME e t retourner en mod e de
fonct ionnement normal, e t pour d’autres opér ations les de
l’édition de s patterns et de s morceaux.
(30) LED NORMAL MODE - cette LED s’allume lo rsque
l’appareil fonctionne en mode normal.
(31 ) TRANSPOSE DOWN/NOTE/S TEP - permet de transp oser
d’une oct ave plus grave en mode PITCH, d ’entrer un e note
en mode TIME e t d’entrer le nombre de p as d’un pattern.
(32 ) TRANSPOSE UP/TIE/TRIPLET - per met de transpose r
d’une oct ave plus aigue en mode PITC H, de main-tenir une
note en mode T IME et d’écrire des tr iplets dans un pat tern.
(33 ) ACCENT / PATTERN A - permet d ’ajouter un e accentuation
aux notes en m ode PITCH et de sélec tionner la banque d e
patter ns « A », de 1A à 8A.
(34) SLIDE / PATTERN B - permet d’ajo uter un eet de
glisseme nt aux notes en mode PITCH e t de sélection ner la
banque de p atterns « B », de 1B à 8B.
(35) D.S./WRITE/NE XT/TAP - permet d’enregis trer un patter n
dans un morce au, de sélectio nner la note suivante d ’un
patter n et de modier le tem po manuellement en le
tapant. Ce b outon, ainsi que le bo uton BACK (27) sont
utilisé s pour sélecti onner et modier le s réglages SYNC
et CLOCK.
Face arrière
(36) OUTPUT - connectez ce tte sortie Jac k 6,35 mm à une
entrée ni veau de ligne de votre s ystème. Assurez vous
que le volume e st au minimum avant d ’eect uer
toute connexion.
(37 ) MIDI OUT/THRU - ce conn ecteur DIN à 5 broc hes est
utilisé co mme sortie MIDI e t pour transmet tre les données
MIDI reçu es à l’entrée MIDI IN.
(38) MIDI IN - ce connect eur DIN à 5 broches per met
de recevoi r des données MIDI tr ansmises par une
source ex terne. Il s’agit génér alement d’un clavier M IDI,
d’un séquenceur externe, d’un ordinateur équipé d’une
interf ace MIDI, etc.
(39 ) PORT USB - ce por t USB type B permet l a connexion à un
ordinate ur. Le TD-3 appar ait comme un appare il MIDI USB
reconnu na tivement et capab le de supporter d es entrées
et des sor ties MIDI.
ENTRÉE MIDI USB - permet de r ecevoir des donnée s MIDI
depuis une application.
SORTIE MIDI USB - p ermet d’envoyer des donn ées MIDI à
une application.
(40) POWER - permet de me ttre l’appareil s ous/hors tensio n.
Assure zvous que toutes le s connexions ont b ien été
eec tuées avant de met tre l’appareil sous t ension.
(41) DC INPUT - connecte z l’adaptateur sec teur 9V fourni
à cette em base. L’adaptateur p eut être branché à u ne
prise de co urant alternativ e pouvant fourni r une tension
de 100 V à 240 V à 50 Hz/60 H z. Utilisez uniqu ement
l’adaptateur secteur fourni.
Page 14

26 27Quick Start GuideTD -3
TD-3 Bedienelemente
(DE) Schritt 2: Bedienelemente
Synthesizer-Sektion
(1) TUNE - regelt di e Frequenz des inter nen VCO.
Ausgehend von der Mittestellung beträgt der
Regelbe reich ca. eine Ok tave auf beiden Seit en.
(2 ) CUTOFF - regelt die Cu to-Frequenz de s Tiefpass-VCF.
Frequenzen über der Cuto-Frequenz werden bedämpft.
(3 ) RESONANCE - regelt, wie stark der Signalpegel im Bereich
der Cuto-Frequenz angehoben wird.
(4 ) ENVELOPE - regelt, wie stark der Hüllkurvengenerator die
VCF Cuto-Frequenz moduliert.
(5 ) DEC AY - regelt die Zeit spanne, in der die Hüllk urve von
ihrem aktuellen Pegel bis auf das Minimum abfällt.
(6 ) ACCENT - regelt die St ärke des Akzents , der auf die
Ausgabe von Noten mit programmiertem Akzent
angewandt wird.
Patchbay (3,5 mm TS-Eingänge
und Ausgänge)
(7 ) FILTER IN - Zum Anschließen eines externen Audiosignals
anstelle des internen VCO.
(8 ) SYNC IN - Zum E inspeisen eines e xternen Clock- un d
Start/Stop-Signals.
(9 ) CV OUT - Steu erspannungs-Aus gang von 1V/Oktave.
(10) GATE OUT - Gate-Ausgang.
(11) PHONES - An diesen 3,5 mm TR S-Ausgang schli eßen
Sie Ihre Kopf hörer an. Drehen S ie die Lautstä rke zurück,
bevor Sie die Kopfhörer aufsetzen.
Distortion-Sektion
Diese Regler sind nur bei aktiviertem DISTORTION-Schalter
(20) wirks am. Die Schaltung li egt im Signalweg dir ekt vor dem
Lautstärkeregler und dem Audioausgang.
(12 ) DRIVE - regelt die Stärke der Verzerrung.
(13 ) TONE - regelt d ie Klangfarbe.
(14) LEVEL - regelt den Distortion-Ausgangspegel.
Hauptregler
(15) TEMPO - regelt die Wiedergabegeschwindigkeit der
Patter ns und Tracks, von langs am bis schnell.
(16) WAVEFOR M - wählt die Wellenform des internen VCO,
entweder Sägezahn invers oder Puls.
(17) TRACK/PATTERN GROUP - wählt TR ACK 1 bis 7, we nn Sie
Tracks sch reiben oder abspi elen, und PATTERN GROUP I,
II, III, IV, wenn Sie Patt erns schreiben o der abspielen. Die
Patter ns in Gruppe I sind nur f ür Track 1 oder 2 nutzb ar –
entspre chend ist Grupp e II für Tracks 3 oder 4, Gr uppe III
für Tracks 5 o der 6 und Gruppe IV f ür Track 7 nutzbar.
(18) MODE - wählt unter den Be triebsart en Track Write,
Track Play, Patter n Play, Pattern Write.
(19 ) NETZANZEIGE-LED - zeigt an, da ss der rückseit ige
Power-Schalter ak tiviert is t und das Gerät mit Spa nnung
versorgt wird.
(20) DISTORTION ON/OFF - In der OFF-Stellu ng wird Distort ion
umgangen und die DRIVE-, TONE- und LEVEL-Regler sind
wirkungslos.
(21 ) VOLUME - regelt d en Pegel des rück seitigen Ausgang s
und Kopfhörerausgangs. Drehen Sie die Lautstärke zurück,
bevor Sie Kopfhörer aufsetzen.
Sequencer-Sektion
(22 ) D.C./BAR RESET/CLEAR - lös cht ein Pattern aus d em
Speicher, set zt einen Track an den An fang zurück
und signali siert, dass das le tzte Patter n dem Track
hinzugefügt wird.
(23 ) PITCH MODE - schalte t den Pitch-Modus e in und aus.
Im Pitch-M odus leuchtet die L ED. In diesem Modus gibt
man beim Erstellen von Patterns die Noten ein.
(24) 13-NOT EN TAS TATUR - Diese Tast en sind wie eine
Pianotastatur mit 13 Noten angeordnet, damit man
beim Erstellen von Patterns die Noten entsprechend
wählen kan n. Mit den unteren acht Tas ten kann man auch
Patterns und Tracks erstellen, speichern und wählen.
(25) TIME MODE LED - leuchtet i m TIME-MODUS.
(26) TIME MODE ON/OFF - schal tet den TIME-MODUS ein
oder aus. In diesem Modus gibt man die Zeitwerte der
Noten, Haltebögen und Pausen ein, nachdem die Noten im
PITCH-MODUS eingegeben wurden.
(27 ) BACK - Wenn man ein Patte rn schritt weise durchgeht,
kann man mit d ieser Taste die letz te gespielte Note
wählen und editieren. Mit dieser und der WRITE/
NEXT-Taste (35) kann man au ßerdem SYNC- und
CLOCK-Einstellungen anzeigen und ändern.
(28) START / STOP - startet u nd stoppt die Wied ergabe von
Patter ns und Tracks. Bei der Wi edergabe leucht et die LED.
(29 ) FUNCTION - Mit dieser Me hrzweck-Taste setz t man den
TD-3 aus dem PITCH - und TIME-MODUS in den no rmalen
Modus zur ück und starte t verschieden e Verfah ren beim
Schreib en von Patterns und Trac ks.
(30) NORMAL MODE LED - leuchtet im Normal-Modus
des T D-3.
(31 ) TRANSPOSE DOWN/NOTE/S TEP - Im PITCH-MODUS
kann man eine O ktave nach unten t ransponieren,
im TIME-MODUS eine Note eingeben sowie die Anzahl
von Steps in einem Pattern eingeben.
(32 ) TRANSPOSE UP/TIE/TRIPLET - Im PITCH -MODUS kann
man eine Ok tave nach oben tran sponieren, im TIMEMODUS einen Haltebogen eingeben sowie ein Pattern in
den Triolen-Modus schalten.
(33 ) ACCENT / PATTERN A - Im PITCH-Mo dus kann man Noten
einen Ak zent hinzufügen s owie “A” Patterns wie 1A,
2A bis 8A wähl en.
(34) SLIDE / PATTERN B - Im PITCH-Modu s kann man Noten
einen SLIDE (gleitende Tonhöhe) hinzufügen sowie “B”
Patter ns wie 1B, 2B bis 8B wählen.
(35) D.S./WRITE/NE XT/TAP - schreibt ein Pat tern in den
Track, wählt d ie nächste Note eine s Patterns und
ermöglicht manuelles Timing durch Tapping. Mit dieser
und der BACK-Taste (27) kann man a ußerdem SYNC- und
CLOCK-Einstellungen anzeigen und ändern.
Rückseite
(36) OUTPUT - Verbinden Sie dies en 6,3 mm TS-Ausgang
mit dem Line-Pegel Audioeingang Ihres Systems.
Bevor Sie Anschlüsse herstellen, sollten Sie die
Lautstärke zurückdrehen und das System ausschalten.
(37 ) MIDI OUT/THRU - Über diese 5 -Pol DIN-Buchs e werden
MIDI OUT-Daten a usgegeben und die ü ber MIDI IN
empfangenen Daten weitergeleitet.
(38) MIDI IN - Über diese 5- Pol DIN-Buchse we rden die
MIDI-Daten einer externen Quelle empfangen. Dies ist
meistens e in MIDI Keyboard, ein e xterner Hardw are
Sequence r, ein mit MIDI In terface ausge rüsteter
Computer etc.
(39 ) USB PORT - Diese n USB Typ-B Por t verbindet man
meistens m it einem Computer. Der TD -3 wird als
standar dkonformes USB MIDI -Gerät angezei gt, das MIDI IN
und OUT unterstützt.
USB MIDI IN - akzeptiert die von einer Applikation
eingehenden MIDI-Daten.
USB MIDI OUT - sendet MIDI-Daten zu einer Applikation.
(40) POWER - schaltet de n Synthesizer ein od er aus. Stellen Sie
alle Ansch lüsse her, bevor Sie das Ger ät einschalten.
(41) DC INPUT - Hier schließen Sie den mitgelieferten 9V DC
Netza dapter an. Verbinden Si e den Netzadapte r mit
einer Net zsteckdose, di e eine Spannung von 100 V bi s
240 V bei 50 Hz/60 H z liefert. Verw enden Sie nur den
mitgelieferten Netzadapter.
Page 15

28 29Quick Start GuideTD-3
TD-3 Controles
(PT) Passo 2: Controles
Seção sintetizador
(1) TUNE - ajusta a f requência do osc ilador VCO interno,
aproxima damente uma oitava em c ada lado do cen-tro.
(2 ) CUTOFF - ajusta a fr equência de cor te do ltro VCF
passa- baixa. Frequênc ias acima do corte s erão atenuadas.
(3 ) RESONANCE - ajust a o valor de ênfase dad o ao nível do
sinal na fr equência de cort e.
(4 ) ENVELOPE - sel eciona a profund idade da modulaçã o
aplicada p elo gerador de envel ope à frequên- cia de corte.
(5 ) DEC AY - controla o valor d o tempo que leva para o
envelope da cair do nível atual ao mí nimo.
(6 ) ACCENT - ajusta o valo r do acento dado à saída p ara
qualquer n ota programada com a cento.
Patchbay (conexões de entradas e saídas
TS de 3.5 mm)
(7 ) FILTER IN - permite co nexão de um sinal de áud io externo
em vez do osc ilador VCO interno.
(8 ) SYNC IN - pe rmite o uso de um relóg io externo e sina l
start/stop.
(9 ) CV OUT - sa ída de tensão de contr ole da 1V/oitava.
(10) GATE O UT - saída do gate.
(11) PHONES - conecte s eus fones de ouvid o à essa saída TRS
de 3.5 mm. Cer tique-se de qu e o volume esteja abai xado
antes de col ocar os fones de ou vido.
Seção Distorção
Esses co ntroles somente t êm efeito quando o bo tão DISTORTION
(20) estiver li gado, em ON. O circuito é l ocalizado no cam inho de
sinal logo an tes do controle de vo lume e saída de áudio n al.
(12 ) DRIVE - ajusta o valor d a distorção.
(13 ) TONE - ajusta o t om.
(14) LEVEL - ajusta a di storção do nível d e saída.
Controles Gerais
(15) TEMPO - ajusta o ri tmo no qual um padrão e f aixa toca,
de vagaroso a rápido.
(16) WAVEFOR M - seleciona a for ma de onda do oscila dor
VCO interno de s erra de dente rever sa ou pul-so.
(17) TRACK/PATTERN GROUP - seleci ona dentre as
faixas TR ACK 1 a 7 durante a gravaç ão ou reprodução,
e PATTERN GROUP I, II, III, IV du rante a gravação ou
padrõe s de reprodução. Pad rões em grupo I som en-te
estão di sponíveis ao uso na fa ixa 1 ou 2, padrões em
grupo II pa ra as faixas de 3 ou 4, gru po III para faixas 5
ou 6, e grupo IV p ara a faixa 7.
(18) MODE - seleciona de ntre Track Write, Track Play,
Patter n Play, Pattern Write.
(19 ) POWER LED - indica qu e a alimentação es tá ativa na
unidade e o bo tão power do painel t raseiro está lig ado.
(20) DISTORTION ON/OFF - quando em OFF, a distor ção
é ignorada e o s controles DRIVE , TONE e LEVEL não
têm efeit o.
(21 ) VOLUME - ajusta o n ível de saída da saíd a do painel
traseiro e saída dos fones de ouvido. Certique-se de
que o volume e steja abaixado ant es de colocar os fon es
de ouvido.
Seção Sequenciador
(22 ) D.C./BAR RESET/CLEAR - é usa do para limpar um pad rão
da memória , para colocar a fai xa no início e sinaliz ar que o
último pa drão está sendo a dicionado à faixa .
(23 ) PITCH MODE - seleci ona o modo do tom, ligand o ou
desligan do o mesmo. O LED acenderá q uando estiver no
modo pitc h. Este modo é usad o para inserir not as durante
a criaçã o de padrões.
(24) 13-NOTE KEY BOARD - esses botões e stão disposto s
como um tec lado de 13 notas, permit indo que as notas
sejam sele cionadas durante a c riação de padrõ es. Os oito
botões ma is baixos também sã o usados durante a cr iação,
ao salvar e s elecionar padrõ es e faixas.
(25) TIME MODE LED - O LED acende qua ndo está no modo
TIME MODE.
(26) TIME MODE ON/OFF - selec iona o modo TIME MODE,
ligando ou d esligando o mesmo. E ste modo é usado
quando se in sere o tempo (nota, ligad ura, ou pausa)
depois das notas terem sido inseridas no modo
PITCH MODE.
(27 ) BACK - o acesso de um pa drão permite a sel eção da última
nota toc ada para que ela poss a ser edi-tada. Es se botão e o
WRITE/N EXT(35) são usados par a a visualização e m udança
das congurações SYNC e CLOCK.
(28) START / STOP - permite que s e inicie ou interro mpa a
reprodu ção de padrões e fa ixas. O LED acend-e rá quando
estiver t ocando.
(29 ) FUNCTION - este botão d e propósitos múlt iplos é usado
para reto rnar o TD-3 do modo PITCH MOD E e TIME MODE ao
modo norm al, e para várias oper ações durante a grav ação
de padrão e f aixas.
(30) NORMAL MODE LED - esse LED acender á quando a
unidade es tiver no modo norm al.
(31 ) TRANSPOSE DOWN/NOTE/S TEP - transpõem a oitava
para baix o no modo PITCH MODE, insir a uma nota no modo
TIME MODE e ins ira o número dos pass os no padrão.
(32 ) TRANSPOSE UP/TIE/TRIPLET - tra nspõem a oitava par a
cima baixo n o modo PITCH MODE, insir a um ligadura no
modo TIME MODE, e congure o padrão em modo triplet.
(33 ) ACCENT / PATTERN A - acresce nte um acento às notas
no modo PITCH MO DE, e selecione pad rões “A” como 1A,
2A, até 8A.
(34) SLIDE / PATTERN B - acrescent e SLIDE às notas no modo
PITCH MODE, e par a selecionar pad rões “B”, tais como 1B,
2B, até 8B.
(35) D.S./WRITE/NE XT/TAP - grave um padrão em uma f aixa,
selecio ne a próxima nota em um p adrão e acrescen te o
tempo manua lmente ao bater leveme nte. Esse botão
e o BACK(27) são usad os para vi-sualiz ar e modicar as
congurações SYNC e CLOCK.
Painel Traseiro
(36) OUTPUT - conecte ess a saída TS de ¼” à entrada de á udio
do nível de lin ha do seus sistema. Cer tique-se d e que o
volume es teja abaixado e que o sis tema esteja desli gado
antes de fa zer conexões.
(37 ) MIDI OUT/THRU - este jack de 5 p inos é usado como sa ída
de dados MIDI O UT e passagem de dad os MIDI recebidos
pela entr ada MIDI INPUT.
(38) MIDI IN - este jack de 5 pi nos recebe dados MID I de uma
fonte ex terna. Isso pode s er geralmente um tec lado MIDI,
um sequen ciador de hardwar e externo, um compu tador
equipad o com interface MID I, etc.
(39 ) USB PORT - este ja ck USB tipo B permite co nexão a um
computa dor. O TD-3 aparecerá como u m dis-positivo MID I
compatív el com a classe USB, capa z de suportar ent rada
e saída MIDI.
USB MIDI IN - aceita d ados MIDI provenien tes de
um aplicativo.
USB MIDI OUT - envia d ados MIDI a um aplicati vo.
(40) POWER - liga e desliga o si ntentizador. Cert ique-se de
que todas as c onexões tenham sid o feitas antes de liga r
a unidade.
(41) DC INPUT - conecte o ad aptador DC de 9V for necido aqui.
O adaptado r pode ser ligado a uma t o-mada AC capaz de
fornec er de 100V a 240V em 50 Hz/60 Hz. Use ap enas o
adaptador fornecido.
Page 16

30 31Quick Start GuideTD -3
TD-3 Controlli
(IT) Controlli
Sezione Synthesizer
(1) TUNE - regola la f requenza dell ’o scillatore VCO inter no,
no a circa u n’ottava s otto o sopra da quel la centrale.
(2 ) CUTOFF - regola la fr equenza di cuto d el low-pass del
ltro VCF. Le frequ enze superiori a qu ella di cuto sarann o
attenuate.
(3 ) RESONANCE - regola l a quantità di enfas i data al livello
del segna le alla frequenz a di taglio.
(4 ) ENVELOPE - sceglie la profondità della modulazione
applicat a dall’envelope genera tor alla frequenz a di cuto
de l V CF.
(5 ) DEC AY - controlla la quant ità di tempo impie gato
dall’inviluppo per decadere dall’attuale valore al minimo.
(6 ) ACCENT - regola la quan tità di accento data i n uscita per
qualsiasi no ta con un accento.
Patch bay (connessioni di ingresso e uscita
con mini-jack sbilanciati da 3,5 mm)
(7 ) FILTER IN - consente la co nnessione di un se gnale audio
esterno invece dell’oscillatore VCO interno.
(8 ) SYNC IN - con sente l’uso di un cloc k esterno e segnal e di
start/stop.
(9 ) CV OUT - con trolla il voltaggi o in uscita di 1V/ottava.
(10) GATE OUT - uscita gate.
(11) PHONES - collegate la vo stra cua a ques to mini-jack
stereo da 3,5m m. Prima di metter e la cua assicurate vi
che il volum e sia abbassato.
Sezione Distortion
Questi c ontrolli sono at tivi solo quan do l’interrut tore DISTORTIO N (20)
è su ON. Il circ uito è posto nel pe rcorso del seg nale immediatam ente
prima del co ntrollo di volum e e dell’uscita audi o nale.
(12 ) DRIVE - regola la quant ità di distorsi one.
(13 ) TONE - regola il t ono.
(14) LEVEL - regola il li vello di uscita del la distorsione.
Controlli generali
(15) TEMPO - regola la vel ocità di riprod uzione del patt ern e
delle trac k, da lenta a rapida.
(16) WAVEFOR M - sceglie la form a d’onda dell ’oscillato re VCO
interno fra dente di sega inversa o impulso.
(17) TRACK/PATTERN GROUP - selezi ona da TRACK 1 a 7
durante la s crittura o la ri produzione di tr ack, e di PATTERN
GROUP I, II, III, IV du rante la scritt ura o la riproduzi one di
patter n. I pattern nel gr uppo I sono dispon ibili solo per
track 1 o 2, i pa ttern nel grupp o II per track 3 o 4, il grup po
III per trac k 5 o 6 e il gruppo IV per tr ack 7.
(18) MODE - seleziona fr a Track Write (s crittura de lla track),
Track Play (ripro duzione della trac k), Pattern Play
(riproduz ione del patter n) e Patter n Write (scrittu ra
del pattern).
(19 ) POWER LED - indica ch e l’alimentazione è f ornita all’unità
e l’interruttore di alimentazione sul pannello posteriore
è acceso.
(20) DISTORTION ON/OFF - quando è OFF la d istorsione
è esclus a e i controlli DRIVE, TON E e LEVEL non
hanno ee tto.
(21 ) VOLUME - regola i l livello per l’uscit a del pannello
poster iore e per l’uscita c ua. Prima di mett ere la cua,
assicur atevi che il volume sia a bbassato.
Sezione Sequencer
(22 ) D.C./BAR RESET/CLEAR - ser ve per cancellare u n pattern
dalla memor ia, per tornare all’ inizio di una track e p er
segnalar e che l’ultimo patt ern è stato aggiunt o alla track.
(23 ) PITCH MODE - selezio na il modo PITCH on o o. Il led si
accender à in MODO PITCH. Usate ques to modo per inseri re
le note dura nte la creazione di pa ttern.
(24) 13-NOTE KEYBOARD - questi in terruttori s ono disposti
come una tas tiera di 13 note, che cons ente di selezionar e
le note dura nte la creazione di pa ttern. Gli ott o interruttor i
inferio ri sono utilizz ati anche durante la c reazione,
il salvat aggio e la selezion e di pattern e trac k.
(25) TIME MODE LED - il led si illum ina quando si è in
TIME MODE.
(26) TIME MODE ON/OFF - selezi ona TIME MODE on o o.
Questo m odo è utilizzato q uando si inserisco no i tempi
(nota, legat ura o pausa) dopo che le n ote sono state
inserite in PITCH MODE.
(27 ) BACK - passa in un pa ttern consente d i selezionare
l’ultima not a suonata, in modo da p oterla che modic are.
Questo in terruttore e WR ITE/NEXT (35) son o usati per
visualiz zare e modicar e le impostazio ni SYNC e CLOCK.
(28) START / STOP - vi consente di r iprodurre o fer mare
patter n e track. Il led è acce so durante la ripro duzione.
(29 ) FUNCTION - questo interruttore multi-funzione serve
per far tor nare il TD-3 al modo nor male quando è in PITCH
MODE e TIME MOD E, e per diverse ope razioni durante la
scrittura di pattern e track.
(30) NORMAL MODE LED - questo LED si illum ina quando
l’unità è nel m odo normale.
(31 ) TRANSPOSE DOWN/NOTE/S TEP - in PITCH MODE
traspone un’ottava sotto, inserisce una nota in TIME MODE
e inseris ce il numero di step in u n pattern.
(32 ) TRANSPOSE UP/TIE/TRIPLET - in PITCH MO DE traspone
un’ottava so pra, inserisce una l egatura in TIME MODE e
imposta il pattern nel modo terzina.
(33 ) ACCENT / PATTERN A - in PITCH MODE agg iunge un
accento alle n otes, e seleziona i p attern “A”, q uali 1A, 2A,
no a 8A.
(34) SLIDE / PATTERN B - in PITCH MODE aggi unge un SLIDE
(glissato) alle n ote, e seleziona i pat tern “B”, quali 1B, 2B,
no a 8B.
(35) D.S./WRITE/NE XT/TAP - Scrivere un pat tern su una tracK ,
selezionare la nota successiva in un pattern e aggiunge un
ritmo ba ttendo il tempo con u n dito. Questo inter ruttore
e BACK (27) sono usa ti per visualizz are e modicare le
impostazioni SYNC e CLOCK.
Panello posteriore
(36) OUTPUT - collegate questo jack sbilanciato da 6,35mm
all’ingr esso audio di livell o linea del vostro im pianto.
Prima di e ettuare le conne ssioni, assicur atevi che il
volume sia abbassato e l’impianto spento.
(37 ) MIDI OUT/THRU - questa pr esa DIN 5 poli ser ve per
inviare i dat i MIDI OUT, e passare i dati MIDI r icevuti dal
MIDI INPUT.
(38) MIDI IN - questa p resa DIN 5 poli riceve i d ati da una
sorgente e sterna. Che spes so è una tastiera M IDI,
un sequen cer hardware este rno, a computer dotat o di
interfaccia MIDI, ecc .
(39 ) USB PORT - ques ta presa USB di tipo B co nsente il
collegam ento a un computer. Il TD-3 app arirà come un
disposit ivo MIDI USB conforme a lla classe, in grado di
suppor tare il MIDI IN e OUT.
USB MIDI IN - accet ta dati MIDI in ingre sso da
un’applicazione.
USB MIDI OUT - invia d ati MIDI a un’applicazio ne.
(40) POWER - accende/speg ne il synth. Assic uratevi di aver
eet tuato tutte le conn essioni prima di acc endere l’unità.
(41) DC INPUT - collegate q ui l’adattatore di al imentazione
9V c.c. for nito. L’alimentator e può essere inser ito in una
presa c.c . in grado di fornir e da 100V a 240V a 50Hz/60Hz.
Utilizzare solo l’alimentatore in dotazione.
Page 17

32 33Quick Start GuideTD -3
TD-3 Bediening
(NL) Stap 2: Bediening
Synthesizer-sectie
(1) TUNE - pas de fre quentie van de inter ne VCO-oscillato r
aan, ongeve er een octaaf aan we erszijden van h et midden.
(2 ) CUTOFF- pas de afsn ijfrequentie v an het laagdoorlaa t
VCF-lter aan . Frequenties bove n de cuto worden
verzwakt, zoals de hogere orde harmonischen.
(3 ) RESONANCE - pas de ho eveelheid nadruk aa n die aan het
signaalniveau wordt gegeven bij de afsnijfrequentie.
(4 ) ENVELOPE - selecteer de modulatiediepte die door
de envelopgenerator wordt toegepast op de VCFafsnijfrequentie.
(5 ) DEC AY - controle over de ho eveelheid tijd die d e envelop
nodig hee ft om van het huid ige niveau naar het mini mum
te vervallen.
(6 ) ACCENT - pas de hoevee lheid accent aan die aan d e
uitvoe r wordt gegeven voor a lle noten die met een ac cent
zijn geprogrammeerd.
Patchbay (3,5 mm TS input en output
aansluitingen)
(7 ) FILTER IN - op deze ingang ka n een extern audi osignaal
worden aan gesloten in plaats v an de interne VCOoscillator.
(8 ) SYNC IN- d eze ingang maakt he t gebruik van een ex terne
klok en st art / stop-sig naal mogelijk.
(9 ) CV OUT - stuur spanningsuitgang van 1V / octaaf.
(10) GATE O UT - poortuitgang.
(11) PHONES- sluit uw ho ofdtelefoon aa n op deze 3,5 mm
TRS-ui tgang. Zorg ervoo r dat het volume laag st aat
voordat u ee n hoofdtelefo on opzet.
Vervormingssectie
Deze rege laars werken alleen a ls de DISTORTION-s chakelaar (20)
op ON staat . Het circuit bevi ndt zich in het signa alpad net voor de
volumeregeling en de uiteindelijke audio-uitvoer.
(12 ) DRIVE - pas de hoeveel heid vervormin g aan.
(13 ) 1TONE - pas de toon aan.
(14) LEVEL - past het vervormingsuitgangsniveau aan.
Algemene controles
(15) TEMPO - pas de snelheid a an waarmee het pat roon en de
tracks worden afgespeeld, van langzaam naar snel.
(16) WAVEFOR M - select the wav eform of the inter nal VCO
oscillat or from reverse s awtooth or pulse.
(17) TRACK/PATTERN GROUP - selec t from TRACK 1 to 7 wh en
writin g or playing track s, and PATTERN GROUP I, II, III, IV
when wri ting or playing pat terns. Patte rns in group I are on ly
available f or use in track 1 or 2, p atterns in gro up II for tracks
3 or 4, group III f or tracks 5 or 6, an d group IV for trac k 7.
(18) MODE - select fr om Track Writ e, Track Play, Patte rn Play,
Patter n Write.
(19 ) POWER LED - indicate s that power is suppli ed to the unit
and the rear- panel power switch i s on.
(20) DISTORTION ON/OFF - when OFF, the distor tion is
bypasse d, and the DRIVE, TONE, an d LEVEL controls have
no eect.
(21 ) VOLUME - adjust t he output level fr om the rear-panel
output an d the headphones ou tput. Make sure the vo lume
is turned down before putting on headphones.
Sequencer Section
(22 ) D.C./BAR RESET/CLEAR - this is used t o clear a pattern
from mem ory, to return a trac k to the beginning, a nd to
signal that t he last pattern i s being added to a trac k.
(23 ) PITCH MODE - selec ts the pitch mode o n or o. The LED
will light w hen in pitch mode. This m ode is used to enter
the notes when creating patterns.
(24) 13-NOTE KEYBOARD - these sw itches are laid out as a
13-note keybo ard, allowing notes to b e selected whe n
creatin g patterns. The lo wer eight switche s are also used
when creating, saving, and selecting patterns and tracks.
(25) TIME MODE LED - the LED will li ght when in TIME MODE.
(26) TIME MODE ON/OFF - selec t the TIME MODE on or o. Thi s
mode is use d when entering the t iming (note, tie, or rest)
after the notes have been entered in PITCH MODE.
(27 ) BACK - when steppi ng through a patt ern, this allows you
to selec t the last played note, s o it can be edited. T his
switch an d WRITE/NEXT (35) are u sed to view and chang e
SYNC and CLOCK settings.
(28) START / STOP - this allows you to s tart or stop pla ying the
patter ns and tracks. T he LED will turn on when p laying.
(29 ) FUNCTION - this multipu rpose switch is u sed to return
the TD-3 to nor mal mode from PITCH MOD E and TIME
MODE, and fo r various operat ions during patt ern and
track writing.
(30) NORMAL MODE LED - this LED will light wh en the unit is
in normal m ode.
(31 ) TRANSPOSE DOWN/NOTE/S TEP - this is used to
transpo se the octave down wards in PITCH MODE, enter a
note in TIME MO DE, and to enter the numb er of steps in
a patter n.
(32 ) TRANSPOSE UP/TIE/TRIPLET - this i s used to transpos e
the oct ave upwards in PITCH MODE, e nter a tie in TIME
MODE, and se t the pattern to tr iplet mode.
(33 ) ACCENT / PATTERN A - hierdoo r kan een accent worden
toegevo egd aan noten in PITCH MODE, e n kunnen “A”
-patron en zoals 1A, 2A tot 8A worden g eselecteer d.
(34) SLIDE / PATTERN B - dit maakt he t mogelijk een SLIDE to e
te voegen aa n noten in PITCH MODE, en om “B” - patronen
te selec teren, zoals 1B, 2B, tot 8B.
(35) D.S./WRITE/NE XT/TAP - hierdoor kan een p atroon naar
een trac k worden geschreve n, de volgende noot in e en
patroon selecteren en handmatige timing toevoegen
door op te ti kken. Deze schakelaa r en BACK (27) worden
gebruikt om de SYNC- en CLOCK-instellingen te bekijken
en te wijzigen.
Achter paneel
(36) OUTPUT - sluit deze 1/4 “TS-ui tgang aan op de audio-
ingang op lij nniveau van uw syst eem. Zorg ervoo r dat het
volume laag s taat en het syste em is uitgeschakel d voordat
u aansluitingen maakt.
(37 ) MIDI OUT/THRU - deze 5-pin s DIN-aansluiting w ordt
gebruik t om MIDI OUT-gegeven s uit te voeren en MIDIgegevens d ie via de MIDI INPUT worde n ontvangen, door
te geven.
USB MIDI IN - this 5- pin DIN jack receive s MIDI data
from an ex ternal source. Th is will commonly be a MID I
keyboard , an external hard ware sequencer, a compu ter
equippe d with a MIDI inter face, etc.
(38) USB PORT - this USB t ype B jack allows conn ection to a
computer. The T D-3 will show up as a class- compliant USB
MIDI device, c apable of suppor ting MIDI in and out .
(39 ) USB MIDI IN - accepts i ncoming MIDI data fr om
an application.
USB MIDI OUT - send s MIDI data to an applic ation.
(40) POWER - turn the sy nthesizer on or o. Make sur e all the
connec tions are made bef ore turning on the u nit.
(41) DC INPUT - connect t he supplied 9V DC power a dapter
here. The pow er adapter can be plug ged into an AC outlet
capable o f supplying fro m 100V to 240V at 50 Hz /60 Hz.
Use only the p ower adapter suppli ed.
Page 18

34 35Quick Start GuideTD-3
TD-3 Kontroller
(SE) Steg 2: Kontroller
Syntesavsnitt
(1) TUNE - justera f rekvensen f ör den interna VCO-o scillatorn,
ungef är en oktav på båda si dor om mitten.
(2 ) CUTOFF - justera gr änsfrekvens en för lågpass VCF- lter.
Frekven ser över gränsvärd et kommer att dämp as, till
exempel överordnade övertoner.
(3 ) RESONANCE - juster a mängden betonin g som ges till
signalnivån vid gränsfrekvensen.
(4 ) ENVELOPE - välj d et modulerings djup som tillämpas av
kuvertgeneratorn på VCF-gränsfrekvensen.
(5 ) DEC AY - kontrollera hur l ång tid det tar för k uvertet att
förfalla från nuvarand e nivå till minimum.
(6 ) ACCENT - justera män gden accent som ges ti ll utgången
för alla ton er som är programm erade med en accent.
Patchbay (3,5 mm TS ingångs- och
utgångsanslutningar)
(7 ) FILTER IN - denna ingång möjliggör anslutning av en
exter n ljudsignal istäl let för den intern a VCO-oscillator n.
(8 ) SYNC IN - denna ingång tillåter användning av en extern
klocka o ch start / stop p-signal.
(9) CV OUT - st yrspännings utgång på 1V / oktav.
(10) GATE O UT - grindutgång.
(11) PHONES- anslut din a hörlurar till denn a 3,5 mm TRS-
utgång. Se t ill att volymen sä nks innan du sät ter på dig
hörlurarna.
Distorsionsavsnitt
Dessa kon troller har bara e ekt när DISTORTIO N-omkopplaren (20)
är PÅ. Krets en är belägen i signalv ägen strax för e volymkontrolle n
och den slutliga ljudutgången.
(12 ) DRIVE - justera mängden förvrängning.
(13 ) TONE - justera tonen.
(14) LEVEL - justera distorsionsnivån.
Allmänna kontroller
(15) TEMPO - justera den t akt med vilken möns tret och spåren
spelas, f rån långsam till snab b.
(16) WAVEFOR M - välj vågforme n för den interna VCO -
oscillat orn från omvänd så gtand eller puls.
(17) TRACK/PATTERN GROUP - välj mellan S PÅR 1 till 7 när
du skrive r eller spelar spår, och MÖNS TERGRUPP I, II, III,
IV när du skri ver eller spelar möns ter. Mönster i grupp I är
endast ti llgängliga för anvä ndning i spår 1 eller 2, mö nster
i grupp II f ör spår 3 eller 4, grupp II I för spår 5 eller 6 och
grupp IV f ör spår 7.
(18) MODE - välj mellan Spåra s kriv, Spela spela, Möns ter
spela, Mönster skriva.
(19 ) POWER LED - indikera r att enheten matas t ill strömmen
och att s trömbryt aren på bakpanel en är på.
(20) DISTORTION ON/OFF - när OFF är för bikopplingen
förbiko pplad och kontrol lerna DRIVE, TONE och L EVEL har
ingen eekt.
(21 ) VOLUME- juste ra utnivån från u tgången på bakpan elen
och hörlu rarnas utgång. Se t ill att volymen sä nks innan du
sätter p å dig hörlurarna .
Sekvenserare
(22 ) D.C./BAR RESET/CLEAR - detta anv änds för att ren sa
ett mön ster från minnet , för att åters tälla ett spår till
början oc h för att signale ra att det sista m önstret läggs
till ett s pår.
(23 ) PITCH MODE - LÄGE - välje r tonhöjningsläge p å eller av.
LED-lam pan tänds när den är i tonh öjdsläge. Dett a läge
används för att skriva in anteckningarna när du skapar
mönster.
(24) 13-NOTE KEY BOARD - dessa omkoppl are är utformad e
som ett t angentbord med 13 note r, så att ant eckningar
kan väljas nä r du skapar mönster. De ne dre åtta
omkopplarna används också när du skapar, sparar och
väljer mönster och spår.
(25) TIME MODE LED - lysdioden tänds i TIDLÄGE.
(26) TIME MODE ON/OFF - välj TIME MO DE på eller av. Detta
läge använd s när du matar in tidpun kten (anteckning , slips
eller vila) ef ter att tonern a har matats in i PITCH MODE .
(27 ) BACK - när du går igenom e tt mönster låter d u dig välja
den senas t spelade noten så at t den kan redigera s. Denna
switch o ch WRITE / NEXT (35) använd s för att visa oc h
ändra SYNC- och CLOCK-inställningar.
(28) START / STOP - detta gör a tt du kan börja elle r sluta spela
mönster o ch spår. Lysdioden tänd s när du spelar.
(29 ) FUNCTION - den här multifunktionsomkopplaren används
för att å terställa TD-3 til l normalt läge frå n PITCH MODE
och TIME MOD E, och för olika op erationer under m önsteroch spårskrivning.
(30) NORMAL MODE LED - denna lysdiod t änds när enheten
är i normalt l äge.
(31 ) TRANSPOSE DOWN/NOTE/S TEP - detta används f ör
att tran sponera oktave n nedåt i PITCH MODE, ange en
anteckn ing i TIME MODE och för a tt ange antalet s teg i
ett mönster.
(32 ) TRANSPOSE UP/TIE/TRIPLET - det ta används för at t
transpo nera oktav uppåt i P ITCH MODE, ange en tie i TIME
MODE och s tälla in mönstret t ill triplett läge.
(33 ) ACCENT / PATTERN A - detta g ör att en accent kan lä ggas
till antec kningar i PITCH MODE och a tt välja “A” -mönster
som 1A, 2A, till 8 A.
(34) SLIDE / PATTERN B - detta gö r att en SLIDE kan lägga s
till antec kningar i PITCH MODE och a tt välja “B” -möns ter,
såsom 1B, 2B, till 8B .
(35) D.S./WRITE/NE XT/TAP - detta gör at t ett mönster kan
skrivas t ill ett spår, att välj a nästa anteckni ng i ett mönster
och att lä gga till manuell timi ng genom att knack a på.
Denna omkop plare och BACK (27) används f ör att visa och
ändra SYNC- och CLOCK-inställningar.
Bakre panel
(36) OUTPUT - anslut denna 1/4 “TS-u tgång till ljudingån gen
på ditt s ystem. Se till at t volymen är nere och a tt systemet
är avstängt innan du gör anslutningar.
(37 ) MIDI OUT/THRU - det här 5-s tifts DIN-u ttaget används
för att m ata ut MIDI OUT-data oc h passera MIDI- data som
tas emot vi d MIDI INPUT.
(38) MIDI IN - detta 5 -stifts DIN -uttag tar em ot MIDI-data frå n
en exter n källa. Detta är v anligtvis et t MIDI-tangentb ord,
en exter n hårdvarusek venserare, en dato r utrustad med
ett MIDI-gränssnitt etc.
(39 ) USB PORT - det här USB -uttaget t yp B möjliggör
anslutni ng till en dator. TD-3 kommer at t visas som en
klass-ko mpatibel USB MIDI- enhet, som kan stö dja MIDI
in och ut.
USB MIDI IN - accepterar inkommande MIDI-data från
en ansökan.
USB MIDI OUT - skickar MIDI-data till en applikation.
(40) POWER - slå på eller av sy nthesizern. Se t ill att alla
anslutningar är gjorda innan du slår på enheten.
(41) DC INPUT - anslut den m edföljande 9V lik strömsadap tern
här. Strömadaptern kan anslutas till ett nätuttag som kan
mata frå n 100V till 240V vi d 50 Hz / 60 Hz. Använd enda st
den medföljande nätadaptern.
Page 19

36 37Quick Start GuideTD -3
TD-3 Sterowanica
(PL) Krok 2: Sterowanica
Sekcja syntezatorów
(1) TUNE - wyreg uluj częstotli wość wewnętrz nego oscylator a
VCO, około jedn ą oktawę po obu str onach środka.
(2 ) CUTOFF- wyregulować częstotliwość odcięcia
dolnoprzepustowego ltra VCF. Częstotliwości
powyż ej wartości odc ięcia będą tłumi one, na przykła d
harmoniczne wyż szego rzędu.
(3 ) RESONANCE - dosto sować wielkość naci sku kładzioneg o
na poziom sygnału przy częstotliwości odcięcia.
(4 ) ENVELOPE - wy brać głębokoś ć modulacji zasto sowaną
przez generator obwiedni do częstotliwości odcięcia VCF.
(5 ) DEC AY - kontrolować ilo ść czasu potr zebną do zaniku
obwiedni z poziomu bieżącego do minimum.
(6 ) ACCENT - dostosuj p oziom akcentu podawan ego
na wyjśc ie dla dowolnych nut za programowanych z
akcentem.
Patchbay (złącza wejściowe i wyjściowe
TS 3,5 mm)
(7 ) FILTRUJ - to wejście u możliwia podłą czenie zewnętr znego
sygnału audio zamiast wewnętrznego oscylatora VCO.
(8 ) SYNCHRO NIZACJA - wejście to p ozwala na użycie
zewnętr znego zegara i syg nału start / s top.
(9 ) CV OUT - w yjście napięci a sterującego 1V / okt awę.
(10) GATE OUT - wyjście bramki.
(11) TELEFONY- pod łącz słuchaw ki do tego wyjśc ia TRS 3,5
mm. Upewni j się, że głośność je st zmniejszona pr zed
założeniem słuchawek.
Sekcja zniekształceń
Te elementy s terujące działaj ą tylko wtedy, gdy p rzełączni k
DISTORTIO N (20) jest włączony. Obwó d znajduje się na torz e
sygnał u tuż przed regul acją głośności i ko ńcowym wyjś ciem audio.
(12 ) DRIVE - dostosować w ielkość znieks ztałcenia.
(13 ) TONE - dostosuj ton.
(14) LEVEL - dostosuj poziom wyjściowego zniekształcenia.
Ogólne sterowanie
(15) TEMPO - dostosowa ć szybkość odt warzania pater nu i
ścieżek , od wolnego do szy bkiego.
(16) WAVEFOR M - wybierz pr zebieg wewnętr znego oscyl atora
VCO z odwróconego piłokształtnego lub impulsowego.
(17) TRACK/PATTERN GROUP- wybi eraj od TRACK 1 do 7
podcz as zapisywan ia lub odtwarz ania ścieżek i PATTERN
GROUP I, II, III, IV po dczas pisani a lub odtwarza nia
sekwencji. Schematy w grupie I są dostępne tylko
do użyci a na ścieżce 1 lub 2, sche maty w grupie II na
ścieżk ach 3 lub 4, w grupie III na śc ieżkach 5 lub 6 oraz w
grupie IV na ś cieżce 7.
(18) MODE - wybierz z Track Wr ite, Track Play, Pattern Play,
Patter n Write.
(19 ) POWER LED - wskazuj e, że zasilanie jest do starczane
do urząd zenia i włączni k zasilania na tylny m panelu jest
włączony.
(20) DISTORTION ON/OFF - gdy jest w yłączone,
zniekształcenie jes t pomijane, a elementy sterujące DRIVE,
TONE i LEVEL ni e działają.
(21 ) VOLUME- wyr eguluj poziom wy jściowy z wyj ścia na
tylnym p anelu i wyjścia s łuchawkowego. Upe wnij się, że
głośność jest zmniejszona przed założeniem słuchawek.
Sekcja sekwencera
(22 ) D.C./BAR RESET/CLEAR - służy d o usuwania wzoru z
pamięci, p owrotu ścieżk i na początek i syg nalizowania, że
ostatn i wzór jest dodawan y do ścieżki.
(23 ) PITCH MODE - włąc za lub wyłąc za tryb pitch. D ioda
LED zaświ eci się w trybie p itch. Ten tryb słu ży do
wprowad zania nut podcz as tworzenia w zorów.
(24) 13-NOTE KEYBOARD- prze łączniki te są r ozmieszczone
jako 13-klawiszowa klawiatura, umożliwi ając
wybie ranie nut podcz as tworzenia wz orów. Dolnych
osiem pr zełączników je st również uży wanych podcz as
tworze nia, zapisywa nia i wybierania p aternów i ścieżek .
(25) Dioda TIME MODE LED - diod a LED będzie się świe cić w
TRYBIE CZASOWYM.
(26) TIME MODE ON/OFF - włąc zyć lub wyłąc zyć TRYB CZA SU.
Ten tryb jes t używany pod czas wprowad zania czasu (nuta,
remis lub pa uza) po wprowadzeni u nut w TRYBIE PITCH.
(27 ) BACK- podczas p rzechodzenia p rzez patern, umoż liwia
to wybr anie ostatnio gr anej nuty, aby można ją był o
edytow ać. Ten przełącz nik i WRITE / NEXT (35) sł użą do
przeglą dania i zmiany ustawi eń SYNC i CLOCK.
(28) START / STOP - pozwala to na ro zpoczęcie lub
zakońc zenie odtwarz ania paternów i ści eżek. Podczas
odtwa rzania zaświe ci się dioda LED.
(29 ) FUNCTION - ten wielofunkcyjny przełącznik jest
używ any do powrotu TD-3 do no rmalnego try bu z TRYBU
PITCH i TRYBU CZ ASU oraz do różnych o peracji podc zas
zapisy wania paternów i ś cieżek.
(30) NORMAL MODE LED - ta dioda LED zaśw ieci się, gdy
urządz enie jest w tryb ie normalnym.
(31 ) TRANSPOSE DOWN/NOTE/S TEP - służy do trans pozycji
oktaw y w dół w TRYBIE PITCH, wpr owadzenia nuty w
TRYBIE CZ ASU oraz wprowad zenia liczby kro ków we
wzorze.
(32 ) TRANSPOSE UP/TIE/TRIPLET - sł uży do transpoz ycji
oktaw y w górę w TRYBIE PITCH, wpr owadzenia remisu w
TRYBIE CZ ASU i ustawienia p aternu w trybie t rioli.
(33 ) ACCENT / PATTERN A - pozwala t o na dodanie akcentu
do nut w TRYBIE P ITCH i wybranie wzo rów „A”, takich jak
1A, 2A, do 8A.
(34) SLIDE / PATTERN B - pozwala to na d odanie SLAJDU do
nut w TRYBIE PITCH i w ybranie wzor ów „B”, takich ja k 1B,
2B, do 8B.
(35) DS / WRITE / NEX T / TAP - pozwala to n a zapisanie pat ternu
na ścieżce, w ybranie nastę pnej nuty we wzorc u i dodanie
ręczn ego pomiaru cz asu przez dotkni ęcie. Ten przełąc znik
i WSTECZ (27) s ą używane do pr zeglądania i zmiany
ustawień SYNCHRONIZACJI i ZEGAR A.
Tylny panel
(36) OUTPUT - podłącz to w yjście 1/4 “TS do wejści a liniowego
audio sys temu. Upewnij się, że g łośność jest zm niejszona,
a system w yłączony pr zed wykonaniem p ołączeń.
(37 ) MIDI OUT/THRU - to 5-pinowe g niazdo DIN służ y do
wypro wadzania danych MIDI O UT i przesyłan ia danych
MIDI odebr anych przez MIDI INPUT.
(38) MIDI IN - to 5-pinowe g niazdo DIN odbiera d ane MIDI z
zewnętr znego źródł a. Zwykle będzi e to klawiatura MIDI,
zewnętr zny sekwencer sp rzętowy, komputer w yposażony
w interf ejs MIDI itp.
(39 ) USB PORT - to gniaz do USB typu B umożliwi a połączenie
do komputer a. TD-3 pojawi się jako zgo dne z klasą
urządz enie USB MIDI, zdolne do obs ługi wejścia i
wyjścia MIDI.
Wejście USB MIDI IN - akceptuje p rzychodzące d ane MIDI
z aplikacji.
Wyjście USB MIDI OUT - wy syła dane MIDI do ap likacji.
(40) POWER- włącz lu b wyłącz syn tezator. Przed wł ączeniem
urządz enia upewnij się, że ws zystkie po łączenia zost ały
wykonane.
(41) DC INPUT - podłąc z tutaj dostarc zony zasilacz 9 V DC .
Zasilac z można podłąc zyć do gniazda prąd u zmiennego
zapewni ającego napięcie o d 100 V do 240 V przy 50 Hz / 60
Hz. Używaj tylko dostarczonego zasilacza.
Page 20

38 39Quick Start GuideTD-3
TD-3 Getting started
(EN) Step 3: Getting started
OVERVIEW
This ‘getting s tarted’ guide will he lp you set up the
TD-3 analog bass line synthesizer and briey introduce
its capabilities.
CONNECTION
To connect the TD -3 to your system, please consult the
connection guide earlier in this document.
SOFTWARE SETUP
The TD-3 is a USB Class Compliant MIDI device,
and so no driver installation is required. The TD-3
does not require any additional dri vers to work
with Windows and MacOS.
HARDWARE SETUP
Make all the connec tions in your system. Keep the TD-3
power turned o when making any connections.
Use only the supp lied power adapter for the TD-3.
Ensure your sound system is turne d down.
Turn on the TD-3 before turning on any power ampli ers,
and turn it o last. This will help prevent any turn on or turn
o “pops or thumps” in your speakers.
WARM UP TIME
We recommend leaving 15 minutes or more time for the
TD-3 to warm up bef ore recording or live per formance.
(Longer if it has been brought in from the cold.) This will
allow the precision analog circuit s time to reach their
normal operating temperature and tuned performance.
SETTING SYNC and CLOCK TYPE
Selector switches 1, 2, 3, or 4 represent clock source INT,
MIDI, USB, or TRIG respec tively
Selector switches 5, 6, 7, or 8 represent clock rate 1PPs,
2PPQ, 24PPQ, or 48PPQ respectively
1. Press Function.
2. Make sure no s equence is playing.
3. Pre ss BACK and WRITE/NEXT at the s ame time to
enter Sync setting mode.
4. Selector 1 to 8 LEDs will turn on, and the current
clock source (1 to 4) and clock rate (5 to 8) will ash,
you have about 3 seconds to make any changes.
5. Press Selector 1, 2, 3, or 4 to change the clock source
to INT, MIDI, USB, or TRIG respectively
6. Press S elector 5, 6, 7, or 8 to change the clock rate to
1PPs, 2PPQ, 24PPQ, or 48PPQ respectively.
7. Press any other buttons or after no changes for a
3 seconds, the c hanges are saved.
8. Repeat s tep 3 to check your selection.
Caution: Clock source must always be INT (internal) i f
you are not using an e xternal clock. Note: Clock rate 24 or
48 PPQ (Pulses per quarter) are recommended.
TUNING
To quickly star t making sounds with your TD -3, use the
tuning feature as follows. Note that in t his mode, the notes
are transposed one octave higher.
1. Make sure the VOLUME is turned down.
2. Set the MODE switch to PATTERN PLAY.
3. Pre ss and hold down the PITCH MODE switch and
then press the PAT TERN 6 switch (note A).
4. Now, each time you press WRITE/NEXT, you will hear
this note in your headphones or speakers. Adjust the
VOLUME level to a comfor table listening level.
5. Use the TUNE control to adjust the output frequency
to exactly 220 Hz. The frequency can be adjusted up
or down, and allow ne tuning to other instr uments.
6. To tune to other notes instead of A, press and hold
PITCH MODE and then the desired note.
7. Now that the TD-3 can make sounds, you can
experiment with the synthe sizer controls, and the
distortion, and listen to the eects on the sound.
SIGNAL FLOW
The signal path within the TD-3 can be thought of as
moving from left to right as follows:
1. The TD-3 has one voltage controlled oscillator (VCO)
which generates the sound, and can be adjusted by
its WAVEFORM and TUNING. The waveform can be
selecte d from reverse-sawtooth or pulse. Lis ten to
the changes in sound that both waveforms make.
2. Nex t in line is the voltage controlled lter (VCF)
where the CUTOFF f requency and RESONANCE can
be adjusted. Play with the cuto frequency, and
resonance controls, and listen to their eects on
the sound. The classic low-pass lter allows a great
deal of control over the sounds created by TD-3.
It reduces the level of signals that are above the
cuto frequency, so reducing the levels of the
higher-order harmonics.
3. The RESONANCE control gives an enhancement to
the signals at the c rossover frequency. Rotating it
towards maximum will give very inter esting eects
and self-oscillation.
4. The ENVELOPE and DECAY controls aect the VCF by
modulating the cuto frequenc y. The controls are
dependent on each other, so if the envelope level
is high, then the decay eect on the sound will be
more noticeable.
5. The ACCENT control aects only those notes in a
pattern that have accent assigned.
6. The volt age controlled amplier ( VCA) output then
moves through the DISTORTION section (if this is
selecte d). Use the VOLUME control to adjust the level
going to your headphones and the main out put.
7. Keep the level down low when rst put ting
on headphones.
PATCH BAY SECTION
This section allows you the vers atility to connect to other
units and modular synthesizer equipment to create
many dierent s ounds. The connections are standard
3.5 mm TS, and the voltage requirements are shown in
the specications table. The TD -3 does not need these
connections in order to operate, they are used for further
expansion of your system.
Caution: Do not overload the 3.5 mm inputs.
They can only accept the correct level of voltages as
shown in the specication tables. The 3.5 mm outputs
should only be connected to input s capable of receiving the
output volt ages. Failure to follow these ins tructions may
damage the TD-3 or external units.
SEQUENCER SECTION
Please see the section later in this guide for details of
pattern writing and playing, and track writing and playing.
FIRMWARE UPDATE
Please check our website behringer.com regularly for
any updates to the rmware of your TD-3 synthesizer.
The rmware le can be downloaded and stored on your
computer, and then used to update the TD-3. It comes with
detailed instructions on the update procedure.
HAVE FU N
The TD-3 has many useful controls to recreate dierent bass
instruments, and to create bass lines. The patch bay allows
for fur ther experimentation and expansion to other units
and modular synthesizer equipment.
With all these controls, the possibilities for musical
creativity are endless!
We hope that you will enjoy your new TD-3, and that it will
become an ess ential part of your system.
Page 21

40 41Quick Start GuideTD -3
TD-3 Puesta en marcha
(ES) Paso 3: Puesta en marcha
RESUMEN
Esta guía l e ayudará a congurar el sintet izador analógico
de línea de bajo TD -3 y le present ará de forma resumida
sus capacidades.
CONEXIÓN
Para conec tar el TD-3 a su sistema, consulte la guía de
conexión que está más adelante en es te mismo documento.
CONFIGURACIÓN DEL SOFTWARE
El TD-3 es un disposi tivo MIDI USB Class Compliant, por lo
que no es neces aria la instalación de ningún driver. El TD-3
no requiere tampoco ningún driver para funcionar con
Windows y MacOS.
CONFIGURACIÓN DEL HARDWARE
Realice todas las conexiones en su sistema. Deje el TD-3
apagado mientras realiza las conexiones.
Utilice únicamente el adaptador de cor riente incluido
con el TD-3. Asegúrese de que su sistema de sonido
esté apagado.
Encienda el TD -3 antes de encender las etapas de potencia
o amplicadores, y encienda dichos amplicadores al nal.
Esto evitará cualquier posible “chasquido o petardeo” de
encendido o apagado en sus altavoces.
TIEMPO DE CALENTAMIENTO
Le recomendamos que deje un tiempo de calentamiento de
unos 15 minutos como mínimo en el TD-3 antes de realizar
una grabación o actuación en directo. (Este tiemp o debería
ser mayor en el cas o de que vaya a usarlo en un entorno
muy frío). Esto per mitirá que los circuitos analógicos de
precisión tengan tiempo para alcanzar su temperatura
operativa normal y que den el rendimiento adecuado.
AJUSTE DE SINCRONIZACIÓN Y TIPO DE SEÑAL DE RELOJ
Los selec tores 1, 2, 3 ó 4 representan las fuentes de reloj
INT, MIDI, USB o TRIG, respectivamente
Los selec tores 5, 6, 7 ó 8 representan las frecuencias de
reloj 1PPs, 2PPQ, 24PPQ o 48PPQ, respectivamente
1. Pulse Function.
2. Asegúrese de que no esté siendo reproducida
ninguna secuencia.
3. Pulse a la vez BACK y WRITE/NEXT para acceder al
modo de ajuste de sincronización (Sync).
4. L os pilotos del selector 1 a 8 se iluminarán y la
fuente de reloj activa (1 a 4) y la frecuencia de reloj
(5 a 8) parpadearán. En ese momento tendrá 3
segundos para realizar cualquier cambio.
5. Puls e el selector 1, 2, 3 ó 4 para cambiar la f uente de
reloj a INT, MIDI, USB o TRIG, respec tivamente.
6. Pulse el selector 5, 6, 7 ó 8 para cambiar la
frecuencia de reloj a 1PPs, 2PPQ, 24PPQ o 48PPQ,
respectiva-mente.
7. Pulse cualquier otro botón o espere 3 segundos
sin hacer nada más y los cambios realizados
previamente serán guardados.
8. Repita el paso 3 para comprobar sus selecciones.
Atención: Si no está usando una fuente de reloj externa,
la fuente de reloj siempre deberá es tar ajustada a
INT (interna). Nota: Recomendamos frecuencias de reloj
de 24 ó 48 PPQ (pulsos por negra o cuarto de nota).
AFINACIÓN
Para empezar a producir sonidos rápidamente con su TD-3,
utilice la función de anación de la siguiente forma. Tenga
en cuenta que en este modo las notas serán transportadas
una octava arriba.
1. Asegúrese de que el control VOLUME esté al mínimo.
2. Ajuste el interruptor MODE a PATTERN PLAY.
3. Mantenga pulsado el interr uptor PITCH MODE y
pulse el interruptor PATTERN 6 (nota A - la).
4. Ahora, c ada vez que pulse WRITE/NEXT, escuchará
esta nota a t ravés de sus auriculares o altavoces.
Ajuste el nivel del mando VOLUME a un nivel de
escucha cómodo.
5. Use el control TUNE para ajus tar la frecuencia de
salida a exac tamente 220 Hz. Puede ajustar esta
fre-c uencia hacia arriba y abajo, de c ara a permitir
una anación precisa con otros instrumentos.
6. Si quiere anar la unidad a otro tono dis tinto al
A (la), mantenga pulsado PITCH MODE y después la
nota del tono deseado.
7. Ahora que el TD-3 puede producir sonidos, puede
experimentar con los controle s del sintetizador,
así como con la distorsión y escuchar el efecto sobre
el sonido.
FLUJO DE SEÑAL
Puede imaginarse el ujo de señal dentro del TD-3 como
en un movimiento que va haciendo la señal de izquierda a
derecha de la siguiente forma:
1. El TD-3 tiene un oscilador controlado por voltaje
(VCO) que genera el sonido y que puede ser ajustado
con sus mandos WAVEFORM y TUNING. Puede elegir
la forma de onda entre diente de sierra inverso
o pulso. Escuche los cambios que pr oduce sobre el
sonido cada uno de estos tipos de forma de onda.
2. Lo siguiente en la ruta del ujo de señal es el
ltro controlado por voltaje (VCF) en el que
podrá ajustar la frecuencia de corte o CUTOFF y
la resonancia (RESONANCE). Experimente con los
controles de frecuencia de cor te y resonancia y
escuche los efectos que producen sobre el sonido.
El clásico ltro pasabajos le ofrece una gran
capacidad de control sobre los sonidos creados por
el TD-3 al reducir el nivel de las señales que están
por encima de la f recuencia de corte, reduciendo así
el nivel de los armónicos de orden super ior.
3. El control RESONANCE ofrece una intensicación
de las señales en la f recuencia de separac ión
o crossover. El girar e ste mando hacia su máximo
le ofrecerá efectos muy interesantes como la
auto-oscilación.
4. Los controles ENVELOPE y DECAY afectan al VCF al
modulador la frecuencia de cor te. Los controles son
interdependientes entre sí, por lo que si el nivel de
la envolvente es alto, el efecto de decaimiento sobre
el sonido será más marcado.
5. El control ACCENT afecta solo a aquellas notas del
patrón sobre las que haya asignado un acento.
6. La salida del amplicador controlado por voltaje
(VCA) pasa entonces a través de la sección
DISTORTION (si est á seleccionada). Use el control
VOLUME para ajustar el nivel que es enviado a sus
auriculares y a la salida principal.
7. Mantenga el nivel en un ajuste bajo cuando se vaya
a colocar los auriculares sobre sus oídos.
SECCIÓN DE PATCHBAY
Esta sección le ofrece la versatilidad de conec tarse a otras
unidades y sinte tizadores modulares p ara crear otros
sonidos diferentes. Las conexiones se realizan a través de
clavijas TS standard de 3.5 mm y los requisitos de voltaje
son mostrados en la tabla de especicaciones. El TD-3
no necesita e stas conexiones para funcionar; se utilizan
únicamente para expandir más su sis tema.
Atención: No sobrecargue las entradas de 3.5 mm.
Solo pueden aceptar el nivel adecuado de voltaje
indicado en la tabla de especicaciones. Las salidas de
3.5 mm solo deberían ser conectadas a entradas capaces de
admitir sus voltajes de salida. El no cumplir con estas
indicaciones puede producir daños tanto en el TD-3 como
en las unidades externas.
SECCIÓN DE SECUENCIADOR
Consulte más adelante en este manual la sección que trata
sobre los detalles del registro y reproducción de patrones
y pistas.
ACTUALIZACIÓN DE FIRMWARE
Acceda de forma regular a nuestra web b ehringer.com para
informar se de cualquier posible ac tualización del rmware
de su sintetizador TD-3.
Descargue desde allí el chero del nuevo rmware
y almacénelo en su ordenador, y úselo después para
actualiz ar el TD-3. Este chero viene con instrucciones
detalladas sobre el proceso de actualización.
DISFRUTE
El TD-3 tiene una gran cantidad de controles muy útiles
para recrear diferentes bajos y para crear líneas de bajo.
El patchbay permite un mayor nivel de experimentación y
expansión con otras unidades y sintetizadores modulares.
Con todos estos controles, ¡las posibilidades de creatividad
musical son ilimitadas!
Esperamos que disfrute de su nuevo TD-3 y que se convierta
en una parte e sencial de su sistema musical.
Page 22

42 43Quick Start GuideTD-3
TD-3 Mise en oeuvre
(FR) Etape 3 : Mise en oeuvre
APERÇU
Ce guide va vous aider à congurer votre synthétiseur
analogique de lignes de basse TD-3 et vous donner un bref
aperçu de se s capacités.
CONNEXION
Pour connec ter votre TD-3 à votre système, veu illez consulter
le guide de connexion dans les pages précédentes de
ce document.
CONFIGURATION LOGICIELLE
Le TD-3 est un appa reil USB MIDI reconnu nativement. Il n’est
pas nécessaire d’installer de pilote pour qu’il fonctionne sous
Windows et Mac OS.
CONFIGURATION MATÉRIELLE
Eectu ez toutes les connexion s à votre système. Gardez le
TD-3 hors tensio n lors de cette étape.
Utilisez uniquement l’adaptateur secteur fourni avec
le TD-3. Assurez vous que votre système d e sonorisation est
hors tension.
Mettez le T D-3 sous tension avant tous vos amplis d e
puissance, et m ettez-le hors tensio n en dernier. Cela permet
d’éviter les bruit s de claquement lors de la mi se sous/hors
tension de vos enceintes.
TEMPS DE CHAUFFE
Il est recom mandé de laisser le TD-3 chauer p endant au
moins 15 minutes avant tout enregistrement ou performance
live, voire plus s’i l a passé du temps au froid. Cela p ermet
aux circuits analogiques d’atteindre leur température de
fonctionnement normale et d’être accordés.
RÉGLAGE DE LA SYNCHRONISATION ET DE L’HORLOGE
Les boutons 1, 2, 3 et 4 repr ésentent la source de l’hor loge,
respec tivement INT, MIDI, USB ou TRIG
Les boutons 5, 6, 7 et 8 rep résentent le ryt hme,
respectivement 1 noire, 2 pulsations par noire, 24 pulsations
par noire ou 4 8 pulsations par noire
1. Appuyez sur Function.
2. Assurezvous qu’aucune séquence n’est en cours
de lecture.
3. Appuyez simultanément sur BACK et WRITE/
NEXT pour passer en mode de réglage de
la synchronisation.
4. Les LEDs des sélecteur s 1 à 8 s’allument et celles
correspondant aux sources d’horloge (1 à 4) et
au rythme (5 à 8) clignotent. Vous disposez de
3 secondes pour eectuer tout changement :
5. Appuyez sur les boutons 1, 2, 3 et 4 pour modier
la source de l’horloge, respec tivement INT, MIDI,
USB ou TRIG.
6. Appuye z sur les boutons 5, 6, 7 et 8 pour modier
le rythme, respectivement 1 noire, 2 pulsations
par noire, 24 pulsations par noire ou 48 puls ations
par noire.
7. Appuyez sur n’importe quel autre bouton
ou patientez 3 s econdes pour sauvegarder
les modications.
8. Répétez l’étape 3 pour vérier votre sélection.
Attention : La source d’horloge doit toujours être
INT (interne) si aucune horloge externe n’est utilisée.
Remarque : Les r ythmes 24 ou 48 pulsations par noire
sont recommandées.
ACCORDAGE
Pour pouvoir utiliser rapidement vot re TD-3, utilisez la
fonction d’accordage comme indiqué ciaprès. Notez bien
que sous ce mode, les notes sont transposées d’une octave
plus aigüe.
1. Assurezvous que le VOLUME est au minimum.
2. Placez le sélecteur MODE sur PATTERN PLAY.
3. Maintenez le bouton PITCH MODE enfoncé puis
appuyez sur le bouton de PATTERN n° 6 (note A,
ou L A).
4. À prés ent, à chaque fois que vous appuierez sur
WRITE/NEXT, vous entendrez cette note dans votre
casque ou dans les enceintes. Réglez le VOLUME à un
niveau d’écoute confortable.
5. Utilisez le potentiomè tre TUNE pour régler la
fréquence à 220 Hz exactement. Vous pouvez
la régler à une fréquence plus grave ou plus
aigüe pour vous accorder parfai tement avec les
autres instruments.
6. Pour vous accorder en fonction d’une autre note que
LA (A), maintenez le bouton PITCH MODE enfoncé
puis la note souhaitée.
7. Le TD-3 est désormais conguré pour produire
du son et vous pouvez essayer les réglages du
synthétiseur et la distorsion et écouter les eets
produits sur le son.
LE CHEMIN DU SIGNAL
Vous pouvez imaginer que le signal du TD-3 suit un chemin
de gauche à droite comme indiqué cidessous :
1. Le TD-3 possède un oscillateur contrôlé par la
tension (VCO) qui génère le son et dont vous
pouvez modier la forme d’onde (WAVEFORM) et
la hauteur (TUNING). Vous pouvez sélectionner
une forme d’onde parmi le s formes suivantes :
dent de scie inver sée ou pulsation. Écoute z les eets
produits sur le son par chaque forme d’onde.
2. Le signal passe ensuite par le ltre contrôlé par la
tension (VCF) dont vous pouvez régler la f réquence
de coupure (CUTOFF) et la RESONANCE. Modiez la
fréquence et la résonance et écoutez les eets
produits sur le son. Le ltre passebas permet de
modier grandement le son du TD-3. Il rédui t le
niveau des signau x plus aigus que la fréquence de
coupure et donc des hautes harmoniques.
3. Le réglage de RESONANCE per met d’amplier le
signal autour de la f réquence de coupure. Si vous le
montez vers le m aximum, vous obtiendrez d es eets
très intéressant et ferez auto-osciller l’oscillateur.
4. Les réglages ENVELOPE et DECAY agissent sur le VCF
en modulant la fréquence de coupure. Ces r églages
sont interdépendants, donc si le niveau du réglage
ENVELOPE est élevé, l’eet du DECAY sur le son sera
plus notable.
5. Le ré glage ACCENT agit uniquement sur les notes
d’un pattern auxquelles une accentuat ion a
été appliquée.
6. Le signal passe ensuite par l’amplic ateur contrôlé
par la tension (VC A) puis la sec tion DISTORTION
(si elle est activée). Utilisez le potentiomètre
VOLUME pour régler le niveau du casque et de la
sortie principale.
7. Vériez que le niveau est bas avant de placer le
casque sur vos oreilles.
PANNEAU DE CONNEXIONS
Cette sec tion vous ore une grande polyvalence en
connect ant d’autres appareils ainsi que des éléments
de synthétiseur modulaire pour créer de nombreux
nouveaux sons. Les connexions s’eec tuent en minijack
mono standard et les caractéristiques de tension
sont indiquées dans le tableau des caractéristiques
techniques. Aucune connexion n’est nécessaire pour
que le TD-3 fonc tionne ; elles permettent d’étendre les
possibilité s de votre système.
Attention: Ne surchargez pas les entrées minija ck.
Elles sont comp atibles uniquement avec les
tensions indiquées dans le tableau des caractéristiques
techniques. Les sorties minijack doivent être connectées
uniquement à de s entrées pouvant accepter la tension de
sortie produite. Le non-respect de ces inst ructions peut
endommager le TD-3 ou les appareils externes.
SECTION DU SÉQUENCEUR
Consultez la section correspondante située dans les pages
suivantes de ce guide pour plus de détails quant à la
création et à la lecture des pat terns et des morceaux.
MISE A JOUR DU FIRMWARE
Merci de consulter régulièrement le site behringer.com
pour mettre à jour le rmware de vot re synthétiseur TD-3.
Téléchargez le chier du rmware sur votre or dinateur puis
utilisezle pour mettre à jour le TD-3. Le dossier téléchargé
comprend des instructions détaillées quant à la procédure
de mise à jour.
AMUSEZ-VOUS
Le TD-3 met à votre disposition de nombreu x réglages pour
créer des lignes de basses. Le panneau de connexions vous
permet d’expérimenter toutes sortes de sons et d’améliorer
votre appareil avec des modules de sy nthèse externes.
Les possibilités de création music ales sont innies!
Nous espérons que vous vous amuserez avec votre TD-3 et
qu’il deviendra un élément essentiel de votre système.
Page 23

44 45Quick Start GuideTD-3
TD-3 Erste Schritte
(DE) Schritt 3: Erste Schritte
ÜBERBLICK
Diese Anleitung hilft Ihnen beim Einr ichten des analogen
TD-3 Bass Line Synthesizers und beschreibt kurz
seine Fähigkeiten.
ANSCHLUSS
Wie Sie den TD-3 mit Ihr em System verbinden, ist weite r
oben in diesem Dokument unter ‘Verkabelung‘ beschrieben.
SOFTWARE EINRICHTEN
Der TD-3 ist ein s tandardkonformes USB MIDI -Gerät, für
dessen Betrieb mit Windows und MacOS keine zusätzlichen
Treiber installiert werden müssen.
HARDWARE EINRICHTEN
Stellen Sie alle Ansc hlüsse in Ihrem System bei
ausgeschaltetem TD-3 her.
Verwenden Sie für den TD-3 nur den mitgelieferten
Netzadapter. Drehen Sie Ihr Soundsystem zurück.
Schalten Sie den TD-3 vor allen Endstufen ein und schalten
Sie ihn als Letz ten wieder aus. Dadurch ver meiden
Sie Popp- und Plo ppgeräusche, die beim Ein - und
Ausschalten von den Lautsprechern übertragen werden.
AUFWÄRMZEIT
Geben Sie dem TD -3 vor Aufnahmen o der Live Performance s
15 Minuten oder länger Zeit zum Aufwärmen. (Eher länger,
wenn er stark a bgekühlt war.) Danach haben die präzis en
Analogschaltungen ihre normale Betriebstemperatur und
Stimmstabilität erreicht.
SYNC UND CLOCK-TYP EINSTELLEN
Die Selec tor-Schalter 1, 2, 3 oder 4 sind je weils den
Clock-Quel len INT, M IDI, USB oder TRIG zugewiesen.
Die Selec tor-Schalter 5, 6, 7 oder 8 sin d jeweils den
Clock-Raten 1PPs, 2PPQ, 24PPQ od er 48PPQ zugewiesen.
1. Drücken Sie Function.
2. Hierbei darf keine Sequenz abgespielt werden.
3. Drücken Sie gleichzeitig BACK und WRITE/NEXT,
um in den Sync-Einstellungsmodus zu wechseln.
4. Die Selector LEDs 1 bis 8 leuchten und die aktuelle
Clock-Quelle (1 bis 4) und Clock-Rate (5 bis 8)
blinken. Jetzt müssen Sie innerhalb von 3 Sekunden
Änderungen vornehmen:
5. Dr ücken Sie Selector 1, 2, 3 oder 4, um die
Clock-Quelle jeweils auf INT, MIDI, USB oder
TRIG einzustellen.
6. Drücken Sie Selector 5, 6, 7 oder 8, um die
Clock-Rate jeweils auf 1PPs, 2PPQ, 24PPQ oder
48PPQ einzustellen.
7. Wenn Sie keine andere Taste drücken, werden die
Änderungen nach 3 Sekunden gespeichert.
8. Wiederholen Sie Schrit t 3, um die getroene Wahl
zu überprüfen.
Vorsicht: Die Clock-Que lle muss immer auf INT (intern)
gesetz t sein, wenn Sie keine exter ne Clock verwenden.
Hinweis: Wir empf ehlen eine Clock-Rate von 24 oder 48 PPQ
(Pulse pro Viertelnote).
STIMMUNG
Damit Sie mit Ihre m TD-3 schnellstmöglich So unds erzeugen
können, sollten Sie die Tuning-Funktion wie folgt nutzen.
Hinweis: In diese m Modus sind die Noten eine Ok tave
höher transponiert.
1. Drehen Sie den VOLUME-Regler zurück.
2. Stellen Sie den MODE-Schalter auf PATTERN
PLAY ein.
3. Halten Sie den PITCH MODE-Schalter gedrückt und
drücken Sie den PATTERN 6-Schalter (Note A).
4. Immer wenn Sie jetzt WRITE/NEXT drücken,
werden Sie diese Note in Ihren Kopfhörern oder
Lautsprechern hören. Stellen Sie den VOLUME-Pegel
auf eine angenehme Lautstärke ein.
5. Stellen Sie mit dem TUNE-Regler die
Ausgabefrequenz exakt au f 220 Hz ein. Man kann
die Frequenz aufwärts o der abwärts justieren und
eine Feineinstellung zu anderen Instrumenten
vornehmen.
6. Um zu anderen Noten als A zu stimmen, halten
Sie PITCH MODE gedrückt und drücken die
gewünschte Note.
7. Jetzt kann der TD-3 Sounds erzeugen.
Experimentieren Sie mit den Synthesizer-Reglern
und der Distortion-Funktion und achten Sie auf die
klanglichen Auswirkungen.
SIGNALFLUSS
Der Signalweg in nerhalb des TD-3 läuft sc hematisch gesehen
von links nac h rechts wie folgt:
1. Der spannungsgesteuerte Oszillator (VCO) des TD-3
erzeugt den K lang und lässt sich via WAVEFORM
und TUNING modizieren. Als Wellenform stehen
Sägezahn invers oder Puls zur Wahl. Beachten
Sie, wie sich der Klang durch die jeweilige
Wellenform ändert.
2. Es folgt das spannungsgesteuerte Filter (VCF),
bei dem man die CUTOFF-Frequenz und RESONANCE
einstellen kann. Spielen Sie mit den Cuto- und
Resonance-Reglern und achten Sie auf die
klanglichen Auswirkungen. Mit dem klassischen
Tiefpasslter kann man die vom TD -3 erzeugten
Sounds umfassend steuern. Es verringert den Pegel
der Signale oberhalb der Cuto-Frequenz und somit
den Pegel der Harmonischen höherer Ordnung.
3. Der RESONANCE-Regler betont die Signale im
Bereich der Cuto-Frequenz. Einstellungen in der
Nähe des Maximums erzeugen sehr interessante
Eekte bis hin zur Selbstoszillation.
4. Die ENVELOPE- und DECAY-Regler wirken auf das
VCF, indem sie die Cuto-Frequenz modulieren.
Die Regler beeinussen sich gegenseitig. Bei hohem
Envelope-Pegel ist also auch der Decay-Eekt auf
den Sound deutlicher wahrnehmbar.
5. Der ACCENT-Regler wirkt nur auf die Noten im
Pattern, denen ein Akzent zugewiesen wurde.
6. Über den Ausgang des spannungsgesteuerten
Verstärkers (VCA) erreicht das Signal dann die
DISTORTION-Sektion (falls aktiviert). Stellen Sie
mit dem VOLUME-Regler die Lautstärke in den
Kopfhörern und am Hauptausgang ein.
7. Drehen Sie die L autstärke zurück, bevor Sie die
Kopfhörer aufsetzen.
PATCH BAY-SEK TION
Über diese Se ktion können Sie den TD-3 ex ibel mit
modularen Synthesizern und anderen Geräten verbinden,
um eine breite Pal ette an Sounds zu erzeu gen. Die Anschlüsse
sind als stand ard 3,5 mm TS-Buchsen ausgele gt und die
Spannungsanforderungen sind in der Spezikationstabelle
aufgeführt. Für den normalen Betrieb des TD-3 werden
diese Anschlüsse nicht benötigt, aber sie können Ihr System
stark erweitern.
Vorsicht: Sie dürfen d ie 3,5 mm Eingänge nic ht
überlasten. Sie akzeptieren nur die korrekten
Spannungspegel, die in den Spezikationstabellen
aufgefü hrt sind. Verbinden Sie die 3,5 mm Ausg änge nur
mit Eingängen, die die Ausgangsspannungen verarbeiten
können. Bei Nichtbeachtung dieser Hinweise können
TD-3 oder externe Geräte beschädigt werden.
SEQUENCER-SEKTION
Details zum Schreiben und Abspielen von Patterns und
Tracks werden in einem speziellen Abschnitt weiter
unten beschrieben.
FIRMWARE UPDATE
Bitte informieren Sie sich regelmäßig auf unserer
Website behringer.com über Firmware-Updates für
Ihren TD-3 Synthesizer.
Sie können die Fir mware-Datei auf Ihren Compu ter
herunterladen und speichern und anschließend den TD-3
damit aktualisieren. Ein detaillierte Beschreibung des
Update-Verfahrens ist in der Datei enthalten.
VIEL SPASS
Mit den vielen e ektiven Reglern d es TD-3 kann man
verschiedene Bassinstrumente reproduzieren und
Basslinien kreieren. Die Patchbay bietet viel Spielraum zum
Experimentieren und Integrieren modularer Synthesizer und
anderer Geräte.
Der musikalischen Kreaktivität sind bei der Vielfalt an Reglern
keine Grenzen gesetzt!
Wir hoen, dass Si e Ihren neuen TD-3 genießen und als
zentrales Element in Ihr System integrieren werden.
Page 24

46 47Quick Start GuideTD-3
TD-3 Primeiros Passos
(PT) Passo 3: Primeiros Passos
VISÃO GERAL
Esse guia o aju dará a congurar seu sinteti zador de
linha de baixo anál ogo TD-3 e apresentará breve -mente
suas capacidades.
CONEX ÃO
Para conec tar o TD-3 ao seu sistema, favor cons ultar o guia de
conexão apresentado anteriormente nes-te documento.
CONFIGURAÇÃO DE SOFTWARE
O TD-3 é um disposit ivo MIDI compatível com a classe USB,
então não há a nece ssidade de se instalar um dr iver. O TD-3
não requer dr ivers adicionais para f uncionar com o Windows
e MacOS.
CONFIGURAÇÃO DE HARDWARE
Faça todas as conexõ es no seu sistema. Mantenha o TD -3
desligado quando estiver fazendo conexões.
Use apenas o adapt ador fornecido par a o TD-3. Certi que-se
de que o seu siste ma de áudio esteja abai-xado.
Ligue o TD-3 antes de li gar os amplicadores, e de sligue-o
por último. Iss o ajudará a evitar que o ato de ligar o u desligar
cause ruídos nos seus amplicadores.
TEMPO DE AQUECIMENTO
Recomendamo s que reserve 15 minutos ou mais p ara que
o TD-3 aqueça, ante s de começar a gravar ou per formances
ao vivo (mais tempo se el e tiver sido trazido de loc al frio)
isso permi tirá que os circuitos anál ogos de precisão tenham
tempo o suciente para alcançar sua temperatura nor mal de
operação e performance anada.
CONFIGURAÇÃO DE SYNC E TIPO DE RELÓGIO
Os botões se letores 1, 2, 3, ou 4 representam a fonte do
relógio INT, MIDI, USB, ou TRIG respe ctivamente.
Os botões se letores 5, 6, 7, ou 8 re presentam o ritmo do
relógio 1PPs, 2PPQ, 24PPQ, ou 4 8PPQ respectiva -mente.
1. Função Press.
2. Certique-se de que nenhuma sequência es teja
sendo tocada.
3. Aperte BACK e WRITE/NEXT ao mesmo tempo para
inserir o modo de conguração Sync.
4. Os LEDS dos seletores 1 a 8 acender ão e a fonte
de relógio atual (1 a 4) e o ritmo do relógio (5 a 8)
piscarão, e você terá aproximadamente 3 segundos
para fazer mudanças:
5. Aperte o seletor 1, 2, 3, ou 4 para mudar a
fonte de relógio para INT, MIDI, USB, ou TRIG
respectiva-mente.
6. Aper te o seletor 5, 6, 7, or 8 para mudar o o ritmo
do relógio par a 1PPs, 2PPQ, 24PPQ, ou 48PPQ
res-pectivamente.
7. Aperte quaisquer outros botões, ou depois de
nehuma mudança por 3 segundos, as mudanças
serão salvas.
8. Repita o passo 3 para veric ar sua seleção.
Cuidado: A fonte do relógio deve s empre ser INT
(interna) se você não es tiver usando um relógio e xter-no.
Nota: Recomen da-se o ritmo do relógio 24 ou 48 PP Q (pulsos
por quarto).
AFINAÇÃO
Para começa r a fazer sons com o seu TD-3, use os rec ursos em
seguida. Ob serve que neste modo, as n o-tas são transpos tas
um oitava mais alt a.
1. Certique -se de que o VOLUME esteja abaixado.
2. Congur e o botão MODE em PATTERN PLAY.
3. Aperte e segure o botão de modo PITCH MODE então
aperte o botão PATTERN 6 (nota A).
4. Agora, todas vez que você apert ar WRITE/NEXT,
ouvirá esta nota nos seus fones de ouvido ou
alto-falantes. Ajuste o nível de VOLUME em um
nível confor tável.
5. Use o controle TUNE para ajus tar a frequência de
saída a exatamente 220 Hz. A frequência pode ser
ajustada para mais ou para menos, e possibilita
anação renada de outros instrumentos.
6. Para anar outras notas em vez de A, aperte e
segure PITCH MODE e em s eguida a nota desejada.
7. Agora que o TD-3 pode emitir sons, você poderá
experimentar com os controles do sintetizador, e a
distorção, e ouvir os efeitos no som.
FLUXO DO SINAL
O caminho do sina l dentro do TD-3 pode ser entend ido
como algo que se m ovimenta da esquerda par a a direita,
da seguinte maneira:
1. O TD-3 tem um oscilador controlado por tensão
(VCO) que gera o som e pode ser ajustado por
WA-VEFORM e TUNING. A forma da onda pode ser
selecionada dentre dente de serr a reversa ou pulso.
Ouça as mudanças no som que ambas as formas de
onda fazem.
2. Em seguida, está o ltro controlado por tensão (VCF)
onde a frequência de corte CUTOFF e RE SO-NANCE
podem ser ajustadas. Toque com a frequência de
corte e controles de ressonânc ia e ouça seus efeitos
no som. O clássico ltro passa-baixa possibilita
muito controle dos sons criados pelo TD-3. Ele reduz
o nível dos sinais que estão acima da frequência de
corte, consequentemente redu-zindo dos níveis de
harmonia de ordem mais alta.
3. O cont role RESONANCE aprimora os sinais
da frequência crossover. Ao ser girado ao
máximo, pro-porciona efeitos e auto-oscilação
bem interessantes.
4. Os controles ENVELOPE e DECAY afetam o VCF,
modulando a frequência de corte. Os controles
de-pendem uns dos outros, então se o nível do
envelope estiver alto, o efeito de decaimento do som
será mais notável.
5. O controle ACCENT afeta apenas as notas no padrão
que tem o acento designado.
6. A saída do amplicador contr olado por tensão (VCA)
passa pela seção DISTORTION (se estiver selecionada). Use o controle VOLUME para ajustar o nível
dos fones de ouvido e saída principal.
7. Mantenha o nível baixo quando colocar os fones de
ouvido pela primeira vez.
SEÇÃO PATCH BAY
Essa seç ão possibilita vers atilidade ao conecta r-se a outras
unidades e equipamento sintetizador modu-lar para criar
vários sons d iferentes. As conexõ es são padrão TS de 3.5 mm,
e os requisito s de tensão es-tão demons trados na tabela de
dados técnico s. O TD-3 não precisa dess as conexões para
operar. Elas são us adas para expandir mais o si stema.
Advertência: Não ca rregue as entradas de 3.5 mm.
Elas só aceitam o s níveis corretos de tensão,
conforme especicado nas tabelas. As saídas de 3.5 mm
deveriam apena s ser conectadas a ent radas capazes de
re-cebe r tensões de saída. O não cump rimento dessas
instruçõ es pode danicar suas unid ades de TD-3 ou unidades
externas.
SEÇÃO SEQUENCIADOR
Favor vericar a se ção disponível em porções p osteriores
deste guia, para obter detalhes do padrão de gravação e
reproduç ão de padrão e de faixa.
ATUALIZAÇÃO DE FIRMWARE
Favor vericar o website behringer.com regularmente para
obter atualiz ações do rmware do seu sinte -tizador TD-3.
Você pode fazer o do wnload e armazenar o arquivo de
rmware no seu c omputador e usá-lo par a atua-lizar o TD-3.
Ele vem com instr uções detalhadas do pro cedimento de
atualização.
DIVIRTA-SE
O TD-3 tem muitos cont roles úteis para a recr iação de
instrume ntos de baixo diferentes e c riação de li-nhas de
baixo. O patch bay o pe rmite experimenta r e expandir a
outras unidades e equipamento de sin-tetizador modular.
Com esses controles, as possibilidades criativas musicais são
innitas!
Esperamo s que tenha gostado do seu novo TD -3 e que ele se
torne uma peç a essencial do seu siste ma.
Page 25

48 49Quick Start GuideTD-3
TD-3 Iniziare
(IT) Iniziare
PANORAMICA
Questa gu ide vi aiuterà a impostar e il synth bass line
analogico TD -3 e presenta br evemente le sue capacità.
CONNESSIONE
Per collegare il TD -3 al vostro imp ianto, consultate la
consultare la guida alla connessione, precedente in
questo documento.
IMPOSTAZIONE SOFTWARE
Il TD-3 è un disposit ivo MIDI conforme a USB, pert anto non
è richies ta l'installazione di dri ver. TD-3 non richied e alcun
driver aggiun tivo per funzionare con Wi ndows e MacOS.
IMPOSTAZIONE HARDWARE
Eettua te tutte le connessioni d el vostro impianto. Tenete il
TD-3 spento mentre eett uate qualsiasi connessione.
Usate esclus ivamente l'adattatore di alim entazione fornito
per il TD-3. Assicu ratevi che il vostro impia nto sia abbassato.
Accendete il TD -3 p rima di qualsiasi amplica tore o cassa
attiva e sp egnetelo per ultimo. Ciò aiu terà a prevenire
qualsiasi “colpo o boato” nelle vostre casse.
TEMPO DI RISCALDAMENTO
Suggeriamo di l asciare 15 minuti o più al TD-3 per
scaldars i prima di registrare o di u n'esecuzione d al vivo.
(tempi maggiori s e è stato portato dal f reddo) Ciò consentirà
ai circuiti analogici di precisione di raggiungere la normale
temperatura operativa e le prestazioni ottali.
IMPOSTARE IL TIPO DI SYNC E CLOCK
I seletto ri 1, 2, 3 o 4 rappresen tano rispettivam ente la
sorgente di c lock INT, MIDI, USB o TRIG
I seletto ri 5, 6, 7 o 8 rappresentano rispe ttivamente la
frequen za di clock 1PPs, 2PPQ, 24PPQ o 48PPQ
1. Premete Function.
2. Assic uratevi che non sia in esecuzione
nessuna sequenza.
3. Premete contemporaneamente BACK e WRITE/NEXT
per entrare ne modo di impostazione del Sync.
4. I led dei s elettori da 1 a 8 si accenderanno e
lampeggeranno sia l'attuale sorgente (da 1 a 4) che
la frequenza di clock (da 5 a 8), avete circa 3 secondi
per appor tare eventuali modiche:
5. Premete il selettore 1, 2, 3 o 4 per cambiare la
sorgente del clock rispettivamente a INT, MIDI,
USB, or TRIG
6. Premete il selettore 5, 6, 7 o 8 per cambiare la
frequenza di clock rispet tivamente a 1PPs, 2PPQ,
24PPQ o 48PPQ.
7. Per salvare i cambi, premete qualsiasi alt ro tasto o
non premete ne ssun tasto per 3 secondi.
8. Ripetete il passo 3 per controllare la vostra scelta.
Attenzione: se non si utilizza un c lock esterno la sorge nte
di clock deve e ssere sempre INT (interna). Nota: si consig lia la
frequenza di clock 24 o 48PPQ (impulsi per semiminima).
ACCORDATURA
Per iniziare rap idamente a emettere suoni c on il vostro TD-3,
utilizz ate la funzione di accordatu ra come segue. Notate che
in questo mo do le note sono trasposte un'ott ava più in alto.
1. Assicuratevi che il VOLUME sia abbassato.
2. Impos tate l'interruttore MODE su PAT TERN PLAY.
3. Premete e tenete premuto l'interruttore PITCH
MODE quindi premete l'interruttore PATTERN 6
(not a LA).
4. Ora, ogni volta che premete WRITE / NEXT,
ascolterete questa nota nella cua o nell'impianto.
Regolate il livello del VOLUME per avere un ascolto
confortevole.
5. Usate il controllo TUNE per re golare la frequenza
di uscita esattamente a 220Hz. La frequenza
può essere regolata verso l'alto o verso il basso e
consente la regolazione ne di altri strumenti.
6. Per accordare su altre note anziché su LA, tenete
premuto PITCH MODE e quindi la nota desiderata.
7. Ora che il TD-3 può emettere suoni, è possibile
sperimentare i controlli del sintetizzatore e la
distorsione e ascoltare gli eetti sul suono.
PERCORSO DEL SEGNALE
Il percors o del segnale all'interno del TD -3 può essere
considerato da s inistra a destra, come s egue:
1. Il TD-3 ha un oscillatore controllato in voltaggio
(VCO) che genera il suono e può essere regolato da
WAVEFORM e TUNING. La forma d'onda può essere
selezionat a fra dente di sega inversa o impulso.
Ascoltate i c ambiamenti nel suono appor tati da
entrambe le forme d'onda.
2. In linea segue il ltro controllato in voltaggio
(VCF) nel quale è possibile regolare la f requenza
CUTOFF e RESONANCE. Modicate la frequenza di
taglio e i controlli di risonanza e ascoltate i loro
eetti sul suono. Il classico ltro passa-basso
consente un grande controllo sui suoni c reati dal
TD-3. Riduce il livello dei segnali al di sopra della
frequenza di cuto, riducendo così i livelli delle
armoniche di ordine superiore.
3. Il controllo RESONANCE migliora i segnali alla
frequenza di crossover. Ruotandolo verso il
massimo si ottengono eett i e auto-oscillazioni
molto interessanti.
4. I controlli ENVELOPE e DECAY inuenzano il VCF
modulando la frequenza di cuto. I controlli
dipendono uno dall'altro, quindi se il livello di
envelope è alto l'eet to di decadimento del suono
sarà più evidente.
5. Il controllo ACCENT inuenza solo quelle note in un
pattern alle quali è stato assegnato l'accento.
6. L'uscita dell'amplicatore controllato in voltaggio
(VCA) si spost a quindi verso la sezione DISTORTION
(se selezionat a). Utilizzate il comando VOLUME
per regolare il livello che va alla cua e all'uscita
principale.
7. Tenere il livello basso quando mettete la cua per
la prima volta.
SEZIONE PATCH BAY
Questa s ezione vi ore la versa tilità di connettere al tre unità
e sintetiz zatori modulari per cre are molti suoni diversi. I
connetto ri sono mini-jack stan dard da 3,5mm. e i requisiti
di tensione sono indicati nella tabella delle speciche. Per
funzionar e il TD-3 non necessita di ques ti collegamenti,
servono per un'ulteriore espansione del sistema.
Attenzione: non sovraccaricare gli ingressi da
3,5mm. Possono accet tare solo il corret to livello di
tensioni come in dicato nella tabella delle spe ciche. Le uscite
da 3,5mm devono esser e collegate solo a ingressi in g rado di
ricevere le tensi oni di uscita. La mancat a osservanza di que ste
istruzi oni può danneggiare il TD-3 o le unit à esterne.
SEZIONE SEQUENCER
Consultate la se zione più avanti in questa g uida per i dettagli
sulla scrit tura e la riproduzio ne dei pattern, e su scri ttura e
riproduzione di track.
AGGIORNAMENTO FIRMWARE
Controllate re golarmente il nostro si to web behringer.
com per eventuali a ggiornamenti al rmware d el vostro
synth TD-3.
Il le del rmwar e può essere scaricat o e memorizzato sul
computer e quin di utilizzato per aggi ornare il TD-3. È fornito
con istruzioni dettagliate sulla procedura di aggiornamento.
DIVERTITEVI
Il TD-3 ha molti cont rolli utili per ricreare d iversi strumenti
di basso e per c reare linee di basso. La patc h bay consente
ulteriori sperimentazioni ed espansioni ad altre unità e a
sintetizzatore modulari.
Tutti questi c ontrolli, le possibilità p er la creatività musica le
sono innite!
Speriamo che a pprezzerete il vost ro TD-3 e che diventerà una
parte es senziale del vostro sist ema.
Page 26

50 51Quick Start GuideTD -3
TD-3 Aan de slag
(NL) Stap 3: Aan de slag
OVERVIEW
This ‘getting started’ guide will help you set up the
TD-3 analoge baslijnsynthesizer en introduceer kort de
mogelijkheden ervan.
VERBINDING
Raadpleeg de verbindingsgids eerder in dit document om
de TD-3 op uw systeem aan te sluiten.
SOFTWARE-INSTELLING
De TD-3 is een USB Class Compliant MIDI-apparaat, en
daarom is er geen driverinstallatie vereist. De TD-3 heef t
geen extra stuurprogramma's nodig om met Windows en
MacOS te werken.
HARDWZIJN SETUP
Maak alle verbindingen in uw systeem. Houd de TD-3
uitgeschakeld als u aansluitingen maakt.
Gebruik alle en de meegeleverde stroomadapter voor de
TD-3.
Zorg ervoor dat uw geluidssysteem is uitgeschakeld.
Schakel de TD-3 in voordat u eindversterkers inschakelt, en
schakel deze als laatste uit. Dit zal helpen voorkomen dat
uw luidsprekers worden in- of uitgeschakeld.
WARM UP TIJD
We raden aan om de TD-3 15 minuten of meer te laten
opwarmen voordat u gaat opnemen of live optreden.
(Langer als het uit de kou is gehaald.) Hierdoor krijgen
de analoge precisiecircuits de tijd om hun normale
bedrijfstemperatuur en afgestelde prestaties te bereiken.
SYNC EN KLOKTYPE INSTELLEN
Keuzeschakelaars 1, 2, 3 of 4 vertegenwoordigen
respec tievelijk klokbron INT, MIDI, USB of TRIG
Keuzeschakelaars 5, 6, 7 of 8 vertegenwoordigen
respec tievelijk kloksnelheid 1PPs, 2PPQ, 24PPQ of 48PPQ
1. Druk op Functie.
2. Zorg er voor dat er geen sequentie wordt afgespeeld.
3. Druk tegelijkertijd op BACK en WRITE / NEXT om de
instelmodus voor synchronisatie te openen.
4. Keuzeschakelaar 1 t / m 8 LED's gaan aan en de
huidige klok bron (1 t / m 4) en kloksnelheid (5 t /
m 8) knipperen, u hebt ongeveer 3 seconden om
wijzigingen aan te brengen.
5. Dr uk op keuzeschakelaar 1, 2, 3 of 4 om de klokbron
respec tievelijk te wijzigen in INT, MIDI, USB of TRIG
6. Druk op keuzeschakelaar 5, 6, 7 of 8 om de
kloksnelheid te wijzigen in respectievelijk 1PPs,
2PPQ, 24PPQ of 48PPQ.
7. Druk op een willekeurige andere knop of na 3
seconden geen wijzigingen, worden de wijzigingen
opgeslagen.
8. Herhaal stap 3 om uw selec tie te controleren.
Voorzichtigheid: De klokbron moet altijd INT (intern) zijn
als u geen externe klok gebruikt. Opmerking: kloksnelheid
van 24 of 48 PPQ (pulsen per kwartaal) wordt aanbevolen.
TUNING
Om snel geluiden te maken met uw TD-3, gebruik t u de
stemmingsfunctie als volgt. Merk op dat in deze modus de
noten een octaaf hoger worden getransponeerd.
1. Zorg ervoor dat het VOLUME laag staat.
2. Zet de MODE-schakelaar op PATTERN PLAY.
3. Houd de PITCH MODE-schakelaar inge drukt en druk
vervolgens op de PATTERN 6-schakelaar (noot A).
4. Elke keer dat u nu op WRITE / NEXT druk t, hoort
u deze noot in uw koptelefoon of luidsprekers.
Pas het VOLUME-niveau aan voor een
comfortabel luisterniveau.
5. Gebruik de TUNE-knop om de uitgangsfrequentie
in te stellen op exact 220 Hz. De frequentie kan
omhoog of omlaag worden aangepast en maakt
jnafstemming op andere instrumenten mogelijk.
6. Om op andere noten in plaats van A af te s temmen,
houdt u PITCH MODE ingedrukt en vervolgens de
gewenste noot.
7. Nu de TD-3 geluiden kan maken, kunt u
experimenteren met de synthesizerregelaars
en de vervorming, en naar de eec ten op het
geluid luisteren.
SIGNAL STROMEN
Het signaalpad binnen de TD-3 kan als volgt worden
beschouwd als bewegend van links naar rechts:
1. De TD-3 heeft een spanningsges tuurde oscillator
(VCO) die het geluid genereert, en kan worden
aangepast met zijn WAVEFORM en TUNING.
De golfvorm kan worden geselecteerd uit
omgekeerde zaagtand of puls. Luister naar de
geluidsveranderingen die beide golfvormen maken.
2. Nex t in line is the voltage controlled lter (VCF)
where the CUTOFF f requency and RESONANCE
can be adjusted. Play with the cuto f requency,
and resonance controls, and listen to their eects
on the sound. The classic low-pass lter allows a
great deal of cont rol over the sounds created by
TD-3. It reduces the level of signals that are above
the cuto frequency, so reducing the levels of the
higher-order harmonics.
3. The RESONANCE control gives an enhancement to
the signals at the c rossover frequency. Rotating it
towards maximum will give very inter esting eects
and self-oscillation.
4. The ENVELOPE and DECAY controls aect the VCF by
modulating the cuto frequenc y. The controls are
dependent on each other, so if the envelope level
is high, then the decay eect on the sound will be
more noticeable.
5. The ACCENT control aects only those notes in a
pattern that have accent assigned.
6. The volt age controlled amplier ( VCA) output then
moves through the DISTORTION section (if this is
selecte d). Use the VOLUME control to adjust the level
going to your headphones and the main out put.
7. Keep the level down low when rst put ting
on headphones.
PATCH BAY SECTION
This section allows you the vers atility to connect to other
units and modular synthesizer equipment to create
many dierent s ounds. The connections are standard
3.5 mm TS, and the voltage requirements are shown in
the specications table. The TD -3 does not need these
connections in order to operate, they are used for further
expansion of your system.
Caution: Overbelast de 3,5 mm-ingangen niet.
Ze kunnen alleen het juiste spanningsniveau
accepteren, zoals weergegeven in de specicatietabellen.
De uitgangen van 3,5 mm mogen alleen worden
aangesloten op ingangen die de uitgangsspanningen
kunnen ontvangen. Het niet opvolgen van deze instruc ties
kan de TD-3 of ex terne eenheden beschadigen.
SEQUENCER SECTIE
Zie het gedeelte verderop in deze handleiding voor details
over het schrijven en spelen van patronen, en het schrijven
en spelen van tracks.
FIRMAWAOPNIEUW BIJWERKEN
Kijk regelmatig op onze website behringer.com voor
updates van de r mware van uw TD-3 synthesizer. Het
rmwarebestand kan worden gedownload en op uw
computer worden opgeslagen en vervolgens worden
gebruik t om de TD-3 bij te werken. Het wordt geleverd met
gedetailleerde instruc ties over de updateprocedure.
HAVE PRET
De TD-3 heeft veel handige bedieningselementen
om verschillende basinstrumenten na te bootsen en
om baslijnen te creëren. De patch-bay maakt verdere
experimenten en uitbreiding naar andere eenheden en
modulaire synthesizerapparatuur mogelijk.
Met al deze bedieningselementen zijn de mogelijkheden
voor muzikale creativiteit eindeloos!
We hopen dat u veel plezier zult beleven aan uw nieuwe
TD-3 en dat deze een essentieel onderdeel van uw systeem
zal worden.
Page 27

52 53Quick Start GuideTD -3
TD-3 Komma igång
(SE) Steg 3: Komma igång
ÖVERSIKT
Denna "komma igång" -guide hjälper dig att ställa in
TD-3 analog baslinjesynthesizer och kort introducera dess
funktioner.
FÖRBINDELSE
För att ansluta TD-3 till ditt system, se anslutningsguiden
tidigare i detta dokument.
PROGRAMINSTÄLLNINGAR
TD-3 är en USB-klass kompatibel MIDI-enhet och därför
krävs ingen installation av drivrutiner. TD-3 kräver inga
ytter ligare drivrutiner f ör att fungera med Windows och
MacOS.
HARDWÄR INSTÄLLNINGAR
Gör alla anslutningar i ditt system. Håll TD-3-strömmen
avstängd när du gör några anslutningar.
Använd endast den medföljande nätadaptern för TD-3.
Se till att ditt ljudsystem är avstängt.
Sätt på TD -3 innan du slår på några eektförstärkare och
stäng av den sis t. Detta hjälper till at t förhindra att du slår
på eller stänger av "poppar eller dunkar" i högtalarna.
WARM UP TID
Vi rekommenderar att du lämnar 15 minuter eller mer
tid för TD-3 att värma upp innan du spelar in eller spelar
live. (Längre om den har förts in f rån förkylningen.) Det ta
kommer att göra det möjligt för precisionsanalogkretsarna
att nå sin normala drifts temperatur och inställda
prestanda.
SETTING SYNC och CLOCK TYPE
Väljaromkopplare 1, 2, 3 eller 4 representerar klockkällan
INT, MIDI, USB respektive TRIG
Väljaromkopplare 5, 6, 7 eller 8 representerar
klockf rekvensen 1PPs, 2PPQ, 24PPQ respek tive 48PPQ
1. Tryck på Funktion.
2. Se till at t ingen sekvens spelas.
3. Tryck på BACK och WRITE / NEXT samtidigt för att gå
till Sync inställningsläge.
4. Väljarens 1 till 8 lysdioder tänds och den aktuella
klockkällan (1 till 4) och klockfrekvensen (5 till
8) blinkar, du har ungefär 3 sekunder på dig at t
göra ändringar.
5. Tryck p å väljarknappen 1, 2, 3 eller 4 för att ändra
klockkällan till INT, MIDI, USB eller TRIG
6. Tryck på väljaren 5, 6, 7 eller 8 för att ändra
klockf rekvensen till 1PP, 2PPQ, 24PPQ eller 48PPQ.
7. Tryck på någon annan k napp eller efter inga
ändringar på 3 sekunder sparas ändringarna.
8. Upprepa steg 3 för att kontrollera ditt val.
Varning: Klockkällan måste alltid vara INT (intern) om du
inte använder en extern klocka. Obs! Klockfrekvens 24 eller
48 PPQ (pulser per kvartal) rekommenderas.
TUNING
För att snabbt börja göra ljud med din TD-3, använd
inställningsfunktionen enligt följande. Observera att i
detta läge transponeras ante ckningarna en oktav högre.
1. Se till att VOLYM är avstängt.
2. Ställ MODE- omkopplaren på PATTERN PLAY.
3. Håll ne d PITCH MODE-omkopplaren och tryck sedan
på PATTERN 6-omkopplaren (not A).
4. Nu, varje gång du trycker på WRITE / NEXT, kommer
du att höra denna anteckning i dina hörlurar eller
högtalare. Justera VOLUME-nivån till en bekväm
lyssningsnivå.
5. Använd TUNE-kontrollen för att justera
utfrekvensen till exak t 220 Hz. Frekvensen kan
justeras upp eller ner och möjliggöra njustering till
andra instrument.
6. För at t ställa in andra toner istället för A, tryck och
håll ned PITCH MODE och s edan önskad ton.
7. Nu när TD-3 kan göra ljud kan du experimentera
med synthesizer-kontrollerna och distorsionen o ch
lyssna på eekterna på ljudet.
SIGNAL FLÖDE
Signalvägen i TD -3 kan ses som at t den rör sig från vänster
till höger enligt följande:
1. TD-3 har en spänningss tyrd oscillator (VCO) som
genererar ljudet och kan justeras med WAVEFORM
och TUNING. Vågformen kan väljas från omvänd
sågtand eller puls. Lyssna på ljudförändringarna
som båda vågf ormerna gör.
2. Nästa i rad är det spänningsstyrda ltret (VCF)
där CUTOFF-frekvensen och RESONANS kan
justeras. Spela med avstängningsfrekvensen och
resonanskontrollerna och lyssna på deras eekter
på ljudet. Det klassiska lågpass ltret tillåter
stor kontroll över de ljud som skapas av TD-3.
Det minskar nivån på signaler som ligger över
avstängningsfrekvensen, vilket minskar nivåerna för
överordnade övertoner.
3. RESONANCE-kontrollen ger en förbät tring av
signalerna vid delningsfrekvensen. Att vrida det
mot maximalt ger mycket intressant a eekter och
självsvängning.
4. Kontrollerna ENVELOPE och DECAY påverkar VCF
genom att modulera avstängningsfrekvensen.
Kontrollerna är beroende av varandr a, så om
kuvertnivån är hög, kommer sönderfallseekten på
ljudet att bli mer märkbar.
5. ACCENT-kontrollen påverkar bara de anteckningarna
i ett mönster som har accent tilldelat.
6. Den spänningsst yrda förstärkaren (VCA) går sedan
genom DISTORTION-sektionen (om detta är valt).
Använd VOLUME-kontrollen för att justera nivån för
dina hörlurar och huvudutgången.
7. Håll nivån nere när du sätter på dig hörlurarna.
PATCH BAY SEKTION
Detta avsnitt ger dig mångsidigheten att anslut a till andra
enheter och modulär synthesizer-utrustning för att skapa
många olika ljud. Anslutningarna är standard 3,5 mm TS,
och spänningskraven visas i specikationstabellen. TD-3
behöver inte dessa anslutningar för att fungera, de används
för yt terligare expansion av ditt system.
Varning:Överbelasta inte 3,5 mm-ingångarna.
De kan endast acceptera rätt spänningsnivå som
visas i specikationstabellerna. 3,5 mm-utgångarna ska
endast anslutas till ingångar som kan ta emot
utspänningarna. Underlåtenhet att följa dessa
instruktioner kan skada TD-3 eller externa enheter.
SEKVENCER AVSNITT
Se avsnitte t senare i den här guiden för detaljer om
mönsterskrivning och spelning, samt spårskrivning och
spelning.
FASTWAÅTER UPPDATERA
Kontrollera vår webbplats behringer.com regelbundet
för uppdateringar av rmware för din TD-3 synthesizer.
Firmwarelen kan laddas ner och lagras på din dator och
sedan användas f ör att uppdatera TD-3. Den levereras med
detaljerade instruktioner om uppdateringsförfarandet.
HAVE R OLIGT
TD-3 har många användbara kontroller för att återskapa
olika basinstrument och skapa baslinjer. Patchfacket
möjliggör ytterligare experiment och expansion till andra
enheter och modulär synthesizer-utrustning.
Med alla dessa kontroller är möjligheterna till musikalisk
kreativitet oändliga!
Vi hoppas at t du kommer att njuta av din nya TD-3 och att
den kommer att bli en viktig del av dit t system.
Page 28

54 55Quick Start GuideTD-3
TD-3 Pierwsze kroki
(PL) Krok 3: Pierwsze kroki
PRZEGLĄD
Ten przewodnik dla początkującyc h pomoże Ci
skongurować TD -3 analogowy s yntezator linii basowej i
pokrótce przedstawię jego możliwości.
POŁĄCZENIE
Aby podłąc zyć TD-3 do swojego systemu, zapoznaj
się z instrukcją połączeń we wc ześniejszej części tego
dokumentu.
USTAWIENIA OPROGRAMOWANIA
TD-3 jest urz ądzeniem MIDI zgodnym z klasą USB, więc nie
jest wymagana instalacja sterowników. TD-3 nie wymaga
żadnych dodatkowych sterowników do pracy z Windows
i MacOS.
HARDWSĄ KONFIGURACJĄ
Wykonaj wsz ystkie połączenia w systemie. Nie w yłączaj
zasilania TD-3 podczas wykony wania jakichkolwiek
połąc zeń.
Używaj tylko dostarczonego zasilacza dla TD-3.
Upewnij się, że sy stem dźwiękowy je st wyłączony.
Włącz TD-3 przed włączeniem jakichkolwiek wzmacniacz y
mocy i w yłącz go jako ostatn i. Pomoże to zapobiec włąc zaniu
się lub wył ączaniu „trzasków lub uderzeń” w głośnikach.
WARM UCZAS P.
Zalecamy pozostawienie 15 minut lub więcej czasu na
rozgrzanie TD-3 przed nagry waniem lub występem na
żywo. (Dłużej, jeśli zosta ł przyniesiony z zimna). Pozwoli
to precyzyjnym obwodom analogowym na osiągnięcie
normalnej temperatury pracy i dostrojonej wydajności.
USTAWIANIE SYNCHRONIZACJI i TYPU ZEGARA
Przełączniki wyboru 1, 2, 3 lub 4 reprezentują odpowiednio
źród ło zegara: INT, MIDI, USB lub TRIG
Przeł ączniki 5, 6, 7 lub 8 reprezentują o dpowiednio
częstotliwość zegara 1PPs, 2PPQ, 24PPQ lub 48PPQ
1. Naciśnij klawisz Funkcja.
2. Upew nij się, że nie jest odtwar zana żadna sekwencja.
3. Naciśnij jednocześnie BACK i WRITE / NEXT,
aby przejść do trybu ustawień synchronizacji.
4. Diody LED wybieraka od 1 do 8 włączą się, a
aktualne źródło zegara (od 1 do 4) i częstotliwość
zegara (od 5 do 8) zaczną migać, masz około 3
sekund na dokonanie zmian.
5. Naciśnij Selektor 1, 2, 3 lub 4, aby zmienić źródło
zegara odpowiednio na INT, MIDI, USB lub TRIG
6. Naciśnij Selektor 5, 6, 7 lub 8, aby zmienić
częstotliwość zegara odpowiednio na 1PPs, 2PPQ,
24PPQ lub 48PPQ.
7. Naciśnij jakikolwiek inny przycisk lub po 3
sekundach braku zmian, zmiany zostaną zapisane.
8. Powtórz krok 3, aby sprawdzić swój wybór.
Uwaga: Źródło zegara musi zawsze być INT (wewnętrzne),
jeśli nie używasz zewnętrznego zegara. Uwaga: Zalecana
jest częstotliwość taktowania 24 lub 48 PPQ (impulsy
na kwartał).
TUNING
Aby szybko z acząć wydawać dźwięki za pomocą TD -3, użyj
funkcji strojenia w następując y sposób. Zwróć uwagę, że w
tym tr ybie nuty są transponowane o jedną oktawę wyżej.
1. Upewnij się, że GŁOŚNOŚĆ jest zmniejszona.
2. Ustaw przełącznik MODE na PATTERN PLAY.
3. Naciśnij i prz ytrzymaj pr zełącznik PITCH MODE,
a następnie naciśnij przełącznik PATTERN 6 (uwaga A).
4. Teraz za każdym razem, gdy naciśniesz WRITE
/ NEXT, usły szysz tę notatkę w słuchawkach
lub głośnikach. Dostosuj poziom GŁOŚNOŚCI do
wygodnego poziomu słuchania.
5. Za pomocą pokrętła TUNE ustaw częs totliwość
wyjściową dokładnie na 220 Hz. C zęstotliwość
można regulować w górę lub w dół, co umożliwia
dostrojenie do innych instrumentów.
6. Aby dostroić się do innych nut zamiast A, naciśnij i
przy trzymaj PITCH MODE, a następnie żądaną nutę.
7. Teraz, gdy TD-3 może wydawać dźwięki, możes z
poeksperymentować z kontrolkami syntezatora
i przesterowaniem oraz posł uchać efektów
na dźwięku.
SIGNAL PŁYW
Ścieżkę sygnału w TD-3 można traktować jako poruszając ą
się od lewej do prawej w następujący spos ób:
1. TD-3 ma jeden osc ylator sterowany napięciem
(VCO), który generuje dźwięk i może być regulowany
przez jego WAVEFORM i TUNING. Przebieg można
wybrać z odwróconego piłoksz tałtnego lub
impulsowego. Pos łuchaj zmian dźwięku, jakie
wywo łują oba przebiegi.
2. Następny w kolejce jest ltr sterowany napięciem
(VCF), w którym można regulować c zęstotliwość
odcięcia i rezonans. Graj z częstotliwością odcięcia
i kontrolkami rezonansu i słuchaj ich wpływ u na
dźwięk. Klasyczny ltr dolnoprzepustow y pozwala
na dużą kontrolę nad dźwiękami t worzonymi przez
TD-3. Zmniejsza poziom sygnałów, które są powyżej
częstotliwości odcięcia, zmniejszając w ten sposób
poziomy harmonicznych wyż szego rzędu.
3. Regulator RESONANCE zapewnia wzmocnienie
sygnałów przy częstotliwości zwrotnicy. Obracanie
go w kierunku maksimum da bardzo ciekawe efekty
i samo-oscylację.
4. Kontrolki ENVELOPE i DECAY wpły wają na VCF
poprzez modulację częstotliwości odcięcia.
Elementy s terujące są od siebie zależne, więc jeśli
poziom obwiedni jest wysoki, efekt zaniku dźwięku
będzie bardziej zauważalny.
5. Kontrolka ACCENT wpły wa tylko na te nuty we
wzorze, które mają przypisany akcent.
6. Wyjście wzmacniacza sterowanego napięciem (VCA)
przechodzi następnie przez sekcję DISTORTION
(jeśli jest wybrana). Użyj pok rętła VOLUME, aby
wyregulować poziom dźwięku w słuchawkach i na
głównym wyjściu.
7. Podczas pierwszego zakładania słuchawek utrzymuj
niski poziom głośności.
PATCH BAY SEKCJA
Ta sekcja pozwala na wszechstronność łączenia się z innymi
jednostk ami i modularnym sprzętem syntezatorowym
w celu tworzenia wielu różnych dźwięków. Połączenia są
standardowe 3,5 mm TS, a wymagania dotyczące napięcia
przedst awiono w tabeli specy kacji. TD-3 nie potrzebuje
tych połączeń do działania, służą one do dalszej rozbudowy
Twojego systemu.
Uwaga: Nie przeciążaj wejść 3,5 mm. Akceptują
tylko prawidłowy poziom napięcia, jak pokazano w
tabelach specykacji. Wyjścia 3,5 mm należy podłączać
tylko do wejść, które mogą prz yjmować napięcia
wyjściowe. Niezastosowanie się do tych instrukcji może
spowodować uszkodzenie TD-3 lub jednostek
zewnętrznych.
SEQUENCESEKCJA R.
Zapoznaj się z sekcją w dalszej części te go przewodnika,
aby uzyskać szczegółowe informacje na temat pis ania i
odtwarzania pat ternów oraz zapisywania i odtwarzania
ut worów.
FIRMAwaPONOWNIE AKTUALIZAC JA
Prosimy o regularne sprawdzanie nas zej strony
internetowej behringer.com w celu uzyskania aktualizacji
oprogramowania sprzętowego syntezatora TD-3. Plik
oprogramowania można pobrać i przechowywać na
komputerze, a nas tępnie użyć do aktualizacji TD-3. Zawiera
szczegółowe instrukcje dotyczące procedury aktualiz acji.
HAVE ZABAWA
TD-3 posiada wiele przydatnych elementów sterujących
do odtwar zania różnych instrumentów basowych i
tworzenia linii basowych. Patch bay pozwala na dalsze
eksper ymenty i rozbudowę o inne jednostki i modu łowy
sprzęt syntezatorowy.
Dzięki tym wszystkim elementom sterującym możliwości
kreaty wności muzycznej są nieogranic zone!
Mamy nadzieję, że now y TD-3 Ci się spodoba i stanie się
istotną częścią Twojego systemu.
Page 29

56 57Quick Start GuideTD -3
LED
TIME MODE
TD-3 Operation
TEMPO
CLEAR PITCH MODE 13 KEY KEYBOARD LED TIME MODE BACK
FUNCTION
TRACK/PATTERN GROUP MODE
LED
TRANSPOSESTART/STOP
RESTTIENOTE
OVERVIEW
The following details show some of the basic operations
of the TD-3. Keep it simple to start with, until you become
familiar with the steps required, and it becomes routine.
There are four pattern groups, I, II, III and IV.
Each pattern group can have up to eight A patterns and
eight B patterns. Each pattern can have up to 16 steps. The
default step is a 16th note.
A pattern of desired notes is rst entered in PITCH MODE,
and then the timing of each note is added in TIME MODE.
WRITING A PATTERN
As an example, we will program pattern 1A of pattern
group I. All writing (pitch and timing) is done in
PATTERN WRITE Mode.
Writing the notes in PITCH MODE
1. Turn the MODE switch to PATTERN WRITE.
2. Turn the PATTERN GROUP switch to Group I, position
1 or 2 (it does not mat ter which).
3. Pre ss FUNCTION, and the nearby NOR MAL MODE LED
will turn on, and one of the PATTERN switch LEDs
will be ashing.
4. Press the PATTERN 1 switc h (note C) and its LED will
ash, showing that we are getting ready to program
it. (Press it any way, even if it is already ashing.)
5. Press the PATTERN A switch (100) and its LED will
turn on (it may even be on already).
6. If PATTERN 1A already exis ts, press and hold the
PATTERN 1 switch and then press CLEAR. If you now
press START/STOP, you should not hear a pattern.
(Remember to pre ss START/STOP once more to get
out of play mode.)
7. Enter the number of steps in your pattern, by
holding down FUNCTION and pressing the STEP
switch by the number of steps required. For
example, you can press it 8 times. If you skip this
step, then the pattern will be 16 steps.
8. Press PITCH MODE and its LED will turn on. Now you
can enter the notes required for your pattern by
pressing any of the 13 notes in the keyboard.
9. To change the octave for a note, press and hold
either of the TR ANSPOSE up or down switches and
then press the required note.
DOWN UP
TRANSPOSE
Checking and editing notes
10. To listen to the pattern of note s, press PITCH MODE
to return to the start of the pattern, and press
WRITE/NEXT to play the notes one at a time. (Press
PITCH MODE at any time to ret urn to the start.)
11. 1To change a note that has jus t played, press BACK
to go back to that step. Then press the new note
(or to change octave, press and hold either of the
TRANSPOSE up or down switches and then press the
desired note).
12. Continue to press WRITE/NEX T until all notes have
been played, or press PITCH MODE to return to the
start, or FUNCTION to exit PITCH MODE.
WRITE/NEXTSLIDEACCENTUPDOWN
TAPPAT B PAT ATRIPLETSTEP
13. To redo the whole pattern, repeat step 3 onwards.
Writing the timing in TIME MODE
After all note s have been entered, you need to enter the
timing of each note in TIME MODE. Note: While in TIME
MODE, no sounds will be heard.
Checking and editing timing
16. To check the timing is OK, press TIME MODE, and
press WRITE/NEXT to cycle through the pattern
steps, one at a time. Look at the LEDs to see which
step is a note, tie, or rest.
17. To change t he timing of the pattern, repeat
steps 14 and 15 to re-enter t he new timing.
(Press TIME MODE at any time to return to the
start of the pattern.)
18. Now that the notes and timing have been added,
you can play the pattern by pressing FUNCTION to
return to normal mode, and then press START/STOP.
As the pat tern repeats, you can change the TEMPO
and adjust the synthesizer controls as required.
Alternative timing method
There is another way of entering the timing:
19. Press FUNCTION and then START/STOP to play the
existing pattern.
TAP
NOTE TIE REST
14. Press the TIME MODE switch and its LED will tur n on.
15. In TIME MODE, you can play the NOTE as it is, or add a
TIE, or a REST using three switches as shown above.
For examp le, for 16 notes, you could pr ess these three
switches as follows: Note, Rest, Rest, Note, Tie, Note, Note,
Tie, Note, Note, Tie, Note, Note, Note, Tie, Note. Whenever
you reach th e required numbe r of notes (which you set i n
procedu re 7 above), it will automatic ally exit TIME MODE .
Note: To play all the no tes just as they are, re peatedly
press the N OTE switch until you e xit TIME MODE. This w ill
create a sim ple Arpeggio.
20. Press the CLEAR switch and you will hear a
metronome, with a downbeat at the beginning of
the pattern.
21. Tap on the TAP switch, in the timing you would
like. Turn down the TEMPO if this will help. To add
Sustain, pre ss and hold down TAP.
22. Repeat steps 20 and 21 until the timing sounds good
(or repeat steps 14 and 15 if you pref er this method).
Adding or deleting ACCENT and SLIDE
23. While s till in PATTERN WRITE MODE, press PITCH
MODE and its LED will turn on. Press WRITE /NEXT
repeatedly to play each note of the current pattern.
24. When you reach a note that you would like to add
an accent or a slide to, keep holding the WRITE/
NEXT(don’t release it). If you go past a note you want
to change, press BACK rst, then press and hold
WRITE/NEXT.
Page 30

58 59Quick Start GuideTD-3
TD-3 Operation (continued)
25. Press ACCENT and/or SLIDE as required, to add it to
the note. (If these are already added to this note,
they will be deleted.) Then release WRITE/NEXT.
26. The ACCENT control knob will only aect those notes
that have ACCENT applied.
27. If the last note of a pattern is a slide, then:
28. In T RACK PLAY mode, this will slide to the n ext pattern
in a track (when th e pattern is added to a tra ck).
29. In PATTERN WRITE /PLAY mode, if there is only
one patter n, it will slide to the beginning of itself.
If there are t wo or more patterns, it will slide to next
pattern.
PLAYING A PATTERN
Although you can play the patterns w hile the MODE switch
is in the PATTERN WRITE position, use the PATTERN PLAY
position during normal pattern playing. This will prevent
you from accidentally erasing the p atterns with the CLEAR
switch.
The patter ns are recalled by setting the PATTERN GROUP
switch to position I, II, III, or IV and then using the PAT TERN
switches 1 to 8, and the A and B switches
1. Turn the MODE switch to the PAT TERN PLAY position.
2. Turn the PATTERN GROUP switch to the group where
your desired p attern was stored, eit her I, II, III, or IV.
3. Pre ss the FUNCTION switch, and the NORMAL MODE
LED will turn on.
4. Press the desired PATTERN switch 1 to 8, and i ts LED
will ash.
5. Press the desired A or B switch and its LED will light.
6. Press the START/STOP switch to play the pattern.
7. Adjust the sy nthesizer controls, the TEMPO, and the
distortion, and have fun.
8. If you pre ss and hold PITCH MODE, and then press
one of the 13 keys of the keyboard, the current
pattern will be transposed to that key when the
pattern restar ts.
9. While the pat tern is playing, you can press another
PATTERN switch 1 to 8, or A or B and it will play that
as soon as the current pattern is nished.
10. If you press and hold a PATTERN switch and then
press another one at the same time, this will select
both patterns and all the patterns in between, and
play them in order. This is a good way of hearing
multiple pat terns before you make a track.
TRACKS
After you have created a few patter ns, you can add them
together to form a TRACK.
1. Rotate the MODE sw itch to the TRACK
WRITE position.
2. Rotate the TRACK switch to one of the available
positions 1 to 7. This also selects the pattern group
to be used. For e xample, TRACK 1 and 2 can only
select f rom patterns saved in PATTERN GROUP
I. TRACK 3 and 4 can only select patterns from
PATTERN GROUP II.
3. Pre ss CLEAR to reset the track to the beginning.
4. Press START/STOP, and the TD-3 will play the current
pattern of the selected track. (Tracks are only
written while the unit is playing, and not stopped.)
5. Select the rst pattern to add to track. For example,
if you wanted to play a previously recorded pattern
2A, press 2 (note D) then press A (labled 100), even if
it is already selected, and pat tern 2A should play.
6. Press WRITE/NEXT to add this to the track
7. Select the next pattern in the same way. To add a
transpose, hold PITCH MODE and choose a key, and
the pattern playing will change pi tch to the new key.
8. Press WRITE/NEX T to enter this pattern.
9. Continue adding patterns in the same way.
10. When you reach the last pat tern, press CLEAR to let
the TD-3 know this is the last pattern in the track.
11. Press WRITE/NEXT.
12. Press START/STOP to nish.
Playing Tracks
1. Rotate the MODE sw itch to the TRACK PLAY position.
2. Rotate the TRACK switch to the de sired track.
3. Pre ss CLEAR to reset the track to the beginning.
4. Press START/STOP to play the track.
Deleting Patterns from a Track
To remove one pattern from the track, just select that
Pattern number. For example, to delete the t hird pattern
in a track:
1. Rotate the MODE sw itch to the TRACK WRITE
position.
2. Rotate the TRACK switch to the track to be edited.
3. Select the third pattern in the track by holding
FUNCTION down and pressing PATTERN 3.
4. Delete by holding FUNCTION down and then
pre ssing DEL (C sharp).
5. Rot ate the MODE switch to the TRACK PL AY position.
6. Press CLEAR to reset the track to the start.
7. Press START/STOP to play the track and listen to
the changes.
Inserting Patterns into a Track
For example, to add a pattern before the 5th pattern in
a track:
1. Rotate the MODE sw itch to the TRACK
WRITE position.
2. Rotate the TRACK switch to the track to be edited.
3. Select the fth pattern in the track by holding
FUNCTION down and pressing PATTERN 5.
4. Add by holding FUNCTION down and pressing
INS (D sharp). The new patter n will be added to
the track.
5. Press the START/STOP switch and the current pattern
added will play.
6. Selec t the pattern you want to play by pressing
its selec tor 1 to 8 and the A and B switches.
The selec ted pattern will play.
7. Press TAP to store the change.
8. Press START/STOP to stop play.
9. Rotate the MODE s witch to the TRACK PLAY position.
10. Press CLEAR to reset the track to the star t.
11. Press START/STOP to play the track and listen to
the changes.
Overwriting a Track
1. Existing t racks can be overwr itten with a new
track. It is not necessary to delete all patterns in a
track when writing over an exist ing track with a
shorter track. This is because when the new track
plays its last pattern, it will automatically retur n to
the beginning.
Page 31

60 61Quick Start GuideTD -3
TD-3 Poly Chain Function MIDI information
TD-3 Poly Chain Function MIDI information
System Mode
System Mode
POWER LED Mode
POWER LED Mode
Amber Normal Mo de
Amber Normal Mo de
Red Poly Chain Mo de (not playing)
Red Poly Chain Mo de (not playing)
Green Poly Chain Mod e (playing)
Green Poly Chain Mod e (playing)
Please use the “SynthTool.exe” to congure the
Please use the “SynthTool.exe” to congure the
Poly Chain mode.
Poly Chain mode.
The POWER LED will tur n red during Poly Chain mode.
The POWER LED will tur n red during Poly Chain mode.
MIDI message
MIDI message
Channel
Channel
Message
Message
SysRT
SysRT
Examples
Examples
Function Command
Function Command
Note on 90 3C 64
Note on 90 3C 64
Note o 80 3C 40
Note o 80 3C 40
All notes o B0 7B
All notes o B0 7B
Note: 1, MIDI input channel 1.
Note: 1, MIDI input channel 1.
Status Second Third Parameter Description
Status Second Third Parameter Description
8n kk vv [0, 7F] Note O
8n kk vv [0, 7F] Note O
9n kk vv [0, 7F] Note On
9n kk vv [0, 7F] Note On
Bn 7B — — All Notes O
Bn 7B — — All Notes O
En bb bb [0, 3FFF] Pitch Bend
En bb bb [0, 3FFF] Pitch Bend
F8 — — — Timing Clock
F8 — — — Timing Clock
FA — — — Start
FA — — — Start
FB Continue
FB Continue
FC Stop
FC Stop
Page 32

62 63Quick Start GuideTD-3
Specications
Synthesizer Architecture
Number of voices Monophonic
Type Analog
Oscillators 1
VCF 1 low pass
Envelopes 1
Connectivity
Power input DC input co nnector
Power switc h Push button on/o
MIDI In/Thru MIDI In and MIDI T hru, 5-pin DIN
USB (MIDI) USB 2.0, type B
Outputs Line outp ut: ¼" TRS, unbalanced, ma x. +8 dBu
Output impedance 1.5 k
Headphones 3.5 mm TRS, ma x. 50 mW/32 (1 KHz, 1% THD)
Headphones output impedance 15
USB
Type Class comp liant USB 2.0, type B
Supported Operating Systems Windows 7 or higher
Mac OS X 10.6.8 or hig her
Input s and Output s (TS 3.5 mm)
Inputs Filter in: +12 dBu
Outputs CV out: +1 V to +5 V (1 volt/oct)
Power Requirements
Exter nal power adaptor (use on ly the
supplied adapter)
Power consumption 2 W Maximum
Indicator Power LED
Environmental
Operating temperature range 5°C – 4 0°C (41°F – 104°F)
Physical
Dimensio ns (H x W x D) 56 x 305 x 165 mm (2.2 x 12 x 6.5")
Weight 0.8 kg (1.8 lbs)
Shipping weight 1.4 kg (3.1 lbs)
Sync in: More th an: 2.5 V
Gate out: O FF: 0 V; ON: +12 V
9 VDC 670 mA
Page 33

64 65Quick Start GuideTD-3
Other important information
Important information Aspectos importantes
1. Register online.
Pleaseregister your new Music Tribe
equipment right after you purchase it by
visiting musictribe.com. Registeringyour
purchase using our simple online
form helps us to process your repair
claims more quickly and eciently.
Also, read the terms and conditions of
our warranty, ifapplicable.
2. Malfunction. Should your
Music Tribe Authorized Reseller not be
located in your vicinity, you may contact
the Music Tribe Authorized Fulller for
your country listed under “Support” at
musictribe.com. Shouldyour country not
be listed, pleasecheck if your problem
can be dealt with by our “OnlineSupport”
which may also be found under “Support”
at musictribe.com. Alternatively, please
submit an online warranty claim at
musictribe.com BEFORE returning
theproduct.
3. Power Connections.
Beforeplugging the unit into a power
socket, please make sure you are using the
correct mains voltage for your particular
model. Faulty fuses must be replaced
with fuses of the same type and rating
withoutexception.
1. Registro online.
Lerecomendamos que registre su nuevo
aparato Music Tribe justo después de
su compra accediendo a la página web
musictribe.com. Elregistro de su compra
a través de nuestro sencillo sistema
online nos ayudará a resolver cualquier
incidencia que se presente a la mayor
brevedad posible. Además,aproveche
para leer los términos y condiciones
de nuestra garantía, siesaplicable en
sucaso.
2. Averías. En el caso de que no
exista un distribuidor Music Tribe en las
inmediaciones, puede ponerse en contacto
con el distribuidor Music Tribe de su
país, queencontrará dentro del apartado
“Support” de nuestra página web
musictribe.com. En caso de que su país no
aparezca en ese listado, acceda a la sección
“Online Support” (quetambiénencontrará
dentro del apartado “Support” de nuestra
páginaweb) y compruebe si su problema
aparece descrito y solucionado allí.
Deforma alternativa, envíenos a través
de la página web una solicitud online de
soporte en periodo de garantía ANTES de
devolvernoselaparato.
3. Conexiones de corriente.
Antes de enchufar este aparato a una
salida de corriente, asegúrese de que
dicha salida sea del voltaje adecuado
para su modelo concreto. En caso de
que deba sustituir un fusible quemado,
deberáhacerlo por otro de idénticas
especicaciones, sinexcepción.
Informations importantes
1. Enregistrez-vous
enligne. Prenezle temps
d’enregistrer votre produit Music Tribe
aussi vite que possible sur le site Internet
musictribe.com. Lefait d’enregistrer le
produit en ligne nous permet de gérer
les réparations plus rapidement et plus
ecacement. Prenezégalement le
temps de lire les termes et conditions de
notregarantie.
2. Dysfonctionnement. Si vous
n’avez pas de revendeur Music Tribe près
de chez vous, contactez le distributeur
Music Tribe de votre pays: consultez la
liste des distributeurs de votre pays dans
la page “Support” de notre site Internet
musictribe.com. Si votre pays n’est pas
dans la liste, essayez de résoudre votre
problème avec notre “aideen ligne”
que vous trouverez également dans la
section “Support” du site musictribe.com.
Vouspouvez également nous faire
parvenir directement votre demande de
réparation sous garantie par Internet sur
le site musictribe.com AVANT de nous
renvoyer leproduit.
3. Raccordement au secteur.
Avant de relier cet équipement au secteur,
assurez-vous que la tension secteur
de votre région soit compatible avec
l’appareil. Veillez à remplacer les fusibles
uniquement par des modèles exactement
de même taille et de même valeur
électrique — sans aucuneexception.
Weitere wichtige
Informationen
1. Online registrieren.
Bitteregistrieren Sie Ihr neues
Music Tribe-Gerät direkt nach dem
Kauf auf der Website musictribe.com.
WennSie Ihren Kauf mit unserem
einfachen online Formular registrieren,
könnenwir Ihre Reparaturansprüche
schneller und ezienter bearbeiten.
Lesen Sie bitte auch unsere
Garantiebedingungen, fallszutreend.
2. Funktionsfehler. Sollte sich
kein Music Tribe Händler in Ihrer Nähe
benden, können Sie den Music Tribe
Vertrieb Ihres Landes kontaktieren, der
auf musictribe.com unter „Support“
aufgeführt ist. Sollte Ihr Land nicht
aufgelistet sein, prüfen Sie bitte, ob Ihr
Problem von unserem „Online Support“
gelöst werden kann, den Sie ebenfalls
auf musictribe.com unter „Support“
nden. Alternativ reichen Sie bitte
Ihren Garantieanspruch online auf
musictribe.com ein, BEVOR Sie das
Produktzurücksenden.
3. Stromanschluss. Bevor Sie das
Gerät an eine Netzsteckdose anschließen,
prüfen Sie bitte, obSie die korrekte
Netzspannung für Ihr spezielles Modell
verwenden. Fehlerhafte Sicherungen
müssen ausnahmslos durch Sicherungen
des gleichen Typs und Nennwerts
ersetztwerden.
Outras Informações
Importantes
1. Registre-se online. Porfavor,
registreseu novo equipamento
Music Tribe logo após a compra visitando
o site musictribe.com Registrar sua
compra usando nosso simples formulário
online nos ajuda a processar seus
pedidos de reparos com maior rapidez
e eciência. Além disso, leia nossos
termos e condições de garantia,
caso sejanecessário.
2. Funcionamento
Defeituoso. Casoseufornecedor
Music Tribe não esteja localizado nas
proximidades, vocêpode contatar
um distribuidor Music Tribe para o
seu país listado abaixo de “Suporte”
emmusictribe.com. Se seu país não estiver
na lista, favor checar se seu problema pode
ser resolvido com o nosso “SuporteOnline”
que também pode ser achado abaixo
de “Suporte”em musictribe.com.
Alternativamente, favorenviar uma
solicitação de garantia online em
musictribe.com ANTES da devolução
doproduto.
3. Ligações. Antes de ligar a unidade
à tomada, assegure-se de que está a
utilizar a voltagem correcta para o modelo
em questão. Osfusíveis com defeito
terão de ser substituídos, sem qualquer
excepção, porfusíveis do mesmo tipo e
correntenominal.
Informazioni importanti
1. Registratevi online.
Vi invitiamo a registrare il nuovo
apparecchio Music Tribe subito
dopo averlo acquistato visitando
musictribe.com. La registrazione
dell'acquisto tramite il nostro semplice
modulo online ci consente di elaborare
le richieste di riparazione in modo più
rapido ed eciente. Leggete anche
i termini e le condizioni della nostra
garanzia, qualora applicabile.
2. Malfunzionamento. Nel caso
in cui il rivenditore autorizzato Music
Tribe non si trovi nelle vostre vicinanze,
potete contattare il Music Tribe Authorized
Fulller per il vostro paese, elencato in
“Support” @ musictribe.com. Se la vostra
nazione non è elencata, controllate se
il problema può essere risolto tramite
il nostro “Online Support”che può
anche essere trovato sotto “Support”
@ musictribe.com. In alternativa,
inviate una richiesta di garanzia online
su musictribe.com PRIMA di restituire
il prodotto.
3. Collegamento
all'alimentazione. Prima di
collegare l'unità a una presa di corrente,
assicuratevi di utilizzare la tensione di rete
corretta per il modello specico. I fusibili
guasti devono essere sostituiti, senza
eccezioni, con fusibili dello stesso tipo e
valore nominale.
Page 34

66 67Quick Start GuideTD-3
Other important information
Belangrijke informatie Viktig information Ważna informacja
1. Register online.
Pleaseregister your new Music Tribe
equipment right after you purchase it by
visiting musictribe.com. Registeringyour
purchase using our simple online
form helps us to process your repair
claims more quickly and eciently.
Also, read the terms and conditions of
our warranty, ifapplicable.
2. Malfunction. Should your
Music Tribe Authorized Reseller not be
located in your vicinity, you may contact
the Music Tribe Authorized Fulller for
your country listed under “Support” at
musictribe.com. Shouldyour country not
be listed, pleasecheck if your problem
can be dealt with by our “OnlineSupport”
which may also be found under “Support”
at musictribe.com. Alternatively, please
submit an online warranty claim at
musictribe.com BEFORE returning
theproduct.
3. Power Connections.
Beforeplugging the unit into a power
socket, please make sure you are using the
correct mains voltage for your particular
model. Faulty fuses must be replaced
with fuses of the same type and rating
withoutexception.
1. Registro online.
Lerecomendamos que registre su nuevo
aparato Music Tribe justo después de
su compra accediendo a la página web
musictribe.com. Elregistro de su compra
a través de nuestro sencillo sistema
online nos ayudará a resolver cualquier
incidencia que se presente a la mayor
brevedad posible. Además,aproveche
para leer los términos y condiciones
de nuestra garantía, siesaplicable en
sucaso.
2. Averías. En el caso de que no
exista un distribuidor Music Tribe en las
inmediaciones, puede ponerse en contacto
con el distribuidor Music Tribe de su
país, queencontrará dentro del apartado
“Support” de nuestra página web
musictribe.com. En caso de que su país no
aparezca en ese listado, acceda a la sección
“Online Support” (quetambiénencontrará
dentro del apartado “Support” de nuestra
páginaweb) y compruebe si su problema
aparece descrito y solucionado allí.
Deforma alternativa, envíenos a través
de la página web una solicitud online de
soporte en periodo de garantía ANTES de
devolvernoselaparato.
3. Conexiones de corriente.
Antes de enchufar este aparato a una
salida de corriente, asegúrese de que
dicha salida sea del voltaje adecuado
para su modelo concreto. En caso de
que deba sustituir un fusible quemado,
deberáhacerlo por otro de idénticas
especicaciones, sinexcepción.
1. Enregistrez-vous
enligne. Prenezle temps
d’enregistrer votre produit Music Tribe
aussi vite que possible sur le site Internet
musictribe.com. Lefait d’enregistrer le
produit en ligne nous permet de gérer
les réparations plus rapidement et plus
ecacement. Prenezégalement le
temps de lire les termes et conditions de
notregarantie.
2. Dysfonctionnement. Si vous
n’avez pas de revendeur Music Tribe près
de chez vous, contactez le distributeur
Music Tribe de votre pays: consultez la
liste des distributeurs de votre pays dans
la page “Support” de notre site Internet
musictribe.com. Si votre pays n’est pas
dans la liste, essayez de résoudre votre
problème avec notre “aideen ligne”
que vous trouverez également dans la
section “Support” du site musictribe.com.
Vouspouvez également nous faire
parvenir directement votre demande de
réparation sous garantie par Internet sur
le site musictribe.com AVANT de nous
renvoyer leproduit.
3. Raccordement au secteur.
Avant de relier cet équipement au secteur,
assurez-vous que la tension secteur
de votre région soit compatible avec
l’appareil. Veillez à remplacer les fusibles
uniquement par des modèles exactement
de même taille et de même valeur
électrique — sans aucuneexception.
FEDERAL COMMUNICATIONS
COMMISSION COMPLIANCE
INFORMATION
TD-3
Responsi ble Party Name: Music Tri be Commercia l NV Inc.
Address: 5270 Procyon Street,
Phone Number: +1 702 800 8290
TD-3
This equi pment has been te sted and found t o comply with the l imits
for a Class B d igital device, p ursuant to par t 15 of the FCC Rules. The se
limits a re designed to pr ovide reasonab le protecti on against harm ful
interference in a residential installation. This equipment generates, uses
and can ra diate radio fre quency energ y and, if not inst alled and used in
accordan ce with the inst ructions, may c ause harmfu l interferen ce to radio
communications. However, there is no guarantee that interference will
not occur i n a particular i nstallation . If this equipme nt does cause har mful
interf erence to radio o r television rec eption, which c an be determine d by
turnin g the equipment o and on, the user is en couraged to tr y to correct
the inter ference by one o r more of the follo wing measures:
• • Reorient or relocate the receiving antenna.
• • Increas e the separati on between the e quipment and re ceiver.
• • Connec t the equipment i nto an outlet on a ci rcuit diere nt from that to
which the r eceiver is conne cted.
• • Consult th e dealer or an expe rienced radio /TV technic ian for help.
This devi ce complies wit h Part 15 of the FCC rules . Operation is su bject to
the following two conditions:
(1) this device may no t cause harmfu l interfere nce, and
(2) this devic e must accept any int erference re ceived, includ ing
interference that may cause undesired operation.
Important information:
Changes o r modicatio ns to the equipme nt not expressl y approved by
Music Tribe c an void the user ’s authority to us e the equipment .
Hereby, Musi c Tribe de clares that this p roduct is in com pliance with
Directive 2014/35/EU,Direct ive 2014/30/EU, Directive 2011/65/EU and
Amendme nt 2015/863/EU, Directiv e 2012/19/EU, Regulat ion 519/2012
REACH SVHC a nd Directiv e 1907/ 2006/EC.
Full text of EU DoC is available at https://community.musictribe.com/
EU Repres entative: Music Tri be Brands DK A/S
Address : Ib Spang Olsens Ga de 17, DK - 820 0 Aarhus N, Denma rk
Las Vegas NV 8 9118,
United States
Page 35

We Hear You
 Loading...