

Page 1
Page 2
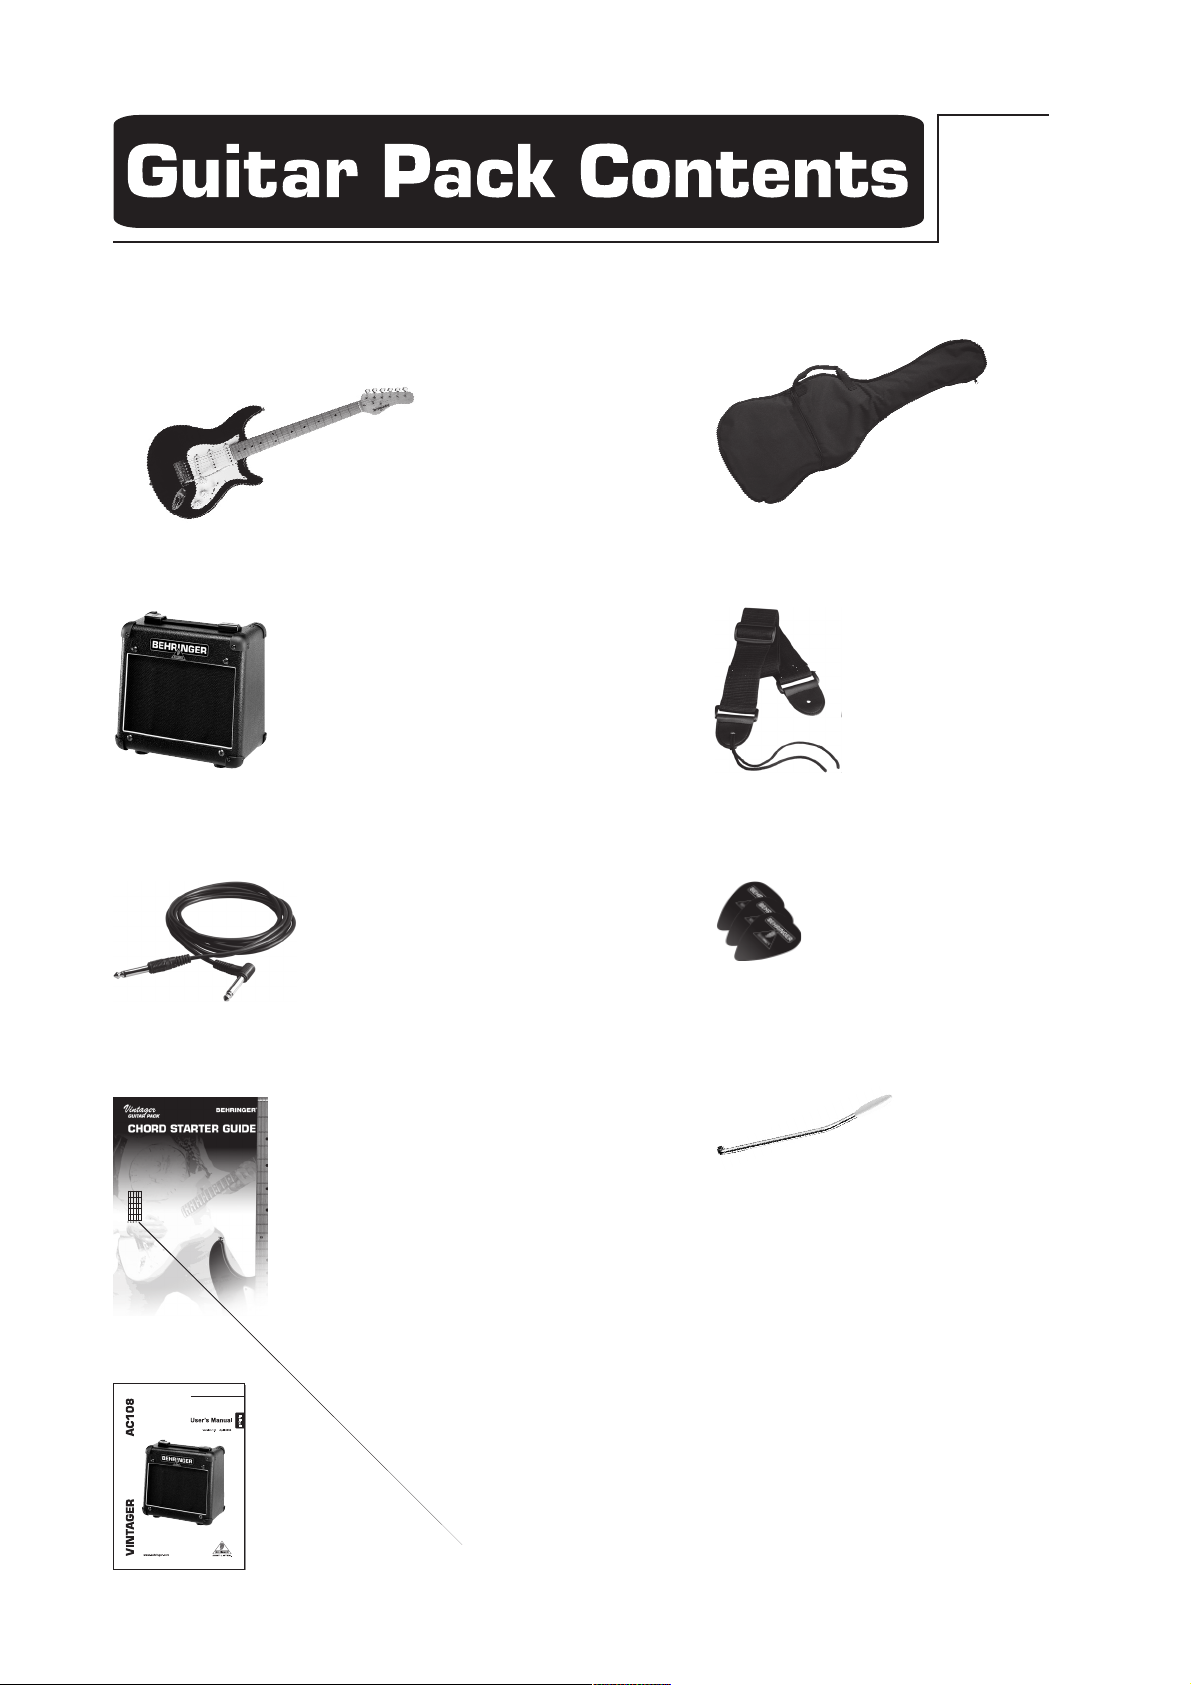
Top-notch electric guitar
Padded gig bag
BEHRINGER VINTAGER AC108 guitar amplifier
6.5 foot high-quality instrument cable
Chord chart poster
Adjustable black nylon strap
3 picks
Vibrato arm
Amp manual
Guitar instruction book
Page 3

Your Guitar ..................................................................................................................................................4
Introduction ................................................................................................................. 4
Parts of a guitar ............................................................................................................ 4
Installing the vibrato arm ................................................................................................ 4
Guitar fretboard diagram ................................................................................................. 4
Left-hand position .......................................................................................................... 4
Holding Positions .......................................................................................................................................5
Holding the guitar .......................................................................................................... 5
The picks ..................................................................................................................... 5
Downward strum .......................................................................................................... 5
Tuning............................................................................................................................................................6
Introduction ................................................................................................................. 6
Guitar pitch pipe ............................................................................................................ 6
Keyboards .................................................................................................................... 6
Relative tuning .............................................................................................................. 6
Electronic tuner ............................................................................................................ 6
Tuning with BEHRINGER guitar amps ................................................................................. 6
Online tuning ................................................................................................................ 6
Chords ...........................................................................................................................................................7
Brief introduction to chords ............................................................................................. 7
First Steps...................................................................................................................................................8
F major ....................................................................................................................... 8
Power chords ............................................................................................................... 8
Easy chord progressions ................................................................................................. 8
Pentatonic scale ........................................................................................................... 8
Care/Maintenance ................................................................................................................................... 9
Cleaning your guitar ....................................................................................................... 9
Care ........................................................................................................................... 9
Changing strings ........................................................................................................... 9
Tips ................................................................................................................................................................. 9
Page 4

INTRODUCTION
Welcome to the BEHRINGER family!
Well show you how playing a musical
instrument like the guitar can be a lot of
fun. The following pages will help you learn
some guitar basics. Youll get familiar
with chords that allow you to play wellknown songs. Youll get the skills you need
to add a musical flair to your life.
PARTS OF A GUITAR
No matter what guitar you use (acoustic
or electric), and no matter what it is
used to play (folk, rock, country, jazz, or
even classical music), the basic parts of
the guitar are always the same. The
illustration to the right shows you what
these parts are called. Take some time
to familiarize yourself with those! Knowing
those parts by name will help you
understand what you read in this book
and elsewhere.
INSTALLING THE VIBRATO ARM
Carefully insert the threaded end of the vibrato arm into the arm socket in the bridge (see diagram above for the correct
position). Rotate the arm clockwise until it is firmly (but not too tightly) attached. The arm swing can be adjusted (some
players prefer a loose arm swing) by turning it counter-clockwise one turn. Depressing the vibrato arm (while playing the
instrument) lowers the pitch and pulling up on the arm will raise the pitch.
GUITAR FRETBOARD DIAGRAM
Fretboard diagrams are like road maps for playing
the guitar. They show you what notes to play and
what strings to strum. Take note of how the diagram
represents the guitar fretboard.
LEFT-HAND POSITION
Left-hand fingers are
numbered 1 to 4, beginning with the index
finger. Always press
the strings with the tips
of the fingers; keeping
your fingernails short
will make your life a lot
easier.
4
Page 5

HOLDING THE GUITAR
Place the guitar on your right thigh and hold it against the right
side of your chest using your right arm. Try to stay relaxed. You
should support the guitar using your body and not your hands,
tilting the guitar neck upwards. If you cross your legs, you can
elevate the neck to a higher position.
A couple of general guidelines to follow:
* Adjust the position of your body, arms and legs so you avoid
tension
* Try several positions before you find the one that feels most
comfortable
* Try to hold your head up straight; letting it droop causes
strain on your spine
If the guitar hangs too low while you are playing in the standing
position, this may cause unnecessary strain on your left wrist.
Similarly, it may also overwhelm your right hand when you are
strumming. Therefore, adjust the strap so that you find yourself
in a relaxed playing position, allowing both of your hands to
comfortably assume their positions.
SITTING
5
Page 6

INTRODUCTION
KEYBOARDS
Correcting the pitch of each string is called
tuning. Pitch simply means how high or how
low the sound of a musical instrument (in
this case, your guitar) is. There are several
ways to tune your guitar:
GUITAR PITCH PIPE
Pitch pipe is a pipe that you can buy at your
local music store. Blow into it to produce a
reference tone. The guitar string is then tuned
to this tone.
So lets start with what we know for sure:
there are six strings on your guitar and six
holes in the pitch pipe. Now how do you match
the six sounds of the pitch pipe to the sound
of the strings?
1. Sit comfortably and hold your guitar.
2. Have the pitch pipe near you.
3. Now here is the tricky part. Pick up your
pitch pipe and blow through the hole marked
E1. Try to match the sound of the pitch pipe
to the E1 string (all the way at the bottom)
by turning the tuning key for that string.
When both the pitch pipe and the string have
the same pitch, youre done with that string.
4. Do the same for the top string (E6) by blowing
through the hole marked E6 and turn the tuning
key for that string until the sounds match.
5. Continue the same steps to do B2 (2
string) and A5 (5th string) and the same thing
for G3 and D4 (3
6. When you are finished tuning all six strings,
go back through the tuning once again to be
sure all strings match the sounds of the notes
on the pitch pipe. Your guitar is now in tune
and ready to play.
If you experience difficulty in tuning all six
strings to the pitch pipes tones, tune only
one string to the pitch pipe and then tune
the rest by using the relative tuning method.
rd
and 4
th
string).
If you have a piano or electric keyboard, heres a quick overview of how
to tune your guitar. Follow the same procedure as with the pitch pipe.
Which key corresponds to which guitar string is shown below.
RELATIVE TUNING
Relative tuning is the most versatile tuning method because you can
use it anywhere and anytime.
All you need is a single reference tone (e.g. from another instrument
or your pitch pipe). You can tune all strings relative to one another,
provided one of them is tuned right.
What makes it even better: if you dont have a reference tone against
which to check your pitch, simply choose a reference tone. The following
example uses the 6th string (E6) as the reference tone.
1. Tune the open (no chord played) 6th string (E6) to a clear, low-pitch
sound. Get the string to the point of not being too loose, otherwise it
will buzz when you play.
2. Press the sixth string at the fifth fret. This is the pitch to which you
should tune the open fifth string. Keep on strumming the pressed 6th
string and the open 5th string until their sounds match. They are now
in tune with one another.
nd
3. Keep doing the same for the remaining strings, always using the
higher-numbered string as the reference for tuning the adjacent lowernumbered string.
Heres a short overview of how its all done:
6th string 5th fret = open 5th string
5th string 5th fret = open 4th string
4th string 5th position = open 3rd string
3rd string 4th position = open 2nd string
2nd string 5th position = open 1st string
Simply refer to the following diagram:
ELECTRONIC TUNER
Electronic tuners are widely available at music
stores, and are probably the easiest method
to tune a guitar. The tuner listens to the
pitch of each string as you strum it, one at a
time, and uses an easily understandable
display to let you know if your pitch is too
high or too low. You may consider getting
one if you find it difficult to tune your guitar
using the other tuning methods we describe
in this book.
ONLINE TUNING
At www.behringer.com, you will find an awesome online tuner for your guitar. Go for it!
TUNING WITH BEHRINGER GUITAR AMPS
The 2-channel amps of our V-TONE guitar amp series (GMX212,
GMX210 and GMX110) feature an integrated electronic tuner! Further
information can be found at www.behringer com.
6
Page 7

BRIEF INTRODUCTION TO CHORDS
Dont be afraid of chordstheres no reason for it. Chords are simply three or more notes that are being played together at
the same time. The most popular chords are major and minor chords. Major chords have an elevated, cheerful character,
while minor chords often connote a sense of melancholy and sadness.
A chord consists of a root note and some additional notes that have a specific tonal relationship to the root. This relationship,
or distance between the root and the other notes in the chord, depends on the type of chord (e.g. major, minor or seventh
chords) being played. This is why the finger positions for the C major, C minor and C seventh chords are different.
Remember the last camp fire sing-along with the guy playing the guitar? Chances are, he was just playing a couple of chords,
but only a couple of chords you master are enough to get you started and be able to play a couple of simple songs.
7
Page 8

F MAJOR
POWER CHORDS
The F chord (F major) on page 7 is a base barre
chord, and it may take some time to get it right.
So, whats a barre chord? Barre chords are
basically chords moved up the fretboard by using
your barred finger as the nut.
Dont avoid practicing; doing it just a little each
day, youll be positively surprised by the results.
Once youve mastered basic chords, youll have
a powerful tool for controlling how you play your
guitar.
Did you notice the similar shape of the E and F
chords? Right, the F chord is simply an E chord,
shifted upward one position.
This trick works equally well for a lot more chords,
e.g. Am. Shift to the 5th fret position and play
Dm! Here, too, the index finger replaces the
nut.
Power cords are those chords that utilize only the bottom three
strings of the guitar. This creates a more closed sound and
mutes the top strings. Its called power chord because this
technique creates a more imposing overall sound. Power chords
are an integral part of rock and metal music.
See the following example:
You can easily mute the top three strings with your index finger
while playing the power chord.
Note: If you move the G power chord 2 frets upward (in the
direction to the pickups), you get an A power chord, 4 frets
upward and you get a B power chord... you get the picture. ;-)
EASY CHORD PROGRESSIONS
This diagram shows an easy chord progression in the key of A minor. The tune has a total length of 12 measures, divided
in three parts of four measures each. Start again from the beginning when youve played it all the way through.
Each slash means a downstroke. Study each chord as a single unit before you start playing the whole progression. Strive for
a slow but steady beat. When you feel comfortable, experiment with different tempos.
PENTATONIC SCALE
Penta means five in Greek, and tonic refers
to tone. Therefore, the pentatonic scale consists
of five tones per octave. In other words, it is a
major scale without the 4th and the 7th note.
Still with us? Keep in mind that, in contrast to
the pentatonic scale, the major scale consists
of 7 tones per octave.
The diagram shows you how a pentatonic scale
is derived from a G major scale. For example,
use the notes which belong to the G major
pentatonic scale to play an easy guitar solo.
Here are some more chord progressions to play:
1) A - D - E - A
2) A - D - E7 - A
3) A7 - D7 - E7 - A7
4) D - G - A7 - D
5) G - C - D - G
6) D - Em - G - A - D
7) C - Am - Dm - G - C
8) G - Em - Am - D - E
8
Page 9

CLEANING YOUR GUITAR
Use a soft, dry cloth to clean the strings of your guitar
each time after you play. The wetness from your hands
can cause the strings to rust. Cleaning the strings
regularly will greatly prolong their life.
Polish your guitar from time to time using a high-grade
instrument polish containing small amounts of non-silicon
wax and maybe a little lemon oil.
To keep the fingerboard free from dry marks and cracks,
some lemon oil on a cloth applied to the wood should do
the job.
CARE
Do not lean your guitar against walls; it could get knocked
over or bumped into.
Never leave your guitar lying on the floor or on the edge
of your bed where it may get stepped on or knocked off
or even sat on.
If youre looking for further guitar instructions, please take a look at the following books:
PETER BURSCHs ROCK GUITAR. Guitar tab/without
notes. Learn to play guitar without notes! Rocking made
easystart playing right away! Master easy basic
rhythms. Discover what made Jimi Hendrix, Metallica,
Van halen and AC/DC sound so great. Learn how to
move your fingers faster than ever! Use the left-hand
finger exercises included, plus much more.
info@voggenreiter.de
ISBN 3-8024-0365-7
HAL LEONARD GUITAR METHOD BOOK 2, Will Schmid
and Greg Koch. The second installment continues in
the footsteps of the first book, covering Am, Dm, A, E,
F and B7 chords; power chords; fingerstyle guitar;
syncopations, dotted rhythms, and triplets; Carter style
solos; bass runs; pentatonic scales; improvising;
tablature; it also offers 92 great songs, riffs and
examples; notes in first and second position; and more!
The included CD contains 57 tracks that nicely
demonstrate the techniques at hand and let the student
play along.
ISBN: 0634013130
Never leave your instrument in the trunk of a car when
the weather is very warm or extremely cold. Extreme
temperatures can be harmful to your gear. If you must
store your guitar inside a car, first remove the tension
from the strings and allow things to cool off or warm up
completely before pulling up to pitch again.
CHANGING STRINGS
Visit your local music store to purchase new strings
and get detailed instructions on how to change them.
Replace the strings periodically, as they will lose their
brilliance after a while. How often you change the strings
depends on the type of strings, their gauge or diameter.
Rule of thumb: When the strings start sounding dull,
this is a hint that you should replace them.
HAL LEONARD GUITAR METHOD BOOK 1, Will Schmid
and Greg Koch, new revision! More teachers prefer
this edition of the now-famous learning method by Will
Schmid and Greg Koch because it is effective and userfriendly. The easy-to-follow format gives students a solid
music education and lets them play songs right away.
In Book 1, you will find beginning instruction on tuning,
1st position melody playing, C, G, G7, D7, and Em
chords, rhythms through eighth notes, solos and
ensembles and strumming. You also get a chord chart
and many all-time favorites like Amazing Grace ·
Greensleeves · and When the Saints Go Marching In.
ISBN: 079351245X
Technical specifications and appearance subject to change without notice. The information contained herein is correct at the time of printing. The names
of companies, institutions or publications pictured or mentioned and their respective logos are registered trademarks of their respective owners. Their
use neither constitutes a claim of the trademarks by BEHRINGER® nor affiliation of the trademark owners with BEHRINGER®. BEHRINGER® accepts no
liability for any loss which may be suffered by any person who relies either wholly or in part upon any description, photograph or statement contained
herein. Colours and specification may vary slightly from product. Products are sold through our authorised dealers only. Distributors and dealers are
not agents of BEHRINGER® and have absolutely no authority to bind BEHRINGER® by any express or implied undertaking or representation. No part of this
manual may be reproduced or transmitted in any form or by any means, electronic or mechanical, including photocopying and recording of any kind, for
any purpose, without the express written permission of BEHRINGER Spezielle Studiotechnik GmbH. BEHRINGER® is a registered trademark.
ALL RIGHTS RESERVED. © 2004 BEHRINGER Spezielle Studiotechnik GmbH,
Hanns-Martin-Schleyer-Str. 36-38, 47877 Willich-Münchheide II, Germany.
Tel. +49 2154 9206 0, Fax +49 2154 9206 4903
9
 Loading...