


®
Analyzer
Operating
Manual

© 2003 Bayer HealthCare LLC
All Rights Reserved
Printed in U.S.A.
Unless otherwise noted, all ® Trademarks are the property of Bayer HealthCare LLC
50241739 |
ii |
Revised 6/03 |

TABLE OF CONTENTS
SECTION 1. Introduction |
Page |
System and Intended Use . . . . . . . . . . . . . . . . . . . . . . . . . . . . . . . . . . . . . . . . . . . . . . . . . . . . . . . . . . . . . . . . . . . . . . . . . 1.1
Features . . . . . . . . . . . . . . . . . . . . . . . . . . . . . . . . . . . . . . . . . . . . . . . . . . . . . . . . . . . . . . . . . . . . . . . . . . . . . . . . . . . . . . . . . . 1.1
Specifications . . . . . . . . . . . . . . . . . . . . . . . . . . . . . . . . . . . . . . . . . . . . . . . . . . . . . . . . . . . . . . . . . . . . . . . . . . . . . . . . . . . . . 1.1
Hazards. . . . . . . . . . . . . . . . . . . . . . . . . . . . . . . . . . . . . . . . . . . . . . . . . . . . . . . . . . . . . . . . . . . . . . . . . . . . . . . . . . . . . . . . . . . 1.1
Safety Standards. . . . . . . . . . . . . . . . . . . . . . . . . . . . . . . . . . . . . . . . . . . . . . . . . . . . . . . . . . . . . . . . . . . . . . . . . . . . . . . . . . . 1.1
Symbols Used . . . . . . . . . . . . . . . . . . . . . . . . . . . . . . . . . . . . . . . . . . . . . . . . . . . . . . . . . . . . . . . . . . . . . . . . . . . . . . . . . . . . . 1.2
SECTION 2. Unpacking, Getting Acquainted and Set Up
Unpacking . . . . . . . . . . . . . . . . . . . . . . . . . . . . . . . . . . . . . . . . . . . . . . . . . . . . . . . . . . . . . . . . . . . . . . . . . . . . . . . . . . . . . . . . 2.1 Carton Contents. . . . . . . . . . . . . . . . . . . . . . . . . . . . . . . . . . . . . . . . . . . . . . . . . . . . . . . . . . . . . . . . . . . . . . . . . . . . . . . . . . . 2.1 Getting Acquainted
DCA 2000® Analyzer (Front Panel) . . . . . . . . . . . . . . . . . . . . . . . . . . . . . . . . . . . . . . . . . . . . . . . . . . . . . . . . . . . 2.2 DCA 2000® Analyzer (Back Panel) . . . . . . . . . . . . . . . . . . . . . . . . . . . . . . . . . . . . . . . . . . . . . . . . . . . . . . . . . . . . 2.3 Screen Saver . . . . . . . . . . . . . . . . . . . . . . . . . . . . . . . . . . . . . . . . . . . . . . . . . . . . . . . . . . . . . . . . . . . . . . . . . . . . . . . . . . . . 2.3 Audible Tones . . . . . . . . . . . . . . . . . . . . . . . . . . . . . . . . . . . . . . . . . . . . . . . . . . . . . . . . . . . . . . . . . . . . . . . . . . . . . . . . . . 2.3 Blinking Colon in Displayed Time . . . . . . . . . . . . . . . . . . . . . . . . . . . . . . . . . . . . . . . . . . . . . . . . . . . . . . . . . . . . . . 2.3 When To Turn the Power Off . . . . . . . . . . . . . . . . . . . . . . . . . . . . . . . . . . . . . . . . . . . . . . . . . . . . . . . . . . . . . . . . . . . 2.3
Set Up
Placing the Instrument/Connecting the Power Cord/Inserting Program Card . . . . . . . . . . . . . . . . . . . . . 2.4 Checking to Verify Instrument Functions Properly . . . . . . . . . . . . . . . . . . . . . . . . . . . . . . . . . . . . . . . . . . . . . . 2.5 Viewing Factory Settings . . . . . . . . . . . . . . . . . . . . . . . . . . . . . . . . . . . . . . . . . . . . . . . . . . . . . . . . . . . . . . . . . . . . . . . 2.6 Options . . . . . . . . . . . . . . . . . . . . . . . . . . . . . . . . . . . . . . . . . . . . . . . . . . . . . . . . . . . . . . . . . . . . . . . . . . . . . . . . . . . . . . . . 2.8 Accepting Factory Settings . . . . . . . . . . . . . . . . . . . . . . . . . . . . . . . . . . . . . . . . . . . . . . . . . . . . . . . . . . . . . . . . . . . . 2.10 Changing Factory Settings. . . . . . . . . . . . . . . . . . . . . . . . . . . . . . . . . . . . . . . . . . . . . . . . . . . . . . . . . . . . . . . . . . . . . 2.10 Setting Date and Time. . . . . . . . . . . . . . . . . . . . . . . . . . . . . . . . . . . . . . . . . . . . . . . . . . . . . . . . . . . . . . . . . . . . . . . . . 2.14 Setting Creatinine Concentration Units (Microalbumin/Creatinine Assay ONLY). . . . . . . . . . . . . . . 2.16 Running the Optical Test Cartridge (Standard 1) —
Prior To Analyzing Samples for the First Time . . . . . . . . . . . . . . . . . . . . . . . . . . . . . . . . . . . . . . . . . . . . . . 2.17
SECTION 3. Menu
Menu . . . . . . . . . . . . . . . . . . . . . . . . . . . . . . . . . . . . . . . . . . . . . . . . . . . . . . . . . . . . . . . . . . . . . . . . . . . . . . . . . . . . . . . . . . . . . 3.1 RECALL PREVIOUS TESTS? . . . . . . . . . . . . . . . . . . . . . . . . . . . . . . . . . . . . . . . . . . . . . . . . . . . . . . . . . . . . . . . . . 3.2 SET SEQUENCE NUMBER? . . . . . . . . . . . . . . . . . . . . . . . . . . . . . . . . . . . . . . . . . . . . . . . . . . . . . . . . . . . . . . . . . . 3.4 RECALL CONTROL RESULTS? . . . . . . . . . . . . . . . . . . . . . . . . . . . . . . . . . . . . . . . . . . . . . . . . . . . . . . . . . . . . . . 3.5 VIEW CALIBRATION STATUS? . . . . . . . . . . . . . . . . . . . . . . . . . . . . . . . . . . . . . . . . . . . . . . . . . . . . . . . . . . . . . . 3.8 SET DATE/TIME? . . . . . . . . . . . . . . . . . . . . . . . . . . . . . . . . . . . . . . . . . . . . . . . . . . . . . . . . . . . . . . . . . . . . . . . . . . . . 3.10 INSTRUMENT SETUP? . . . . . . . . . . . . . . . . . . . . . . . . . . . . . . . . . . . . . . . . . . . . . . . . . . . . . . . . . . . . . . . . . . . . . . 3.13 SET CREATININE UNITS? . . . . . . . . . . . . . . . . . . . . . . . . . . . . . . . . . . . . . . . . . . . . . . . . . . . . . . . . . . . . . . . . . . 3.15 INSTRUMENT TEST? . . . . . . . . . . . . . . . . . . . . . . . . . . . . . . . . . . . . . . . . . . . . . . . . . . . . . . . . . . . . . . . . . . . . . . . 3.16 RUN CONTROL?. . . . . . . . . . . . . . . . . . . . . . . . . . . . . . . . . . . . . . . . . . . . . . . . . . . . . . . . . . . . . . . . . . . . . . . . . . . . . 3.17
Revised 6/03 |
iii |

SECTION 4. Operating Instructions — Hemoglobin A1c |
Page |
Step 1: Turning the Power On . . . . . . . . . . . . . . . . . . . . . . . . . . . . . . . . . . . . . . . . . . . . . . . . . . . . . . . . . . . . . . . . . . . . . 4.1 Step 2: Calibration . . . . . . . . . . . . . . . . . . . . . . . . . . . . . . . . . . . . . . . . . . . . . . . . . . . . . . . . . . . . . . . . . . . . . . . . . . . . . . . . 4.2 Step 3: Preparing Patient Samples and Controls. . . . . . . . . . . . . . . . . . . . . . . . . . . . . . . . . . . . . . . . . . . . . . . . . . . . 4.3 Step 4: Analyzing the Patient Sample . . . . . . . . . . . . . . . . . . . . . . . . . . . . . . . . . . . . . . . . . . . . . . . . . . . . . . . . . . . . . . 4.8 Analyzing DCA 2000® Hemoglobin A1c Controls, ONLY. . . . . . . . . . . . . . . . . . . . . . . . . . . . . . . . . . . . . . . . . 4.12 Cancelling a Test . . . . . . . . . . . . . . . . . . . . . . . . . . . . . . . . . . . . . . . . . . . . . . . . . . . . . . . . . . . . . . . . . . . . . . . . . . . . . . . . 4.15
SECTION 5. Operating Instructions — Microalbumin/Creatinine |
Page |
Step 1: Turning the Power On . . . . . . . . . . . . . . . . . . . . . . . . . . . . . . . . . . . . . . . . . . . . . . . . . . . . . . . . . . . . . . . . . . . . |
. 5.1 |
Step 2: Calibration . . . . . . . . . . . . . . . . . . . . . . . . . . . . . . . . . . . . . . . . . . . . . . . . . . . . . . . . . . . . . . . . . . . . . . . . . . . . . . . |
. 5.2 |
Step 3: Preparing Patient Samples and Controls. . . . . . . . . . . . . . . . . . . . . . . . . . . . . . . . . . . . . . . . . . . . . . . . . . . |
. 5.4 |
Step 4: Analyzing the Patient Sample . . . . . . . . . . . . . . . . . . . . . . . . . . . . . . . . . . . . . . . . . . . . . . . . . . . . . . . . . . . . . |
. 5.8 |
Analyzing DCA 2000® Microalbumin/Creatinine Controls, ONLY . . . . . . . . . . . . . . . . . . . . . . . . . . . . . . . . |
5.12 |
Cancelling a Test . . . . . . . . . . . . . . . . . . . . . . . . . . . . . . . . . . . . . . . . . . . . . . . . . . . . . . . . . . . . . . . . . . . . . . . . . . . . . . . . |
5.15 |
|
|
SECTION 6. Error and Warning Messages, Error Codes and Troubleshooting
Chart of Contents. . . . . . . . . . . . . . . . . . . . . . . . . . . . . . . . . . . . . . . . . . . . . . . . . . . . . . . . . . . . . . . . . . . . . . . . . . . . . . . . . 6.1
Error and Warning Messages . . . . . . . . . . . . . . . . . . . . . . . . . . . . . . . . . . . . . . . . . . . . . . . . . . . . . . . . . . . . . . . . . . . . . . 6.2
Error Codes . . . . . . . . . . . . . . . . . . . . . . . . . . . . . . . . . . . . . . . . . . . . . . . . . . . . . . . . . . . . . . . . . . . . . . . . . . . . . . . . . . . . . . . 6.4
Troubleshooting . . . . . . . . . . . . . . . . . . . . . . . . . . . . . . . . . . . . . . . . . . . . . . . . . . . . . . . . . . . . . . . . . . . . . . . . . . . . . . . . . 6.10
SECTION 7. Instrument Care and Routine Maintenance
Instrument Care . . . . . . . . . . . . . . . . . . . . . . . . . . . . . . . . . . . . . . . . . . . . . . . . . . . . . . . . . . . . . . . . . . . . . . . . . . . . . . . . . . . 7.1 Routine Maintenance Chart . . . . . . . . . . . . . . . . . . . . . . . . . . . . . . . . . . . . . . . . . . . . . . . . . . . . . . . . . . . . . . . . . . . . . . . 7.1 Exterior of Instrument and Bar Code Window (includes disinfection) . . . . . . . . . . . . . . . . . . . . . . . . . . . . . . 7.2 Changing Air Filter . . . . . . . . . . . . . . . . . . . . . . . . . . . . . . . . . . . . . . . . . . . . . . . . . . . . . . . . . . . . . . . . . . . . . . . . . . . . . . . 7.3 Cartridge Compartment . . . . . . . . . . . . . . . . . . . . . . . . . . . . . . . . . . . . . . . . . . . . . . . . . . . . . . . . . . . . . . . . . . . . . . . . . . . 7.4 Running Optical Test Cartridge. . . . . . . . . . . . . . . . . . . . . . . . . . . . . . . . . . . . . . . . . . . . . . . . . . . . . . . . . . . . . . . . . . . . 7.6
SECTION 8. Minor Repair
How to Replace the Fuse . . . . . . . . . . . . . . . . . . . . . . . . . . . . . . . . . . . . . . . . . . . . . . . . . . . . . . . . . . . . . . . . . . . . . . . . . . 8.1
SECTION 9. Service Information
How to Report the Problem . . . . . . . . . . . . . . . . . . . . . . . . . . . . . . . . . . . . . . . . . . . . . . . . . . . . . . . . . . . . . . . . . . . . . . . 9.1 Accessory Items and Replacement Parts . . . . . . . . . . . . . . . . . . . . . . . . . . . . . . . . . . . . . . . . . . . . . . . . . . . . . . . . . . . 9.3
APPENDIX . . . . . . . . . . . . . . . . . . . . . . . . . . . . . . . . . . . . . . . . . . . . . . . . . . . . . . . . . . . . . . . . . . . . . . . . . . . . . . . . . . . . App.1.1
iv |
Revised 6/03 |

INTRODUCTION
The DCA 2000® System consists of:
•DCA 2000® Analyzer
•DCA 2000® Reagent Cartridges, Capillary Holders and Calibration Card
•DCA 2000® Controls
•Optical Test Cartridge
INTENDED USE
The DCA 2000® Analyzer quantitatively measures:
•the percent concentration of Hemoglobin A1c in blood
•the concentrations of Microalbumin and Creatinine in urine
FEATURES
•easily calibrated using the bar code card provided with each reagent kit
•stores calibrations for up to two lots of reagent
•stores up to 16 test results
•stores up to 16 control results
•can be connected to a computer and/or printer
SPECIFICATIONS
Power Required:
Instrument Model No. 5031C: 100–240 VAC,
@ 0.4 amps
50/60 Hz
Dimensions/Weight:
Depth 27.2 cm (10.7 in) without power line cord Width 24.1 cm (9.5 in)
Height 23.9 cm (9.4 in) Weight 5 kg (11 lbs)
Ambient Operating Temperature:
|
32 |
15 |
(15–32°C)—Hemoglobin A1c |
30
18 (18–30°C)—Microalbumin/Creatinine
Relative Humidity Range:
10% – 90% RH (non-condensing)
NOTE: If an instrument I/O port is utilized, the cable used should be 100% shielded to guard against EMI and RFI. There should be continuity between the cable shield and connector shell that mates with the instrument.
Instrument Safety Design
The instument is for professional,  in vitro diagnostic use and must be used in the manner specified in the Operating Manual in order to provide the safety and standard performance standards specified. The instrument will operate safely in the conditions listed below; however, results will only be correct for the system specifications listed above:
•indoors
•5°– 40°C (41°– 104°F)
•installation category II (IEC 1010.1)
•safety tested to comply to IEC 1010.1
HAZARDS
To alert you to potential electrical or operational hazards, warning and caution statements are provided where applicable. To ensure your safety, comply with all warning and caution statements.
SAFETY STANDARDS
Underwriters’ Laboratories, Inc. (UL) and the Canadian Standards Association (CSA) as certified and complies with the safety standards specified in UL 3101 and CSA-C22.2, No. 1010.1.
The instrument meets the provisions of the IVD Directive 98/79/EC (Oct./1998), which includes the EMC Directive 89/336 Amendment 92/31/EEC, and the Low Voltage Safety Directive 73/23/EEC.
WARRANTY INFORMATION
Contact your Authorized Bayer Representative for complete warranty information.
1
INTRODUCTION
Revised 6/03 |
1.1 |
1
INTRODUCTION
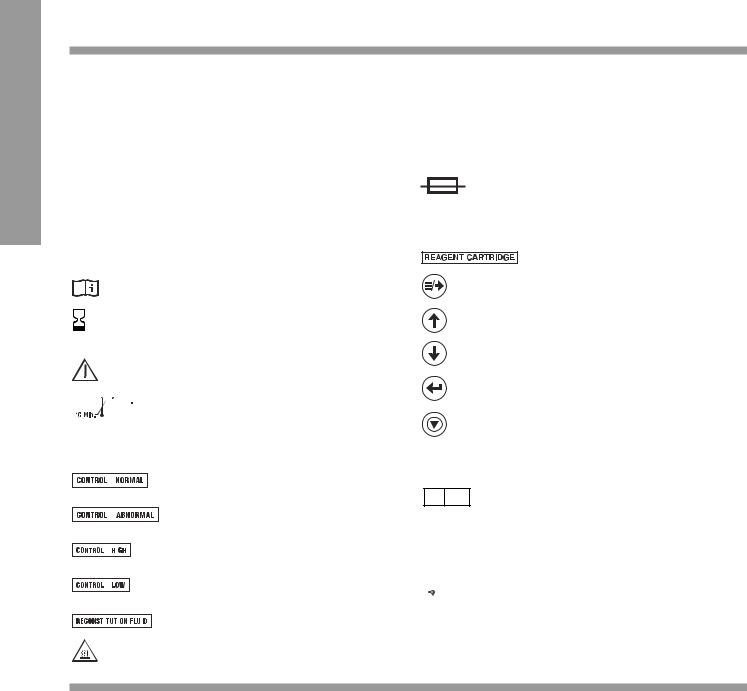
SYMBOLS USED
The following symbols are used throughout the product labeling for the DCA 2000® System (Instrument, Instrument Manual, Quick Reference Guide, DCA Reagent Labeling and Instructional inserts and the DCA Control packaging and instructional inserts).
 Catalog number
 In vitro diagnostic device
 (LOT) Batch code
Consult operating instructions
(EXP) Use by
Warning/Attention: consult instructions for use
8

2 |
|
|
|
|
Temperature limitations |
||
|
|
Do not use spray |
|||||
|
|
|
|
|
|
|
Normal control |
|
|
|
|
|
|
|
|
|
|
|
|
|
|
|
|
|
|
|
|
|
|
|
Abnormal control |
|
|
|
|
|
|
|
|
|
|
|
|
|
|
|
|
|
|
|
|
|
High control |
||
|
|
|
|
|
|||
|
|
|
|
|
|||
|
|
|
|
|
Low control |
||
|
|
|
|
|
|||
|
|
|
|
|
|||
|
|
|
|
|
|
|
Reconstitution fluid |
|
|
|
|||||
|
|
|
|||||
|
|
High temperature part |
|||||
Fuse
 Quantity
Reagent cartridge
Menu/Next
Increase
Decrease
Enter
Escape
 Manufactured by
EC REP Authorized representative  Calibration card
  Optical test cartridge
  Do not freeze
U.S. PATENTS
6,043,043, 5,822,071, 5,610,073, 5,385,847, 5,372,948, 5,305,093, 5,272,093, 5,258,311, 5,220,161, 5,162,237, 5,151,369, 5,084,397, 4,990,075, 4,970,171, 4,968,472, 4,898,824, 4,847,209, 4,727,036, 4,658,022, 4,647,654, 4,629,692, D400,673.
1.2 |
Revised 6/03 |

UNPACKING, GETTING ACQUAINTED AND SET UP
UNPACKING
The DCA 2000® System arrives in one shipping carton.
Inspect the carton for shipping damage.
Unpack the carton.
•Use extreme care when unpacking and handling the instrument. The instrument contains sensitive electronic and optical parts.
Check each item for shipping damage.
•Report shipping damage to the representative of the carrier or to your Bayer HealthCare Sales Representative.
CARTON CONTENTS
*Some instruments will require a separately packed Installation Kit containing language specific instructional materials (Program Card, Operating Manual and Quick Reference Guide), Cleaning Kit, Air Filter Replacement Kit and the appropriate Power Cord.
1 |
DCA 2000® Analyzer |
|
|
|
|
2 |
Cleaning Kit* |
|
|
||
|
|
|
3 |
Optical Test Cartridge |
|
|
||
|
(in instrument cartridge compartment) |
|
|
|
|
4 |
Program Card* |
|
|
||
|
|
|
5 |
Power Line Cord* |
|
|
||
|
|
|
6 |
Other (not shown) |
|
|
||
|
• Operating Manual* |
|
|
• |
Replacement Fuse (stored in fuse holder |
|
|
located inside the instrument) |
|
• |
Air Filter Replacement Kit* |
• HbA1c Quick Reference Guide*
1
5
2
4
3
Missing Items?. . . Contact the nearest Bayer HealthCare office or authorized distributor.
2
GETTING UNPACKING, UP SET AND ACQUAINTED
Revised 6/03 |
2.1 |

2
UNPACKING, GETTING ACQUAINTED AND SET UP
UNPACKING, GETTING ACQUAINTED AND SET UP
Unlock and then remove the optical test cartridge according to the following instructions.
1. Open the cartridge compartment door.
2.Locate the button on the right side of the cartridge compartment. Push and hold it down with your right hand.
3.With your left hand, gently push the plastic tab on the cartridge to the right; this action releases (unlocks) cartridge.
4.Pull test cartridge out of compartment.
5.Put test cartridge aside for later use (page 2.17).
6.Make sure the cartridge return spring inside the cartridge compartment is intact (refer to Section 7, page 7.4, for information regarding this spring).
GETTING ACQUAINTED
1
2
3
6 
5 |
4 |
DCA 2000® Analyzer
FRONT PANEL
1 Display— indicates date, time, error messages, test results, procedural prompts, etc.
2 Keys — allow you to provide input for system set-up, menu items, etc.
3 Reagent Cartridge Compartment Access Door— covers and protects the reagent cartridge; closing door starts test timing (after a 5 second delay)
4 Reagent Cartridge Compartment— holds one reagent cartridge during sample analysis
5 Bar Code Reader Window— covers and protects the bar code reader
6 Bar Code Track— area where reagent cartridge, calibration card or control card is placed prior to scanning bar code
2.2 |
Revised 6/03 |

3
4
2
1 |
5 |
7 |
6 |
BACK PANEL
1 |
Power Switch — turns the power to the |
|
instrument ON and OFF |
|
|
2 |
Filter Holder— contains replaceable air |
|
|
|
filter that prevents dust contamination |
|
|
3 |
Program Card Connector — accepts the |
|
|
|
program card |
|
|
4 |
EIA-232-D Output — accepts the plug for |
|
the computer interface cable |
|
|
5 |
Printer Output — accepts the plug for the |
|
printer cable |
|
|
6 |
Power Cord Connector— accepts the |
|
plug for connecting the power cord to |
|
the instrument |
|
|
7 |
Fuse Holder Compartment — holds two |
|
fuses (one fuse is the replacement fuse) |
AUDIBLE TONES
Beep — a short audible tone; indicates successful completion of an activity (such as scanning the bar code)
Buzz — a long audible tone; indicates an error condition or reminds you to perform an activity such as removing a reagent cartridge
SCREEN SAVER
When the instrument is not in use for more than 5 minutes, the display will change to a block shaped moving cursor. If the screen saver is on, press any key to return to a normal display before performing any other steps.
BLINKING COLON IN
DISPLAYED TIME
The current time is displayed using a “blinking” colon. When the colon does not blink, the time displayed is the time the assay began.
WHEN TO TURN THE POWER OFF
When the instrument is not in use, the power may be turned OFF without loss of stored results. However, when the power is subsequently restored, a warm up period of one to eight minutes is required.
IMPORTANT: If power is turned OFF or interrupted while a test is in progress, the test must be discarded.
Turn the power off when inserting or removing the program card and whenever instructed
to do so by the particular procedure (maintenance, etc.) in use.
2
GETTING UNPACKING, UP SET AND ACQUAINTED
Revised 6/03 |
2.3 |

2
UNPACKING, GETTING ACQUAINTED AND SET UP
UNPACKING, GETTING ACQUAINTED AND SET UP
SET UP
PLACING THE INSTRUMENT/ CONNECTING THE POWER CORD/ INSERTING PROGRAM CARD
IMPORTANT: Do not place the instrument where it would be subjected to extreme temperature variations, direct sunlight, excessive humidity or air current, or excessive particulate matter.
1.Place the instrument on a firm, level* surface near a properly grounded electrical outlet.
0. *If the surface is not level, the instrument will not function properly.
2.Set power switch to OFF (O).
3.Plug in program card (contacts facing instrument; label side up).
0.IMPORTANT: The program card can be damaged if inserted when the power is ON (I).
4.Connect the power cord to the power cord connector on the instrument.
5.Plug in power cord to a properly grounded outlet.
6.Move the instrument into place on the designated work space.
0. • Allow at least 2 inches of air space between the wall (or other surface) and the back and right sides of the instrument (ventilation panels).
2.4 |
Revised 6/03 |
CHECKING TO VERIFY INSTRUMENT FUNCTIONS PROPERLY
Set the power switch to ON (I).
•After about 8 seconds, the software version is displayed.
SOFTWARE VERSION
E3.11/01.04
(displayed for about 8 seconds)
•Copyright information is displayed for 3 seconds.
COPYRIGHT 1991–2003
BY BAYER CORPORATION
• Then:
*
INITIALIZING
KEEP DOOR CLOSED
The instrument is checking internal optics and proper operation of mechanical features.
• Then:
INSTRUMENT SETUP
PRESS [<--] TO CONTINUE
Instrument does not function? Above display(s) fail(s) to appear? . . . Contact the nearest Bayer HealthCare office or authorized distributor. Otherwise, continue with “Viewing Factory Settings” (next).
2
GETTING UNPACKING, UP SET AND ACQUAINTED
Revised 6/03 |
2.5 |

2
UNPACKING, GETTING ACQUAINTED AND SET UP
UNPACKING, GETTING ACQUAINTED AND SET UP
VIEWING FACTORY SETTINGS—
Upon Receipt of a New or Factory-Serviced Instrument
Only upon receipt of a new or factory-serviced instrument, the following display appears (just after “INITIALIZING / KEEP DOOR CLOSED”).
INSTRUMENT SETUP
PRESS [<--] TO CONTINUE
Before the instrument can analyze samples for the first time, it is necessary for you to either accept or change factory settings.
• To view factory settings, press  .
.
1 1 4 0 00000000000000 T D L C P0000000000000
Line 1 shows the factory setting numbers. Line 2 shows the factory setting options.
The options in Line 2 correspond directly to the number above them in Line 1.
The following chart defines the factory setting now active for each available option.
|
|
FACTORY SETTING |
|
OPTION |
NUMBER |
DEFINITION |
|
T |
(Time) |
1 |
AM/PM |
D |
(Date) |
1 |
Month/Day/Year |
L |
(Labels |
4 |
Time Assay Began; |
|
displayed |
— (0) |
Sequence Number (reset |
|
with results) |
— (0) |
daily, automatically |
|
|
— (0) |
at midnight) |
C |
(Controls) |
0 |
Use of DCA 2000 |
|
|
— (0) |
Controls, only |
P |
(Port) |
0 |
Computer Port is turned |
|
|
— (0) |
Off (O) |
|
|
|
|
Before deciding to accept factory settings, review the chart under OPTIONS, on the following pages.
2.6 |
Revised 6/03 |

2
GETTING UNPACKING,
UP SET AND ACQUAINTED
(This page left blank on purpose. Intended for future use)
Revised 6/03 |
2.7 |

2
UNPACKING, GETTING ACQUAINTED AND SET UP
UNPACKING, GETTING ACQUAINTED AND SET UP
OPTIONS
All available settings are shown in the following chart.
•Review this chart before you decide to accept or change the factory setting for each option. An asterisk (*) marks factory settings.
OPTION |
SETTING NUMBER |
DEFINITION OF SETTING NUMBER |
||
T |
(Time |
1* |
AM/PM* |
|
|
Format) |
2 |
24 hour format |
|
|
|
|
|
|
D |
(Date |
1* |
Month/Day/Year* |
|
|
Format) |
2 |
Day • Month •Year |
|
|
|
3 |
Year– Month – Day |
|
|
|
|
|
|
L |
(Labels displayed |
0 |
No labels |
|
|
with results) |
1 |
Sequence number |
|
|
|
|
|
(reset daily, automatically at midnight) |
|
|
2 |
Sequence number |
|
|
|
|
|
(continuous, 001 – 999) |
|
|
3 |
Time assay began |
|
|
|
4* |
Time assay began; sequence number |
|
|
|
|
|
(reset daily, automatically at midnight)* |
|
|
5 |
Time assay began; sequence number |
|
|
|
|
|
(continuous, 001 – 999) |
|
|
|
|
|
C |
(Controls) |
0* |
DCA 2000 Controls, only* |
|
|
|
|
• |
The control bar code card enables the |
|
|
|
|
instrument to label the control result. The |
|
|
|
|
control result is then stored in the control |
|
|
|
|
memory (separate from patient results). |
|
|
1 |
ANY CONTROL |
|
|
|
|
• |
If using controls other than DCA 2000 |
|
|
|
|
Controls, use the MENU (just prior to each |
|
|
|
|
control assay) to label the control result. |
|
|
|
|
The control result, once labeled, is stored in |
|
|
|
|
the control memory. |
|
|
|
• |
IMPORTANT: When the MENU is used |
|
|
|
|
to label control results, only the next |
sample analyzed is labeled (and stored in the control memory).
2.8 |
Revised 6/03 |

OPTION |
SETTING NUMBER |
DEFINITION OF SETTING NUMBER |
P (Computer Port |
0* |
OFF*—Computer port is OFF. |
Configuration) |
2 |
ON— Computer port is ON. |
|
All subsequent results will be transferred to the computer.
NOTE: The options below (baud rate through modem control) are selectable only if the computer port is turned ON.
B |
(Baud Rate) |
9* |
9600 bps* |
|
|
4 |
4800 bps |
|
|
2 |
2400 bps |
|
|
1 |
1200 bps |
|
|
3 |
300 bps |
|
|
|
|
U |
(Data Bits) |
8* |
8 bits* |
|
|
7 |
7 bits |
|
|
|
|
V |
(Parity) |
0* |
None* |
|
|
1 |
Odd |
|
|
2 |
Even |
|
|
|
|
W |
(Stop Bits) |
1* |
1* |
|
|
2 |
2 |
|
|
|
|
X |
(Xon—Xoff |
0* |
Off* |
|
Protocol) |
1 |
On |
|
|
|
|
Y |
(Block |
0 |
Off |
|
Transfer) |
1* |
On* |
|
|
|
|
Z |
(Modem |
0* |
Off* |
|
Control) |
1 |
On |
|
|
|
|
2
GETTING UNPACKING, UP SET AND ACQUAINTED
Revised 6/03 |
2.9 |

2
UNPACKING, GETTING ACQUAINTED AND SET UP
UNPACKING, GETTING ACQUAINTED AND SET UP
ACCEPTING FACTORY SETTINGS
If the factory setting for each option is acceptable, |
now ready to set the current date and time. Refer |
press . If not, see below. If acceptable, you are |
to instructions on page 2.14. |
|
|
CHANGING FACTORY SETTINGS
Before attempting to change factory settings, read the following information on “Keys” and “Cursor.”
Keys:
—moves the cursor* (underline) under setting you desire to change
—cycles through each setting choice, such as AM/PM or 24 HR for time format
—accepts all displayed settings (for time, date, labels, controls and computer port) and immediately advances to “SET DATE/TIME” display.
Important: If you (prematurely) press  before you are finished changing factory settings, refer to Section 3, MENU for instructions on how to access “INSTRUMENT SETUP?”
HINT: Don’t press  until all settings on Line 1 reflect your choices.
*Cursor
The cursor is the underline in the display. The cursor shows you which setting is ready for change.
1 1 4 0 0 nnnnnnnnnnnn
TIME FORMAT |
AM/PM |
Reminder: If the underlined number is acceptable, press  . The cursor then moves horizontally (right) to the next number on line 1 while line 2 defines the corresponding option and setting choice. Only when all numbers shown in Line 1 are acceptable, press
  .
.
*The cursor does not move in reverse (left). To change a number to the left of the cursor,
repeatedly press  until the cursor returns to the desired location.
DISPLAY
1 1 4 0 0 mmmmmmmmmmmm T D L C P mmmmmmmmmmmm
1 1 4 0 0 mmmmmmmmmmmm TIME FORMAT AM/PM
WHAT YOU DO
1.Press  (places a cursor under factory setting for first option, TIME FORMAT).
2.Press  and
and  to cycle through choices for TIME FORMAT.
0. When the desired choice is displayed, press 0.  (moves cursor under setting for next
0. option).
2.10 |
Revised 6/03 |

DISPLAY
1 1 4 0 0 mmmmmmmmmmmm DATE FORMAT MM/DD/YY
1 1 4 0 0 mmmmmmmmmmmm LABELS USED TIME/DAILY
1 1 4 0 0 mmmmmmmmmmmm
CONTROLS |
DCA 2000 |
1 1 4 0 0mm mmmmmmmmmm COMPUTER PORT OFFmmmmm
WHAT YOU DO
3.Press  and
and  to cycle through choices for DATE FORMAT.
0. When the desired choice is displayed, press 0.  (moves cursor under setting for next
0. option).
4.Press  and
and  to cycle through choices for LABELS.
0. When the desired choice is displayed, press 0.  (moves cursor under setting for next
0. option).
5.Press  and
and  to cycle through choices for CONTROLS.
0. When the desired choice is displayed, press 0.  (moves cursor under setting for next
0. option).
6.Press  and
and  to cycle through choices for COMPUTER PORT.
0.If you have selected “0” for COMPUTER PORT OFF:
0. • Check to make sure all numbers on Line 1 reflect your choices.
0. • Reminder: Options Chart is found on pages 2.8–2.9.
0. • Press  (accepts all settings and
0. • advances display to SET DATE/TIME?)
0. • Continue with instructions on page 2.14, “Setting the Date and Time.”
0.If you have selected “2” for COMPUTER PORT ON:
0. • Continue with instructions on page 2.12, “Changing Factory Settings For: Computer Port ‘ON’ Option.”
2
GETTING UNPACKING, UP SET AND ACQUAINTED
Revised 6/03 |
2.11 |

2
UNPACKING, GETTING ACQUAINTED AND SET UP
UNPACKING, GETTING ACQUAINTED AND SET UP
CHANGING FACTORY SETTINGS FOR: COMPUTER PORT “ON” OPTION
Refer to the chart on page 2.9 for Computer Port Configurations.
NOTE: The first four numbers in each display (below) are factory settings. The display on your instrument may be different for the first four numbers (depending on whether the first four factory settings were accepted or changed).
DISPLAY |
|
|
|
|
WHAT YOU DO |
|||
|
|
|
|
|
|
|
|
|
|
1 |
1 |
4 |
0 |
2 |
9801110 |
1. |
Press (places a cursor under factory |
|
COMPUTER PORT ON |
|||||||
|
0. |
setting for first computer port option). |
||||||
|
|
|
|
|
|
|
||
|
|
|
|
|
|
|
|
|
1 |
1 |
4 |
0 |
2 |
9801010 |
BAUD RATE |
|
9600 |
|||
|
|
|
|
|
|
1 |
1 |
4 |
0 |
2 |
9801110 |
DATA BITS |
|
EIGHT |
|||
|
|
|
|
|
|
1 |
1 |
4 |
0 |
2 |
9801010 |
PARITY |
|
|
NONE |
||
|
|
|
|
|
|
2.Press  and
and  to cycle through choices for BAUD RATE.
0. When the desired choice is displayed, press 0.  (moves cursor under setting for next
0. option).
3.Press  and
and  to cycle through choices for DATA BITS.
0. When the desired choice is displayed, press 0.  (moves cursor under setting for next
0. option).
4.Press  and
and  to cycle through choices for PARITY.
0. When the desired choice is displayed, press 0.  (moves cursor under setting for next
0. option).
2.12 |
Revised 6/03 |

DISPLAY
1 |
1 |
4 0 |
2 |
9821010 |
STOP BITS |
|
ONE |
||
|
|
|
|
|
1 |
1 4 |
0 |
2 |
9821010 |
XON/XOFF |
|
OFF |
||
|
|
|
|
|
1 |
1 |
4 |
0 |
2 |
9821000 |
BLOCK |
XFER |
|
OFF |
||
|
|
|
|
|
|
1 |
1 |
4 |
0 |
2 |
9801110 |
MODEM |
|
|
OFF |
||
|
|
|
|
|
|
WHAT YOU DO
5.Press  and
and  to cycle through choices for STOP BITS.
0. When the desired choice is displayed, press 0.  (moves cursor under setting for next
0. option).
6.Press  and
and  to cycle through choices for XON/XOFF.
0. When the desired choice is displayed, press 0.  (moves cursor under setting for next
0. option).
7.Press  and
and  to cycle through choices for BLOCK TRANSFER.
0. When the desired choice is displayed, press 0.  (moves cursor under setting for next
0. option).
8.Press  and
and  to cycle through choices for MODEM.
0. • Check to make sure all numbers on Line 1 represent desired settings.
0. • Press  (accepts all settings and
0. • advances display to SET DATE/TIME).
2
GETTING UNPACKING, UP SET AND ACQUAINTED
Revised 6/03 |
2.13 |

2
UNPACKING, GETTING ACQUAINTED AND SET UP
UNPACKING, GETTING ACQUAINTED AND SET UP
SETTING THE DATE AND TIME
Use the following keys:
 and
and  To cycle through each available setting (e.g., digits for day/month/year and time, or AM/PM)
To move cursor under setting you desire to change (e.g., “2” in display below is marked by cursor and indicates “26” is ready for change)
SET DATE/TIME 02/24/03 6:20AM
To set the displayed date and time in the instrument
DISPLAY
SET DATE/TIME 02/24/03 6:20AM
SET DATE/TIME 02/24/03 6:20AM
SET DATE/TIME 02/24/03 6:20AM
WHAT YOU DO
The display on your instrument is displaying the date and time in your chosen format.
1.Press  or
or  until the correct two digits are displayed.
0. Press  .
.
2.Press  or
or  until the correct two digits are displayed.
0. Press  .
.
3.Press  or
or  until the correct two digits are displayed.
0. Press  .
.
2.14 |
Revised 6/03 |
DISPLAY
SET DATE/TIME 02/24/03 6:20AM
AM or PM if AM/PM format is selected
SET DATE/TIME 02/24/03 6:20AM
AM or PM if AM/PM format is selected
WHAT YOU DO
4.Press  or
or  until the correct two digits are displayed.
0. Press  .
.
5.Press  or
or  until the correct two digits are displayed.
0. • If 24 HR format is selected, press  .
.
0. • If AM/PM format is selected, press  . 0. • Then press
  or
or  until the correct
choice is displayed. 0. • Press  .
.
2
GETTING UNPACKING, UP SET AND ACQUAINTED
Revised 6/03 |
2.15 |

2
UNPACKING, GETTING ACQUAINTED AND SET UP
UNPACKING, GETTING ACQUAINTED AND SET UP
SETTING CREATININE CONCENTRATION UNITS
(Microalbumin/Creatinine Assay ONLY)
The concentration units reported for creatinine are selectable between “mg/dL” and “mmol/L”. The factory setting is “mg/dL”.
DISPLAY
READY: SCAN BAR CODE 02/24/03 2:09PM
SET CREATININE UNITS? mg/dL
SET CREATININE UNITS mg/dL
SET CREATININE UNITS mmol/L
SET CREATININE UNITS? mmol/L
WHAT YOU DO
1.Press  .
.
2.Repeatedly press  , until
“SET CREATININE UNITS?” is displayed.
3.Press  . This places a cursor below the “m” in “mg/dL”, and the question mark disappears.
4.Press  or
or  to display “mmol/L” or “mg/dL”.
5.Press  to accept desired units.
6. Press  to exit the MENU.
2.16 |
Revised 6/03 |

RUNNING THE OPTICAL TEST CARTRIDGE (Standard 1) —Prior to Analyzing Samples for the First Time
The provided optical test cartridge allows you to monitor the performance of the optical system over time. (The optical test cartridge holds the cartridge return spring in place and also simulates the mass of a reagent test cartridge.)
Before samples are analyzed for the first time, run the optical test cartridge.
IMPORTANT!
Keep a permanent record of the results obtained (i.e., Mean Transmittance, Standard Deviation and Drift).* These initial values will be used for comparison, as in control charting (and also to isolate the cause of an instrument malfunction in conjunction with instructions provided by our Bayer HealthCare Customer Service Department Representative).
*It is recommended that you record the results on the page provided in the appendix of this manual.
After the optical test cartridge is run initially, it is recommended that the optical test cartridge be run:
•quarterly
•after cleaning the cartridge compartment
•after changing the air filter
•when instructed to do so by our Customer Service Representative
NOTE: Refer to Section 7, page 7.6, Instrument Care and Routine Maintenance, for information regarding the comparison of initial values obtained for your instrument with values obtained thereafter.
DISPLAY
READY: SCAN BAR CODE 02/24/03 2:09PM
RUN STANDARD 1?
WHAT YOU DO
1.Locate the bar code on the optical test cartridge.
2.Hold the cartridge so that the bar code faces right.
3.Insert the cartridge (above dot on instrument) into the bar code track.
4.Quickly (within 1 second) and smoothly, slide the cartridge down past the dot.
0. A beep sounds to signal a successful scan.
0. • If no beep sounds, repeat the procedure. If a beep repeatedly fails to sound, refer to Troubleshooting, Section 6.
5. Press  .
.
2
GETTING UNPACKING, UP SET AND ACQUAINTED
Revised 6/03 |
2.17 |

2
UNPACKING, GETTING ACQUAINTED AND SET UP
UNPACKING, GETTING ACQUAINTED AND SET UP
DISPLAY
STANDARD 1
LOAD, CLOSE DOOR
PROCESSING STANDARD
S1 6 MIN |
10:02AM |
6 MIN = total test time
After 1 minute:
1.0001 T |
0.00012 SD |
S1 |
5 MIN 10:03AM |
|
|
Upon completion of test:
1.0001 T 0.00012 SDnnn
S1 0.00387 DRIFT
WHAT YOU DO
6.Open the cartridge compartment door.
7.Hold the optical test cartridge so that the bar code faces right.
0.Insert the cartridge into the compartment until a subtle snap is heard/felt.
0.HINT: The cartridge is designed to fit only one way into the instrument.
8. Close door.
09. Record the displayed results in the blanks provided on the last page of this manual (appendix).
10. Remove cartridge.
00. a) Open cartridge compartment door.*
00.b) Locate the button on the right side of the cartridge compartment. Push and hold it down with your right hand.
00.c) With your left hand, gently push the plastic tab on the cartridge to the right; this action releases (unlocks) cartridge.
00. d) Pull cartridge out of compartment.
*If the door is opened (within 15 minutes after assay completion), the test result is displayed for only 30 seconds.
*If the door is not opened, the test result will remain displayed for 15 minutes.
*At 15 minutes, an audible tone (error buzz) sounds and the display changes to “READY: REMOVE TEST.”
2.18 |
Revised 6/03 |

MENU
The MENU consists of up to nine (9) items listed below. Note that item number two and item number nine are optional (may or may not be active—depends upon choices made during “Instrument Setup”).
1RECALL PREVIOUS TESTS?
2SET SEQUENCE NUMBER? (optional)
3RECALL CONTROL RESULTS?
4VIEW CALIBRATION STATUS?
5SET DATE/TIME?
6INSTRUMENT SETUP?
7SET CREATININE UNITS?
8INSTRUMENT TEST?
9RUN CONTROL? (optional)
To access the MENU (and display the first item):
• Press 
To display each additional item:
• Repeatedly press 
To select the item displayed:
• Press 
To exit the MENU:
• Press 
Information and instructions for each MENU item are provided in this section.
3
MENU
Revised 6/03 |
3.1 |

3
MENU
MENU
1RECALL PREVIOUS TESTS?
•Up to 16 test results can be recalled (and printed if a printer is in use).
Recalled Test Result Format
|
|
|
|
|
Test |
|
|
|
|
|
|
Assay Result |
|
Type |
Reagent Lot No. |
||
|
|
|
|
|
|
|||
|
|
|
6.0 % HbA1c |
LOT:0325 |
|
|||
|
|
|
02/24/03 |
#011 |
11:24PM |
|
||
|
|
|
|
|
|
|
||
|
|
Date of Assay |
Sequence No. |
Time Assay Began |
||||
|
Date of Assay |
Sequence No. |
Time Assay Began |
|||||
|
Date of Assay |
|
(optional) |
Time A. (optional) |
||||
|
(optional) |
|
||||||
|
|
|
|
|
|
|
||
DISPLAY |
|
|
|
WHAT YOU DO |
||||
|
|
|
|
|
|
|
||
|
WAIT: WARMING UP |
|
1. |
Press . |
||||
|
02/24/03 |
|
2:09PM |
|
||||
|
|
|
|
|
|
|
||
|
|
|
|
|
|
|
|
|
OR
READY: SCAN BAR CODE 02/24/03 2:09PM
OR
TEST IN PROGRESS
#001 6 MIN 10:15AM
(Test in progress is not aborted when MENU is pressed.)
3.2 |
Revised 6/03 |

DISPLAY
RECALL PREVIOUS TESTS? 02/17/90 #001 11:47AM
6.0 % HbA1c |
LOT:0325 |
|
02/24/03 |
#011 |
11:24PM |
|
|
|
(example)
OR
A=55.0mg/L LOT:0325
09/13/02 #010 10:24PM
(example)
OR
C=72.1mg/dL LOT:0325 09/13/02 #010 10:24PM
(example)
OR
A/C=76 LOT:0325 02/24/03 #010 10:24PM
(example)
NO MORE RESULTS STORED
IN INSTRUMENT
(after all results are displayed)
WHAT YOU DO
2. Press  .
.
0. • The test result for the sample most recently assayed is displayed first.
3. Press  to recall up to 16 test results.
NOTES:
•To print the displayed test result, press  (if a printer is in use).
–If  is pressed for more than 3 seconds, all stored test results are printed.
•To return display to “RECALL PREVIOUS TESTS?,” press  once anytime during recall of test results.
•To exit the MENU, press  twice.
•Albumin (A), creatinine (C), and the albumin/ creatinine ratio (A/C) results for the same specimen are shown sequentially on separate displays, and are labeled with the same sequence number (optional) and date/time.
This display is retained until:
•a calibration card bar code is read
• or
or  is pressed
– 
 is pressed, the display returns to the first test result previously recalled (this is the result for the most recent sample assayed).
–If  is pressed once, the display returns to “RECALL PREVIOUS TESTS?”
–If  is pressed twice, you exit the MENU.
3
MENU
Revised 6/03 |
3.3 |

3
MENU
MENU
2 SET SEQUENCE NUMBER? (optional)
DISPLAY
WAIT: WARMING UP 02/24/03 2:09PM
OR
READY: SCAN BAR CODE 02/24/03 2:09PM
OR
WHAT YOU DO
1.Press  .
.
2.Press  .
.
NOTE: If a sequence number is selected while a test is in progress, the sequence number for the test in progress is changed to the newly selected sequence number.
TEST IN PROGRESS
#001 6 MIN 10:15AM
SET SEQUENCE NUMBER?
SET SEQUENCE NUMBER
#009
SET SEQUENCE NUMBER?
3.Press  .
.
4.Press  or
or  to select the digit above the cursor.
0. Press  to move cursor (right) to next 0. digit.
0. • Repeat procedure to select second and third digits.
0. Press  .
.
5. To exit the MENU, press  .
.
0. To display the next MENU item, press  .
.
3.4 |
Revised 6/03 |

3 RECALL CONTROL RESULTS?
• |
Up to 16 control results can be stored and |
• |
Lower case “c” in display indicates a result for a |
|
recalled (and also printed if a printer is in use). |
|
control other than a DCA 2000 Control*. |
• |
Upper case “C” in display indicates a result for a |
• |
A control lot number is displayed only for DCA |
|
DCA 2000® Control. |
|
2000 Controls. |
Format for Recalled Results (examples)
DCA 2000 CONTROLS, ONLY
Control Result |
Test |
Reagent Lot Number |
||||
Type |
||||||
mmmmmmmmmmmmmmmmmmmmmmmmm |
||||||
|
|
|
|
|||
|
9.8% HbA1c |
LOT:0325 |
|
|||
|
02/24/03 C1 LOTC:0223 |
|
||||
|
|
|
|
|
|
|
|
|
DCA 2000 |
||||
|
|
|
||||
Date of Assay |
C1 — indicates |
|||||
|
|
a result for the |
Control Lot Number |
|||
|
|
DCA 2000 |
|
|
|
|
|
|
Normal or Low |
|
|
||
|
|
Control** |
|
|
|
|
**Cl—is replaced with “C2” for the DCA 2000 Abnormal or High Control and “C1out” or “C2out” for an out-of-range control
3
MENU
ALL CONTROLS EXCEPT DCA 2000 CONTROLS*
Control Result |
Test |
Reagent Lot Number |
||
Type |
||||
|
|
|
||
|
9.8% HbA1c |
LOT:0325 |
|
|
|
02/24/03 |
c1 LOTC:0223 |
|
|
|
|
|
|
|
Date of Assay |
c1—indicates control |
|||
|
|
level “1” of 9 possible |
||
|
|
levels |
||
*unless a DCA 2000 Control was run without scanning the DCA 2000 Control bar code card provided with the control kitmmmmmmmmn
— continued on next page
Revised 6/03 |
3.5 |

3
MENU
MENU
Recall Control Results
DISPLAY |
|
WHAT YOU DO |
||
|
|
|
|
|
|
WAIT: WARMING UP |
1. |
Press . |
|
|
02/24/03 |
2:09PM |
||
|
|
|
||
|
|
|
2. |
Repeatedly press , until “RECALL |
|
OR |
|
||
|
|
|
CONTROL RESULTS?” is displayed. |
|
READY: SCAN BAR CODE 02/24/03 2:09PM
OR
TEST IN PROGRESS
#001 6 MIN 10:15AM
RECALL CONTROL RESULTS?
(Test in progress is not aborted.)
3. Press  .
.
0. • The control result for the control most recently assayed is displayed first.
3.6 |
Revised 6/03 |
 Loading...