


Clinitek 50

USER’S GUIDE

1996 Bayer Corporation
All Rights Reserved
Printed in the U.S.A.
Unless otherwise noted, all
trademarks are the property
of Bayer Corporation.
Revised 3/02 99915549
Bayer Corporation
Elkhart, IN 46515 USA

Contents
iii
A Brief Description . . . . . . . . . . . . . . . . . . . . iv
1 Unpacking and Setup . . . . . . . . . . . . . . . . . . . 1
Unpacking . . . . . . . . . . . . . . . . . . . . . . 1
Installing the battery pack . . . . . . . . . . . . . 4
Loading the paper roll . . . . . . . . . . . . . . . 5
Powering up . . . . . . . . . . . . . . . . . . . . . 6
Final paper work . . . . . . . . . . . . . . . . . . 8
2 Selecting your Options . . . . . . . . . . . . . . . . . . 9
Location of results and number of copies . . . . 9
Setting the time . . . . . . . . . . . . . . . . . . .10
Setting the date . . . . . . . . . . . . . . . . . . . 10
Reporting the urine color . . . . . . . . . . . . . 11
Setting the sequence number . . . . . . . . . . .11
Clearing the memory and marking positives . .12
Printing the instr ument setup . . . . . . . . . . .12
3 Testing Controls . . . . . . . . . . . . . . . . . . . . . . 13
4 Testing Routine Urines . . . . . . . . . . . . . . . . . . 14
Procedure . . . . . . . . . . . . . . . . . . . . . .14
Summary of steps . . . . . . . . . . . . . . .16
Getting results . . . . . . . . . . . . . . . . . . . 16
If results are printed . . . . . . . . . . . . . . 16
If results are displayed . . . . . . . . . . . . . 16
When you are finished testing . . . . . . . . . . 17
Operating notes . . . . . . . . . . . . . . . . . . 17
5 Cleaning the Instrument . . . . . . . . . . . . . . . . . 18
Daily cleaning . . . . . . . . . . . . . . . . . . . . 18
Disinfecting the table . . . . . . . . . . . . . . . . 19
Removing heavy buildup . . . . . . . . . . . . . 20
General cleaning . . . . . . . . . . . . . . . . . .21
Appendix . . . . . . . . . . . . . . . . . . . . . . . . . .22
Solving problems . . . . . . . . . . . . . . . . . .22
If the display is blank . . . . . . . . . . . . . . 22
Error messages and remedies . . . . . . . . 23
Problem checklist . . . . . . . . . . . . . . . .24
Where to call for ser vice . . . . . . . . . . . . 25
Ordering accessories . . . . . . . . . . . . . . . 26
Ordering replacement par ts . . . . . . . . . . . . 27
Specifications . . . . . . . . . . . . . . . . . . . . 28
Tables of results . . . . . . . . . . . . . . . . . .29
CHAPTER

iv
A Brief Description
What does this instrument do?
Your CLINITEK®50 Urine
Chemistry Analyzer is a portable
instrument for reading traditional
Bayer Reagent Strips for Urinalysis
(e.g., MULTISTIX®10 SG), Bayer
MULTISTIX PRO®Reagent Strips,
and CLINITEK®Microalbumin
Reagent Strips. Refer to the bottle
label or carton for the tests that
are included with each product.
The Analyzer can also report the
color of the urine sample. No special training is needed to use the
instrument.
The Analyzer can be plugged
into an electrical outlet for use on
the benchtop, or it can be
powered by batteries and freely
moved from one testing site to
another.The battery pack, which
is purchased separately, fits into
an opening on the bottom side of
the instrument.
Do I have to calibrate?
You do not have to do anything
extra to calibrate .The instrument
performs a “self-test”and calibration each time it is turned on.
Then, each time a test is run, the
instrument calibrates again, using
the white plastic bar located on the
end of the test strip table.
How does it work?
Testing starts when either of the
two Start keys (labeled “ ”) is
pressed.You have 10 seconds
after the key is pressed to blot
the edge of the wet reagent test
strip (if required for the test) and
place it on the test strip table.The
table is then pulled into the instrument, where the test strip is read.
The instrument measures the
color and amount of light that is
reflected from the test pads on the
strip.It then converts these measurements into meaningful results.
How do I get results?
Results can be either printed or
displayed.The results can also be
transferred to a computer using a
special cable that is plugged into
the computer port on the back of
the instrument.
What about this User’s Guide?
The User’s Guide contains the
directions you need to unpack the
instrument, use it for your daily
urine testing, and keep it in good
working condition.The User’s
Guide is provided in several
languages; please recycle the
Guides you will not be using.
As you read through the User’ s
Guide, you will find these symbols:
NOTES contain useful tips
on using your instrument. They
appear in italicized type.
CAUTIONS should be
followed carefully to ensure your
instrument operates correctly and
is not damaged.Cautions appear
in bold type like this.
✏
1 Carefully remove the
contents of the shipping carton.
Check the carton and instrument
for visible signs of damage;if
seen, immediately contact the
carrier.
2 Remove each of the
wrappings and check for the
following items:
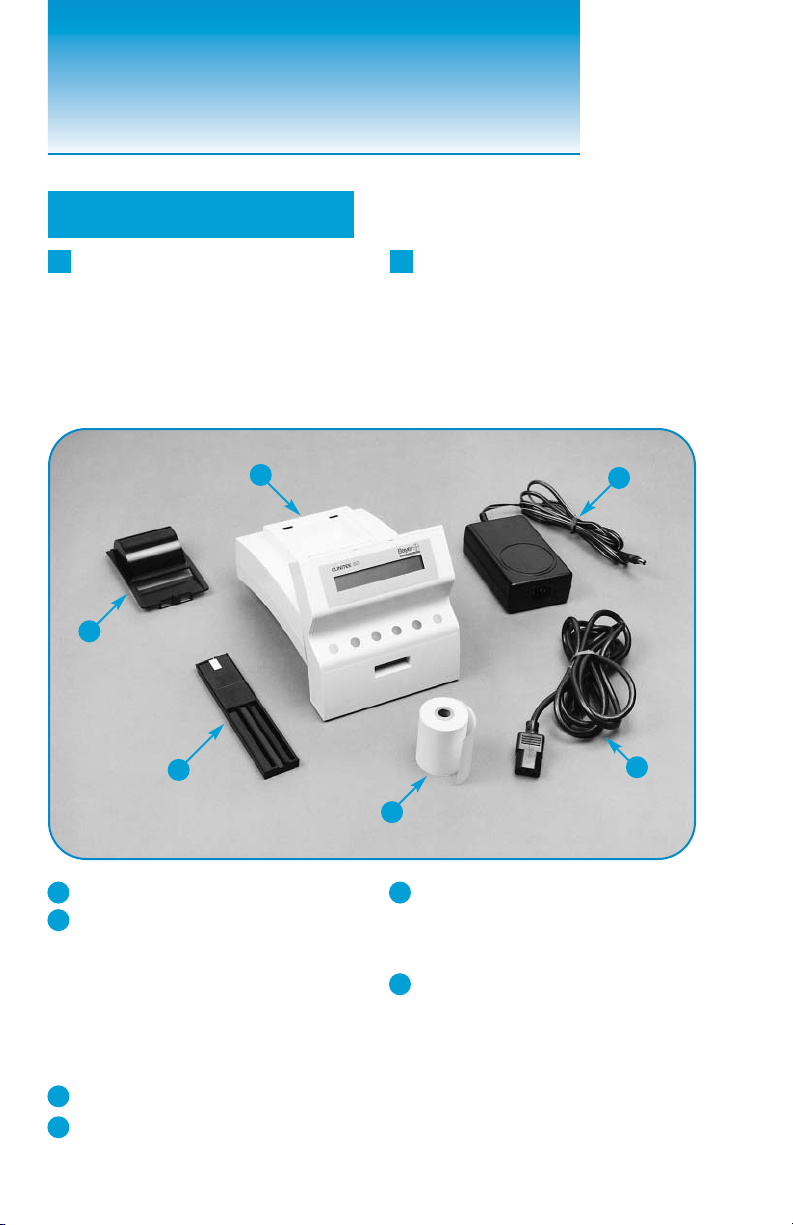
1
Unpacking
1 CLINITEK
®
50 Analyzer
2
Test strip table
(Do not touch the white bar!)
If you will be using a Reagent Strip
that has four or fewer test pads, you
must use a short test strip table, which
must be ordered separately (see page
27).(CLINITEK
®
Microalbumin Strips
are run using the long table.)
3 Printer cover
4 Power transformer
5 Power cord
If the power cord is not the style you
need, contact your Bayer office
(see page 25).
6 Paper roll
Depending on the model you have
received, there may also be a Warranty
Registration Card, Customer Information
Card, Unpacking/Setup Guide, and/or
Quick Reference Guide included.
1
2
6
4
5
3
Unpacking and Setup
1
3 Place the instrument on a
level work surface where the
temperature and humidity are
fairly constant.
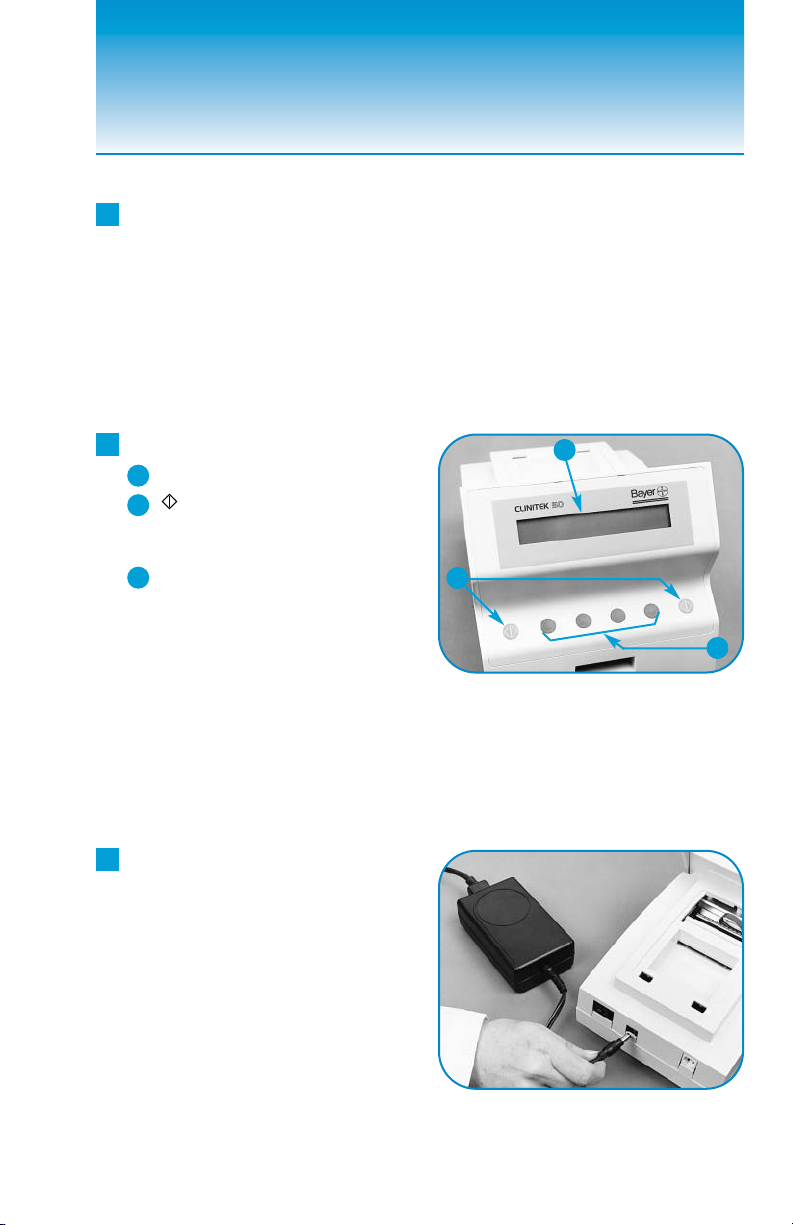
4 Locate the following:
1 Display
2 (START) Keys
Either green key can be
pressed to start a test.
3 Option Keys
Each dark gray key corresponds
to one of four words that may be
shown on the bottom line of the
display;press the key beneath
the word to select that choice.
If you will be using the
optional battery pack instead of
the power cord and transf ormer,
skip Step 5.
5 Plug the power cord into
the transformer, then plug the
transformer cord into the
instrument. Plug the power
cord into an appropriate
grounded AC electrical
wall outlet.
2
The best temperature
for using the instrument is
between 22°C and 26°C (72°F
to 79°F). Do not place the
instrument near such things
as an outside window,oven,
hot plate, or radiator.
✏
1
2
3

3
6 Insert the test strip table into
the instrument, holding it by the
end opposite the white bar and
with the flat side facing up. Do
not touch the white bar. Push
the table in about halfway.
7 If you will be sending results
to a computer, you must obtain
a special Computer Cable/
Connector Kit (see page 26 to
order).The kit includes all the
information you need to connect
and use the cable.

4
2 Turn the instrument over
and snap the battery pack into
the opening.
3 Plug the cord into the
power inlet.
1 If you will be using the
optional battery pack, place
six AA-size batteries into
the battery compartment.
Installing the
Battery Pack
5
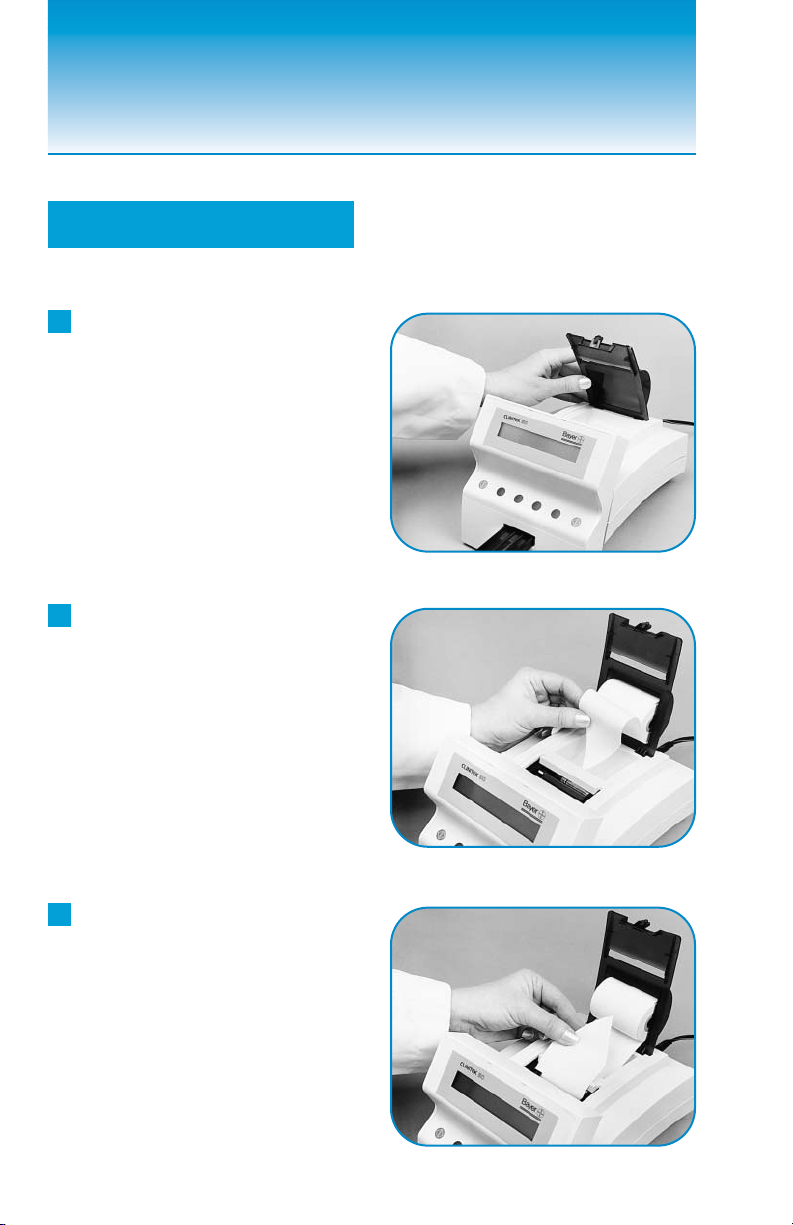
If changing the paper,
leave the cover down and pull
out the remaining paper.Then
raise the cover and remove
the empty core to continue.
3 Pulling toward the back,
gently pull the end of the paper
until the full width of the paper
is completely exposed.
1 Insert the two tabs on the
printer cover into the two openings
on the instrument. Rest the cover
on its back edge.
2 Trim the end of the paper so
it has a large “V”shape at least
2 inches (5 cm) long.With the
paper unrolling from underneath,
insert the paper under the printer
roller until the tip comes through
the other side of the roller.
Loading the Paper Roll
Do not pull the paper
straight up or toward the
front, as this will damage
the printer.
✏
The cover must be
latched in order for the
instrument to function.
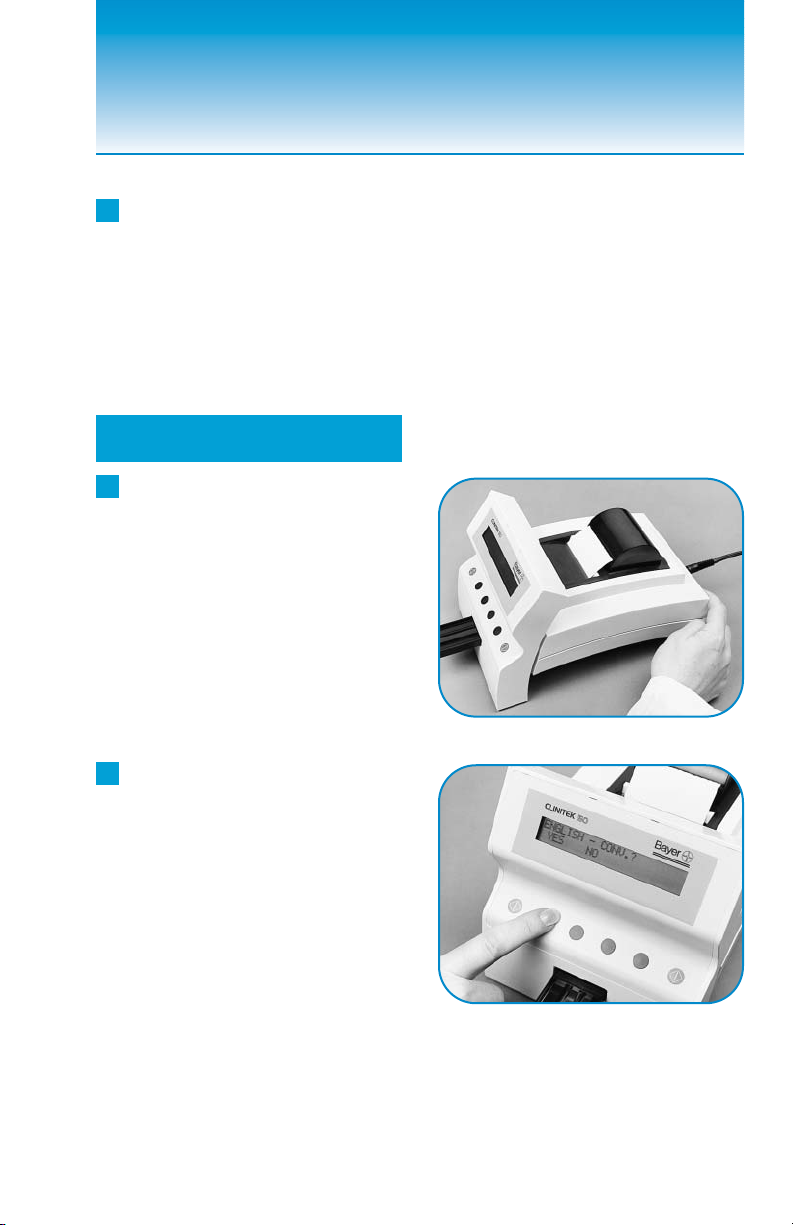
1 Press the power switch on
the back of the instrument to
the “––” (ON) position.
2 If you want to use the
language and units shown
on the screen, press the key
under the word YES. If you
want another language and/or
units, press the key under the
word NO.
6
4 Feed the paper through the
printer cover opening and snap
the cover into position.
To prevent damage
to the printer,do not tear
the paper without the cover
in place.
Powering Up
Refer to pages 29 to 34
for the test abbreviations and
results that are used with each
of the three options for English.
For tests not shown in these
tables, refer to the insert
included with the product.
✏
✏

7
3 Press the key under the word
NORMAL if you want the results
to appear in clinical units.Press
the key under +/– if you prefer
plus and minus signs.
4 If you want to use the Bayer
Reagent Strip shown on the
screen, press the key under the
word YES. If you want to use a
different strip, press the key
under the word NO.
✏
The MULTISTIX PRO
®
and CLINITEK Microalbumin
Strips are not included in this list.
✏
5 Your selections will be printed.
If they are correct, press the key
under YES. If they are not correct,
press NO and repeat Steps 2 to 4.
The screens shown in
Steps 2, 3, and 4 appear only
the first time the instrument is
turned on.

1 Find the bar-coded serial
number label on the bottom of
the instrument.Write this
number and today’s date on the
Problem Checklist on page 24.
2 Fill out and mail the Warranty
Registration Card and Customer
Information Card if these are
included with your instrument.
Final Paper Work
8
6 The instrument briefly
displays two screens while it
does an internal check.When
the check is complete, the
READY screen appears. Look
for the names of the products
that can be used — they are
shown after the words
“READY FOR TEST.”
MULTISTIX PRO and
CLINITEK Microalbumin Reagent
Strips are automatically identified
by the instrument; if your software
cannot identify a test, the test is
rejected and the display will
show “STRIP PROBLEM –
RETEST.”
✏
Do not use any
traditional Bayer Reagent
Strip product other than what
is shown on the display. Using
the wrong Reagent Strip will
give you incorrect results.
 Loading...