

Page 1

USER’S GUIDE
Page 2

1996 Bayer Corporation
All Rights Reserved
Printed in the U.S.A.
Unless otherwise noted, all
trademarks are the property
of Bayer Corporation.
Revised 3/02 99915549
Bayer Corporation
Elkhart, IN 46515 USA
Page 3

Contents
iii
A Brief Description . . . . . . . . . . . . . . . . . . . . iv
1 Unpacking and Setup . . . . . . . . . . . . . . . . . . . 1
Unpacking . . . . . . . . . . . . . . . . . . . . . . 1
Installing the battery pack . . . . . . . . . . . . . 4
Loading the paper roll . . . . . . . . . . . . . . . 5
Powering up . . . . . . . . . . . . . . . . . . . . . 6
Final paper work . . . . . . . . . . . . . . . . . . 8
2 Selecting your Options . . . . . . . . . . . . . . . . . . 9
Location of results and number of copies . . . . 9
Setting the time . . . . . . . . . . . . . . . . . . .10
Setting the date . . . . . . . . . . . . . . . . . . . 10
Reporting the urine color . . . . . . . . . . . . . 11
Setting the sequence number . . . . . . . . . . .11
Clearing the memory and marking positives . .12
Printing the instr ument setup . . . . . . . . . . .12
3 Testing Controls . . . . . . . . . . . . . . . . . . . . . . 13
4 Testing Routine Urines . . . . . . . . . . . . . . . . . . 14
Procedure . . . . . . . . . . . . . . . . . . . . . .14
Summary of steps . . . . . . . . . . . . . . .16
Getting results . . . . . . . . . . . . . . . . . . . 16
If results are printed . . . . . . . . . . . . . . 16
If results are displayed . . . . . . . . . . . . . 16
When you are finished testing . . . . . . . . . . 17
Operating notes . . . . . . . . . . . . . . . . . . 17
5 Cleaning the Instrument . . . . . . . . . . . . . . . . . 18
Daily cleaning . . . . . . . . . . . . . . . . . . . . 18
Disinfecting the table . . . . . . . . . . . . . . . . 19
Removing heavy buildup . . . . . . . . . . . . . 20
General cleaning . . . . . . . . . . . . . . . . . .21
Appendix . . . . . . . . . . . . . . . . . . . . . . . . . .22
Solving problems . . . . . . . . . . . . . . . . . .22
If the display is blank . . . . . . . . . . . . . . 22
Error messages and remedies . . . . . . . . 23
Problem checklist . . . . . . . . . . . . . . . .24
Where to call for ser vice . . . . . . . . . . . . 25
Ordering accessories . . . . . . . . . . . . . . . 26
Ordering replacement par ts . . . . . . . . . . . . 27
Specifications . . . . . . . . . . . . . . . . . . . . 28
Tables of results . . . . . . . . . . . . . . . . . .29
CHAPTER
Page 4

iv
A Brief Description
What does this instrument do?
Your CLINITEK®50 Urine
Chemistry Analyzer is a portable
instrument for reading traditional
Bayer Reagent Strips for Urinalysis
(e.g., MULTISTIX®10 SG), Bayer
MULTISTIX PRO®Reagent Strips,
and CLINITEK®Microalbumin
Reagent Strips. Refer to the bottle
label or carton for the tests that
are included with each product.
The Analyzer can also report the
color of the urine sample. No special training is needed to use the
instrument.
The Analyzer can be plugged
into an electrical outlet for use on
the benchtop, or it can be
powered by batteries and freely
moved from one testing site to
another.The battery pack, which
is purchased separately, fits into
an opening on the bottom side of
the instrument.
Do I have to calibrate?
You do not have to do anything
extra to calibrate .The instrument
performs a “self-test”and calibration each time it is turned on.
Then, each time a test is run, the
instrument calibrates again, using
the white plastic bar located on the
end of the test strip table.
How does it work?
Testing starts when either of the
two Start keys (labeled “ ”) is
pressed.You have 10 seconds
after the key is pressed to blot
the edge of the wet reagent test
strip (if required for the test) and
place it on the test strip table.The
table is then pulled into the instrument, where the test strip is read.
The instrument measures the
color and amount of light that is
reflected from the test pads on the
strip.It then converts these measurements into meaningful results.
How do I get results?
Results can be either printed or
displayed.The results can also be
transferred to a computer using a
special cable that is plugged into
the computer port on the back of
the instrument.
What about this User’s Guide?
The User’s Guide contains the
directions you need to unpack the
instrument, use it for your daily
urine testing, and keep it in good
working condition.The User’s
Guide is provided in several
languages; please recycle the
Guides you will not be using.
As you read through the User’ s
Guide, you will find these symbols:
NOTES contain useful tips
on using your instrument. They
appear in italicized type.
CAUTIONS should be
followed carefully to ensure your
instrument operates correctly and
is not damaged.Cautions appear
in bold type like this.
✏
Page 5
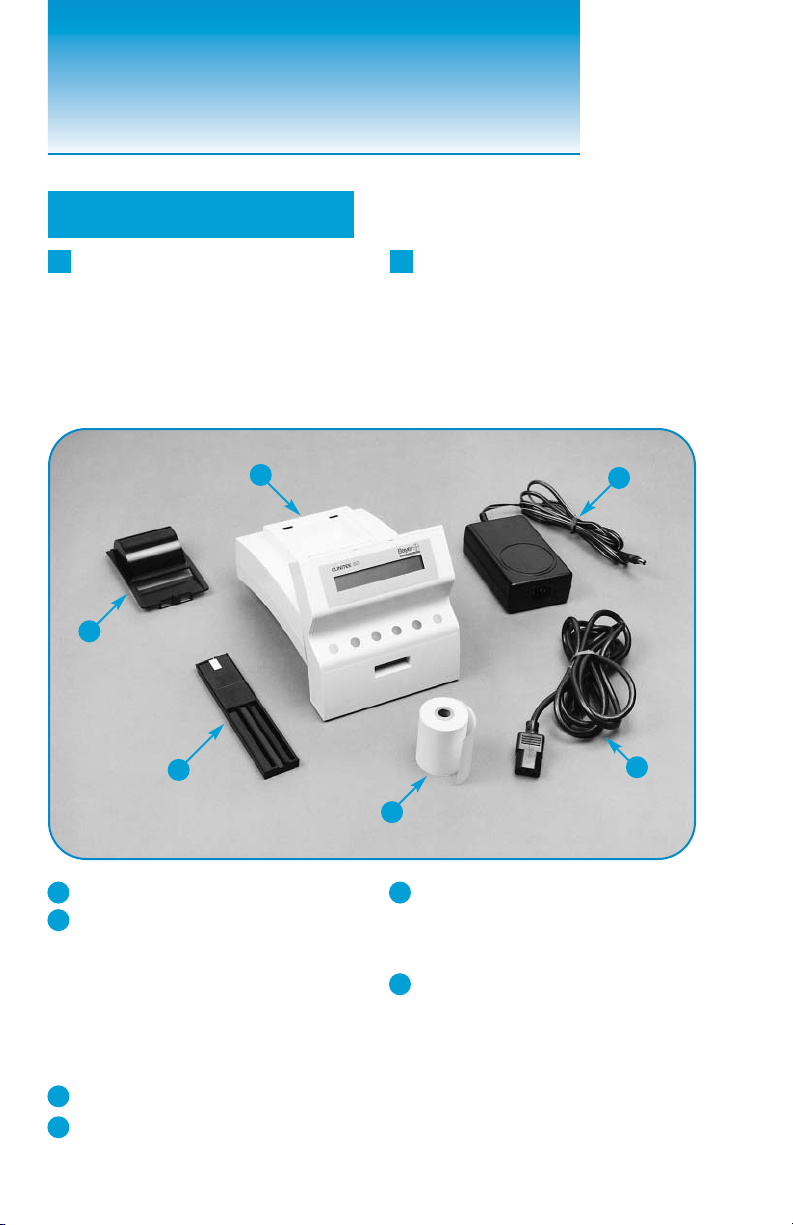
1 Carefully remove the
contents of the shipping carton.
Check the carton and instrument
for visible signs of damage;if
seen, immediately contact the
carrier.
2 Remove each of the
wrappings and check for the
following items:
1
Unpacking
1 CLINITEK
®
50 Analyzer
2
Test strip table
(Do not touch the white bar!)
If you will be using a Reagent Strip
that has four or fewer test pads, you
must use a short test strip table, which
must be ordered separately (see page
27).(CLINITEK
®
Microalbumin Strips
are run using the long table.)
3 Printer cover
4 Power transformer
5 Power cord
If the power cord is not the style you
need, contact your Bayer office
(see page 25).
6 Paper roll
Depending on the model you have
received, there may also be a Warranty
Registration Card, Customer Information
Card, Unpacking/Setup Guide, and/or
Quick Reference Guide included.
1
2
6
4
5
3
Unpacking and Setup
1
Page 6
3 Place the instrument on a
level work surface where the
temperature and humidity are
fairly constant.
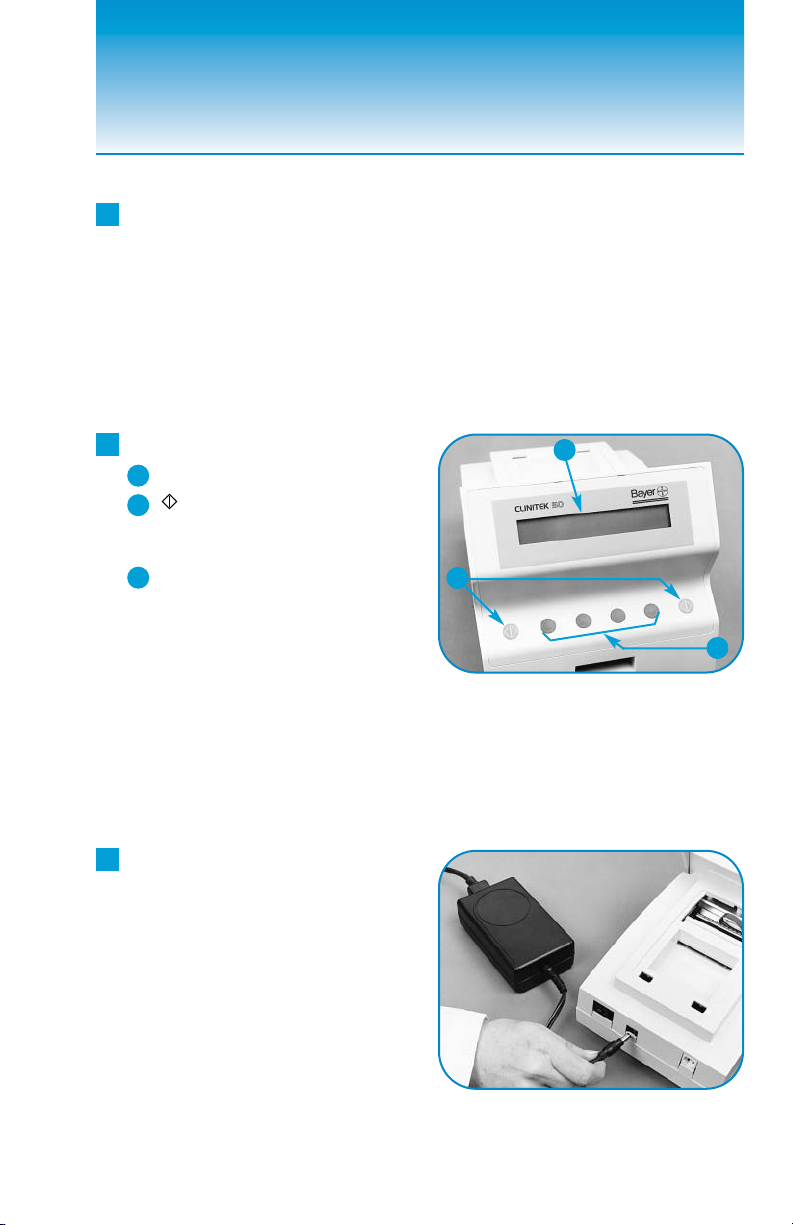
4 Locate the following:
1 Display
2 (START) Keys
Either green key can be
pressed to start a test.
3 Option Keys
Each dark gray key corresponds
to one of four words that may be
shown on the bottom line of the
display;press the key beneath
the word to select that choice.
If you will be using the
optional battery pack instead of
the power cord and transf ormer,
skip Step 5.
5 Plug the power cord into
the transformer, then plug the
transformer cord into the
instrument. Plug the power
cord into an appropriate
grounded AC electrical
wall outlet.
2
The best temperature
for using the instrument is
between 22°C and 26°C (72°F
to 79°F). Do not place the
instrument near such things
as an outside window,oven,
hot plate, or radiator.
✏
1
2
3
Page 7
3
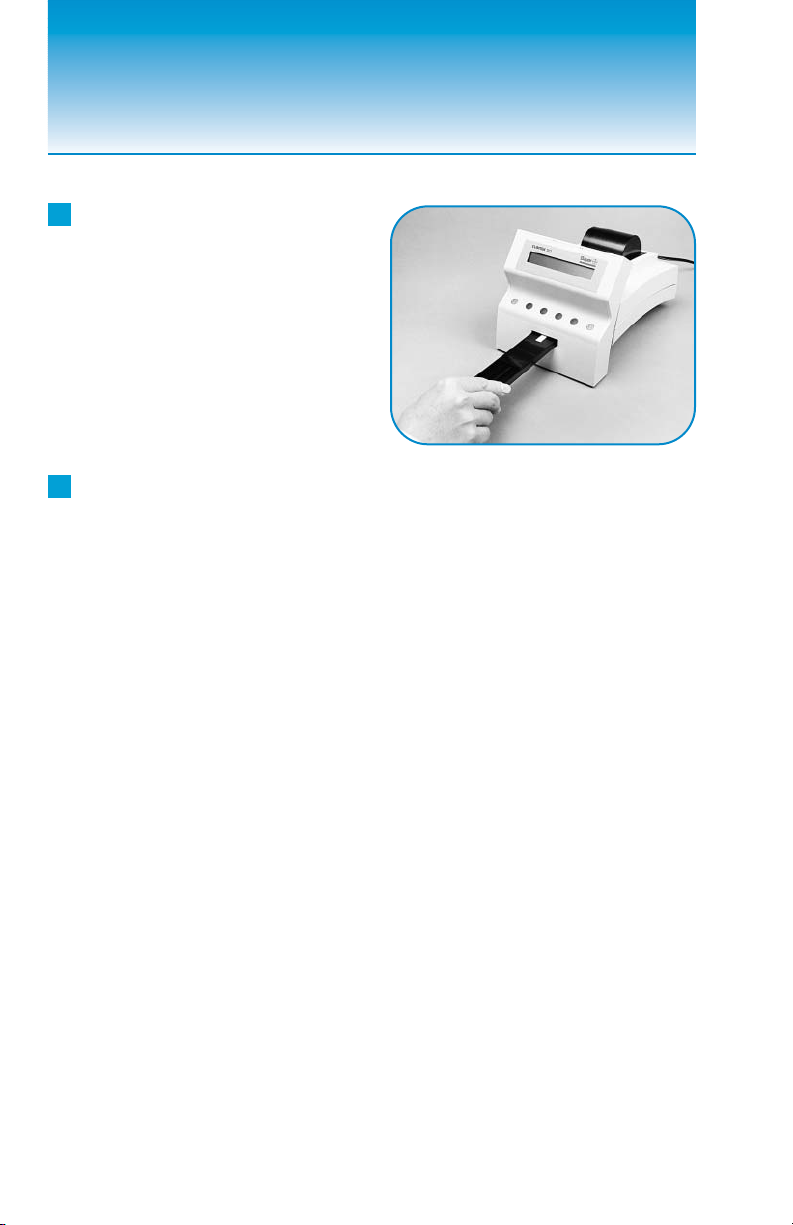
6 Insert the test strip table into
the instrument, holding it by the
end opposite the white bar and
with the flat side facing up. Do
not touch the white bar. Push
the table in about halfway.
7 If you will be sending results
to a computer, you must obtain
a special Computer Cable/
Connector Kit (see page 26 to
order).The kit includes all the
information you need to connect
and use the cable.
Page 8

4
2 Turn the instrument over
and snap the battery pack into
the opening.
3 Plug the cord into the
power inlet.
1 If you will be using the
optional battery pack, place
six AA-size batteries into
the battery compartment.
Installing the
Battery Pack
Page 9
5
If changing the paper,
leave the cover down and pull
out the remaining paper.Then
raise the cover and remove
the empty core to continue.
3 Pulling toward the back,
gently pull the end of the paper
until the full width of the paper
is completely exposed.
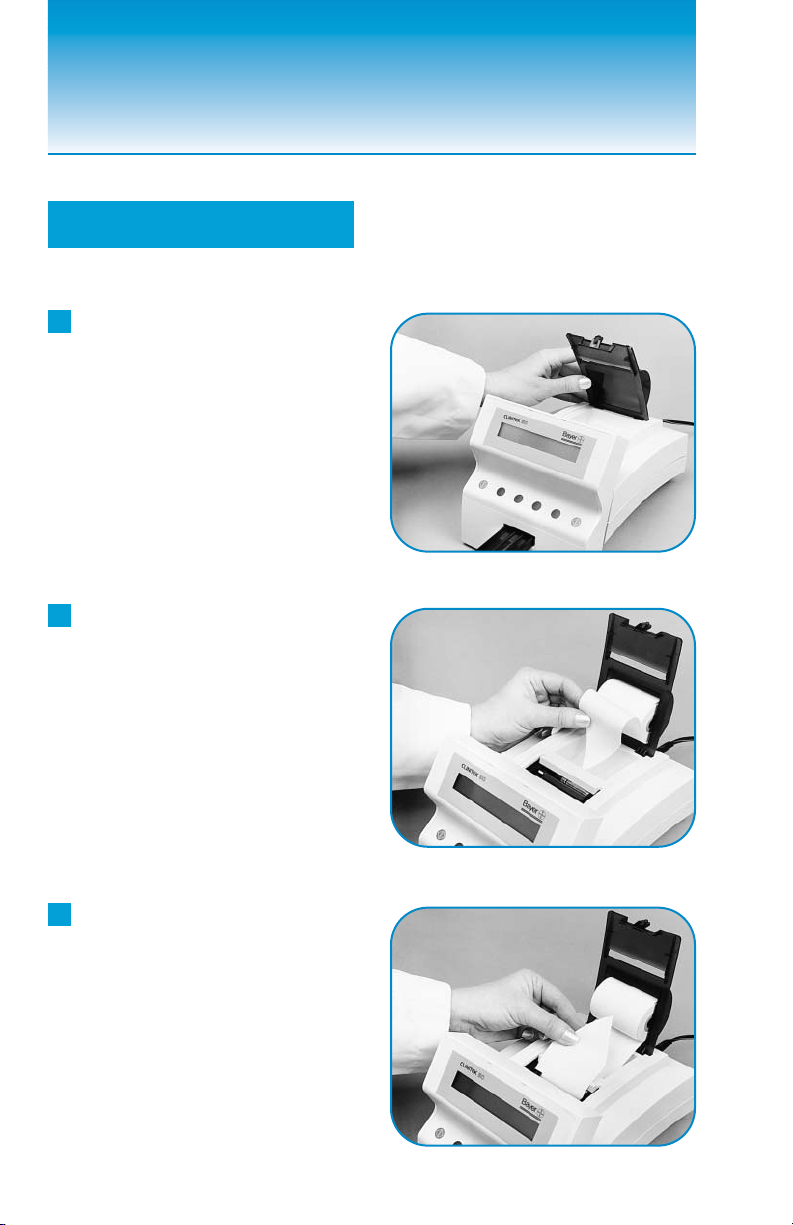
1 Insert the two tabs on the
printer cover into the two openings
on the instrument. Rest the cover
on its back edge.
2 Trim the end of the paper so
it has a large “V”shape at least
2 inches (5 cm) long.With the
paper unrolling from underneath,
insert the paper under the printer
roller until the tip comes through
the other side of the roller.
Loading the Paper Roll
Do not pull the paper
straight up or toward the
front, as this will damage
the printer.
✏
Page 10
The cover must be
latched in order for the
instrument to function.
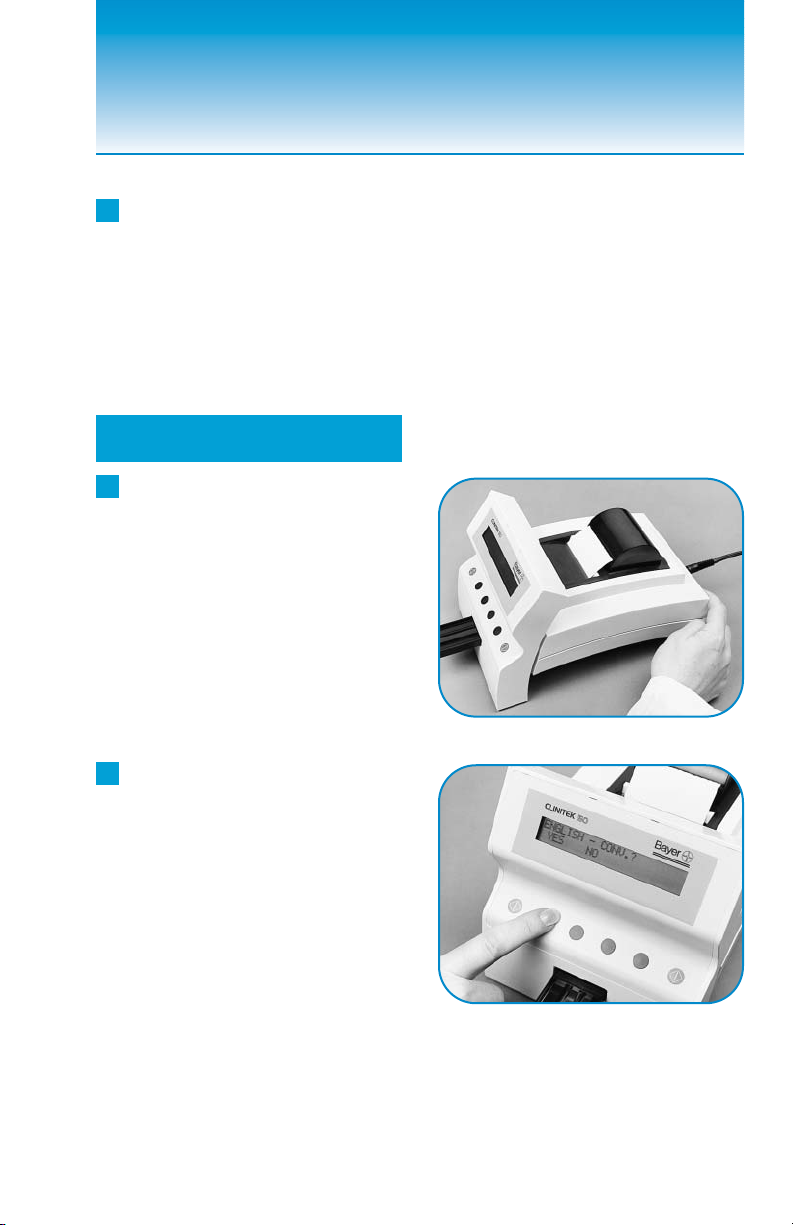
1 Press the power switch on
the back of the instrument to
the “––” (ON) position.
2 If you want to use the
language and units shown
on the screen, press the key
under the word YES. If you
want another language and/or
units, press the key under the
word NO.
6
4 Feed the paper through the
printer cover opening and snap
the cover into position.
To prevent damage
to the printer,do not tear
the paper without the cover
in place.
Powering Up
Refer to pages 29 to 34
for the test abbreviations and
results that are used with each
of the three options for English.
For tests not shown in these
tables, refer to the insert
included with the product.
✏
✏
Page 11
7
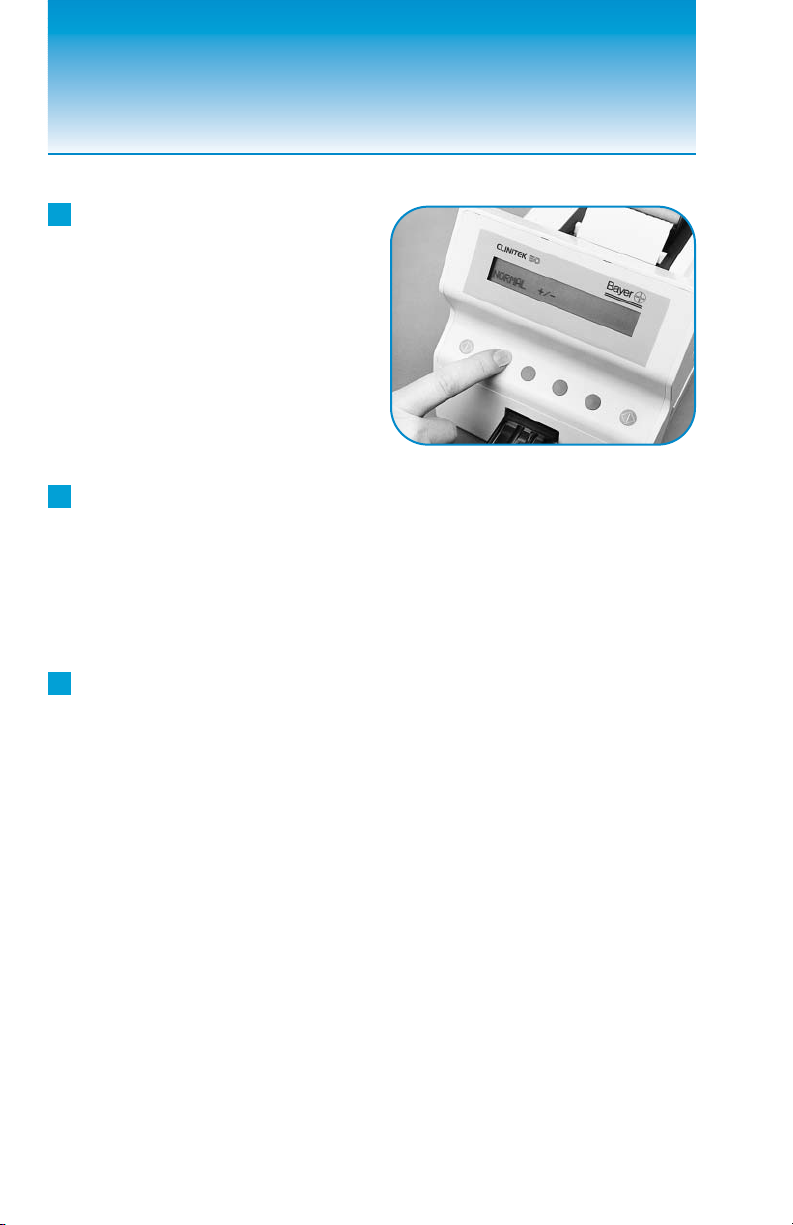
3 Press the key under the word
NORMAL if you want the results
to appear in clinical units.Press
the key under +/– if you prefer
plus and minus signs.
4 If you want to use the Bayer
Reagent Strip shown on the
screen, press the key under the
word YES. If you want to use a
different strip, press the key
under the word NO.
✏
The MULTISTIX PRO
®
and CLINITEK Microalbumin
Strips are not included in this list.
✏
5 Your selections will be printed.
If they are correct, press the key
under YES. If they are not correct,
press NO and repeat Steps 2 to 4.
The screens shown in
Steps 2, 3, and 4 appear only
the first time the instrument is
turned on.
Page 12

1 Find the bar-coded serial
number label on the bottom of
the instrument.Write this
number and today’s date on the
Problem Checklist on page 24.
2 Fill out and mail the Warranty
Registration Card and Customer
Information Card if these are
included with your instrument.
Final Paper Work
8
6 The instrument briefly
displays two screens while it
does an internal check.When
the check is complete, the
READY screen appears. Look
for the names of the products
that can be used — they are
shown after the words
“READY FOR TEST.”
MULTISTIX PRO and
CLINITEK Microalbumin Reagent
Strips are automatically identified
by the instrument; if your software
cannot identify a test, the test is
rejected and the display will
show “STRIP PROBLEM –
RETEST.”
✏
Do not use any
traditional Bayer Reagent
Strip product other than what
is shown on the display. Using
the wrong Reagent Strip will
give you incorrect results.
Page 13

9
1 If you want more than one
printed copy or if you prefer
results to be displayed on the
screen, press the key under
the word OUTPUT.
3 If you pressed PRINTER,
you can choose to have more
than one copy of the results.
Press the key under your choice.
Location of Results
and Number of Copies
One copy of each set of
results will be printed if you do
not change this option.
✏
2 Press the key under your
choice.
Selecting Your Options
2
Page 14

10
1 Press the key under the
word SET.
2 Press the key under DA TE
and select a date format:
MDY Month-Day-Year
DMY Day-Month-Year
YMD Year-Month-Day
3 Press the key to adjust
the first number.
4 Press the ➞ key, then press
to adjust the second number.
5 Press the ➞ key, then press
to adjust the third number.
6 Press EXIT.
4 Press the ➞ key, then press
to adjust the minutes.
5 Press EXIT.
If you press and hold
the key, the numbers will
advance more quickly.
Setting the Date
1 Press the key under the
word SET.
2 Press the key under TIME
and select the 12 hour (AM/PM)
format or the 24 hour (military)
format.
3 Press the key to adjust
the hour.
✏
Setting the Time
Page 15

11
1 Press the key under the
word SET.
2 Press MORE, then press
COLOR. Press the YES or NO
key to make your selection.
3 Press EXIT as needed.
Reporting the Urine
Color
Setting the Sequence
Number
Color will be reported
automatically when using Bayer
Reagent Strips that include the
leukocyte test pad if this option
is set to YES. If there is no
leukocyte pad, lines for manual
entry of the color and clarity are
printed.
The sequence number
will not be displayed or printed
unless you change this option.
If you are already using
sequence numbers and the
number is greater than 001,
you will first be given the option
of setting it to 001.
Color results reported
by the instrument may be
different from the color seen
visually.This is because of the
inherent differences between the
human eye and the optical
system of the instrument.
1 If you want to have the
sequence number appear, press
the key under the word SET.
2 Press MORE, then press
SEQ#.
3 Press YES to use sequence
numbers (or press NO if you
don’t want them displayed).
4 Press EXIT as needed.
✏
✏
✏
✏
Page 16

12
Clearing the Memory
and Marking Positives
You can connect the
instrument to a computer to
transfer results.Fifty sets of
results are stored (for transfer
only) if the memory is not
cleared.
Check whether your
software program can accept
the asterisk that marks positive
results.Press NO if it cannot.
1 If you want to clear the
instrument’s memory of all test
results, or to turn off the
asterisk, press the key under
the word SET.
2 Press MORE, then press
CMPTR.
3 Press YES to clear the
memory and reset the sequence
number to 001.
4 Then select whether
positives will be marked with
an asterisk (
*
).
5 Press EXIT as needed.
✏
✏
Printing the
Instrument Setup
If you want to print a list of your
instrument’s setup selections,
press the key under the word
LIST.
Page 17

13
Positive and negative control
solutions should be tested on a
regular basis.This provides a
check to ensure that the test
strips are reacting properly and
the instrument is reading the
strips properly.Testing controls
also helps detect errors caused
by incorrect user technique.
CHEK-STIX
®
Positive and
Negative Control Strips are
available for use in your quality
control program for routine urine
testing (see page 26 for product
numbers).Prepare the control
solutions as instructed in the
package insert that comes with
the control product.Then test the
control solution using the same
procedure as you use when
testing patient urines.
Record the control results.If
any results are not within the
expected range, notify the lab
supervisor or physician. Refer to
the bottle label and/or package
insert for storage information
and expiration date.
Expected values are found
in the package insert that comes
with the control product.
✏
If using a MULTISTIX PRO
®
or CLINITEK®Microalbumin
Reagent Strip, quality control
should be performed using
commercially-availab le controls
that include values for each test
on the strip; CHEK-STIX Control
Strips are not suitable for use
with these products.For information about control manufacturers,
contact your local Bayer office or
representative.In the United
States, call the Bay er Technical
Care Center at 1-877-229-3711.
✏
You should test controls:
▲ at the start of the day;
▲ when you open a new bottle
of test strips;
▲ whenever test results are
in doubt;
▲ when training instrument
operators.
Te s ting Controls
3
Page 18

14
Procedure
Testing can be started only
from the READY FOR TEST
screen. Be sure the Reagent
Strip name agrees with the
strip being used, unless using
MULTISTIX PRO
®
or CLINITEK
®
Microalbumin Reagent Strips,
which are automatically
identified after testing begins.
Before beginning the day’s
testing, check the test strip
table to make sure it is clean.
If it looks dirty, remove the
table and clean it, as described
on page 18.
The urine specimen should
be fresh, well-mixed, and
uncentrifuged. If the urine depth
is less than about 3 inches
(7.6 cm), pour the specimen
into a narrow tube, such as a
URIN-TEK
®
Specimen Tube.
1
Dip a Bayer Reagent Strip
into the urine. Be sure all the
test pads are wet.
2
Immediately remove the
Reagent Strip from the urine,
dragging the edge of the strip
against the side of the container
as you remove the strip. At the
same time, press either green
(START) key.You now have
10 seconds to complete Steps 3
and 4.
✏
Replace the cap as soon
as you remove each strip from
the bottle.
✏
Refer to the direction
insert included with your
Reagent Strips for complete
information on using the strips.
✏
4
Te s ting Routine Urines
Page 19

15
You must place the test
strip while the message
PLACE STRIP ON TABLE is
on the screen. It will appear
for 10 seconds.
5 The table is automatically
pulled into the instrument for
reading. Results are available in
one minute.Be sure not to move
or bump the table.
3 Blot the strip to remove
excess urine by touching the
edge to a paper towel. Do not
drag the strip across the towel;
touch the edge only.
4 Place the Reagent Strip,
with the test pads facing up,
into the middle trough of the test
strip table.Slide the strip along
the table until it touches the end
of the trough.
Page 20

16
If results are printed:
The test results are automatically
printed. Press the PRINT key to
reprint the last set of test results.
Press PAPER, if desired, to add
blank lines after the results.
If results are displayed:
To view results, press the key
repeatedly. When all results have
been displayed and recorded,
press EXIT. To display the
results again, press DISPL.
Getting Results
Wipe the test strip table
with a damp, lint-free tissue.
Do this as often as needed to
prevent urine from building up.
Also, wipe the table after testing
a urine that is visibly bloody or
that gives a very high result on
any test pad.
Thermal print will fade
with time. Also, do not cover
thermally printed results with
transparent tape.
6 Remove the used Reagent
Strip and discard it in the
proper container.
Summary of Steps:
1 Dip a new Reagent Strip
into the urine sample.
2 Press as the strip is
removed from the urine;at the
same time, drag the strip edge
against the side of the container.
3 Blot by touching the edge
of the strip to a paper towel.
4 Place it on the test strip
table within 10 seconds.
5 Discard the strip when the
test is finished.
✏
Page 21

17
1 Clean the test strip table and
check the white bar at the end
of each day or after testing 50
strips, whichever is more often.
Follow the directions for “Daily
Cleaning,” given on page 18.
2 Be sure the test table is empty.
Then gently push the table about
halfway into the instrument.
3 The instrument can be left
on when it is not being used.
However, if you are using the
battery pack, turn the instrument
off to save battery power.
When You Are
Finished Testing
You will be prompted to
clean the table after every 50
strips. Press CONT to return to
the READY FOR TEST screen.
The instrument does not
detect when the internal printer
is out of paper.However, a pink
edge will appear on the last
several feet of paper. Change
the roll shortly after you see this.
Operating Notes
If you never erase the memory
or reset the sequence number,
the number will continue to
increase until 999 is reached.
The next number will then be 001.
If the battery pack is
installed, a unique tone will
sound after 15 minutes of
nonuse to remind you to turn
the instrument off.It will repeat
in 5 minutes, then again
every minute.
✏
✏
Page 22

18
The test strip table must be
kept clean if the instrument is
to provide accurate test results
and operate correctly. Clean
the table and check the white
bar at the end of every day.
1 Remove the test strip table
by pulling it straight out of the
instrument.
2 Wet a cotton-tipped stick
with distilled water.Thoroughly
scrub the trough and surrounding areas.Do not touch the
white bar.Rinse the entire table
(both top and bottom) with
distilled water.
3 Dry the table thoroughly
(except for the white bar) with
a soft cloth or lint-free tissue.
4 Check the white bar for
dust, marks, or scratches.If it
is dirty, wet a new cotton-tipped
stick and gently wipe the bar.
Allow the white bar to air dry
and check it again.If it is
scratched or scuffed, or if it
cannot be cleaned, replace
the table (see page 27).
5 If you want to disinfect the
table, do that now. Or insert the
table into the instrument,
pushing it in about halfway.
Daily Cleaning
Do not use anything
that will scratch the white
bar.Do not use solvents of
any kind to clean the bar.
5
Cleaning the Instrument
Page 23

19
Disinfecting the Table
1 Remove, clean, and dry
the table.
2 Several solutions are safe
to use on the table when they
are used for no longer than 10
minutes once a day. Prepare
one of the following solutions:
Use of any other solution
may damage the table.
Cidex
®
*
, Theracide
®
*
, and
Amphyl
®
*
— these products
(or their equivalent) can be
purchased for use in general
disinfection.Prepare and use
the solution according to the
directions that come with the
product.
Household Bleach (5%
sodium hypochlorite) — can
be used either full strength or
diluted to as much as a 1:20
dilution.To make a 1:20 dilution,
add 5 mL of bleach to a
container and add 95 mL of
water, for a total volume of
100 mL. (To make a 1:10
dilution, combine 10 mL of
bleach and 90 mL of water.)
Isopropyl Alcohol (70% to
85%) — can be used full
strength.
*
Cidex (registered trademark of Johnson & Johnson)
is a 3.2% glutaraldehyde solution.
Theracide (registered trademark of Lafayette
Pharmaceuticals, Inc., Lafayette, IN) is a quaternary
ammonium solution.
Amphyl (registered trademark of National
Laboratories, L&F Products, Montvale, NJ) is
a phenol solution.
Page 24

20
3 Fill a tall, narrow container
to a depth of about 4 inches
(10 cm) with the solution you
have prepared.
4 Place the table into the
solution, making sure the white
bar remains above the liquid le v el.
5 Soak the table for no longer
than 10 minutes, then rinse it
thoroughly with water.
6 Dry the table with a soft cloth
or tissue and insert it into the
instrument.
If the table is cleaned each day,
heavy buildup should not occur.
However, if the urine has dried
on the table for many days,
you may need to use a stronger
solution to clean the table
completely.
1 Obtain a small volume of
0.1N sodium hydroxide (NaOH).
2 Remove the table from the
instrument and clean it.
Removing Heavy
Buildup
Be sure the solution
does not come in contact with
the white bar! Do not cover
the container while the table
is soaking.
Page 25

21
Do not touch the white
bar with the NaOH!
General Cleaning
Always keep the outside of the
CLINITEK
®
50 instrument clean
and free of dust.You can wipe
the outside with a damp (not
wet) cloth and a mild detergent.
Wipe the display screen with
a soft, nonabrasive cloth that
has been dampened with a mild
glass cleaner.Do not spray the
glass cleaner directly onto the
screen. Do not use laboratory
wipes, such as Kimwipes
®
, since
they may scratch the screen.
The keypad and display may
be disinfected using the same
solutions as for the test strip
table (see page 19). Wipe the
solution on and allow to remain
for 10 minutes. Rinse using a
clean cloth dampened with
water, then dry.
Do not use any type of
solvent, oil, grease, silicone
spray, or lubrication on the
instrument.
3 Wet a cotton-tipped stick
with the NaOH.Thoroughly
clean the trough and side areas
of the table until all urine is
removed.
4 Rinse the table thoroughly
with water to remove the NaOH.
5 Wipe the surface of the table
and the grooves on the underside of the table with a damp
cloth.Then dry the table with a
soft cloth or tissue and insert it
into the instrument.
Page 26

22
Solving Problems
Your CLINITEK®50 Analyzer will
give you troub le-free operation if
you follow the directions for using
and cleaning the instrument. If
a problem occurs, however, an
error message will be displayed.
Follow the steps on the next
page to help solve the problem.
If the printer is being used,
most error messages will also
show the word HELP. You can
press the key under this word to
print a description of the error
and how to correct it.Press the
key under the word CONT to
continue.With most errors, the
display will return to the READY
FOR TEST screen;with certain
errors, you will be told to turn the
power off, then on again.
If the Bayer Reagent Strips
seem to be causing the problem,
carefully read the direction insert
that comes with the Reagent
Strips for information that might
help solve the problem.
If the Display is Blank
If there are no words on the
display after the instrument has
been turned on, check for each
of these possible causes:
The printer cover is not
latched: This might occur only
if the serial number of your
instrument begins with “6510A.”
If the cover is unlatched, the
instrument turns itself off; it
turns on again when the cover
is snapped shut. If a test was
being read or results being
printed when the cover was
raised, the results will be lost
and the specimen must be
retested.
The power cord is not
plugged in: Check the
connections at the instrument,
transformer, and wall outlet.
The batteries in the battery
pack are dead: Place fresh
batteries into the pack.
The instrument is broken:
Contact Customer Service
(see page 25).
Appendix
Page 27

23
Error Message
The batteries do not have enough
power to test any more strips.Turn the
power off and replace the batteries.
A test strip is not present, is dry, or
is not positioned properly (upside
down, not touching the end of the
test table, or not laying flat in the
middle trough); the wrong table is
inserted for the strip being used;
or the test being used cannot be
identified by the software.Discard
the strip, then press CONT and
retest using a new test strip and the
correct table;be sure the name of
the strip you are using is shown on
the display.
The test table is not in its correct
position.The instrument or table
may have been moved or bumped
during testing, or the bottom of the
table may be dirty. Discard the strip.
Remove and clean the table, then
reinsert. Press CONT and retest
with a new test strip.
Error 3:The table is not present or is
not pushed in far enough to allow
movement.Push the table in about
halfway.
All other Errors: Discard the strip.
Turn the instrument off, wait several
seconds, then turn it back on. If the
error occurs again, contact Customer
Service (see page 25).
Possible Cause
and Remedy
REPLACE BATTERIES
STRIP PROBLEM-RETEST
HELP CONT
TABLE PROBLEM-RETEST
HELP CONT
INSTRUMENT ERROR X
HELP CONT
Page 28

24
Serial Number __ __ _ _ _ _ _ _ _ _ _ _ _ _ _ _ _ _ _ _
Installation Date __________________________
YES NO
1. Have you reviewed the error messages on page 23?
2. Does the test table move out to the “load”position when
the Analyzer is first turned on?
3. If Step 2 is NO —
•
Is the power cord plugged into a live electrical outlet, into the
transformer, and then into the Analyzer?
•
If using the battery pack, are the batteries fully charged and correctly
placed in the pack and the cord plugged into the Analyzer?
4. Does the display show the expected messages? (If the
display is blank, see page 22 for possible causes.)
5. Does the test table move into the Analyzer shortly after
the key is pressed?
6. Does a test strip dipped into a negative control provide
correct results?
•
Has a second test strip been tried?
7. Is the name of the Bayer Reagent Strip shown on the display the
same as the product being used? (If using any of the MULTISTIX
PRO
®
Reagent Strips, is the family name of the product shown on
the display?)
8. Does the display or printout show the correct test names
and reasonable results?
9. Is the test table or the white bar dirty, scratched, or damaged?
10. Does the test table operate correctly?
If not, describe:
———————————————————————————
——————————————————————————————————
11. Please record any error messages that have been displayed:
——————————————————————————————————
——————————————————————————————————
If you need additional help, our Technical Care Center is here to assist you. Before you
call, please fill out this checklist (you may want to make a photocopy of the page first).
Then call the nearest Bayer office using the list on the ne xt page.
CLINITEK®50 Problem Checklist
Page 29

25
Where to Call
for Ser vice
If you are located in the United
States, contact the Technical
Care Center of Bayer Corporation
by calling toll free:
1-877-229-3711
The office is open from 8:00 AM
to 8:00 PM Eastern Time
(weekend and holiday schedule
may vary).
If you are located in a country
other than the United States,
call the Bayer office that is
nearest you:
Canada
Bayer Inc.Healthcare Division
77 Belfield Road
Toronto, Ontario M9W 1G6
Telephone: 416-248-0771
1-888-406-2222
U.K.
Bayer Plc, Bayer Diagnostics
Bayer House
Strawberry Hill
Newbury RG14 1JA
Telephone: 01635 566211
Australia
Bayer Diagnostics
2 Keith Campbell Court
Scoresby VIC 3179
Telephone (toll free):
Telephon 1800 034 490
East Asia, Pakistan, Sri Lanka,
Bangladesh
Bayer (Singapore) Pte, Ltd.
Regional Headquarters BG-DS
9 Benoi Sector
Singapore 629844
Telephone: 65 261-3389
Fax:65 266-3376
Page 30

26
Product
No. Description
6511 Battery Pack and Batteries
5773 Thermal Printer Paper (5 rolls)
1364 CHEK-STIX
®
Combo Pak Control Strips
(1 bottle each — Positive and Negative Control Strips)
1360 CHEK-STIX
®
Positive Control Strips for Urinalysis
(1 bottle of 25 strips)
6517 Computer Cable/Connector Kit
6521 Software Update Kit (Cable and software disk
can also be ordered separately)
Ordering Accessories
Where to Order:
In the United States, you can
order these accessory items
directly from your authorized
CLINITEK distributor.
In countries other than the
United States, you can order
these accessory items through
your nearest Bayer office.You
can find the address and phone
number on page 25.
Page 31

27
Part
No. Description
95001874 Test Strip Table — Long (labeled “L”)
(for use with Bayer Reagent Strips with five or more
tests and with CLINITEK®Microalbumin Strips)
95001875 Test Strip Table — Short (labeled “S”)
(for use with Bayer Reagent Strips with four or fewer
tests except for CLINITEK Microalbumin Strips)
50062316 Printer Cover
Ordering Replacement Parts
Where to Order:
In the United States, you can
order these replacement parts
directly from:
Instrument Service
Bayer Corporation
P.O. Box 2004
Mishawaka, IN 46546
or by calling toll free:
1-800-348-8100
In countries other than the
United States, you can order
these replacement parts through
your nearest Bayer office.You
can find the address and phone
number on page 25.
Page 32

28
Specifications
Power Required:
Power T r ansformer:
Input: 100-250 V~, 50/60 Hz,
0.5-0.3 A, grounded
Output: +9 V , 2.78 A
Optional Battery Pack —
Holds 6 “AA”standard alkaline or
rechargeable NiCad batteries
Up to 200 tests can be run when
using new alkaline batteries,
fewer with rechargeable batteries.
Instrument Fuse:
4A, 63V, Quick-Acting
(
not replaceable by the user)
Line Leakage Current:
<0.5 milliamperes in normal
condition
<3.5 milliamperes in single
fault condition
(
Testing protocol and allowable limits as
specified by the safety standards for
laboratory equipment outlined in UL 3101-1,
CSA 22.2, No.1010.1, and IEC 1010-1.)
Computer Interface:
Customized RJ11 Cable
(
For use in connecting to a
computer only)
Dimensions:
Depth — 23.5 cm (9.2 in.)
Width — 15.2 cm (6.0 in.)
Height — 15.5 cm (6.1 in.)
Weight:
Instrument only — 1.25 kg (2.8 lbs.)
Instrument with Battery Pack —
1.42 kg (3.1 lbs.)
Ambient Operating Temperature
Range:
18°C to 30°C (64°F to 86°F)
Optimum Operating Temperature
Range:
22°C to 26°C (72°F to 79°F)
Ambient Operating Humidity Range:
20% to 85% Relative Humidity
Safety Standards:
The CLINITEK
®
50 Urine Chemistry
Analyzer (Models 6510 and 6510A)
conforms to the Low Voltage Safety
Directive 73/23/EEC.The instrument
is listed by the Underwriters’
Laboratories, Inc.(UL) and the
Canadian Standards Association
(CSA) as certified and complies
with the safety standards specified
in UL 3101 and CSA-C22.2, No.1010.1.
Model 6510A conforms to EMC
Directive 89/336 Amendment
92/31/EEC.
Warning:
This instrument must be used in the
manner specified in this User’s Guide
in order to provide the safety and
performance standards specified.
Symbols:
Refer to User’s Guide for
complete information on
using this instrument.
DC V oltage
Power Input
Computer Interface
CLIA Status:
The CLINITEK 50 Analyzer is “Waived”
per CLIA ’88.
Page 33

29
Table 1
Traditional Bayer Reagent Strips
ENGLISH — CONV.
Units — Conventional
Abbre-
Printed/Displayed Results
Test
viation
Units
Normal System + / – System
YELLOW GREEN
Color* ORANGE BLUE No Difference
RED BROWN
NEGATIVE 500 NEGATIVE 2+
Glucose GLU mg/dL 100 > = 1000 TRACE 3+
250 1+
Bilirubin BIL
NEGATIVE MODERATE NEGATIVE 2+
SMALL LARGE 1+ 3+
NEGATIVE 40 NEGATIVE 2+
Ketone KET mg/dL TRACE > = 80 TRACE 3+
15 1+
Specific
< = 1.005 1.020
Gravity
SG 1.010 1.025 No Difference
1.015 > = 1.030
Occult
NEGATIVE SMALL NEGATIVE 1+
Blood
BLO TRACE-LYSED MODERATE TRACE-LYSED 2+
TRACE-INTACT LARGE TRACE-INTACT 3+
5.0 6.5 8.0
pH pH 5.5 7.0 8.5 No Difference
6.0 7.5 > = 9.0
NEGATIVE 100 NEGATIVE 2+
Protein PRO mg/dL TRACE > = 300 TRACE 3+
30 1+
0.2 4.0
Urobilinogen URO E.U./dL 1.0 > = 8.0 No Difference
2.0
Nitrite NIT NEGATIVE POSITIVE No Difference
NEGATIVE MODERATE NEGATIVE 2+
Leukocytes LEU TRACE LARGE TRACE 3+
SMALL 1+
*Color may be preceded with “LT.”or “DK.” Shaded areas = abnormal results
Traditional Bayer Reagent Strips
Page 34

30
Abbre-
Printed/Displayed Results
Test
viation
Units
Normal System + / – System
YELLOW GREEN
Color* ORANGE BLUE No Difference
RED BROWN
NEGATIVE 28 NEGATIVE 2+
Glucose GLU mmol/L 5.5 > = 55 TRACE 3+
14 1+
Bilirubin BIL
NEGATIVE MODERATE NEGATIVE 2+
SMALL LARGE 1+ 3+
NEGATIVE 3.9 NEGATIVE 2+
Ketone KET mmol/L TRACE > = 7.8 TRACE 3+
1.5 1+
Specific
< = 1.005 1.020
Gravity
SG 1.010 1.025 No Difference
1.015 > = 1.030
Occult
NEGATIVE Ca 25 NEGATIVE 1+
Blood
BLD Ery/µL TRACE-LYSED Ca 80 TRACE-LYSED 2+
TRACE-INTACT Ca 200 TRACE-INTACT 3+
5.0 6.5 8.0
pH pH 5.5 7.0 8.5 No Difference
6.0 7.5 > = 9.0
NEGATIVE 1.0 NEGATIVE 2+
Protein PRO g/L TRACE > = 3.0 TRACE 3+
0.3 1+
3.2 66
Urobilinogen UBG µmol/L 16 > = 131 No Difference
33
Nitrite NIT NEGATIVE POSITIVE No Difference
NEGATIVE Ca 125 NEGATIVE 2+
Leukocytes LEU Leu/µL Ca 15 Ca 500 TRACE 3+
Ca 70 1+
*Color may be preceded with “LT.”or “DK.” Shaded areas = abnormal results
Table 2
Traditional Bayer Reagent Strips
ENGLISH — S.I.
Units — International (S.I.)
Traditional Bayer Reagent Strips
Page 35

31
Abbre-
Printed/Displayed Results
Test
viation
Units
Normal System + / – System
YELLOW GREEN
Color* ORANGE BLUE No Difference
RED BROWN
NEGATIVE 3+ NEGATIVE 2+
Glucose GLU 1+ 4+ TRACE 3+
2+ 1+
Bilirubin BIL
NEGATIVE 2+
1+ 3+
No Difference
NEGATIVE 3+ NEGATIVE 2+
Ketone KET 1+ 4+ TRACE 3+
2+ 1+
Specific
< = 1.005 1.020
Gravity
SG 1.010 1.025 No Difference
1.015 > = 1.030
Occult
NEGATIVE 1+
Blood
BLD + / – 2+ No Difference
+ / – INTACT 3+
5.0 6.5 8.0
pH pH 5.5 7.0 8.5 No Difference
6.0 7.5 > = 9.0
NEGATIVE 2+ NEGATIVE 2+
Protein PRO + / – 3+ TRACE 3+
1+ 1+
3.2 66
Urobilinogen URO µmol/L 16 > = 131 No Difference
33
Nitrite NIT NEGATIVE POSITIVE No Difference
NEGATIVE 3+ NEGATIVE 2+
Leukocytes LEU 1+ 4+ TRACE 3+
2+ 1+
*Color may be preceded with “LT.”or “DK.” Shaded areas = abnormal results
Table 3
Traditional Bayer Reagent Strips
ENGLISH — NORDIC
Units — Nordic Plus System
Traditional Bayer Reagent Strips
Page 36

32
Table 4
MULTISTIX PRO Reagent Strips
ENGLISH — CONV.
Units — Conventional
MULTISTIX PRO Reagent Strips
Abbre-
Printed/Displayed Results
Test
viation
Units
Normal System + / – System
YELLOW GREEN
Color* ORANGE BLUE No Difference
RED BROWN
NEGATIVE 500 NEGATIVE 2+
Glucose GLU mg/dL 100 > = 1000 TRACE 3+
250 1+
Bilirubin BIL
NEGATIVE MODERATE NEGATIVE 2+
SMALL LARGE 1+ 3+
NEGATIVE 40 NEGATIVE 2+
Ketone KET mg/dL TRACE > = 80 TRACE 3+
15 1+
Specific
< = 1.005 1.020
Gravity
SG 1.010 1.025 No Difference
1.015 > = 1.030
Occult
NEGATIVE SMALL NEGATIVE 1+
Blood
BLO TRACE-LYSED MODERATE TRACE-LYSED 2+
TRACE-INTACT LARGE TRACE-INTACT 3+
5.0 6.5 8.0
pH pH 5.5 7.0 8.5 No Difference
6.0 7.5 > = 9.0
0.2 4.0
Urobilinogen URO E.U./dL 1.0 > = 8.0 No Difference
2.0
Nitrite NIT NEGATIVE POSITIVE No Difference
NEGATIVE MODERATE NEGATIVE 2+
Leukocytes LEU TRACE LARGE TRACE 3+
SMALL 1+
NEGATIVE 100 NEGATIVE 2+
Protein PRO mg/dL 15 300 LOW 3+
30 1+
10 200
Creatinine CRE mg/dL 50 300 No Difference
100
NORMAL DILUTE
†
Protein-to- NORMAL
Creatinine P:C mg/g 150 ABNORMAL No Difference
Ratio 300 ABNORMAL
> 500 ABNORMAL
*Color may be preceded with “LT.”or “DK.” Shaded areas = abnormal results
†
Specimen is too dilute to accurately determine ratio result. Repeat test on new specimen.
Page 37

33
Table 5
MULTISTIX PRO Reagent Strips
ENGLISH — S.I.
Units — International (S.I.)
MULTISTIX PRO Reagent Strips
Abbre-
Printed/Displayed Results
Test
viation
Units
Normal System + / – System
YELLOW GREEN
Color* ORANGE BLUE No Difference
RED BROWN
NEGATIVE 28 NEGATIVE 2+
Glucose GLU mmol/L 5.5 > = 55 TRACE 3+
14 1+
Bilirubin BIL
NEGATIVE MODERATE NEGATIVE 2+
SMALL LARGE 1+ 3+
NEGATIVE 3.9 NEGATIVE 2+
Ketone KET mmol/L TRACE > = 7.8 TRACE 3+
1.5 1+
Specific
< = 1.005 1.020
Gravity
SG 1.010 1.025 No Difference
1.015 > = 1.030
Occult
NEGATIVE Ca 25 NEGATIVE 1+
Blood
BLD Ery/µL TRACE-LYSED Ca 80 TRACE-LYSED 2+
TRACE-INTACT Ca 200 TRACE-INTACT 3+
5.0 6.5 8.0
pH pH 5.5 7.0 8.5 No Difference
6.0 7.5 > = 9.0
3.2 66
Urobilinogen UBG µmol/L 16 > = 131 No Difference
33
Nitrite NIT NEGATIVE POSITIVE No Difference
NEGATIVE Ca 125 NEGATIVE 2+
Leukocytes LEU Leu/µL Ca 15 Ca 500 TRACE 3+
Ca 70 1+
NEGATIVE 1.0 NEGATIVE 2+
Protein PRO g/L 0.15 3.0 LOW 3+
0.3 1+
0.9 17.7
Creatinine CRE mmol/L 4.4 26.5 No Difference
8.8
NORMAL DILUTE
†
Protein-to- NORMAL
Creatinine P:C mg/mmol 17.0 ABNORMAL No Difference
Ratio 33.9 ABNORMAL
> 56.6 ABNORMAL
*Color may be preceded with “LT.”or “DK.” Shaded areas = abnormal results
†
Specimen is too dilute to accurately determine ratio result. Repeat test on new specimen.
Page 38

34
Table 6
MULTISTIX PRO Reagent Strips
ENGLISH — NORDIC
Units — Nordic Plus System
Abbre-
Printed/Displayed Results
Test
viation
Units
Normal System + / – System
YELLOW GREEN
Color* ORANGE BLUE No Difference
RED BROWN
NEGATIVE 3+ NEGATIVE 2+
Glucose GLU 1+ 4+ TRACE 3+
2+ 1+
Bilirubin BIL
NEGATIVE 2+
1+ 3+
No Difference
NEGATIVE 3+ NEGATIVE 2+
Ketone KET 1+ 4+ TRACE 3+
2+ 1+
Specific
< = 1.005 1.020
Gravity
SG 1.010 1.025 No Difference
1.015 > = 1.030
Occult
NEGATIVE 1+
Blood
BLD +/– 2+ No Difference
+/– INTACT 3+
5.0 6.5 8.0
pH pH 5.5 7.0 8.5 No Difference
6.0 7.5 > = 9.0
3.2 66
Urobilinogen URO µmol/L 16 > = 131 No Difference
33
Nitrite NIT NEGATIVE POSITIVE No Difference
NEGATIVE 3+ NEGATIVE 2+
Leukocytes LEU 1+ 4+ TRACE 3+
2+ 1+
NEGATIVE 2+
Protein PRO LOW 3+ No Difference
1+
0.9 17.7
Creatinine CRE mmol/L 4.4 26.5 No Difference
8.8
NORMAL DILUTE
†
Protein-to- NORMAL
Creatinine P:C mg/mmol 17.0 ABNORMAL No Difference
Ratio 33.9 ABNORMAL
> 56.6 ABNORMAL
*Color may be preceded with “LT.”or “DK.” Shaded areas = abnormal results
†
Specimen is too dilute to accurately determine ratio result. Repeat test on new specimen.
MULTISTIX PRO Reagent Strips
Page 39

Be kind to the environment.
Please recycle the User’s
Guides you do not use.
 Loading...