

Page 1
1 INTRODUCTION AND
1 OF 8
GENERAL DESCRIPTION
Introduction ......................................................................................... 2
Features ............................................................................................... 3
General Specifications ......................................................................... 5
NEXT
Page 2

INTRODUCTION AND GENERAL DESCRIPTION
1.1 Introduction
2 OF 8
This manual is to be used in conjunction with the Clinitek Sta
in performing routine troubleshooting and service on an instrument. Each section of
the service manual is dedicated to specific areas of interest: General features,
methods overview, troubleshooting, error code descriptions, repair, functional
diagrams, and parts breakdown. Any future service information or instrument
revisions would be covered through service bulletins and/or revisions of this manual.
The CLINITEK
capable of reading a range of Bayer Urine Reagent Strips along with the Bayer
Clinitest hCG Immunoassay Cassette. It was developed as a next generation
instrument combining features of the CLINITEK® 50 along with the CLINITEK® 100
plus the ability to read and interpret immunoassay cassette tests.
®
Status instrument is a small, portable urine chemistry analyzer
tus Operator’s Manual
NEXT
Page 3

INTRODUCTION AND GENERAL DESCRIPTION
3 OF 8
1.2 Features
The major feature is the lower cost and size, portability, centered around small office
placement, converting from visual user to instrument. Thus, reducing the
subjectivity in visual interpretation and combined with better patient to sample
tracking.
•
Touch screen display for easier and faster operation,
Internal automatic calibration to improve reliability of readings,
•
•
Memory recall which allows customers to display the test results from specific
samples,
Entry of patient information along with operator for each test result for improved
•
traceability,
•
Allows for entry of color and clarity of sample which can be printed along with
results,
•
User Interface available in English, German, French, Spanish, Italian, and
Swedish.
NEXT
Page 4
INTRODUCTION AND GENERAL DESCRIPTION
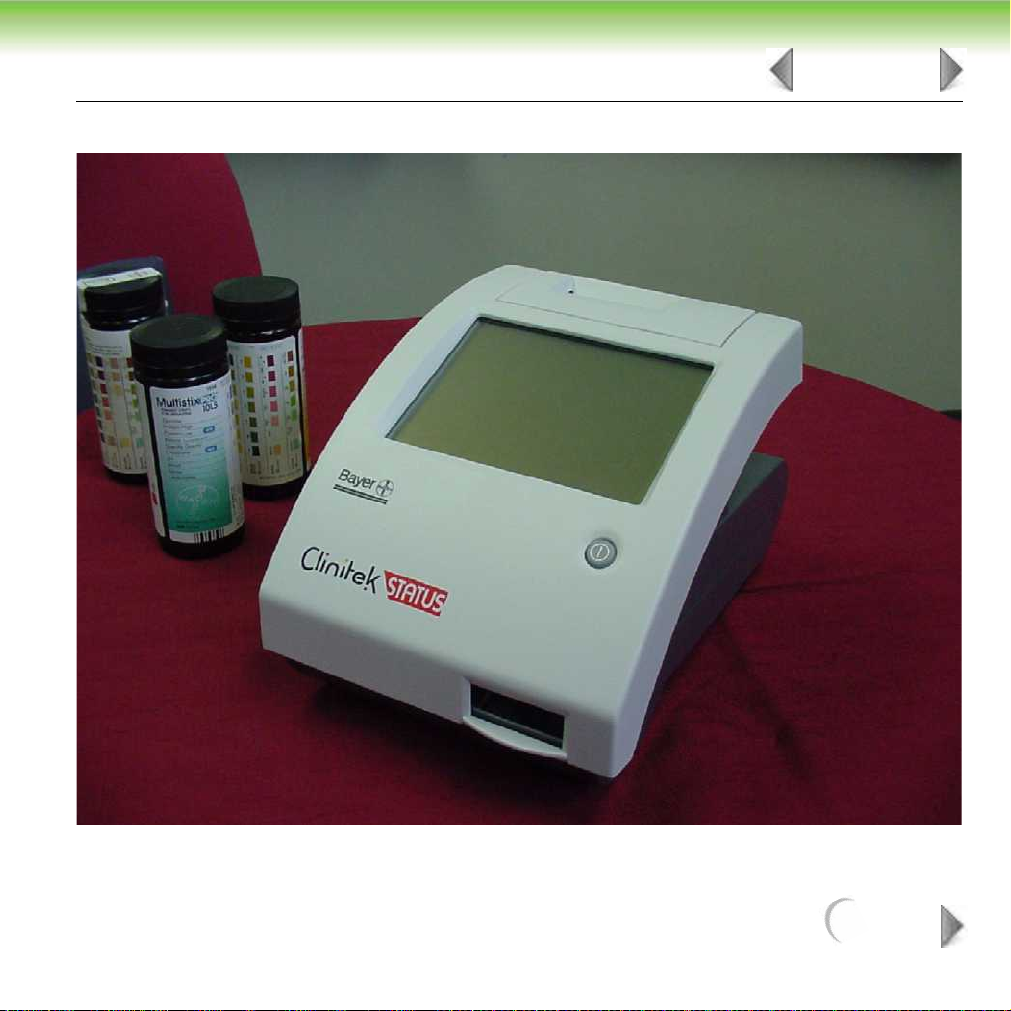
Figure 1-1: Clinitek Status
4 OF 8
NEXT
Page 5

INTRODUCTION AND GENERAL DESCRIPTION
1.3 General Specifications
SIZE:
Depth – 27.2 cm (10.7 in.)
Width – 17.1 cm (6.7 in.)
H
eight – 15.8 cm (6.2 in.)
WEIGHT:
1.66 Kg (3.65 lb)
INPUT VOLTAGE:
110 VAC ± 20%
45-65 Hz (US only)
220 VAC ± 20%
45-65 Hz (European)
9 VDC
5 OF 8
(6 AA Batteries)
MAXIMUM POWER INPUT:
Maximum power input to battery eliminator is 18.4 VA
Maximum power output from battery eliminator / input to instrument is 7.2 VA
NEXT
Page 6

INTRODUCTION AND GENERAL DESCRIPTION
THERMAL OUTPUT:
Battery eliminator 62.7 BTU/hr
Instrument 24.6 BTU/hr
Line Leakage Current:
170 microamperes in normal condition
Power supply is double insulated type, no leakage in fault condition.
(Testing protocol and allowable limits as specified by the safety standards for
laboratory equipment outlined in UL 3101-1; CSA 22.2 No. 1010.1; IEC 1000-4
Sections 2, 3, 4, 5, 6, 8, and 11; CISPR 11; EN 50082-1 Jan. 1992; EN60950 5.2.2
and 5.2.3; and EN 50081-1 Jan. 1992.)
AMBIENT OPERATING TEMPERATURE RANGE:
10˚C to 40˚C (50˚F to 104˚F)
AMBIENT OPERATING HUMIDITY RANGE:
10% to 90% relative humidity
6 OF 8
OPTIMUM OPERATING CONDITIONS:
18˚C to 30˚C (64˚F to 86˚F)
10% to 85% relative humidity
This device complies to FCC Part 15 as a Class A device.
COMPUTER INTERFACE:
9-Pin RS-232 protocol with comma deliminated output. Null modem cable required.
NEXT
Page 7

INTRODUCTION AND GENERAL DESCRIPTION
PRINTER PAPER:
(Ludlow C-696)
Width — 5.8 cm (2.28 in.)
Length — 2500 cm (82 ft.)
Shelf Life — 5 years
Storage — <25˚C; <65% RH
DEFAULT SETTINGS:
Default settings are defined in the Operator’s Manual. New instruments are shipped
from the manufacture set to English-Conventional.
7 OF 8
NEXT
Page 8

INTRODUCTION AND GENERAL DESCRIPTION
Instrument Programmed Reagent Strip Multiples and Cassettes:
8 OF 8
Multistix® 10 SG (N-Multistix® SG-L)
Multistix® 8 SG (Multistix® GP)
Multistix® 7
Multistix® 5
Multistix® SG
Multistix PRO® 10LS
Multistix PRO® 7PH
Multistix PRO® 7G
Multistix PRO® 6B
Multistix PRO® 6K
N-Multistix® SG
Uro-Hema-Combistix® SG-L
Uro-Hema-Combistix
Hema-Combistix
®
®
Uristix® 4
Uristix
®
Labstix® SG
N-Neostix
Uro-Uristix
®
®
Combistix® SG
Clinitek® Microalbumin
Clinitest® hCG
TO TOP
BACK
Page 9

2 METHODS OVERVIEW
1 OF 2
Introduction ........................................................................................ 2
NEXT
Page 10

METHODS OVERVIEW
2 OF 2
2.1 Introduction
The CLINITEK® Status instrument is a reflectance photometer, which reads the
changes in color of the Bayer urine reagent strips and immunoassay cassettes. A
series of six light emitting diodes (LED) each at a different wavelength illuminates
the entire strip or cassette length. Reflected light from the strip is then passed
through a lens and focused on a photodiode detector array (CCD) which then
converts the light energy into an electronic signal. This signal is then passed
through an A/D converter and then onto a microprocessor. Once there, the signal
is processed into percent reflectances and then decodes. These decode values
are compared to lookup tables containing specific decode ranges for each
reagent and their respective clinical values. Results are reported to the customer
via the touch screen, onboard printer, and/or through a computer interface.
For methods used on the urine reagent strips and immunoassay cassettes, refer
to their specific product inserts.
TO TOP
BACK
Page 11

3 INSTALLATION
Introduction ........................................................................................ 2
1 OF 2
NEXT
Page 12

INSTALLATION
3.1 Introduction
2 OF 2
Refer to Section 1 “Introduction”
Manual for the proper installation and set up of the CLINITEK
1
Unpack the instrument from the shipping packaging.
2
Remove package tape from the front of the instrument, table shutter.
3
Insert test table with table insert approximately one half to two thirds of the
way into the instrument.
Plug the power supply into a mains outlet.
4
5
Connect the power supply plug into the back of the instrument using the
power jack on the instrument.
6
Push the power button momentarily to turn instrument on, instrument should
beep once.
7
For initial, first time power up for the instrument, follow the “Start-Up Wizard.”
8
Subsequent power ups after the initial, the instrument should return to the
“Select Ready” screen after instrument hardware and software checks.
and Section 3 “Start-Up Wizard” of the Operators
®
Status Analyzer.
TO TOP
BACK
Page 13
4 OPERATIONS /
1 OF 18
PROCEDURES
Introduction.......................................................................................... 1
Urinalysis Strip Test ............................................................................ 3
Cassette Method ................................................................................ 12
NEXT
Page 14

OPERATIONS / PROCEDURES
2 OF 18
4.1 Introduction
Refer to Section 4 “Instrument Operations” of the Operators Manual for the
operation of the CLINITEK® Status Analyzer. This section describes both strip and
cassette test procedures.
NEXT
Page 15
OPERATIONS / PROCEDURES
3 OF 18
4.2 Urinalysis Strip Test
A Full Strip Test allows you the option to enter an Operator ID, Patient Name and/or
Patient ID prior to inserting a strip. The procedures to enter the Operator and
Patient data are presented in this section. The strip testing process is identical to a
Quick Strip Test.
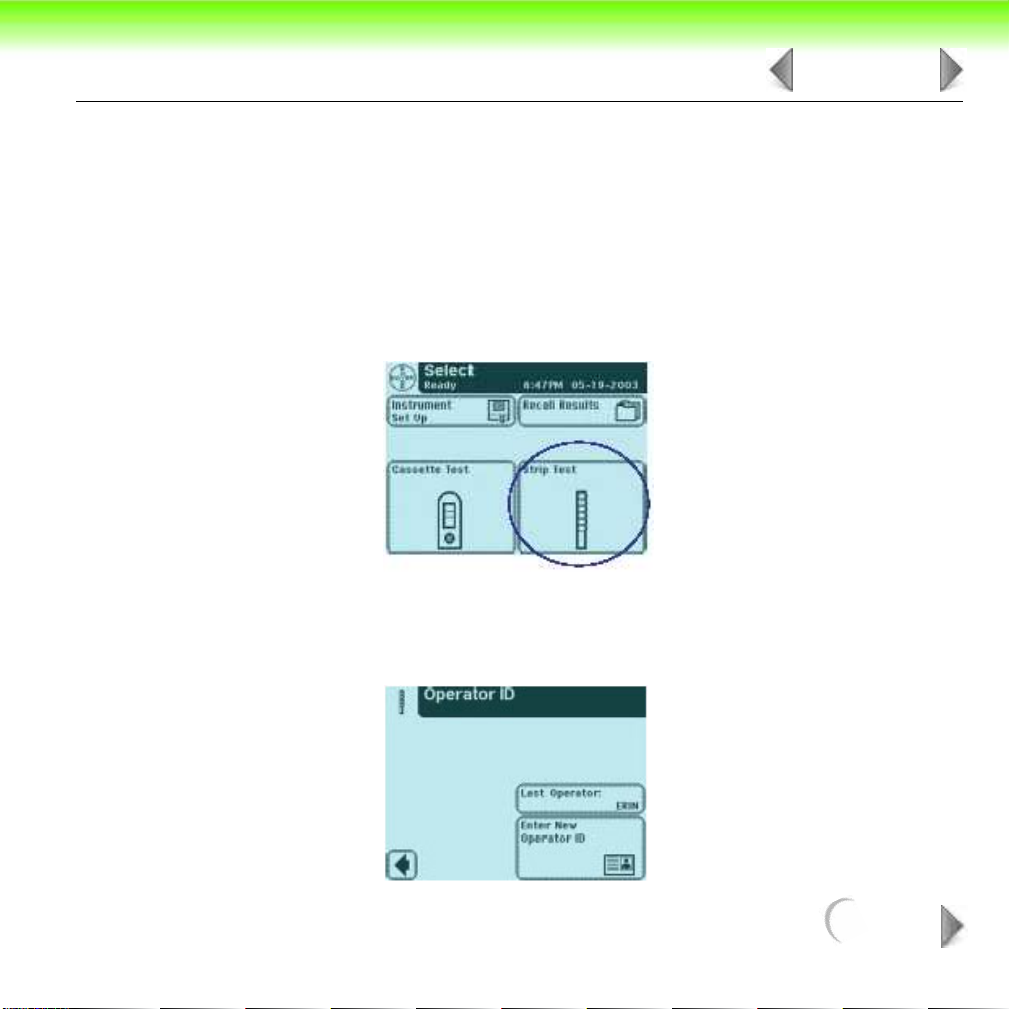
Testing is started from the main Select screen.
Touch Strip Test to conduct a Bayer urinalysis strip test.
The next screen that appears is Operator ID.
NEXT
Page 16
OPERATIONS / PROCEDURES
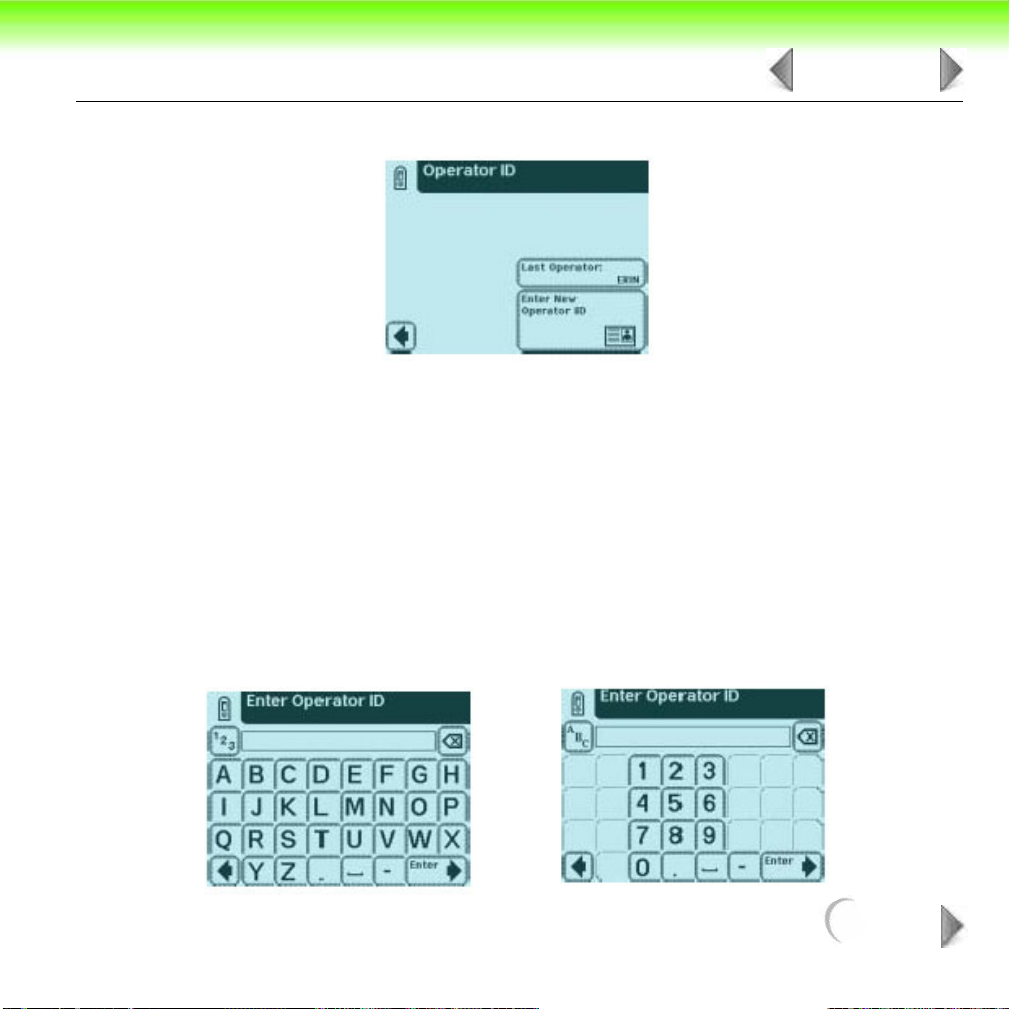
There are two options under Operator ID: Last Operator or Enter New
Operator ID.
OPTION 1: LAST OPERATOR
If this option is enabled, the last operator that entered his/her ID will be displayed on
the screen in the lower right side of the box. If you are this operator, then touch the
Last Operator button to proceed.
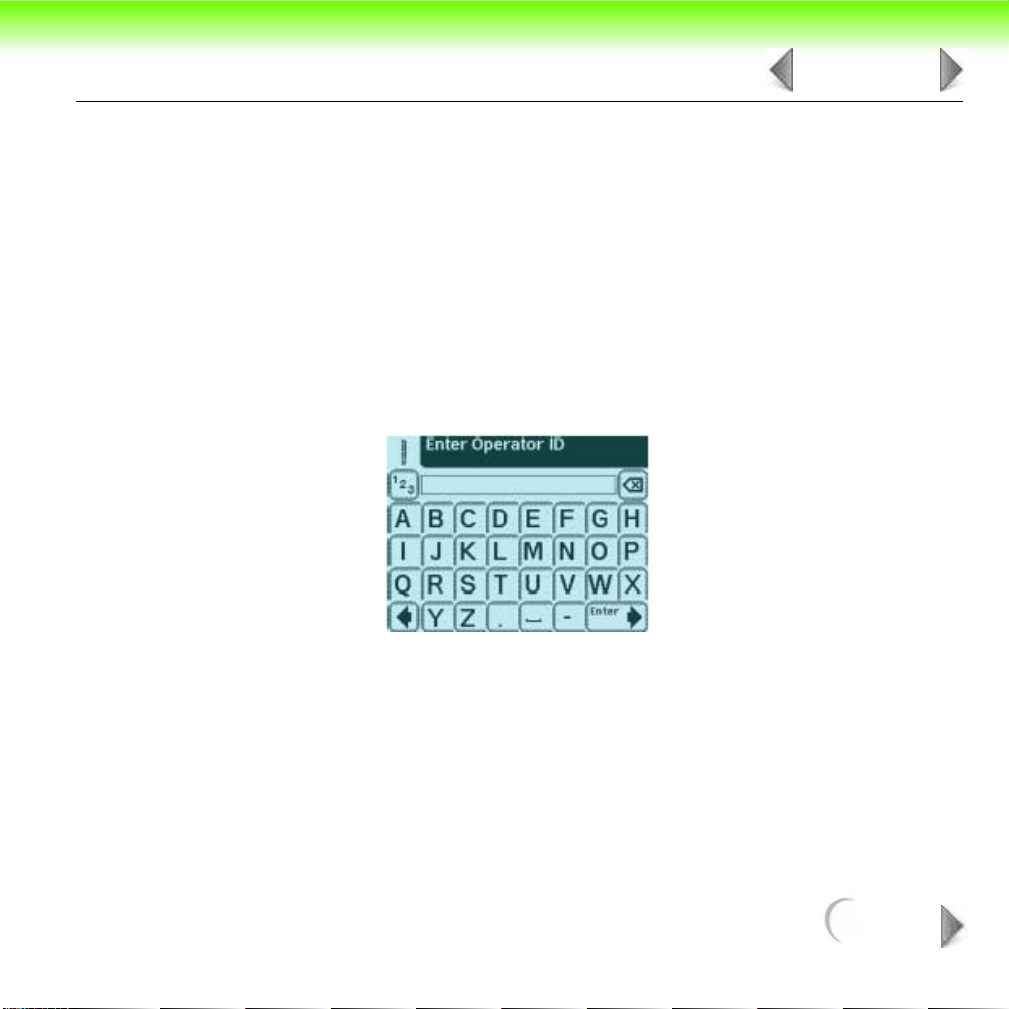
OPTION 2: ENTER NEW OPERATOR ID
In order to enter the information for a new operator, touch Enter New Operator ID
button. The next screen that is displayed is Enter Operator ID.
4 OF 18
NEXT
Page 17
OPERATIONS / PROCEDURES
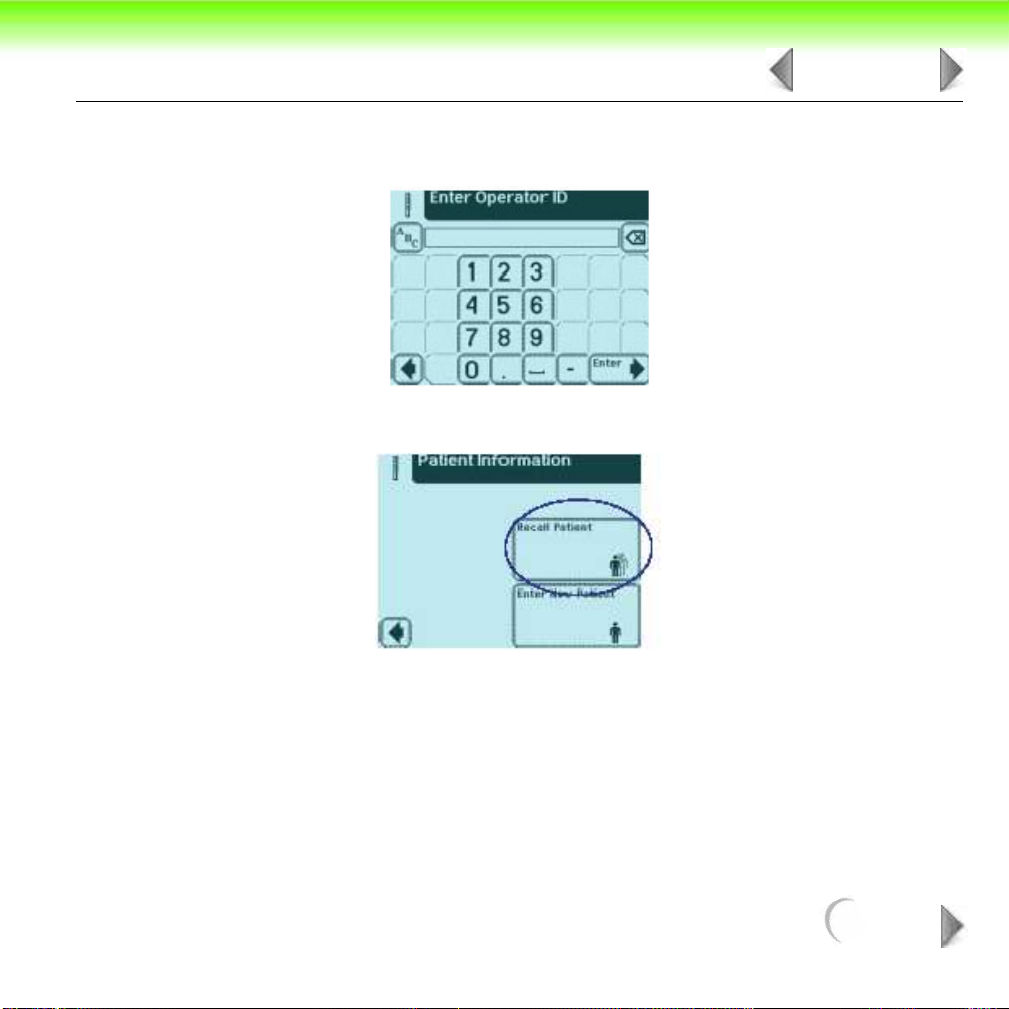
Use the keyboards to enter Operator ID using a maximum of 13 characters. Touch
Enter when you have finished entering the ID and to move to the next screen.
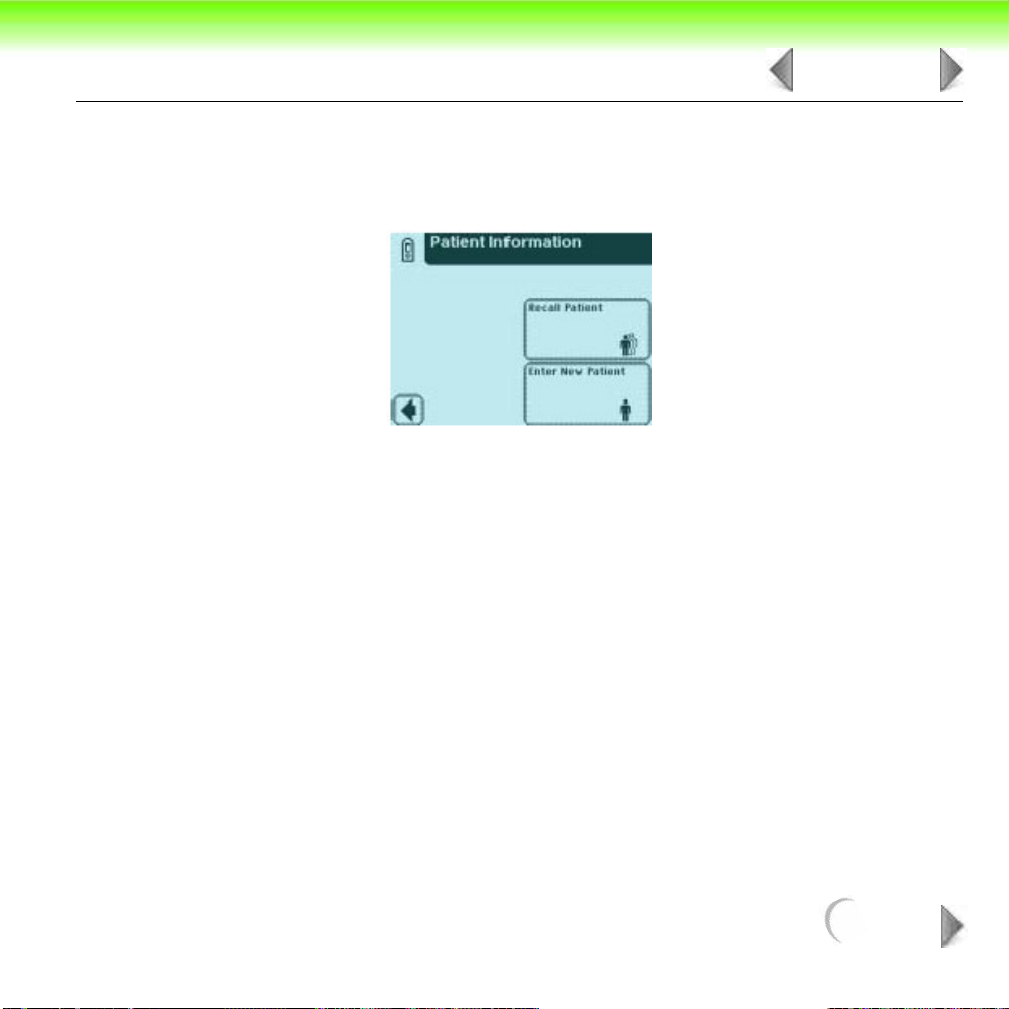
The next screen displayed is Patient Information.
5 OF 18
There are two options under Patient Information: Recall Patient or Enter New
Patient.
NEXT
Page 18
OPERATIONS / PROCEDURES
6 OF 18
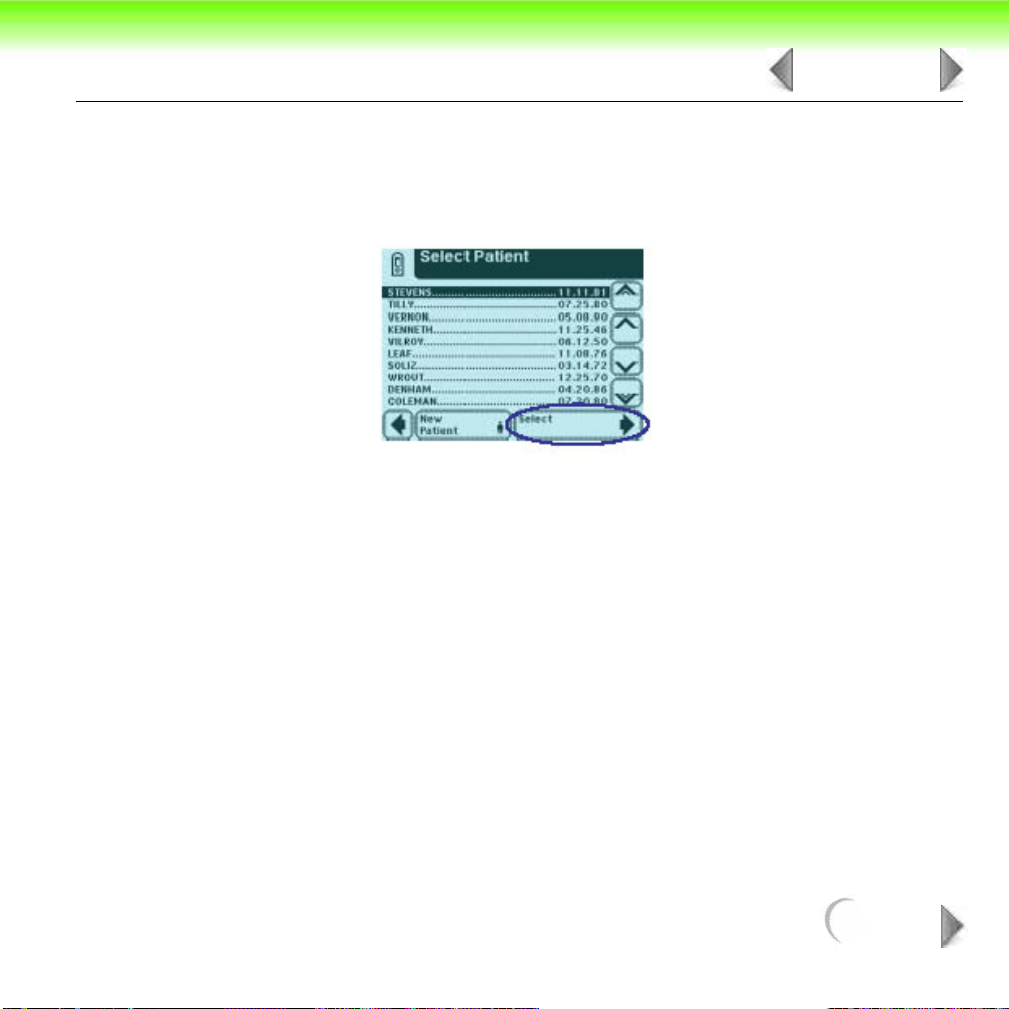
OPTION 1: RECALL PATIENT
In order to look up previous patients, touch Recall Patient.
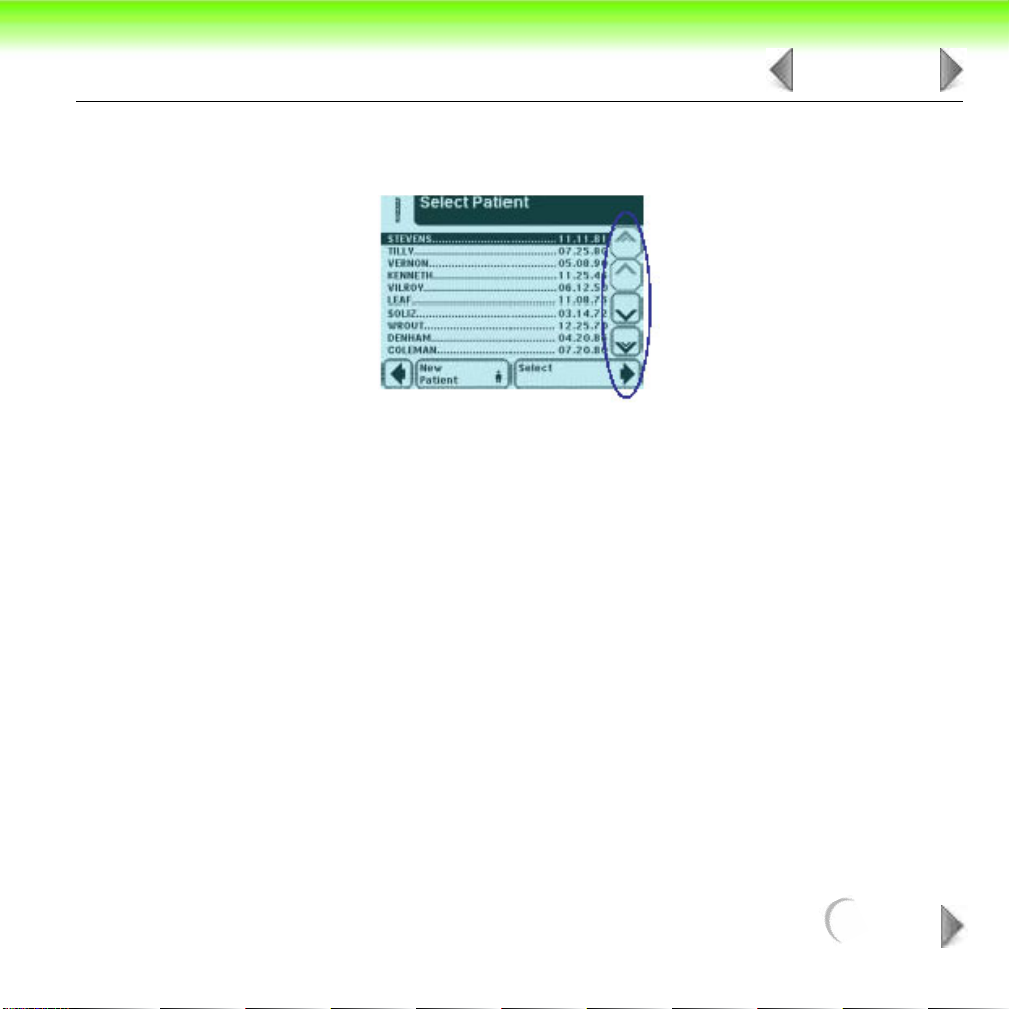
If previous patient identification has been entered, a list of up to 200 patient results
will appear on the screen. Use the up and down arrow buttons to scroll through the
list of patients. The most recently performed test will be shown at the top. Once the
patient is highlighted, touch Select button.
The next screen will be Prepare Test.
NOTE: A total of 200 patient tests can be stored in the analyzer. The tests are listed in
chronological order. When the limit of 200 has been reached, the oldest test will be
deleted from the analyzer. Deleted information cannot be retrieved from the
analyzer.
NEXT
Page 19
OPERATIONS / PROCEDURES
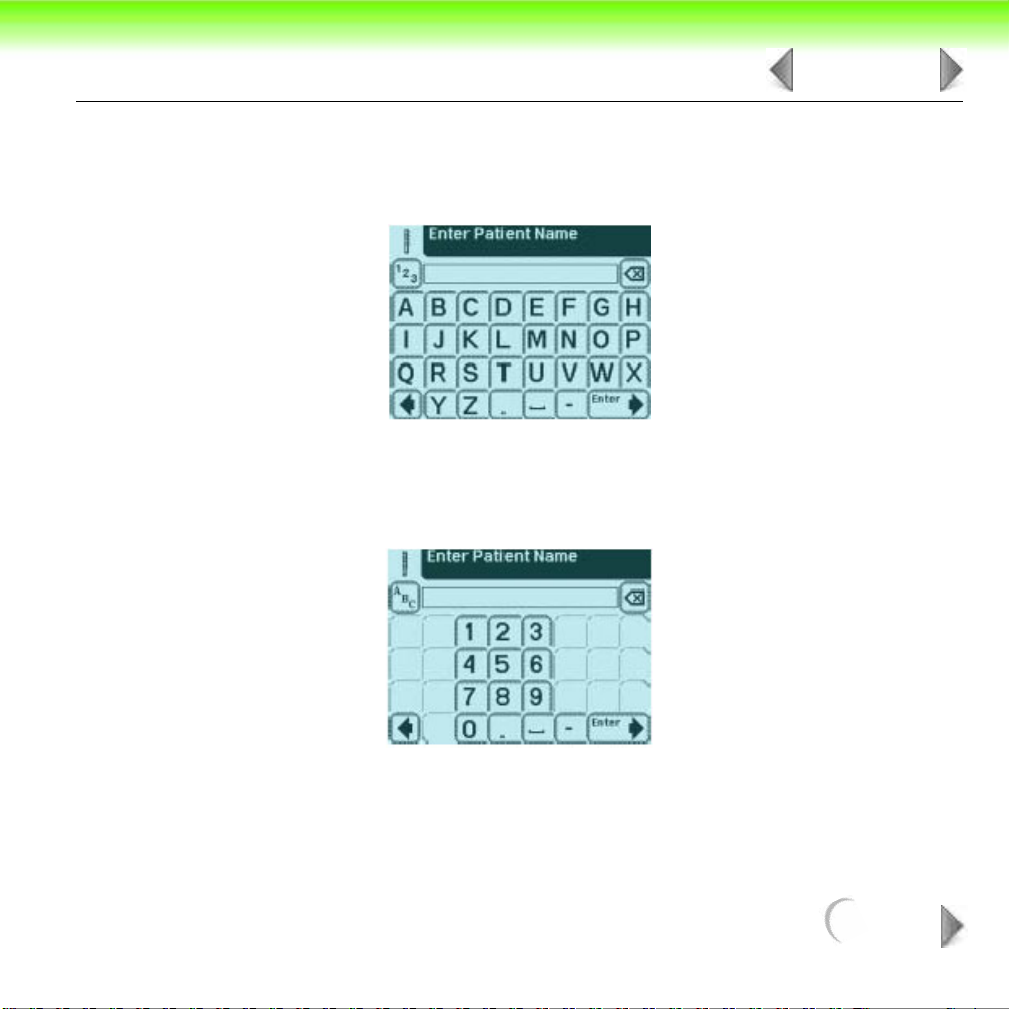
OPTION 2: ENTER NEW PATIENT
In order to enter the information for a new patient, touch Enter New Patient button.
The next screen displayed is Enter Patient Name.
Use the keyboards to enter Patient Name using a maximum of 20 characters. Touch
Enter when you have finished entering the patient’s name and to proceed to the
next screen.
7 OF 18
The next screen that appears is Prepare Test.
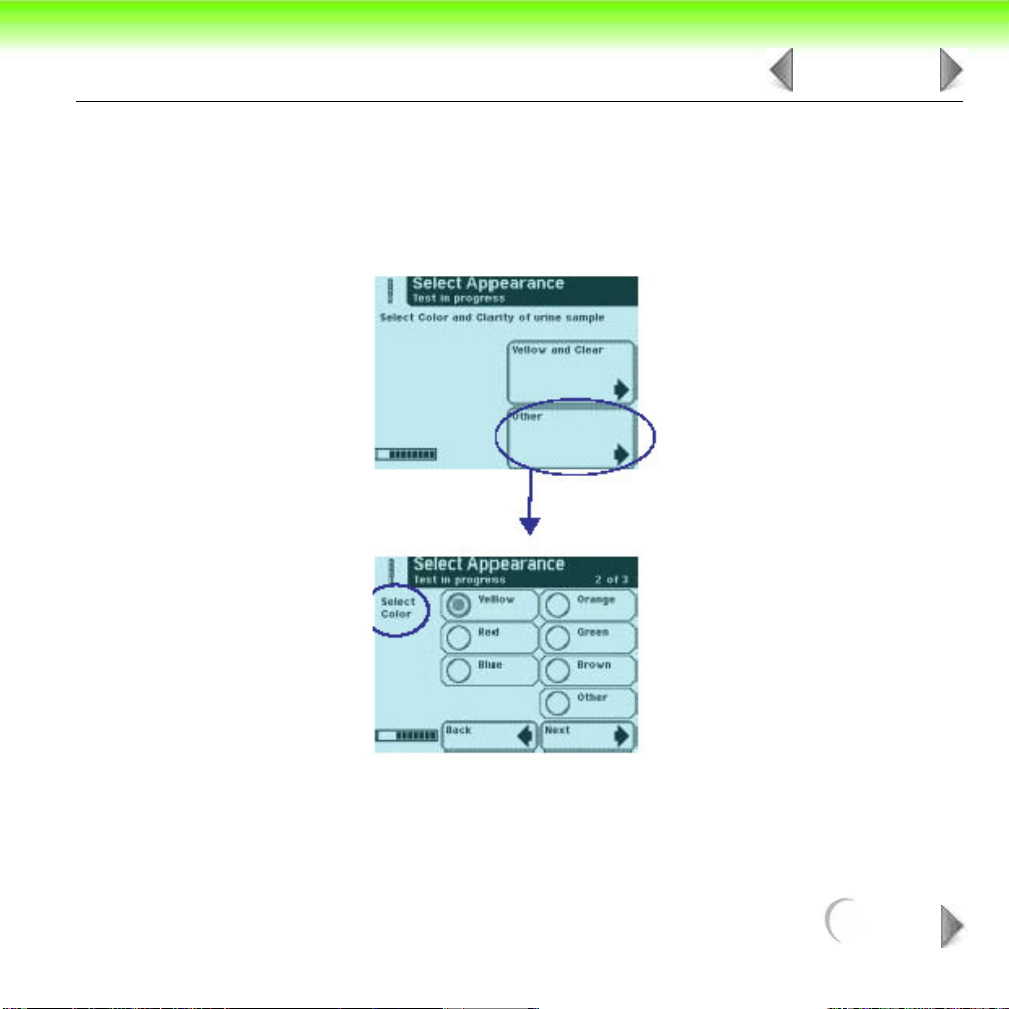
While the strip is being analyzed, a Select Appearance screen will be displayed.
The urine sample must be visually observed and then the appropriate color and
clarity must be selected.
NEXT
Page 20
OPERATIONS / PROCEDURES
If the urine sample is yellow and clear, touch the Yellow and Clear button.
If the urine sample is not yellow and clear, touch the Other button for more choices.
If you touched the Other button, then select the appropriate color by touching the
circle button that corresponds to the correct description.
8 OF 18
NEXT
Page 21
OPERATIONS / PROCEDURES
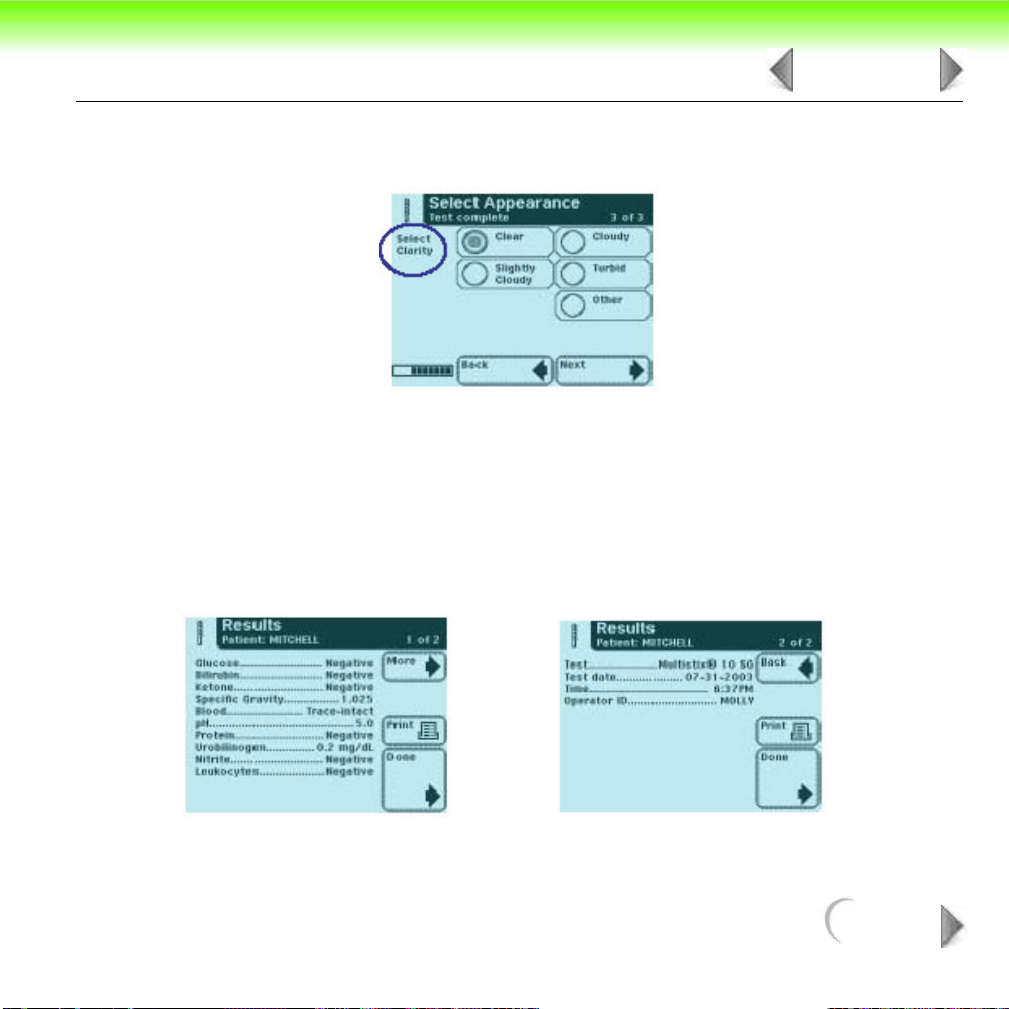
Select the clarity by touching the circle that corresponds to the correct description.
Then touch Next.
There is a time indicator on the Select Appearance screen that is counting down
the time remaining in the analysis of the strip.
After color and clarity have been entered the next screen displayed will either be:
9 OF 18
• Analyzing — if the strip is still being analyzed
• Results — if analyzing the strip has been completed
NEXT
Page 22

OPERATIONS / PROCEDURES
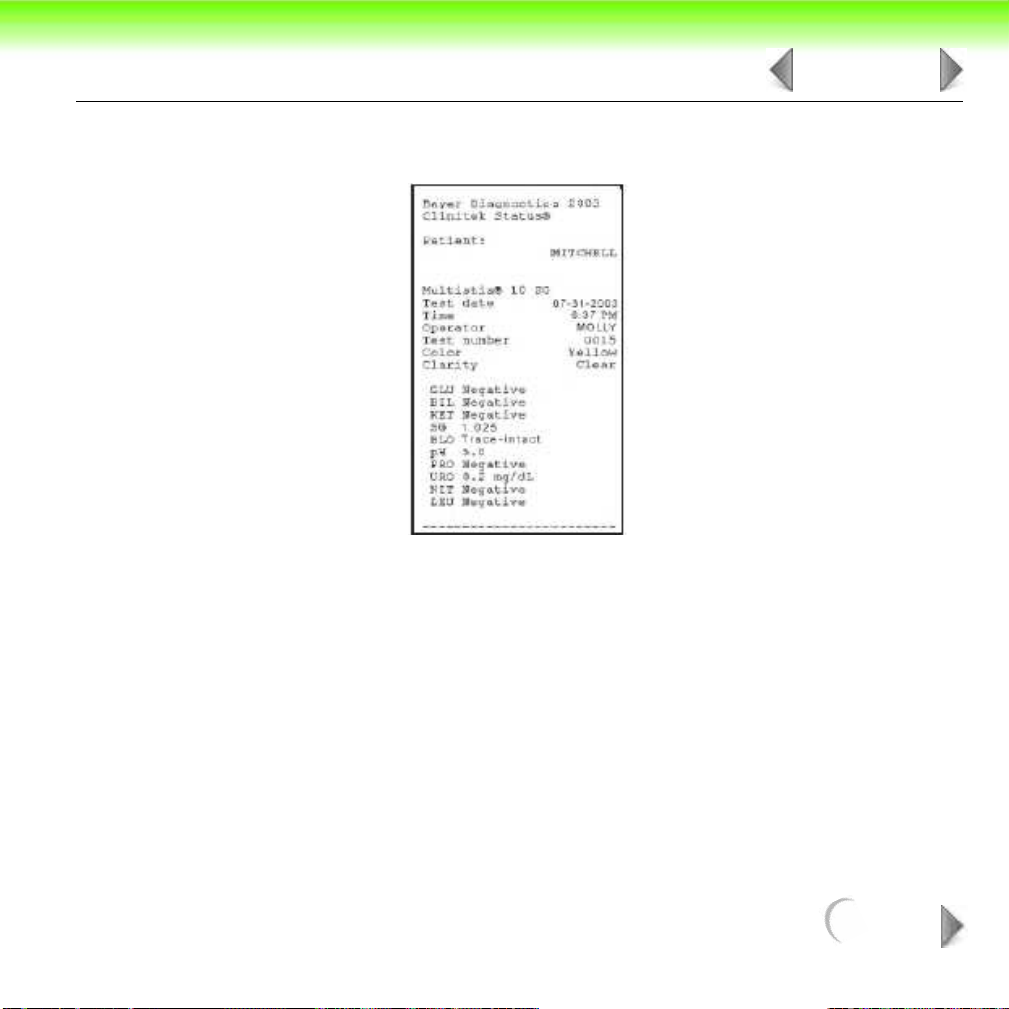
The test results displayed on the screen and the printout will include the following
information:
10 OF 18
• Patient Name or ID
• Type of strip used
• Test date
• Time
• Operator
• Test Number
• Color
• Clarity
• Results
NEXT
Page 23
OPERATIONS / PROCEDURES
NOTE: If the results are positive, an asterisk* will appear next to the results (if “mark
positive results” was selected in Instrument Set Up).
11 OF 18
NEXT
Page 24

OPERATIONS / PROCEDURES
4.3 Cassette Method
A Full Cassette Test allows you the option to enter an Operator ID,
Patient Name and/or Patient ID prior to inserting a cassette.
The procedures to enter the Operator and Patient data are
presented in this section.
The cassette testing process is identical to a Quick Cassette Test.
Testing is started from the main Select screen.
12 OF 18
Touch Cassette Test to conduct an hCG pregnancy test.
NEXT
Page 25
OPERATIONS / PROCEDURES
The next screen that appears is Operator ID.
There are two options under Operator ID: Last Operator or Enter New Operator ID.
OPTION 1: LAST OPERATOR
If this option is enabled, the last operator that entered his/her ID will be displayed on
the screen in the lower right side of the box. If you are this operator, then touch the
Last Operator button to proceed.
OPTION 2: ENTER NEW OPERATOR ID
In order to enter the information for a new operator, touch Enter New Operator ID
button. The next screen that is displayed is Enter Operator ID.
13 OF 18
NEXT
Page 26
OPERATIONS / PROCEDURES
Use the keyboards to enter Operator ID using a maximum of 13 characters. Touch
Enter when you have finished entering the ID and to move to the next screen.
The next screen displayed is Patient Information.
There are two options under Patient Information: Recall Patient or Enter New
Patient.
OPTION 1: RECALL PATIENT
In order to look up previous patients, touch Recall Patient.
14 OF 18
NEXT
Page 27
OPERATIONS / PROCEDURES
15 OF 18
If the previous patient identification has been entered, a list of up to 200 patients will
appear on the screen. Use the up and down arrow buttons to scroll through the list
of patients. The most recently performed test will be shown at the top. Once the
patient is highlighted, touch the Select button.
The next screen will be Test Type.
NOTE: A total of 200 patient tests can be stored in the analyzer. The tests are listed in
chronological order. When the limit of 200 has beenreached, the oldest test will be
deleted from the analyzer. Deleted information cannot be retrieved from the
analyzer.
NEXT
Page 28

OPERATIONS / PROCEDURES
OPTION 2: ENTER NEW PATIENT
In order to enter the information for a new patient, touch the Enter New Patient
button.
The next screen displayed is Enter Patient Name.
16 OF 18
Use the keyboards to enter Patient Name using a maximum of 20 characters. Touch
Enter when you have finished entering the patient’s name and to move to the next
screen.
NEXT
Page 29
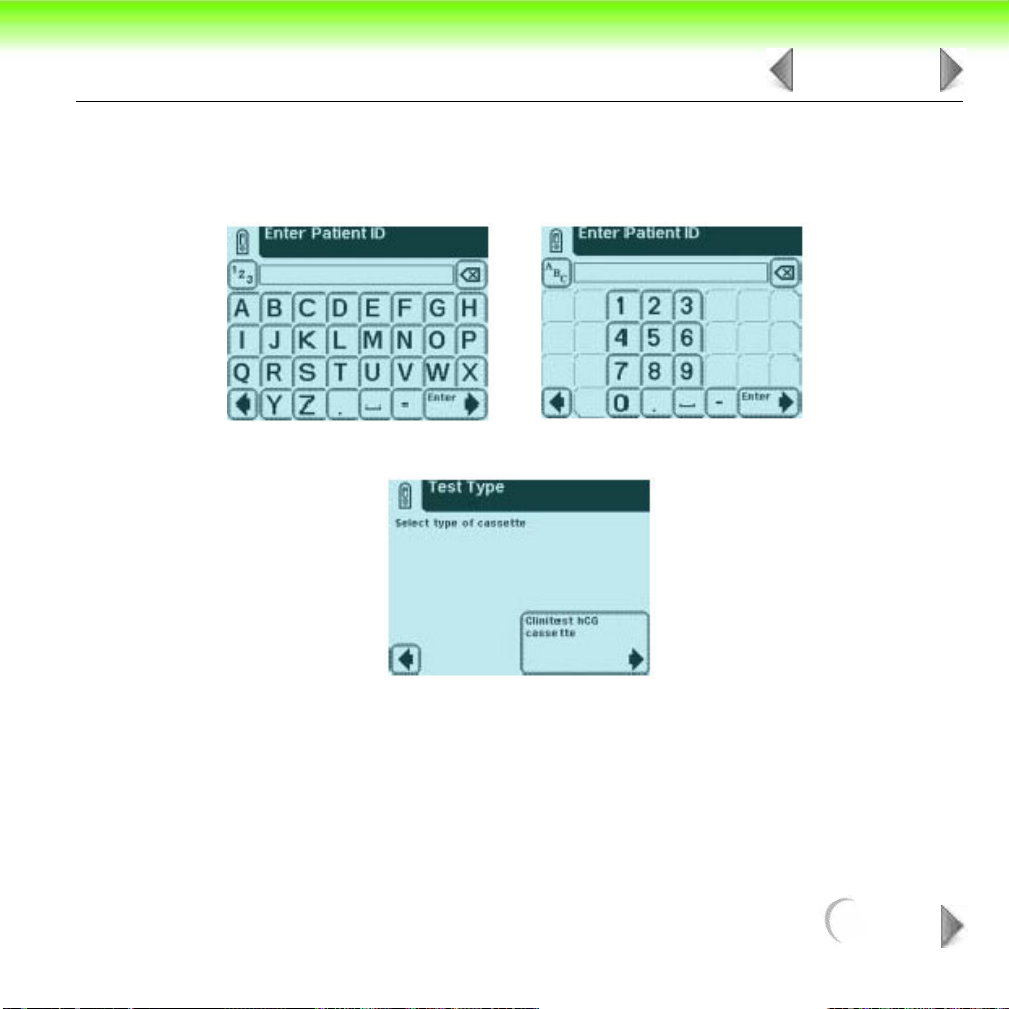
OPERATIONS / PROCEDURES
The next screen displayed is Enter Patient ID. Use the keyboards to enter Patient
Identification using a maximum of 13 characters. Touch Enter when you have
finished entering the patient’s ID and are ready to proceed to the next screen.
The next screen that appears is Test Type.
17 OF 18
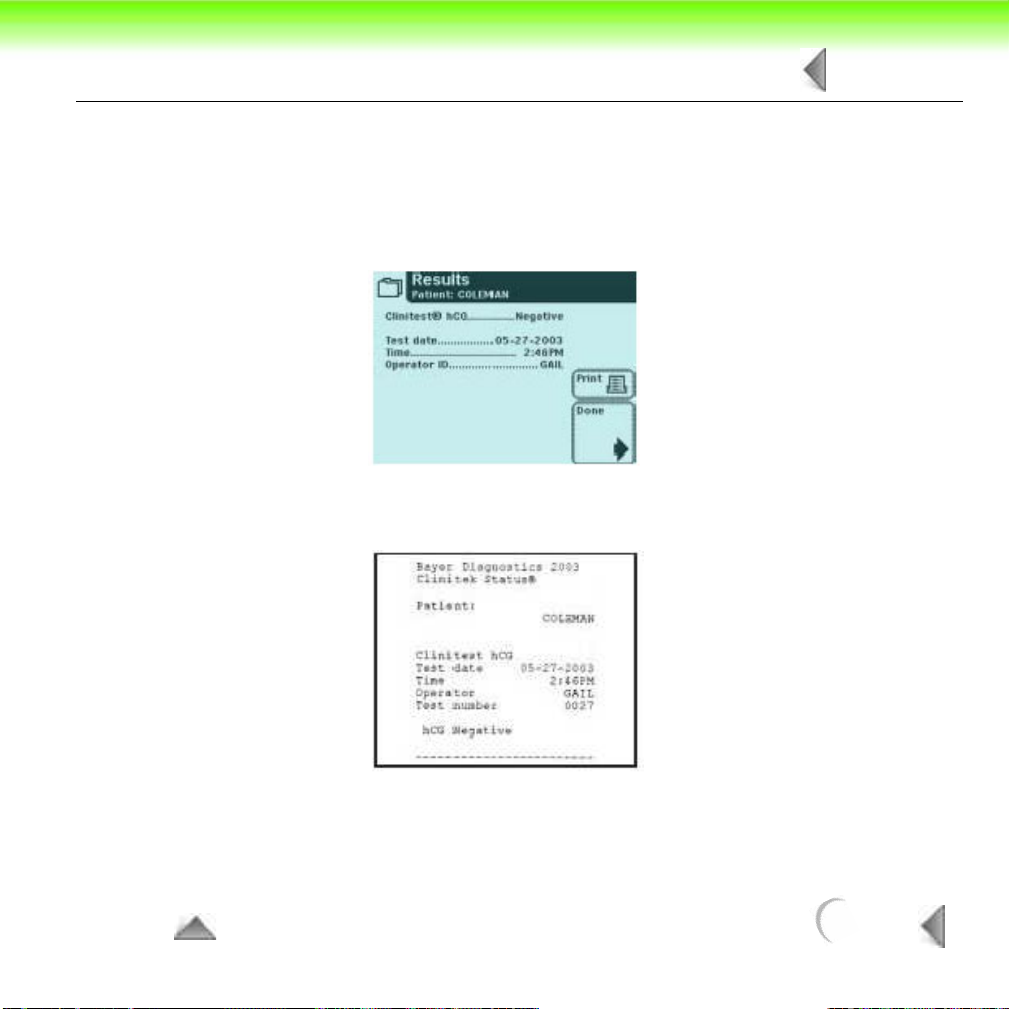
The test results displayed on the screen and the printout will include the following
information:
• Patient Name or ID
• Type of Clinitest cassette test
• Test date
NEXT
Page 30
OPERATIONS / PROCEDURES
18 OF 18
• Time
• Operator
• Tes t N u m b e r
• Result
NOTE: If the result is positive, an asterisk* will appear next to the result (if “mark positive
results” was selected in Instrument Set Up).
TO TOP
BACK
Page 31

5 PREVENTIVE
1 OF 7
MAINTENANCE
Introduction ........................................................................................ 2
Cleaning.............................................................................................. 3
NEXT
Page 32

PREVENTIVE MAINTENANCE
2 OF 7
5.1 Introduction
This section describes cleaning and preventative maintenance test procedures that
should be performed as a matter of routine anytime that a CLINITEK® Status
instrument is in Bayer Diagnostics possession. Following these procedures will help
identify possible system weaknesses prior to them manifesting themselves as field
failures.
Wear disposable surgical gloves when working with reagents, fluids, or
cleaning the instrument.
Place all cleaning or disposable items in a biohazard bag.
NEXT
Page 33

PREVENTIVE MAINTENANCE
3 OF 7
5.2 Cleaning
Refer to Section 8 “Maintenance” of the CLINITEK® Status Operators Manual for
specific cleaning and disinfecting instructions for the instrument, test table insert
and test table.
CAUTION:
Care should be taken when handling the test table to insure that the
calibration bar is not damaged, scratched or marred in any way. If any
damage does occur, the test table must be replaced.
Daily
1
With the instrument power on, gently pull the test table carriage from the instrument.
Remove the test table insert and drain the drip tray if required.
2
3
Examine the calibration strip for any dust, dirt, scratches, or mars.
Do not touch the calibration strip.
4
Using a cotton tipped applicator and distilled water, thoroughly scrub the strip
channel and surrounding area of the insert and also scrub the drip tray. Rinse
the entire test table insert under running water.
Dry insert with a soft lint-free cloth or tissue.
5
If the calibration strip appears dirty, gently clean with a new cotton tipped
6
applicator and distilled water. Allow to air dry and examine again. Obtain a new
test table if the calibration strip can not be cleaned, is scratched or marred.
NEXT
Page 34

PREVENTIVE MAINTENANCE
Refer to “Disinfecting Test Table and Test Table Insert” for disinfecting the test
7
table and test table insert.
8
To reinstall test table and insert, gently push table into instrument until halfway in.
4 OF 7
Disinfecting Test Table and Test Table Insert
If the test table or insert needs to be disinfected the following solutions may be used:
CAUTION:
CAUTION:
Precept
Cidex™ (3.2% glutaraldehyde solution)
Amphyl™ liquid
Theracide™ liquid
Preparation and use of the above products or their equivalents should be in
accordance with their product directions.
Do not allow the disinfection solution to come in contact with the white
calibration strip.
Any solutions other than these listed may damage the test table and
insert.
NEXT
Page 35

PREVENTIVE MAINTENANCE
Household Bleach (5% sodium hypochlorite)
Can be used either full strength or diluted to as much as a 20:1 dilution (5 mL of 5%
sodium hypochlorite to 95 mL of water). Full strength 10% bleach should not be
used since any residue not thoroughly rinsed off can affect several of the reagent
chemistries.
Isopropyl alcohol (70% - 85% or undiluted)
Remove the test table and insert and clean according to “Disinfecting Test Table
1
and Test Table Insert” .
2
Fill a tall, narrow container to a depth of about 4 inches (10 cm) with the
prepared disinfecting solution. An empty Multistix bottle makes an ideal
container.
Place the test table or insert in the solution making sure the calibration strip does
3
not come into contact with solution.
4
Soak the table or insert for no longer than 10 minutes then rinse thoroughly with
water.
5 OF 7
5
Dry with a soft cloth or tissue and replace test table and table insert in the
instrument.
NEXT
Page 36

PREVENTIVE MAINTENANCE
6 OF 7
Removing Heavy Buildup
If the test table and table insert are cleaned regularly, heavy buildup should not
occur. However, if urine has been allowed to dry on the table and insert a strong
solution may be required to clean.
CAUTION:
1
Remove the test table and insert from instrument. Wet a cotton-tipped applicator
with 0.1N sodium hydroxide (NaOH).
Clean the strip holding channel, surrounding areas, drip tray and table insert
2
until all traces of urine has been removed.
Rinse thoroughly with water.
3
Dry with a soft cloth or tissue and replace into instrument.
4
Do not allow the solution to come in contact with the white calibration
strip.
NEXT
Page 37

PREVENTIVE MAINTENANCE
7 OF 7
General Instrument Cleaning
T
he outside of the CLINITEK Status instrument should be kept free of dust, dirt,
and urine. If the instrument requires cleaning, turn the instrument off by pressing
the power button for 2 seconds. The instrument can be wiped off with a damp
cloth and any of the disinfection solutions listed or a mild detergent.
CAUTION:
Care should be taken to insure that no liquid is allowed to enter the
printer compartment.
TO TOP
BACK
Page 38

6 THEORY OF OPERATION
1 OF 11
General Description ............................................................................ 2
LCD display and Touch Screen assembly .......................................... 3
Main PCB ............................................................................................ 4
Printer ................................................................................................. 9
Interconnection ....................................................................... 10
Block Diagram ........................................................ 11
NEXT
Page 39

THEORY OF OPERATION
2 OF 11
6.1 General Description
The Clintiek Status urine analyzer is a reflectance photometer designed to provide
semiquantative clinical results when used with Bayer Urinalysis test strips and
imuno assay cassettes. The instrument can be broken down into the following
subsystems:
Optical system
The Processor
User interface
The optical system provides both llimation of the test cassette of strip using light
from six LEDs. This light is directed on to the test surface by a light plastic light
guide that provides unforim ilumation across the length of the read area. This light
is then reflected off the read area to a mirer which directs the light to a lens that
focuses the reflected image onto a CCD array.
The Clinitek Status optical system reads the entire length of the read area in one
reading. The image of the read area is refected and focused on the CCD array, each
element of the CCD array is then clocked out, amplified ,sent to a 10 bit A/D
convertor, and the digital value to each ellemnt is then stored in an array in the
instruments memory. This entire process is refered to a “Scan”. When a test is
processed the system will scan the read area ten times and averaged, thus the
average of the ten scans are used in the instrument aliogrothms for generating the
clinical results. At the start of eact test the instrument scans the white calibration
bar on the table to calibrate the instrument so that the sample refletance readings
can be determined. Test results are displayed on the screen, they can also be printed
on the internal printer or sent out the serial communcations port.
NEXT
Page 40

THEORY OF OPERATION
3 OF 11
6.2 LCD display and Touch Screen assembly
The LCD display and Touch Screen assembly is the primary user interface for the
instrument. The LCD and integrated touch panel are supplied as a semi–
customised assembly with a housing that directly attaches to the upper cover of the
instrument. This provides a fluid resistant and electrically resistant seal to the
housing. The assembly contains electronics that convert a serial stream of 4 bit
wide data along with some necessary control signals to the electrical signals
necessary to excite the LCD panel itself. The LCD then provides a 320 by 240
monochrome, single level (Black or background) display for viewing by the user
from a single 5V supply and TTL/CMOS signals. An analog voltage input from the
main PCB can then vary the contrast of the whole display. The LCD is interfaced
directly to the main PCB by a single 14 way Flexible cable with printed connector.
The 8 by 6 touch screen overlay is completely passive and contains no electronics.
It provides an 8 by 6 crosspoint matrix of normally open resistive switches on a
second 14 pin flexible cable with printed connector for direct interface to the main
PCB. These crosspoints are scanned sequentially by the main board electronics for
any closures. Should multiple closures be detected (which may be ambiguous), the
software in the main board decides on the outcome of these scenariosThis unit
contains embedded electronics to format a 4-bit wide data stream into a 320 by 240
pixel display and control the contrast of the display. The resistive touch screen
provides an 8 by 6 passive overlay on the LCD.
NEXT
Page 41

THEORY OF OPERATION
4 OF 11
6.3 Main PCB
A single PCB that contains all of the necessary control circuits is mounted on the
This “Main PCB “contains the following:
a.
The Microcontroller used to control most of the functions within the instrument is
a Hitachi H8/3006. This component incorporates an internal 32 bit CPU architecture with a 16 bit register set along with embedded RAM, timers, serial communications, memory interface, DMA, I/O ports, ADC and DAC functions. In this
design it is powered from the 5V supply and receives a system clock from an
external oscillator at a frequency of 18.432MHz. External RAM and ROM
(Flash) support the Microcontroller. A large number of the pins / ports on the
device are used for this high-speed interface.
The on chip serial communications controllers are used to interface with the
external RS232 interface, an internal serial interface to a future expansion card
and to the SIP bus that communicates with the NVM, MMC card and RTC.
In general, the I/O ports on the processor are used as inputs and the output
functions are segregated to the U26 CPLD, as there are insufficient on-chip
ports to meet all of the system requirements. The digital input ports come from
the touch screen sensing, power state sensing, drawer position sensing & printer
status.
The timer / counters are used to provide:
A general system timing function.
The sounder drive.
The PWM modulation for controlling the speed of the drawer mechanism.
NEXT
Page 42

THEORY OF OPERATION
The LCD interface which stimulates the DMA to transfer the display image
repeatedly independent of the CPU operation.
The CCD interface which stimulates the ADC and DMA to transfer data from the
CCD into memory independent of the CPU operation.
The 8 bit DAC’s are used to set the LED illumination level when scanning the
sample, the contrast level on the LCD and the offset adjustment to the CCD
variable gain amplifier.
The 10 bit ADC is used in conjunction with its input multiplexer to sample analog
voltages from the CCD, the raw supply voltage, the printer head current and
head temperature and the drawer motor current.
The Microcontroller is reset by an external device (U11, via U26). U11 also
provides a watchdog function so that the instrument is stopped from operating in
the event of a timeout.
b.
The External Memory provided consists of a single 512K byte Static RAM device
for transient data and a single 1 M byte Flash ROM device for the program
memory and static data. The ROM is initially assembled onto the PCB with a
boot loader pre-loaded into it. Subsequently, the ROM has the ‘Status’
application loaded into it during board test using the serial port at high speed. In
service, the ROM can be updated either from an MMC card being inserted into
the MMC connector from under the printer cover of the instrument or from the
serial connection should it be required.
5 OF 11
The Programmable logic device (CPLD - U26) is generally used to provide
c.
output latches and hardware processing functions that were not available on the
Microcontroller. The device is a flash memory programmable device and can be
reprogrammed in-situ by attaching a programmer to the connector position
NEXT
Page 43

THEORY OF OPERATION
provided on the PBA. The CPLD complexity is quite low (72 storage elements)
and so only provides simple functions. In particular, it converts and re-times the
8 bit data into 4bit data for interface to the LCD, drives the touch screen inputs,
the printer head and paper feed functions, the sounder, the sample drawer driver,
the CCD amplifier gain and the power switching functions.
The LED Driver circuit has a digital part that switches on the appropriate LED
d.
when required (under CPU control) and an analog part that converts the voltage
output of one of the Microcontroller DAC’s to a current output. The current is
then used to vary the drive level of the LED’s used for illuminating the sample.
Additionally, two of the digital outputs from this circuit control the power to the
drawer position sensing opto-couplers.
The Variable Gain Amplifier is used to amplify the signal from the CCD on the
e.
Emitter / Detector PCB before application to the ADC in the Microcontroller. The
gain of this amplifier is by default set to +2, but may be set to gains of +1, +3 and
+4 as well when required by the Microcontroller via output ports in the CPLD. To
accommodate the voltage offset from ground of the CCD signal compensation is
applied to the amplifier by a DAC on the Microcontroller.
6 OF 11
f.
The Drawer Motor Driver takes a PWM signal from the Microcontroller, a
direction signal and control signals from the CPLD and produces a high current
‘H Bridge’ drive to the brushed dc. motor. This allows the drawer motor speed
and direction to be altered by the Microcontroller as well as providing braking of
the motor when required. A circuit to allow sampling of the drawer motor current
for future use is also provided that feeds into an ADC channel on the
Microcontroller.
NEXT
Page 44

THEORY OF OPERATION
The Drawer position sensors mounted on the flexible cable assembly are driven
g.
by two outputs from the LED driver circuit and the signals returned from the
sensors interfaced to digital inputs on the Microcontroller via the CPLD.
Additionally two signals are generated by the CPLD to drive interrupt inputs on
the Microcontroller in order to provision for fast servicing of the drawer position
state when required.
h.
The non-volatile memory (NVM) device is a serial EEPROM device that can
store 256k bits of data as 32K bytes of storage that is retained without power on
the instrument. The device is used amongst other things for the storage of
instrument set-up data and calibration data.
The Real Time Clock (RTC) device is a serial device that stores the current date
i.
and time and is powered from the Instrument 5V supply when it is present or
from a permanently fitted primary lithium cell when the instrument supply is not
present. The device communicates over the SPI bus with the Microcontroller,
using its own protocol. The device has its own 32.786KHz crystal timing source.
j.
The Multi-Media Card (MMC) interface is comprised of a connector and some
protection components, so that an MMC card can be inserted into the connector
and read over the SPI bus, using the SPI protocol. The data recorded on the
card is for the purposes of software updates in the field. A specially formatted
card is recognised at power up and read into memory so that reprogramming of
the software application can take place.
7 OF 11
The Sounder is a simple ceramic capsule fitted to the main PCB. The sounder is
k.
driven in a bridge mode from two outputs of the CPLD. The frequency of the
sound is derived from one of the timers on the Microcontroller.
NEXT
Page 45

THEORY OF OPERATION
The Printer Paper Feed Driver is a stepping motor driver that is stepped using
l.
two signals from output latches in the CPLD using a gray code sequence. The
device boosts the current capabilities of the CPLD and provides a bipolar drive
for each winding of the motor. An analog circuit monitors the current that the
motor windings are consuming and chops the waveform to keep the current at or
below one of two predetermined levels that can be set by the Microcontroller.
m.
The Printer Head monitoring circuits buffer and amplify the head current and
head temperature signals before sending them to the ADC on the
Microcontroller. The head temperature should not normally exceed a pre-set
temperature, in the event that it does the software turns off the instrument. The
printer head current is monitored by amplifying the voltage across a low value
resistor in series with the head elements. The signal is then sent to the ADC on
the Microcontroller.
n.
The Printer “head up” and paper out opto sensors on the printer are powered by
main board through resistor feeds and are interfaced back to the Microcontroller
for digital sensing of the states of these signal in order to inhibit printing under
paper out or head up conditions.
8 OF 11
The RS232 Interface acts as a level changer between the 5V logic levels
o.
required at the Microcontroller pins and the +/- 6V (min) signals required to meet
the RS232 specification at the connector on the end of the flexible cable
assembly. The device used is a +/- 15KV ESD compliant part with on board
charge pumps to generate the required voltages for the interface.
NEXT
Page 46

THEORY OF OPERATION
9 OF 11
6.4 Printer
The printer is a thermal printer that prints rows of 384 dots as required across the
special paper supplied from a roll. The paper is then moved so that the next row of
dots can be printed to build up a pixel by pixel graphical image on the paper. The
electronics in the printer takes a serial stream of 8 parallel inputs and determines
which of the thermal heads should be energized. The printing head electronics also
contains a temperature sensor that monitors the temperature of the printhead. This
electronics is connected directly to the main PCB via a high current, 20 way flexible
cable with printed connector.
The paper feed to expose the paper and print the next row of dots is driven by a
simple stepping motor. There are no electronics to drive this motor in the printer.
The two motor windings are presented directly to the main PCB electronics via a 9
way flexible cable with printed connector. On the same flexible cable, the
connections to two opto-couplers that sense the printer head position and paper
present conditions are provided for action by the main PCB electronics.
A 5V logic supply and a 4.2 – 8.5V power source from the main PCB power the
printer. The current taken by the printer has to be actively managed by the main
board electronics to provide an acceptably dense and even image and regulate how
much power is consumed at each printing operation.
NEXT
Page 47

THEORY OF OPERATION
10 OF 11
6.5 Interconnection
A flexible printed circuit assembly provides the interconnections between the main
PCB to the power supply, Drawer mechanism, battery pack and RS232 connector.
At one end it has a 30 way FPC male connector printed within it for connection to
the main PCB. The connections from the main board connector are then distributed
to the other connectors and assemblies directly attached to exposed pads on the
flexible printed circuit.
Connections are made to:
The power inlet connector (with EMC ferrite in line), the RS232 connector with
a.
EMC ferrite on connector pins.
b.
The battery pack via soldered interconnect leads.
The drawer opto-coupler positional feedback devices mounted on a small rigid
c.
section of this circuit.
d.
The drawer motor and noise suppression component(s).
NEXT
Page 48

THEORY OF OPERATION
6.6 Block Diagram
Figure 6-1: Block Diagram
11 OF 11
TO TOP
BACK
Page 49

7 DIAGNOSTICS
1 OF 60
TROUBLESHOOTING
Introduction ........................................................................................ 2
Troubleshooting Table ....................................................................... 3
Instrument Diagnostic Screens ........................................................ 40
NEXT
Page 50

DIAGNOSTICS TROUBLESHOOTING
2 OF 60
7.1 Introduction
This chapter is divided into two different sections. The first section is devoted to
troubleshooting tables and error code tables giving a brief description and steps the
customer and service individual would need to take. The second section goes into a
description of the diagnostic screens available on the instrument.
NEXT
Page 51

DIAGNOSTICS TROUBLESHOOTING
3 OF 60
7.2 Troubleshooting Table
The following table is provided to assist in troubleshooting the CLINITEK Status
system. The first four columns are similar to those found in the Operators Manual
under troubleshooting with the exception that “Contact Bayer Service” has been
removed from Customer Remedy column and replaced with “Replace instrument.”
The fifth column, “Service Remedy,” gives a more advanced troubleshooting guide
that should be utilized by Bayer Service Personnel or under the guidance of trained
personnel. The items are listed in increasing order of technical difficulty.
In some isolated cases, the power plug must be unplugged from the back of the
instrument in order to turn the instrument off or batteries removed. Once the plug or
batteries has been replaced, the power button on front of the instrument must be
pressed to turn the instrument back on.
NEXT
Page 52

DIAGNOSTICS TROUBLESHOOTING
4 OF 60
Symptom
or Error
Touch
screen
does not
respond
Meaning Possible
Cause
Electronic lock-upHave the customer
Faulty touch
screen
Loose cable Replace instrument Same as above
Customer Remedy Service Remedy
disconnect from
power and
reconnect, and turn
instrument on
Replace instrument
Reseat cables to the
1
main PCB
2
Replace display / bezel
assemble
3
Replace main PCB.
NEXT
Page 53

DIAGNOSTICS TROUBLESHOOTING
5 OF 60
Symptom
or Error
Blank
Display
Meaning Possible
Cause
No power
Defective
Display Unit
Battery
contacts
corroded
Customer Remedy Service Remedy
1
Check that the
power cord is
firmly plugged into
the instrument
and the line cord
is plugged into a
live AC electrical
outlet and firmly
plugged into the
Power Supply.
Replace batteries.
2
Replace instrument
Replace instrument Replace optical chassis
1
Test instrument using a
second power supply
and line cord.
Inspect battery holder
2
and replace batteries
as needed.
1
Remove Bezel and
check that all cables
are properly seated.
Troubleshoot the Main
2
PCB.
NEXT
Page 54

DIAGNOSTICS TROUBLESHOOTING
6 OF 60
Symptom
or Error
Faint
Display
Missing
Character
s or
Strange
Character
s
Meaning Possible
Cause
Possible
low
contrast
setting
Possible low
contrast setting
Faulty display Replace instrument
Electronics
lock-up
Loose Cable Replace instrument Run Display diagnostics
Customer Remedy Service Remedy
Refer to operators
manual for
adjusting contrast
1
Replace display / bezel
assembly
Replace main PCB
2
Disconnect and
reconnect from
power source, and
turn instrument
“on”.
Reseat cables
1
2
Replace Display/Bezel
Assembly
3
Replace Main PCB
Faulty display Replace Instrument Replace Main PCB
Main PCB
Failure
Replace instrument Replace Main PCB
NEXT
Page 55

DIAGNOSTICS TROUBLESHOOTING
7 OF 60
Symptom
or Error
Test Table
cannot be
installed
Meaning Possible
Cause
Broken Table
Guides
Customer Remedy Service Remedy
1
Inspect the Test
Ta ble opening on
the instrument for
any obstructions
nspect bottom of
2
I
Test Table for any
obstructions
blocking the teeth.
3
Tr y inserting a different
Test Table.
Inspect the Test Table
4
opening on the
instrument for any
obstructions such as
bent guide pins.
NEXT
Page 56

DIAGNOSTICS TROUBLESHOOTING
8 OF 60
Symptom
or Error
Instrument
does not
turn “ON”
or turn
“OFF
”
Meaning Possible
Cause
Front
panel
switch is
not
functioni
ng
correctly
No Power
Dirty switch
connect
Main PCB
Failure
Customer Remedy Service Remedy
1
Check that the
power cord is
firmly plugged into
the instrument
and the line cord
is plugged into a
live AC electrical
outlet and firmly
plugged into the
Power Supply.
Replace batteries.
2
Replace instrument
Replace instrument Replace Main PCB
1
Test system using a
second power supply
and line cord.
Inspect battery holder
2
and replace batteries
as needed.
1
Remove Bezel and
clean power switch
and PCB switch contacts Troubleshoot the
Main PCB.
Replace Display/Bezel
2
assembly
NEXT
Page 57

DIAGNOSTICS TROUBLESHOOTING
9 OF 60
Symptom
or Error
Forgot
password
Meaning Possible
Cause
Password set,
and operator
does not know
it
Customer Remedy Service Remedy
1
Have customer
check to see written operators
manual.
From the main
2
screen press
instrument set-up,
then enter the
password ”3654”.
Then select
choose setting
option. Then
select remove
password. Then if
they want to reset
the manual
instruct refer them
to the operators
manual.
From the main screen
press instrument set-up,
then enter the
password”
select choose setting
option. Then select
remove password. Then
if they want to reset the
manual instruct refer
them to the operators
manual.
3654
”. Then
NEXT
Page 58

DIAGNOSTICS TROUBLESHOOTING
10 OF 60
Symptom
or Error
Test Table
does not
move into
instrument
when a
test is
started
Test Table
does not
move into
instrument
when
instrument
is powered
off
Meaning Possible
Cause
Instrument
“Lock-Up”
Broken teeth
on test table
Defective Test
Ta ble Motor
Drive Unit
Instrument
“Lock-Up”
Broken teeth
on test table
Defective Test
Ta ble Motor
Drive Unit
Customer Remedy Service Remedy
Tu rn the instrument
off and on.
Replace table Replace test table
Replace instrument Replace the Optical
1
Tu rn the instrument off and on.
Perform test table
2
diagnostics
Replace instrument Replace Test Table
Replace instrument Replace optical chassis
Perform Table Movement
test through the
Diagnostics menu.
Chassis that contains
the Motor Drive Unit.
NEXT
Page 59

DIAGNOSTICS TROUBLESHOOTING
11 OF 60
Symptom
or Error
Results
are not
printing
Meaning Possible
Cause
Printer option
disabled
Paper in
backwards
Incorrect paper
being used
Batteries are
low
Printer
defective
Printer cable
loose
Customer Remedy Service Remedy
Refer to operators
manual to select
printer option
Refer to operators
manual for how
install paper
Recommend that
they use Bayer
thermal paper
Replace batteries or
use power supply
Run printer
diagnostics; refer to
operators manual
for instructions. If it
fails replace
instrument
Run printer
diagnostics; refer to
operators manual
for instructions. If it
fails replace
instrument
Run printer diagnostics
Check cable
1
connections.
2
Replace printer
Replace main PCB
3
Run printer diagnostics
1
Check cable
connections.
2
Replace printer
3
Replace main PCB
NEXT
Page 60

DIAGNOSTICS TROUBLESHOOTING
12 OF 60
Symptom
Meaning Possible
or Error
E00 Not used
E01
E02
Low
battery
power
Battery
voltage
drops to
5.8 Vdc
Failure of
Calibrati
on data
checksu
m
Cause
Batteries have
low voltage
Battery
contacts
corroded
Power supply
is faulty
Battery
detector circuit
is damaged
Main PCB
failure
Customer Remedy Service Remedy
Replace with fresh
batteries.
Clean if possible,
replace instrument
Replace power
supply
Replace instrument
Return for service Replace Main PCB
Replace with fresh
batteries.
Replace optical chassis
1
Replace power supply
Power input connector
2
damaged, replace
optical chassis
1
Reload instrument
software
Replace main PCB
2
NEXT
Page 61

DIAGNOSTICS TROUBLESHOOTING
13 OF 60
Symptom
or Error
E03
E04
E05
E06
E07
E08
E09
E10
Meaning Possible
Cause
Failure of
Flash
(ROM)
checksu
m
Failure of
RAM
checksu
m
Not used
Loss of
test
results
Memory
checksum
error
Main PCB
failure
(Non Volatile
Memory failure
during storage
of test results)
Customer Remedy Service Remedy
1
If customer has a
program card,
have them
attempt to reload
software
Return for service
2
Return for service Replace Main PCB
Tu rn instrument off
and on and repeat
the test.
1
Reload software
Replace Main PCB
2
Replace Main PCB
NEXT
Page 62

DIAGNOSTICS TROUBLESHOOTING
14 OF 60
Symptom
or Error
E11
Meaning Possible
Cause
Failure of
test table
Ta ble
fails to
move 2
steps in
<4
seconds.
Insert or
Cassette not
fully into table
Ta ble bumped Disconnect from
Customer Remedy Service Remedy
1
Reseat the table
insert.
Remove the table
2
inset and inspect
that there is no
debris in the table
preventing the
insert from
seating.
3
Clean and inspect
the table insert, if
damaged replace
the insert.
Confirm that the
test table is in
place.
power source to
reset and clear the
error (
Tur ning
instrument “off” and
“on” will not reset
and clear the error
Run table diagnostics to
troubleshoot.
Replace test table.
Replace lower optical
chassis.
).
NEXT
Page 63

DIAGNOSTICS TROUBLESHOOTING
15 OF 60
Symptom
Meaning Possible
or Error
E12
E13 Not used
E20
Failure of
LED
During
the
calibratio
n step
the
instrume
nt could
not set
the
current
gain on
one or
more of
the Led
Real time
clock
failure
Customer Remedy Service Remedy
Cause
Calibration
strip dirty
Failure of LED Replace the
Main PCB
failure
Electronics
lock-up
Main PCB
failure
1
Remove the table
and clean the
table as directed
in the operators
manual
Replace the table
2
Replace the
instrument
instrument
Replace the
instrument
Tu rn instrument off
and on.
Run electronics
diagnostics.
Run light source
diagnostics.
Replace the table
Replace lower optical
chassis
Replace the Main PCB
Run electronics
diagnostics.
Replace Main PCB
E21 Not used
NEXT
Page 64

DIAGNOSTICS TROUBLESHOOTING
16 OF 60
Symptom
or Error
E23
Meaning Possible
Cause
Low
battery
power
approach
ing (one
segment
on
battery
icon on
display
Battery
voltage is
below
6.6Vdc
Batteries have
low voltage
Battery
contacts
corroded.
Power supply
is faulty
)
Battery
detector circuit
is damaged
Customer Remedy Service Remedy
Replace with fresh
batteries.
Clean if possible,
replace instrument
Replace power
supply
Replace instrument
Replace with fresh
batteries.
Replace optical chassis
1
Replace power supply
2
Power input connector
damaged, replace
optical chassis
1
Reload instrument
software
2
Replace main PCB
NEXT
Page 65

DIAGNOSTICS TROUBLESHOOTING
17 OF 60
Symptom
Meaning Possible
or Error
E24 No
printer
paper
Cause
No printer
paper
Printer
defective
Main PCB
failure
Customer Remedy Service Remedy
Replace the printer
paper
If paper is in
installed:
1 Cycle power off
and on
2 Replace
instrument.
If paper is in
installed:
1 Cycle power off
and on
2 Replace
instrument
Replace the printer
paper and check that
flex cables from printer
to main PCB are seated
in their connectors
Replace printer
Replace Main PCB
E25 Auto
Calibrati
on failure
Same as
E12
Same as E12 Same as E12 Same as E12
NEXT
Page 66

DIAGNOSTICS TROUBLESHOOTING
18 OF 60
Symptom
Meaning Possible
or Error
E27 Set up
failure
(loss of
test
results or
instrume
nt set up
due to
checksu
m failure)
E28 Printer
error
Cause
Instrument
lock-up
Main PCB
Failure
Printer paper
release lever
arm is not
down.
Printer cable
not seated fully
in connector
Printer
defective
Customer Remedy Service Remedy
Tu rn instrument off
and on.
Replace instrument Replace Main PCB
Lift the printer cover
and push the paper
holding arm back
into position.
Replace instrument Check that printer cable
Replace instrument Replace printer
Cycle instrument power
off and on.
Lift the printer cover and
push the paper holding
arm back into position
in fully seated and
locked in place
Main PCB
Failure
Replace instrument Replace Main PCB
NEXT
Page 67

DIAGNOSTICS TROUBLESHOOTING
19 OF 60
Symptom
Meaning Possible
or Error
E48 Loss of
test
results.
The
same as
E10
Cause
(Non Volatile
Memory failure
during storage
of test results)
Customer Remedy Service Remedy
Tu rn instrument off
and on and repeat
the test.
Replace Main PCB
NEXT
Page 68

DIAGNOSTICS TROUBLESHOOTING
20 OF 60
Symptom
Meaning Possible
or Error
E50 Incorrect
strip type
(Failure
to
identify
strip)
Cause
Strip type used
does not
match setting
selected.
Instrument
failed to read
correctly
match strip ID
bands to pad
configuration.
Customer Remedy Service Remedy
Ensure that the strip
type selected in
Instrument set up is
being used (see
Section 6, Select
Instrument Tests).
1 If the correct type
of strip is being
used, check the
instrument operation by running
another test
using.
2 Excess sample is
on the color ID
bands, instruct the
customer on
proper dipping
technique (refer to
Operators
manual).
3 Have the
customer run a
Control such as
Chek-Stix.
NEXT
Page 69

DIAGNOSTICS TROUBLESHOOTING
21 OF 60
Symptom
or Error
Meaning Possible
Cause
Strip was
slightly tilted on
table
Instrument
problem Test
Ta ble, Main
PCB, or Lower
Chassis
Customer Remedy Service Remedy
1 Have customer
rerun the sample.
2 Have the
customer run a
Control such as
Chek-Stix.
Replace instrument
1 Replace Test Table
2 Replace Main PCB
3 Replace lower optical
assembly.
NEXT
Page 70

DIAGNOSTICS TROUBLESHOOTING
22 OF 60
Symptom
Meaning Possible
or Error
E52 Invalid
cassette
barcode
Area of
barcode
on
cassette
does not
match
supporte
d
cassette
tests
Cause
Cassette
barcode label
damaged
Cassette not
seated in
insert.
Insert not
installed in to
table correctly
Insert
damaged
Ta ble
damaged
Instrument
failure
Customer Remedy Service Remedy
Repeat the test
using a Bayer
cassette.
Clean insert and
retest
Clean table and
retest
Replace insert
Replace table.
Replace instrument
1 Replace test table
2 Replace lower Optical
assembly.
3 Replace Main PCB
NEXT
Page 71

DIAGNOSTICS TROUBLESHOOTING
23 OF 60
Symptom
Meaning Possible
or Error
E53 Strip Test
selected
but
cassette
detected
Cassette
barcode
detected
Cause
Incorrect test
was selected
Instrument
failure
Customer Remedy Service Remedy
Repeat the test
using the
appropriate test
routine.
Have the customer
use the CSCC test
to confirm
instrument failure.
If confirmed replace
instrument.
If CSCC tests are
successfully, have
customer run
controls.
Replace lower Optical
assembly.
Replace Main PCB
NEXT
Page 72

DIAGNOSTICS TROUBLESHOOTING
24 OF 60
Symptom
Meaning Possible
or Error
E54 Cassette
Test
selected
but strip
detected
No
barcode
detected
but a test
is
present
Cause
Incorrect test
was selected
Instrument
failure
Customer Remedy Service Remedy
Repeat the test
using the
appropriate test
routine.
Have the customer
use the CSCC test
to confirm
instrument failure.
If confirmed replace
instrument.
If CSCC tests are
successfully, have
customer run
controls.
Replace lower Optical
assembly.
Replace Main PCB
NEXT
Page 73

DIAGNOSTICS TROUBLESHOOTING
25 OF 60
Symptom
Meaning Possible
or Error
E55 Strip
being
used on
cassette
side of
table
insert
%R in all
areas is
> black
and no
cue mark
is
detected
Cause
Incorrect side
of insert being
used
Instrument
optical error
Customer Remedy Service Remedy
1 Tu rn the test table
insert over so that
the strip holder
face of the insert
is upwards.
2 Repeat the test.
Have the customer
use the CSCC test
to confirm
instrument failure.
If confirmed,
replace instrument.
If CSCC tests are
successfully, have
customer run
controls
1 Replace lower Optical
assembly.
2 Replace Main PCB
NEXT
Page 74

DIAGNOSTICS TROUBLESHOOTING
26 OF 60
Symptom
Meaning Possible
or Error
E56 Incorrect
size test
table
4.25”
strip on a
3.25” test
table
Cause
Long strip
being used on
a short strip
insert
Instrument
failure
Customer Remedy Service Remedy
Verify that the
customer is using
the correct insert
with the strip that
they are using.
Repeat the test
using the correct
test table.
Have the customer
use the CSCC test
to confirm
instrument failure.
If confirmed,
replace instrument.
If CSCC tests are
successfully, have
customer run
controls
Replace lower Optical
assembly.
Replace Main PCB
NEXT
Page 75

DIAGNOSTICS TROUBLESHOOTING
27 OF 60
Symptom
Meaning Possible
or Error
E57 Missing
strip or
cassette
%R in all
areas is
equal to
black
Cause
Test started
with out either
a strip in the
insert
Test started
without an
insert in table
Instrument
failure
Customer Remedy Service Remedy
Repeat the test
ensuring that the
strip or cassette is
correctly positioned
when the test is
started
Repeat testing
using the correct
insert installed on
the table
Have the customer
use the CSCC test
to confirm
instrument failure.
If confirmed,
replace instrument.
If CSCC tests are
successfully, have
customer run
controls Replace
Instrument.
1 Replace lower Optical
assembly.
2 Replace Main PCB
NEXT
Page 76

DIAGNOSTICS TROUBLESHOOTING
28 OF 60
Symptom
Meaning Possible
or Error
E58 Misplace
d strip
845nm%
R <20%
from cue
mark +
50 pixels
and
565nm%
R >17%
Cause
Test strip is not
correctly
positioned in
the insert; the
tip is not to the
end of the
channel.
Customer Remedy Service Remedy
1 Repeat the test
ensuring that the
strip is correctly
positioned on the
test table.
2 Have customer
clean the insert,
checking to see
that there is not
any build up near
edges of the
channel Repeat
the test ensuring
that the strip is
correctly
positioned on the
test table.
3 Have the
customer remove
the table and
clean the gears.
4 Replace the Insert
5 Replace the table
NEXT
Page 77

DIAGNOSTICS TROUBLESHOOTING
29 OF 60
Symptom
or Error
Meaning Possible
Cause
Instrument
failure
Customer Remedy Service Remedy
Have the customer
use the CSCC test
to confirm
instrument failure.
If confirmed,
replace instrument.
If CSCC tests are
successful, have
customer run
controls
Replace the
instrument
1 Replace lower Optical
assembly.
2 Replace Main PCB
NEXT
Page 78

DIAGNOSTICS TROUBLESHOOTING
30 OF 60
Symptom
Meaning Possible
or Error
E59 Inverted
strip
Cause
Strip placed
upon the table
upside down.
Instrument
failure
Customer Remedy Service Remedy
Repeat the test
ensuring that the
strip is correctly
positioned on the
test table.
Have the customer
use the CSCC test
to confirm
instrument failure.
If confirmed,
replace instrument.
If CSCC tests are
successfully, have
customer run
controls.
Replace the
instrument
1 Replace lower Optical
assembly.
2 Replace Main PCB
NEXT
Page 79

DIAGNOSTICS TROUBLESHOOTING
31 OF 60
Symptom
Meaning Possible
or Error
E60 Tilted
strip
Cause
Strip not laying
flat in the insert
channel
Insert not flat
in the table
Customer Remedy Service Remedy
1 Repeat the test
ensuring that the
strip is correctly
positioned on the
test table.
2 Have customer
clean the insert,
checking to see
that there is not
any build up near
edges of the
channel. Repeat
the test ensuring
that the strip is
correctly
positioned on the
test table.
Have the customer
clean and inspect
the table for
anything that might
prevent the insert
from sitting flat in
the table.
NEXT
Page 80

DIAGNOSTICS TROUBLESHOOTING
32 OF 60
Symptom
or Error
Meaning Possible
Cause
Instrument
failure
Customer Remedy Service Remedy
Have the customer
use the CSCC test
to confirm
instrument failure.
If confirmed,
replace instrument.
If CSCC tests are
successfully, have
customer run
controls.
Replace the
instrument
1 Replace lower Optical
assembly.
2 Replace Main PCB
NEXT
Page 81

DIAGNOSTICS TROUBLESHOOTING
33 OF 60
Symptom
or Error
E61 Dry strip Strip was not
Meaning Possible
Cause
fully dipped in
to the sample.
Instrument
failure
Customer Remedy Service Remedy
Refer the customer
to the operators
manual section 4 on
dipping the strips.
Repeat the test.
Have the customer
use the CSCC test
to confirm
instrument failure.
If confirmed replace
instrument.
If CSCC tests are
successfully, have
customer run
controls.
Replace the
instrument.
1 Replace lower Optical
assembly.
2 Replace Main PCB
NEXT
Page 82

DIAGNOSTICS TROUBLESHOOTING
34 OF 60
Symptom
Meaning Possible
or Error
E62 Light
ingress
Cause
Light is leaking
into the
instrument.
Instrument
failure
Customer Remedy Service Remedy
If instrument is in
direct sunlight or
strong side lighting,
move out of bright
light.
Have the customer
use the CSCC test
to confirm
instrument failure.
If confirmed replace
instrument.
If CSCC tests are
successfully, have
customer run
controls
Replace the
instrument
1 Check shutter door for
proper operation.
Clean and repair if possible.
2 Replace lower optical
chassis.
3 Replace Main PCB
NEXT
Page 83

DIAGNOSTICS TROUBLESHOOTING
35 OF 60
Symptom
Meaning Possible
or Error
E63 Failure to
find end
of strip
(Fails to
locate
cue mark
on table
insert,
strip
side)
Cause
Insert dirty or
damaged
Ta ble
damaged
Instrument
failure
Customer Remedy Service Remedy
1 Have the cus-
tomer clean and
inspect the insert
to see the white
line at the end of
the channel is
present.
2 Replace the insert
3 Repeat the test
ensuring that the
strip is correctly
positioned on the
test table.
Have the customer
make sure table is
clean and not
damaged.
Have the customer
use the CSCC test
to confirm
instrument failure.
1 Replace lower Optical
assembly.
2 Replace Main PCB
If confirmed replace
instrument.
If CSCC tests are
successfully, have
customer run
controls
Replace the
instrument
NEXT
Page 84

DIAGNOSTICS TROUBLESHOOTING
36 OF 60
Symptom
Meaning Possible
or Error
E64 Over-
range
CAL strip
Cause
Calibration bar
is dirty.
Instrument
failure
Customer Remedy Service Remedy
1 Clean and inspect
the calibration bar.
2 Replace Test
Ta ble
Have the customer
use the CSCC test
to confirm
instrument failure.
If confirmed replace
instrument.
If CSCC tests are
successfully, have
customer run
controls
Replace the
instrument
1 Replace Optical chas-
sis
2 Replace Main PCB
NEXT
Page 85

DIAGNOSTICS TROUBLESHOOTING
37 OF 60
Symptom
Meaning Possible
or Error
E65 Dirty
CAL strip
Cause
Calibration bar
is dirty
Instrument
failure.
Customer Remedy Service Remedy
1 Clean and inspect
the calibration bar.
2 Replace Test
Ta ble
Have the customer
use the CSCC test
to confirm
instrument failure.
If confirmed,
replace instrument.
If CSCC tests are
successfully, have
customer run
controls
Replace the
instrument
1 Replace Optical chas-
sis
2 Replace Main PCB
NEXT
Page 86

DIAGNOSTICS TROUBLESHOOTING
38 OF 60
Symptom
Meaning Possible
or Error
E66 Dry
cassette
Cause
Insufficient
sample
Instrument
failure
Customer Remedy Service Remedy
1 Review the direc-
tions for applying
the sample to the
cassette with the
customer.
2 Repeat the test
3 Have customer
run a control.
Have the customer
use the CSCC test
to confirm
instrument failure.
If confirmed replace
instrument.
If CSCC tests are
successfully, have
customer run
controls Replace
the instrument
1 Replace Optical chas-
sis
2 Replace Main PCB
NEXT
Page 87

DIAGNOSTICS TROUBLESHOOTING
39 OF 60
Symptom
Meaning Possible
or Error
E67 Insufficie
nt
sample
Cause
Poor immune
flow
Instrument
failure
Customer Remedy Service Remedy
1 Review the direc-
tions for applying
the sample to the
cassette.
2 Repeat the test
ensuring that the
sample is
correctly
dispensed into the
cassette and/or
there is enough
sample in the
pipette before
dispensing into
the cassette.
Have the customer
use the CSCC test
to confirm
instrument failure.
If confirmed,
replace instrument.
1 Replace Optical chas-
sis
2 Replace Main PCB
If CSCC tests are
successfully, have
customer run
controls
Replace the
instrument
NEXT
Page 88

DIAGNOSTICS TROUBLESHOOTING
40 OF 60
Symptom
Meaning Possible
or Error
E68 Insufficie
nt
sample
Cause
Poor immune
flow
Instrument
failure
Customer Remedy Service Remedy
1 Review the direc-
tions for applying
the sample to the
cassette.
2 Repeat the test
ensuring that the
sample is
correctly
dispensed into the
cassette and/or
there is enough
sample in the
pipette before
dispensing into
the cassette.
Have the customer
use the CSCC test
to confirm
instrument failure.
If confirmed replace
instrument.
1 Replace Optical chas-
sis
2 Replace Main PCB
If CSCC tests are
successfully, have
customer run
controls
Replace the
instrument
NEXT
Page 89

DIAGNOSTICS TROUBLESHOOTING
41 OF 60
Symptom
or Error
E90
E91
E92
E93
Meaning Possible
Cause
Not Used
Customer Remedy Service Remedy
NEXT
Page 90

DIAGNOSTICS TROUBLESHOOTING
42 OF 60
7.3 Instrument Diagnostic Screens
The following section is provided to assist in troubleshooting the CLINITEK Status
system. This section explains the different diagnostic screens available on the
instrument.
Diagnostics Screens: Initial Screens
The following is done in order to access the instruments diagnostic features.
Figure 7-1: Ready for Test Screen
1 From the ready screen, select “Instrument Set Up” by pressing the screen
button.
2 If the customer has set a Password to access the instrument set up, then you
must use the default password, 3654, to gain access to the Settings Menu.
NEXT
Page 91

DIAGNOSTICS TROUBLESHOOTING
Press the “123” button on the “Enter Password” screen to get the number pad
and enter 3654 then “Enter.”
43 OF 60
3 You then get the following menu options. Press the down arrow button to scroll
down until “Diagnostics” is highlighted.
4 Once highlighted, press the “Select” button to proceed to the next menu screen.
5 If you want to exit any screen without proceeding to any of the listed options,
simply press the “Done” button to return to the previous menu screen or the
ready screen.
NEXT
Page 92

DIAGNOSTICS TROUBLESHOOTING
44 OF 60
Diagnostics Screens: Display
The display test is the first test on the menu. This test is designed to highlight all 48
areas of the touch screen/display through an alternating checker board pattern. If
any area is not properly displayed then there may be a problem with the display
cable, display, or main PCB.
1 Scroll down using the down arrow to highlight the desired menu option.
The above screen is displayed once “Display” was selected.
2 Select “Run Test.”
3 These two screens will alternate back and forth several times in 20 seconds.
Make sure all areas are displayed in order to pass the test. If any area is not
NEXT
Page 93

DIAGNOSTICS TROUBLESHOOTING
properly displayed then follow the troubleshooting for missing characters or
strange characters in “
When the instrument has finished the test, the following screen is displayed.
Troubleshooting Table” .
45 OF 60
4 Select “Done” to return to the diagnostics menu screen or “Repeat Test” if
needed.
NEXT
Page 94

DIAGNOSTICS TROUBLESHOOTING
46 OF 60
Diagnostics Screens: Touch Screen
The touch screen test is designed to test the touch screen portion of the display. All
48 quadrants are highlighted and numbered. You are instructed to physically touch
all 48 areas. The touch screen will respond to the pressure of the touch by
changing the number into a forward arrow. An area not responding can indicate a
problem with either the touch screen cable, touch screen, or main PCB.
1 Scroll down using the down arrow to select “Touch Screen” and press “Select.”
NEXT
Page 95

DIAGNOSTICS TROUBLESHOOTING
47 OF 60
Once “Touch Screen” was selected this screen is displayed.
2 Press “Run Test.”
Each of the 48 touch areas are displayed with a number except the last one
which is the enter/done key.
NEXT
Page 96

DIAGNOSTICS TROUBLESHOOTING
48 OF 60
3 Press each numbered area to change the number into an arrow icon by starting
at 1 and ending at 47.
4 Press the last button to proceed to final screen.
Either “Test Passed” will be displayed (if all areas successfully changed to
arrows) or the “Test was not successful” screen will be shown. If the latter
screen is displayed then follow the troubleshooting guide for “Touch screen does
not respond” in “
Troubleshooting Table” .
NEXT
Page 97

DIAGNOSTICS TROUBLESHOOTING
49 OF 60
Diagnostics Screens: Printer
The printer test is to be used to test the printer by generating a test print. This test
print is designed to utilize all areas of the thermal print head. If there are problems
with the print head, voids in the printing would be seen or no printing at all. If the
printer fails to respond to the test then there may be other problems like printer
cables bad, printer bad, or main PCB bad.
1 Highlight “Printer” by scrolling
down using the down arrow and
then pressing “Select.”
Once “Select” was press, this
screen will be displayed.
2 Press “Run Test” to continue.
NEXT
Page 98

DIAGNOSTICS TROUBLESHOOTING
The “Please Wait” screen is displayed while the printer is printing.
The Final screen is displayed.
50 OF 60
3 Select “Done” to return to the diagnostic menu screen or repeat as needed.
Follow the troubleshooting guide for “Results are not printing” in “
Table” if the printer fails to work properly.
Troubleshooting
NEXT
Page 99

DIAGNOSTICS TROUBLESHOOTING
51 OF 60
Diagnostics Screens: Test Table
The “Test Table” diagnostics feature allows for the user to test the table drive
components along with the table position sensor. In this test the table gets drawn
into the instrument table checks are performed along with a calibration check and
then the table is moved back into the ready for test position. The test fails if there
are any problems encountered during the checks or table movement. This test can
also be used to help clear an E11 error (test table failure error) by running the
diagnostics and retesting the sample.
1 Scroll down using the down
arrow to highlight “Test Table”
and press “Select.”
This screen is displayed after
Test Table” was selected.
2 Select “Run Test.”
NEXT
Page 100

DIAGNOSTICS TROUBLESHOOTING
The “Please wait” screen is displayed while the test table is being cycled.
Screen that is displayed when there is a successful test completed. If there were
any problems, a failed test screen would be displayed.
52 OF 60
NEXT
 Loading...