

GB
TRKK 6852
QUICK REFERENCE GUIDE
Please also carefully read the
“Instructions for Use”.
Very
Wet
Load
Indicative
drying
times
(in
minutes)
95’
160’
80’
130’
Cotton
60’
110’
25’
45’
20’
35’
Mixed Fabrics
100’ 85’ 2.5
Care
Extra
---
Airing
---
Time
Wet
Load
80’
130’
60’
110’
50’
85’
20’
35’
15’
25’
Load
Kg
3.0
6.0
3.0
6.0
3.0
6.0
1.0
2.5
1.0
2.5
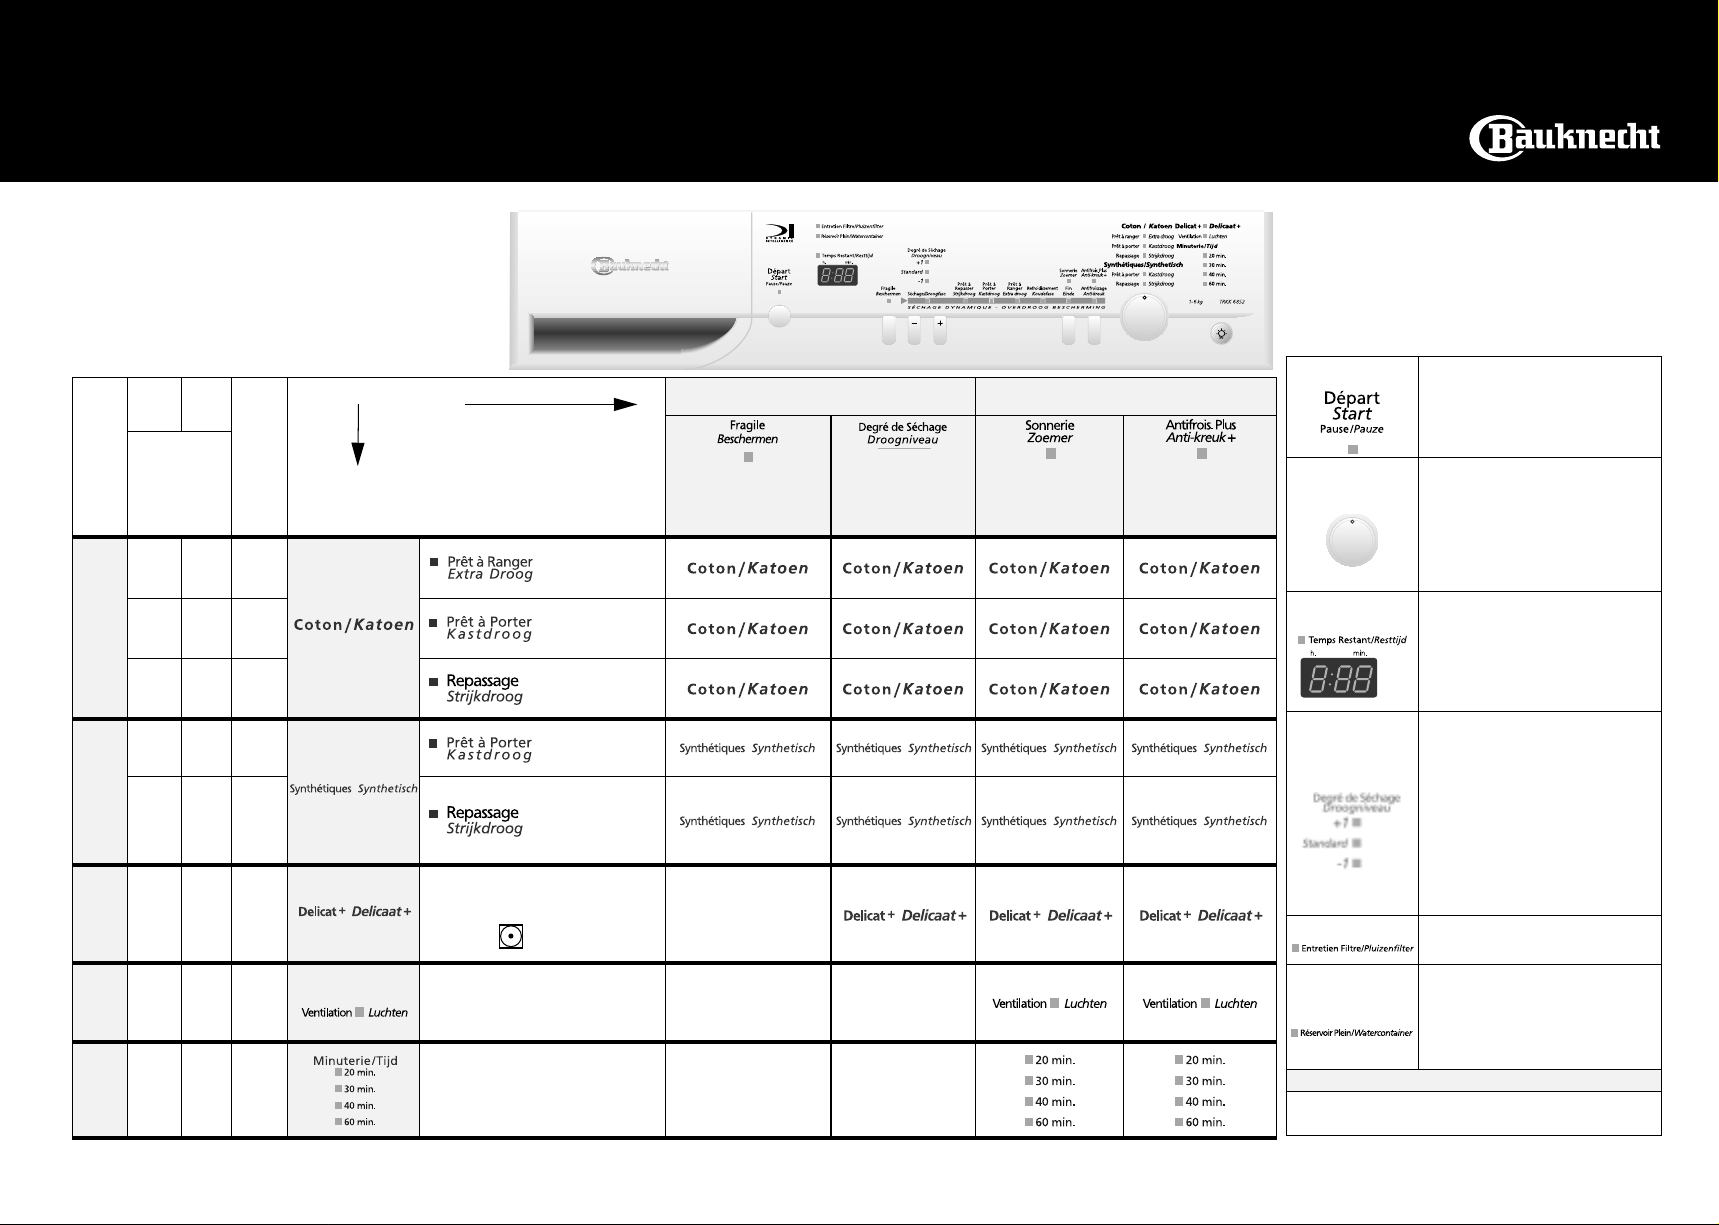
Fabric Drying
Cycles
& Drying
levels
Cotton
max 6 kg
Mixed Fabrics
max 2.5 kg
Extra Care
max 2.5 kg
Airing
Drying options
Cupboard dry +
Cupboard dry *
Iron dry *
Cupboard dry *
Iron dry
Low drying intensity for
delicates and garments
labelled
.
Laundry is aired and
refreshed for 30 minutes
without heating.
Completes drying or dries
single items (suitable for
all fabrics).
Gentle
Reduces drying
intensity
(recommended for
delicate items)
-
--
--
Dryness
Adjustment
Adjusts Dryness
Level according to
wishes
Buzzer & Anti-Crease
cannot be selected together
Buzzer
Signals/Sounds
end of drying cycle
at Intervals
Anti-Crease
Prevents laundry
from creasing
Start
Pause
Programme
selection
Remaining time
indication
Dryness
Adjustment
Filter
Water
Container
PROGRAMME SEQUENCE INDICATION
The programme sequence is indicated by lamps,
switching on when programme step starts and
switching off when the programme step is passed.
Starts the drying cycle. The
Start/Pause indicator lamp is
blinking during the selection
phase.
Press to confirm the final
selection.
Turn the programme selector knob
to the desired programme. The
indicator next to the programme
name lights up. The start indicator
blinks to show, that the dryer is in
selection mode. After the Start /
Pause button is pressed the start
indicator lamp lights up and the
programme starts.
After cycle start a default drying
time is indicated depending on the
selected drying programme and the
dryness adjustment. After 15
seconds the time will be adjusted to
the real expected remaining time,
depending on size, type and
humidity of the load.
Dryness adjustment is an option to
adjust the dryness of the laundry
according to your wishes. Select the
desired programme and the option
dryness level adjustment by pressing
the button “+“ for more dry or the
button “–“ for more humid. The
selected dryness will be stored as a
pre-setting to the selected drying
programme. Using the drying
programme next time the pre-setting
appears. By pressing the dryness
adjustment buttons “+” or “–” the
pre-setting can be changed.
The indicator lamp lights up when
the filter needs cleaning.
filter at the end of every cycle.
Lights up when water container
needs to be emptied. The drying
cycle is automatically interrupted.
Empty the water container.
the Start/Pause button to restart the
dryer and to continue the
programme.
Clean the
Press
* Test programmes according IEC 61121
5019 407 00427

PREPARING THE LAUNDRY
1. Check that all fastenings are closed and
that pockets are empty.
2. Turn the articles inside out.
3. Place laundry loosely in the drum to make
sure it doesn’t become tangled.
Sort laundry as follows:
A) By care symbols (on the collar or
inside seam):
Suitable for tumble drying
Tumble drying with reduced
drying intensity only. Press gentle
button or select specific
programme
Do not tumble dry
B) By amount and thickness/weight
Whenever the load to be dried exceeds
dryer capacity , separate l aundry
according to weight (e.g. towels from
thin underwear).
C) By type of fabrics
Cotton/linen
: towels, cotton jersey , bed
and table linen made of cotton or linen.
Synthetics/Easy Care
: blouses, shirts,
overalls, etc. made of polyester or
polyamide, as well as cotton/synthetic
mixes.
D) By drying level
• Sort into: iron dry, cupboard dry, etc.
Do not tumble dry:
woollens, silk, nylon
stockings, delicate embroidery, fabrics with
metallic decorations, bulky items such as
sleeping bags, etc.
Important: only use specific indicated
dryer-safe additives
and rinse items that
have been treated with stain remover
thoroughly in plenty of water before drying.
Only use specific indicated dryer-safe
plastic items
and never dry rubber or
articles contaminated with vegetable oil in
the dryer
DRUM LIGHT OPTION
(Option only available when Programme is
selected).
• Push the button to turn the drum l ight on
for 30 sec. and push again to turn the drum
light off.
SELECTING A PROGRAMME & OPTIONS
Programme and Options:
• To select a programme, turn the
programme selector knob to the required
position. The Start/Pause indicator lamp is
blinking, indicating that the cycle needs to
be started.
• To select an option, press the
corresponding button. The indicator light
above the button lights up confirming
that the selection has been made.
• Press the option button again to cancel
the option.
STARTING & COMPLETING A
PROGRAMME
1. Having selected the desired programme
and options, press the Start/Pause button.
If the laundry is not removed at the end
of the drying cycle, an automatic anticrease cycle will operate for maximum 60
min. The drum rotates at regular
intervals, preventing the laundry from
creasing.
Anti-Crease protection re-distributes
laundry in the drum.
When the Anti-Crease option is selected
and laundry has not been taken out, an
anti-crease cycle is activated for 12 hrs.
On completion of the programme, set the
2.
programme selector knob to position
“0”
.
CHANGING A PROGRAMME
When changing the programme during the
drying cycle, the dryer stops. The Start/Pause
indicator lamp is blinking.
To operate the new programme, press the
Start/Pause button.
INTERRUPTING A PROGRAMME
To interrupt the dryer during operation
1. Set the programme selector knob to
Airing.
2. Press the Start/Pause button.
Wait at least 5 minutes before opening
the door to allow the dryer to cool down.
For your safety the programme stops
automatically if you open the door .
T o restart, after door opening, close the
3.
door and press the Start/Pause button
again.
DAILY MAINTENANCE & CLEANING
Clean the lint filter at the end of every
drying cycle:
1. Open the door.
2. Pull the filter upwards.
3. Open the filter.
4. Remove lint using a soft brush or your
fingertips.
5. Close the filter.
6. Push the filter back into place
.
Empty the water container at the end of
every drying cycle.
1. Pull the handle to remove the water
container.
2. Empty the water container.
3.
Replace the water container when empty
by pushing it
completely
back in place
.
DRAINAGE SYSTEM
The 6 kg cotton programmes are made for
matching a 6 kg washed load of cotton spun
at more than 1000 rpm. With a 6 kg load spun
at lower speed than 1000 rpm, we
recommend to connect your dryer to an
external drainage hose for direct water
drainage to avoid water container emptying.
TROUBLESHOOTING GUIDE
If a fault occurs, before contacting our
After-Sales Service, make the following
checks to try and remedy the problem:
Drying takes too long / laundry is not dry
enough:
• Was the correct programme selected?
• Was the inserted laundry too wet?
• Is the lint filter dirty (filter indicator lamp
on)?
• Is the heat exchanger dirty (refer to the
Instructions for use)?
• Are the END and Anti-crease indicator
lamps lighting up? The drying cycle is
complete and the laundry can be taken
out.
• Is the ambient temperature too high?
The dryer does not operate:
(after a power failure and/or
interruption to the mains supply, always
press the Start/Pause button).
• Is the plug properly insert ed into the
mains electricity socket?
• Is there a power failure?
• Has the start-delay option been selected?
•Has the
Start/Pause
button been
pressed?
Lint filter or water container indicator
lamp on:
• Is the lint filter clean?
• Is the water container empty?
• Is the water container correctly
positioned?
• Is the heat exchanger clean?
Water droplets underneath the dryer:
• Is the heat exchanger correctly
positioned?
• Has any fluff on the heat exchanger seal
been wiped away?
• Has any fluff on the door seal been wiped
away?
• Has the water container been po sitioned
correctly?
All programme sequence indicators
blinking:
• Service call necessary.
Replacing the drum light bulb (if
supplied):
• If the inside lamp does not work, the bulb
may be faulty.
• Unplug the dryer.
• Open the door and unscrew the gl ass cover
insie the drum.
• Replace the faulty bulb with a new one and
screw the glass cover back on.
• Replacement bulb: Philips 15W,
230/240V, E14.
AFTER-SALES SERVICE
If, after carrying out the above checks the
malfunction persists or appears again, turn
the dryer off and call our After-Sales Service
(refer to guarantee).
Please specify:
• The nature of the fault.
• The dryer type and model.
• The service code (the number after the
word Service on the adhesive rating plate)
on the right-hand side when the door is
open.
• Your full address and phone num ber.
• Has the fuse blown?
• Is the door properly closed?
• Has the programme been selected?
5019 407 00427
 Loading...