

BAUKNECHT EMPK11 F645 Daily Reference Guide
DAILY REFERENCE
WWW
GUIDE
EN
THANK YOU FOR PURCHASING A
BAUKNECHT PRODUCT
To receive more comprehensive help and
support, please register your product at
www . bauknecht . eu/ register
Before using the appliance carefully read the Health and Safety guide.
PRODUCT DESCRIPTION
1
2
3
You can download the Safety Instructions
and the Use and Care Guide by visiting our
website docs . bauknecht . eu and following
the instructions on the back of this booklet.
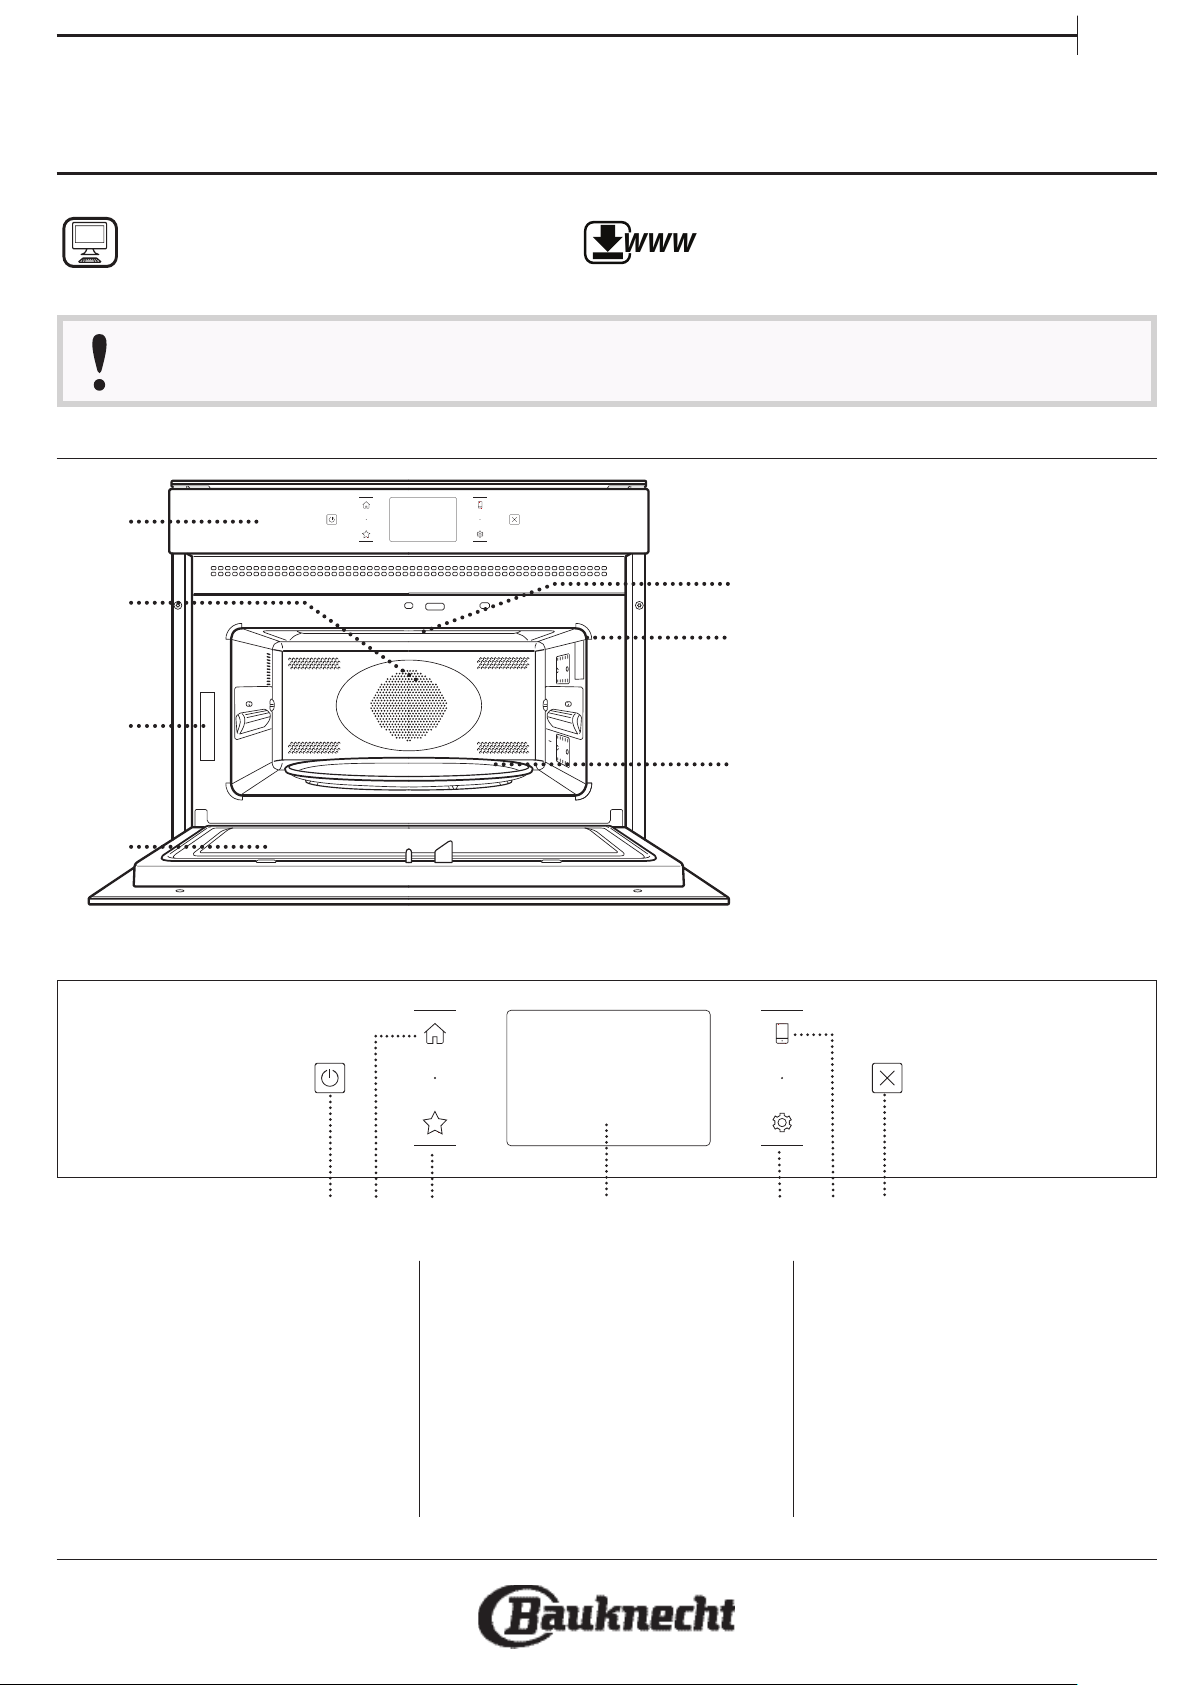
1. Control panel
2. Circular heating element
(non-visible)
5
6
7
3. Identification plate
(do not remove)
4. Door
5. Upper heating element/grill
6. Light
7. Turntable
4
CONTROL PANEL DESCRIPTION
1
2 3 4 65 7
1. ON / OFF
For switching the oven on and off.
2. HOME
For gaining quick access to the
main menu.
3. FAVORITE
For retrieving up the list of your
favorite functions.
4. DISPLAY
5. TOOLS
To choose from several options
and also change the oven settings
and preferences
6. REMOTE CONTROL
To enable use of the Bauknecht
Home Net app.
7. CANCEL
To stop any oven function except
the Clock, Kitchen Timer and
Control Lock.
1
ACCESSORIES
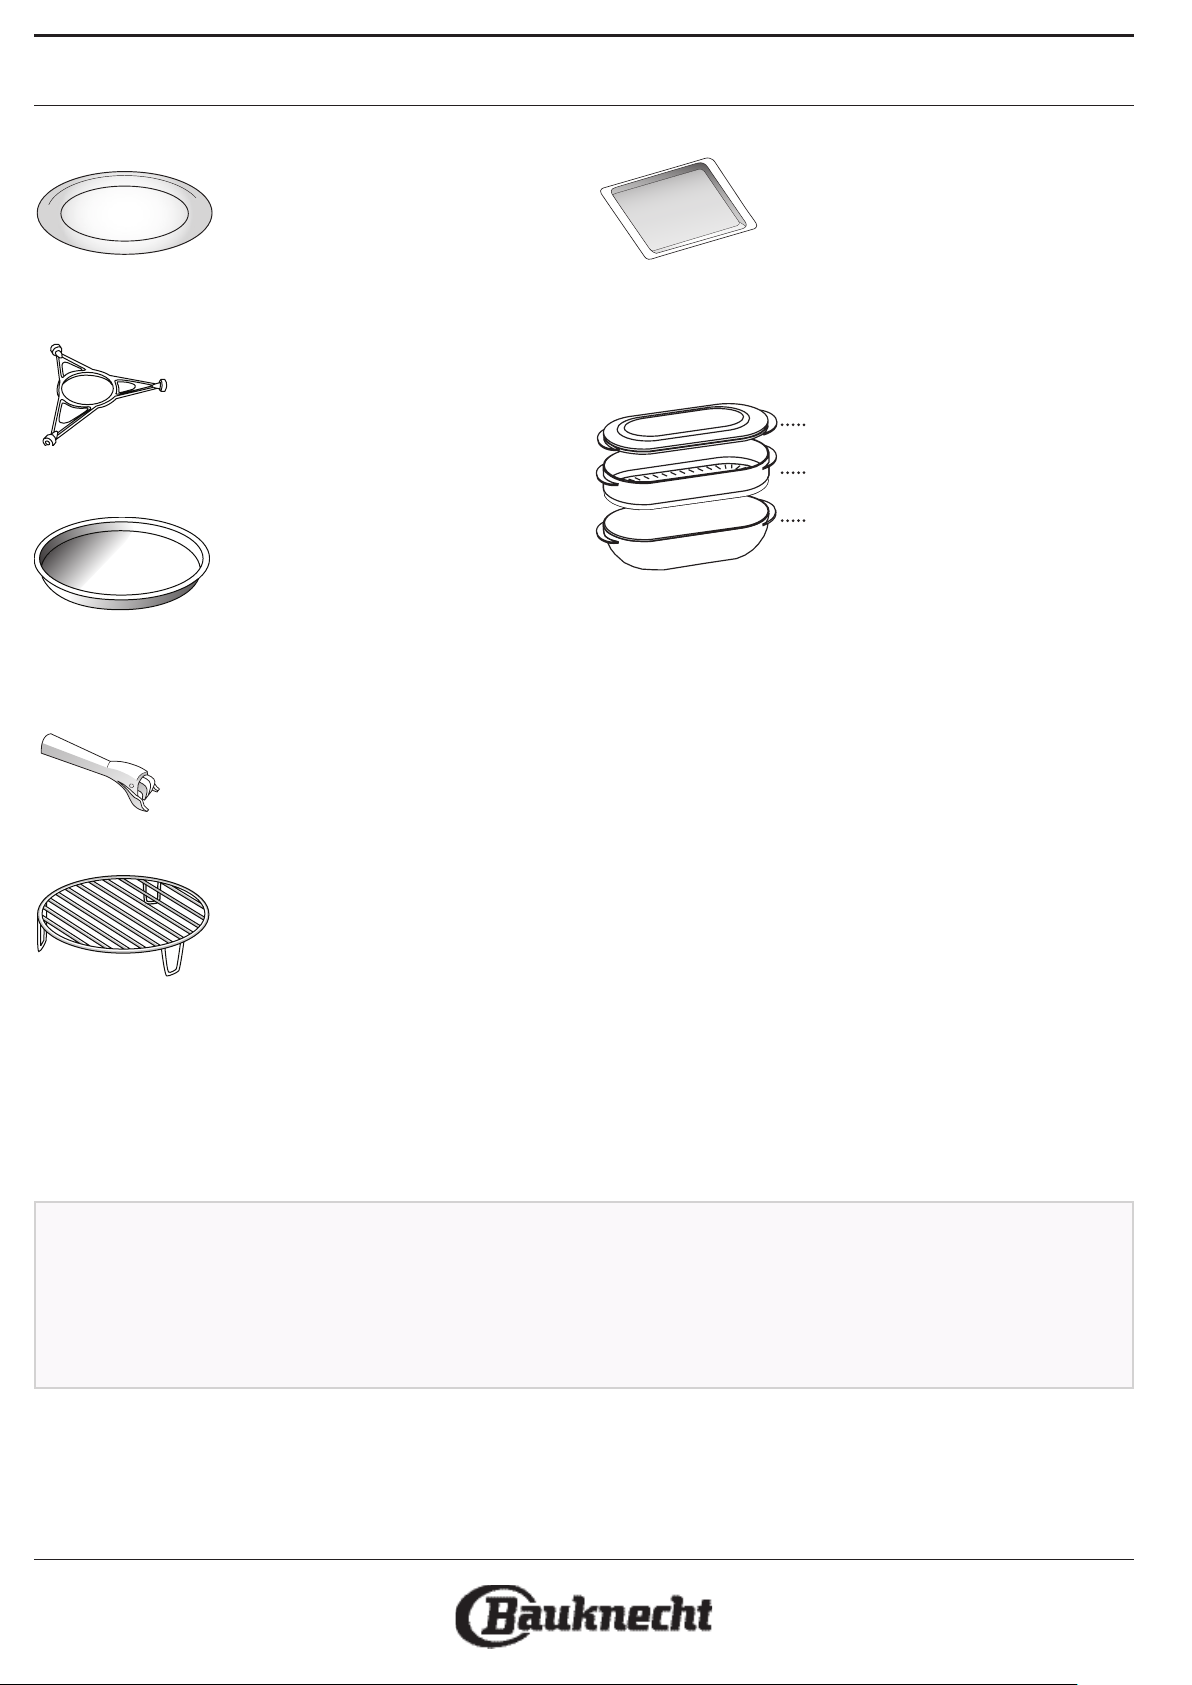
TURNTABLE
Placed on its support, the glass
turntable can be used with all
cooking methods.
The turntable must always be used
as a base for other containers or
accessories, with the exception of the Baking tray.
TURNTABLE SUPPORT
Only use the support for the glass
turntable.
Do not rest other accessories on the
support.
CRISP PL ATE
Only for use with the designated
functions.
The Crisp plate must always be
placed in the centre of the glass
turntable and can be pre-heated
when empty, using the special function for this purpose
only. Place the food directly on the Crisp plate.
HANDLE FOR CRISP PLATE
Useful for removing the hot Crisp
plate from the oven.
WIRE RACK
This allows you to place food closer
to the grill, for perfectly browning
your dish and allows an optimal air
circulation.
It must be used as base for the crisp
plate in some “Dynamic Crisp Fry” functions.
Place the wire rack on the turntable, making sure that it
does not come into contact with other surfaces.
RECTANGULAR BAKING TRAY
Only use the baking tray with
functions that allow for convection
cooking; it must never be used in
combination with microwaves.
Insert the plate horizontally, resting
it on the rack in the cooking compartment.
Please note: You do not need to remove the turntable and its
support when using the baking tray.
STEAMER
To steam foods such as fish or
1
vegetables, place these in the
basket (2) and pour drinking
2
water (100 ml) into the bottom
of the steamer (3) to achieve the
3
right amount of steam.
To boil foods such as potatoes,
pasta, rice or cereals, place
these directly on the bottom of the steamer (the basket
is not required) and add an appropriate amount of
drinking water for the amount you are cooking.
For best results, cover the steamer with the lid (1)
provided.
Always place the steamer on the glass turntable and
only use it with the appropriate cooking functions, or
with microwave function.
The steamer bottom has been designed also to be used
in combination with the special steam clean function.
The number and the type of accessories may vary depending
on which model is purchased.
There are a number of accessories available on the
market. Before you buy, ensure they are suitable for
microwave use and resistant to oven temperatures.
Metallic containers for food or drink should never be
used during microwave cooking.
2
Other accessories that are not supplied can be purchased
separately from the After-sales Service.
Always ensure that foods and accessories do not
come into contact with the inside walls of the oven.
Always ensure that the turntable is able to turn freely
before starting the oven. Take care not to unseat the
turntable whilst inserting or removing other
accessories.

COOKING FUNCTIONS
EN
MANUAL FUNCTIONS
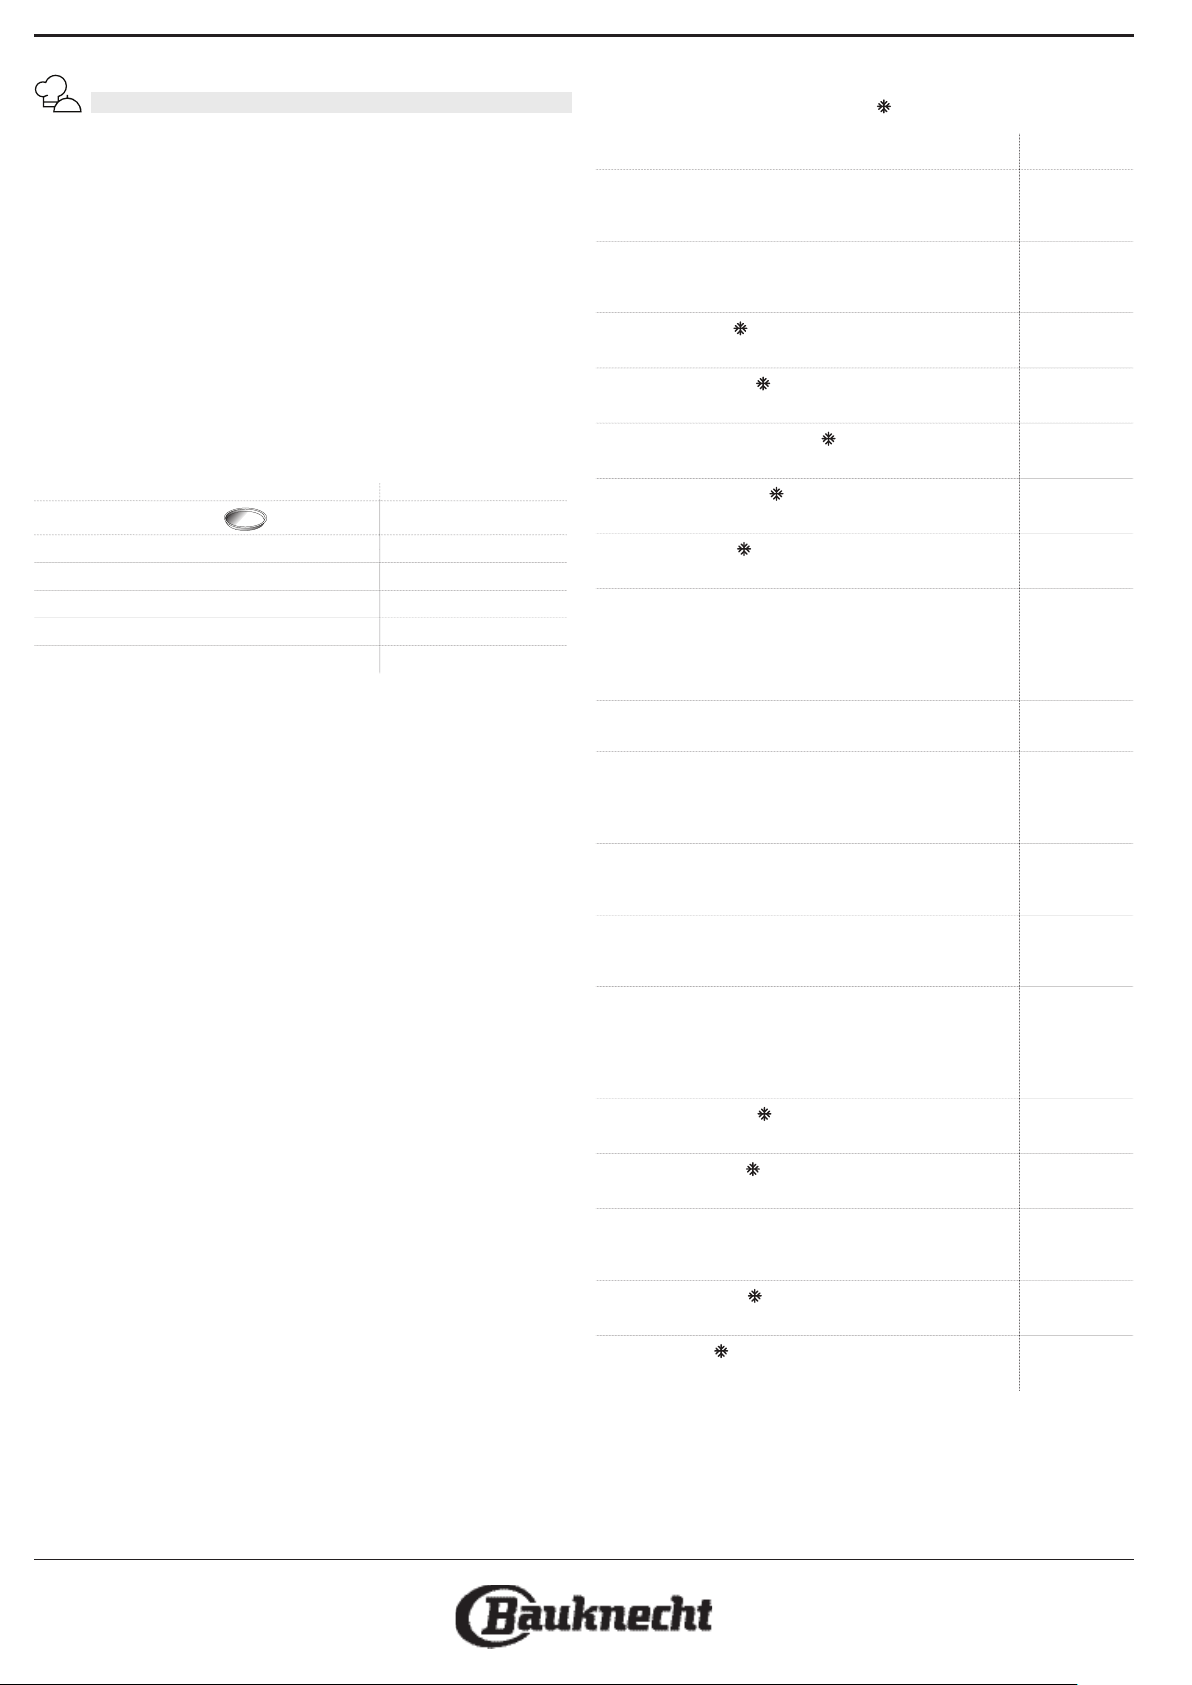
• MICROWAVE
For quickly cooking and reheating food or drinks.
Power (W) Recommended for
900
750 Cooking vegetables.
650 Cooking meat and sh.
500
350
160
90 Softening ice cream.
Action Food Power (W) Duration (min.)
Reheat 2 cups 900 1 - 2
Reheat Mashed potatoes 1 kg 900 10 - 12
Defrost Minced Meat 500 g 160 15 - 16
Cook Sponge cake 750 7 - 8
Cook Egg custard 500 16 - 17
Cook Meat loaf 750 20 - 22
Quickly reheating drinks or other foods with a high
water content.
Cooking meaty sauces, or sauces containing cheese or
egg. Finishing o meat pies or pasta bakes.
Slow, gently cooking. Perfect for melting butter or
chocolate.
Defrosting frozen foods or softening butter and
cheese.
• DYNAMIC CRISP
For perfectly browning a dish, both on the top and
bottom of the food. This function must only be used
with the special Crisp plate.
Food Duration (min.)
Leavened cake 7 - 10
Hamburger 8 - 10 *
* Turn food halfway through cooking.
Required accessories: Crisp plate, handle for the Crisp plate
• FORCED AIR
For cooking dishes in a way that achieves similar
results to using a conventional oven. The baking plate
or other cookware that is suitable for oven use can be
used to cook certain foods.
Please note: when 250°C is selected, after 30 minutes the
oven automatically regulates the temperature to 200°C in
order avoid overcooking/burning of the food and to save
energy.
Food Temp. (°C) Duration (min.)
Soufflé 175 30 - 35
Cheese Cupcake 170 * 25 - 30
Cookies 175 * 12 - 18
* Preheat needed
Recommended accessories: Rectangular baking plate / Wire
rack
• FORCED AIR + MW
To prepare oven dishes in a short time. It is suggested
to use the rack in order to optimize the air circulation.
Food Power (W) Temp. (°C) Duration (min.)
Roasts 350 170 35 - 40
Meat Pie 160 180 25 - 35
Recommended accessories: Wire rack
• GRILL
For browning, grilling and gratins. We recommend
turning the food during cooking.
Food Grill Level Duration (min.)
Toast High 6 - 7
Prawns Medium 18 - 22
Recommended accessories: Wire rack
• GRILL + MW
For quickly cooking and gratinating dishes, combining
the microwave and grill functions.
Food Power (W) Grill Level Duration (min.)
Potatoes gratin 650 Medium 20 - 22
Jacket Potatoes 650 High 10 - 12
Recommended accessories: Wire rack
• TURBO GRILL
For perfect results, combining the grill and oven air
convection. We recommend turning the food during
cooking.
Food Grill Level Duration (min.)
Chicken Kebab High 25 - 35
Recommended accessories: Wire rack
• TURBO GRILL + MW
For quickly cooking and browning your food,
combining the microwave, grill and the oven air
convection.
Food Power (W) Grill Level Duration (min.)
Cannelloni Frozen 650 High 20-25
Pork Chops 350 High 30-40
Recommended accessories: Wire rack
• FAST PREHEATING
For quickly preheating the oven before a cooking
cycle.
• SPECIAL FUNCTIONS
» KEEP WARM
For keeping just-cooked food hot and crisp,
including meat, fried foods or cakes.
» RISING
For optimal proving of sweet or savoury dough. To
maintain the quality of proving, do not activate the
function if the oven is still hot following a cooking
cycle.
3
MY MENU
These enable all types of food to be cooked fully
automatically. To use at best this function, follow the
indications on the relative cooking table.
• DYNAMIC DEFROST
For quickly defrosting various different types of food
simply by specifying their weight. Always place the food
directly on the glass turntable for best results.
CRISP BREAD DEFROST
This exclusive Bauknecht function allows you to defrost frozen
bread. Combining both Defrost and Crisp technologies, your
bread will taste and feel as if it were freshly baked. Use this
function to quickly defrost and heat frozen rolls, baguettes &
croissants. The Crisp Plate must be used in combination with
this function.
Food Weight
CRISP BREAD DEFROST
ME AT 100 - 2000 g
PO ULTRY 100 - 3000 g
FISH 100 - 2000 g
VEGETABLE 100 - 2000 g
BREAD 100 - 2000 g
50 - 800 g
• DYNAMIC REHEAT
For reheating ready-made food that is either frozen or at
room temperature. The oven automatically calculates
the settings required to achieve the best results in the
shortest amount of time. Place food on a microwavesafe and heatproof dinner plate or dish. Take out from
packaging being careful to remove any aluminium foil.
At the end of reheating process, leaving to stand for 1-2
minutes will always improve the result, especially for
frozen food.
Do not open the door during this function.
• DYNAMIC STEAM
For steam-cooking foods such as vegetables or fish,
using the steamer provided. The preparation phase
automatically generates steam, bringing the water
poured into the bottom of the steamer to the boil.
Timings for this phase may vary. The oven then
proceeds with steamcooking the food, according to the
time set.
Set 1- 4 minutes for soft vegetables such as broccoli and
leek or 4 - 8 minutes for harder vegetables such as
carrots and potatoes.
Do not open the door during this function.
Required accessories: Steamer
• DYNAMIC CRISP FRY
This healthy and exclusive function combines the
quality of crisp function with the properties of the warm
air circulation. It allows crunchy, tasty frying results to
be achieved, with a remarkable reduction of oil needed
compared to the traditional way of cooking, even
removing the need for oil in some recipes. It is possible
fry a variety of preset foods, either fresh or frozen.
Follow the following table to use the accessories as
indicated and obtain the best cooking results for each
type of food (fresh or frozen
Food
BREADED FILLET FRY
Coat lightly in oil before cooking. Distribute evenly on
the crisp plate. Set plate on rack
MEATBALLS
Coat lightly in oil before cooking. Distribute evenly on
the crisp plate. Set plate on rack
FISH AND CHIPS
Distribute evenly on the crisp plate
BREADED SHRIMPS
Distribute evenly on the crisp plate
BREADED CALAMARI RINGS
Distribute evenly on the crisp plate
BREADED FISH STICK
Distribute evenly on the crisp plate. Turn when prompted
POTATOES FRIED
Distribute evenly on the crisp plate
POTATOES FRIED
Peel and cut in stick. Soak in cold salted water for 30 min.
Dry with a towel and weight them. Brush with olive oil
(5%). Distribute on crisp plate. Set plate on rack. Turn
when prompt
POTATOES CROQUETTES
Distribute evenly on the crisp plate
EGGPLANT
Chop, salt and let rest for 30 min. Wash, dry and weigh.
Brush with olive oil (5%). Distribute evenly on crisp plate.
Set plate on rack. Turn when prompted
PEPPER
Slice, weight and brush with olive oil (5%). Distribute
evenly on crisp plate. Set plate on rack
ZUCCHINI
Slice, weigh and brush with olive oil (5%). Distribute
evenly on crisp plate. Set plate on rack
HASH BROWNS
Peel and grind. Soak in cold salted water for 30 min. Dry
with a towel and weight them. Brush with olive oil (5%).
Distribute on crisp plate. Set plate on rack. Add and turn
when prompted
CHICKEN NUGGETS
Distribute evenly on the crisp plate. Set plate on rack
BREADED CHEESE
Distribute evenly on the crisp plate. Set plate on rack
FELAFEL
Lightly grease the crisp plate. Add and turn food when
prompted
MIXED FRIED FISH
Distribute evenly on the crisp plate
ONION RINGS
Distribute evenly on the crisp plate. Set plate on rack
•
MY MENU COOK
).
Weight /
portions
100 - 500 g
200 - 800 g
1 - 3 pt
100 - 500 g
100 - 500 g
100 - 500 g
200 - 500 g
200 - 500 g
100 - 600 g
200 - 600 g
200 - 500 g
200 - 500 g
100 - 600 g
200 - 600 g
100 - 400 g
100 - 400 g
100 - 500 g
100 - 500 g
These functions automatically select the best
temperature and cooking method for all types
of food. To use at best this function, follow the
indications on the relative cooking table.
4
HOW TO USE THE TOUCH DISPLAY
EN
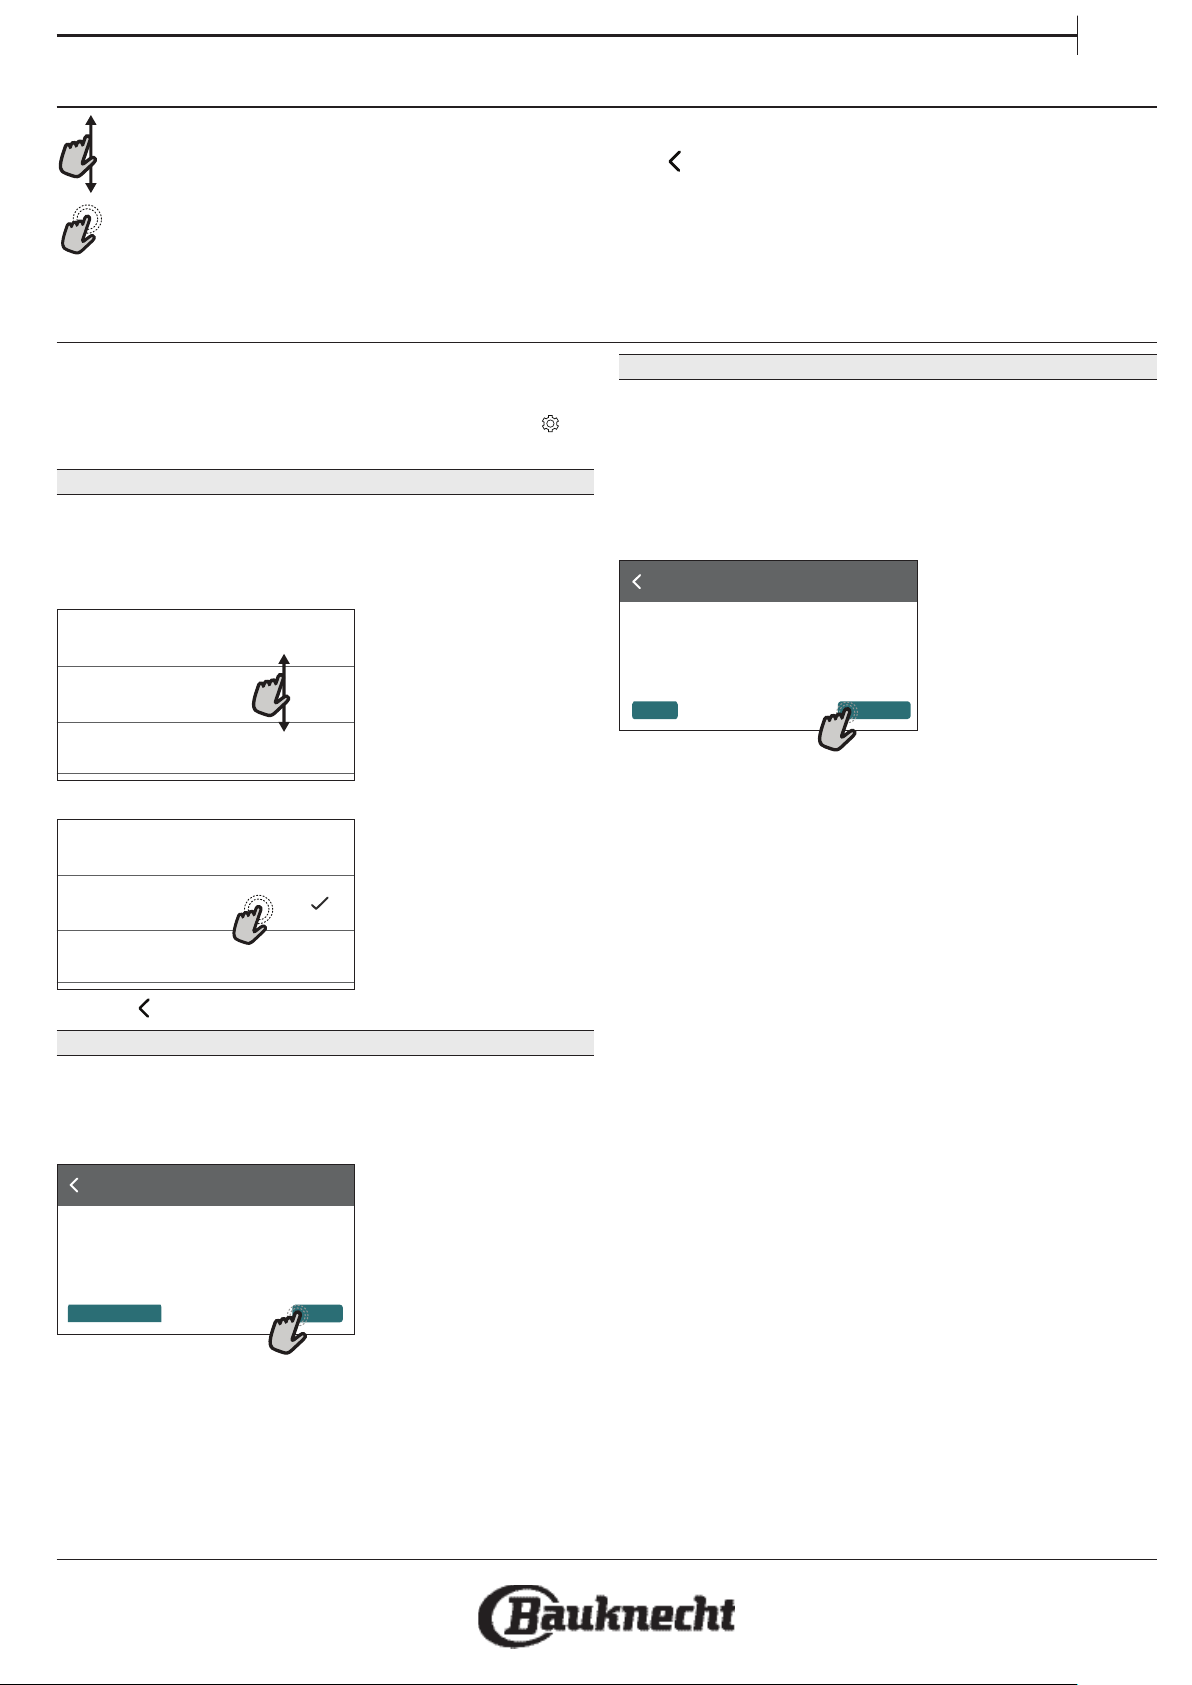
To scroll through a menu or a list:
Simply swipe your finger across the display to
scroll through the items or values.
To select or confirm:
Tap the screen to select the value or menu item
you require.
FIRST TIME USE
You will need to configure the product when you
switch on the appliance for the first time.
The settings can be changed subsequently by pressing to
access the “Tools” menu.
1. SELECT THE LANGUAGE
You will need to set the language and the time when
you switch on the appliance for the first time.
• Swipe across the screen to scroll through the list of
available languages.
Čeština, Český Jazyk
Czech
Dansk
Danish
Deutsch
German
•
Tap the language you require.
Ελλνικά
Greek, Modern
English
English
Español
Spanish
Tapping will take you back to the previous screen.
2. SELECT SETTINGS MODE
Once you have selected the language, the display
will prompt you to choose between “STORE DEMO”
(useful for retailers, for display purposes only) or
continue by tapping “NEXT”.
Thank you for your purchase!
Press Next to continue the setup for home
use.
NEXTSTORE DEMO
To go back to the previous screen:
Tap .
To confirm a setting or go to the next screen:
Tap “SET” or “NEXT”.
3. SETTING UP WIFI
The The Bauknecht Home Net feature allows you to
operate the oven remotely from a mobile device.
To enable the appliance to be controlled remotely,
you will need to complete the connection process
successfully first. This process is necessary to register
your appliance and connect it to your home network.
• Tap “SETUP NOW” to set up the connection.
Wi Setup
Setup WiFi now to automatically set the time,
date, and enable connectivity with your
smartphone.
If you skip, you can find the optional later in
your Tools menu.
SETUP NOWSKIP
Otherwise tap “SKIP” to connect your product later.
HOW TO SET UP THE CONNECTION
To use this feature you will need: A smartphone
or tablet and a wireless router connected to the
Internet.
Please use your smart device to check that your
home wireless network’s signal is strong close to the
appliance.
Minimum requirements.
Smart device: Android 4.3 (or higher) with a 1280x720 (or
higher) screen or iOS 8 (or higher).
Wireless router: 2.4Ghz WiFi b/g/n.
1. Download the Bauknecht Home Net app
The first step to connecting your appliance is to
download the app on your mobile device. The
Bauknecht Home Net app will guide you through
all the steps listed here. You can download the
Bauknecht Home Net app from the iTunes Store or
the Google Play Store.
2. Create an account
If you haven’t done so already, you’ll need to create
an account. This will enable you to network your
appliances and also view and control them remotely.
3. Register your appliance
Follow the instructions in the app to register your
appliance. You will need the Smart Appliance
IDentifier (SAID) number to complete the registration
process. You can find its unique code the number on
the identification plate attached to the product.
5

4. Connect to WiFi
Follow the scan-to-connect setup procedure. The app
will guide you through the process of connecting
your appliance to the wireless network in your home.
If your router supports WPS 2.0 (or higher), select
“MANUALLY”, then tap “WPS Setup”: Press the
WPS button on your wireless router to establish a
connection between the two products.
If necessary you can also connect the product
manually by using “Search for a network”.
The SAID code is used to synchronise a smart device with
your appliance.
MAC address is displayed for the WiFi module.
The connection procedure will only need to be
carried out again if you change your router settings
(e.g. network name or password or data provider).
. SETTING THE TIME AND DATE
Connecting the oven to your home network will set
the time and date automatically. Otherwise you will
need to set them manually.
• Tap the relevant numbers to set the time.
• Tap “SET” to confirm.
Once you have set the time, you will need to set the
date.
• Tap the relevant numbers to set the date.
• Tap “SET” to confirm.
4. HEAT THE OVEN
A new oven may release odours that have been left
behind during manufacturing: this is completely
normal.
Before starting to cook food, we therefore
recommend heating the oven with it empty in order
to remove any possible odours.
Remove any protective cardboard or transparent
film from the oven and remove any accessories from
inside it.
Heat the oven to 200 °C, ideally using the “Fast preheat”
function
It is advisable to air the room after using the appliance for the
rst time.
.
6
 Loading...