

Page 1

BeoCenter 2
Guide – Socket Unit
Page 2
For the US -market only!
NOTE: This equipment has been tested and found
to comply with the limits for a class B digital device,
pursuant to part 15 of the FCC Rules. These limits
are designed to provide reasonable protection
against harmful interference in a residential
installation.
This equipment generates, uses and can radiate ra
dio frequenc y energy and, if not installed and used
in accordance with the instructions, may cause
harmful interference to radio communications.
However, there is no guarantee that interference
will not occur in a particular installation. If this
equipment does cause harmful interference to radio or television reception, which can be determined
by turning the equipment off and on, the user is
encouraged to try to correct the interference by
one or more of the following measures:
– Reorient or relocate the receiving antenna.
– Increase the separation between the equipment
and receiver.
– Connect the equipment into an outlet on a
circuit different from that to which the receiver
is connected.
– Consult the dealer or an experienced radio/ TV
technician for help.
For the Canadian market only:
CAUTION: To prevent electric shock do not use the
polarized plug, attached to this apparatus, with an
extension cord, receptacle or other outlet unless
the blades can be fully inserted to prevent blade
exposure.
This class B digital apparatus meets all requirements of the Canadian Interference -Causing
Equipment Regulations.
WARNING: To reduce the risk of fire or
electric shock, do not expose this appliance
to rain or moisture. Do not expose this equipment to dripping or splashing and ensure
that no objects filled with liquids, such as
vases, are placed on the equipment.
To completely disconnect this equipment
from the AC Mains, disconnect the mains
plug from the wall socket. The disconnect
device shall remain readily operable.
The lightning flash with arrowhead symbol
within an equilateral triangle, is intended
to alert the user to the presence of un-
insulated “dangerous voltage” within the
product’s enclosure that may be of sufficient
magnitude to constitute a risk of electric
shock to persons.
The exclamation point within an equilateral
triangle is intended to alert the user to the
presence of important operating and maintenance (servicing) instructions in the
literature accompanying the product.
CAUTION
RISK OF EL ECTRI C SHOC K
DO N OT OPE N
CAUTION: To reduce the risk of
electric shock, do not remove
cover (or back).
No User-serviceable parts inside.
Refer servicing to qualified service
personnel.
Page 3

Contents
Placing your music system, 4
Find out how to place your BeoCenter 2 and the Socket unit.
Connect the cables,
6
Find out how to connect all cables to the Socket unit.
Mounting the wall bracket,
8
Find out how to mount the optional wall bracket for the Socket unit.
Audio/Video system, 10
Find out how set up your products to the correct option and operate different
Audio/ Video systems.
Looking after your music system, 12
Find out how to clean your system and your discs.
Index, 13
3
Page 4
Placing your music system
Make sure that the music system is
set up, placed and connected in
accordance with the instructions in
this guide.
We recommend that you follow this
procedure when you set up your
music system:
1 Connect the cable between the
Master unit and the Socket unit
2 Connect all cables to the sockets in
the Socket unit – remember not to
connect it to the mains yet
3 Lead the cables through the
opening at each end of the Socket
unit
4 Mount the cover for the sockets on
the Socket unit
5 Connect the products to the mains
If you wish to mount the Socket unit
on a wall bracket, refer to the
following pages.
– Place your music system on a firm sur face,
preferably on the table, sideboard or stand
where you want it placed permanently. Use
Bang & Olufsen approved stands and wall
brackets only!
– Do not place any items on top of
BeoCenter 2.
– The music system is designed for indoor use
in dry, domestic environments only, and for
use within a temperature range of
10– 40º C ( 50–105º F).
– Avoid placing the system in direct sunlight,
near radiators or other sources of heat.
– Do not connect any of the products in your
system to the mains, until you have
connec ted all the cables (refer to page 6).
– The music system can only be switched off
completely by disconnecting it from the
mains supply. Therefore, connect the music
system to an easily accessible wall socket.
– If the Socket unit is placed close to the floor,
it is best to connect all the necessary cables
to the Socket unit before you mount it on
the wall bracket. Also make sure that there
is room enough to detach the Socket unit
from the wall bracket again.
– Before mounting the wall bracket, ensure
that all cables have the proper length.
– The Socket unit can be placed vertically or
horisontally, for example on the floor – however, the need for ventilation must be
obser ved. If required, the Socket unit can
be fastened to the wall with the enclosed
wall bracket (refer to page 8).
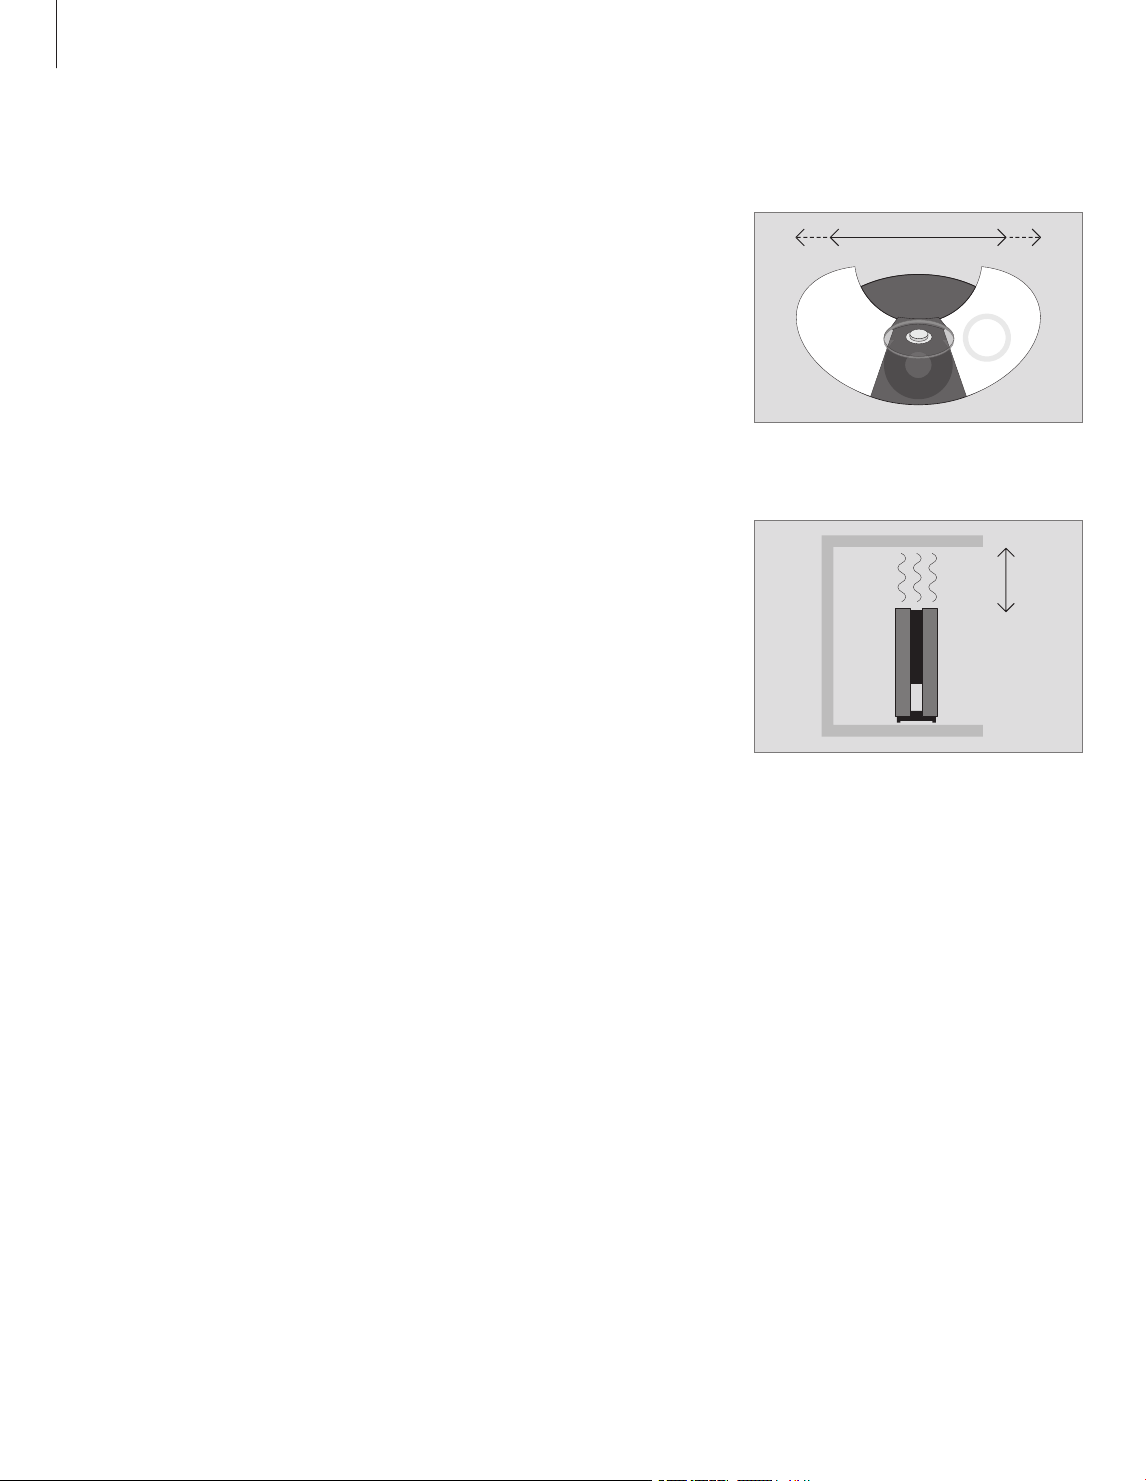
Remember to leave enough space at the sides for
the doors to open.
To ensure proper ventilation, allow for at least 5 cm
(2") of space at the sides of the Socket unit and
10 cm (4") above the unit. The Socket unit must
under no circumstances be covered by for example
insulation material.
Placing the Master unit and the Socket unit …
4
Page 5
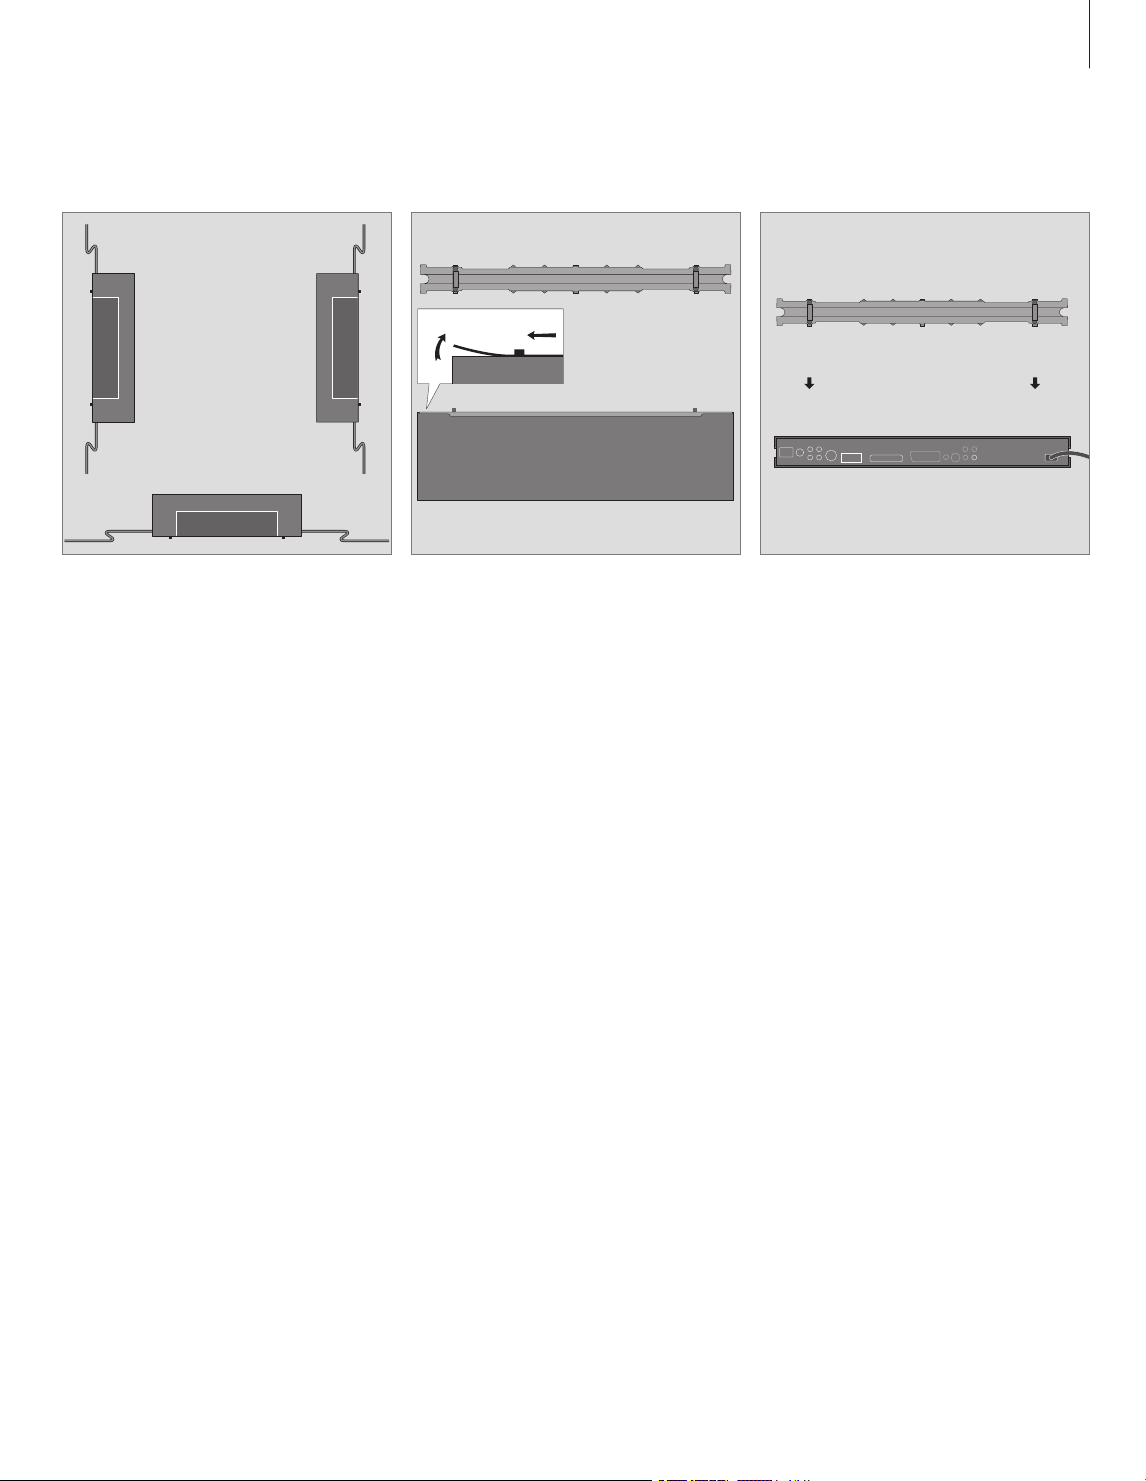
You can fasten the Socket unit either horisontally or
vertically. Note that the lock mechanism of the
wall bracket requires that the sockets face downward if you mount the Socket unit horisontally.
Cover for sockets: To gain access to the sockets,
it is necessary to remove the cover. Lift one end of
the cover, slide the cover to the side and lift it off.
The cables must be lead through the openings at
each end of the Socket unit.
Mains lead: For security reasons the cover must
be mounted. When the mains cord has been lead
through the opening at the end of the Socket unit
and the cover has been mounted, the mains cord
cannot be pulled out of the socket by accident.
1 2
5
Page 6
Connect the cables
Use the diagram and graphics
imprinted on the Socket unit when
locating the sockets. Note that the
greyed out sockets are only present if
your BeoCenter 2 is equipped with
DVD.
Do not connect your system to the
mains until you have finished
connecting all other cables.
To access the sockets in the Socket
unit, you must remove the cover –
refer to page 5 and the graphics
imprinted on the cover.
Master Unit connection
Connect the Master unit to the Socket unit with
the enclosed cable. Longer cables are available
from your Bang & Olufsen retailer.
Master Link connections
Use a Master Link cable to connect the sockets
marked Master Link on the Socket unit and the
television. The socket is also used for BeoLink
distribution of sound throughout the house.
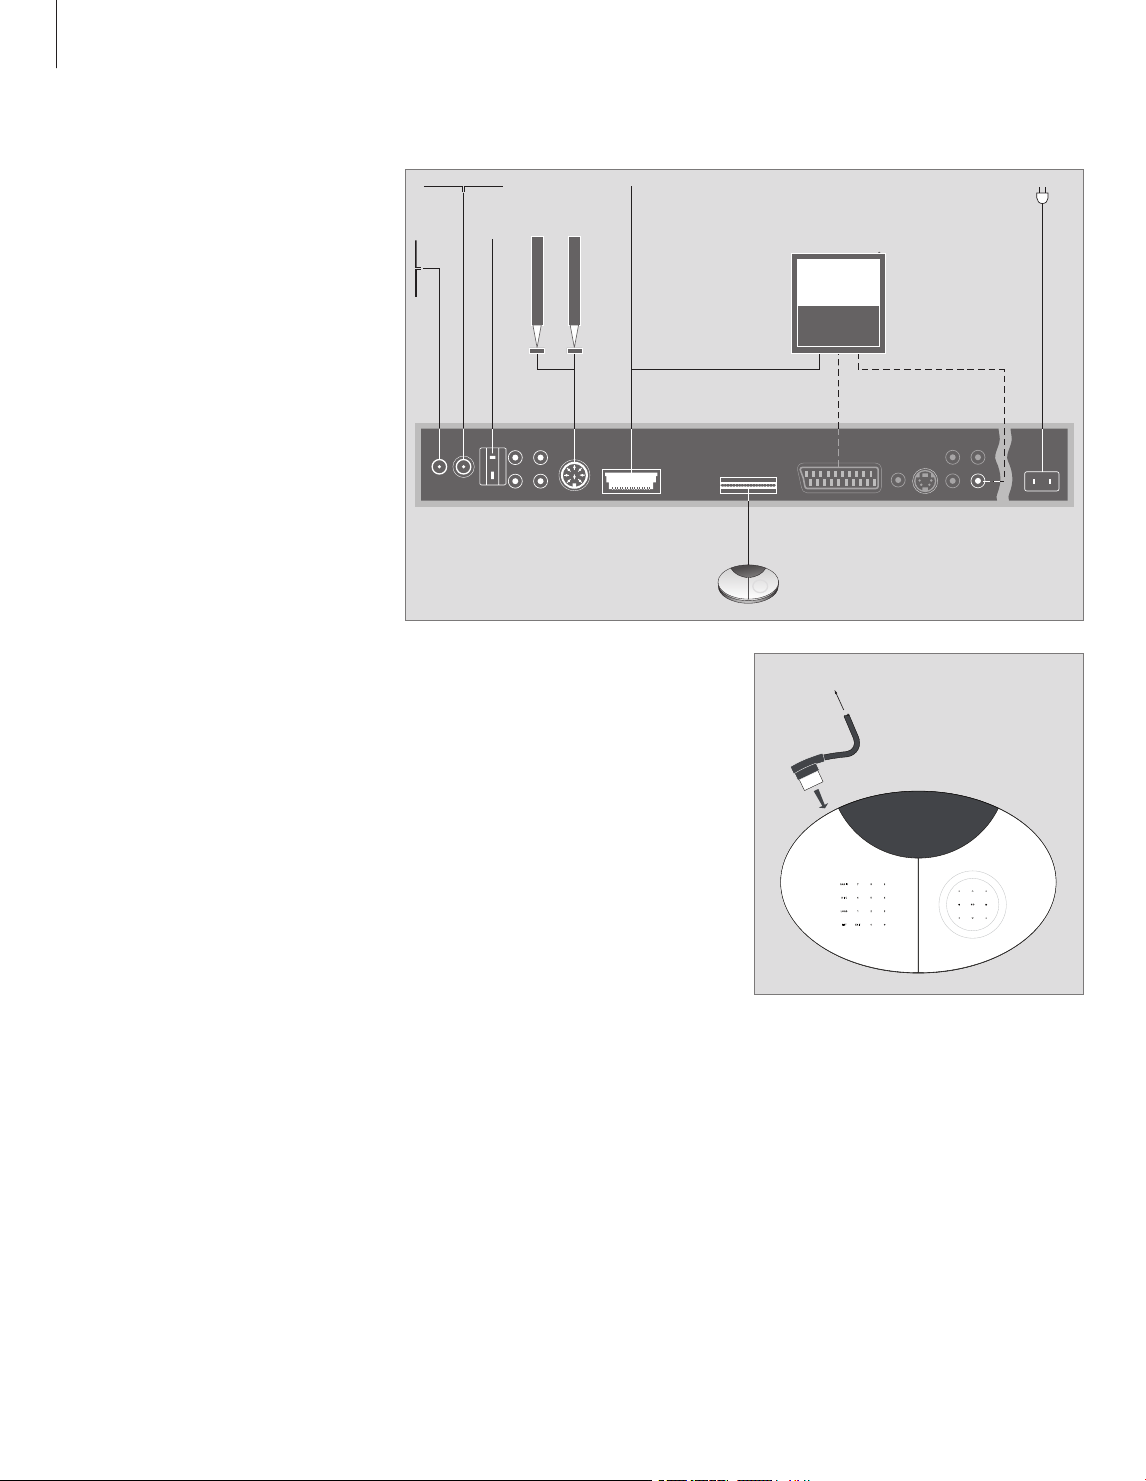
AUX
IN
R R
L L
AUX
OUT
LINE
OUT
R
L DIG. OUT
VIDEO
S-VIDE O
CTRL
AMFM
DAB ~POWER LINK MASTER LINK
MASTER UNIT
AV
Socket Unit
6
Master Link
connec tion to other
rooms …
Page 7

Aerial connections – AM/FM/DAB
We recommend that you connect your DAB aerial
before connecting your other aerials. DAB radio
programs are only available if your music system is
equipped with the built-in DAB module.
Connect your DAB aerial to the socket marked
DAB, your FM aerial to the socket marked FM, and
your AM aerial to the socket marked AM.
When using an AM loop aerial or FM dipol
aerial …
Tune in to the radio station you want, then turn
the aerial horisontally until you receive the best
possible signal.
When using a DAB aerial …
Use the DAB AERIAL ADJUSTMENT menu, described
on page 10 in the BeoCenter 2 Guide, to find out
where to place your aerial. The menu lets you
know how strong the DAB signal is.
Make sure that you hang or mount the aerial
vertically.
Do not mount your BeoCenter 2 or the Socket unit
permanently – for example, in a wall bracket – until
you have found out where the signal is strongest
and placed your system accordingly!
Loudspeaker connections – Power Link
Connect your active speakers to the socket
marked Power Link and loop the signal through
from speaker to speaker. Refer to the Guides for
the BeoLab Loudspeakers.
When headphones are plugged in, the speakers,
connected to your music system, are muted.
Prolonged listening at a high volume level may
cause hearing damages!
Audio/Video connections – AV
This connection is only available if your BeoCenter 2
is equipped with DVD.
Use a 21-pin AV cable to connect the sockets
marked AV on the Socket unit and the television.
For connection without a 21-pin AV cable, refer to
the next column.
DIG.OUT
If you connect your music system to a Bang &
Olufsen television with a built-in surround sound
module, you must connect the socket marked
DIG.OUT to the digital input socket on your television or speakers. If the required cable is not
enclosed, it is available from your Bang & Olufsen
retailer.
Mains connection
Plug the mains cord into the socket marked ~ on
the socket unit, but do not connect it to the mains
before you have finished all connections.
Audio/Video connection without a 21-pin AV cable …
If your television is not equipped with an 21pin AV socket, you can still connect it to the
music system. This applies only if your BeoCenter 2
is equipped with DVD!
> Connect the CTRL socket on the Socket unit to
the CTRL socket on your television.
> Connect the S-VIDEO socket on the Socket unit
to the S-VIDEO socket on your television.
> Connect the VIDEO socket on the Socket unit to
the VIDEO socket on your television.
> Connect the DIG.OUT socket on the socket unit
to the digital input on your television.
> Connect the LINE OUT R and L socket for right
and left channel audio output on the socket unit
to the R and L sockets on your television.
Connect auxiliary equipment …
AUX IN R – L
For connection of auxiliary equipment, such as a
record player.
AUX OUT R – L
For connection of auxiliary equipment, such as a
mini disc or a recorder.
7
Page 8

Mounting the wall bracket
The Socket Unit can be mounted on
the enclosed wall bracket in either a
horisontal or vertical position.
We recommend that you follow this
procedure when you mount the wall
bracket:
– Use the wall bracket to mark the
placement of the holes to be drilled in
the wall.
The dimensional sketch on this page
shows the placement of the Socket unit
compared to the wall bracket
– Mount the wall bracket on the wall
– Mount the Socket unit on the wall
bracket. If you place the unit close to
the floor, we suggest that you connect
all cables before mounting the Socket
unit on the bracket
See the special notice about light partition
walls on the next page.
Should questions arise concerning screws
or fasteners, please contact your Bang &
Olufsen retailer.
Mounting the wall bracket : Two screws/
fasteners with a minimum load rating of 6 kg
(13 lbs.) each must be used.
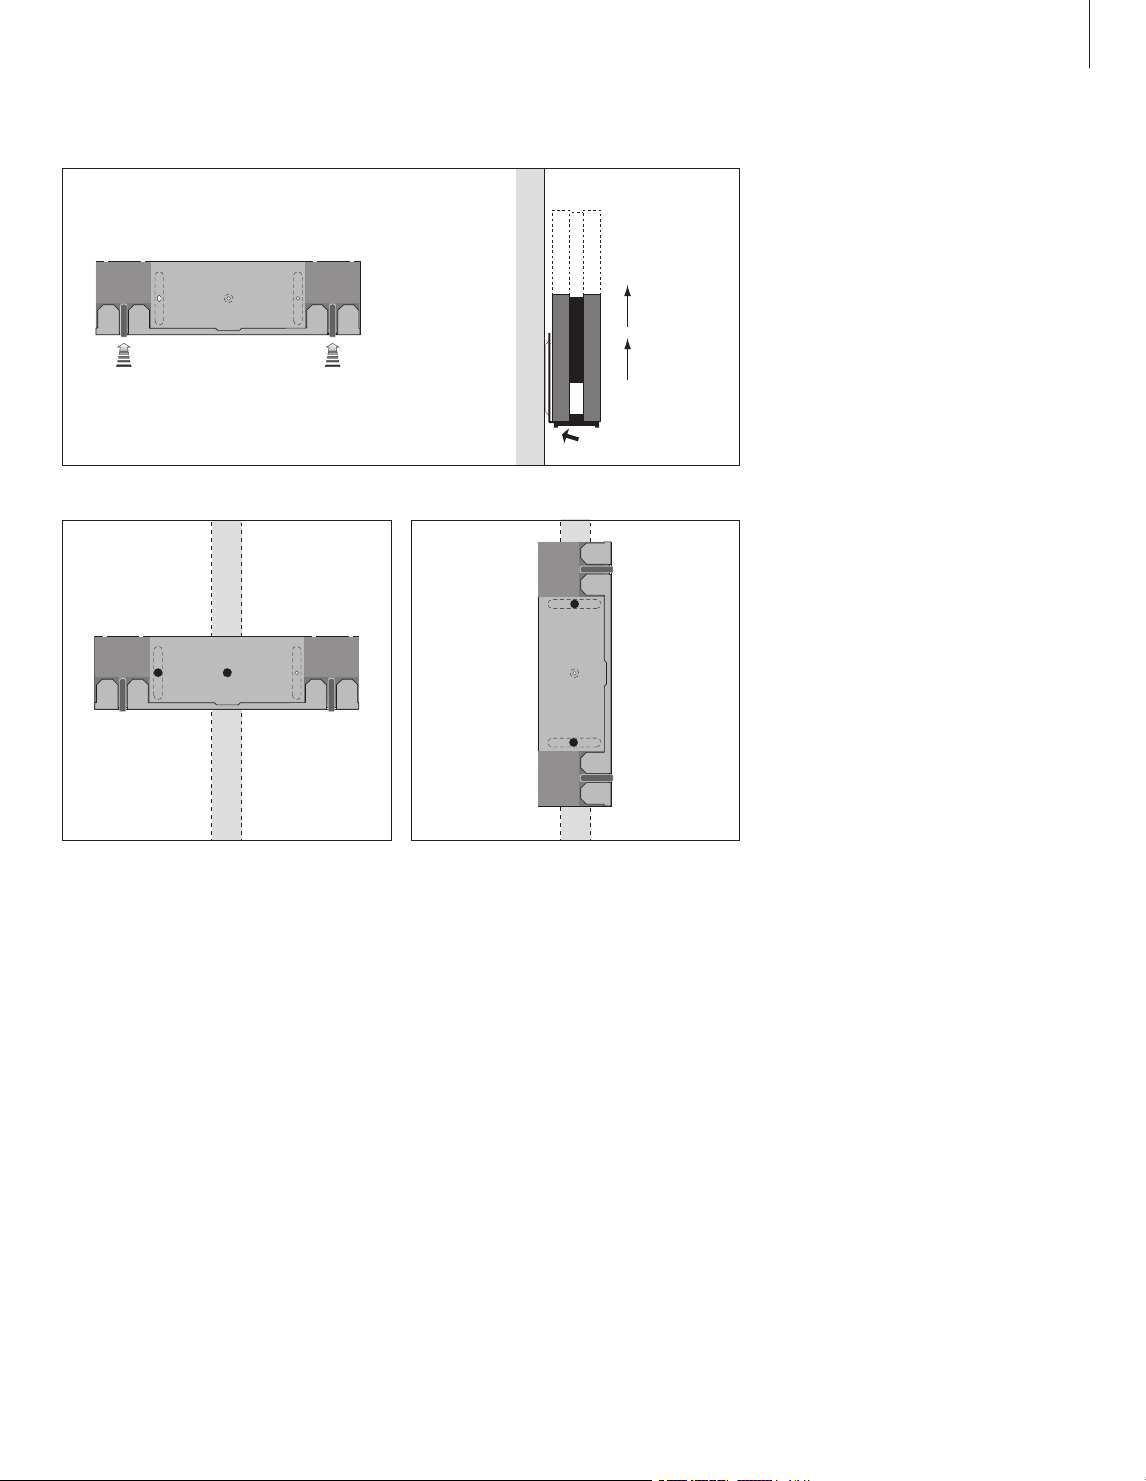
Fastening the Socket Unit to the Wall bracket :
Slide the Socket unit down into place on the wall
bracket. Make sure that the socket unit is pushed
all the way down to engage the two lock
mechanisms.
27 cm
10.6"
5.5 cm
2.2"
17.5 cm
6.9"
17.5 cm
6.9"
27 cm
10.6"
10 cm
3.9"
20 cm
8"
8
Page 9
Horizontal position : One screw must be a lag
screw (4 mm – countersunk/#8 – 5/32"), which
penetrates the gypsum, and is screwed a
minimum of 15 mm (5/8") into a vertical stud.
Furthermore, for stability, at least one screw of a
type intended for gypsum panels, must be used in
one of the other holes.
Vertical position : Use two lag screws (4 mm –
countersunk/#8 – 5/32"), which penetrate the
gypsum, and are screwed a minimum of 15 mm
(5/ 8") into a vertical stud.
Removing the Socket unit from the wall
bracket:
To ensure that the Socket unit is placed securely
on the wall bracket, the wall bracket has two lock
mechanisms (A) which must be released before
the unit can be removed.
Push the two clips in towards the wall and lift the
unit out of the bracket.
Special notice about light partition walls
If you intend to hang the BeoCenter 2 Socket unit
on a gypsum wall (also known as drywall or wallboard) , the wall bracket must be fastened to a
vertical stud.
A
A
1
2
9
Page 10

Audio/Video system
You can use your music system as a
stand-alone system or as an Audio/
Video system, if you connect the
systems with a Master Link cable.
If you connect your music system and
your video system, you must make
sure that they are set up to function
together. This means that you have
set it to the correct Option with Beo4
as described on this page.
When your music system is connected to
your video system with a Master Link
cable, you choose whether to use the
speakers connected to the music system, if
any, or the speakers connected to the
video system. Via the menu ‘DVD SOUND’
described on page 21 in the BeoCenter 2
Guide, you decide which speakers should
be used. Note: This function is only avail-
able if your BeoCenter 2 is equipped with
DVD.
To program Option for your audio system
with the Beo4 remote control …
> While holding down the • button, press LIST
.
> Let go of both buttons.
> Press LIST repeatedly until OPTION? is shown in
the Beo4 display and press GO.
> Press LIST repeatedly until A.OPT is shown in
the Beo4 display and then key in the
appropriate number (0, 1, 2, 5 or 6).
Choose V.OPT to program Option for your video
system.
The music system has five different Option
settings:
Option 0 : Used when your music system is
connected to your video system and no
speakers are connected directly to your music
system. If you wish to change the Option
setting to 0 from any other setting, change it
first to 1 before changing it to 0.
Option 1: Used when your music system is set up
on its own or connected to a video system, when
speakers are connected to your music system.
Option 2: Used when your music system is set up
in one room and connected to a video system
set up in another room.
Option 5 : Used when your music system is set up
in a link room which also comprises a Bang &
Olufsen television.
Option 6 : Used when your music system is set up
in a link room without a Bang & Olufsen television.
An Audio/Video system. When your music system
is connected to a video system and the speakers
are connected to the video system, the video
system takes over some of the functions
mentioned in the BeoCenter 2 Guide, for example
programming a Timer.
A stand-alone setup.
Option 2 Option 0
Option 1
10
Page 11

Audio and Video system in one room
If your BeoCenter 2 is set up with its own
speakers and connected to a television
(Option 1–1), you can listen to the radio while
watching a DVD. However, all close-up
operation is directed at the radio. DVD
operation with Beo4 is directed through the
television. Note: This function is only avail-
able if your BeoCenter 2 is equipped with
DVD!
To listen to sound from your video system on
your music system speakers without switching
on the television screen …
> Press LIST repeatedly until AV is shown in the
Beo4 display.
> Then press a video source button such as TV
.
If you press a source button before or after AV
has been shown in the Beo4 display, the television
screen will be switched on.
To listen to sound from your music system on
the television speakers …
> Press LIST repeatedly until AV is shown in the
Beo4 display.
> Then press a source button such as RADIO
.
Audio and Video system in two rooms
If your speakers are connected to your music
system, your audio and video systems do not
have to be placed in the same room
(Option 2–2).
However, if your BeoCenter 2 is equipped
with DVD and you activate DVD playback in
the room where the BeoCenter 2 is placed,
the television does not start up. An Audio and Video system set up in one room.
An Audio/Video system set up in two rooms.
Option 1 Option 1
Option 2 Option 2
11
Page 12

Looking after your music system
Normal maintenance, such as
cleaning the music system, is the
responsibility of the user. To achieve
the best result, please follow these
instructions.
Handle discs with care. If the disc is
always held by its edges and placed
in its original cassette when out of
the player, no cleaning will be
required.
Wipe dust off the surface of the system using
a dry, sof t cloth. If necessar y, remove grease
stains or more persistent dirt with a firmly
wrung, soft cloth which you have dipped in a
solution of water containing a few drops of
mild detergent.
Do not attempt to clean the optics of the
system or open any part of the music system
yourself. Leave such operations to qualified
service personnel.
Never use alcohol or other solvents to clean
any part of the system!
Note: Should the disc become soiled by fingerprints, dust or dirt, it can be wiped clean with a
lint-free, soft, dry cloth. No solvents or abrasive
cleaners should ever be used on the discs. Avoid
extreme heat and humidity, and never write on
your discs.
Cleaning your music system
12
Handling your discs : When cleaning your discs,
wipe in a straight line from the centre to the edge.
Page 13

Index
Audio/Video system
Connect your music system to a video
system,
6
Option programming, 10
Use an Audio/ Video system, 11
Beo4 remote control
Use the Beo4 remote control, BeoCenter 2
Guide p. 22
Cables
Connect the cables, 6
Mount the cable cover,
5
CD player
Delete CD names, BeoCenter 2 Guide p. 12
Load a disc, BeoCenter 2 Guide p. 5
Name CDs, BeoCenter 2 Guide p. 12
Play a CD, BeoCenter 2 Guide p. 4
Play favourite tracks only, BeoCenter 2 Guide
p. 12
Play tracks in random order, BeoCenter 2 Guide
p. 12
Repeat a CD for up to 12 hours, BeoCenter 2
Guide p. 12
Cleaning
Looking after your music system, 12
Handling your CDs, 12
Clock
Enter settings for the built-in clock,
BeoCenter 2 Guide p. 15
Connections
Aerial socket, 6
Connect headphones, BeoCenter 2 Guide p. 5
Connect speakers,
6
Connect your music system to a video
system,
6
Socket unit,
6
Contact
Contact Bang & Olufsen, BeoCenter 2
Guide p. 25
DAB radio programs
Adjust DAB audio signal compression – DAB
DRC, BeoCenter 2 Guide p. 10
Adjust your DAB aerial, BeoCenter 2 Guide p. 11
DAB aerial socket,
6
Tune in DAB radio programs, BeoCenter 2
Guide pp. 10–11
Delete
Delete CD names, BeoCenter 2 Guide p. 12
Delete radio programs, BeoCenter 2 Guide
p. 10
Delete series of tracks, BeoCenter 2 Guide p. 12
Displays
Understand and change the displayed
information, BeoCenter 2 Guide p. 5 and 15
DVD
DVD – audio language, BeoCenter 2 Guide
p. 19
DVD on-screen menus, BeoCenter 2 Guide p. 19
DVD operation, BeoCenter 2 Guide p. 18
DVD OPTIONS menu, BeoCenter 2 Guide p. 20
DVD – Parental Lock, Beocenter 2 Guide
p. 19–20
DVD – subtitle language, BeoCenter 2 Guide
p. 19
Play a DVD, BeoCenter 2 Guide p. 18
First-time setup
The first-time setup procedure, BeoCenter 2
Guide p. 8
Headphones
Connect headphones, BeoCenter 2 Guide p. 5
Indicator light
The indicator light, BeoCenter 2 Guide p. 5
Language
Change DVD languages, BeoCenter 2 Guide p. 19
Change the language in the display, BeoCenter 2
Guide p. 15
Loudspeakers
Connect loudspeakers, 6
13
Page 14

Maintenance
Looking after your music system, 12
Master Link
Audio /Video setup, 10
Option programming, 10
Use an Audio/ Video system, 11
Menus
How to read menu symbols, BeoCenter 2 Guide
p. 6
How to use the menus, BeoCenter 2 Guide p. 7
Naming
Delete CD names, BeoCenter 2 Guide p. 12
Name a CD, BeoCenter 2 Guide p. 12
Name a radio program, BeoCenter 2 Guide p. 10
N.Music
Play N. MUSIC, BeoCenter 2 Guide p. 9
N.Radio
Play N.R ADIO, BeoCenter 2 Guide p. 9
Operation panel
Overview of the operation panel, BeoCenter 2
Guide p.
4
Option
Program your music system to the correct
Option, 10
Pincode
Activate the pincode system, BeoCenter 2
Guide p. 16
Change or delete your pincode, BeoCenter 2
Guide p. 16
Did you forget your pincode?, BeoCenter 2
Guide p. 16
Open for Mastercode, BeoCenter 2 Guide p. 16
Use your pincode, BeoCenter 2 Guide p. 16
Placement
Placing your music system, 4
Radio
Delete radio programs, BeoCenter 2 Guide
p. 10
Move radio programs, BeoCenter 2 Guide p. 10
Name radio programs, BeoCenter 2 Guide p. 10
Switch on the radio, BeoCenter 2 Guide p. 4
Tune in radio programs, BeoCenter 2 Guide
p. 10
Random
Play tracks in random order, BeoCenter 2 Guide
p. 12
Repeat
Repeat a CD, BeoCenter 2 Guide p. 12
Settings
Set the clock, BeoCenter 2 Guide p. 15
Setting your preferences for DVD playback,
BeoCenter 2 Guide p. 19–20
Sound adjustments, BeoCenter 2 Guide p. 14
Socket panel
Overview of sockets, 6
Sound
Adjust or mute the sound volume, BeoCenter 2
Guide p. 4
Change sound from stereo to mono,
BeoCenter 2 Guide p. 10
Change volume, bass, treble or loudness,
BeoCenter 2 Guide p. 14
Timer
Enter settings for the built-in clock,
BeoCenter 2 Guide p. 15
Make your music system start or stop
automatically, BeoCenter 2 Guide p. 13
Switch on the Timer play function,
BeoCenter 2 Guide p. 13
To view, edit or delete a Timer, BeoCenter 2
Guide p. 13
Tracks
Play favourite tracks only, BeoCenter 2 Guide
p. 12
Play tracks in random order, BeoCenter 2 Guide
p. 12
Wall bracket
Mount the optional wall bracket, 8
>> Index
14
Page 15

Technical specifications, features and the use
thereof are subject to change without notice!
This product fulfils the conditions stated in the
Directives 89/336/EEC and 73/23/ EEC.
3505814 0702
Page 16

www.bang-olufsen.com
 Loading...