


B E O S O U N D 4 0 0 0 |
1 |
|
|
P R I N C I P L E S O F O P E R A T I O N |
|
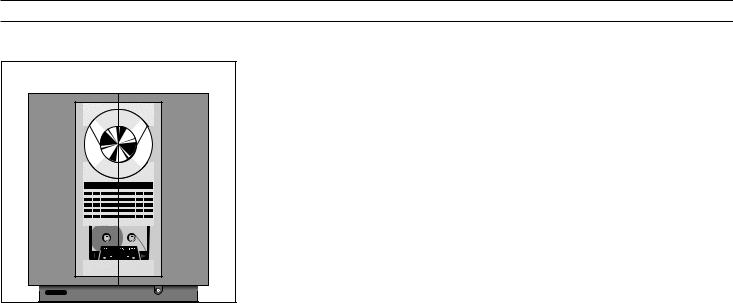
The BeoSound 4000 is a fully integrated music system with radio, compact disc player and tape recorder all in one unit.
The system can be placed anywhere you want music – on a wall in the specially designed wall bracket, on the specially designed stand, or on a table or sideboard.
No matter how, whenever you reach out to operate the BeoSound 4000, the glass doors slide open as if by magic, inviting you in to the music...
User’s guide

2
This User’s guide describes the operation of the BeoSound 4000 music system. Each function described in this guide is accompanied by a set of buttons which will guide you through the operation step-by-step.
The BeoSound 4000 may be used with various types of active Bang & Olufsen loudspeakers, or it may be used as a music centre in a Bang & Olufsen AV system. This guide applies to both situations.
Note: Complete setting-up and maintenance instructions are found in the Setting-up guide, which is also enclosed with the BeoSound 4000.
Be sure to keep the Setting-up guide. You will need it for cleaning and maintenance instructions, and when you move or rearrange your BeoSound 4000 setup in the future.
C O N T E N T S |
3 |
|
4 Open to possibilities
6 Principles of operation
9 Using the radio
15 Using the CD player
21 Using the tape recorder
27 Timer programming
33 Nice to know
38 Remote control
Using BeoSound 4000 in a link room with Beo4
Note: Detailed contents are found at the start of each major section.
4 |
O P E N T O P O S S I B I L I T I E S |
|
Your BeoSound 4000 music system is versatile, mobile... and responsive!
You can move the whole system around at will and place it wherever you like – on the wall in a specially designed bracket, on a table, or on the specially designed stand.
But no matter where you place your BeoSound 4000, it will always respond to a wave of your hand.
As soon as you reach out to touch the operation panel, the glass doors open automatically, revealing the music system concealed behind the screen.

5
6 |
P R I N C I P L E S O F O P E R A T I O N |
|
|
|
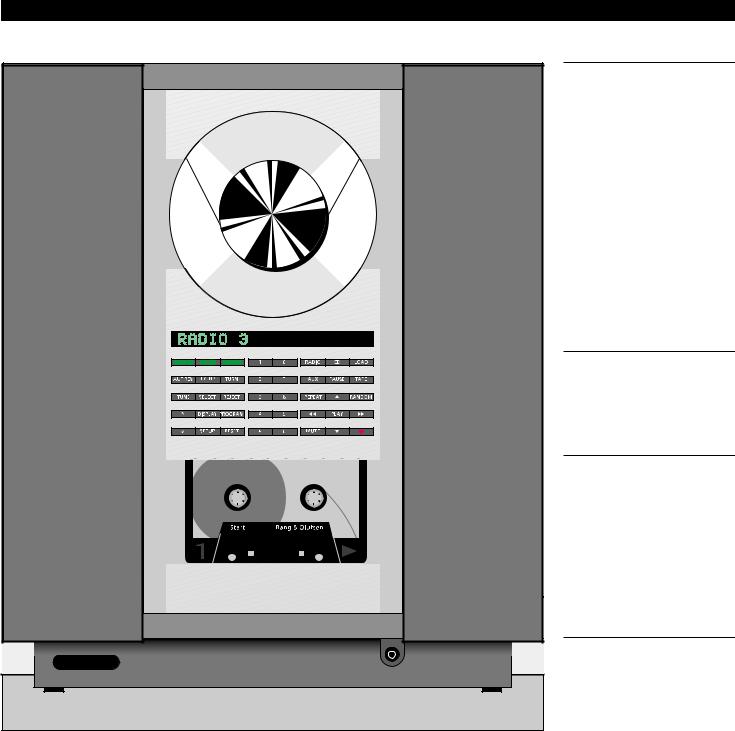
The top section holds the tray for |
|
compact discs. The disc is kept in |
|
place by a clamp, which can be |
|
raised or lowered by pressing the |
|
LOAD button (top right-hand |
|
button). Discs must always be loaded |
|
with the text side facing you! |
|
The BeoSound 4000 radio only |
|
becomes visible when it is being used. |
|
The display then lights up with radio |
|
program information. |
|
The middle-section contains the |
|
display and the buttons for |
|
operating the system. |
|
The bottom section is for tape |
|
cassettes. Cassettes must be loaded |
|
with the tape slot pointing |
|
downwards! |
|
Socket for headphones. |

7
The open doors give you access to the operating panel and the display...
Number buttons
The number buttons enable you to key in radio program numbers, and to select specific tracks on a CD or a tape.
Status display
The display keeps you informed about what the system is doing and about any on-going operation.
Volume buttons |
|
|
|
|
|
|
|
|
|
|
|
|
|
|
|
and allow you to raise and |
|
|
|
|
|
|
|
|
|
|
|
|
|
|
|
|
|
|
|
|
|
|
|
|
|
|
|
|
|
|
|
lower the volume level. |
|
|
|
|
|
|
|
|
|
|
|
|
|
|
|
|
|
|
Secondary functions |
Primary functions |
|||||||||||
|
|
|
|
||||||||||||
|
|
|
|
The buttons in the left-hand |
The buttons in the right-hand section give access to |
||||||||||
|
|
|
|
section give access to all the |
the primary functions in the system: |
||||||||||
|
|
|
|
secondary functions in the |
|
|
|
|
|
||||||
|
|
|
|
system: Tuning in to radio |
RADIO, CD, or TAPE: Plays the radio, the CD or the |
||||||||||
|
|
|
|
stations and naming them, |
tape. |
||||||||||
|
|
|
|
controlling the tape, |
AUX: Switches on extra Bang & Olufsen equipment. |
||||||||||
|
|
|
|
programming a sequence of |
MUTE: Mutes or demutes the loudspeakers. |
||||||||||
|
|
|
|
tracks on the CD player, |
•: Switches the Ouverture to stand-by. |
||||||||||
For detailed operating instructions, |
|
|
|
adjusting sound, programming |
The step (▲ ▼) and wind (ss tt) buttons let you |
||||||||||
please refer to the relevant |
|
|
|
the Timer function, etc... |
|||||||||||
sections in this guide. |
|
|
|
The three buttons with green |
step or wind through radio programs and tracks. |
||||||||||
|
|
|
|
|
|
|
|
|
|||||||
|
|
|
|
text are used for recording only. |
REPEAT and RANDOM operate the special repeated |
||||||||||
|
|
|
|
|
|
|
|
|
|
|
and random playing functions in the CD player. |
||||
|
|
|
|
|
|
|
|
|
|
|
|
|
|
|
|

8 |
N O T E S |
|
U S I N G T H E R A D I O |
9 |
|
10Switching displays
11Playing your radio programs
12Presetting radio stations
13Radio program list Clearing presets
14Fine tuning a radio station Mono/stereo reception
Note: Proper FM and AM aerial connections must be made to the BeoSound 4000 in order for the radio to pick up the stations available in your area. Please refer to the Setting-up guide for details about aerial connections.

10 |
U S I N G T H E R A D I O |
|
RADIO
then
DISPLAY
Turn on the radio
Press repeatedly to change the radio display indication
Switching displays
The display can give you three different types of information about the radio program you are listening to:
•Program name* •Program number •Radio frequency
To switch from one display to the other, you must press the DISPLAY button repeatedly while the radio is playing.
Your chosen display indication for the radio will be maintained until you select another via the DISPLAY button.
Program name indication*
Program number indication
Radio frequency indication
*Nice to know about RDS...
The program name function requires that your radio is equipped with the RDS facility.
RDS is not a standard feature in all BeoSound 4000 radios. Please contact your Bang & Olufsen dealer for further information.
The RDS facility enables you to give a short name of your own choice to your radio programs. If you haven’t named a program yourself, the station’s own name may appear instead, provided such a name is being transmitted by the station.
In this way, the RDS facility enables you to remember a station not only by its program number, but also by a particular name.
B E O C E N T E R 9 3 0 0 |
11 |
|
Playing your radio programs
To turn on the radio simply press the RADIO button. The program you were last listening to starts playing, and you will see the indication RADIO followed by a program number in the display.
If you have given a name to the radio program, or if the radio station you are listening to transmits a name of its own, the display may read out that name instead*.
To switch to another program you can either use the step buttons ▲ or ▼, or you can key in the exact program number you want, using the number buttons.
* Note: The program name function requires that the radio is equipped with the RDS facility described on page 10.
If you select another source, the radio switches off automatically. To switch off the entire system, press the standby button •.
Note: Selecting radio programs as described here requires that you have tuned in to all your favourite radio stations and preset them on program numbers of their own. See how on the next few pages.
Turns on the radio |
RADIO |
|
|
Press to step through your radio |
|
programs |
or |
Alternatively, key in the exact |
|
0 |
|
program number you want (1-30) |
through |
|
|
|
9 |
|
|
Press to raise the volume |
|
Press to lower the volume |
|
Silences the speakers immediately |
|
MUTE |
|
Press again to recall the sound |
|
|
|
Switches the system to stand-by |
|
• |
12 > Using the radio
RADIO |
Turn on the radio |
then |
|
|
Press to access to the tuning |
TUNE |
|
|
function |
|
Switches from FM to AM, or vice |
|
versa |
then |
|
|
Press to accept FM or AM |
PLAY |
|
|
Press to search for a radio station |
or |
– up or down the frequency band |
then |
|
|
Press to accept the station you have |
PLAY |
|
|
found |
|
Press to change the displayed |
or |
program number (1-30), if you like |
then |
Press to store the radio station on |
|
|
PLAY |
|
|
the displayed program number |
|
If you want to name* the program: |
|
Press to reveal the characters one |
or |
by one |
|
Moves to the next character position |
tt |
|
or |
forwards or backwards |
|
|
ss |
Keep writing the name you want, |
|
|
|
using this method... |
|
Finally, press to store your new radio |
PLAY |
|
|
program |
Presetting radio stations
To be able to use the radio as described on the previous page, you must first tune in to your favourite radio stations and store them on program numbers of their own.
You can store up to 30 radio stations and, if your radio is equipped with the RDS facility, you will even be able to give a short name of your own choice to each program.
The TUNE button gives access to presetting radio stations. When you have pressed TUNE, presetting a radio station is like having a conversation with the BeoSound 4000 display:
The display prompts you to do something; then press ▲ or ▼ to reveal other options. Pressing the PLAY button accepts any information that is currently shown in the display.
All in all, the tuning procedure takes
you through five stages...
1.First you must select the band in which you want to tune – FM or AM.
2.Then you can make the radio search for a station by pressing ▲ or ▼. Searching stops at the first station producing an acceptable signal. If this is not the station you want, just press ▲ or ▼ again to continue searching.
3.When you have found a station, you must store it on a program number of its own. The display automatically offers you a vacant program number, but you may select another if you like. If the number in the display is blinking, it is to indicate that the station you have found has already been stored once – and on that program number.
4.Then, if you like, you can give a short name of your own choice (8 characters) to your new radio program*; or you can skip the naming function by pressing PLAY – in that case, you will see the name transmitted by the radio station (if any) instead when you play the radio program*.
5.Finally, you must store your new radio program along with all the information you have keyed in with it.
* Note: This function is only available if your radio is equipped with the RDS facility. Please refer to page 10 for further information.
Note: If a station needs fine tuning, or if you wish to switch sound (mono/stereo) on a radio program, please refer to page 14.

Document your radio presets here
1
2
3
4
5
6
7
8
9
10
11
12
13
14
15
16
17
18
19
20
21
22
23
24
25
26
27
28
29
30
13
Clearing presets...
If you wish to clear (cancel) one of your
radio presets, you can do so via the
SETUP button. See how to the right...
When the program number has been cleared, the display reads CLEARED.
Switch on to the radio program you |
RADIO |
||
want to clear, |
then |
||
for example program number 5 |
|
||
5 |
|||
Press to access the setup function |
|
||
SETUP |
|||
|
|
then |
|
Press twice until the display reads |
|
|
|
|
|
||
CLEAR? |
|
|
|
|
then |
||
Press to confirm that you want to |
|||
|
|||
PLAY |
|||
clear (cancel) the radio program |
|
||
14 > Using the radio
RADIO
then
5
TUNE
then
PLAY
TUNE
then
or
PLAY
Switch on to the radio program you wish to fine tune,
for example program number 5
Press to get access to the tuning function
Press again to get access to the fine tuning function
Fine tunes towards a higher or a lower frequency
Press to store your fine tuning
Fine tuning a radio station
If the sound from a radio station is not coming through clearly, it may be because the station needs fine tuning.
The fine tuning function enables you to move slowly through the frequencies, or to detune a station slightly because of noisy reception.
To do so, just follow the instructions to the left, and listen carefully as you proceed...
|
RADIO |
|
Switch on to the relevant radio |
then |
|
program, |
|
|
|
|
for example program number 5 |
5 |
|||
|
|
|
Press to get access to the tuning |
|
TUNE |
||
then |
|
function |
|
|
|
|
|
|
PLAY |
|
|
|
|
|
Press twice to display the current |
|
TUNE |
|
|
|
|||
|
|
|
mono/stereo setting |
then |
|
||
|
Press to switch from stereo to |
||
|
|
|
|
|
|
|
|
|
|
|
mono,or vice versa |
|
|
|
|
|
|
|
Press to store your new setting on |
|
PLAY |
|
|
|
|
|
the program number |
|
|
|
|
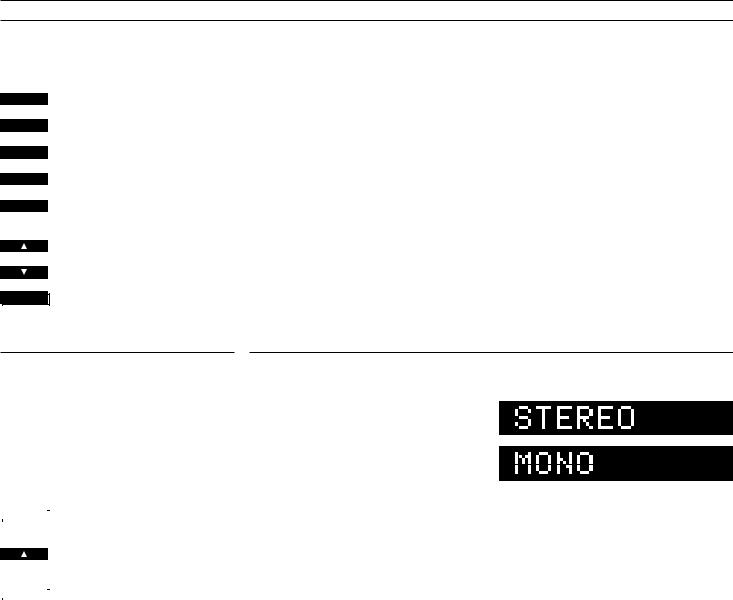
Mono/stereo reception
If you have tuned in to an FM station broadcasting a stereo signal, this signal will be stored along with the radio program.
The system automatically switches to mono if the stereo signal is not strong enough to produce an acceptable sound.
However, you can overrule this automatic function if you wish, and select mono or stereo manually. See how to the left on this page...
The current setting is indicated in the display – stereo or mono sound.
 Loading...