

Page 1
RCT 1000 Coriolis EtherNet/IP Setup
Registering and Using an EDS File in
Rockwell Automation® Studio 5000®
OVERVIEW
Studio 5000 (formally RSLogix 5000) is the design software used to program and configure ControlLogix and CompactLogix programmable
automation controllers and modules. In order for Studio 5000 to recognize a device that is not included with the installation of Studio 5000,
the device’s Electronic Data Sheet (or .eds file) must be registered in Studio.
These are the steps to register a file and add the meter. The example is for an RCT 1000 Coriolis Meter. These are general instructions
intended for personnel who understand ControlLogix and CompactLogix controllers as well as the safe operation and program practices of
controllers and the systems that are controlled by the ControlLogix and CompactLogix controllers.
Summary of Steps
• Install the meter .eds file into Studio 5000.
• Add and configure the meter in Studio 5000.
INSTALLING AN EDS FILE
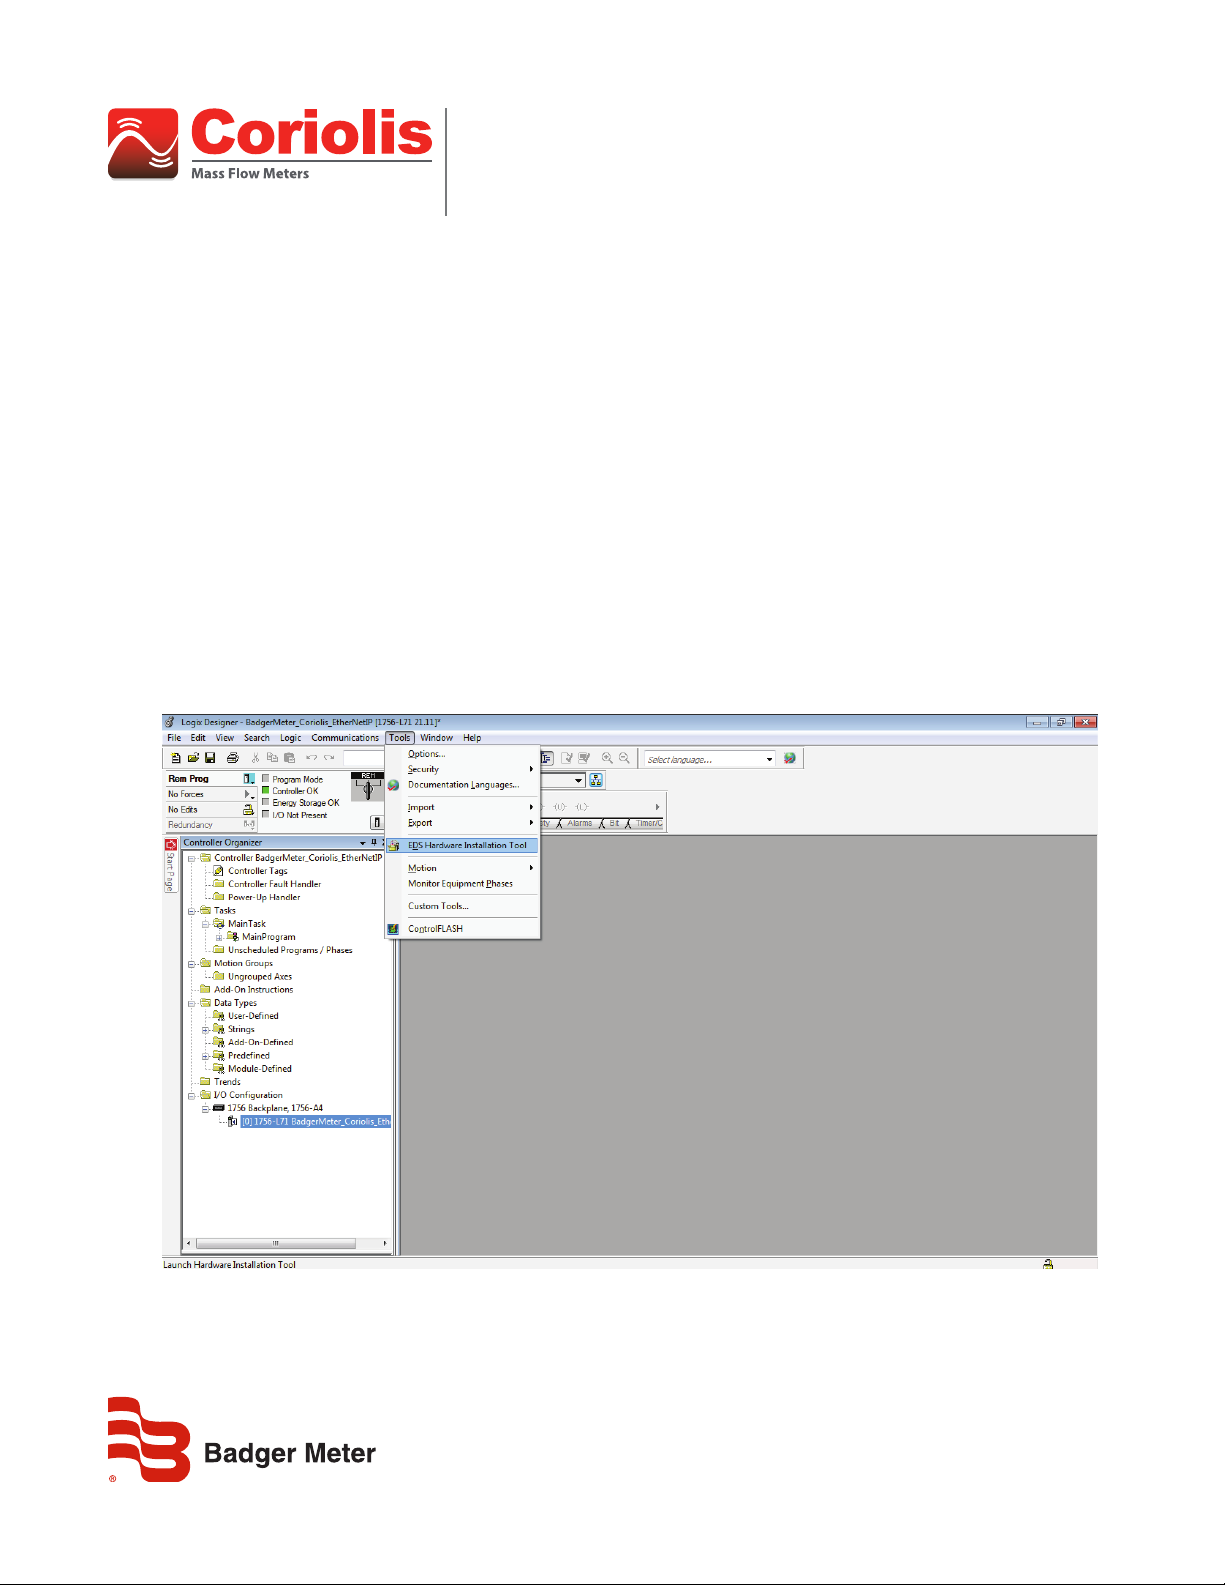
1. Download the .eds le from www.badgermeter.com.
2. Open a new or existing project in Studio 5000 and make sure the controller is powered and connected via USB to your computer.
3. To upload the .eds le to Studio 5000, go to the Tools menu and select EDS Hardware Installation Tool. The EDS Wizard opens.
CRL-UM-01542-EN-03 (May 2016)
Technical Note
Page 2
RCT 1000 Coriolis EtherNet/IP Setup, Registering and Using an EDS File in Rockwell Automation® Studio 5000®
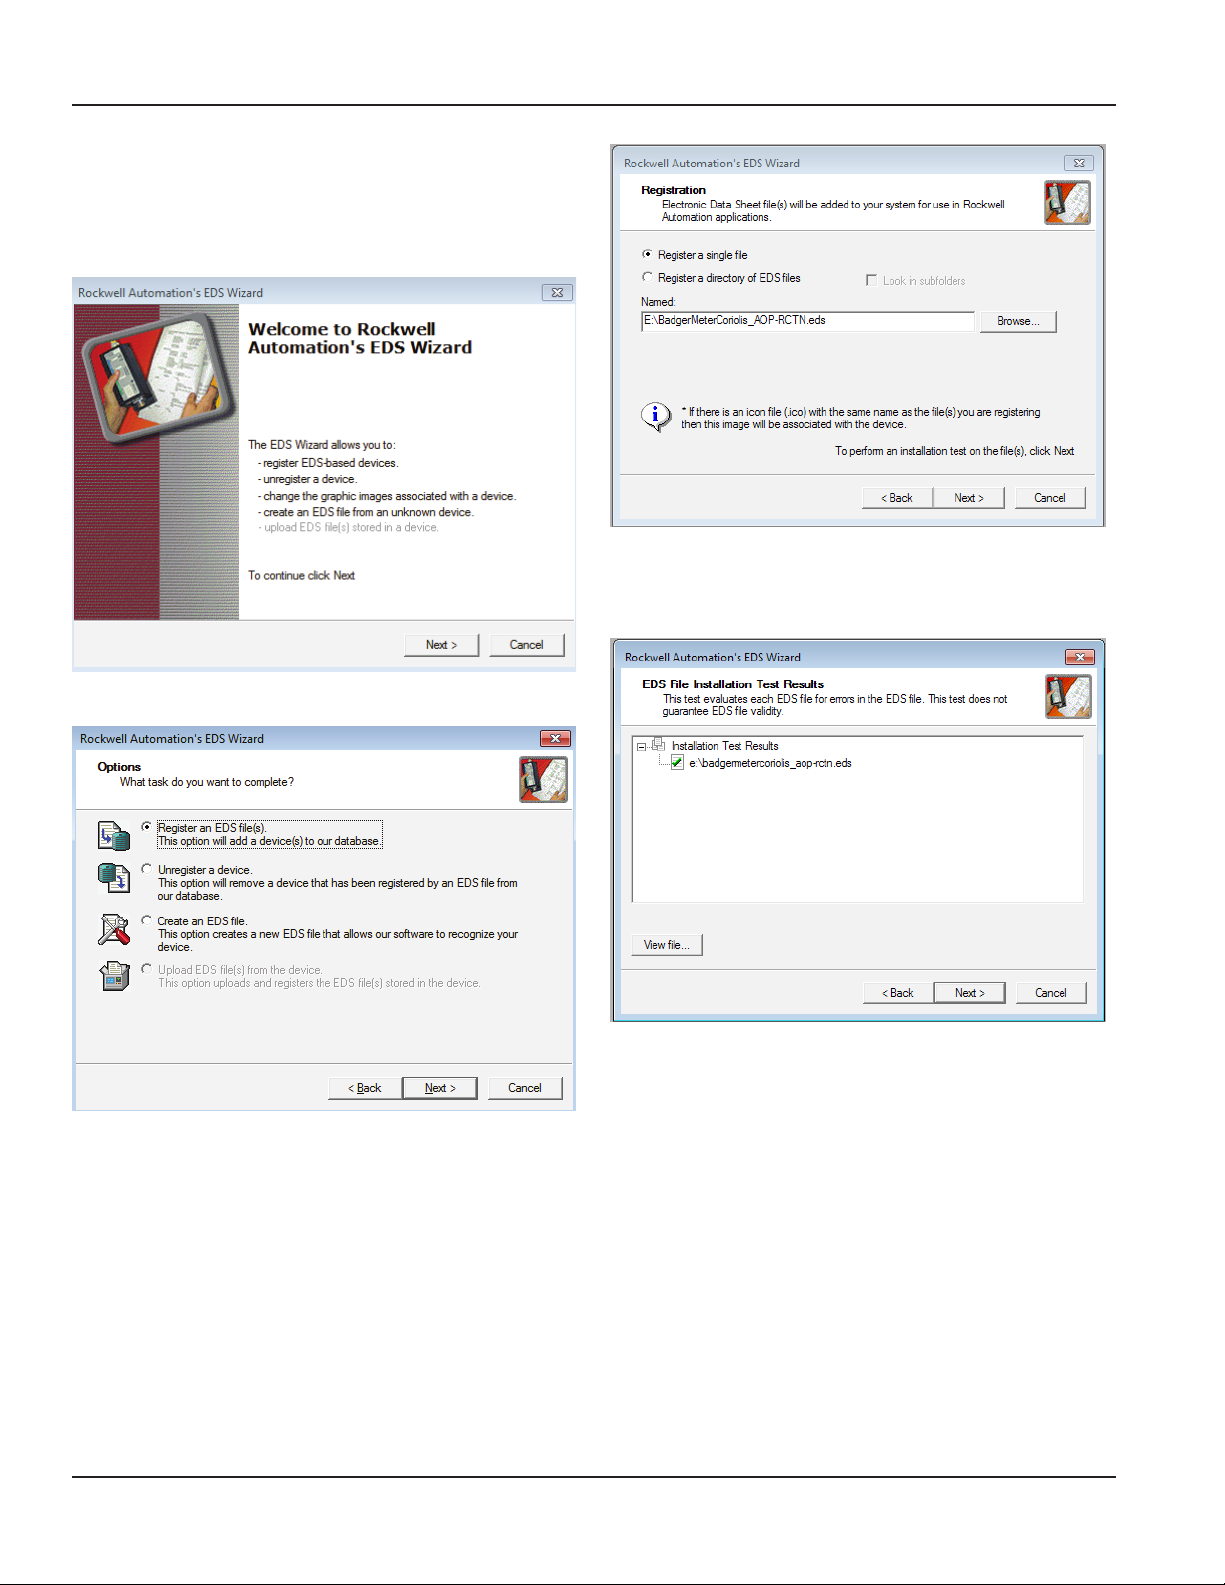
You can use the EDS Wizard to register or unregister a device,
change the graphic associated with a device, or create a file from an
unknown device. In this instance, it is assumed you have a valid .eds
file and are only registering:
4. Select Next.
The Wizard checks the selected file for errors.
8. Make sure the le you selected is the same one being checked. If
so, select Next. If not, go back to step 6.
5. Registering a le is the default option so simply select Next.
Use the registration page to select the number of files to register
and where those files are located. Unless you are uploading a
directory of files, the default option is to register a single file.
6. Click Browse and select the .eds le to upload, or type the
directory path of your le into the Named eld.
7. Make sure the correct le was chosen and select Next.
9. To change the icon for your newly registered device, highlight
the Coriolis Meter and then select Change Icon. Select from the
default set of icons or browse for an icon you have previously
uploaded to your computer. To leave the icon as the default gray
cube, select Next. The icon you select displays next to the
RCT 1000 Coriolis Meter.
Page 2 May 2016
CRL-UM-01542-EN-03
Page 3
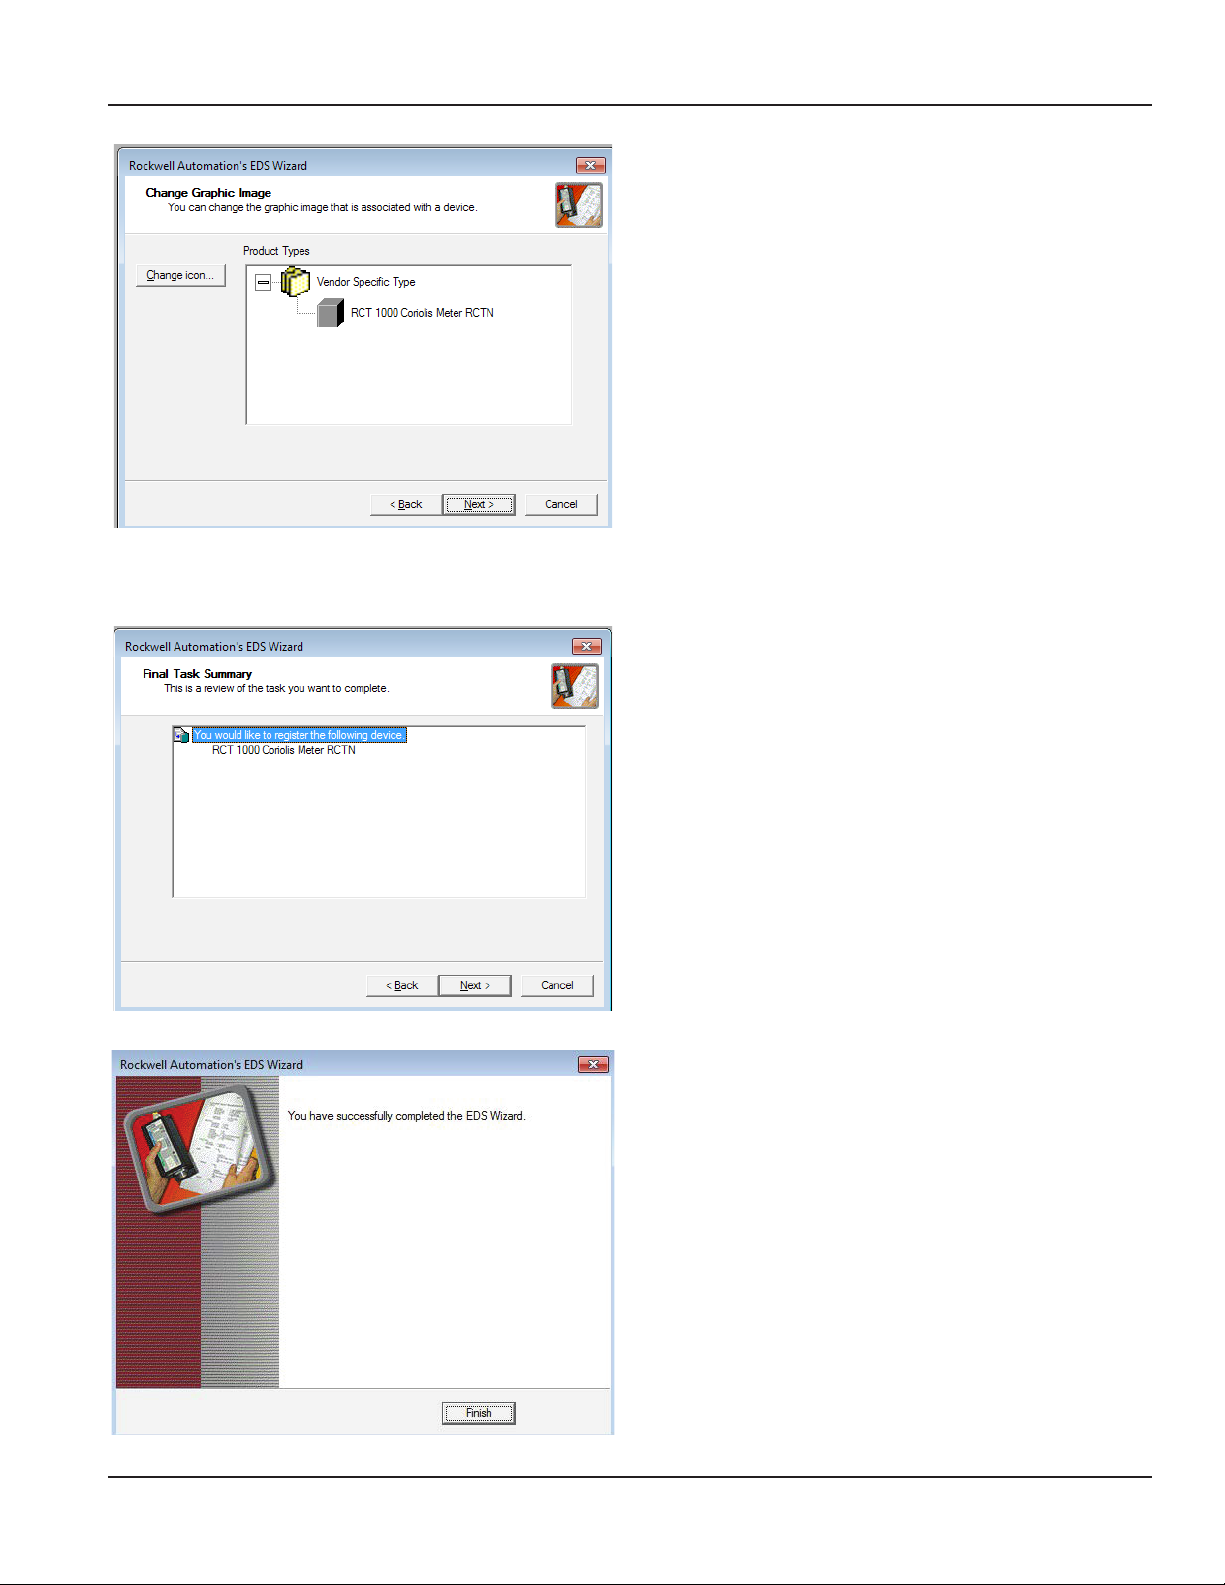
A final check ensues. Make sure the uploaded file registers an
RCT 1000 Coriolis Meter.
10. Select Next.
Technical Note
11. The wizard is now complete. Select Finish to exit the wizard.
CRL-UM-01542-EN-03
Page 3 May 2016
Page 4

RCT 1000 Coriolis EtherNet/IP Setup, Registering and Using an EDS File in Rockwell Automation® Studio 5000®
ADDING AND CONFIGURING THE METER
Depending on your controller, you may need to install a separate Ethernet module so the meter can communicate with the controller.
• CompactLogix controllers have the Ethernet connection built in to the controller.
• ControlLogix controllers require a separate Ethernet module to be able communicate on an Ethernet network. Install an Ethernet
module in the chassis and locate the module in Studio 5000. See “Adding an Ethernet Module” on page 8 for instructions.
After the Ethernet module is set up, you must configure the connection to the meter.
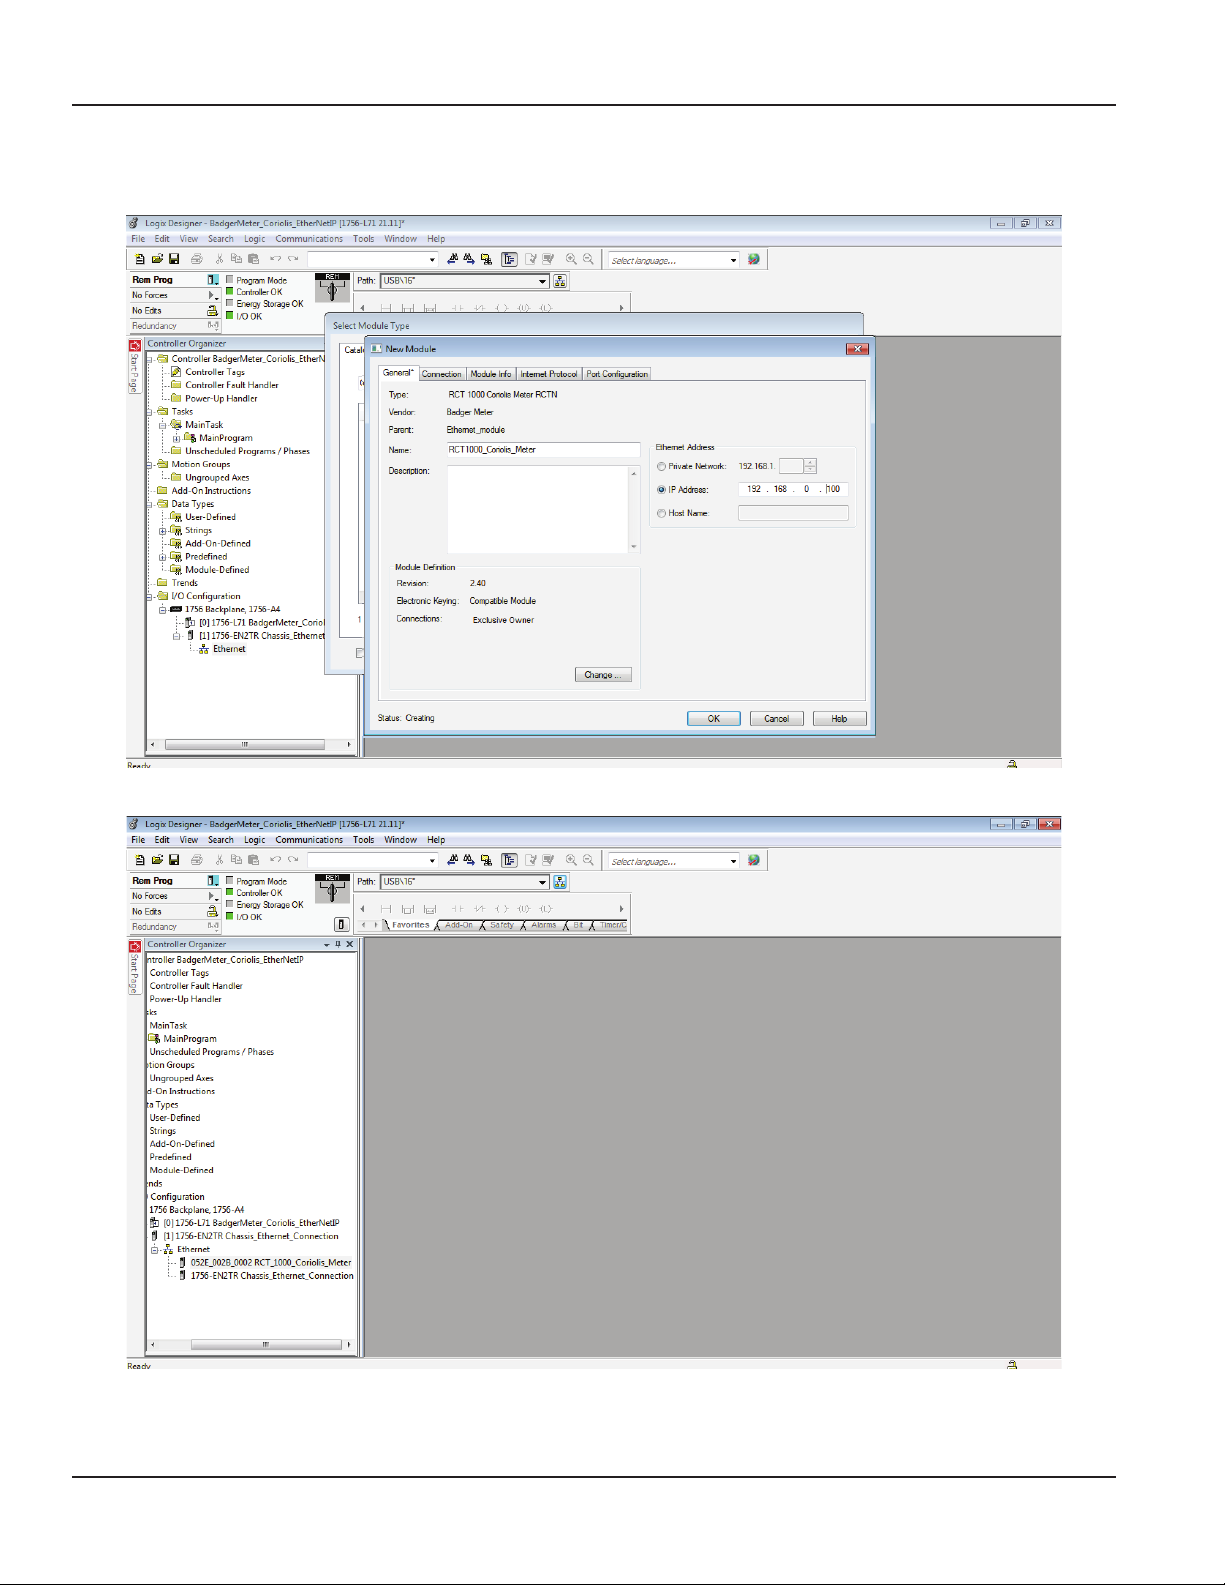
12. Right-click on the new Ethernet tab at the bottom of the left menu and select New Module.
Page 4 May 2016
CRL-UM-01542-EN-03
Page 5

13. In the Filters eld, type “Coriolis” and then select the RCT 1000 Coriolis Meter from Badger Meter.
14. Select Create.
Technical Note
CRL-UM-01542-EN-03
Page 5 May 2016
Page 6
RCT 1000 Coriolis EtherNet/IP Setup, Registering and Using an EDS File in Rockwell Automation® Studio 5000®
15. Name your meter and set the IP address. For RCT 1000 Coriolis meters, the default IP address is 192.168.0.100.
16. Select OK.
Your meter is now listed under the Ethernet module.
Page 6 May 2016
CRL-UM-01542-EN-03
Page 7

Technical Note
17. All the tag names and data types are automatically set up. To see the values and names for each of the tags, look under the organizer
and select Controller Tags.
CRL-UM-01542-EN-03
Page 7 May 2016
Page 8

RCT 1000 Coriolis EtherNet/IP Setup, Registering and Using an EDS File in Rockwell Automation® Studio 5000®
ADDENDUM
Adding an Ethernet Module
ControlLogix controllers require a separate Ethernet module to be able communicate on an Ethernet network. Install an Ethernet module in
the chassis and locate the module in Studio 5000
1. Right-click on the Backplane at the bottom of the left menu and select New Module.
2. If you know the module, such as a 1756-EN2TR Ethernet module, you can type it into the lter to locate it easily. If you do not know what
type it is, pull the module free of the chassis and look at the product tag on the side. An easier way is to select the Module Discovery
tab and let the controller nd the module for you. However, your Logix controller and module must both be properly connected and the
controller needs to be connected to the computer and online in Studio 5000. When you nd the module, select Create.
Page 8 May 2016
Page 9

Technical Note
3. Specify the module name, description and IP address. Name the module something that you will recognize. When setting the IP address,
make sure it is not the same as the controller or the meter or it will not function.
OTE:N The default address for the Coriolis meter is 192.168.0.100, which will be set up later.
4. When nished, select OK.
Your module displays under the backplane with the name you selected.
Page 9 May 2016
Page 10

RCT 1000 Coriolis EtherNet/IP Setup, Registering and Using an EDS File in Rockwell Automation® Studio 5000®
Page 10 May 2016
Page 11

Technical Note
Changing the IP Address of the Coriolis Meter
OTE:N See the user manual for details.
1. Open a web browser and type “192.168.0.100” into the URL eld.
2. When prompted for a username and password, type “admin” as the username and leave the password blank.
3. Select OK to continue.
4. Select Conguration at the bottom of the main page. This will lead to a new page in which editing dierent elds is allowed, and
halfway down the list is Network Settings.
5. Select Edit under Network Settings to bring up a small window that allows you to change the IP conguration.
6. Select the text next to IP Address and type in another
valid address.
OTE:N This should not be the same as the computer or any other object on the network.
7. Select Save Settings to keep the new IP address.
Page 11 May 2016
Page 12

RCT 1000 Coriolis EtherNet/IP Setup, Registering and Using an EDS File in Rockwell Automation® Studio 5000®
Setting the Controller to ONLINE Mode (Used with the Find Module)
It may be desirable to have Logix find your connected modules itself. However, in order to do this the controller must be online and
working properly.
1. Make sure the power for both the controller and meter are correctly wired and plugged in.
2. Verify that there is an Ethernet connection between the computer, controller, and meter and that the three are connected to
an Ethernet.
3. Verify that an A-to-B USB cable connects the controller to your computer.
4. Start Suite 5000 and select your project.
5. To set a communications path, select the button next to Path in the upper middle portion of your screen. Once selected, it will bring
you to a screen showing your workstation and three different expanding tabs.
6. Select the (+) next to the USB tab and select the name of the controller that is shown. This will open up the four top options on the right
of the tab.
7. Select Go Online. You will be prompted to download your project from Suite 5000 to the controller.
8. Press Download again.
Your controller is now online and able to locate modules for you.
Control. Manage. Optimize.
Trademarks appearing in this document are the property of their respective entities. Due to continuous research, product improvements and enhancements, Badger Meter reserves
the right to change product or system specications without notice, except to the extent an outstanding contractual obligation exists. © 2016 Badger Meter, Inc. All rights reserved.
www.badgermeter.com
The Americas | Badger Meter | 4545 West Brown Deer Rd | PO Box 245036 | Milwaukee, WI 53224-9536 | 800-876-3837 | 414-355-0400
México | Badger Meter de las Americas, S.A. de C.V. | Pedro Luis Ogazón N°32 | Esq. Angelina N°24 | Colonia Guadalupe Inn | CP 01050 | México, DF | México | +52-55-5662-0882
Europe, Middle East and Africa | Badger Meter Europa GmbH | Nurtinger Str 76 | 72639 Neuen | Germany | +49-7025-9208-0
Europe, Middle East Branch Oce | Badger Meter Europe | PO Box 341442 | Dubai Silicon Oasis, Head Quarter Building, Wing C, Oce #C209 | Dubai / UAE | +971-4-371 2503
Czech Republic | Badger Meter Czech Republic s.r.o. | Maříkova 2082/26 | 621 00 Brno, Czech Republic | +420-5-41420411
Slovakia | Badger Meter Slovakia s.r.o. | Racianska 109/B | 831 02 Bratislava, Slovakia | +421-2-44 63 83 01
Asia Pacic | Badger Meter | 80 Marine Parade Rd | 21-06 Parkway Parade | Singapore 449269 | +65-63464836
China | Badger Meter | 7-1202 | 99 Hangzhong Road | Minhang District | Shanghai | China 201101 | +86-21-5763 5412
 Loading...