

Page 1
Page 2

Page 3

CONTENTS
INTRODUCTION......................................................................................................................2
USING THE CIRCULAR ATTACHMENT TO SEW PATTERNS IN A CIRCLE...............................2
About the Circular Attachment.............................................................................................. 2
Included Accessories............................................................................................................. 2
Attaching the Circular Attachment......................................................................................... 3
Sewing a Circle ..................................................................................................................... 3
Using the Quarter Circle Template........................................................................................ 5
Using the Included Presser Feet............................................................................................. 5
CREATING BOBBIN WORK......................................................................................................7
About Bobbin Work .............................................................................................................. 7
Required Materials ................................................................................................................ 8
Upper Threading................................................................................................................... 9
Preparing the Bobbin Thread................................................................................................. 9
Positioning the Fabric and Sewing....................................................................................... 12
Adjusting the Thread Tension.............................................................................................. 15
Troubleshooting .................................................................................................................. 16
LIST OF STITCHES THAT CANNOT BE USED WITH THE CIRCULAR ATTACHMENT............ 17
ENGLISH
1
Page 4

INTRODUCTION
Note
CAUTION
This Addendum provides additional information not described in the Instruction and Reference Guide.
Refer to these instructions after first reading the Instruction and Reference Guide provided with your sewing
machine.
USING THE CIRCULAR ATTACHMENT TO SEW
PATTERNS IN A CIRCLE
About the Circular Attachment
This device can sew circular patterns that graduate out at 5mm intervals, ranging from 30mm to 130mm in
radius* when the center needle position is selected. The device is set to the left of the needle on your sewing
machine. Utility and decorative stitches can both be sewn using this device.
*
Radius= Distance from center of circle to any point on the circle.
• You cannot use any decorative stitch with side feeding or stitches with a width over 7.0 mm. Before sewing on your
project, be sure to sew trial stitches and check the sewing results. If stitches that cannot be used are sewn, the pattern
may become misaligned. For a list of stitches that cannot be used, refer to the table “LIST OF STITCHES THAT CANNOT
BE USED WITH THE CIRCULAR ATTACHMENT” located on page 17.
• Special care is required for the pivot pin; neglectful treatment may cause injury. Young children should be
supervised to ensure that they do not play with the attachment. When attachment is not in use, always
keep the pivot pin in the indicator to avoid its loss.
Included Accessories
1 4 Conversion Chart 5
mm (f)inch
130 5 3/16
120 4 3/4
110 4 3/8
100 4
2 3 90 3 1/2 6
80 3 3/16
70 2 3/4
60 2 3/8
50 2
40 3/2
30 13/16
No. Part Name Part Code
1 Circular Attachment
a Indicator
b Handle/Flips Up
c Release button
d Setting position for pivot pin
e Scale
2 Pivot Pin XE6016-001
3 Attachment Screw
(2pcs. one is extra)
-
XE6022-001
No. Part Name Part Code
4 Template
f Radius of circle in mm
g Angular lines listed in degrees
starting at 0 with 5 degree
intervals
h Center
5 Braiding Foot XE5680-001
6 Cording Foot XA6871-001
XE6024-001
2
Page 5
Note
• We recommend that you use the extension table on
3040
Note
Note
your sewing machine for smooth fabric control.
• Do not raise the extension table when the circular
devise is attached.
• The pivot pin may be released if you hold up the
fabric while attached to the circular attachment.
When holding up the fabric gently press down on the
top of the pivot pin.
• When sewing smaller circles or using fabric with a
grain or uneven textures, a perfect circle may not be
achieved.
• Some of presser feet such as the side cutter cannot
be used with this attachment, always test your
accessory feet with the attachment.
• When using this attachment test the sewing speed
of your machine for the best results.
• When sewing larger pieces of fabric or garments,
make sure that your fabric or garment does not get
caught on the machine creating drag or distortion of
your design.
Securely tighten the screw with the disc-
c
shaped screwdriver included in your
machine.
a Disc-shaped screwdriver
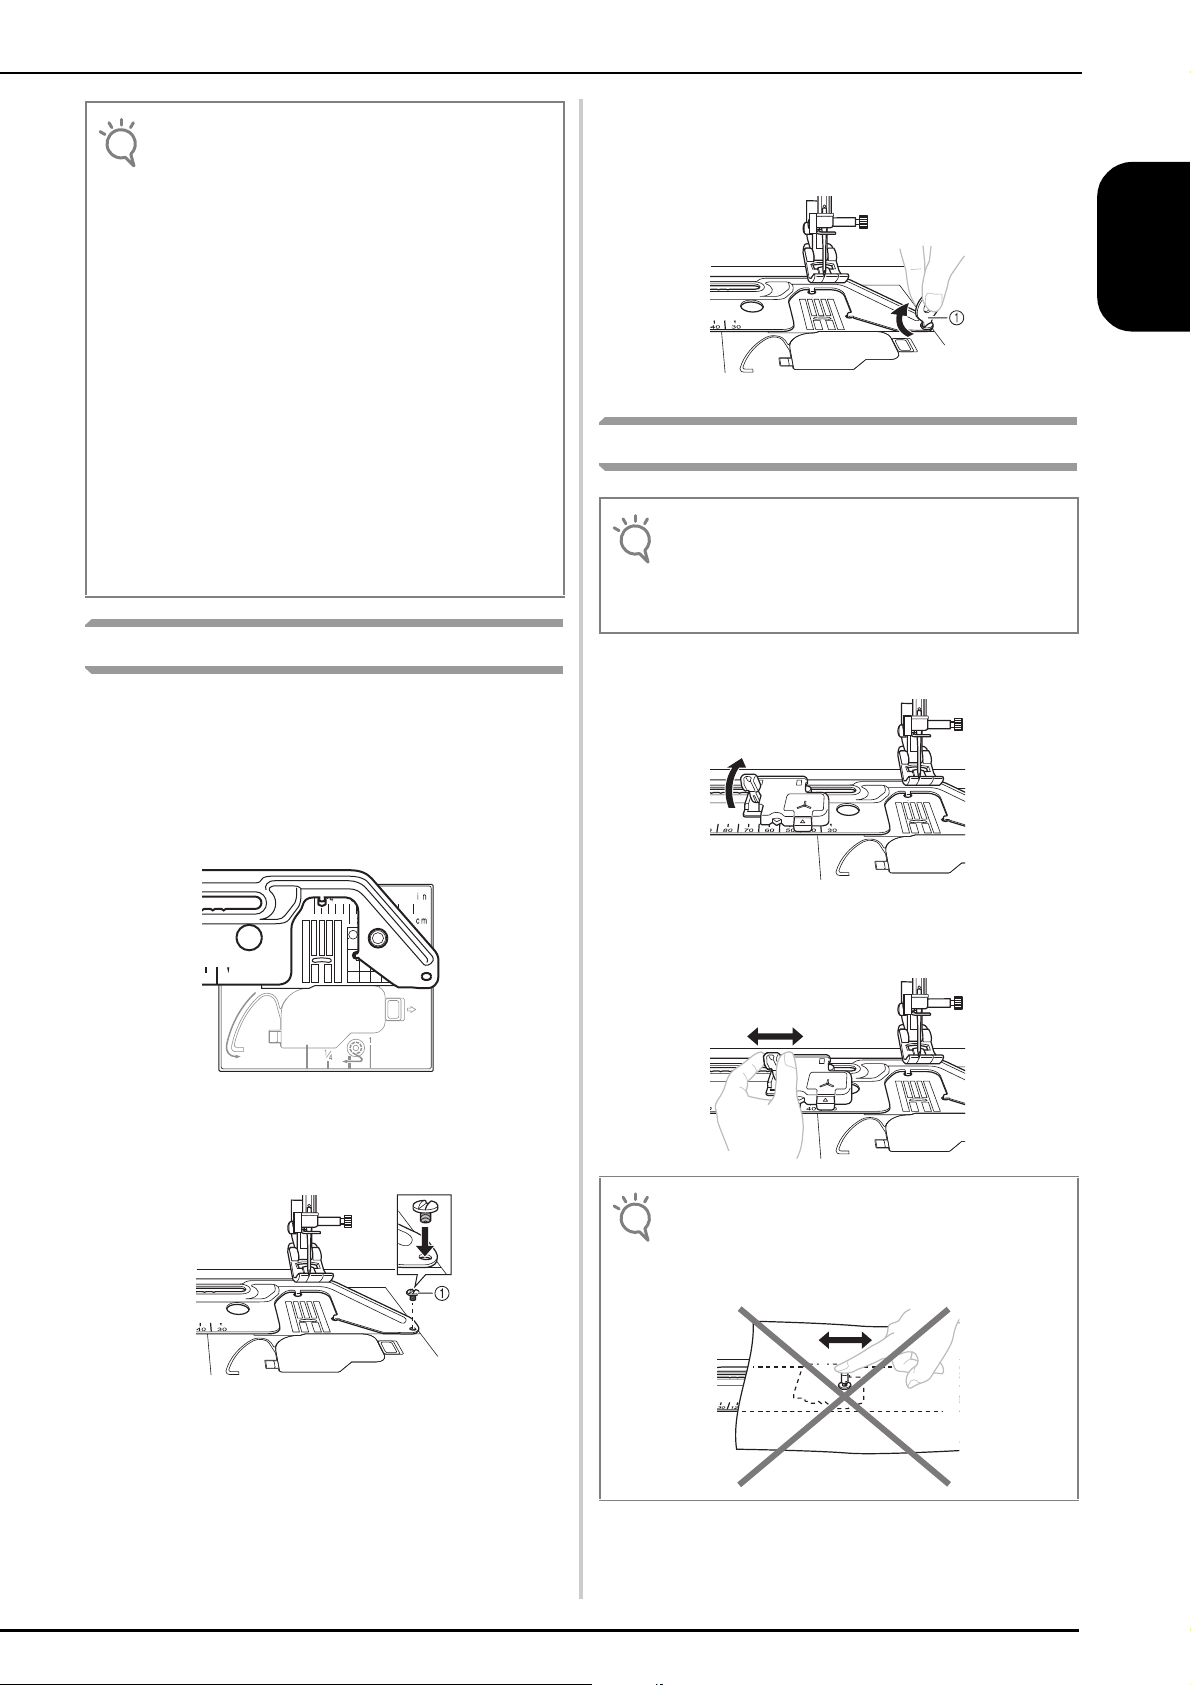
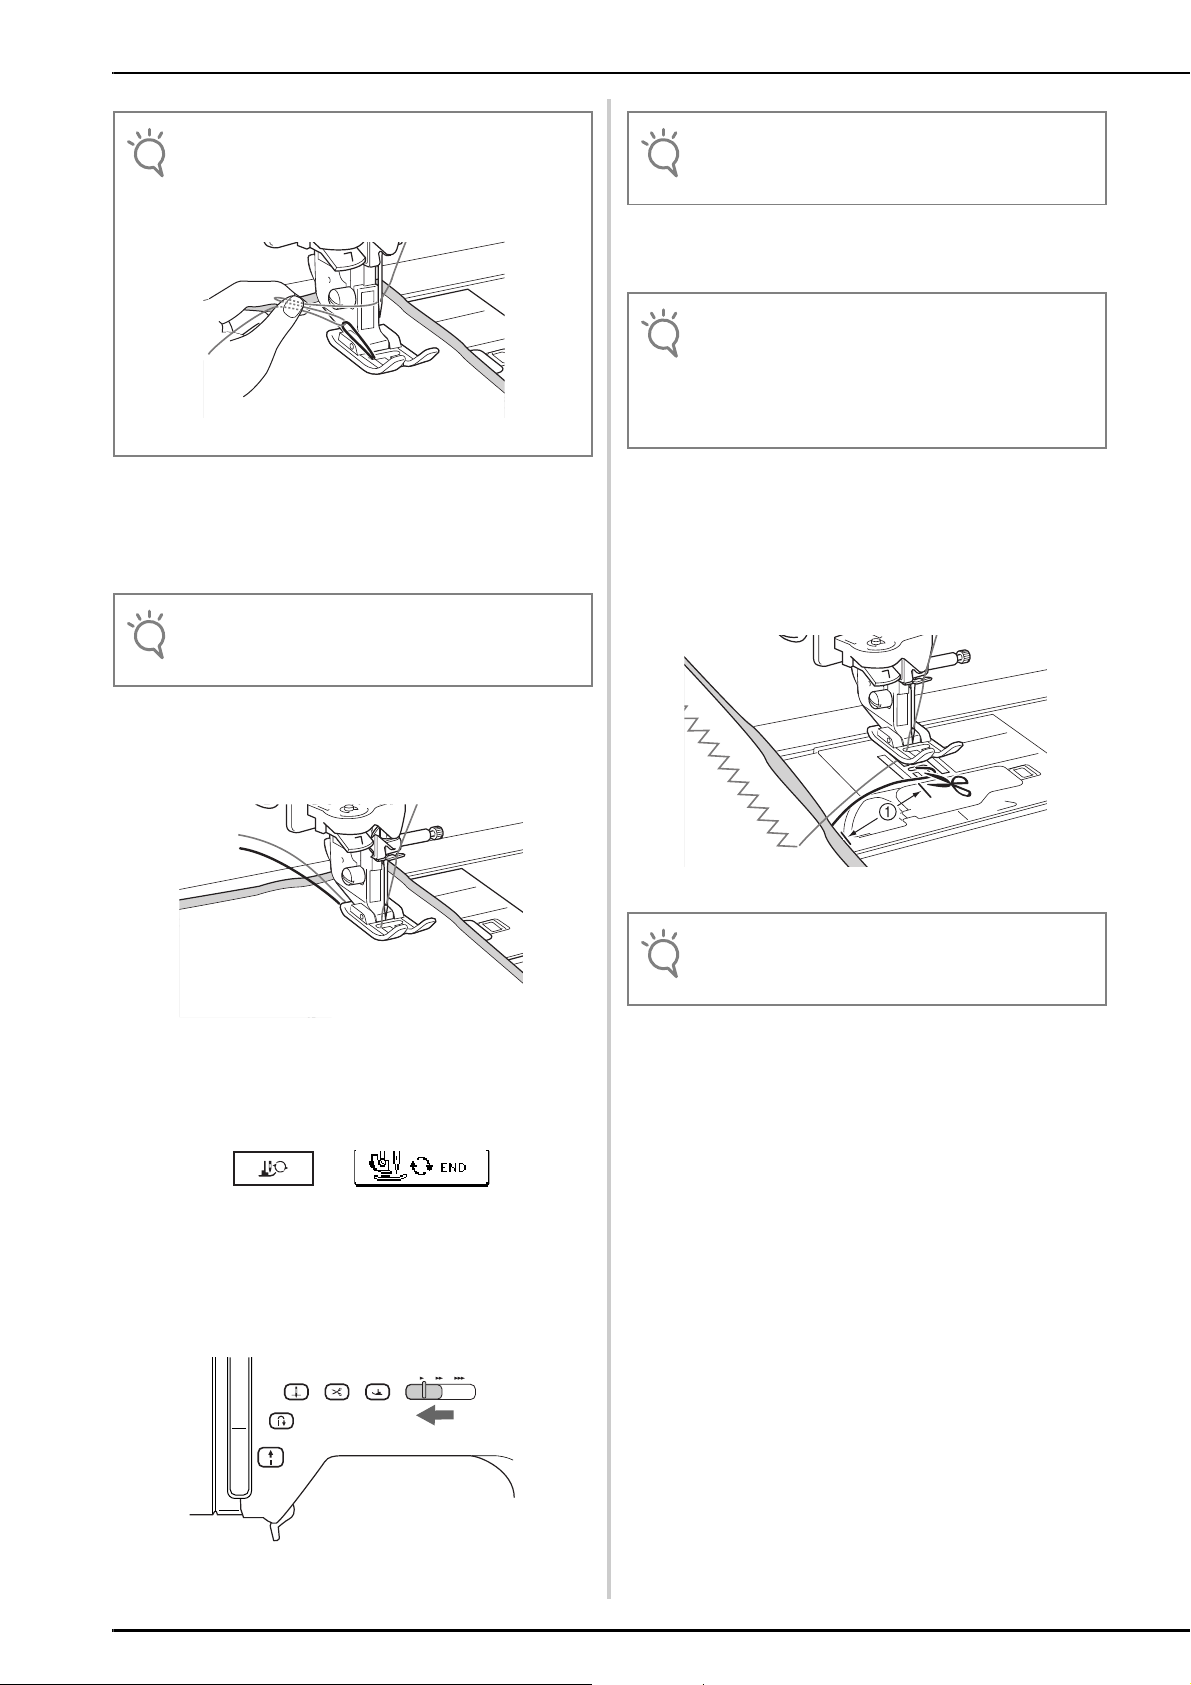
Sewing a Circle
• Thread the machine needle before setting the pivot
pin into the circular attachment. Threading lever
may hit the pivot pin and damage the pin or the
machines threading mechanism.
ENGLISH
Attaching the Circular Attachment
Place the circular attachment at left as shown
a
in the figure.
→ The two tabs on the underside of the attachment will
drop down into corresponding holes in the needle
plate, so that the attachment lays flat on the bed of
your machine.
Insert the screw on the circular attachment in
b
the screw hole at the right of the needle plate
(a).
Raise the handle.
a
Slide the indicator to match the desired size
b
of your circle.
• Do not slide the indicator by holding onto the pivot
pin, doing so may cause the pivot pin to bend or
break.
a Attachment Screw
3
Page 6

Use a piece of stabilizer that is larger than
Note
Note
CAUTION
c
your design area, reinforcing with a smaller
piece of the stabilizer at the center of the
circle when using fine fabric or the same
pivot pin area repeatedly.
a Wrong side of Fabric
b Stabilizer
c Reinforcement Stabilizer
d Pivot Pin area
• A stabilizer is always required when sewing on any
fabric or garment to prevent stretching or puckering.
Depending on the type of fabric being sewn, will
determine wether you use permanent, iron on,
temporary or a sticky stabilizer.
Insert the pivot pin at the center of circle
d
from the right side of fabric.
Pressing the top of the pivot pin, insert the
e
point of the pivot pin into the “Y” mark on
the attachment.
a Right side of Fabric
b Wrong side of Fabric
Select the desired stitch and sew allowing the
f
fabric to feed smoothly, making sure that you
do not push or pull your fabric causing an
uneven circle.
a Pivot Pin
b Center of circle
c Right side of Fabric
• When sewing a small diameter circle, we
recommend that you first pin the fabric to the
attachment and then set the indicator to your
desired size.
After sewing, always press the release button
g
to remove the pin and fabric from the circular
attachment.
a Release button
• Do not leave the pivot pin inserted in your fabric
and not attached to the circular attachment. To do
so may result in accidental injury or machine
damage.
4
Page 7

Using the Quarter Circle Template
Note
CAUTION
When combining utility or decorative stitches, or
repeating an individual stitch, use the included
template as a guide.
Mark the pivot point (center of your circle)
a
prior to sewing on the fabric (a).
Select your desired stitch and the size of a
b
circle using the markings on the attachment,
then place the fabric on the attachment.
Sew a single stitch or one pattern
c
combination (b).
Remove fabric or garment from attachment.
d
With temporary pencil draw two lines from
e
the pivot point, one at the start of your stitch
pattern (c) and one at the end of the stitch
pattern (d).
Check the line at the end of the stitch (d) and
g
note the approximate degrees. With a circle
measuring 360 degrees divide the stitch
length (your degree/stitch measurement) into
360 and that will give you an approximate
count on the stitch repetitions. SAMPLE: Your
stitch is 16 degrees long so: 360 divided by 16
equals 22.5 repetitions.
• This is not an exact count due to the number of
variables i.e. stitch length, fabric used, thread and
the stabilizer. You may be able to adjust the length
of the stitch, depending on the stitch used,
increasing or decreasing to get a closer match so
that your circle closes without overlapping or
shortage (a).
• Always stitch a trial version of the design checking
the stitch length, width and the direction of sewing,
making sure that it is suitable for your project.
• Additional calculations may be necessary if your
pattern overlaps.
Example: Shortage of the Pattern
ENGLISH
a Pivot Point
b Single stitch/Pattern combination
c Start of the stitch
d End of the stitch
Place the template on top of your design,
f
lining up the center pivot point and the center
marking on the template (a). Then place the
0 degree line on the right side of template (b)
at the start of the stitch (c).
a End of the stitch
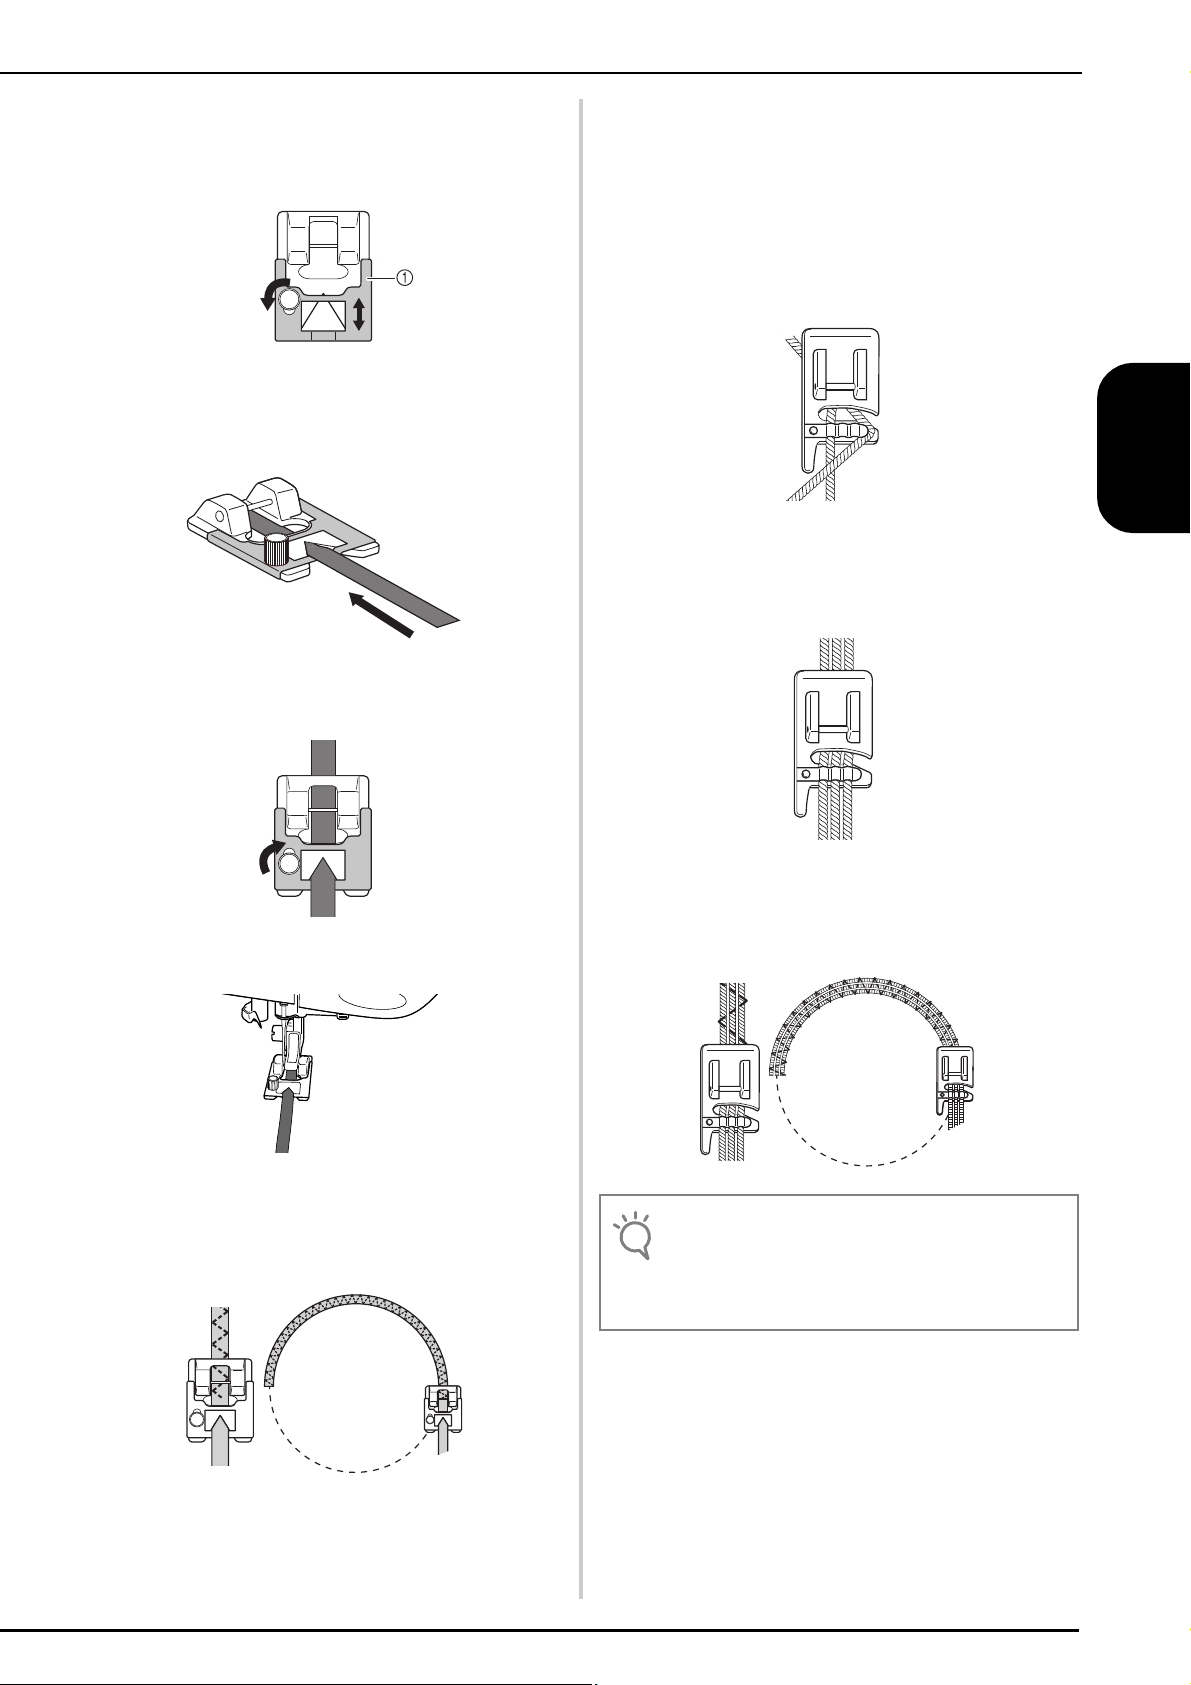
Using the Included Presser Feet
Using the included presser feet, you can embellish
your sewing projects, giving them a professional look
with your personal flair.
■ BRAIDING FOOT
You can use a wide variety of braiding up to 5mm in
width, using straight, zigzag and select decorative
stitches.
• Do not use this foot when sewing with densely
woven braiding that is difficult for the needle to
penetrate easily. Doing so could result in needle
breakage, damage and/or injury.
a Center on template
b 0 degree line
c Start of the stitch
d End of the stitch
5
Page 8

Loosen the screw on the guide plate sliding
Note
a
the plate to fit the width of the braid.
a Plate
Insert the braid through the guide before
b
attaching the foot onto the machine.
Tighten the screw and pull the braid to the
c
back of the braiding foot.
■ CORDING FOOT
You can embellish using 1 to 3 cords of decorative
threads or yarn.
Slip a cord from the right of the presser foot,
a
into each guide (to use single cord, use the
center guide).
Place the cords under and to the back of the
b
cording foot.
Attach the foot onto the machine.
d
Select the desired stitch and sew in a circular
e
manner gently guiding the braid.
Select a zigzag or decorative stitch and sew in
c
a circular manner gently guiding the cords.
• When sewing with zigzag or decorative stitches,
adjust the stitch width, so that it is slightly wider than
the width of the braid or cording.
6
Page 9
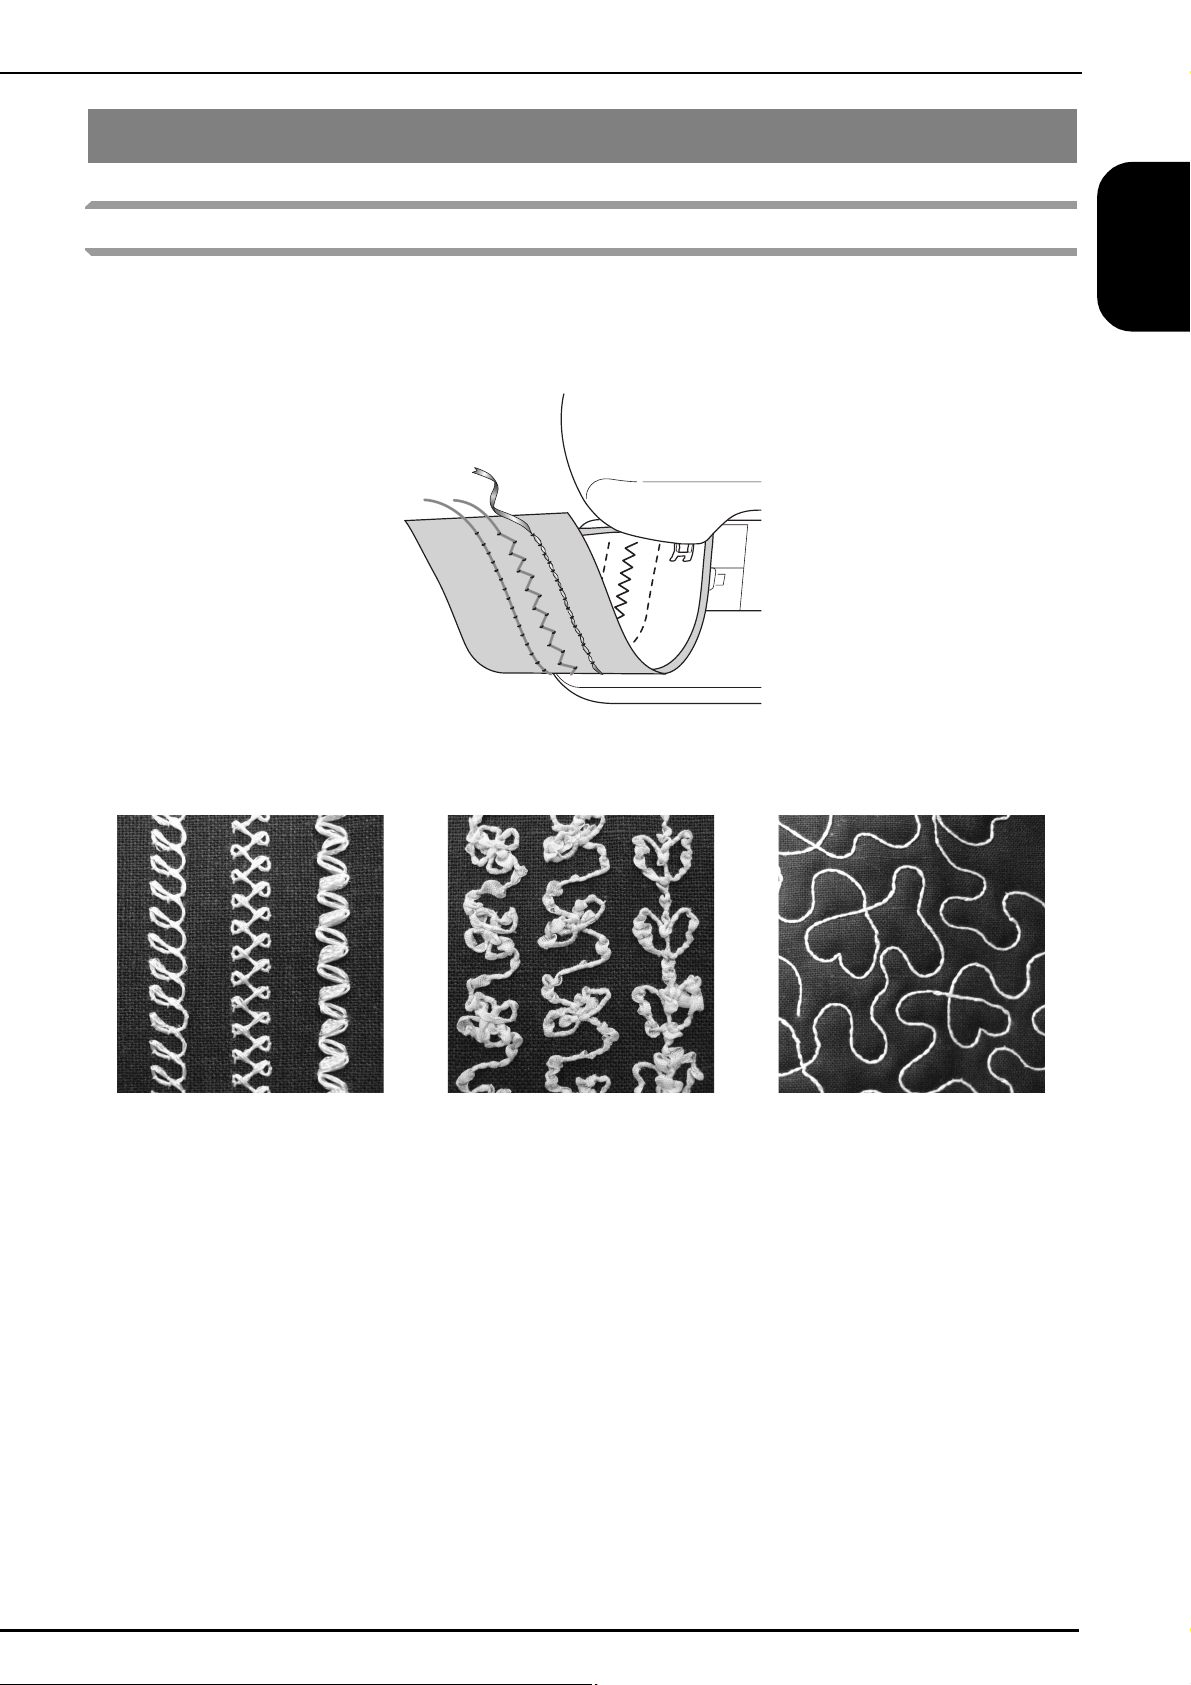
CREATING BOBBIN WORK
About Bobbin Work
Beautiful embroidery work, with a three-dimensional appearance, can be created by winding the bobbin with heavy
weight thread or ribbon, which is too thick to be threaded through the machine’s needle. The decorative thread or
ribbon will stitch out on the underneath side of fabric while sewing with the fabric wrong side facing up.
ENGLISH
1. Utility stitches 2. Decorative stitches 3. Free motion sewing
7
Page 10

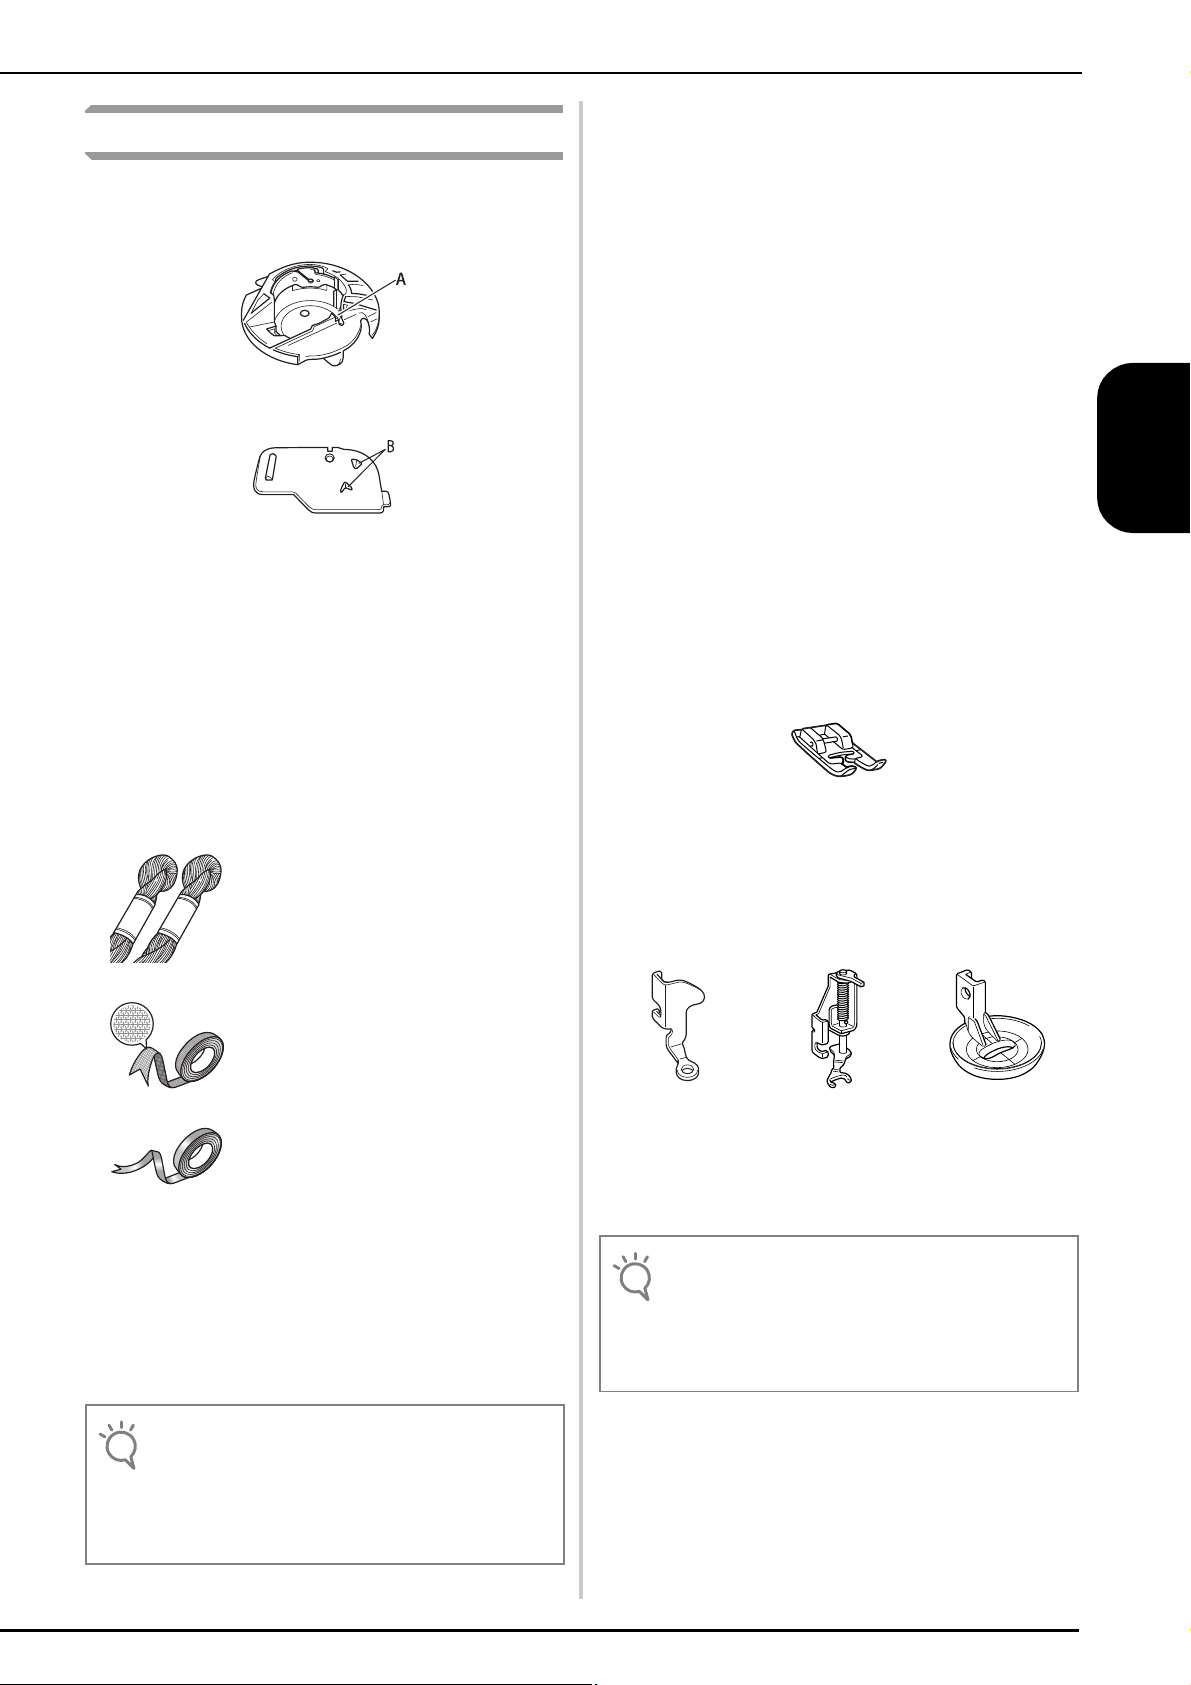
Required Materials
Note
Note
■ Bobbin case and cord guide bobbin cover
a Bobbin case (gray)
There is a notch at the location indicated by the letter
“A”.
b Cord guide bobbin cover (for bobbin work or attaching
cording using single hole).
There are two small v-shaped tabs on the back of the
bobbin cover as indicated by the letter “B”.
The tabs help hold the bobbin in place so it does not lift
up while thick thread is being pulled through.
■ Lower thread
We recommend the following types of threads for
bobbin work.
■ Upper thread
Upper thread choices can vary depending on the
finished look you would like to achieve. By using
sewing machine embroidery thread (polyester),
multipurpose polyester thread, or monofilament
(transparent nylon) thread the appearance of a single
design can be changed many times just by choosing a
different upper thread weight and/or color.
If you do not wish for the upper thread to be visible, we
recommend using monofilament thread or polyester
light weight thread (50wt. or above) that is the same
color as the lower thread.
■ Needle
Use a needle appropriate for the upper thread and
fabric being used. Refer to “Fabric/Thread/Needle
Combinations” (in the chapter “CHANGING THE
NEEDLE”) in the Instruction and Reference Guide.
■ Presser foot
Utility stitches or decorative stitches: Monogramming
foot “N”
No.5 or finer hand embroidery
thread or decorative thread
Flexible woven ribbon
Fine embroidery ribbon (silk or
silk-like material) (3.5 mm (approx.
1/8 inch) or less, recommended)
* When wide ribbon or heavy weight threads are being used, we
recommend test sewing with and without bobbin case tension
being applied to see which gives the best stitching results.
If wide ribbon such as 3.5mm (approx. 1/8 inch) is to be used,
we recommend that bobbin case tension not be applied. Refer
to page 11 for more detailed instructions.
• Do not use thread heavier than No.5 hand
embroidery thread.
• Some threads may not be appropriate for bobbin
work. Be sure to sew trial stitches before sewing on
your project.
Free motion sewing: Free motion quilting foot “C”, Free
motion open toe quilting foot “O” or Free motion echo
quilting foot “E”
■ Fabric
Be sure to sew trial stitches on a piece of scrap fabric,
which includes the same threads and fabric as what is
being used in your project.
• The sewing results may be affected by the type of
fabric used. Before sewing your project, be sure to
sew trial stitches on a piece of scrap fabric that is
the same as the fabric used in the project.
8
Page 11
Upper Threading
Install a needle appropriate for the upper
a
thread and fabric to be used.
For details on installing the needle, refer to
“CHANGING THE NEEDLE” in the Instruction
and Reference Guide.
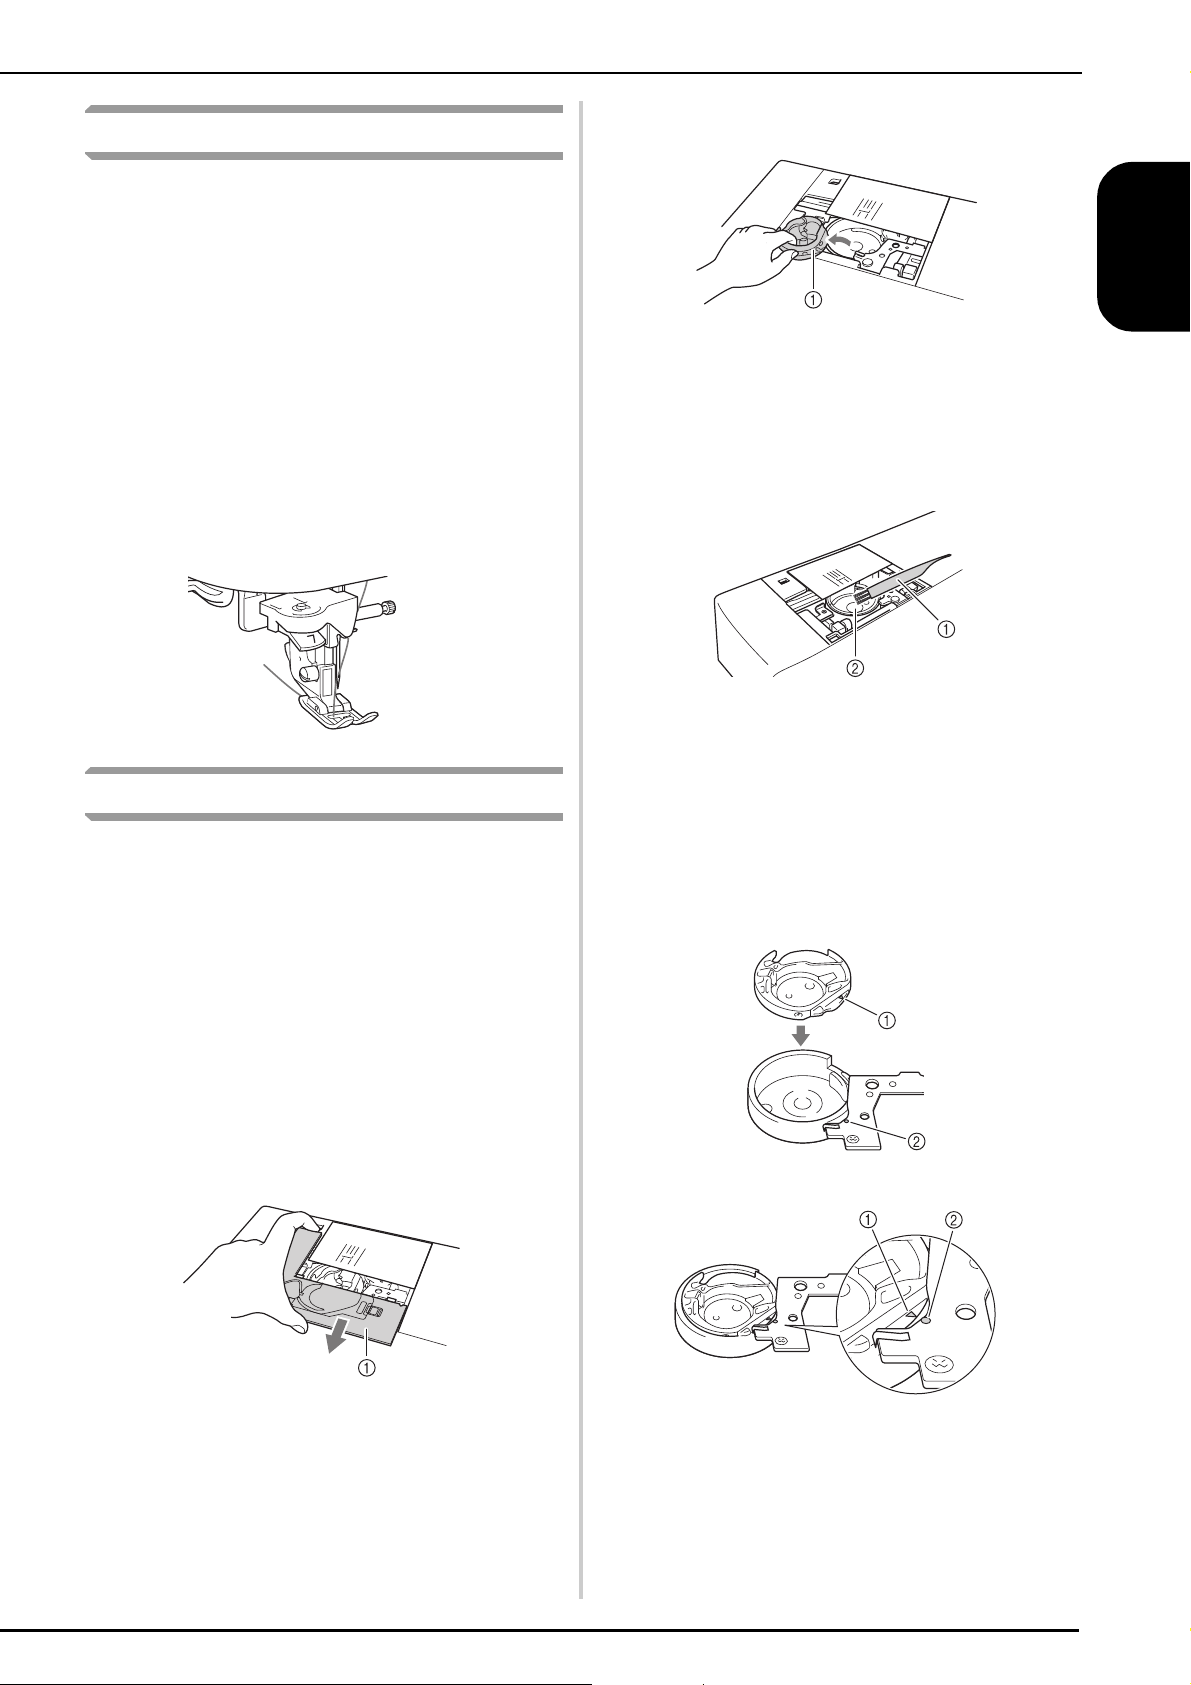
Remove the bobbin case.
d
ENGLISH
Attach the presser foot.
b
For details on attaching the presser foot, refer to
“CHANGING THE PRESSER FOOT” in the
Instruction and Reference Guide.
Thread the machine with the upper thread.
c
For details on threading the machine, refer to
“Upper Threading” in the Instruction and
Reference Guide.
Preparing the Bobbin Thread
In order to create bobbin work, the bobbin case must
be replaced with the one for bobbin work.
Before creating bobbin work, clean the bobbin case
and the race.
a Bobbin case
Use the cleaning brush included with the
e
machine or a vacuum cleaner to remove any
lint and dust from the race and its
surrounding area.
a Cleaning brush
b Race
Wipe the bobbin case (gray) with a soft lint
f
free cloth to clean it.
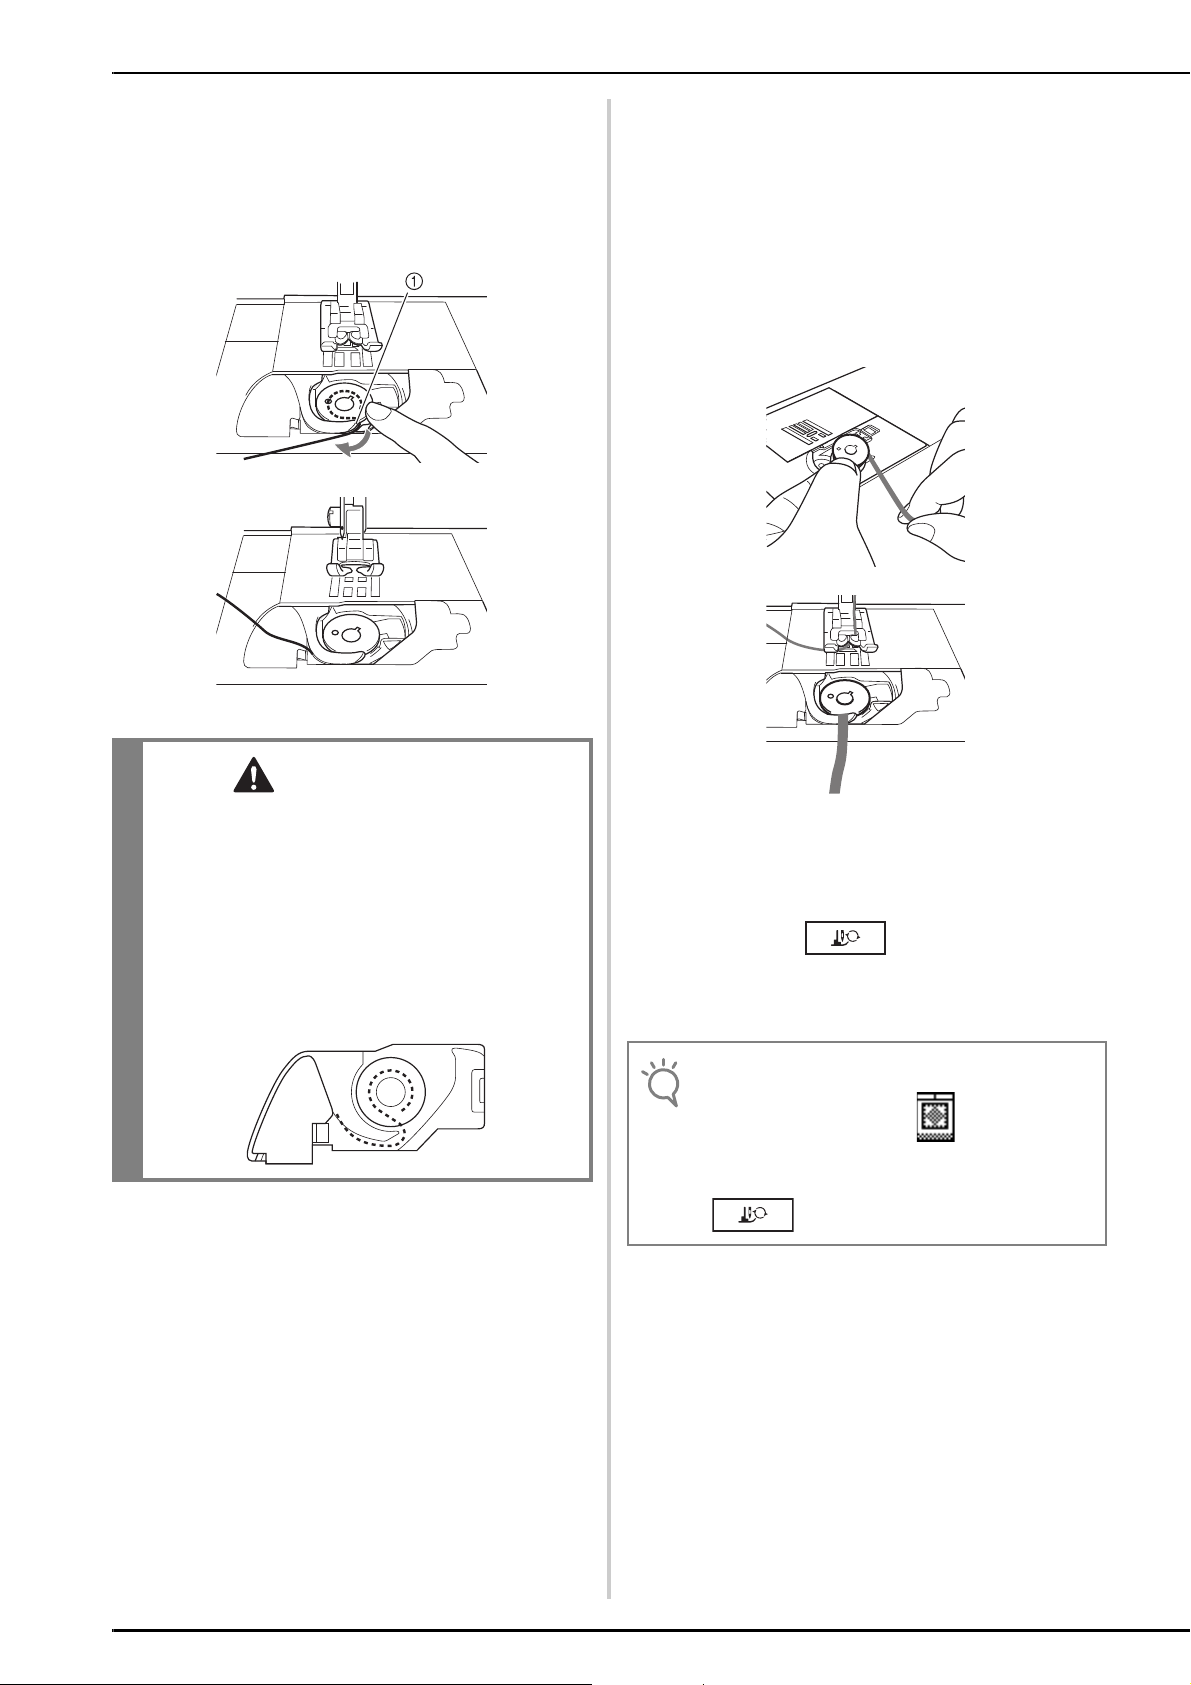
Insert the bobbin case (gray) so that the S
g
mark on bobbin case aligns with the ● mark
on machine as shown below.
Raise the needle and presser foot, and then
a
turn off the machine.
Remove the flat bed attachment.
b
Grasp both sides of the needle plate cover,
c
and then slide it toward you to remove it.
a Needle plate cover
a S mark
b ● mark
9
Page 12

Note
• The bobbin case (gray) cannot be used for sewing in
CAUTION
CAUTION
CAUTION
Note
CAUTION
Memo
any way other than bobbin work. After sewing
bobbin work, refer back to the steps in "Preparing
the Bobbin Thread" for removing and cleaning the
bobbin case (gray), and then reinstall the standard
bobbin case (black).
• Be sure to use the bobbin case (gray) when creating
bobbin work. Using any other bobbin case may
result in the thread becoming tangled or damage to
the machine.
• Make sure that the bobbin case is correctly
installed. If the bobbin case is incorrectly installed,
the thread may become tangled or the machine may
be damaged.
• Be sure to use the included bobbin or one designed
specifically for this machine (Class 15). Using any
other bobbin may result in damage or injuries.
Actual size
11.5 mm
(approx.
7/16 inch)
This model Other models
• Slowly and evenly wind the thread around the
bobbin.
• For best results, wind the bobbin so the thread is not
twisted.
Install the needle plate cover.
h
For details on installing the needle plate cover,
refer to “Cleaning the Race” in the Instruction
and Reference Guide.
a Needle plate cover
• When creating bobbin work, use the cord guide
bobbin cover (for bobbin work and attaching
cords), otherwise the thread may become tangled
or the needle may break.
Install the flat bed attachment.
i
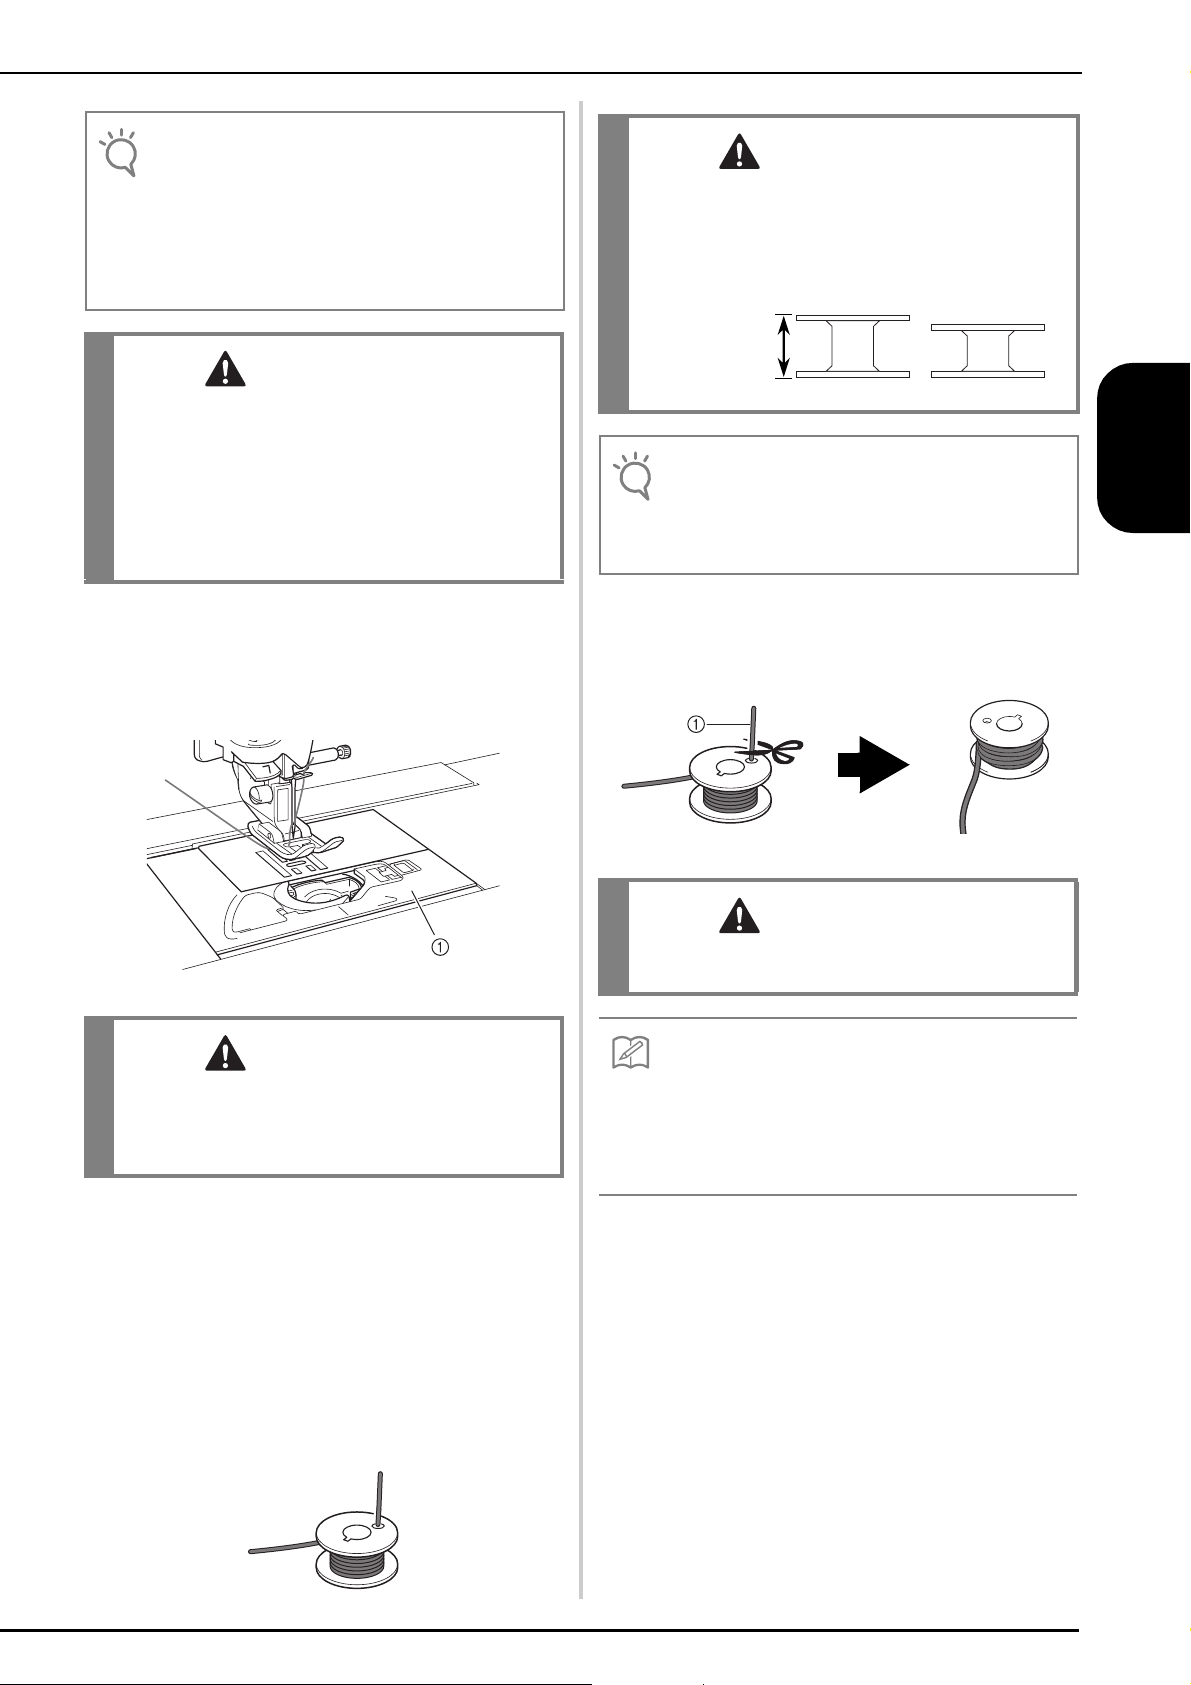
Insert the thread tail from the spool of thread
j
through the hole in the bobbin from the inside
to the outside. Hold the thread tail while
winding the thread around the bobbin by
hand. After winding the bobbin so it is filled
as shown below (about 80%), cut the thread.
Using scissors carefully trim the thread tail as
k
close to the bobbin as possible.
a Beginning of wound thread
• If thread extends beyond the top of the bobbin too
much, the thread may become tangled or the
needle may break.
If inserting thread tail through bobbin hole is difficult
bobbin can be wound by holding tail and wrapping
thread around inside base. Then carefully trim thread
tail so it does not extend from the side of the bobbin.
Install the bobbin wound with thread.
l
Whether or not tension should be applied to the
bobbin thread depends on the type of thread
used.
10
Page 13

■ When tension is applied to the bobbin
CAUTION
Note
thread
Insert bobbin into bobbin case so the thread unwinds
from the left side. Pass the thread carefully through
groove of needle plate cover as shown below.
a Groove of needle plate cover
■ When tension is not applied to the bobbin
thread
If the bobbin thread in the trial stitching is too tight and
adjusting the bobbin case tension does not help, do not
pass the thread through the tension spring.
Hold the bobbin with your left hand so the thread
unwinds from the right side and hold the end of the
thread with your right hand.
ENGLISH
• When winding the bobbin, make sure the thread is
not frayed. Sewing with frayed thread may result in
the thread catching on the tension spring of the
bobbin case, the thread completely becoming
tangled or damage to the machine.
• Do not guide the bobbin thread completely through
the groove in the needle plate cover, otherwise the
lower threading will not be done correctly. Thread
only as far as shown below.
Pull out about 8 cm (approx. 3 inches) of
m
bobbin thread.
Turn on the sewing machine, and then press
n
.
→ The screen changes, and all keys and operation
buttons are locked.
• If “OPENING DISPLAY” in the Settings Screen is
turned “ON” press anywhere on the LCD screen
before pressing the icon.
11
Page 14

Lightly hold the end of the upper thread while
Note
Memo
o
turning the handwheel toward you
(counterclockwise) until the mark on the
handwheel aligns with the line on the
machine.
Gently pull the upper thread to pull up the
p
bobbin thread through the needle plate.
Install the the cord guide bobbin cover (for
t
bobbin work and attaching cords).
a Cord guide bobbin cover (for bobbin work and
attaching cords)
Press or on the
u
screen.
→ All keys and operation buttons are unlocked, and
the previous screen is displayed.
Positioning the Fabric and Sewing
→ A loop of the bobbin thread comes out through the
hole in the needle plate.
Use the presser foot lever to raise the presser
q
foot.
Insert tweezers through bobbin thread loop
r
and pull bobbin thread above the needle
plate.
Align the upper thread and bobbin thread,
s
and then pull out about 10 cm (approx.
4 inches) of the threads and pass them under
the presser foot toward the rear of the
machine.
• Recommended stitches for bobbin work are open
“airy” type stitches.
• Be sure to sew trial stitches using same fabric and
threads as project in order to check the sewing results.
• The bobbin thread may become tangled due to the
type of pattern and thread that are being used. Since
this may cause the needle to break, immediately
stop sewing if this occurs. Turn off the machine, and
then cut out the tangled thread with scissors. Then,
clean the race and bobbin case as described in
“Preparing the Bobbin Thread” on page 9.
Select a stitch. For this example, press .
a
• For best results, select a longer stitch length and a
wider stitch width. Depending on the selected stitch,
it may not be possible to change the stitch length
and stitch width.
12
• Depending on the fabric, bunched stitches may
result. We recommend selecting a simple stitch and
sewing trial stitches to check the sewing results.
Examples of simple stitches: , ,
Page 15

Adjust the upper thread tension.
Memo
CAUTION
Note
b
For details on adjusting the upper thread tension,
refer to “Adjusting the Thread Tension” in the
Instruction and Reference Guide.
We recommend a setting between 6 and 8 for the
upper thread tension.
With the wrong side facing up, place the
h
fabric under the presser foot.
ENGLISH
Make sure that automatic thread cutting
c
( ) and automatic reinforcement/reverse
stitching ( ) have been turned off.
• Before sewing, make sure that automatic thread
cutting has been turned off. If sewing is started with
automatic thread cutting turned on, the thread may
become tangled or the machine may be damaged.
Place stabilizer on top (wrong side) of the
d
fabric.
• Type and weight of stabilizer will depend on fabric
and thread being used.
If thread is too thick to pull through fabric to
e
machine surface use an awl to punch a hole in
the fabric at the beginning of stitching so the
bobbin thread can be fed through the
opening.
a Wrong side of fabric
Turn the handwheel toward you
i
(counterclockwise) to feed the needle into the
fabric or punched hole. Position the upper
thread over the presser foot and lightly hold
then, lower the presser foot lever.
a Punched hole
b Upper thread over the presser foot
Pulling the upper thread gently, turn the
j
handwheel toward you (counterclockwise)
until the mark on the handwheel aligns with
the line on the machine.
f
g
Press .
→ The screen changes, and all keys and operation
buttons are locked.
Use the presser foot lever to raise the presser
foot.
→ A loop of the bobbin thread comes out through the
hole in the fabric.
13
Page 16
Note
• If the bobbin thread does not come up, hold the
Note
Note
Note
Note
upper thread as shown below to pull up the bobbin
thread.
a Upper thread
• Before sewing, check that there is enough thread in
the bobbin.
When you have reached the end of the
p
stitching area, stop the machine.
• Do not sew reinforcement/reverse stitches at the
end of the stitching, otherwise the threads may
become tangled or the needle may break. In
addition, it may be difficult to pull the bobbin thread
up to the wrong side of the fabric.
Raise the presser foot lever, and then use
k
tweezers to pull up the bobbin thread and
bring the end of the thread to the top of the
fabric.
• Pull the thread while holding down the fabric so it
does not move out of place.
Align the upper thread and bobbin thread,
l
and then pass them under the presser foot
toward the rear of the machine.
While gently holding threads at the rear of the
m
machine, turn the handwheel to feed the
needle into the fabric or punched hole again,
and then lower the presser foot lever.
Raise the needle and presser foot.
q
Leaving about 10 cm (approx. 4 inches) of
r
thread at the ends, use scissors to cut the
threads.
a 10 cm (approx. 4 inches)
• Do not press the “Thread Cutter” button to cut the
threads, otherwise the machine may be damaged.
14
Press or in the
n
screen.
→ All keys and operation buttons are unlocked, and
the previous screen is displayed.
Select a low speed , gently hold the threads
o
behind the presser foot and start sewing.
Page 17

■ Finishing the thread ends
Note
Note
Note
At the end of the stitching, use a hand sewing
a
needle to bring the bobbin thread up to the
wrong side of the fabric.
a Wrong side of fabric
b Bobbin thread
• If it is difficult to place bobbin thread through the eye
of a hand sewing needle, use a ribbon embroidery
needle to pull the thread up to the wrong side of the
fabric. Otherwise, use an awl to pull up the bobbin
thread.
■ Adjusting the upper thread tension
Refer to “Adjusting the Thread Tension” in the
Instruction and Reference Guide. We recommend a
setting between 6 and 8 for the upper thread tension.
■ Adjusting the tension of the bobbin thread
If the desired stitching cannot be achieved after
adjusting the upper thread tension, adjust the tension of
the bobbin thread. The tension of the bobbin thread can
be adjusted by turning the slotted-head (–) screw on the
bobbin case (gray) for bobbin work.
a Do not turn the phillips screw (+).
b Adjust with a screwdriver (small).
To increase the tension of the bobbin thread, turn the
slotted-head (–) screw 30° to 45° clockwise.
ENGLISH
Working from the wrong side of the fabric, tie
b
the bobbin and upper threads together by
hand. Cut away excess threads with scissors.
a Wrong side of fabric
b Right side of fabric
• To ensure threads do not come undone after being
tied place a drop of fabric glue on knots.
If the desired results could not be achieved,
c
adjust the tension of the bobbin thread and of
the upper thread, and then try sewing the
stitching again.
For more details, refer to “Adjusting the Thread
Tension”.
To decrease the tension of the bobbin thread, turn the
slotted-head (–) screw 30° to 45° counterclockwise.
• Turning the screw on the bobbin case (gray) may
push up the spring plate, as shown below.
If this occurs, gently press down the spring plate
with a screwdriver so it is lower than the top surface
of the bobbin case (gray), and then insert the bobbin
case into the machine.
Adjusting the Thread Tension
After sewing trial stitches and checking the sewing
results, adjust the thread tensions if necessary. After
adjusting the tensions, be sure to sew trial stitches in
order to check the sewing results.
a Spring plate
15
Page 18

CAUTION
• DO NOT adjust the position of the phillips (+)
Note
CAUTION
screw on the bobbin case (gray) as this may result in
damage to the bobbin case, rendering it useless.
• If the slotted screw (-) is difficult to turn, do not use
force. Turning the screw too much or providing
force in either (rotational) direction may cause
damage to the bobbin case. Should damage occur,
the bobbin case may not maintain proper tension.
• If the bobbin thread tension is tight, the thread
cannot be passed through the tension spring when
the bobbin is installed in the bobbin case. (Refer to
“When tension is not applied to the bobbin thread”
on page 11.)
Troubleshooting
Several solutions for minor problems are described
below. If the problem persists, contact your nearest
authorized retailer.
Apply slight tension on bobbin thread by
d
holding thread out to the left side of presser
foot. Press the “Thread Cutter” button again.
■ The thread was accidentally cut
automatically and the bobbin thread is
caught inside the machine
Cut the thread near the fabric above the
a
needle plate, and then remove the fabric.
a Thread
Remove the bobbin, and then hold it out
b
toward the left side of the machine.
• Do not pull on the thread with excessive force,
otherwise the machine may be damaged.
■ The pattern is misaligned
Refer to“Adjusting the thread tension”and increase the
upper thread tension. If the pattern is still misaligned,
reduce the tension of the bobbin thread.
a Correct tension
b The upper thread tension is too loose, or the bobbin
thread tension is too tight.
■ The bobbin thread catches on the tension
spring of the bobbin case
Sew with no tension applied to the bobbin thread.
(Refer to “When tension is not applied to the bobbin
thread” on page 11.)
16
Lower the presser foot.
c
Page 19

LIST OF STITCHES THAT CANNOT BE USED WITH
THE CIRCULAR ATTACHMENT
Category Stitches that cannot be used
1* - All usable
2*- All usable
3 - All usable
4 - All not usable
5 - 01, 03, 04, 05, 06, 08, 09, 10
Q All usable
015, 016, 017, 018, 019, 020, 022, 023, 024, 025, 026, 027, 028, 029, 030, 032, 033,
034, 035, 036, 037, 038, 039, 040, 041, 042, 043, 044, 045, 046, 051, 052, 053, 054,
055, 056, 057, 058, 059, 063, 064, 065, 066, 067, 068, 069, 071, 072, 075, 076, 077,
078, 079, 080, 081, 082, 083, 084, 085, 086, 087, 088, 089, 090, 091, 092, 093, 094,
6 -
095, 096, 097, 098, 099, 100, 101, 102, 103, 104, 105, 106, 107, 108, 109, 110, 111,
112, 113, 114, 117, 118, 119, 121, 124, 125, 126, 127, 128, 129, 130, 131, 132, 133,
134, 135, 136, 137, 138, 139
ENGLISH
064, 082, 084, 085, 086, 087, 088, 089, 090, 091, 092, 093, 094, 095, 096, 097, 098,
099, 100, 101, 103, 104, 105, 106, 107, 108, 109, 110, 111, 112, 113, 114, 126
7 - All usable
01, 02, 03, 04, 06, 07, 09, 10, 11, 12, 13, 14, 15, 16, 17, 18, 19, 20, 21, 22, 24, 25, 26,
28, 29, 30, 31, 32, 33, 34, 36, 37, 38, 39, 40, 41, 42, 43, 44, 47, 48, 50, 51, 52, 53, 54,
8 -
9 - All usable
10 - 04, 09
11 - All usable
Alphabet patterns
* Do not use overcasting foot “G”, side cutter “S” or blind stitch foot “R” even if they appear in the screen as the presser foot to be used with
the selected stitch.
56, 57, 58, 60
09, 10, 11, 12, 13, 14, 15, 16, 17, 18, 19, 20, 24, 25, 28, 29, 30, 53
All not usable
17
Page 20

TABLE DES MATIÈRES
INTRODUCTION....................................................................................................................19
UTILISATION DU GUIDE POUR COUTURE CIRCULAIRE POUR COUDRE DES MOTIFS
CIRCULAIRES.......................................................................................................................... 19
À propos du guide pour couture circulaire.......................................................................... 19
Accessoires inclus............................................................................................................... 19
Fixation du guide pour couture circulaire............................................................................ 20
Couture d’un cercle ............................................................................................................ 20
Utilisation du gabarit quart de cercle .................................................................................. 22
Utilisation du pied-de-biche fourni ..................................................................................... 22
CRÉATION D’UN TRAVAIL À LA CANETTE............................................................................ 24
À propos du travail à la canette........................................................................................... 24
Matériel nécessaire ............................................................................................................. 25
Enfilage supérieur................................................................................................................ 26
Préparation du fil de la canette............................................................................................ 26
Positionnement du tissu et couture...................................................................................... 29
Réglage de la tension du fil................................................................................................. 32
Dépannage ......................................................................................................................... 33
LISTE DES POINTS NE POUVANT PAS ÊTRE UTILISÉS AVEC LE GUIDE POUR COUTURE
CIRCULAIRE............................................................................................................................ 34
18
Page 21

INTRODUCTION
Remarque
ATTENTION
Cet addendum fournit des informations supplémentaires non décrites dans le Guide d’instructions et de référence.
Reportez-vous à ces instructions après avoir lu le Guide d’instructions et de référence accompagnant votre machine
à coudre.
UTILISATION DU GUIDE POUR COUTURE CIRCULAIRE
POUR COUDRE DES MOTIFS CIRCULAIRES
À propos du guide pour couture circulaire
Ce guide permet de coudre des motifs circulaires à des intervalles de 5 mm, en rayons* allant de 30 mm à 130
mm lorsque l’aiguille est au centre. Le guide est placé à gauche de l’aiguille sur votre machine à coudre. Il
permet également de coudre des points de couture courants et décoratifs.
*
Rayon : distance entre le centre et le bord du cercle.
• Vous ne pouvez pas utiliser de point décoratif lorsque le fil passe par le côté, ni de points de plus de 7,0 mm de largeur.
Avant de commencer votre travail de couture, nous vous conseillons de coudre quelques points d’essai et d’en vérifier le
résultat. Si vous cousez des points ne pouvant pas être utilisés, le motif risque d’être décalé. Pour consulter la liste des
points ne pouvant pas être utilisés, reportez-vous au tableau « LISTE DES POINTS NE POUVANT PAS ÊTRE UTILISÉS
AVEC LE GUIDE POUR COUTURE CIRCULAIRE » à la page 34.
• Accordez une attention particulière au pivot ; une utilisation négligente peut provoquer des blessures.
Veillez à ce que les jeunes enfants ne jouent pas avec le guide. Lorsque vous n’utilisez pas le guide, gardez
toujours le pivot dans l’indicateur pour éviter de le perdre.
FRANÇAIS
Accessoires inclus
1 4 Tableau de conversion 5
mm (f) pouces
130 5 3/16
120 4 3/4
110 4 3/8
100 4
2 3 90 3 1/2 6
80 3 3/16
70 2 3/4
60 2 3/8
50 2
40 3/2
30 13/16
N° Nom de la pièce Code de la pièce
1 Guide pour couture circulaire
a Indicateur
b Poignée/Inversion vers le haut
c Bouton de dégagement
d Position d’insertion pour le
pivot
e Échelle
2 Pivot XE6016-001
3 Vis de fixation
(2 pcs, une de réserve)
-
XE6022-001
N° Nom de la pièce Code de la pièce
4 Gabarit
f Rayon du cercle en mm
g Lignes angulaires indiquées en
degrés, commençant à 0 avec
des intervalles de 5 degrés
h Centre
5 Pied de tressage XE5680-001
6 Pied pour cordonnet XA6871-001
XE6024-001
19
Page 22

Remarque
• Nous vous recommandons d’utiliser la table
3040
Remarque
Remarque
d’extension avec votre machine à coudre pour un
meilleur contrôle du tissu.
• Ne relevez pas la table d’extension lorsque le guide
pour couture circulaire est fixé.
• Le pivot peut se retirer si vous soulevez le tissu fixé
au guide pour couture circulaire. Lorsque vous
soulevez le tissu, appuyez doucement sur la tête du
pivot.
• Lorsque vous cousez de plus petits cercles ou
utilisez du tissu à grain ou à texture irrégulière, il est
impossible de réaliser un cercle parfait.
• Certains pieds-de-biche, tels que le couteau raseur,
ne peuvent pas être utilisés avec ce guide. Testez
toujours vos pieds auxiliaires avec le guide.
• Lorsque vous utilisez ce guide, testez la vitesse de
couture de votre machine pour obtenir les meilleurs
résultats.
• Lorsque vous cousez de plus grandes pièces de
tissu ou vêtements, assurez-vous qu’ils ne
s’accrochent pas à votre machine, ce qui
provoquerait un glissement ou une distorsion de
votre motif.
Fixation du guide pour couture
Serrez fermement la vis à l’aide du tournevis
c
en forme de disque fourni avec votre
machine.
a Tournevis en forme de disque
Couture d’un cercle
• Enfilez l’aiguille de la machine avant de placer le
pivot dans le guide pour couture circulaire. Le levier
d’enfilage risque de toucher le pivot et
d’endommager ce dernier ou le dispositif d’enfilage
de la machine.
Soulevez la poignée.
a
circulaire
Placez le guide pour couture circulaire à
a
gauche comme illustré ci-dessous.
→ Les deux taquets en dessous du guide vont s’insérer
dans les emplacements correspondants dans la
plaque d’aiguille, de sorte que le guide repose à plat
sur le plateau de votre machine.
Insérez la vis sur le guide pour couture
b
circulaire dans l’emplacement prévu à cet
effet à droite de la plaque d’aiguille (a).
Faites glisser l’indicateur pour atteindre la
b
taille de cercle de votre choix.
• Ne faites pas glisser l’indicateur en appuyant sur le
pivot car cela pourrait le tordre ou le casser.
20
a Vis de fixation
Page 23

Utilisez un renfort plus large que le motif,
Remarque
Remarque
ATTENTION
c
avec un tissu fin. Renforcez le centre du
cercle avec une pièce de renfort si vous
utilisez le même centre de façon répétée.
a Envers du tissu
b Renfort
c Renfort
d Zone du pivot
• Utilisez toujours un renfort lorsque vous cousez sur
un tissu ou un vêtement pour éviter de l’étirer ou de
faire des plis. Selon le type de tissu à coudre,
choisissez un renfort permanent, thermocollant,
temporaire ou adhésif.
Insérez la pointe du pivot dans l’emplacement
e
désigné par « Y » sur le guide en appuyant
dessus.
a Endroit du tissu
b Envers du tissu
FRANÇAIS
Insérez le pivot au centre du cercle sur
d
l’endroit du tissu.
a Pivot
b Centre du cercle
c Endroit du tissu
• Lorsque vous cousez un cercle de petit diamètre,
nous vous recommandons de fixer d’abord le tissu
au guide et de placer ensuite l’indicateur à la taille
désirée.
Sélectionnez le point désiré et cousez en
f
permettant au tissu d’être librement entraîné.
Si vous poussez ou tirez sur le tissu, votre
cercle sera irrégulier.
Lorsque vous avez terminé de coudre,
g
appuyez toujours sur le bouton de
dégagement pour enlever le pivot et le tissu
du guide pour couture circulaire.
a Bouton de dégagement
• Ne laissez pas le pivot inséré dans le tissu et non
fixé au guide couture circulaire. Cela pourait causer
une blessure ou endommager la machine.
21
Page 24

Utilisation du gabarit quart de cercle
Remarque
ATTENTION
Lorsque vous combinez des points courants ou
décoratifs ou que vous répétez un point individuel,
utilisez le gabarit fourni comme guide.
Repérez d’abord le point pivot (centre de
a
votre cercle) avant de commencer à coudre
sur votre tissu (a).
Sélectionnez le point désiré et la taille du
b
cercle en utilisant les repères sur le guide ;
placez-y ensuite le tissu.
Cousez un point unique ou une combinaison
c
de motifs (b).
Retirez le tissu ou le vêtement du guide.
d
A l’aide d’un crayon effaçable, tracez deux
e
lignes à partir du point pivot, une au début du
motif de point, l’autre à la fin.
Vérifiez la ligne à la fin du point (d) et notez
g
les degrés approximatifs. À l’aide d’un cercle
de 360 degrés, divisez la longueur du point
(votre degré/mesure du point) par 360, ce qui
vous donnera un nombre de répétitions de
points approximatif. EXEMPLE : votre point
est long de 16 degrés, donc : 360 divisé par 16
est égal à 22,5 répétitions.
• TIl ne s’agit pas d’un compte exact en raison du
nombre de variables, p. ex. la longueur du point, le
tissu utilisé, le fil et le renfort. Selon le point utilisé,
vous pouvez ajuster la longueur du point,
l’agrandissant ou le réduisant pour réussir à fermer
votre cercle sans chevauchement ou insuffisance
(a).
• Cousez toujours une version d’essai du motif en
vérifiant la longueur et la largeur du point ainsi que
la direction de couture pour vous assurer qu’il
convienne à votre projet.
• Des calculs supplémentaires peuvent être
nécessaires si votre motif se chevauche.
Exemple: insuffisance du motif
a Point pivot
b Combinaison de motif de points/point unique
c Début du point
d Fin du point
Placez le gabarit au-dessus de votre motif,
f
alignant ainsi le point pivot central et le
repère central du gabarit (a). Placez ensuite
la ligne 0 degré (b) sur le côté droit du
gabarit au début du point (c).
a
Fin du point
Utilisation du pied-de-biche fourni
L’utilisation du pied-de-biche fourni vous permet de
décorer vos projets de couture en leur donnant un
aspect professionnel agrémenté de votre touche
personnelle.
■ PIED DE TRESSAGE
Vous pouvez utiliser une grande variété de tresses
mesurant jusqu’à 5 mm de largeur à l’aide des points
droits, des points zigzag et de certains points
décoratifs.
• N’utilisez pas ce pied lorsque vous cousez avec des
tresses tissées denses que l’aiguille pénètre
difficilement. Sinon, vous pourriez casser l’aiguille,
provoquer des dommages et/ou des blessures.
22
a Centre du gabarit
b Ligne 0 degré
c Début du point
d Fin du point
Page 25
Desserrez la vis de la plaque du guide sur le
Remarque
a
pied et faites glisser la plaque pour l’ajuster à
la largeur de la tresse.
■ PIED POUR CORDONNET
Vous pouvez décorer votre motif en utilisant 1 à 3
cordonnets de fils décoratifs.
Faites glisser les cordonnets à partir de la
a
droite du pied-de-biche et placez chacun
d’eux dans chaque guide (pour utiliser un seul
cordonnet, employez le guide central).
a Plaque
Insérez la tresse via le guide avant de fixer le
b
pied à la machine.
Serrez la vis et positionnez la tresse à l’arrière
c
du pied de tressage.
Fixez le pied à la machine.
d
Placez les cordonnets en dessous et à l’arrière
b
du pied pour cordonnet.
Sélectionnez un point zigzag ou décoratif et
c
cousez de manière circulaire en guidant
doucement les cordonnets.
FRANÇAIS
Sélectionnez le point désiré et cousez de
e
manière circulaire en guidant doucement la
tresse.
• Lorsque vous cousez des points zigzag ou
décoratifs, ajustez la largeur du point de sorte qu’il
soit légèrement plus large que la tresse ou le
cordonnet.
23
Page 26

CRÉATION D’UN TRAVAIL À LA CANETTE
À propos du travail à la canette
Il est possible de réaliser de magnifiques travaux de broderie en trois dimensions en bobinant sur la canette un fil ou
un ruban lourd trop épais pour être enfilé par l’aiguille de la machine. Le fil ou le ruban décoratif sera visible en
dessous du tissu alors que vous cousez avec le côté envers du tissu vers le haut.
1. Points de couture
courants
2. Points décoratifs 3. Couture en mouvement
libre
24
Page 27
Matériel nécessaire
Remarque
Remarque
■ Boîtier de la canette et capot du
compartiment à canette avec guide-cordon
a Boîtier de la canette (gris)
Il y a une encoche à l’emplacement marqué d’un « A ».
b Capot du compartiment à canette avec guide cordon (à
trou unique pour le travail à la canette ou la fixation de
cordon).
Deux petits taquets en forme de V (marqués d’un « B »)
se situent à l’arrière du capot du compartiment à
cannette.
Les taquets permettent de maintenir la canette en place
de sorte qu’elle ne se soulève pas pendant que le fil
épais est passé par cette dernière.
■ Fil supérieur
Le choix du fil supérieur peut varier selon la finition que
vous souhaitez atteindre. En utilisant un fil de broderie
(polyester), un fil en polyester à usages multiples ou un
fil monofilament (nylon transparent), l’aspect d’un seul
motif peut être modifié de nombreuses fois juste en
choisissant un poids et/ou une couleur de fil supérieur
différent.
Si vous souhaitez que le fil supérieur ne soit pas visible,
nous vous recommandons d’utiliser un fil monofilament
ou un fil léger en polyester (50 wt. ou plus) de la même
couleur que le fil inférieur.
■ Aiguille
Utilisez l’aiguille adéquate en fonction du fil supérieur
et du tissu utilisés. Reportez-vous à la section
« Combinaisons tissu/fil/aiguille » (du chapitre
« CHANGEMENT DE L’AIGUILLE ») du Guide
d’instructions et de référence.
■ Pied-de-biche
Points de couture courants ou points décoratifs : pied
pour monogrammes « N »
FRANÇAIS
■ Fil inférieur
Nous recommandons les types de fil suivants pour le
travail à la canette.
Fil de broderie à la main Nº 5 ou
plus fin ou fil décoratif
Ruban tissé flexible
Ruban fin de broderie (en soie ou
en tissu ressemblant à la soie) (3,5
mm (environ 1/8 pouce) ou moins
recommandé)
* Lorsqu’un ruban large ou des fils lourds sont utilisés, nous vous
recommandons de coudre quelques points d’essai avec et sans
tension sur le boîtier de la canette pour définir laquelle des
deux méthodes donne les meilleurs résultats de couture.
Si un ruban d’une taille de 3,5 mm (env. 1/8 de pouce) est
utilisé, nous vous recommandons de ne pas appliquer de
tension sur le boîtier de la canette. Reportez-vous à la page 28
pour des instructions plus détaillées.
Couture en mouvement libre : pied pour quilting en
mouvement libre « C », pied pour quilting ouvert en
mouvement libre « O » ou pied pour quilting en écho
en mouvement libre « E »
■ Tissu
Veillez à coudre quelques points d’essai sur un
morceau de tissu « brouillon » avec les mêmes fils et le
même tissu que ceux utilisés dans votre projet.
• Les résultats peuvent être affectés par le type de
tissu utilisé. Avant de commencer votre projet,
veillez à coudre quelques points d’essai sur un
morceau de tissu « brouillon » qui soit le même que
celui utilisé dans votre projet.
• N’utilisez pas de fil plus lourd que du fil de broderie
à la main Nº 5.
• Certains fils peuvent ne pas être adéquats pour le
travail à la canette. Veillez à coudre quelques points
d’essai avant de coudre sur votre projet.
25
Page 28

Enfilage supérieur
Installez une aiguille adéquate en fonction du
a
fil supérieur et du tissu utilisés.
Pour plus de détails sur l’installation de l’aiguille,
veuillez vous reporter à la section
« CHANGEMENT DE L’AIGUILLE » du Guide
d’instructions et de référence.
Fixez le pied-de-biche.
b
Pour plus de détails sur la façon de fixer le piedde-biche, veuillez vous reporter à la section
« CHANGEMENT DU PIED-DE-BICHE » du
Guide d’instructions et de référence.
Enfilez la machine avec le fil supérieur.
c
Pour plus de détails sur la façon d’enfiler la
machine, veuillez vous reporter à la section
« Enfilage supérieur » du Guide d’instructions et
de référence.
Retirez le boîtier de la canette.
d
a Boîtier de la canette
Utilisez la brosse de nettoyage fournie avec la
e
machine ou un aspirateur pour retirer les
peluches et la poussière de la coursière et de
la zone environnante.
Préparation du fil de la canette
Pour créer un travail à la canette, le boîtier de la canette
doit être remplacé par celui prévu pour le travail à la
canette.
Avant de créer votre travail à la canette, nettoyez le
boîtier de la canette et la coursière.
Soulevez l’aiguille et le pied-de-biche, puis
a
éteignez la machine.
Enlevez le plateau.
b
Saisissez les deux côtés du capot de la plaque
c
de l’aiguille, puis faites-le glisser vers vous
pour l’enlever.
a Brosse de nettoyage
b Coursière
Essuyez le boîtier de la canette (gris) avec un
f
chiffon doux non pelucheux pour le nettoyer.
Insérez le boîtier de la canette (gris) de telle
g
sorte que la marque S soit alignée avec la
marque ● comme illustré ci-dessous.
26
a Marque S
b Marque ●
a Capot de la plaque de l’aiguille
Page 29
Remarque
• Le boîtier de la canette (gris) ne peut pas être utilisé
ATTENTION
ATTENTION
ATTENTION
Remarque
ATTENTION
Mémo
pour coudre autrement que pour le travail à la
canette. Une fois le travail à la canette terminé,
reportez-vous à nouveau à la procédure décrite dans
la section « Préparation du fil de la canette » pour
enlever et nettoyer le boîtier de la canette (gris), puis
réinstallez le boîtier de la canette standard (noir).
• Veillez à bien utiliser le boîtier de la canette (gris)
quand vous créez un travail à la canette. Si vous
utilisez un autre boîtier de canette, le fil pourrait
s’emmêler ou la machine s’endommager.
• Veillez à ce que le boîtier de la canette soit
correctement installé. Si le boîtier de la canette est
mal installé, le fil pourrait s’emmêler ou la machine
s’endommager.
• Veillez à bien utiliser la canette fournie ou une
autre conçue spécifiquement pour cette machine
(Classe 15). L’utilisation d’une toute autre canette
peut entraîner des dommages ou des blessures.
Taille réelle
11,5 mm
(env.
7/16 de
pouce)
Ce modèle Autres modèles
• Enroulez le fil lentement et de façon homogène
autour de la canette.
• Pour obtenir les meilleurs résultats, enroulez le fil
autour de la canette de sorte qu’il ne s’emmêle pas.
FRANÇAIS
Installez le capot de la plaque de l’aiguille.
h
Pour plus de détails sur l’installation du capot de
la plaque de l’aiguille, veuillez vous reporter à la
section « Nettoyage du boîtier de la canette » du
Guide d’instructions et de référence.
a Capot de la plaque de l’aiguille
• Quand vous créez un travail à la canette, utilisez le
capot du compartiment à canette avec guide-cordon
(pour le travail à la canette et la fixation de cordons),
sinon le fil pourrait s’emmêler ou l’aiguille se casser.
Installez le plateau.
i
Insérez l’extrémité du fil de la bobine de fil à
j
travers le trou de la canette de l’intérieur vers
l’extérieur. Maintenez l’extrémité du fil tout
en bobinant le fil autour de la canette à la
main. Après avoir enroulé le fil autour de la
canette de sorte que cette dernière soit
remplie de la manière illustrée ci-dessous
(environ 80 %), coupez le fil.
À l’aide de ciseaux, coupez la queue du fil qui
k
dépasse avec soin aussi près de la canette que
possible.
a Début du fil enroulé
• Si le fil dépasse trop au delà du dessus de la canette,
il pourrait s’emmêler ou l’aiguille pourrait se casser.
Si l’insertion de l’extrémité du fil dans le trou de la
canette s’avère difficile, la canette peut être bobinée si
vous maintenez l’extrémité et enroulez le fil autour de
la base interne. Coupez ensuite doucement l’extrémité
du fil de sorte qu’il ne dépasse pas du côté de la
canette.
Installez la canette sur laquelle vous avez
l
enroulé le fil.
La tension ou non du fil autour de la canette
dépend du type de fil utilisé.
27
Page 30
■ Quand une tension est appliquée au fil de la
ATTENTION
Remarque
canette
Insérez la canette dans le boîtier de la canette de sorte
que le fil se déroule du côté gauche. Passez le fil
doucement par la rainure du capot de la plaque
d’aiguille comme illustré ci-dessous.
■ Quand une tension n’est pas appliquée au fil
de la canette
Si le fil de la canette est trop serré lors des essais de
couture et le réglage de la tension du boîtier de la
canette n’aide pas, ne passez pas le fil dans le ressort de
tension.
Maintenez la canette de la main gauche de sorte que le
fil se déroule du côté droit et tenez l’extrémité du fil de
la main droite.
a Rainure du capot de la plaque d’aguille
• En enroulant la canette, veillez à ce que le fil ne soit
pas effiloché. Si vous cousez avec un fil effiloché, ce
dernier peut s’accrocher au ressort de tension du
boîtier de la canette puis s’emmêler complètement
ou endommager la machine.
• Ne guidez pas le fil de la canette complètement
dans la rainure du capot de la plaque de l’aiguille,
sinon l’enfilage inférieur ne sera pas effectué
correctement. Enfilez-le uniquement jusqu’à la
limite illustrée ci-dessous.
Tirez environ 8 cm (env. 3 de pouces) de fil
m
de la canette.
Mettez la machine à coudre sous tension, puis
n
appuyez sur .
→ L’écran change et toutes les touches ainsi que toutes
les touches de fonctionnement sont bloquées.
• Si « Affichage d’ouverture ( ) » sur l’écran des
réglages est sur « ON », appuyez n’importe où sur
l’écran LCD avant d’appuyer sur l’icône
.
28
Page 31

Tenez légèrement l’extrémité du fil supérieur
Remarque
Mémo
o
tout en tournant le volant vers vous (sens
antihoraire) jusqu’à ce que la marque du
volant soit alignée avec la ligne de la
machine.
Tirez légèrement sur le fil supérieur pour tirer
p
le fil de la canette au travers de la plaque de
l’aiguille.
Installez le capot du compartiment à canette
t
avec guide-cordon (pour le travail à la canette
et la fixation de cordons).
a Capot du compartiment à canette avec guide-cordon
(pour le travail à la canette et la fixation de cordons)
Appuyez sur ou sur
u
à l’écran.
→ Toutes les touches et toutes les touches de
fonctionnement se débloquent et l’écran précédent
s’affiche.
FRANÇAIS
→ Une boucle formée par le fil de la canette sort par le
trou de la plaque de l’aiguille.
Utilisez le levier du pied-de-biche pour
q
soulever le pied-de-biche.
Insérez une petite pince dans la boucle du fil
r
de la canette et tirez le fil de la canette au
dessus de la plaque de l’aiguille.
Alignez le fil supérieur et le fil de la canette,
s
puis tirez les fils sur une longueur d’environ
10 cm (env. 4 de pouces) et passez-les sous le
pied-de-biche vers l’arrière de la machine.
Positionnement du tissu et couture
• Les points recommandés pour le travail à la canette
sont des points ouverts de type « aéré ».
• Veillez à effectuer vos essais de couture en utilisant
le même tissu et les mêmes fils pour pouvoir en
vérifier les résultats.
• Le fil de la canette pourrait s’emmêler à cause des
types de motifs et de fils utilisés. Comme ceci pourrait
casser l’aiguille, arrêtez immédiatement de coudre si
cela se produit. Éteignez la machine, puis coupez le fil
emmêlé avec des ciseaux. Ensuite, nettoyez la
coursière et le boîtier de la canette comme décrit dans
la section « Préparation du fil de la canette » page 26.
Sélectionnez un point. Pour cet exemple,
a
appuyez sur .
• Pour obtenir les meilleurs résultats, choisissez une
longueur de point plus longue et une largeur de point plus
large. Selon le point sélectionné, il se peut qu’il ne soit pas
possible de modifier la longueur et la largeur du point.
• Selon le tissu utilisé, les points peuvent se tasser. Nous
recommandons de sélectionner un point simple et de faire
des essais de couture pour vérifier les résultats.
Exemples de points simples : , ,
29
Page 32

Réglez la tension du fil supérieur.
Mémo
ATTENTION
Remarque
b
Pour plus de détails sur la façon de régler la
tension du fil supérieur, veuillez vous reporter à
la section « Réglage de la tension du fil » du
Guide d’instructions et de référence.
Nous recommandons un réglage entre 6 et 8 pour la
tension du fil supérieur.
Veillez à ce que les fonctions de coupure
c
automatique du fil ( ) et de point de
renfort/inverse automatique ( ) soient
désactivées.
• Avant de coudre, vérifiez que la fonction de
coupure automatique du fil a été désactivée. Si vous
commencez à coudre alors que la fonction de
coupure automatique du fil est activée, le fil
pourrait s’emmêler ou la machine s’endommager.
Orientez l’envers du tissu vers le haut et
h
placez le tissu sous le pied-de-biche.
a Envers du tissu
Tournez le volant vers vous (dans le sens
i
antihoraire) pour faire passer l’aiguille dans le
trou percé ou dans le tissu. Placez le fil
supérieur au dessus du pied-de-biche et
maintenez-le légèrement, puis abaissez le
levier du pied-de-biche.
Placez le renfort au-dessus (sur son côté
d
envers) du tissu.
• Le type et le poids du renfort dépendra du tissu et
du fil utilisés.
Si le fil est trop épais pour passer à travers le
e
tissu vers la surface de la machine, utilisez un
poinçon pour percer un trou dans le tissu au
début de la couture, de sorte que le fil de la
canette puisse passer par l’ouverture.
Appuyez sur .
f
→ L’écran change et toutes les touches ainsi que toutes
les touches de fonctionnement sont bloquées.
a Trou percé
b Fil supérieur au dessus du pied de biche
En tirant doucement sur le fil supérieur, faites
j
tourner le volant vers vous (sens antihoraire)
jusqu’à ce que la marque du volant soit
alignée avec la ligne de la machine.
→ Une boucle formée par le fil de la canette sort par le
trou fait dans le tissu.
g
30
Utilisez le levier du pied-de-biche pour
soulever le pied-de-biche.
Page 33

Remarque
• Si le fil de la canette n’apparaît pas, maintenez le fil
Remarque
Remarque
Remarque
Remarque
supérieur comme illustré ci-dessous pour soulever
le fil de la canette.
a Fil supérieur
Sélectionnez une vitesse lente, maintenez
o
doucement les fils derrière le pied-de-biche et
commencez à coudre.
FRANÇAIS
Soulevez le levier du pied-de-biche, puis
k
utilisez une petite pince pour tirer le fil de la
canette vers le haut et ramenez l’extrémité du
fil sur le dessus du tissu.
• Tirez sur le fil tout en maintenant le tissu vers le bas
pour qu’il ne bouge pas.
Alignez le fil supérieur et le fil de la canette,
l
puis passez-les sous le pied-de-biche vers
l’arrière de la machine.
Tout en maintenant légèrement les fils à
m
l’arrière de la machine, tournez le volant pour
refaire passer l’aiguille dans le trou percé ou
le tissu, puis abaissez le levier du pied-debiche.
• Avant de commencer à coudre, vérifiez qu’il y a
suffisamment de fil dans la canette.
Une fois arrivé au bout de la surface à coudre,
p
arrêtez la machine.
• Ne faites pas de point de renfort/inverse à la fin de
la couture, sinon les fils pourraient s’emmêler ou
l’aiguille se casser. De plus, il se peut qu’il soit
difficile de tirer le fil de la canette vers le haut sur
l’envers du tissu.
Relevez l’aiguille et le pied-de-biche.
q
Laissez environ 10 cm (env. 4 de pouces) de
r
fil aux extrémités et utilisez des ciseaux pour
couper les fils.
Appuyez sur ou sur
n
sur l’écran.
→ Toutes les touches et toutes les touches de
fonctionnement se débloquent et l’écran précédent
s’affiche.
a 10 cm (env. 4 de pouces)
• N’appuyez pas sur la touche « Coupe-fil » pour
couper les fils, au risque d’endommager la machine.
31
Page 34

■ Finition des extrémités de fil
Remarque
Remarque
Remarque
À la fin de la couture, utilisez une aiguille
a
pour couture à la main pour amener le fil de
la canette sur l’envers du tissu.
a Envers du tissu
b Fil de la canette
■ Réglage de la tension du fil supérieur
Reportez-vous à la section « Réglage de la tension du fil »
dans le Guide d’instructions et de référence. Nous
recommandons un réglage entre 6 et 8 pour la tension du
fil supérieur.
■ Réglage de la tension du fil de la canette
Si vous ne parvenez pas à obtenir le point souhaité
après avoir réglé la tension du fil supérieur, réglez la
tension du fil de la canette. La tension du fil de la
canette peut se régler en tournant la vis à tête fendue (–)
située sur le boîtier de la canette (gris) pour le travail à
la canette.
• En cas de difficulté pour passer le fil de la canette par
le chas de l’aiguille pour couture à la main, utilisez une
aiguille pour broderie de ruban pour tirer le fil vers le
haut jusqu’au côté envers du tissu. Ou alors, utilisez
un poinçon pour tirer le fil de la canette vers le haut.
En travaillant sur le côté envers du tissu,
b
nouez les fils de la canette et supérieur
ensemble à la main. Coupez l’excédent de fil
à l’aide d’une paire de ciseaux.
a Envers du tissu
b Endroit du tissu
a Ne faites pas tourner la vis cruciforme (+).
b Réglez avec un tournevis (petit).
Pour augmenter la tension du fil de la canette, tournez
la vis à tête fendue (–) de 30° à 45° dans le sens des
aiguilles d’une montre.
Pour diminuer la tension du fil de la canette, tournez la
vis à tête fendue (–) de 30° à 45° dans le sens inverse
des aiguilles d’une montre.
c
Réglage de la tension du fil
Après avoir fait des essais de couture et vérifié les
résultats, réglez la tension des fils si nécessaire. Après
avoir réglé les tensions, veillez à bien effectuer des
essais de couture afin de vérifier les résultats obtenus.
32
• Pour s’assurer que les fils ne se déferont pas après
les avoir noués, mettez une goutte de colle pour
tissus sur les nœuds.
Si vous n’êtes pas parvenu à obtenir les
résultats souhaités, réglez la tension du fil de
la canette et celle du fil supérieur, puis
essayez de coudre à nouveau.
Pour plus de détails, reportez-vous à la section
« Réglage de la tension du fil ».
• Si vous faites tourner la vis située sur le boîtier de la
canette (gris), la lame ressort pourrait se relever
comme illustré ci-dessous.
Si ceci se produit, enfoncez doucement la lame
ressort avec un tournevis pour qu’elle se retrouve
plus bas que la surface supérieure du boîtier de la
canette (gris), puis insérez le boîtier de la canette
dans la machine.
a Lame ressort
Page 35

Abaissez le pied-de-biche.
ATTENTION
Remarque
ATTENTION
c
• NE réglez PAS la position de la vis cruciforme (+)
sur le boîtier de la canette (gris) car ceci pourrait
endommager le boîtier de la canette et le rendre
inutilisable.
• Si la vis fendue (-) est difficile à tourner, ne forcez
pas. Trop tourner la vis ou forcer dessus dans
n’importe quel sens (de rotation) pourrait
endommager le boîtier de la canette. En cas de
dommage, le boîtier de la canette pourrait ne pas
pouvoir maintenir la tension adéquate.
• Si le fil de la canette est trop tendu, le fil ne parvient
pas à passer dans le ressort de tension quand la
canette est installée dans le boîtier de la canette.
(Veuillez vous reporter à la section « Quand une
tension n’est pas appliquée au fil de la canette »
page 28.)
Dépannage
Veuillez trouver ci-dessous plusieurs solutions à des
problèmes mineurs. Si le problème persiste, veuillez
contacter votre détaillant agréé le plus proche.
Appliquez une légère tension sur le fil de la
d
canette en tenant le fil hors du côté gauche
du pied-de-biche. Appuyez de nouveau sur la
touche « Coupe-fil ».
FRANÇAIS
■ Le fil a accidentellement été coupé
automatiquement et le fil de la canette est
coincé à l’intérieur de la machine
Coupez le fil près du tissu au dessus de la
a
plaque de l’aiguille, puis enlevez le tissu.
a Fil
Enlevez la canette, puis maintenez-la vers le
b
côté gauche de la machine.
• N’utilisez pas de force excessive en tirant sur le fil,
sinon vous pourriez endommager la machine.
■ Le motif est mal aligné
Reportez-vous à la section « Réglage de la tension du fil »
et augmentez la tension du fil supérieur. Si le motif est
toujours mal aligné, réduisez la tension du fil de la
canette.
a Tension correcte
b Le fil supérieur est trop lâche, ou le fil de la canette est
trop tendu.
■ Le fil de la canette s’accroche sur le ressort
de tension du boîtier de la canette
Cousez sans appliquer de tension sur le fil de la canette.
(Veuillez vous reporter à la section « Quand une
tension n’est pas appliquée au fil de la canette » page
28.)
33
Page 36

LISTE DES POINTS NE POUVANT PAS ÊTRE UTILISÉS
AVEC LE GUIDE POUR COUTURE CIRCULAIRE
Catégorie Points ne pouvant pas être utilisés
1* - Pris en charge
2*- Pris en charge
3 - Pris en charge
4 - Non pris en charge
5 - 01, 03, 04, 05, 06, 08, 09, 10
Q Pris en charge
015, 016, 017, 018, 019, 020, 022, 023, 024, 025, 026, 027, 028, 029, 030, 032, 033,
034, 035, 036, 037, 038, 039, 040, 041, 042, 043, 044, 045, 046, 051, 052, 053, 054,
055, 056, 057, 058, 059, 063, 064, 065, 066, 067, 068, 069, 071, 072, 075, 076, 077,
078, 079, 080, 081, 082, 083, 084, 085, 086, 087, 088, 089, 090, 091, 092, 093, 094,
6 -
095, 096, 097, 098, 099, 100, 101, 102, 103, 104, 105, 106, 107, 108, 109, 110, 111,
112, 113, 114, 117, 118, 119, 121, 124, 125, 126, 127, 128, 129, 130, 131, 132, 133,
134, 135, 136, 137, 138, 139
064, 082, 084, 085, 086, 087, 088, 089, 090, 091, 092, 093, 094, 095, 096, 097, 098,
099, 100, 101, 103, 104, 105, 106, 107, 108, 109, 110, 111, 112, 113, 114, 126
7 - Pris en charge
01, 02, 03, 04, 06, 07, 09, 10, 11, 12, 13, 14, 15, 16, 17, 18, 19, 20, 21, 22, 24, 25, 26,
28, 29, 30, 31, 32, 33, 34, 36, 37, 38, 39, 40, 41, 42, 43, 44, 47, 48, 50, 51, 52, 53, 54,
8 -
9 - Pris en charge
10 - 04, 09
11 - Pris en charge
Motifs alphabétiques
* N’utilisez pas le pied pour sujet « G », le couteau raseur « S » ni le pied pour ourlets invisibles « R » même s’ils apparaissent à l’écran
comme pied-de-biche à utiliser pour le point sélectionné.
56, 57, 58, 60
09, 10, 11, 12, 13, 14, 15, 16, 17, 18, 19, 20, 24, 25, 28, 29, 30, 53
Non pris en charge
34
Page 37

Page 38

CONTENIDO
INTRODUCCIÓN ................................................................................................................... 37
UTILIZACIÓN DE LA UNIDAD PARA COSTURA CIRCULAR PARA COSER PATRONES
CIRCULARES........................................................................................................................... 37
Información sobre la unidad para costura circular............................................................... 37
Accesorios incluidos........................................................................................................... 37
Colocación de la unidad para costura circular .................................................................... 38
Costura de un círculo.......................................................................................................... 38
Utilización de la plantilla de cuarto de círculo.................................................................... 40
Uso de los pies prensatela incluidos.................................................................................... 40
CREACIÓN DE EFECTOS DECORATIVOS CON BOBINAS..................................................... 42
Acerca de los efectos decorativos con bobinas.................................................................... 42
Materiales necesarios.......................................................................................................... 43
Hilo superior....................................................................................................................... 44
Preparación del hilo de la bobina ....................................................................................... 44
Colocación de la tela y costura........................................................................................... 47
Ajuste de la tensión del hilo................................................................................................ 50
Solución de problemas........................................................................................................ 51
LISTA DE PUNTADAS QUE NO SE PUEDEN UTILIZAR CON LA UNIDAD PARA
COSTURA CIRCULAR............................................................................................................. 52
36
Page 39

INTRODUCCIÓN
Nota
PRECAUCIÓN
Este apéndice proporciona información adicional no incluida en el Manual de instrucciones y referencia.
Consulte estas instrucciones después de leer el Manual de instrucciones y referencia que se suministra con la
máquina de coser.
UTILIZACIÓN DE LA UNIDAD PARA COSTURA
CIRCULAR PARA COSER PATRONES CIRCULARES
Información sobre la unidad para costura circular
Esta unidad puede coser en patrones circulares que se gradúan a intervalos de 5 mm, desde los 30 mm a los
130 mm de radio*, cuando se selecciona la posición de la aguja en el centro. La unidad se coloca a la
izquierda de la aguja en la máquina de coser. Con esta unidad pueden coserse puntadas de utilidad y
decorativas.
*
Radio = Distancia del centro del circulo a cualquier otro punto del circulo.
• No es posible utilizar puntadas decorativas con arrastre hacia los lados ni puntadas de más de 7,0 mm de ancho. Antes
de coser su labor, asegúrese de realizar algunas puntadas de prueba y compruebe los resultados de la costura. Si se
cosen puntadas que no se pueden utilizar, es posible que el patrón no quede alineado. Consulte la tabla “LISTA DE
PUNTADAS QUE NO SE PUEDEN UTILIZAR CON LA UNIDAD PARA COSTURA CIRCULAR” en la página 52 para ver
una lista de puntadas que no es posible utilizar.
ESPAÑOL
• Hay que tener especial cuidado con el perno giratorio; la negligencia en su manejo podría provocar
lesiones. Los niños deberán ser vigilados para asegurarse de que no juegan con la unidad. Cuando la
unidad no se utilice, guarde siempre el perno giratorio en el indicador para evitar que se pierda.
Accesorios incluidos
1 4 Tabla de conversión 5
mm (f) pulgada
130 5 3/16
120 4 3/4
110 4 3/8
100 4
2 3 90 3 1/2 6
80 3 3/16
70 2 3/4
60 2 3/8
50 2
40 3/2
30 13/16
Nº
1 Unidad para costura circular
2 Perno giratorio XE6016-001
3 Tornillo de montaje (2 tornillos, se
Nombre de la pieza Código de la pieza
a Indicador
b Asa/Abatible
c Botón de liberación
d Posición de ajuste del perno
giratorio
e Regla
incluye uno de más)
-
XE6022-001
Nº
4 Plantilla
5 Pie para cinturillas XE5680-001
6 Pie para cordones XA6871-001
Nombre de la pieza Código de la pieza
f Radio del círculo en mm
g Líneas angulares indicadas en
grados, comenzando en 0 con
intervalos de 5 grados
h Centro
XE6024-001
37
Page 40

Nota
• Se recomienda la utilización de la tabla extensible
3040
Nota
Nota
de la máquina de coser para controlar la tela con
más suavidad.
• No levante la tabla extensible cuando esté colocado
el dispositivo para costura circular.
• El perno giratorio puede soltarse si se levanta la tela
colocada en la unidad para costura circular. Para
levantar la tela, presione con suavidad sobre la
parte superior del perno giratorio.
• Al coser círculos más pequeños o utilizar tela con
texturas rugosas o irregulares, es posible que no se
consiga un círculo perfecto.
• Algunos de los pies prensatela, como el pie para
cuchilla lateral, no pueden utilizarse con esta
unidad; pruebe siempre los pies para accesorios
con la unidad.
• Cuando utilice esta unidad, pruebe la velocidad de
costura de la máquina para conseguir los mejores
resultados.
• A la hora de coser telas más grandes o prendas de
vestir, asegúrese de que la tela o la prenda no
quedan enganchadas en la máquina creando así
arrastre o distorsión en el diseño.
Colocación de la unidad para costura
Apriete con firmeza el tornillo con el
c
destornillador de disco que se incluye con la
máquina.
a Destornillador de disco
Costura de un círculo
• Enhebre la aguja de la máquina antes de colocar el
perno giratorio en la unidad para costura circular. La
palanca del enhebrador puede golpear el perno
giratorio y dañar el perno o el mecanismo
enhebrador de la máquina.
Levante el asa.
a
circular
Coloque la unidad para costura circular a la
a
izquierda, según se muestra en la figura.
→ Las dos patillas de la parte inferior de la unidad
encajarán en los orificios correspondientes de la
placa de la aguja, de forma que la unidad quedará
plana sobre la base de la máquina.
nserte el tornillo de la unidad para costura
b
circular en el orificio que hay a la derecha de
la placa de la aguja (a).
Deslice el indicador para que coincida con el
b
tamaño de círculo que desee.
• No deslice el indicador agarrando el perno giratorio;
si lo hace, podría hacer que el perno se doblara o se
rompiera.
a Tornillo de montaje
38
Page 41

Utilice un estabilizador que sea más grande
Nota
Nota
PRECAUCIÓN
c
qu el área de diseño , reforzando con un
estabilizador más pequeño en el centro del
círculo cuando cambias por la pieza original
o el mismo perno del área repetida.
a Revés de la tela
b Estabilizador
c Estabilizador de refuerzo
d Zona del perno giratorio
• Siempre es necesario un estabilizador al coser en
telas o prendas de vestir para evitar que se estiren o
frunzan. El tipo de tela que se vaya a coser
determinará si se debe emplear un estabilizador
permanente, para planchar, temporal o adhesivo.
Inserte el perno giratorio en el centro del
d
círculo desde el derecho de la tela.
Presionando sobre la parte superior del perno
e
giratorio, inserte el punto del perno giratorio
en la marca “Y” de la unidad.
a Derecho de la tela
b Revés de la tela
Seleccione la puntada que desee y cosa
f
dejando que la tela avance suavemente
asegurándose de que no empuja ni tira de la
tela, pues se produciría un círculo irregular.
ESPAÑOL
a Perno giratorio
b Centro del círculo
c Derecho de la tela
• Al coser un círculo de diámetro pequeño, se
recomienda que primero sujete con alfileres la tela
en la unidad y, a continuación, ajuste el indicador al
tamaño que desee.
Una vez finalizada la costura, pulse siempre
g
el botón de liberación para retirar el perno y
la tela de la unidad para costura circular.
a Botón de liberación
• No deje el eje giratorio insertado en la tela o
adjunto al accesorio circular. Al hacer esto, puede
resultar en una herida accidental o daño a la
maquina.
39
Page 42

Utilización de la plantilla de cuarto de
Nota
PRECAUCIÓN
círculo
Cuando combine puntadas de utilidad o decorativas
o repita una puntada individual, utilice la plantilla
incluida a modo de guía.
Marque el eje central (centro del círculo)
a
antes de coser la tela (a).
Seleccione la puntada que desee y el tamaño
b
del círculo utilizando las marcas de la unidad
y, a continuación, coloque la tela en la
unidad.
Cosa una sola puntada o un patrón de
c
combinación de puntadas (b).
Retire la tela o la prenda de vestir de la
d
unidad.
Dibuje, con un lápiz que se pueda borrar, dos
e
líneas desde el eje central, una al comienzo del
patrón de costura y la otra al final del mismo.
Compruebe la línea al final de la puntada (d)
g
y anote los grados aproximados. Con un
círculo que mida 360 grados, divida el largo
de la puntada (la medida de grado/puntada)
entre 360 y eso le dará un recuento
aproximado de las repeticiones de la puntada.
EJEMPLO: su puntada tiene 16 grados de
largo, entonces: 360 dividido entre 16 es igual
a 22,5 repeticiones.
• No es un recuento exacto debido a diversas
variables; por ejemplo, el largo de la puntada, la tela
empleada, el hilo y el estabilizador. Dependiendo de
la puntada empleada, podrá ajustar su largo
aumentándolo o disminuyéndolo para conseguir un
ajuste mejor de forma que el círculo se cierre sin
que quede solapado o demasiado corto (a).
• Cosa siempre una versión de prueba del diseño
comprobando el largo y el ancho de la puntada y la
dirección de la costura, asegurándose de que sean
apropiados para la labor.
• Si el patrón se solapa, puede ser necesario realizar
más cálculos.
Ejemplo: patrón demasiado corto
a Eje central
b Puntada individual/Combinación de puntadas
c Comienzo de la puntada
d Fin de la puntada
Coloque la plantilla encima del diseño,
f
alineando el eje central con la marca central
de la plantilla (a). A continuación, coloque la
línea de 0 grados (b) de la derecha de la
plantilla al comienzo de la puntada (c).
a
Fin de la puntada
Uso de los pies prensatela incluidos
Mediante la utilización de los pies prensatela
incluidos, podrá embellecer sus labores de costura
dándolas un aspecto profesional con su estilo
personal.
■ PIE PARA CINTURILLAS
Puede utilizar una amplia variedad de cinturillas
hasta de 5 mm de ancho, utilizando puntadas rectas,
puntadas de zig-zag y algunas puntadas decorativas.
• No utilice este pie al coser con cinturillas de tejido
denso en las que es difícil que la aguja penetre con
facilidad. Si lo hace, la aguja podría romperse,
dañarse y/o provocar lesiones.
40
a Centro de la plantilla
b Línea de 0 grados
c Comienzo de la puntada
d Final de la puntada
Page 43
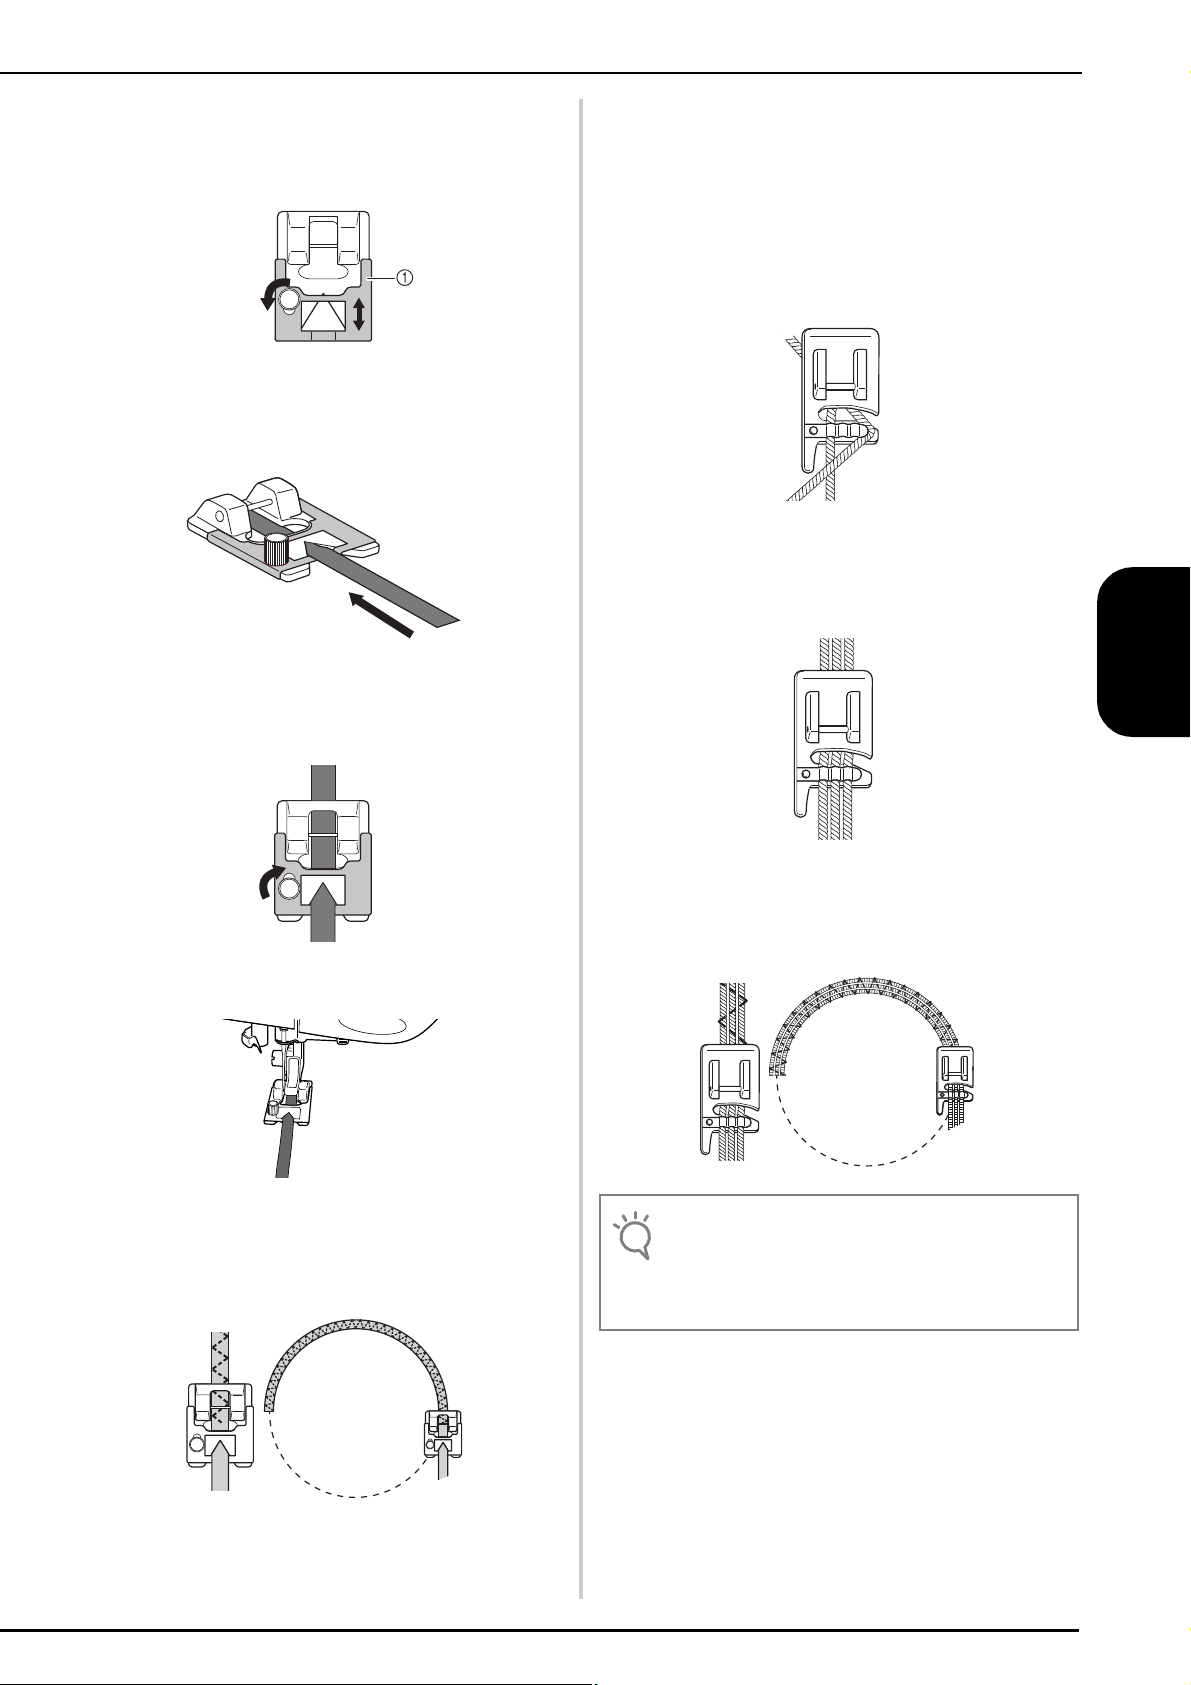
Afloje el tornillo de la placa de la guía del pie
Nota
a
y deslice la placa para que se ajuste al ancho
de la cinturilla.
a Placa
Inserte la cinturilla a través de la guía antes
b
de colocar el pie en la máquina.
■ PIE PARA CORDONES
Puede embellecer sus labores utilizando de 1 a 3
cordones de hilos decorativos.
Deslice un cordón desde la derecha del pie
a
prensatela introduciéndolo en cada guía (para
utilizar un solo cordón, utilice la guía
central).
Apriete el tornillo y tire de la cinturilla hacia
c
la parte posterior del pie para coser
cinturillas.
Coloque el pie en la máquina.
d
Coloque los cordones debajo y por detrás del
b
pie para cordones.
Seleccione la puntada de zig-zag o la puntada
c
decorativa y cosa de manera circular guiando
suavemente los cordones.
ESPAÑOL
e
Seleccione la puntada que desee y cosa de
forma circular guiando suavemente la
cinturilla.
• Cuando se cosan puntadas de zig-zag o
decorativas, ajuste el ancho de la puntada de forma
que sea ligeramente superior al ancho de la
cinturilla o del cordón.
41
Page 44

CREACIÓN DE EFECTOS DECORATIVOS CON BOBINAS
Acerca de los efectos decorativos con bobinas
Puede crear bonitos bordados, con un aspecto tridimensional, enrollando la bobina con hilo o cinta pesados de un
grosor superior al permitido para la aguja de la máquina. La cinta o hilo decorativos se verá por el derecho de la tela
al coser con el revés de la tela hacia arriba.
1. Costuras de utilidad 2. Costuras decorativas 3. Costura libre
42
Page 45

Materiales necesarios
Nota
Nota
■ Caja de la bobina y tapa de bobina con guía
de cable
a Caja de la bobina (gris)
Hay una muesca en la zona indicada con la letra “A”.
b Tapa de bobina con guía de cable (para crear efectos
decorativos con bobinas o colocar cordones con un
solo orificio).
Hay dos pequeños salientes con forma de v en la parte
trasera de la tapa de la bobina, indicados con la letra
“B”.
Estos salientes sujetan la bobina para que no se salga
cuando se tire del hilo grueso.
■ Hilo superior
Los tipos de hilo superior que pueden utilizarse varían
según el acabado que se desee obtener. Con hilo de
bordar a máquina (de poliéster), hilo de poliéster
multiusos o hilo monofilamentado (de nailon
transparente), es posible modificar el aspecto de un
mismo diseño numerosas veces con sólo seleccionar un
peso y/o color de hilo superior diferente.
Si no desea que se vea el hilo superior, se recomienda
utilizar hilo monofilamentado o hilo de poliéster de
poco grosor (50 wt. o más) del mismo color que el hilo
inferior.
■ Aguja
Use una aguja adecuada para el hilo superior y la tela
empleados. Consulte “Combinaciones de tela/hilo/
aguja” (en el capítulo “CAMBIO DE LA AGUJA”) en el
Manual de instrucciones y referencia.
■ Pie prensatela
Costuras de utilidad o costuras decorativas: pie para
monogramas “N”
ESPAÑOL
■ Hilo inferior
Se recomiendan los siguientes tipos de hilos para los
efectos decorativos con bobinas.
Hilo decorativo o hilo de bordar a
mano n.º 5 o más fino
Cinta trenzada flexible
Cinta de bordar fina (de seda o
similar) (se recomienda 3,5 mm
(aprox. 1/8 pulg.) o menos)
* Si se utiliza cinta ancha o hilo grueso, se recomienda realizar
una costura de prueba con y sin aplicar tensión a la caja de la
bobina para ver qué es lo que proporciona mejores resultados.
Si se usa cinta con un ancho de 3,5 mm (aprox. 1/8 pulg.), se
recomienda no aplicar tensión a la caja de la bobina. Consulte
la página 46 para obtener instrucciones más detalladas.
Costura libre: pie para acolchado libre “C”, pie para
acolchado libre de punta abierta “O” o pie para
acolchado repetido libre “E”
■ Tela
Asegúrese de realizar algunas puntadas de prueba en
un retal con los mismos hilos y de la misma tela que
vaya a utilizar para la labor de costura.
• Los resultados de la costura pueden verse
afectados por el tipo de tela que se utilice. Antes de
comenzar la labor de costura, asegúrese de realizar
algunas puntadas de prueba en un retal que sea
igual que la tela que vaya a emplear.
• No utilice hilo con un peso superior al hilo de bordar
a mano n.º 5.
• Algunos tipos de hilos pueden no resultar
adecuados para bobinas. Asegúrese de realizar
algunas puntadas de prueba antes de comenzar la
labor de costura.
43
Page 46

Hilo superior
Coloque una aguja adecuada para el hilo
a
superior y la tela empleados.
Para obtener más información sobre cómo
colocar la aguja, consulte “CAMBIO DE LA
AGUJA” en el Manual de instrucciones y
referencia.
Coloque el pie prensatela.
b
Para obtener más información sobre cómo
colocar el pie prensatela, consulte “CAMBIO
DEL PIE PRENSATELA” en el Manual de
instrucciones y referencia.
Enhebre la máquina con el hilo superior.
c
Para obtener más información sobre cómo
enhebrar la máquina, consulte “Enhebrado del
hilo superior” en el Manual de instrucciones y
referencia.
Retire la caja de la bobina.
d
a Caja de la bobina
Utilice el cepillo de limpieza que se incluye
e
con la máquina o una aspiradora para
eliminar la pelusa y el polvo de la guía y la
zona de alrededor.
Preparación del hilo de la bobina
Para poder crear efectos decorativos con bobinas, es
necesario reemplazar la caja de la bobina por la caja
para efectos decorativos con bobinas.
Antes de crear estos efectos decorativos, limpie la caja
de la bobina y la guía.
Suba la aguja y el pie prensatela y, a
a
continuación, apague la máquina.
Extraiga la unidad de cama plana.
b
Agarre ambos lados de la cubierta de la placa
c
de la aguja y, a continuación, deslícela hacia
usted para retirarla.
a Cepillo de limpieza
b Guía
Pase un paño suave y sin pelusa por la caja de
f
la bobina (gris) para limpiarla.
Introduzca la caja de la bobina (gris) de tal
g
manera que la marca S de la caja de la
bobina quede alineada con la marca ● de la
máquina como se muestra a continuación.
44
a Marca S
b Marca ●
a Cubierta de la placa de la aguja
Page 47
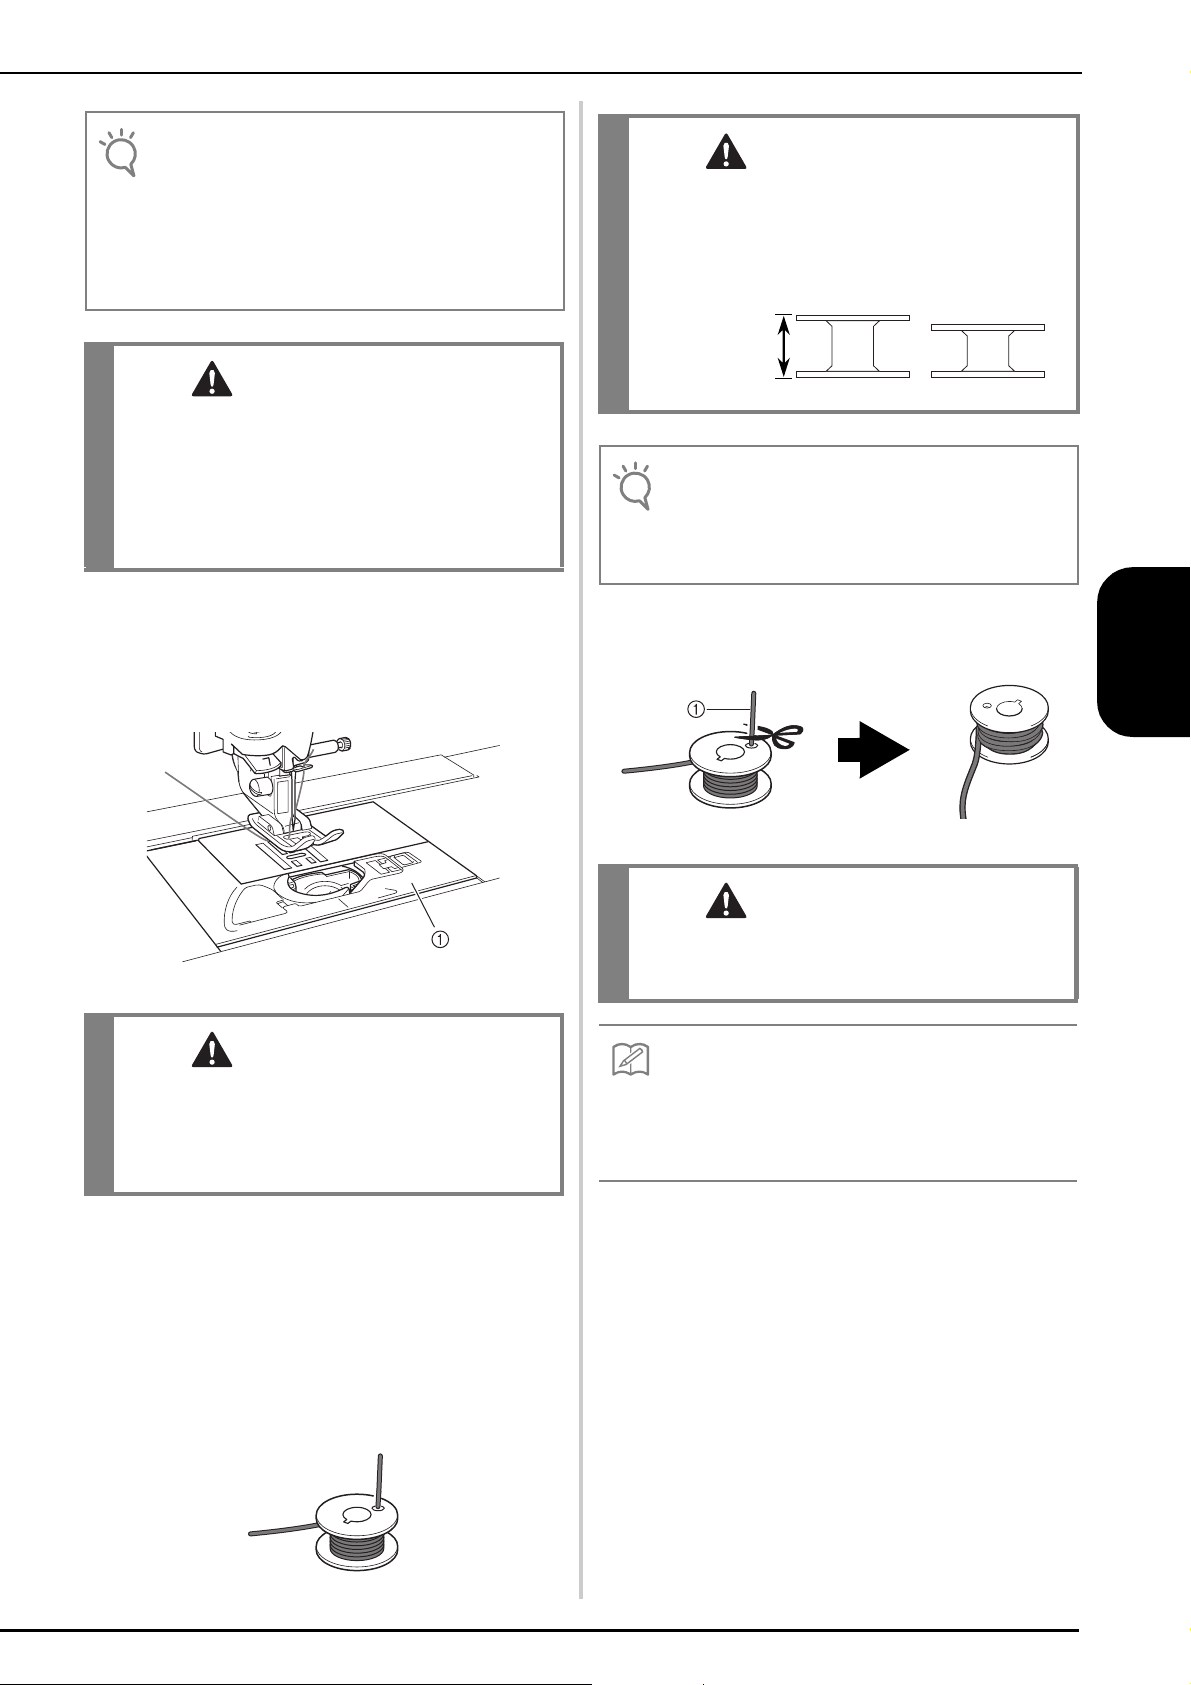
Nota
• La caja de la bobina (gris) no se puede utilizar para
PRECAUCIÓN
PRECAUCIÓN
PRECAUCIÓN
Nota
PRECAUCIÓN
Recuerde
otras costuras distintas de los efectos decorativos
con bobinas. Después de crear efectos decorativos
con bobinas, consulte los pasos indicados en
“Preparación del hilo de la bobina” para quitar y
limpiar la caja de la bobina (gris) y, a continuación,
vuelva a colocar la caja de la bobina normal (negra).
• Asegúrese de utilizar la caja de la bobina (gris) al
crear efectos decorativos con bobinas. El uso de
cualquier otra caja de bobina puede causar que el
hilo se enrede o dañar la máquina.
• Asegúrese de que la caja de la bobina está colocada
correctamente. Si no lo estuviera, el hilo podría
enredarse o la máquina podría sufrir una avería.
Coloque la cubierta de la placa de la aguja.
h
Para obtener más información sobre cómo
colocar la cubierta de la placa de la aguja,
consulte “Limpieza de la guía” en el Manual de
instrucciones y referencia.
• Asegúrese de utilizar la bobina suministrada o una
diseñada específicamente para esta máquina de
coser (clase 15). El uso de cualquier otro tipo de
bobinas podría causar daños o lesiones personales.
Tamaño real
11,5 mm
(aprox.
7/16 pulg.)
Este modelo Otros modelos
• Enrolle el hilo en la bobina lentamente y de manera
uniforme.
• Para obtener los mejores resultados, enrolle la
bobina sin retorcer el hilo.
Con unas tijeras, corte con cuidado la punta
k
del hilo lo más cerca posible de la bobina.
ESPAÑOL
a Cubierta de la placa de la aguja
• Cuando cree efectos decorativos con bobinas,
utilice la tapa de bobina con guía de cable (para
crear efectos decorativos con bobinas y colocar
cordones) pues, de lo contrario, la aguja podría
romperse o el hilo podría enredarse.
Coloque la unidad de cama plana.
i
Introduzca la punta del hilo desde el carrete
j
por el orificio de la bobina, de dentro a fuera.
Sujete la punta del hilo mientras lo enrolla en
la bobina a mano. Después de enrollar la
bobina hasta llenarla como se muestra a
continuación (aprox. 80%), corte el hilo.
a Extremo del hilo enrollado
• Si el hilo sobresale demasiado por la parte superior
de la bobina, la aguja podría romperse o el hilo
podría enredarse.
Si resulta difícil introducir la punta del hilo por el orificio
de la bobina, sujete la punta y enrolle el hilo en la base
interna para enrollar la bobina. A continuación, corte
con cuidado la punta del hilo para que no sobresalga
por el lateral de la bobina.
Coloque la bobina enrollada con el hilo.
l
Deberá aplicar tensión o no al hilo de la bobina
según el tipo de hilo empleado.
45
Page 48

■ Si se aplica tensión al hilo de la bobina
PRECAUCIÓN
Nota
Inserte la bobina en la caja de la bobina de forma que
el hilo se desenrolle desde el lado izquierdo. Pase el
hilo con cuidado por la ranura en la cubierta de la
placa de la aguja, como se muestra a continuación.
a Ranura en la cubierta de la placa de la aguja
■ Si no se aplica tensión al hilo de la bobina
Si el hilo de la bobina de la costura de prueba está
demasiado tenso, y no se corrige ajustando la tensión
de la caja de la bobina, no pase el hilo por el resorte de
tensión.
Sujete la bobina con la mano izquierda de tal manera
que el hilo se desenrolle desde el lado derecho, y sujete
el extremo del hilo con la mano derecha.
• Al enrollar la bobina, asegúrese de que el hilo no se
deshilacha. Si cose con hilo deshilachado, el hilo
podría engancharse en el resorte de tensión de la
caja de la bobina o podría enredarse totalmente, así
como causar daños en la máquina.
• No guíe todo el hilo de la bobina por la ranura en la
cubierta de la placa de la aguja, ya que el hilo
inferior no se enhebrará correctamente. Enhebre
solamente hasta donde se muestra a continuación.
Saque el hilo de la bobina unos 8 cm (aprox.
m
3 pulg.).
Encienda la máquina de coser y pulse
n
.
→ La pantalla cambia, y todas las teclas y los botones
de operación se bloquean.
• Si, en la pantalla de ajustes, aparece la “Pantalla de
presentación ( )” ajustada en “ON”, pulse en
cualquier parte de la pantalla LCD antes de pulsar el
icono .
46
Page 49

Sujete ligeramente el extremo del hilo
Nota
Recuerde
o
superior mientras gira la polea hacia usted
(hacia la izquierda) hasta que la marca de la
polea coincida con la línea de la máquina.
Tire con suavidad del hilo superior para pasar
p
el hilo de la bobina por la placa de la aguja.
Coloque la tapa de bobina con guía de cable
t
(para crear efectos decorativos con bobinas y
colocar cordones).
a Tapa de bobina con guía de cable (para crear efectos
decorativos con bobinas y colocar cordones)
Pulse o en la
u
pantalla.
→ Todas las teclas y los botones de operación se
desbloquearán, y se mostrará la pantalla anterior.
Colocación de la tela y costura
ESPAÑOL
→ Del orificio en la placa de la aguja saldrá un lazo
del hilo de la bobina.
Utilice la palanca del pie prensatela para
q
subir el pie prensatela.
Inserte unas tenacillas por el lazo del hilo de
r
la bobina y tire de este hilo para pasarlo por
encima de la placa de la aguja.
Alinee el hilo superior y el hilo de la bobina y,
s
a continuación, saque unos 10 cm (aprox.
4 pulg.) de ambos hilos y páselos por debajo
del pie prensatela hacia la parte trasera de la
máquina.
• Los tipos de puntadas que se recomiendan para crear
efectos decorativos con bobinas son puntadas abiertas
“sueltas”.
• Asegúrese de realizar algunas puntadas de prueba con
los mismos hilos y la misma tela que vaya a utilizar en la
labor para comprobar los resultados de la costura.
• El hilo de la bobina podría enredarse debido al tipo de
patrón e hilo empleados. Dado que podría provocar que
la aguja se rompiese, detenga la costura inmediatamente
si esto llegara a producirse. Apague la máquina y corte el
hilo enredado con unas tijeras. A continuación, limpie la
guía y la caja de la bobina tal y como se describe en
“Preparación del hilo de la bobina” en la página 44.
Seleccione una puntada. Para este ejemplo,
a
pulse .
• Para obtener los mejores resultados, seleccione un
largo y un ancho de puntada superiores. Según el
tipo de puntada que seleccione, es posible que no
pueda cambiar el largo y el ancho de puntada.
• Según la tela empleada, las puntadas pueden
amontonarse. Se recomienda seleccionar una
puntada sencilla y coser algunas puntadas de
prueba para comprobar los resultados de la costura.
Ejemplos de puntadas sencillas: , ,
47
Page 50
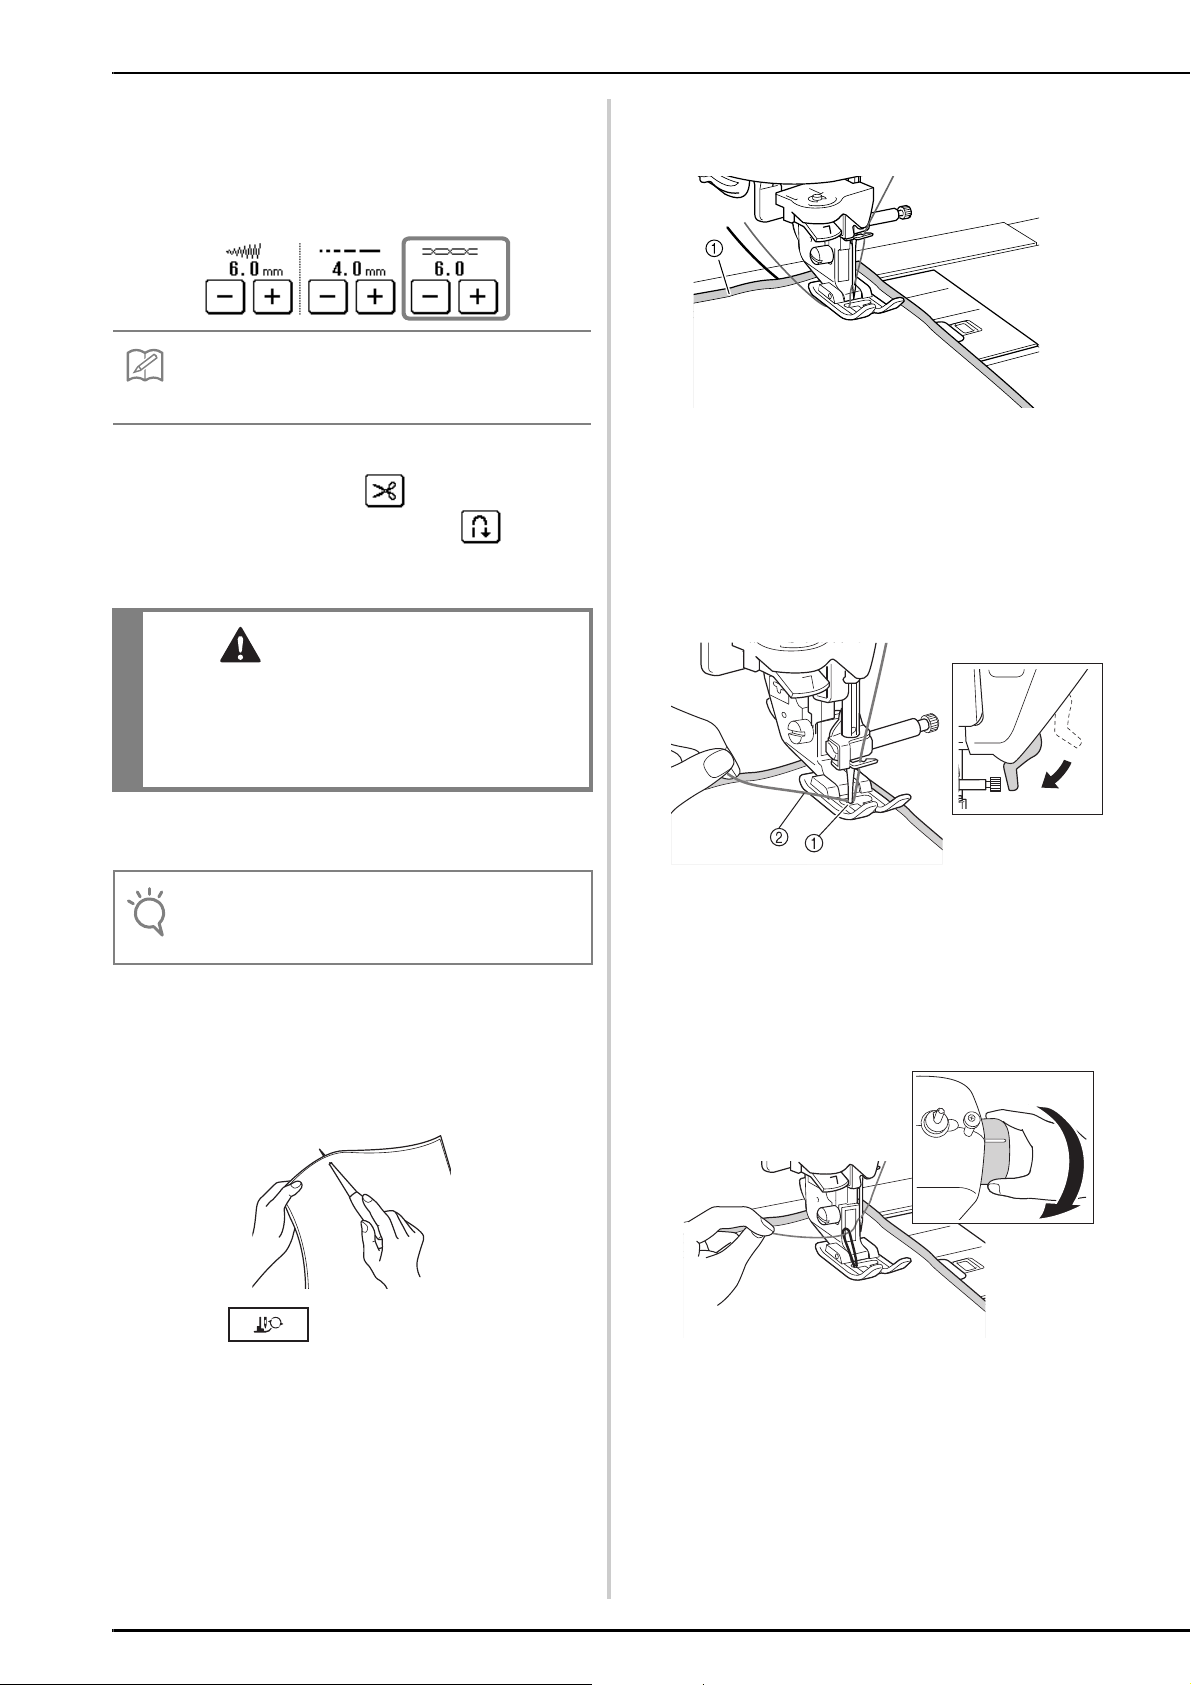
Ajuste la tensión del hilo superior.
Recuerde
PRECAUCIÓN
Nota
b
Para obtener más información sobre cómo
ajustar la tensión del hilo superior, consulte
“Ajuste de la tensión del hilo” en el Manual de
instrucciones y referencia.
Se recomienda un ajuste entre 6 y 8 para la tensión
del hilo superior.
Asegúrese de que las funciones de corte
c
automático del hilo ( ) y costura de
remate/en reversa automática ( ) están
desactivadas.
• Antes de comenzar la costura, asegúrese de que la
función de corte automático del hilo está
desactivada. Si comienza a coser con esta función
activada, el hilo podría enredarse o la máquina
podría sufrir una avería.
Con el revés de la tela hacia arriba, coloque la
h
tela debajo del pie prensatela.
a Revés de la tela
Gire la polea hacia usted (hacia la izquierda)
i
para insertar la aguja en la tela o en el oficio
realizado. Coloque el hilo superior por
encima del pie prensatela, sujételo
ligeramente y, a continuación, baje la palanca
del pie prensatela.
Coloque un estabilizador encima (revés) de la
d
tela.
• El tipo y peso del estabilizador dependerá del hilo y
la tela empleados.
Si el hilo es demasiado grueso para que
e
atraviese la tela hasta la superficie de la
máquina, use un punzón para hacer un
orificio en la tela al principio de la costura
para introducir el hilo por la abertura.
Pulse .
f
→ La pantalla cambia, y todas las teclas y los botones
de operación se bloquean.
a Orificio
b Hilo superior por encima del pie prensatela
Tire con suavidad del hilo superior y gire la
j
polea hacia usted (hacia la izquierda) hasta
que la marca de la polea coincida con la línea
de la máquina.
→ Del orificio en la tela saldrá un lazo del hilo de la
bobina.
g
48
Utilice la palanca del pie prensatela para
subir el pie prensatela.
Page 51

Nota
• Si no sale el hilo de la bobina, sujete el hilo superior
Nota
Nota
Nota
Nota
como se muestra a continuación para tirar del hilo
de la bobina.
a Hilo superior
Seleccione una velocidad baja, sujete con
o
suavidad los hilos por detrás del pie
prensatela y comience a coser.
Suba la palanca del pie prensatela y, con unas
k
tenacillas, tire del hilo de la bobina y pase el
extremo del hilo hasta la parte superior de la
tela.
• Tire del hilo sujetando la tela para que no se mueva.
Alinee el hilo superior y el hilo de la bobina, y
l
páselos por debajo del pie prensatela hacia la
parte trasera de la máquina.
Mientras sujeta con suavidad los hilos en la
m
parte trasera de la máquina, gire la polea para
volver a insertar la aguja en la tela o en el
orificio realizado y, a continuación, baje la
palanca del pie prensatela.
Pulse o en la
n
pantalla.
→ Todas las teclas y los botones de operación se
desbloquearán, y se mostrará la pantalla anterior.
• Antes de comenzar a coser, compruebe que la
bobina contiene suficiente hilo.
Cuando haya alcanzado el final de la zona de
p
costura, detenga la máquina.
• No cosa puntadas de refuerzo o en reversa al final
de la costura, pues los hilos podrían enredarse o la
aguja podría romperse. Además, podría resultar
difícil tirar del hilo de la bobina hasta el revés de la
tela.
Suba la aguja y el pie prensatela.
q
Deje unos 10 cm (aprox. 4 pulg.) de hilo en
r
los extremos y córtelos con unas tijeras.
a 10 cm (aprox. 4 pulg.)
• No pulse el botón de “corte de hilo” para cortar los
hilos, pues la máquina podría sufrir una avería.
ESPAÑOL
49
Page 52

■ Acabado de los extremos del hilo
Nota
Nota
Nota
Cuando termine de coser, utilice una aguja de
a
coser a mano para tirar del hilo de la bobina
hasta el revés de la tela.
a Revés de la tela
b Hilo de la bobina
■ Ajuste de la tensión del hilo superior
Consulte “Ajuste de la tensión del hilo” en el Manual
de instrucciones y referencia. Se recomienda un ajuste
entre 6 y 8 para la tensión del hilo superior.
■ Ajuste de la tensión del hilo de la bobina
Si no se obtiene la costura deseada después de ajustar
la tensión del hilo superior, ajuste la tensión del hilo de
la bobina. Para ajustar la tensión del hilo de la bobina,
gire el tornillo de cabeza ranurada (–) de la caja de la
bobina (gris) para crear efectos decorativos con
bobinas.
• Si resulta difícil pasar el hilo de la bobina por el ojo
de una aguja de coser a mano, utilice una aguja de
bordado de cintas para tirar del hilo hasta el revés
de la tela. En caso contrario, use un punzón para
tirar del hilo de la bobina.
Desde el revés de la tela, ate los hilos de la
b
bobina y superior a mano. Corte el hilo
sobrante con unas tijeras.
a Revés de la tela
b Derecho de la tela
a No gire el tornillo Phillips (+).
b Ajuste con un destornillador (pequeño).
Para aumentar la tensión del hilo de la bobina, gire el
tornillo de cabeza ranurada (–) entre 30° y 45° hacia la
derecha.
Para disminuir la tensión del hilo de la bobina, gire el
tornillo de cabeza ranurada (–) entre 30° y 45° hacia la
izquierda.
50
• Para asegurarse de que los hilos no se deshacen
después de atarse, ponga una gota de pegamento
para tela en los nudos.
Si no se han obtenido los resultados deseados,
c
ajuste la tensión del hilo de la bobina y del
hilo superior, y repita la costura.
Para obtener más información, consulte “Ajuste
de la tensión del hilo”.
Ajuste de la tensión del hilo
Después de coser algunas puntadas de prueba y
comprobar los resultados de la costura, ajuste las
tensiones de los hilos en caso necesario. Tras ajustar las
tensiones, asegúrese de realizar algunas puntadas de
prueba para comprobar los resultados de la costura.
• Al girar el tornillo de la caja de la bobina (gris),
puede que empuje hacia arriba la placa del resorte,
como se muestra a continuación.
Si esto ocurre, presione suavemente sobre la placa
con un destornillador para que quede más baja que
la superficie de la caja de la bobina (gris) y, a
continuación, introduzca la caja de la bobina en la
máquina.
a Placa del resorte
Page 53
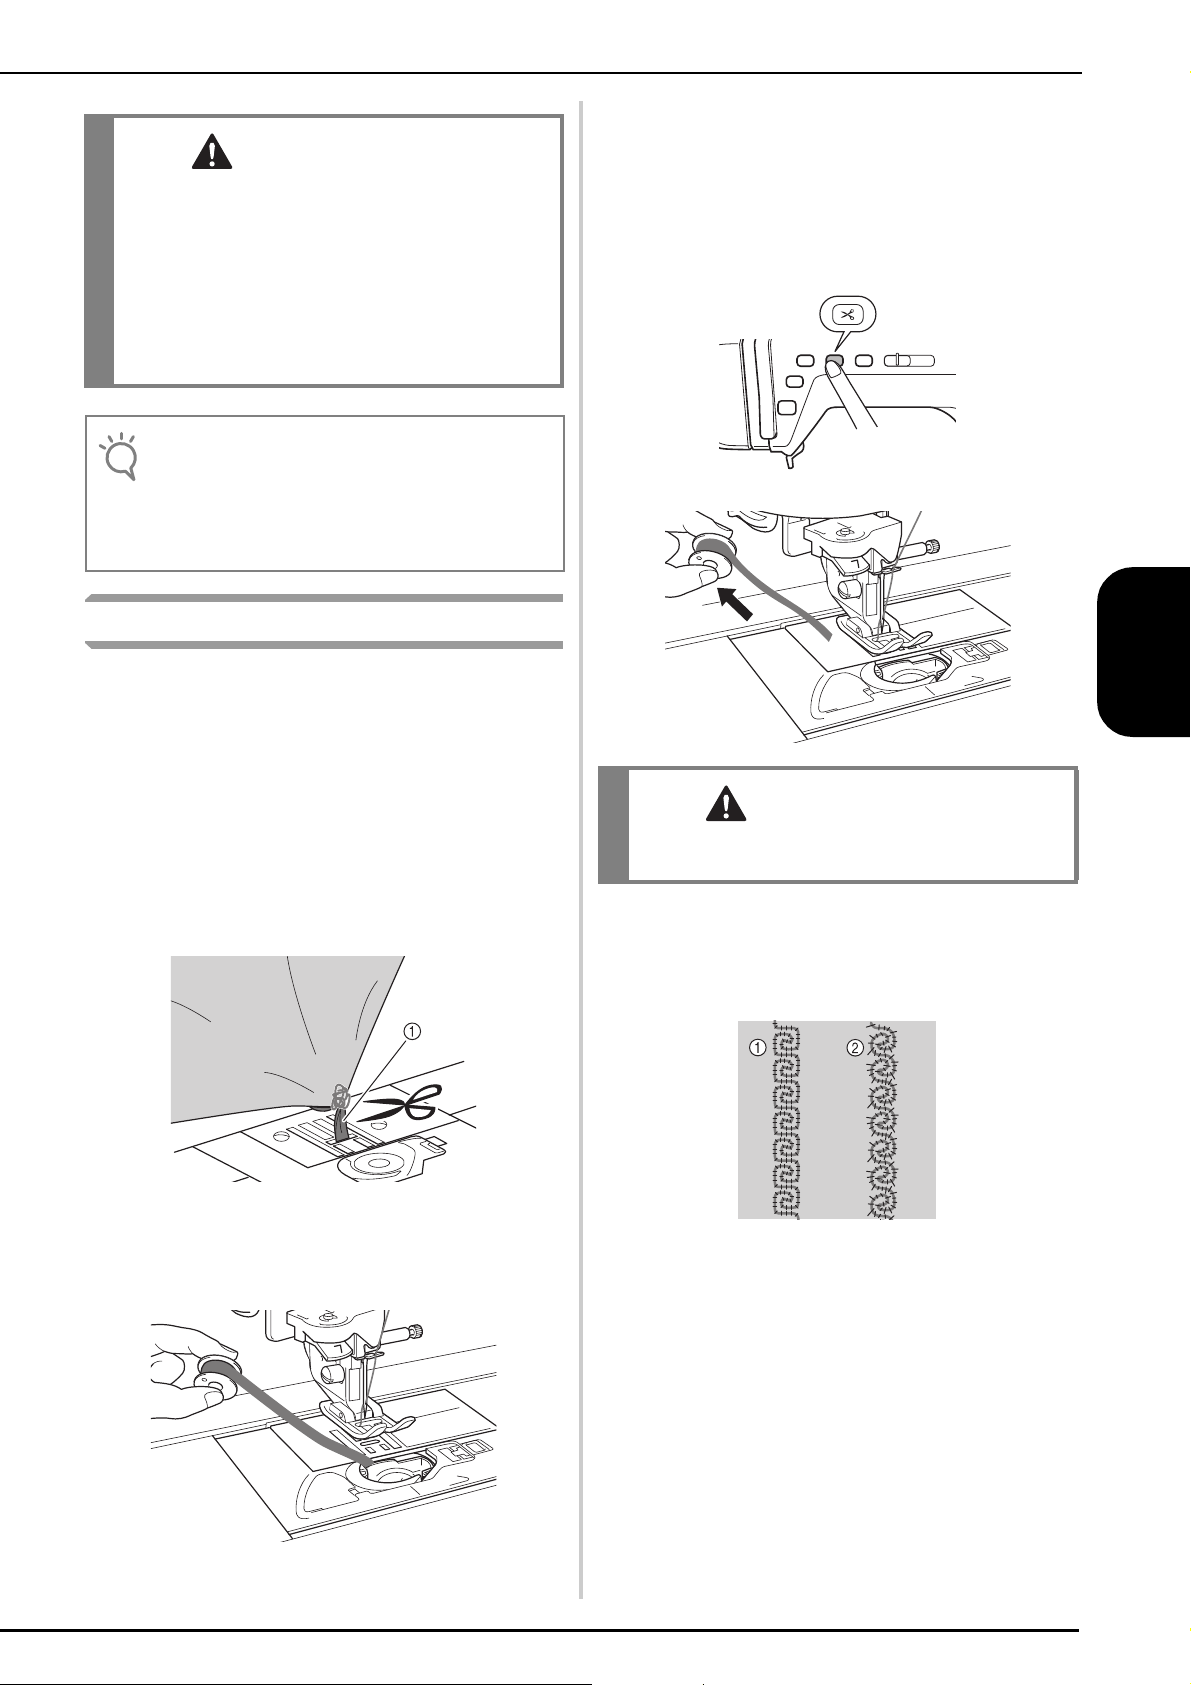
Baje el pie prensatela.
PRECAUCIÓN
Nota
PRECAUCIÓN
c
• NO ajuste la posición del tornillo Phillips (+)
situado en la caja de la bobina (gris), ya que esta
última podría dañarse y quedar inservible.
• Si resulta difícil girar el tornillo de cabeza ranurada
(-), no ejerza fuerza. Si gira demasiado el tornillo o
ejerce fuerza en cualquiera de las direcciones (de
rotación), la caja de la bobina podría dañarse. Si se
producen daños, es posible que la caja de la bobina
no mantenga la tensión adecuada.
• Si el hilo de la bobina está tenso, no será posible
pasarlo por el resorte de tensión cuando se coloque
la bobina en la caja de la bobina. (Consulte “Si no
se aplica tensión al hilo de la bobina” en la página
46).
Solución de problemas
A continuación se indican diversas soluciones para
pequeños problemas. Si el problema continúa, póngase
en contacto con el proveedor autorizado más cercano.
Tense ligeramente el hilo de la bobina
d
sujetándolo hacia el lado izquierdo del pie
prensatela. Pulse de nuevo el botón de “corte
de hilo”.
ESPAÑOL
■ El hilo se cortó automáticamente por
equivocación y el hilo de la bobina está
enganchado en la máquina
Corte el hilo cerca de la tela y por encima de
a
la placa de la aguja y, a continuación, retire la
tela.
a Hilo
Retire la bobina y sujétela hacia el lado
b
izquierdo de la máquina.
• No tire del hilo con demasiada fuerza, pues la
máquina podría sufrir una avería.
■ El patrón de costura no está bien alineado
Consulte “Ajuste de la tensión del hilo” y aumente la
tensión del hilo superior. Si el patrón sigue sin estar
alineado, disminuya la tensión del hilo de la bobina.
a Tensión correcta
b El hilo superior está demasiado flojo, o el hilo de la
bobina está demasiado tenso.
■ El hilo de la bobina se engancha en el resorte
de tensión de la caja de la bobina
Cosa sin aplicar tensión al hilo de la bobina. (Consulte
“Si no se aplica tensión al hilo de la bobina” en la
página 46).
51
Page 54

LISTA DE PUNTADAS QUE NO SE PUEDEN UTILIZAR
CON LA UNIDAD PARA COSTURA CIRCULAR
Categoría Puntadas que no se pueden utilizar
1* - Todas pueden utilizarse
2*- Todas pueden utilizarse
3 - Todas pueden utilizarse
4 - No puede utilizarse ninguna
5 - 01, 03, 04, 05, 06, 08, 09, 10
Q Todas pueden utilizarse
015, 016, 017, 018, 019, 020, 022, 023, 024, 025, 026, 027, 028, 029, 030, 032, 033,
034, 035, 036, 037, 038, 039, 040, 041, 042, 043, 044, 045, 046, 051, 052, 053, 054,
055, 056, 057, 058, 059, 063, 064, 065, 066, 067, 068, 069, 071, 072, 075, 076, 077,
078, 079, 080, 081, 082, 083, 084, 085, 086, 087, 088, 089, 090, 091, 092, 093, 094,
6 -
095, 096, 097, 098, 099, 100, 101, 102, 103, 104, 105, 106, 107, 108, 109, 110, 111,
112, 113, 114, 117, 118, 119, 121, 124, 125, 126, 127, 128, 129, 130, 131, 132, 133,
134, 135, 136, 137, 138, 139
064, 082, 084, 085, 086, 087, 088, 089, 090, 091, 092, 093, 094, 095, 096, 097, 098,
099, 100, 101, 103, 104, 105, 106, 107, 108, 109, 110, 111, 112, 113, 114, 126
7 - Todas pueden utilizarse
01, 02, 03, 04, 06, 07, 09, 10, 11, 12, 13, 14, 15, 16, 17, 18, 19, 20, 21, 22, 24, 25, 26,
28, 29, 30, 31, 32, 33, 34, 36, 37, 38, 39, 40, 41, 42, 43, 44, 47, 48, 50, 51, 52, 53, 54,
8 -
9 - Todas pueden utilizarse
10 - 04, 09
11 - Todas pueden utilizarse
Costuras alfabéticas
* No utilice el pie para sobrehilado “G”, la cuchilla lateral “S” o el pie para puntada invisible “R” aunque aparezcan en la pantalla como pie
prensatela para utilizar con la puntada seleccionada.
56, 57, 58, 60
09, 10, 11, 12, 13, 14, 15, 16, 17, 18, 19, 20, 24, 25, 28, 29, 30, 53
No puede utilizarse ninguna
52
Page 55

Page 56

English
French
Spanish
882-U65
XE8669-001
Printed in Taiwan
 Loading...