

Page 1

Page 2

About this manual
This manual provides additional information not described in the Instruction and Reference Guide. Be sure to read
this information before using the machine.
The screen illustrations in this Instruction and Reference Guide Addendum may differ from actual ones shown on
the machine.
CONTENTS
About this manual................................................................................................................. 1
More About Included Presser Feet ............................................................................................. 2
Blind stitch foot (with guide) ................................................................................................. 2
Narrow hemmer foot............................................................................................................. 3
Cording foot (3 cord guide) ................................................................................................... 5
Using the Embroidery Foot “W2” with LED Pointer ................................................................... 6
Checking the Needle Drop Point With the Embroidery Foot “W2” with LED Pointer............. 6
Adjusting the LED Pointer ..................................................................................................... 6
Adjusting the Brightness of the LED Pointer........................................................................... 7
Using the Multi-Function Foot Controller .................................................................................. 8
Included Items ...................................................................................................................... 8
Functions That Can Be Specified........................................................................................... 8
Assembling the Controller..................................................................................................... 8
Specifying the Functions ....................................................................................................... 9
Adjusting the Pedal Positions ...................
Selecting Additional Embroidery Patterns ................................................................................ 10
............................................................................. 9
1
Page 3
THE
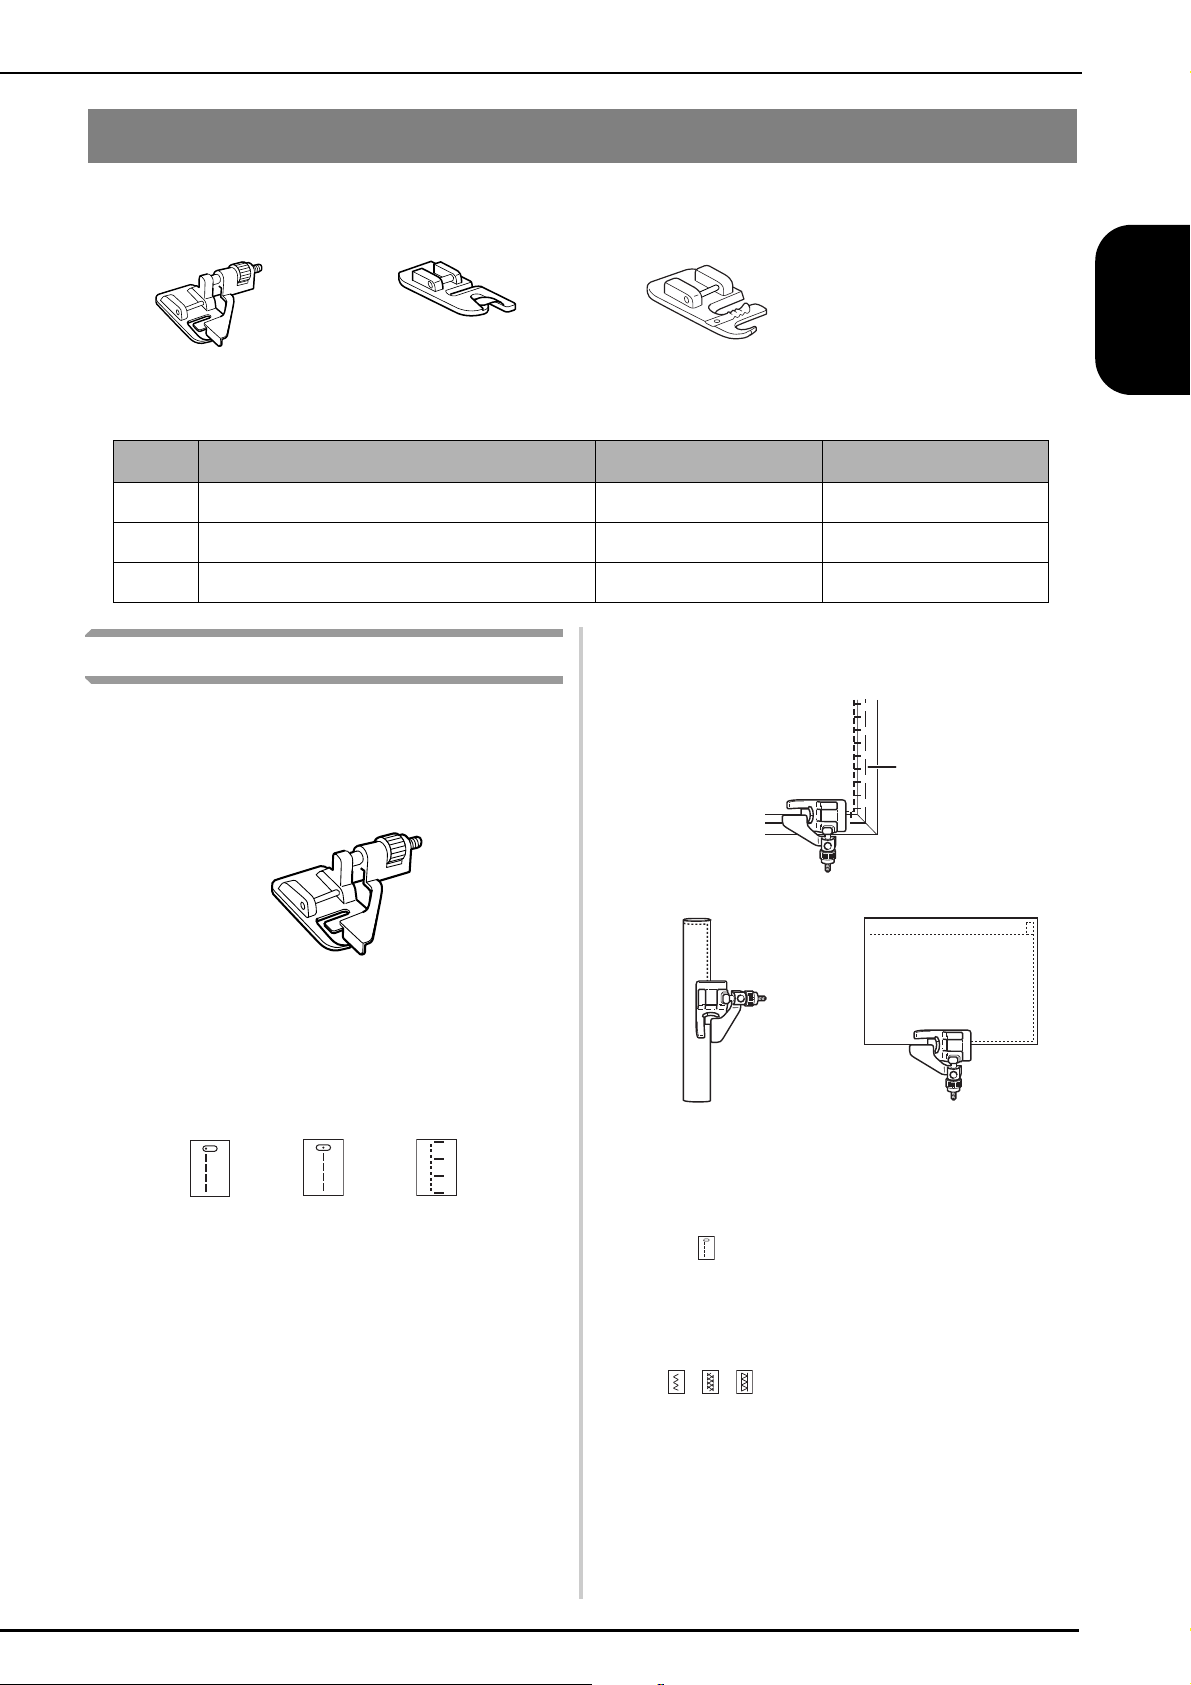
More About Included Presser Feet
1. 2. 3.
No. Part Name Part Code Reference Page
1 Blind stitch foot (with guide) XA0059-001 page 2
2 Narrow hemmer foot 184600-001 page 3
3 Cording foot (3 cord guide) XA6871-001 page 5
Turn foot guide screw and carefully adjust to guide
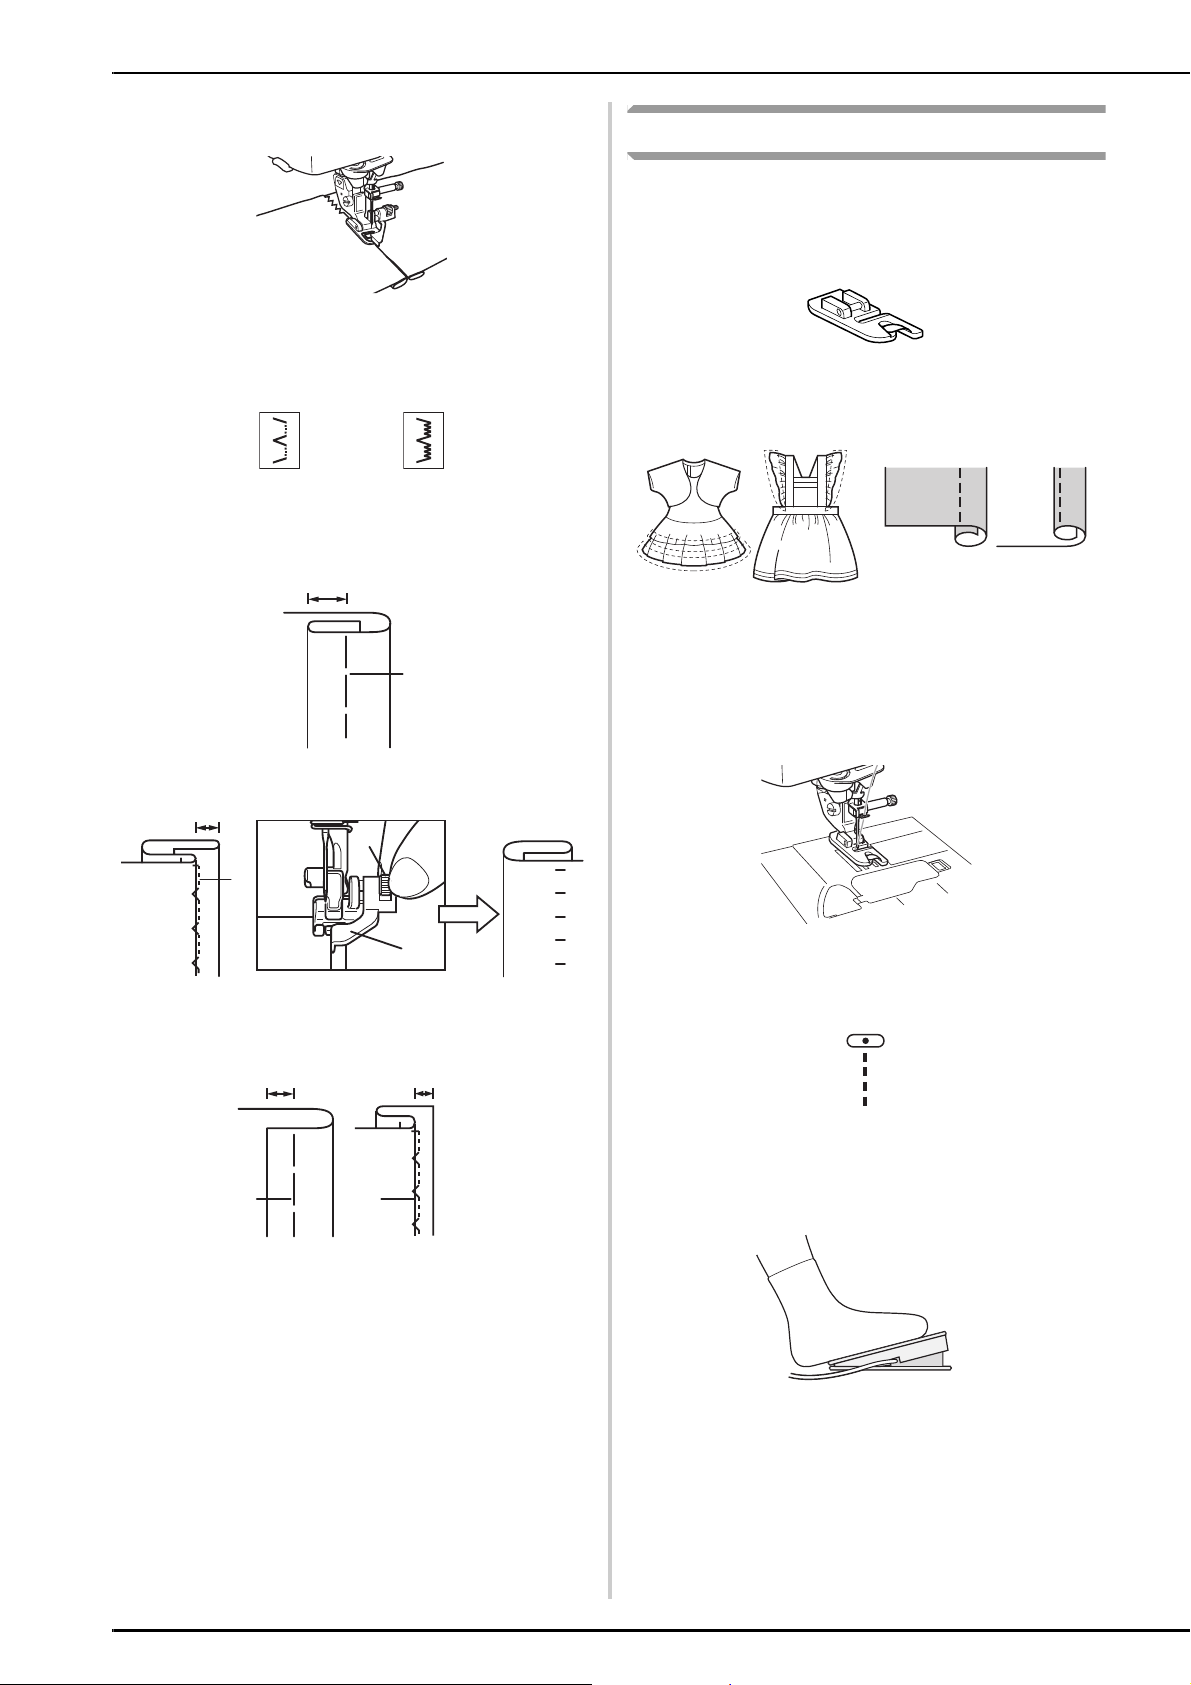
Blind stitch foot (with guide)
fabric.
■ Use
This foot comes in handy not only for blindstitching,
but also for sewing fabric edges and seams.
Remove presser foot and attach snap-on blind stitch
foot.
ENGLISH
1
Blind stitch foot (with guide)
■ Sewing
• When Edge Stitching
Position needle the distance you wish it to be from
the edge of the fabric and lower needle in that
position.
a Basting
• When Sewing Seams
Select “ ”. Align position of foot guide to needle
position and sew the desired width seam allowance.
• When Joining
Select desired top stitch. Examples
a
( , , etc.)
Place cloth under foot so that foot guide is
b
lined up between both edges of fabric.
2
Page 4
Lower foot and sew.
Reverse sideFront side
c
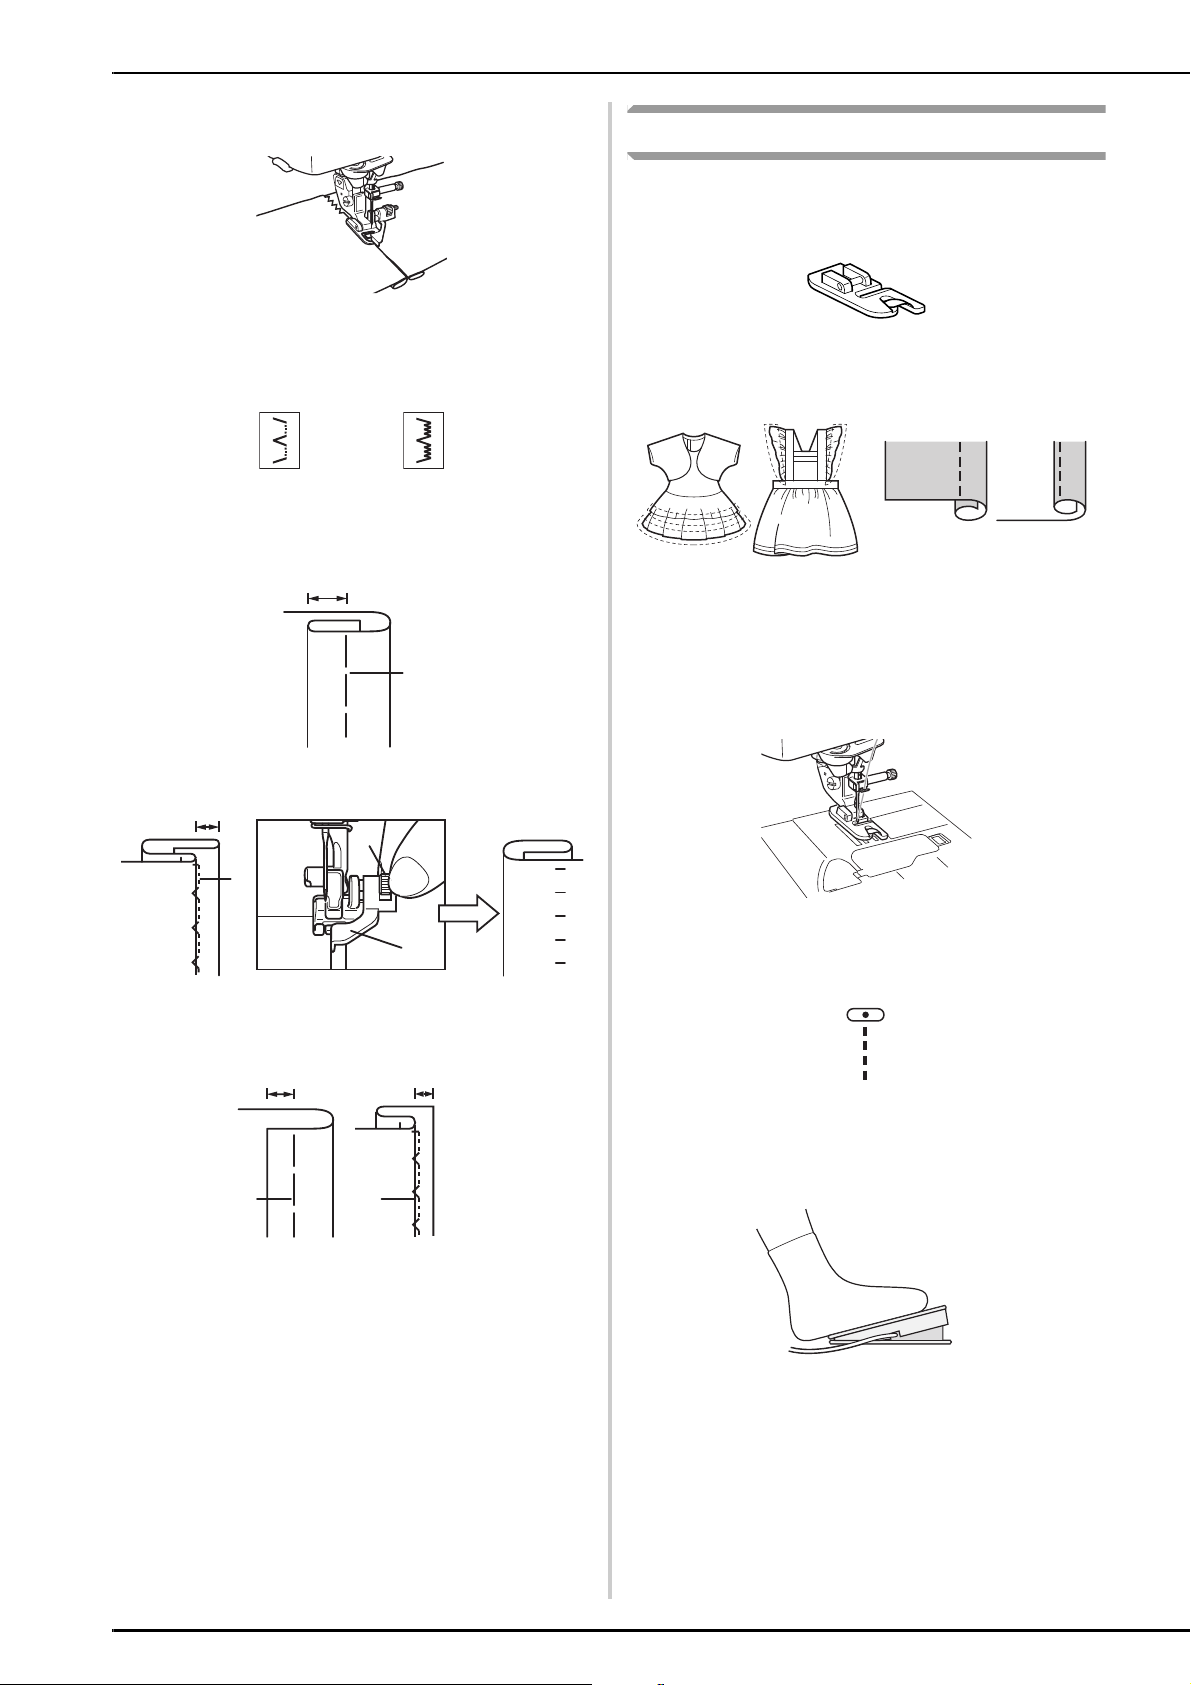
Narrow hemmer foot
This foot is designed to curl under a 3 mm (approx. 1/8
inch) double hem while sewing a straight stitch.
• When Blindstitching
When using regular weight fabrics
10 mm (3/8 inch)
*1
*2
5 mm (3/16 inch)
3
2
*2
1
4
5
*1
Narrow hemmer foot
■ Preparing to sew
Remove presser foot and attach snap-on
a
narrow hemmer foot.
Select the straight stitch (center needle
b
position).
When using heavyweight fabric
10 mm (3/8 inch) 5 mm (3/16 inch)
*2
*1
1 2
a Basting
b Sewing position
c Turn screw to adjust guide to folded hem.
d Guide
e Turn to front side
*1 Front side
*2 Reverse side
*2
Connect the foot controller so that both
c
hands are free to guide the fabric.
3
Page 5
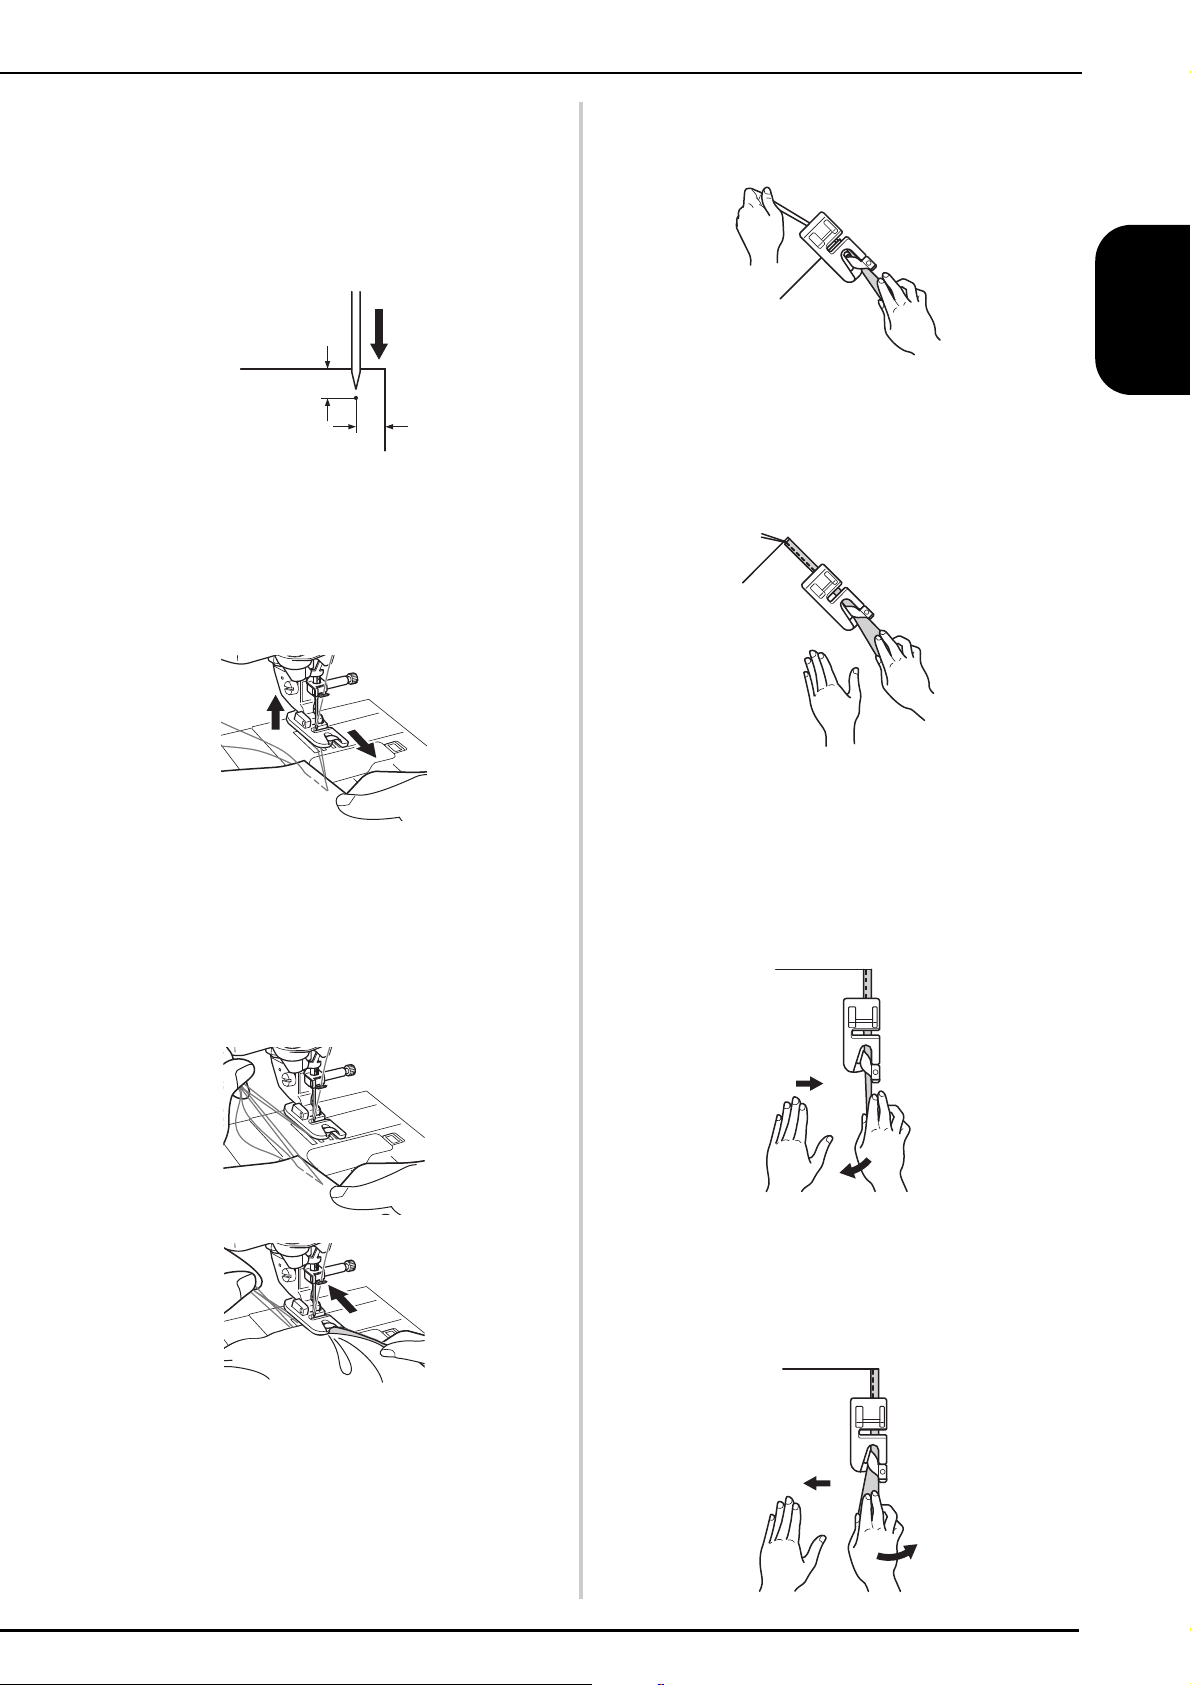
■ Sewing
Position the fabric (reverse side facing up)
a
under the presser foot. Lower the needle
3 mm (approx. 1/8 inch) from the edges of the
fabric, lower the presser foot, then sew 2 or 3
stitches.
Without allowing the fabric to stick out from
d
the right side of the presser foot, lightly pull
on the thread while slowly sewing.
ENGLISH
1
1
a 3 mm (approx. 1/8 inch)
Raise the needle and the presser foot, then
b
hold the ends of the upper thread and lower
thread to prevent them from being pulled out
of the fabric and pull the fabric out from the
front of the presser foot.
Holding both threads, pass them through the
c
curled part of the presser foot and pull them
toward the back of the presser foot. Wrap the
fabric around the curled part of the presser
foot in the same way. Position the edge of the
fabric just behind the needle and lower the
presser foot.
After sewing 2 to 3 cm (approx. 1 to 1-3/16
e
inches) of the fabric, release the thread and
guide the fabric from the front of the presser
foot with your left hand. Keep a uniform
amount of fabric wrapped around the presser
foot curl until the seam is completed.
■ Hints
• If too little fabric is wrapped around the curl
and a threefold seam is not being sewn:
Pull the fabric held in your right hand to the left in
order to increase the amount of fabric wrapped in
the presser foot curl. At the same time, carefully
guide the fabric to the right with your left hand.
• If too much fabric is wrapped around the curl
and a wide threefold seam is being sewn:
Pull the fabric held in your right hand to the right in
order to decrease the amount of fabric wrapped in
the presser foot curl. At the same time, carefully
guide the extra fabric to the left with your left hand.
4
Page 6
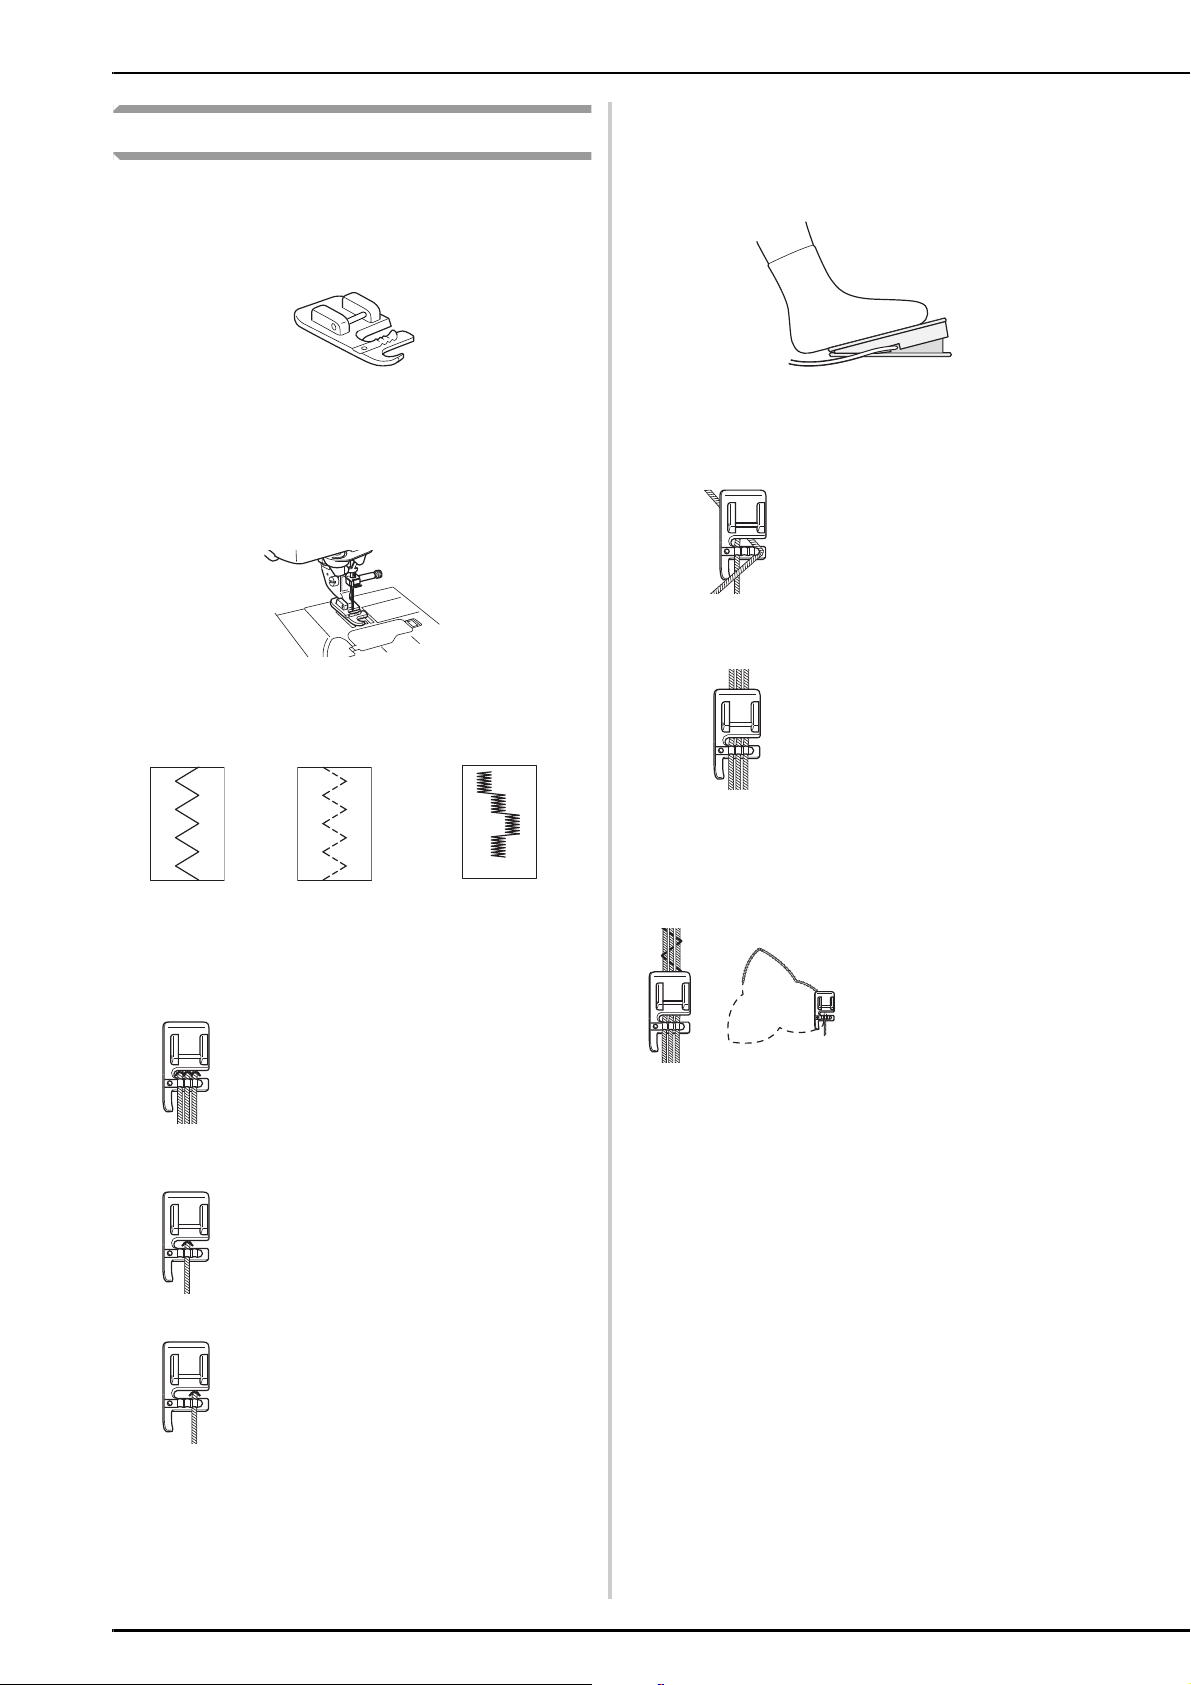
Cording foot (3 cord guide)
■ Use
Embellish clothing and household linens with
decorative threads.
Cording foot (3 cord guide)
■ Preparing to sew
Remove presser foot and attach snap-on cording
foot.
• Suggested Stitches
• Foot control
Using your foot controller will help you to have both
hands free for easier fabric handling.
■ Sewing
Feed cords, one by one, from
the right side of the cording
foot spring into their
respective guides.
Draw cording under foot and
extend the cord 4-5 mm
(approx. 3/16 inch) behind
foot. When using 2 or 3
cords, be careful to make
sure that cords are not
trampled under the front of
foot.
Zigzag Stretch Zigzag Decorative Satin Stitch
• Zigzag stitch width
Triple Cording stretch
Select dotted zigzag stitch and sew
at a maximum stitch width of 5 mm
(approx. 3/16 inch).
Single Cording
The zigzag stitch may be positioned
in the center or right guide. Verify
position of stitch and determine the
appropriate guide to be followed. Set
stitch width slightly greater than
width of cording.
Place cloth under foot.
Lower foot and sew.
• Stitch Length
Select desired stitch length. Remember that the
results will vary based on the stitch length you have
selected.
5
Page 7
Using the Embroidery Foot “W2” with LED Pointer
Memo
Note
Memo
Included Embroidery foot with LED pointer indicates the needle position with a red LED point.
The LED pointer shows you the location of the needle penetration so that it is easier to adjust the embroidery
position.
Before beginning to embroider when using the embroidery foot “W2” with LED pointer, carefully read “Attaching
Embroidery foot W2” instructions, described in the “Embroidery” chapter of the Instruction and Reference Guide
included with your machine.
ENGLISH
Checking the Needle Drop Point With
the Embroidery Foot “W2” with LED
Pointer
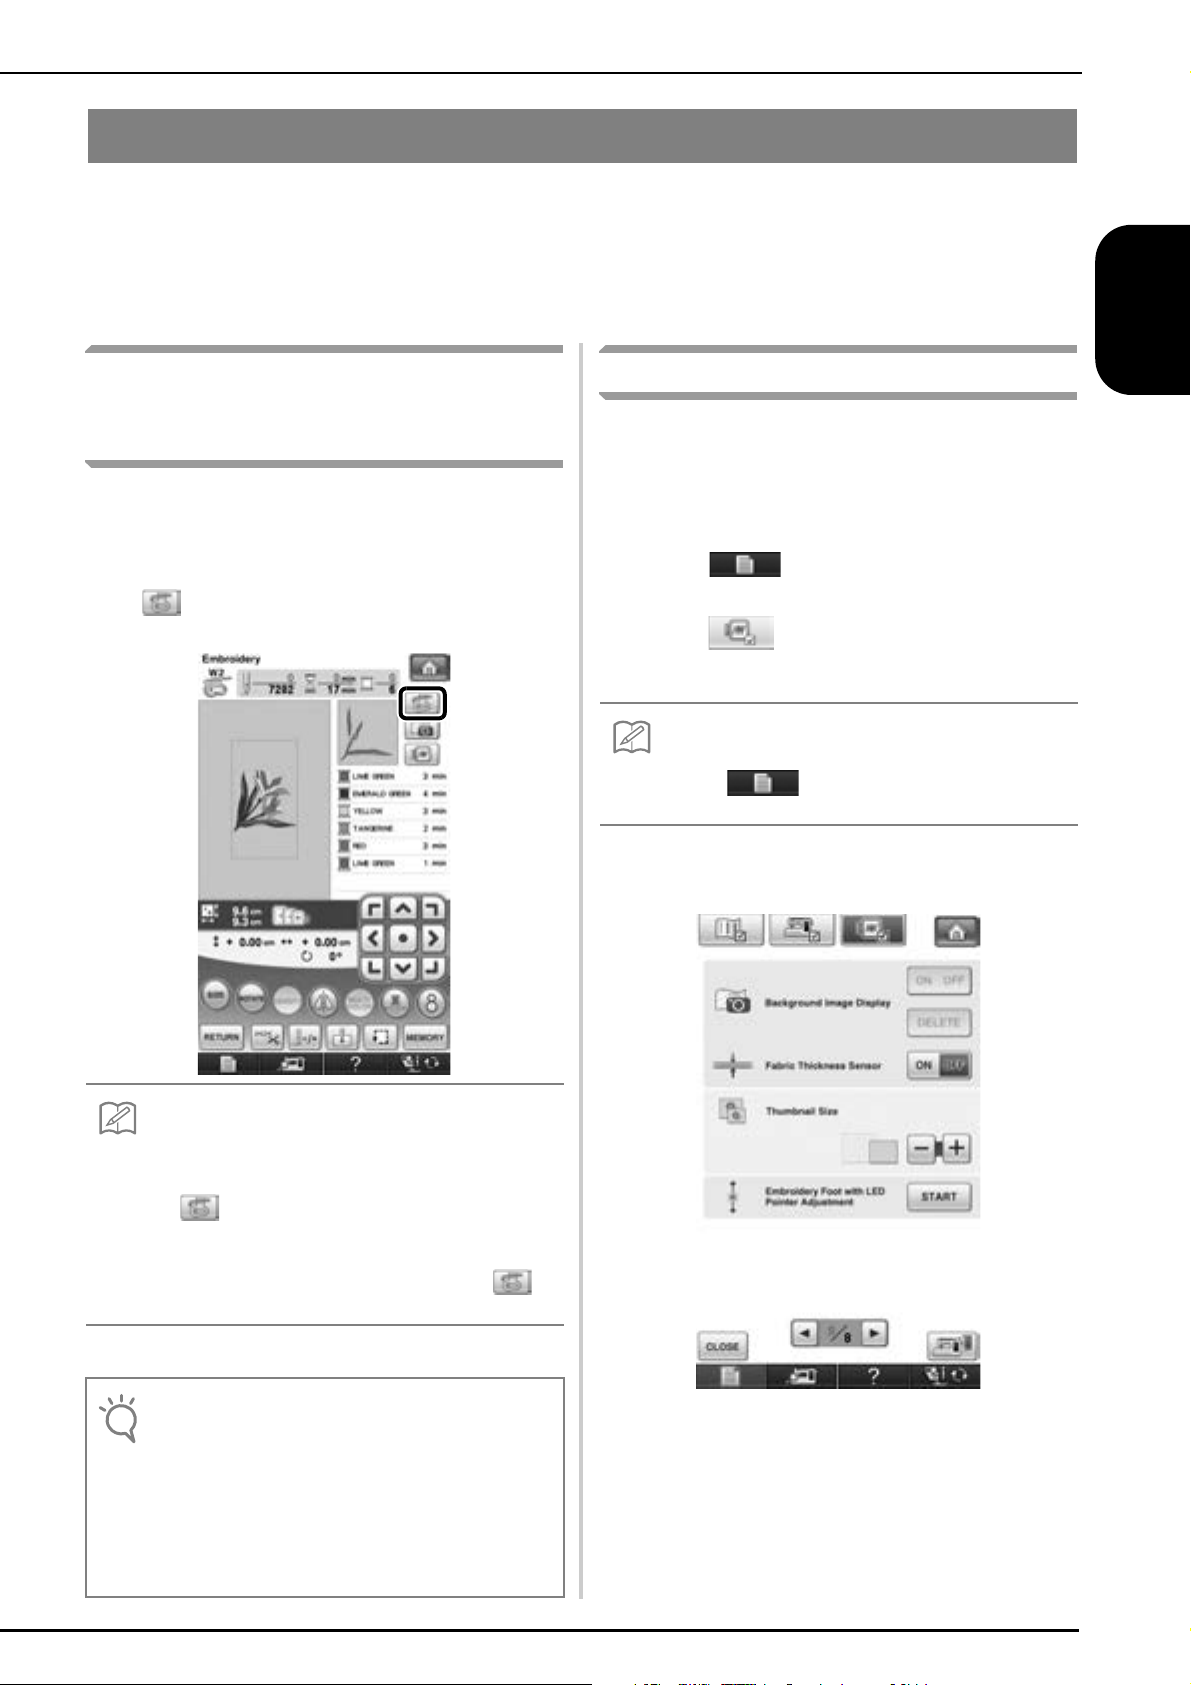
The presser foot code “W2” appears on the upper left
side of the screen while the embroidery foot “W2” with
LED pointer is attached to your machine.
After the embroidery frame is attached, press
a
in the embroidery screen.
→ The LED pointer indicates the needle drop point.
Adjusting the LED Pointer
Adjust the LED pointer if it indicates a point different
than the actual needle drop point.
Before adjusting the LED pointer, mark the actual
needle drop point on the fabric to be embroidered, and
then hoop the fabric and attach the embroidery frame.
Press .
a
→ The settings screen appears.
Press .
b
→ The Embroidery settings screen appears.
• When using the “Embroidery” or “Embroidery Edit”,
touch to directly access the Embroidery
settings screen.
Display page 8 of the Embroidery settings
c
screen.
• When the LED pointer is turned on, the presser foot
height is automatically adjusted according to the
fabric thickness.
• If is pressed again, the fabric thickness is
remeasured and the presser foot is set to the
optimum height.
• If the embroidery foot “W2” is not attached,
appears in gray.
* The LED pointer turns off automatically by lowering the
presser foot or returning to the previous page.
• With thick elastic fabric, the position will be
misaligned only at raised parts in the fabric. In this
case, manually adjust the position according to the
thickness of the fabric.
• With fabric that has a very uneven surface such as
quilting, the position is not correctly aligned. In this
case, the pointer indication should be used only as a
reference.
6
Page 8
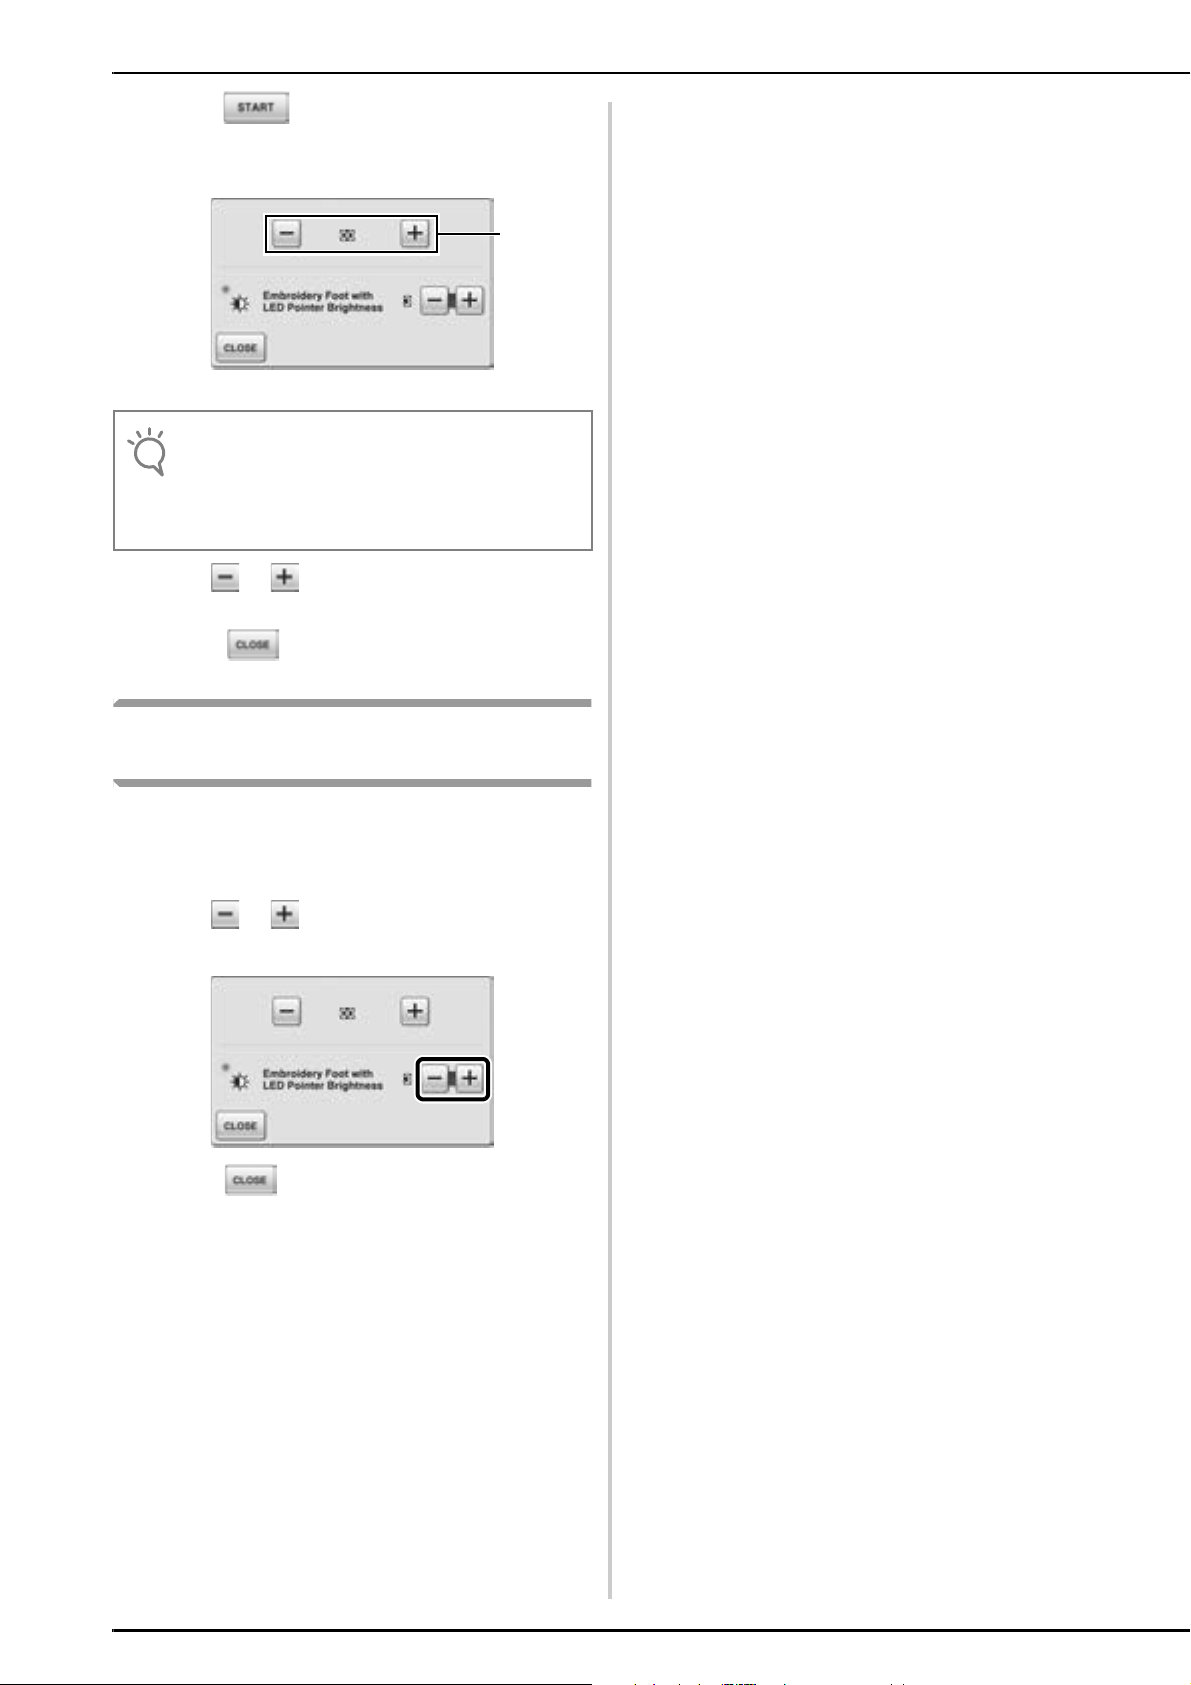
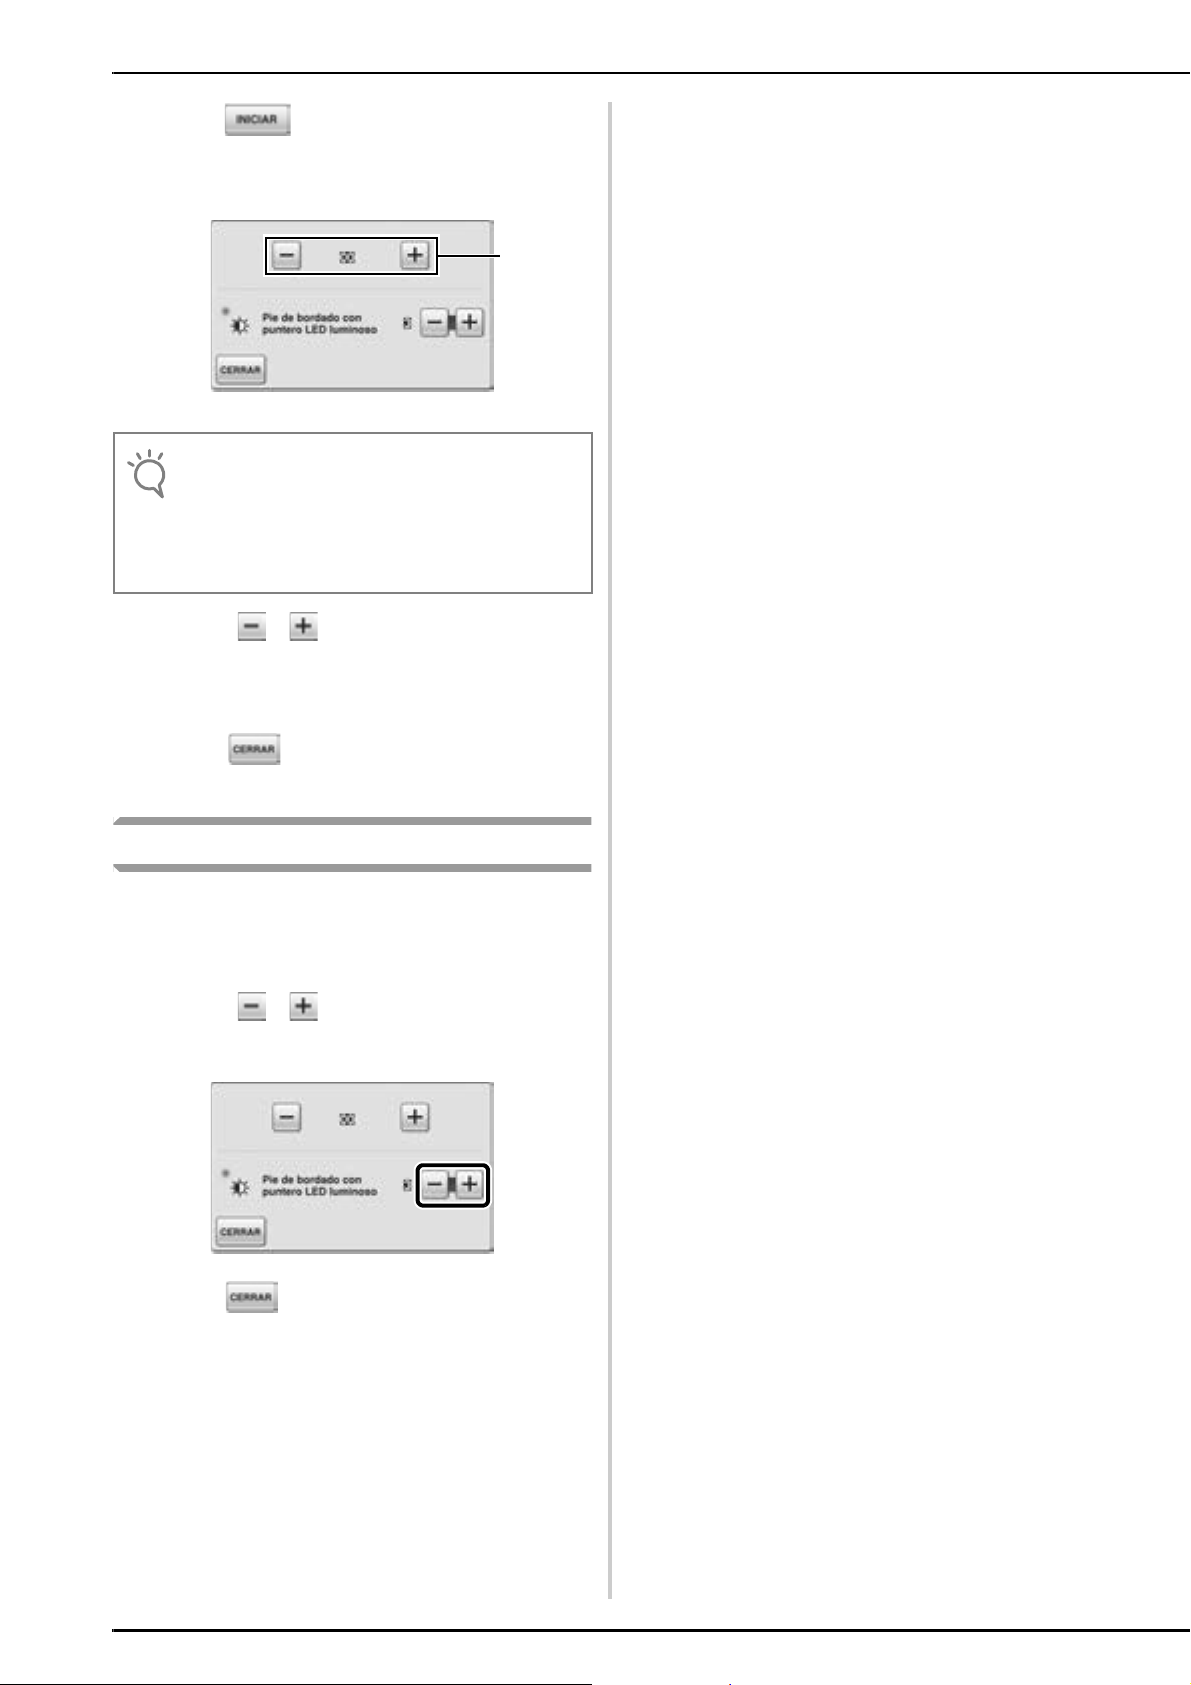
Press .
Note
a
d
→ The Embroidery Foot “W2” with LED Pointer
Adjustment screen appears.
LED pointer adjustment
a
• The specified setting is saved in the machine’s
memory. This is useful for positioning during
continuous embroidering.
• For normal use, return the setting to “00”.
Use or to adjust the LED pointer so
e
that it indicates the actual needle drop point.
Press twice to return to the original
f
screen.
Adjusting the Brightness of the LED
Pointer
Follow the steps from a to d to display the
a
embroidery foot with LED pointer adjust
screen.
Use or to adjust the brightness of the
b
LED pointer.
Press twice to return to the original
c
screen.
7
Page 9
Using the Multi-Function Foot Controller
Memo
With the multi-function foot controller, various sewing machine operations in addition to starting/stopping sewing,
such as thread cutting and reverse stitching, can be specified to be performed. In addition, the small pedal can be
installed on either the left or right side of the large pedal to suit your preference.
ENGLISH
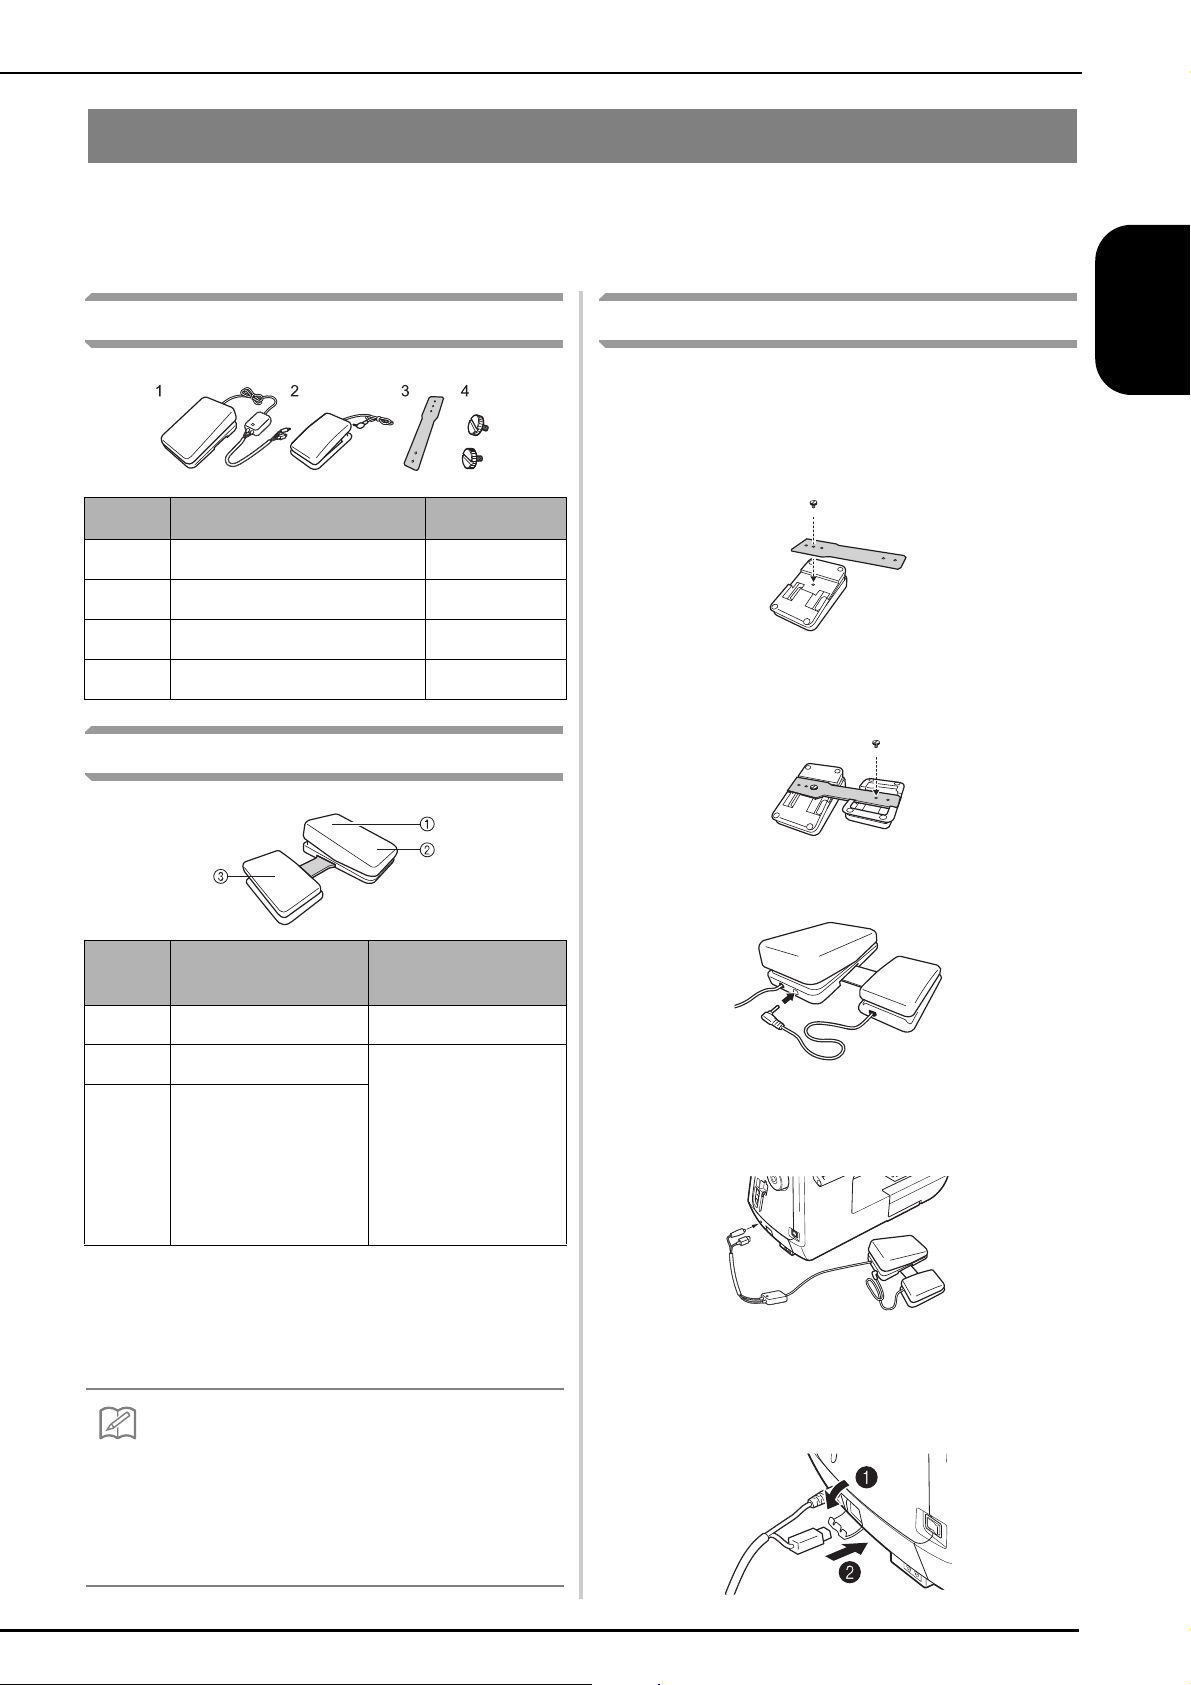
Included Items
No. Part name Part code
1 Main foot controller XF6626-001
2 Side pedal XF3217-001
3 Mounting plate XF3222-001
4 Mounting screw × 2 XF3223-001
Functions That Can Be Specified
Assembling the Controller
Align the wide side of the mounting plate with
a
the notch in the bottom of the main foot
controller, and then secure them together
with a screw.
Align the other side of the mounting plate with
b
the notch on the bottom of the side pedal, and
then secure them together with a screw.
Insert the plug for the side pedal into the jack
c
at the back of the main foot controller.
Controller Functions that
can be specified
a
b
c
Main foot controller Start/Stop
Heel switch Select any of the
following:
Side pedal
* If you set the “Reverse Stitch” function on the heel switch,
machine operates the same as pressing the “Reverse/
Reinforcement Stitch” button on the machine.
For the details, please refer to the Instruction and
Reference Guide.
• If you set “Reverse Stitch” on the side pedal, you
can easily sew darning, using zigzag stitches. With
both feet, keep pressing the main foot controller,
and repeat pressing and releasing the side pedal to
sew forward and reverse in turn. Machine will
reverse at the speed you press the main foot
controller.
• Thread Cutting
• Needle Position
UP/DOWN
• Single Stitch
• Reverse Stitch*
(Reinforcement
Stitch)
Insert the round-shaped plug for the main
d
foot controller into the foot controller jack on
the right side of the machine.
Open the cover of the external port (1) next
e
to the foot controller jack, and then insert the
square-shaped plug for the main foot
controller into the external port (
2).
8
Page 10
Specifying the Functions
Note
Note
Adjusting the Pedal Positions
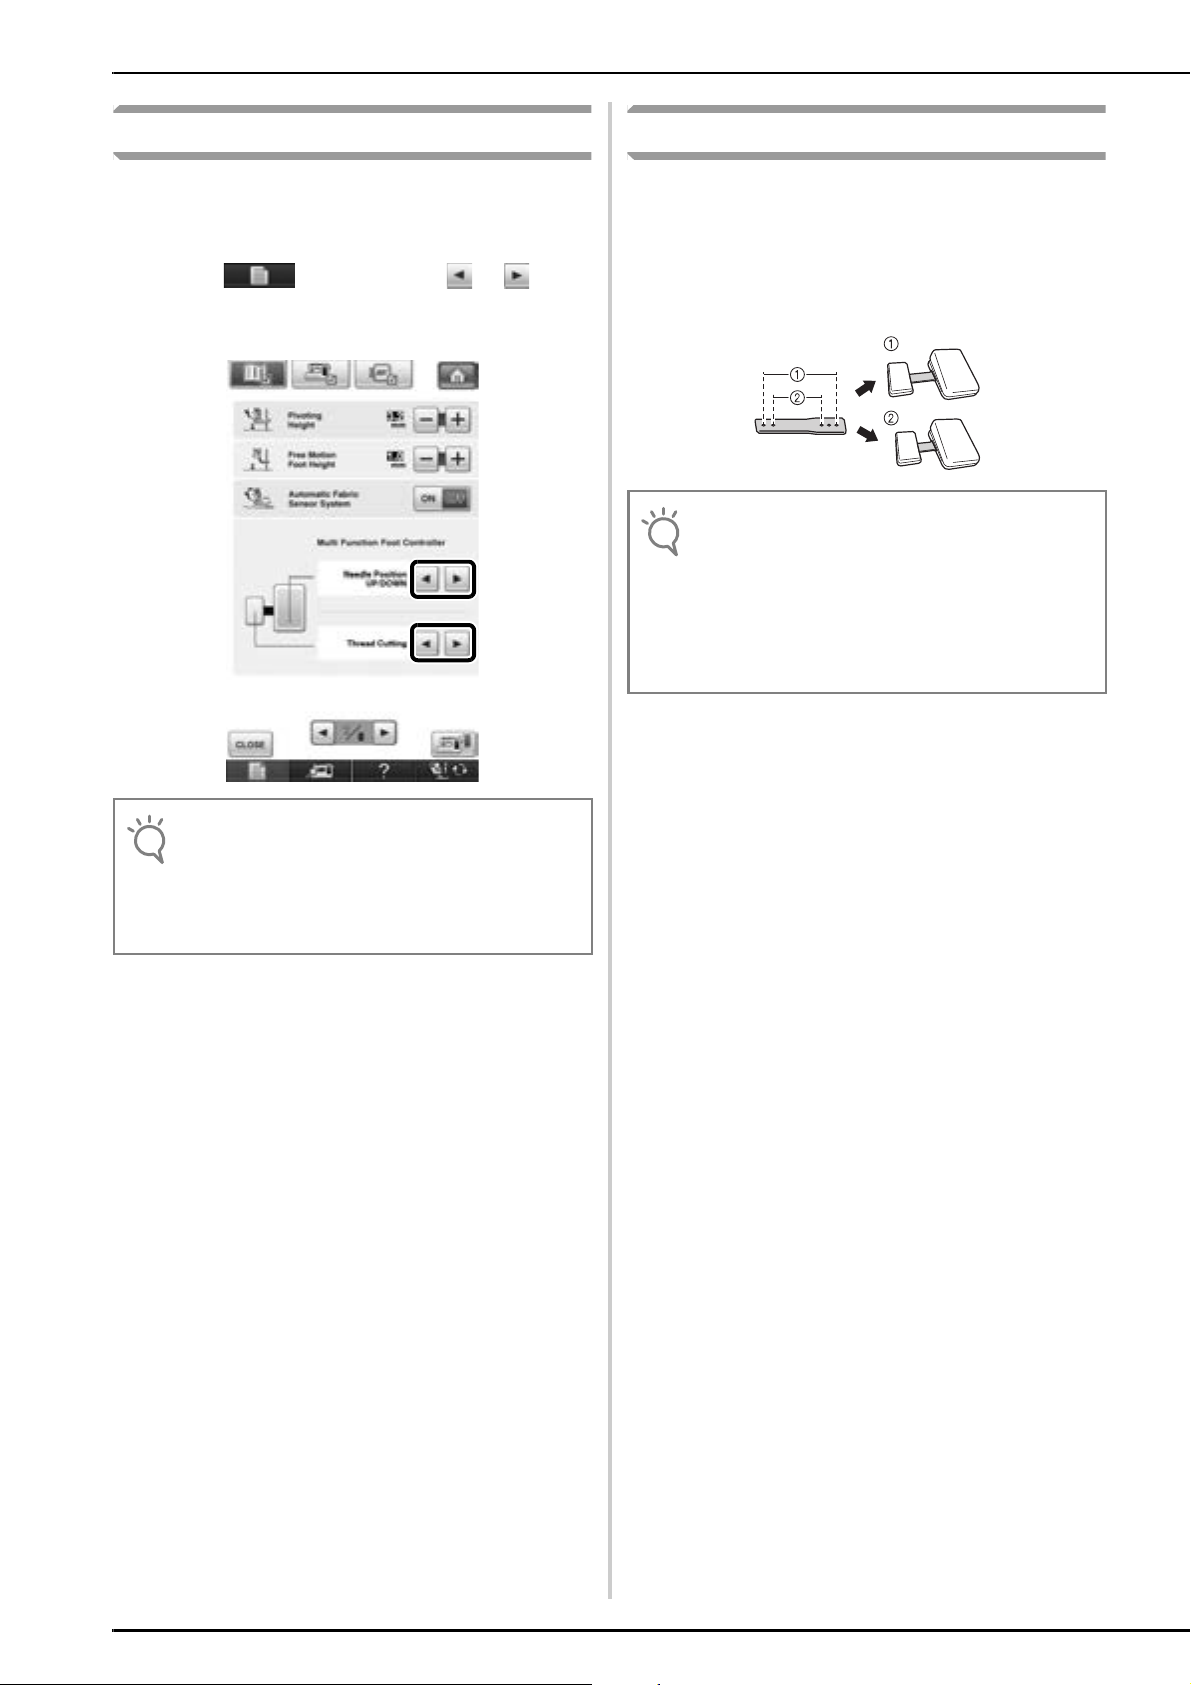
The functions performed by the multi-function foot
controller can be specified in the machine settings
screen.
Press , and then press or to
a
select the functions to be performed by the
multi-function foot controller.
The pedal spacing can be adjusted depending on the
screw holes used in the mounting plate. The pedal
spacing is the widest when the pedals are attached
using the outermost screw holes
a; the pedal spacing is
the narrowest when they are attached using the
innermost screw holes
• The side pedal may be attached on the right or left
side of the main foot controller.
• For greater distance you always have the option of
not connecting the side pedal and main foot
controller using the mounting plate, making sure that
both pedals are connected using the jack from the
side pedal to the main foot controller.
b.
• After the multi-function foot controller is connected
to the sewing machine and the functions are
specified, the machine's “Start/Stop” button cannot
be used. All buttons other than the “Start/Stop”
button can continue to be used.
9
Page 11

Selecting Additional Embroidery Patterns
There is an additional category of embroidery patterns including, 2 large size fonts, buttonholes and decorative
buttonhole frames. The pattern selection screen appears as below.
Refer to the Instruction and Reference Guide how to select or edit the embroidery patterns. Refer to the Quick
Reference Guide for the details of each pattern.
Striped character patterns
Block character patterns
ENGLISH
Additional Category
Large buttonhole patterns
Design patterns (for buttonhole decoration)
10
Page 12

Acerca de este manual
Este manual facilita información adicional no descrita en el Manual de instrucciones. Lea esta información antes de
utilizar la máquina.
Las ilustraciones de las pantallas mostradas en este manual pueden ser distintas a las que realmente muestra la
máquina.
Contenido
Acerca de este manual.......................................................................................................... 1
Información adicional sobre los pies prensatela incluidos ......................................................... 2
Pie para puntada invisible (con guía)..................................................................................... 2
Pie para dobladillo estrecho.................................................................................................. 3
Pie para cordones (guía para 3 cordones).............................................................................. 5
Utilizar el pie de bordado “W2” con puntero LED..................................................................... 6
Comprobar el punto de entrada de la aguja con el pie de bordado “W2” con puntero LED
Ajustar el puntero LED .......................................................................................................... 6
Ajustar el brillo del puntero LED ........................................................................................... 7
Utilizar el pedal multifunción.................................................................................................... 8
Elementos incluidos .............................................................................................................. 8
Funciones que se pueden especificar .................................................................................... 8
Instalar el controlador ........................................................................................................... 8
Especificar las funciones ....................................................................................................... 9
Ajustar las posiciones del pedal ............................................................................................ 9
Seleccionar patrones de bordado adicionales.......................................................................... 10
......... 6
1
Page 13

Información adicional sobre los pies prensatela incluidos
1. 2. 3.
N.º Nombre de la pieza Código de la pieza Página de referencia
1 Pie para puntada invisible (con guía) XA0059-001 page 2
2 Pie para dobladillo estrecho 184600-001 page 3
3 Pie para cordones (guía para 3 cordones) XA6871-001 page 5
Gire el tornillo de la guía del pie y ajústelo con
Pie para puntada invisible (con guía)
cuidado para guiar la tela.
ESPAÑOL
■ Uso
Este pie resulta útil no solo para la costura invisible,
sino también para coser bordes de la tela y costuras.
Extraiga el pie prensatela y coloque el pie para
puntada invisible acoplable a presión.
Pie para puntada invisible (con guía)
■ Costura
• Para la costura de bordes
Coloque la aguja a la distancia a la que desee que
esté desde el borde de la tela y bájela a esa
posición.
1
a Hilvanado
• Para coser costuras
Seleccione “ ”. Alinee la posición de la guía del
pie con la posición de la aguja y cosa el margen de
costura del ancho que desee.
•Para unir
Seleccione la puntada superior que desee.
a
Ejemplos ( , , etc.)
Coloque la tela debajo del pie de forma que la
b
guía del pie quede alineada entre ambos
bordes de la tela.
2
Page 14
Baje el pie y cosa.
Revés
Parte delantera
c
• Para la costura invisible
Si se utilizan telas de grosor normal
10 mm (3/8 pulg.)
Pie para dobladillo estrecho
Este pie está diseñado para formar ondas debajo de un
dobladillo doble de 3 mm (aprox. 1/8 pulg.) al coser
una puntada recta.
Pie para dobladillo estrecho
*1
*2
5 mm (3/16 pulg.)
2
*2
Si se utilizan telas pesadas
10 mm (3/8 pulg.) 5 mm (3/16 pulg.)
*2
*1
1 2
3
*2
1
4
5
*1
■ Preparativos para la costura
Extraiga el pie prensatela y coloque el pie
a
para dobladillo estrecho acoplable a presión.
Seleccione la puntada recta (posición de la
b
aguja en el centro).
Conecte el pedal de forma que ambas manos
c
queden libres para guiar la tela.
3
a Hilvanado
b Posición de costura
c Gire el tornillo para ajustar la guía al dobladillo
doblado.
d Guía
e Gire hacia la parte delantera
*1 Parte delantera
*2 Revés
Page 15

■ Costura
Coloque la tela (con el revés hacia arriba)
a
debajo del pie prensatela. Baje la aguja
3 mm (aprox. 1/8 pulg.) desde los bordes de
la tela, baje el pie prensatela y, a
continuación, cosa 2 ó 3 puntadas.
1
1
a 3 mm (aprox. 1/8 pulg.)
Suba la aguja y el pie prensatela, sujete los
b
extremos del hilo superior y del hilo inferior
para evitar que se salgan de la tela y tire de la
tela desde la parte delantera del pie
prensatela.
Sin dejar que la tela sobresalga del lado
d
derecho del pie prensatela, tire ligeramente
del hilo mientras cose lentamente.
Después de coser de 2 a 3 cm(aprox. de 1 a 1-
e
3/16 pulg.) de la tela, suelte el hilo y guíe la
tela desde la parte delantera del pie
prensatela con la mano izquierda. Mantenga
una cantidad uniforme de tela envuelta
alrededor de la parte ondulada del pie
prensatela hasta que se complete la costura.
ESPAÑOL
Sujetando ambos hilos, páselos por la parte
c
ondulada del pie prensatela y tire de ellos
hacia la parte trasera del pie prensatela.
Envuelva la tela alrededor de la parte
ondulada del pie prensatela de la misma
manera. Coloque el borde de la tela justo
detrás de la aguja y baje el pie prensatela.
■ Consejos
• Si se envuelve poca tela alrededor de la parte
ondulada y no se cose una costura triple:
Tire de la tela que tiene sujeta con la mano derecha
hacia la izquierda para aumentar la cantidad de tela
envuelta en la parte ondulada del pie prensatela. Al
mismo tiempo, guíe con cuidado la tela hacia la
derecha con la mano izquierda.
• Si se envuelve demasiada tela alrededor de la parte
ondulada y se cose una costura triple ancha:
Tire de la tela que tiene sujeta con la mano derecha
hacia la derecha para reducir la cantidad de tela
envuelta en la parte ondulada del pie prensatela. Al
mismo tiempo, guíe con cuidado la tela que sobra
hacia la izquierda con la mano izquierda.
4
Page 16

Pie para cordones (guía para 3 cordones)
■ Uso
Adorne prendas de vestir y la ropa blanca de la casa
con hilos decorativos.
Pie para cordones (guía para 3 cordones)
■ Preparativos para la costura
Extraiga el pie prensatela y coloque el pie para
cordones acoplable a presión.
• Puntadas sugeridas
• Largo de la puntada
Seleccione el largo de puntada que desee. Recuerde
que los resultados se basarán en el largo de puntada
seleccionado.
•Pedal
El pedal le ayudará a mantener ambas manos libres
para así facilitar el guiado de la tela.
■ Costura
Haga avanzar los cordones,
uno a uno, desde el lado
derecho del resorte del pie
para cordones hasta sus
respectivas guías.
Zig-zag Zig-zag elástica Puntada decorativa para
satén
• Ancho de la puntada de zig-zag
Triple cordón elástico
Seleccione la puntada de zig-zag
discontinua y cosa a un ancho de
puntada máximo de 5 mm (aprox.
3/16 pulg.).
Cordón simple
La puntada de zig-zag puede
colocarse en la guía central o
derecha. Verifique la posición de la
puntada y determine la guía
apropiada que se seguirá. Ajuste el
ancho de la puntada ligeramente
mayor que el ancho del cordón.
Tense los cordones debajo
del pie y extienda el cordón
4-5 mm (aprox. 3/16 pulg.)
detrás del pie. Si se utilizan 2
ó 3 cordones, asegúrese de
que los cordones no quedan
atrapados debajo del pie
prensatela.
Coloque la tela debajo del
pie.
Baje el pie y cosa.
5
Page 17

Utilizar el pie de bordado “W2” con puntero LED
Recuerde
Nota
Recuerde
El pie de bordado con puntero LED incluido indica la posición de la aguja mediante un punto LED de color rojo.
El puntero LED muestra la posición de penetración de la aguja, por lo que resulta más fácil ajustar la posición de bordado.
Antes de comenzar a bordar cuando se usa el pie de bordado “W2” con puntero LED, lea con atención las
instrucciones “Colocar el pie de bordado W2” descritas en el capítulo “Bordado” de la Guía de referencia y de
instrucciones incluida con el equipo.
Comprobar el punto de entrada de la
aguja con el pie de bordado “W2”
con puntero LED
El código del pie prensatela “W2” aparece en la parte
superior izquierda de la pantalla cuando el pie de
bordado “W2” con puntero LED se coloca en la máquina.
Después de colocar el bastidor, pulse en
a
la pantalla de bordado.
→
El puntero LED indica el punto de entrada de la aguja.
Ajustar el puntero LED
Ajuste el puntero LED si indica un punto distinto al de
entrada real de la aguja.
Antes de ajustar el puntero LED, marque el punto de
entrada real de la aguja en la tela a bordar y, a
continuación, coloque la tela e instale el bastidor.
Pulse .
a
→ Aparece la pantalla de ajustes.
Pulse .
b
→ Aparece la pantalla de ajustes de bordado.
• Si utiliza el “Bordado” o la “Edición de bordado”,
toque para acceder directamente a la
pantalla de ajustes de bordado.
Vaya a la página 8 de la pantalla de ajustes de
c
bordado.
ESPAÑOL
• Cuando el puntero LED está activado, la altura del
pie prensatela se ajusta automáticamente en
función del grosor de la tela.
• Si se vuelve a pulsar , se mide de nuevo el
grosor de la tela y el pie prensatela se ajusta a la
altura óptima.
• Si no se ha colocado el pie de bordado “W2”,
aparece en gris.
* El puntero LED se desactiva automáticamente bajando el
pie prensatela o volviendo a la página anterior.
• Si se utiliza una tela elástica gruesa, la posición
quedará desalineada solo en las partes elevadas
del tejido. En este caso, ajuste manualmente la
posición en función del grosor de la tela.
• Si la tela tiene una superficie muy irregular (como
por ejemplo un acolchado), la posición no queda
correctamente alineada. En este caso, la indicación
del puntero debe utilizarse solo como referencia.
6
Page 18
Pulse .
Nota
a
d
→ Aparece la pantalla de ajuste del pie de bordado
“W2” con puntero LED.
a
Ajuste del puntero LED
• El ajuste especificado se guarda en la memoria de
la máquina. Esto resulta útil para el posicionamiento
durante el bordado continuo.
• Para un uso normal, vuelva a seleccionar “00” para
el ajuste.
Utilice o para ajustar el puntero LED
e
de forma que indique el punto de entrada real
de la aguja.
Pulse dos veces para regresar a la
f
pantalla inicial.
Ajustar el brillo del puntero LED
Siga los pasos del a al d para mostrar la
a
pantalla de ajuste del pie de bordado con
puntero LED.
Utilice o para ajustar la luminosidad
b
del puntero LED.
Pulse dos veces para regresar a la
c
pantalla inicial.
7
Page 19

Utilizar el pedal multifunción
Recuerde
Con el pedal multifunción pueden especificarse distintas operaciones de la máquina de coser, además de iniciar/
detener la costura, como por ejemplo el corte del hilo y la costura en reversa. Además, puede instalar el pedal
pequeño en el lado izquierdo o derecho del pedal grande, según sus preferencias.
Elementos incluidos
N.º Nombre de la pieza Referencia
1 Pedal principal XF6626-001
2 Pedal lateral XF3217-001
3 Placa de montaje XF3222-001
4 Tornillo de montaje × 2 XF3223-001
Funciones que se pueden especificar
Instalar el controlador
Alinee el lado ancho de la placa de montaje con
a
la muesca de la parte inferior del pedal principal
y, a continuación, únalos con un tornillo.
Alinee el otro lado de la placa de montaje con
b
la muesca de la parte inferior del pedal lateral
y, a continuación, únalos con un tornillo.
Inserte el conector del pedal lateral en el jack
c
de la parte posterior del pedal principal.
ESPAÑOL
Controlador
Funciones que se
pueden especificar
a
b
c
Pedal principal Inicio/Parada
Conmutador de talón
Pedal lateral
* Si ajusta la función “Puntada en reversa” en el conmutador
de talón, la máquina funcionará de la misma forma que si
pulsara el botón “Puntada en reversa/remate” en la
máquina.
Para más detalles, consulte la Guía de referencia y de
instrucciones.
• Si selecciona la “Puntada en reversa” en el pedal
lateral, puede coser fácilmente zurcidos empleando
puntadas en zig-zag. Pise el pedal principal con
ambos pies, y vaya pisando y soltando el pedal
lateral para coser hacia adelante y hacia atrás
alternativamente. La máquina coserá hacia atrás a
la misma velocidad con que pise el pedal principal.
Seleccione
cualquiera de las
siguientes:
• Corte del hilo
• Posición de la aguja
ARRIBA/ABAJO
• Puntada única
• Puntada en reversa*
(Puntada de remate)
Inserte el conector redondo del pedal
d
principal en el jack del pedal, en el lado
derecho de la máquina.
Abra la tapa del puerto externo (1) situado
e
junto al jack del pedal y, a continuación,
inserte el conector redondo del pedal
principal en el puerto externo (
2).
8
Page 20

Especificar las funciones
Nota
Nota
Ajustar las posiciones del pedal
Las funciones realizadas por el pedal multifunción
pueden especificarse en la pantalla de ajustes de la
máquina.
Pulse y, a continuación, o para
a
seleccionar las funciones que desea que
realice el pedal multifunción.
Podrá ajustar el espaciado del pedal dependiendo de
los orificios de los tornillos utilizados en la placa de
montaje. El espaciado de los pedales estará al máximo
de su anchura si se instalan utilizando los orificios
situados en la parte más externa
a, y estará al mínimo
de su anchura si se instalan utilizando los orificios
situados en la parte más interna
• El pedal lateral puede colocarse en el lado derecho
o izquierdo del pedal principal.
• Si la distancia es superior, también tenemos la
opción de no conectar el pedal lateral y el pedal
principal utilizando la placa de montaje,
asegurándose de que ambos pedales se conectan
utilizando el conector del pedal lateral al pedal
principal.
b.
• Después de conectar el pedal multifunción a la
máquina de coser y de especificar las funciones, no
se podrá utilizar el botón “Inicio/Parada” de la
máquina. El resto de los botones, excepto el de
“Inicio/Parada”, sí pueden utilizarse.
9
Page 21

Seleccionar patrones de bordado adicionales
Existe una categoría adicional de patrones de bordado, incluyendo 2 fuentes de gran tamaño, ojales y marcos
decorativos para ojales. Aparece la pantalla de selección del patrón mostrada a continuación.
Consulte, en la Guía de referencia y de instrucciones, la forma de seleccionar o editar los patrones de bordado.
Consulte la Guía de referencia rápida para más detalles acerca de cada uno de los patrones.
Patrones de caracteres con franjas
Patrones de caracteres en bloques
ESPAÑOL
Categoría adicional
Patrones para ojales de gran tamaño
Patrones de diseño (para la decoración de ojales)
10
Page 22

À propos de ce manuel
Le présent manuel offre des informations supplémentaires qui ne sont pas décrites dans le Manuel d’instructions.
Veillez à lire ces informations avant d’utiliser la machine.
Les illustrations de l’écran présentées dans ce manuel peuvent différer de celles qui apparaissent réellement sur la
machine.
Table des matières
À propos de ce manuel ......................................................................................................... 1
Plus d’informations sur le pied-de-biche fourni.......................................................................... 2
Pied pour ourlets invisibles (avec guide)................................................................................ 2
Pied ourleur étroit ................................................................................................................. 3
Pied pour cordonnet (guide 3 cordonnets)............................................................................. 5
Utilisation du pied de broderie « W2 » avec pointeur lumineux................................................ 6
Vérification du point de chute de l’aiguille avec le pied de broderie « W2 »
avec pointeur lumineux ........................................................................................................ 6
Réglage du pointeur lumineux .............................................................................................. 6
Réglage de la luminosité du pointeur lumineux..................................................................... 7
Utilisation de la pédale multifonction........................................................................................ 8
Éléments fournis.................................................................................................................... 8
Fonctions disponibles............................................................................................................ 8
Assemblage des pédales........................................................................................................ 8
Spécification des fonctions.................................................................................................... 9
Réglage des positions de la pédale........................................................................................ 9
Sélection de motifs de broderie supplémentaires ..................................................................... 10
1
Page 23

Plus d’informations sur le pied-de-biche fourni
1. 2. 3.
N° Nom de la pièce Code de la pièce Page de référence
1 Pied pour ourlets invisibles (avec guide) XA0059-001 page 2
2 Pied ourleur étroit 184600-001 page 3
3 Pied pour cordonnet (guide 3 cordonnets) XA6871-001 page 5
Pied pour ourlets invisibles (avec
guide)
■ Utilisation
Ce pied est pratique non seulement pour les points
ourlet invisible mais aussi pour la couture de points
par rapport aux bords du tissu et pour les rabats.
Retirez le pied-de-biche et fixez le pied pour ourlets
invisibles de type à montage par simple pression.
Pied pour ourlets invisibles (avec guide)
■ Couture
• Couture par rapport au bord du tissu
Tournez la vis du guide du pied et réglez
soigneusement pour guider le tissu.
1
a Faufilage
FRANÇAIS
Positionnez l'aiguille en fonction de la distance à
laquelle vous souhaitez coudre le point par rapport
au bord du tissu, puis abaissez-la.
• Couture de rabats
Sélectionnez « ». Alignez la position du guide
du pied sur celle de l'aiguille et cousez le rabat de la
largeur souhaitée.
• Assemblage
Sélectionnez la surpiqûre souhaitée. Exemples
a
( , , etc.)
Placez le tissu sous le pied de façon à aligner
b
le guide du pied entre les deux bords du tissu.
2
Page 24

Abaissez le pied et cousez.
EnversEndroit
c
Pied ourleur étroit
Ce pied est conçu pour froncer un double ourlet de
3 mm (env. 1/8 de po) tout en cousant des points droits.
• Couture de points ourlet invisible
Pour les tissus de grammage normal
10 mm (env. 3/8 de po)
1
3
4
5 mm (env. 3/16 de po)
2
*2
Pour les tissus lourds
*2
*1
5
*1
Pied ourleur étroit
■ Préparation de la couture
Retirez le pied-de-biche et fixez le pied
a
ourleur étroit de type à montage par simple
pression.
Sélectionnez le point droit (aiguille au
b
centre).
10 mm (env. 3/8 de po) 5 mm (env. 3/16 de po)
*2
*1
1 2
a Faufilage
b Position de la couture
c Tourner la vis pour régler le guide sur l'ourlet plié.
d Guide
e Tourner sur l'endroit
*1 Endroit
*2 Envers
*2
Utilisez la pédale de manière à ce que vos
c
mains soient libres pour guider le tissu.
3
Page 25

■ Couture
Placez le tissu (l'envers vers le haut) sous le
a
pied-de-biche. Abaissez l'aiguille à
3 mm (env. 1/8 de po) des bords du tissu,
abaissez le pied-de-biche, puis cousez 2 ou
3 points.
1
1
a 3 mm (env. 1/8 de po)
Relevez l'aiguille et le pied-de-biche, puis
b
tenez les extrémités des fils supérieur et
inférieur pour les dégager du tissu et tirez le
tissu par l'avant du pied-de-biche.
Tout en évitant de faire dépasser le tissu du
d
côté droit du pied-de-biche, tirez légèrement
sur le fil tout en cousant lentement.
Après avoir cousu 2 à 3 cm (env. 1 à 1-3/16 de
e
po) de tissu, relâchez le fil et guidez le tissu par
l'avant du pied-de-biche à l'aide de votre main
gauche. Gardez une quantité uniforme de tissu
enroulé autour de la partie recourbée du piedde-biche jusqu'à ce que le rabat soit terminé.
FRANÇAIS
Tout en tenant les fils, faites-les passer par la
c
partie recourbée du pied-de-biche et tirez-les
vers l'arrière du pied-de-biche. Enroulez le
tissu autour de la partie recourbée du piedde-biche de la même façon. Placez le bord du
tissu sous l'aiguille et abaissez le pied-debiche.
■ Conseils
• Si le tissu enroulé autour de la partie
recourbée est insuffisant et que vous n'avez
pas cousu un triple rabat :
Tirez le tissu que vous tenez dans votre main droite
vers la gauche pour augmenter la quantité de tissu
enroulé autour de la partie recourbée du pied-debiche. En même temps, guidez soigneusement le
tissu vers la droite à l'aide de votre main gauche.
• Si la quantité de tissu enroulé autour de la
partie recourbée est trop importante et que
vous avez cousu un large triple rabat :
Tirez le tissu que vous tenez dans votre main droite
vers la droite pour réduire la quantité de tissu enroulé
autour de la partie recourbée du pied-de-biche. En
même temps, guidez soigneusement l'excédent de
tissu vers la gauche à l'aide de votre main gauche.
4
Page 26

Pied pour cordonnet (guide 3
cordonnets)
■ Utilisation
Permet de décorer des vêtements et du linge de
maison avec des fils décoratifs.
Pied pour cordonnet (guide 3 cordonnets)
■ Préparation de la couture
Retirez le pied-de-biche et fixez le pied pour
cordonnet de type à montage par simple pression.
• Longueur de point
Sélectionnez la longueur de point souhaitée.
N'oubliez pas que les résultats varient en fonction
de la longueur de point sélectionnée.
•Pédale
Grâce à la pédale, vos mains sont libres et vous
pouvez ainsi manipuler facilement le tissu.
■ Couture
Faites passer les cordonnets,
un par un, du côté droit du
ressort du pied pour
cordonnet dans leurs guides
respectifs.
• Points suggérés
Zigzag Zigzag élastique Point plumetis décoratif
• Largeur du point zigzag
Triple cordonnet élastique
Sélectionnez le point zigzag en
pointillé et cousez à une largeur
maximale de point de 5 mm (env.
3/16 de po).
Cordonnet simple
Le point zigzag peut être positionné
dans le guide central ou droit.
Vérifiez la position du point et
déterminez le guide approprié à
suivre. Définissez une largeur de
point supérieure à celle du
cordonnet.
Placez le cordonnet sous le
pied et faites-le dépasser de
4 à 5 mm (env. 3/16 de po)
derrière le pied. Si vous
utilisez 2 ou 3 cordonnets,
veillez à ne pas les enfoncer
en dessous de l'avant du
pied.
Placez un tissu en dessous du
pied.
Abaissez le pied et cousez.
5
Page 27

Utilisation du pied de broderie « W2 » avec pointeur lumineux
Mémo
Remarque
Mémo
Le pied de broderie avec pointeur lumineux inclus indique la position de l'aiguille à l'aide d'un point lumineux rouge.
Le pointeur lumineux vous indique l’emplacement de l’insertion de l’aiguille afin de faciliter le réglage de la position de broderie.
Avant de commencer à broder à l’aide du pied de broderie « W2 » avec pointeur lumineux, lisez attentivement les
instructions de la section « Fixation du pied de broderie W2 » du chapitre « Broderie » du Guide d’instructions et de
référence fourni avec votre machine.
Vérification du point de chute de
l’aiguille avec le pied de broderie
« W2 » avec pointeur lumineux
Le code « W2 » du pied-de-biche apparaît dans l’angle
supérieur gauche de l’écran lorsque le pied de broderie
« W2 » avec pointeur lumineux est fixé sur la machine.
Une fois le cadre de broderie fixé, appuyez
a
sur dans l’écran de broderie.
→
Le pointeur lumineux indique le point de chute de l’aiguille.
Réglage du pointeur lumineux
Réglez le pointeur lumineux s’il indique un autre point
que le point de chute réel de l’aiguille.
Auparavant, marquez le point de chute réel de l’aiguille sur
le tissu à broder, puis fixez le tissu au cadre de broderie.
Appuyez sur .
a
→ L’écran de réglages s’affiche.
Appuyez sur .
b
→ L’écran de réglages de broderie s’affiche.
• Lorsque vous utilisez la fonction « Broderie » ou
« Modification de broderie », touchez pour
accéder directement à l’écran de réglages de broderie.
Affichez la page 8 de l’écran de réglages de broderie.
c
FRANÇAIS
* Le pointeur lumineux s’éteint automatiquement lorsque vous
• Lorsque le pointeur lumineux est activé, la hauteur
du pied-de-biche est automatiquement ajustée en
fonction de l’épaisseur du tissu.
• Si vous appuyez une seconde fois sur ,
l’épaisseur du tissu est de nouveau mesurée et le
pied-de-biche est défini sur la hauteur optimale.
• Si le pied de broderie « W2 » n’est pas fixé, est grisé.
abaissez le pied-de-biche ou revenez à la page précédente.
• Avec du tissu élastique épais, la position ne sera
alignée de manière incorrecte qu’aux parties hautes
du tissu. Dans ce cas, réglez manuellement la
position en fonction de l’épaisseur du tissu.
• Avec un tissu ayant une surface très inégale,
comme avec le quilting (courtepointe), la position
n’est pas correctement alignée. Dans ce cas,
l’indication du pointeur ne doit être utilisée qu’en
référence.
6
Page 28
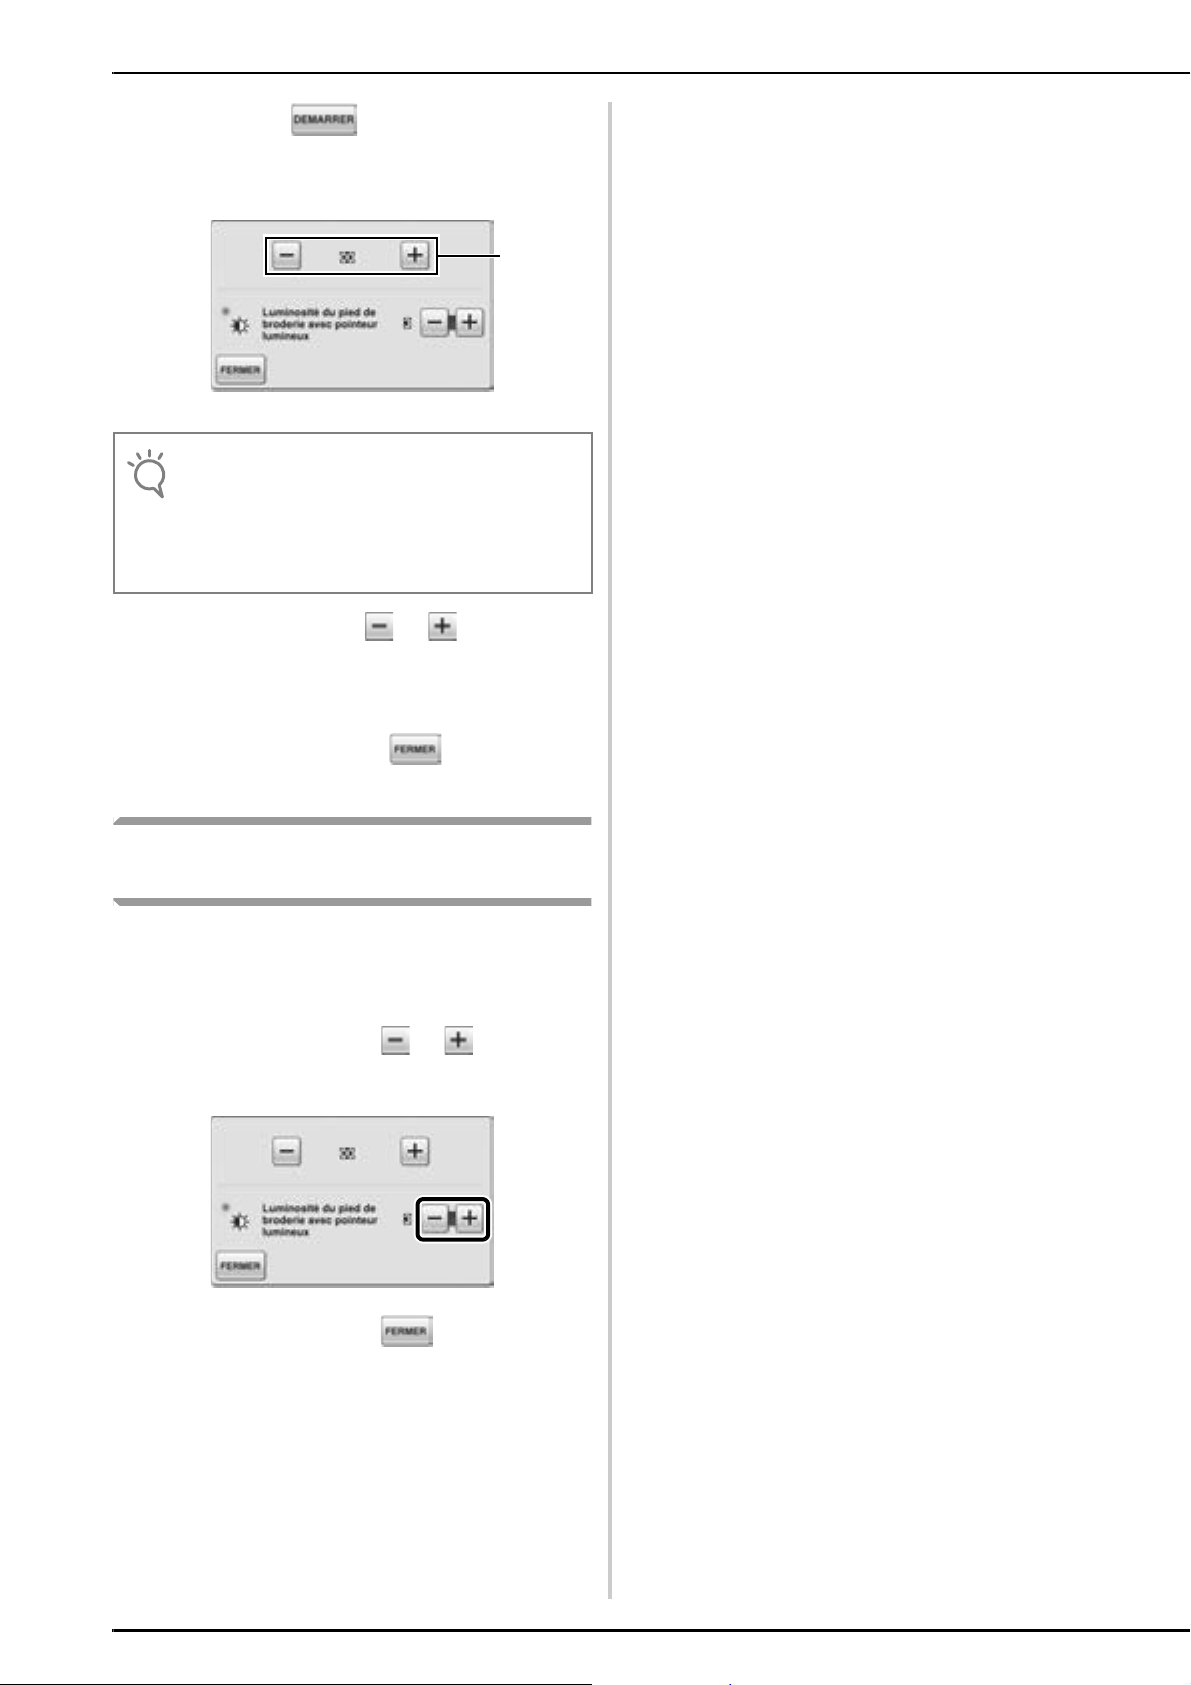
Appuyez sur .
Remarque
a
d
→ L’écran de réglage du pied de broderie « W2 » avec
pointeur lumineux apparaît.
a
Réglage du pointeur lumineux
• Le réglage spécifié est mémorisé dans la machine.
Ceci est utile pour le positionnement au cours d’une
broderie continue.
• Pour une utilisation normale, redéfinissez le réglage
sur «00».
À l’aide de la touche ou , réglez le
e
pointeur lumineux de sorte qu’il indique le
point de chute réel de l’aiguille.
Appuyez deux fois sur pour revenir à
f
l’écran initial.
Réglage de la luminosité du pointeur
lumineux
Suivez les étapes a à d pour afficher l’écran
a
de réglage du pied de broderie avec pointeur
lumineux.
Appuyez sur la touche ou pour régler
b
la luminosité du pointeur lumineux.
c
7
Appuyez deux fois sur pour revenir à
l’écran initial.
Page 29

Utilisation de la pédale multifonction
Mémo
Grâce à la pédale multifonction, outre le démarrage et l’arrêt de la couture, vous pouvez spécifier diverses
opérations à exécuter sur la machine à coudre, telles que la coupe de fil et la couture de points inverses. Vous
pouvez également installer la petite pédale à gauche ou à droite de la grande pédale, à votre convenance.
Éléments fournis
N° Noms des pièces Code de
référence
1 Pédale principale XF6626-001
2 Pédale latérale XF3217-001
3 Plaque d’assemblage XF3222-001
4 Vis de montage × 2 XF3223-001
Fonctions disponibles
Assemblage des pédales
Alignez le bord large de la plaque d’assemblage
a
sur l’encoche en dessous de la pédale principale,
puis fixez-les ensemble à l’aide d’une vis.
Alignez l’autre côté de la plaque d’assemblage
b
dans l’encoche en dessous de la pédale latérale,
puis fixez-les ensemble à l’aide d’une vis.
Insérez la fiche de la pédale latérale dans la
c
prise à l’arrière de la pédale principale.
FRANÇAIS
Commande Fonctions
disponibles
a
b
c
Pédale principale Marche/Arrêt
Contacteur à pied
Pédale latérale
* Définir la fonction « Point inverse » sur le contacteur à
pied revient à appuyer sur la touche « Point inverse/de
renfort » sur la machine.
Pour plus de détails, consultez le Guide d’instructions et
de référence.
• Si vous définissez « Point inverse » sur la pédale latérale,
vous pouvez facilement coudre des points zigzag en vue
d’un reprisage. Maintenez la pédale principale enfoncée
à l’aide des deux pieds, puis appuyez sur la pédale
latérale et relâchez-la à plusieurs reprises pour coudre
tour à tour des points vers l’avant et vers l’arrière. La
machine coud des points inverses à la vitesse déterminée
par la pression que vous exercez sur la pédale principale.
Sélectionnez l’une des
fonctions suivantes :
• Coupe du fil
• Positionnement
aiguille HAUT/BAS
• Point unique
• Point inverse*
(point de renfort)
Insérez la fiche arrondie de la pédale principale
d
dans la prise de la pédale à droite de la machine.
Ouvrez le cache du port externe (1) près de la
e
prise de la pédale, puis insérez la fiche carrée de
la pédale principale dans le port externe (
2
).
8
Page 30

Spécification des fonctions
Remarque
Remarque
Réglage des positions de la pédale
Les fonctions de la pédale multifonction peuvent être
spécifiées dans l’écran de réglages de la machine.
Appuyez sur , puis sur ou pour
a
sélectionner les fonctions à exécuter avec la
pédale multifonction.
L’espacement de la pédale peut être réglé en fonction
des trous de vis utilisés dans la plaque d’assemblage.
L’espacement des pédales est au maximum si vous
utilisez les trous de vis les plus éloignés
a pour les
fixer. Il est au minimum si vous utilisez les trous de vis
les plus proches
• La pédale latérale peut être fixée à droite ou à
gauche de la pédale principale.
• Pour une distance supérieure, vous pouvez choisir
de ne pas relier la pédale latérale et la pédale
principale à l'aide de la plaque d'assemblage, tout
en veillant toutefois à ce que ces deux pédales
soient connectées via la prise, de la pédale latérale
vers la pédale principale.
b.
• Une fois la pédale multifonction connectée à la
machine à coudre et les fonctions spécifiées, le
bouton « Marche/Arrêt » de la machine ne peut plus
être activé. En revanche, les autres boutons restent
actifs.
9
Page 31
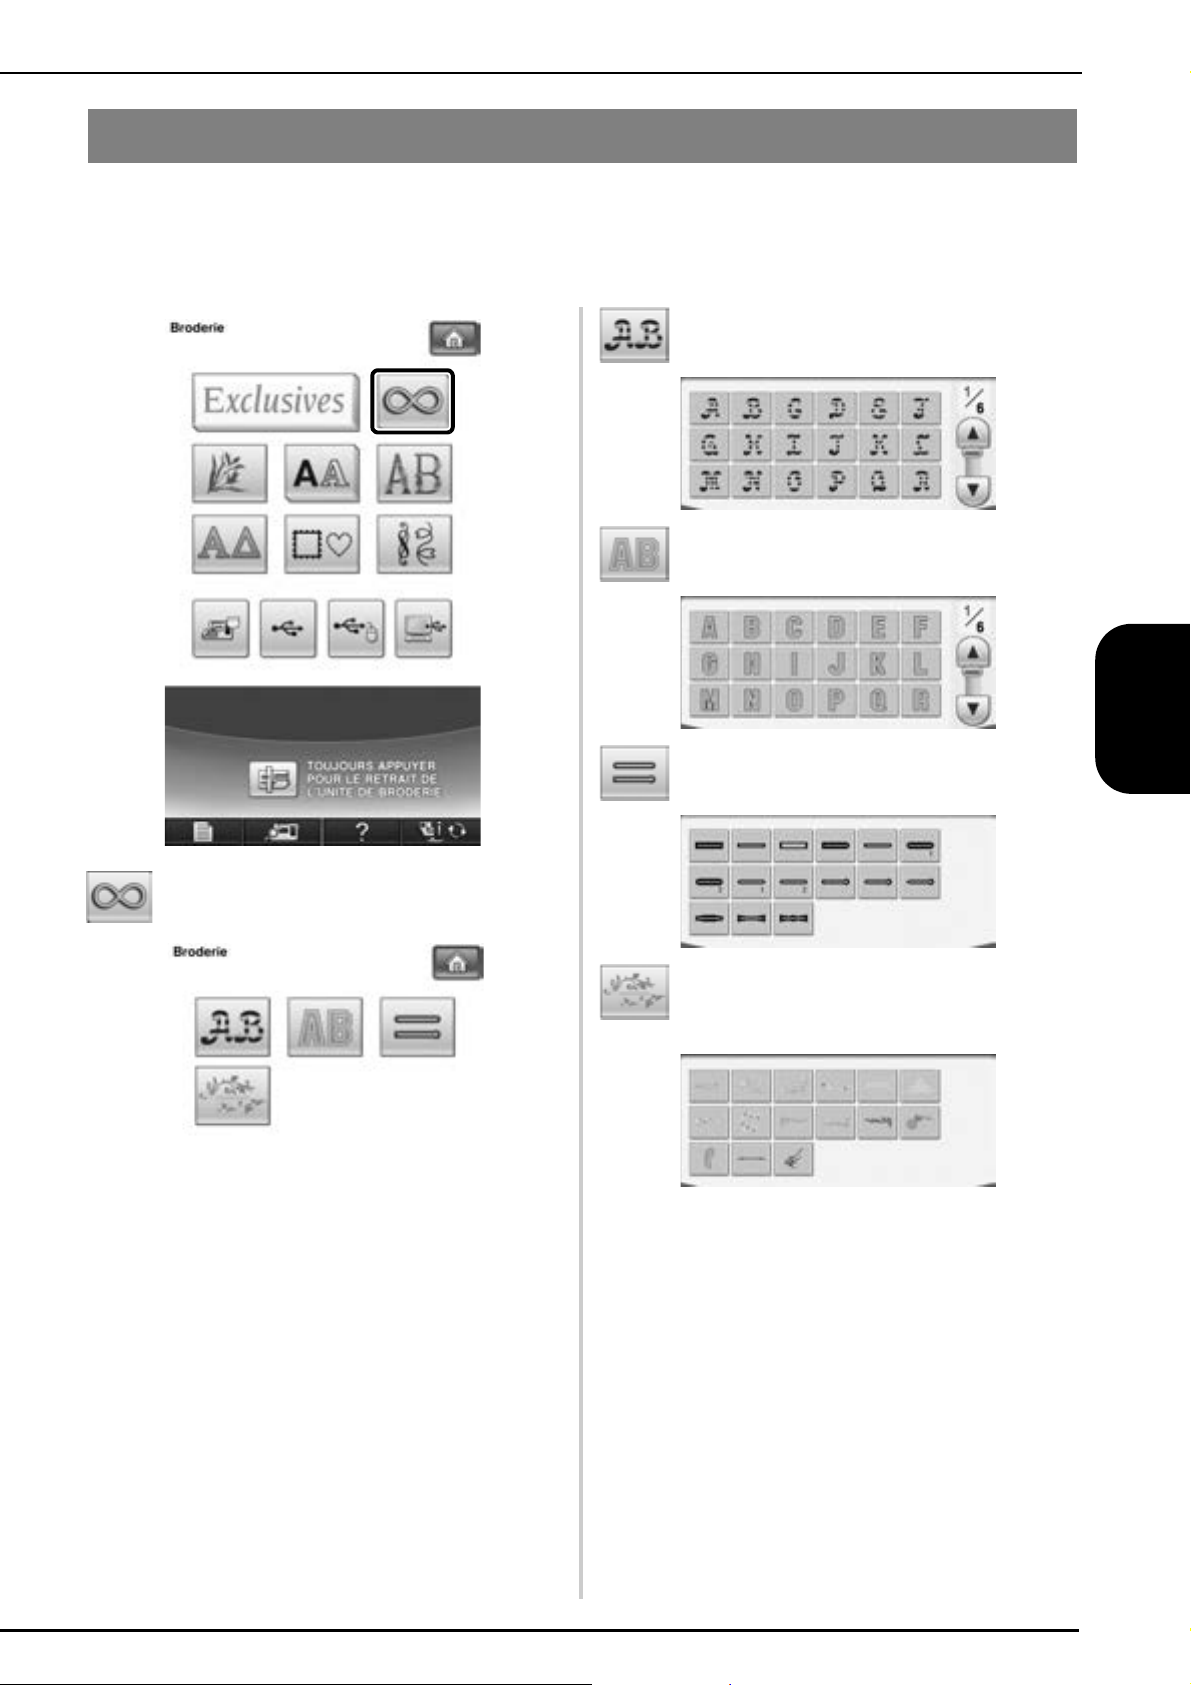
Sélection de motifs de broderie supplémentaires
L'une des catégories supplémentaires de motifs de broderie comprend 2 grandes polices, des cadres de
boutonnières et de boutonnières décoratives. L'écran de sélection des motifs s'affiche comme illustré ci-dessous.
Consultez le Guide d’instructions et de référence pour savoir comment sélectionner ou modifier les motifs de
broderie. Reportez-vous au Guide de référence rapide pour plus de détails sur chaque motif.
Motifs de caractères rayés
Motifs de caractères de type empreinte
FRANÇAIS
Catégorie supplémentaire
Grands motifs de boutonnières
Motifs de dessins (pour la décoration des
boutonnières)
10
Page 32

Spanish
882-W08
Printed in Taiwan
XF6314-001
English
French
 Loading...