

Page 1

Page 2

Chapter 5
Basic Embroidery
BEFORE EMBROIDERING..................................... 196
Embroidery Step by Step ........................................................196
Attaching Embroidery Foot “W+” with LED pointer ..............197
Attaching the Embroidery Unit ..............................................197
■ About the Embroidery Unit.................................................... 197
■ Removing the Embroidery Unit ............................................. 198
SELECTING PATTERNS.......................................... 200
■ Copyright Information ...........................................................200
■ Pattern Selection Screens ......................................................201
Selecting Embroidery Patterns/Decorative Alphabet Patterns/
Utility Embroidery Patterns/Bobbin Work Patterns ................202
Selecting Alphabet Character Patterns....................................203
Selecting Frame Patterns.........................................................205
Selecting Patterns from Embroidery Cards ..............................205
■ About Embroidery Card Reader (Sold Separately) and
USB Card Writer Module*...................................................... 205
■ About Embroidery Cards (Sold Separately).............................205
Recalling from USB Media ......................................................207
Recalling from the Computer ..................................................208
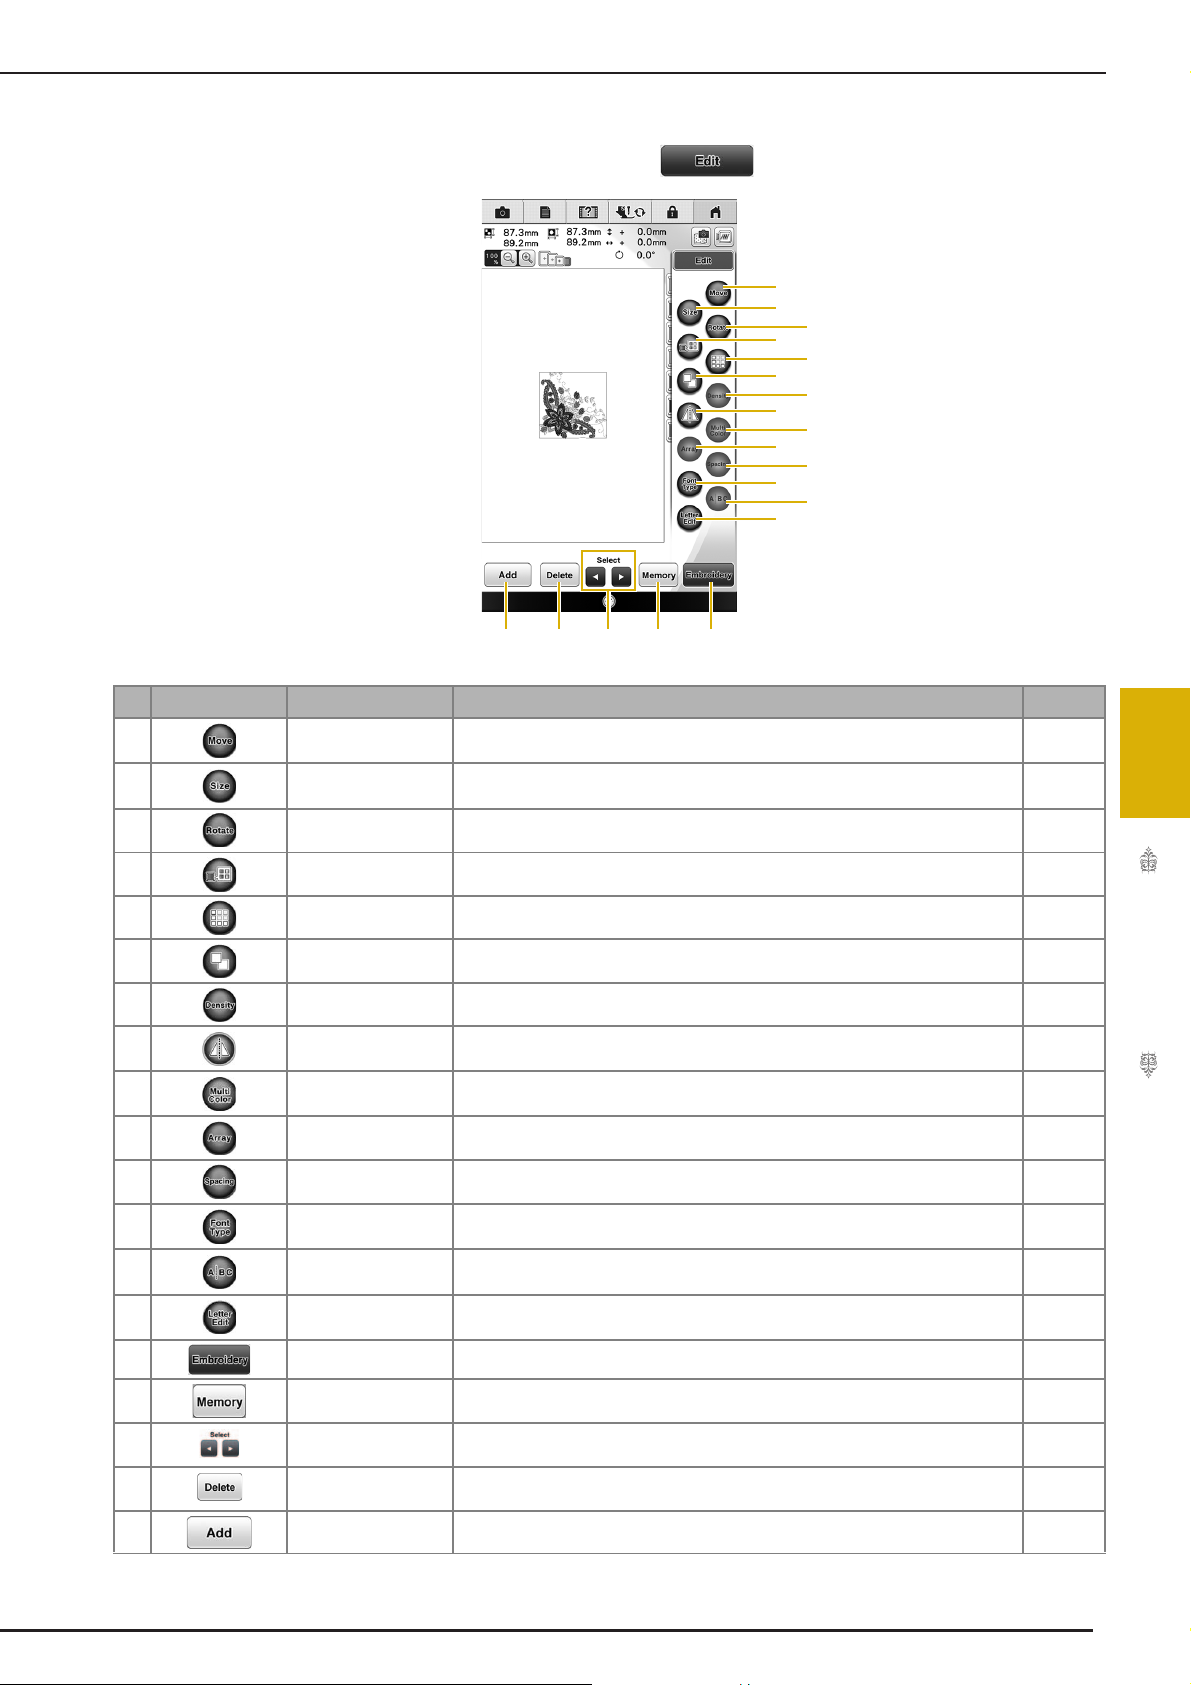
EDITING PATTERNS ............................................. 210
■ Key Functions.........................................................................211
Previewing the Pattern ...........................................................212
Moving the Pattern .................................................................212
Rotating the Pattern ................................................................213
Changing the Size of the Pattern .............................................214
■ Changing the Size and the Density of the Pattern ..................215
■ Changing the Size by Dragging............................................... 215
Creating a Horizontal Mirror Image ......................................215
Changing Font Type ................................................................216
Editing Letters (Size/Font Type) ..............................................216
Changing the Density (Alphabet Character and Frame
Patterns Only) ........................................................................217
Changing the Colors of Alphabet Character Patterns .............218
Changing the Configuration of Alphabet Character Patterns
Deleting the Pattern ...............................................................219
Displaying Patterns in the Screen Magnified ...........................220
■ Selecting the Percent of Magnification...................................220
Changing Alphabet Character Spacing....................................221
Separating Combined Character Patterns ...............................221
Changing the Thread Color ....................................................222
Creating a Custom Thread Table.............................................223
■ Adding a Color to the Custom Thread Table from the List .....224
■ Saving the Custom Thread Table to USB media...................... 225
■ Recalling the Custom Thread Table data from USB media .....225
Choosing a Color from the Custom Thread Table ...................226
Find New Color Schemes With the Color Visualizer Function
Designing Repeated Patterns...................................................229
■ Sewing Repeated Patterns ...................................................... 229
■ Repeating One Element of a Repeated Pattern....................... 231
■ Color Sorting Repeated Patterns.............................................232
■ Assigning Thread Marks..........................................................232
Embroidering the Pattern Repeatedly......................................233
Duplicating a Pattern ..............................................................235
After Editing............................................................................235
....219
....227
VIEWING THE EMBROIDERY SCREEN ................. 236
■ Key Functions.........................................................................237
COMBINING PATTERNS.......................................238
Editing Combined Patterns ..................................................... 238
■ Selecting combined embroidery patterns................................240
Sewing Combined Patterns..................................................... 241
PREPARING THE FABRIC.......................................242
Attaching Iron-on Stabilizers (Backing) to the Fabric ............ 242
Hooping the Fabric in the Embroidery Frame ........................ 243
■ Types of Embroidery Frames ..................................................243
■ Inserting the Fabric.................................................................244
■ Using the Embroidery Sheet ...................................................245
Embroidering Small Fabrics or Fabric Edges .......................... 245
■ Embroidering Small Fabrics.....................................................245
■ Embroidering Edges or Corners...............................................246
■ Embroidering Ribbons or Tape................................................246
ATTACHING THE EMBROIDERY FRAME .............247
■ Removing the Embroidery Frame............................................247
CONFIRMING THE PATTERN POSITION..............249
Checking the Needle Drop Point With the Embroidery
Foot “W+” with LED Pointer.................................................. 249
■ Adjusting the LED Pointer.......................................................249
■ Adjusting the Brightness of the LED Pointer............................250
Aligning the Embroidering Position Using the Built-In Camera....
Using the Built-In Camera to Align the Embroidering Position
Specifying the Embroidering Position With the Sensor Pen .... 254
■ Selecting the Embroidering Position by the Pattern Edge........255
■ Selecting the Embroidering Position by the Pattern Center.....256
Checking the Pattern Position ............................................... 257
250
.... 252
EMBROIDERING A PATTERN................................259
Embroidering Attractive Finishes............................................ 259
■ Embroidery Needle Plate Cover .............................................260
Embroidering Patterns ............................................................ 260
Spool Stand LED..................................................................... 262
■ When Not Using the Spool Stand LED....................................262
Using Appliqués ..................................................................... 262
■ 1. Creating the Appliqué Piece................................................263
■ 2. Sewing the Appliqué Position on the Base Fabric................263
■ 3. Affixing the Appliqué Piece to the Base Fabric ...................264
■ 4. Embroidering the Remainder of the Pattern........................265
ADJUSTMENTS DURING THE EMBROIDERY
PROCESS................................................................266
If the Bobbin Runs Out of Thread ......................................... 266
If the Thread Breaks During Sewing ...................................... 267
Restarting from the Beginning ............................................... 268
Resuming Embroidery After Turning Off the Power ............... 268
Page 3
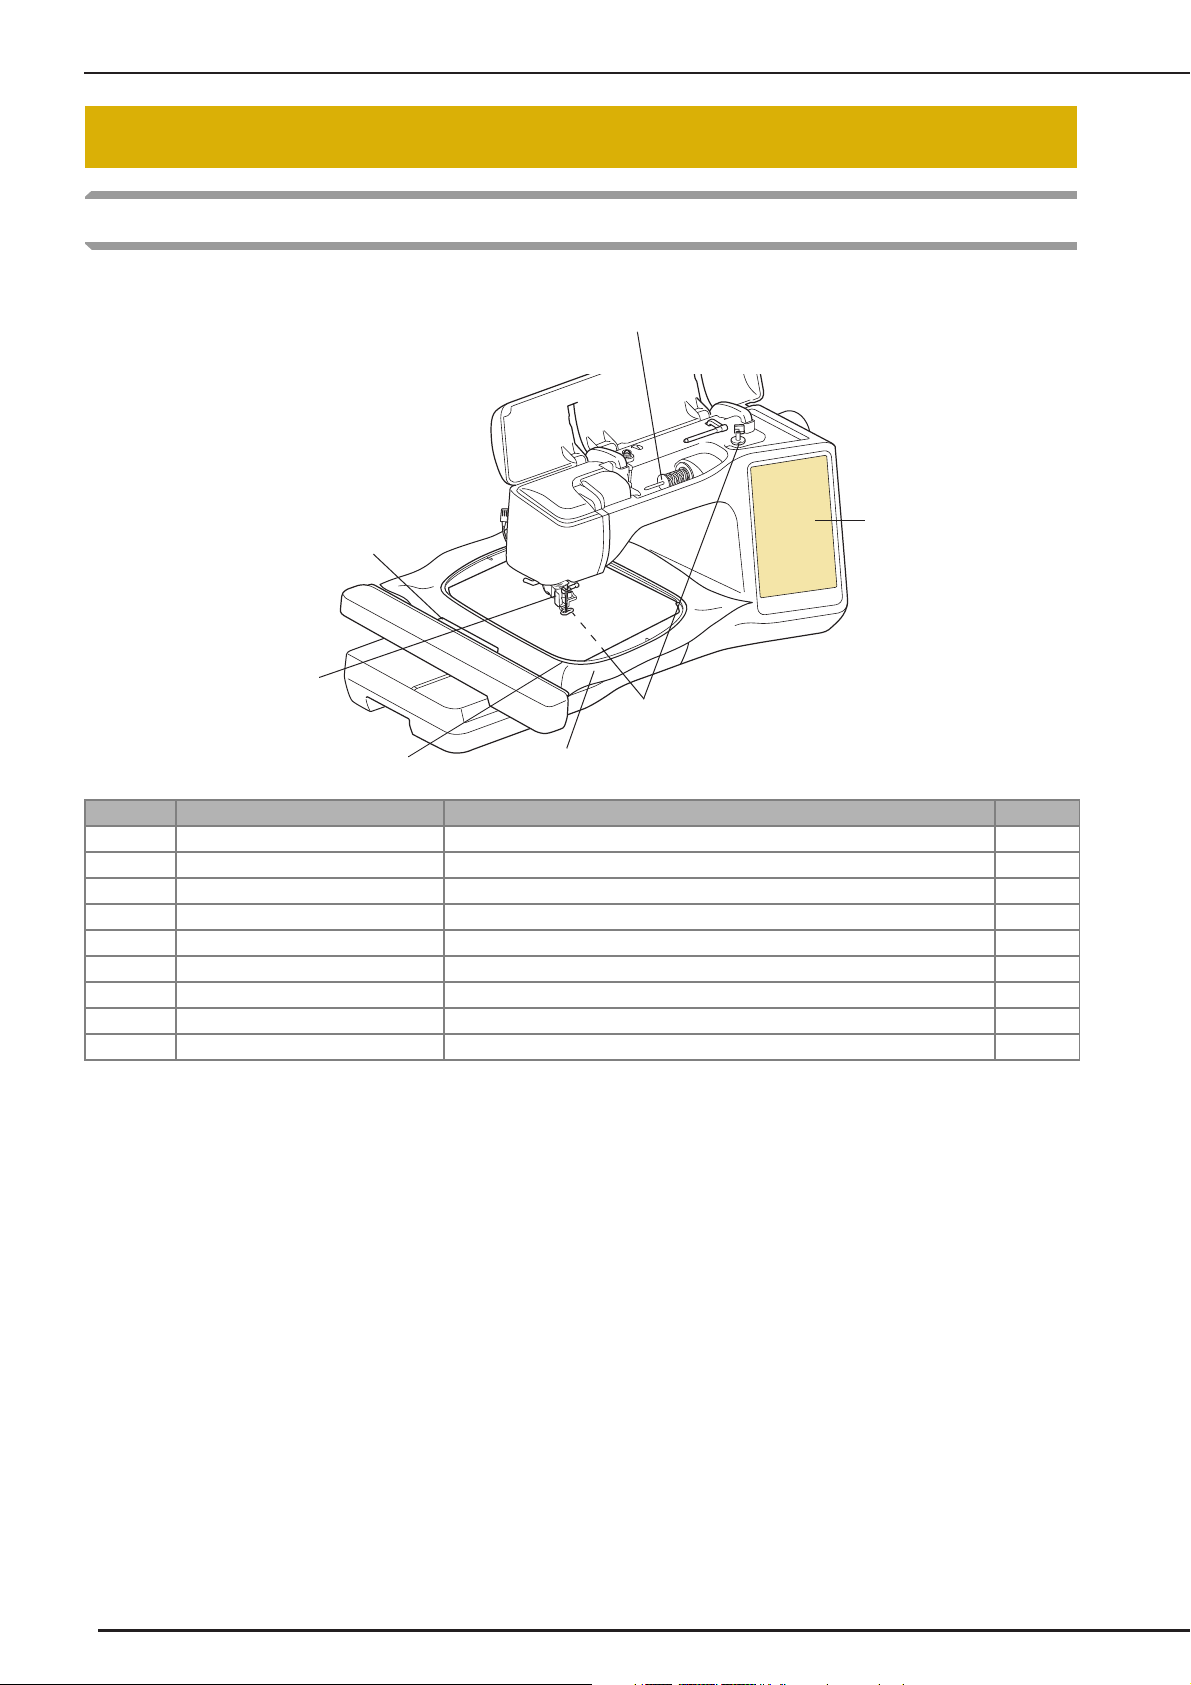
BEFORE EMBROIDERING
Step 3
Step 1, 2
Step 7 Step 5
Step 4
Step 6, 8
Step 9
BEFORE EMBROIDERING
Embroidery Step by Step
Follow the steps below to prepare the machine for embroidery.
Step # Aim Action Page
1 Presser foot attachment Attach embroidery foot “W+”. 197
2 Checking the needle Use needle 75/11 for embroidery. * 75
3 Embroidery unit attachment Attach the embroidery unit. 197
4 Bobbin thread setup For the bobbin thread, wind embroidery bobbin thread and set it in place. 52
5 Fabric preparation Attach a stabilizer material to the fabric, and hoop it in the embroidery frame. 242
6 Pattern selection Turn the main power to ON, and select an embroidery pattern. 200
7 Embroidery frame attachment Attach the embroidery frame to the embroidery unit. 247
8 Checking the layout Check and adjust the size and position of the embroidery. 249
9 Embroidery thread setup Set up embroidery thread according to the pattern. 60
* It is recommended that a 90/14 needle should be used when embroidering on heavy weight fabrics or stabilizing products (for example;
denim, puffy foam, etc.). Ball point needle (golden colored) 90/14 is not recommended for embroidery.
196
Page 4
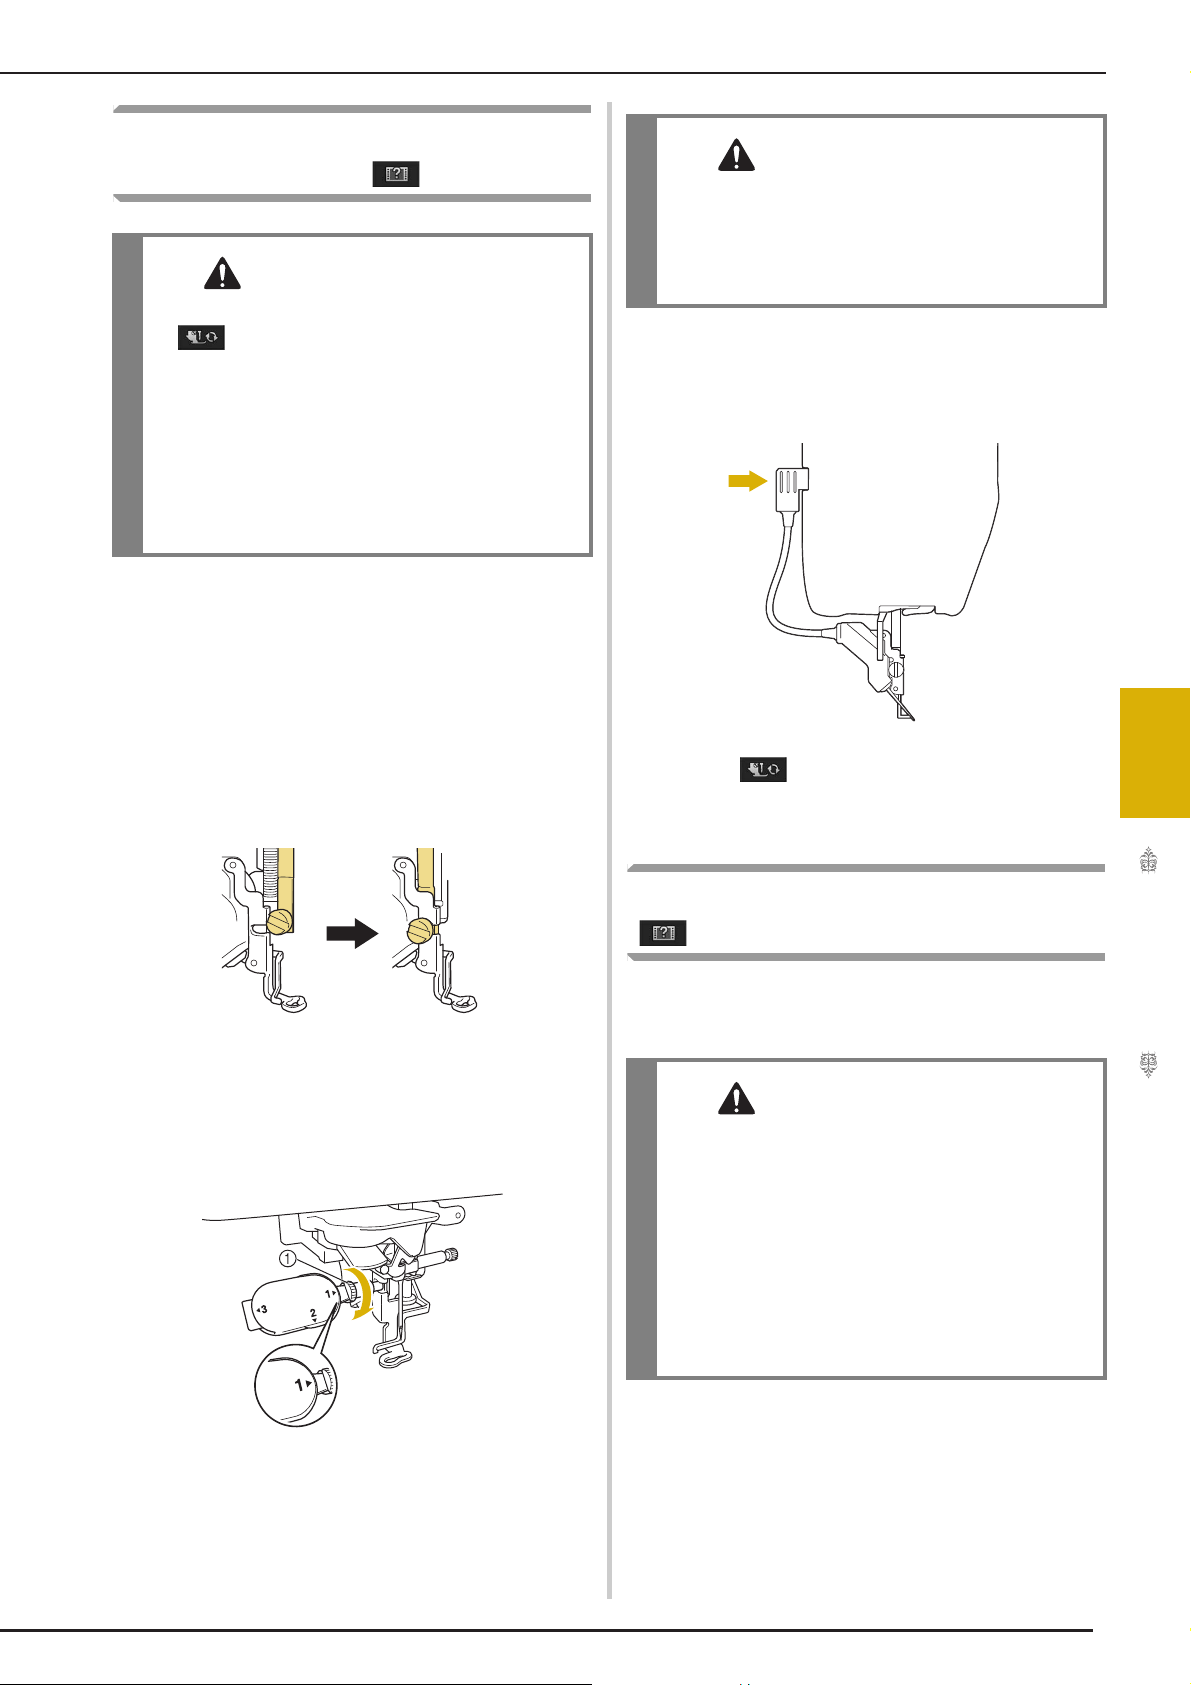
Attaching Embroidery Foot “W+”
CAUTION
CAUTION
CAUTION
BEFORE EMBROIDERING
with LED pointer
• When attaching a presser foot, always press
on the screen. You may accidentally
press the “Start/Stop” button and possibly
cause injury.
• Be sure to use embroidery foot “W+” with LED
pointer or “W” (optional) when doing
embroidery. Using another presser foot may
cause the needle to strike the presser foot,
causing the needle to bend or break and
possibly cause injury.
Remove the presser foot and presser foot
a
holder. For details, refer to “CHANGING
THE PRESSER FOOT” on page 68.
Position the embroidery foot “W+” with
b
LED pointer on the presser foot bar by
aligning the notch of the presser foot to the
large screw.
Side view
• Use the included multi-purpose screwdriver to
firmly tighten the screw of the presser foot
holder. If the screw is loose, the needle may
strike the presser foot and possibly cause
injury.
Plug the connector of the embroidery foot
d
“W+” with LED pointer into the jack on the
back left side of your machine.
Press to unlock all keys and buttons.
e
→ All keys and operation buttons are unlocked, and
the previous screen is displayed.
5
Hold the embroidery foot in place with
c
your right hand, and then use the included
multi-purpose screwdriver to securely
tighten the presser foot holder screw.
a Presser foot holder screw
Attaching the Embroidery Unit
■ About the Embroidery Unit
• Do not move the machine with the embroidery
unit attached. The embroidery unit could fall
off and cause injury.
• Keep your hands and foreign objects away
from the embroidery carriage and frame when
the machine is embroidering. Otherwise,
injury may result.
• To avoid distorting your embroidery design, do
not touch the embroidery carriage and frame
when the machine is embroidering.
Basic Embroidery
197
Page 5
BEFORE EMBROIDERING
Note
Note
CAUTION
Note
• You can also sew utility/decorative stitches
with the embroidery unit attached. Touch
and . The feed dog will
automatically raise for utility and decorative
stitching.
• Be sure to turn off the power before
installing the embroidery unit. Otherwise,
the machine may be damaged.
• Do not touch the inner connector of the
embroidery unit. The pins on the
embroidery unit connection may be
damaged.
• Do not apply strong force to the embroidery
unit carriage or pick up the unit by the
carriage. Otherwise, the embroidery unit
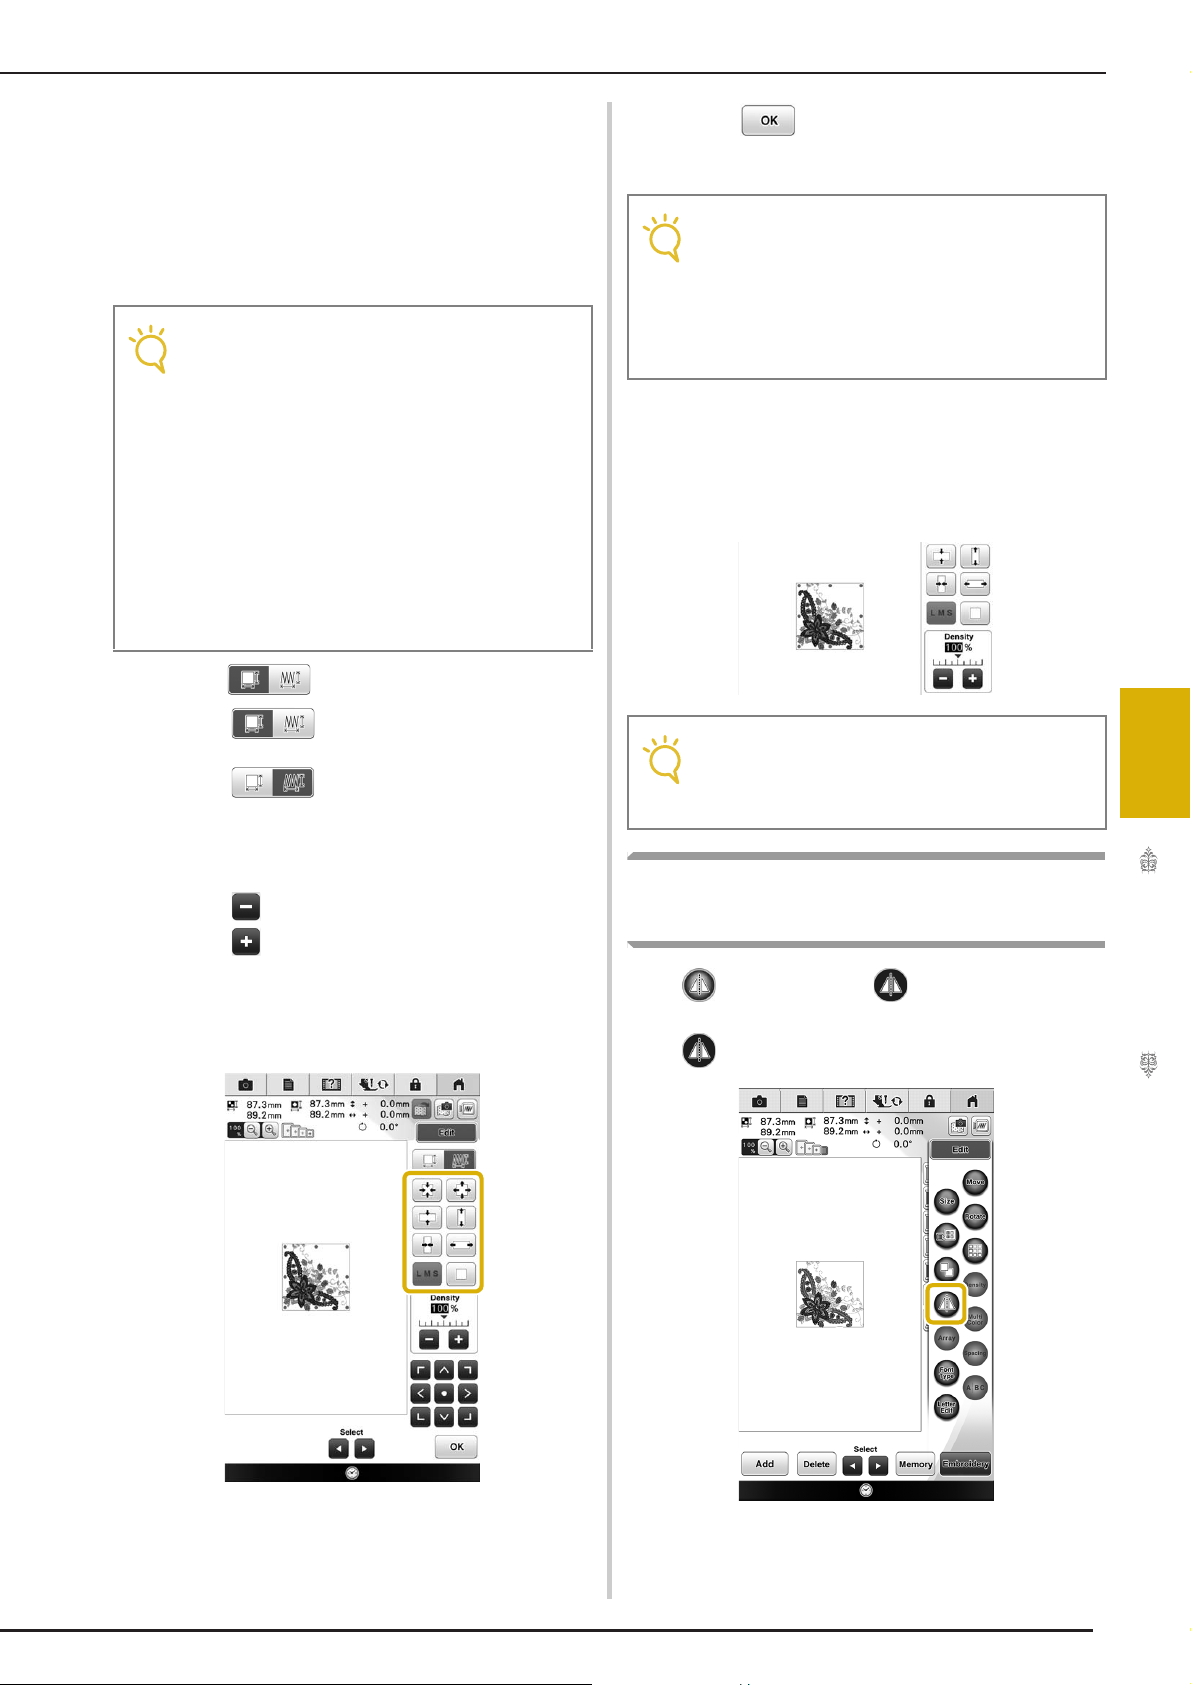
may be damaged.
• Store the embroidery unit in a safe place to
prevent damage to the unit.
Turn the main power to OFF, and remove
a
the flat bed attachment.
Turn the main power to ON.
c
→ The following message will appear.
Press .
d
→ The carriage will move to the initialization position.
Insert the embroidery unit connection into
b
the machine connection port. Push lightly
on the connection port cover until the unit
clicks into place.
a Embroidery unit connection
b Machine connection port
■ Removing the Embroidery Unit
Press , then press .
a
→ The carriage will move to the removal position.
• Always remove the embroidery frame before
pressing . Otherwise, the frame may
strike the embroidery foot, and possibly cause
injury.
Turn the main power to OFF.
b
• Be sure to turn off the machine before
removing the embroidery unit, otherwise
damage to the machine may result.
198
• Be sure there is no gap between the
embroidery unit and the sewing machine. If
there is a gap, the embroidery patterns will
not embroider with the correct registration.
• Do not push on the carriage when installing
the embroidery unit onto the machine.
Moving the carriage may damage the
embroidery unit.
Page 6

Press the release button, and pull the
CAUTION
c
embroidery unit away from the machine.
a Release button
BEFORE EMBROIDERING
• Do not carry the embroidery unit by holding
the release button compartment.
5
Basic Embroidery
199
Page 7
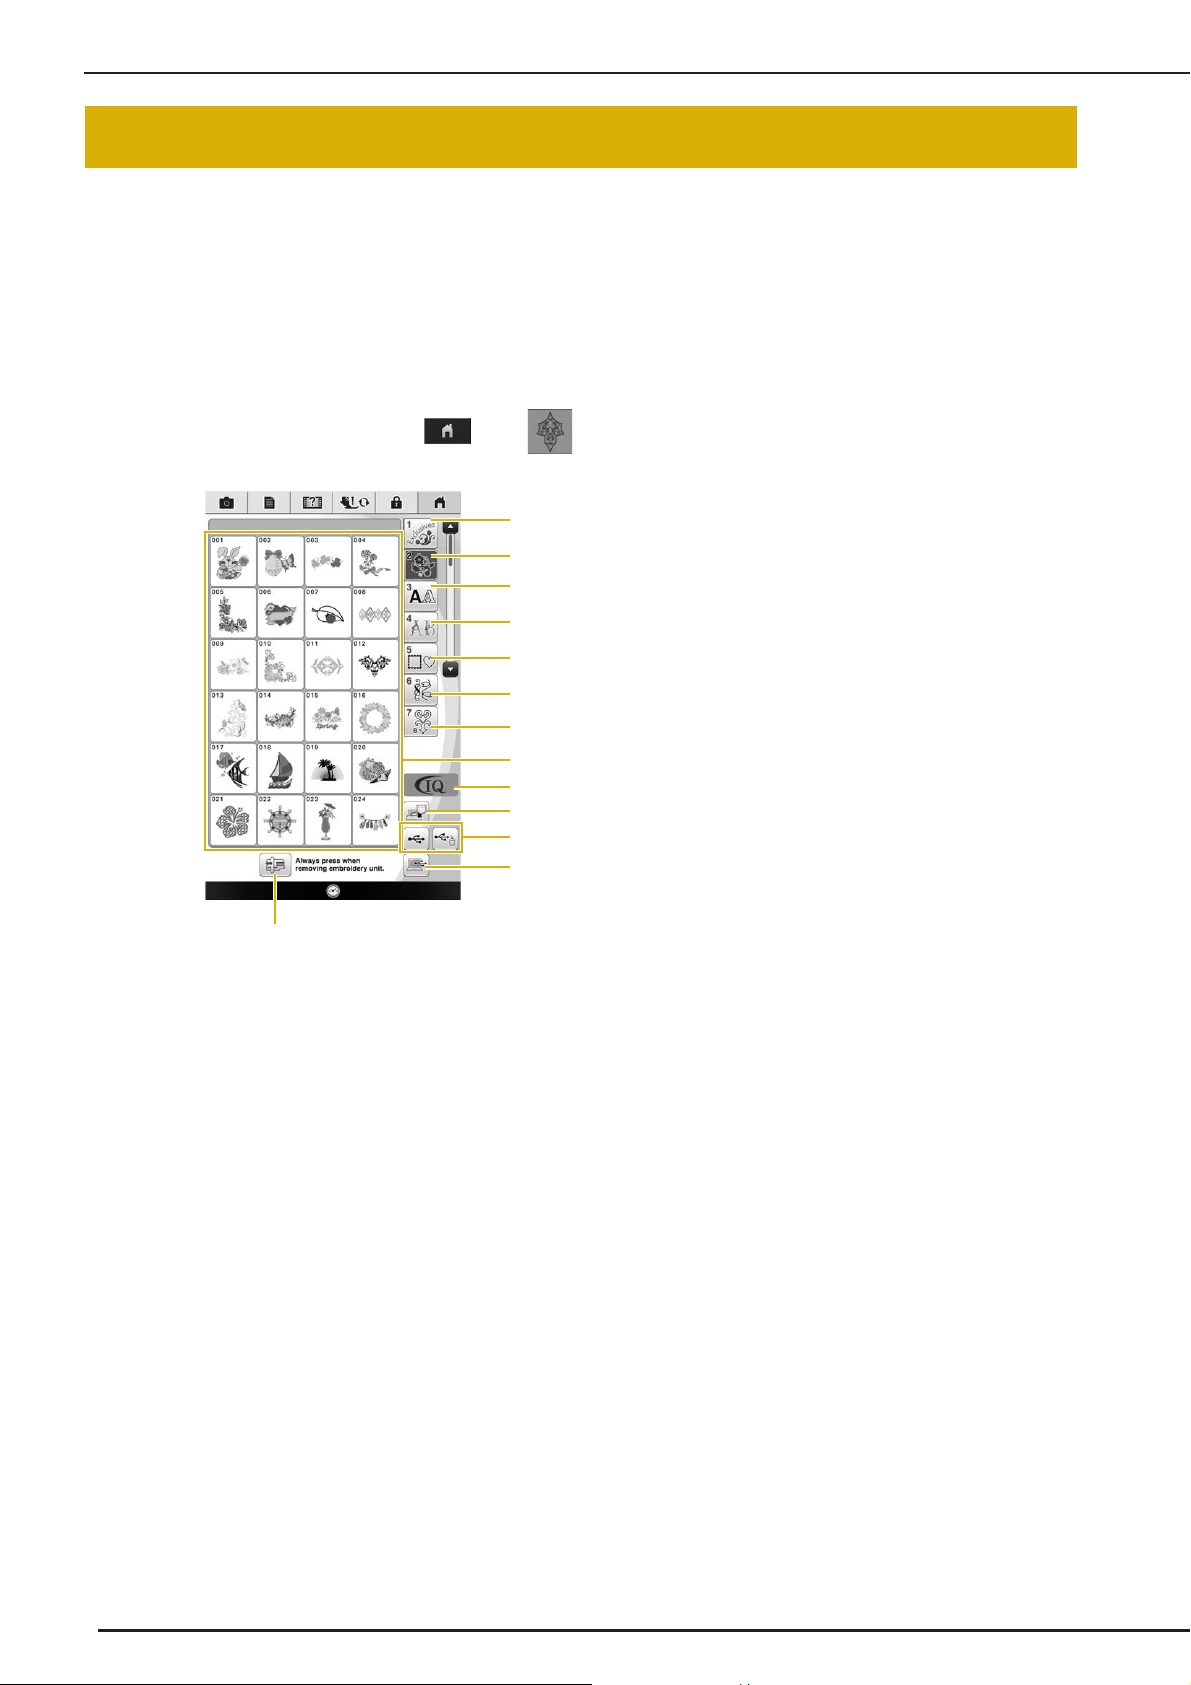
SELECTING PATTERNS
a
m
b
c
d
e
f
h
i
j
k
l
g
SELECTING PATTERNS
■ Copyright Information
The patterns stored in the machine and patterns sold separately are intended for private use only. Any public or
commercial use of copyrighted patterns is an infringement of copyright law and is strictly prohibited.
There are many character and decorative embroidery patterns stored in the machine’s memory (see the “QUICK
REFERENCE GUIDE” for a full summary of patterns in the machine’s memory). You can also use patterns sold
separately.
Once the machine has finished the initialization and the carriage has moved to the start position, the pattern
selection screen will display.
If another screen is displayed, press , then to display the screen below.
a “Baby Lock” Exclusives
b Embroidery patterns
c Character patterns
d Decorative alphabet patterns
e Frame patterns
f Utility embroidery patterns
g Bobbin work patterns (see page 368)
h Pattern type selection keys
i IQ Designer (see page 324)
j Patterns saved in the machine’s memory (see
page 301)
k Patterns saved in USB media (see page 207)
l Patterns saved on the computer (see page 208)
m Press this key to position the embroidery unit for
storage
200
Page 8
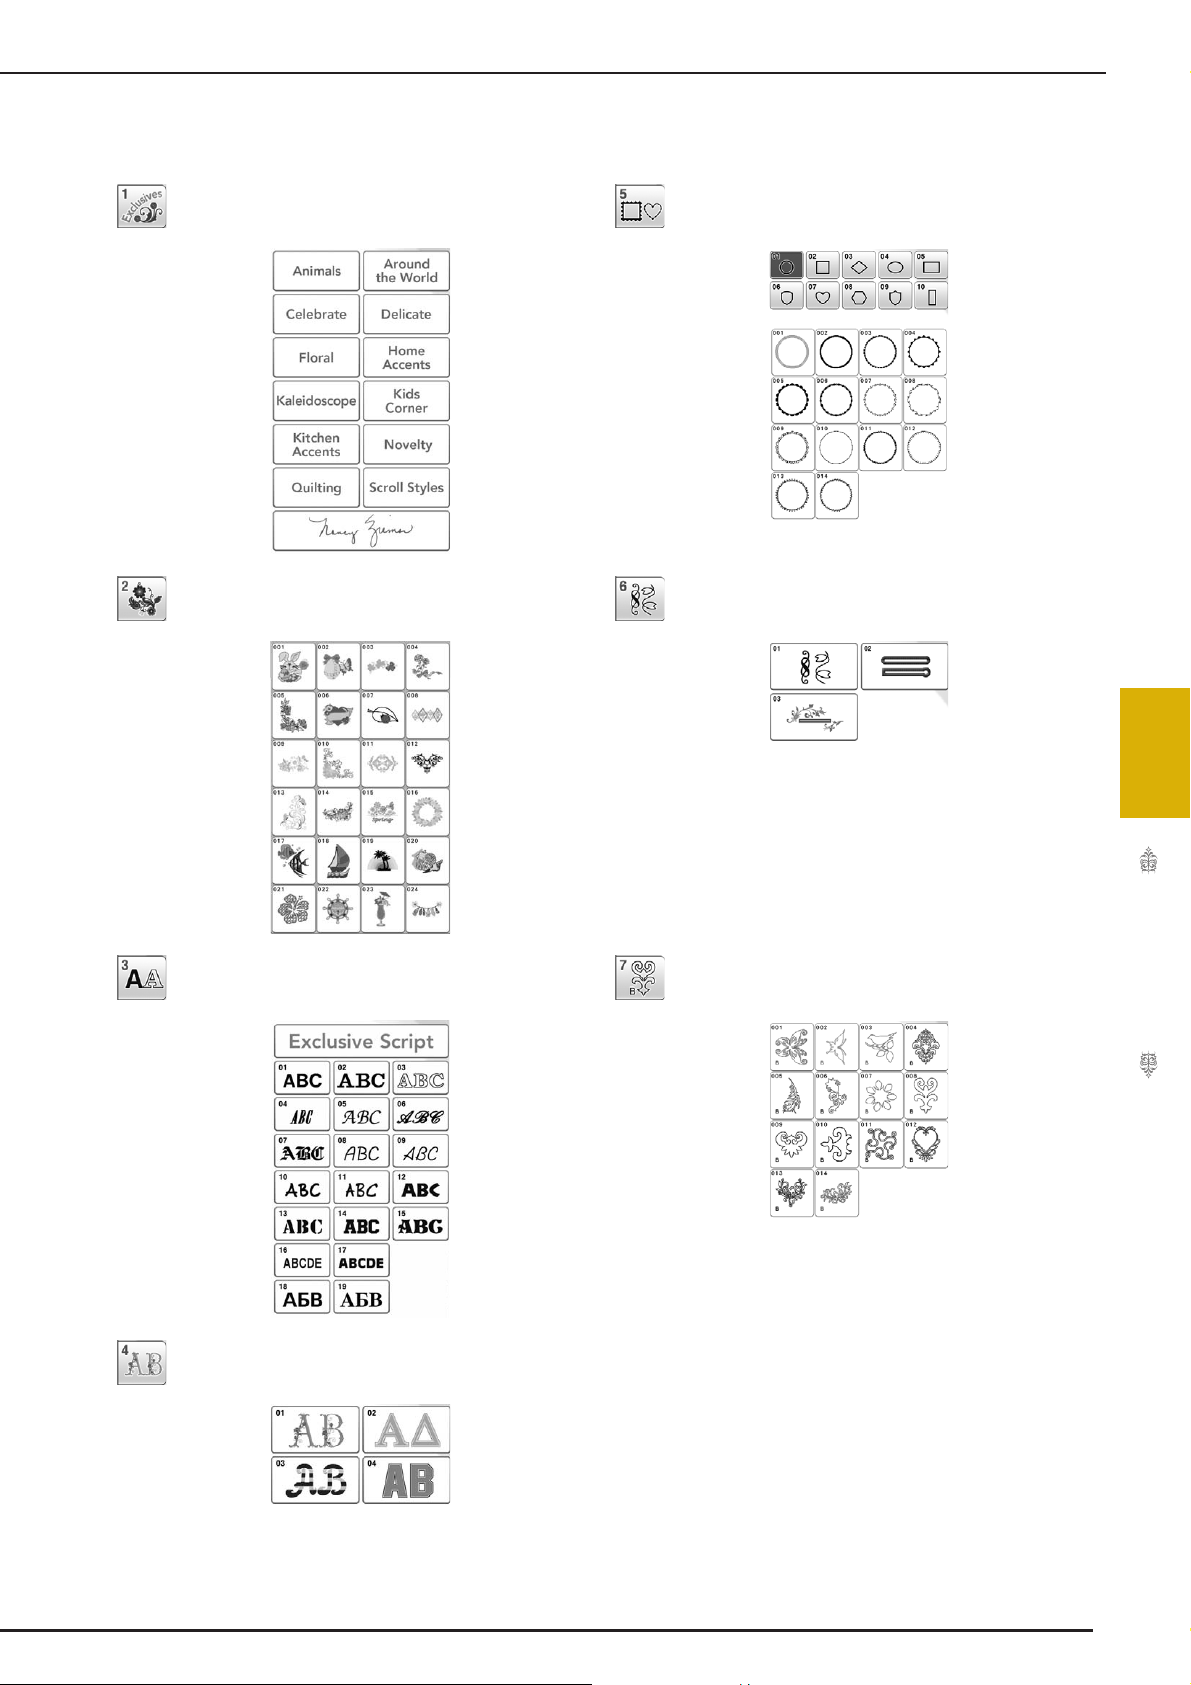
■ Pattern Selection Screens
There are 7 categories of patterns in this machine.
“Baby Lock” Exclusives Frame patterns
Embroidery patterns Utility embroidery patterns
SELECTING PATTERNS
Alphabet characters Bobbin work patterns
5
Basic Embroidery
Floral alphabet patterns
201
Page 9
SELECTING PATTERNS
a
b
Selecting Embroidery Patterns/
Decorative Alphabet Patterns/
* Press the category tab to return to the previous
screen.
→ The selected pattern is displayed.
Utility Embroidery Patterns/
Bobbin Work Patterns
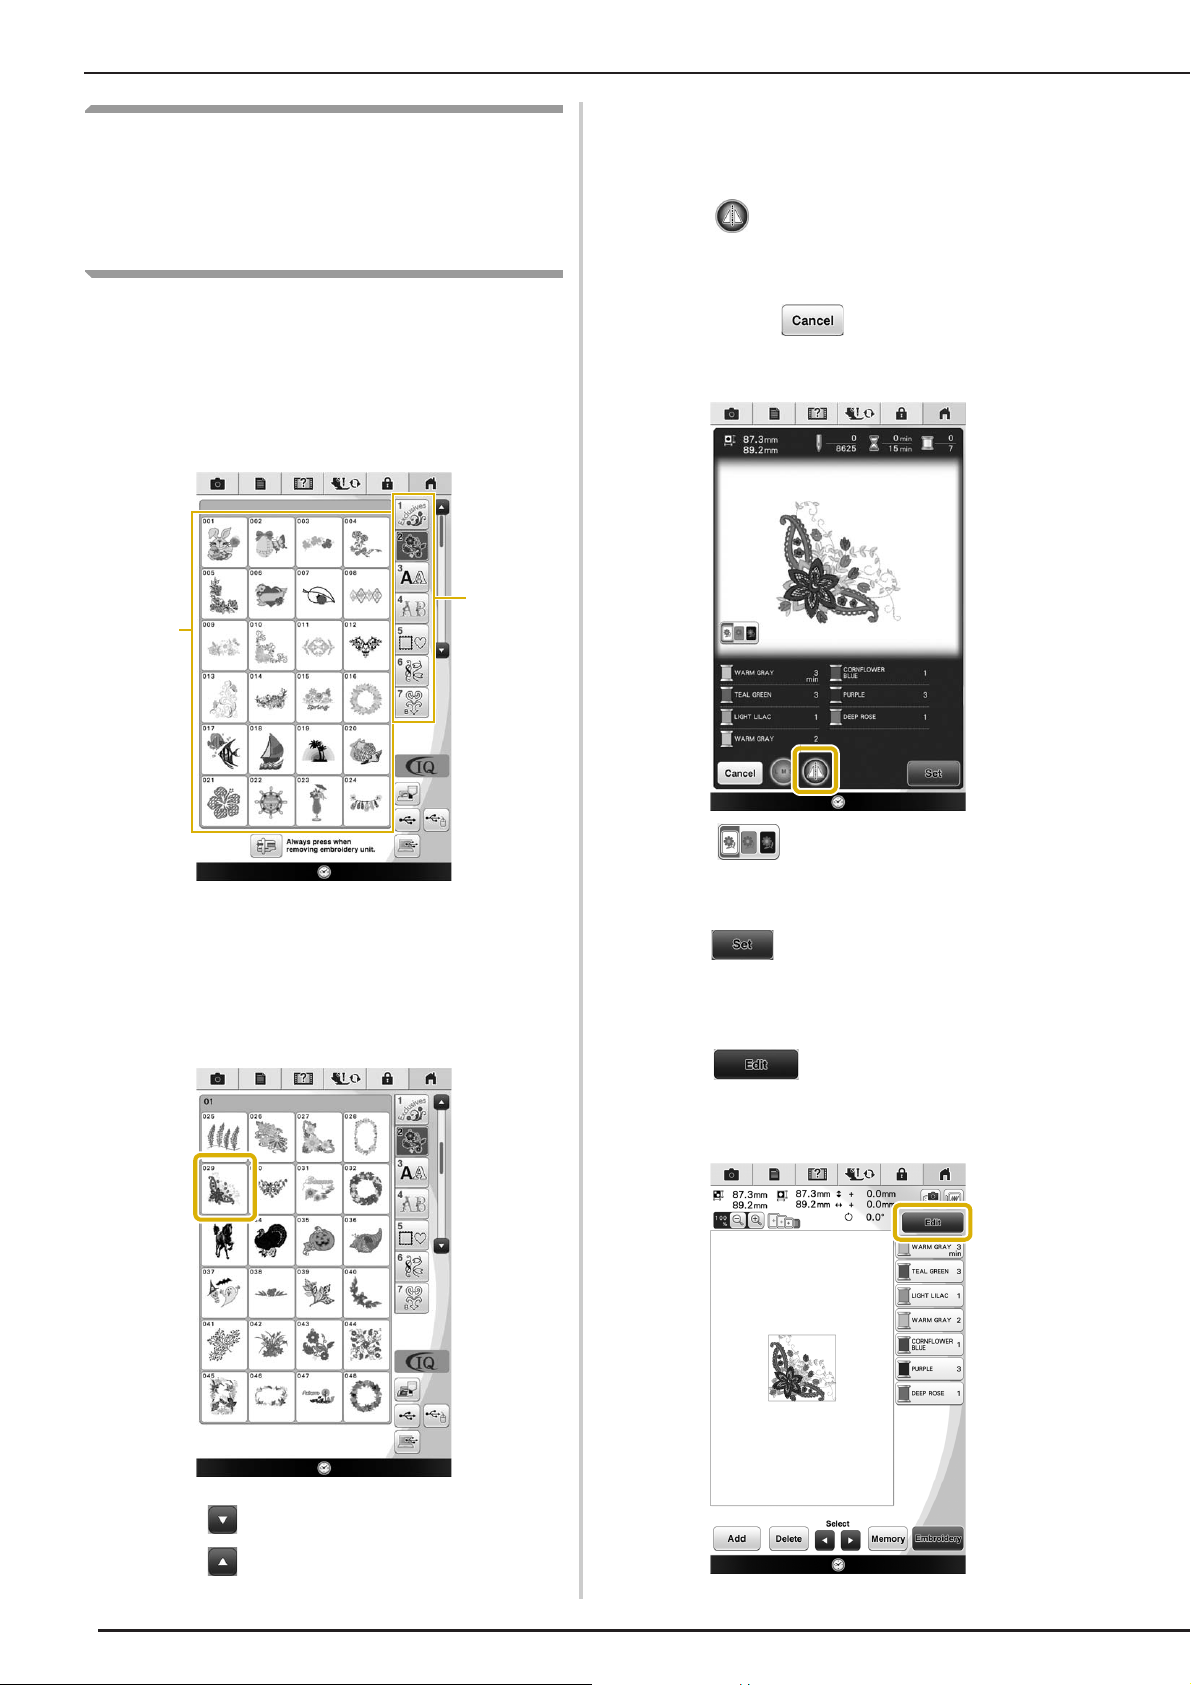
Press the category tab and then press the
a
pattern type selection key or pattern key
you want to embroider.
* Refer to “How to Create Bobbin Work” on page 318
about the bobbin work embroidery.
Press to create a mirror image of the
c
pattern as needed.
* If a mistake has been made when selecting the
pattern, press to return to the previous
screen, and select the pattern you want to
embroider.
a Pattern category tab
b Pattern type/pattern selection key
Press the key of the pattern you want to
b
embroider.
* Press to darken the screen background for
the pattern with bright thread colors, to get a clearer
image.
Press or touch the selected pattern.
d
→ The pattern selected is outlined in red on the “Edit”
display.
Press to edit the selected pattern.
e
* Refer to “EDITING PATTERNS” on page 210 about
the “Edit” display.
202
* Press to view the next page.
* Press to view the previous page.
Page 10
SELECTING PATTERNS
Memo
Press .
f
→ The embroidering screen is displayed.
Press to edit the pattern before
g
embroidering in this “Embroidery” screen.
* Refer to “VIEWING THE EMBROIDERY SCREEN” on
page 236.
* To return to the previous screen to select another
pattern, press .
Press the key of the font you want to
b
embroider.
Press the tab to select a character type.
c
Press the “Start/Stop” button to begin
h
embroidering.
* See “Embroidering Patterns” on page 260.
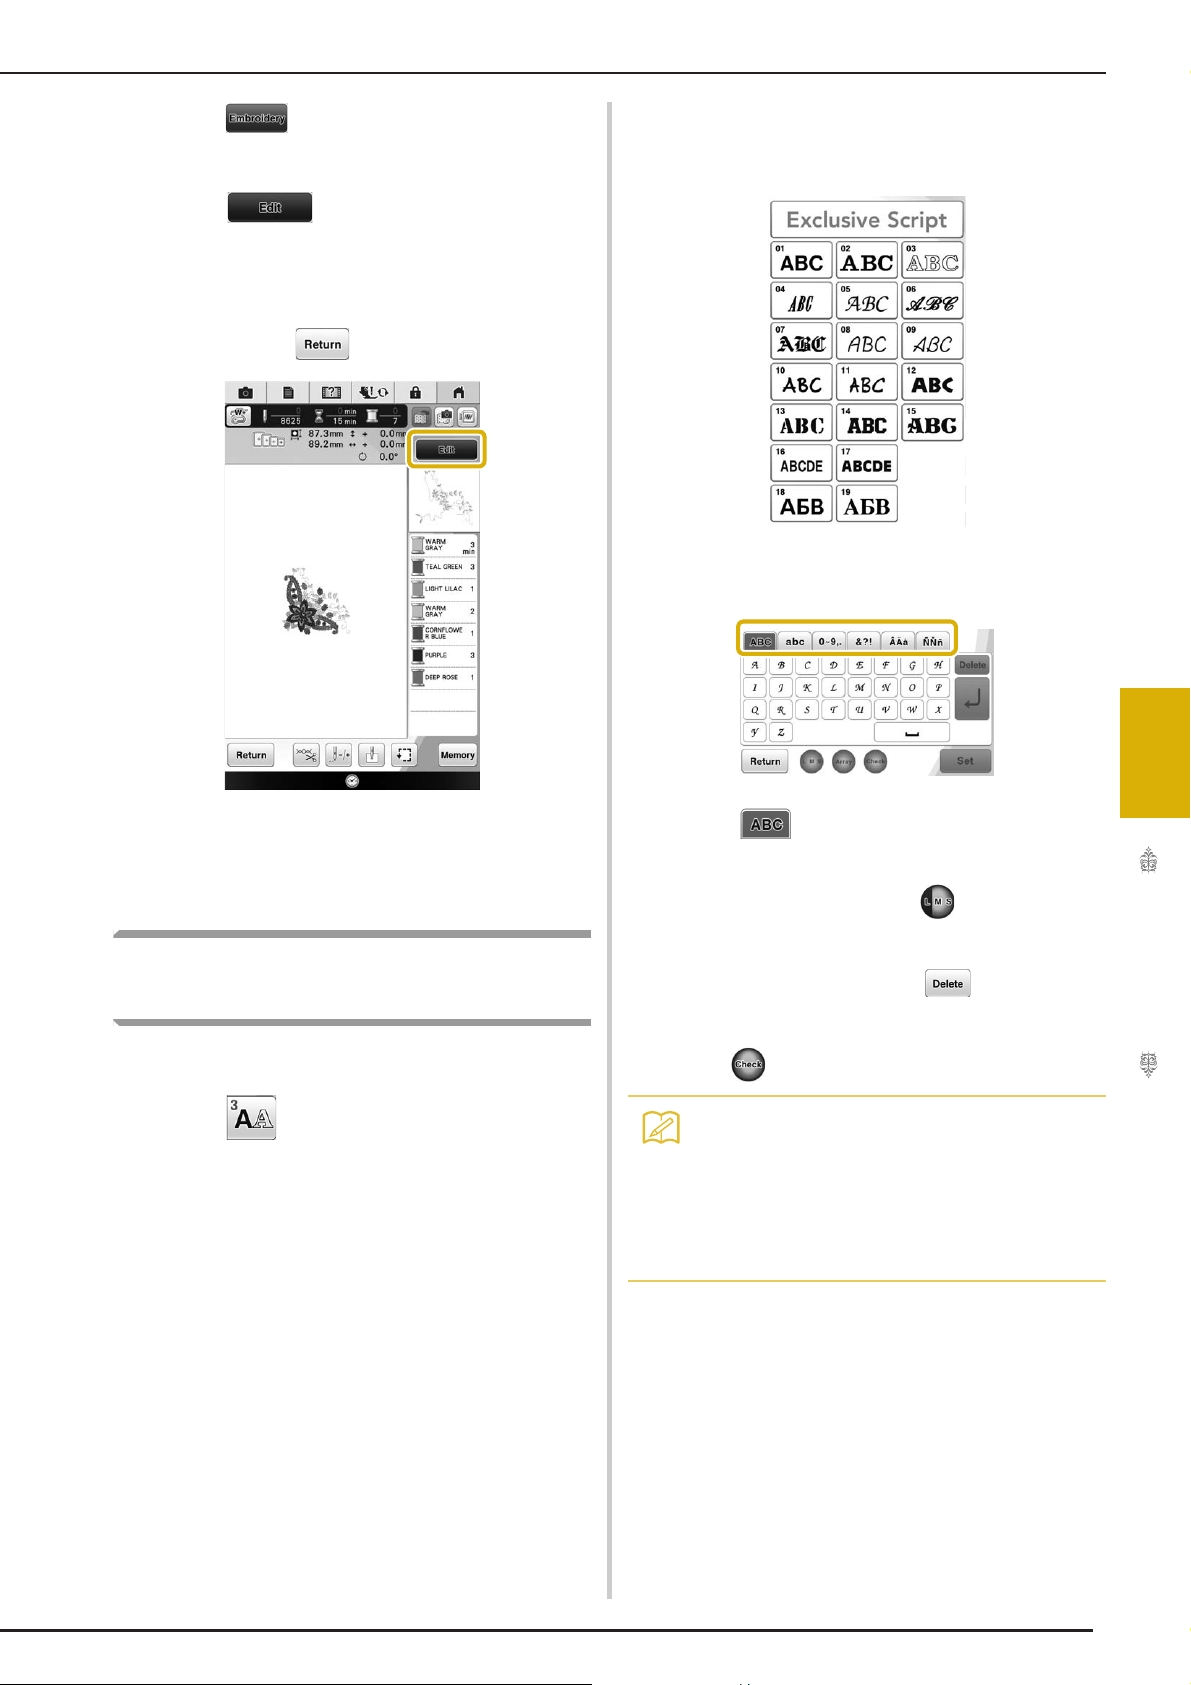
Selecting Alphabet Character
Patterns
Example: Entering “Blue Sky”.
Press .
a
Press and then enter “B”.
d
* If you want to change the size of a character, select
the character and then press to change the size.
The size changes each time you press the key, from
large to medium to small.
* If you make a mistake, press to erase the
mistake.
* If the pattern is too small to see clearly, you can use
the key to check it.
• If you continue adding characters after
changing the size, the new characters will
be entered in the new size.
• You cannot change the size of the entered
characters after combining character stitch
patterns.
5
Basic Embroidery
203
Page 11

SELECTING PATTERNS
Press and enter “lue”.
e
Press to enter a space.
f
Press again and enter “S”.
g
Press and then enter “ky”.
h
204
Press .
i
→ The embroidering screen is displayed.
Follow the steps from e - h of “Selecting
j
Embroidery Patterns/Decorative Alphabet
Patterns/Utility Embroidery Patterns/
Bobbin Work Patterns” on page 202.
Page 12
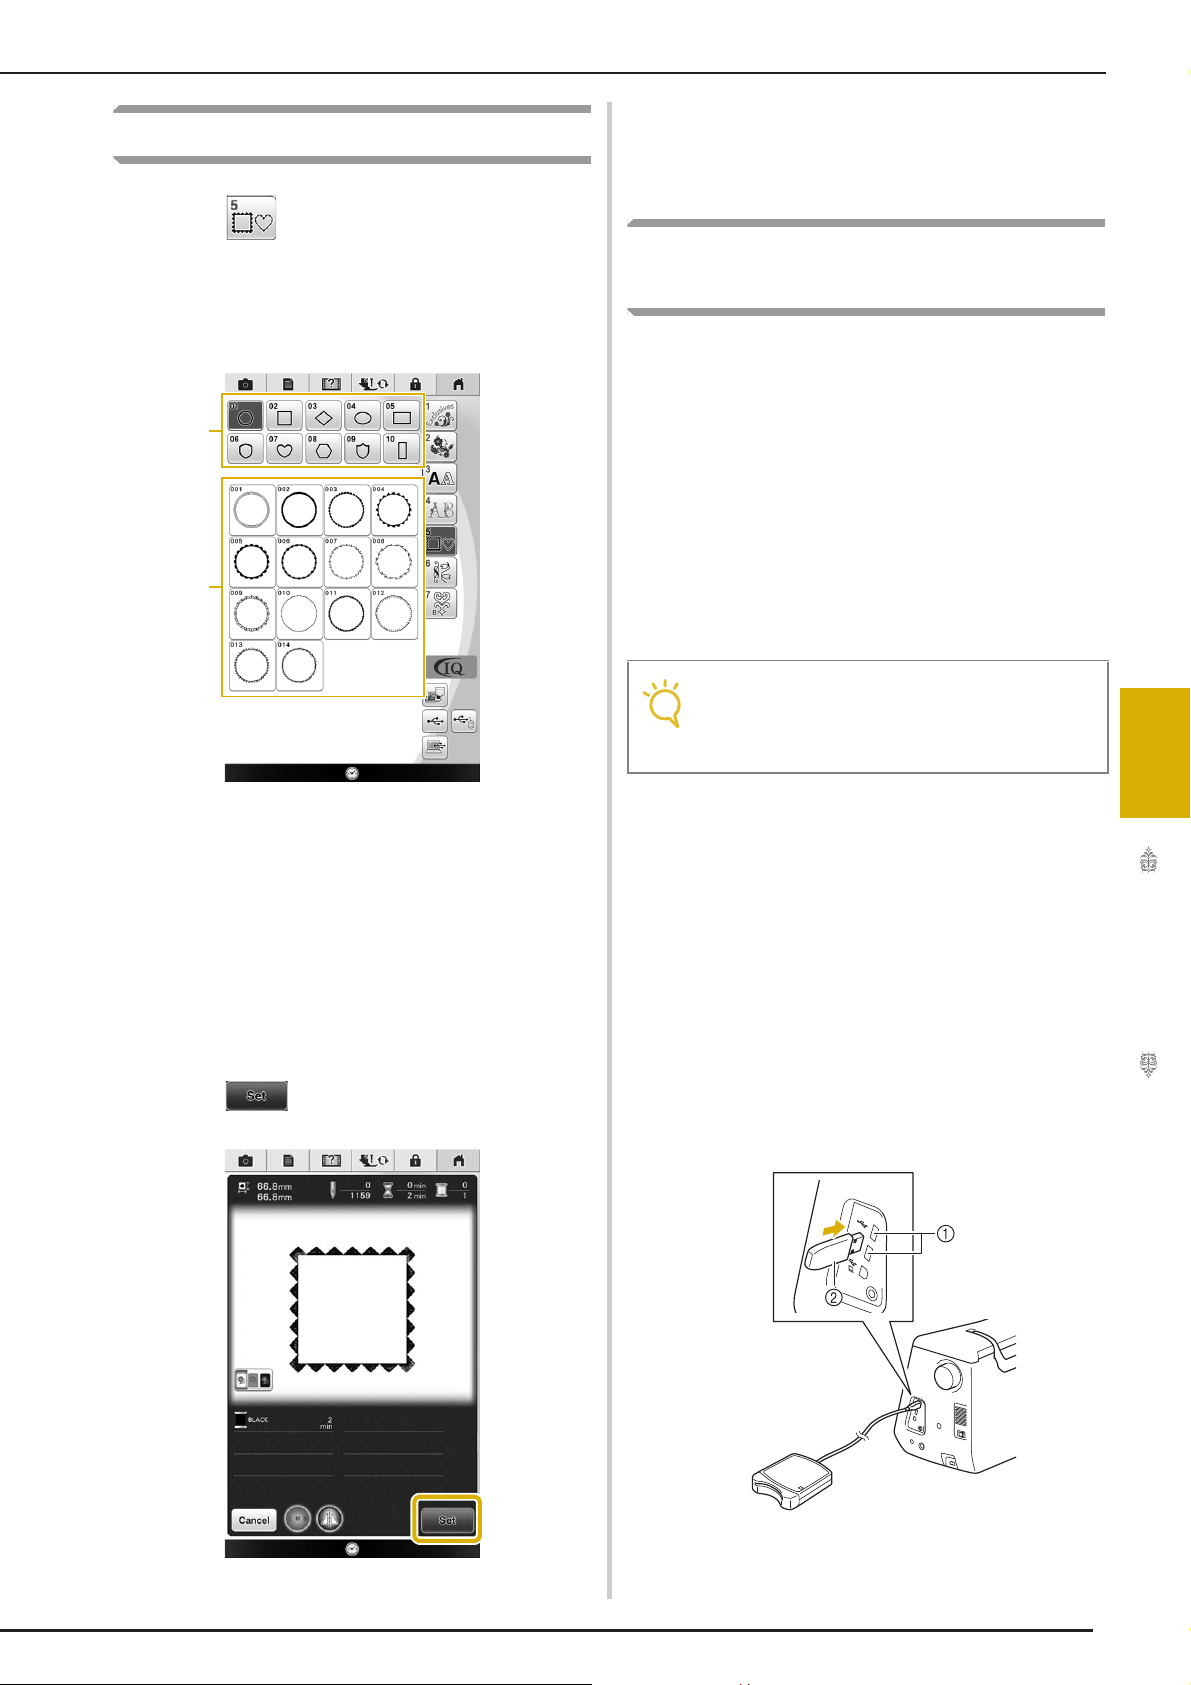
Selecting Frame Patterns
a
b
Note
Press .
a
SELECTING PATTERNS
Follow the steps from e to h of “Selecting
e
Embroidery Patterns/Decorative Alphabet
Patterns/Utility Embroidery Patterns/
Bobbin Work Patterns” on page 202.
Selecting Patterns from
Press the key of the frame shape you want
b
to embroider in the top part of the screen.
a Frame shapes
b Frame patterns
→ Various frame patterns are displayed at the bottom
part of the screen.
Press the key of the frame pattern you want
c
to embroider.
* If you make a mistake selecting the pattern, press the
key of the pattern you want to embroider.
→ The selected pattern is displayed on the screen.
Press .
d
Embroidery Cards
■ About Embroidery Card Reader (Sold
Separately) and USB Card Writer
Module*
• Use only an embroidery card reader designed for
this machine. Using an unauthorized embroidery
card reader may cause your machine to operate
incorrectly.
* If you have purchased the Palette 5 or higher, Palette
Petite or Palette PTS, you can plug the included USB
card writer module into the machine as an
embroidery card reader, and recall patterns.
• Embroidery patterns cannot be saved from
the machine to an embroidery card inserted
into a connected USB card writer module*.
■ About Embroidery Cards (Sold
Separately)
• Use only embroidery cards manufactured for this
machine. Using unauthorized cards may cause
your machine to operate incorrectly.
• Embroidery cards sold in foreign countries
cannot be used with this machine.
• Store embroidery cards in the hard case.
Plug the optional embroidery card reader/
a
USB card writer module into the USB port
on the machine.
5
Basic Embroidery
→ The embroidering screen is displayed.
a USB port
b Embroidery card reader/USB card writer module
205
Page 13
SELECTING PATTERNS
Note
Insert the card completely into the card
b
reader/USB card writer module.
* Insert the embroidery card so that the end with a
printed arrow is facing up.
• Two embroidery USB card readers/USB
card writer modules cannot be used with
this machine at the same time. If two
embroidery USB card readers/USB card
writer module are inserted, only the
embroidery USB card reader/USB card
writer module inserted first is detected.
Press .
c
→ The patterns on the embroidery card are displayed
on the selection screen.
Press the key of the pattern you want to
d
recall.
206
* Press to return to the original screen.
Press .
e
Page 14
Recalling from USB Media
Note
a
b
c
You can recall a specific embroidery pattern from
either direct USB media or a folder in the USB
media. If the pattern is in a folder, check each
folder to find the embroidery pattern.
• The processing speed may vary by quantity
of data.
Insert the USB media into the USB port on
a
the machine.
SELECTING PATTERNS
Press when there is a subfolder to sort
c
two or more stitch patterns to USB media,
the embroidery pattern in the subfolder is
displayed.
a USB port
b USB media
Press .
b
a Folder name
b Embroidery patterns in USB media
c Path
* The path to show the current folder at the top of the
list.
Embroidery patterns and subfolders within a folder
are displayed.
* Press to return to the previous folder.
* Use the computer to create folders. Folders cannot
be created with the machine.
Press the key of the pattern you want to
d
retrieve.
5
Basic Embroidery
* Press to return to the original screen.
→ Embroidery patterns and a folder in a top folder are
displayed.
207
Page 15
SELECTING PATTERNS
Note
Press .
e
* Press to delete the pattern from the USB
media.
→ The Embroidery Edit screen is displayed.
Recalling from the Computer
Move/copy the pattern data to “Removable
c
Disk”.
→ Pattern data in “Removable Disk” is written to the
machine.
• While data is being written, do not
disconnect the USB cable.
• Do not create folders within “Removable
Disk”. Since folders are not displayed, stitch
pattern data within folders cannot be
recalled.
Refer to “Connecting Your Machine to the PC” on
page 298 for the available computer operating
systems.
Plug the USB cable connector into the
a
corresponding USB ports for the computer
and for the machine (see page 300).
On the computer, open “Computer (My
b
Computer)” then go to “Removable Disk”.
Press .
d
→ The patterns in the computer are displayed on the
selection screen.
208
Page 16

Press the key of the pattern you want to
e
recall.
SELECTING PATTERNS
Press .
f
* Press to delete the pattern from the computer.
→ The Embroidery Edit screen is displayed.
5
Basic Embroidery
209
Page 17
EDITING PATTERNS
Memo
b
a
e
c
d
EDITING PATTERNS
a Shows the size of the entire combined pattern.
b Shows the size of the pattern currently selected.
c Shows the distance from the center of the frame.
d Shows the degree of rotation for the pattern.
e Shows the color sequence and stitching times of each step of the pattern currently selected.
• If a key display is darkened, you cannot use that function with the selected pattern.
210
Page 18
EDITING PATTERNS
s
a
b
c
d
e
f
g
h
i
j
k
l
m
n
r p oq
■ Key Functions
Using these keys, you can edit the pattern as you like. Press to display the editing window.
No. Display Key Name Explanation Page
a Move key Press to display the pattern moving window. 212
b Size key Press this key to change the size of the pattern. Patterns can be enlarged or
c Rotate key Press this key to rotate the pattern. You can rotate a pattern one degree, ten
d Thread palette key Press this key to change the colors of the displayed pattern. 222
e Border key Press this key to make and edit a repeating pattern. 229
f Duplicate key Press this key to duplicate a pattern. 235
g Density key Press this key to change the density of frame patterns or character patterns. 217
h Horizontal mirror
image key
i Multi color key Press this key to change the color of individual characters in a pattern. 218
j Array key Press this key to change the configuration of a character pattern. 219
k Character spacing
key
l Font Type key Press to change the font type after entering all the characters. 216
m Separate key Press to display the pattern separate window. You can separate the combined
n Letter Edit key Press to edit characters after entering all. You can change the size or font type. 216
o Embroidery key Press this key to call up the embroidering screen. 235
p Memory key Press this key to save a pattern in the machine’s memory, USB media or a
q Pattern select key When a combined pattern is selected, use these keys to select a part of the
r Delete key Press this key to delete the selected pattern (the pattern outlined by the red
s Add key Press this key to add another pattern to the editing pattern. 235
reduced.
degrees or ninety degrees at a time.
Press this key to make a horizontal mirror image of the selected pattern. 215
Press this key to change the spacing of character patterns. 221
character patterns to adjust the spacing or edit separately afterwards.
computer.
pattern to edit.
box).
214
213
221
299, 300
240
219
5
Basic Embroidery
211
Page 19
EDITING PATTERNS
Memo
a
b
Previewing the Pattern
Press .
a
→ An image of the pattern as it will be embroidered
appears.
Press to select the frame
b
used in the preview.
* Frames displayed in dark gray cannot be selected.
* Press to enlarge the image of the pattern.
* The pattern can be sewn as it appears in the
following display.
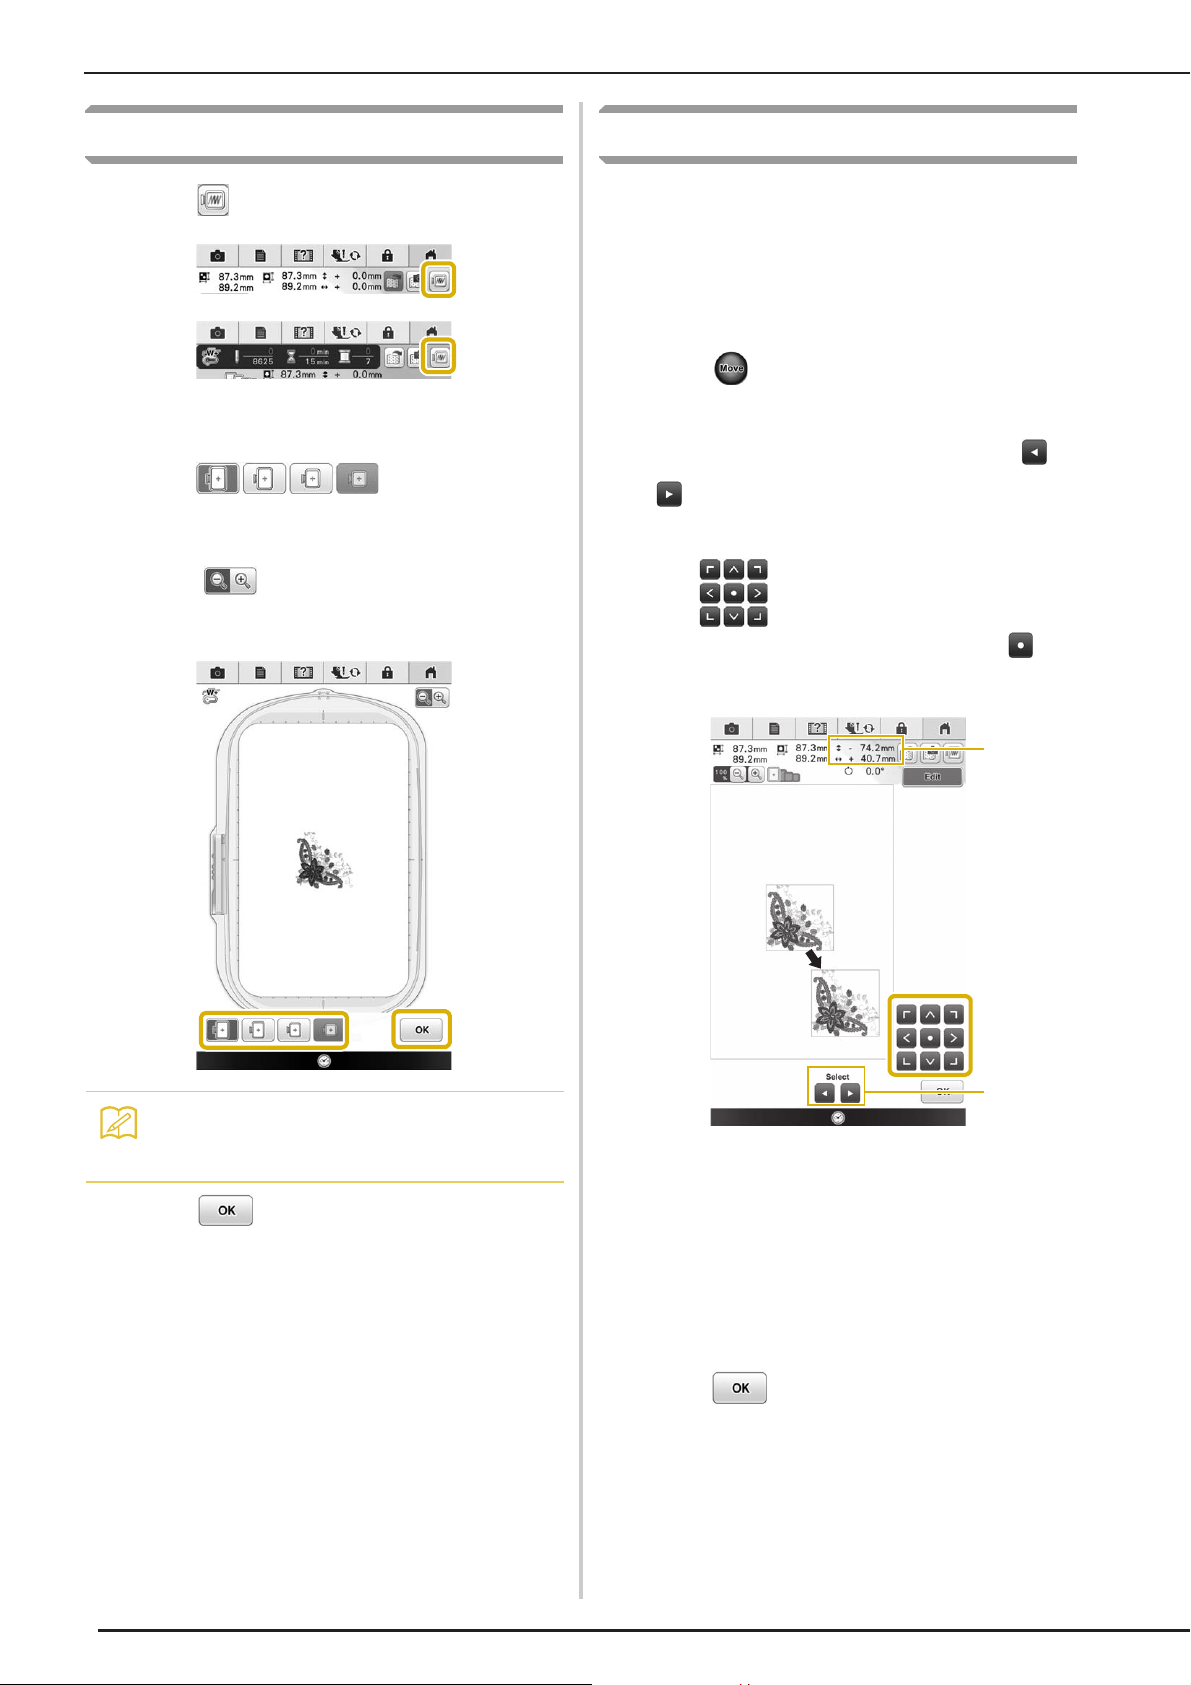
Moving the Pattern
The pattern can be moved to the desired position
by dragging on the screen using your finger, the
touch pen or connected mouse without displaying
the editing window. If you need some fine
adjustment, move the pattern from the editing
window.
Press to display the pattern move
a
window.
Select the desired pattern by pressing
b
, if there are several patterns on the
screen.
Use to move the pattern in the
c
direction shown by the arrow. Press to
center the pattern.
212
c
• You can begin sewing from this screen by
pressing the “Start/Stop” button.
Press .
a Distance from the center
b Pattern select key
The pattern can also be moved by dragging it.
If a USB mouse is connected, move the mouse to
position the pointer on the desired pattern, and
then select and drag the pattern. The pattern can
also be dragged by selecting it directly in the
screen with your finger or the touch pen.
Press .
d
Page 20
EDITING PATTERNS
Memo
a
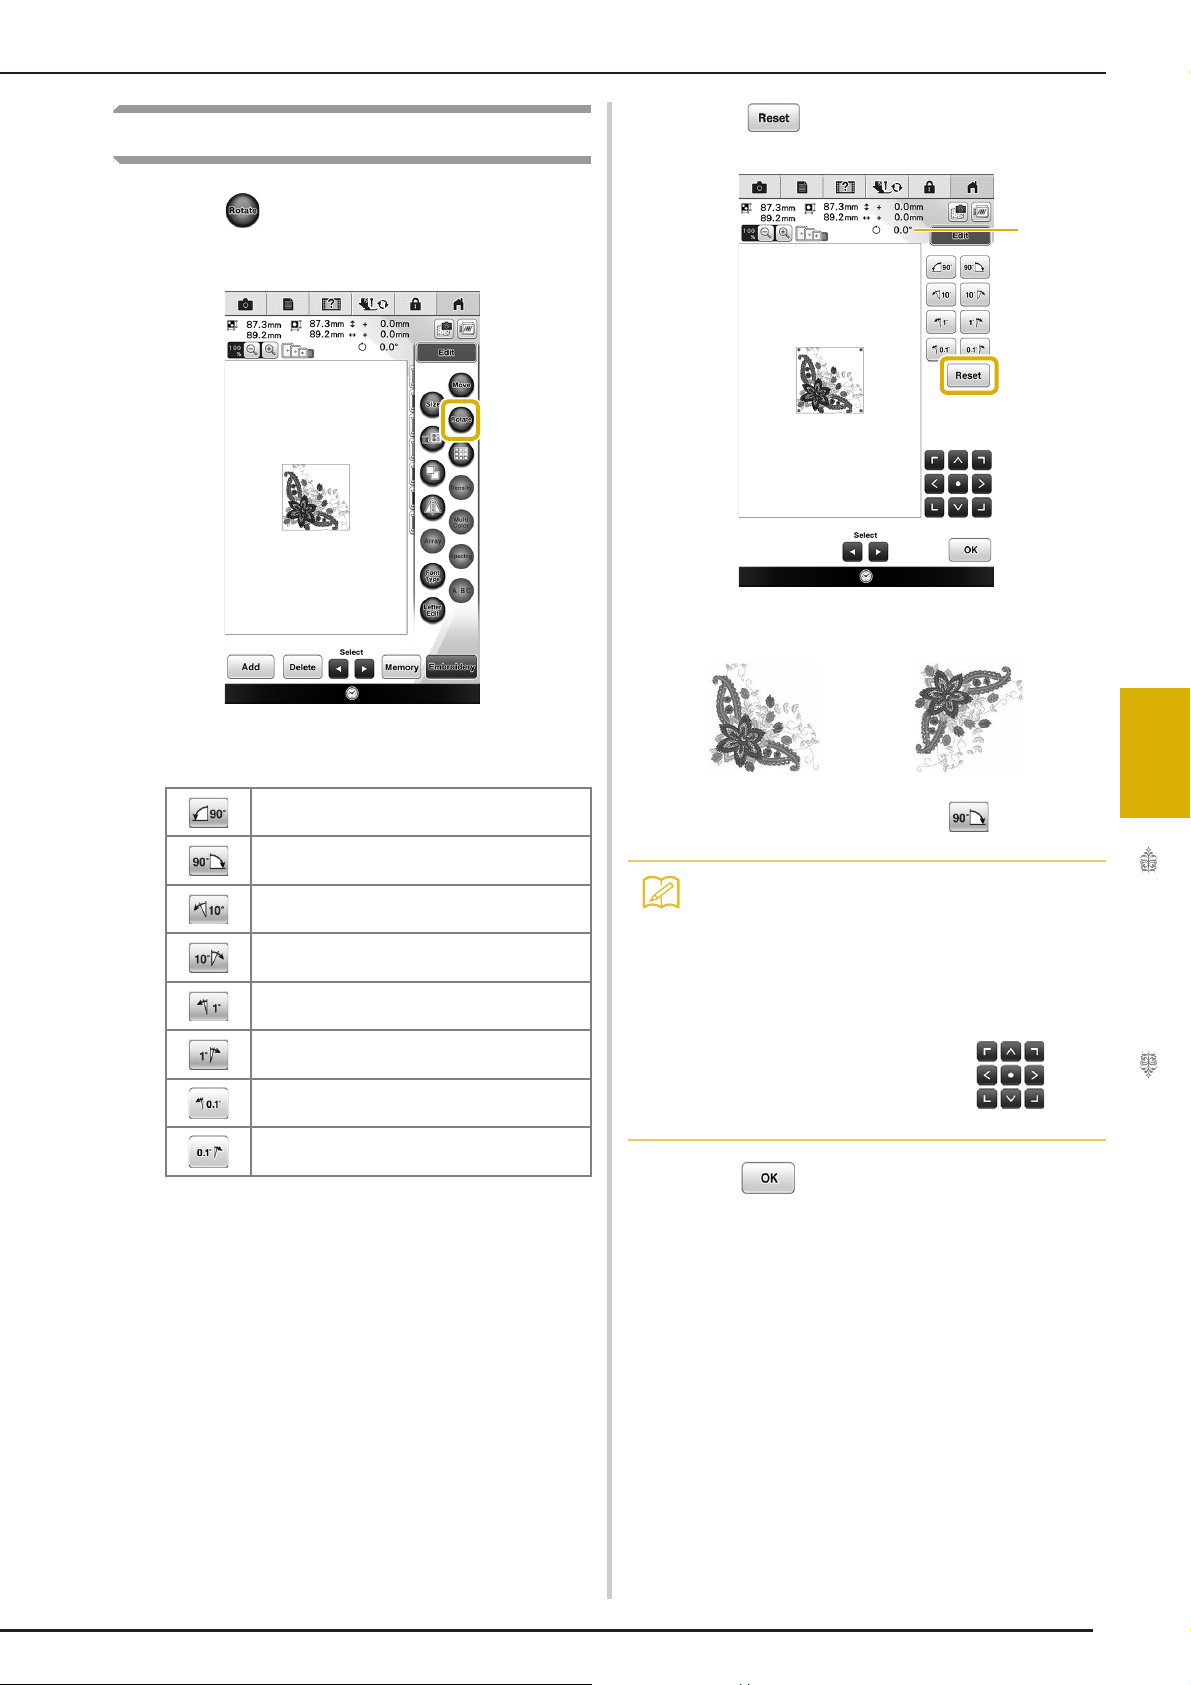
Rotating the Pattern
Press .
a
* Press to return the pattern to its original
position.
a Degree of rotation
Select the angle of rotation for the pattern.
b
Rotate the pattern 90 degrees to the left.
Rotate the pattern 90 degrees to the right.
Rotate the pattern 10 degrees to the left.
Rotate the pattern 10 degrees to the right.
Rotate the pattern 1 degree to the left.
Rotate the pattern 1 degree to the right.
Rotate the pattern 0.1 degree to the left.
Rotate the pattern 0.1 degree to the right.
c
5
0°
Basic Embroidery
• You can rotate the pattern by rotating the
mouse wheel. Rotate the mouse wheel
away from you to rotate the pattern 10
degrees to the left. Rotate the mouse wheel
toward you to rotate the pattern 10 degrees
to the right.
• You can move patterns using on
the window.
Press .
213
Page 21
EDITING PATTERNS
Memo
a
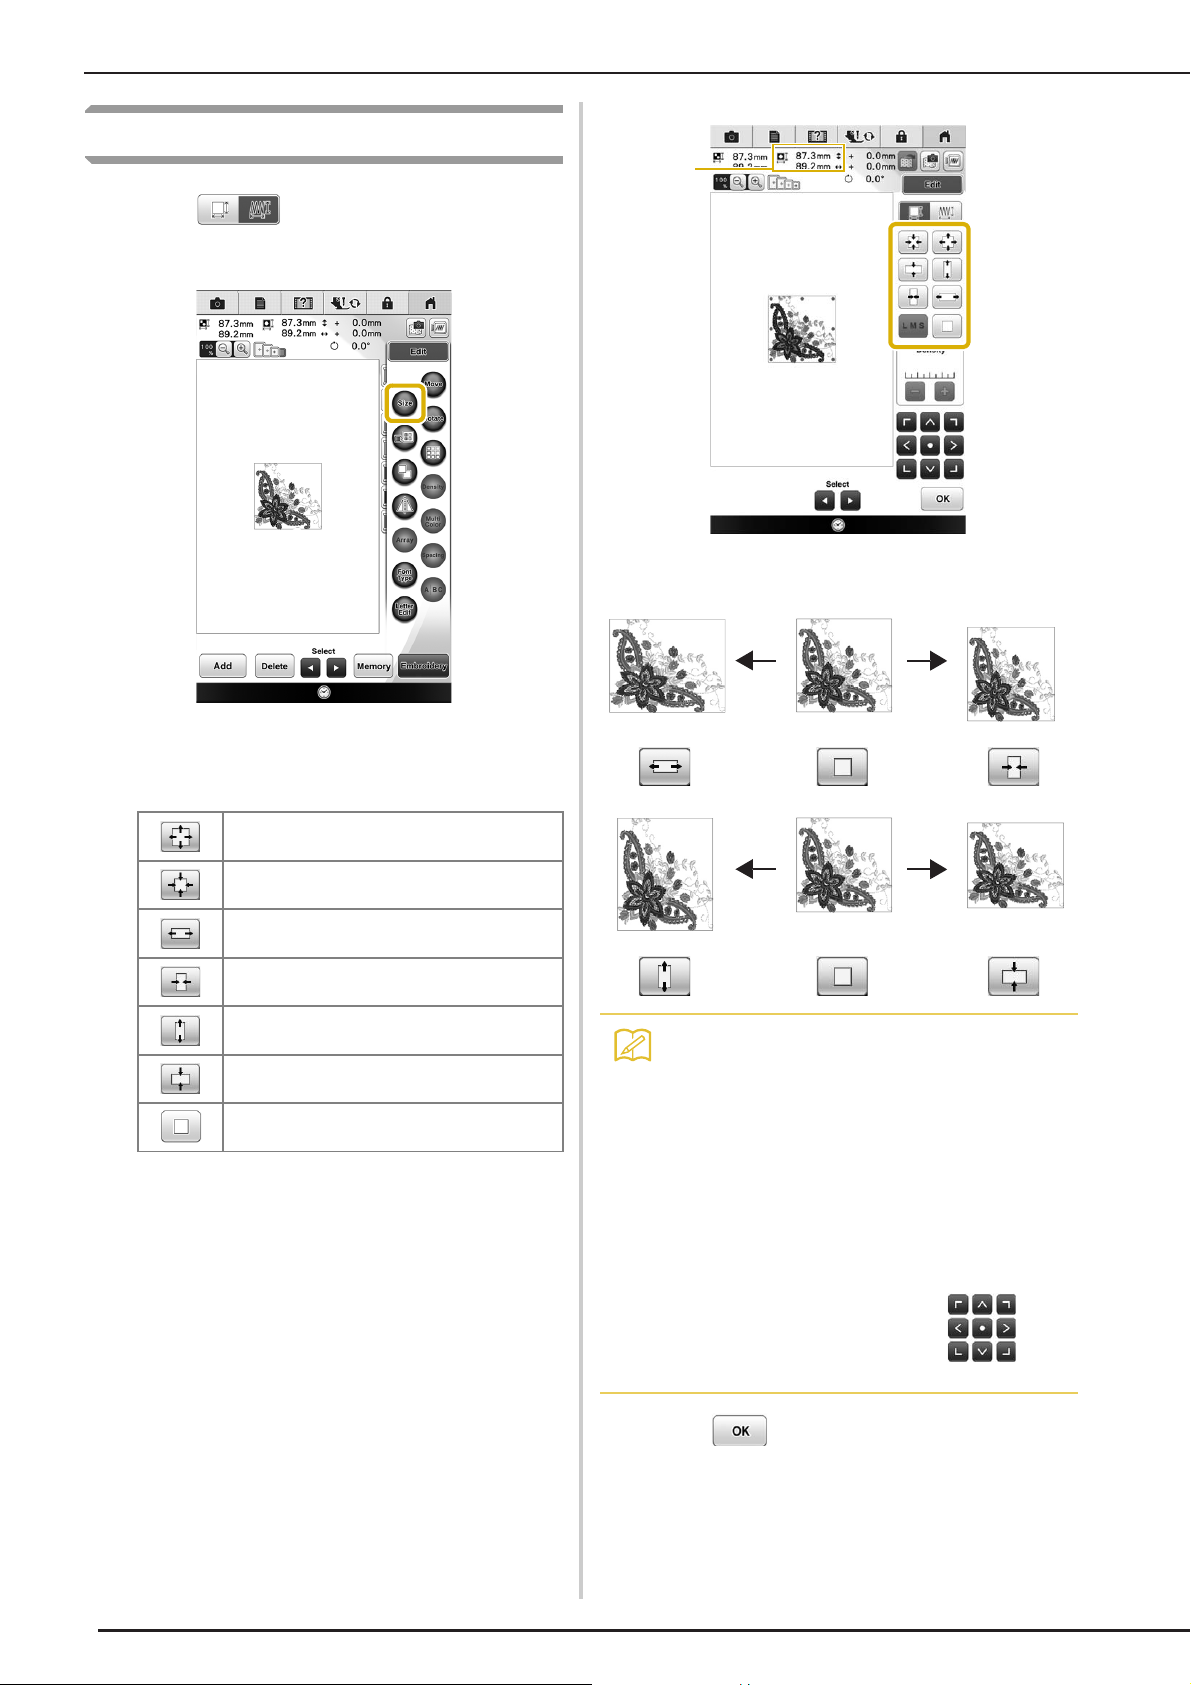
Changing the Size of the Pattern
Press .
a
a Size of the pattern
Select the direction in which to change the
b
size.
Enlarge the pattern proportionately.
Decrease the pattern proportionately.
Stretch the pattern horizontally.
Decrease the pattern horizontally.
Stretch the pattern vertically.
Decrease the pattern vertically.
Return the pattern to its original appearance.
• Some patterns or characters can be
enlarged more than others.
• Some patterns or characters can be
enlarged to a greater degree if they are
rotated 90 degrees.
• You can change the size of the pattern by
rotating the mouse wheel. Rotate the
mouse wheel away from you to shrink the
pattern. Rotate the mouse wheel toward
you to enlarge the pattern.
• You can move patterns using on
214
c
the window.
Press .
Page 22
EDITING PATTERNS
Note
Note
Note
■ Changing the Size and the Density of
the Pattern
You can change the pattern size while maintaining
the desired thread density. The machine recalculates
the stitch density automatically. With this function,
the pattern will be enlarged or reduced at a larger
ratio than with normal pattern resizing.
• Be sure to sew trial embroidery using same
fabric and threads as project in order to
check the sewing results.
• This function cannot be used with alphabet
character patterns, frame patterns or border
patterns. However, a border pattern can be
edited after this function has been used.
• Patterns with a large number of stitches
(about 100,001 or more) cannot be resized
while maintaining a desired thread density.
The maximum limit for the number of
stitches differs depending on the data size
of pattern.
Press in the size window.
a
* Press : When changing the size, the
pattern keeps the original density.
* Press : When you want to increase or
decrease the density of the design.
Press .
d
• If the pattern is enlarged and there is space
between stitches, a better effect can be
achieved by increasing the thread density.
• If the pattern is reduced and the stitching is
too thick, a better effect can be achieved by
reducing the thread density.
■ Changing the Size by Dragging
You can also change the pattern size by dragging the
red point on the pattern image using your finger,
touch pen or connected mouse.
• You can change the pattern size with one
finger. Using two or more fingers does not
work.
5
Change the density.
b
* Press to make the pattern less dense.
* Press to make the pattern more dense.
Select the direction in which to change the
c
size.
Creating a Horizontal Mirror
Image
Press so it appears as to create a
horizontal mirror image of the selected pattern.
Press again to return the pattern to normal.
Basic Embroidery
215
Page 23
EDITING PATTERNS
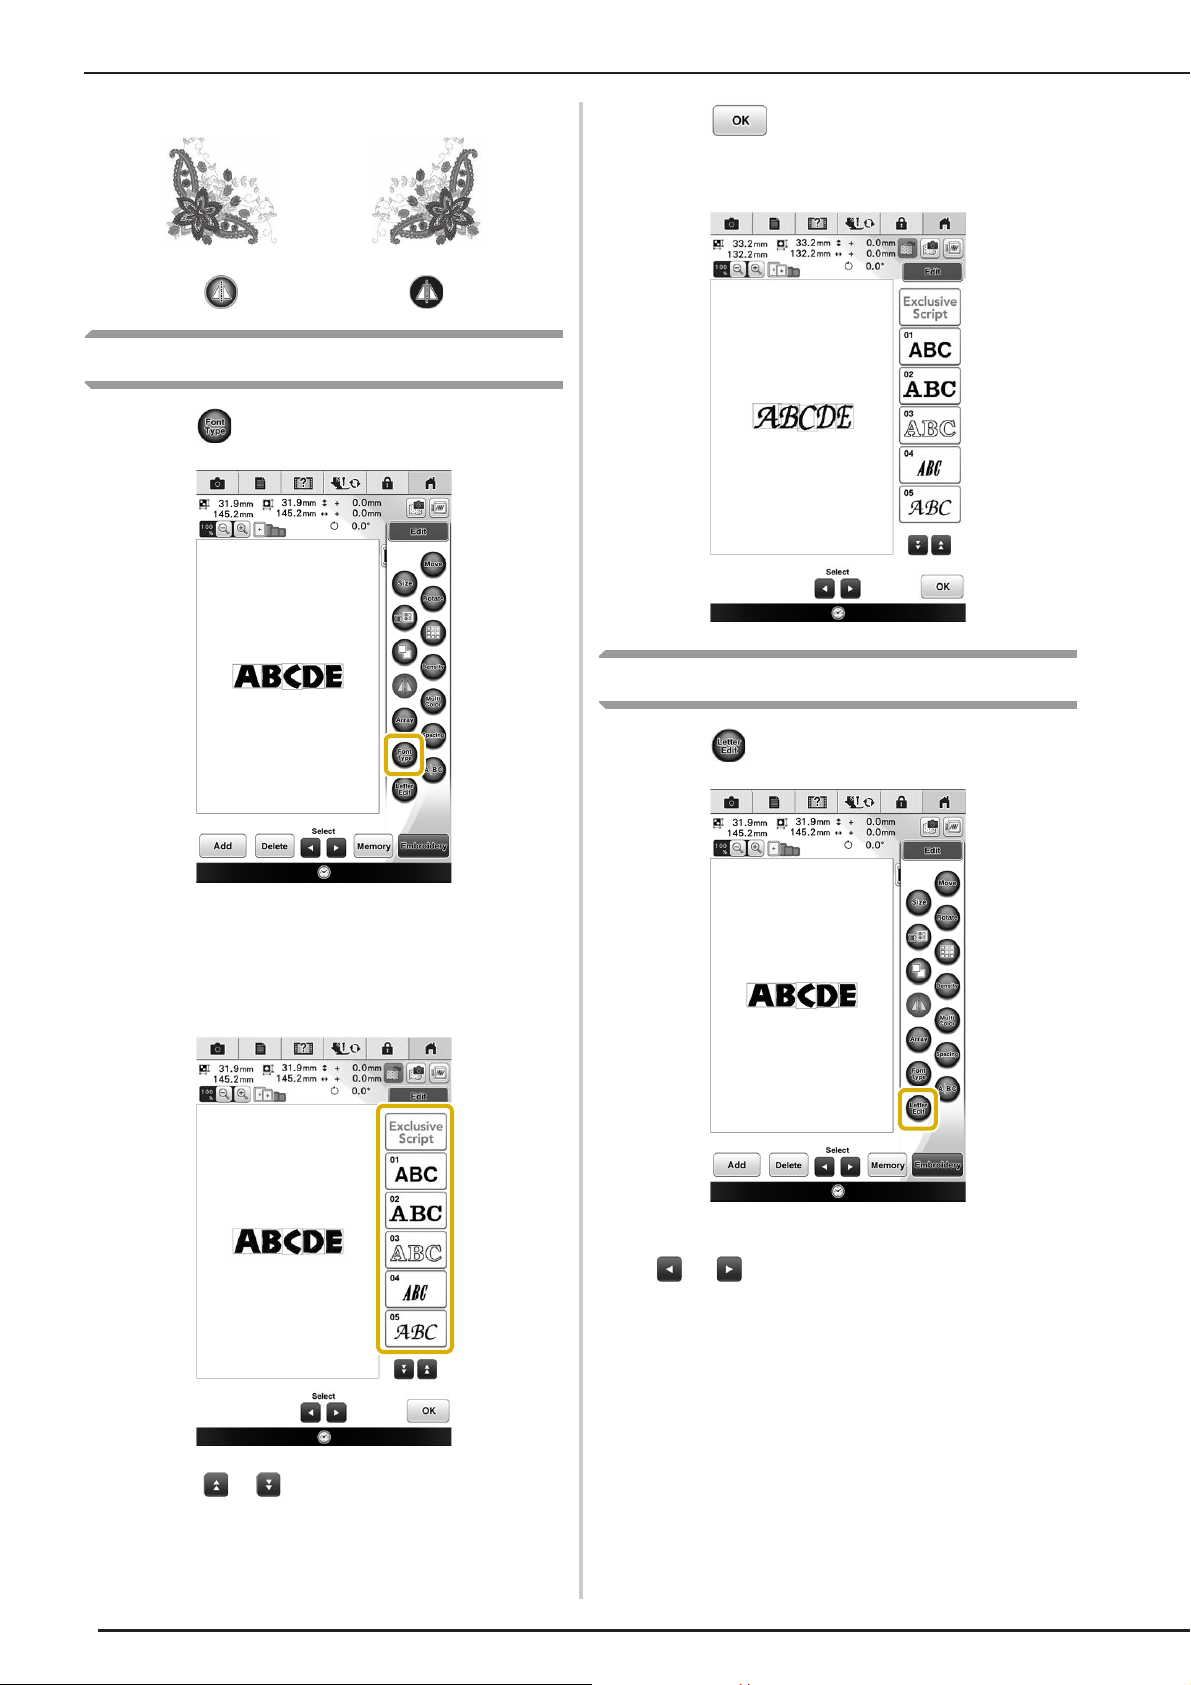
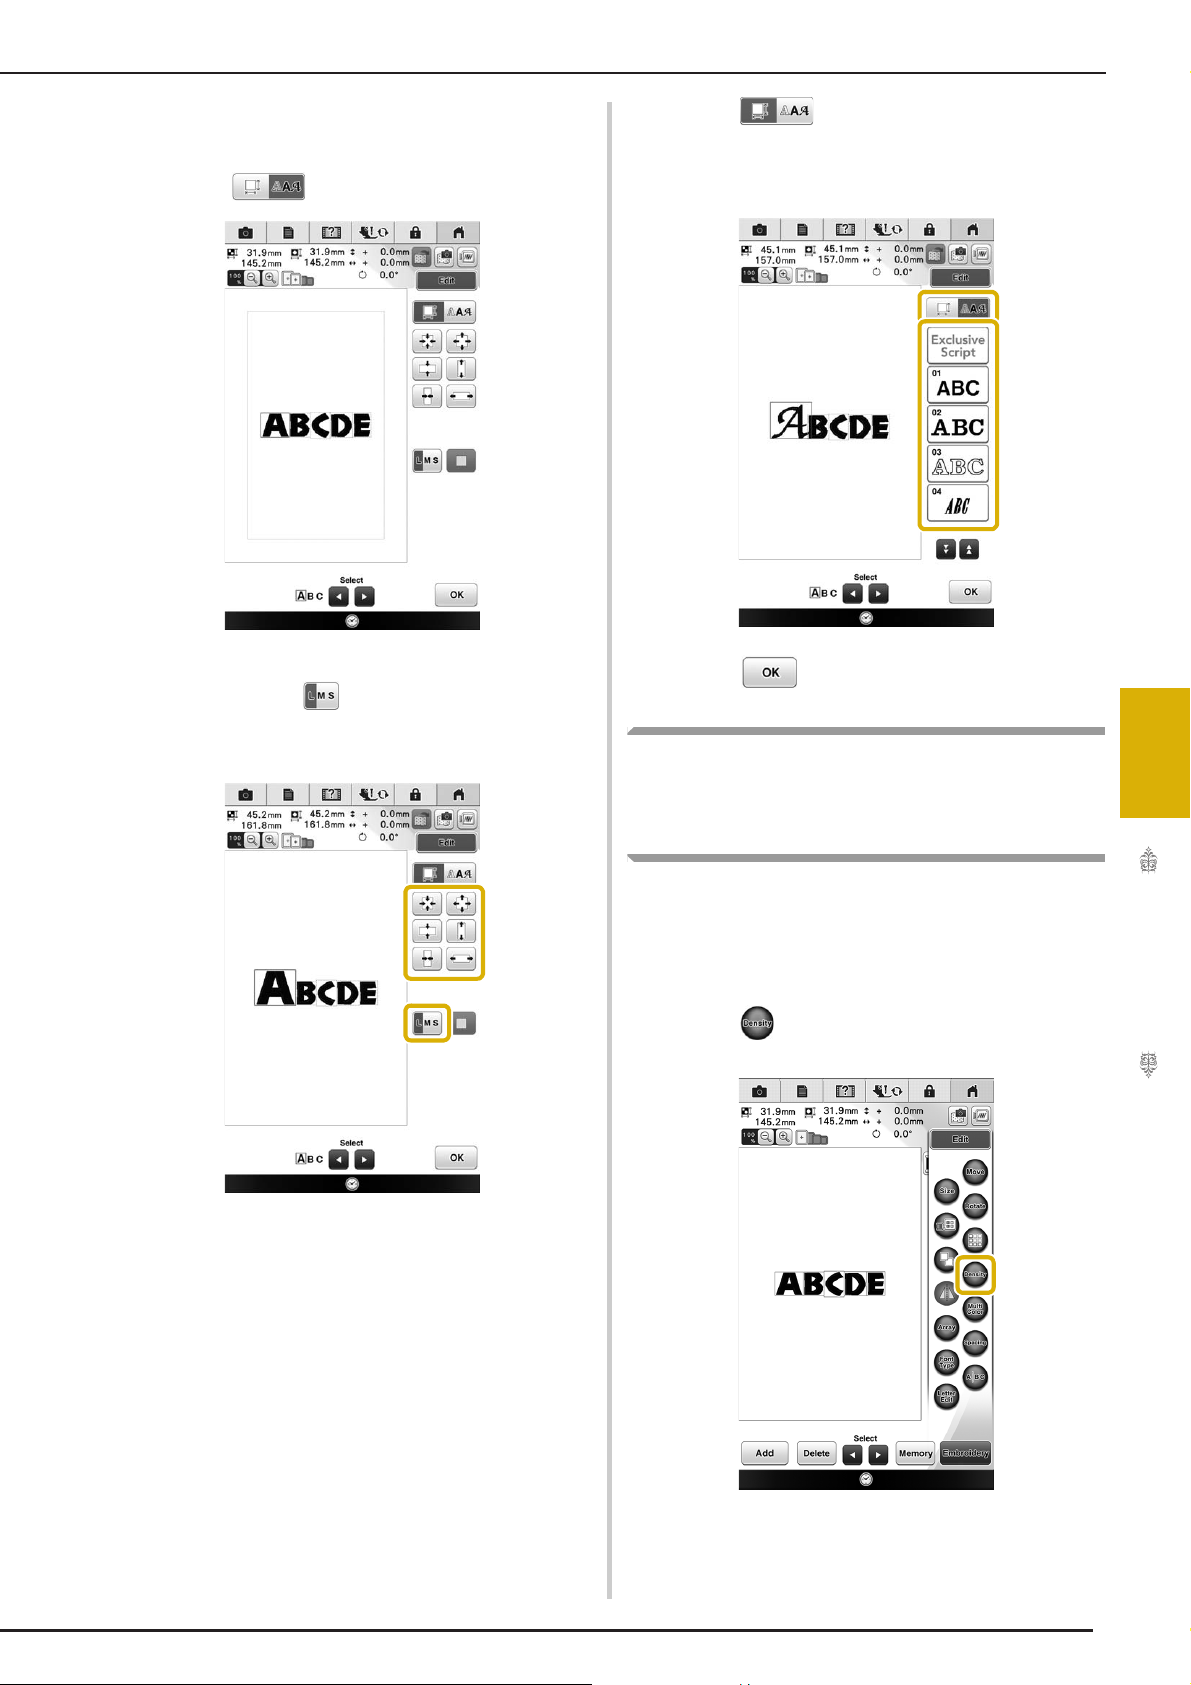
Changing Font Type
Press .
a
Press .
c
→ The new font is selected.
Select the font type.
b
→ All the characters in the screen change into the
selected font type.
Editing Letters (Size/Font Type)
Press .
a
Select a letter you want to edit by pressing
b
or .
216
* Press or to display the font type that is not
on the screen.
Page 24
EDITING PATTERNS
Change the size of letters.
c
→ Selected letter will be resized.
* Press if the resize keys are not displayed.
Select the direction in which to change the
d
size, or press .
→ Refer to “Changing the Size of the Pattern” on
page 214 about selecting the direction.
Press to change font type, and then
e
select the font type.
→ Selected letter's font type will be changed.
Press .
f
Changing the Density
(Alphabet Character and Frame
5
Patterns Only)
The thread density for some alphabet character
and frame patterns can be changed.
A setting between 80% and 120% in 5%
increments can be specified.
Press .
a
Basic Embroidery
217
Page 25
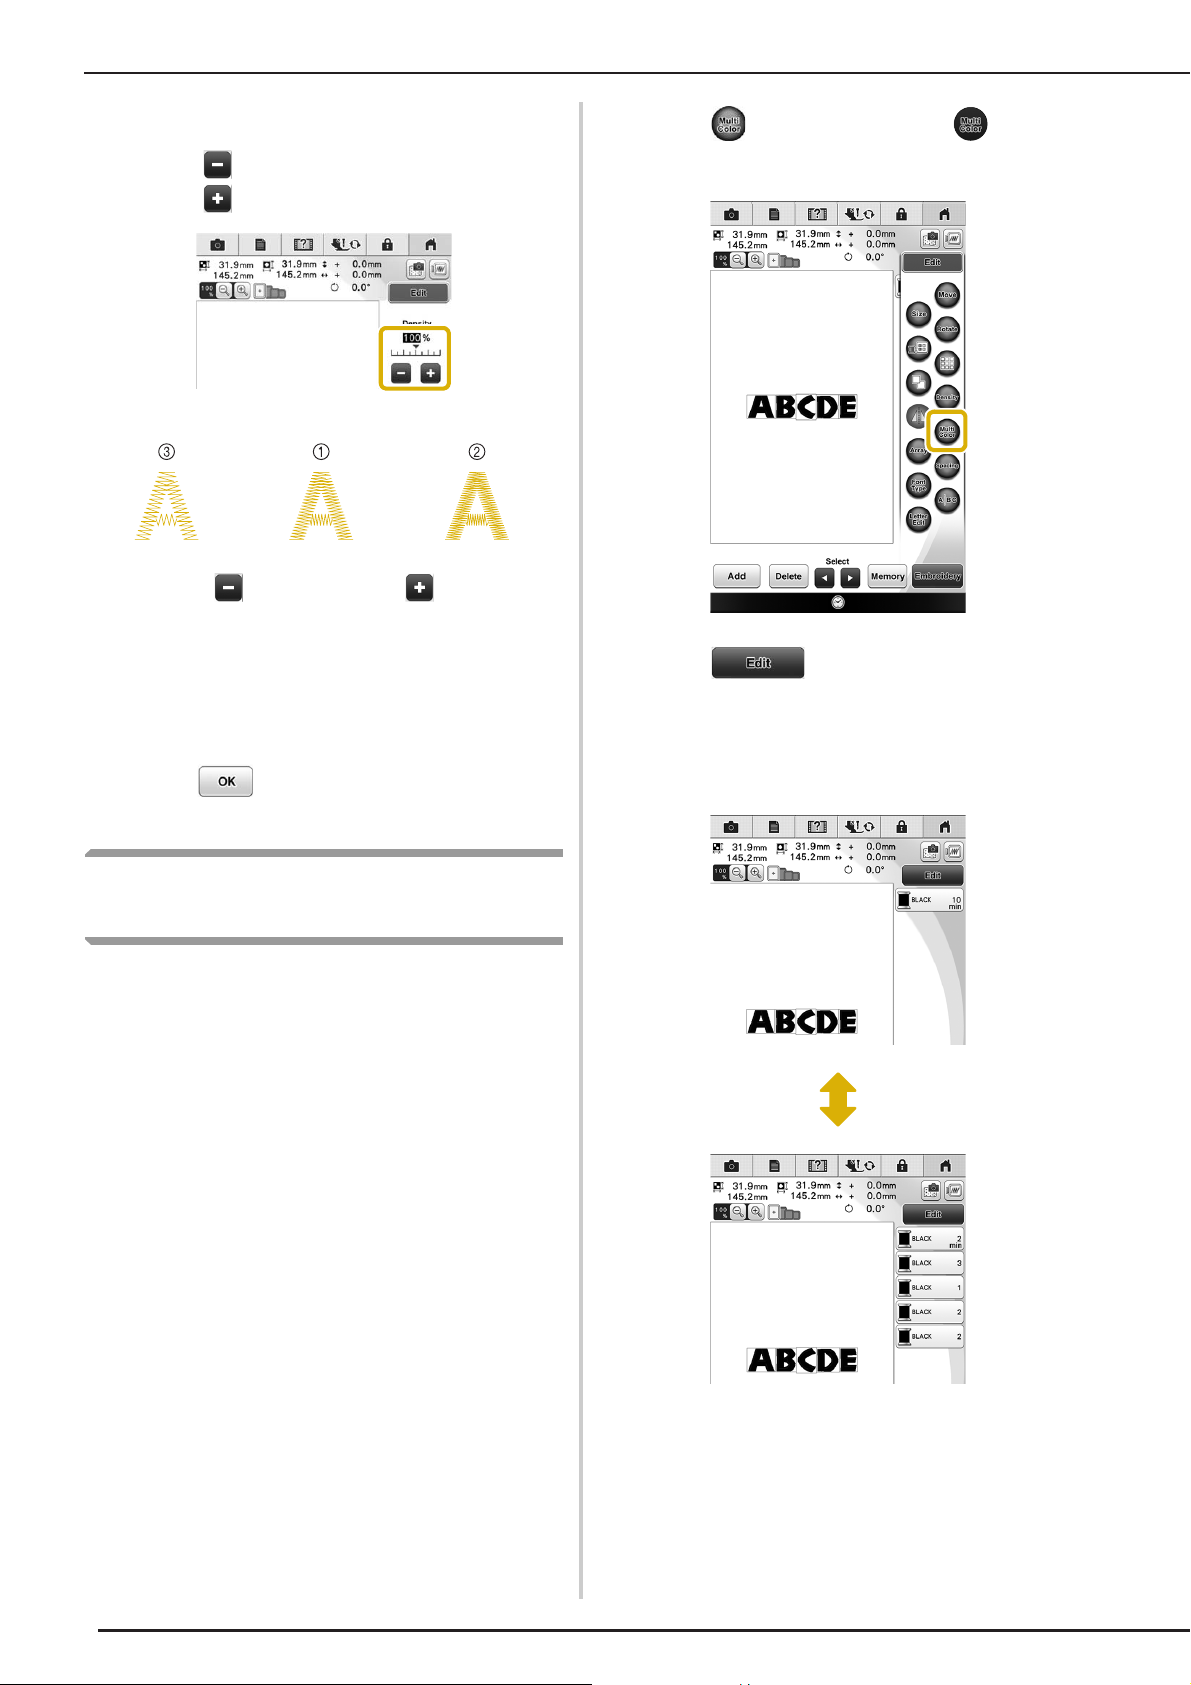
EDITING PATTERNS
Change the density.
b
* Press to make the pattern less dense.
* Press to make the pattern more dense.
a Normal
b Fine (stitches closer together)
c Coarse (stitches farther apart)
→ The pattern density changes each time you press a
button.
Press .
c
Press so that it appears as .
a
* Press the key again to return to the original setting.
Press .
b
After a character is sewn, change the thread
c
color, and then sew the next character.
Changing the Colors of Alphabet
Character Patterns
Combined alphabet character patterns can be
sewn with each letter in a different color. If “Multi
Color” is set, the machine stops after each
character is sewn so that the thread can be
changed to a different color.
218
Page 26
Changing the Configuration of
Memo
EDITING PATTERNS
Alphabet Character Patterns
Press .
a
• When selecting , and
change to and . You can
increase or decrease the incline.
• You can move patterns using on
the window.
Press .
c
Deleting the Pattern
Press to delete the pattern from the screen.
Select the layout. (Example: )
b
When selecting an arc, use and to
change the degree of the arc.
* Press to make the arc flatter.
* Press to make the arc rounder.
5
Basic Embroidery
219
Page 27
EDITING PATTERNS
Displaying Patterns in the Screen
Magnified
Press to magnify the image.
a
* The image is magnified by 125%, 150% and 200%
as you press .
■ Selecting the Percent of
Magnification
Press .
a
Check the displayed pattern.
b
→ Use to scroll through the display in
any direction.
Press the percent of magnification you
b
desire.
220
Press to return the pattern image to the
c
normal size (100%).
Page 28
Changing Alphabet Character
Memo
Note
Memo
EDITING PATTERNS
Spacing
Press .
a
• You can move patterns using on
the window.
Press .
c
• It is not recommended to edit data and
transfer to other or older version machines.
Some features do not apply in other
machines, so problems may occur.
• Character spacing can be reduced only
when characters are arranged normally on a
straight line.
• The spacing between characters can be
reduced to 50% of the narrowest character
in the group.
Select the spacing.
b
* Press to increase the character spacing.
* Press to decrease the character spacing.
* Press to return the pattern to its original
appearance.
Separating Combined Character
Patterns
Combined character patterns can be separated to
adjust the character spacing or to separately edit
the patterns after all characters have been entered.
Press .
a
5
Basic Embroidery
221
Page 29
EDITING PATTERNS
Note
Memo
b
a
Use to select where the pattern is
b
to be separated, and then press to
Changing the Thread Color
separate it. For this example, the pattern
will be separated between “C” and “D”.
• A separated character pattern cannot be
combined again.
You can change the thread color by moving the
color to be changed to the top of the sewing order
and selecting a new color from the thread colors in
the machine.
Press .
a
→ The thread color palette screen displays.
c
• You can move patterns using on
the window.
Press .
Press the thread color key you want to
b
change.
*Press to display the thread color that is not
on the screen.
→ The selected thread color image is displayed.
222
a Selected thread color image
b 64 Embroidery thread color table
Page 30

EDITING PATTERNS
Memo
Note
a
Press or color tip to choose a
c
new color from the color palette.
* To return to the original color, press . If
multiple colors have been changed, this command
will return all colors to their original colors.
Press and then press .
a
Use or press directly to
b
choose where to add a color on the custom
thread table.
* You can scroll through 100 colors at a time using
and on the custom thread table.
Use to select one of the thread
c
brands in the machine.
a Color palette
→ The selected color appears at the top of the sewing
order.
→ The display shows the changed colors.
Press .
d
• To select a color from the Custom Thread
Table, “Choosing a Color from the Custom
Thread Table” on page 226.
Creating a Custom Thread Table
You can create a custom thread table containing
the thread colors that you most often use by
selecting thread colors from the machine’s
extensive list of thread colors from nine different
thread brands. You can select any color and move
the color to your custom thread table.
5
Basic Embroidery
• Some machines may already have an
additional 300 Robison-Anton thread colors
contained in the custom thread table. 300
Robison-Anton thread colors table data can
be downloaded from our website
“ www.babylock.com
”.
223
Page 31

EDITING PATTERNS
Note
a
d
c
e
b
b
a
Note
b
a
Use to
d
enter a color’s 4-digit number.
* If you make a mistake, press to erase the
entered number, and then enter the correct number.
Repeat the previous steps until all desired
f
thread colors are specified.
* To delete a specified color from the palette, press
.
* To delete all the specified color from the palette,
press .
• You can save the created custom thread
table data. Refer to “Saving the Custom
Thread Table to USB media” on page 225
for the detailed procedure.
Press .
g
■ Adding a Color to the Custom
Thread Table from the List
Press and then press .
a
a Custom thread table
b Select the thread brand.
c Choose where to add a color.
d Press to recall the custom thread table
data (see page 225).
e Enter a color’s 4-digit number.
Press .
e
Press to display the thread list.
b
Use to select a thread color.
c
224
a Thread brand
b Entered thread color number
→ The selected thread color is set in the custom thread
table.
• If is not pressed, the thread color
number will not be changed.
a Thread list
b Thread brand
Press .
d
Page 32

EDITING PATTERNS
Note
Note
Note
Repeat the previous steps until all desired
e
thread colors are specified.
* To delete a specified color from the palette, press
.
* To delete all the specified color from the palette,
press .
Press .
f
■ Saving the Custom Thread Table to
USB media
You can save a custom thread table data file to USB
media.
• Custom thread table data can only be saved
to USB media. You cannot save the data in
the machine’s memory or to your computer.
• Custom thread table data is saved as “.pcp”
data file.
Press .
d
→ Select the USB port, and then the “Saving” screen is
displayed. When the data is saved, the display
returns to the original screen automatically.
Press and then press .
a
Set your desired colors in the custom thread
b
table according to the procedure in
“Creating a Custom Thread Table” on
page 223.
Insert the USB media into the USB port on
c
the machine.
• Do not insert or remove USB media while
“Saving” screen is displayed. You will lose
some or all of the data you are saving.
■ Recalling the Custom Thread Table
data from USB media
You can recall a custom thread table data from USB
media.
• Do not store two or more “.pcp” data file in
USB media. You can only recall one custom
thread table data at a time.
Insert the USB media containing the custom
a
thread table data into the USB port.
5
Basic Embroidery
a USB port
b USB media
a USB port
b USB media
225
Page 33

EDITING PATTERNS
Note
a
Press and then press .
b
Press .
c
Choosing a Color from the
Custom Thread Table
You can select a color from the up to 300 thread
colors you have set in the custom thread table.
Press .
a
→ The “Saving” screen is displayed. When the data is
loaded to the machine, the display returns to the
original screen automatically.
• Do not insert or remove USB media while
“Saving” screen is displayed. You will lose
some or all of the data you are saving.
The recalled custom thread table is
d
displayed on the screen.
→ The thread color palette screen displays.
Press the thread color key you want to
b
change.
*Press to display the thread color that is not
on the screen.
→ The selected thread color image is displayed.
Press .
c
226
a Custom thread change key
→ The custom thread table will appear.
Page 34

EDITING PATTERNS
a
Note
a
b
c
Press to choose a new color
d
from the custom thread table.
* Use and to scroll through the custom thread
table.
* Press to return to the original color.
* You can choose colors from the custom thread table
by directly touching the screen with the touch pen
or your finger.
a Custom thread table
→ The display shows the changed colors.
Press .
e
Press .
b
→ The color visualizer screen appears.
• This function may not be available
depending on the pattern you select (ex. a
bordered embroidery pattern, a pattern
which can not be flipped).
If the alarm sounds when the color
visualizer key is pressed, select another
pattern.
Select the color table and the number of
c
colors you want to create the pattern with.
5
Basic Embroidery
Find New Color Schemes With
the Color Visualizer Function
With the color visualizer function, the machine
suggests new color schemes for the embroidery
pattern that you have selected. After you select the
desired effect from the four available (“Random”,
“Vivid”, “Gradient” and “Soft”), sample color
schemes for the selected effect are displayed.
Press .
a
→ The thread color palette screen appears.
a Thread table (64 colors)
b Custom thread table (300 colors)
c Number of colors to be used.
227
Page 35

EDITING PATTERNS
Note
a
a
b
• Selection for the desired number of colors
must stay within the range for the number of
thread changes for the pattern you
selected.
• If an error message appears in this step,
refer to page 394.
• If you have not set any color in the custom
thread table, the color visualizer key will be
grayed out. In that case, use the thread
table (64 colors) instead or set some colors
in the custom thread table. Refer to
“Creating a Custom Thread Table” on
page 223 for the detail.
Select the number of colors you want to use
d
and then select the desired effect.
Press and specify the thread color to
e
use in the desired effect.
* If you don’t need to specify the thread color, just set
to .
“Manual” setting for “Random”
You can select up to 6 colors to be used in the
“Random” effect.
The effect will be created using the selected
colors.
a Effects for schemes
→ If you select “Random” or “Gradient”, the color
specifying screen will appear.
* If you select “Vivid” or “Soft”, proceed to step f.
a Select colors from the pallet.
b Selected colors are listed.
228
Page 36

EDITING PATTERNS
Note
a
b
a
“Manual” setting for “Gradient”
You can select one color to be used in the
“Gradient” effect.
The effect will be created with a color you select.
a Select a color from the pallet.
b Selected color is displayed.
Press and then, select the displayed
h
color scheme.
* Press to return to the previous screen.
* You can continue selecting color schemes from the
selected page prior to pressing .
* Press or to display the other color schemes.
Press .
f
Press the desired color scheme from
g
samples.
* Press to display the new schemes.
→ The thread color palette screen will appear.
Designing Repeated Patterns
■ Sewing Repeated Patterns
Using the border function, you can create stitches
using repeated patterns. You can also adjust the
spacing of the patterns within a repeated pattern
stitch.
Press .
a
5
Basic Embroidery
a Press to review the previous schemes.
• Maximum 10 pages of schemes can be
reviewed. After 10 pages of schemes, the
oldest page is deleted every time you press
.
229
Page 37

EDITING PATTERNS
e
a
c
e
b
d
Memo
Memo
a
Select the direction in which the pattern
b
will be repeated.
Adjust the spacing of the repeated pattern.
d
* To widen spacing, press .
* To tighten spacing, press .
a Press to change a repeated pattern back to
one single pattern.
a Vertical direction
b Horizontal direction
c Repeating and deleting vertical keys
d Repeating and deleting horizontal keys
e Spacing keys
→ The pattern direction indicator will change
depending on the direction selected.
Use to repeat the pattern on the left
c
and to repeat the pattern on the right.
* To delete the left pattern, press .
* To delete the right pattern, press .
• You can only adjust the spacing of patterns
included in the red frame.
Complete repeated patterns by repeating
e
f
b through d.
steps
Press .
• When there are two or more patterns, all
patterns will be grouped together as one
pattern in the red frame.
• When changing the direction in which the
pattern will be repeated, all of the patterns
in the red frame will automatically be
grouped as one repeating unit. Press
to change a repeated pattern back to one
single pattern. See the following section on
how to repeat one element of a repeated
pattern.
230
Page 38

EDITING PATTERNS
Note
■ Repeating One Element of a
Repeated Pattern
By using the Cut function, you can select one
element of a repeated pattern and repeat only that
single element. This function allows you to design
complex repeated patterns.
Choose the direction in which the repeated
a
pattern will be cut.
* Press to cut horizontally.
* Press to cut vertically.
Press .
c
→ The repeated pattern will be divided into separate
elements.
Press .
d
→ The pattern direction indicator will change
depending on the direction selected.
Use and to select the cut line.
b
Use and to select the element to
e
repeat.
Repeat the selected element.
f
5
Basic Embroidery
→ The cut line will move.
g
Press .
• Once you have cut a repeated pattern into
separate elements, you cannot return to the
original repeated pattern.
• Each element can be edited separately in
the edit screen. See “Selecting combined
embroidery patterns” on page 240.
231
Page 39

EDITING PATTERNS
Memo
Memo
■ Color Sorting Repeated Patterns
Press to automatically change the sewing
order of colors in combined border embroidery
patterns so that the same color can be continuously
sewn. This allows you to continue sewing without
repeatedly changing the upper thread or changing
the sewing order manually.
• In combined stitch patterns that contain two
or more border patterns or other patterns
combined with border patterns, the sewing
order of only the border patterns is
changed.
• When a group of two or more patterns using
border patterns is repeated, the sewing
order is changed so that the same color can
be sewn continuously in each pattern.
■ Assigning Thread Marks
By sewing thread marks, you can easily align
patterns when sewing a series. When sewing is
finished on a pattern, a thread mark in the shape of
an arrow will be sewn using the final thread. When
sewing a series of patterns, use the point of this
arrow for positioning the following designs to be
sewn.
• When repeatedly sewing individual patterns,
thread marks can be sewn around the
perimeter of the pattern only.
Press .
a
Press .
b
Press to select the thread mark to be
c
sewn.
232
Page 40

Memo
• When there are two or more elements, use
Memo
Note
and or and to select a
pattern that you want to assign a thread
mark(s) to.
Press .
d
Embroidering the Pattern
Repeatedly
EDITING PATTERNS
Press the “Start/Stop” button to begin
c
embroidering.
→ When embroidering is finished, the thread mark is
sewn with the last thread color.
After creating the repeated pattern, rehoop the
embroidery frame and keep sewing for the next
pattern.
• The optional border frame allows you to
easily rehoop the fabric without removing
the embroidery frame from the machine.
Select the boarder pattern with the thread
a
mark at the center of the end of the pattern.
* Refer to “Assigning Thread Marks” on page 232.
Remove the embroidery frame.
d
Rehoop the fabric in the embroidery frame.
e
• Adjust the position of the fabric so that the
embroidering area for the next pattern is
within the embroidering area of the
embroidery sheet.
5
Basic Embroidery
Press , then .
b
a Pattern embroidered first
b Position of pattern to be embroidered next
c Embroidering area of embroidery sheet
233
Page 41

EDITING PATTERNS
Memo
a
c
b
Attach the embroidery frame to the
f
machine, and then touch .
Touch to set the starting point to the top
g
center of the pattern.
Press .
k
Press the positioning keys to move the
l
embroidery frame until the thread mark on
the fabric is aligned on the starting point in
the camera view window.
234
Touch .
h
Press the “Presser Foot Lifter” button to
i
lower the presser foot.
Press .
j
a Grid lines
b Thread mark on the fabric
c Positioning keys
• Press to enlarge the camera view. By
enlarging the camera view, you can make a
close adjustment for the needle drop
position moving the embroidery frame little
by little.
Page 42

If the pattern position cannot be aligned
Note
Note
Memo
a
m
using the positioning keys, rehoop the
fabric, and then try again to align the
position with the positioning keys.
• When embroidering the repeated pattern,
you cannot rotate the pattern in the camera
view window. If the pattern is rotated in the
camera view window, you cannot sew the
pattern properly aligned even if the thread
mark and the starting point are aligned in
the camera view window.
Press to return to the previous
n
screen.
Remove the thread mark.
o
Press the “Start/Stop” button to begin
p
embroidering.
Duplicating a Pattern
Press .
a
EDITING PATTERNS
a Duplicated pattern
• If multiple patterns are displayed in the
screen, only the pattern selected using
and is duplicated.
• Move and edit each duplicated pattern
individually.
5
→ The duplicate is positioned over the original pattern.
After Editing
Press .
a
* To combine the pattern with other patterns, select
Basic Embroidery
(see page 238).
* See page 259 for more information about sewing
patterns.
• If you want to return to the edit screen after
pressing , press .
235
Page 43

VIEWING THE EMBROIDERY SCREEN
Note
c
l
a
d
e
i
j
f g h
k
b
VIEWING THE EMBROIDERY SCREEN
a Shows the presser foot code.
Attach embroidery foot “W+” with LED pointer or “W” (optional) for all embroidery projects. When the foot presser
symbol is displayed on the screen, you are able to sew.
b Shows the embroidery frames that can be used for the selected pattern. Be sure to use the proper frame (see page
243).
c Shows the size of the selected pattern.
d Shows a preview of the selected pattern.
e Shows the boundary for embroidering with the selected frame in the settings screen. (see page 292)
f Shows how many stitches are in the selected pattern and how many stitches have been sewn so far.
g Shows the time necessary to sew the pattern, and the time already spent sewing the pattern (not including time for
changing and automatically trimming the thread).
h Shows the number of colors in the selected pattern, and the number of the color currently being sewn.
i Shows how far the sewing position is from the center (when you move the sewing position).
j Shows the degree of rotation of the pattern.
k Shows the part of the embroidery that will be sewn with the first thread color.
l Shows the order for thread color changes and the embroidering time for each thread color.
* The displayed time is the approximate time that will be required. The actual embroidering time may be longer than the
displayed time, depending on the embroidery frame that is used. In addition, the amount of time required to change
thread colors is not included.
• There is an explanation of additional key functions on the next page.
236
Page 44

VIEWING THE EMBROIDERY SCREEN
e
b
f
m
r
noq p
d
c
g
h
i
j
k
l
a
Note
■ Key Functions
Using these keys, you can move or rotate pattern, etc. Press to display the editing window.
• Some operations or functions are not
available for certain patterns. If the key
display is darkened, you cannot use that
function or operation with the selected
pattern.
No. Display Key Name Explanation Page
a Needle point check
key
b Fabric image save key Press this key to save the currently displayed fabric image. 272
c Fabric scan key Press this key to scan the fabric to align the embroidery position. 272
d Image key Press this key for a preview of the sewn image. 212
e Move key Press to display the pattern moving window. 212
f Uninterrupted
g Rotate key Press this key to rotate the pattern. You can rotate a pattern 0.1 degree, 1
h Basting key Press to add the basting stitch to the pattern. You can set the desired basting
i Appliqué key Press to create an appliqué piece using the selected pattern. 277
j Embroidery
k Pattern connect key Press to start pattern connecting embroidering. You can connect the patterns
l Sensor function key Press this key to use the sensor function. 254
m Memory key Press this key to save a pattern in the machine’s memory, USB media or a
n Trial key Press this key to check the position of the pattern.The embroidery frame moves
o Starting point key Press this key to move the needle start position to align the needle with the
p Forward/Back key Press this key to move the needle forward or back in the pattern; useful if the
q Cut/Tension key Press this key to specify automatic thread cutting, thread trimming or the
r Return key Press this key to return to the pattern type selection screen. —
embroidery key
positioning key
Press this key to check the needle drop point with the light of the LED pointer. 249
Press this key to embroider the selected pattern with a single color. 272
213
degree, 10 degrees or 90 degrees at a time.
276
distance.
Press this key to align the embroidering position using the built-in camera. 252
307
accurately using the built-in camera.
299, 300
computer.
257
to the desired position so you can check that there is enough space to sew the
pattern.
293, 294
pattern position.
267-269
thread breaks while sewing or if you want to start again from the beginning.
287-290
thread tension. For embroidery, these functions are set automatically.
5
Basic Embroidery
237
Page 45

COMBINING PATTERNS
COMBINING PATTERNS
Editing Combined Patterns
Example: Combining alphabet characters
with an embroidery pattern and
editing
Press to select an embroidery pattern.
a
Select .
b
Press or touch the selected pattern.
c
238
Page 46

COMBINING PATTERNS
Press .
d
Press to enter the alphabet
e
characters.
Select and enter “LOVE”.
f
→ The characters you enter will be displayed in the
center of the display.
Press .
g
* Press to return to the previous screen.
Press to change the layout of the
h
characters. Press .
* See page 219 for more information about changing
the layout.
5
Basic Embroidery
Use to move the characters.
i
* With a USB mouse, your finger or the touch pen,
drag the characters to move them.
239
Page 47

COMBINING PATTERNS
Memo
Press to change the color of the
j
characters.
* See page 222 for more information about changing
the color.
When all editing is finished, press .
k
■ Selecting combined embroidery
patterns
If multiple patterns have been combined, use
to select the pattern to be edited. If a USB mouse is
connected, the pattern can be selected by clicking
it. Move the mouse to position the pointer over the
desired pattern, and then click the left mouse
button. In addition, patterns can be selected by
directly touching the screen with your finger or
touch pen.
• Use to select patterns that are
overlapping and cannot be selected by
clicking them or by touching the screen.
240
Page 48

COMBINING PATTERNS
Note
Sewing Combined Patterns
Combined patterns will be embroidered in the
order they were entered. In this example, the
embroidery order will be as follows:
→
• Follow the directions in “Embroidering
Patterns” on page 260.
Embroider by following the color
a
order on the right side of the display.
Embroider .
b
→ When “LOVE” is embroidered, the display returns to
the embroidering screen.
→ After the hart are embroidered, the [+] cursor will
move to the “LOVE” part of the pattern.
5
Basic Embroidery
241
Page 49

PREPARING THE FABRIC
CAUTION
Note
CAUTION
Memo
PREPARING THE FABRIC
• Use fabrics with a thickness of less than 3 mm (approx. 1/8 inch). Using fabrics thicker than 3 mm
(approx. 1/8 inch) may cause the needle to break.
• When using layers with thicker batting etc., you can sew more attractive embroidery by adjusting the
embroidery presser foot height in the embroidery settings screen (see below).
• In the case of thick terry cloth towels we recommend that you place a piece of water soluble stabilizer on
the top surface of the towel. This will help to reduce the nap of the toweling and result in more attractive
embroidery.
• Press , and select page 7 to use and in the “Embroidery Foot Height” display in the
embroidery settings screen. Adjust the presser foot height for thick or puffy fabrics.
• To increase the space between the presser foot and the needle plate, set the “Embroidery Foot
Height” to a larger number, 1.5 mm setting is used for most embroidery.
Attaching Iron-on Stabilizers
(Backing) to the Fabric
• Always use a stabilizer material for embroidery
when sewing stretch fabrics, lightweight
fabrics, fabrics with a coarse weave, or fabrics
which cause pattern shrinkage. Otherwise, the
needle may break and cause injury. Not using
a stabilizer material may result in a poor finish
to your project.
Use a piece of stabilizer which is larger
a
than the embroidery frame being used.
Iron the iron-on stabilizer material to the
b
wrong side of the fabric.
a Fusible side of stabilizer
b Fabric (wrong side)
• When embroidering on thin fabrics such as
organdy or lawn, or on napped fabrics such
as towel or corduroy, use water soluble
stabilizer (sold separately) for best results.
The water soluble stabilizer material will
dissolve completely in water, giving the
project a more attractive finish.
242
a Size of the embroidery frame
b Iron-on stabilizer (backing)
Page 50

Hooping the Fabric in the Embroidery Frame
CAUTION
ab
■ Types of Embroidery Frames
Super large Extra Large Large Medium
PREPARING THE FABRIC
Embroidery field
36 cm × 24 cm
(approx. 14 inches × 9-1/2
inches)
Use when embroidering patterns
larger than 30 cm × 20 cm
(approx. 12 inches × 8 inches).
Use when embroidering
connected or combined
characters or patterns, or when
embroidering large patterns.
Embroidery field
30 cm × 20 cm
(approx. 12 inches × 8 inches)
Embroidery field
18 cm × 13 cm
(approx. 7 inches × 5 inches)
Use when embroidering patterns
between 10 cm × 10 cm (approx.
4 inches × 4 inches) and
18 cm × 13 cm (approx. 7 inches
× 5 inches).
Embroidery field
10 cm × 10 cm
(approx. 4 inches × 4 inches)
Use when embroidering patterns
under 10 cm × 10 cm
(approx. 4 inches × 4 inches).
Other optional embroidery frames can be used. When choosing frames that do not appear on the screen, be sure
to check the design size of the embroidery field of the optional frame. Check with your authorized Baby Lock
retailer for frame compatibility.
Select a frame that matches the pattern size. Included frame options are displayed on the LCD.
5
Basic Embroidery
a Highlighted: Can be used
b Shaded: Cannot be used
• If you use a frame that is too small, the presser foot may strike the frame during sewing and cause injury.
243
Page 51

PREPARING THE FABRIC
Note
Memo
■ Inserting the Fabric
• If the fabric is not securely held in the
embroidery frame, the embroidery design
will sew out poorly. Insert the fabric on a
level surface, and gently stretch the fabric
taut in the frame. Follow the steps below to
insert the fabric correctly.
Lift-up and loosen the frame adjustment
a
screw and remove the inner frame.
a Frame adjustment screw
b Inner frame
Slightly tighten the frame adjustment screw,
c
and then remove the slack in the fabric by
pulling on the edges and corners. Do not
loosen the screw.
Gently stretch the fabric taut, and tighten
d
the frame adjustment screw to keep the
fabric from loosening after stretching.
* After stretching the fabric, make sure the fabric is
taut.
Lay the fabric right side up on top of the
b
outer frame.
Re-insert the inner frame making sure to align the
inner frame’s with the outer frame’s .
a Inner frame’s
b Outer frame’s
c Frame adjustment screw
* Make sure the inside and outside frames are even
before you start embroidering.
a Outer frame
b Inner frame
c Fabric
• Stretch the fabric from all four corners and
all four edges. While stretching the fabric,
tighten the frame adjustment screw.
Return the frame adjustment screw to its
e
initial position.
244
Page 52

Memo
• You can use the included multi-purpose
screw driver setting the position to “3”,
when you loosen or tighten the frame
adjustment screw.
■ Using the Embroidery Sheet
PREPARING THE FABRIC
Gently stretch the fabric so there are no
c
folds or wrinkles, and press the inner frame
into the outer frame.
When you want to embroider the pattern in a
particular place, use the embroidery sheet with the
frame.
With a chalk pencil, mark the area of the
a
fabric you want to embroider.
a Embroidery pattern
b Mark
Place the embroidery sheet on the inner
b
frame. Align the guide lines on the
embroidery sheet with the mark you made
on the fabric.
a Inner frame
b Outer frame
Remove the embroidery sheet.
d
Embroidering Small Fabrics or
Fabric Edges
Use an embroidery stabilizer to provide extra
support. After embroidering, remove the stabilizer
carefully. Attach the stabilizer as shown in the
following examples. We recommend using a
stabilizer for embroidery.
5
Basic Embroidery
■ Embroidering Small Fabrics
Use a temporary spray adhesive to adhere the small
piece of fabric to the larger piece in the frame.
If you do not wish to use a temporary spray
adhesive, attach the stabilizer with a basting stitch.
a Inner frame
b Guide line
a Fabric
b Stabilizer
245
Page 53

PREPARING THE FABRIC
■ Embroidering Edges or Corners
Use a temporary spray adhesive to adhere the small
piece of fabric to the larger piece in the frame.
If you do not wish to use a temporary spray
adhesive, attach the stabilizer with a basting stitch.
a Fabric
b Stabilizer
■ Embroidering Ribbons or Tape
Secure with double-sided tape or a temporary spray
adhesive.
a Ribbon or tape
b Stabilizer
246
Page 54

ATTACHING THE EMBROIDERY FRAME
Note
CAUTION
ATTACHING THE EMBROIDERY FRAME
• Wind and insert the bobbin before attaching the embroidery frame.
Press the “Presser Foot Lifter” button to
a
raise the presser foot.
Align the embroidery frame guide with the
b
right edge of the embroidery frame holder.
a Embroidery frame holder
b Embroidery frame guide
Lower the frame-securing lever to be level
d
with the frame to secure the embroidery
frame in the embroidery frame holder.
a Frame-securing lever
• If the frame-securing lever is not lowered, the
following message appears. You cannot start
sewing until you lower the frame-securing
lever.
5
Basic Embroidery
Slide the embroidery frame into the holder,
c
making sure to align the embroidery frame’s
with the holder’s .
a Arrow mark
■ Removing the Embroidery Frame
Raise the frame-securing lever.
a
247
Page 55

ATTACHING THE EMBROIDERY FRAME
Pull the embroidery frame toward you.
b
248
Page 56

CONFIRMING THE PATTERN POSITION
Memo
Note
Note
a
CONFIRMING THE PATTERN POSITION
The pattern is normally positioned in the center of the embroidery frame. If the pattern needs to be
repositioned for better placement on the garment, you can check the layout before starting embroidery.
■ Adjusting the LED Pointer
Checking the Needle Drop Point
With the Embroidery Foot “W+”
with LED Pointer
With the embroidery foot “W+” with LED pointer,
you can check the needle drop position before
embroidering.
Press in the embroidery screen.
a
→ The LED pointer indicates the needle drop point.
Adjust the LED pointer if it indicates a point different
than the actual needle drop point. Before adjusting
the LED pointer, mark the actual needle drop point
on the fabric to be embroidered, and then hoop the
fabric and attach the embroidery frame.
• As a default, the key mentioned in the
following procedures appear in light gray
and is not available. To enable the key for
specifying the settings, attach embroidery
foot “W+” with LED pointer to the machine.
The key is enabled after the embroidery foot
is plugged in.
• When the LED pointer is turned on, the
presser foot height is automatically adjusted
according to the fabric thickness.
• If is not displayed, you cannot use the
LED pointer.
* The LED pointer turns off automatically by lowering
the presser foot or returning to the previous page.
• With bulky fabrics, the position may not be
accurate due to the various depths of the
fabrics.
• With fabric that has a very uneven surface
such as quilting, the fabric thickness may
not be correctly measured. In this case, the
pointer indication should be used only as a
reference.
Press .
a
→ The settings screen appears.
Display page 8 of the Embroidery settings
b
screen.
Press .
c
→ The Embroidery Foot “W+” with LED Pointer
Adjustment screen appears.
5
Basic Embroidery
a LED pointer adjustment
249
Page 57

CONFIRMING THE PATTERN POSITION
Note
Note
• The specified setting is saved in the
machine’s memory. This is useful for
positioning during continuous
embroidering.
• For normal use, return the setting to “00”.
Use or to adjust the LED pointer so
d
that it indicates the actual needle drop
point.
Press twice to return to the original
e
screen.
■ Adjusting the Brightness of the LED
Pointer
Follow the steps from a to d to display
a
the embroidery foot with LED pointer
adjustment screen.
Use a chalk pencil to draw a cross at the
a
desired embroidering location.
a Chalk pencil mark
* Display the grid lines or cross grid lines in the
pattern display area to check the pattern orientation.
(Refer to “Changing the Embroidery Frame Display”
on page 292.)
Hoop the fabric.
b
Use or to adjust the brightness of
b
the LED pointer.
Press twice to return to the original
c
screen.
Aligning the Embroidering
Position Using the Built-In
Camera
The camera built into this machine can be used to
easily align the embroidering position. This is
useful for patterns which need to be embroidered
in a particular position as shown below.
• When hooping the fabric in the embroidery frame,
make sure that the embroidery pattern will fit within
the embroidering area of the frame being used.
a Embroidering area
b Embroidery pattern size
c Chalk pencil mark
Select the pattern on your sewing machine
c
and press .
250
Page 58

CONFIRMING THE PATTERN POSITION
Memo
a
a
b
Press in the embroidering screen.
d
Press to set the starting point to the
e
center of the pattern.
Press the positioning keys to move the
i
embroidery frame until the cross-shaped
chalk mark drawn on the fabric is displayed
in the camera view window.
a Positioning keys
Press .
f
Press the “Presser Foot Lifter” button to
g
lower the presser foot.
Press to display the grid lines.
j
a Grid lines
b Chalk mark on the fabric
5
Basic Embroidery
h
Press .
• Press to enlarge the camera view. By
enlarging the camera view, you can make a close
adjustment for the center point of the pattern
moving the embroidery frame little by little.
251
Page 59

CONFIRMING THE PATTERN POSITION
a
Note
Adjust the orientation of the pattern by
k
pressing the orientation keys until the grid
lines are parallel with the chalk mark drawn
on the fabric. (Refer to “Rotating the
Pattern” on page 213.)
Using the Built-In Camera to
Align the Embroidering Position
The embroidering position can easily be aligned
using the machine’s built-in camera and the
included embroidery positioning sticker.
Affix the embroidery positioning sticker to
a
the location in the fabric to be
embroidered. Place the embroidery
positioning sticker so that the center of the
larger circle is at the center or edge of the
embroidery pattern.
a Center point of the pattern
Press the positioning keys to move the
l
embroidery frame until the center point of
the pattern in the camera view window is
aligned with the chalk mark drawn on the
fabric.
Press to return to the previous
m
screen.
a Embroidery positioning sticker
b Center or edge of the embroidery pattern
c Embroidery field
• When inserting the fabric in the embroidery
frame, check that the embroidery pattern
fits within the embroidery field for the frame
that is used.
a Embroidery field
b Embroidery pattern
c Embroidery positioning sticker
• Depending on the type of fabric that is
used, a part of the embroidery positioning
sticker may remain attached when it is
peeled off. Before using the embroidery
positioning sticker, check that it can be
cleanly removed from a scrap piece of the
fabric to be used.
252
Press the “Start/Stop” button to begin
n
embroidering.
* See “Embroidering Patterns” on page 260.
Page 60

CONFIRMING THE PATTERN POSITION
Note
Note
Press to display the editing
b
window, and then press .
Following message appears. Press .
c
e
Press .
• Attach embroidery foot “W+” with LED
pointer before pressing . The
embroidery foot “W+” lowers and check the
fabric thickness, to help the built-in camera
recognize the embroidery positioning
sticker.
5
→ The embroidering position will return to the original
position, even if you changed before.
Select the position you want to set as the
d
reference point.
* Select if you want to embroider referring the
embroidery positioning sticker as the center of the
pattern.
Following message appears. Press .
f
→ The built-in camera automatically searches for the
embroidery positioning sticker, and then the
carriage is moved so that the selected reference
point of the embroidery pattern is aligned with the
embroidery positioning sticker. The brightness of the
machine light is dimmed while the built-in camera
searches for the embroidery positioning sticker.
• If the following warning message appears,
touch and reposition the embroidery
positioning sticker so the pattern is within
the embroidery field, and then press
again.
Basic Embroidery
253
Page 61

CONFIRMING THE PATTERN POSITION
Note
Note
A reminder message appears. Remove the
g
embroidery positioning sticker from the
fabric, and press .
* To remove the embroidery positioning sticker more
easily, press so that the embroidery frame
moves slightly forward and away from under the
needle. After the embroidery positioning sticker is
removed, press .
Press , and then .
a
Press .
b
Press the “Start/Stop” button to begin
h
embroidering.
* See “Embroidering Patterns” on page 260.
• After the included embroidery positioning
stickers are used up, optional stickers are
available. For details, refer to “Options” on
page 22.
Specifying the Embroidering
Position With the Sensor Pen
By using the sensor pen, the embroidering position
can be adjusted to the desired location.
• If the message “The carriage of the
embroidery unit will move. Keep your hands
etc. away from the carriage.” appears
during the operation, ensure safety, and
then press .
→ The embroidering position selection screen appears.
Select the reference point for positioning
c
the embroidery pattern.
* To align the edge of the embroidery with a pattern
or mark on the fabric, select the edge of design. If
the center of the pattern to be embroidered is
determined, select the center position.
254
Page 62

■ Selecting the Embroidering Position
by the Pattern Edge
From the keys on the screen, press the edge
a
to be the reference for positioning.
CONFIRMING THE PATTERN POSITION
a Square of pattern edge
b Pattern position
With the sensor pen, touch the point on the
d
fabric corresponding to corner b in the
screen.
Press .
b
With the sensor pen, touch the point on the
c
fabric corresponding to corner a in the
screen.
a Square of pattern edge
b Pattern position
Press to adjust the positions.
e
→ If you don’t need to adjust the positions, continue to
step
i.
5
Basic Embroidery
255
Page 63

CONFIRMING THE PATTERN POSITION
Press to move the LED pointer on
f
the fabric for adjusting the first position.
■ Selecting the Embroidering Position
by the Pattern Center
Press in the following screen.
a
Press to apply the setting.
g
Press to move the LED pointer on
h
the fabric for adjusting the second position.
With the sensor pen, touch 2 points on the
b
fabric corresponding to the numbers in the
center of the embroidery pattern.
256
Press to apply the setting.
i
The preview in the screen is updated
j
according to the specified embroidering
position.
Press the “Start/Stop” button to start
k
embroidering.
a Center line of the pattern
b Pattern position
→ Specified point number turns into red.
Page 64

CONFIRMING THE PATTERN POSITION
Note
Press to adjust the positions.
c
→ If you don’t need to adjust the positions, continue to
g.
step
Press to move the LED pointer on
d
the fabric for adjusting the first position.
Press the “Start/Stop” button to start
i
embroidering.
• When using the sensor pen to specify the
embroidering position, it may not be
possible to exactly specify the desired
location. In this case, move the embroidery
frame to align the center of the pattern with
the location indicated by the LED pointer.
Checking the Pattern Position
The embroidery frame moves and shows the
pattern position. Watch the frame closely to make
sure the pattern will be sewn in the right place.
Press .
a
Press to apply the setting.
e
Press to move the LED pointer on
f
the fabric for adjusting the second position.
5
Basic Embroidery
→ The following screen is displayed.
Press to apply the setting.
g
The preview in the screen is updated
h
according to the specified embroidering
position.
257
Page 65

CONFIRMING THE PATTERN POSITION
Memo
CAUTION
a
From , press the key for the position
b
that you want to check.
a Selected position
→ The needle will move to the selected position on the
pattern.
• To see the entire embroidering area, press
. The embroidery frame moves and
shows the embroidery area.
• Make sure the needle is up when the
embroidery frame is moving. If the needle is
down, it could break and result in injury.
258
Press .
c
Page 66

EMBROIDERING A PATTERN
Memo
CAUTION
Note
Embroidering Attractive Finishes
There are many factors that go into sewing
beautiful embroidery. Using the appropriate
stabilizer (see page 242) and hooping the fabric in
the frame (see page 243) are two important factors
mentioned earlier. Another important point is the
appropriateness of the needle and thread being
used. See the explanation of threads below.
Included with this machine are two bobbin cases.
Follow the explanation below.
Thread Upper thread Use embroidery thread intended for
use with this machine.
Other embroidery threads may not
yield optimum results.
Bobbin thread Use embroidery bobbin thread
intended for use with this machine.
EMBROIDERING A PATTERN
Bobbin case (for prewound or other embroidery
bobbin threads)
a Bobbin case (no color on the screw)
The bobbin case with no color on the screw is set
with tighter tension for embroidery with different
weights of bobbin threads and a variety of
embroidery techniques. This bobbin case is
identified with a dark colored mark on the inside
of the bobbin cavity. The tension screw on this
case can be adjusted if necessary.
• If you use threads other than those listed
above, the embroidery may not sew out
correctly.
Bobbin case (recommended for sewing and for
embroidering with included 60 weight bobbin
thread)
a Standard bobbin case (green marking on the
screw)
Standard bobbin case originally installed in the
machine has a green marking on the screw. We
recommend using the included embroidery
bobbin thread with this bobbin case. Do not adjust
the tension screw on this bobbin case with the
green marked screw.
• When embroidering on large garments
(especially jackets or other heavy fabrics), do
not let the fabric hang over the table.
Otherwise, the embroidery unit cannot move
freely and the embroidery frame may strike the
needle, causing the needle to bend or break
and possibly cause injury.
Place the fabric so that it does not hang off the
table or hold the fabric to keep it from
dragging.
• Before embroidering, check that there is
enough thread in the bobbin. If you start to
sew your embroidery project without
enough thread in the bobbin, you will need
to rewind the bobbin in the middle of the
embroidery pattern.
• Do not leave objects in the range of motion
of the embroidery frame. The frame may
strike the object and cause a poor finish to
the embroidery pattern.
• When embroidering on large garments
(especially jackets or other heavy fabrics),
do not let the fabric hang over the table.
Otherwise, the embroidery unit cannot
move freely, and the pattern may not turn
out as planned.
5
Basic Embroidery
259
Page 67

EMBROIDERING A PATTERN
CAUTION
Note
Memo
b
a
■ Embroidery Needle Plate Cover
Under some conditions, based on the type of fabric,
stabilizer, or thread being used, there may be some
looping in the upper thread. In this case, attach the
included embroidery needle plate cover to the
needle plate. Attach the cover by inserting the two
projections on the underside of the cover into the
notches on the needle plate as shown below.
a Groove
b Projection
c Notch
To remove the embroidery needle plate cover, place
your fingernail in the groove and lift the plate out.
Embroidering Patterns
Example:
• Push the embroidery needle plate cover as far
as possible to attach it. If the embroidery
needle plate cover is not securely attached, it
may cause the needle to break.
• Do not use the embroidery needle plate
cover for any applications other than
embroidery.
a Embroidery color order
b Cursor
• The [+] cursor moves over the pattern,
showing which part of the pattern is being
sewn.
Using the automatic needle threader,
a
thread the machine for the first color.
260
Page 68

EMBROIDERING A PATTERN
Memo
Memo
c
d
b
a
Lower the presser foot, then press the
b
“Start/Stop” button to start embroidering.
→ When the first color is completely sewn, the machine
will automatically trim the threads and stop. The
presser foot will then automatically be raised.
On the embroidery color order display, the next
color will move to the top.
• If you want to get more attractive finishes,
try the procedures below;
- After 5-6 stitches, press the “Start/Stop”
button again to stop the machine.
- Trim the excess thread at the end of the
seam. If the end of the seam is under the
presser foot, raise the presser foot, then
trim the excess thread.
• If there is thread left over from the beginning
of sewing, it may be sewn over as you
continue embroidering the pattern, making
it very difficult to deal with the thread after
the pattern is finished. Trim the threads at
the beginning of each thread change.
Remove the thread for the first color from
c
the machine. Thread the machine with the
next color.
Repeat the same steps for embroidering the
d
remaining colors.
a Current stitch numbers/Total stitch numbers
b Current time/Total time
c The part of pattern embroider next
d Embroidered colors/Total colors
→ When the last color is sewn, “Finished
embroidering” will appear on the display. Press
, and the display will return to the original
screen.
• The Thread Trimming Function is originally
set to trim excess thread jumps (threads
linking parts of the pattern, etc.). Depending
on the type of thread and fabric that are
used, an end of upper thread may remain
on the surface of the fabric at the beginning
of the stitching. After embroidering is
finished, cut off this excess thread.
If the setting has been turned off, trim the
excess thread jumps using scissors after
the pattern is finished.
See page 290 for information on the thread
trimming function.
5
Basic Embroidery
261
Page 69

EMBROIDERING A PATTERN
Memo
Memo
Spool Stand LED
This machine is equipped with a spool stand LED.
Its lighting status and color indicate the machine
status and thread color for embroidering.
• Use the color in which the LED lights up as
a guide. Since the actual embroidery thread
color may differ slightly, be sure to also
check the thread color number in the LCD.
a Spool stand LED
Set “Spool Stand LED” to “OFF”.
d
Press to return to the original screen.
e
Lit Lights up in thread color for
Lit (color changing) Indicates thread spool replacement
Flashing (red) Error
Flashing (green) End of stitching
• When embroidering a pattern with
uninterrupted embroidering, the LED lights
up in gray.
• When embroidering an appliqué pattern, the
LED light indicates no color while
embroidering “
MATERIAL”, “
POSITION” or “
embroidering
(then lights up in embroidery thread
color)
APPLIQUE
APPLIQUE
APPLIQUE”.
■ When Not Using the Spool Stand
LED
Press .
a
Using Appliqués
This machine can sew patterns that contain an
appliqué. Follow the procedure described below
to sew patterns with (appliqué piece),
(appliqué position) and
(appliqué) in the embroidery color order display.
1. Create the appliqué piece.
È
2. Sew the appliqué position on the base
fabric.
È
3. Affix the appliqué piece to the base
fabric.
È
4. Embroider the remainder of the pattern.
Required materials
• Fabric for the appliqué piece
• Fabric for the appliqué base
262
Press .
b
→ The General settings screen appears.
Display page 5 of the Embroidery settings
c
screen.
• Stabilizer material
• Craft glue
• Embroidery thread
Page 70

Note
• If (appliqué piece),
Note
(appliqué position) and (appliqué)
appear in the embroidery color order
display, the names and numbers of the
thread colors to be used will not appear.
Select the thread colors according to those
in the appliqué pattern.
■ 1. Creating the Appliqué Piece
Select the appliqué pattern, and then
a
continue to the embroidering screen.
EMBROIDERING A PATTERN
Thread the machine with the embroidery
c
thread, lower the presser foot lever, and
then press the “Start/Stop” button to sew
the cutting line of the appliqué piece.
→ The outline of the appliqué piece is sewn, and then
the machine stops.
a Cutting line for appliqué piece
b Fabric for appliqué piece
Remove the fabric for the appliqué piece
d
from the embroidery frame, and then
carefully cut along the sewn cutting line.
Attach stabilizer material to the wrong side
b
of the appliqué fabric.
Hoop the fabric in the embroidery frame, and then
attach the embroidery frame to the embroidery unit.
a Appliqué (cotton, felt, etc.)
b Stabilizer
• If the appliqué piece is cut out along the
inside of the cutting line, it may not be
correctly attached to the fabric. Therefore,
carefully cut out the appliqué piece along
the cutting line.
• After cutting out the appliqué piece,
carefully remove the thread.
■ 2. Sewing the Appliqué Position on
the Base Fabric
Attach stabilizer material to the wrong side
a
of the fabric for the appliqué base.
Hoop the fabric in the embroidery frame, and then
attach the embroidery frame to the embroidery unit.
5
Basic Embroidery
263
Page 71

EMBROIDERING A PATTERN
Note
Note
Memo
Thread the machine with the embroidery
b
thread, lower the presser foot lever, and
then press the “Start/Stop” button to sew
the appliqué position.
→ The position of the appliqué is sewn, and then the
machine stops.
• If the appliqué piece is not securely
attached to the base fabric, the appliqué
piece may lift off the base fabric during
sewing, causing misalignment.
• If the appliqué piece cannot be attached to
the base fabric with craft glue, securely
baste it in place with basting stitches.
• If thin fabric is used for the appliqué piece,
reinforce and secure it in place with an ironon adhesive sheet. An iron can be used to
attach the appliqué piece to the appliqué
location.
• Do not remove the fabric from the
embroidery frame when attaching the
appliqué piece to the base fabric.
After the appliqué piece is attached,
b
reattach the embroidery frame to the
machine.
Thread the machine with the embroidery thread, lower
the presser foot lever, and then press the “Start/Stop”
button to sew the appliqué.
a Appliqué position
b Base fabric
Remove the embroidery frame from the
c
embroidery unit.
• Do not remove the base fabric from the
embroidery frame until all sewing is finished.
■ 3. Affixing the Appliqué Piece to the
Base Fabric
Lightly apply craft glue to the back of the
a
appliqué piece, and then attach it to the
base fabric within the outline of the
position sewn in step
Appliqué Position on the Base Fabric”.
b of “2. Sewing the
→ The appliqué piece is sewn to the base fabric, and
then the machine stops.
• Depending on the pattern that is selected,
(appliqué piece),
(appliqué position) and (appliqué)
for all three steps may not appear. If
(appliqué) appears as a color,
embroider using thread of that color.
264
Page 72

■ 4. Embroidering the Remainder of
Memo
the Pattern
Change the embroidery thread according to
a
the embroidery color order display, and
then finish embroidering the remainder of
the pattern.
EMBROIDERING A PATTERN
• Since glue may become attached to the
presser foot, needle or needle plate, clean
off any glue off after finishing embroidering
the appliqué pattern.
• For best results, trim all excess threads
each time the thread color is changed.
5
Basic Embroidery
265
Page 73

ADJUSTMENTS DURING THE EMBROIDERY PROCESS
Note
Note
ADJUSTMENTS DURING THE EMBROIDERY PROCESS
• Be careful not to bump the embroidery unit carriage or the presser foot when removing or attaching
the embroidery frame. Otherwise, the pattern will not embroider correctly.
Unlock the frame-securing lever and
If the Bobbin Runs Out of Thread
When the bobbin begins to run out of thread
during embroidering, the machine will stop and
the message below will appear. Press and
follow the directions below to rethread the lower
threading. If very little sewing remains, you can
embroider 10 final stitches without rethreading the
machine by pressing . The machine will stop
after sewing the 10 stitches.
b
remove the embroidery frame.
* Be careful not to apply strong force to the fabric at
this time. Otherwise, the fabric may loosen in the
frame.
a
• If “Upper and Bobbin Thread Sensor” in the
General settings screen of the machine
setting mode is set to “OFF”, the message
shown above does not appear.
Press .
Insert a wound bobbin into the machine.
c
(see page 57 for Setting the bobbin.)
Press .
d
→ The carriage will return to its original position.
266
→ After the thread is automatically cut, the carriage
will move.
Attach the embroidery frame.
e
To return to the spot in the pattern where
f
you stopped sewing, follow steps
through
i in the next section.
c
Page 74

If the Thread Breaks During
Sewing
Press the “Start/Stop” button to stop the
a
machine.
If the upper thread is broken, redo the
b
upper threading. If the bobbin thread is
broken, press and follow the
directions in steps
previous section to reset the bobbin.
Press .
c
a through e from the
ADJUSTMENTS DURING THE EMBROIDERY PROCESS
Press , , , or to move the
f
needle back the correct number of stitches
before the spot where the thread broke.
* If you cannot move back to the spot where the
thread broke, press or
and move to the beginning position of that color,
then use , , , or
to slightly before where the thread broke.
to select the color
to move ahead
Press the “Presser Foot Lifter” button to
d
lower the presser foot.
Press .
e
* Press to enlarge the image in the screen.
* Press to remove “ “ from the screen.
Press to close the camera view
g
window.
Press to return to the original screen.
h
Press the “Start/Stop” button to continue
i
sewing.
5
Basic Embroidery
→ The camera view window appears.
267
Page 75

ADJUSTMENTS DURING THE EMBROIDERY PROCESS
Memo
Note
a
Restarting from the Beginning
Press .
a
Resuming Embroidery After
Turning Off the Power
The current color and stitch number are saved
when embroidery is stopped. The next time the
machine is turned on, you have the option to
continue or delete the pattern.
• Even if the power goes out in the middle of
embroidery, the machine returns to the
point where embroidery was stopped when
the machine is turned on again.
Press .
b
→ The embroidery frame moves, returning the needle
to the pattern’s beginning position.
Press the “Presser Foot Lifter” button to
c
lower the presser foot and start sewing.
a Current stitch number when embroidery was
stopped
• Do not remove the embroidery unit or the
memory will no longer remember your
design.
Turn the main power to ON.
a
Follow the instructions shown on the screen
b
and remove the embroidery frame.
→ The following message will appear.
268
Page 76

Attach the embroidery frame and press
Memo
a
c
.
ADJUSTMENTS DURING THE EMBROIDERY PROCESS
→ The previous embroidering screen displayed before
the machine was turned off appears.
• If you want to start a new embroidery
pattern, press so the pattern
selection screen appears.
Continue embroidering.
d
5
Basic Embroidery
a Stitch number when embroidery is resumed
269
Page 77

ADJUSTMENTS DURING THE EMBROIDERY PROCESS
270
Page 78

Chapter 6
Advanced Embroidery
VARIOUS EMBROIDERING FUNCTIONS ............ 272
Uninterrupted Embroidering
(Using a Single Color : Monochrome) .....................................272
Display the Fabric While Aligning the Embroidering Position
■ Specify Fabric Display from the Settings Screen.....................274
■ Saving Scanned Image to USB Media..................................... 274
■ Positioning the Pattern on Thick Fabric.................................. 275
Basting Embroidery .................................................................276
Creating an Appliqué Piece.....................................................277
■ Creating an Appliqué Piece.................................................... 277
■ Using a Frame Pattern for the Outline ...................................280
.....272
PRINT AND STITCH (COMBINING EMBROIDERY
PATTERNS AND PRINTED DESIGNS)................... 282
Selecting a Pattern ..................................................................283
■ Checking the Combined Image............................................... 283
Outputting the Background Image and Positioning Image ......283
■ Using USB Media ...................................................................284
■ Using a USB Cable ................................................................. 284
Printing the Background and Embroidery Position Sheet ........285
Sewing Embroidery Patterns ...................................................286
MAKING EMBROIDERY ADJUSTMENTS .............. 287
Adjusting Thread Tension........................................................287
■ Correct Thread Tension..........................................................287
■ Upper Thread is Too Tight .....................................................287
■ Upper Thread is Too Loose ....................................................288
■ Adjusting Overall Upper Thread Tension............................... 288
Adjusting the Alternate Bobbin Case
(with No Color on the Screw) .................................................289
■ Correct Tension...................................................................... 289
■ Bobbin Thread is Too Loose ................................................... 289
■ Bobbin Thread is Too Tight .................................................... 289
Using the Automatic Thread Cutting Function (End Color Trim)
Using the Thread Trimming Function (Jump Stitch Trim)........290
■ Selecting the Length of Jump Stitch Not to Trim .................... 291
Adjusting the Embroidery Speed .............................................291
Changing the Thread Color Display ........................................291
Changing the Embroidery Frame Display ...............................292
Aligning the Pattern and the Needle .......................................293
Embroidering Linked Characters .............................................294
.....290
USING THE MEMORY FUNCTION....................... 297
Embroidery Data Precautions .................................................297
■ Types of Embroidery Data that can be Used ..........................297
■ Types of USB Devices/Media that can be Used......................297
■ Connecting Your Machine to the PC...................................... 298
■
Precautions on Using the Computer to Create and Save Data
■ Tajima (.dst) Embroidery Data................................................ 298
Saving Embroidery Patterns in the Machine’s Memory ...........299
■ If the Memory is Full ..............................................................299
Saving Embroidery Patterns to USB Media..............................299
Saving Embroidery Patterns in the Computer..........................300
Retrieving Patterns from the Machine’s Memory ...................301
.... 298
EMBROIDERY APPLICATIONS ............................. 303
Using a Frame Pattern to Make an Appliqué (1) .....................303
Using a Frame Pattern to Make an Appliqué (2) .....................304
Sewing Split Embroidery Patterns ...........................................305
USING THE CAMERA TO CONNECT PATTERNS
Connecting Three Patterns ..................................................... 307
Changing the Position of a Sticker.......................................... 313
....307
CONNECTING ROTATED PATTERNS....................316
Connecting Patterns to be Joined Along an Edge.................... 318
■ Measuring the Distance That the Pattern Will Be Slid.............318
■ Trial Sewing ............................................................................319
RESUME FEATURE .................................................321
Page 79

VARIOUS EMBROIDERING FUNCTIONS
Memo
Note
Note
VARIOUS EMBROIDERING FUNCTIONS
Uninterrupted Embroidering
(Using a Single Color :
Monochrome)
A selected pattern can be stitched out in one color
instead of multicolor. The machine will continue
till the pattern is completed.
Press .
a
* Press the key again to return to the original setting.
Display the Fabric While
Aligning the Embroidering
Position
The fabric hooped in the embroidery frame can be
displayed on the LCD so that the embroidery position
can be easily aligned.
Example:
• When embroidery frame (small: H 2 cm × W 6 cm (H
1 inch × W 2-1/2 inches) (optional)) is installed, the
built-in camera cannot be used to align the
embroidering position. Install medium embroidery
frame or larger.
• For details on using thicker fabric such as quilting,
refer to “Positioning the Pattern on Thick Fabric”
(page 275).
→ The thread color displayed on the screen will be
grayed out.
• Even if uninterrupted embroidering has
been set, the automatic thread cutting
function and the thread trimming function
can be used (see page 290 and 290).
Hoop the fabric in the embroidery frame, and
a
then attach the frame to the embroidery
machine.
Select the pattern, and then press .
b
• When using light to medium weight fabrics, check
the settings screen to make sure “Fabric Thickness
Sensor” is set to “OFF”.
272
Page 80

VARIOUS EMBROIDERING FUNCTIONS
Memo
Press .
c
When the following message appears, press
d
.
When the fabric appears as a background for
e
the pattern, press to display the
editing window.
* The pattern can be moved to the desired position by
dragging on the screen using your finger, the touch
pen or connected mouse without displaying the
editing window. If you need some fine adjustment,
move the pattern from the editing window.
→ The embroidery frame moves so the fabric can be
scanned.
• If you do not wish the upper thread to be scanned
together with the fabric, scan the fabric without the
needle threaded with the upper thread.
Press to display the pattern moving
f
window.
6
Advanced Embroidery
273
Page 81

VARIOUS EMBROIDERING FUNCTIONS
Memo
Note
b
a
c
d
Use to align the pattern to the desired
g
embroidery position.
■ Specify Fabric Display from the
Settings Screen
Whether the fabric disappears or remains displayed
can be specified from the settings screen.
Press .
h
• If necessary, press to display a preview in
order to check the pattern position.
Press the “Start/Stop” button to start
i
embroidering.
* See “Embroidering Patterns” on page 260.
→ When embroidery is finished, the fabric displayed in
the background disappears.
a Set to “ON” to leave the fabric displayed in the
background.
b When set to “OFF”, the background will disappear.
c Set to “Fine” to scan clearer than setting to “Standard”.
d Press to remove the background image
completely.
• The fabric background will remain if the embroidery
is not finished. In this case, erase the background
image from the settings screen.
■ Saving Scanned Image to USB Media
Insert the USB media into the USB port on
a
the machine.
274
a USB port
b USB media
Page 82

VARIOUS EMBROIDERING FUNCTIONS
Memo
CAUTION
Press and select the USB port to save
b
image.
→ After the short melody, the image file will be saved
to the USB media.
Remove the USB media, and then check the
c
saved image using a computer.
→ The files for scanned images are saved with the
name “BG**.JPG” in a folder labeled “bPocket”.
* “**” in the name “BG**.JPG” will automatically be
replaced with a number between 00 and 99.
■ Positioning the Pattern on Thick
Fabric
When positioning the pattern on thick fabric such as
quilting, the fabric may not be detected correctly. In
order for the fabric to be correctly detected, its
thickness must first be measured.
• This feature is functional only when the fabric is
scanned. It will not affect embroidering if it is turned
on with normal embroidery.
Affix the embroidery positioning sticker to the
f
fabric within the area indicated by the red
frame in the LCD, and then press .
When the following message appears, remove
g
the embroidery positioning sticker, and then
press .
Hoop the fabric in the embroidery frame, and
a
then attach the frame to the embroidery
machine.
Select the pattern, and then press .
b
Display page 9 of the Settings screen, and
c
then set “Fabric Thickness Sensor” to “ON”.
Press .
d
Press .
e
→ The embroidery frame is moved, and the
embroidery positioning sticker affixed to the fabric is
detected.
Continue with step g on page 274 to align
h
the pattern with the desired embroidery
position.
• Use fabrics with a thickness of less than 3 mm
(approx. 1/8 inch). Using fabrics thicker than 3 mm
(approx. 1/8 inch) may cause the needle to break.
6
Advanced Embroidery
275
Page 83

VARIOUS EMBROIDERING FUNCTIONS
Note
Memo
Note
Memo
Basting Embroidery
Before embroidering, basting stitches can be sewn
along the outline of the pattern. This is useful for
embroidering fabric that cannot have stabilizer
material affixed with an iron or adhesive. By
stitching stabilizer material to the fabric, shrinkage
of the stitching or misaligned pattern can be
minimized.
• It is recommended to finish combining and
editing the pattern before selecting the
basting setting. If the pattern is edited after
selecting the basting setting, the basting
and pattern may become misaligned, and
the basting under the pattern may be
difficult to remove after embroidering is
complete.
Press .
a
Use and to specify the distance from
b
the pattern to the basting stitching.
Press to select the basting setting.
e
• When is pressed, the pattern is moved
to the center. After selecting the basting
setting, move the pattern to the desired
position.
• The higher the setting, the farther the
basting is from the pattern.
• The setting remains selected even if the
machine is turned off.
Press to return to the previous
c
screen.
Press .
d
• To cancel the setting, press .
• If no pattern is selected, the key appears
gray and cannot be selected.
→ Basting is added to the beginning of the sewing
order.
Press the “Start/Stop” button to begin
f
embroidering.
When embroidering is finished, remove the
g
basting stitching.
276
Page 84

Creating an Appliqué Piece
Note
Note
Appliqué pieces can be created from the built-in
patterns and patterns on embroidery cards. This is
convenient for fabrics that cannot be embroidered
or when you wish to attach an appliqué to a
garment.
■ Creating an Appliqué Piece
The following pattern will be used to create an
appliqué piece.
VARIOUS EMBROIDERING FUNCTIONS
• Finish combining and editing the pattern
before selecting the appliqué setting. If the
pattern is edited after selecting the appliqué
setting, the appliqué stitching and pattern
may become misaligned.
• Since an outline is added, the pattern for an
appliqué piece (when the appliqué setting is
selected) will be larger than the original
pattern. First, adjust the size and position of
the pattern as shown below.
• Felt or denim fabrics are recommended to
make the appliqué piece. Depending on the
pattern and fabric used, lighter weight
fabrics may cause the stitching to appear
smaller.
• For best results, be sure to use stabilizer
material for embroidering.
• Select a frame that matches the pattern
size. Frame options are displayed on the
LCD screen.
• When making appliqué pieces, do not use
the border embroidery frame. Depending on
the pattern density and fabric used,
shrinkage of the stitching may occur.
Select the pattern, and edit it if necessary.
a
a Embroidering area
b Approx. 10 mm (3/8 inch)
c Pattern size
Press to display the settings screen.
b
Use and to specify the distance
c
between the pattern and the appliqué
outline.
Press .
d
6
Advanced Embroidery
e
Press .
277
Page 85

VARIOUS EMBROIDERING FUNCTIONS
Note
Memo
Memo
Note
Note
a
b
c
Press and then, press to
f
position the satin stitching around design.
• Three steps are added to the sewing order:
appliqué cutting line, position of pattern
placement on the garment, and appliqué
stitching.
• When is pressed, the pattern is moved
to the center. After selecting the appliqué
setting, move the pattern to the desired
position.
• To cancel the setting, press .
• If no pattern is selected, the key appears
darkened and cannot be selected.
→ The steps for creating the appliqué piece are added
to the sewing order.
a Cutting line for appliqué
b Position of pattern placement on garment
c Appliqué stitching
• An appliqué piece cannot be created if the
pattern is too large or too complicated or a
combined pattern is separated. Even if the
selected pattern fits within the embroidering
area, the entire appliqué pattern may
exceed the embroidering area when the
outline is added. If an error message
appears, select a different pattern or edit it.
Fuse or stick a piece of stabilizer to the
g
back of the felt or denim fabric to be used
as the appliqué piece.
• For best results, be sure to use stabilizer
material for embroidering.
278
Page 86

VARIOUS EMBROIDERING FUNCTIONS
Memo
Note
Note
Note
Hoop the appliqué fabric in the embroidery
h
frame, attach the embroidery frame to the
machine, and then start embroidering.
After the pattern is embroidered, thread the
i
machine with the thread for the cutting
line, and then sew the cutting line
(APPLIQUE MATERIAL).
a Cutting line for appliqué
• We recommend using thread for the cutting
line that is closest to the color of the fabric.
Use two layers of adhesive water-soluble
k
stabilizer material with their sticky sides
together, and then hoop them in the
embroidery frame.
• If water-soluble stabilizer is used, it is not
necessary to remove the stabilizer material
after sewing the appliqué outline. To reduce
shrinkage of the pattern, we recommend
using water-soluble stabilizer.
• Put together two layers of water-soluble
stabilizer, otherwise the stabilizer material
may tear during embroidering.
Remove the appliqué material from the
j
embroidery frame, and then carefully cut
along the stitching. After cutting, carefully
remove all of the cutting line thread.
• Depending on the pattern density and fabric
used, there may be shrinking of the pattern
or the appliqué may be misaligned with the
placement line. We recommend cutting
slightly outside of the cutting line.
• When using patterns that are vertically and
horizontally symmetrical, use a chalk pencil
to indicate the pattern orientation before
cutting it out.
• Carefully cut out the pattern on the outline
you just sewed. Do not cut inside the
cutting line, otherwise the appliqué fabric
will not be caught by the appliqué stitch.
Thread the machine with the thread for the
l
outline from step
n, and then sew the
placement line for the appliqué position
(APPLIQUE POSITION).
a Pattern placement line
Lightly apply glue or spray adhesive, and
m
paste the appliqué piece so that it aligns
with the placement line.
6
Advanced Embroidery
• Before pasting the appliqué piece down,
make sure the appliqué piece is positioned
correctly within the placement line.
279
Page 87

VARIOUS EMBROIDERING FUNCTIONS
Memo
Note
With the machine threaded using the thread
n
for the outline from step
l, sew the outline
(APPLIQUE).
a Outline of appliqué piece
• The outline is sewn using satin stitching.
• Some glue may get onto the presser foot,
needle, and needle plate at this time. Finish
embroidering the appliqué pattern, and then
clean off the glue.
After embroidering is finished, remove the
o
stabilizer material from the embroidery
frame.
■ Using a Frame Pattern for the
Outline
Using a frame pattern, the desired shape can be
added as the outline of the appliqué. To select the
desired frame, see “Selecting Frame Patterns” on
page 205.
Perform the operations described in steps
a
a through d of “Creating an Appliqué
Piece” on page 277.
Select the desired frame shape and pattern,
b
and add it to the appliqué pattern.
Use scissors to cut the excess water-soluble
p
stabilizer from outside the appliqué outline.
Soak the appliqué piece in water to dissolve
q
the water-soluble stabilizer.
Dry the appliqué piece, and then iron it if
r
necessary.
• Do not apply a strong force when ironing,
otherwise the stitching may be damaged.
280
Page 88

VARIOUS EMBROIDERING FUNCTIONS
Press to edit the frame pattern to
c
fit the size of the appliqué pattern.
Press and then press .
d
Press , and then press to
e
select the appliqué piece setting.
Use to select the frame pattern, and
g
then press and .
→ The frame pattern is deleted.
Press .
h
f
Press .
Continue with step g of “Creating an
i
Appliqué Piece” on page 277 to complete
the appliqué piece.
6
Advanced Embroidery
281
Page 89

PRINT AND STITCH (COMBINING EMBROIDERY PATTERNS AND PRINTED DESIGNS)
Note
PRINT AND STITCH (COMBINING EMBROIDERY
PATTERNS AND PRINTED DESIGNS)
Completed embroidery patterns combined with printed designs are built into this machine.
Beautiful three-dimensional embroidered designs can be created by ironing a background onto fabric or
printing it onto printable fabric, then sewing complementary embroidery on top of the background.
Using iron-on paper
Using printable fabric
Step1
Step2
Step3
Step4
Select a pattern to be combined with the background image.
→ See “Selecting a Pattern” on page 283.
Output from the machine the background image and the positioning image.
→ See “Outputting the Background Image and Positioning Image” on page 283.
When using iron-on paper
With a printer, print the background onto iron-on paper, and print the embroidery position sheet on plain paper. Then, iron
the background image onto fabric.
When using printable fabric
With a printer, print the background onto printable fabric, and print the embroidery position sheet on plain paper.
→ See “Printing the Background and Embroidery Position Sheet” on page 285.
Hoop in the embroidery frame the fabric with the background image ironed on or printed, check the embroidering
position, and then start embroidering.
→ See “Sewing Embroidery Patterns” on page 286.
• Print the background and embroidery position sheet in their original dimensions. If an image is printed
in a different size, the sizes of the embroidery pattern and background may not match. In addition, the
built-in camera cannot detect the embroidery position mark. Make sure that the print settings are
correctly specified.
282
Page 90

PRINT AND STITCH (COMBINING EMBROIDERY PATTERNS AND PRINTED DESIGNS)
Memo
Selecting a Pattern
Patterns combining embroidery and printed
designs appears with and .
• Refer to the Quick Reference Guide for the
detail of patterns which enable this function.
Select a pattern combining embroidery and
a
printed designs.
* To return to the image of only the embroidery
design, press .
→ Only the embroidery pattern (not the background
image of the selected embroidery pattern) is
displayed.
■ Checking the Combined Image
Press .
Outputting the Background
Image and Positioning Image
Use USB media or the computer to output the
following three images from the machine.
* File name may differ depending on the PDF file
selected.
• [xxx]r.pdf (Example: E_1r.pdf)
An image flipped on a vertical axis (for an ironon transfer)
6
Advanced Embroidery
• [xxx]n.pdf (Example: E_1n.pdf)
An image that is not flipped (for printing on
printable fabric)
• [xxx]p.pdf (Example: E_1p.pdf)
An image that is not flipped, but has positioning
marks attached (for positioning)
→ An image of the pattern combined with the
background appears.
283
Page 91

PRINT AND STITCH (COMBINING EMBROIDERY PATTERNS AND PRINTED DESIGNS)
Note
Memo
• Print the background and embroidery
position sheet in their original dimensions. If
an image is printed in a different size, the
sizes of the embroidery pattern and
background may not match. In addition, the
built-in camera cannot detect the
embroidery position mark. Make sure that
the print settings are correctly specified.
• When printing the PDF file of the image with
positioning marks, specify the highest
image quality possible for full-color printing.
In addition, use matte printing paper. Due to
poor printing conditions, the machine’s
built-in camera may not be able to correctly
detect the positioning marks. (For details on
printing, refer to the operating instructions
for your printer.)
■ Using USB Media
Insert the USB media into the primary (top)
a
USB port on the machine.
Select the pattern, and then press .
b
• Do not remove the USB media from the
machine until data output is finished.
Remove the USB media where the image
d
data is saved from the machine, and then
copy the image data from the USB media to
the computer.
■ Using a USB Cable
Plug the USB cable connectors into the
a
corresponding USB ports on the computer
and on the machine.
→ The select USB output screen appears.
Press to select the USB port where
c
the USB media is inserted.
→ Two files of the background image only and one file
for aligning embroidery into position are copied
(PDF format) onto the USB media.
a USB port for computer
b USB cable connector
→ The “Removable Disk” icon appears in “Computer
(My Computer)” on the computer.
Select the pattern, and then press .
b
→ The select USB output screen appears.
284
Page 92

PRINT AND STITCH (COMBINING EMBROIDERY PATTERNS AND PRINTED DESIGNS)
Memo
Note
Note
Note
Memo
Press .
c
→ Two files of the background image and one file for
aligning embroidery into position are copied (PDF
format) into “Removable Disk” under “Computer
(My Computer)”.
• Before printing onto iron-on paper or
printable fabric, we recommend performing
a test print to check the print settings.
• For details on printing on iron-on transfer
sheets or printable fabric, refer to the
instructions for the iron-on transfer sheets
and printable fabric.
• Some printers will automatically print an
image flipped if an iron-on transfer sheet is
selected as the paper. For details, refer to
the instructions for the printer being used.
• Do not disconnect the USB cable from the
machine until data output is finished.
Copy the image data saved in “Removable
d
Disk” into a different file before closing.
Printing the Background and
Embroidery Position Sheet
Print the PDF files of the background and
embroidery position sheet. The background file
that is printed differs depending on whether ironon paper or printable fabric is used.
®
To view the PDF file, Adobe
it is not installed on your computer, you can
download it from the Adobe Systems website:
http://www.adobe.com/
Open the PDF file to be printed, click
a
“File”-“Print”, and then set “Page Scaling”
to “None (100%)”.
Reader® is needed. If
Print the embroidery position sheet (file
c
named E_1p.pdf) onto plain paper.
a Embroidery position sheet
• When printing the PDF file for the
embroidery position sheet, specify the
highest image quality possible for full-color
printing. In addition, we recommend
printing on matte paper. If this is not done,
the built-in camera may not be able to
correctly detect the embroidery positioning
mark.
If an iron-on transfer sheet is used, transfer
d
the image onto fabric.
6
Advanced Embroidery
• Print the background and embroidery
position sheet in their original dimensions. If
an image is printed in a different size, the
sizes of the embroidery pattern and
background may not match. In addition, the
built-in camera cannot detect the
embroidery position mark. Make sure that
the print settings are correctly specified.
Print the background image.
b
* When printing onto iron-on paper, print the file
named E_1r.pdf (an image flipped on a vertical axis).
When printing onto printable fabric, print the file
named E_1n.pdf (an image that is not flipped).
a Background image
• For details on transferring from iron-on
transfer sheets, refer to the instructions for
the iron-on transfer sheets.
• If necessary, cut the iron-on transfer sheet
to the size of the pattern before transferring
the image.
285
Page 93

PRINT AND STITCH (COMBINING EMBROIDERY PATTERNS AND PRINTED DESIGNS)
Note
CAUTION
After checking that a pattern is selected,
Sewing Embroidery Patterns
Hoop in the embroidery frame the fabric
a
with the background image ironed on.
d
press .
→ The embroidering screen appears.
• Before embroidering, check that the
embroidery position sheet is perfectly
aligned with the background.
Align the embroidering position according
e
to steps
b through m of “Aligning the
Embroidering Position Using the Built-In
Camera” on page 250.
Remove the positioning sheet and press the
f
“Start/Stop” button to begin embroidering.
Cut the paper printed with the center
b
positioning image so it can easily be
positioned aligned with the background
image on the fabric.
* Lines or color changes in the image can help you
find the correct alignment position.
• Before pressing the “Start/Stop” button to
begin embroidering, remove the positioning
sheet taped to the fabric in step
c.
Place the paper printed with the positioning
c
image on top of the fabric so that the
pattern is aligned, and then affix the paper
to the fabric with cellophane tape to
prevent the paper from moving.
a Cellophane tape
286
Page 94

MAKING EMBROIDERY ADJUSTMENTS
Note
Memo
Note
MAKING EMBROIDERY ADJUSTMENTS
■ Upper Thread is Too Tight
Adjusting Thread Tension
When embroidering, the thread tension should be
set so that the upper thread can slightly be seen on
the wrong side of the fabric.
■ Correct Thread Tension
The pattern can be seen from the wrong side of the
fabric. If the thread tension is not set correctly, the
pattern will not finish well. The fabric may pucker or
the thread may break.
a Right side
b Wrong side
Follow the operations described below to adjust
thread tension according to the situation.
The tension of the upper thread is too tight, resulting
in the bobbin thread being visible from the right side
of the fabric.
• If the bobbin thread was incorrectly
threaded, the upper thread may be too
tight. In this case, refer to “Setting the
Bobbin” (page 57) and rethread the bobbin
thread.
a Right side
b Wrong side
Press .
a
• If the thread tension setting is made
extremely weak, the machine may stop
during sewing. This is not the sign of a
malfunction. Increase the thread tension
slightly, and begin sewing again.
• If you turn the main power to OFF or select
a different pattern, the thread tension will
reset to the automatic setting.
• When you retrieve a saved pattern, the
thread tension setting will be the same as
when the pattern was saved.
6
Advanced Embroidery
287
Page 95

MAKING EMBROIDERY ADJUSTMENTS
Note
Note
Press to weaken the upper thread
b
tension. (The tension number will
decrease.)
Press .
c
■ Upper Thread is Too Loose
Press .
c
• With “Embroidery Tension” on page 6/8 of
the setting screen, the tension of the upper
thread can be adjusted for embroidering.
The selected setting will be applied to all
patterns.
When embroidering, if the overall tension of
the upper thread is too tight or too loose,
adjust it from the setting screen. Press
to tighten the upper thread tension and
press to loosen the upper tension. If an
individual embroidery pattern needs
additional fine tuning, refer to “Adjusting
Thread Tension” on page 287.
■ Adjusting Overall Upper Thread
Tens io n
When embroidering, if the overall tension of the
upper thread is too tight or too loose, adjust it from
the setting screen.
The tension of the upper thread is too loose,
resulting in a loose upper thread, loose thread locks,
or loops appearing on the right side of the fabric.
• If the upper thread was incorrectly
threaded, the upper thread may be too
loose. In this case, refer to “Upper
Threading” (page 60) and rethread the
upper thread.
a Right side
b Wrong side
Press .
a
Press to tighten the upper thread
b
tension. (The tension number will increase.)
Press and .
a
In the “Embroidery Tension”, use to
b
adjust the upper thread tension.
* Press to tighten the upper thread tension.
* Press to loosen the upper thread tension.
Press .
c
288
Page 96

Adjusting the Alternate Bobbin
CAUTION
Case (with No Color on the
Screw)
When using the embroidery bobbin thread
provided, please be sure to choose the green
marked bobbin case when performing utility stitch
sewing and embroidery functions. When in the
embroidery function mode, the alternate bobbin
case (with no color on the screw) should be
selected when substitute embroidery bobbin
threads (other than what is accompanied with your
machine) are being used. The alternate bobbin
case (with no color on the screw) can be easily
adjusted when bobbin tension changes are
required to accommodate different bobbin
threads. See “Sewing Attractive Finishes” on page
173.
To adjust the bobbin tension for embroidery
function, using the alternate bobbin case (with no
color on the screw), turn the slotted screw (-) with
a (small) screwdriver.
MAKING EMBROIDERY ADJUSTMENTS
■ Bobbin Thread is Too Loose
Bobbin thread appears slightly on the right side of
fabric.
a Right side
b Wrong side
If this occurs, turn the slotted screw (-) clockwise,
being careful not to over-tighten the screw,
approximately 30-45 degrees to increase bobbin
tension.
■ Bobbin Thread is Too Tight
Upper thread on the right side of fabric seems to be
lifting/looping and bobbin thread is not seen on the
wrong side of fabric.
a Do not turn a phillips screw (+).
b Adjust with a screwdriver (small).
■ Correct Tension
Upper thread slightly appears on the wrong side of
fabric.
a Right side
b Wrong side
a Right side
b Wrong side
6
If this occurs, turn the slotted screw (-)
counterclockwise, being careful not to over-loosen
the screw, approximately 30-45 degrees to decrease
bobbin tension.
Advanced Embroidery
• When adjusting the alternate bobbin case, be
sure to remove the bobbin from the alternate
bobbin case.
• DO NOT adjust the position of the phillips (+)
screw on the alternate bobbin case as this may
result in damage to the bobbin case, rendering
it unusable.
• If the slotted screw (-) is difficult to turn, do
not use force. Turning the screw too much or
providing force in either (rotational) direction
may cause damage to the bobbin case. Should
damage occur, the bobbin case may not
maintain proper tension.
289
Page 97

MAKING EMBROIDERY ADJUSTMENTS
Note
Using the Automatic Thread
Cutting Function (End Color
Trim)
The automatic thread cutting function will
cut the thread at the end of sewing each color.
This function is initially turned on. To turn this
function off, press key and then . This
function can be turned on or off during
embroidering.
* This setting returns to its default
when the machine is turned off.
Press .
a
Using the Thread Trimming
Function (Jump Stitch Trim)
The thread trimming function will
automatically trim any excess thread jumps within
the color. This function is initially turned on. To
turn this function off, press key and then
. This function can be turned on or off
during embroidering.
* Your customized setting remains after turning the
machine off and on.
Press to turn off the automatic
b
thread cutting function.
→ The key will display as .
* When one color thread is sewn, the machine will
stop without cutting the thread.
a Jump stitch
Press .
a
• When this function is turned on, use the
included ball point needle 75/11 for
embroidering patterns with short jump
stitches such as alphabet characters. Using
other needles may cause the thread to
break.
290
Page 98

Press to turn off the thread
Note
Memo
Memo
b
trimming function.
MAKING EMBROIDERY ADJUSTMENTS
Adjusting the Embroidery Speed
Press and .
a
In the “Max Embroidery Speed”, use
b
to change the maximum embroidery speed.
* You can choose from 8 different speed levels.
→ The key will display as .
* The machine will not trim the thread before moving
to the next stitching.
■ Selecting the Length of Jump Stitch
Not to Trim
When the thread trimming function is
turned on, you can select the length of the jump
stitch not to trim the thread. This function can be
turned on or off during embroidering.
Select a setting from 5 mm to 50 mm in 5 mm
increments.
* Your customized setting remains after turning the
machine off and on.
Press or to select the length of jump stitch.
For example: Press to select 25 mm (1 inch)
and the machine will not trim a jump stitch of 25
mm or less before moving to the next stitching.
• SPM is the number of stitches sewn in one
minute.
• Decrease the embroidery speed when
embroidering on thin, thick, or heavy
fabrics.
• The embroidery speed can be changed
while embroidery is being sewn.
• The setting specified before the main power
is set to OFF remains selected the next time
that the machine is turned on.
• Decrease the embroidery speed to 600 spm
when using a speciality thread like a
metallic thread.
Press .
c
Changing the Thread Color
Display
You can display the name of the thread colors or
embroidery thread number.
6
Advanced Embroidery
• If design has many trims it is recommended
to select a higher jump stitch trim setting in
order to reduce the amount of excess tails
on backside of fabric.
• The higher number of the jump stitch length
selected, the fewer number of times the
machine will trim. In this case, more jump
stitches remain on the surface of the fabric.
• Colors on the screen may vary slightly from
actual spool colors.
Press and then, press .
a
291
Page 99

MAKING EMBROIDERY ADJUSTMENTS
#123
In the “Thread Color Display”, use
b
to display the name of the thread colors or
the embroidery thread number.
When the thread number is
c
displayed, use to select from six
embroidery thread brands pictured below.
Changing the Embroidery Frame
Display
Press and .
a
In the “Embroidery Frame Display”, use
b
to change the embroidery frame display
mode.
* There are 23 choices.
Embroidery: Polyester thread
Country: Cotton thread*
Madeira Poly: Polyester thread
Madeira Rayon
Sulky
Robison-Anton: Polyester
thread
* Depending on the country or area, cotton-like
polyester thread is sold.
292
d
Press .
Page 100

MAKING EMBROIDERY ADJUSTMENTS
a Super large frame embroidering area
36 cm × 24 cm (14 inches × 9-1/2 inches)
b Center mark
c Extra large frame embroidering area 30 cm × 20
cm (12 inches × 8 inches)
d Quilt frame embroidering area 20 cm × 20 cm (8
inches × 8 inches)
e Extra large frame embroidering area 26 cm × 16
cm (10 inches × 6 inches)
f Embroidery area for optional large embroidery
frame
18 cm × 13 cm (7 inches × 5 inches)
g Embroidering area for optional border embroidery
frame
18 cm × 10 cm (7 inches × 4 inches)
h Embroidering area for optional medium frame
15 cm × 15 cm (6 inches × 6 inches)
i Medium frame embroidering area
10 cm × 10 cm (4 inches × 4 inches)
j Small frame embroidering area
2 cm × 6 cm (1 inch × 2-1/2 inches)
k Grid lines 10 mm (3/8 inch), 25 mm (1 inch)
l Cross lines
Press .
c
Aligning the Pattern and the
Needle
Example: Aligning the lower left side of a
pattern and the needle
Mark the embroidery start position on the
a
fabric, as shown.
6
Advanced Embroidery
* For the optional embroidery frame.
293
 Loading...