

Page 1
e
arl
Pearl Frame
Pearl Frame
Instruction Addendum
Instruction Addendum
How to Load Fabric to Frame
Model BLQF
Model BLQF
www.babylock.com
Page 2
Step 1
Anatomy of the Frame
Note: A little preparation the first time you use your quilting frame will save you a lot of time later
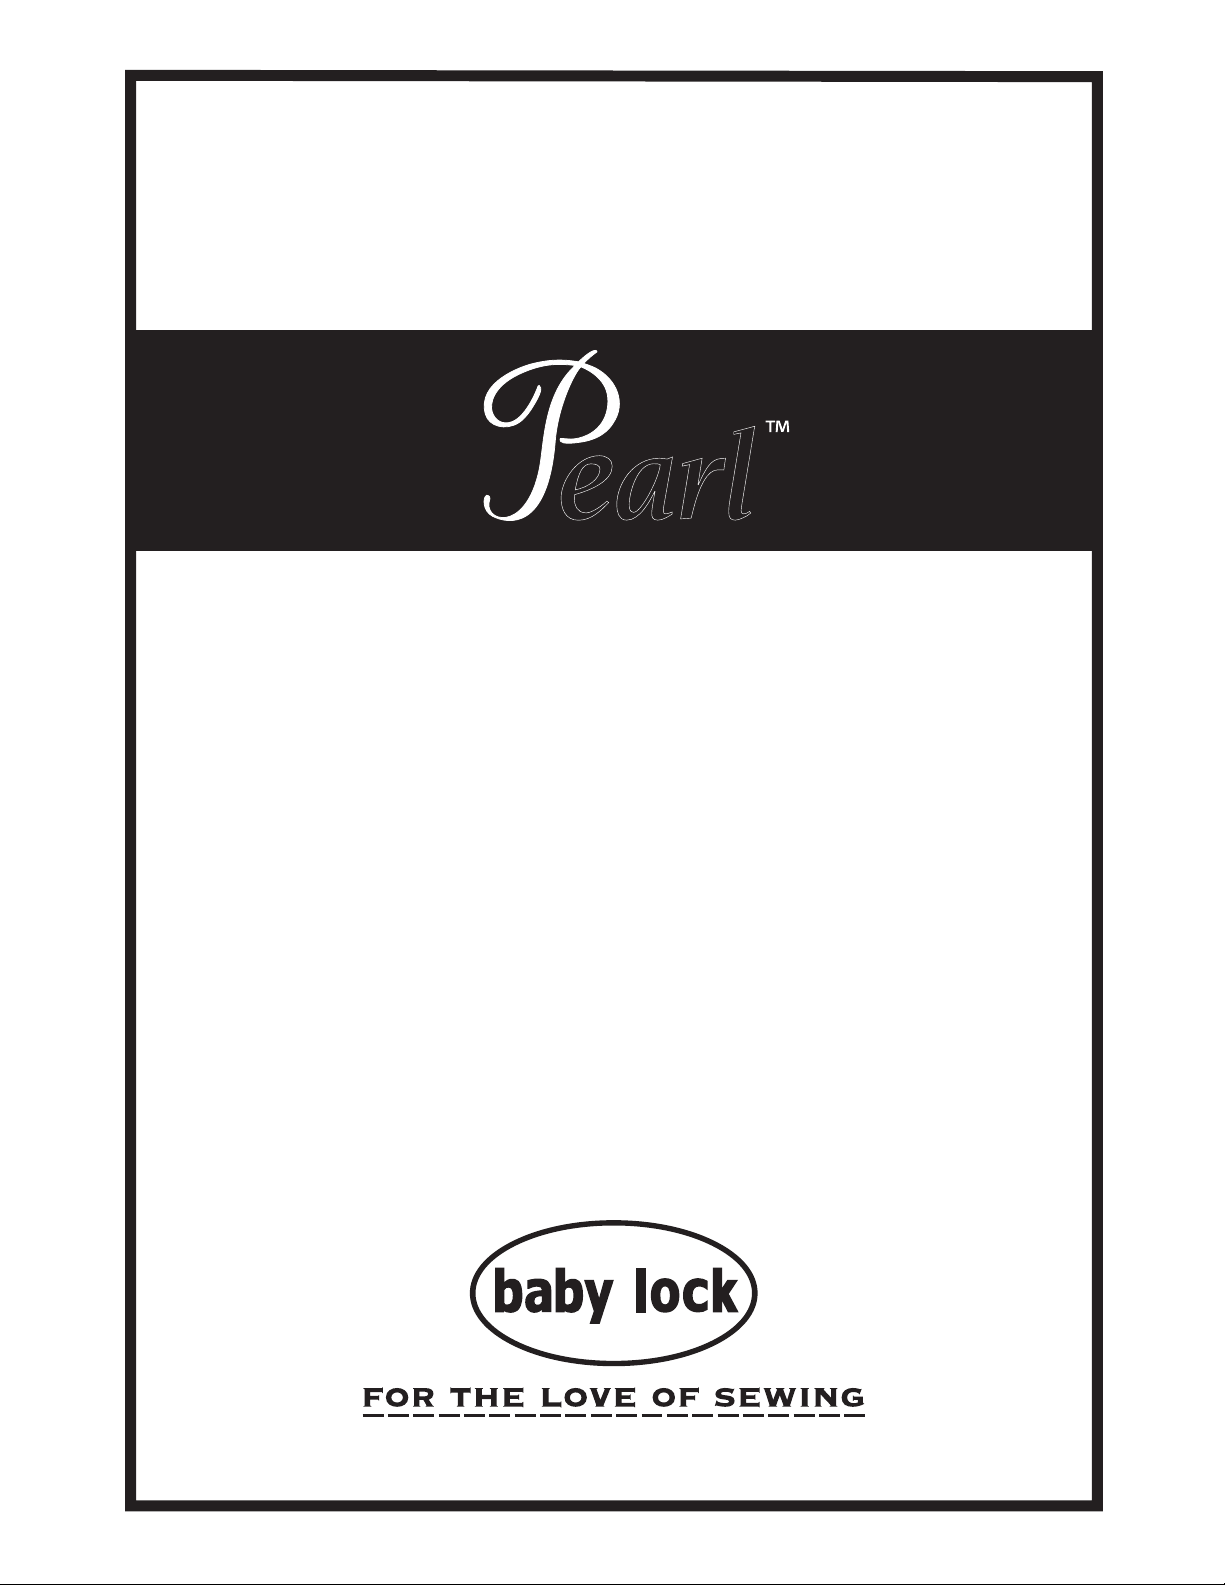
A. Set up the rails
1. Ensure that all of your rails are installed correctly
and turning in the right direction
a) The large black gears should always be placed
at the right end of the Pearl Frame
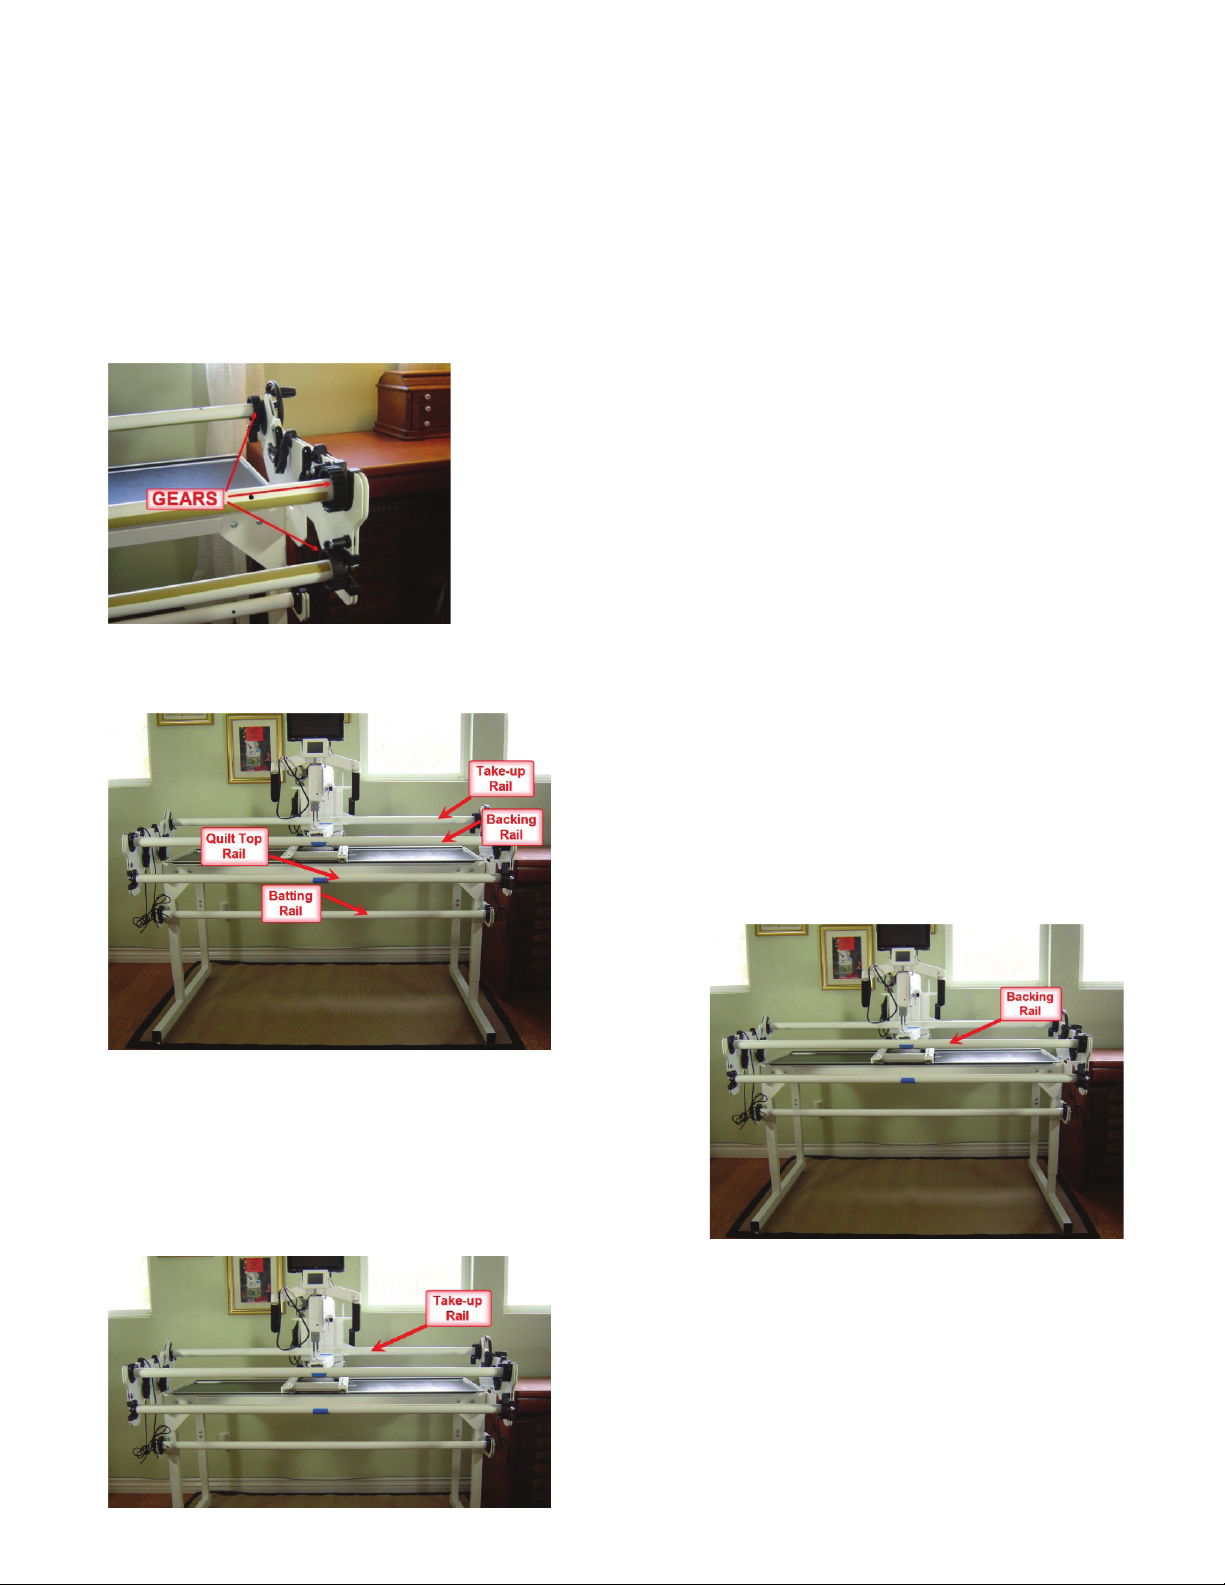
2. There are four rails on the Pearl Frame.
Descriptions of each rail follows.
2. The take-up rail turns toward the center of the
frame
a) The hand wheel at the right end can be used
to turn this rail as the quilt is rolled forward
b) If the rail is turning in the wrong direction,
and the gears are on the wrong end, lift it
off the frame, turn it around and place it
back into the frame. (You are switching
which end is on the right and which end is on
the left.)
C. The Backing Rail
1. The top rail on the front of the quilt frame
is the backing rail
a) The quilt back will be rolled onto this rail
2. The backing rail rotates away from the
center of the frame
a) If the rail is turning in the wrong direction,
lift it off the frame, turn it around and
place it back into the frame. (You are
switching which end is on the right and
which end is on the left.)
B. Take-up Rail
1. The rail that passes through the throat of the
Crown Jewel is the take-up rail
a) As you work, the portion of the quilt that has
already been quilted will be rolled onto this
rail
1
Page 3

D. The Quilt Top Rail
1. The quilt top rail is below the backing rail on the
front of the quilt frame
a) The quilt top will be rolled onto this rail
Step 2
Attach the Velcro and Leaders
to the Rails
2. The quilt top rail rotates away from the center of
the frame
a) If the rail is turning in the wrong direction, lift
it off the frame, turn it around and place it
back into the frame. (You are switching which
end is on the right and which end is on the
left.)
E. The Batting Rail
1. The batting rail is below and slightly behind the
other two rails on the front of the frame
a) The batting rail does not have ratchets and
turns freely in both directions
A. Mark the Rail
It is helpful to mark the center of each rail
1. Painters tape is an easy way to mark the rails
a) Place a line at the center of the rail
b) If it makes it easier for you to remember
which way the rails fit into the frame, also
label left and right on the tape
B. Cloth Leaders
1. Cloth leaders have markings that make it
easy to get the quilt back and quilt top
centered and straight on the frame
2. There are several different leader packages
available at your local authorized Baby Lock
retail store
a) Baby Lock Quilt Leaders
(1) 9.5 foot length - part #BLQL
b) Start-Right Cloth Leaders
(1) 10 foot length - part #GFCL
(2) 12 foot length - part# GFCL-12
2
Page 4

C. Attaching the leaders with Velcro
1. The hook side of the Velcro will be put on the
take-up rail, the backing rail, and the quilt top
rail
a) There is no leader for the batting rail, so you
will not need Velcro for that fourth rail
b) Cut the Velcro to the length needed for each
rail
4. If you are using the Start-Right cloth leaders,
attach the shortest width leader to the take-up
rail
a) Match the center of the leader to the center
of the rail
b) The right side of the leader faces the back of
the frame
c) The Baby Lock leaders are all the same
width, so it will not matter which of the
three leaders is attached to the take-up rail
c) Place the hook side of the Velcro on the rails
1- The hook side is the stiff hard feeling side
of the Velcro
2- Trim the Velcro so it does not interfere with
gears on the end of the rail for the ratchet
3- The easiest way to attach the Velcro is to
peel back about six inches of the paper and
press the sticky Velcro into place. Then
peel back the next six inches of paper and
press
Note: If you remove the paper from the entire length
of the sticky Velcro, you will end up with a big knot of
Velcro stuck to itself instead of the rails!
2. Prepare the leaders
a) If you are using a frame set up smaller than
the width of the leaders, cut the leaders to
match the width of the rails on your frame
b) Attach the Velcro strips along the top edge of
each leader on the wrong side
1- The Velcro loops are the strip that is soft
and fuzzy
3. Fold each leader in half and mark the center at
both the top edge and at the hem
a) If you have marked the center of the rail, and
marked the center of each leader, then it will
be easy to get all of your leaders centered on
the rails
5. If you are using the Start-Right cloth leaders,
attach the medium width leader to the backing
rail
a) Match the center of the leader to the center
of the rail
b) The printed or right side of the leader faces
the back of the frame
c) The Baby Lock leaders are all the same
width, so it will not matter which of the three
leaders is attached to the backing rail
3
Page 5

6. If you are using the Start-Right cloth leaders,
attach the widest leader to the quilt top rail
a) Match the center of the leader to the center
of the rail
b) The printed or right side of the leader faces
the back of the frame
c) The Baby Lock leaders are all the same width,
so it will not matter which of the three leaders
is attached to the quilt top rail
Note that all of the leaders face the back of the
frame and there is no leader for the batting rail
Step 3
Load the Quilt on the Frame
A. The back of your quilt and the batting will need
to be cut larger than the quilt top
1. Always make the quilt back four to six inches
wider than your quilt top
2. The back of the quilt should also be at least six
inches longer than the quilt top
3. The batting should be at least two inches wider
than your quilt top
4.
Pin the quilt top to the right side of the leader
a) Match the center of the quilt top edge to
the center mark on your leader
b)
for this
1 top, and placed about 1/4” apart
2- Pins can point either right or left,
on each end with the points toward the
center of the quilt top. This will keep
you from poking yourself with those
pins on the end as you work
Long straight pins with flat heads are ideal
Pins are parallel to the edge of the quilt
however you may want to place the pins
B. Attach the quilt top to the leader on the quilt
top rail
1. Roll the backing leader up so it is out of the way
2. Lay your quilt top over the top of the frame with
the right side up
3. Find the center of the quilt on the edge that will
be pinned to the leader and mark it with a pin
4
Page 6

5. Roll the quilt top onto the quilt top rail
a) Do not pull and tug on the top as you are
rolling it
b) Smooth it, if needed, to roll it evenly
1- Run your hand over it the way you would
smooth the sheets when making the bed
C. Attach the quilt back to the leader on the
backing rail
1. Lay quilt back over the top of the frame with the
wrong side up
2. Mark the center of the back with a pin
3. Unroll the leader on the backing rail
4. Pin the quilt back to the leaders
a) Match the center of the quilt backing to the
center mark on your leader
5. Roll the back onto the backing rail
a) Do not pull and tug on the back as you are
rolling it
b) Smooth it, if needed, to roll it evenly
c) Run your hand over it the way you would
smooth the sheets when making the bed
D. Roll the batting onto the batting rail
1. There is no leader for the batting rail, so the
batting will be attached directly to the rail
2. An easy way to attach the batting to the rail
is to use painters tape
a) A mark on the tape can be used to center
the batting on the rail
3. Spread the batting on the floor
4. Roll the batting onto the batting rail
Now we have all three layers of our quilt loaded
onto the rails at the front of the frame!
5
Page 7

E. Attach the quilt back to the take-up rail
1. Unlatch the take-up rail so it turns freely and
unroll the take-up leader
2. Unlatch the backing rail so it turns freely
a) Bring the quilt back across the frame so it
reaches the take-up leader
b) Pin the quilt back to the take-up leader
1- Match the centers
2- Use the guide line on the leader to keep
the back straight
3- The wrong side of the quilt back faces up
a) Bring the batting up over the quilt back on
top of the frame
b) The leading edge of the batting should be
just below the pins in the quilt back
2. Use a channel lock to stitch a straight line
across the top of the batting
a) This line of stitching will serve two purposes
1- The batting will be anchored to the quilt
back
2- You will have a nice straight line that
can be used to position the quilt top
3. Re-engage the latches on both the take-up rail
and the backing rail
a) Turn the rails so the quilt back is stretched
firmly across the top of the quilt frame and
no longer sags loosely
F. Bring the batting up to lay on top of the quilt
back
1. Bring the batting to the front of the frame
between the backing and quilt top rails
Note: This makes sense since the batting belongs
between the quilt top and the quilt back
3. Set up to channel lock
a) Position the Crown Jewel so the needle is
at the left end of the line to be sewn
b) Place the optional channel lock
(part #BLJ18-CL) over the wheel of the
machine as shown in the picture below
(e)
6
Page 8

c) The channel lock prevents the wheel from rolling
forward or back, so the machine will now only
move from left to right.
d) You will be able to sew a perfect straight line
across the top of the batting
e) When using the channel lock (shown on the
previous page), use a gentle touch as you move
the Crown Jewel.
1- If you pull hard, you can defeat the channel
lock and sew a crooked line
4. If you have the Pro-Stitcher Software, you can
use the channel locking feature to sew your
straight line
a) Touch Quilt
b) Touch Manual/Channel
c) Touch Horizontal Channel Lock
5. Pull up the bobbin thread before you begin to
sew
a) Hold the needle thread
b) Use the Needle Up/Down button on the left
handlebar to take the needle down and then
back up to bring a loop of bobbin thread to
the top of the batting.
c) Hold the needle thread taut between both
hands and swipe the needle thread under the
foot so the bobbin thread is pulled out from
under the foot
1- Hold both threads as you begin to sew, so
you will not get a bird’s nest of thread on
the back of the quilt
G. Use a walking stitch to sew the straight stitch
line across the batting
1. The walking stitch sews a long basting stitch
2. To sew a walking stitch with the Crown Jewel
press and hold the Needle Up/Down key on
the left handle bar while moving the machine
H. At the end of the line of stitching
1. Remove the channel lock so you can move the
machine in any direction
2. Move the machine about six inches away
from the end of the stitching line. A loose
thread is dragged across the fabric
3. Move the machine back to the end of the
stitching line
4. Hold the loose thread and touch the Needle
Up/Down button to pull the bobbin thread up
through the fabric and batting
7
Page 9

5. Move the machine to one side and trim both the
top and bobbin threads
J. Attach the clamps at each side of the quilt
1. The clamps should be attached to the quilt
back and, if needed, to the batting. The
clamps are not attached to the quilt top
2. Pull the bungee cord taut, being careful not
to stretch the backing fabric too much, and
pull down to settle the cord into the narrow
part of the opening in the frame
I. Bring the quilt top up to lay on top of the batting
1. Release the latch on the quilt top rail
a) Bring the quilt top over the top of the quilt
frame
b) The quilt top is right side up
c) Line up the leading edge of the quilt top with
your channel lock stitching
d) You may want to place a few pins along the top
of the quilt top to keep it from shifting until you
get it anchored
e) Latch the quilt top rail
f) Turn the quilt top rail so the quilt top lays
smooth and firm
8
 Loading...