

Page 1
Getting to Know:
Diana
A-LINE SERIES
Model BL480A
Baby Lock Consumer Helpline: 800-313-4110
www.babylock.com
Page 2
Diana
Model BL480A
Introducing Diana, the easy-to-use serger from the Baby Lock A-Line Series
designed for creative techniques. If you’re bursting at the seams with ambition,
Diana’s the perfect friend to help keep those stitches secure with cover stitching,
chain stitching, rolled hems and more. Diana loves a challenge, and she’s the
perfect friend to call when you need an extra hand.
This Getting to Know You Guide will take you through a simple, step-by-step
process on how to thread your serger and set tension dials for balanced stitches.
Once you’re familiar with your machine, refer to the instruction and reference guide
(packaged with your machine) for additional directions.
Like all machines in the A-Line Series, Diana has the features and the durability to
handle all of your projects – you can always count on her to be there for you. Be
sure to ask your Baby Lock Retailer about Diana’s friends in the A-Line Series, like
Audrey, Anna and Grace. From classic tailored looks to modern-day fashions, the
machines in the A-Line Series will help you sew and serge with success – all with
the quality you’ve come to expect from Baby Lock.
Page 3

Setting Up Your Serger
When threading, it’s important to consider the type of thread you use for serging. Remember, a serger
creates a finished look with reinforced stitches, so strong thread is an important ingredient. A top quality, long
staple, polyester or poly/cotton blend is the best choice. Skipped stitches and broken threads are often the
direct result of using old or inferior thread.
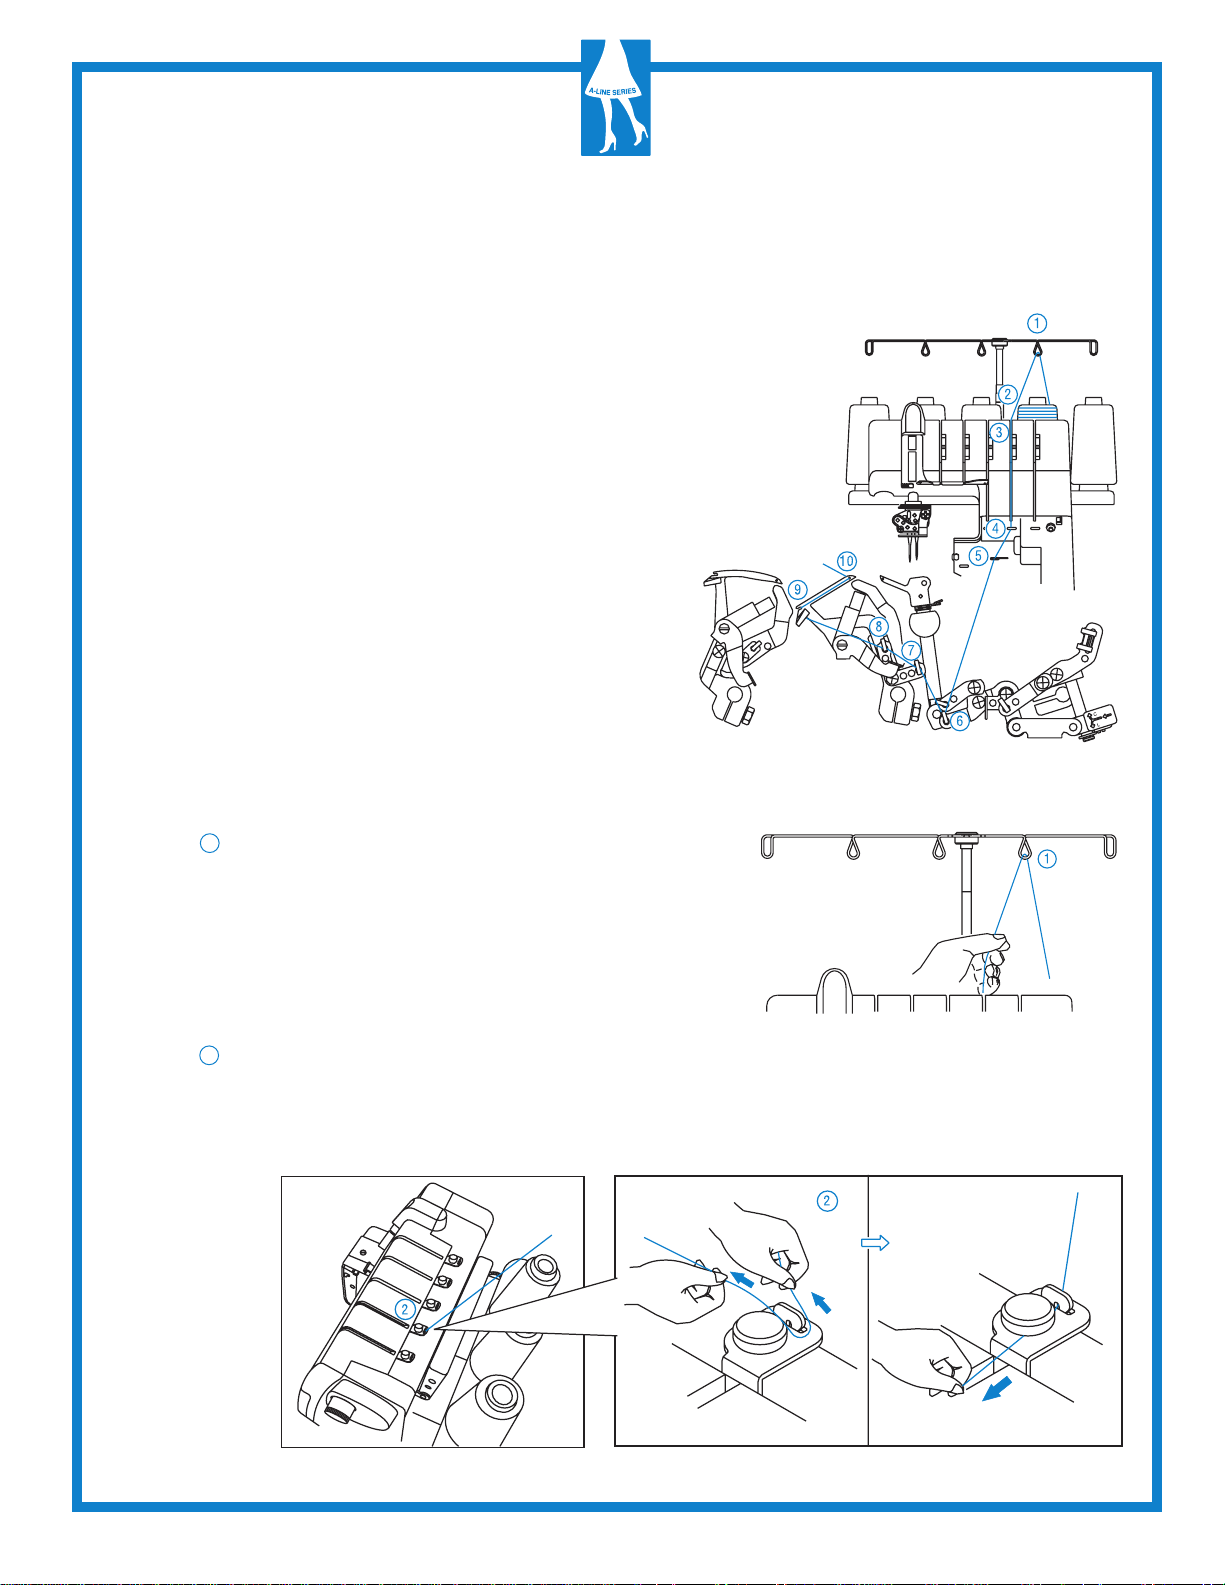
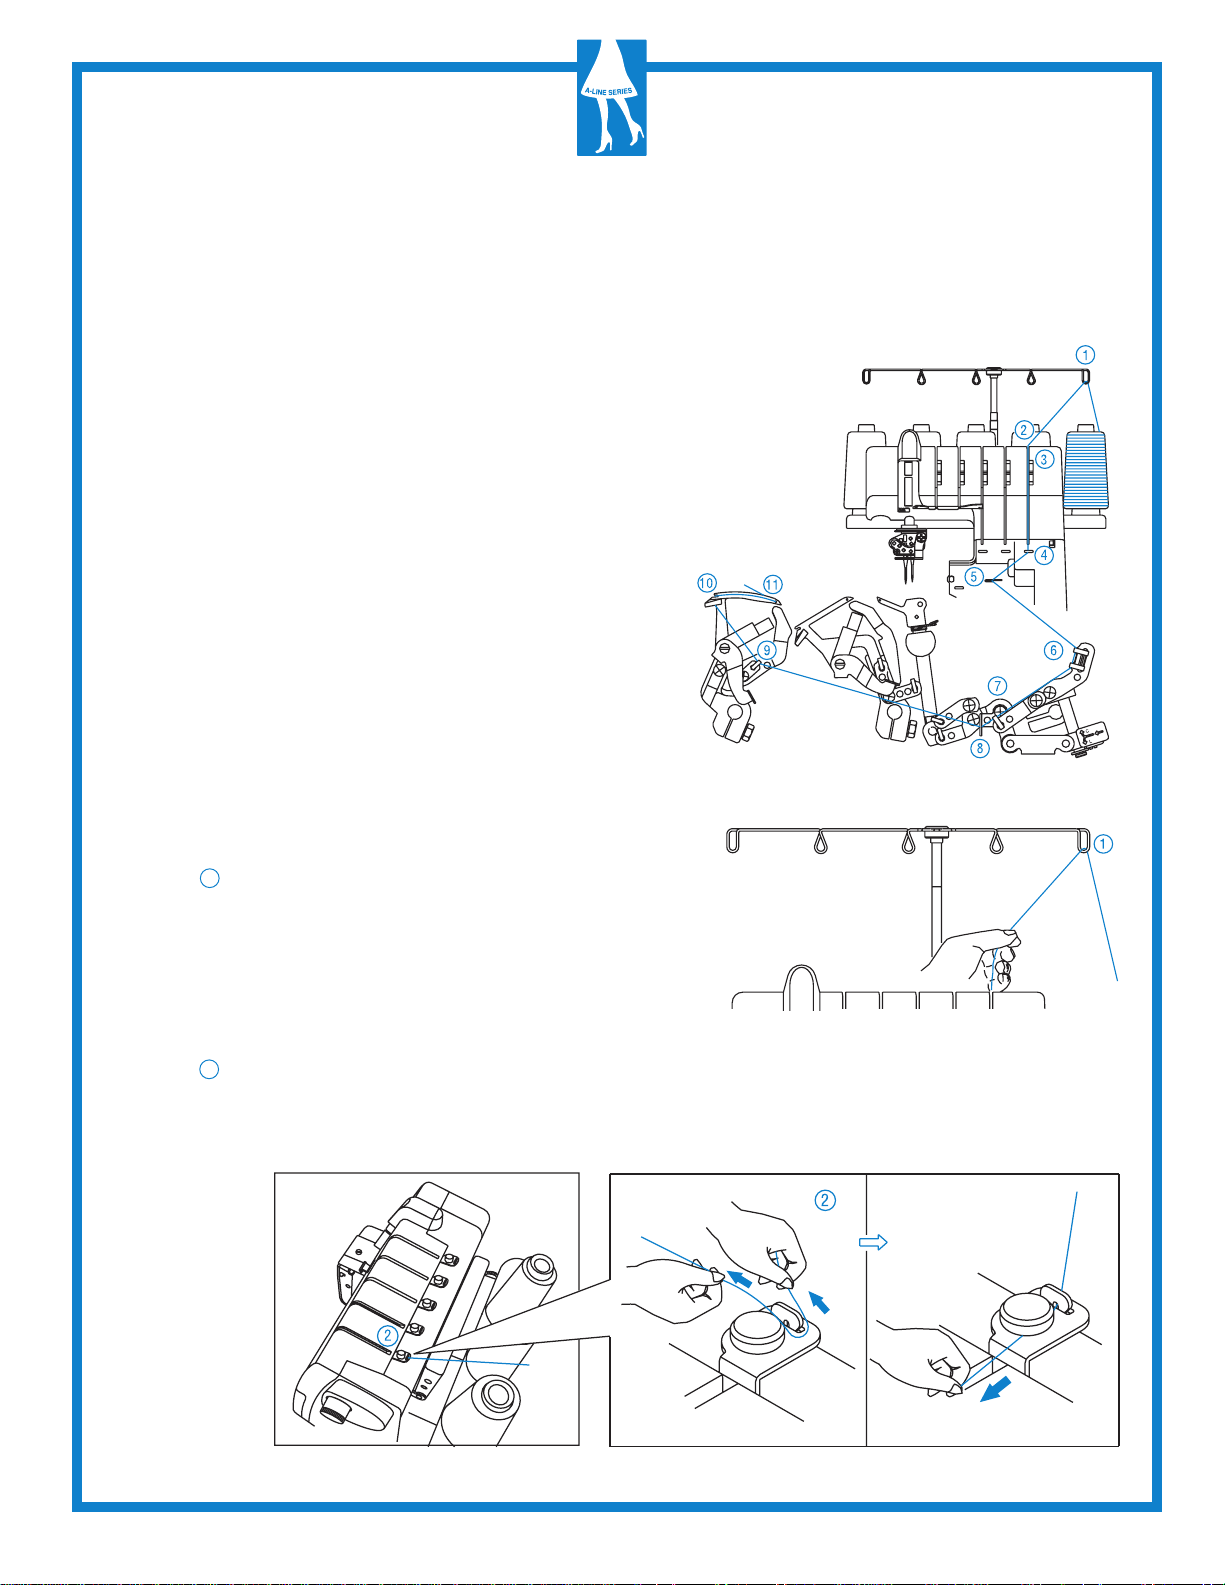
Preparation For Threading
Setting Up the Thread Antenna
• Take out the thread antenna from the top of
styrofoam, and insert it as shown in first illustration.
• Fully extend the thread antenna.
• The two joints on the telescope will click into place
when they are correctly positioned as shown in
second illustration
• Center the thread guides above the spool pins.
• Place thread over the cone adapters on the spool
pins.
Thread Net
When using synthetic threads that easily spill off the
cone, slip the thread net furnished with the machine,
over the thread from bottom of the cone leaving the
thread end hanging free at the top as shown on the
right.
1
Thread
Page 4

Setting Up Your Serger
Thread
Spool Cap
• When using a regular thread spool, fit the spool cap
supplied with the machine onto the thread spool as
shown at right.
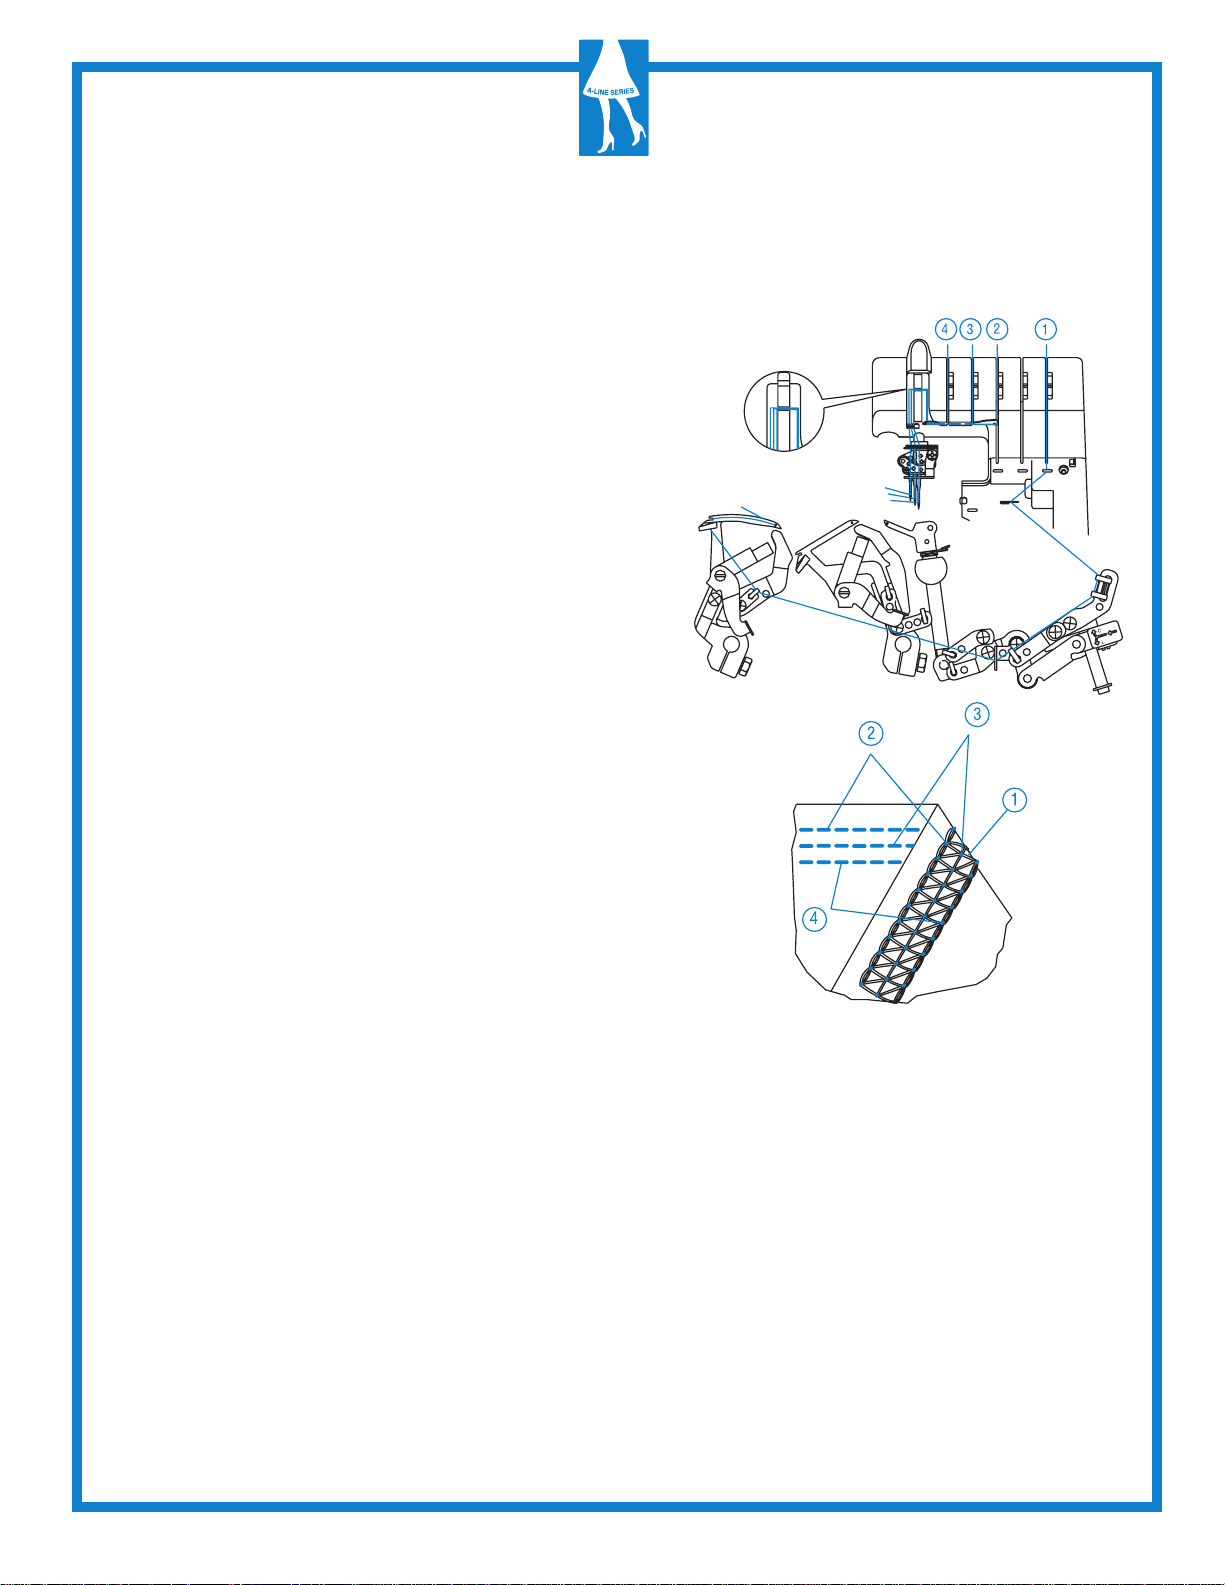
Threading the Machine
Threading Diagram Sequence: 5-Thread
Chain Stitch-3-Thread overlock
• A color coded threading diagram is located inside
the front cover for quick reference.
• Thread the machine in the order 1 to 5 as shown
at right.
Note: Threads go through the take-up lever cover
for Overlock and Chain stitching as shown.
Spool cap
Press in
Thread spool
Tension Color Code: 5-Thread Chain
Stitch-3-Thread overlock
1. Upper looper thread ............................ Green
2. Lower looper thread ............................ Blue
3. Chain stitch looper thread ................... Purple
4. Right needle thread ............................. Yellow
5. Chain stitch needle thread ................... Red
2
Page 5
Threading Triple Cover Stitch
Threading Diagram Sequence: Triple
Cover Stitch
• A color threading diagram is located inside the front
cover for quick reference.
• Thread the machine in the order 1 to 4 as shown at
right.
Note: Threads go through the take-up lever cover for
cover stitch as shown.
Tension Color Code: Triple Cover Stitch
1. Cover stitch looper thread .................. Purple
2. Right needle thread ............................ Green
3. Middle needle thread .......................... Yellow
4. Left needle thread ............................... Red
3
Page 6

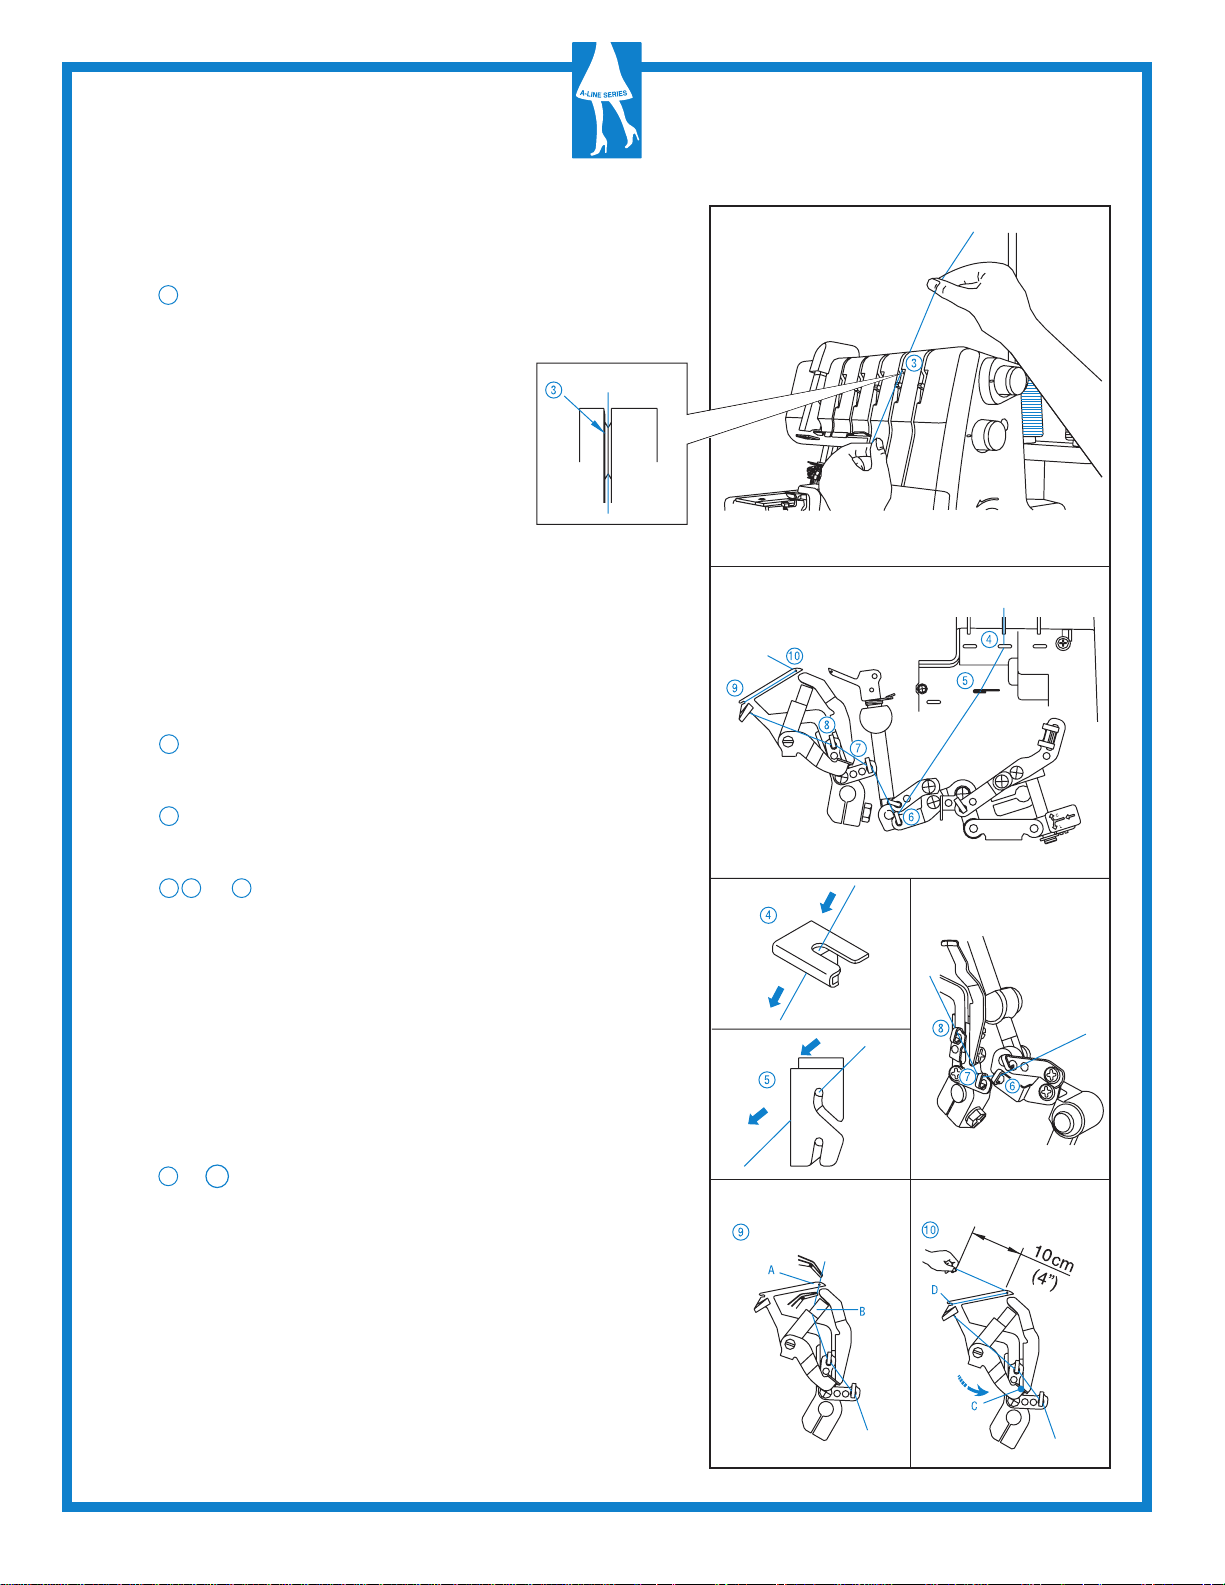
Manual Threading
Threading the Upper Looper (Green)
Open the front cover and thread the upper
looper as indicated in steps 1 through 9.
CAUTION: Be sure to turn off power switch
• Raise Presser foot to release tension discs.
• Thread the upper area of the machine following
the green color-coded thread guides.
1 Pass thread from back to the front through the
thread guide.
1
2
3
4
9
8
7
1
5
6
2 Thread the top cover thread guide by pulling
the thread towards the left until it slips under
guide. Then pull thread along the right side of
pretension disc as illustrated.
3 While holding thread with fingers, pass it
between the tension discs and pull thread
down to make certain it is properly located in
between the tension discs.
4 Place the thread from right to left into
thread guide.
5 Place the thread from left to right and
position thread behind finger on thread
guide.
4
Page 7

6 7 & 8 Thread the balance of the upper
looper area of the machine following the
green color-coded thread guides.
9 Thread the hole in the upper looper from
front to back. Make sure thread passes
behind lower looper. Pull about 10cm
(4 inches) of thread through the looper
and place to the back of the needle plate.
Note: Use tweezers provided in the
accessory case to aid in threading
the looper.
5
Page 8
Manual Threading
Threading the Lower Looper (Blue)
Open the front cover and thread the lower looper
as indicated in steps 1 through 10.
• Raise Presser foot to release tension discs.
• Turn the handwheel toward you until the
lower looper eye extends out 5 - 10mm from the
needle plate edge.
• Thread the lower looper area of the machine following
the blue color-coded thread guides.
1 Pass thread from back to the front through the
thread guide.
2 Thread the top cover thread guide by pulling
the thread towards the left until it slips under
guide. Then pull thread along the right side of
pretension disc as illustrated.
6
Page 9
3 While holding thread with fingers,
pass it between the tension discs
and pull thread down to make
certain it is properly located in
between the tension discs.
4 Place the thread from right to left, into
the thread guide.
5 Place the thread from right to left, into
the thread guide.
6 7 & 8 Thread the balance of the lower
looper area of the machine following the
blue color-coded thread guides, placing
thread in guides.
9 & 10 Thread the lower looper eye (A) from
front to back. Pull about 10cm (4 inches)
of thread and position into V cutout (B) on
looper threader. Firmly hold thread tail
with left hand and pull threader lever (C)
up into place (D).
Note: Use tweezers provided in the
accessory case to aid in threading
the looper.
7
Page 10
Manual Threading
Threading the Chain and Cover Chain
Stitch Looper (Purple)
Open the front cover and thread the chain
stitch/cover stitch looper as indicated in
steps 1 through 11.
• Raise Presser foot to release tension discs.
• Turn the handwheel toward you until the chain
stitch looper eye extends out 5 - 10mm from the
needle plate edge.
• Thread the chain looper area of the machine
following the purple color-coded thread guides.
1 Pass thread from back to the front through the
thread guide.
2 Thread the top cover thread guide by pulling
the thread towards the left until it slips under
guide. Then pull thread along the right side of
pretension disc as illustrated.
8
Page 11

3 While holding thread with fingers, pass it
between the tension discs and pull thread
down to make certain it is properly located in
between the tension discs.
4 Place the thread from right and to left
into threading guide..
5 Place the thread from right to left
into threading guide.
6 7 8 & 9 Thread the balance of the
lower looper area of the machine following
the purple color-coded thread guides,
placing thread in guides.
10 & 11 Thread the looper eye (A) from front
to back. Pull about 10cm (4 inches) of
thread and position into V cutout (B) on
threader. Firmly hold thread tail with left
hand and pull threader lever (C) up to
place thread into correct position (D) for
sewing.
Note: Use tweezers provided in the
accessory case to aid in threading
the looper.
9
Page 12

Manual Threading
Threading the Overlock Right Needle
(Yellow) (B on needle clamp)
Thread the center needle as indicated in
steps 1 through 9.
• Raise Presser foot to release tension discs.
1 Pass thread from back to the front through the
thread guide.
2 Thread the top cover thread guide by pulling
the thread towards the left until it slips under
guide. Then pull thread along the right side of
pretension disc as illustrated.
10
Page 13

3 While holding thread with fingers, pass it
between the tension discs and pull thread
down to make certain it is properly located in
between the tension discs.
4 & 5 Slip thread behind metal guide and
into rear slot on thread guide.
6 Pass thread into the slot of take-up lever
cover.
7 Position thread into the right guide
located at base of take-up lever cover.
8 Slip thread from left to right into the thread
guide located on bottom of the needle
clamp. Position the thread into the right
section of the guide.
Note: Before threading eye of needle, slip
thread behind thread guide located on the
bottom of the needle clamp.
9 Thread the eye of the right needle from
front to back. Draw about 10cm (4 inches)
of thread through needle eye toward the
rear of machine and place thread to the
back, under the presser foot.
Note: Use tweezers provided in the
accessory case to aid in threading
the needle.
11
Page 14

Manual Threading
Threading the Chain Stitch Needle
(Red) (D on needle clamp) Center Needle
Thread the center needle as indicated in
steps 1 through 9.
• Raise Presser foot to release tension discs.
1 Pass thread from back to the front through the
thread guide.
2 Thread the top cover thread guide by pulling
the thread towards the left until it slips under
guide. Then pull thread along the right side of
pretension disc as illustrated.
12
Page 15

3 While holding thread with fingers, pass it
between the tension discs and pull thread
down to make certain it is properly located in
between the tension discs.
4 & 5 Slip thread behind metal guide and
into center slot on thread guide.
6 Pass thread into the slot of take-up lever
cover.
7 Position thread into the center slot on guide
located at base of take-up lever cover.
8 Slip thread from left to right into the thread
guide located on bottom of the needle
clamp. Position the thread into the center
section of the guide.
Note: For 4-Thread overlock left needle: Use
Needle A.
Note: Before threading eye of needle, slip
thread behind thread guide located on the
bottom of the needle clamp.
Note: For Chain stitch: Use needle D before
threading eye of needle, make sure thread is
in front of thread guide located at bottom of
the needle clamp.
9 Thread the eye of the center needle from
front to back. Position of the thread must
be behind the thread guide for overlock
stitching. Draw about 10cm (4 inches) of
thread through needle eye toward the rear
of machine and place thread to the back,
under the presser foot.
Note: Use tweezers provided in the
accessory case to aid in threading
the needle.
13
Page 16

Manual Threading
Threading the Left Cover Stitch Needle
(Red) (C on needle clamp)
Thread the cover stitch/left chain stitch needle
as indicated in steps 1 through 9.
• Raise Presser foot to release tension discs.
1 Pass thread from back to the front through the
thread guide.
2 Thread the top cover thread guide by pulling
the thread towards the left until it slips under
guide. Then pull thread along the right side of
pretension disc as illustrated.
14
Page 17

3 While holding thread with fingers, pass it
between the tension discs and pull thread
down to make certain it is properly located in
between the tension discs.
4 & 5 Slip thread behind metal guide and
into rear slot on thread guide.
6 Pass thread into the slot of take-up lever
cover.
7 Position thread into the left guide
located at base of take-up lever cover.
8 Slip thread from left to right into the thread
guide located on bottom of the needle
clamp. Position the thread into the left
section of the guide.
Note: Before threading eye of needle, make
sure thread is in front of thread guide located
on the bottom of the needle clamp, for cover
stitch and for chain stitch.
9 Thread the eye of the left needle. Draw
about 10cm (4 inches) of thread through
needle eye to hang free. Place the thread
to the back, and slightly to left under the
presser foot.
Note: Use tweezers provided in the
accessory case to aid in threading
the needle.
15
Page 18

Manual Threading
Threading the Cover Stitch
Middle/Chain Needle (Yellow)
(D on needle clamp) Center Needle
Thread the center needle as indicated in
steps 1 through 9.
• Raise Presser foot to release tension discs.
1 Pass thread from back to the front through the
thread guide.
2 Thread the top cover thread guide by pulling
the thread towards the left until it slips under
guide. Then pull thread along the right side of
pretension disc as illustrated.
16
Page 19

3 While holding thread with fingers, pass it
between the tension discs and pull thread
down to make certain it is properly located in
between the tension discs.
4 & 5 Slip thread behind metal guide and
into center slot on thread guide.
6 Pass thread into the slot of take-up lever
cover.
7 Position thread into the center guide
located at base of take-up lever cover.
8 Slip thread from left to right into the thread
guide located on bottom of the needle
clamp. Position the thread into the center
section of the guide.
Note: Before threading eye of needle, make
sure thread is in front of thread guide located
on the bottom of the needle clamp, for cover
stitch and for chain stitch.
9 Thread the eye of the middle needle. Draw
about 10cm (4 inches) of thread through
needle eye to hang free. Place the thread
to the back, and slightly to left under the
presser foot.
Note: Use tweezers provided in the
accessory case to aid in threading
the needle.
17
Page 20

Manual Threading
Threading the Cover Stitch Right Needle
(Green) (E on needle clamp)
Thread the cover stitch right needle as indicated
in steps 1 through 9.
• Raise Presser foot to release tension discs.
1 Pass thread from back to the front through the
thread guide.
2 Thread the top cover thread guide by pulling
the thread towards the left until it slips under
guide. Then pull thread along the right side of
pretension disc as illustrated.
18
Page 21

3 While holding thread with finger, pass it
between the tension discs and pull thread
down to make certain it is properly located in
between the tension discs.
4 & 5 Slip thread behind metal guide and
into front slot on thread guide.
6 Pass thread into the slot of take-up lever
cover.
7 Position thread into right guide located at
base of take-up lever cover.
8 Slip thread from left to right into the thread
guide located on bottom of the needle
clamp. Position the thread into the right
section of the guide.
Note: Before threading eye of needle, make
sure thread is in front of thread guide located
on the bottom of the needle clamp, for cover
stitch.
9 Thread the eye of the right needle. Draw
about 10cm (4 inches) of thread through
needle eye to hang free. Place the thread
to the back, and slightly to left under the
presser foot.
Note: Use tweezers provided in the
accessory case to aid in threading
the needle.
19
Page 22

Manual Threading
Tie-on Method
How to Change Threads Tie On Method
• To change thread type or color, clip thread near the
spool.
• Place new thread on stand.
• Tie new thread and old thread ends together with a
square knot. Clip thread tails to 2-3cm (1 inch) length.
If clipped too short, threads may come untied.
• Firmly pull both thread to test knot security.
• Raise Presser foot to release Tension discs.
• Pull the threads through the machine one at a time.
• If threads do not pull easily, check for tangles on
thread guides or looping under thread stand.
• When pulling thread through the needles, STOP
when the knot is in front of the needle.
• Cut the thread, and insert it through the needle.
20
Page 23

Stitch Settings
Stitch Length
How to Adjust the Stitch Length
• The stitch length dial should be set on the N setting for
most sewing conditions.
• Adjust the stitch length to N-4 when sewing heavy
weight fabrics.
• Adjust the stitch length to 2-N when sewing lightweight
fabrics to obtain excellent seams without puckering.
Stitch Width
Width adjustment dial
As shown on the illustration, turn the dial counter
clockwise to increase width of cutting, and clockwise to
decrease width of cutting.
21
Page 24

Starting to Serge
Chaining Off and Test Sewing
Note: The following instructions do not apply to cover
stitch.
For instructions on cover stitch, see page 48 “How to
Sew a Cover Stitch”, in the instruction manual.
• When the machine is completely threaded, bring all of
the threads across the throat plate and slightly to the
left under the pressor foot.
• Hold the threads and apply a slight tension.
• Turn the hand wheel toward you 2 or 3 complete turns
to start the thread chain.
• Lower presser foot.
• Continue holding the chain and press on the foot
controller until chain is 5-7.5cm (2-3 inches) in length.
• Place fabric under the front of the presser foot and
sew a test sample.
Note: Do not pull on the fabric while sewing as this may
deflect the needle, causing it to break.
• At the end of the sample, continue to run the machine
with the presser foot down until the chain reaches
15-20cm (6-8 inches) in length.
Note: In case it is difficult to chain off when chain
stitching, pull the fabric lightly backward.
Presser Foot Markings
• A mark to indicate the needle location is provided on the
presser foot fitted on this machine. Use this mark as a
guide when sewing.
Presser Foot Lifter
• Put the presser foot lifter in the raised position to lower
the presser foot for sewing.
• Swing the presser foot lifter down to lift the presser foot.
• For bulky fabrics, pull forward on the presser foot lifter
to allow additional clearance under the foot.
22
Page 25

Starting to Coverstitch
At start of sewing
1 Raise presser foot.
2 Place fabric under presser foot behind the needle.
3 Lower presser foot.
4 Note: When you start to sew from the middle of the fabric,
place the fabric at the desired starting point of sewing.
At end of sewing
Stop sewing when the fabric is not under the
needles
5 Raise presser foot.
6 Turn the handwheel toward you one circle
(Counter-clockwise), then turn handwheel one circle
back. (Clockwise)
7 Pull out the fabric lightly to rear of machine and
cut the threads to take out the fabric.
8 Note: Follow the instructions given, when sewing
cover stitches, because chaining-off at the end of
sewing is not possible.
23
Page 26

This machine is capable of producing various types of stitches according to the combination of Auto Tension
Selected, needle positions, threading methods, and the use of convertible right looper/converter.
22. SELECTION OF STITCHES & AUTO TENSION
Selection of Stitches & Auto Tension
This machine is capable of producing various types of stitches according to the combination of Auto
Tension Selected, needle positions, threading methods, and the use of convertible right looper/
converter.
Stitch Type Reference
ATD: Auto Tension Dial Selected
1. Chain Stitch
ATD:D
2. 2-Thread
Wrapped Edge
Overlock
ATD:D
ATD:G
3. 2-Thread
Overlock
ATD:E
4. 3-Thread
Overlock
ATD:A
ATD:B
Narrow
Wide
Narrow
Wide
A 1-needle 2-thread straight stitch is used
for construction or decorative stitching.
Seams also can be sewn at desired
distance from edge of fabric by
disengaging the right looper and movable
knife.
1-needle 2-thread stitch is used for
seaming lightweight or stretch fabrics.
It is also ideal for rolled and blind hemming.
A 4 mm and 6 mm overlock seam width
can be obtained by changing the needle
position.
1-needle 2-thread stitch is used for
overedging common fabrics. It is also
ideal for flatlock (butted or lapped) seams
and blind hemming. A 4 mm and
6 mm overedge seam width can be
obtained by changing the needle position.
1-needle 3-thread stitch is used for
overedging and seaming on common
fabrics. A mm and 6 mm overlock seam
width can be obtained by changing the
needle position.
Instruction
Manual
Page
Reference Page
39
40
41
42
5. 3-Thread
Flatlock
ATD:F
6. 3-Thread Mock
Safety Stitch
Overlock
ATD:G
7. 4-Thread Mock
Safety Stitch
Overlock
ATD:A
1-needle 3-thread stitch is used for
butted or lapped seams and ornamental
stitching with decorative thread. Also,
a 4 mm and 6 mm flatlock width can
be obtained by changing the needle
position.
2-needle 3-thread stitch that is ideal for
lightweight, extremely stretchy fabrics
such as tricot and spandex.
2-needle 4-thread stitch that is ideal
for medium to heavyweight stretchy
fabrics such as double knits and swim
wear.
24
43
44
45
Page 27

Selection of Stitches & Auto Tension
This machine is capable of producing various types of stitches according to the combination of Auto
Tension Selected, needle positions, threading methods, and the use of convertible right looper/
converter.
Stitch Type Reference
8. 4-Thread
Chain Stitch2-Thread
Overlock
ATD:I
ATD: Auto Tension Dial Selected
The 4-thread stitch is a safety stitch
made up of combined 2-thread
overedge and double chain stitch.
Instruction
Manual
Page
Reference Page
46
9. 5-Thread
Chain Stitch3-Thread
Overlock
ATD:A
Narrow
ATD:B
Wide
10. Cover Stitch
ATD:K
Narrow
(2.8mm)
ATD:H
Wide
(5.6mm)
The 5-thread stitch is a safety stitch
made up of combined 3-thread overlock
and double chain stitch.
A wide seam is formed by using left needle.
Overedge and seaming can be done in one
operation on non-stretch fabrics.
The 5-thread stitch is a safety stitch
made up of combined 3-thread
overlock and double chain stitch.
A narrow seam is formed by using right
needle Overedge and seaming can be dane
in one operation on non-stretch fabrics.
2-needle, 3-thread cover stitch is
suitable for stretchy fabrics such as
knits, etc.
A narrow seam is formed by using left
and middle needles.
2-needle 3-thread cover stitch is
suitable for stretchy fabrics such as
knits, etc.
A wide seam is formed by using left
and right needles.
one
47
47
50
50
11.Triple Cover
Stitch (5.6mm)
ATD:J
12. 3-Thread
Rolled Hem
(4.0mm)
ATD:C
3-needle 4-thread cover stitch is
suitable for stretchy fabrics such as
knits, etc.
A triple seam is formed by using left,
middle, and right needles
1-needle 3-thread stitch is used for sewing
narrow rolled hems.
.
25
51
54
Page 28

2 . HANDY REFERENCE CHART3
Handy Reference Chart
Stitch Type
Chain Stitch
1
2-Thread Wrapped
2
Edge Overlock
2-Thread Overlock
3
4
3-Thread Overlock
3-Thread Flatlock
5
A
T
D
D
D
G
E
E
A
B
F
F
SLDFL
N
N
2
N
2
N
2
N
2
N
N
N
N
N
2
N
2
N
/
C
C
L
L
L
L
L
L
L
L
Needle
Position
4.0mm
narrow
6.0mm
wide
4.0mm
narrow
6.0mm
wide
4.0mm
narrow
6.0mm
wide
4.0mm
narrow
6.0mm
wide
Tension Dial Selected :As select ATD option,
the tension dial are set automatically.
Yellow
GreenRed Purple
converter
converter
converter
converter
Blue
Instruction
Manual
Page
Reference
Page
39
40
40
41
41
42
42
43
43
3-Thread Mock Safety
6
Stitch Overlock
4-Thread Mock Safety
7
Stitch Overlock
4-Thread Chain Stitch-
8
2-Thread Overlock
5-Thread Chain Stitch-
9
3-Thread Overlock
Cover Stitch
10
Narrow/ Wide
Triple Cover Stitch
11
Three - Thread
12
Rolled Hem
G
2
A
N
I
N
A
N
B
N
K
N
H
N
J
N
C
1
ATD: Auto Tension Dial Selection
DF: Differential Feed
N
L
N
L
N
L
N
N
N
N
N
N
narrow
L
wide
L
2.8mm
C
narrow
5.6mm
C
wide
5.6mm
C
4.0mm
L
SL: Stitch Length
L/C: Upper Looper driving clutch position
converter
converter
44
45
46
47
47
50
50
51
54
* When option 2, 3, 6, 8 selected, use converter.
* When option 1, 10, and 11 selected, turn upper knife down, move seam width finger knob to setting R, and change front cover
attached cover (A) into (B).
* Auto tension settings are based on medium weight fabric and standard #60 polyester spun thread. It can satisfy most requirements
for sewing. If using different thread number or fabric and the result is not what you expected, please adjust in small increments.
26
Page 29

Create a classic silhouette by making a
Wrap Skirt
Skill Level: Beginner
Supplies:
• Baby Lock Diana serger
• Wrap skirt pattern or template below
• Paper to trace pattern
• 4 Cones of Maxi-Lock serger thread
• 1 Spool decorative or contrasting color thread
• Measuring tape
• 2 ½ yards linen
• Interfacing
• Hand sewing needle
• Skirt hook and eye
• Pencil
• Ruler
• Iron and ironing board
simple A-line skirt all on the serger.
Instructions:
1. Measure and trace off pattern on to the pattern paper.
Template front
27
Template back
Page 30

2. Measure your back waist (from hipbone to hipbone). Then, measure your front waist.
3. Adjust the pattern width according to your measurements. Add or subtract as needed.
Remember the front pieces overlap.
4. On the front and back pattern, measure from the waist edge 4” down and draw a line.
Trace this section off to form the front and back facings.
5. Cut the back on the fold. Cut two front pieces.
6. Cut four tie pieces 3-½” x 22”. Cut one short end of the ties off at an angle.
7. Set up the serger for a 4-thread stitch.
8. Place two ties right sides together. Serge both long ends and the angled end. Turn the
tie right side out through the open short end. Press.
9. Repeat for the remaining tie strand.
10. Serge the front to the back at the side seam. Place one of the ties in the left side seam.
11. Serge the facing front to the facing back at the side seams.
12. With right sides together serge facing to the skirt at the waist band edge.
13. Place the remaining tie on the right front.
14. Serge the front sides catching the facings. Continue along the front edge to the hem
edge. Serge across the hem edge.
15. Turn the waistband edge to the right side and press.
16. Set the serger up for a chain stitch using a decorative or contrasting thread in the chain
looper.
17. Chain stitch along the edges of the skirt waistband, skirt ties and skirt front, and hem
turning under the serged edge when needed.
18. Hand stitch a skirt hook in place to secure the front without a tie to the waist band edge.
27
Page 31

For other exciting projects like this one, visit our Web site at www.babylock.com
28
Page 32

Visit our Web site at www.babylock.com
LBIN-BL480A
 Loading...