

Page 1

Getting to Know:
A-LINE SERIES
Model BL40A
Baby Lock Consumer Helpline: 800-313-4110
www.babylock.com
Page 2
A-LINE SERIES
Model BL40A
If you’re an ambitious sewer, Grace can help you get to the head of the class when it comes
to your sewing projects. This versatile machine is equipped to take your sewing to the next
step with project-enhancing features and everything you need to make challenging projects a
breeze. From timeless, classic fashions to modern crafts and décor, Grace will always be there
to lend a hand.
This Getting to Know Guide will take you through a simple, step-by-step process on how to
wind your bobbin, thread the machine, set stitches and more. Once you’re familiar with your
machine, refer to the instructions and reference guide (packaged with your machine) for
additional directions.
Like all machines in the A-Line Series, Grace has the features and the durability to handle all
of your projects – you can always count on her to be there for you. Be sure to ask your Baby
Lock Retailer about Grace’s friends in the A-Line Series; like Lauren, Natalie, Maria and Audrey.
From classic tailored looks to modern-day fashions, the machines in the A-Line Series will help
you sew and serge with success – all with the quality you’ve come to expect from Baby Lock.
Page 3

Winding the Bobbin
1 Hook for the bobbin-winding thread guide
2 Pretension disk
3 Bobbin winder shaft
4 Bobbin
1. Placethebobbinonthebobbinwindershaftsothatthespringontheshafttsintothenotch
in the bobbin.
1 Notch
2 Bobbin winder shaft spring
2. Slide the bobbin winder shaft to the right until it snaps into place.
3. Fully insert the spool of thread for the bobbin onto the spool pin. Slide the spool onto the pin
so that the spool is horizontal and the thread unwinds to the front at the bottom.
1
Page 4
Winding the Bobbin
4. Slide the spool cap onto the spool pin.
5. Pull some thread off the spool and pass the thread under the thread guide, then behind the
thread guide, cover from the back to the front. Hold the thread with your right hand so that there is
no slack in the thread after placing it under the thread guide, and then pass the thread behind the
thread guide cover with your left hand.
1
1 Thread guide
2
6. Pull the thread, pass it under the hook of the bobbin-winding thread guide, and then wind the
thread counterclockwise between the discs, pulling it in as far as possible.
1 Hook for the bobbin-winding thread guide
2 Pretension disk
2 Thread guide cover
2
Page 5

Winding the Bobbin
7. While using your left hand to hold the thread that was passed through the bobbin-winding
thread guide, use your right hand to wind the end of the thread clockwise around the bobbin
veorsixtimes.
8. Pass the end of the thread through the slit in the bobbin winder seat, and then pull the thread
to the right to cut it. The thread is cut to a suitable length.
1 Slit in bobbin seat (with built-in cutter)
9. Press start/stop button once. The bobbin starts spinning and the thread is wound around the
bobbin. Slide the sewing speed controller to the right to increase the speed, if desired.
2
1 Start/Stop button
2 Sewing speed controller
10. When the bobbin winding becomes slow, press start/stop button once to stop the machine.
11. Cut the thread, slide the bobbin winder shaft to the left, and then remove the bobbin from the
shaft.
NOTE: When the sewing machine is started or the handwheel is turned after winding the bobbin, the
machine will make a clicking sound; this is not a malfunction. Sewing is not possible while the bobbin
winder shaft is moved to the right.
3
Page 6
Inserting the Bobbin
1. Press needle position button once or twice to raise the needle, and then raise the presser
foot lever. Turn OFF the sewing machine (set it to “O”).
1 Needle position button
2. Slide the latch on the right side of the bobbin cover to the right, and then remove the bobbin
cover.
1 Bobbin cover
2 Latch
3. Insert the bobbin so that the thread unwinds to the left side and catches under the tab. Lightly
hold down the bobbin with your right hand, and guide the thread through the slot, and then
pull it toward you to cut it with the cutter. The cutter cuts the thread.
2
1 Tab
2 Slot
3
3 Cutter
1
4
Page 7

Inserting the Bobbin
4. Makesurethatthethreadiscorrectlypassedthroughtheatspringofthebobbincase.Ifit
is not inserted correctly, reinsert the bobbin.
1 Flat spring
5. The direction for feeding the bobbin thread is indicated by marks around the needle plate
cover. Be sure to thread the machine as indicated.
6. Reattach the bobbin cover. Insert the tab of the bobbin cover (A) in the lower-left corner, and
then press down on the right side (B).
NOTE: You can begin sewing without pulling up the bobbin thread.
5
Page 8

Threading the Machine
1. Raise the presser foot lever so the sewing machine can be threaded correctly.
1 Spool pin
2 Mark on handwheel
NOTE: The needle threader can be used with sewing machine needles 75/11 through 100/16. The needle
threader cannot be used with a wing needle, the twin needle or threads with thicknesses larger than 130/20.
1 Presser foot lever
2. Press needle position button once or twice to raise the needle.
1 Needle position button
NOTE: If the needle is not correctly raised, the sewing machine cannot be threaded. Check that the mark on
the handwheel points up as shown in the illustration below. If the handwheel is not in this position, be sure to
press the needle position button to raise the needle before continuing the procedure.
1 Mark on handwheel
6
Page 9
Threading the Machine
3. Fully insert the spool for the upper thread onto the spool pin. Slide the spool onto the pin so
that the spool is horizontal and the thread unwinds to the front at the bottom. Slide the spool
cap onto the spool pin.
4. Pull some thread off the spool and pass the thread under the thread guide, then behind the
thread guide cover from the back to the front. Hold the thread with your right hand so that
there is no slack in the thread after placing it under the thread guide, and then pass the thread
under the thread guide cover with your left hand.
1
1 Thread guide
2
2 Thread guide cover
7
Page 10

Threading the Machine
5. Thread the machine by guiding the thread along the path indicated by the number on
the machine.
6. Slide the thread into the thread take-up lever from the right to the left.
1 Thread take-up lever
7. Pass the thread behind the needle bar thread guide. The thread can easily be passed behind the
needle bar thread guide by holding the thread in your left hand, then feeding the thread with your right
hand.
1 Needle bar thread guide
8. Continue threading the machine by following the section on using the needle threader.
8
Page 11

Using the Needle Threader
9. Lower the presser foot lever.
1 Presser foot lever
10. While lowering the needle threader lever, hook the thread onto the guide.
11. Catch the thread on the hook as shown below.
1 Needle threader
2 Thread
3 Guide
1 Needle threader lever
9
Page 12

Using the Needle Threader
12. Raise the needle threader lever, and then pull the end of the thread which passed through the
eye of the needle.
13. Raise the presser foot lever. Pass the end of the thread through and then under the presser foot,
and then pull out about 2 inches of thread toward the rear of the machine.
1 2 inches
10
Page 13

Selecting the Stitch
1. Turn the pattern selection dial to select the stitch to be sewn. Turn the dial to the right to
increase the number, or turn the dial to the left to decrease the number.
1 Pattern selection dial
The stitch appears in the
LCD screen
2. Attach the presser foot indicated in the LCD screen. The presser foot to be used is indicated by the
letter (J, A, etc.) that appears above the stitch number.
1 Presser foot type
3. If necessary, adjust the stitch width and stitch length.
ADJUSTING THE STITCH LENGTH AND WIDTH
4. Turn the pattern selection dial until your desired stitch appears on the LCD screen.
5. Press “+” or “–” on the top row, which are the stitch length keys for adjusting the stitch length.
1 Stitch length key
2 Stitch length
3 Fine
4 Coarse
11
Page 14

Selecting the Stitch
6. Press “+” or “–” on the bottom row, which are the stitch width keys for adjusting the stitch
width.
1 Stitch width key
2 Stitch width
3 Narrow
4 Wide
NOTE: When the stitch length or stitch width is changed from the default setting, around or
disappears from the LCD screen. When the stitch length or stitch width is reset back to the default
setting, reappears around or in the LCD screen.
If the stitch width of the selected stitch cannot be adjusted, “--” appears to the right of in the LCD
screen.
12
Page 15

Starting to Sew
POSITIONING THE FABRIC
Be sure that the fabric pieces are sewn in the correct order and that the right and wrong sides of the
fabric are aligned correctly.
1. With the foot and needle raised, place the fabric under the presser foot.
2. While holding the end of the threads and the fabric with your left hand, turn the handwheel toward you
(counterclockwise) with your right hand to lower the needle to the starting point of the stitching.
4. Lower the presser foot lever.
1 Presser foot lever
13
Page 16

Starting to Sew
5. Slide the sewing speed controller to the left or right to select the desired sewing speed. The speed set
using the sewing speed controller will be the foot controller’s maximum sewing speed.
1 Sewing speed controller
6. Connect the foot controller into its jack on the side of the machine. Once you are ready to start
sewing, slowly press down on the foot controller. Pressing down on the foot controller increases the
sewing speed; releasing the pressure on the foot controller decreases the sewing speed.
7. When the end of the stitching is reached, completely release the foot controller. The machine stops
sewing with the needle lowered (in the fabric).
8. Whenyouwishtonishthestitchingandthesewingmachineisstopped,presstheneedleposition
button once to raise the needle.
1 Needle position button
14
Page 17

Starting to Sew
9. Raise the presser foot lever.
1 Presser foot lever
10. Pull the fabric to the left side of the machine, and then pass the threads through the thread cutter to
cut them.
1 Thread cutter
15
Page 18

Grace’s
Convertible
Capri Jeans
Grace’s Jump-Up Jeans – Turn a pair of jeans (especially
ones with worn hems) into a pair of convertible capri pants.
These fashionable, flirty capris include several length
options for any kind of weather or activity, like bike riding.
3. Cut the legs off at capri
length.
Skill Level: Beginner
Supplies:
• Baby Lock Grace Sewing Machine
• Pair of jeans
• Iron and ironing board
• All-purpose thread to match
• 14 buttons
• ½ yard cotton fabric
• 1/2 yard of ½” wide ribbon
• Fabric Glue or Steam-a-Seam 2 Fusible web
• Hand needle
• Scissors
• Tape Measure
• Ruler
• Pins
• Chalk
• Friend to measure you
Instructions:
4. Fold the cotton fabric
wrong side out so you
have four layers.
5. Lay the leg down on the
wrong side of the cotton
fabric. Trace the leg shape
on the cotton fabric using
the chalk.
6. Trace up the leg 6”.
7. Cut ½” outside the traced
lines on all sides. This is
for the seam allowance.
3.
5.
1. Try on the jeans; have a friend mark a
chalk line on the jeans for the desired
length for the capris.
NOTE: You cannot achieve accurate
measurements on yourself; as you
bend down the measurement will
change. Having a friend help will take
only a few minutes and will give you the
opportunity to tell them about your project!
2. With the jeans on a flat surface, use the
chalk and ruler to draw a solid line for
cutting ½” below the mark across both
legs.
16
Page 19
8. Thread the Baby Lock Grace sewing machine with
all-purpose thread.
9. Stitch the side seams of two of the cotton leg pieces
together forming a tube shape.
17. Adjust the stitch width, and turn the handwheel
to check if the needle enters into each hole in the
button. Lower the foot to hold the button in place.
The holes in the button should align with the slot of
the foot.
10. Fold over ½” and press the top edge of the cotton
piece.
11. Pin the lower cut end of the jeans leg and the cotton
leg piece right sides together. Stitch the lower leg
using a ½” seam allowance.
12. Turn the jeans wrong side out; press.
13. Glue or fuse (following the manufacturer’s
instructions) the upper edge of the cotton piece to
the inside of the jeans leg.
14. Repeat for the other leg. Turn the jeans right side
out. Fold up and press the lower edge 3” to form the
cuff.
15. Stitch 5 buttons to each leg,
3 on each denim side and
2 on each cuff. To sew the
buttons by machine, attach
the button fitting foot M
(Figure 1), select stitch 05,
and lower the feed dog on
the machine.
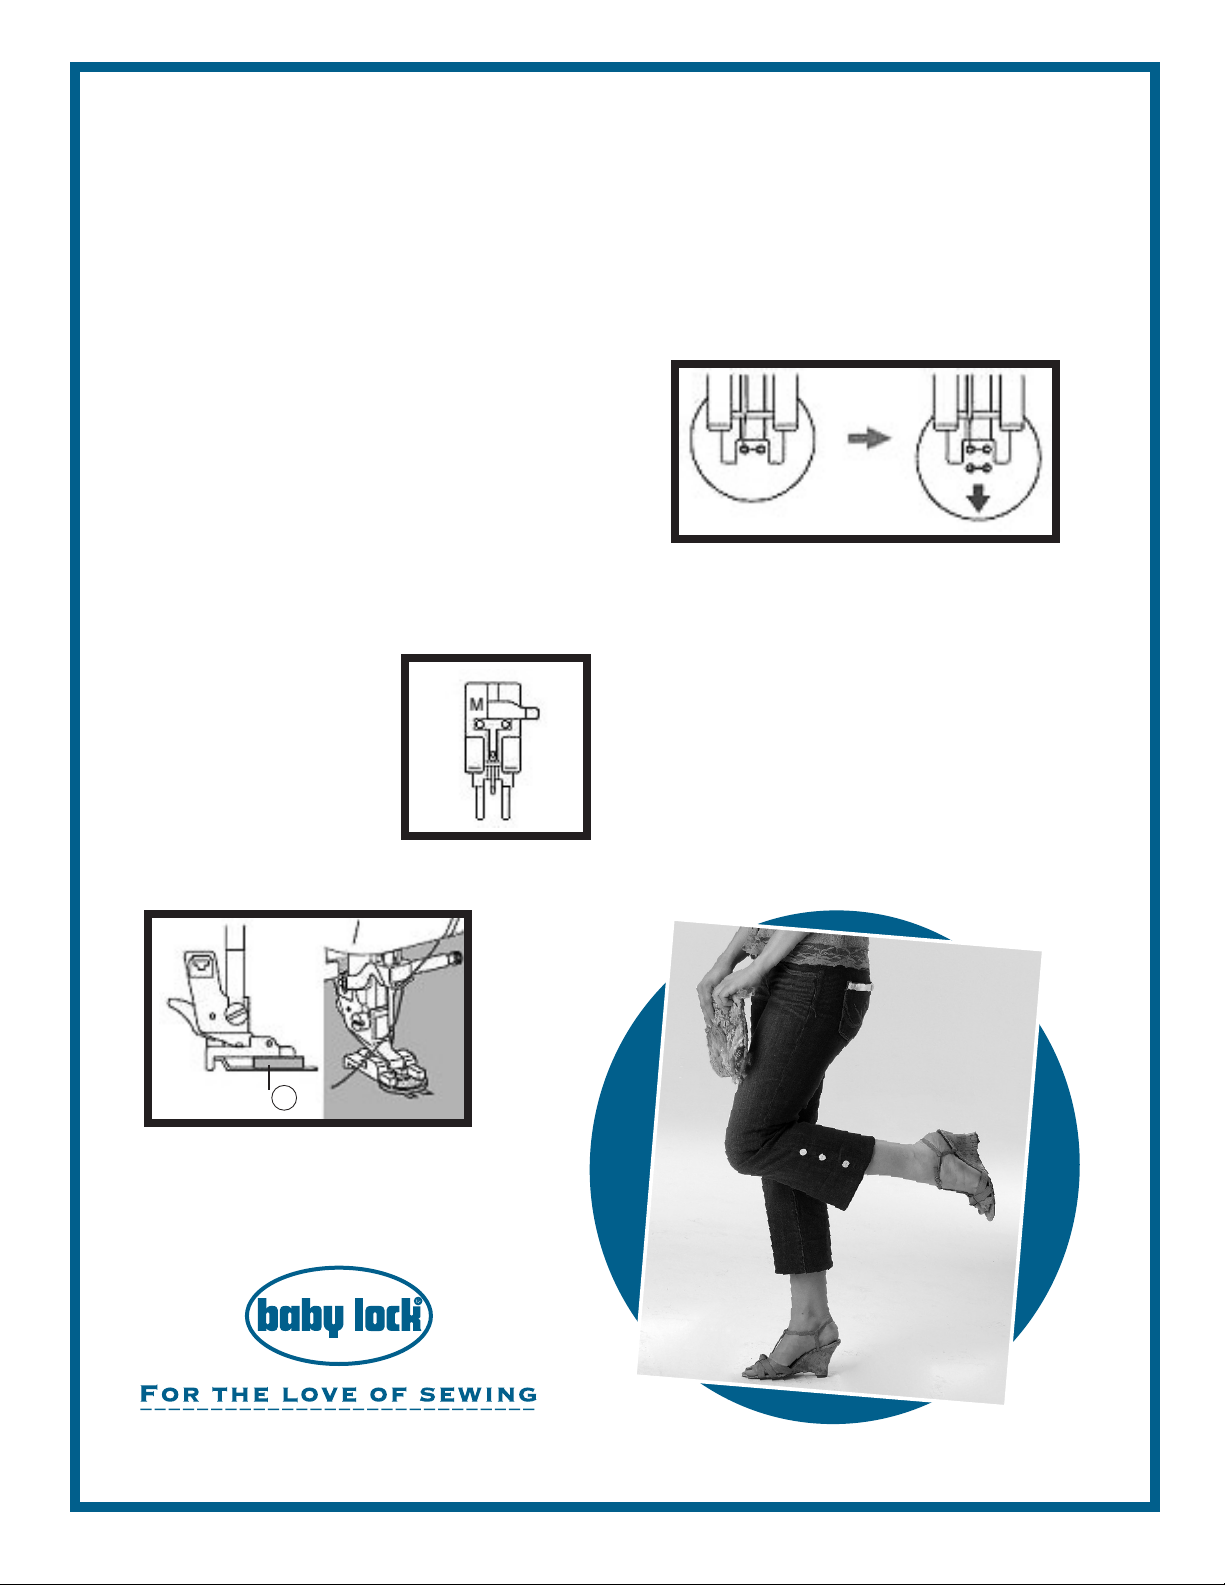
Fig. 1
16. Place the button into the button fitting foot (Figure 2).
18. On a four-hole button, stitch the two holes closest
to you first and then slide the button so the needle
aligns with the remaining holes (Figure 3). Stitch
several times.
Fig. 3
19. Repeat this process until all the buttons on the legs
are secure. Remember to raise the feed dog after
sewing.
20. To embellish the pockets, cut two strips of ribbon
the length of the pocket plus 1”. Fold the ends of
the ribbon under and glue or fuse (following the
manufacturer’s instructions) the ribbon to the top of
the back pockets.
21. Using a hand needle and thread or fabric glue,
place a button on both ends of the ribbon.
Button
1
Fig. 2
For other exciting projects like this one, visit our Web sites at www.totallystitchin.net and www.babylock.com
17
Page 20

For other exciting projects like this one, visit our Web site at www.totallystitchin.net or www.babylock.com
LBIN-BL40A
 Loading...