


city GOTM i-Size
Model City GO i-Size car seat & base
0 - 87cm / ≤13kg
NWL0000669035A ©2017 BABY JOGGER 8/17
EN |
CS |
DE |
DA |
EL |
ES |
FI |
babyjogger.com
IMPORTANT! KEEP FOR FUTURE REFERENCE
Do not install or use this child restraint until you read and understand the instructions in this manual.
FAILURE TO PROPERLY USE THIS CHILD RESTRAINT INCREASES THE RISK OF SERIOUS INJURY OR DEATH IN A SUDDEN STOP OR CRASH.
EN |
12 |
14
10
11 |
7
13
5
7
1
15
16
2
11 3
8
9
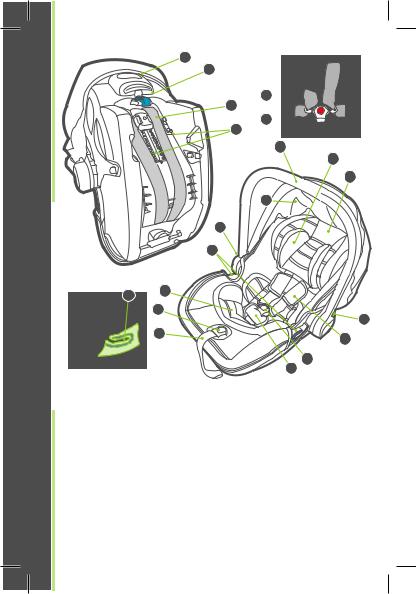
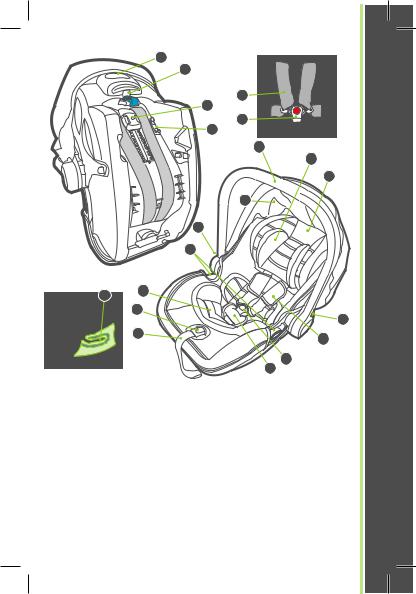
1Carry Handle
2Canopy
3Body Support
4Harness Covers
5Buckle
6Buckle Cover
7Harness Straps
8Harness Release Lever
10
4
5
6
9Harness Adjustment Strap
10Handle Adjustment Buttons
11Lap Belt Path
(when used without the base)
12Car Seat Release Handle
13Headrest/Harness Adjustment Button
14Shoulder Belt Path
(when used without the base)
15Head Support
16Headrest
2
EN
1 |
2
3 |
4 |
5
6
8 |
7 |
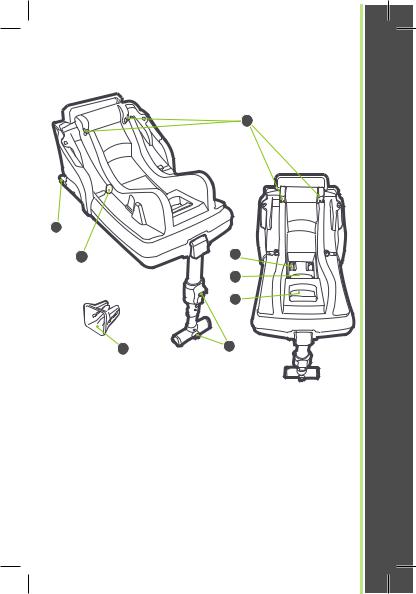
1 |
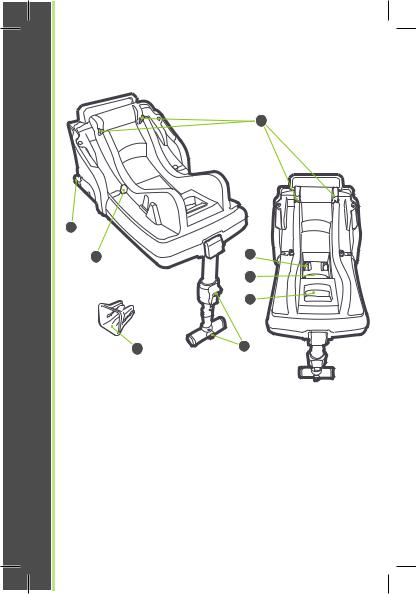
Car Seat Base Lock |
5 |
ISOFIX Release Lever |
2 |
ISOFIX Attachments |
6 |
Recline Handle |
3 |
Car Seat Attachment |
7 |
Support Leg Adjustment |
|
Indicator |
|
Buttons |
4 |
ISOFIX Extend Buttons |
8 |
ISOFIX guide caps |
3
1 |
2 |
3 
4

 4
4 


4

5 
6 |
7 |
1
3
 4 5
4 5
6
7
8
5
9
4 


10 |
11 |
12
 4
4 

13 |
14 |
6
A
B

 C
C
D
16
18
20
 2.5 cm (1”)
15
17
19
21
7
22
23 24
24
25
26
8
27 |
28 |
29 |
30 |
31 |
32 |
33 
9

34
35
36
10
WARNING |
EN |
|
Do not make any alterations or additions to this child restraint without the approval of the Type Approval Authority, it is dangerous to do so.
It is dangerous not to follow closely the manufacturer installation instructions provided with this child restraint, FAILURE TO USE THIS CHILD RESTRAINT PROPERLY INCREASES THE RISK OF SERIOUS INJURY OR DEATH IN A SHARP TURN, SUDDEN STOP OR CRASH!
It is dangerous to use the car seat on an elevated surface, e.g. a table.
Always use the restraint system.
This car seat is not intended for prolonged periods of sleeping.
Do not use as a reclined cradle once your child can sit unaided.
This car seat does not replace a cot or a bed. Should your child need to sleep, then it should be placed in a suitable cot or bed.
Do not use the reclined cradle if any components are broken or missing.
Do not use accessories or replacement parts other than those approved by the manufacturer.
Important safety advice:
When this Infant Carrier is used in recline position 5, 6, and 7, it may not fit in all vehicles approved for a Universal fixture.
This child restraint is suitable for use by children within the following size range 0 cm - 87 cm.
11

EN This child restraint is suitable for use by children with a maximum weight of 13 kg.
Please also check “i-Size Child Restraint System” instructions in the vehicle manufacturer’s handbook.
It is very important to ensure that any lap strap is worn low down, so that the pelvis is firmly engaged.
The rigid items and plastic parts of a child restraint shall be so located and installed that they are not liable, during everyday use of the vehicle, to become trapped by a movable seat or in a door of the vehicle.
Do not use this child restraint in seating positions where there is an active frontal airbag installed.
Any straps restraining the child should not be twisted.
Any straps holding the restraint to the vehicle should be tight.
The support-leg should be in contact with the vehicle floor.
Any straps restraining the child should be adjusted to the child’s body.
This Child Restraint should be replaced when it has been subject to violent stresses in an accident.
Do not leave a child in this child restraint unattended.
Any luggage or other objects liable to cause injuries in the event of a collision must be properly secured.
This Child Restraint System must not be used without the cover.
The Child Restraint System cover must not be replaced with any other than the one recommended by the manufacturer, because the cover constitutes an integral part of the restraint performance.
12

! Even if using this child restraint seems easy to figure out EN on your own, it is very important to READ, UNDERSTAND
AND FOLLOW THE OWNER’S MANUAL.
If you need help, please contact our Customer Service Department with any questions you may have concerning parts, use, or maintenance. When you contact us, please have your product’s model number and manufactured in (date) ready so that we may help you efficiently.
The numbers can be found on a sticker on the back of your child restraint.
! Your child’s safety depends on:
1.Choose proper head support position based on your child’s size.
2.Properly securing your child in the child restraint.
3.Selecting a suitable location for the child restraint in your vehicle.
4.Properly routing and securing the vehicle seat belt.
!THE CHILD RESTRAINT CAN BECOME VERY HOT IF LEFT IN THE SUN. Contact with these parts can burn your child’s skin. Always touch the surface of any metal or plastic parts before putting your child in the child restraint.
!NEVER USE A SECOND-HAND CHILD RESTRAINT or a child restraint whose history you do not know.
13

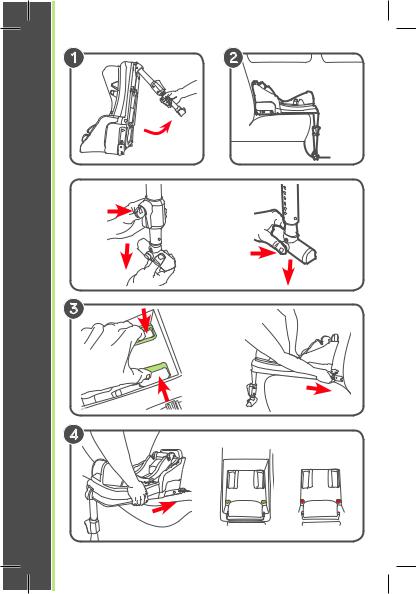
EN CAR SEAT INSTALLATION AND UNINSTALLATION
1Rotate Support Leg Out
2Place base on vehicle seat. The support leg has two buttons to allow the length to be adjusted. Press the buttons to adjust the leg length. The support leg must contact the vehicle floor. Make sure the load leg is secure by pressing down on the base.
3Extend the ISOFIX connectors.
Squeeze the ISOFIX extend buttons and pull the ISOFIX connectors out.
4Press the ISOFIX connectors onto the vehicle anchors until a click is heard. When the ISOFIX connectors are locked the connection indicators will be green. If the base is not locked in the indicators will be red.
5Squeeze the ISOFIX extend buttons. Push down firmly on the base towards the back of the vehicle seat to ensure a tight on the seat.
6To release the base from the vehicle seat pull the ISOFIX release lever and remove base.
RECLINE CAR SEAT
7To recline the car seat pull recline handle and slide into correct position for your child.
ATTACHING THE CAR SEAT TO THE BASE
8To attach seat to base, position front of seat in base then push down on the back until it locks into place. Pull up on car seat to be sure it is securely fixed onto base.
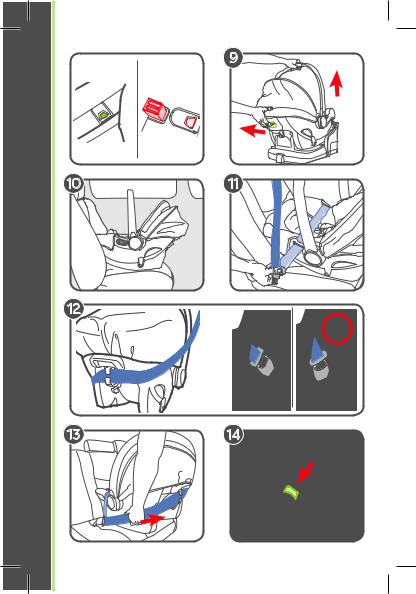
9To remove, squeeze release handle at back of the car seat to release the attachment catch. Lift car seat
from base as shown. Always place handle in the down position when removing your baby from the seat and if you place the car seat onto the floor.
14

CAR SEAT INSTALLATION WITHOUT BASE |
EN |
10Place Car Seat Rear-Facing in the Vehicle
Place the car seat on the vehicle seat. Push it back until the front of the car seat touches the vehicle seat back.
11Put lap section of belt over car seat and under the two belt hooks marked in blue. Buckle the vehicle belt.
12Place shoulder belt around the back of the car seat exactly as shown, making sure to run it through the center guides on the back of the seat and below the notch opposite the shoulder belt origin. The seat belt should lay as flat as possible and not be twisted. Make sure buckle and seat belt are in line with each other. Contact Baby Jogger if in doubt about this point.
13Tighten Vehicle Seat Belt
Lay your forearm across the car seat at the belt path and push down. Pull on the shoulder belt to tighten while feeding the slack back into the retractor.
ADJUSTING THE HANDLE
14Squeeze latches on both sides at bottom of handle to release it.
Rotate handle until it clicks into any of the 4 positions: Position A (up): MUST be used when carrying by handle,
Position B: Vehicle Travel Position
Position C: Convenience Position Position D (down): is the sitting position.
Always place handle in the B position when using it in a vehicle.
SECURING CHILD
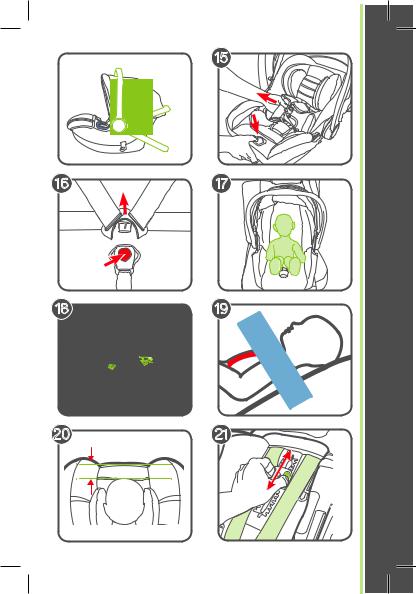
15Loosen Harness Straps
Push down on the harness release lever while pulling out on the harness straps.
15

|
|
|
EN |
|
16 |
Press the red button on the buckle to unfasten the |
|
|
|
|
|||
|
|
|
|
|||
|
|
|
|
|
|
buckle. Place harness straps off to the sides. |
|
|
|
|
|
17 |
Place Your Child in the Seat |
|
|
|
|
|
|
Make sure their back is flat against the car seat back. |
|
|
|
|
|
18 |
Place Harness Straps Over Child’s Shoulders |
|
|
|
|
|
19 |
Be Sure the Harness Straps are at the Proper Height |
|
|
|
|
|
|
Harness straps must be at or just below the child’s |
|
|
|
|
|
|
shoulders. |
|
|
|
|
|
20 |
The top of child’s head must be at least 2.5 cm (1”) |
|
|
|
|
|
|
below the top of the headrest. |
|
|
|
|
|
21 |
To change harness height, from the back of the seat, |
|
|
|
|
|
|
squeeze the headrest adjustment buttons and move it |
|
|
|
|
|
|
up or down to the correct harness position. |
|
|
|
|
|
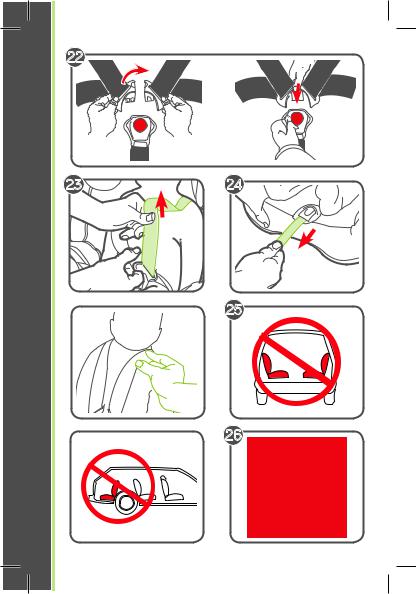
22 |
Buckle Harness Straps |
|
|
|
|
|
|
Fit the two buckle tongues together and push them |
|
|
|
|
|
|
into the buckle. You will hear a “click” when buckle |
|
|
|
|
|
|
tongues are securely attached. Pull up on the buckle |
|
|
|
|
|
|
tongue to make sure it is securely attached. |
|
|
|
|
|
23 |
Pull All the Slack Out From around the Waist |
|
|
|
|
|
|
Pull up on the harness strap while pushing the buckle |
|
|
|
|
|
|
tongue down. Do this on both sides. |
|
|
|
|
|
24 |
Tighten the Harness by Pulling the Harness |
|
|
|
|
|
|
Adjustment Strap |
|
|
|
|
|
|
When you are not able to pinch any of the harness |
|
|
|
|
|
|
webbing at your child’s shoulder, the harness is tight |
|
|
|
|
|
|
enough. |
|
|
|
|
|
UNSAFE VEHICLE SEAT LOCATIONS |
|
|
|
|
|
|
|
Never install this car seat in any of the following vehicle |
|
|
|
|
|
|
seating locations: |
|
|
|
|
|
25 rear-facing or side-facing vehicle seats |
|
|
|
|
|
|
26 rear-facing with an active front air bag |
|
|
|
|
|
|
|
16 |
|
|
|
|
|
|
|
|
|
|
|
|
|
|
|
|
|
|
|
|
|
|
|
|
|
|
|
|
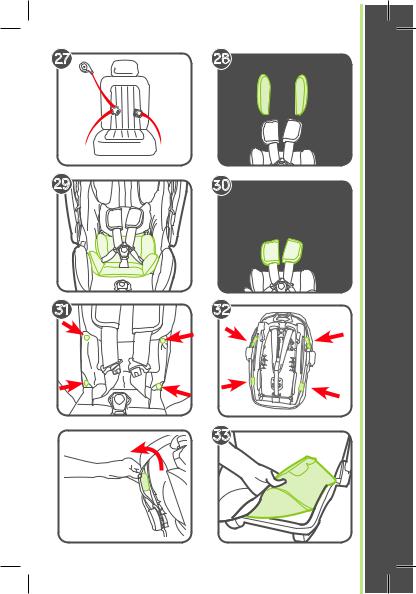
27 Identify Your Seat Belt Type |
EN |
There is only one type of vehicle seat belts that can |
|
be used with this car seat: Combined Lap & Shoulder |
|
Seat-belt 3 connections points. |
|
ACCESSORIES |
|
28 HEAD SUPPORT |
|
Use only with infants up to 60 cm. To remove, slide |
|
out from behind the headrest pad. |
|
29 BODY SUPPORT |
|
Use only with the lowest two sets of harness slots. To |
|
remove, unbuckle the buckle and remove the body |
|
support. |
|
30 Harness Covers |
|
To remove, undo the fastening strips and remove. |
|
CLEANING SEAT COVER |
|
31Unsnap the four buttons on the seat cover.
32Pull out the 4 plastic flaps from the side of the seat.
33Pull cover off the shell.
34To remove canopy from the canopy hoop, first press release tab and remove from mounting bracket, then slide the canopy off the hoop to remove the canopy. Machine wash cover and canopy in cold water on delicate cycle and drip dry. DO NOT USE BLEACH. Reverse the steps to reattach the cover to the shell.
Make sure the harness straps are not twisted.
CLEANING CROTCH BUCKLE
WARNING! Inspect and clean buckle from time to time to remove any objects or debris that could prevent latching.
35 To clean buckle, place in a cup of warm water and gently agitate the buckle. Press the red button several times while in the water.
17

EN |
DO NOT SUBMERGE THE BUCKLE STRAP. DO |
|
NOT USE SOAPS, HOUSEHOLD DETERGENTS or |
|
LUBRICANTS. |
|
Shake out excess water and allow to air dry. Repeat |
|
steps as needed until it fastens with a click. |
|
CLEANING HARNESS |
|
Surface wash only with mild soap and damp cloth. DO |
|
NOT IMMERSE THE HARNESS STRAPS IN WATER |
|
Doing so may weaken the straps. |
|
If harness straps are frayed or heavily soiled, contact |
|
Customer Service at babyjogger.com |
|
36 Store instruction manual in the slot with the instruction |
|
book icon as shown. |
|
REPLACEMENT PARTS |
|
To purchase parts or accessories, please contact us at |
|
the following: |
|
babyjogger.com |
18
12 |
CS |
|
14 |
|
7 |
|
13 |
|
5 |
|
7 |
|
1 |
|
15 |
|
16 |
|
2 |
10
11 |
11 |
|
3 |
|
|
|
|
8 |
10 |
|
|
|
|
9 |
4 |
|
|
5
6
1 |
Rukojeť |
9 |
Popruh nastavení postroje |
|
2 |
Klenba |
10 |
Tlačítka uvolnění rukojeti |
|
3 |
Podpora těla |
11 |
Vodítko klínového pásu při jízdě zády po |
|
4 |
Kryty postroje |
|
směru jízdy (při použití bez základny) |
|
12 |
Páčka uvolnění autosedačky |
|||
5 |
Přezka |
|||
13 |
Tlačítko pro úpravu hlavové opěrky/ |
|||
6 |
Kryt přezkyw |
|||
|
postroje |
|||
7 |
Popruhy postroje |
14 |
Dráha ramenního pásu (při použití bez |
|
8 |
Odepínací páčka |
|
základny) |
|
15 |
Podpora hlavy |
|||
|
postroje |
|||
|
16 |
Opěrka hlavy |
||
|
|
19
CS
1 |
2
3 |
4 |
5
6
8 |
7 |
1 |
Zámek základy dětské |
5 |
Odepínací páčka systému |
|
autosedačky |
|
ISOFIX |
2 |
Vodítka ISOFIX |
6 |
Sklápěcí rukojeť |
3 |
Ukazatel upevnění dětské |
7 |
Tlačítka nastavení opěrné |
|
autosedačky |
|
nohy |
4 |
Nastavovací tlačítka systému |
8 |
vodící krytky ISOFIX |
|
ISOFIX |
|
|
20
 VAROVÁNÍ! CS
Neprovádejte žádné zmeny nebo dodatky zádržného systému bez úredního schválení typu. Je to nebezpecné.
Je nebezpecné dusledne nedodržovat pokyny výrobce k instalaci dodané s detským zádržným systémem. NESPRÁVNÉ POUŽITÍ DETSKÉHO ZÁDRŽNÉHO SYSTÉMU ZVYŠUJE RIZIKO VÁŽNÉHO ÚRAZU NEBO SMRTI V OSTRÉ ZATÁCCE, PRI NÁHLÉM ZASTAVENÍ NEBO NEHODE.
Je nebezpecné používat detskou autosedacku na vyvýšené ploše, napr. na stole.
Vždy použijte zádržný systém.
Detská autosedacka není urcena pro delší spánek dítete.
Jakmile je vaše díte schopné sedet samo bez pomoci, nepoužívejte tento výrobek jako klidovou kolébku.
Detská autosedacka nenahrazuje detskou postýlku nebo lužko. Pokud se vašemu díteti chce spát, melo by být dáno do odpovídající detské postýlky nebo lužka.
Klidovou kolébku nepoužívejte, pokud jsou jakékoliv cásti poškozeny nebo pokud chybí.
Nepoužívejte príslušenství nebo náhradní díly, které nejsou schváleny výrobcem.
Duležité bezpecnostní upozornení
Pri použití kojenecké sedacky v naklonené poloze 5, 6 nebo 7 nemusí sedacka pasovat do všech vozidel schválených pro univerzální uchycení.
Detský zádržný systém je urcený k použití pro deti v rozmezí velikosti 0 až 87 cm.
21
CS Detský zádržný systém je urcený k použití pro deti s maximální váhou 13 kg.
Prectete si prosím návod „Detský zádržný systém i-Size“ v návodu k použití výrobce vozidla.
Je velmi duležité zajistit, aby brišní popruh byl nasazen nízko dole tak, aby pevne zachycoval pánev.
Pevné cásti a plastové soucásti detského zádržného systému musí být umísteny a namontovány tak, že nenastane možnost jejich zachycení pri každodenním provozu vozidla, pri pohybu sedadlem nebo ve dverích vozidla.
Nepoužívejte detský zádržný systém na sedackách, které jsou vybaveny aktivním predním airbagem.
Popruhy zadržující díte nesmejí být prekroucené.
Popruhy upevnující zádržný systém k vozu musí být napjaté.
Prední podpurná noha musí být v kontaktu s podlahou vozidla.
Popruhy zadržující díte musí být nastaveny podle velikosti dítete.
Pokud byl detský zádržný systém vystaven velkým tlakum pri autonehode, musí se vymenit.
V zádržném systému nenechávejte díte bez dozoru.
Všechna zavazadla nebo jiné predmety, od kterých v prípade nehody hrozí zranení, musí být bezpecne
pripevneny. Detský zádržný systém nesmí být používán bez prebalu.
22

Prebal detského zádržného systému nesmí být nahrazen |
CS |
jiným prebalem, krome typu doporuceného výrobcem, |
|
protože prebal tvorí nedílnou soucást zádržné funkce. |
|
! I když se muže zdát, že na použití detského zádržného |
|
systému prijdete snadno sami, je velice duležité si |
|
PRECÍST NÁVOD K POUŽITÍ, POROZUMET MU A DRŽET |
|
SE JEJ. |
|
Pokud potrebujete pomoc, kontaktujte prosím oddelení |
|
péce o zákazníky s jakýmikoliv otázkami ohledne dílu, |
|
použití nebo údržby. Pokud nás budete kontaktovat, |
|
pripravte si prosím císlo modelu výrobku a datum výroby, |
|
abychom vám mohli lépe pomoci. Císla najdete na |
|
samolepce na zadní strane detského zádržného systému. |
|
! Bezpecí vašeho dítete závisí na: |
|
1.Zvolení odpovídající operky hlavy podle velikosti vašeho dítete.
2.Správném zabezpecení dítete do detského zádržného systému.
3.Volbe vhodného umístení detského zádržného systému ve vozidle.
4.Správném vedení a uchycení bezpecnostního pásu vozidla.
!POKUD JE DETSKÝ ZÁDRŽNÝ SYSTÉM PONECHÁN NA SLUNCI, MUŽE BÝT VELICE HORKÝ. Pri kontaktu s detskou pokožkou by ji tyto cásti mohly popálit. Než dáte díte do detského zádržného systému, vždy se dotknete povrchu všech kovových nebo plastových cástí.
!NIKDY NEPOUŽÍVEJTE BAZAROVÝ DETSKÝ ZÁDRŽNÝ SYSTÉM, nebo systém, u kterého neznáte jeho historii.
23

CS INSTALACE A VYJMUTÍ AUTOSEDAČKY
1Opernou nohu vytocte smerem ven
2Položte základnu na sedadlo auta. Operná noha má dve tlacítka, která upravují nastavení její výšky. Stisknutím tlacítek nastavíte výšku operné nohy.
Operná noha musí být v kontaktu s podlahou vozidla. Zatlacením na základnu smerem dolu se ujistíte, že je operná noha bezpecne nastavena.
3Vysunte konektory ISOFIX. Stlacte tlacítka vysunutí na systému ISOFIX a konektory ISOFIX vytáhnete smerem ven.
4Zatlacte konektory ISOFIX na kotevní poutka vozidla, dokud neuslyšíte zacvaknutí. Pokud jsou konektory ISOFIX správne zajišteny, ukazatel upevnení bude zelený. Pokud by základna nebyla správne zajištena, ukazatel bude cervený.
5Stlacte tlacítka vysunutí na systému ISOFIX. Základnu pevne zatlacte na zadní stranu sedadla vozidla a ujistete se, že na sedadle správne sedí.
6Odpojení základny z vozidla provedete zatažením za odepínací pácku systému ISOFIX a vyjmutím základny.
SKLOPENÍ AUTOSEDACKY
7Sklopení autosedacky provedete zatažením klopící páky a posunutím do správné pozice pro vaše díte.
PRIPEVNENÍ AUTOSEDACKY K ZÁKLADNE
8Sedacku na základnu pripevníte tak, že prední cást nasadíte na prední stranu základny a zatlacíte na zadní stranu do té doby, než zacvakne na místo. (Viz obrázek.) Zatáhnete za autosedacku smerem nahoru a presvedcte se, že je pevne pripevnena k základne..
24
 Loading...