


INSTALLATION GUIDE
Axis Thermal Network Camera
Replacement Lens
ENGLISH DEUTSCH
FRAN
Ç
AIS
ITALIANO
ESPAÑOL

Legal Considerations
Video and audio surveillance can be
prohibited by laws that vary from
country to country. Check the laws in
your local region before using this
product for surveillance purposes.
Trademark Acknowledgments
Apple, Boa, Bonjour, Ethernet, Internet
Explorer, Linux, Microsoft, Mozilla,
Netscape Navigator, OS/2, Real,
SMPTE, QuickTime, UNIX, Windows,
WWW are registered trademarks of the
respective holders. Java and all Javabased trademarks and logos are
trademarks or registered trademarks of
Sun Microsystems, Inc. in the United
States and other countries. Axis
Communications AB is independent of
Sun Microsystems Inc. UPnP™ is a
certification mark of the UPnP™
Implementers Corporation.
Electromagnetic Compatibility
(EMC)
This equipment generates, uses and
can radiate radio frequency energy
and, if not installed and used in
accordance with the instructions, may
cause harmful interference to radio
communications. However, there is no
guarantee that interference will not
occur in a particular installation.
If this equipment does cause harmful
interference to radio or television
reception, which can be determined by
turning the equipment off and on, the
user is encouraged to try to correct the
interference by one or more of the
following measures: Re-orient or
relocate the receiving antenna.
Increase the separation between the
equipment and receiver. Connect the
equipment to an outlet on a different
circuit to the receiver. Consult your
dealer or an experienced radio/TV
technician for help. Shielded (STP)
network cables must be used with this
unit to ensure compliance with EMC
standards.
USA - This equipment has been tested
and found to comply with the limits
for a Class B computing device
pursuant to Subpart B of Part 15 of
FCC rules, which are designed to
provide reasonable protection against
such interference when operated in a
commercial environment. Operation of
this equipment in a residential area is
likely to cause interference, in which
case the user at his/her own expense
will be required to take whatever
measures may be required to correct
the interference.
Canada - This Class B digital
apparatus complies with Canadian
ICES-003
Europe - This digital equipment fulfills
the requirements for radiated emission
according to limit B of EN55022, and
the requirements for immunity
according to EN55024 residential and
commercial industry.
Japan - This is a class B product based
on the standard of the Voluntary
Control Council for Interference from
Information Technology Equipment
(VCCI). If this is used near a radio or
television receiver in a domestic
environment, it may cause radio
interference. Install and use the
equipment according to the
instruction manual.
Australia - This electronic device
meets the requirements of the Radio
communications (Electromagnetic
Compatibility) Standard AS/NZS
CISPR22:2002.
Korea - Class B: As this equipment has
obtained EMC registration for
household use, it can be used in any

area including residential areas.
Safety
Complies to EN 60950-1 (IEC 60950-1), Safety of Information Technology
Equipment.
Equipment Modifications
This equipment must be installed and used in strict accordance with the
instructions given in the user documentation. This equipment contains no userserviceable components. Unauthorized equipment changes or modifications
will invalidate all applicable regulatory certifications and approvals.
Liability
Every care has been taken in the preparation of this document. Please inform
your local Axis office of any inaccuracies or omissions. Axis Communications
AB cannot be held responsible for any technical or typographical errors and
reserves the right to make changes to the product and documentation without
prior notice. Axis Communications AB makes no warranty of any kind with
regard to the material contained within this document, including, but not
limited to, the implied warranties of merchantability and fitness for a particular
purpose. Axis Communications AB shall not be liable nor responsible for
incidental or consequential damages in connection with the furnishing,
performance or use of this material.
RoHS
This product complies with both the European RoHS directive, 2002/
95/EC, and the Chinese RoHS regulations, ACPEIP.
WEEE Directive
The European Union has enacted a Directive 2002/96/EC on Waste
Electrical and Electronic Equipment (WEEE Directive). This directive
is applicable in the European Union member states.
The WEEE marking on this product (see right) or its documentation
indicates that the product must not be disposed of together with
household waste. To prevent possible harm to human health and/or
the environment, the product must be disposed of in an approved and
environmentally safe recycling process. For further information on how to
dispose of this product correctly, contact the product supplier, or the local
authority responsible for waste disposal in your area.
Business users should contact the product supplier for information on how to
dispose of this product correctly. This product should not be mixed with other
commercial waste.


Replacement lens Page 5
Axis Thermal Camera
Replacement Lens Installation Guide
Replace the lens
The instructions below describe how to replace the camera
lens. For information on available lens options, go to
www.axis.com or contact your Axis reseller.
Outdoor cameras
1. Remove the top cover.
2. Disconnect the window heater cable from the window
heater connector on the camera.
3. Refer to the instructions in Indoor/outdoor cameras,
below.
Indoor/outdoor cameras
1. Disconnect the network cable.
ENGLISH

Page 6 Replacement lens
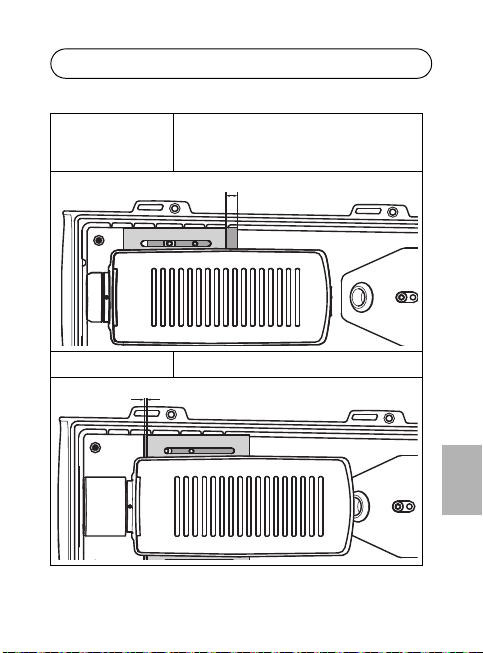
Wave bracket
2. Loosen the stop screw.
Stop
screw
3. Unscrew the lens by turning it counter-clockwise.
Note: Make sure the wave bracket behind the lens
stays in place.
4. Install the replacement lens by turning it clockwise.
5. Connect the network cable.
6. Open the Live View page of the network camera and
go to Setup > System Options > Advanced > Plain
config.

Replacement lens Page 7
7. Select ImageSource in the drop-down list and click
Select group.
8. Select the matching lens option in the ImageSource
IO Lens drop-down list.
9. Focus the camera to the appropriate distance. See the
table below for recommended focus distances for
achieving optimal focus both for near focus and
infinity.
Lens 10mm 19mm 35mm 60mm
AXIS
Q1921/-E
AXIS
Q1922/-E
2m
(6.6 ft.)
3m
(10 ft.)
8m
(26 ft.)
10 m
(33 ft.)
22 m
(72 ft.)
33 m
(108 ft.)
60 m
(197 ft.)
90 m
(296 ft.)
10. Secure the stop screw.
Notes:
• Hold the lens gently by the metal ring; do not touch
the lens surface.
• Be careful not to get dust on the sensor while
exchanging the lens.
ENGLISH

Page 8 Replacement lens
9 mm
9 mm
Adjust the holder distance
1. Loosen the upper holder screws.
2. Adjust the distance between the upper and lower
holder according to the table below.
10 mm lens Holder distance 9mm

Replacement lens Page 9
9/10 mm
0-2 mm
ENGLISH
19 mm lens Holder distance AXIS Q1921/-E: 10mm
35 mm lens Holder distance 0-2mm
AXIS Q1922/-E: 9mm

Page 10 Replacement lens
17 mm
60 mm lens Holder distance 17mm
3. Measure the holder distance on both sides of the
camera to make sure the camera and holders are
mounted parallel to each other.
4. Tighten the screws.
Further information
To install the camera on the network, please see the
Installation Guide provided with the camera. For other
details about the camera, see the User’s Manual, available
from www.axis.com

Remplacer l’objectif Page 11
Caméra thermique Axis
Objectif de rechange Guide d’installation
Remplacer l’objectif
Les instructions ci-après expliquent le remplacement de
l’objectif de la caméra. Pour obtenir de plus amples
informations concernant les options d’objectif disponibles,
consultez le site www.axis.com ou contactez votre
revendeur Axis.
Caméras extérieures
1. Retirez le couvercle supérieur.
2. Déconnectez le câble du régulateur de chaleur au
niveau du connecteur du régulateur de chaleur sur la
caméra thermique.
3. Reportez-vous aux instructions de la sectionCaméras
pour l’intérieur/l’extérieur ci-après.
Caméras pour l’intérieur/l’extérieur
1. Débranchez le câble réseau.
FRAN
Ç
AIS

Page 12 Remplacer l’objectif
Joint
Vis de
butée
2. Dévissez la vis de butée.
3. Dévissez l’objectif en tournant ce dernier dans le sens
inverse des aiguilles d’une montre.
Note: Assurez-vous que le joint qui se trouve à
l’arrière de l’objectif reste en place.
4. Fixez l’objectif de rechange en le tournant dans le sens
des aiguilles d’une montre.
5. Branchez le câble réseau.

Remplacer l’objectif Page 13
6. Ouvrez la page LiveView de la caméra réseau et
accédez à Setup (Configuration) > System Options
(Options système) > Advance (Avancé) > Plain
config (Configuration simple).
7. Sélectionnez ImageSource dans la liste locale, puis
cliquez sur Select group (Sélectionner le groupe).
8. Dans la liste locale ImageSource IO Lens (Objectif
ImageSource E/S), sélectionnez l’option d’objectif
correspondante.
9. Procédez à la mise au point de la caméra à la distance
requise. Consultez le tableau ci-après pour les
distances de mise au point recommandées, afin
d’obtenir la mise au point optimale autant pour la
mise au point approximative que pour la mise au point
fixe.
Objectif 10 mm 19 mm 35 mm 60 mm
AXIS
Q1921/-E
AXIS
Q1922/-E
2m
(6.6 ft.)
3m
(10 ft.)
8m
(26 ft.)
10 m
(33 ft.)
22 m
(72 ft.)
33 m
(108 ft.)
60 m
(197 ft.)
90 m
(296 ft.)
10. Fixez la vis de butée.
FRAN
Ç
AIS

Page 14 Remplacer l’objectif
Notes:
• Tenez délicatement l’objectif par l’anneau métallique.
Ne touchez à pas la surface de l’objectif.
• Prenez soin de ne pas mettre le capteur en contact
avec de la poussière pendant que vous changez
l’objectif.

Remplacer l’objectif Page 15
9 mm
9 mm
Régler la distance du porte-objectif
1. Dévissez les vis du support supérieur.
2. Réglez la distance entre le support supérieur et
inférieur, conformément au tableau ci-après
10 mm Objectif Distance du porte-objectif 9mm
FRAN
Ç
AIS

Page 16 Remplacer l’objectif
9/10 mm
0-2 mm
19 mm Objectif Distance du porte-objectif
35 mm Objectif Distance du porte-objectif 0-2mm
AXIS Q1921/-E: 10mm
AXIS Q1922/-E: 9mm

Remplacer l’objectif Page 17
17 mm
60 mm Objectif Distance du porte-objectif 17mm
Note: Mesurez la distance du porte-objectif des
deux côtés de la caméra afin de vous assurer
que la caméra et les porte-objectifs soient
montés parallèlement.
3. Serrez les vis.
FRAN
Ç
AIS

Page 18 Remplacer l’objectif
Plus d’informations
Pour installer la caméra sur le réseau, veuillez vous référer
au guide d’installation fourni avec la caméra. Pour obtenir
de plus amples détails relatifs à la caméra, consultez le
manuel de l’utilisateur, disponible sur le site www.axis.com

Austauschobjektiv Page 19
Axis Wärmebildkamera
Austauschobjektiv Installationsanleitung
Wechseln des Objektivs
In den folgenden Anweisungen wird der Austausch des
Kameraobjektivs beschrieben. Informationen zu den
erhältlichen Objektiven finden Sie unter „www.axis.com“
oder wenden Sie sich an Ihren Axis-Händler.
Kameras für den Außenbereich
1. Entfernen Sie die obere Abdeckung.
2. Trennen Sie das Scheibenheizungskabel vom
Scheibenheizungsanschluss der Kamera.
3. Anweisungen hierzu finden Sie im folgenden
Abschnitt Kameras für Innenräume/Außenbereiche.
Kameras für Innenräume/Außenbereiche
1. Ziehen Sie das Netzwerkkabel ab.
DEUTSCH

Page 20 Austauschobjektiv
Arretierschraube
Sicherungsring
2. Lösen Sie die Arretierschraube.
3. Schrauben Sie das Objektiv ab, indem Sie es gegen den
Uhrzeigersinn drehen.
Note: Stellen Sie sicher, dass der Sicherungsring
hinter dem Objektiv an seinem Platz bleibt und
nicht herausgenommen wird.
4. Bringen Sie das Austauschobjektiv an, indem Sie es
nach rechts drehen.
5. Schließen Sie das Netzwerkkabel an.

Austauschobjektiv Page 21
6. Öffnen Sie die Seite „Live View“ (Live-Ansicht) der
Netzwerk-Kamera und wählen Sie Setup > System
Options > Advanced > Plain config (Setup >
Systemoptionen > Erweitert > Direktkonfiguration).
7. Wählen Sie ImageSource (Bildquelle) in der
Dropdown-Liste aus und klicken Sie auf Select group
(Gruppe auswählen).
8. Wählen Sie die entsprechende Objektivgröße in der
Dropdown-Liste ImageSource IO Lens (Bildquelle IO-
Objektiv) aus.Fokussieren Sie die Kamera auf die
entsprechende Entfernung. In der folgenden Tabelle
finden Sie die empfohlenen Fokusentfernungen für
einen optimalen Fokus (Nahfokus und unendlich).
Objektiv 10 mm 19 mm 35 mm 60 mm
AXIS
Q1921/-E
AXIS
Q1922/-E
2m
(6.6 ft.)
3m
(10 ft.)
8m
(26 ft.)
10 m
(33 ft.)
22 m
(72 ft.)
33 m
(108 ft.)
60 m
(197 ft.)
90 m
(296 ft.)
9. Ziehen Sie die Arretierschraube an.
DEUTSCH

Page 22 Austauschobjektiv
Notes:
• Halten Sie das Objektiv vorsichtig am Metallring und
berühren Sie nicht die Objektivoberfläche.
• Achten Sie darauf, dass beim Austausch des Objektivs
kein Staub auf den Sensor gelangt.

Austauschobjektiv Page 23
9 mm
9 mm
Einstellen des Halterabstands
1. Lösen Sie die Schrauben des oberen Halters.
2. Stellen Sie den Abstand vom oberen zum unteren
Halter gemäß den Angaben in der folgenden Tabelle
ein..
10 mm Objektiv Halter-abstand 9mm
DEUTSCH

Page 24 Austauschobjektiv
9/10 mm
0-2 mm
19 mm Objektiv Halter-abstand
35 mm Objektiv Halter-abstand 0-2mm
AXIS Q1921/-E: 10mm
AXIS Q1922/-E: 9mm

Austauschobjektiv Page 25
17 mm
60 mm Objektiv Halter-abstand 17mm
Note: Messen Sie den Halterabstand an beiden
Seiten der Kamera, um sicherzustellen,
dass die Kamera parallel zu den Haltern
montiert wird.
3. Ziehen Sie die Schrauben fest.
DEUTSCH

Page 26 Austauschobjektiv
Weitere Informationen
4. Anweisungen zur Installation der Kamera im Netzwerk
finden Sie in der Installationsanleitung zu Ihrer
Kamera. Alle weiteren Hinweise zur Verwendung der
Kamera finden Sie im Benutzerhandbuch, das auf
unserer Website unter „www.axis.com“ zur Verfügung
steht.

Obiettivo sostitutivo Page 27
Telecamera termica Axis
Obiettivo sostitutivo Guida all'installazione
Rimontaggio dell'obiettivo
Le istruzioni che seguono descrivono como rimontare
l'obiettivo della telecamera. Per informazioni sulle scelte di
obiettivi disponibili, andare a www.axis.com o contattare il
rivenditore Axis.
Telecamere per ambienti esterni
1. Rimuovere la copertura superiore.
2. Scollegare il cavo del riscaldatore della finestra
dall'apposito connettore sulla telecamera.
3. Seguire le istruzioni riportate di seguito in Telecamere
per interni/esterni.
Telecamere per interni/esterni
1. Scollegare il cavo di rete.
ITALIANO

Page 28 Obiettivo sostitutivo
Vite di arresto
Supporto a collare
2. Allentare la vite di arresto.
3. Svitare l'obiettivo ruotandolo in senso antiorario.
Note: Assicurarsi che il supporto a collare dietro
all'obiettivo rimanga in posizione.
4. Installare l'obiettivo sostitutivo ruotandolo in senso
orario.
5. Collegare il cavo di rete.

Obiettivo sostitutivo Page 29
6. Aprire la pagina della vista in diretta della telecamera
di rete e andare a Setup (Impostazione) > System
Options (Opzioni di sistema) > Advanced
(Avanzate)> Plain config (Configurazione normale).
7. Selezionare ImageSource nell'elenco a discesa e fare
clic su Select group (Selezione gruppo).
8. Selezionare la scelta l’obiettivo corrispondente
nell'elenco a discesa ImageSource IO Lens.
9. Mettere a fuoco la telecamera alla distanza
appropriata. Vedere la tabella che segue per le
distanze focali raccomandate per ottenere una messa
a fuoco ottimale per le immagini a distanza
ravvicinata e infinita.
Obiettivo 10 mm 19 mm 35 mm 60 mm
AXIS
Q1921/-E
AXIS
Q1922/-E
2m
(6.6 ft.)
3m
(10 ft.)
8m
(26 ft.)
10 m
(33 ft.)
22 m
(72 ft.)
33 m
(108 ft.)
60 m
(197 ft.)
90 m
(296 ft.)
10. Fissare la vite d'arresto.
ITALIANO

Page 30 Obiettivo sostitutivo
Notes:
• Tenere delicatamente l'obiettivo per l'anello metallico;
non toccare la superficie della lente.
• Fare attenzione a non lasciare cadere della polvere sul
sensore mentre si cambia l'obiettivo.

Obiettivo sostitutivo Page 31
9 mm
9 mm
Regolare la distanza del supporto
1. Allentare le viti del supporto superfiore.
2. Regolare la distanza fra il supporto superiore ed
inferiore secondo la tabella che segue.
.
10 mm Obiettivo Distanza del supporto 9mm
ITALIANO

Page 32 Obiettivo sostitutivo
9/10 mm
0-2 mm
19 mm Obiettivo Distanza del supporto
35 mm Obiettivo Distanza del supporto 0-2mm
AXIS Q1921/-E: 10mm
AXIS Q1922/-E: 9mm

Obiettivo sostitutivo Page 33
17 mm
60 mm Obiettivo Distanza del supporto 17mm
Note: Misurare la distanza del supporto su
entrambi i lati della telecamera per
assicurarsi che la telecamera e i supporti
siano montati paralleli l'uno rispetto
all'altro.
3. Serrare le viti.
ITALIANO

Page 34 Obiettivo sostitutivo
Ulteriori informazioni
4. Per installare la telecamera nella rete, vedere la Guida
all'installazione fornita con la telecamera. Per tutte le
altre informazioni relative all'uso della telecamera,
consultare la Guida per l'utente, disponibile sul sito
www.axis.com

Objetivo de repuesto Page 35
Cámara térmica Axis
Objetivo de repuesto Guía de instalación
Sustituya el objetivo
Estas instrucciones describen el modo de sustituir el
objetivo de la cámara. Para obtener información sobre las
opciones de objetivo disponibles, vaya a www.axis.com o
póngase en contacto con su distribuidor de Axis.’
Cámaras de exterior
1. Retire la cubierta superior.
2. Desconecte el cable del calefactor de ventana del
conector del calefactor de ventana de la cámara.
3. Consulte las instrucciones de Cámaras de interior/
exterior a continuación.
Cámaras de interior/exterior
1. Desconecte el cable de red.
ESPAÑOL

Page 36 Objetivo de repuesto
Wave bracket
2. Afloje el tornillo de retención.
Stop
screw
3. Desatornille el objetivo girándolo a la izquierda.
Note: Asegúrese de que el soporte ondulado de detrás
del objetivo permanece en su sitio.
4. Instale el objetivo de repuesto girándolo a la derecha.
5. Conecte el cable de red.
6. Abra la página Live View de la cámara de red y vaya a
Setup > System Options > Advanced > Plain config
(Configuración > Opciones del sistema > Avanzada >
Configuración normal).

Objetivo de repuesto Page 37
7. Seleccione ImageSource (Fuente de imagen) en la lista
desplegable y haga clic en Select group (Seleccionar
grupo).
8. Seleccione la opción de objetivo pertinente en la lista
desplegable ImageSource IO Lens (Objetivo de E/S de
fuente de imagen).
9. Enfoque la cámara en la distancia adecuada. Consulte
en la tabla siguiente las distancias de enfoque
recomendadas para lograr un enfoque óptimo tanto
cercano como infinito.
Objetivo 10 mm 19 mm 35 mm 60 mm
AXIS
Q1921/-E
AXIS
Q1922/-E
2m
(6.6 ft.)
3m
(10 ft.)
8m
(26 ft.)
10 m
(33 ft.)
22 m
(72 ft.)
33 m
(108 ft.)
60 m
(197 ft.)
90 m
(296 ft.)
10. Fije el tornillo de retención.
Notes:
• Sostenga el objetivo con suavidad por el anillo
metálico; no toque la superficie del objetivo.
• Tenga cuidado de que no entre polvo en el sensor al
cambiar el objetivo.
ESPAÑOL

Page 38 Objetivo de repuesto
9 mm
9 mm
Ajuste la distancia del soporte
1. Afloje los tornillos del soporte superior.
2. Ajuste la distancia entre el soporte superior y el
inferior de acuerdo con la tabla siguiente.
10 mm Objetivo Distancia del soporte 9mm
Objetivo de repuesto Page 39
9/10 mm
0-2 mm
19 mm Objetivo Distancia del soporte
35 mm Objetivo Distancia del soporte 0-2mm
AXIS Q1921/-E: 10mm
AXIS Q1922/-E: 9mm
ESPAÑOL

Page 40 Objetivo de repuesto
17 mm
60 mm Objetivo Distancia del soporte 17mm
Note: Mida la distancia de los soportes a ambos
lados de la cámara para asegurarse de que la
cámara y los soportes están montados en
paralelo entre sí.
3. Apriete los tornillos.
Más informacíon
Para instalar la cámara en la red, consulte la guía de
instalación que acompaña a la cámara. Si desea conocer
más información acerca de la cámara, consulte el manual
del usuario, disponible en www.axis.com.

Installation Guide Ver.1.1
Axis Thermal Camera
Replacement Lens
Printed: July 2011
© Axis Communications AB, 2011-2012
Part No. 48409
 Loading...