

Axis Q8414-LVS Installation Guide

AXISQ8414–LVSNetworkCamera
InstallationGuide


English
EN
France:Français
Deutschland:Deutsch
Italia:Italiano
España:Español
日本:日本語
中文:简体中文
FR
DE
IT
ES
JA
ZH

Readthisrst
ReadthroughthisInstallationGuidecarefullybefore
installingtheproduct.KeeptheInstallationGuidefor
futurereference.
Legalconsiderations
Videoandaudiosurveillancecanberegulatedbylaws
thatvaryfromcountrytocountry.Checkthelaws
inyourlocalregionbeforeusingthisproductfor
surveillancepurposes.
Thisproductincludesthefollowinglicences:
•one(1)AACdecoderlicense
•one(1)H.264decoderlicense
Topurchasefurtherlicenses,contactyourreseller.
Liability
Everycarehasbeentakeninthepreparationofthis
document.PleaseinformyourlocalAxisofceof
anyinaccuraciesoromissions.AxisCommunications
ABcannotbeheldresponsibleforanytechnicalor
typographicalerrorsandreservestherighttomake
changestotheproductandmanualswithoutprior
notice.AxisCommunicationsABmakesnowarranty
ofanykindwithregardtothematerialcontained
withinthisdocument,including,butnotlimitedto,
theimpliedwarrantiesofmerchantabilityandtness
foraparticularpurpose.AxisCommunicationsAB
shallnotbeliablenorresponsibleforincidental
orconsequentialdamagesinconnectionwiththe
furnishing,performanceoruseofthismaterial.This
productisonlytobeusedforitsintendedpurpose.
Intellectualpropertyrights
AxisABhasintellectualpropertyrightsrelatingto
technologyembodiedintheproductdescribedinthis
document.Inparticular,andwithoutlimitation,these
intellectualpropertyrightsmayincludeoneormore
ofthepatentslistedatwww.axis.com/patent.htmand
oneormoreadditionalpatentsorpendingpatent
applicationsintheUSandothercountries.
Thisproductcontainslicensedthird-partysoftware.
Seethemenuitem“About”intheproduct’suser
interfaceformoreinformation.
Thisproductcontainssourcecodecopyright
AppleComputer,Inc.,undertheterms
ofApplePublicSourceLicense2.0(see
www.opensource.apple.com/apsl).Thesourcecodeis
availablefromhttps://developer.apple.com/bonjour/
Equipmentmodications
Thisequipmentmustbeinstalledandusedin
strictaccordancewiththeinstructionsgivenin
theuserdocumentation.Thisequipmentcontains
nouser-serviceablecomponents.Unauthorized
equipmentchangesormodicationswillinvalidateall
applicableregulatorycerticationsandapprovals.
Trademarkacknowledgments
AXISCOMMUNICATIONS,AXISandVAPIXare
registeredtrademarksortrademarkapplicationsof
AxisABinvariousjurisdictions.Allothercompany
namesandproductsaretrademarksorregistered
trademarksoftheirrespectivecompanies.
Apple,Boa,Apache,Bonjour,Ethernet,Internet
Explorer,Linux,Microsoft,Mozilla,Real,SMPTE,
QuickTime,UNIX,Windows,WindowsVistaandWWW
areregisteredtrademarksoftherespectiveholders.
JavaandallJava-basedtrademarksandlogosare
trademarksorregisteredtrademarksofOracleand/or
itsafliates.UPnP
TM
UPnP
ImplementersCorporation.
SD,SDHCandSDXCaretrademarksorregistered
trademarksofSD-3C,LLCintheUnitedStates,
othercountriesorboth.Also,miniSD,microSD,
miniSDHC,microSDHC,microSDXCarealltrademarks
orregisteredtrademarksofSD-3C,LLCintheUnited
States,othercountriesorboth.
TM
isacerticationmarkofthe
Regulatoryinformation
Europe
Thisproductcomplieswiththeapplicable
CEmarkingdirectivesandharmonizedstandards:
•ElectromagneticCompatibility(EMC)Directive
2014/30/EU.SeeElectromagneticcompatibility
(EMC)onpage4.
•LowVoltage(LVD)Directive2014/35/EU.See
Safetyonpage5.
•RestrictionsofHazardousSubstances(RoHS)
Directive201 1/65/EU.SeeDisposalandrecycling
onpage5.
Acopyoftheoriginaldeclarationofconformity
maybeobtainedfromAxisCommunicationsAB.See
Contactinformationonpage5.
Electromagneticcompatibility(EMC)
Thisequipmenthasbeendesignedandtestedtofulll
applicablestandardsfor:
•Radiofrequencyemissionwheninstalled
accordingtotheinstructionsandusedinits
intendedenvironment.
•Immunitytoelectricalandelectromagnetic
phenomenawheninstalledaccordingtothe
instructionsandusedinitsintendedenvironment.
USA
Thisequipmenthasbeentestedusingashielded
networkcable(STP)andfoundtocomplywiththe
limitsforaClassBdigitaldevice,pursuanttopart15
oftheFCCRules.Theselimitsaredesignedtoprovide
reasonableprotectionagainstharmfulinterferencein
aresidentialinstallation.Thisequipmentgenerates,
usesandcanradiateradiofrequencyenergyand,
ifnotinstalledandusedinaccordancewiththe
instructions,maycauseharmfulinterferencetoradio
communications.However,thereisnoguaranteethat
interferencewillnotoccurinaparticularinstallation.
Ifthisequipmentdoescauseharmfulinterferenceto
radioortelevisionreception,whichcanbedetermined
byturningtheequipmentoffandon,theuseris
encouragedtotrytocorrecttheinterferencebyone
ormoreofthefollowingmeasures:
•Reorientorrelocatethereceivingantenna.
•Increasetheseparationbetweentheequipment
andreceiver.
•Connecttheequipmentintoanoutletona
circuitdifferentfromthattowhichthereceiver
isconnected.
•Consultthedealeroranexperiencedradio/TV
technicianforhelp.
Theproductshallbeconnectedusingashielded
networkcable(STP)thatisproperlygrounded.
Canada
Thisdigitalapparatuscomplieswith
CANICES-3(ClassB).Theproductshallbe
connectedusingashieldednetworkcable(STP)that
isproperlygrounded.Cetappareilnumériqueest
conformeàlanormeCANNMB-3(classeB).Leproduit
doitêtreconnectéàl'aided'uncâbleréseaublindé
(STP)quiestcorrectementmisàlaterre.
Europe
Thisproductfulllstherequirementsforimmunity
accordingtoEN61000-6-1residential,commercial
andlight-industrialenvironments.
Thisproductfulllstherequirementsforimmunity
accordingtoEN61000-6-2industrialenvironments.
Thisproductfulllstherequirementsforimmunity
accordingtoEN55024ofceandcommercial
environments.
Australia/NewZealand
Thisdigitalequipmentfulllstherequirements
forRFemissionaccordingtotheClassBlimitof
AS/NZSCISPR22.Theproductshallbeconnected
usingashieldednetworkcable(STP)thatisproperly
grounded.
Japan
この装置は、クラスB情報技術装置です。この
装置は、家庭環境で使⽤することを⽬的とし
ていますが、この装置がラジオやテレビジョ
ン受信機に近接して使⽤されると、受信障害
を引き起こすことがあります。取扱説明書に
従って正しい取り扱いをして下さい。本製品
は、シールドネットワークケーブル(STP)を
使⽤して接続してください。また適切に接地
してください。
Korea
이기기는가정용(B급)전자파적합기기로서주
로가정에서사용하는것을목적으로하며,모
든지역에서사용할수있습니다.적절히접지
된STP(shieldedtwistedpair)케이블을사용하
여제품을연결하십시오.
Safety
ThisproductcomplieswithIEC/EN/UL60950-1,Safety ofInformationTechnologyEquipment.
Ifitsconnectingcablesareroutedoutdoors,the
productshallbegroundedeitherthroughashielded
networkcable(STP)orotherappropriatemethod.
Disposalandrecycling
Whenthisproducthasreachedtheendofits
usefullife,disposeofitaccordingtolocallawsand
regulations.Forinformationaboutyournearest
designatedcollectionpoint,contactyourlocal
authorityresponsibleforwastedisposal.Inaccordance
withlocallegislation,penaltiesmaybeapplicablefor
incorrectdisposalofthiswaste.
Europe
Thissymbolmeansthattheproductshallnotbe
disposedoftogetherwithhouseholdorcommercial
waste.Directive2012/19/EUonwasteelectrical
andelectronicequipment(WEEE)isapplicablein
theEuropeanUnionmemberstates.Toprevent
potentialharmtohumanhealthandtheenvironment,
theproductmustbedisposedofinanapproved
andenvironmentallysaferecyclingprocess.For
informationaboutyournearestdesignatedcollection
point,contactyourlocalauthorityresponsiblefor
wastedisposal.Businessesshouldcontacttheproduct
supplierforinformationabouthowtodisposeofthis
productcorrectly.
Thisproductcomplieswiththerequirementsof
Directive201 1/65/EUand2015/863ontherestriction
oftheuseofcertainhazardoussubstancesinelectrical
andelectronicequipment(RoHS).
China
Thisproductcomplieswiththerequirements
ofSJ/T1 1364-2014,Markingfortherestrictionof
hazardoussubstancesinelectricalandelectronic
products.
有毒有害物质或元素
部
件
名
称
电
气
实
装
部
分
0:表示该有毒有害物质在该部件均质材料
中的含量均在GB/T26572标准规定的限量要
求以下。
X:表示该有毒有害物质至少在该部件的某一
均质材料中的含量超出GB/T26572标准规定的
限量要求。
Contactinformation
AxisCommunicationsAB
Emdalavägen14
22369Lund
Sweden
Tel:+46462721800
Fax:+4646136130
www.axis.com
汞
铅
(Hg)
(Pb)
00000
X
六
镉
(Cd)
多
价
铬
(Cr(VI))
溴
溴
二
联
苯
苯
醚
(PB-
(PB-
B)
DE)
Warrantyinformation
ForinformationaboutAxis’productwarranty
andtheretorelatedinformation,goto
www.axis.com/warranty/
Support
Shouldyourequireanytechnicalassistance,please
contactyourAxisreseller.Ifyourquestionscannotbe
answeredimmediately,yourresellerwillforwardyour
queriesthroughtheappropriatechannelstoensurea
rapidresponse.IfyouareconnectedtotheInternet,
youcan:
•downloaduserdocumentationandsoftware
updates
多

•ndanswerstoresolvedproblemsintheFAQ
database.Searchbyproduct,category,orphrase
•reportproblemstoAxissupportstaffbylogging
intoyourprivatesupportarea
•chatwithAxissupportstaff
•visitAxisSupportatwww.axis.com/support
Learnmore!
VisitAxislearningcenterwww.axis.com/academy/for
usefultrainings,webinars,tutorialsandguides.

Packagecontents
•AXISQ8414–LVSNetworkCamera
•Washers(formountingscrews)
•AXISConnectorGuardA
•Torx®bitTR20
•4–pinterminalconnector
•Printedmaterials
-InstallationGuide(thisdocument)
-AVHSAuthenticationkey
AXISQ8414–LVSNetworkCamera
EN
7

AXISQ8414–LVSNetworkCamera
Productoverview
1
Cablegasket(networkcable)
2
Cablegasket(I/Ooraudiocable)
3
PoEClassselector*
4
Networkconnector
5
Audiooutconnector
6
LEDindicators
7
Audioinconnector
8
I/Oconnector
9
Controlbutton
10
IRwindow
11
Microphone
12
Notused
13
SDcardslot
*UsedforswitchingbetweenPoEClass2(limitedIR)andPoEClass3(fullIR).Seepage26.
8
AXISQ8414–L VSNetworkCamera
Howtoinstalltheproduct
Installthehardware
NO
TICE
NO NO
TICE TICE
•Theproductshallbeconnectedusingashieldednetworkcable(STP).Allcablesconnecting
theproducttothemidspanshallbeshielded(STP)andintendedfortheirspecicuse.
Makesurethatthemidspanisproperlygrounded.Forinformationaboutregulatory
requirements,seeRegulatoryinformationonpage4.
•Becarefulnottoscratch,damageorleavengerprintsonthedomecoverbecausethis
coulddecreaseimagequality.Ifpossible,keeptheprotectiveplasticonthefrontofthe
cameraassemblyuntiltheinstallationiscomplete.
TheAxisproductcanbeinstalledwiththecablesroutedthroughthewallorceiling.
Readalltheinstructionsbeforeinstallingtheproduct.Someinstallationstepswouldbenetfrom
beingcompletedtogetherbecausetheyrequireremovalofthecameraassembly.
•AstandardorhighcapacitySDcard(notincluded)canbeusedtostorerecordingslocally
intheproduct.ToinstallanSDcard,seepage14.
•Toroutethecablesbeforeinstallingtheproduct,seepage9.
•Toinstalltheproduct,seepage10.
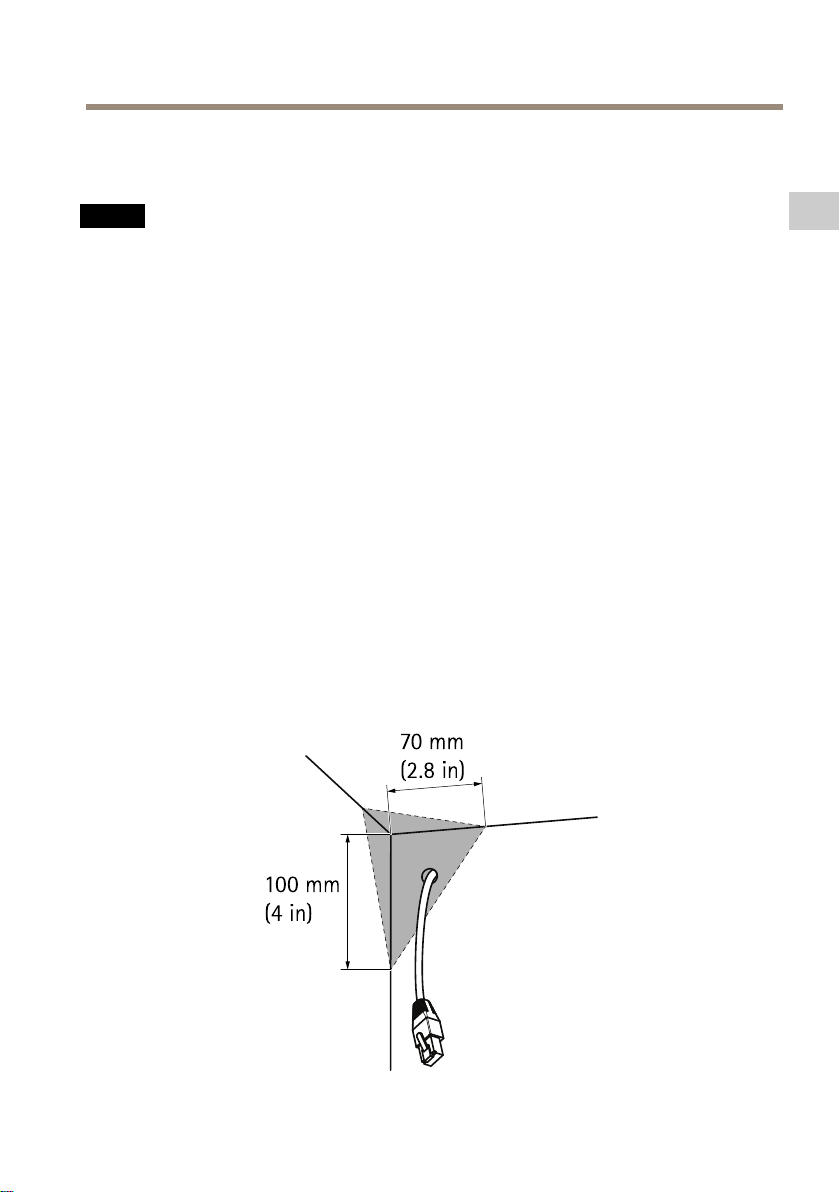
Routethecables
1.Measureatriangularareainthecornerbetweentheceilingandthewalls.
2.Routethenetworkcable(andtheI/O,audiocableifneccessary)throughthetriangular
areaofthewall.
EN
9

AXISQ8414–LVSNetworkCamera
Installthecameraunit
1.Removethegasketsfromthetop-andsideholesinthebackchassis.
2.Positionthebackchassisinthecornerbetweentheceilingandthewalls.Useapencilto
makemarksforthescrewsthroughthetop-andsideholes.
1
Cablegasket,network
2
Cablegasket,I/O
3
Screw(notincluded)
4
Washer
5
Gasket
3.Drillholesforthescrewsintheceilingandinthewalls.
4.Plugthegasketsbackitintotheirholes.Thegasketsshouldtsnuglywithnofolds
orbends.
5.Removethenetworkcablegasketfromthebackholeandroutethenetworkcable
throughthisbackhole.
6.Ifapplicable:RemovetheI/OcablegasketfromthebackholeandroutetheI/Ocable
throughthisbackhole.
7.Pullthetabonthecablegaskettoopenit.
8.AttachtheAXISConnectorGuardAontopoftheRJ45networkconnector.Dragthe
networkcablegasketalongthecableandplugthenetworkcablegasketintoitshole.
Thegasketshouldtsnuglywithnofoldsorbends.
9.RemovetheAXISConnectorGuardAfromthetopoftheRJ45networkconnector.
10

AXISQ8414–L VSNetworkCamera
10.Ifapplicable:PulltheI/OcablethroughtheI/OcablegasketbeforeattachingtheI/O
connectortothecable.PlugtheI/Ocablegasketintoitshole.Thegasketshouldt
snuglywithnofoldsorbends.
11.Attachthebackchassistothecornerinthewallusingscrewsappropriateforthewall
andceilingmaterial.Thescrewsshouldgothroughthewashersandthegasketsto
securetheIP66sealing.
EN
1
Cablegasket,network
2
Cablegasket,I/O
3
Screw(notincluded)
4
Washer
5
Gasket
12.Foroptimizedsealing:Applyastripofexiblegapller/masticsealantalongthesides
ofthebackchassis.Ensurethatanygapsbetweenthebackchassisandtheceiling/
wallsarelled.
13.Ifapplicable:InsertanSDcard(notincluded)intotheSDcardslotonthecamera
assembly.
14.Ifapplicable:SeeInstallAXIST8642MountingKitA(soldseparately)onpage15.
15.Ifapplicable:SeeInstallAXISDoorSwitchAforintrusiondetection(soldseparately)
onpage16
16.Ifapplicable:SeeInstallAXISQ8414-LVSSmokedDome(soldseparately)onpage17.
17.Ifapplicable:SeeInstallAXISQ8414-LVSIRWindowB(soldseparately)onpage17.
11

AXISQ8414–LVSNetworkCamera
18.Ifnecessary:Manuallyadjusttheangleofthelenstoadapttothesizeandshapeofthe
monitoredarea.Fortiltpositions,seeSetuptheeldofviewonpage13
19.Guidethenetworkcablethroughthecabletunneltothebackofthecameraassembly
andplugthenetworkcableintothenetworkconnector.
20.Ifapplicable:GuidetheI/Ocablethroughthecabletunneltothebackofthecamera
assemblyandplugtheI/OcableintotheI/Oconnector.
21.HoldthecameraassemblysothattheIRwindowonthefrontisinasixo’clockposition,
andplacethebottomofthecameraassemblyagainstthebottomofthebackchassis
opening.
12

AXISQ8414–L VSNetworkCamera
22.Foldthetopofthecameraassemblyupwardsuntilthecameraassemblyispressed
againsttheentireriminthebackchassisopening.
Important
Adjustthecableslacksothatthecablesarenotsqueezedbetweenthesidesofthecamera
assemblyandthebackchassis.
23.Attachthecameraassemblytothebackchassisusingthescrews(torque2.5Nm).
24.Removetheprotectivelmonthefrontofthecameraassembly.
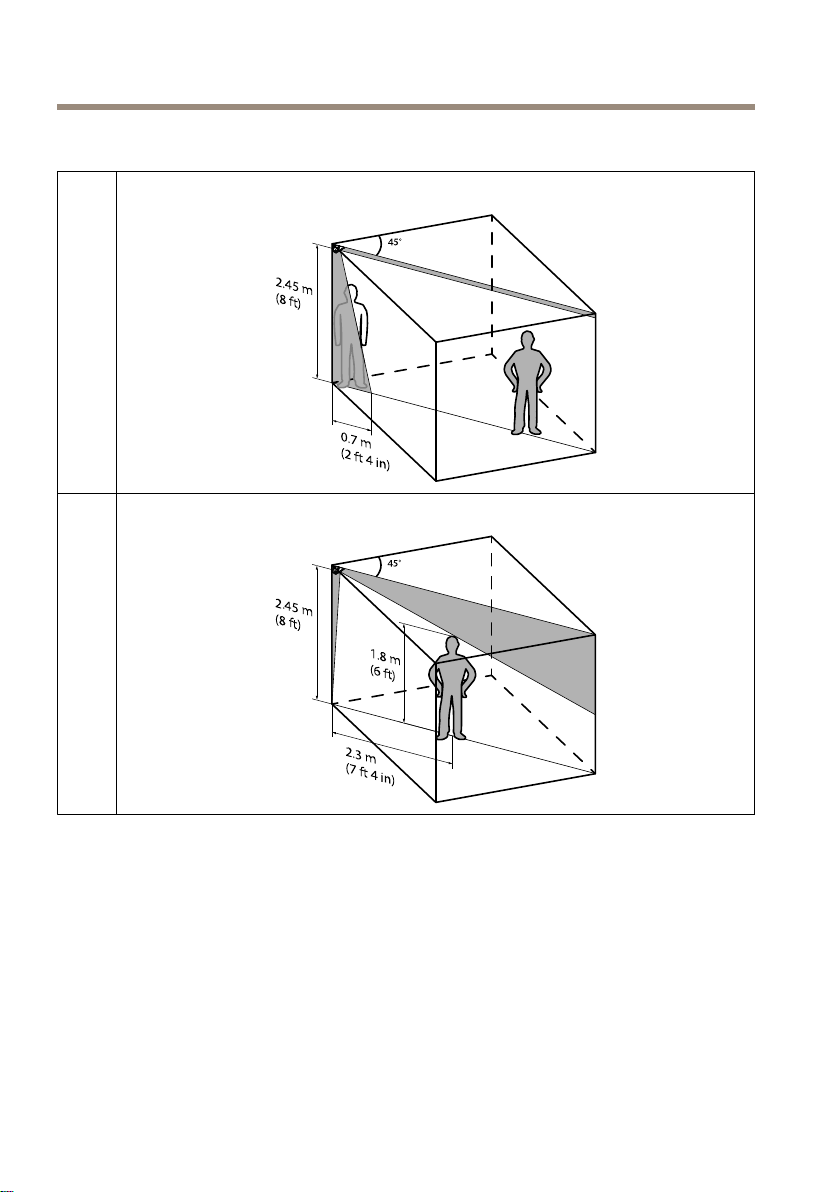
Setuptheeldofview
EN
Tiltthelenstoobtaintheoptimaleldofviewthatcoversasmuchaspossibleofthemonitored
area.
MaximumTiltPositionsfortheLens
Yourtiltpositionforoptimaleldofviewisfoundinbetweenthemaximumtiltpositions.
13
AXISQ8414–LVSNetworkCamera
MaximumTiltPositionsfortheLens(Continued)
Tilt
up
Tilt
down
InstallanSDcard
ItisoptionaltoinstallastandardorhighcapacitySDcard(notincluded),whichcanbeusedfor
localrecordingwithremovablestorage.
1.Loosenthescrewsinthefrontandremovethecameraassembly.
2.InsertanSDcard(notincluded)intotheSDcardslot.
3.HoldthecameraassemblysothattheIRwindowonthefrontisinasixo’clockposition,
andplacethebottomofthecameraassemblyagainstthebottomofthebackchassis
opening.
14

AXISQ8414–L VSNetworkCamera
4.Foldthetopofthecameraassemblyupwardsuntilthecameraassemblyispressed
againsttheentireriminthebackchassisopening.
Important
Adjustthecableslacksothatthecablesarenotsqueezedbetweenthesidesofthecamera
assemblyandthebackchassis.
5.Attachthecameraassemblytothebackchassisusingthescrews(torque2.5Nm).
NO
TICE
NO NO
TICE TICE
Topreventcorruptionofrecordings,theSDcardshouldbeunmountedbeforeitisejected.
Tounmount,gotoSetup>SystemOptions>Storage>SDCardandclickUnmount.
EN
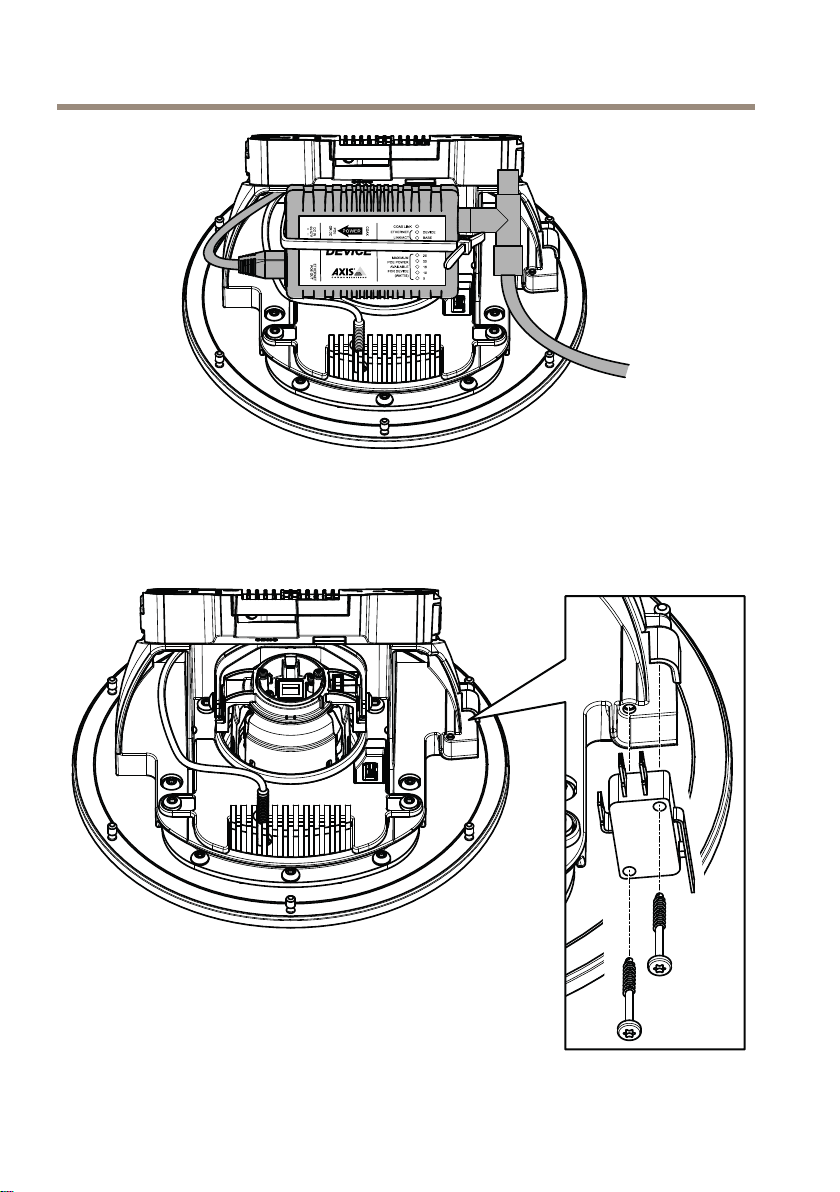
InstallAXIST8642MountingKitA(soldseparately)
ThecontentsofthisaccessorykitmakesitpossibletomountanEthernetOverCoaxAdaptor(not
included)thatenablescamerainstallerstokeepthelegacycoaxcablingwhenconvertingananalog
systemtodigital.ItdeliversstandardPoEandcentrally-sourcedpowerwithnonewcablesrequired.
1.AttachtheangledBNCconnectortotheAXIST8642device.
2.PlugthenetworkcableintothenetworkconnectorontheAXIST8642device.
3.Guidetheotherendofthenetworkcablethroughthecabletunneltothebackofthe
cameraassemblyandplugthenetworkcableintothenetworkconnector.
4.GuidethecabletiesthroughthecabletunnelsandattachtheAXIST8642deviceto
thecameraassembly.
15
AXISQ8414–LVSNetworkCamera
InstallAXISDoorSwitchAforintrusiondetection(soldseparately)
1.Onthebackofthecameraassembly:placetheswitchintheemptycompartmentnext
tothecabletunnel.
16

AXISQ8414–L VSNetworkCamera
2.Attachtheswitchtothecompartmentusingthescrews.
3.GuidetheI/Ocablethroughthecabletunneltothebackofthecameraassembly.
4.SnipoffanyexcessivelengthfromtheI/OcableandttheI/Oconnectorblocktothe
I/Ocable.
5.PlugtheI/OconnectorblockintotheI/Oconnector.
InstallAXISQ8414-LVSSmokedDome(soldseparately)
1.Placethecameraassemblywithitsfrontdownonaraisedsurface,andensurethatthe
domeglassdoesnottouchanyobjectsfromthisposition.
2.Loosentheblackscrews(T20)thatattachthecameraholdertothebackofthecamera
assembly.
3.Unplugthemicrophonecablefromthecamera,pulltheotherendofthemicrophone
cablethroughthecameraholderandremovethemicrophonecablefromthecamera
assembly.
4.Removethecameraholderfromthebackofthecameraassembly.
5.Replacetheclearglassdomeinthefrontopeningwithasmokedglassdome.
6.PlugthemicrophonecableintotheIRlightwindowanddragtheotherendofthe
microphonecablethroughthecameraholder.
7.Placethecameraholderinitsoriginalpositiononthebackofthecameraassembly.
Important
EnsurethattheIRlightwindowispositionedinitscompartmentandthatthemicrophonecable
remainspluggedintotheIRlightwindow.
EN
8.Dragthemicrophonecablethroughthecabletunnelandconnectthemicrophonecable
tothecamera.
9.Tightentheblackscrews(T20,torque2.5Nm)toattachthecameraholdertothecamera
assembly.
InstallAXISQ8414-LVSIRWindowB(soldseparately)
Thisaccessorykitissuitableforinstallationsthatdonotrequireaudio.TheIRlightwindowsare
notequippedwithmicrophoneholes.
1.Placethecameraassemblywithitsfrontdownonaraisedsurface,andensurethatthe
domeglassdoesnottouchanyobjectsfromthisposition.
2.Loosentheblackscrews(T20)thatattachthecameraholdertothebackofthecamera
assembly.
3.Unplugthemicrophonecablefromthecamera,pulltheotherendofthemicrophone
cablethroughthecameraholderandremovethemicrophonecablefromthecamera
assembly.
4.Removethecameraholderfromthebackofthecameraassembly.
5.ReplacetheIRlightwindowinthefrontopeningwithanIRlightwindowfromthekit.
17

AXISQ8414–LVSNetworkCamera
6.Placethecameraholderinitsoriginalpositiononthebackofthecameraassembly.
Important
EnsurethattheIRlightwindowispositionedinitscompartment.
7.Tightentheblackscrews(T20,torque2.5Nm)toattachthecameraholdertothecamera
assembly.
Howtoaccesstheproduct
AXISIPUtilityandAXISCameraManagementarerecommendedmethodsforndingAxisproducts
onthenetworkandassigningthemIPaddressesinWindows®.Bothapplicationsarefreeandcan
bedownloadedfromwww.axis.com/support
Theproductcanbeusedwithmostoperatingsystemsandbrowsers.Werecommendthefollowing
browsers:
•InternetExplorer
•Safari
•Chrome
®
withOSX
TM
®
withWindows
®
orFirefox
®
withotheroperatingsystems.
Formoreinformationaboutusingtheproduct,seetheUserManualavailableatwww .axis.com
®
18

AXISQ8414–L VSNetworkCamera
Setfocusandzoom
Focusandzoomshouldonlybeconguredwheninstallingorreinstallingtheproduct.
1.GotoSetup>Video&Audio.
2.OnthefocuspagegototheBasictab.
3.Setthezoomlevelusingtheslider.
Note
Movementsinfrontofthecamerashouldbeavoidedwhenperformingautofocus.
4.ClickPerformautofocus.
5.Iftheresultisnotsatisfactory,gototheAdvancedtab.
Note
Changingthezoomlevelmovesthefocusposition.Focusshouldalwaysbeadjustedafter
changingthezoom.
OntheAdvancedtab,focuscanbeadjustedmanually:
1.ClickOpeniristoopentheiristoitsmaximumposition.Thisgivesthesmallestdepthof
eldandprovidesthebestconditionsforfocusing.
2.FocusissetintheFocuswindow.Usethemousetomoveandresizethefocuswindow.
3.ClickintheFocuspositionbartofocusonadesiredlocation.
4.Whensatised,clickEnableiristoenabletheiris.
EN
19

AXISQ8414–LVSNetworkCamera
Howtoresettofactorydefaultsettings
Important
Resettofactorydefaultshouldbeusedwithcaution.Aresettofactorydefaultresetsall
settings,includingtheIPaddress,tothefactorydefaultvalues.
Toresettheproducttothefactorydefaultsettings:
1.Disconnectpowerfromtheproduct.
2.Pressandholdthecontrolbuttonandreconnectpower.
3.Keepthecontrolbuttonpressedfor15–30secondsuntilthestatusLEDindicatorashes
amber.
4.Releasethecontrolbutton.TheprocessiscompletewhenthestatusLEDindicatorturns
green.Theproducthasbeenresettothefactorydefaultsettings.IfnoDHCPserveris
availableonthenetwork,thedefaultIPaddressis192.168.0.90
5.Usingtheinstallationandmanagementsoftwaretools,assignanIPaddress,setthe
password,andaccessthevideostream.
Theinstallationandmanagementsoftwaretoolsareavailablefromthesupportpages
atwww.axis.com/support
Itisalsopossibletoresetparameterstofactorydefaultviathewebinterface.GotoSetup>
SystemOptions>MaintenanceandclickDefault.
20

AXISQ8414–L VSNetworkCamera
Maintenance
NO
TICE
NO NO
TICE TICE
•TocleantheAxisproduct,usesoapywaterorothermulti-purposecleaningagents(acidic,
alkaline,neutral)*andfollowtheinstructionsprovidedbythemanufacturer.
•Ifrequired,theAxisproductcanbecleanedwithawaterhose.Movethesprayina
side-to-sidemotion.
*Donotuseabrasivecleaningproducts.
EN
21

AXISQ8414–LVSNetworkCamera
Furtherinformation
•Forthelatestversionofthisdocument,seewww.axis.com
•Theusermanualisavailableatwww.axis.com
•Tocheckifthereisupdatedrmwareavailableforyourproduct,see
www.axis.com/support
•Forusefulonlinetrainingsandwebinars,seewww.axis.com/academy
OptionalAccessories
•AXIST8642MountingKitA(forinstallingaPoEEthernetoverCoaxAdaptorinside
thecamera).Seepage15.
•AXISDoorSwitchA(forintrusiondetection).Seepage16.
•AXISQ8414-LVSSmokedDome(5pcs).Seepage17.
•AXISQ8414-LVSIRWindowB(solidwindowwithoutmicrophonehole;5pcs).See
page17.
•I/OAudioCable5m(16ft.)
Forinformationaboutavailableaccessories,seewww .axis.com
22

AXISQ8414–L VSNetworkCamera
Specifications
LEDIndicators
Note
•TheStatusLEDcanbeconguredtobeunlitduringnormaloperation.Tocongure,go
toSetup>SystemOptions>Ports&Devices>LED.Seetheonlinehelpformore
information.
•TheStatusLEDcanbeconguredtoashwhileaneventisactive.
•TheStatusLEDcanbeconguredtoashforidentifyingtheunit.GotoSetup>System
Options>Maintenance.
EN
StatusLED
GreenSteadygreenfornormaloperation.
Amber
RedFirmwareupgradefailure.
NetworkLEDIndication
Green
Amber
UnlitNonetworkconnection.
PowerLEDIndication
Green
Amber
Indication
Steadyduringstartup.Flasheswhenrestoringsettings.
Steadyforconnectiontoa100Mbit/snetwork.Flashesfor
networkactivity.
Steadyforconnectiontoa10Mbit/snetwork.Flashesfor
networkactivity.
Normaloperation.
Flashesgreen/amberduringrmwareupgrade.
SDcardslot
NO
TICE
NO NO
TICE TICE
•RiskofdamagetoSDcard.Donotusesharptools,metalobjects,orexcessiveforcewhen
insertingorremovingtheSDcard.Useyourngerstoinsertandremovethecard.
•Riskofdatalossandcorruptedrecordings.DonotremovetheSDcardwhiletheproduct
isrunning.DisconnectpowerorunmounttheSDcardfromtheproduct’swebpagebefore
removal.
ThisproductsupportsSD/SDHC/SDXCcards(notincluded).
23
AXISQ8414–LVSNetworkCamera
ForSDcardrecommendations,seewww .axis.com
Connectors
Networkconnector
RJ45EthernetconnectorwithPoweroverEthernet(PoE).
NO
TICE
NO NO
TICE TICE
Theproductshallbeconnectedusingashieldednetworkcable(STP).Allcablesconnecting
theproducttothenetworkshallbeintendedfortheirspecicuse.Makesurethatthe
networkdevicesareinstalledinaccordancewiththemanufacturer’sinstructions.For
informationaboutregulatoryrequirements,seeElectromagneticcompatibility(EMC)on
page4.
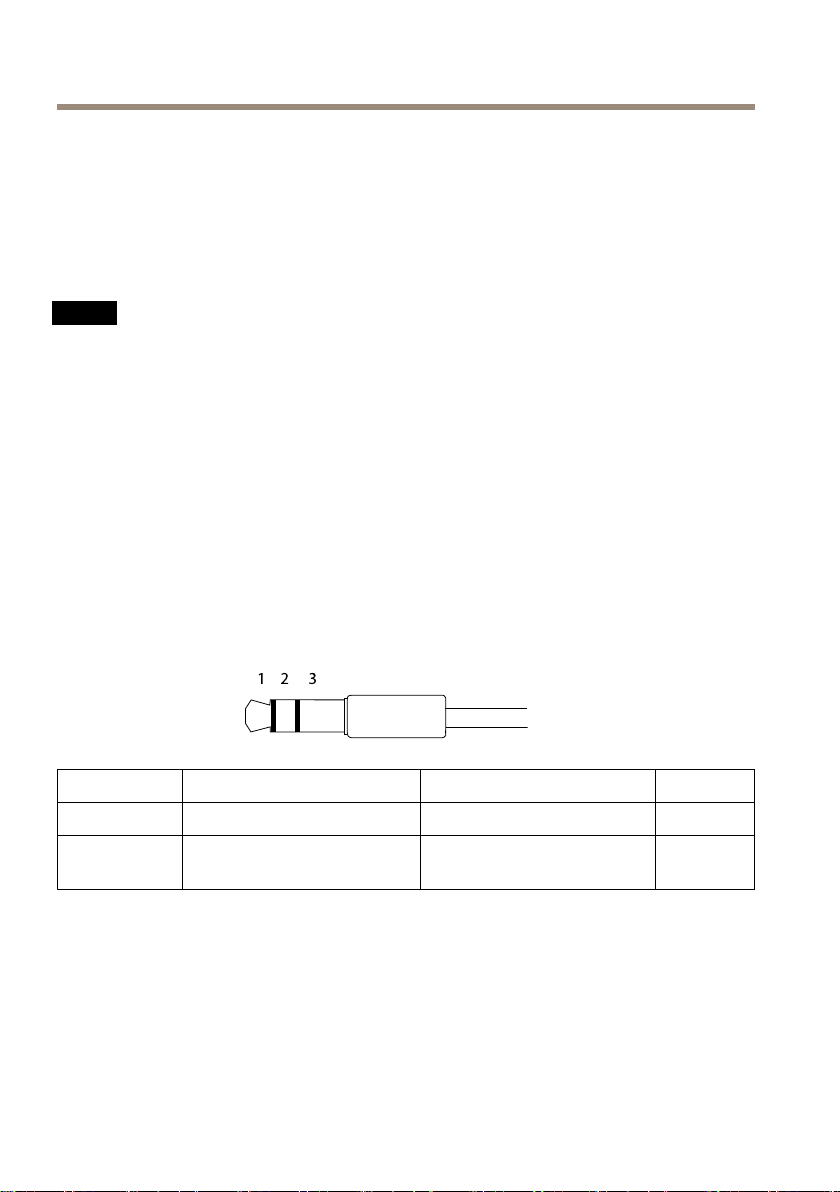
Audioconnector
TheAxisproducthasthefollowingaudioconnectors:
•Audioin(pink)–3.5mminputforamonomicrophone,oraline-inmonosignal.
•Audioout(green)–3.5mmoutputforaudio(linelevel)thatcanbeconnectedto
apublicaddress(PA)systemoranactivespeakerwithabuilt-inamplier.Astereo
connectormustbeusedforaudioout.
Foraudioin,theleftchannelisusedfromastereosignal.
3.5mmaudio
connectors(stereo)
1Tip2Ring
AudioInput
AudioOutput
Microphone/Linein
Lineout,mono(stereo
connectorcompatible)
Lineout,mono(stereo
connectorcompatible)
3Sleeve
Ground
Ground
AboutI/Oconnectors
UsetheI/Oconnectorwithexternaldevicesincombinationwith,forexample,tamperingalarms,
motiondetection,eventtriggering,andalarmnotications.Inadditiontothe0VDCreference
pointandpower(DCoutput),theI/Oconnectorprovidestheinterfaceto:
Digitaloutput-ForconnectingexternaldevicessuchasrelaysandLEDs.Connecteddevicescan
beactivatedbytheVAPIX®ApplicationProgrammingInterfaceorintheproduct’swebpage.
24
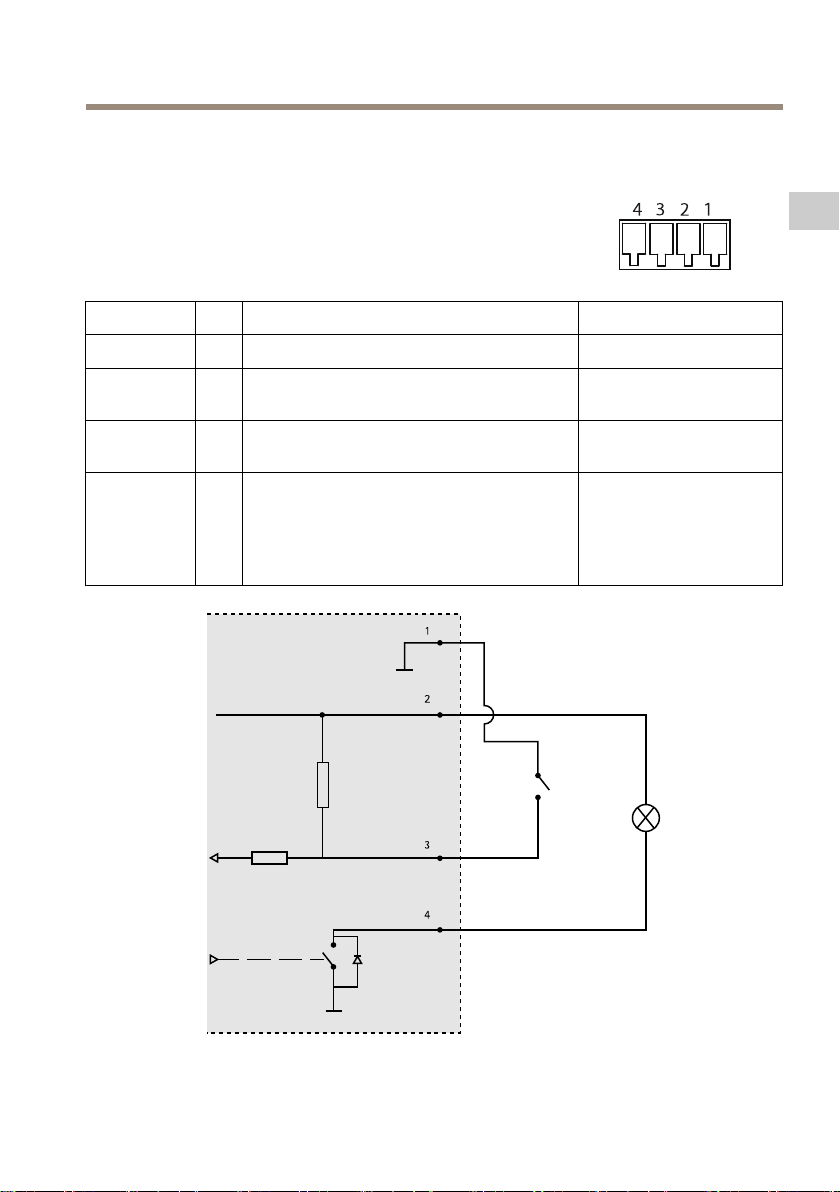
AXISQ8414–L VSNetworkCamera
Digitalinput-Forconnectingdevicesthatcantogglebetweenanopenandclosedcircuit,for
examplePIRsensors,door/windowcontacts,andglassbreakdetectors.
4-pinterminalblock
FunctionPinNotes
0VDC(-)
DCoutput
Digitalinput
Digital
output
1
2
Canbeusedtopowerauxiliaryequipment.
Note:Thispincanonlybeusedaspowerout.
3
Connecttopin1toactivate,orleaveoating
(unconnected)todeactivate
4
Connectedtopin1whenactivated,oating
(unconnected)whendeactivated.Ifused
withaninductiveload,e.g.arelay,adiode
mustbeconnectedinparallelwiththeload,
forprotectionagainstvoltagetransients.
EN
Specications
0VDC
3.3VDC
Maxload=50mA
0tomax40VDC
0tomax40VDC,open
drain,100mA
1
0VDC(-)
25
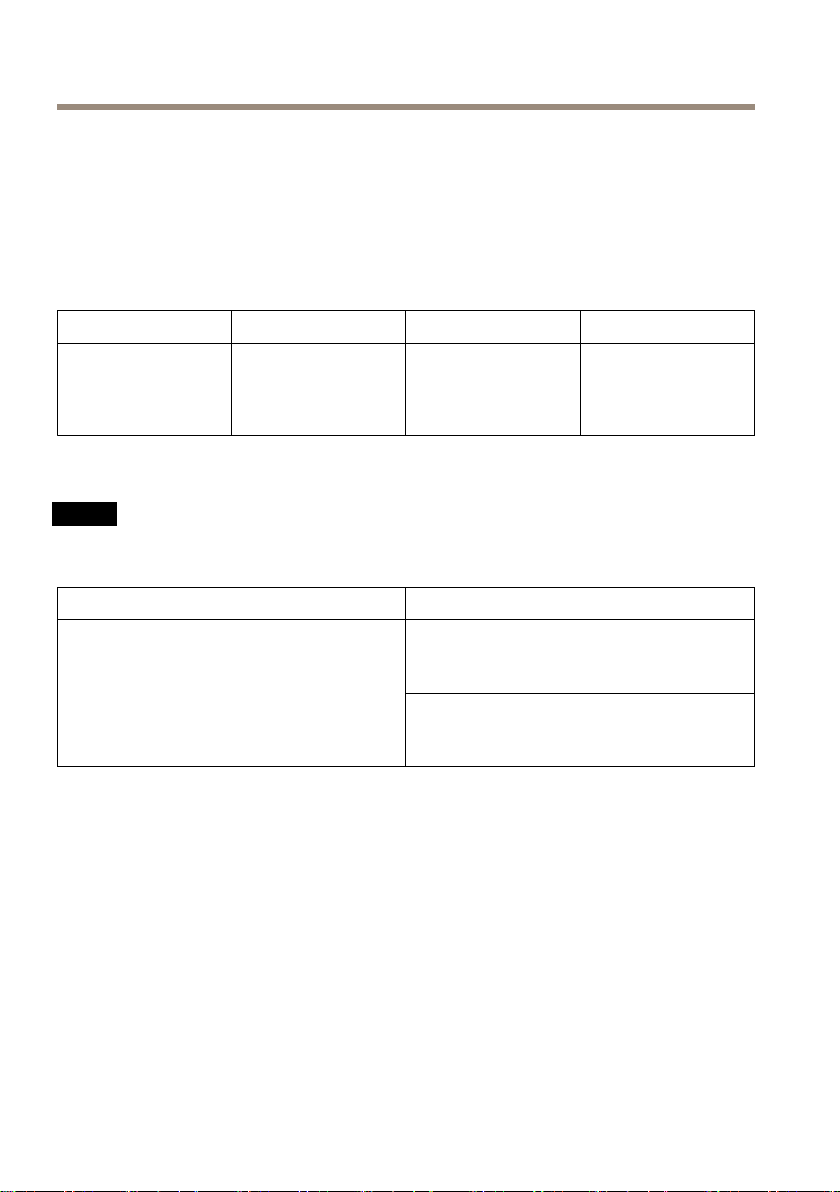
AXISQ8414–LVSNetworkCamera
2
DCoutput3.3V,max50mA
3
Digitalinput0tomax40VDC
4
Digitaloutput0tomax40VDC,opendrain,100mA
OperatingConditions
TheAxisproductisintendedforindooruse.
Product
AXISQ8414–LVS
Classication
NEMA250Type4X,
IEC/EN60529IP66,
Class4M4
IEC60721-3-4
TemperatureHumidity
0°Cto50°C
(32°Fto122°F)
PowerConsumption
NO
TICE
NO NO
TICE TICE
Usealimitedpowersource(LPS)witheitheraratedoutputpowerlimitedto≤100W
oraratedoutputcurrentlimitedto≤5A.
ProductPoE
AXISQ8414–LVS
PoweroverEthernetIEEE802.3af/802.3atType
1Class2,max.6.2W
(limitedIR)
PoweroverEthernetIEEE802.3af/802.3atType
1Class3,max.8.7W
(fullIR)
10-100%RH
(condensing)
26

AXISQ8414–L VSNetworkCamera
Safetyinformation
Hazardlevels
DANGER
Indicatesahazardoussituationwhich,ifnotavoided,willresultindeathorseriousinjury.
WARNING
Indicatesahazardoussituationwhich,ifnotavoided,couldresultindeathorseriousinjury.
CAUTION
Indicatesahazardoussituationwhich,ifnotavoided,couldresultinminorormoderate
injury.
NO
TICE
NO NO
TICE TICE
Indicatesasituationwhich,ifnotavoided,couldresultindamagetoproperty.
Othermessagelevels
Important
Indicatessignicantinformationwhichisessentialfortheproducttofunctioncorrectly.
Note
Indicatesusefulinformationwhichhelpsingettingthemostoutoftheproduct.
EN
27

AXISQ8414–LVSNetworkCamera
Safetyinstructions
NO
TICE
NO NO
TICE TICE
•TheAxisproductshallbeusedincompliancewithlocallawsandregulations.
•Axisrecommendsusingashieldednetworkcable(STP)CAT5orhigher.
•StoretheAxisproductinadryandventilatedenvironment.
•Donotinstalltheproductonunstablepoles,brackets,surfacesorwalls.
•UseonlyapplicabletoolswheninstallingtheAxisproduct.Usingexcessiveforcewith
powertoolscouldcausedamagetotheproduct.
•Useonlyaccessoriesthatcomplywiththetechnicalspecicationofyourproduct.These
canbeprovidedbyAxisorathirdparty.AxisrecommendsusingAxispowersource
equipmentcompatiblewithyourproduct.
•UseonlysparepartsprovidedbyorrecommendedbyAxis.
•Donotattempttorepairtheproductyourself.ContactAxissupportoryourAxisreseller
forservicematters.
Transportation
NO
TICE
NO NO
TICE TICE
•WhentransportingtheAxisproduct,usetheoriginalpackagingorequivalenttoprevent
damagetotheproduct.
Battery
TheAxisproductusesa3.0VBR2032lithiumbatteryasthepowersupplyforitsinternalreal-time
clock(RTC).Undernormalconditionsthisbatterywilllastforaminimumofveyears.
LowbatterypoweraffectstheoperationoftheRTC,causingittoresetateverypower-up.When
thebatteryneedsreplacing,alogmessagewillappearintheproduct’sserverreport.Formore
informationabouttheserverreport,seetheproduct´ssetuppagesorcontactAxissupport.
Thebatteryshouldnotbereplacedunlessrequired,butifthebatterydoesneedreplacing,contact
Axissupportatwww .axis.com/supportforassistance.
Lithiumcoincell3.0Vbatteriescontain1,2-dimethoxyethane;ethyleneglycoldimethylether
(EGDME),CASno.110-71-4.
WARNING
•Riskofexplosionifthebatteryisincorrectlyreplaced.
•ReplaceonlywithanidenticalbatteryorabatterywhichisrecommendedbyAxis.
•Disposeofusedbatteriesaccordingtolocalregulationsorthebatterymanufacturer's
instructions.
28

Contenudel’emballage
•CaméraréseauAXISQ8414–LVS
•Rondelles(pourvisdemontage)
•ProtectionduconnecteurAXISA
•Torx®emboutTR20
•Blocdeconnexionà4broches
•Documentsimprimés
-Guided’installation(cedocument)
-Cléd'authenticationAVHS
AXISQ8414–L VSNetworkCamera
FR
29

AXISQ8414–LVSNetworkCamera
Vued'ensembleduproduit
1
Jointdecâble(câbleréseau)
2
Jointdecâble(câbleE/Souaudio)
3
SélecteurdeclassePoE*
4
Connecteurréseau
5
Connecteurdesortieaudio
6
VoyantsLED
7
Connecteurd'entréeaudio
8
Connecteurd'E/S
9
Boutondecommande
10
Fenêtreinfrarouge
11
Microphone
12
Nonutilisé
13
EmplacementpourcarteSD
*UtilisépourbasculerentrePoEClasse2(IRrestreint)etPoEClasse3(IRmaximal).Cf.page50.
30
 Loading...