

Page 1

INSTALLATION GUIDE
AXIS Camera Station S1016 Recorder
AXIS Camera Station S9001 Desktop Terminal
ENGLISH DEUTSCH
FRAN
Ç
AIS
ITALIANO
ESPAÑOL
日本語
Page 2

About this Document
This document includes instructions for installing
AXIS Camera Station S1016 Recorder and AXIS Camera
Station S9001 Desktop Terminal on your network. Previous
experience of networking will be beneficial when installing
the product.
Legal Considerations
Video and audio surveillance can be regulated by laws that
vary from country to country. Check the laws in your local
region before using this product for surveillance purposes.
Liability
Every care has been taken in the preparation of this
document. Please inform your local Axis office of any
inaccuracies or omissions. Axis Communications AB cannot
be held responsible for any technical or typographical errors
and reserves the right to make changes to the product and
manuals without prior notice. Axis Communications AB
makes no warranty of any kind with regard to the material
contained within this document, including, but not limited
to, the implied warranties of merchantability and fitness for
a particular purpose. Axis Communications AB shall not be
liable nor responsible for incidental or consequential
damages in connection with the furnishing, performance or
use of this material. This product is only to be used for its
intended purpose.
Intellectual Property Rights
Axis AB has intellectual property rights relating to
technology embodied in the product described in this
document. In particular, and without limitation, these
intellectual property rights may include one or more of the
patents listed at www.axis.com/patent.htm and one or more
additional patents or pending patent applications in the US
and other countries.
Equipment Modifications
This equipment must be installed and used in strict
accordance with the instructions given in the user
documentation. This equipment contains no
user-serviceable components. Unauthorized equipment
changes or modifications will invalidate all applicable
regulatory certifications and approvals.
• download user documentation and firmware updates
• find answers to resolved problems in the FAQ database.
Search by product, category, or phrases
• report problems to Axis support by logging in to your
private support area
• chat with Axis support staff (selected countries only)
• visit Axis support at www.axis.com/techsup
Copyright
©2014 Axis Communications AB, © 2013 Dell Inc. All rights
reserved. This product is protected by U.S. and international
copyright and intellectual property laws. AXIS
COMMUNICATIONS, AXIS, ETRAX, ARTPEC and VAPIX are
registered trademarks or trademark applications of Axis AB
in various jurisdictions. All other company names and
products are trademarks or registered trademarks of their
respective companies. We reserve the right to introduce
modifications without notice.
Trademark Acknowledgments
Dell™ is a trademark of Dell Inc. Ethernet, Internet Explorer,
WWW are registered trademarks of the respective holders.
Microsoft®, Windows®, MS-DOS®, Windows Vista®, the
Windows Vista start button, and Office Outlook® are either
trademarks or registered trademarks of Microsoft
Corporation in the United States and/or other countries.
Java and all Java-based trademarks and logos are
trademarks or registered trademarks of Oracle and/or its
affiliates.
Contact Information
Axis Communications AB
Emdalavägen 14
223 69 Lund
Sweden
Tel: +46 46 272 18 00
Fax: +46 46 13 61 30
www.axis.com
Support
Should you require any technical assistance, please contact
your Axis reseller. If your questions cannot be answered
immediately, your reseller will forward your queries through
the appropriate channels to ensure a rapid response. If you
are connected to the Internet, you can:
Page 3

AXIS S1016/AXIS S9001 Installation Guide Page 3
AXIS S1016/AXIS S9001 Installation Guide
This installation guide provides instructions for installing AXIS Camera Station S1016 Recorder and
AXIS Camera Station S9001 Desktop Terminal. For more information about how to use the product,
go to www.axis.com
Installation Steps
1. Hardware overview. See page 4.
2. Connect the cables. See page 6.
3. Set up software. See page 8.
4. Network configuration. See page 8.
5. Get Started. See page 8.
Package Content
• AXIS Camera Station S1016 Recorder or AXIS Camera Station S9001 Desktop Terminal
• Computer mouse
• Keyboard
• Power cable
• Safety and Regulatory Information document
• Installation Guide (this document)
ENGLISH
Page 4

Page 4 AXIS S1016/AXIS S9001 Installation Guide
1
2
3
4
5
7
8
9
14
13
12
11
10
6
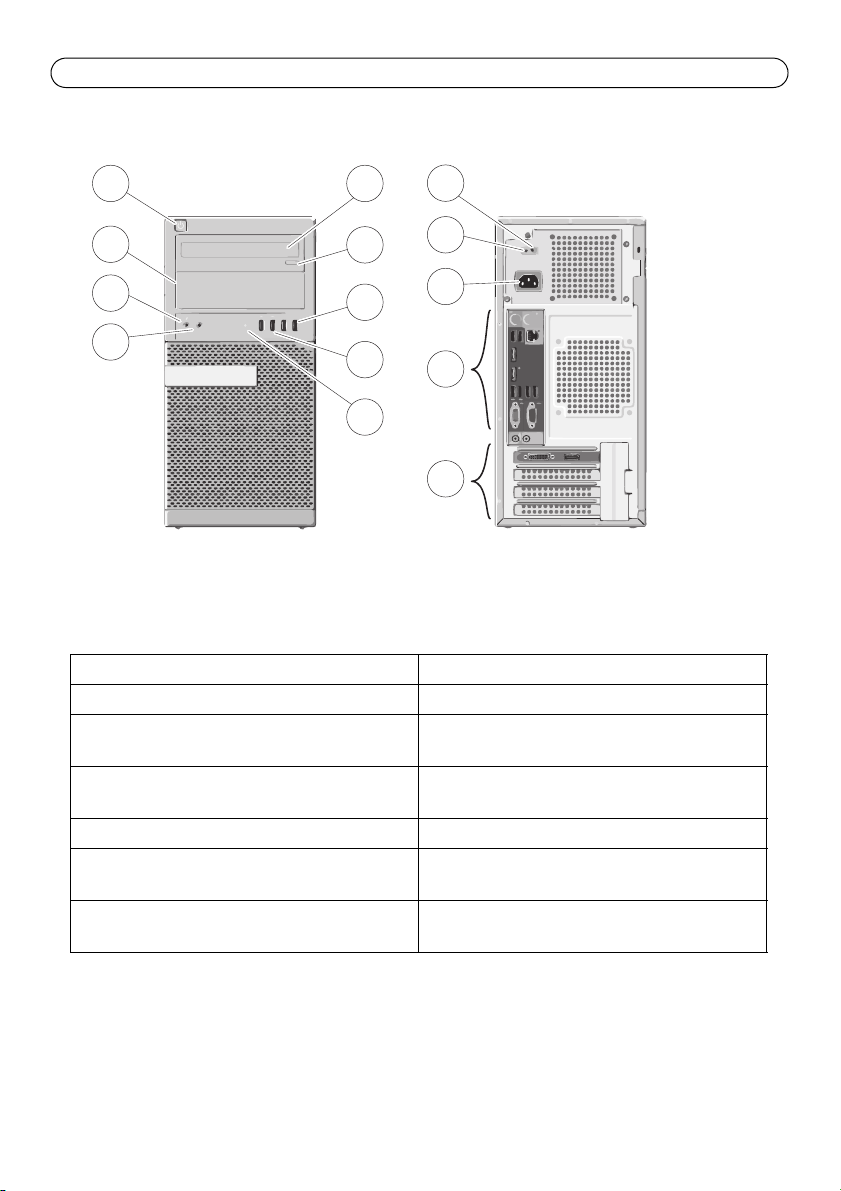
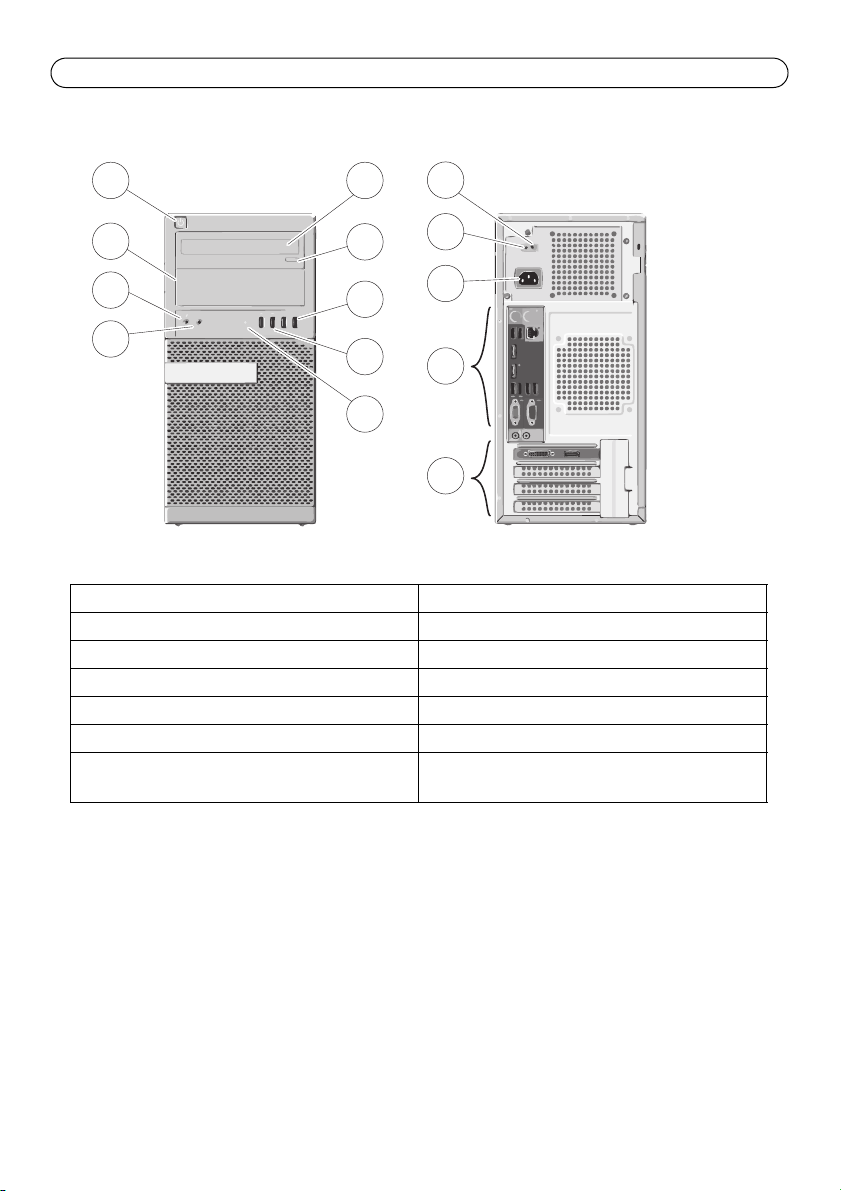
Hardware Overview - Front and Back
1 Power button, power light 8 USB 3.0 connectors (2)
2 Optical-drive bay 9 Drive activity light
3 Microphone connector 10 Power-supply diagnostic light
4 Headphone connector 11 Power-supply diagnostic button
5 Optical drive 12 Power connector
6 Optical drive eject button 13 Backpanel connectors, see page 5
7 USB 2.0 connectors (2) 14 Graphics card, see page 5
Expansion-card slots (3)
Page 5

AXIS S1016/AXIS S9001 Installation Guide Page 5
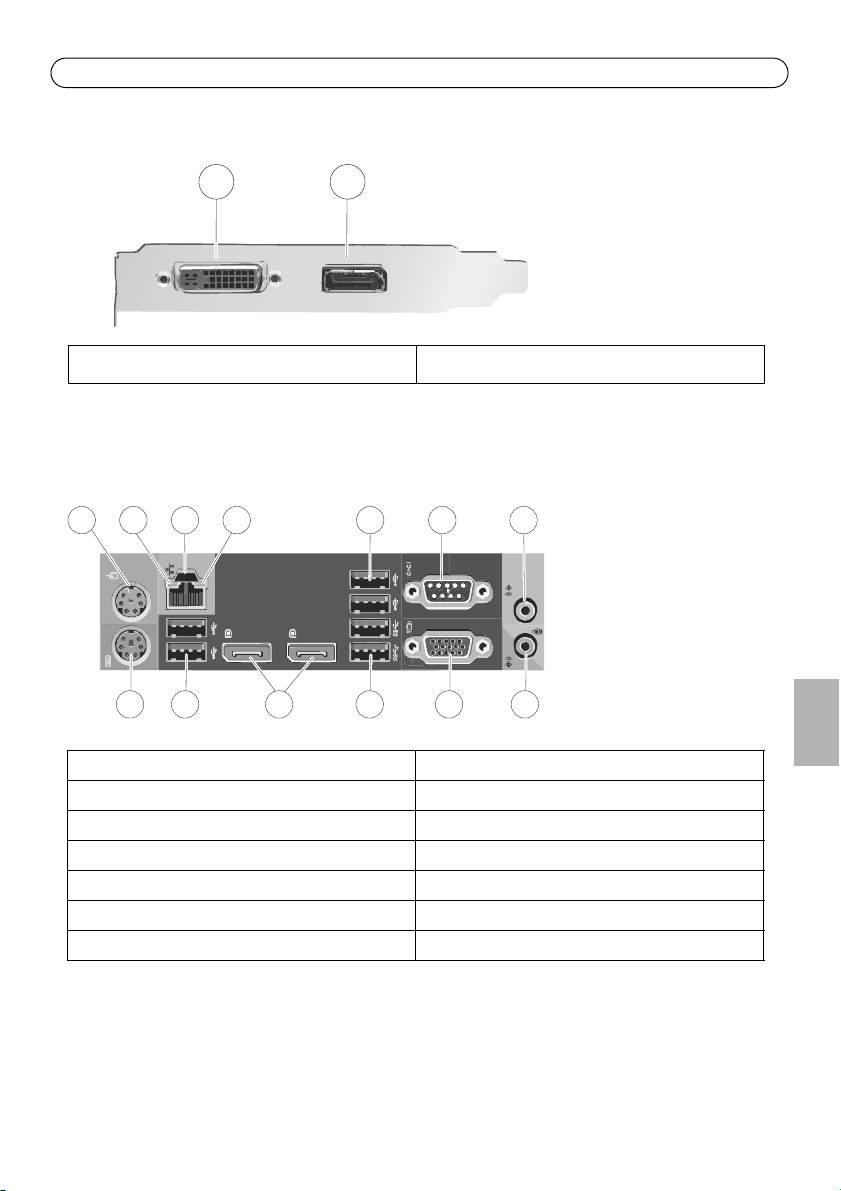
1 2
1 2 3 4 5
8 9 11 12 1310
6 7
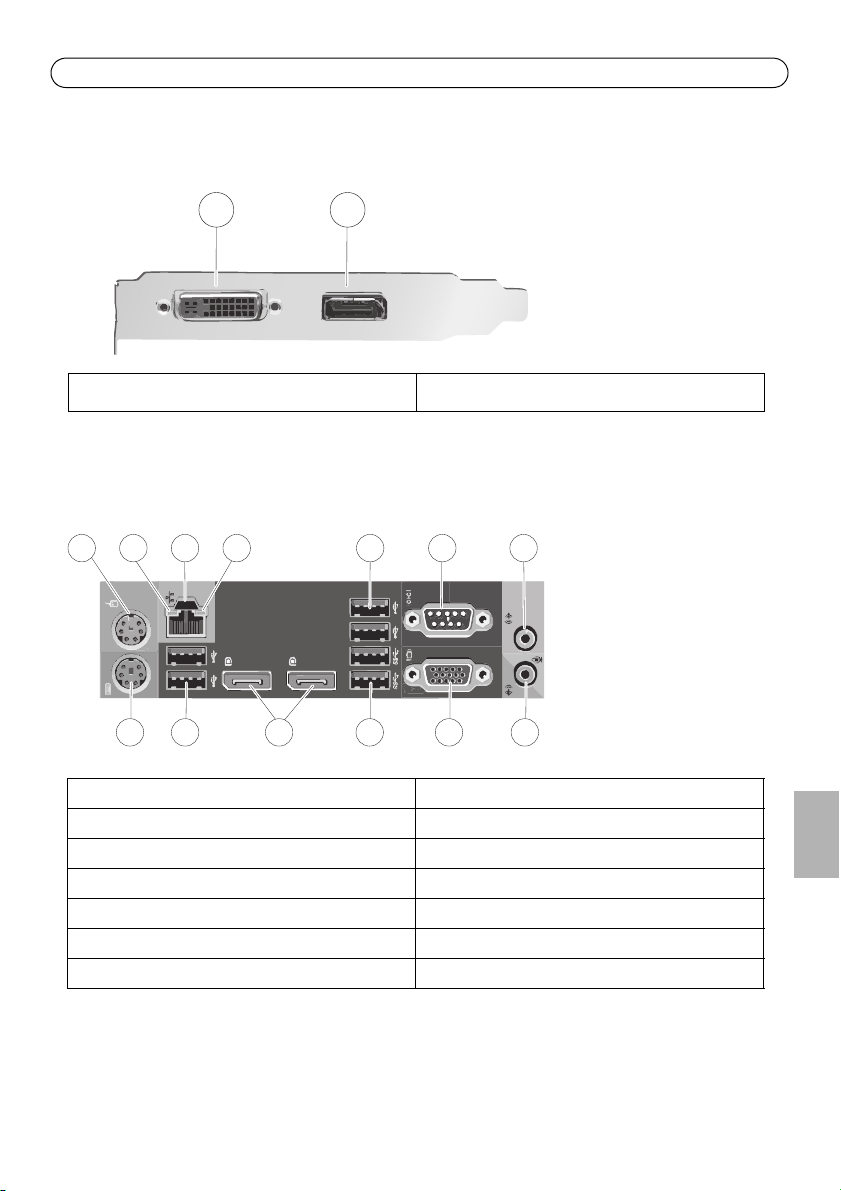
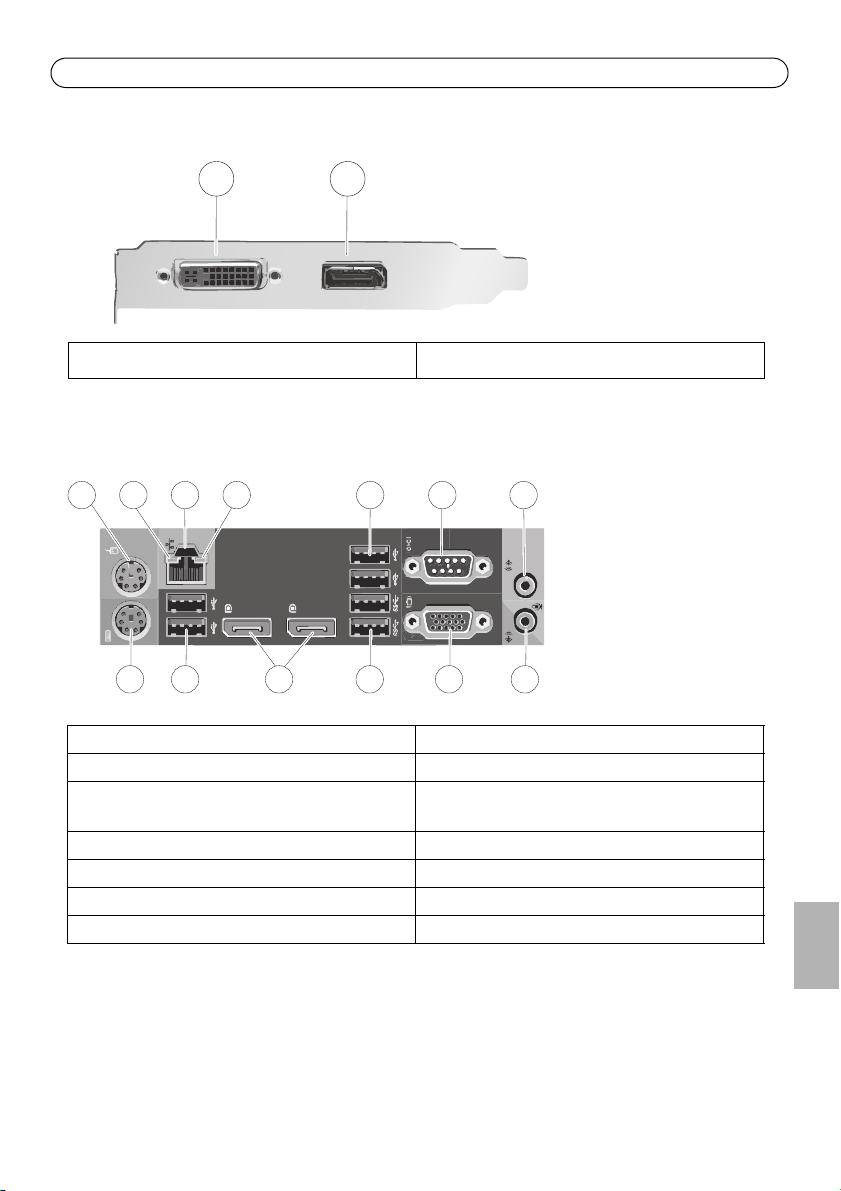
Hardware Overview - Graphics Card Panel
1 DVI-I connector 2 DisplayPort connector
Hardware overview - Back Panel
ENGLISH
1 Mouse connector 8 Keyboard connector
2 Network link integrity light 9 USB 2.0 connectors (2)
3 Network connector 10 Do not use (DisplayPort connectors (2))
4 Network activity light 11 USB 3.0 connectors (2)
5 USB 2.0 connectors (2) 12 Do not use (VGA connector)
6 Do not use (Serial connector) 13 Line-in/microphone connector
7 Line-out/speakers connector
Page 6

Page 6 AXIS S1016/AXIS S9001 Installation Guide
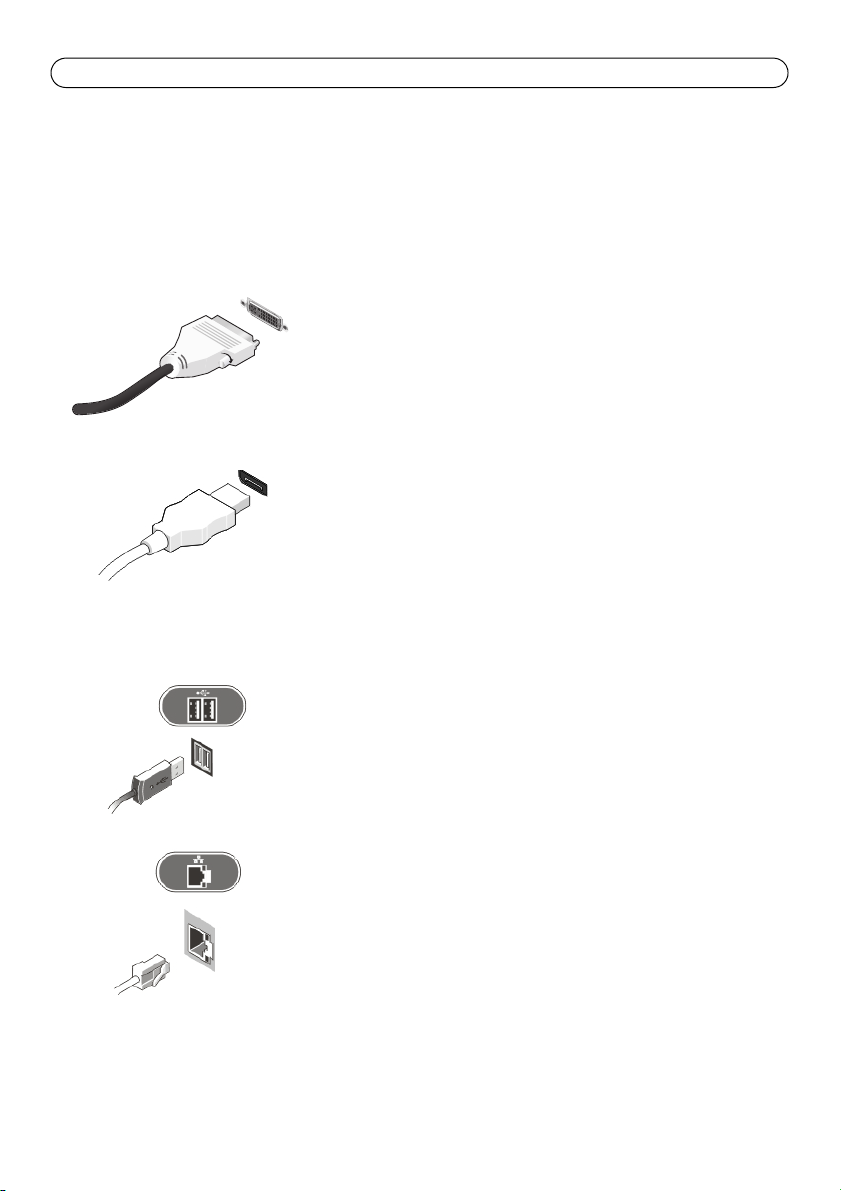
Connect the Cables
Warning: Before you begin any of the procedures in this section, read the safety information that
shipped with your computer. For additional information, see www.axis.com
NOTE: Some devices may not be included if you did not order them.
1. Connect the monitor(s) to the graphics card, see Graphics Card Panel on page 5, using the following cables:
DVI-I Cable.
DisplayPort Cable.
2. Connect the USB keyboard or mouse.
3. Connect the network cable.
Page 7

AXIS S1016/AXIS S9001 Installation Guide Page 7
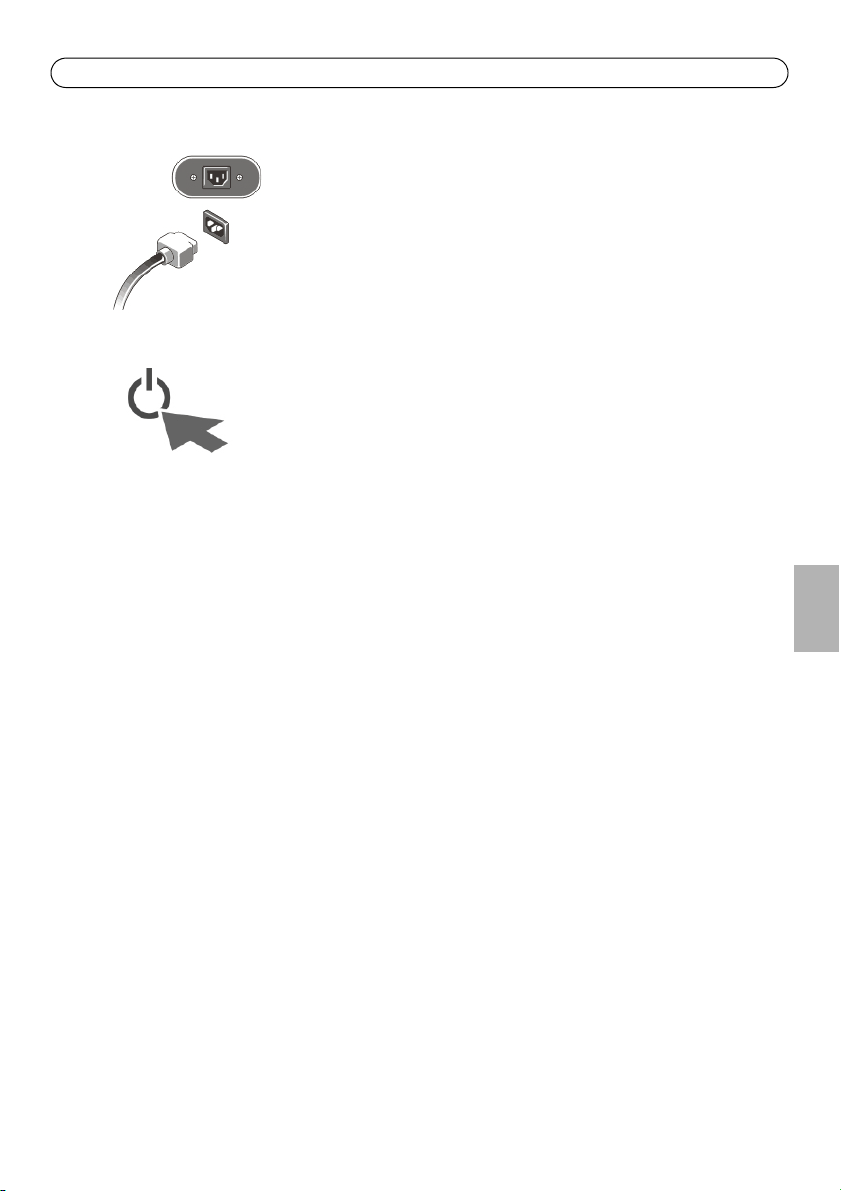
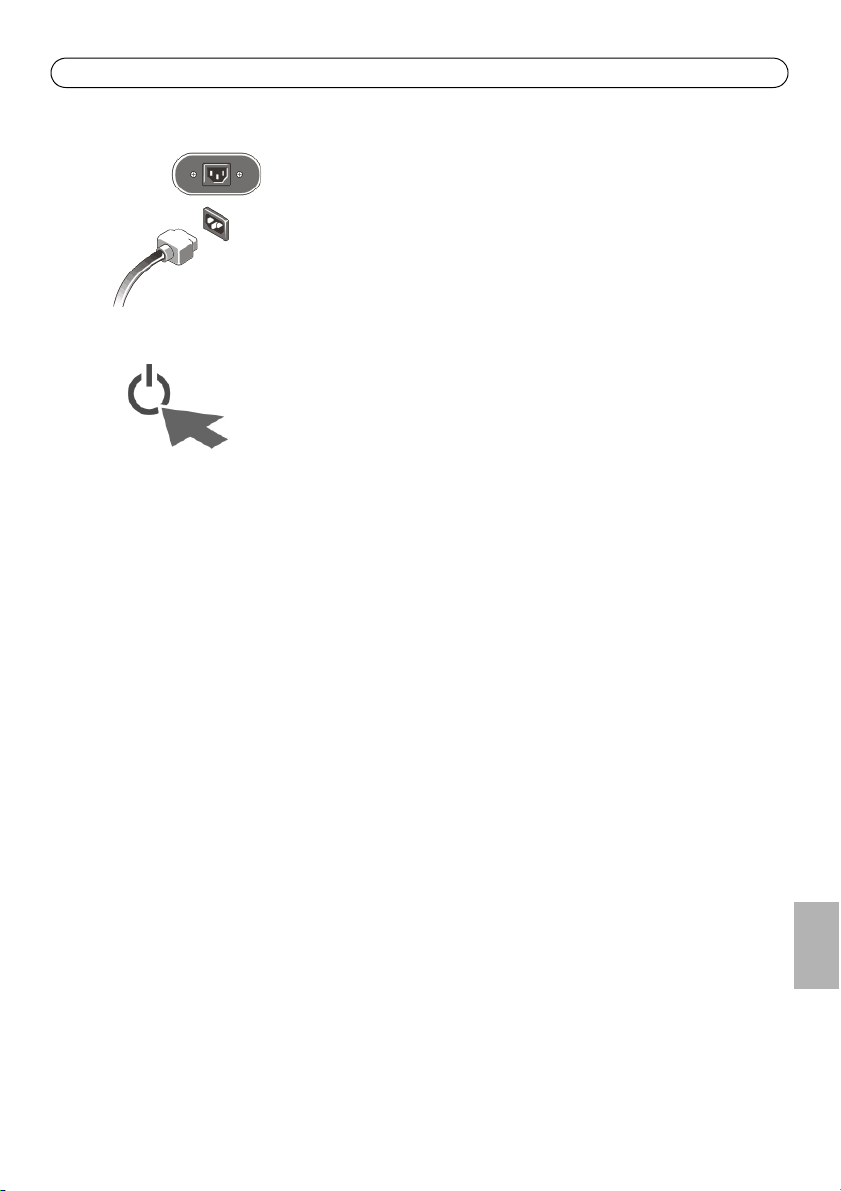
4. Connect the power cable(s).
5. Press the power button on the monitor and the computer.
ENGLISH
Page 8

Page 8 AXIS S1016/AXIS S9001 Installation Guide
Set Up Software
When the computer has been powered on, the Windows operating system will be installed. Follow
the instructions displayed on the screen and provide the required information. When the Windows
installation is finalized, AXIS Camera Station Installer will start automatically. Follow the steps in
the installation wizard and use the default settings.
Network Configuration
AXIS Camera Station can record and play back video from cameras and video encoders that are
connected to a LAN (Local Area Network) or to a WAN (Wide Area Network). Depending on the
installation, follow the instructions under Network & Security Configuration in AXIS Camera Station
User Manual available at www.axis.com
Get Started
AXIS Camera Station Client and the wizard “Get Started with AXIS Camera Station” start
automatically when the installation is complete. “Get Started with AXIS Camera Station” provides
a quick way to add cameras and to configure and enable recording:
1. Select cameras and video encoders to add.
2. Select recording methods and where to store recordings.
3. Review settings and click Finish to add cameras and start recording.
For more information, see the built-in help and AXIS Camera Station User Manual available at
www.axis.com
Page 9

AXIS S1016/AXIS S9001 Installation Guide Page 9
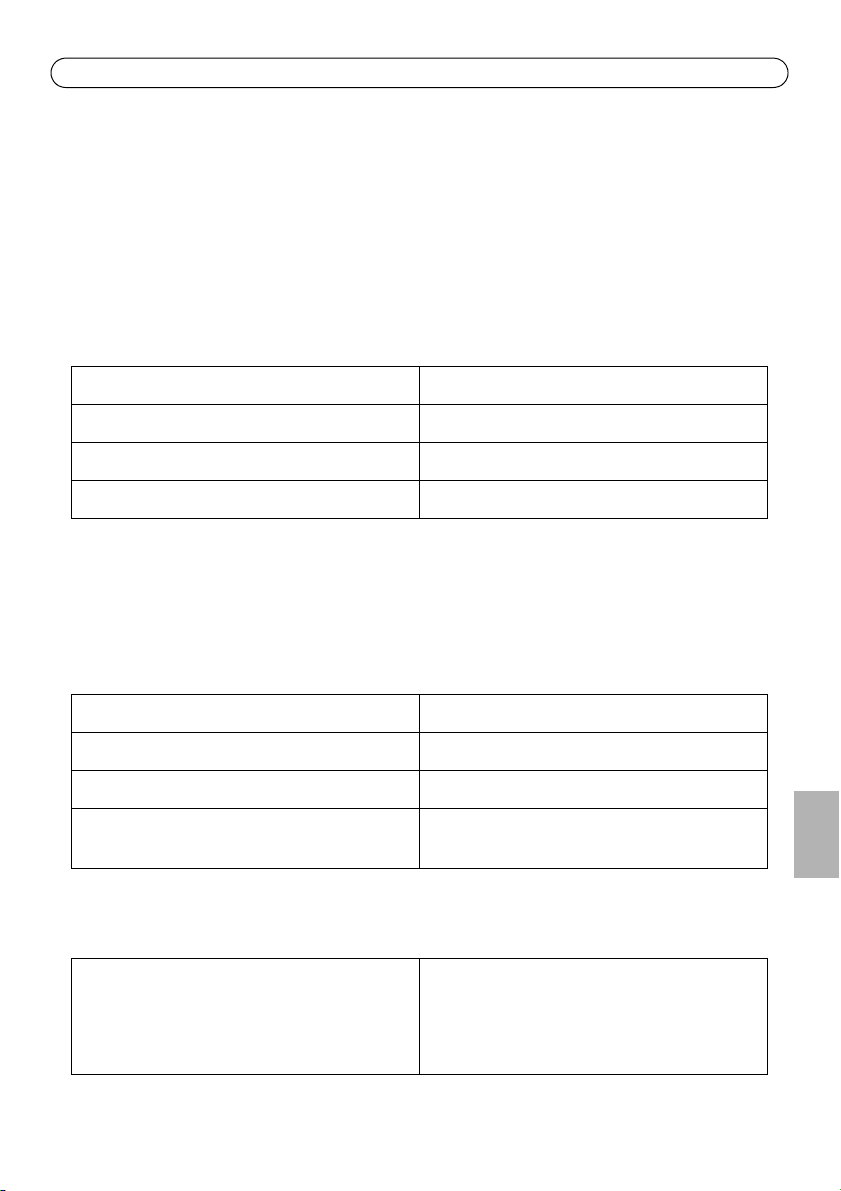
Specification
Note:
Offerings may vary by region. The following specifications are only those required by law to
ship with your computer. For more information regarding the configuration of your computer, click Start > Help and Support and select the option to view information about your
computer.
Power:
Voltage 100 V AC to 240 V AC
Coin-cell battery 3 V CR2032 lithium coin cell
Wattage 365 W
Maximum heat dissipation 1245 BTU/hr
Note:
Heat dissipation is calculated by using the power supply wattage rating.
Physical:
ENGLISH
Height 360.00 mm (14.17 inches)
Width 175.00 mm (6.89 inches)
Depth 417.00 mm (16.42 inches)
Weight (computer only) 8.00 kg (17.6 lb) AXIS S9001
8.50 kg (18,7 lb) AXIS S1016
Environmental:
Operating temperature 5°C to 35°C (41°F to 95°F)
5°C to 45°C (41°F to 113°F)(limited to 65 W or
lower processor. No discrete graphic card)
Page 10

Page 10 AXIS S1016/AXIS S9001 Installation Guide
Further information
For more information about the product visit www.axis.com
Visit Axis learning center www.axis.com/academy for useful trainings, webinars, tutorials and
guides.
Warranty
For information about Axis’ product warranty and thereto related information, see
www.axis.com/warranty
Page 11

AXIS S1016/AXIS S9001 Guide d'installation Page 11
AXIS S1016/AXIS S9001 Guide d'installation
Ce guide d’installation explique comment installer l'AXIS Camera Station S1016 Recorder et l'AXIS
Camera Station S9001 Desktop Terminal. Pour plus d’informations sur l'utilisation du produit,
consultez www.axis.com
Procédures d’installation
1. Vue d'ensemble du matériel. Cf. page 12.
2. Branchement des câbles. Cf. page 14.
3. Configuration du logiciel. Cf. page 16.
4. Configuration réseau. Cf. page 16.
5. Démarrage. Cf. page 16.
FRAN
Contenu de l’emballage
• AXIS Camera Station S1016 Recorder ou AXIS Camera Station S9001 Desktop Terminal
• Souris d'ordinateur
•Clavier
• Câble d’alimentation
• Document concernant les informations sur la sécurité et les réglementations
• Guide d'installation (ce document)
Ç
AIS
Page 12

Page 12 AXIS S1016/AXIS S9001 Guide d’installation
1
2
3
4
5
7
8
9
14
13
12
11
10
6
Vue d'ensemble du matériel - Avant et arrière
1 Bouton d’alimentation, voyant d'alimentation 8 Connecteurs USB 3.0 (2)
2 Baie du lecteur optique 9 Voyant d'activité du lecteur
3 Connecteur pour microphone 10 Voyant de diagnostic de l'alimentation
4 Connecteur pour casque 11 Bouton de diagnostic de l'alimentation
5 Lecteur optique 12 Connecteur d'alimentation
6 Bouton d'éjection du lecteur optique 13 Connecteurs du panneau arrière, cf. page 13
7 Connecteurs USB 2.0 (2) 14 Carte graphique, voir page 13
Fentes pour cartes d'extension (3)
Page 13

AXIS S1016/AXIS S9001 Guide d'installation Page 13
1 2
1 2 3 4 5
8 9 11 12 1310
6 7
Vue d'ensemble du matériel - Panneau de la carte graphique
1 Connecteur DVI-I 2 Connecteur DisplayPort
Vue d'ensemble du matériel - Panneau arrière
FRAN
Ç
AIS
1 Connecteur de la souris 8 Connecteur du clavier
2 Voyant d'intégrité de la liaison réseau 9 Connecteurs USB 2.0 (2)
3 Connecteur réseau 10 Ne pas utiliser (Connecteurs DisplayPort (2))
4 Voyant d'activité réseau 11 Connecteurs USB 3.0 (2)
5 Connecteurs USB 2.0 (2) 12 Ne pas utiliser (Connecteur VGA)
6 Ne pas utiliser (Connecteur série) 13 Connecteur entrée/microphone
7 Connecteur de sortie de ligne/haut-parleurs
Page 14

Page 14 AXIS S1016/AXIS S9001 Guide d’installation
Branchement des câbles
Avertissement : Avant d'exécuter une procédure de la présente section, lisez les informations
relatives à la sécurité fournies avec votre ordinateur. Pour obtenir des informations
supplémentaires, reportez-vous à www.axis.com
REMARQUE : Certains périphériques peuvent ne pas être fournis si vous ne les avez pas commandés.
1. Raccordez le(s) moniteur(s) à la carte graphique, voir Panneau de la carte graphique à la
page 13, à l'aide des câbles suivants :
Câble DVI-I.
Câble DisplayPort.
2. Branchez le clavier USB ou la souris.
3. Branchez le câble réseau.
Page 15

AXIS S1016/AXIS S9001 Guide d'installation Page 15
4. Branchez le(s) câble(s) d'alimentation.
5. Appuyez sur le bouton d'alimentation du moniteur et de l'ordinateur.
FRAN
Ç
AIS
Page 16

Page 16 AXIS S1016/AXIS S9001 Guide d’installation
Configuration du logiciel
Lorsque l'ordinateur est mis sous tension, le système d'exploitation Windows est installé. Suivez les
instructions affichées à l’écran et renseignez les informations requises. Une fois l'installation de
Windows terminée, AXIS Camera Station Installer démarre automatiquement. Suivez les étapes de
l'assistant d'installation et utilisez les paramètres par défaut.
Configuration réseau
AXIS Camera Station permet d'enregistrer et de visionner des images vidéo à partir de caméras et
d'encodeurs vidéo connectés à un réseau local ou étendu. En fonction de votre installation, suivez
les instructions figurant au chapitre Network & Security Configuration d´ AXIS Camera Station User
Manual disponible à www.axis.com
Démarrage
AXIS Camera Station Client et l'assistant « Get Started with AXIS Camera Station » démarrent
automatiquement une fois l'installation terminée. « Get Started with AXIS Camera Station » offre
une façon rapide d'ajouter des caméras ainsi que de configurer et d'activer l'enregistrement :
1. Sélectionnez les caméras et encodeurs vidéo à ajouter.
2. Sélectionnez les méthodes d'enregistrement et l'endroit où archiver les enregistrements.
3. Vérifiez les paramètres et cliquez sur Finish (Terminer) pour ajouter des caméras et lancer
l'enregistrement.
Pour plus d'informations, reportez-vous à l'aide intégrée et au AXIS Camera Station User Manual
disponible sur www.axis.com
Page 17
AXIS S1016/AXIS S9001 Guide d'installation Page 17
Caractéristiques techniques
Remarque :
Les offres peuvent varier d'une région à l'autre. Les caractéristiques techniques suivantes
sont uniquement celles qui doivent être fournies légalement avec votre ordinateur. Pour
obtenir plus d'informations sur la configuration de votre ordinateur, cliquez sur Start >
Help and Support (Démarrer, Aide et support), puis sélectionnez l'option de votre choix pour
afficher les informations concernant votre ordinateur.
Alimentation :
Tension 100 V CA à 240 V CA
Pile bouton Pile bouton 3 V CR2032 au lithium
Puissance nominale 365 W
Dissipation maximale de la chaleur 1 245 BTU/h
Remarque :
La dissipation de la chaleur est calculée par rapport à la puissance nominale de l'alimentation.
Caractéristiques physiques :
Hauteur 360,00 mm (14,17 pouces)
Largeur 175,00 mm (6,89 pouces)
Profondeur 417,00 mm (16,42 pouces)
Poids (ordinateur uniquement) 8,00 kg (17,6 lb) AXIS S9001
8,50 kg (18,7 lb) AXIS S1016
Environnement :
Température d’exploitation 5 °C à 35 °C (41 °F à 95 °F)
5 °C à 45 °C (41 °F à 113 °F) (limité à 65 W ou
processeur inférieur. Aucune carte graphique
discrète)
FRAN
Ç
AIS
Page 18

Page 18 AXIS S1016/AXIS S9001 Guide d’installation
Informations complémentaires
Pour en savoir plus sur l'utilisation le produit, visitez www.axis.com
Visitez le centre d'apprentissage en ligne www.axis.com/academy pour en savoir plus sur les
formations, les webinaires, les tutoriels et les guides.
Garantie
Pour plus d'informations à propos de la garantie du produit Axis et des informations s'y rapportant,
voir www.axis.com/warranty
Page 19

AXIS S1016/AXIS S9001 Installationsanleitung Seite 19
AXIS S1016/AXIS S9001
Installationsanleitung
Diese Installationsanleitung enthält Anweisungen zur Installation von AXIS Camera Station S1016
Recorder und AXIS Camera Station S9001 Desktop Terminal. Weitere Informationen zur
Verwendung des Produkts finden Sie unter www.axis.com.
Installationsschritte
1. Übersicht über die Hardware. Siehe Seite 20.
2. Anschließen der Kabel. Siehe Seite 22.
3. Einrichten der Software. Siehe Seite 24.
4. Netzwerkkonfiguration. Siehe Seite 24.
5. Erste Schritte. Siehe Seite 24.
Lieferumfang
• AXIS Camera Station S1016 Recorder oder AXIS Camera Station S9001 Desktop Terminal
• Computermaus
•Tastatur
•Netzkabel
• Sicherheits- und zulassungsrelevante Informationen
• Installationsanleitung (dieses Dokument)
DEUTSCH
Page 20
Seite 20 AXIS S1016/AXIS S9001 Installationsanleitung
1
2
3
4
5
7
8
9
14
13
12
11
10
6
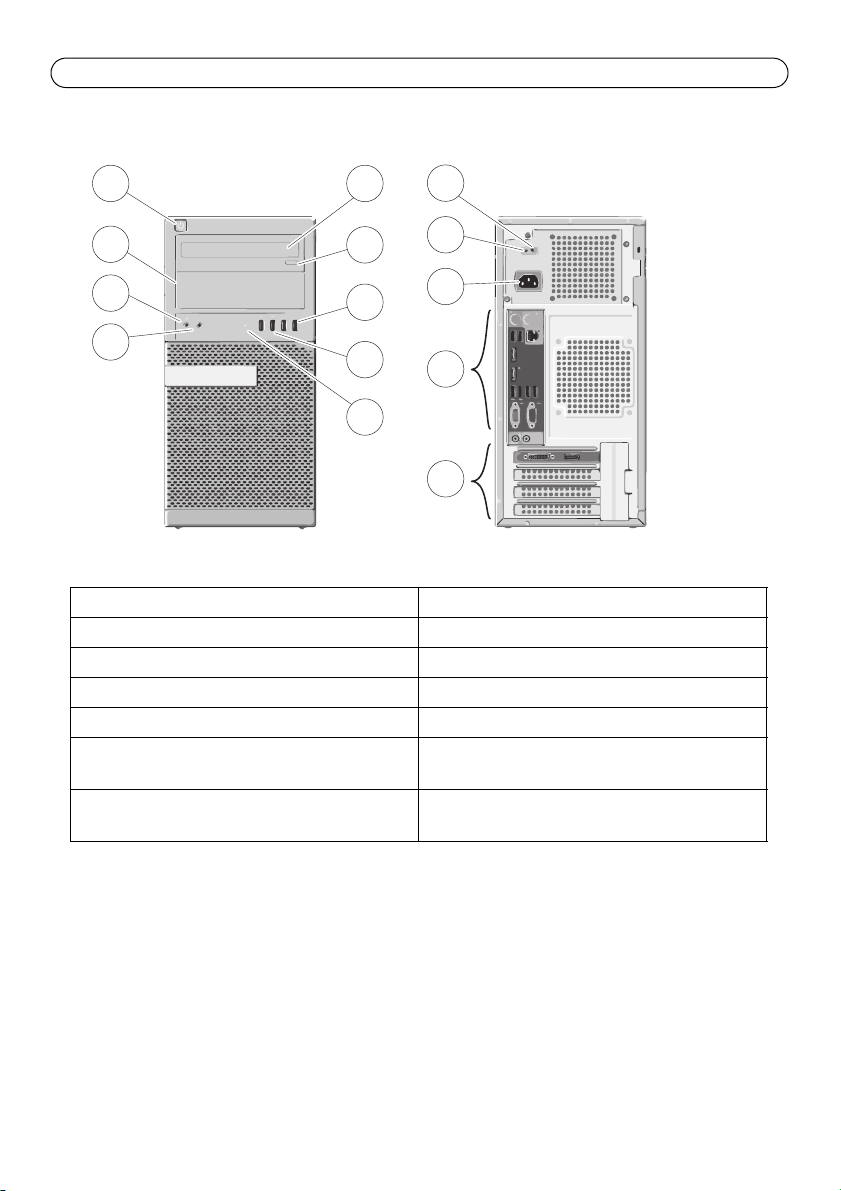
Übersicht über die Hardware – Vorder- und Rückseite
1 Netzschalter, Netzleuchte 8 USB 3.0-Anschlüsse (2)
2 Erweiterungsschacht für optisches Laufwerk 9 Leuchte Laufwerkaktivität
3 Mikrofonanschluss 10 Diagnoseleuchte Stromversorgung
4 Kopfhöreranschluss 11 Diagnosetaste Stromversorgung
5 Optisches Laufwerk 12 Netzanschluss
6 Auswurftaste für optisches Laufwerk 13 Anschlüsse auf Geräterückseite, siehe
7 USB 2.0-Anschlüsse (2) 14 Grafikkarte, siehe Seite 21
Seite 21
Steckplätze für Erweiterungskarten (3)
Page 21
AXIS S1016/AXIS S9001 Installationsanleitung Seite 21
1 2
1 2 3 4 5
8 9 11 12 1310
6 7
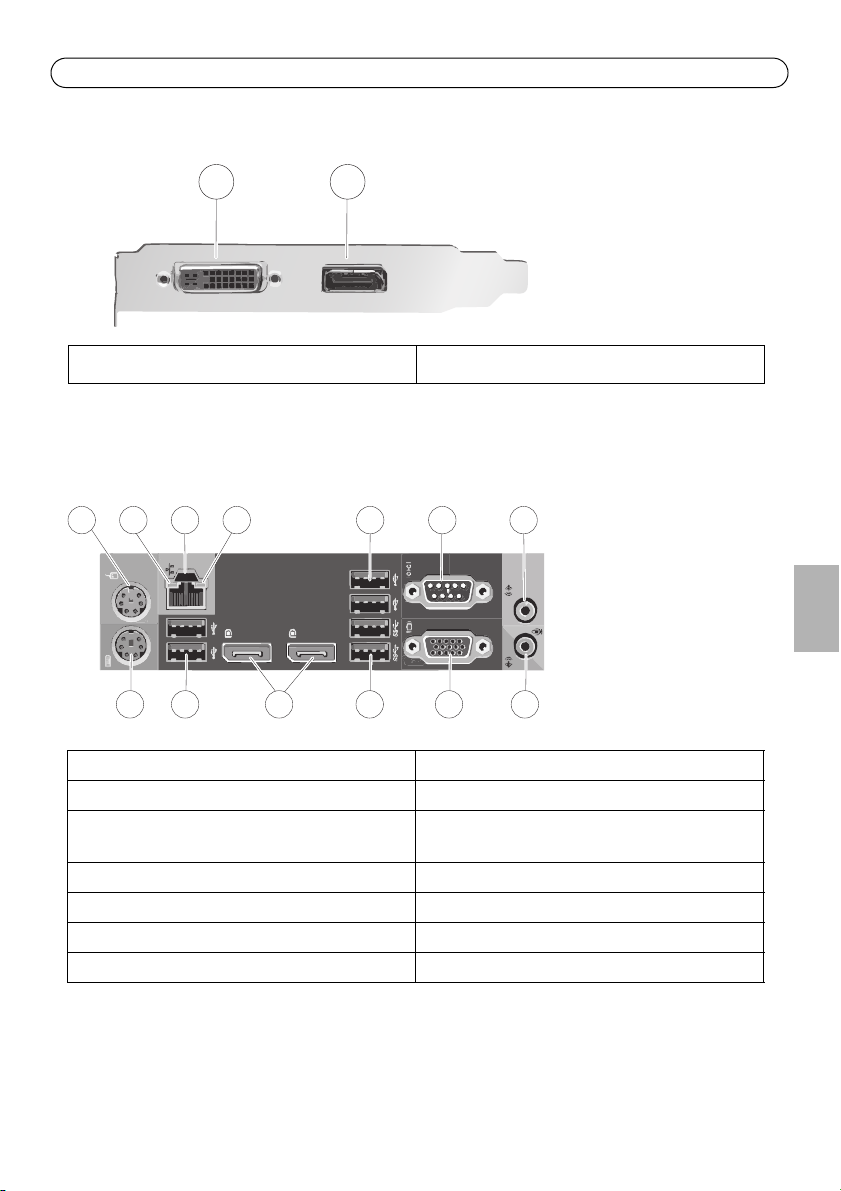
Hardware-Übersicht – Grafikkartenanschlüsse
1 DVI-I-Anschluss 2 DisplayPort-Anschluss
Hardware-Übersicht – Rückseite
DEUTSCH
1 Mausanschluss 8 Tastaturanschluss
2 Leuchte Integrität der Netzwerkverbindung 9 USB 2.0-Anschlüsse (2)
3 Netzwerkanschluss 10 Nicht verwenden (DisplayPort-Anschlüsse
4 Leuchte Netzwerkaktivität 11 USB 3.0-Anschlüsse (2)
5 USB 2.0-Anschlüsse (2) 12 Nicht verwenden (VGA-Anschluss)
6 Nicht verwenden (Serieller Anschluss) 13 Line-Eingang/Mikrofonanschluss
7 Line-Ausgang/Lautsprecheranschluss
(2))
Page 22
Seite 22 AXIS S1016/AXIS S9001 Installationsanleitung
Anschließen der Kabel
Warnung: Lesen Sie die Sicherheitsinformationen, die Sie mit dem Computer erhalten haben, bevor
Sie die Anweisungen in diesem Abschnitt durchführen. Weitere Informationen finden Sie unter
www.axis.com.
HINWEIS: Einige Geräte sind nur nach gesonderter Bestellung enthalten.
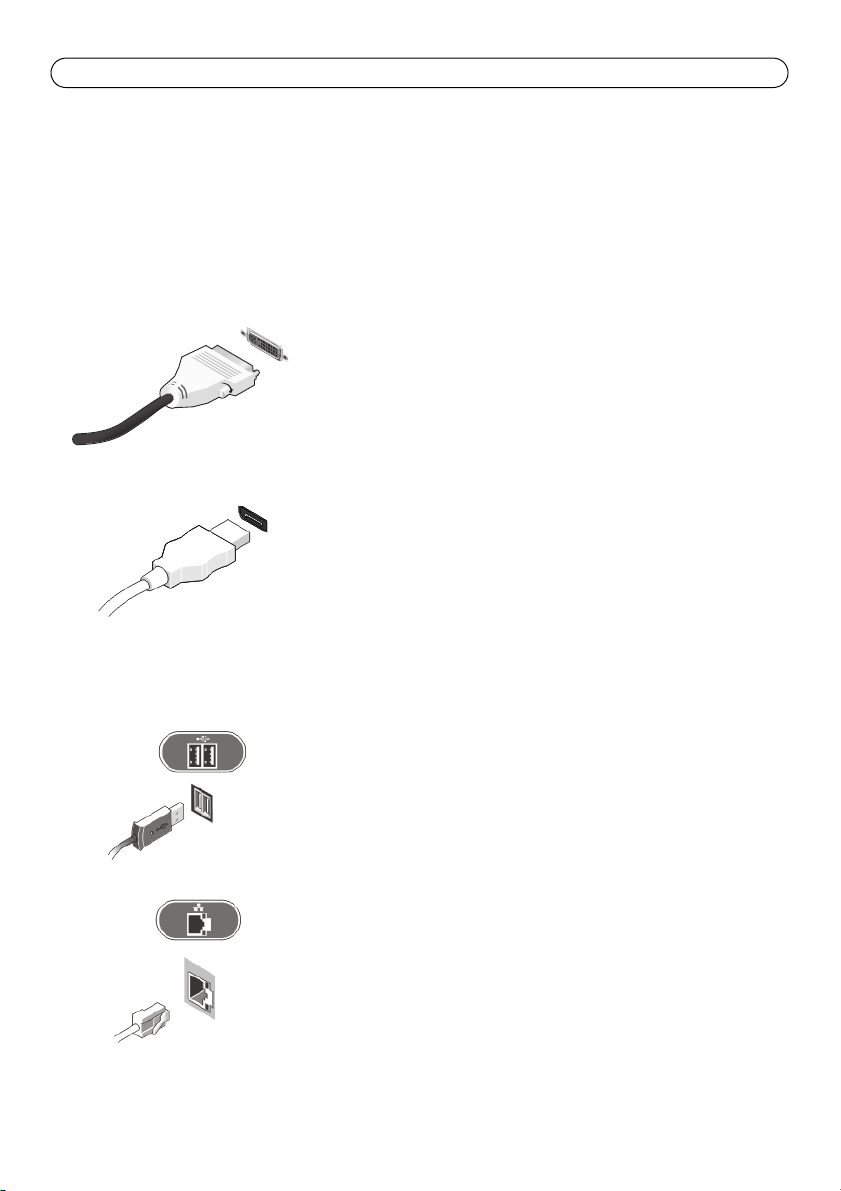
1. Schließen Sie den oder die Monitore an die Grafikkarte an; siehe Grafikkartenanschlüsse auf
Seite 21. Verwenden Sie dazu folgende Kabel:
DVI-I-Kabel
DisplayPort-Kabel
2. Schließen Sie die USB-Tastatur oder die Maus an.
3. Schließen Sie das Netzwerkkabel an.
Page 23
AXIS S1016/AXIS S9001 Installationsanleitung Seite 23
4. Schließen Sie das/die Stromkabel an.
5. Drücken Sie die Netztaste am Monitor und am Computer.
DEUTSCH
Page 24

Seite 24 AXIS S1016/AXIS S9001 Installationsanleitung
Einrichten der Software
Nach dem Einschalten des Computers wird das Windows-Betriebssystem installiert. Folgen Sie den
Anweisungen auf dem Bildschirm und geben Sie die erforderlichen Informationen ein. AXIS Camera
Station Installer startet nach Abschluss der Windows-Installation automatisch. Befolgen Sie die
Schritte im Installationsassistenten und verwenden Sie die Standardeinstellungen.
Netzwerkkonfiguration
Mit AXIS Camera Station können Videodaten von Kameras und Video-Encodern in einem LAN (Local
Area Network) oder WAN (Wide Area Network) aufgezeichnet und wiedergegeben werden. Befolgen
Sie, abhängig von Ihrer Installation, die Anweisungen unter Network & Security Configuration im
AXIS Camera Station User Manual, verfügbar unter www.axis.com.
Erste Schritte
Wenn die Installation abgeschlossen ist, starten AXIS Camera Station Client und der Assistent „Get
started with AXIS Camera Station“ (Erste Schritte mit AXIS Camera Station) automatisch. „Get
Started with AXIS Camera Station“ (Erste Schritte mit AXIS Camera Station) ermöglicht das
schnelle Hinzufügen von Kameras sowie das Konfigurieren und Aktivieren von Aufzeichnungen:
1. Wählen Sie die hinzuzufügenden Kameras und Video-Encoder aus.
2. Wählen Sie Aufzeichnungsmethoden und Speicherorte für die Aufzeichnungen aus.
3. Überprüfen Sie die Einstellungen und klicken Sie auf Finish (Fertig stellen) , um Kameras
hinzuzufügen und mit dem Aufzeichnen zu beginnen.
Weitere Informationen finden Sie in der integrierten Hilfe und im AXIS Camera Station User Manual
unter www.axis.com.
Page 25
AXIS S1016/AXIS S9001 Installationsanleitung Seite 25
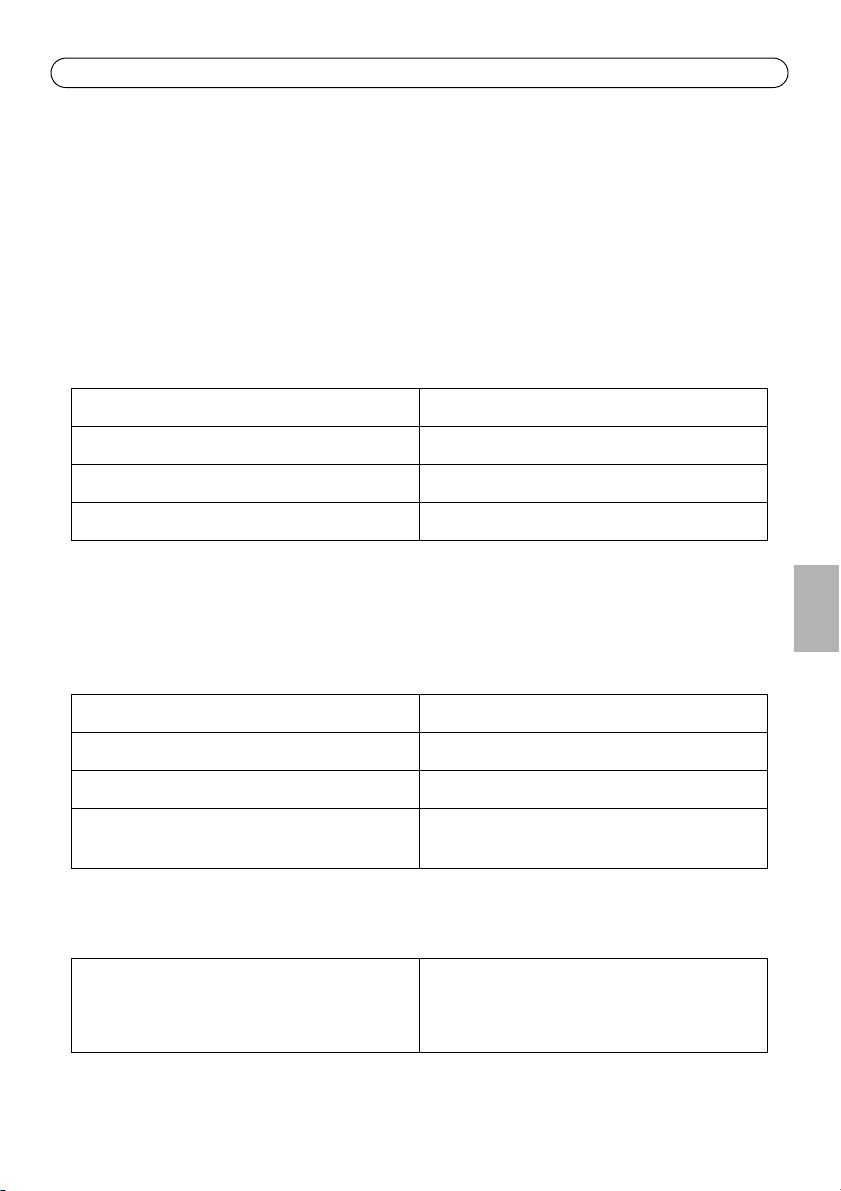
Technische Daten
Hinweis:
Die Angebote variieren je nach Region. Die folgenden technischen Daten beschränken sich
auf jene, die Ihrem Computer nach gesetzlicher Vorschrift bei der Lieferung beiliegen müssen. Weitere Informationen zur Konfiguration Ihres Computers erhalten Sie, wenn Sie auf
„Start“ > „Hilfe und Support“ klicken und die Option zur Ansicht von Informationen über
Ihren Computer auswählen.
Stromversorgung:
Spannung 100 V AC bis 240 V AC
Knopfzelle Lithium-Knopfzelle (3 V, CR2032)
Leistungsaufnahme 365 W
Maximale Wärmeabfuhr 1245 BTU/h
Hinweis:
Die Wärmeabfuhr wird mithilfe der Nennleistungsaufnahme des Netzteils berechnet.
Abmessungen:
Höhe 360,00 mm
Breite 175,00 mm
Tiefe 417,00 mm
Gewicht (nur Computer) 8,00 kg AXIS S9001
8,50 kg AXIS S1016
Umgebung:
Betriebstemperatur 5 °C bis 35 °C
5 °C bis 45 °C (beschränkt auf Prozessor mit
maximal 65 W. Ohne separate Grafikkarte)
DEUTSCH
Page 26

Seite 26 AXIS S1016/AXIS S9001 Installationsanleitung
Weitere Informationen
Weitere Informationen zu diesem Produkt finden Sie unter www.axis.com.
Im Axis-Schulungszentrum unter www.axis.com/academy finden Sie nützliche Schulungen,
Webinare, Tutorien und Anleitungen.
Garantie
Weitere Informationen zur Produktgarantie von Axis usw. finden Sie unter www.axis.com/warranty.
Page 27
AXIS S1016/AXIS S9001 Guida all'installazione Pagina 27
AXIS S1016/AXIS S9001 Guida
all'installazione
La presente guida contiene istruzioni per l'installazione di AXIS Camera Station S1016 Recorder e
AXIS Camera Station S9001 Desktop Terminal. Per ulteriori informazioni su come utilizzare il
prodotto andare sul sito www.axis.com
Procedure di installazione
1. Panoramica dell'hardware. Vedere pagina 28
2. Collegare i cavi. Vedere pagina 30
3. Installare il software. Vedere pagina 32
4. Configurazione di rete. Vedere pagina 32.
5. Introduzione. Vedere pagina 32.
Contenuto della confezione
• AXIS Camera Station S1016 Recorder o AXIS Camera Station S9001 Desktop Terminal
• Mouse del computer
•Tastiera
• Cavo di alimentazione
• Documento di informazioni sulla sicurezza e le normative
• Guida all'installazione (questo documento)
ITALIANO
Page 28
Pagina 28 AXIS S1016/AXIS S9001 Guida all'installazione
1
2
3
4
5
7
8
9
14
13
12
11
10
6
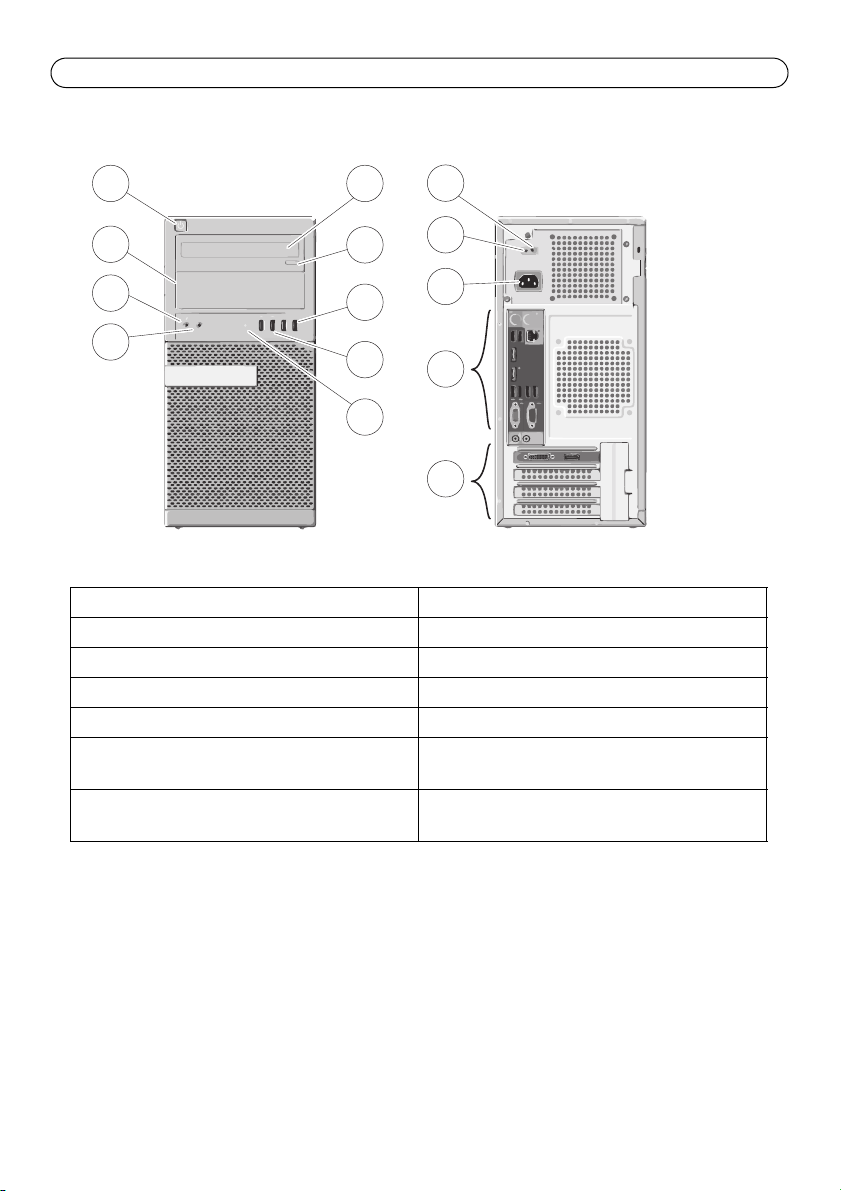
Panoramica dell'hardware: vista anteriore e posteriore
1 Tasto di accensione, luce di accensione 8 Connettori USB 3.0 (2)
2 Vano unità ottica 9 Luce attività disco
3 Connettore microfono 10 Luce diagnostica alimentatore
4 Connettore cuffie 11 Pulsante diagnostica alimentatore
5 Unità ottica 12 Connettore di alimentazione
6 Pulsante di espulsione vano unità ottica 13 Connettori pannello posteriore, vedere
7 Connettori USB 2.0 (2) 14 Scheda grafica, vedere la pagina 29
pagina 29
Slot per schede di espansione (3)
Page 29
AXIS S1016/AXIS S9001 Guida all'installazione Pagina 29
1 2
1 2 3 4 5
8 9 11 12 1310
6 7
Panoramica hardware: pannello scheda grafica
1 Connettore DVI-I 2 Connettore DisplayPort
Panoramica hardware: pannello posteriore
1 Connettore mouse 8 Connettore tastiera
2 Luce di integrità collegamento di rete 9 Connettori USB 2.0 (2)
3 Connettore di rete 10 Non utilizzare (Connettori DisplayPort (2))
4 Luce attività di rete 11 Connettori USB 3.0 (2)
5 Connettori USB 2.0 (2) 12 Non utilizzare (Connettore VGA)
6 Non utilizzare (Connettore di serie) 13 Connettore microfono/linea
7 Connettori altoparlanti/uscita linea
ITALIANO
Page 30
Pagina 30 AXIS S1016/AXIS S9001 Guida all'installazione
Collegare i cavi
Avviso: prima di iniziare le procedure riportate in questa sezione, leggere le informazioni di
sicurezza spedite con il computer. Per ulteriori informazioni, vedere www.axis.com
NOTA: alcuni dispositivi potrebbero non essere inclusi se non sono stati ordinati.
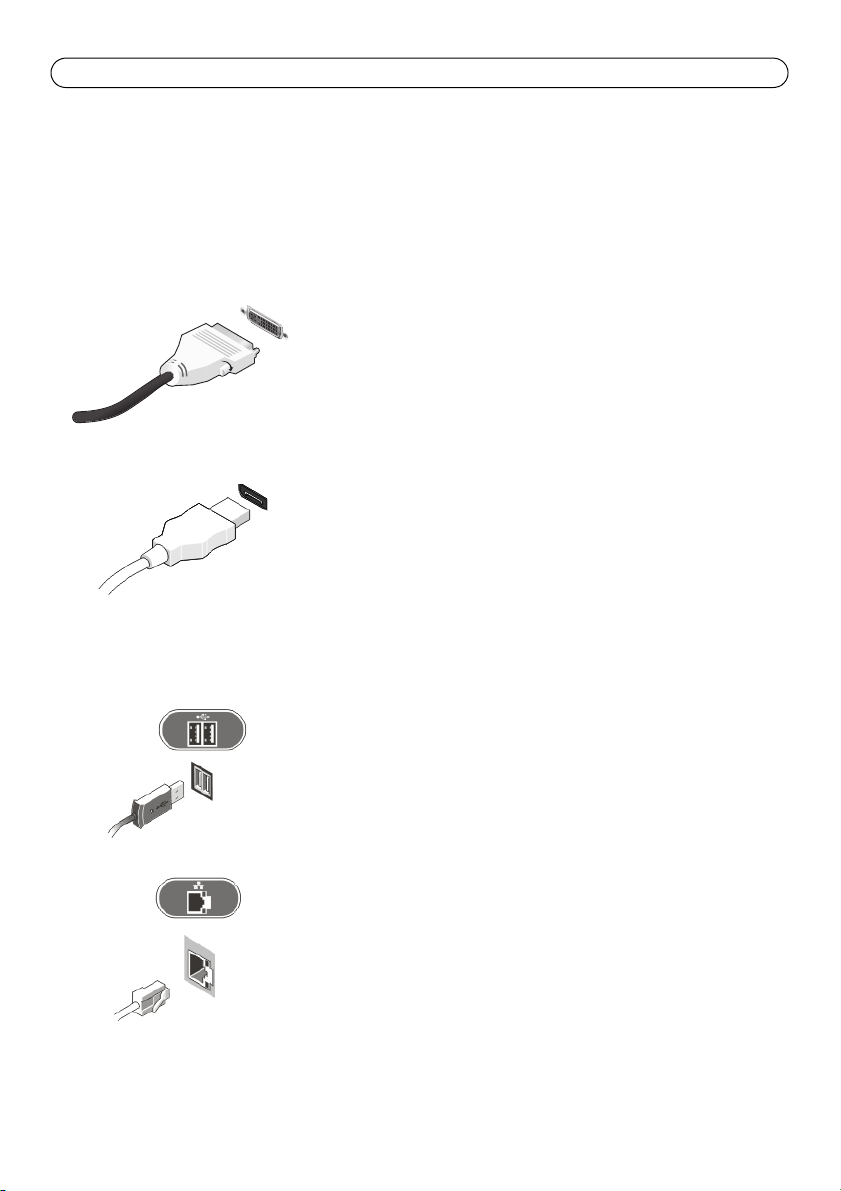
1. Collegare i monitor alla scheda grafica, vedere il pannello della scheda grafica a pagina 29, utilizzando i seguenti cavi:
Cavo DVI-I.
Cavo DisplayPort.
2. Collegare la tastiera o il mouse USB.
3. Collegare il cavo di rete.
Page 31
AXIS S1016/AXIS S9001 Guida all'installazione Pagina 31
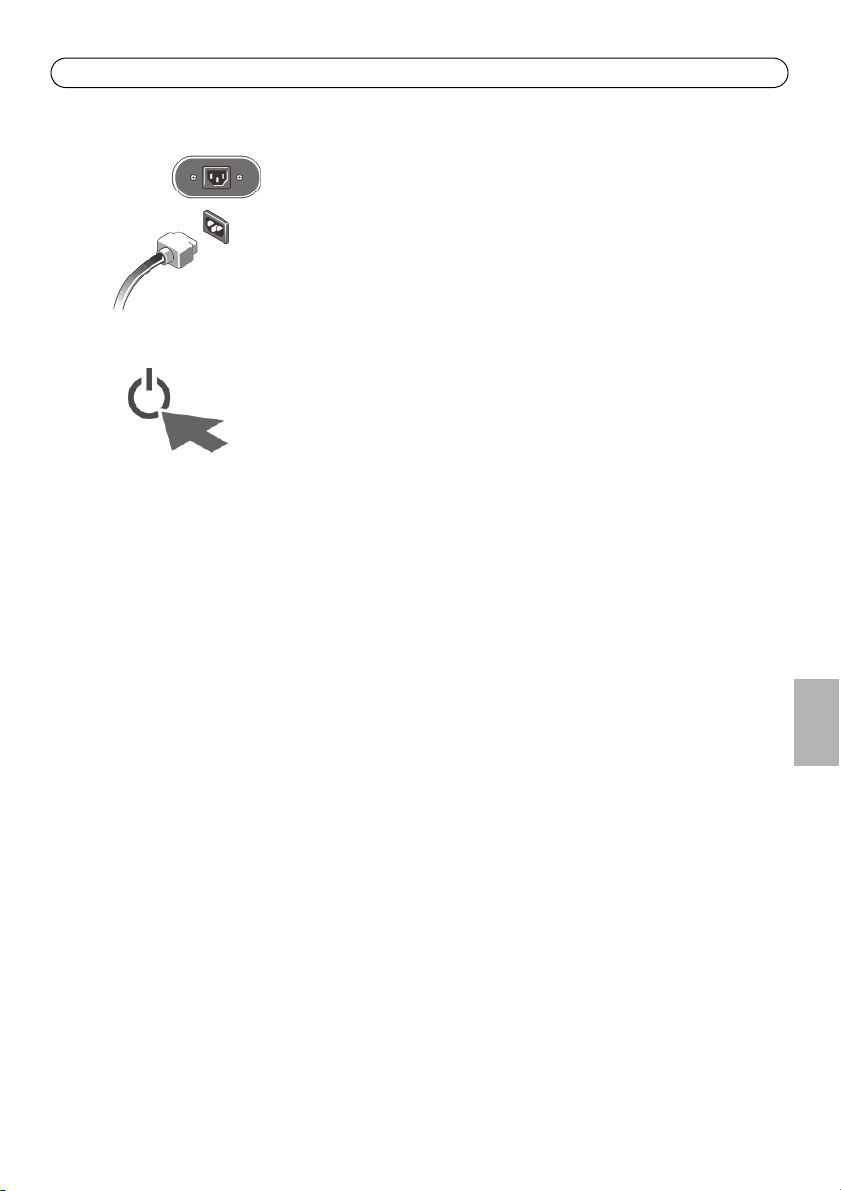
4. Collegare i cavi di alimentazione
5. Premere il pulsante di alimentazione sul monitor e sul computer.
ITALIANO
Page 32

Pagina 32 AXIS S1016/AXIS S9001 Guida all'installazione
Installare il software
All'accensione del computer, verrà installato il sistema operativo Windows. Seguire le istruzioni
visualizzate sullo schermo e fornire le informazioni necessarie. Una volta terminata l'installazione di
Windows, AXIS Camera Station Installer verrà avviato automaticamente. Seguire i passaggi
nell'installazione guidata e utilizzare le impostazioni predefinite.
Configurazione di rete
AXIS Camera Station può registrare e riprodurre video da telecamere e codificatori video collegati a
una LAN (Local Area Network) o a una WAN (Wide Area Network). A seconda dell'installazione,
seguire le istruzioni riportate nella sezione relativa alla Network & Security Configuration nell’
AXIS Camera Station User Manual disponibile sul sito www.axis.com
Introduzione
AXIS Camera Station Client e la procedura guidata "Introduzione a AXIS Camera Station"
verranno avviati automaticamente al termine dell'installazione. "Introduzione a AXIS Camera
Station" offre un metodo veloce per aggiungere le telecamere e per configurare e abilitare la
registrazione:
1. Selezionare le telecamere e i codificatori video da aggiungere.
2. Selezionare i metodi di registrazione e il luogo in cui archiviare le registrazioni.
3. Rivedere le impostazioni e fare clic su Fine per aggiungere le telecamere e avviare la
registrazione.
Per maggiori informazioni, vedere la Guida integrata e AXIS Camera Station User Manual
disponibile su www.axis.com
Page 33
AXIS S1016/AXIS S9001 Guida all'installazione Pagina 33
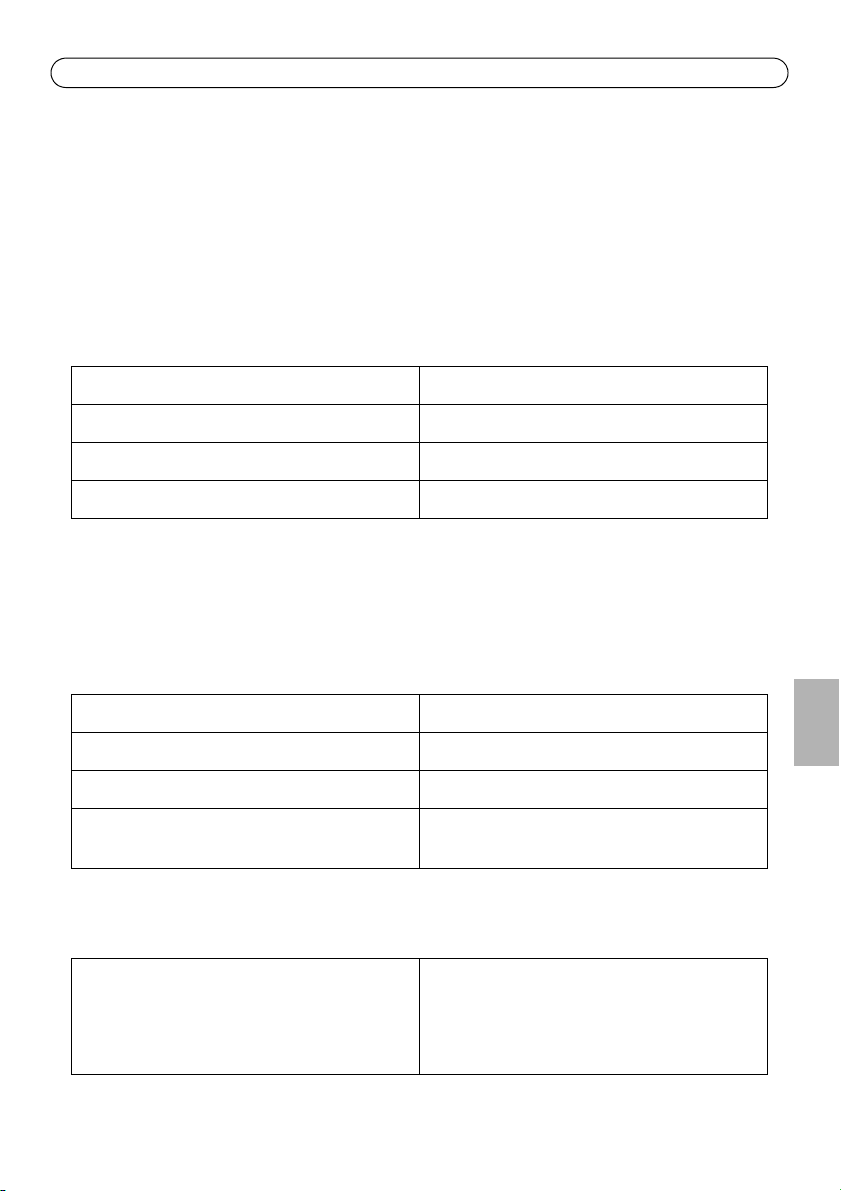
Specifiche
Nota:
Le offerte possono variare per regione. Le seguenti specifiche sono solo quelle richieste per
legge da spedire con il computer. Per ulteriori informazioni relative alla configurazione del
computer, fare clic su Start > Guida e Supporto e selezionare l'opzione per visualizzare le
informazioni sul computer.
Alimentazione:
Tensione Da 100 V CA a 240 V CA
Batteria a bottone Batteria a bottone al litio 3 V CR2032
Potenza 365 W
Dissipazione calore massima 1245 BTU/ora
Nota:
La dissipazione del calore viene calcolata utilizzando la classificazione della potenza
dell'alimentazione.
Fisiche:
Altezza 360,00 mm (14,17 pollici)
Larghezza 175,00 mm (6,89 pollici)
Profondità 417,00 mm (16,42 pollici)
Peso (solo computer) 8,00 kg (17,6 lb) AXIS S9001
8,50 kg (18,7 lb) AXIS S1016
Ambientali:
Temperatura di esercizio Da 5°C a 35°C (da 41°F a 95°F)
Da 5°C a 45°C (da 41°F a 113°F)(limitato a un
processore di 65 W o più basso. Nessuna scheda
grafica separata)
ITALIANO
Page 34

Pagina 34 AXIS S1016/AXIS S9001 Guida all'installazione
Ulteriori Informazioni
Per ulteriori informazioni sul prodotto andare sul sito www.axis.com
Visitare il centro di apprendimento Axis alla pagina www.axis.com/academy per utili servizi di
formazione, webinar, tutorial e guide.
Garanzia
Per informazioni sulla garanzia del prodotto Axis e relative informazioni, consultare la pagina
www.axis.com/warranty
Page 35

AXIS S1016/AXIS S9001 Guía de instalación Página 35
AXIS S1016/AXIS S9001 Guía de instalación
Esta Guía de instalación incluye las instrucciones necesarias para instalar Grabadora AXIS Camera
Station S1016 y Terminal de escritorio AXIS Camera Station S9001. Para obtener información
acerca de cómo se utiliza este producto, vaya a www.axis.com
Pasos de la instalación
1. Descripción general del hardware. Vea página 36.
2. Conexión de los cables. Vea página 38.
3. Software de configuración. Vea página 40.
4. Configuración de red. Vea página 40.
5. Introducción. Vea página 40.
Contenido del paquete
• Grabadora AXIS Camera Station S1016 o Terminal de escritorio AXIS Camera Station S9001
• Ratón para el ordenador
•Teclado
• Cable de alimentación
• Documento de información normativa y de seguridad
• Guía de instalación (este documento)
ESPAÑOL
Page 36
Página 36 AXIS S1016/AXIS S9001 Guía de instalación
1
2
3
4
5
7
8
9
14
13
12
11
10
6
Descripción general del hardware - Parte delantera y
posterior
1 Botón de encendido, luz de encendido 8 Conectores USB 3.0 (2)
2 Módulo de la unidad óptica 9 Luz de actividad de la unidad
3 Conector del micrófono 10 Luz de diagnóstico de la alimentación
eléctrica
4 Conector para auriculares 11 Botón de diagnóstico de la alimentación
5 Unidad óptica 12 Conector de alimentación
6 Botón de expulsión de la unidad óptica 13 Conectores del panel posterior, vea
7 Conectores USB 2.0 (2) 14 Tarjeta gráfica, vea página 37
eléctrica
página 37
Ranuras de tarjeta de expansión (3)
Page 37
AXIS S1016/AXIS S9001 Guía de instalación Página 37
1 2
1 2 3 4 5
8 9 11 12 1310
6 7
Descripción general del hardware - Panel de la tarjeta gráfica
1 Conector DVI-I 2 Conector DisplayPort
Descripción general del hardware - Panel posterior
1 Conector del ratón 8 Conector del teclado
2 Luz de integridad de la conexión de red 9 Conectores USB 2.0 (2)
3 Conector de red 10 No utilizar (conectores DisplayPort [2])
4 Luz de actividad de red 11 Conectores USB 3.0 (2)
5 Conectores USB 2.0 (2) 12 No utilizar (conector VGA)
6 No utilizar (conector en serie) 13 Conector de entrada de línea/micrófono
7 Conector de salida de línea/altavoces
ESPAÑOL
Page 38
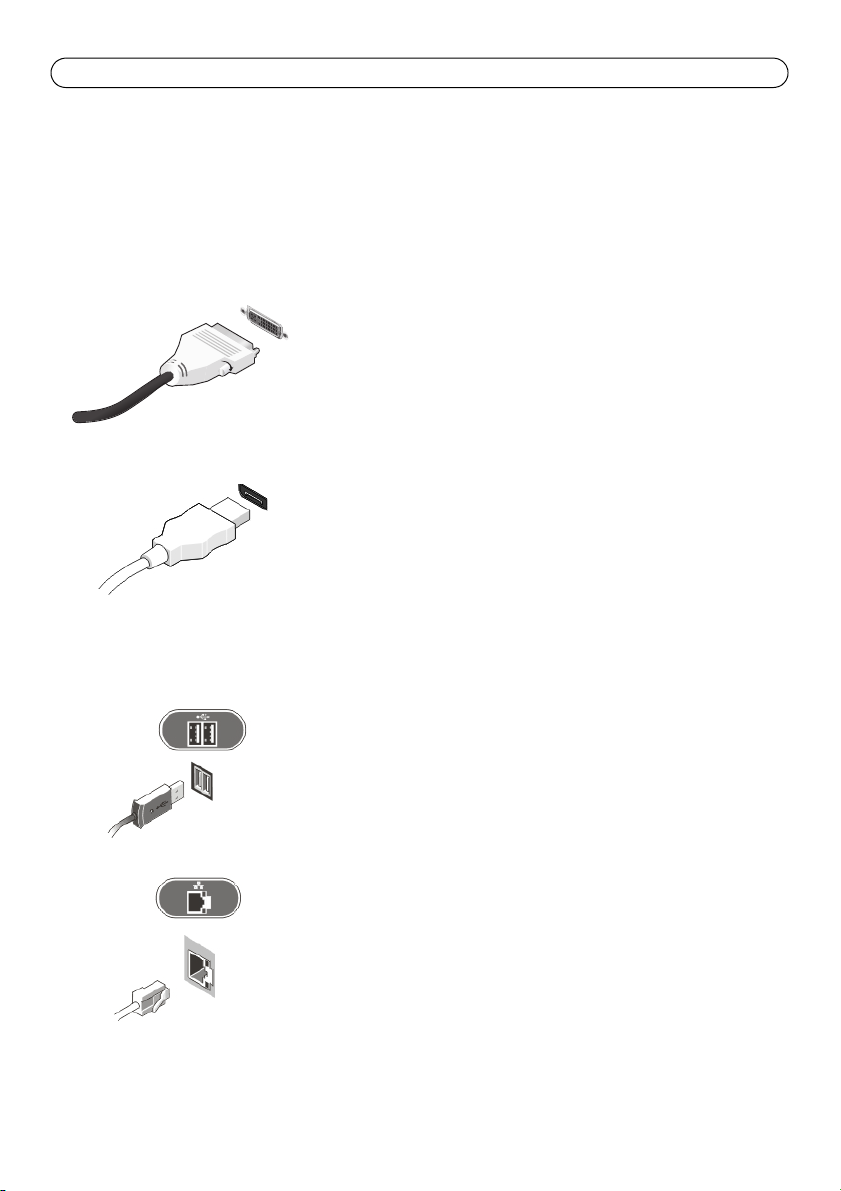
Página 38 AXIS S1016/AXIS S9001 Guía de instalación
Conexión de los cables
Advertencia: Antes de iniciar ninguno de los procedimientos de esta sección, lea la información de
seguridad suministrada con su ordenador. Para obtener más información, vea www.axis.com
NOTA: Puede que no se incluyan algunos dispositivos si no los ha pedido.
1. Conecte el monitor a la tarjeta gráfica, vea Panel de la tarjeta gráfica en la página 37, con los
cables siguientes:
Cable DVI-I.
Cable DisplayPort.
2. Conecte el ratón o el teclado USB.
3. Conecte el cable de red.
Page 39
AXIS S1016/AXIS S9001 Guía de instalación Página 39
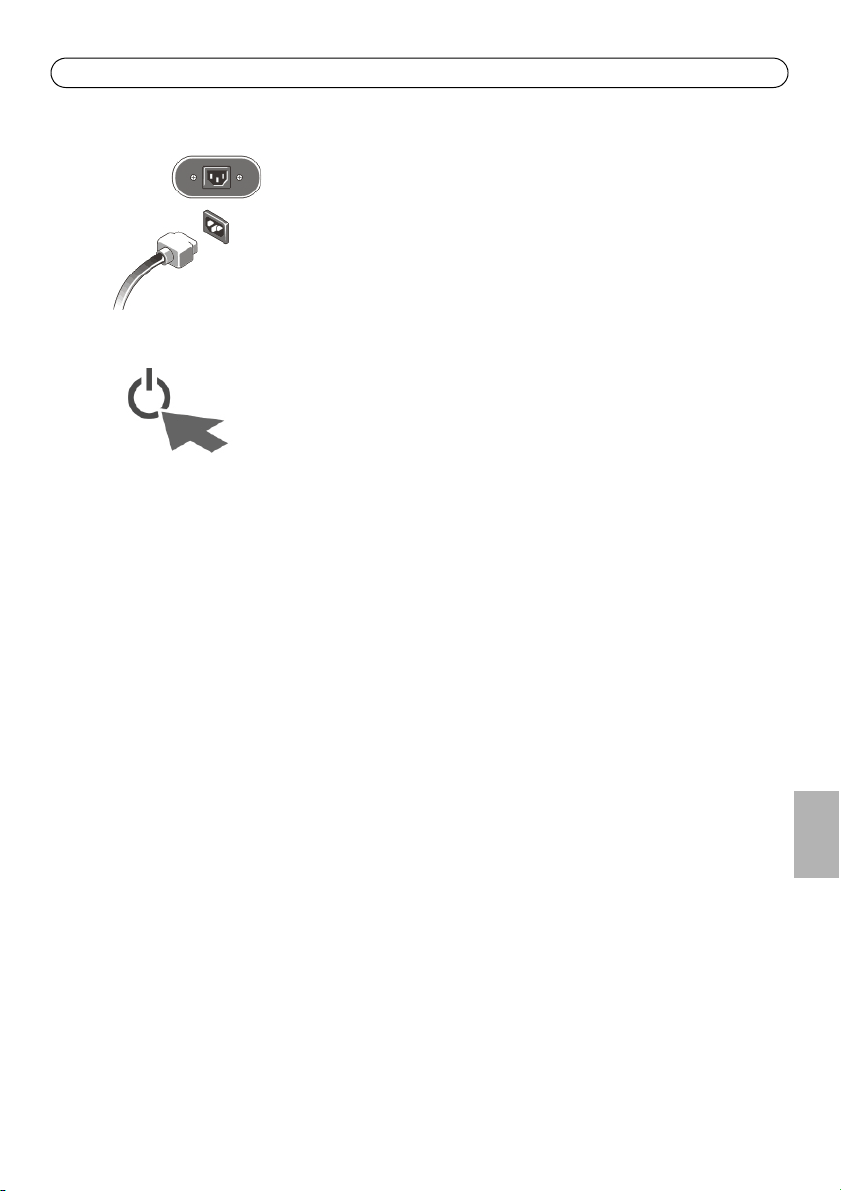
4. Conecte los cables de alimentación.
5. Pulse el botón de alimentación en el monitor y en el ordenador.
ESPAÑOL
Page 40

Página 40 AXIS S1016/AXIS S9001 Guía de instalación
Software de configuración.
Una vez que el ordenador se haya encendido, se instalará el sistema operativo Windows. Siga las
instrucciones que aparecen en pantalla y aporte la información que se le solicite. Una vez finalizada
la instalación de Windows, el programa de instalación de AXIS Camera Station se iniciará
automáticamente. Siga los pasos que le indique el asistente de instalación y utilice los ajustes
predeterminados.
Configuración de red
AXIS Camera Station puede grabar y reproducir vídeo de cámaras y codificadores de vídeo
conectados a una LAN (red de área local) o a una WAN (red de área amplia). Según la instalación,
siga las instrucciones para la Network & Security Configuration del AXIS Camera Station User
Manual disponible en www.axis.com
Introducción
El cliente y el asistente de AXIS Camera Station "Get Started with AXIS Camera Station"
(Introducción a AXIS Camera Station) se inician automáticamente cuando se completa la
instalación. El asistente de AXIS Camera Station proporciona un método rápido para añadir cámaras
y configurar y activar la grabación:
1. Seleccione las cámaras y los codificadores de vídeo que desea añadir.
2. Seleccione los métodos de grabación y el lugar de almacenamiento de las grabaciones.
3. Revise los ajustes y haga clic en Finish (Finalizar) para añadir cámaras y empezar a grabar.
Para obtener más información, consulte la ayuda integrada en el AXIS Camera Station User Manual
disponible en www.axis.com
Page 41
AXIS S1016/AXIS S9001 Guía de instalación Página 41
Especificaciones
Nota:
La oferta puede variar según la región. Las siguientes especificaciones son las únicas que la
ley exige que se suministren junto con su ordenador. Para obtener más información sobre la
configuración de su ordenador, haga clic en Start > Help and Support (Inicio > Ayuda y
asistencia) y seleccione la opción que le permite ver la información sobre su ordenador.
Alimentación:
Tensión 100 V CA a 240 V CA
Pila de botón Pila de botón de litio de 3 V CR2032
Potencia 365 W
Disipación del calor máxima 1245 BTU/h
Nota:
La disipación del calor se calcula a partir de la potencia nominal de la fuente de alimentación.
Física:
Altura 360,00 mm (14,17 pulgadas)
Anchura 175,00 mm (6,89 pulgadas)
Profundidad 417,00 mm (16,42 pulgadas)
Peso (ordenador solo) 8,00 kg (17,6 lb) AXIS S9001
8,50 kg (18,7 lb) AXIS S1016
Entorno:
Temperatura de funcionamiento 5°C a 35°C (41°F a 95°F)
5°C a 45°C (41°F a 113°F) (Limitado a un
procesador de 65 W o menos. Sin tarjeta gráfica
discreta)
ESPAÑOL
Page 42

Página 42 AXIS S1016/AXIS S9001 Guía de instalación
Más información
Para obtener información acerca de este producto, vaya a www.axis.com
Visite el centro de aprendizaje de Axis en www.axis.com/academy/ para consultar guías, tutoriales,
seminarios web y cursos que pueden resultarle útiles.
Garantía
Para obtener más detalles sobre la garantía del producto Axis y la información relacionada con ella,
vea www.axis.com/warranty
Page 43

AXIS S1016/AXIS S9001 インストールガイド 43
AXIS S1016/AXIS S9001
インストールガイド
このインストールガイドでは、AXIS Camera Station S1016 レコーダーおよび AXIS Camera Station
S9001 デスクトップターミナルを設置する手順について説明します。製品の使用方法に関する詳
細については、www.axis.com を参照してください。
設置手順
1. ハードウェアの概要。44 ページを参照してください。
2. ケーブルを接続します。46 ページを参照してください。
3. ソフトウェアをセットアップします。48 ページを参照してください。
4. ネットワークを設定します。48 ページを参照してください。
5. 始動します。48 ページを参照してください。
パッケージの内容
・ AXIS Camera Station S1016 レコーダー または AXIS Camera Station S9001 デスクトップター
ミナル
・ コンピューターマウス
・ キーボード
・ 電源ケーブル
・ 安全、規制に関する文書
・ インストールガイド ( 本書 )
日本語
Page 44
44 AXIS S1016/AXIS S9001 インストールガイド
1
2
3
4
5
7
8
9
14
13
12
11
10
6
ハードウェアの概要 - 正面および背面
1 電源ボタン、電源ライト 8 USB 3.0 コネクタ ×2
2 光学ドライブベイ 9 ドライブ動作ライト
3 マイクコネクタ 10 外部電源診断ライト
4 ヘッドホンコネクタ 11 外部電源診断ボタン
5 光学ドライブ 12 電源コネクタ
6 光学ドライブイジェクトボタン 13 バックパネルコネクタ、45 ページ参照
7 USB 2.0 コネクタ ×2 14 グラフィックカード、45 ページ参照
拡張カードスロット ×3
Page 45
AXIS S1016/AXIS S9001 インストールガイド 45
1 2
1 2 3 4 5
8 9 11 12 1310
6 7
ハードウェアの概要 - グラフィックカードパネル
1 DVI-I コネクタ 2 ディスプレイポートコネクタ
ハードウェアの概要 - バックパネル
1 マウスコネクタ 8 キーボードコネクタ
2 ネットワークリンク整合性ライト 9 USB 2.0 コネクタ ×2
3 ネットワークコネクタ 10 使用しません ( ディスプレイポートコネク
4 ネットワーク状態ライト 11 USB 3.0 コネクタ ×2
5 USB 2.0 コネクタ ×2 12 使用しません (VGA コネクタ )
6 使用しません ( シリアルコネクタ )13 ライン入力 / マイクコネクタ
7 ライン出力 / スピーカーコネクタ
タ ×2)
日本語
Page 46
46 AXIS S1016/AXIS S9001 インストールガイド
ケーブルの接続
警告 : このセクションの手順を実行する前に、ご使用のコンピューターに付属の安全情報をお読
みください。詳細については、www.axis.com を参照してください。
注 : 注文内容によっては、一部のデバイスが付属していない場合があります。
1. 次のケーブルを使用して、モニターをグラフィックカードに接続します。45 ページのグラ
フィックカードパネルを参照してください。
DVI-I ケーブル
ディスプレイポートケーブル
2. USB キーボードまたはマウスを接続します。
3. ネットワークケーブルを接続します。
Page 47
AXIS S1016/AXIS S9001 インストールガイド 47
4. 電源ケーブルを接続します。
5. モニターとコンピューターの電源ボタンを押します。
日本語
Page 48

48 AXIS S1016/AXIS S9001 インストールガイド
ソフトウェアのセットアップ
コンピューターの電源をオンにすると、Windows オペレーティングシステムがインストールされ
ます。画面の指示に従って、必要な情報を入力してください。Windows のインストールが完了す
ると、AXIS Camera Station のインストーラーが自動的に起動します。インストールウィザードの
手順に従い、デフォルトの設定を使用します。
ネットワークの設定
AXIS Camera Station では、LAN ( ローカルエリアネットワーク ) または WAN ( ワイドエリアネッ
トワーク ) に接続されたカメラ、ビデオエンコーダからのビデオを録画、再生することができま
す。設置状況に応じて、www.axis.com で入手できる『AXIS Camera Station User Manual』の
「Network & Security Configuration」に記載の指示に従ってください。
始動
AXIS Camera Station Client およびウィザード ・AXIS Camera Station の開始・ インストールが完了
すると自動的に開始されます。・AXIS Camera Station の開始・ カメラの追加や、録画の設定と
有効化をすばやく行うことができます。
1. 追加するカメラとビデオエンコーダを選択します。
2. 録画方法と録画の保存先を選択します。
3. 設定を確認し、[Finish] ( 完了 ) をクリックすると、カメラが追加され、録画が開始されます。
詳細については、AXIS Camera Station のヘルプと、www.axis.com で入手できる『AXIS Camera
Station User Manual』を参照してください。
Page 49
AXIS S1016/AXIS S9001 インストールガイド 49
仕様
注意 :
製品の内容は、地域により異なる場合があります。以下の仕様は、コンピューターの出荷
時に法律により必要とされる項目のみを記載しています。ご使用のコンピューターの構成
については、[ スタート ] > [ ヘルプ ] をクリックして、コンピューターの情報を表示する
オプションを選択してください。
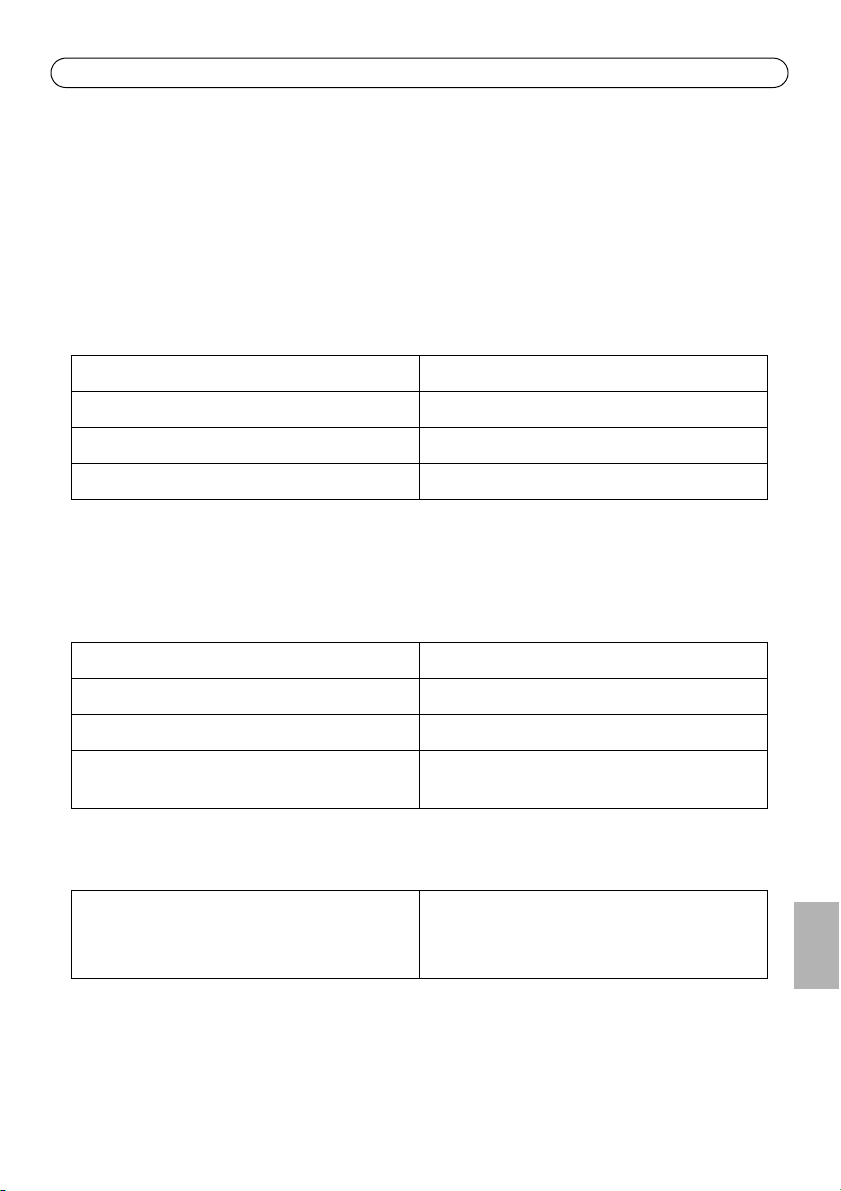
電源 :
電圧 100 ~ 240 V AC
ボタン型電池 3 V CR2032 ボタン型リチウム電池
ワット数
最大放熱
注意 :
最大放熱は、電源のワット数定格に基づいて算出されています。
物理仕様 :
365 W
1245 BTU/hr
高さ
幅
奥行き
重量 ( コンピューターのみ )
360.00 mm
175.00 mm
417.00 mm
8.00 kg: AXIS S9001
8.50 kg: AXIS S1016
環境仕様 :
動作温度 5 ~ 35 ℃
5 ~ 45 ℃ (65 W 以下のプロセッサを使用し、
グラフィックカードを増設しない場合 )
日本語
Page 50

50 AXIS S1016/AXIS S9001 インストールガイド
関連情報
製品の詳細については、www.axis.com を参照してください。
Axis ラーニングセンター (www.axis.com/academy/) にアクセスしてください。役に立つトレーニン
グ、Web セミナー、チュートリアル、ガイドを用意しています。
保証
Axis の製品保証と関連情報については、www.axis.com/warranty を参照してください
Page 51

Page 52

Installation Guide
AXIS Camera Station S1016 Recorder
AXIS Camera Station S9001 Desktop Terminal
© 2014 Axis Communications AB
© 2013 Dell Inc.
Ver.1.0
Printed: November 2014
Part No. 59843
 Loading...