

Page 1
AXIS 225FD
Dome Casing
Installation Guide
ENGLISH
FRANCAIS
DEUTSCH ESPAÑOL
ITALIANO
日本語
Page 2

Page 3
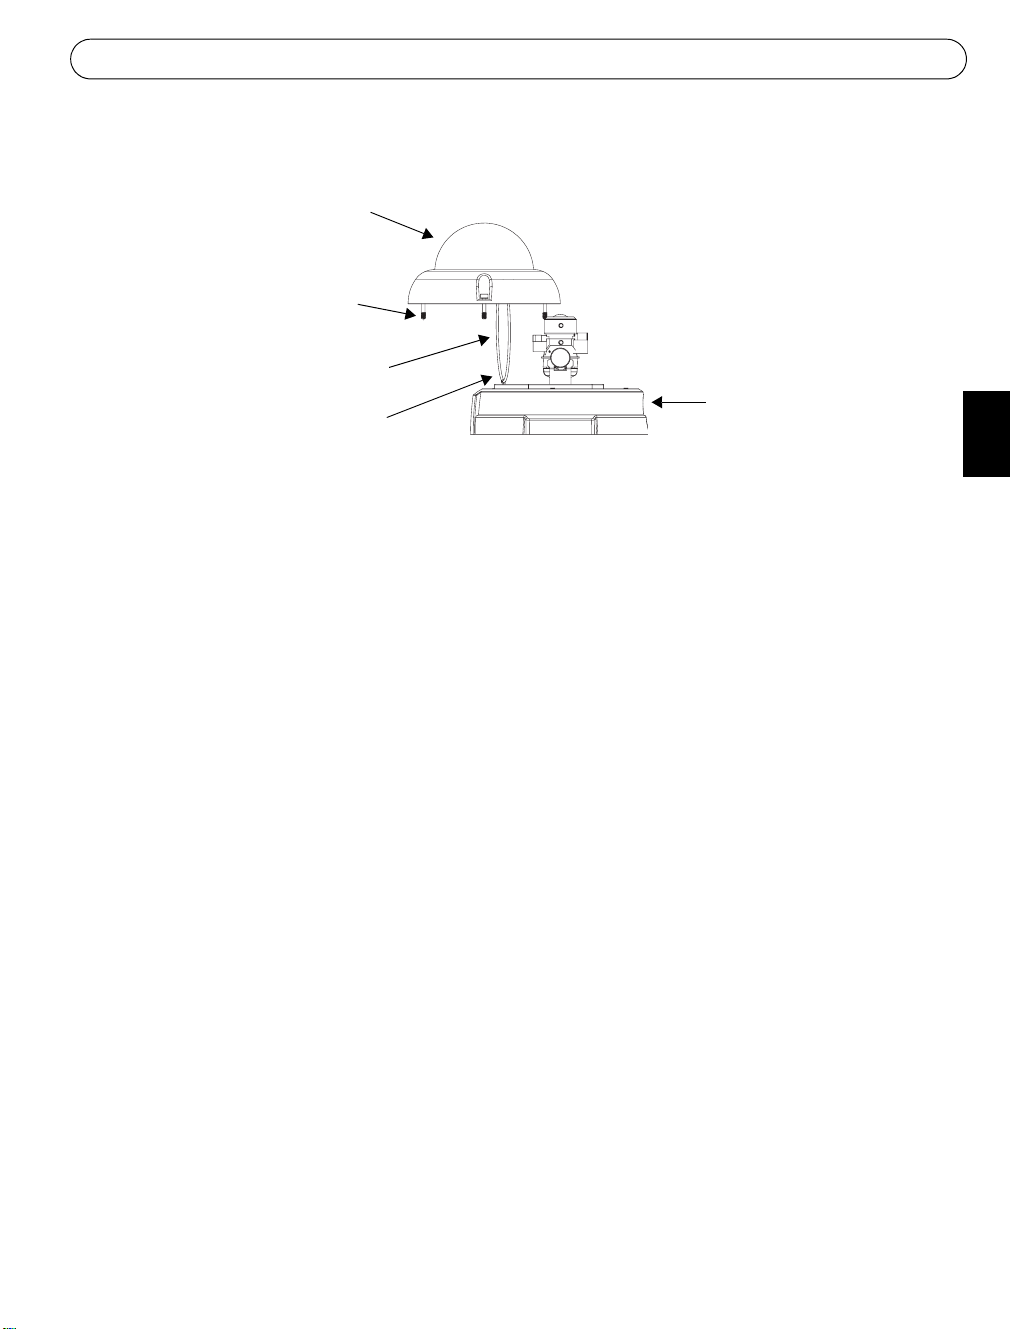
Dome Casing Installation Guide
Dome casing
Tamper-proof
screws (3)
Safety cord
Hook for safety cord
Package contents
• Dome casing with clear/smoke-colored plastic dome
• Dome Casing Installation Guide (this document)
• 1 Allen key
Unit casing
ENGLISH
Follow these instructions to replace the dome casing:
1. Remove the existing dome casing by removing the 3 tamper-proof screws using the
supplied allen key.
2. Remove the safety cord from the hook on the unit casing.
3. Attach the safety cord from the new dome casing to the hook.
4. Rotate the black protective shield inside the dome to match the camera’s position.
5. Fit the dome casing onto the unit casing and secure into place by tightening the tamperproof screws using the allen key.
6. Use a soft, lint-free cloth to remove fingerprints and to wipe the plastic dome clean.
Page 4
Installationsanleitung für Kuppelhaube
Kuppelhaube
Zugriffssichere Schrauben (3)
Sicherungsseil
Haken für Sicherungsseil
DEUTCH
Dome Casing Installation Guide
Kameragehäuse
Lieferumfang
• Kuppelhaube mit transparenter/rauchglasfarbener Kunststoffhaube
• Installationsanleitung für Kuppelhaube (dieses Dokument)
• 1 Schraubenschlüssel
So tauschen Sie die Kuppelhaube aus:
1. Entfernen Sie die vorhandene Kuppelhaube, indem Sie die 3 zugriffssicheren Schrauben
mit dem beigefügten Schraubenschlüssel entfernen.
2. Entfernen Sie das Sicherungsseil vom Haken des Kameragehäuses.
3. Bringen Sie das Sicherungsseil der neuen Kuppelhaube am Haken an.
4. Drehen Sie das schwarze Schutzschild in der Abdeckung passend zur Kameraposition.
5. Setzen Sie die Kuppelhaube auf das Kameragehäuse, und befestigen Sie die Haube mit
den zugriffssicheren Schrauben und dem Schraubenschlüssel.
6. Verwenden Sie ein weiches, staubfreies Tuch, um Fingerabdrücke zu entfernen und die
Plastikhaube zu reinigen.
Page 5

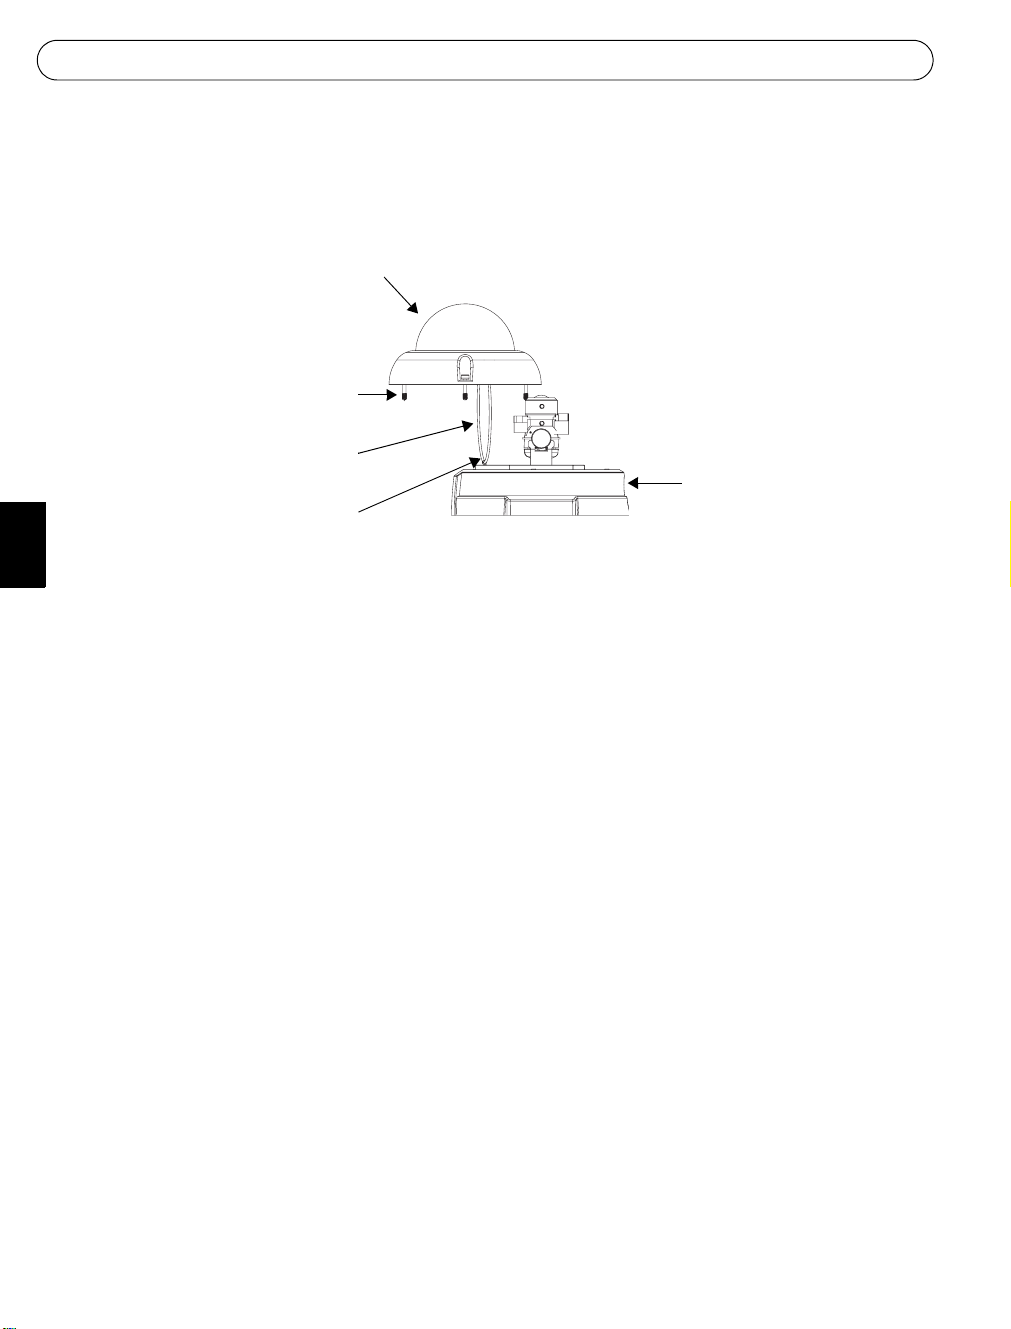
Dome Casing Installation Guide
Guide d’installation du boîtier du dôme
Boîtier du dôme
Vis inviolables (3)
Cordon de sûreté
Crochet pour cordon
de sûreté
Boîtier
Contenu de l’emballage
• Boîtier du dôme avec dôme en plastique clair/bistre
• Guide d’installation du boîtier du dôme (le présent document)
• 1 clé Allen
Suivez ces instructions pour remplacer le boîtier du dôme :
1. Retirez le boîtier existant en ôtant les trois vis inviolables avec la clé Allen fournie.
2. Retirez le cordon de sûreté du crochet.
3. Fixez le cordon au crochet du boîtier du nouveau dôme.
4. Tournez l’écran protecteur noir à l’intérieur du dôme conformément à la position de la
caméra.
5. Introduisez le boîtier du dôme dans le boîtier de l’appareil en serrant les vis inviolables
avec la clé Allen.
FRANCAIS
6. Enlevez les traces de doigts sur le dôme avec un chiffon doux et non pelucheux.
Page 6

Guía de instalación de la carcasa de la burbuja
Carcasa de la burbuja
Tornillos de alta
resistencia (3)
Cordón de seguridad
Gancho para el cordón
de seguridad
Contenido del paquete
Dome Casing Installation Guide
Carcasa de la unidad
• Carcasa de la burbuja con burbuja de plástico mate/transparente.
• Guía de instalación de la carcasa de la burbuja (este documento)
• 1 llave Allen
Siga estas instrucciones para sustituir la carcasa de la burbuja:
ESPAÑOL
1. Para retirar la carcasa de la burbuja antigua, desatornille los tres tornillos de alta
resistencia utilizando la llave Allen que se incluye.
2. Retire el cordón de seguridad del gancho de la carcasa de la unidad.
3. Introduzca el cordón de seguridad de la nueva carcasa de la burbuja en el gancho.
4. Gire el revestimiento de protección negro del interior de la burbuja para que coincida
con la posición de la cámara.
5. Ajuste la carcasa de la burbuja dentro de la carcasa de la unidad y, para fijarla, apriete
los tornillos de alta resistencia con la llave Allen.
6. Utilice un paño suave y sin pelusa para limpiar las huellas dactilares y dejar limpia la
carcasa de plástico.
Page 7

Dome Casing Installation Guide
Guida all'installazione della cupola
Cupola
3 viti antimanomissione
Cavo di sicurezza
Gancio per cavo
di sicurezza
Alloggiamento unità
Contenuto della confezione
• Cupola in plastica di colore chiaro o fumo
• Guida all’installazione della cupola (questo documento)
• 1 chiave a brugola
Per sostituire la cupola seguire le istruzioni riportate di seguito.
1. Rimuovere la cupola estraendo le viti antimanomissione con la chiave a brugola fornita.
2. Rimuovere il cavo di sicurezza dal gancio dell'alloggiamento dell'unità.
3. Collegare il cavo di sicurezza della nuova cupola al gancio.
4. Ruotare lo schermo di protezione di colore nero all'interno della cupola per posizionare
correttamente la videocamera.
5. Fissare la cupola all'alloggiamento dell'unità stringendo le viti antimanomissione con la
chiave a brugola.
ITALLIANO
6. Pulire la cupola ed eliminare eventuali impronte utilizzando un panno morbido e liscio.
Page 8

ドームケーシングインストールガイド
ドームケーシング
いじ り止めネジ
(3 箇所)
安全コー ド
Dome Casing Installation Guide
安全コー ド 取 り 付け用フ ッ ク
ユニ ッ ト ケーシ ング
パ ッ ケージの内容
• ドームケーシング (スモーク またはク リ ア)
• ドームケーシングイ ンス ト ールガイ ド (本書)
• 専用レ ン チ (1 個)
ド ームケーシ ングの交換手順
1. 付属の専用レ ンチ を 利用 し てい じ り 止めネ ジ (3 箇所) を 取 り 外し、 既存の ド ームケーシ ン グ を
持ち上げて く だ さ い。
2. 既存の ド ーム ケ ーシ ン グ の安全 コ ー ド を、 ユニ ッ ト ケーシ ン グ の安全 コ ー ド 取 り 付け用フ ッ ク か
ら取り 外し ます。
3. 新 し い ド ーム ケーシ ン グ の安全コー ド をユ ニ ッ ト ケーシ ン グ のフ ッ ク に取 り 付け ま す。
4. ド ーム内部の黒色保護シール ド を回転 し 、 レ ン ズの位置に合わせます。
5. ドームケーシングをユニッ ト ケーシングに取り 付け、専用のレンチを使用していじ り止めネジ (3
箇所) を 固定 し ま す。
6. 乾いた柔らかい布を使用して、 ド ームケーシングのプラ スチッ ク部分のホコ リ や指紋を拭き取っ
日本語
てください。
Page 9

Page 10

Page 11

Page 12

Part No. 26426
 Loading...