

Page 1

AXIS 262
Network Video Recorder
Installation Guide
ENGLISH
DEUTSCH JAPANESE
Page 2

Page 3
AXIS 262 Installation Guide Page 3
AXIS 262 Network Video Recorder
Installation Guide
This installation guide provides instructions for installing the AXIS 262 Network Video
Recorder on your network. For all other aspects of using the product, please see the AXIS 262
User’s Manual, available on the CD included in this package, or from www.axis.com
Installation steps
Follow these steps to install the AXIS 262 on your local network (LAN):
1. Check the package contents against the list below.
2. Connect the AXIS 262. See page 4.
3. Set an IP address. See page 5 for information on the available methods.
4. Enter the default password and access the unit. See page 7.
Package contents
Item Notes
Network Video Recorder AXIS 262
AC power adapter Supplied with multiple mains cables for use in different locations.
CD Installation tool and product documentation
Printed Materials • AXIS 262 Installation Guide (this document)
• Axis Warranty Document
ENGLISH
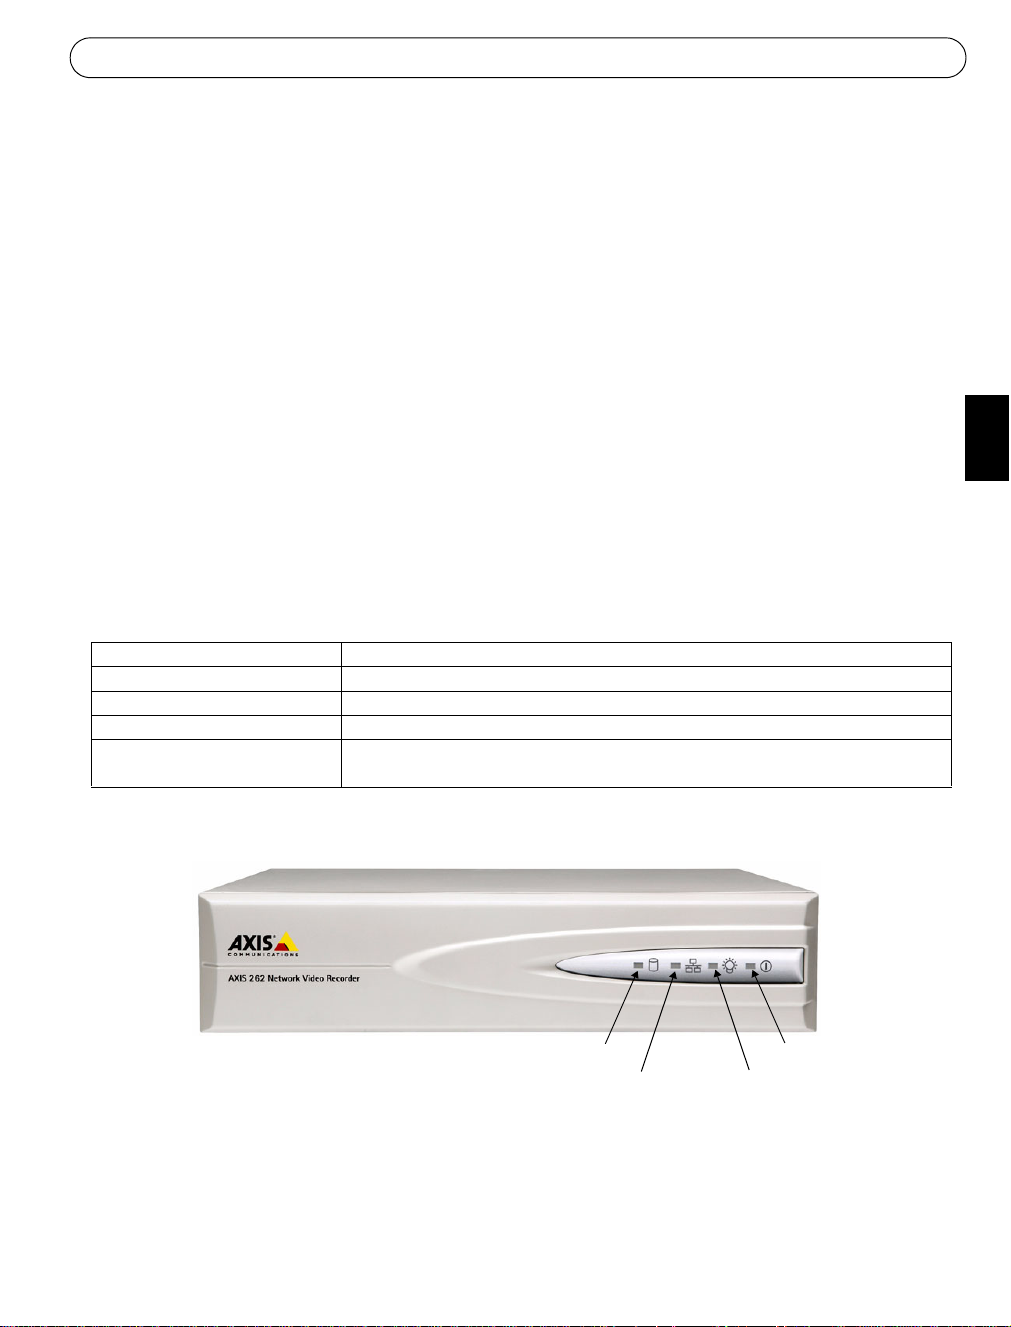
Overview - front panel
Disk indicator
Network indicator
The indicators on the front panel provide useful information about the current status of the
AXIS 262. For a complete listing of LED indicator functions, please see the online help or the
AXIS 262 User’s Manual.
Power indicator
Status indicator
Page 4
Page 4 AXIS 262 Installation Guide
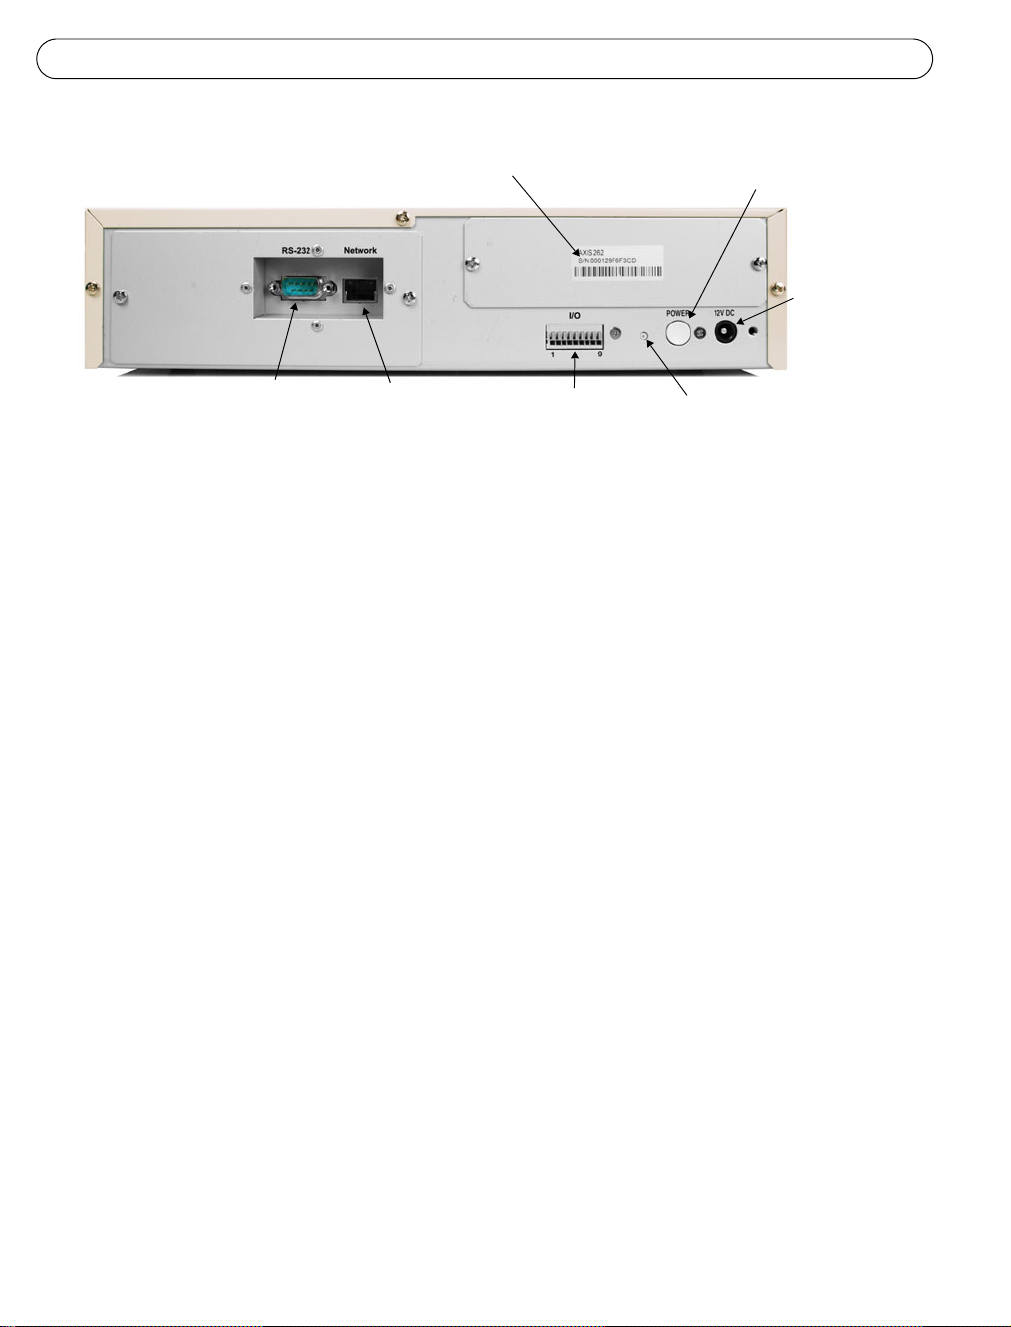
Overview - rear panel
Rear panel
Serial number
Power button
Power
adapter
connector
RS-232
connector
Network
connector
9-pin I/O terminal
connector
Factory setup button
RS-232 connector - For the connection of a UPS (Uninterrptible Power Supply) unit. For
approved models, see the AXIS 262 User’s Manual.
Network connector - Connect the AXIS 262 to your network using a standard CAT-5 network
cable.
I/O terminal connector - Used to connect external devices. See the AXIS 262 User’s Manual
for more information.
Factory setup button - Used to reset the unit to the factory default settings. See page 8.
Power button - To shut the unit down correctly, press and hold this button until a “beep”
sound is heard. Shutdown will then complete after approximately 20 seconds. To start the unit,
press the button once.
Power adapter connector - Attach the supplied power adapter here.
Page 5
AXIS 262 Installation Guide Page 5
Setting the IP address
The AXIS 262 is designed for use on an Ethernet network and must be assigned an IP address
to make it accessible.
Installation methods
The available methods for setting or discovering the IP address are listed below.
• AXIS IP Utility - Using this free Windows application is the recommended method for setting an IP address. AXIS IP Utility can be used on networks with or without a DHCP server.
Note that the AXIS 262 must be installed on the same network segment.
• ARP/Ping - Use these commands to manually set the IP address. Note that the AXIS 262
must be installed on the same network segment. See page 6 for more information.
• DHCP Server - View the admin pages for the DHCP server on your network to discover the
IP address assigned to the AXIS 262. For more information see the DHCP server’s own
documentation, and/or contact your network administrator.
ENGLISH
Notes:
• DHCP is enabled by default in the AXIS 262.
• The AXIS 262 has the default IP address 192.168.0.90
• If setting the IP address fails, check that there is no firewall blocking the operation.
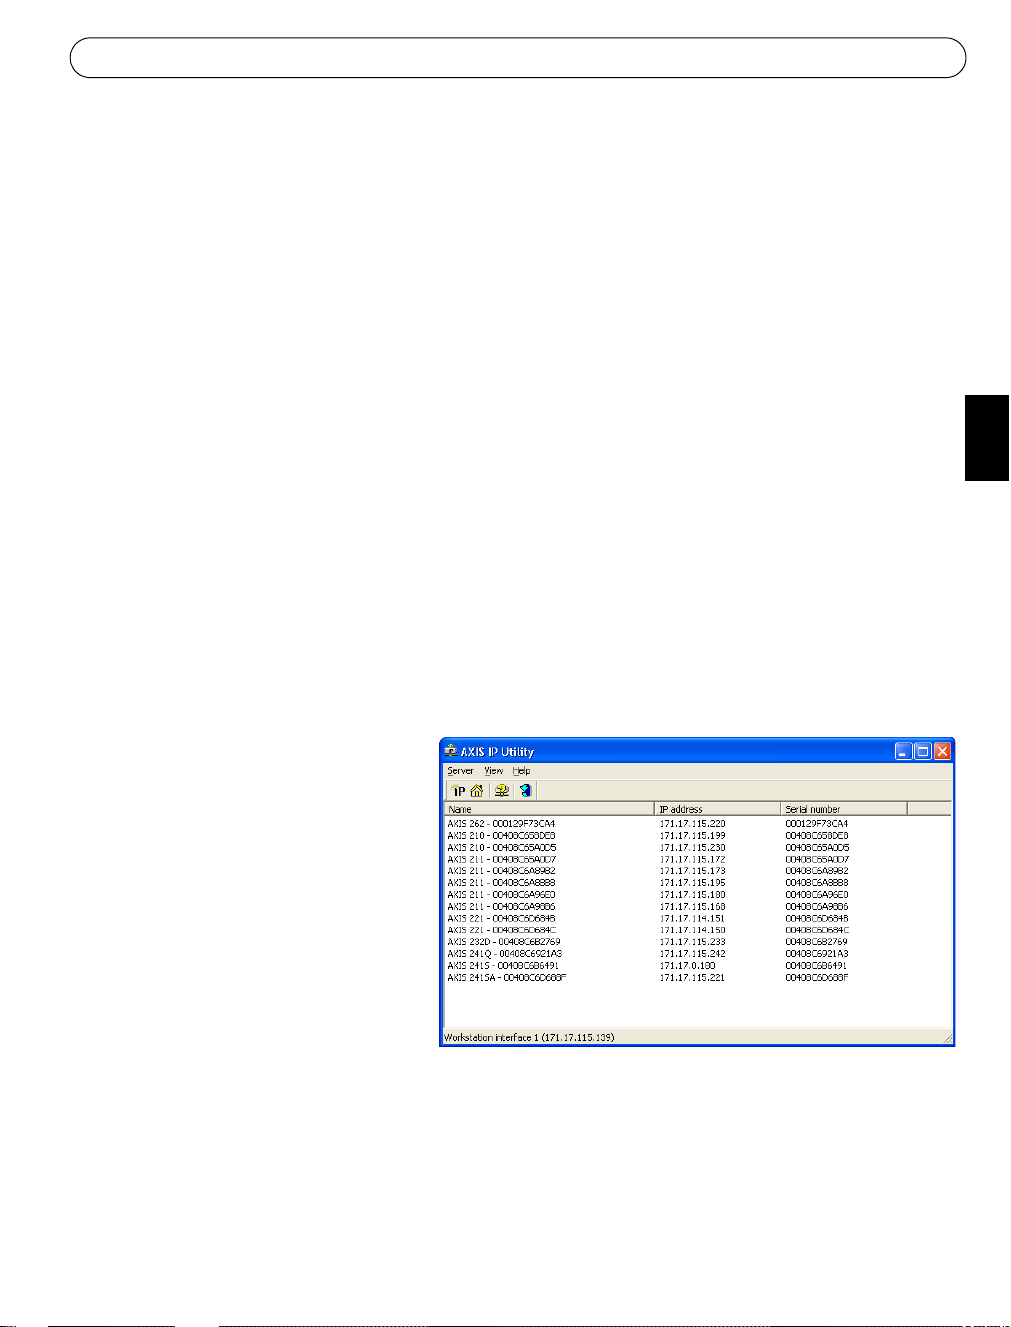
AXIS IP Utility
AXIS IP Utility is a free Windows
application that discovers and lists
Axis devices on your network.
The application can also be used to
manually set a static IP address.
Note that you must install the AXIS
262 on the same network segment
(physical subnet) as the computer
running AXIS IP Utility.
AXIS IP Utility is available on the
CD supplied with this product, or it
can be downloaded from www.axis.com/techsup
Automatic discovery with AXIS IP Utility
1. Check that the AXIS 262 is connected to the network and that power has been applied.
2. Start AXIS IP Utility. When the AXIS 262 appears in the window, double-click it to open
the network video recorder’s home page.
3. See page 7 for information on accessing the AXIS 262.
Page 6
Page 6 AXIS 262 Installation Guide
Set the IP address manually with AXIS IP Utility
1. Acquire an unused IP address on the same network segment as your computer.
2. If already powered up, shut the AXIS 262 down by pressing the power button on the rear
panel.
3. Click the button (Set IP address using serial number) and enter the serial number and
IP address for the AXIS 262.
4. Click the Set IP button and then start the AXIS 262 by pressing the power button again.
5. A message appears when the IP address has been set. Click View Home Page to open the
AXIS 262 web pages.
6. See page 7 for information on accessing the AXIS 262.
Notes:
• Set the IP address with AXIS IP Utility within 2 minutes of starting the unit.
• AXIS IP Utility can be used to change a dynamically set IP address to a static one.
Manual Installation with ARP/Ping
1. Acquire an unused IP address on the same network segment as your computer.
2. If already powered up, shut the AXIS 262 down by pressing the power button on the rear
panel.
3. Locate the serial number (S/N) on the label on the rear panel.
4. Open a Command Prompt on your computer.
Syntax: Example:
arp -s <IP Address> <Serial Number>
ping -l 408 -t <IP Address>
5. Check that the network cable is connected. Start the AXIS 262 by pressing the power
button again.
6. When you see ‘Reply from 192.168.0.125: ...’ or similar, the IP address has been set. Close
the Command prompt.
Notes:
• Set the IP address with ARP and Ping within 2 minutes of starting the unit.
• To open a command prompt in Windows: from the Start menu, select Run... and type cmd. Click OK.
arp -s 192.168.0.125 00-40-8c-18-1-00
ping -l 408 -t 192.168.0.125
Page 7

AXIS 262 Installation Guide Page 7
Accessing the AXIS 262
Start your browser, type in the IP address in
the Location/Address field and press Enter
on your keyboard.
To access the AXIS 262 you must enter a
network user name and password, and a
video user name and password.
1. If this is the first time the unit is
accessed, enter the network user name
root and the password pass.
2. If required, click Yes to install the ActiveX viewing component, to allow viewing of the
video stream in your browser. This requires administrator rights on the comput er.
3. Enter the same user name and password for the video login and click OK.
The Main View page is displayed, with links to the Setup tools and online help.
ENGLISH
Notes:
Setup tools
• To maintain security, the default password should be changed as soon as possible. This is done from
Setup > System Options > Users.
• The default administrator user name root is permanent and cannot be deleted.
• If the password is lost, the AXIS 262 must be reset to the factory default settings.
Online help
Note that the Main View
page shown here is an
example only. The first
time the AXIS 262 is
accessed there will be no
video sources available these must be added first.
Page 8

Page 8 AXIS 262 Installation Guide
Resetting to the Factory Default Settings
The AXIS 262 can be reset to the factory default settings in three different ways:
• By clicking the Restore button on the Maintenance web page in the setup tools. This resets
most parameters, but saves the IP address, the subnet mask, the default gateway, the DHCP
setting, and the time and date.
• By clicking the Default button on the Maintenance web page in the setup tools. Note that
this will reset all
• By pressing the Factory Setup button on the rear of the unit. Pressing the button for 20
seconds while the unit is powered up will reset all
tings, and also format the hard disk drive.
When the Status indicator on the front panel displays steady green, which can take up to 3
minutes, the AXIS 262 has been reset to the factory default settings.
If the IP address was affected by the reset, it will now be set to 192.168.0.90. This should be
changed to an IP address suitable for use on your network. See page 5.
If there is a DHCP server on your network, a new IP address valid on your network will
automatically be assigned. Use AXIS IP Utility to see which IP address the unit received.
Alternatively, see the admin pages for your DHCP server.
parameters to the factory default settings.
parameters to the factory default set-
Important!
Please note that resetting the AXIS 262 to the factory default settings will also erase all recorded
video.
If you have recorded video you wish to save, download it from the download tab on the
Main View page, before resetting the unit.
Further information
For further information, please see the AXIS 262 User’s Manual, which is available on the CD
included in this package. Updated versions can be obtained from www.axis.com
Page 9

AXIS 262 Montageanweisung Seite 9
AXIS 262 Netzwerk-Videorekorder
Montageanweisung
Diese Anwiesung beschreibt, wie Sie den Netzwerk-Videor ekorder AXIS 262 in Ihrem Netzwerk
installieren. Weitere Hinweise zur Nutzung des Produkts entnehmen Sie dem AXIS 262-Benutzerhandbuch auf der beiliegenden CD oder unter www.axis.com
Installationsschritte
Führen Sie diese Schritte aus, um AXIS 262 in Ihrem lokalen Netzwerk (LAN) zu installieren:
1. Vergleichen Sie den Packungsinhalt mit der folgenden Liste.
2. Schließen Sie AXIS 262 an. Siehe Seite 10.
3. Legen Sie eine IP-Adresse fest. Die möglichen Verfahren werden auf Seite 11 beschrieben.
4. Geben Sie das Standardkennwort ein, um auf die Einheit zuzugreifen. Siehe Seite 14.
Lieferumfang
Komponente Hinweise
Netzwerk-Videorekorder AXIS 262
Netzstecker Mit mehreren Anschlusskabeln zur Nutzung an verschiedenen Orten
CD Installationsprogramm und Produktdokumentation
Gedruckte Dokumentation • AXIS 26 2 -I nst allationsanleitung (dieses Dokument)
• Axis-Garantieerklärung
DEUTSCH
Übersicht - Vorderseite
Datenträgeranzeige
Netzwerkanzeige
Die Anzeigen auf der Vorderseite bieten nützliche Informationen zum aktuellen Status von
AXIS 262. Eine umfassende Liste der LED-Anzeigefunktionen entnehmen Sie der Online-Hilfe
oder dem Benutzerhandbuch.
Stromanzeige
Statusanzeige
Page 10

Seite 10 AXIS 262 Montageanweisung
Übersicht – Rückseite
D-Subanschluss
Seriennummer
Netzwerkanschluss
9-poliger E/A-
anschluss
Betriebstaste
Netzsteckeranschluss
Werkseinstellungstaste
D-Sub-Anschluss - Für den Anschluss einer USV-Einheit (unterbrechungsfreie Stromversorgung). Hinweise zu zertifizierten Modellen entnehmen Sie dem AXIS 262-Benutzerhandbuch.
Netzwerkanschluss - Verbinden Sie AXIS 262 mit Ihrem Netzwerk über ein standardmäßiges
CAT-5-Netzwerkkabel.
E/A-Anschluss - Für den Anschluss externer Einheiten. Weitere Informationen entnehmen Sie
dem AXIS 262-Benutzerhandbuch.
Werkseinstellungstaste - Zum Zurücksetzen des Geräts auf die werkseitigen Voreinstellungen.
Siehe Seite 15.
Betriebstaste - Zum korrekten Herunterfahren drücken Sie diese Taste so lange bis ein Piepen
ertönt. Das Herunterfahren ist dann nach ca. 20 Sekunden beendet. Um das Gerät zu starten,
drücken Sie einmalig die Taste.
Netzsteckeranschluss - Bringen Sie hier den mitgelieferten Netzstecker an.
Page 11

AXIS 262 Montageanweisung Seite 11
IP-Adresse festlegen
AXIS 262 ist für die Einbindung in ein Ethernet-Netzwerk ausgelegt. Für die Nutzung in einem
Netzwerk muss dem Gerät eine IP-Adresse zugewiesen werden.
Installationsverfahren
Die möglichen Verfahren zum Festlegen oder Ermitteln der IP-Adresse werden im Folgenden
aufgeführt.
• AXIS IP Utility - Wir empfehlen, zum Festlegen der IP-Adresse dieses kost enlose Win-
dows-Programm zu nutzen. Die Software AXIS IP Utility kann in Netzwerken mit oder
ohne DHCP-Server eingesetzt werden. Beachten Sie, dass AXIS 262 im selben Netzwerksegment installiert sein muss. Einzelheiten finden Sie auf Seite 12.
• ARP/Ping - Mit diesen Befehlen können Sie die IP-Adresse manuell festlegen. Beachten
Sie, dass AXIS 262 im selben Netzwerksegment installiert sein muss. Einzelheiten finden
Sie auf Seite 13.
• DHCP-Server - Rufen Sie die Administrationsseiten für den DHCP-Server in Ihren Netz-
werk auf, um die IP-Adresse zu ermitteln, die AXIS 262 zugewiesen ist. Weitere Informationen entnehmen Sie der Dokumentation für den DHCP-Server und bzw. oder wenden Sie
sich an Ihren Netzwerkadministrator.
DEUTSCH
Hinweise:
• DHCP ist für AXIS 262 standardmäßig aktiviert.
• AXIS 262 besitzt die Standard-IP-Adresse 192.168.0.90.
• Wenn die Festlegung der IP-Adresse fehlschlägt, stellen Sie sicher, dass der Vorgang nicht durch eine Firewall
blockiert wird.
Page 12

Seite 12 AXIS 262 Montageanweisung
AXIS IP Utility
AXIS IP Utility ist ein kostenloses Windows-Programm, das Axis-Einheiten in
Ihrem Netzwerk ermittelt und auflistet.
Diese Software kann ebenfalls genutzt
werden, um eine statische IP-Adresse
manuell festzulegen.
Beachten Sie, dass sich AXIS 262 und der
Computer mit AXIS IP Utility im selben
Netzwerksegment (physikalisches Subnetz) befinden müssen.
AXIS IP Utility befindet sich auf der beiliegenden CD. Die Anwendung kann ebenfalls von
www.axis.com/techsup heruntergeladen werden.
Automatische Erkennung mit AXIS IP Utility
1. Vergewissern Sie sich, dass AXIS 262 mit dem Netzwerk verbunden und eingeschaltet ist.
2. Starten Sie AXIS IP Utility. Wenn AXIS 262 im Fenster erscheint, doppelklicken Sie darauf,
um die Startseite für den Netzwerk-Videorekorder zu öffnen.
3. Wie Sie auf AXIS 262 zugreifen, erfahren Sie auf Seite 14.
IP-Adresse mit AXIS IP Utility manuell festlegen
1. Ermitteln Sie eine nicht benutzte IP-Adresse, die sich im selben Netzwerksegment wie Ihr
Computer befindet.
2. Wenn AXIS 262 bereits eingeschaltet ist, stellen Sie das Gerät mithilfe der Betriebstaste an
der Rückseite aus.
3. Klicken Sie auf die Schaltfläche (IP-Adresse mithilfe der Seriennummer festlegen).
Geben Sie nun die Seriennummer und IP-Adresse für AXIS 262 ein.
4. Klicken Sie auf die Schaltfläche IP-Adresse festlegen und schalten Sie AXIS 262 ein,
indem Sie erneut die Betriebstaste drücken.
5. Es erscheint eine Bestätigungsmeldung, nachdem die IP-Adresse festgelegt wurde. Klicken
Sie auf Startseite anzeigen, um die AXIS 262-Webschnittstelle zu öffnen.
6. Wie Sie auf AXIS 262 zugreifen, erfahren Sie auf Seite 14.
Hinweise:
• Setzen Sie die IP-Adresse mit dem AXIS IP Utility innerhalb von zwei Minuten nach dem Gerätestart.
• AXIS IP Utility kann genutzt werden, um von einer dynamischen zu einer statischen IP-A dres se zu wechse ln.
Page 13

AXIS 262 Montageanweisung Seite 13
Manuelle Installation mit ARP/Ping
1. Ermitteln Sie eine nicht benutzte IP-Adresse, die sich im selben Netzwerksegment wie Ihr
Computer befindet.
2. Wenn AXIS 262 bereits eingeschaltet ist, stellen Sie das Gerät mithilfe der Betriebstaste an
der Rückseite aus.
3. Suchen Sie nach der Seriennummer (S/N) auf dem Etikett auf der Geräterückseite.
4. Öffnen Sie auf Ihrem Computer die Eingabeaufforderung und geben Sie Folgendes ein:
Syntax: Beispiel:
arp -s <IP-Adresse> <Seriennummer>
ping -l 408 -t <IP-Adresse>
arp -s 192.168.0.125 00-40-8c-18-10-00
ping -l 408 -t 192.168.0.125
5. Stellen Sie sicher, dass das Netzwerkkabel angeschlossen ist. Schalten Sie AXIS 262 ein,
indem Sie erneut die Betriebstaste drücken.
6. Wenn die Meldung “Antwort von 192.168.0.125: ...” o.s.ä. erscheint, wurde die IP-Adresse
zugewiesen. Schließen Sie die Eingabeaufforderung.
Hinweise:
• Setzen Sie die IP-Adresse mit dem AXIS IP Utility innerhalb von zwei Minuten nach dem Gerätestart.
• Um unter Windows die Eingabeaufforderung zu öffnen, wählen Sie im Startmenü den Eintrag Ausführen...
auf und geben den Befehl cmd ein. Klicken Sie auf OK.
DEUTSCH
Page 14

Seite 14 AXIS 262 Montageanweisung
Auf AXIS 262 zugreifen
Starten Sie Ihren Webbrowser, geben Sie in
der Adresszeile die IP-Adresse ein und drükken Sie die Eingabetaste auf der Tastatur.
Für den Zugriff auf AXIS 262 müssen Sie
einen Netzwerk-Benutzernamen mit zugehörigem Kennwort sowie einen Video-Benut-
zernamen mit zugehörigem Kennwort
eingeben.
1. Wenn S ie zum ersten Mal auf die Einheit
zugreifen, tragen Sie als Netzwerk-Benutzername root und als Kennwort pass ein.
2. Falls erforderlich, klicken Sie auf Ja, um die ActiveX-Komponente zu installieren. So kann
in Ihrem Browser ein Video-Stream wiedergegeben werden. Dafür benötigen Sie Administratorzugriffsrechte für den Computer.
3. Geben Sie denselben Benutzernamen und dasselbe Kennwort für die Video-Anmeldung ein
und klicken Sie auf OK.
Es erscheint die Seite Hauptansicht. Sie enthält Links zu den Setup-Werkzeugen und zur
Online-Hilfe.
Setup-Werkzeuge
Online-Hilfe
Hinweise:
Hinweis: An dieser Stelle
wird lediglich ein Beispiel
für die Seite Hauptansicht
abgebildet. Beim ersten Zugriff auf AXIS 262 sind
noch keine Videoquellen
verfügbar. Diese müssen erst
hinzugefügt werden.
• Für eine maximale Sicherheit sollte das Standardkennwort umgehend geändert werden. Rufen Sie dazu
Setup > Systemoptionen > Benutzer auf.
• Der standardmäßige Administrator-Benutzername root ist permanent und kann nicht gelöscht werden.
• Bei einem Verlust des Kennworts muss AXIS 262 auf die werkseitigen Standardeinstellungen zurückgesetzt
werden.
Page 15

AXIS 262 Montageanweisung Seite 15
Gerät auf werkseitige Standardeinstellungen zurücksetzen
Es bestehen drei Möglichkeiten, AXIS 262 auf die werkseitigen Standardeinstellungen zurückzusetzen:
• Klicken Sie unter Setup auf der Seite Wartung auf die Schaltfläche Rücksetzen. Dadurch
werden die meisten Parameter zurückgesetzt. IP-Adresse, Subnetzmaske, Standard-Gateway, DHCP-Einstellung, Datum und Uhrzeit werden jedoch beibehalten.
• Klicken Sie in den Setup-Werkzeugen auf der Seite Wartung auf die Schaltfläche
Standardeinstellungen. Dadurch werden alle
lungen zurückgesetzt.
• Drücken Sie die Werkseinstellungstaste an der Geräterückseite. Wenn Sie diese Taste 20
Sekunden lang während des Gerätestarts gedrückt halten, werden alle Parameter auf die
werkseitigen Standardeinstellungen zurückgesetzt und auch die Festplatte wird formatiert.
Wenn die Statusanzeige auf der Vorderseite durchgehend grün leuchtet (was bis zu drei Minuten dauern kann), wurde AXIS 262 auf die werkseitigen Voreinstellungen zurückgesetzt.
Wurde die IP-Adresse geändert, gilt als neue Einstellung 192.168.0.90. Dieser Wert für die IPAdresse ist an die jeweiligen Netzwerkverhältnisse anzupassen. Siehe Seite 12.
Parameter auf die werkseitigen Voreinstel-
DEUTSCH
Wenn das Netzwerk einen DHCP-Server umfasst, wird dem Gerät automatisch eine neue gültige IP-Adresse zugewiesen. Mithilfe von AXIS IP Utility können Sie anzeigen, welche IPAdresse dem Gerät zugewiesen wurde. Sie können ebenfalls die Administrationsseiten für Ihren
DHCP-Server aufrufen.
Wichtig!
Hinweis: Wenn Sie AXIS 262 auf die werkseitigen Standardeinstellungen zurücksetzen, werden
ebenfalls alle
Sie diese vor einem Reset auf Ihren Computer. Die dazu erforderliche Funktion befindet sich auf
der entsprechenden Registerkarte auf der Seite Hauptansicht.
Videoaufzeichnungen gelöscht. Um Videoaufzeichnungen zu speichern, übertragen
Weitere Informationen
Weitere Informationen entnehmen Sie dem AXIS 262-Benutzerhandbuch auf der mitgelieferten CD. Aktualisierte Versionen können Sie von www.axis.com herunterladen.
Page 16

Page 17

Page 18

AXIS 262 Installation Guide v1.0 July 2005
Copyright © Axis Communications AB, 2005 Part No. 24941
 Loading...