

Page 1

DS610CF
User's Manual
(D/N: 250-0245-E Rev. 1.0)
Avision, Inc
Page 2

Trademarks
Microsoft is a U.S. registered trademark of Microsoft Corporation.
Windows and MS-DOS are trademarks of Microsoft Corporation.
IBM, PC, AT, XT are registered trademarks of International
Business Machines Corp.
Other brands and product names herein are trademarks or registered
trademarks of their respective holders.
Copyright
All rights reserved. No part of this publication may be reproduced,
transmitted, transcribed, stored in a retrieval system, or translated
into any language or computer language, in any form or by any
means, electronic, mechanical, magnetic, optical, chemical, manual,
or otherwise, without the prior written permission of the
manufacturer.
Material scanned by this product may be protected by governmental
laws and other regulations, such as copyright laws, the customer is
solely responsible for complying with all such laws and regulations.
-ii
Page 3

Warranty
The information contained in this document is subject to change
without notice.
The manufacturer makes no warranty of any kind with regard to this
material, including, but not limited to, the implied warranties of fitness
for a particular purpose.
The manufacturer shall not be liable for errors contained herein or for
incidental or consequential damages in connection with the furnishing,
performance, or use of this material.
iii
Page 4

FCC Radio Frequency Interference Statement
This equipment has been tested and found to comply with the limits for a
Class B digital device, pursuant to Part 15 of the FCC rules. These limits
are designed to provide reasonable protection against harmful
interference in a residential installation. This equipment generates, uses,
and can radiate radio frequency energy and, if not installed and used in
accordance with the instructions, may cause harmful interference to radio
communication. However, there is no guarantee that interference will not
occur in a particular installation. If this equipment does cause harmful
interference to radio or television reception, which can be determined by
turning the equipment off and on, the user is encouraged to try to correct
the interference by one or more of the following measures:
* Reorient or relocate the receiving antenna.
* Increase the separation between the equipment and receiver.
* Connect the equipment into an outlet on a circuit different from that to
which the receiver is connected.
* Consult the dealer or an experienced radio/TV technician for help.
FCC CAUTION: To assure continued compliance,(example- use only
shielded interface cables when connecting to computer or peripheral devices).
Any changes or modifications not expressly approved by the party
responsible for compliance could void the user's authority to operate the
equipment.
This device complies with Part 15 of the FCC Rules. Operation is subject to
the following two conditions: (1) This device may not cause harmful
interference, and (2) this device must accept any interference received,
including interference that may cause undesired operation.
Responsible Party: AVISION LABS INC.
6815 Mowry Ave. Newark CA 94560,
USA
Telephone No.:
+1 (510) 739-2369
-iv
Page 5

Table of Contents
1. INTRODUCTION................................................................................................1-1
2. DS610CF INSTALLATION..............................................................................2-1
2.1 PRECAUTIONS.............................................................................................2-1
2.2 UNLOCKING THE DS610CF.......................................................................2-2
2.3 CONNECTING THE CABLE........................................................................2-3
2.3.1 CONNECTING DS610CF TO WORK AS A COPIER....................2-3
2.3.2 CONNECTING DS610CF TO WORK AS A SCANNER.................2-4
2.4 DOCUMENT PLACEMENT........................................................................2-5
3.USING DS610CF AS A COPIER......................................................................3-1
3.1 THE CONTROL PANEL..............................................................................3-1
3.2 BEFORE MAKING COPIES.........................................................................3-5
3.3 MAKING SIMPLE COPIES .........................................................................3-6
3.4 MAKING COPIES WITH COPY FEATURES...........................................3-7
3.4.1 MIRROR FUNCTION ..........................................................................3-7
3.4.2 ENLARGING OR REDUCING YOUR ORIGINAL...........................3-8
3.4.3 AUTO ZOOMING YOUR ORIGINAL.................................................3-9
3.4.4 CHANGING YOUR COPY DENSITY..............................................3-10
3.4.5 CHANGING COLOR INTENSITY...................................................3-11
3.4.6 CHOOSING YOUR COPY QUANTITY...........................................3-12
3.4.7 ENHANCING YOUR COPY QUALITY...........................................3-13
3.4.8 FOCUS ON PHOTO COPY, TEXT COPY, OR MIXED PHOTO
& TEXT COPY.............................................................................................3-14
3.4.9 MAKING COPIES OF A 3D OBJECT ............................................3-15
3.4.10 AUTOMATIC POWER SAVING....................................................3-16
4. USING DS610CF AS A SCANNER..............................................................4-17
4.1 INSTALLATION PROCEDURE................................................................4-17
4.2 DOWNLOADING PRINTER COLOR TABLE........................................4-19
4.3 UNINSTALLING THE DS610CF DRIVER................................................4-24
5. SCANNER OPERATION & DOCUMENT PRINTING ..................................5-1
5.1 IMAGE TYPE .................................................................................................5-3
5.2 SCANNING PARAMETERS & IMAGE CONTROL ................................5-5
v
Page 6

5.3 SCANNING..................................................................................................5-11
5.4 PRINTING....................................................................................................5-12
6. MAINTENANCE ..................................................................................................6-1
7. TROUBLESHOOTING......................................................................................7-1
7.1 QUESTIONS AND ANSWERS...................................................................7-1
7.2 TECHNICAL SERVICE.................................................................................7-4
8. SPECIFICATION................................................................................................8-1
9. DS610CF AUTOMATIC DOCUMENT FEEDER(ADF) USER’S GUIDE ...9-1
9.1 INSTALLING THE ADF..............................................................................9-1
9.1.1 UNPACK THE ADF.............................................................................9-1
9.1.2 INSTALLING THE ADF.......................................................................9-2
9.1.3 UNLOCKING THE DS610CF............................................................9-4
9.1.4 CONNECTING THE CABLES............................................................9-5
9.2 USING THE ADF..........................................................................................9-6
9.2.1 FANNING PAPER BEFORE USAGE................................................9-6
9.2.2 LOADING THE PAPER.......................................................................9-7
9.2.3 STARTING YOUR FIRST COPY.........................................................9-7
9.2.4 STARTING YOUR FIRST SCAN.........................................................9-9
9.3 MAINTAINING THE ADF........................................................................9-13
9.3.1 CLEANING THE ADF......................................................................9-13
9.3.2 REPLACING THE ADF SNAP-IN PAD MODULE.......................9-15
9.4 HOW TO CLEAR THE PAPER JAM.......................................................9-17
-vi
Page 7

1. INTRODUCTION
Congratulations on your purchase of DS610CF.
The DS610CF produces better printing quality and is free
from maintenance, compared with traditional copy machines.
Its high printing quality, maintenance-free operation and
affordability make DS610CF the best convenience copier
solution for office.
The following sections introduce the unpacking, hardware
and software installation, the operation, and maintenance
information to you. Please spend a few minutes reading
through them to keep quality scanning result possible.
Figure 1-1 shows how the DS610CF is packed. Please
check all the items against Figure 1-1. If there is any missing
or damaged, please contact your nearest dealer immediately
for the replacement.
1-1
Page 8

5
1
4
2
3
1. Software CD
2. Power Adapter
3. DS610CF Cable
4. Quick Installation Guide
5. DS610CF main unit
Figure 1-1 DS610CF packing
-1-2
Page 9

2. DS610CF INSTALLATION
2.1 PRECAUTIONS
Ÿ Keep the DS610CF out of direct sunlight. Direct
exposure to the sun or excessive heat may cause damage
to the unit.
Ÿ Do not install the DS610CF in a humid or dusty place.
Ÿ Be sure to use the proper AC power source.
Ÿ Place the DS610CF securely on an even, flat surface.
Tilted or uneven surfaces may cause mechanical or paperfeeding problems.
Ÿ Retain the DS610CF box and packing materials for
shipping purposes.
2-1
Page 10
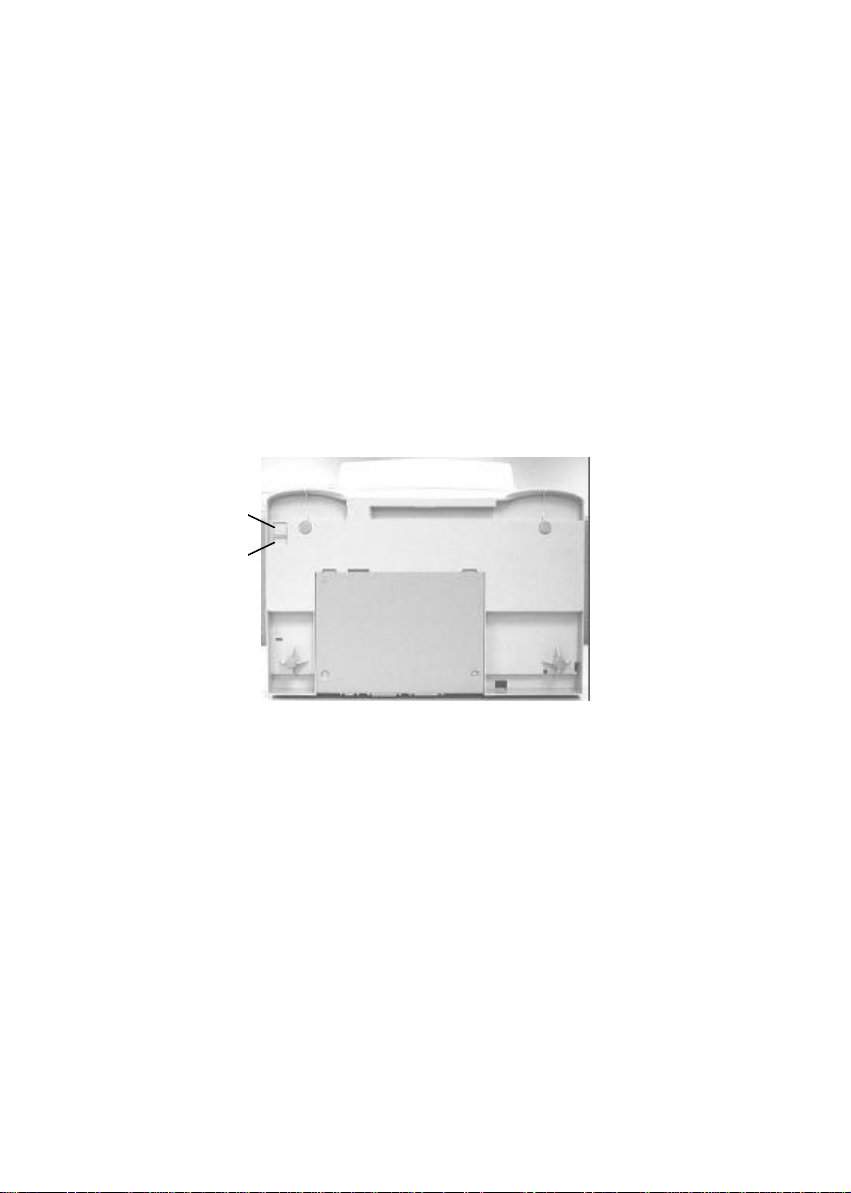
2.2 UNLOCKING THE DS610CF
To protect the scanning head from damage during shipment,
the DS610CF is designed with a lock switch beneath the
main unit. Therefore, before using the DS610CF, it is
required to unlock DS610CF by moving the lock switch to
the Use position.(See Figure 2-1)
1
2
1. “Shipping” Position 2. “Use” Position
Figure 2-1 Unlocking the DS610CF
-2-2
Page 11

2.3 CONNECTING THE CABLE
2.3.1 CONNECTING DS610CF TO WORK AS A
COPIER
Connect the power cable and signal cable as shown below.
Printer Cable
To Printer
Power Cable
To Power Outlet
Figure 2-2 Connecting DS610CF to a printer
2-3
Page 12
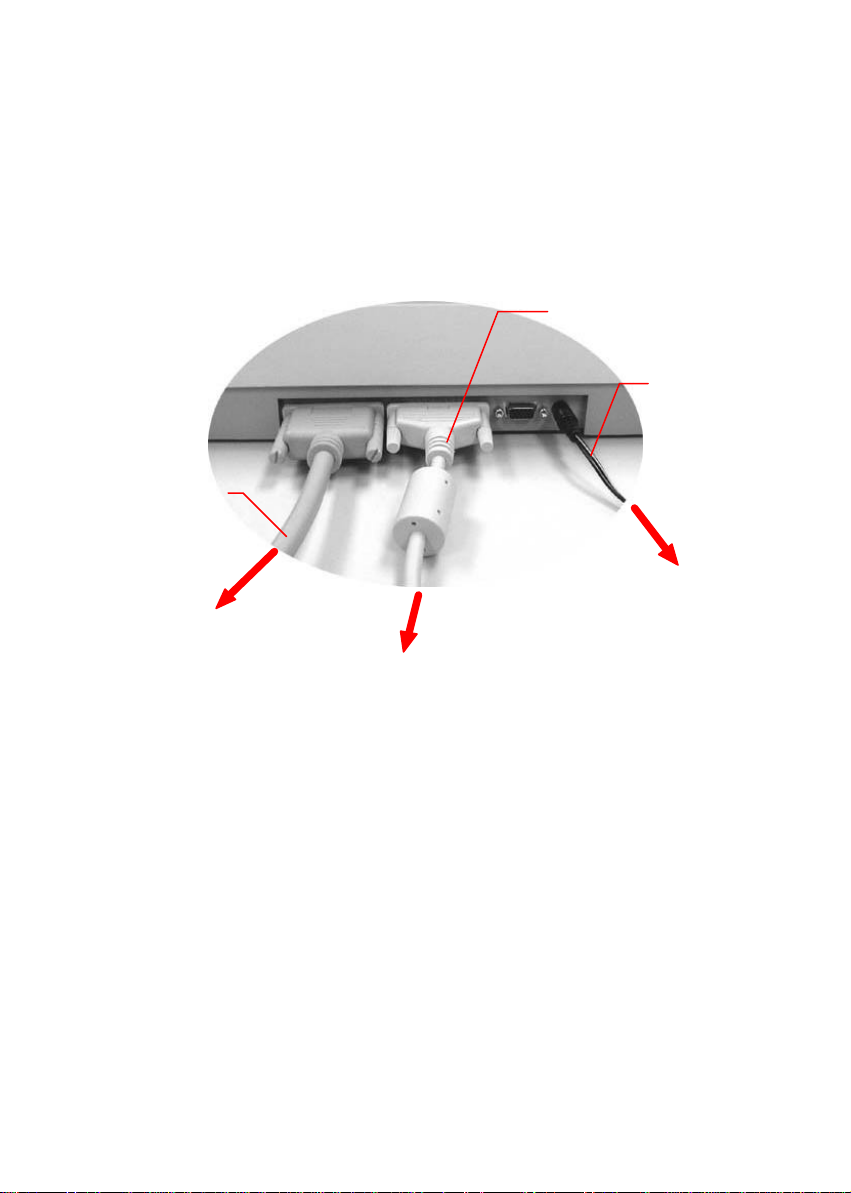
2.3.2 CONNECTING DS610CF TO WORK AS A
SCANNER
Printer Cable
To Printer
To PC Parallel Port
Parallel Cable
Power
Cable
To Power Outlet
Figure 2-3 DS610CF Cable Connection
-2-4
Page 13

2.4 DOCUMENT PLACEMENT
4. Document Glass
As shown in Figure 2-4, place the document on the glass
face (text) down.
2
1
3
4
1. Document Cover
2. Home Position Mark
3. Document
Figure 2.4 Document Placement
2-5
Page 14
3. USING DS610CF AS A COPIER
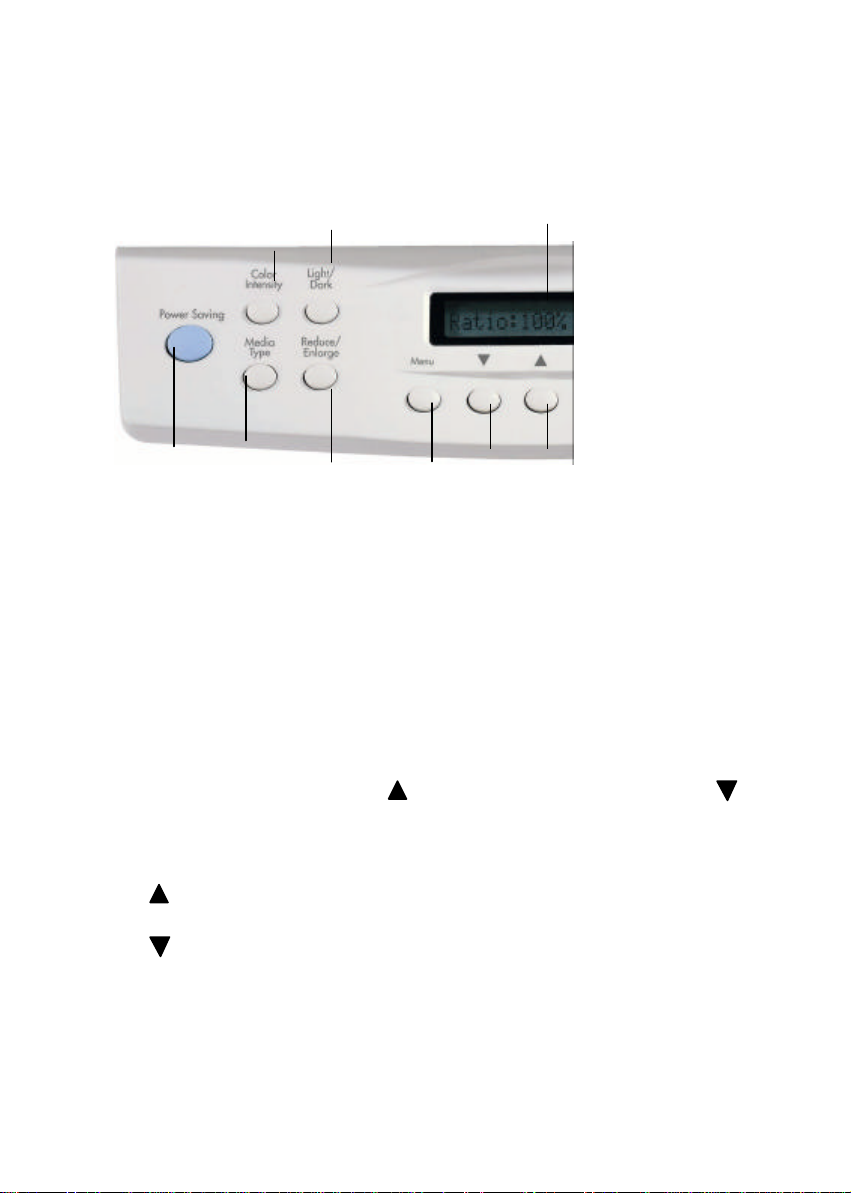
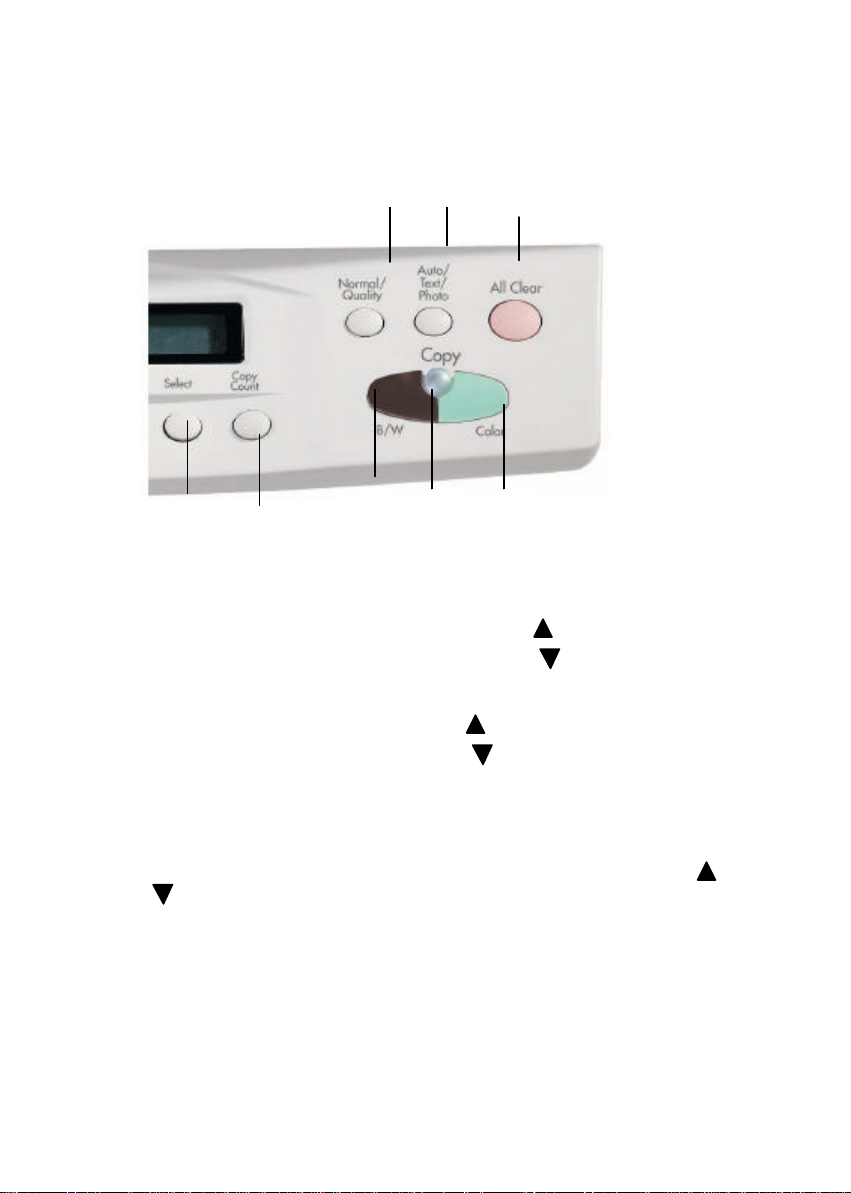
3.1 THE CONTROL PANEL
1314
12
17 9
16
1115
10
1. Copy(Color): Press to start a color copy.
2. Copy(B/W): Press to start a black-and-white copy .
3. Power/Copy LED: The LED indicator turns green when power is on and turns
flashing during copying.
4. All Clear: Press and instantly release to return to the custom settings.
Press for 5 seconds to return to the factory default settings.
5. Auto/Text/Photo: Press to respectively concentrate on photo, text, or auto
copying.
6. Normal/Quality: Select your Copy quality: Normal (300 dpi), or Quality (600
dpi).
7. Copy Count: Choose the number of copies from 1 to 99. Increase the value
of the numeric entries by the ( ) button or decrease the value by the ( )
button.
8. Select: Press to save the latest custom setting. (A star sign, "*", will appear in
the right-hand side.)
9. : Go to the previous item displayed in the Message Display window or
increase the value of the numeric entries.
10. : Go to the next item displayed in the Message Display window or decrease
the value of the numeric entries.
11. Menu: Select paper size, printer type, Mirror function, power-saving interval,
Duplex, Fit-to-A3, Input Tray, or Output Bin, depending on various printer
models.
3-1
Page 15
6 5
4
12. Message Display window: Display current settings.
13. Light/Dark: Lighten or darken your image.
Increase level of brightness or darkness by the ( ) button.
Decrease level of brightness or darkness by the ( ) button.
14. Color Intensity: Intensify the image copied or scanned.
Increase level of color intensity by the ( ) button.
Decrease level of color intensity by the ( ) button.
15. Reduce/Enlarge: Reduce, enlarge or auto zoom your original document.
16. Media Type: Press to select your output paper type, eg. Plain paper,
Glossy, or Premium (for ink jet printer).
17. Power Saving: Press to enter power saving status.
8 7
2 3 1
Press to select the preset ratios: 100%, 115%, 122%, 141%, 200%, 400%, Auto,
25%, 50%, and 86%.
Choose your desired ratio or adjust the ratio in 1% increment by the ( ) or
( ) button.
Auto: Automatically scale your original document to fit your output paper.
Transparency,
-3-2
Page 16

Tips:
To use other settings than the one displayed in the Message Display
window, simply repress the button of that setting to select other
options.
Note:
(1). An item message in the Message Display Windows ending with
a “∗ “ means the last setting.
(2). The default settings are: A4, Normal Print Quality, 100% ratio,
1 copy.
IMPORTANT!
PRINTER MEMORY
To make good use of DS610CF, it is recommended to install at
least 4 MB of memory in your printer. If you want to print your
document using Quality mode - 600 dpi as your Copy Quality mode,
you need to add more RAM for your printer as using this feature
requires more processing time and memory.
See the following chart for printer memory recommendations.
3-3
Page 17

It is strongly recommended that you refer to the following table to
ensure a successful color copy.
Copy Quality Document Size Min. Printer Memory
Normal Letter Size
Legal Size
Quality Letter Size
Legal Size
16 MB
32 MB
32 MB
64 MB
If there is not enough memory in your printer, you may probably
encounter the following results:
1. The printer does not print.
2. The print quality is bad.
-3-4
Page 18

3.2 BEFORE MAKING COPIES
DS610CF provides three paper sizes, A4, letter, and legal.
Check or select the paper size to match your paper supply to
ensure smooth operations.
To check or select paper size,
1. Press the Paper Size button. The Message window displays
“Size:A4 *” (default). If your current paper supply is A4 size,
you can skip the following steps. Otherwise, please do the
following steps.
2. Repress or button . The Message window displays “Letter
“.
• If your current paper supply is letter size, please press the
Select button. The Message window now displays
“Size:Letter *”. This means you have successfully
changed the default size to letter.
• If legal size is your current paper supply, please repress the
or button. The Message window displays “Size: Legal “.
Press the Select button to change the default size to Legal.
ãã Note:
To return to your custom setting saved by the Select button, quickly
press and release the “All Clear” button.
Each time when you press the “All Clear” button for 5 seconds, the
DS610CF automatically returns to the factory default setting.
3-5
Page 19

3.3 MAKING SIMPLE COPIES
The Operating Steps:
1. Place your original face down on the document glass.
2. Press the Copy button. The Message window displays
“Copy…” and the Ready LED is flashing.
3. Within a few seconds, the copying is done. The Message
window then displays “1 Copy @100%” and the Ready
LED is now steadily on until next task.
-3-6
Page 20

3.4 MAKING COPIES WITH COPY FEATURES
3.4.1 MIRROR FUNCTION
This function allows you to horizontally flip the copied image
as if the image were reflected in a mirror.
The Operating Steps
1. Place your document face-down on the document glass.
2. Keep on pressing Menu button till the message, “Mirror:
off”,appears.
3. Press the or button to get the message, “Mirror: on”.
4. Press Copy button.The printout shows the original image is
flipped horizontally as if it were reflected in a mirror.
Mirror function is off Mirror function is on
3-7
Page 21
3.4.2 ENLARGING OR REDUCING YOUR
ORIGINAL
Like a normal copier, the DS610CF also features auto
enlargement/reduction function to resize your original.
The Operating Steps:
1. Place your document face-down on the document glass.
2. Press the “Reduce/Enlarge” button, the Message Window
displays “Ratio:100%”.
3. Repress the button to see more options. For example, if you
need 150% enlargement, select “141%” then press the “s”
button to increase the percentage to 150 in 1% increment.
4. Press the Copy button. And then the printout shows
enlargement of 150% of your original.
Ratio:100% Ratio: 150%
ã Note:
• Another option to reduce your original is to firstly repeat the enlargement
or reduction steps 1 to 3 and then press the “t” button to decrease the
percentage in 1% increment.
• The maximum magnification rate is 400% while the minimum reduction rate
is 25%.
-3-8
Page 22
3.4.3 AUTO ZOOMING YOUR ORIGINAL
Auto Zoom is a convenient function to resize your original
without giving additional thought to whether the
magnification or reduction will be larger than the existing
paper size set on the DS610CF.
The Operating Steps:
1. Repeat the above Enlargement Step 1 & 2.
2. Repress the “Enlarge/Reduce” button until the Message
Window displays “Auto ”.
3. Press the Copy button. The printout shows your original
automatically scales to your paper size.
Before Auto Zoom (Ratio:100%) After Auto Zoom
3-9
Page 23

3.4.4 CHANGING YOUR COPY DENSITY
Copy density refers to the degree of darkness which the
DS610CF has reproduced. There are times when your original
is unsatisfactorily darker or lighter. It is of great advantage
to use the density feature to compensate the unsatisfactory
original.
The Operating Steps:
1. Place your original face down on the document glass.
2. Press the “Lighter/Darker” button. The Message Window
displays the default degree of darkness.
3. Repress the “Lighter/Darker” button to select one of the other
levels. Or you may press the “s” to increase the level, press
the “t” button to decrease the level.
4. Press the Copy button. Your printout shows the darkness or
brightness has been compensated.
-3-10
Page 24

3.4.5 CHANGING COLOR INTENSITY
Color intensity refers to the saturation of color reproduced by
DS610CF . There are times when the saturation of the original
image doesn’t fit your preference. By making a great use of
this function, you could get the most optimal color preference
desired.
The Operating Steps:
1. Place your original face-down on the document glass.
2. Press the “Color Intensity” button. The Message Window
displays the default saturation.
3. Repress the “Color Intensity” button to select one of the other
levels. Or you may press the “s” to increase the level, press
the “t” button to decrease the level.
4. Press the Copy button.
3-11
Page 25

3.4.6 CHOOSING YOUR COPY QUANTITY
The Operating Steps:
1. Place your original face-down on the document glass .
2. The default copy count is 1. If you need to make 3 copies, for
example, press the “Copy Count” button and the Message
Window displays “2 copy @100%”.
3. Repress the “Copy Count” button and the Message Window
displays “3 copy …”.
4. Press the Copy button. After a few seconds, you have 3
copies from your printer.
ã Note:
• Another option to change your copy quantity is to press the
“s” button to increase the number or the “t“ button to
decrease the number.
• The maximum copy quantity is 99.
-3-12
Page 26

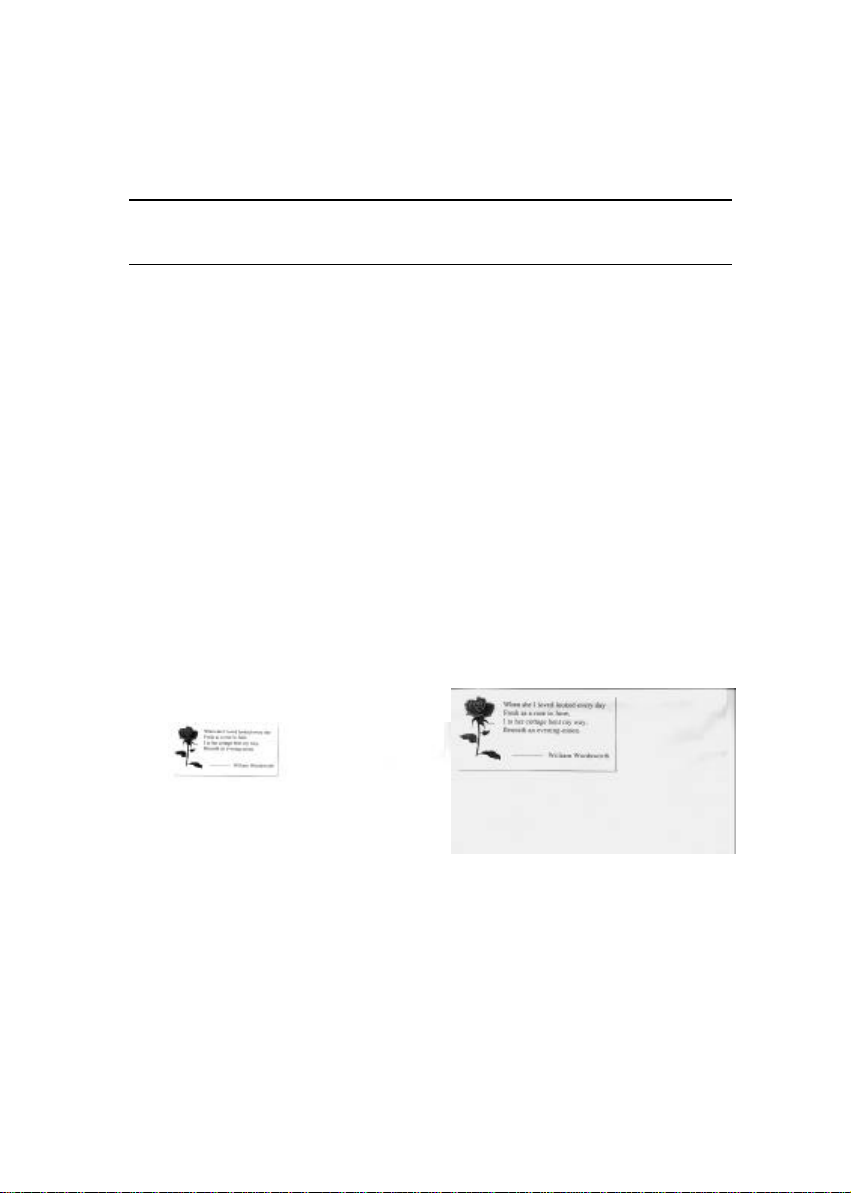
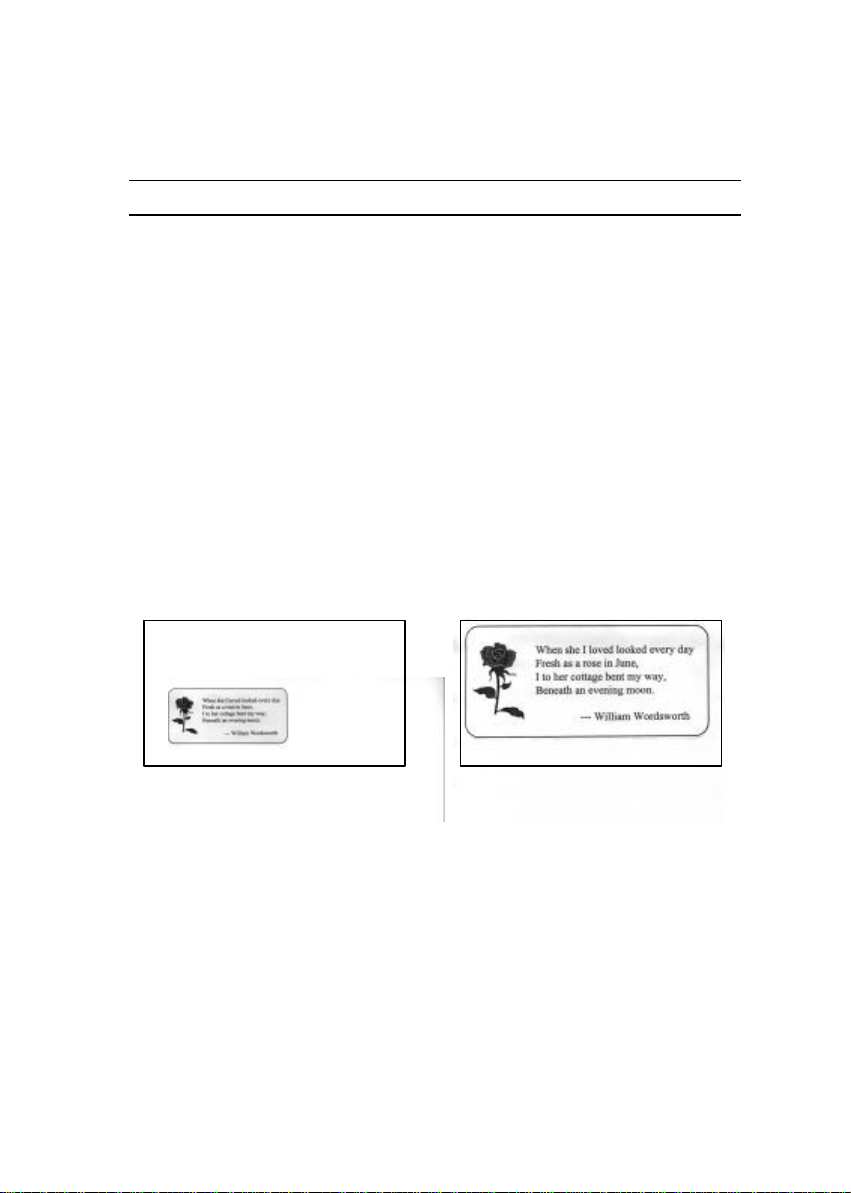
3.4.7 ENHANCING YOUR COPY QUALITY
The DS610CF provides “Quality mode” option to improve
your copy quality particularly when your original comes with a
photo in it. Quality mode allows your printout to impressively
reveals more image(photo) details.
The Operating Steps:
1. Place your document face-down on the document glass.
2. Press the “Normal/Quality” button. The Message Window
displays “Normal mode”.
3. Repress the “Normal/Quality” button and the Message
Window displays “Quality mode”.
4. Press the Copy button. The copying begins processing with
the Quality mode.
See following photo/text reproduction between normal copier
v.s. DS610CF in quality mode.
Make copies with a Make copies with
normal copier a DS610CF in quality mode
ã Note:
• To proceed copies using quality mode, make sure your printer has at
least 4M memory as this requires more processing time.
3-13
Page 27

3.4.8 FOCUS ON PHOTO COPY, TEXT COPY, OR
MIXED PHOTO & TEXT COPY
If the content in the original is occupied by photo images only
or by photo images with a little text on it, press to select the
Photo function to get a photo-concentrated image copy. On
the contrary, the Text function helps you get a textconcentrated copy. However, if the proportion of the photo
image is almost the same as that of text in the original to be
copied, it is recommended to utilize the Auto function from
Auto/Text/Photo button in order to get the most optimal
printout with photo and text mixed.
The Operating Steps:
1. Place your document face-down on the document glass.
2. Keep on pressing “Auto/Text/Photo” button to select any one
of these 3 document-type functions, called Photo, Text, and
Auto.
3. Press the Copy button, and the printout shows the best
reproduction with the document-type concentration selected.
-3-14
Page 28

3.4.9 MAKING COPIES OF A 3D OBJECT
The DS610CF solution improves your copy reproduction
significantly and even makes a 3D object copies amazingly
clear.
The Operating Steps:
1. Place your 3D object on the document glass.
2. Press the “Normal/Quality” button and the Message Window
displays “Normal mode”.
3. Repress the “Normal/Quality” and the Message Window
displays “Quality mode”.
4. Press the Copy button. Your 3D object copy is done.
The 3D copy The amazing 3D copy
using a normal copier using the DS610CF
3-15
Page 29

3.4.10 AUTOMATIC POWER SAVING
The DS610CF features automatic power saving without unplugging
the power cable. If you either have not used the DS610CF over a
selected power-saving interval (15 minutes, 2 hours, 4 hours, or no
power saving) or simply press the Power Saving button , it
automatically turns into power saving status.
To resume the ready status, press any one of the button on the
Control Panel. The Message Window displays “Warming up…”
and then “1 Copy @100%”, the ready status. The Ready LED
now turns steadily on.
-3-16
Page 30

4. USING DS610CF AS A SCANNER
To run DS610CF at optimum speed, the following
minimum requirements are recommended:
• IBM compatible PC 386/486, Pentium or later;
• Microsoft Windows 95/98/Me/2000, Windows NT;
• One printer port available :ECP or EPP(enhanced
parallel port);
• 20 Megabytes of available hard disk space for
installation;
• 16 Megabytes of RAM (32 Megabytes or higher
recommended);
• A video graphics array (VGA) monitor;
• A Microsoft Windows-compatible pointing device
(e.g., mouse);
• A CD ROM drive.
4.1 INSTALLATION PROCED URE
Installation procedures of DS610CF driver are as follows:
1. Start Windows 95/98/Me/2000,or NT
2. Insert software CD into your CD ROM drive.
4-17
Page 31

3. Press the Start button, choose RUN, type d:\driver\setup.exe
(d: the CD-ROM drive in use), and then click O.K. (See
Figure 3-1,3-2)
4. Follow the on-screen instructions to complete the
installation.
Fig. 3.1
Fig. 3.2
-4-18
Page 32

4.2 DOWNLOADING PRINTER COLOR TABLE
Download compatible printer color table files to DS610CF before making
copy with DS610CF.
Do the following steps to complete downloading printer color tables ,
which are compatible to your printer connected to DS610CF.
1. To Install the Download Utility to a PC ,
1). Turn off DS610CF and the PC .
2). Connect DS610CF to a PC by plugging one end of the supplied
cable to the parallel port of the DS610CF and the other end to the
printer port of the PC.
3). Turn on DS610CF and the PC .
4). Insert the supplied CD-ROM into your CD-ROM drive and double-
click the “Color Table Download Kit.exe” from the “Color
Table Download Kit” folder.
4-19
Page 33

5). When the installation screen pops up, click the “Next” button and
follow the on-screen instructions to install the Color Digital Copy
Device Download Kit to the PC.
6) Click the “Finish” button to complete the installation when the
“Installation Completed !” screen appears.
-4-20
Page 34

7) Now, the Start program screen appears as follows.
Click the OK button on the Start program screen to continue
downloading the color tables.
Click the Skip button if you want to download the color tables later.
(Note: if you choose the Skip button or your computer system is
Windows 2000, press Start>Programs>
Color Table Download Kit > Color Table Download Kit
to indirectly continue downloading the color tables.)
8) A Color Digital Copy Device Download Kit dialog box appears, as
shown below.
If your printer connected to DS610CF is not in the list on the
square box , located on the right -hand side of the dialog box,
please add your printer color tables to DS610CF.
See the next page, describing how to customize color tables
on DS610CF.
4-21
Page 35

2. To customize the printer color tables on DS610CF,
1). Press Start>Programs> Color
Table Download Kit > Color
Table Download Kit. A Color
Digital Copy Device Download
Kit dialog box appears.
2). Choose the brand name and
model name of your new printer
on the left side and click the
"Add" button to insert the
model to the right side.
3). If the file size of your new table
exceeds the memory of the
DS610CF, the following
warning message will appear.
Choose one printer model from
the right side and click the
"Delete" button to delete one
table and free some memory.
4). If the warning message does
not appear, choose your new
printer model from the right
side and click the "Update"
button to download the color
table to the DS610CF.
-4-22
Page 36

5). When the status bar shows
100%, this means you have
successfully downloaded the
color table to the DS610CF.
6). Connect the DS610CF to your
printer and turn on the printer.
7). On the Control Panel of the
DS610CF, press the ”Menu”
button and use the “t”or ” s”
button to select your new printer
model.
4-23
Page 37

4.3 UNINSTALLING THE DS610CF DRIVER
You can uninstall the DS610CF driver by selecting
Start>Programs>DS610CF and clicking the Uninstall
driver icon from DS610CF group.
-4-24
Page 38

5. SCANNER OPERATION &
DOCUMENT PRINTING
Scanning Images from within an Application (TWAIN)
1. Open your application and choose Select Source
from the File menu. If the Select Source menu
options are not available from the File menu, see the
user guide of your application to learn how the
TWAIN link is used.
2. A dialog box appears containing the different TWAIN
sources that you can choose to bring an image into
your application.
3. Select DS610CF /32 Vx.xx as the source.
4. When you have used the dialog box to select a
different source, you will need to select DS610CF
as the source again before you can reuse the
DS610CF.
5. Place the image to be scanned face down on the
glass.
5-1
Page 39

6. From the File menu, select Acquire.
7. The TWAIN user interface will pop up on the screen.
Click on the Preview or Scan button to get the
image.
The TWAIN user interface:
-5-2
Page 40

5.1 IMAGE TYPE
The DS610CF provides five image types as explained
below:
Scanning Source Halftone
Scanning Source
Two scanning sources are provided- flatbed as well
as transparency.
Line art
Line art presents the image in black and white only
and there are no intermediate shades of gray in
between.
Line art
Error Diffusion
Gray
Color
Halftone
In addition to the black and white display, Halftone
can present a somehow gray shade of image by
using different size of dots.
5-3
Page 41

Error Diffusion
While taking up but a minimum storage space, error
diffusion gives good image texture and excellent
image details.
Gray (Internal 4096 levels of gray scale)
12-bit Gray presents a 4096 shades of gray in an
image.
Color (Internal 68.7 billion colors)
The 36-bit True Color internally presents 68.7
billion-color levels with much more tonal range and
color-image details.
-5-4
Page 42

5.2 SCANNING PARAMETERS & IMAGE CONTROL
Resolution
Brightness
Contrast
Resolution: The number of dpi (dots per inch) that the DS610CF
uses for a scan. Usually the greater the number, the
higher the resolution. Yet up to a certain level, the
resolution will not be visually increased but the disk
space will be increased.
Brightness: Adjusts the lightness or darkness of an image. The
higher the value, the brighter the image.
Contrast: Adjusts the range between the darkest and the
lightest shades in the image. The higher the contrast,
the bigger the different gray scales.
5-5
Page 43

Auto Level
Color
Auto Area
Descreen
Matching Reset
Invert
Advance_Settings
Quality Mode
Speed Mode
Pixel/Inch/Cm
Set Gamma
Image Information
Auto Level: Optimizes the scanned image.
Auto Area: Automatically sets the whole document as the scan
area, no matter what its size.
Descreen: Eliminates the Moire patterns commonly found in
printed matter.
Before descreen After descreen
-5-6
Page 44

Color Matching:
Adjusts the color quality of the image to make it
close to the original. This function uses default
parameters to adjust the image.
Reset: Resets the scanning parameters you set.
Invert: The invert command reverses the brightness and the
color in the image. For color images, each pixel will
be changed into its complementary color at the
command of Invert.
Advance Settings:
The Advance Settings provide several functions such as
Dynamic Background Removal and Color Drop-out.These
functions are briefly explained as below:
1). DBR(Dynamic Background Removal) - Apply exclusively
when you need to scan as an Lineart image . The DBR
function incorporates a few enhanced options to allow you to
remove background color to sharpen your text or drawing.
5-7
Page 45

Original(Color picture) After applying DBR option
2). Color drop-out - Apply exclusively when you need to
scan as a black and white image
The Color drop-out function allows you to remove one of the
R(Red), G(Green), or B(Blue) color or to convert all the color
data into Neutral Gray. For example, if you want to remove
the text or background in blue color, simply check the Blue
Channel then the text or background in blue color will be
removed. On the other hand, if your original contains various
color data, then check the Neutral Gray to retain all the color
data in gray since removing either one of the red, green, or
blue color will inadvertently affect the rest color data as every
color contains different elements of each of the red, green, and
blue channel. See the result below:
-5-8
Page 46

Your original with blue color background After click the B(Blue) channel
Your original with red watermark After click the R(Red) channel
Quality/Speed Mode:
Users can select the mode to perform scanning
according to their own need. Select quality mode
scanning if your emphasis is on the quality of the
scanned image. Or you can select speed mode
scanning if you want to speed up the scanning
process.
5-9
Page 47

Pixel/Inch/Cm:
Represents the different measuring systems to be
used in each scan.
Set Gamma: Adjusts the midtone of the image yet without losing
details of the lightest and the darkest areas at the
same time.
Image Information:
Gives related information of the scanned image.
-5-10
Page 48

5.3 SCANNING
Cursor Auxiliary
Preview Window
Preview: Previews your image roughly and allocates the
area to be scanned.
Scan: Executes the scan action.
Exit: Cancels the current job.
Document Size: To designate the size of your document, just click
on its icon on the margin of the preview window.
As shown in the figure below, in the Preview window, you can define
the area to be scanned by dragging the four cursor auxiliary lines.
Document Size
Lines
5-11
Page 49

5.4 PRINTING
Printer Cable
To Printer
Figure 5.1 DS610CF Cable Connection
Parallel Cable
Power
Cable
To Power Outlet
To PC Parallel Port
Caution:
Do not scan and print at the same time.
-5-12
Page 50

6. MAINTENANCE
Cleaning:
The DS610CF is designed to be maintenance-free. However,
it still needs to be cleaned occasionally to ensure optimum
image quality and performance.
Procedure
1. Open the document cover as shown in Figure 6-1.
2. Dip a soft clean cloth with isopropyl alcohol (95%).
3. Gently wipe the document glass and the white sheet beneath
the document cover to remove the dust or any toner particles.
4. Close the document cover. The DS610CF is now ready for
use.
3
1
1. Document Cover
2. Document Glass
Figure 6-1 Cleaning
6-1
2
Page 51

7. TROUBLESHOOTING
If you have any operational problem, please refer to the
following troubleshooting hints.
7.1 QUESTIONS AND ANSWERS
Question: Why does the scanned image always come out to
be too dark?
Answer: 1) Modify the Gamma setting to 1.8 for your
monitor and, when printing, set Gamma to 2.2 for
your printer.
2) Use the Brightness setting of the TWAIN user
interface to get a brighter image.
Question: The scanning speed of my DS610CF is much
slower than that of those installed at other
computers. Can I speed it up?
Answer: Set you PC printer port to the ECP or EPP mode
from BIOS setting.
Question: Why does my DS610CF scan at a very low
speed?
Answer: If you have installed Works for Windows, it will
install Window Printing System (WPS) in your
WIN.INI file. This will take up the printer port time
remarkably. You can remove the WPS from your
WIN.INI file, as follows:
7-1
Page 52

From:
[MS Text Converters]
MSWorksWin=Works for Windows
2.0,C:\WINDOWS\MSAPPS\TEXTCONV\worksdos.cnv,wps
Works for Dos 2.0=Works for DOS 2.0 MSAPPS\TEXTCONV\workswin.con, wps
To:
[MS Text Converters]
MSWorksWin=Works for Windows 2.0,C:\WINDOWS\MSAPPS\TEXTCONV\worksdos.cnv
Works for DOS 2.0=Works for DOS 2.0, C:\WINDOWS\MSAPPS\TEXTCONV\workswin.con
Question: The printer does not print the documents. Why?
Answer: Pass-through printing may pose a problem for some
printers. It is suggested to add a second printer
card for printing purpose, or you may call your
authorized local dealer for further support.
Question: Does it take long for the DS610CF to initialize
itself ?
Answer: If your printer port supports SPP mode only, it
takes about two minutes for the DS610CF to
initialize itself. If your printer port supports ECP or
EPP mode, the initialization speed is much faster,
about 20 seconds.
-7-2
Page 53

Question: Why my GDI printer does not work with the
DS610CF?
Answer: Disable the Auto Scan function in the application,
then your printer will function in normal working
condition.
Question: Why some parallel port devices and software’s
keypro do not work with the DS610CF?
Answer: The DS610CF do pass-through printing all right ,
but the pass-through printing may not work if you
connect the parallel port with devices other than
printer. Therefore, if you would like to connect
some parallel port devices other than printer, please
do not connect them to the same parallel port that
the DS610CF currently uses. It is suggested to
use other parallel ports to connect these devices or
keypro. For instance, you can connect the
DS610CF to LPT1, and connect other parallel port
devices to LPT2. Or you can add a data switch to
avoid the problem.
7-3
Page 54

7.2 TECHNICAL SERVICE
Technical support for Avision scanner is provided at the
Avision Technical Assistance Centers. Before you contact
us, please prepare the following information for a quick
solution:
Ÿ Scanner serial & revision number (located on the bottom
of the scanner);
Ÿ Hardware configuration (e.g., your host CPU type,
RAM size, free disk space, display card, interface card);
Ÿ The name and version of your scanning software
application;
Ÿ The version of your scanner driver.
Ÿ The brand and model name of your printer.
AVISION LABS INC.
6815 Mowry Ave. Newark CA 94560, USA
TEL: +1 (510) 739-2369
FAX: +1 (510) 739-6060
Web Site: http://www.avision.com
E-mail: support@avision-labs.com
AVISION INC.
No. 20 Creation Rd. 1, Science-Based Industrial Park,
Hsinchu 300, Taiwan, R.O.C.
TEL: +886 (3) 578-2388
FAX: +886 (3) 577-7017
Web Site: http://www.avision.com.tw
E-mail: service@avision.com.tw
-7-4
Page 55

8. SPECIFICATION
Copier specification
Optical Resolution 600x600dpi
Enhanced Resolution 9600x9600dpi
Copy Area Max. 8.5"x 14.0" (Legal size)
Copy Features Zooming from 25%~400%
Auto Zooming
Printer Supported PCL, PostScript, GDI, Esc/p
BJC capable printer
Printer Interface IEEE 1284 (bi-directional)
ECP/SPP/EPP
Power Source 100 - 240V, 50 - 60 Hz
Power Consumption < 20 W
Physical Dimension 477 x 356 x 98mm
(18.8” x 14.1” x 3.9” )
Weight: 3.9kg (8.5 lbs)
8-1
Page 56

ADF specification
Dimension 448 x 290 x 192 mm
Weight 1.4 kgs
Speed 10 PPM (page per minute) (mono mode)
Paper tray capacity 25 pages
Document size Max: Legal size (8.5” x 14”)
Min: 4.5” x 5.5”
Document thickness 0.07~0.15 mm
-8-2
Page 57

EC Declaration of Conformity
According to EN45014
Manufacturer's Name: Avision Inc.
Manufacturer's Address: No. 20 Creation Rd. 1,
Science- Based Industrial Park,
Hsinchu 300, Taiwan, R.O.C.
declare that the product
Model Number : DS610CF
conforms to the following Product Specifications:
Emission: EN 50081-1 (1992)
EN 55022 (Class A)
(Conducted Radiated) (1994)
Immunity:
EN 60555-2 (Harmonics) (1987)
EN 60555-3 (Flicker) (1987)
EN50082-1 (1992)
IEC 1000-4-2 (ESD) (1995)
IEC 1000-4-3 (RS) (1995)
IEC 1000-4-4 (EFT/Burst) (1995)
IEC1000-4-5(SURGE) (1995)
8-3
Page 58

9. DS610CF AUTOMATIC DOCUMENT
FEEDER(ADF) USER’S GUIDE
The DS610CF Automatic Document Feeder (ADF) is a very convenient
addition to your current DS610CF. With the ADF, you can
automatically copy or scan up to 25 pages at a time.
9.1 INSTALLING THE ADF
9.1.1 UNPACK THE ADF
1. ADF Document Cover
2. ADF Paper Tray
3. ADF Paper Support
1
2
3
9-1
Page 59

9.1.2 INSTALLING THE ADF
1. Turn off your DS610CF.
2. Disconnect the power cable.
3. Remove the document cover by opening the cover and lifting the
studs from the hinge holes at the rear of the DS610CF.
Document
Cover
Studs
Note: Please store the document cover on a flat surface in a safe
place.
4. Hold the ADF document cover and insert its studs to the hinge
holes at the rear of the DS610CF.
ADF
Cover
-9-2
Page 60

5. Insert the notched corners of the ADF Paper Support to the clipjoints on the ADF Paper Tray.
Paper Tray
Paper
Support
6. Insert the notched corners of the ADF Paper Tray into the clipjoints on the ADF document cover.
9-3
Page 61

9.1.3 UNLOCKING THE DS610CF
Slide the Lock Switch on the bottom of the DS610CF to unlock the
scanning unit.
1
2
1. “Shipping” Position 2. “Use” Position
-9-4
Page 62

9.1.4 CONNECTING THE CABLES
9.1.4.1 Connecting DS610CF to work as a Copier
Connect the ADF cable, the power cable, and the printer cable (not
included) respectively.
ADF Cable
Printer Cable
To Printer
To Power
Outlet
9.1.4.2 Connecting DS610CF to work as a Scanner
Connect the ADF cable, the power cable, the parallel cable, and the
printer cable (not included) respectively.
Parallel Cable
Printer Cable
To Printer
To PC Parallel
Port
ADF Cable
Power Cable
To Power
Outlet
Power Cable
9-5
Page 63

9.2 USING THE ADF
9.2.1 FANNING PAPER BEFORE USAGE
Standard paper should be fed easily. To prevent occasional paper jams
when automatically feeding multi-page documents, fan the paper before
loading.
Paper which can not be properly fed by the ADF:
• Paper with clip or staple attached;
• Paper with ink not totally dry;
• Paper with inconsistent thickness, such as envelopes;
• Paper with wrinkles, curls, folds or tears;
• Coated paper;
• Carbonless paper;
• Paper narrower than 4.5" or wider than 8.5"; Shorter than 5” or
longer than 14”
• Paper thinner than 0.07mm; thicker than 0.15mm
• Items other than papers, such as cloth, metal or OHP film;
• Notched paper;
• Paper with an odd (non-rectangular) shape;
.
Please use the flatbed to copy or scan documents that cannot be fed
by the ADF.
-9-6
Page 64

9.2.2 LOADING THE PAPER
Place your document with the text face up and make the top of the
page to the left side as shown below.
Feed Direction
ABC
123
Top of Page
9.2.3 STARTING YOUR FIRST COPY
9.2.3.1 Copying Multi-page Document
After the installation of the ADF unit is completed and you have properly
placed a stack of your document on the ADF Paper Tray, just a touch
of the Copy button on the Control Panel of DS610CF, then your task is
done in a minute.
Control Panel
Copy Button
To apply copy features displayed on the Control Panel, please refer to
the previous section, Making Copies with Copy Features .
9-7
Page 65

9.2.3.2 Copying a Single Page
To copy a single page, you can place your document either on the ADF
Paper Tray or on the document glass(recommended). To copy a single
page through flatbed, please do the following:
1. Remove any pages from the ADF Paper Tray.
2. Raise the ADF document cover.
3. Place your document face-down on the document glass. Observe
that the top edge of your original near the document alignment as
marked by a triangle.
0
A6 A5 B5 LTR A4 LGL
MAY
M
A6
A5
B5
A4
Your Original Correct Positioning
LTR
4. Close the ADF document cover.
5. Press the Copy button on the Control Panel of DS610CF. In a
minute, your copy is done.
A
Y
Control Panel
Copy Button
To apply copy features displayed on the Control Panel, please refer to
the previous section, Making Copies with Copy Features .
-9-8
Page 66

9.2.4 STARTING YOUR FIRST SCAN
9.2.4.1 Scanning Multi-page Document
1. Place your document with the text face up on the ADF Paper Tray.
2. Start your image editing application by clicking the Start button on
the task bar and select the name of the application.
3. Choose Acquire from the File menu and click Select TWAIN
Source, for example, please select DS610CF V.X.xx. (The
command to open the TWAIN source may vary due to different
application. Please refer to the user manual of your TWAIN
application.)
4. In a minute, the TWAIN window will be displayed.
5. Press the Source button to switch the scanning source to ADF at
the top of the TWAIN window.
6. Press the Preview button to get an initial scanned image at a low
resolution to allocate your selected scan area.
7. Open the ADF document cover to take out the document and then
position it on the first page of the document on the ADF Paper Tray.
8. Finally press the Scan button on the bottom of TWAIN window or
the Scan button on the Control Panel.
9-9
Page 67

The Preview Button
The Scan Button
-9-10
Page 68

9.2.4.2 Scanning a Single Page
To scan a single page, you can place your document either on the ADF
Paper Tray or on the document glass(recommended). To scan a single
page through flatbed, please do the following:
1. Raise the ADF document cover.
2. Place the page on the document glass. Observe that the top
edge of your original near the document alignment as marked by a
triangle.
0
A6 A5 B5 LTR A4 LGL
MAY
M
A6
A5
B5
A4
Your Original Correct Positioning
3. Close the ADF document cover.
4. Start your image editing application by clicking the Start button on
the task bar and select the name of the application.
5. Choose Acquire from the File menu and click Select TWAIN
Source, for example, please select DS610CF V.X.xx. (The
command to open the TWAIN source may vary due to different
applications. Please refer to the user manual of your TWAIN
application.)
6. In a minute, the TWAIN window will be displayed.
7. Select Flatbed source at the top of the TWAIN window.
8. Press the Preview button to get an initial scanned image at a low
resolution image to allocate your selected scan area. Finally press
the Scan button on the bottom of TWAIN window or the Scan button
on the Control Panel.
LTR
A
Y
9-11
Page 69

The Preview Button
The Scan Button
-9-12
Page 70

9.3 MAINTAINING THE ADF
9.3.1 CLEANING THE ADF
The DS610CF is designed to be maintenance free. However, it still
needs to be cleaned occasionally to ensure optimum image quality and
performance.
From time to time the pad assembly and feeding rollers may become
contaminated with ink, toner particles or paper dust. In this case the
DS610CF may not feed documents smoothly. If this occurs please
follow the cleaning procedures to return your Scanner to its original
state.
The cleaning procedures:
1. Moisten a cotton swab with isoprophyl alcohol (95%).
2. Gently open the ADF front cover. Wipe the feeding rollers by moving
the swab from side to side. Rotate the rollers forward with your finger
and repeat the above cleaning procedures until the rollers are clean.
Be careful not to snag or damage the pick springs.
3. Wipe the pad in the direction from top to bottom. Be careful not to
hook the pick springs.
4. Close the ADF unit. Your Scanner is now ready for use.
9-13
Page 71

ADF Pad
Feeding Roller
-9-14
Page 72

9.3.2 REPLACING THE ADF SNAP-IN PAD MODULE
After scanning approximately 20,000 pages through the ADF, the pad
may be worn out and you may experience problems with document
feeding. In this case, it is highly recommended to replace the pad
module with a new one. For ordering the pad module, please consult
your nearest dealer and follow the procedure below to replace it.
Disassembling Procedure
1. Gently open the ADF front cover to the left.
2. Press both arms of the ADF snap-in pad module inwardly with
your two fingers to pull out the ADF snap-in pad module.
ADF Pad
9-15
Page 73

Assembling Procedure
1. Take out the ADF pad module from the box.
2. Press both arms of the ADF snap-in pad module inwardly with
your two fingers
3. Place it into the holes until it snaps into place.
-9-16
Page 74

9.4 HOW TO CLEAR THE PAPER JAM
In the event of a paper jam, follow the procedures below to remove the
paper:
1. Turn the DS610CF off by disconnecting the power cable.
2. Gently open the ADF front cover to the left.
3. Carefully pull the paper out of the ADF unit.
4. Close the ADF front cover.
5. Turn on the DS610CF by reconnecting the power cable. Your
DS610CF is now ready to use.
9-17
 Loading...