

Page 1
CC30
User Manual
Page 2
Federal Communication Commission Interference Statement
This device complies with Part 15 of the FCC Rules. Operation is subject to the following
two conditions: (1) This device may not cause harmful interference, and (2) this device must
operation.
This equipment has been tested and found to comply with the limits for a Class B digital device,
pursuant to Part 15 of the FCC Rules. These limits are designed to provide reasonable protection
against harmful interference in a residential installation. This equipment generates uses and can
radiate radio frequency energy and, if not installed and used in accordance with the instructions, may
cause harmful interference to radio communications. However, there is no guarantee that interference
will not occur in a particular installation. If this equipment does cause harmful interference to radio or
television reception, which can be determined by turning the equipment off and on, the user is
encouraged to try to correct the interference by one of the following measures:
accept any interference received, including interference that may cause undesired
Reorient or relocate the receiving antenna.
Increase the separation between the equipment and receiver.
Connect the equipment into an outlet on a circuit different from that to which the receiver is
connected.
Consult the dealer or an experienced radio/TV technician for help.
FCC Caution: Any changes or modifications not expressly approved by the party responsible for
compliance could void the user's authority to operate this equipment.
This transmitter must not be co-located or operating in conjunction with any other antenna or
transmitter.
Radiation Exposure Statement:
This equipment complies with FCC radiation exposure limits set forth for an uncontrolled environment.
This equipment should be installed and operated with minimum distance 20cm between the radiator &
your body.
Europe – EU Declaration of Conformity
This device complies with the essential requirements of the R&TTE Directive 1999/5/EC.
The following test methods have been applied in order to prove presumption of conformity
with the essential requirements of the R&TTE Directive 1999/5/EC.
Industry Canada statement
This device complies with RSS-210 of the Industry Canada Rules. Operation is subject to the following
two conditions: (1) This device may not cause harmful interference, and (2) this device must accept any
interference received, including interference that may cause undesired operation.
Ce dispositif est conforme à la norme CNR-210 d'Industrie Canada applicable aux appareils radio
exempts de licence. Son fonctionnement est sujet aux deux conditions suivantes: (1) le dispositif ne
doit pas produire de brouillage préjudiciable, et (2) ce dispositif doit accepter tout brouillage reçu, y
compris un brouillaVge susceptible de provoquer un fonctionnement indésirable.
Radiation Exposure Statement:
This equipment complies with IC radiation exposure limits set forth for an uncontrolled environment.
This equipment should be installed and operated with minimum distance 20cm between the radiator &
your body.
Déclaration d'exposition aux radiations:Cet équipement est conforme aux limites d'exposition
aux rayonnements IC établies pour un environnement non contrôlé. Cet équipement doit être installé et
utilisé avec un minimum de 20 cm de distance entre la source de rayonnement et votre corps.
Page 3
The mark of Crossed-out wheeled bin indicates that this product must not be disposed
of with your other household waste. Instead, you need to dispose of the waste
equipment by handing it over to a designated collection point for the recycling of waste
electrical and electronic equipment. For more information about where to drop off your
waste equipment for recycling, please contact your household waste disposal service or
the shop where you purchased the product.
この装置は、クラスB情報技術装置です。この装置は、家庭環境で使用することを 目的としていますが、この装
置がラジオやテレビジョン受信機に近接して使用される と、受信障害を引き起こすことがあります。 取扱説明書
に従って正しい取り扱いをして下さい。 VCCI-B
低功率電波輻射性電機管理辦法
第十二條
經型式認証合格之低功率射頻電機,非經許可,公司、商號或使用者均不得擅自變更頻率、加大功率或變更原
設計之特性及功能。
第十四條
低功率射頻電機之使用不得影響飛航安全及干擾合法通信﹔經發現有干擾現象時,應立即停用,並改善至無干
擾時方得繼續使用。前項合法通信,指依電信法規定作業之無線電通信。
低功率射頻電機須忍受合法通信或工業、科學及醫療用電波輻射性電機設備之干擾。
DISCLAIMER
No warranty or representation, either expressed or implied, is made with respect to the contents of this
documentation, its quality, performance, merchantability, or fitness for a particular purpose. Information
presented in this documentation has been carefully checked for reliability; however, no responsibility is
assumed for inaccuracies. The information contained in this documentation is subject to change without
notice.
In no event will AVer Information Inc. be liable for direct, indirect, special, incidental, or consequential
damages arising out of the use or inability to use this product or documentation, even if advised of the
possibility of such damages.
TRADEMARKS
“AVer” is a trademark owned by AVer Information Inc. Other trademarks used herein for description
purpose only belong to each of their companies.
COPYRIGHT
© 2016 AVer Information Inc. All rights reserved.
All rights of this object belong to AVer Information Inc. Reproduced or transmitted in any form or by any
means without the prior written permission of AVer Information Inc. is prohibited. All information or
specifications are subject to change without prior notice.
Page 4

CONTENTS
INTRODUCTION .................................................................................................................. 1
Features ........................................................................................................................2
Camera ...............................................................................................................2
Wireless Microphone ..........................................................................................2
CaptureShare .....................................................................................................2
Package Contents .........................................................................................................3
INSTALLATION .................................................................................................................... 4
Getting Familiar with the CC30 HD Camera ..................................................................4
Camera ...............................................................................................................4
Rear Panel ..........................................................................................................5
Microphone .........................................................................................................6
Connections...................................................................................................................7
Basic Installation Steps .......................................................................................8
Wireless microphone ........................................................................................ 10
Connection as a Conference Camera............................................................... 10
Connect Camera to a computer or a laptop ...................................................... 10
Connect Speaker to Camera ............................................................................ 11
Connection as a Lecture Capture Camera ....................................................... 12
Use the Kensington Lock .................................................................................. 12
Connect HDMI to Lecture Recording System ................................................... 12
Use AVer CC30 CaptureShare Software ..................................................................... 12
DEPLOYMENT .................................................................................................................. 13
Using the Camera ........................................................................................................ 13
Wireless Microphone Connection ................................................................................ 14
Web Video Conferencing ............................................................................................. 16
Lecture Capture ........................................................................................................... 17
Page 5

USE AVER CC30 CAPTURESHARE SOFTWARE ........................................................... 18
Before You Begin ......................................................................................................... 18
Windows ...................................................................................................................... 18
Tool Bar ............................................................................................................ 18
Overlaytool ....................................................................................................... 23
Recording Interface .......................................................................................... 25
Basic image setting ........................................................................................... 30
Advanced image setting ................................................................................... 31
Video output mode ............................................................................................ 32
Audio setting ..................................................................................................... 33
Android ........................................................................................................................ 34
The Same Network ........................................................................................... 34
Connect to CaptureShare Software .................................................................. 34
SOFTWARE APPLICATIONS ............................................................................................ 40
Before You Begin ......................................................................................................... 40
Making a Video Call ..................................................................................................... 40
Skype .......................................................................................................................... 41
Google Hangouts ......................................................................................................... 43
Zoom ........................................................................................................................... 44
TROUBLESHOOTING ....................................................................................................... 46
SPECIFICATIONS .............................................................................................................. 49
Page 6

INTRODUCTION
Thank you for choosing CC30 HD Camera. CC30 is a HD Camera set providing real-time video
transmission with high resolution. Combined with 120-degree wide-angle lens design table to capture
wider view and wireless movable wireless microphone allowing you can expand the scene size viewed
and ensure the audio quality in a large-scale conference or classroom.
CC30 HD Camera is designed easy to mount with multiple ways for more convenient and the
build-in Kensington lock makes protects the camera from being stolen or moved, which is suitable
to crowded place like a conference room or a classroom.
Wireless Microphone is an echo canceling microphone. It provides longer distance voice-pickup
design, mobility and free cabling arrangement for a crowded environment to capture more voice
clearly.
CaptureShare is a powerful application which can be used with your computer, laptop or even an
android mobile phone to control CC30 HD Camera. CaptureShare provides various user-friendly
functions from recording, screen shot or draw and highlighter on the screen. Combine CC30 HD
Camera and CaptureShare to improve the quality of education or effectiveness of a conference.
CC30 HD Camera is compatible with multiple video applications like SkypeTM and Google
Hangouts. You can use the device to make a high-quality video call for chatting or videoconference.
1
Page 7

Features
Camera
Simply Plug and Play
Powerful 120° filed of view with 8M pixel resolution
Advanced Full HD 1080p image streaming via HDMI
USB 2.0 UVC 1.1 supported
Built-in microphone
Compatible with Video application (Skype™, Skype for Business, Google Hangouts™, Zoom™,
WebEx™, Adobe Connect™, WebRTC, YouTube™ and etc.)
Mechanical privacy shutter
AEC, AGC, Noise-Reduction
Wireless Microphone
Plug and Play wireless module
2.4GHz digital audio transmission
Pairing free
10m transceiver distance
Omnidirectional microphone
Up to 8 hours talk time (Typical Zinc-carbon battery @ 25℃
CaptureShare
Desktop screen + dual USB video PIP recording
Desktop screen annotation
Live streaming upload to YouTube/Ustream/LiveHouse.in
PC software Windows / MAC OSX supported
Mobile APPs Android / iOS supported for recording/ePTZ control
2
Page 8
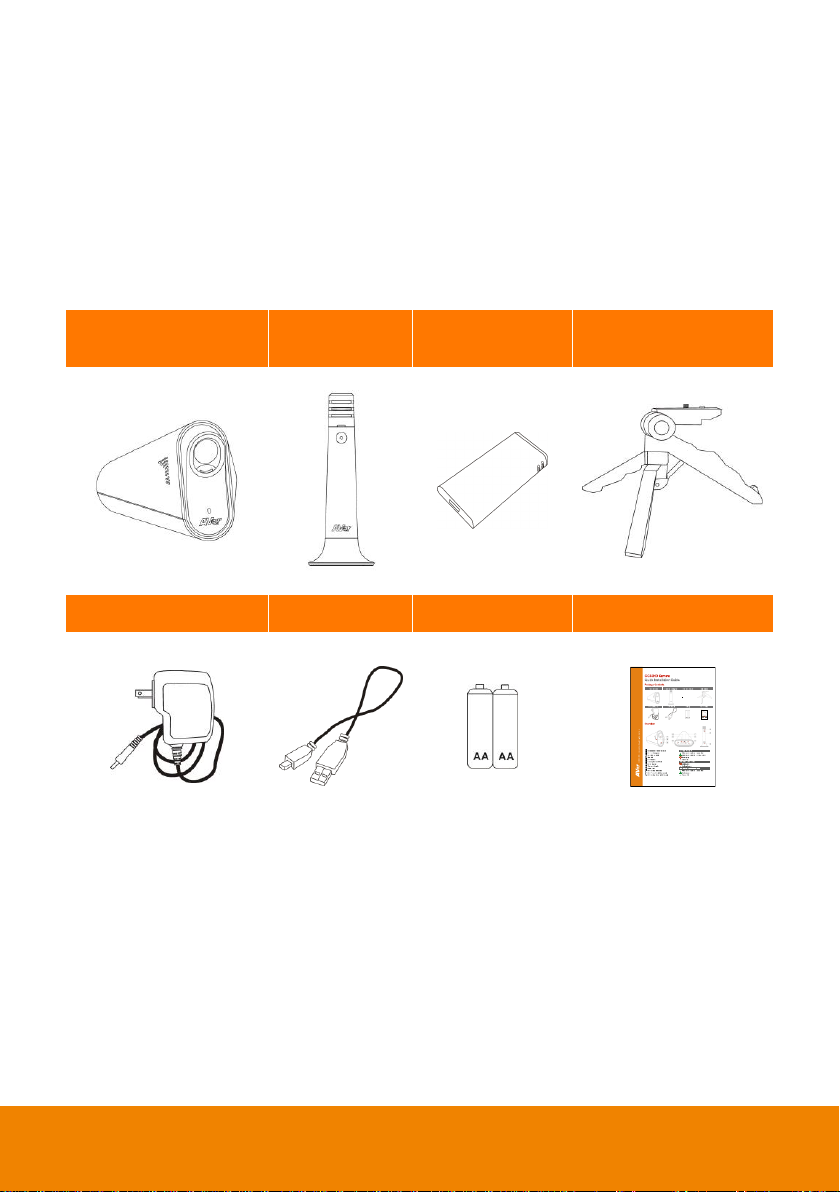
Camera Unit
Wireless
Microphone
Wireless
Dongle
Mini Tripod
Power Adaptor
USB Cable
Battery
Quick Guide
Package Contents
The following items are included in the package. Please check if each item is available and confirm if
there are damage before using.
[Note]
1. Do not disassemble or modify the items by yourself. Contact the dealer for help when the items is
failed to work.
2. Store the items in a dry place away from moisture.
[Note] The power cord will vary depending on the standard power outlet of the country where it is sold.
3
Page 9
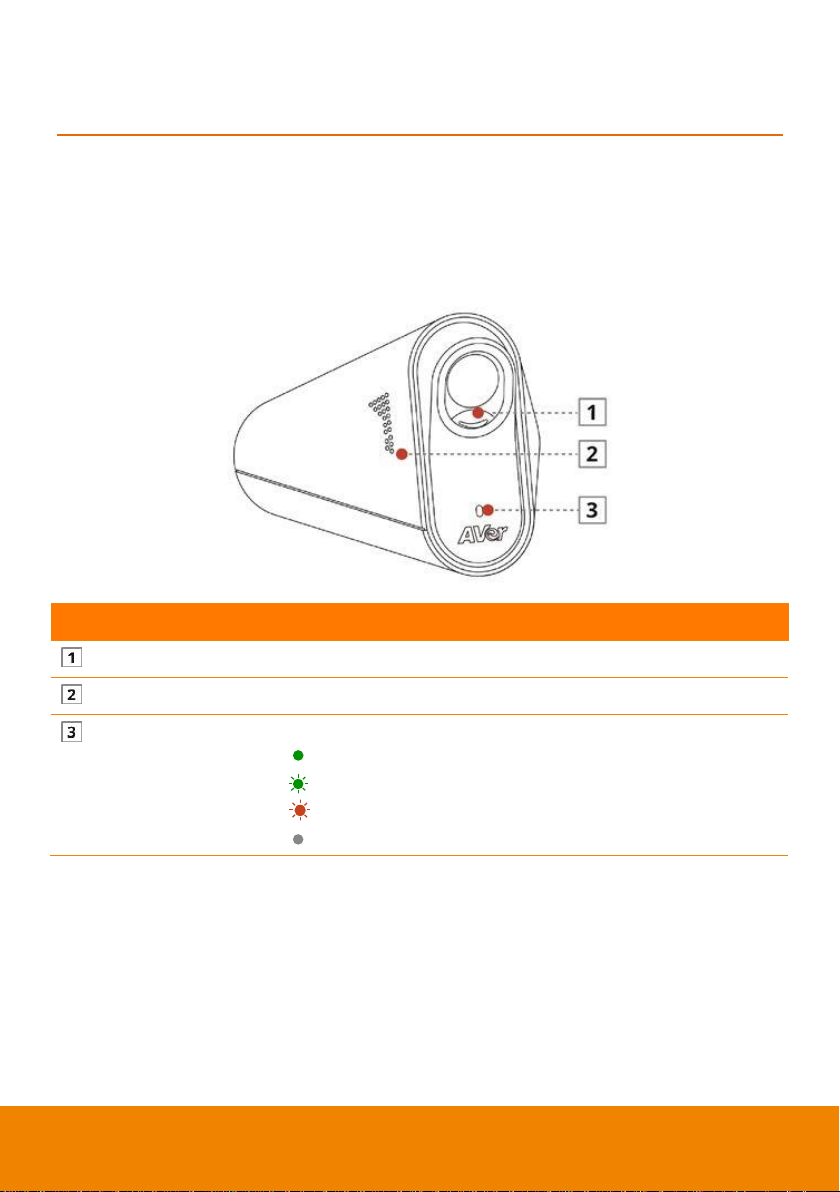
Name
Descriptions
Privacy Shutter
Protect the lens and for the privacy.
Built-in Microphone
Pick up the voice around of microphone
Camera Indicator
Show you the status of the camera.
Wireless microphone connected (Solid green)
Wireless microphone disconnected (Blinking green)
Starting up (Blinking red)
Power off
INSTALLATION
Getting Familiar with the CC30 HD Camera
The main CC30 HD Camera set is including a camera and a microphone. Following shows the
appearance of each item and how to connect the set.
Camera
4
Page 10
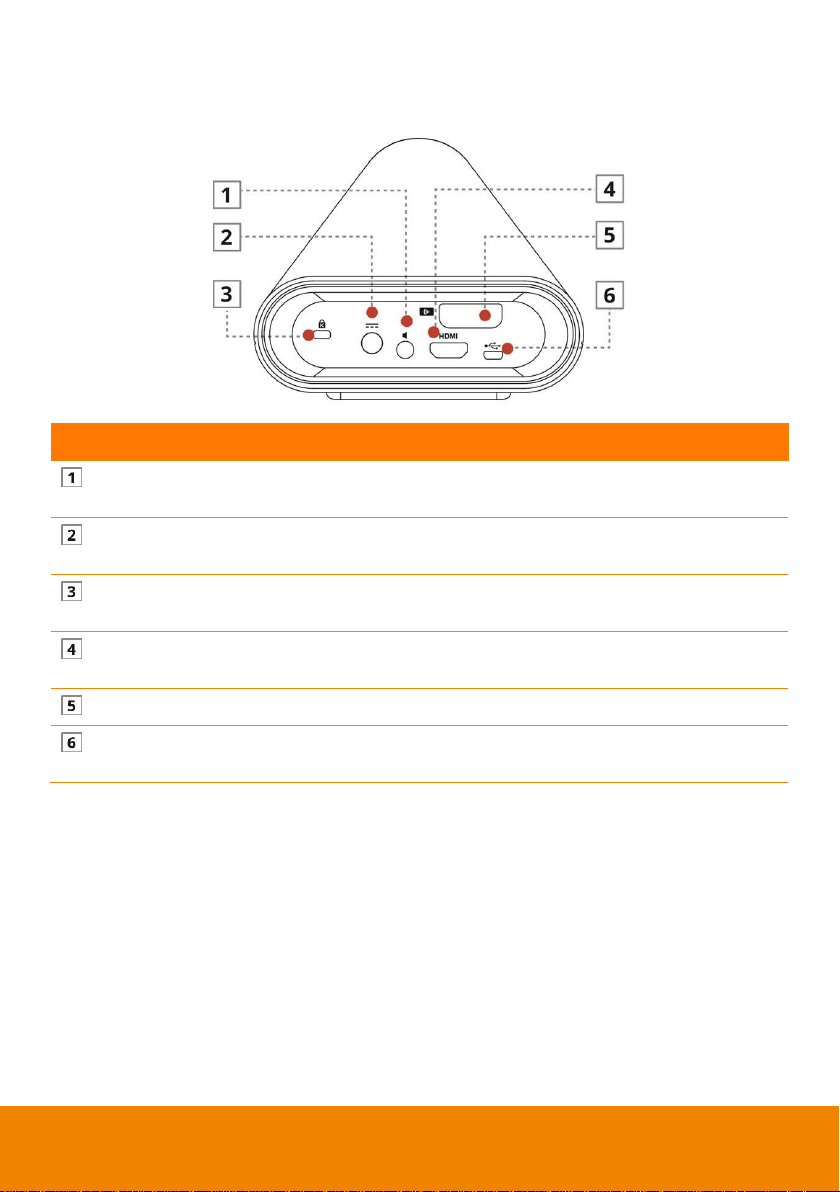
Name
Descriptions
Line Out
Connect the audio cable to a speaker. And connect the other end of
the audio cable to the line out.
Power Jack
Connect the adapter to the power jack. And connect the other end of
the power cord to a suitable power outlet.
Kensington Lock Port
Used to lock the camera to a stable object (desk or table legs) for
protecting the camera from being stolen or moved.
HDMI Output
Connect an HDMI cable to HDMI output. And connect the other end
of the HDMI cable to a lecture recording system.
Wireless Dongle
Used to connect the camera and the wireless microphone.
Micro USB
Connect the USB cable to the micro USB. And connect the other end
of the USB cable to your laptop or computer.
Rear Panel
5
Page 11
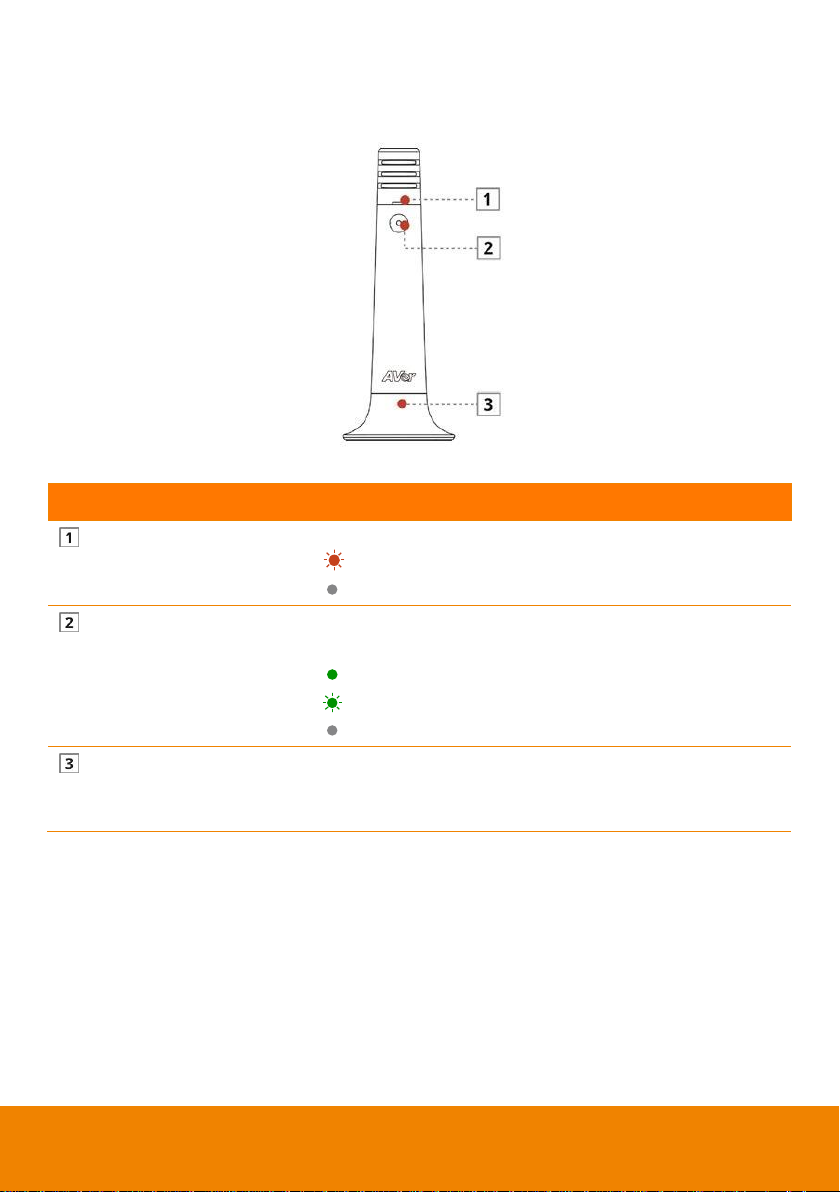
Name
Descriptions
MIC Battery Indicator
Show you the status of the MIC battery.
Battery Low (Blinking red)
Battery Normal
MIC Power Switch (Indicator)
Press this button to turn on/off the wireless microphone. The
indicator shows you the status of the MIC power.
Wireless microphone connected (Solid green)
Out of range (Blinking green)
Power Off
MIC Battery Cover (MIC
Stand)
Used as a wireless microphone stand to place the wireless
microphone on a flat firmly. Simultaneously used as a battery
cover.
Microphone
6
Page 12
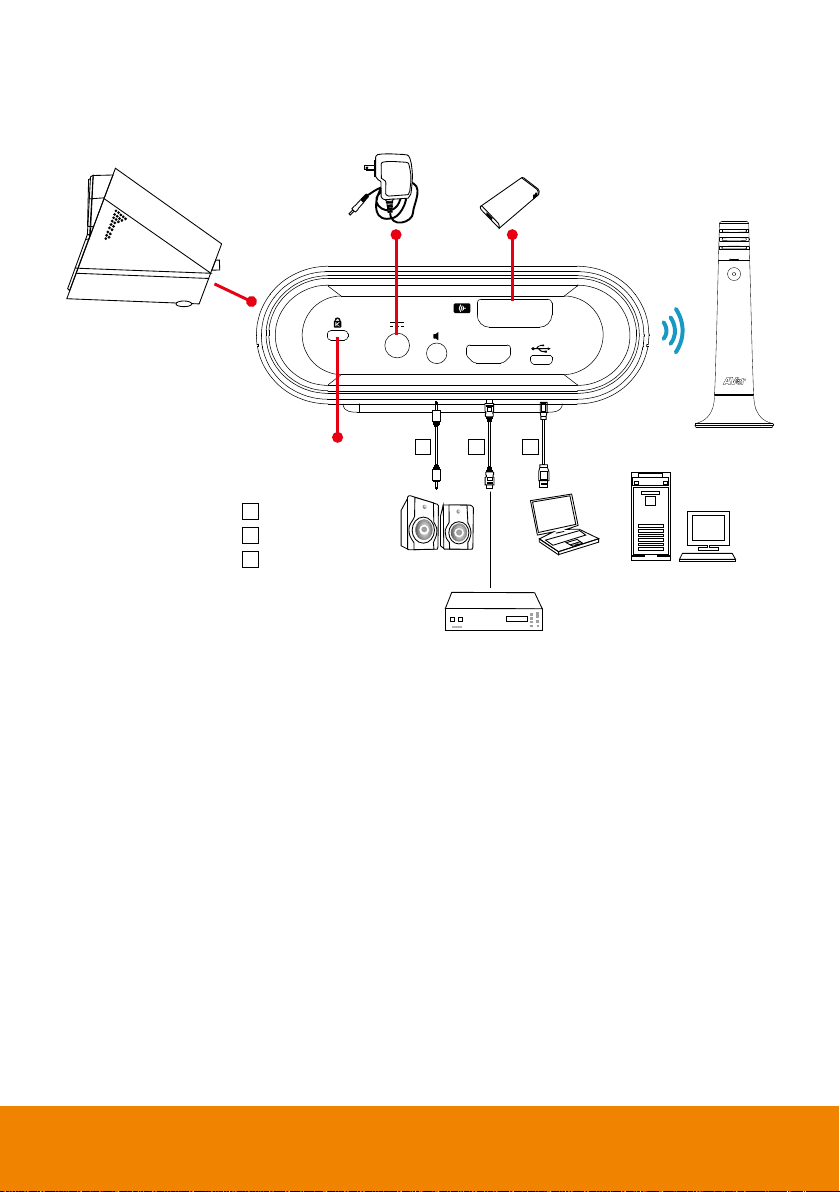
HDMI
Laptop
Desktop
OR
Speaker
Lecture Recording System
Kensington Lock
AVer CC30
1 2 3
Audio Cable
1
HDMI Cable
2
USB Cable
3
Power Adaptor
Wireless Dongle
Connections
7
Page 13
Basic Installation Steps
Following are basic installation steps of each item. Please install each item carefully for better use.
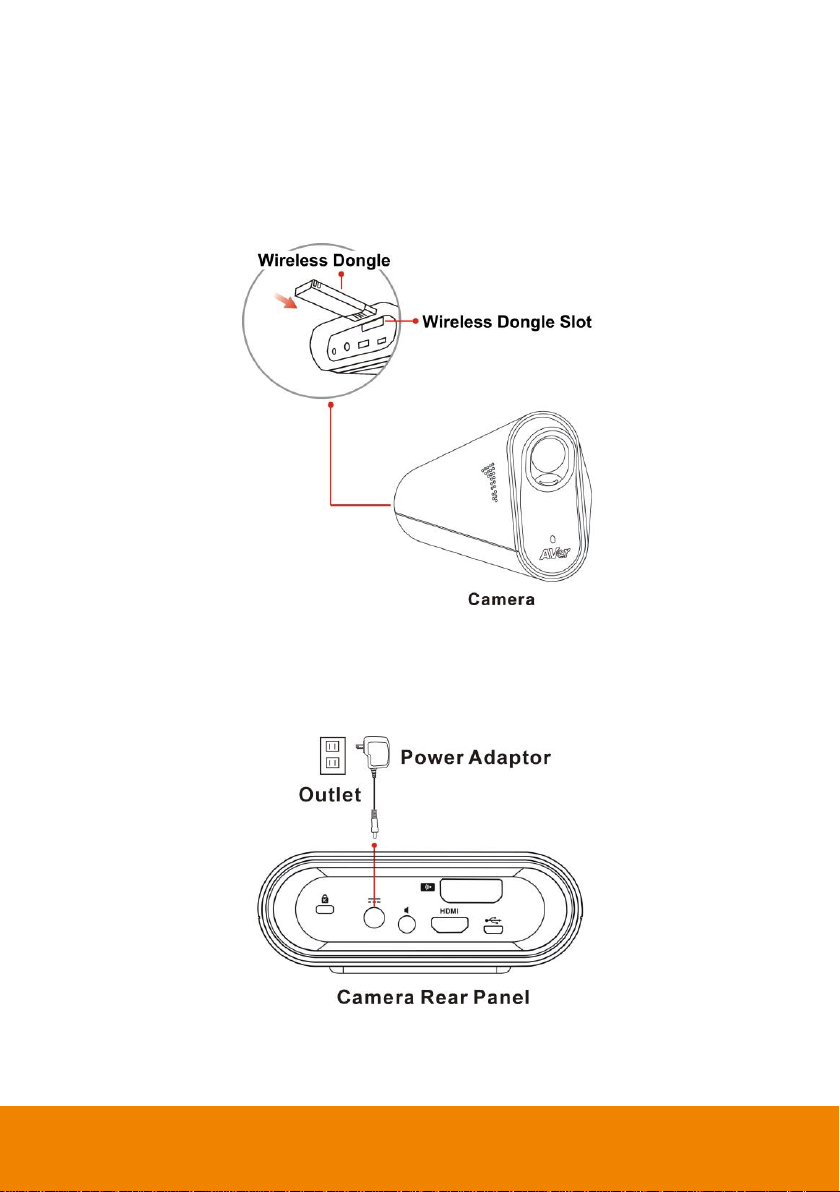
Camera
Place the wireless dongle into the wireless dongle slot on camera rear panel.
Connect the power adaptor to any power source and the power jack located on the camera rear panel.
When the camera starts up, the camera indicator flashes Red. When the camera is connected to the
wireless microphone, the camera indicator turns Solid green. When the camera is disconnected to the
wireless microphone, the camera indicator blinks green.
8
Page 14
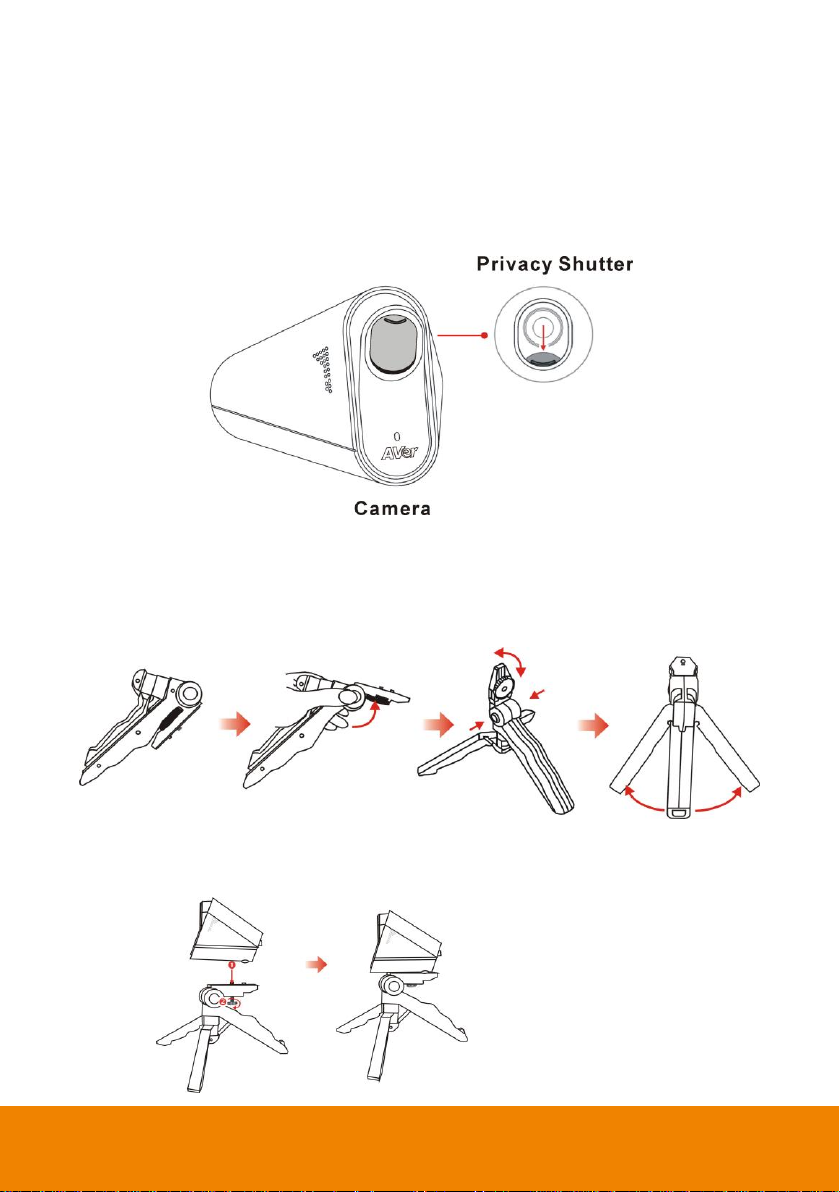
[Note] Do not rotate over close
avoiding damage.
Pull down the privacy shutter of the camera carefully. Clean thoroughly the lens with lens tissue for
better viewing effect before using.
[Note]
1. You may close the privacy shutter after using for protecting your privacy and protect the lens.
2. Do not clean the lens with cleaners containing strong acid or alkaline.
3. Do not press hard on the lens that will cause the camera malfunction.
Mini tripod
Press both sides of the circular shaft and spread the head of your mini tripod to the end. Spread the left
and right legs of the tripod away from the center support so that the three legs of tripod evenly rests on
a flat surface, such as a table.
Attach the tripod socket of camera to the head of mini tripod. Lock the screw located in the center of the
head, into the hole at the base of tripod socket.
9
Page 15
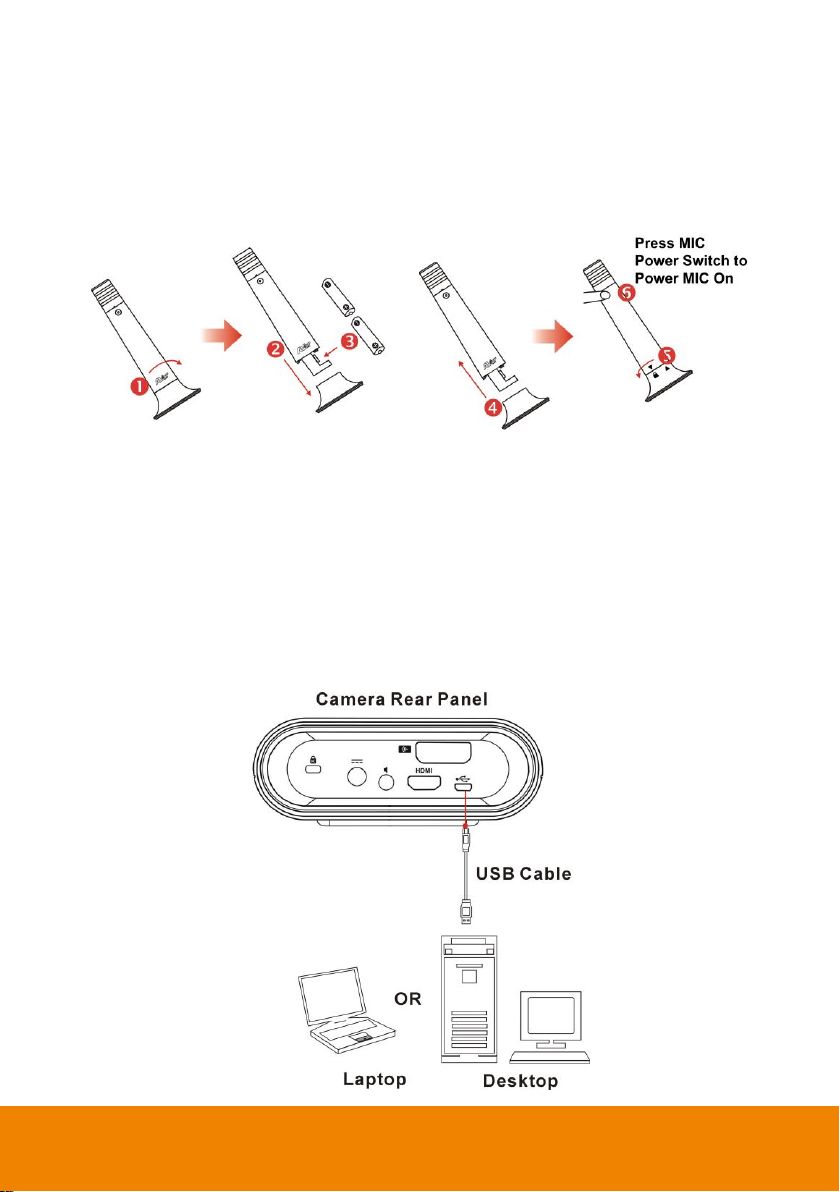
Wireless microphone
Hold the upper part of the microphone and turn counterclockwise carefully to open the microphone.
Place two AA batteries in to the battery holder. The battery cathode are toward outside.
Hold the upper part back to the base and turn clockwise carefully to close the microphone.
[Note] When you close the microphone base, be sure aligning the latch slot avoiding causing damage.
Press the microphone power switch to turn on the microphone. When the microphone connected to the
camera successfully, the indicator turns to Solid green. If out of range or disconnected from wireless
dongle, the indicator is blinking green.
Connection as a Conference Camera
Connect Camera to a computer or a laptop
Use a USB cable to connect the USB jack located on the camera rear panel and your computer or
laptop.
10
Page 16
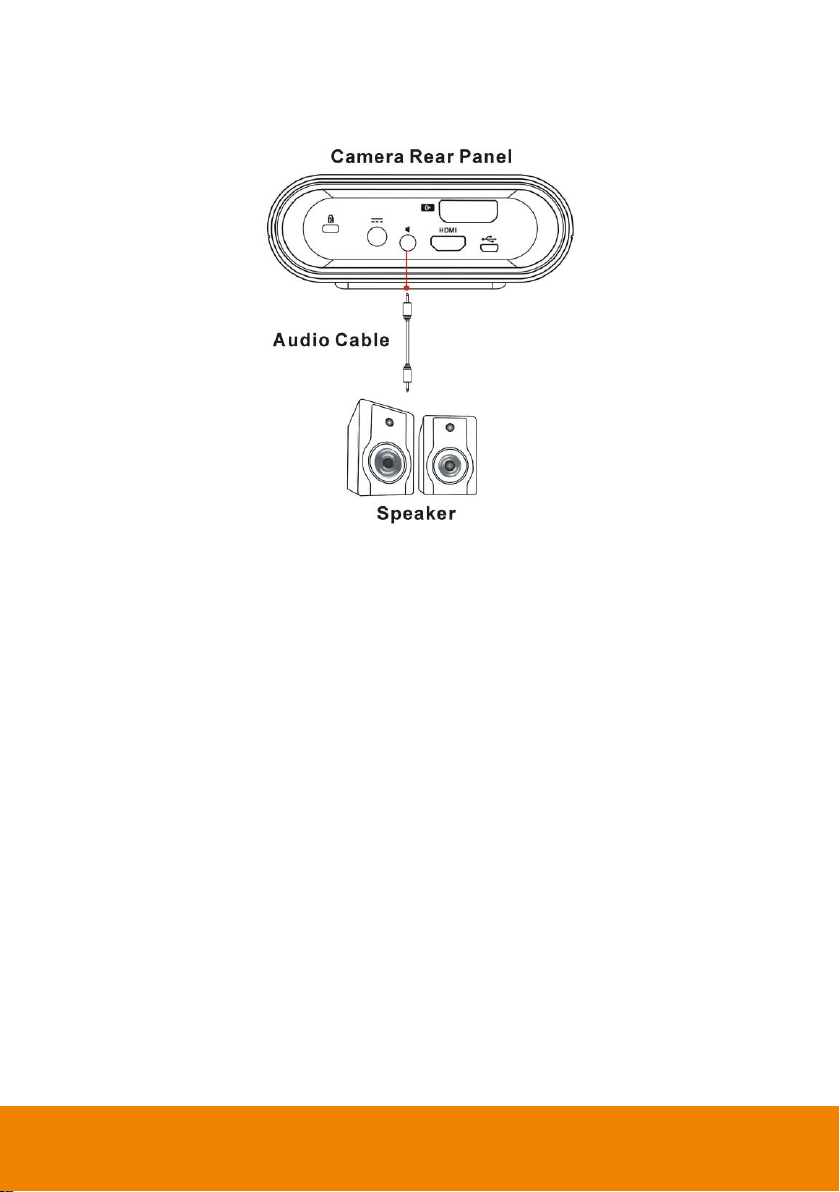
Connect Speaker to Camera
Use an audio cable to connect the line out port and a speaker.
[Note] It is highly recommended that setting low volume level before turn on the speaker for protecting
your hearing.
11
Page 17
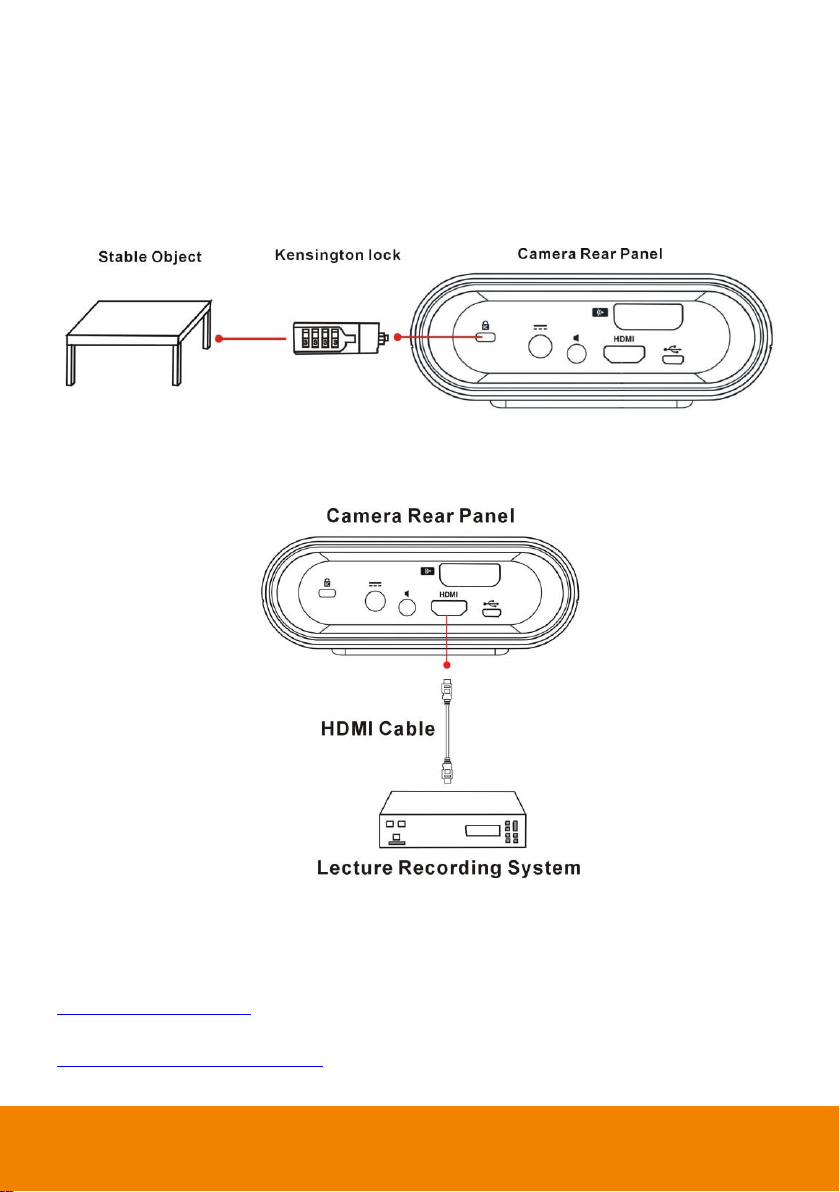
Connection as a Lecture Capture Camera
Use the Kensington Lock
Properly use the Kensington lock to connect the camera to a stable object (desk or table legs) for
protecting the camera from being stolen or moved.
Connect HDMI to Lecture Recording System
Use a HDMI cable to connect the HDMI output jack and a lecture recording system.
Use AVer CC30 CaptureShare Software
Please download the software from the following link:
USA
http://averusa.com/support/
Global
http://www.aver.com/download-center
12
Page 18

DEPLOYMENT
This chapter explains how to deploy the CC30 HD Camera in a best suitable angle and position for a
good visual and audio effect.
Using the Camera
1. The camera provides 120° wide view angle. Set the camera able to capture all view expected.
2. Do not place objects in front of the camera to avoid influencing the recording effect.
3. Clean and dry thoroughly the lens with lens tissue to avoid influencing the viewing effect.
[Note] Do not clean the lens with cleaners containing strong acid or alkaline.
4. Do not place the camera on the edge of a desk to avoid dropping and causing damage.
13
Page 19

5. Properly use the mini tripod to adjust the height of the camera for better recording effect.
Wireless Microphone Connection
1. Build-in 10 meters distance transceiver provides mobility and free cabling arrangement.
2. Do not place the wireless microphone on the edge of a desk to avoid dropping and causing
damage.
14
Page 20

3. Too many people use the wireless microphone simultaneously might cause the voice picked up
unclearly. It is recommended that use the wireless microphone in turns.
4. Please make sure that there is no too much obstacle between the camera and the wireless
microphone to avoid reducing voice pick-up and the transceiver effect.
15
Page 21

Web Video Conferencing
1. Open your Video application in your computer or laptop. (For more information, please refer to
SOFTWARE APPLICATIONS chapter.)
2. Be sure the camera and the wireless microphone are set within the effective range.
3. The camera provides 120° wide view angle. Set the camera able to capture all view expected.
4. Properly use the mini tripod to adjust the height of the camera for better recording view.
5. Turn on the wireless microphone for higher quality to make a video conference or a video call.
6. Please make sure that there is no too much obstacle between the camera and the wireless
microphone to avoid reducing voice pick-up and the transceiver effect.
16
Page 22

Lecture Capture
1. The camera provides 120° wide view angle. Set the camera able to capture all view expected.
2. Properly use the mini tripod to adjust the height of the camera for better recording view.
3. Turn on the wireless microphone for higher quality to make a video conference or a video call.
4. Be sure the camera and the wireless microphone are set with the effective range.
5. Please make sure that there is no too much obstacle between the camera and the wireless
microphone or between the wireless microphone and the voice to avoid reducing voice pick-up and
the transceiver effect.
6. You can use CC30 camera and AVer USB supported Visualizer simultaneously. Connect both
cameras to your computer or laptop with the CaptureShare software for better effect when using
lecture capture function.
7. For more information, please refer to USE AVer CC30 CaptureShare SOFTWARE chapter.
17
Page 23

USE AVer CC30 CaptureShare SOFTWARE
Please download software from the following web link:
USA
http://averusa.com/support/
Global
http://www.aver.com/download-center
[Note] The version may be different.
Before You Begin
Make sure all connections are connected successfully before you are using the CC30 CaptureShare
application. Connections error will cause no image showing, no audio or no reaction. (For more
information, please refer to INSTALLATION chapter.)
Windows
Tool Bar
When you launch CaptureShare, the tool bar is showed at the bottom of the windows.
1. Select Layout
CaptureShare can connect up to two cameras simultaneously. There are four types of layout modes to
choose.
18
Page 24

No camera: Shows no camera screen.
-
1 camera: Shows 1 camera screen.
-
2 cameras: Shows 2 camera screen.
- -
19
Page 25

PIP mode: Picture in Picture mode. One camera small screen is displayed on the other camera
-
full screen at the same time. Sound is usually from the main program only.
Select source of camera then connect the camera to the computer or laptop.
2. Capture Desktop
Click the button to capture a screen shot of the computer or laptop.
20
Page 26

3. Record Desktop
Click the button to show the Desktop Control.
Click the button to start record the movement of the screen of the computer or the
-
laptop.
Click the button to pause recording.
-
Click the button to stop recording.
-
Click the button to choose the build-in microphone of the camera or the wireless
-
microphone.
Slide the blue spot on the volume bar to control the record
-
volume.
4. Stream Setting
Streaming is a technology that the videos are broken up into several sections before sending to the
end user. The process of the transmission and playback of the video are simultaneous in order to
shorten the download times. Click the button showing the Stream Setting.
21
Page 27

There are two Select Service: YouTube and LiveHouse.in
-
There are four Resolution: 1080P, 720P, 480P, 360P
-
You can set a Stream Key.
-
After setting click the button to confirm the settings.
5. Open File
Click the button to review all the recorded videos and captured shots.
6. Other Setting
Network Information: QR code for connection of an android mobile phone and a computer or
laptop.
[Note] The computer or laptop and the mobile phone should share the same Wi-Fi network.
Language Setting: Set the language displayed on the screen.
Software Update/Firmware Update: Click the button to check if the
version of software and the firmware is the latest. It is recommended to check if the software
and firmware need to upgrade regularly for better use.
Stream Setting:
- There are two Select Service: YouTube and LiveHouse.in
- There are four Resolution: 1080P, 720P, 480P, 360P
You can set a Stream Key.
-
Click the button to confirm the setting.
7. Overlaytool
Click the button to show overlaytool bar.
22
Page 28

a. Mouse Mode
Click the button to pause the Overlaytool function.
b. Whiteboard Mode
Click the button to enter Whiteboard Mode. The full screen
transfers to a whiteboard. Click the button again to exit
Whiteboard Mode.
c. Undo
Click the button to cancel or reverse the effects of a previous
action.
d. Redo
Click the button to reconstruct.
e. Capture
Click the button to capture the screen shot. There are three
types capture mode to choose.
- Click the button to capture a full screen shot.
- Click the button to select a specific interface and capture a
shot.
- Click the button to marquee a specific area and capture a
shot.
f. Select
Click the button to select a specific object to modify or cancel.
g. Freehand
Click the button to write or draw on the screen or the whiteboard
in the Whiteboard Mode.
h. Highlighter
Click the button to use highlighter to emphasize a specific area
or object.
Overlaytool
23
Page 29

i. Line
Click the button to make a line.
j. Shape
Click the button to make six different types of shapes
- Rectangle outline
- Rectangle
- Circle outline
- Circle
- Triangle outline
- Triangle
k. Text
Click the button to enter text.
l. Erase
Click the button to erase a specific object.
m. Linestyle
When you use Freehand, Highlighter or Line function, click the
button to set the style of line.
-
Thickness: Small, Medium, Large.
-
Form: Solid, Dash, Arrow1 (Single arrow),
Arrow2 (Double-headed arrow).
n. Color
When you use Freehand, Highlighter, Line or Shape function, click
the button to set the color of line. There are six fixed colors to
choose: Red, Yellow, Green, Blue, Black, and
White. Or you can click the button to set more colors.
o. Clearall
Click the button to clear all objects.
24
Page 30

Recording Interface
You can make different setting on each recording layout screen. This menu shows when the camera is
connected to your computer and laptop successfully. You can adjust these functions before recording
or during recording.
Following are descriptions for each function:
Volume
Set the recording volume on the left of the screen. Press the blue dot and move up to increase the
volume. Conversely move down to decrease the volume.
25
Page 31

Digital zoom
Set the recording digital zoom on the right of the screen. Press the blue dot and move up to zoom in.
Conversely move down to zoom out.
Capture recording
Click the button on the bottom of the screen to take a screen shot.
You can use the Capture recording function before recording or during recording.
26
Page 32

Recording
Click the button to start recording.
-
Click the button to pause recording.
-
Click the button to stop recording.
-
Stream setting
Streaming is a technology that the videos are broken up into several sections before sending to the
end user. The process of the transmission and playback of the video are simultaneous in order to
shorten the download times. Click the button showing the Stream Setting.
27
Page 33

There are two Select Service: YouTube and LiveHouse.in
-
There are four Resolution items: 1080P, 720P, 480P, 360P
-
You can set a Stream Key.
-
After setting click the button to confirm the settings.
28
Page 34

Recording Setting
Click the button on the top of the screen to enter Recording Setting.
29
Page 35

Name
Descriptions
(1) Brightness
Adjust the screen to be brighter or darker.
Value: -5,-4,-3,-2,-1,0,1,2,3,4,5
(2) Contrast
Adjust the color and light of the picture.
Value: 0,1,2,3,4
(3) Saturation
Adjust the degree of purity of a color.
Value: 1,2,3,4,5,6,7,8,9,10.
(4) Sharpness
Higher the sharpness is, clearer the picture.
Value: 1,2,3.
(5) White Balance
The White Balance feature can boil down to the concept of color
temperature. Color temperature is a way of measuring the quality of a
light source. Adjust the white balance to get the colors in your images
as accurate as possible recorded the video. Or click the button
to enable automatic adjustment.
Value: 2800~10000
(6) Default
Click the button to reset all settings to factory default
values.
Basic image setting
30
Page 36

Name
Descriptions
(1) Backlight compensation
Backlight compensation allows the camera to adjust the exposure of
the entire image to properly expose the subject in the foreground.
Value: on/off
(2) Noise reduction
Adjust the level of reduction of noise during recording.
Value: 0,1,2,3
(3) Power frequency
It depends on what voltage the country uses. 60Hz systems usually
use 110V (120V) while 50Hz systems tend to use 220V or 230V.
Value: Auto/50Hz/60Hz
(4) Image orientation
Click the button to mirror the screen. Click the
button to put screen to the upper edge.
(5) Default
Click the button to reset all settings to factory default
values.
Advanced image setting
31
Page 37

Name
Descriptions
(1) Video output mode
Value: H264/MJPG/YUY2
(2) Sensor mode
Value: Standard/60fps/8M
(3) Frame rate
Higher the RATE is, smoother the video.
Value: 30fps/20fps/15fps/10fps/5fps
(4) Resolution
As the resolution goes up, the image becomes clearer, sharper, more
defined, and more detailed as well.
(5) Default
Click the button to reset all settings to factory default
values.
(6) Apply
After setting click the button to confirm the setting.
Video output mode
32
Page 38

Name
Descriptions
(1) Microphone setting
Enable both the CC30 built in microphone and CC30 wireless
microphone together.
Value: Enable/Disable
(2) HDMI output setting
Enable CC30 HDMI audio output
Value: Enable/Disable.
(3) More information
Click this link to learn more about CC30 audio setting.
Audio setting
[Note] Video output mode setting can’t adjust during recording. Make sure that this setting is correct
before recording.
33
Page 39

Android
Use your android mobile phone as remote controller to control the camera properly. Improve the
mobility of a conference or a course.
The Same Network
The computer or laptop and the mobile phone should share the same Wi-Fi network.
Connect to CaptureShare Software
1. Enable the CaptureShare APP in your android mobile phone and CaptureShare software in your
computer or laptop simultaneously.
[Note]
It is recommended that the version of the CaptureShare APP and CaptureShare software are the
same for better using.
You can check if the CaptureShare software is the latest in the Software Update/Firmware
Update of Other Setting.
34
Page 40

2. Find connection information through the
CaptureShare software on your computer or
laptop. In the Network Information of the
Other Setting shows IP address or QR code.
3. Enter the IP address or scan the QR code to
the CaptureShare APP in your android mobile
phone.
35
Page 41

4. Select the source as CC30.
[Note] The camera is required to connect to
your computer or laptop.
5. Press the button firstly and press the
button to start recording.
36
Page 42

6. After starting recording, your computer or
laptop will shows Desktop Control.
7. Press the button to pause recording.
Press the button to stop recording.
[Note] You can pause or stop recording on
your computer or laptop.
37
Page 43

8. When the recording is complete, the recording
file is saved on your computer or laptop.
[Note] Click the button in the
CaptureShare software in your computer or
laptop to review the recorded videos.
9. Press the button to start stream. This
function should set through the CaptureShare
software in your computer or laptop.
38
Page 44

10. Press the button to capture the screen
shot.
[Note] Click the button in the
CaptureShare software in your computer or
laptop to review the captured shots.
11. If you choose the source as Desktop, the
recording video and the captured shots will be
the screen of your computer or laptop.
39
Page 45

SOFTWARE APPLICATIONS
Before You Begin
Make sure all connections are connected successfully before you are using Video applications.
Connections error will cause no image showing, no audio or no reaction. (For more information, please
refer to chapter INSTALLATION.)
Making a Video Call
1. Open your Video application (Skype™, Skype for Business, Google Hangouts™, Zoom™,
WebEx™, Adobe Connect™, WebRTC and etc.)
2. Some Video application needs specific account before using.
3. Set the CC30 as your primary camera, microphone and speaker devices in your application. (For
more information, please refer to chapter INSTALLATION.)
4. Ready to make a video call.
5. It is highly recommended that setting low volume level before turn on the speaker for protecting
your hearing when you start the video call.
6. For a good visual and audio effect, please refer to chapter DEPLOYMENT.
[Note] A computer or a laptop is required to use this device.
40
Page 46

Skype
1. Download SkypeTM from the official website.
(Reference: http://skype.pchome.com.tw/download.html)
[Note] A SkypeTM account is required.
2. Install SkypeTM.
3. Open SkypeTM
4. Choose CC30 as video camera.
41
Page 47

5. Choose CC30 Wireless Microphone (Echo canceling microphone) as video microphone.
6. Start to make a video call.
42
Page 48

Google Hangouts
1. Open your Google Hangouts.
(Reference: https://hangouts.google.com/)
[Note] A Google account is required.
2. Choose CC30 as video camera.
3. Choose CC30 Wireless Microphone (Echo canceling microphone) as video microphone.
4. Start to make a video call.
43
Page 49

Zoom
1. Download Zoom from the official website.
(Reference: https://zoom.us/support/download)
[Note] A Zoom account is required. Or you can use Google or Facebook account to register.
2. Install Zoom.
3. Open Zoom.
4. Choose CC30 as video camera.
44
Page 50

5. Choose CC30 Wireless Microphone (Echo canceling microphone) as video microphone.
6. Start to make a video call.
45
Page 51

TROUBLESHOOTING
Q: There are items in package are damaged.
A: Do not disassemble or modify the items by yourself. Contact the dealer for help when the items is
failed to work.
Q: No audio.
A:
1. Please make sure the wireless microphone is not muted.
2. Please make sure the wireless microphone connections are properly connected as illustrated in
the manual. (For more information, please refer to chapter DEPLOYMENT.)
3. Ensure proper volume level on the system.
4. Please make sure the microphone receiver placed into the receiver slot on camera rear panel.
5. Please make sure if the wireless microphone is with charged battery.
6. Please make sure that there is no too much obstacle between the camera and the wireless
microphone to avoid reducing voice pick-up and the transceiver effect.
Q: The audio quality is poor
A:
1. Please make sure the wireless microphone is not damaged.
2. Please make sure if the battery of the wireless microphone is full.
3. Please make sure if the wireless microphone is not facing the output speakers to prevent echo.
4. Please make sure the distance between the camera and the wireless microphone is within 10
meters.
5. Please make sure the distance between the voice and the wireless microphone is within 2 meters.
6. Please make sure that there is no too much obstacle between the camera and the wireless
microphone to avoid reducing voice pick-up and the transceiver effect.
Q: Unable to install the CaptureShare software
A:
1. Please make sure if your computer or laptop memory capacity is enough.
2. Verify if the firewall blocks the CaptureShare software.
3. Please try to restart your computer or laptop again.
46
Page 52

Q: Unable to booting the CaptureShare application
A:
1. Please make sure if the installation is successful.
2. Restart your computer or laptop before use the CaptureShare firstly.
3. Try to reinstall the CaptureShare.
Q: Unable to connect the computer or laptop to the mobile phone when use the CaptureShare.
A:
1. Please make sure if the CaptureShare software on your computer or laptop and the
CaptureShare APP on your mobile phone installed successful.
2. Please make sure if the CaptureShare software on your computer or laptop and the
CaptureShare APP on your mobile phone enabled simultaneously.
3. Please make sure your computer or laptop and mobile phone are on the same Wi-Fi network.
4. Please make sure if the entered IP address in your mobile phone is correct.
5. Please make sure that your computer or laptop and mobile phone is not too far away from each
other.
6. Please try to restart your computer or laptop again.
Q: Unable to connect to other lecture capture systems.
A:
1. Ensure the power status of the device from the other sited is on.
2. Verify if the firewall blocks the inbound traffics from the other site.
3. Verify if the other site rejected your lecture capture systems.
Q: No image or poor image on the screen.
A:
1. Please make sure if pull down and open the privacy shutter of the camera.
2. Please make sure if the power adaptor connected to any power source and the power jack is on
the camera rear panel.
3. Please make sure if the camera connected to your computer or laptop with USB cable
successfully.
4. Please do not place objects before the camera to avoid influencing the recording effect. It is
recommended the use properly the mini tripod to adjust the height of the camera for better
recording effect.
5. Clean and dry thoroughly the lens to avoid influencing the recording effect.
[Note] Do not clean the lens with cleaners containing strong acid or alkaline.
47
Page 53

Q: No image or poor image when use Video applications.
A:
1. Please make sure if pull down and open the privacy shutter of the camera.
2. Please make sure if the power adaptor connected to any power source and the power jack is on
the camera rear panel.
3. Please make sure if the camera connected to your computer or laptop with USB cable
successfully.
4. Please make sure if the CC30 is chosen as video camera.
5. Please do not place objects before the camera to avoid influencing the recording effect. It is
recommended the use properly the mini tripod to adjust the height of the camera for better
recording effect.
6. Clean and dry thoroughly the lens to avoid influencing the recording effect.
[Note] Do not clean the lens with cleaners containing strong acid or alkaline.
48
Page 54

SPECIFICATIONS
Camera
Image Sensor
High resolution 8MP 1/3.2” CMOS
Zoom ratio
8X digital
Field of view
120° (Diagonal), 100° (Horizontal) @ 8MP full resolution
Lens f-number
F2.0
Built-in Microphone
Integrated dual full duplex omni-directional microphone with AEC
and NR
Video encoder
MJPEG, H.264 AVC high profile/baseline profile, H.264 SVC
Resolution
MJPEG
3264x2448@5fps, 1080p@30fps, 480p@60fps,
download to 320x180@60fps
H.264
3264x2448@5fps, 1080p@30fps, 720p@60fps,
download to 320x180@60fps
Output interface
HDMI
HDMI connector *HDCP is not supported.
Audio
Stereo mini-jack Line-Output Φ1/8 inch (3.5 mm)
USB
USB 2.0 micro-B connector
LED indicator
Power and Wireless microphone connection status LED x 1
Privacy
Mechanical privacy shutter
Security
Kensington lock port
49
Page 55

Wireless Microphone
Polar pattern
Omnidirectional
RF carrier frequency range
2.404 to 2.476 GHz
Working range
32.8 ft (10 m)1
Microphone sensitivity
-36 dB +/- 3 dB
Microphone SNR
58 dBA @ 1K Hz, 1 Pa A weighted
LED indicator
Power and wireless microphone connection status LED x 1
Battery status LED x 1
Battery type
AA x 2
Battery life
Typical up to 8 hours (Zinc-carbon)2
Compatibility and Compliance
USB
USB 1.1 UVC video and audio for broad application compatibility
Driver
No driver needed for Windows 7, 8, 8.1, 10; Mac OS X, Chrome
OS 29 above
Application Compatibility
Skype™, Skype for Business, Google Hangouts™, Zoom™,
WebEx™, Adobe Connect™, WebRTC, YouTube™
1
Actual range depends on signal absorption, reflection and interference.
2
Calculated with a new battery at 77℉ (25℃), runtimes vary depending on battery.
50
 Loading...