

Deploying Harmony Workforce Optimization on Unified Contact Center Enterprise
Table of contents
 Loading...
Avaya Deploying Harmony Workforce Optimization on Unified Contact Center Enterprise User Manual

Deploying Harmony Workforce
Optimization on Unified Contact Center
Enterprise
Release 5.3
Issue 2
May 2020

Contents
Chapter 1: Introduction............................................................................................................ 8
Purpose.................................................................................................................................. 8
New in this release.................................................................................................................. 8
Change history........................................................................................................................ 9
Prerequisites........................................................................................................................... 9
Chapter 2: Harmony Workforce Optimization overview...................................................... 10
Components......................................................................................................................... 10
Adapters............................................................................................................................... 13
Topology............................................................................................................................... 13
Deployment configurations..................................................................................................... 14
Signaling events.................................................................................................................... 15
Recording tone...................................................................................................................... 16
Agent profiles........................................................................................................................ 16
Secure Real-time Transport Protocol support........................................................................... 17
Chapter 3: Cisco Unified Contact Center Enterprise UCCE and Harmony Workforce
Optimization integration......................................................................................................... 18
Integration overview.............................................................................................................. 18
Integration scenarios............................................................................................................. 20
Redundancy and load balancing between UCM SIP trunks....................................................... 20
Chapter 4: Unified Communication Manager configuration............................................... 21
Configuration checklist........................................................................................................... 21
Configuring SIP UCM Recorder.............................................................................................. 22
Logging into Unified Cisco Communication Manager.......................................................... 22
Creating recording profile................................................................................................. 22
Creating trunk................................................................................................................. 23
Creating route group........................................................................................................ 23
Creating route list............................................................................................................ 24
Creating route pattern...................................................................................................... 24
Enabling BIB on selected phones..................................................................................... 25
Enabling ACR on selected phones.................................................................................... 25
Enabling BIB on a single phone........................................................................................ 26
Enabling ACR on a single phone...................................................................................... 26
Enable Redundancy or Load Balancing between UCM SIP Trunks...................................... 26
Enabling SIP options ping feature........................................................................................... 27
SIP Options Ping feature in Unified Communication Manager............................................. 27
Creating SIP profile with OPTIONS Ping enabled............................................................... 28
Applying SIP profile and SIP trunk security profile to the SIP trunk...................................... 29
Chapter 5: Deployment process............................................................................................ 30
Chapter 6: Planning and preconfiguration........................................................................... 31
May 2020 Deploying Harmony Workforce Optimization on Unified Contact Center Enterprise 2
Comments on this document? infodev@avaya.com

Contents
Planning checklist.................................................................................................................. 31
Configuration information....................................................................................................... 31
Signaling and Automatic Call Distribution information......................................................... 31
Harmony Workforce Optimization installation information.................................................... 32
Configuration tools and utilities............................................................................................... 35
Hardware requirements......................................................................................................... 36
Software requirements........................................................................................................... 42
Network requirements............................................................................................................ 45
Preinstallation checklist.......................................................................................................... 46
Assigning metrics to the Network Interface Cards.............................................................. 47
Registering for PLDS....................................................................................................... 48
Downloading software from PLDS.................................................................................... 48
Installing JTAPI client....................................................................................................... 49
Chapter 7: Deployment........................................................................................................... 51
Single box installation............................................................................................................ 51
Installing Harmony Workforce Optimization ....................................................................... 51
Harmony Workforce Optimization multibox installation.............................................................. 57
Installing Harmony Workforce Optimization ....................................................................... 58
Chapter 8: Configuration........................................................................................................ 65
Configure browser settings for SSL......................................................................................... 65
Configuring settings for Internet Explorer........................................................................... 65
Configuring settings for Google Chrome............................................................................ 66
Configuring settings for Mozilla Firefox.............................................................................. 67
Configure log values.............................................................................................................. 68
Modifying default values for logs....................................................................................... 68
Configure SysAdmin.............................................................................................................. 68
Logging on to SysAdmin.................................................................................................. 68
Importing the license file.................................................................................................. 69
Configuring Harmony for hosted or premise deployments .................................................. 69
Adding tenants................................................................................................................ 70
Adding tenant details....................................................................................................... 71
Adding contact details...................................................................................................... 72
Adding users................................................................................................................... 72
Configuring license details............................................................................................... 73
Mapping assets............................................................................................................... 74
Adding storage drive for Windows..................................................................................... 75
Adding storage drive for Amazon S3................................................................................. 77
Mapping storage drives.................................................................................................... 80
Viewing tenant summary.................................................................................................. 81
Modifying tenant status.................................................................................................... 81
Configure parameters for Unified Contact Center Enterprise UCCE on United Communication
Manager............................................................................................................................... 82
Configuring component parameters.................................................................................. 83
May 2020 Deploying Harmony Workforce Optimization on Unified Contact Center Enterprise 3
Comments on this document? infodev@avaya.com

Contents
Performing bulk actions................................................................................................... 84
Configure dynamic parameter for Unified Contact Center Enterprise UCCE on Unified
Communication Manager....................................................................................................... 91
Configuring dynamic parameters for the recorder............................................................... 93
Configuring cluster for SIP adapter................................................................................... 95
Configuring tenant for SIP adapter.................................................................................... 96
Configuring dynamic parameters for adapter..................................................................... 97
Restarting the components............................................................................................... 99
Configure the node name for DNS deployments.................................................................... 100
Node name configuration checklist ................................................................................. 100
Stopping the Harmony Workforce Optimization components............................................. 100
Changing the node name............................................................................................... 100
Starting the Harmony Workforce Optimization components............................................... 101
Configuring component parameters................................................................................ 102
Restarting the Harmony Workforce Optimization components........................................... 102
Configure Secure Real-time Transport Protocol..................................................................... 103
Configuring Recorder parameters for SRTP..................................................................... 103
Configuring Media Manager parameters for SRTP........................................................... 103
Configuring SIP adapter parameters for SRTP................................................................. 104
Configure concurrent call recording....................................................................................... 104
Configuring parameters for concurrent call recording........................................................ 104
Install and configure the Screen Capture and Desktop Monitor applications............................. 105
Overview...................................................................................................................... 105
Screen update overview................................................................................................. 106
Installing the Screen Capture application......................................................................... 109
Installing Screen Capture and Desktop Monitor applications............................................. 110
Screen Capture and Desktop Monitor field descriptions..................................................... 111
Installing and configuring the Screen Capture application using MSI packager................... 112
Verifying the Screen Capture application logs.................................................................. 113
Uploading the Screen Capture application logs................................................................ 113
Verifying the agent login................................................................................................. 114
Uninstalling the Screen Capture and Desktop Monitor applications.................................... 115
Configuring Screen Capture parameters ......................................................................... 115
Configure the Desktop Monitor application....................................................................... 119
Install the Screen Capture application on a terminal service server.......................................... 122
Enabling Windows RDS compatibility.............................................................................. 122
Installing the Screen Capture application through command line....................................... 122
Uninstalling the Screen Capture application through command line method....................... 123
Installing the Screen Capture application through GUI ..................................................... 124
Uninstalling the Screen Capture application using the GUI method.................................... 124
Configure speech................................................................................................................ 125
Speech overview........................................................................................................... 125
Configuring Speech parameters..................................................................................... 125
May 2020 Deploying Harmony Workforce Optimization on Unified Contact Center Enterprise 4
Comments on this document? infodev@avaya.com

Contents
Speech parameters....................................................................................................... 126
Configuring Speech Media Manager drive....................................................................... 127
Limitations.......................................................................................................................... 128
Chapter 9: Administration.................................................................................................... 129
Administration checklist....................................................................................................... 129
Setting passwords for services.msc components................................................................... 130
Starting the Harmony Workforce Optimization web application ............................................... 130
Maintenance....................................................................................................................... 131
Backup and restore....................................................................................................... 131
Taking a backup of the server data.................................................................................. 131
Restoring the data......................................................................................................... 132
Taking a backup of the database files.............................................................................. 133
Restoring the database files........................................................................................... 134
Running the installer in maintenance mode..................................................................... 134
Server maintenance activities......................................................................................... 135
Database maintenance activities.................................................................................... 136
Component maintenance activities.................................................................................. 137
Infrastructure maintenance activities............................................................................... 137
Server restart maintenance activities............................................................................... 139
Certificate management....................................................................................................... 140
Replacing self-signed certificates with CA-signed SSL certificates..................................... 140
Chapter 10: Postinstallation verification............................................................................ 142
System verification checklist................................................................................................. 142
Starting the SysAdmin service.............................................................................................. 142
Logging on to SysAdmin...................................................................................................... 143
Starting the web application service...................................................................................... 143
Logging on to Harmony Workforce Optimization .................................................................... 143
Verifying Harmony Workforce Optimization service logs.......................................................... 144
Component log verification................................................................................................... 145
Log Manager log messages........................................................................................... 145
Media Manager log messages........................................................................................ 145
Messaging log messages............................................................................................... 145
Process Checklist log messages.................................................................................... 146
Packet Sniffer log messages.......................................................................................... 146
Recorder log messages................................................................................................. 147
Chapter 11: Post configuration verification....................................................................... 149
Checklist............................................................................................................................. 149
SIP adapter log verification................................................................................................... 149
Cisco adapter log verification................................................................................................ 150
Recorder log verification...................................................................................................... 150
Chapter 12: High Availability and Redundancy implementation...................................... 152
High availability and redundancy.......................................................................................... 152
Configuring database redundancy........................................................................................ 154
May 2020 Deploying Harmony Workforce Optimization on Unified Contact Center Enterprise 5
Comments on this document? infodev@avaya.com

Contents
Creating the Windows 2012 cluster................................................................................. 154
Installing and configuring SQL Server 2016 basic availability group................................... 158
Configuring web application server redundancy..................................................................... 161
Configure the first instance of the web application on a server.......................................... 161
Configure the second instance of the web application on the same server......................... 163
Configuring the Apache load balancer............................................................................. 166
Starting the Harmony Workforce Optimization components............................................... 168
Configuring High Availability........................................................................................... 168
Configuring recorder redundancy.......................................................................................... 170
Overview...................................................................................................................... 170
Configuring Recorder parameters for high availability....................................................... 171
Configuring Messaging parameters for high availability..................................................... 171
Configuring dynamic parameters for the recorder............................................................. 172
Dynamic recorder parameter configuration values for high availability................................ 173
Configuring screen capture redundancy................................................................................ 174
High Availability support for the Screen Capture application.............................................. 174
Configuring high availability for Screen Capture............................................................... 175
Starting the Screen Capture service................................................................................ 176
Chapter 13: Load balancing implementation..................................................................... 177
Overview............................................................................................................................ 177
Configuring load balancing parameters for Recorder.............................................................. 178
Configuring dynamic parameters for the recorder................................................................... 179
Dynamic recorder parameter configuration values for load balancing....................................... 179
Configuring load balancing parameters for SIP adapter.......................................................... 182
Configuring load balancing parameters for Cisco adapter....................................................... 183
Chapter 14: Troubleshooting............................................................................................... 185
Emails are not delivered to recipients.................................................................................... 185
Interaction playback fails...................................................................................................... 186
Failed to join the instance NODE2 to the availability group AG1.............................................. 187
Interaction playback issues.................................................................................................. 188
Unable to view components in SysAdmin when installing through maintenance mode............... 188
Services disappear from Windows console when Harmony Workforce Optimization installer is
run and closed in maintenance mode.................................................................................... 189
Install or upgrade program fails............................................................................................ 190
Chapter 15: Resources......................................................................................................... 191
Documentation.................................................................................................................... 191
Support.............................................................................................................................. 193
Appendix A: Parameter descriptions.................................................................................. 194
Component parameter descriptions...................................................................................... 194
Log Manager parameters............................................................................................... 194
Process checklist parameters......................................................................................... 195
Packet Sniffer parameters.............................................................................................. 196
System Administration parameters.................................................................................. 198
May 2020 Deploying Harmony Workforce Optimization on Unified Contact Center Enterprise 6
Comments on this document? infodev@avaya.com

Contents
Analytics parameters..................................................................................................... 201
Webapp parameters...................................................................................................... 202
Adapter parameter descriptions............................................................................................ 203
SIP adapter parameters................................................................................................. 203
Cisco adapter parameters.............................................................................................. 204
Recorder parameters..................................................................................................... 207
Messaging parameters.................................................................................................. 212
Media manager parameters........................................................................................... 214
Appendix B: IP address update process............................................................................ 218
Overview............................................................................................................................ 218
Updating database server IP address................................................................................... 218
Running scripts on the hosted database................................................................................ 219
Running scripts on the tenant database................................................................................. 220
Updating web server IP address........................................................................................... 221
Updating Apache server IP address...................................................................................... 221
Updating IP address for components.................................................................................... 225
Parameter configuration for IP address update................................................................ 225
Updating dynamic parameters for components...................................................................... 227
Dynamic parameter configuration for IP address update................................................... 227
Updating IP address of the Screen Capture application.......................................................... 228
Changing the host data IP address....................................................................................... 228
Updating IP address for Harmony Workforce Optimization ..................................................... 229
May 2020 Deploying Harmony Workforce Optimization on Unified Contact Center Enterprise 7
Comments on this document? infodev@avaya.com

Chapter 1: Introduction
Purpose
This document contains the checklist and procedures for the installation, configuration, initial
administration, and basic maintenance of Harmony Workforce Optimization on Unified Contact
Center Enterprise UCCE and Unified Communications Manager (UCM) .
New in this release
Avaya IX™ Workforce Engagement SelectHarmony Workforce Optimization release 5.3 supports
the following new features and enhancements:
• New Reports:
- Calibration Details report: Provides information on how each reviewer evaluated the
interaction and by how much did the criterion score differ from the moderator's evaluation.
- Appeals Summary report: Provides details on the appeal that was raised, the specific
criteria against which the employee raised the appeal, and the recommendation and
comments of the parties involved in the appeal workflow.
- Speech Transcription report: Displays the list of transcribed interactions based on the
filters you choose while generating the report.
• Inactive Account Lockout: Administrators can configure user accounts to be locked
automatically once the configured days of inactivity are reached.
• System Notifications: Users can unsubscribe from all system notifications.
• SNMP Version 3 is supported.
• DMCC split recordings with Multiple Registrations method is supported.
• Record call on hold: Administrator can enable this parameter to allow record calls on hold.
• Enable channel based licensing: Administrator can enable this parameter to count licenses
based on active calls.
• Windows Server 2019 is supported.
May 2020 Deploying Harmony Workforce Optimization on Unified Contact Center Enterprise 8
Comments on this document? infodev@avaya.com

Change history
The following changes are part of this issue:
Issue Date Summary of changes
1.1 August 2020 In Software requirements table:
• Windows Server 2019 is added
• Windows 7 and Windows 8 are removed
• Citrix 2019 is added
Prerequisites
Before deploying Harmony Workforce Optimization, ensure that you have the following
knowledge, skills, and tools:
Knowledge
Change history
• Spanning or Port Mirroring
• Telephony Platforms such as Unified Communication Manager
• Automatic Call Distribution such as Unified Contact Center Enterprise UCCE.
Skills
• How to execute SQL scripts and queries.
• How to validate logs.
• How to run switch commands for spanning or port mirroring.
Tools
• Wireshark
• Notepad ++
• MIB Browser
May 2020 Deploying Harmony Workforce Optimization on Unified Contact Center Enterprise 9
Comments on this document? infodev@avaya.com

Chapter 2: Harmony Workforce
Optimization overview
Harmony Workforce Optimization is a web-based suite of tightly integrated tools designed to
enhance and improve all aspects of your contact center operations and performance. This solution
is easy to implement, maintain, and manage in a variety of contact center deployment models such
as centralized contact centers, distributed branches, and work-at-home agents.
Harmony Workforce Optimization provides the following functionality:
• Offers the ultimate workforce optimization functionality and flexibility to contact centers.
Harmony Workforce Optimization provides contact center staff and businesses with scalable
applications that synchronize and unify the entire workforce, regardless of the VoIP
architecture.
• Has sophisticated yet easy-to-use monitoring, recording, quality assurance, reporting, and
analytic features. Harmony Workforce Optimization provides the contact center management
and agents alike with all the tools necessary to effectively manage the entire agent life cycle
process.
Components
Name
Log Manager Collects and zips log data into a single zip file to debug issues and
May 2020 Deploying Harmony Workforce Optimization on Unified Contact Center Enterprise 10
Description
fetches packet dumps from the Packet Sniffer component. You can
configure the period for which you want to maintain the zipped files.
Table continues…
Comments on this document? infodev@avaya.com

Components
Name Description
Media Manager Manages media files for conversion, encryption, storage, video
generation, download, and compression. Media manager comprises
of the following components:
• Converter: Retrieves audio recordings that are in G.711, G722,
and G.729 codec from storage and converts them to browser
media player-friendly formats such as WAV/MP4/M4a. The
conversion is done based on the call codec or mixed codec call
recorded.
• Encryption Decryption (ED) Service: Encrypts and decrypts
recorded calls. Recorder sends a message to ED Service to
encrypt and move the call to local storage. From the 256–bit keys,
ED Service randomly selects one key and encrypts the call. The
pass phrases used for generating the keys are stored in an
encrypted format in the database. ED Service zips the fwd, bwd,
and inf files into one compressed file and screens into another
compressed file. Then ED Service encrypts these compressed
files.
• Storage Manager: Archives, copies, moves, compress, and
deletes calls and screens across physical locations. You can
define storage rules as per your requirements. For example, you
can specify retention periods, storage locations, clients, sites,
groups, employees, ANI number, DNIS number, call duration, and
call hold duration.
• Video Generator: Processes requests to download calls with
screens in MP4 and M4a (only audio without screens) format. The
component checks for requests in the database, processes the
same by mixing both audio and video files, and then saves them
for download in MP4 format.
• G729 Compressor: Retrieves G.711 and G.722 calls from storage
and compresses them to G.729 format to reduce storage size.
• External Call Playback: Converts the external calls in the following
formats to PCM Wav file for call playback in Harmony Workforce
Optimization
- Wav-G711 u law stereo and mono
- Wav-G711 a law stereo and mono
- Wav-G726 mono and stereo
- Wav-G729 mono and stereo
- Mp4 h264 mono and stereo
- M4a AAC mono and stereo
Table continues…
May 2020 Deploying Harmony Workforce Optimization on Unified Contact Center Enterprise 11
Comments on this document? infodev@avaya.com

Harmony Workforce Optimization overview
Name Description
Messaging Acts like a proxy between the Recorder and Screen component.
The Recorder directly interacts with the Messaging component
which in turn checks for bandwidth availability and accordingly
processes screen requests.
Integrates with Customer Relationship Management (CRM)
applications to receive different types of HTTP events. The
component captures additional customer information such as Credit
Card details and passes the information to the Recorder for
processing.
Enables provisioning synchronization of agents and supervisors in
Harmony Workforce Optimization.
Process Checklist Monitors all components and checks if the processes are running.
Process Checklist sends appropriate alerts and restarts the services
that are not running.
Packet Sniffer Sniffs Network Interface Card (NIC) data and saves them as files for
debugging. Packet sniffer writes all the received packets into local
files along with a timestamp. You can limit the storage consumed by
specifying the file size and the number of files before wrapping. You
can also upload the sniffed packets to a central location.
Recorder Records interactions based on events received from RTP and CTI
information and chat, email, and SMS based on events received
from CTI information. The recorder uses adapters to receive
signaling and media from phones. The recorder receives Automatic
Call Distribution (ACD) information from other Harmony Workforce
Optimization components.
Web Application Provides an interface that allows users to monitor live interactions,
playback recorded interactions, perform quality evaluations on agent
interactions, and supports quiz, coaching, and report functionalities.
SysAdmin Provides an interface to manage tenants, configure parameter
values for components and adapters, and monitor alerts.
Screen Capture Runs on Agent desktop and captures screens during an interaction.
Screens are uploaded to the server and tagged to an interaction.
Adapters Connects to Automatic Call Distributors and PBXs to provide voice
streams, call signaling, dialer, agent information, chat, email, and
SMS. Different adapters are used in the respective Harmony
Workforce Optimization deployment configurations.
The Harmony Workforce Optimization Recorder receives data from
the adapters and annotates the interaction entries in the database
along with the metadata.
May 2020 Deploying Harmony Workforce Optimization on Unified Contact Center Enterprise 12
Comments on this document? infodev@avaya.com
Adapters
Adapters connect to Automatic Call Distributors and PBXs to provide voice streams, call signaling,
dialer, and agent information.
Description
Cisco adapter Used to connect to Unified Contact Center Enterprise server to receive
voice streams and send voice streams to the Recorder.
SIP adapter Used to connect to Unified Contact Center Enterprise server to send
call signalling and agent information to the Recorder.
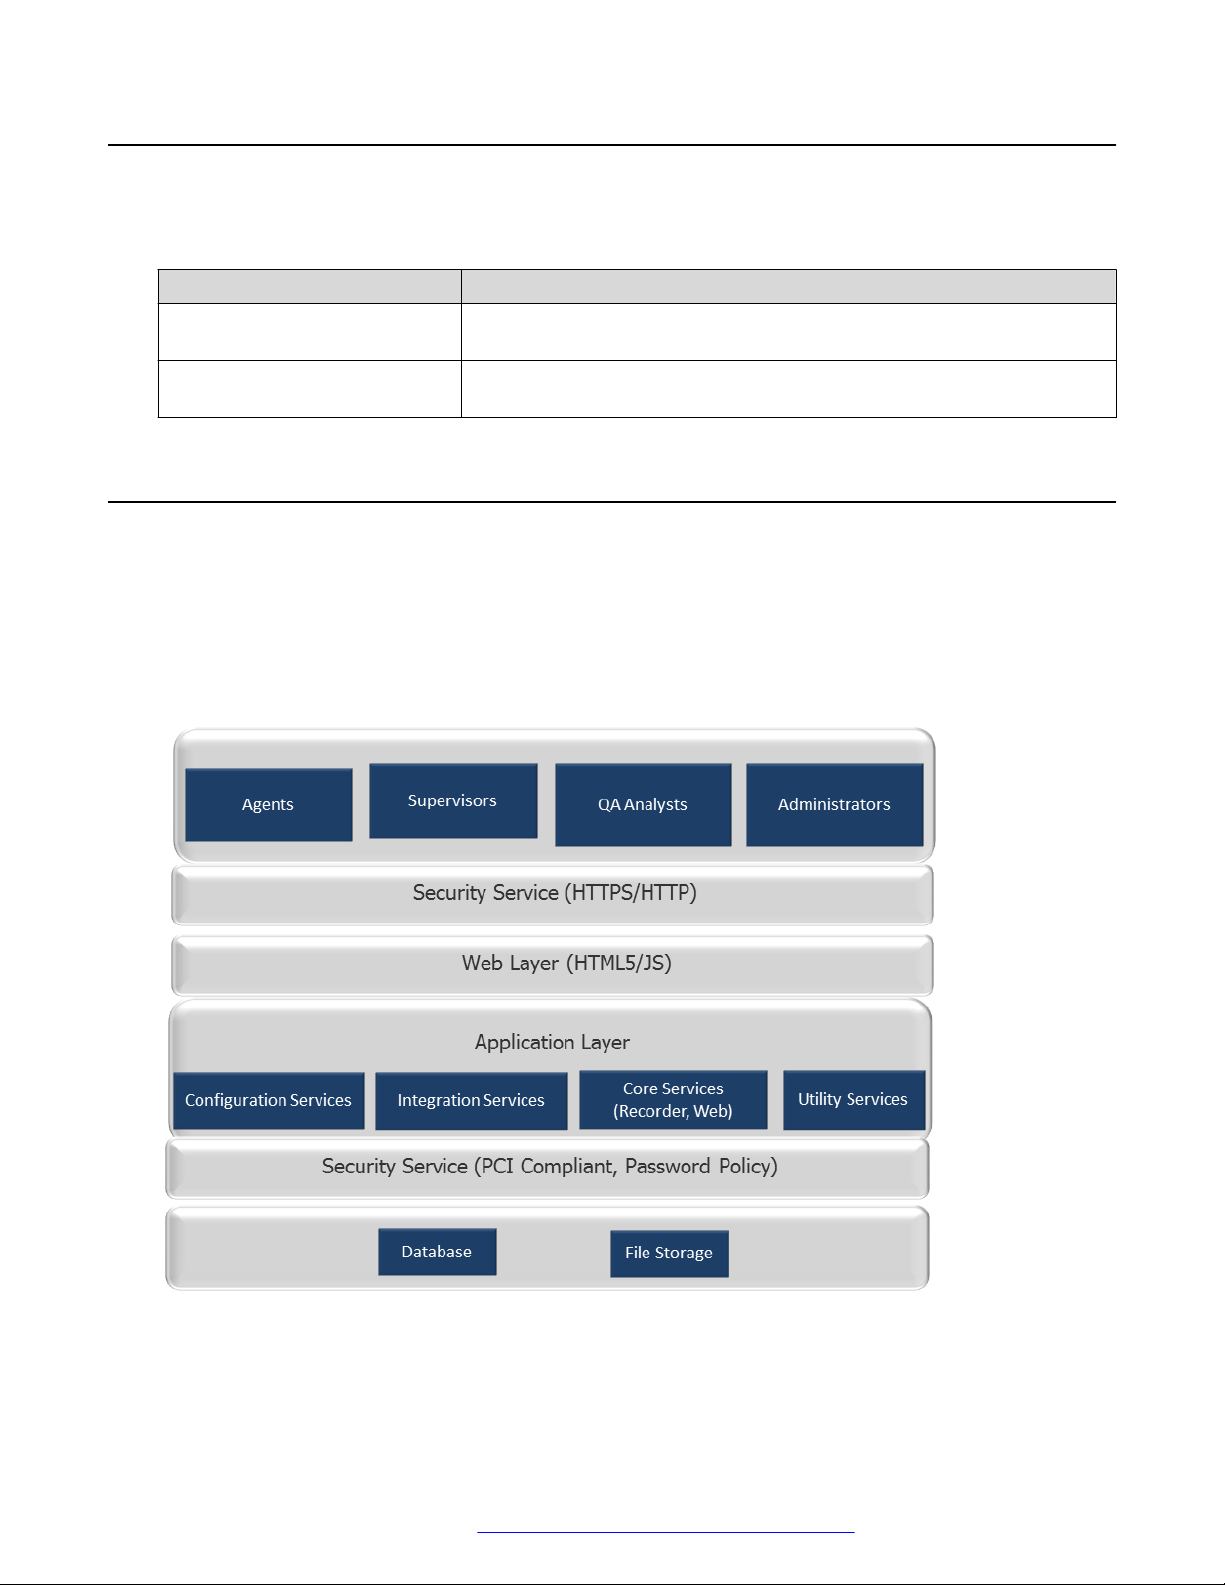
Topology
The following diagram shows the high-level topology for deploying Harmony Workforce
Optimization:
Adapters
May 2020 Deploying Harmony Workforce Optimization on Unified Contact Center Enterprise 13
Comments on this document? infodev@avaya.com

Harmony Workforce Optimization overview
Deployment configurations
Harmony Workforce Optimization supports the following deployment models:
• Single site, single server
• Single site, multiple servers
• Multiple sites, multiple servers
Harmony Workforce Optimization scales from single site environments to distributed multisite
enterprises. Harmony Workforce Optimization also supports multiple accounts across multiple site
configuration models where recorded interactions are stored at individual sites or a central
repository.
Single Site, Single Server
In a single site deployment model, all users are located within the same physical location. A typical
single site, single server deployment implements all the necessary components such as storage,
database, application, and recording servers using one server. This deployment is cost-effective
for organizations with limited hardware budgets.
The single site, single server deployment contains a single server where all necessary
components are installed. Components for recording, monitoring, web application, database,
storage, and reporting are all plugged into the network’s data switch. Voice traffic is captured in the
server through port spanning and switch configuration. You can capture interactions between
agents and customers. If needed, you can also monitor agent-to-agent conversations by spanning
each individual agent phone to Harmony Workforce Optimization.
Single Site, Multiple Servers
A single site, multiserver deployment can accommodate as many users as required by distributing
the server components across multiple physical servers. Typically, separate physical servers exist
for the application, database, and recording components.
In a single site, multiple servers deployment model, the Harmony Workforce Optimization server is
linked to the data switch of the network through the Voice NIC configured on the server. The
switch is configured to copy all voice traffic to the Harmony Workforce Optimization server through
the use of port spanning.
Multiple Sites, Multiple Servers
In a multiple sites, multiple servers deployment model:
• Agents are spread across multiple geographical locations.
• Multiple instances of recording, monitoring, and storage services are installed to scale to
handle larger number of agents.
• Only one instance of the web application and database is installed.
• All the services are split and deployed across multiple physical server spread across multiple
geographical locations.
The number of agents that a multisite environment can handle depends on the underlying network
infrastructure such as routers used and available bandwidth.
May 2020 Deploying Harmony Workforce Optimization on Unified Contact Center Enterprise 14
Comments on this document? infodev@avaya.com

Signaling events
Harmony Workforce Optimization supports different environments for recording interactions.
However, the primary requirement for any environment is to capture signaling events. You can
successfully trace every interaction if you capture the following signaling events:
• Call signaling events for voice transactions
• Media stream events
• Automatic Call Distribution (ACD) signaling and external call variables to tag interaction to
agents as per business rules
Call signaling for voice
Call signaling triggers the following events:
• Offhook event gets triggered when the phone goes off hook and a dial tone is heard.
• Connected event gets triggered when the call is answered.
• Hold event gets triggered when the agent puts the call on hold.
• Resume event gets triggered when the agent resumes the on-hold call.
Signaling events
• Onhook event gets triggered when the receiver is put down or when the call ends.
• Transfer Info event gets triggered when the agent does a blind or consultation transfer to a
supervisor or another agent. The recorder receives the event from the adapter.
• Conference Info event gets triggered when the agent starts a conference between a
customer and a supervisor or another agent. The recorder receives the event from the
adapter.
• RTP Started Info event provides information about the IP address and ports of the local and
remote phones to the recorder.
• Phone extension information is sent to the recorder by adapter to provide IP phone extension
mapping.
• Call information is sent to the recorder by adapter to provide called party, calling party, and
call direction.
• Voice stream information is sent to the recorder by adapter to provide media end point
information.
• SNMP events for getting IP address in SPAN based recording.
ACD signaling and external call variables
The Harmony Workforce Optimization recorder needs the agent information and external call
variables to tag an interaction with the agent who is handling the interaction. The recorder tags
each interaction with the business data that the agent enters in the desktop tools for each
interaction. Agent login, agent logout, ACD information or extended call info, and wrapup data are
the events that the recorder tags.
Passive recording
Passive recording is a recording method used for IP recording deployments to capture voice
transmission or RTP through a network spanning configuration also known as port mirroring. The
call events and RTP stream are mirrored directly to the recording server. However, the network
May 2020 Deploying Harmony Workforce Optimization on Unified Contact Center Enterprise 15
Comments on this document? infodev@avaya.com

Harmony Workforce Optimization overview
switch must support port mirroring capabilities. There are no additional PBX licenses required. IP
recording or passive recording cannot be used for analog or digital extension.
Harmony Workforce Optimization recorder uses SPAN to get voice and adapter to get call
signaling and agent information.
Active recording
Active recording, also known as Conference Mode Recording, conferences the agent call to the
recording server. The recording system captures voice transmission by integrating with specific
PBX models. You might need to get additional PBX licenses. Active recording does not require
port mirroring and supports end points such as analog or digital.
Harmony Workforce Optimization uses PBX to get voice streams and passes the voice streams to
the recorder for recording an interaction. Harmony Workforce Optimization uses adapter to get
agent information and call signaling.
Harmony Workforce Optimization allows call recording for Digital or Analog stations.
Recording tone
Recording tone is a feature that inserts a tone in the audio stream to indicate that a call is being
recorded. Harmony Workforce Optimization supports the recording tone feature for Unified
Contact Center Enterprise on Unified Communications Manager active recording deployments.
Agent profiles
Based on the signaling event, the recorder tags an interaction with the agent ID or extension. Skill
calls are assigned to an agent ID, whereas extension or directory number (DN) calls are assigned
to an extension. When an agent takes a call by logging into the phone, the call gets assigned to
the agent ID. If an agent takes calls on an extension or DN without logging into the phone, the call
gets assigned to the extension.
If an agent profile is configured for 100% recording and if the extension or DN is configured for on
demand segment recording, then the agent profile takes priority. However, if the agent has not
logged in to the phone or if the agent profile is configured for fixed seating, then the extension or
DN takes priority.
You can configure agent profiles for fixed seating and free seating in Harmony Workforce
Optimization.
Fixed Seating
In a fixed seating environment, an agent is allocated an extension. The agent can log in to only
that extension with the individual agent ID. To implement fixed seating in Harmony Workforce
Optimization, the Recording Settings for an employee profile must have the extension or DN.
May 2020 Deploying Harmony Workforce Optimization on Unified Contact Center Enterprise 16
Comments on this document? infodev@avaya.com

Secure Real-time Transport Protocol support
Free Seating
In a free seating environment, an agent can log in to any extension using the individual agent ID.
To implement free seating in Harmony Workforce Optimization, you must configure two employee
profiles and the Recording Settings must specify the following:
• The agent ID in one of the employee profiles
• The extension or DN in the other employee profile
Secure Real-time Transport Protocol support
The Secure Real-time Transport Protocol (SRTP) is a Real-time Transport Protocol (RTP) profile,
intended to provide encryption, message authentication and integrity, and replay attack protection
to RTP data in both unicast and multicast applications.
Harmony Workforce Optimization integration with Unified Contact Center Enterprise UCCE on
Unified Communications Manager supports SRTP. The table below lists the value you must
configure for parameters in the Recorder, Media Manager, and SIP adapter to enable SRTP.
Componen
ts or
Adapters
Recorder SecureSIPTrunkEnab
Media
Manager
SIP
adapter
Parameters Value Description
led
SecureSIPTrunkEnab
led
SIPListenPort
SIPMessageHeaderT
racing
SecureSIPTrunkEnab
led
SSLCertFileName
SSLPrivateKeyFileNa
me
True
True
5061
True
True
Harmony_ce
rt.pem
Harmony_pr
ivatekey.p
em
To enable SRTP recording. The default value is
False.
To enable SRTP recording. The default value is
False.
To configure the secure SIP listen port. The default
value is 5060.
To enable log tracing. The default value is False.
To enable secure SIP trunk for SRTP recording. The
default value is False.
To configure the SSL certificate file name. The
default value is Harmony_cert.pem.
Ensure that you place the same file in the SIP
adapter working directory.
To configure the SSL private key file name. The
default value is Harmony_privatekey.pem.
Ensure that you place the same file in the SIP
adapter working directory.
May 2020 Deploying Harmony Workforce Optimization on Unified Contact Center Enterprise 17
Comments on this document? infodev@avaya.com

Chapter 3: Cisco Unified Contact Center
Enterprise UCCE and Harmony
Workforce Optimization
integration
Cisco Unified Contact Center Enterprise UCCE delivers intelligent contact routing, call treatment,
network-to-desktop computer telephony integration (CTI), and multichannel contact management
over an IP infrastructure. It combines multichannel automatic call distributor (ACD) functionality with
IP telephony in a unified solution, enabling your company to rapidly deploy a distributed contact
center infrastructure.
Harmony Workforce Optimization integration with Cisco is full featured and supports Cisco UCCE.
The recording architecture can support up to 750 (G729) and 450 (G711/G722) concurrent calls on
a standalone recording server and thousands of users in multi-server environments. Organizations
can also set up custom recording rules to accommodate shift-based, ANI-based, call type-based, or
agent-based.
Cisco Unified Communications Manager (UCM) is an IP-based communications system integrating
voice, video, data, and mobility products and applications. It enables more effective, secure
communications and can transform the way in which we communicate.
Note:
Unified Contact Center Enterprise UCCE on UCM deployments do not support SRTP.
Integration overview
Harmony Workforce Optimization 5.2.3 supports integration with Unified Contact Center
Enterprise UCCE on Unified Communications Manager UCM for the following deployments:
• UCCE on UCM active recording
• UCCE on UCM passive recording
Agent and extension based active recording
The Harmony Workforce Optimization Recorder uses SIP adapter to get voice and Cisco adapter
to get call signaling information, agent information and business data. The Cisco adapter filters the
May 2020 Deploying Harmony Workforce Optimization on Unified Contact Center Enterprise 18
Comments on this document? infodev@avaya.com

Integration overview
events received from the UCCE server and sends the required set of events to the Recorder in a
format that the Recorder understands. SIP adapter sends requests to UCM for RTP information.
The Cisco UCM uses Java Telephony Application Interface (JTAPI) to receive telephony device
state events from Cisco TAPI TSP. The audio is then redirected from the device’s Built-in-Bridge or
Cisco Unified Border Element to the Harmony Workforce Optimization call recording application
via a SIP trunk.
The call comes from the PSTN to Cisco UCM. The CiscoUCM routes the call to Cisco UCCE. The
Cisco UCCE queues the call to the respective skill. After an agent is available for that skill, the call
is routed to the agent. The agent receives a call on the UCCE agent UI and on its corresponding
deskphone registered with UCM. The call traverses through a layer 2 switch to the IP phones. The
Cisco UCCE sends the Automatic Call Distribution (ACD) related information and agent login and
logout information to the Harmony Workforce Optimization Recorder through Cisco adapter. Call
signaling-related information is sent by UCM to Harmony Workforce Optimization Recorder using
the Cisco adapter.
For active recording, you must:
• Connect the recorder to a Cisco adapter and SIP adapter.
• Configure parameters for call signalling, agent information, and business variables in Cisco
adapter.
• Configure parameters for voice stream in SIP adapter.
Agent and extension based passive recording
The Harmony Workforce Optimization Recorder uses SPAN to get voice and Cisco adapter to get
call signaling information, agent information and business data. The Cisco adapter filters the
events received from the UCCE server and sends the required set of events to the Recorder in a
format that the Recorder understands. One or more CTI clients exchange information with a
UCCE system.
The call comes from the PSTN to Cisco UCM. The Cisco UCM routes the call to Cisco UCCE. The
Cisco UCCE queues the call to the respective skill. After an agent is available for that skill, the call
is routed to the agent. The agent receives a call on the UCCE agent UI and on its corresponding
deskphone registered with UCM. The call traverses through a layer 2 switch to the IP phones. The
Cisco UCCE sends the Automatic Call Distribution (ACD) related information and agent login and
logout information to the Harmony Workforce Optimization Recorder through Cisco adapter. Call
signaling-related information is sent by UCM to Harmony Workforce Optimization Recorder using
the Cisco adapter.
For passive recording, you must:
• Connect the recorder to a Cisco adapter.
• Configure parameters for call signalling, agent information, and business data in Cisco
adapter.
May 2020 Deploying Harmony Workforce Optimization on Unified Contact Center Enterprise 19
Comments on this document? infodev@avaya.com

Cisco Unified Contact Center Enterprise UCCE and Harmony Workforce Optimization integration
Integration scenarios
Deployments Automatic
Call
Distributor
UCCE on UCM UCM Active SIP adapter Cisco
Recording
type
Passive SPAN Cisco
Voice
stream
events
Call
signaling
adapter
adapter
Agent login
information
Cisco
adapter
Cisco
adapter
Business
call
variables
Cisco
adapter
Cisco
adapter
Redundancy and load balancing between UCM SIP trunks
The primary advantage of distributed trunking is inherent redundancy and load distribution. To
achieve redundancy and load balancing between UCM SIP trunks, ensure you perform the
following tasks:
• Create two recording profiles, primary and secondary, with different destination addresses.
• Create two SIP trunks, route groups, route lists; one as primary and the other as secondary.
• Add the SIP trunks to the route groups. Add the primary SIP trunk to the primary route group
and the secondary SIP trunk to the secondary route group. Ensure each route group has only
one SIP trunk.
• Assign each SIP trunk with the SIP adapter application machine IP address.
• Add both the (primary and secondary) route groups to both the route lists. When you add the
primary and secondary route groups to the primary route list, the order must have the primary
route group first and the secondary route group next However, when you add the primary and
secondary route group to the secondary route list, the order must have the secondary route
group first and the primary route group next.
Note:
If only redundancy is required, do not create the second route list. However, ensure you
add both the route groups to the route list.
• Add the route lists to the route patterns. Add the primary route list to the primary route pattern
and the secondary route list to the secondary route pattern. Ensure each route pattern has
only one route list.
May 2020 Deploying Harmony Workforce Optimization on Unified Contact Center Enterprise 20
Comments on this document? infodev@avaya.com

Chapter 4: Unified Communication Manager
configuration
Configuration checklist
No. Task Reference Notes
1 Configure SIP Unified
Communications Manager
(UCM) Recorder using the
following tasks:
• Create recording profile.
• Create trunk.
• Create route group.
• Create route list.
• Create route pattern.
• Enable built-in-bridge on
selected phones.
• Enable ACR on selected
phones.
• Enable built-in-bridge on
single phones
• Enable ACR on single
phone.
• Enable redundancy and
load balancing between
UCM SIP trunks.
See:
• Creating recording
profile on page 22
• Creating trunk on
page 23
Creating route
•
group on page 23
Creating route list on
•
page 24
• Creating route
pattern on page 24
• Enabling BIB on
selected phones on
page 25
Enabling ACR on
•
selected phones on
page 25
• Enabling BIB on a
single phone on
page 26
Enabling ACR on a
•
single phone on
page 26
Enable Redundancy or
•
Load Balancing
between UCM SIP
Trunks on page 26
Table continues…
May 2020 Deploying Harmony Workforce Optimization on Unified Contact Center Enterprise 21
Comments on this document? infodev@avaya.com

Unified Communication Manager configuration
No. Task Reference Notes
2 Enable SIP Options Ping
feature.
3 Span the traffic between the
PBX or Media Server and
phones. Connect the traffic to
one of the NIC cards in
promiscuous mode on the
recording server.
Configuring SIP UCM Recorder
Logging into Unified Cisco Communication Manager
Procedure
1. Open the Unified Cisco Communication Manager interface in a web browser.
2. Accept the Certificate.
3. Log in the system using the username and password.
Creating recording profile
Procedure
1. Log in to the Unified Cisco Communication Manager interface.
2. Navigate to Device > Device Settings > Recording Profile.
3. Click Add New to create a new recording profile and do the following:
a. Enter a name for the recording profile.
b. Select a Recording Calling Search Space that matches with the Cisco IP Phone DN
on which the BIB and ACR are enabled.
c. Enter a Recording Destination Address. For example, 66666 or 77777.
4. Click Save to save the recording profile.
May 2020 Deploying Harmony Workforce Optimization on Unified Contact Center Enterprise 22
Comments on this document? infodev@avaya.com

Creating trunk
Procedure
1. Log in to the Unified Cisco Communication Manager interface.
2. Navigate to Device > Trunk > Add New.
3. On the Trunk Configuration page, in the Trunk Information section, configure the following:
a. For Trunk Type, select SIP Trunk.
b. The Device Protocol is auto populated to SIP with the Trunk Type selection.
c. Leave the Trunk Service Type to None (Default).
4. Click Next.
5. In the Device Information section, configure the following fields:
a. For Device Name, type the name of the device.
b. Foe Device Pool, select the required device pool.
Configuring SIP UCM Recorder
6. In the Inbound Calls section, select the Calling Search Space that matches with the
Recording Profile you created earlier.
7. In the SIP Information section, configure the following:
a. For Destination Address, type the IP address of the recording server.
b. For high availability, add another Destination Address and type the IP address of the
failover recorder server.
c. For Destination Port, type 5060 for RTP and type 5061 for SRTP.
8. Click Save to save the Trunk configuration.
Creating route group
Procedure
1. Log in to the Unified Cisco Communication Manager interface.
2. Navigate to Call Routing > Route/Hunt > Route Group.
3. Click Add New to create a new route group.
4. On the Route Group Configuration page, in the Route Group Information section, configure
the following:
a. Type a Route Group Name.
b. Select the Distribution Algorithm.
May 2020 Deploying Harmony Workforce Optimization on Unified Contact Center Enterprise 23
Comments on this document? infodev@avaya.com

Unified Communication Manager configuration
5. In the Route Group Member Information section, configure the following:
Select the SIP trunks from the Available Devices and add to Current Route Group
Members by clicking Add to Route Group.
The SIP trunks you added are displayed in the Selected Devices field.
6. Click Reverse Order of Selected Devices to reorder the SIP Trunks based on your
requirement.
7. Click Save.
Creating route list
Procedure
1. Log in to the Unified Cisco Communication Manager interface.
2. Navigate to Call Routing > Route/Hunt > Route List > Add New.
3. For the Name field, type a name for the route list.
4. For the Description field, type a description for the route list.
5. For the Cisco Unified Communications Manager Group field, select Default.
6. Click Save.
The Route List Member Information section appears.
7. Click Enable this Route List (change effective on Save; no reset required).
8. In the Route List Member Information section, click Add Route Group.
The Route List Detail Configuration page appears.
9. Select the desired Route Group from the Route Name drop-down list.
10. Click Save.
Creating route pattern
Procedure
1. Log in to the Unified Cisco Communication Manager interface.
2. Navigate to Call Routing > Route/Hunt > Route pattern > Add New.
3. Configure the same route pattern that you gave in Recording Profile > Recording
Destination field while creating the recording profile.
4. Select an appropriate Route Partition.
5. Enter a description for the route pattern.
6. In the Gateway/Route List drop-down, select the SIP trunk that you configured earlier.
May 2020 Deploying Harmony Workforce Optimization on Unified Contact Center Enterprise 24
Comments on this document? infodev@avaya.com

7. For the Route Option field, select Route this pattern.
8. Click Save.
Enabling BIB on selected phones
Procedure
1. Log in to the Unified Cisco Communication Manager interface.
2. Navigate to Bulk Administration > Phone > Update Phones > Query.
3. Filter your search criteria by Device Name and click Find.
4. Select the phone records for which you want to enable BIB and then, click Next.
5. In the Device Information section, set Built in Bridge to On.
6. In the Job Information section, select any one of the following options:
• Run Immediately
• Run Later
Configuring SIP UCM Recorder
7. Click Submit to save the changes.
Enabling ACR on selected phones
Procedure
1. Log in to the Unified Cisco Communication Manager interface.
2. Navigate to Bulk Administration > Phones > Add/Update Lines > Update Lines.
3. Filter your search criteria based on the Directory Number and click Find.
4. Select the phone Directory Number records for which you want to enable ACR and then,
click Next.
5. In the Line null on Device null section, configure the following:
a. For the Recording Option field, select Automatic Call Recording Enabled.
b. For the Recording Profile filed, select the recording profile you created earlier.
6. In the Job Information section, select any one of the following options:
• Run Immediately
• Run Later
7. Click Submit to save the changes.
May 2020 Deploying Harmony Workforce Optimization on Unified Contact Center Enterprise 25
Comments on this document? infodev@avaya.com

Unified Communication Manager configuration
Enabling BIB on a single phone
Procedure
1. Log in to the Unified Cisco Communication Manager interface.
2. Navigate to Device > Phone.
3. Filter your search criteria based on Directory Number and click Find.
4. Click on the Device Name to go to the Phone Configuration page.
5. In the Device Information section, set Built in Bridge to On.
6. Click Save.
7. Click Reset.
Enabling ACR on a single phone
Procedure
1. Log in to the Unified Cisco Communication Manager interface.
2. Navigate to Device > Phone.
3. Filter your search criteria based on Directory Number and click Find.
4. Click on the Device Name to go to the Phone Configuration page.
5. In the Association section on the left pane, click on the directory number link.
6. In the Line (x) on Device (x) section, configure the following:
a. For the Recording Option field, select Automatic Call Recording Enabled.
b. For the Recording Profile filed, select the recording profile you created earlier.
7. Click Save.
8. Click Reset.
Enable Redundancy or Load Balancing between UCM SIP Trunks
Procedure
1. Log in to the Unified Cisco Communication Manager interface.
2. Create two recording profiles primary and secondary with different destination addresses.
3. Create two SIP Trunks, Route Groups and Route Lists as primary and secondary.
While adding trunks to the route groups, add the primary SIP Trunk to the primary Route
Group and secondary SIP Trunk to the secondary Route Group such that each route group
May 2020 Deploying Harmony Workforce Optimization on Unified Contact Center Enterprise 26
Comments on this document? infodev@avaya.com

Enabling SIP options ping feature
has only one SIP trunk. Each SIP Trunk is assigned with a UCM Recorder application
machine IP.
While adding route groups to the route lists, add both the route groups to both the route
lists but in reverse order. Suppose, you have added both route groups to primary route list
in order like first one to be primary route group and next one to be secondary route group.
The secondary route list must have reverse order like first one to be secondary route group
and next one to be primary route group. This must be done if redundancy and load
balancing is required.
Note:
If only Redundancy is required, do not create the second route list. But you need to
add both the route groups to the first route list as specified earlier..
4. Configuring the Route lists in the Route pattern similarlt. Each route pattern allows only
one route lists.
Enabling SIP options ping feature
SIP Options Ping feature in Unified Communication Manager
The Cisco Unified Communication Manager (CUCM) 8.5 version onwards support the SIP
OPTIONS Ping feature. This feature is introduced to allow quick fail over and the status report
OPTIONS message is sent to the remote destination peer periodically. Response from the remote
destination peer decides if new INVITE is sent to it In SIP Profile. Enabling the SIP OPTIONS Ping
feature is recommended for all SIP trunks because it allows UCM to track trunk state dynamically
rather than determining trunk destination state on a per-node, per-call, and time-out basis. Only
SIP trunk with default type as None(default), supports this feature
The SIP OPTIONS Ping feature can be enabled on the SIP Profile associated with a SIP trunk to
dynamically track the state of the trunk's destination(s). When this feature is enabled, each node
running the trunk's SIP daemon periodically sends an OPTIONS Request to each of the trunk's
destination IP addresses to determine if the request has reached the destination and sends calls
only to reachable nodes.
A destination address is considered to be out of service if the destination address:
• Fails to respond to an OPTIONS Request.
• Sends a Service Unavailable (503) response or Request Timeout (408) response.
• A TCP connection cannot be established
The overall trunk state is considered to be in service when at least one node receives a response
(other than a 408 or 503) from at least one destination address. SIP trunk nodes can send
OPTIONS Requests to the trunk's configured destination IP addresses or to the resolved IP
addresses of the trunk's DNS SRV entry.
May 2020 Deploying Harmony Workforce Optimization on Unified Contact Center Enterprise 27
Comments on this document? infodev@avaya.com

Unified Communication Manager configuration
With SIP OPTIONS Ping feature enabled, the UCM periodically sends SIP OPTIONS to every
remote destination peer, to detect its availability. If the remote destination peer is unavailable (no
response or it responds “408 Request Timeout” or “503 Service Unavailable”), UCM will mark this
peer as unavailable. If the remote destination peer is available (any other responses rather than
“503” or “408”), the UCM marks this peer as available. The UCM sends a new INVITE only to the
available remote destination peers.
Creating SIP profile with OPTIONS Ping enabled
Procedure
1. Log in to the Cisco Unified Communication Manager interface.
2. Navigate to Device > Device Settings > SIP Profile > Add New.
3. On the SIP Profile Configuration page, in the SIP Profile Information section, configure the
following:
a. For Name, type Standard SIP Profile — OPTIONS PING ENABLED.
b. For Description, type SIP Profile — OPTIONS PING ENABLED.
c. For Default MTP Telephony Event Payload Type, type 101.
d. Foe Resource Priority Namespace List, select None.
e. Foe Early Offer for G.Clear Calls*, select Disabled.
4. On the SIP Profile Configuration page, in the SIP OPTIONS Ping section, configure the
following:
a. Select the Enable OPTIONS Ping to monitor destination status for Trunks with
Service Type “None (Default)”* check box.
b. For Ping Interval for In-service and Partially In-service Trunks (seconds)*, type 60.
c. For Ping Interval for Out-of-service Trunks (seconds)*, type 120.
d. For Ping Retry Timer (milliseconds)*, type 500.
e. Foe Ping Retry Count*, type 6.
5. Click Save to save the SIP profile.
6. Navigate to Device > Trunk.
7. Click Find to view the list of trunks you configured for the recording devices.
8. Click on the name of the SIP trunk to modify the SIP profile.
9. In the SIP Information section, configure the following:
a. For Destination Address, configure the failover recorder server IP address.
The Unified Communication Manager sends INVITE messages to the respective
recorder server when the status is UP.
May 2020 Deploying Harmony Workforce Optimization on Unified Contact Center Enterprise 28
Comments on this document? infodev@avaya.com

Enabling SIP options ping feature
b. For the SIP Profile option, click Standard SIP Profile (with Option Ping).
10. Click Save to save the trunk configuration.
11. Click Reset to reset the trunk.
Applying SIP profile and SIP trunk security profile to the SIP trunk
Procedure
1. Log in to the Cisco Unified Communication Manager interface.
2. Navigate to Device > Trunk.
3. Click Find to view the list of trunks you configured for the recording devices.
4. Click on the name of the SIP trunk to modify the SIP profile.
5. In the SIP Information section, configure the following:
a. For Destination Address, configure the failover recorder server IP address.
The Unified Communication Manager sends INVITE messages to the respective
recorder server when the status is UP.
b. For the SIP Trunk Security Profile option, click Secure SIP Trunk Profile.
c. For the SIP Profile option, click Standard SIP Profile (with Option Ping).
6. Click Save to save the trunk configuration.
7. Click Reset to reset the trunk.
May 2020 Deploying Harmony Workforce Optimization on Unified Contact Center Enterprise 29
Comments on this document? infodev@avaya.com
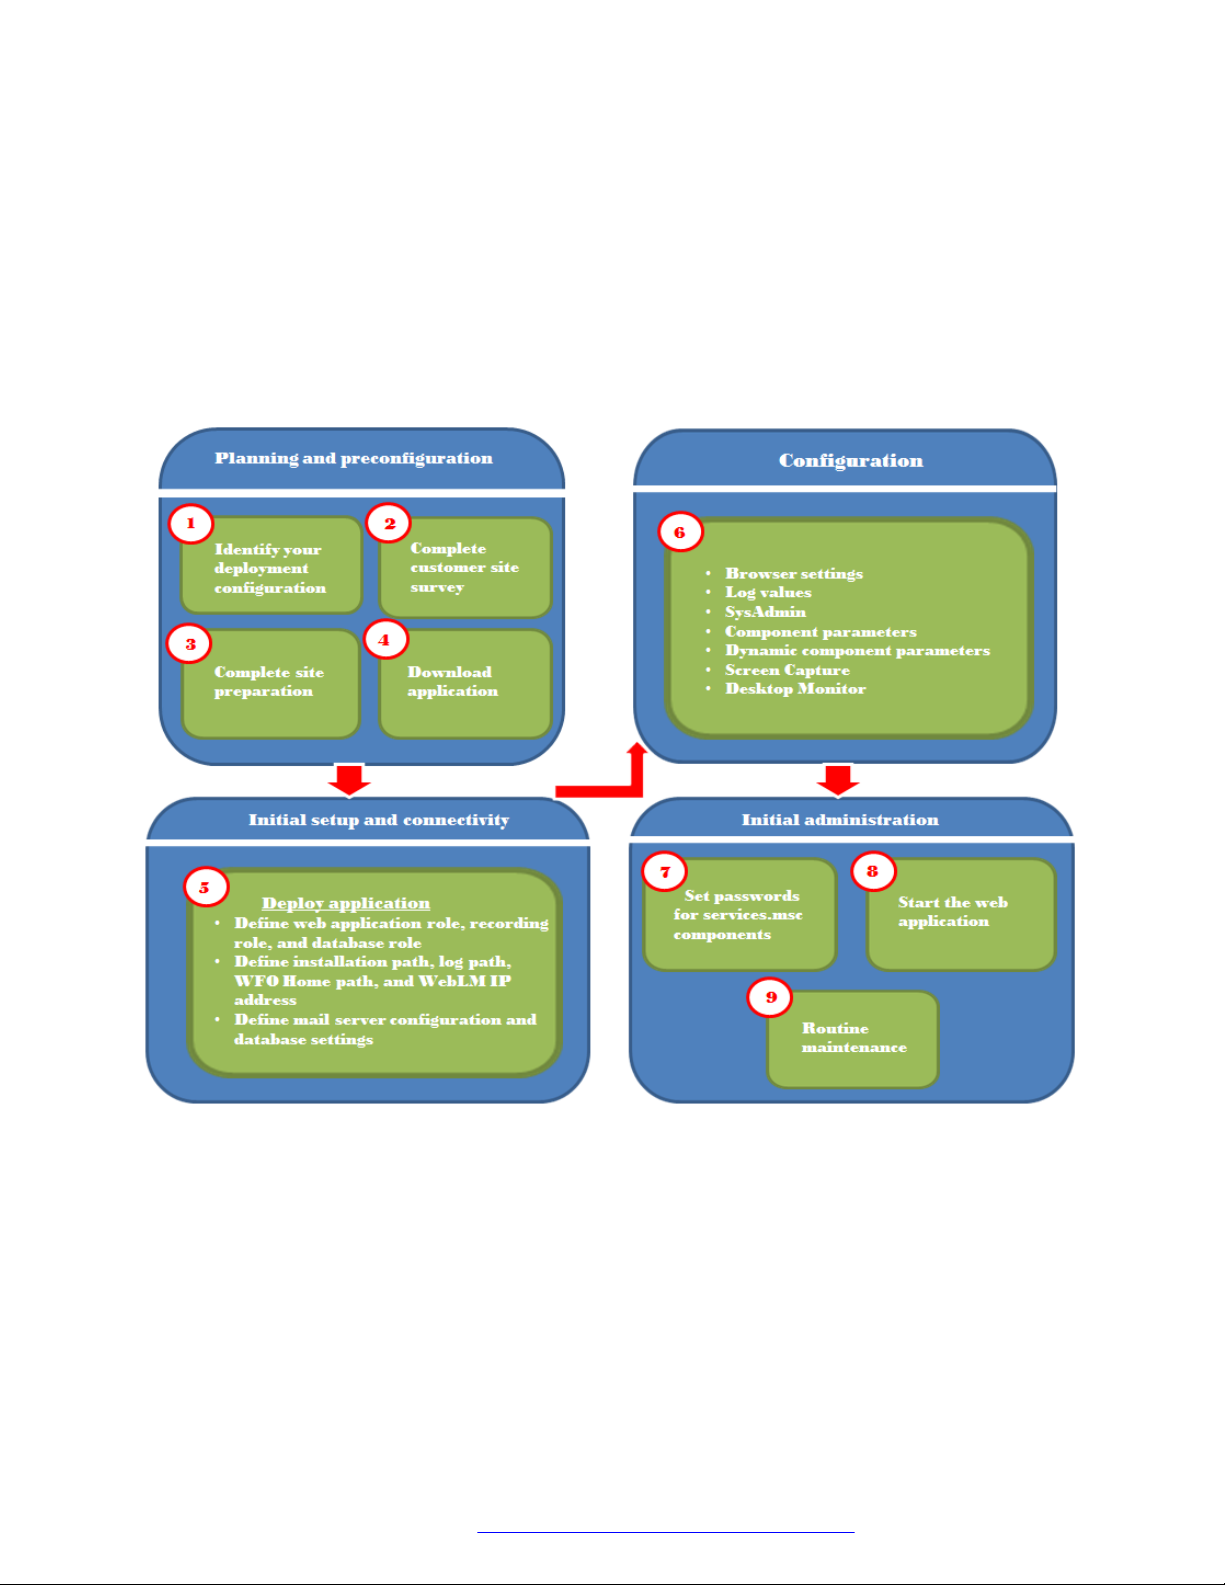
Chapter 5: Deployment process
The following image shows the high-level tasks for deploying Harmony Workforce Optimization:
May 2020 Deploying Harmony Workforce Optimization on Unified Contact Center Enterprise 30
Comments on this document? infodev@avaya.com

Chapter 6: Planning and preconfiguration
Planning checklist
No. Task Reference Notes
1 Download the required
documentation.
2 Gather configuration information. See Harmony Workforce
3 Plan for site preparation. See Preinstallation
See Documentation on
page 191.
Optimization installation
information on page 32.
checklist on page 46.
Configuration information
Signaling and Automatic Call Distribution information
To maintain a record of the Harmony Workforce Optimization configuration information, take a
printout of the following table and work with your network administrator to fill the empty cells:
Signalling for Unified Communications Manager (UCM)
Name
UCM Hostname The hostname of the server
UCM Username The UCM username.
UCM Password The UCM password.
Value Description
where the UCM is installed.
Automatic Call Distribution (ACD) for Unified Contact Center Enterprise UCCE
Name
CTI Hostname The name of the UCCE server.
CTI Port The port number of the UCCE
May 2020 Deploying Harmony Workforce Optimization on Unified Contact Center Enterprise 31
Value Description
server. The default port number is
42027.
Comments on this document? infodev@avaya.com

Planning and preconfiguration
Harmony Workforce Optimization installation information
To maintain a record of the Harmony Workforce Optimization installation information, take a
printout of the following table and work with your network administrator to fill the empty cells:
Web server details
Name Value Description
Server IP address The IP address of the server where Harmony
Workforce Optimization is installed.
Server Hostname The hostname of the server where Harmony
Workforce Optimization is installed.
Harmony Workforce Optimization
Operating System Domain/Login
Harmony Workforce Optimization
Operating System Password
Harmony Workforce Optimization
Services Account Domain/Login
Concurrent web logins The number of web nodes required to be installed
SMTP Server IP address or
Hostname
Default Sender Email Address The default sender email address that is used to
Default Sender Name The name of the user that appears in the From list
The login credentials of the user who has
administrator privileges on the server where
Harmony Workforce Optimization is installed.
The password of the user who has administrator
privileges on the server where Harmony Workforce
Optimization is installed.
The username of the user whose default sender
email address is configured.
depends on the number of concurrent user logins.
The maximum number of concurrent users for a web
node is 40.
The IP address or the hostname of the email
exchange server.
send emails related to alerts and notifications
triggered by the web application and Harmony
Workforce Optimization components.
of the email.
SysAdmin server details
Name
SMTP Server IP address or
Hostname
SMTP port The SMTP port number.
Default Sender Email Address The default sender email address that is used to
May 2020 Deploying Harmony Workforce Optimization on Unified Contact Center Enterprise 32
Value Description
The IP address or the hostname of the email
exchange server.
send emails related to alerts and notifications
triggered by the web application and Harmony
Workforce Optimization components.
Table continues…
Comments on this document? infodev@avaya.com

Configuration information
Name Value Description
Default Sender Name The name of the user that appears in the From list
of the email.
SNMP Server IP address or
Hostname
SNMP port The NMS server port number.
Username admin The default username to log in to the SysAdmin
Password harmony1@3 The default password to log in to the SysAdmin
The IP address or the hostname of the system
where MIB browser is installed to get SNMP traps.
The IP address is configured as NMS server IP
address in SysAdmin.
application.
application.
Database server details
Name Value Description
Database Name The name of the database that points to the Web
application and Harmony Workforce Optimization
components.
Database Server IP address or
Hostname
Database User ID The user ID of the database to connect to the
The IP address or hostname of the server where
the database is installed.
SQL server. You can only use sa as the user ID.
Database Password The password of the database to connect to SQL
server. You can configure a password as
suggested by the customer.
Authentication mode The type of authentication modes. You can
choose either:
• Windows: The windows authentication
credentials of the user to install the database.
• SQL: The option to connect to the database or
login as the database administrator using sa
credentials.
SQL user details
The following table list the permissions that the HarmonyAdmin user has.
May 2020 Deploying Harmony Workforce Optimization on Unified Contact Center Enterprise 33
Comments on this document? infodev@avaya.com

Planning and preconfiguration
On Master On Model On MSDB
• dbcreator
• db_datawriter
• db_datawriter
• securityadmin
• db_datawriter
• db_datareader
• db_accessadmin
• db_securityadmin
• db_ddladmin
• db_datareader
• db_accessadmin
• db_ddladmin
• db_owner
• db_datareader
• db_accessadmin
• db_securityadmin
• db_ddladmin
• SQLAgentOperatorRole
• SQLAgentReaderRole
• SQLAgentUserRole
Recording server details
Name Value Description
Server IP address The IP address of the server where recorder is
installed.
Server Hostname The hostname of the server where recorder is
installed.
Harmony Workforce Optimization
Recorder Operating System
Domain/Login
Harmony Workforce Optimization
Recorder Operating System
Password
Server Voice NIC IP address The IP address of the server where voice NIC is
The login credentials of the user who has
administrator privileges on the server where
recorder is installed.
The password of the user who has administrator
privileges on the server where recorder is
installed.
configured for SPAN-based recording.
Storage details
Name
Directory/Path The location path on the server where calls must
Value Description
be stored.
Note:
If Network Attached Storage (NAS) or
Storage Area Networks (SAN) is configured,
you must mount the location path to the local
server.
License management
Name
WebLM user ID The administrator user ID to access WebLM.
WebLM password The administrator password to access WebLM.
Value Description
Table continues…
May 2020 Deploying Harmony Workforce Optimization on Unified Contact Center Enterprise 34
Comments on this document? infodev@avaya.com

Configuration tools and utilities
Name Value Description
WebLM IP address The IP address of the server on which WebLM is
installed.
Configuration tools and utilities
• One or more Windows servers or virtual machines with the following:
- A user with administrator privileges.
- An SQL server with Mixed Mode Authentication and SQL server agent service enabled.
• Two network interface cards, one for data NIC and another for voice NIC.
• Agent or client machines to install client applications such as Desktop Trigger and Home
Agent Screen.
May 2020 Deploying Harmony Workforce Optimization on Unified Contact Center Enterprise 35
Comments on this document? infodev@avaya.com

Planning and preconfiguration
Hardware requirements
Harmony Workforce Optimization web and database server requirements
Server Specifications VMware (ESXI 5, 5.5, and 6)
requirements
Single box
deployment
Supports up to 150
concurrent calls.
• Intel/AMD 64–bit Dual CPU Quad Core (Total 8
Core) with 2.5 GHz per CPU. Total 20,000 Mhz CPU Reservation
• 16 GB RAM
• vCPU: 8 with 2.5 GHz/CPU
Reservation. Total 20,000
Mhz - CPU Reservation
• vRAM: 16 GB
Multi box
deployment —
Recorder server
Supports 150 to
500 concurrent
calls with one
recorder for every
concurrent calls.
• One C drive with 100 GB SAS 10 K/15K RPM
RAID1 or RAID5 HDD for Operating System,
Database and System Databases
• One D drive with 150 GB SAS 10 K/15K RPM
RAID5 HDD for web application, dumps, log files,
and configuration files
• One E drive with 300 GB SAS 10 K/15K RPM
RAID5 HDD for database storage and local call
storage. Disk space must be calculated based on
the retention policy on the local drive and the
database sizing.
• Apache 2.4.x; Open JDK 1.8.x
• IOPS (input/output operations per second) a
minimum of 2000
• Two 1 Gbps NIC cards
• Intel/AMD 64–bit Dual CPU Quad Core (Total 8
Core) with 2.5 GHz
• 16 GB RAM
• One C drive with 100 GB SAS 10 K/15K RPM
RAID1 or RAID5 HDD for Operating System,
Database and System Databases
• One D drive with 150 GB SAS 10 K/15K RPM
RAID5 HDD for web application, dumps, log files,
and configuration files
• vDisk: C: 100 GB, D: 150
GB, E: 300 GB
• Apache 2.4.x; Open JDK
1.8.x
• IOPS (input/output
operations per second) a
minimum of 2000
• vNIC: 2
• Requires one VM Recorder
instance for every 250
concurrent G.711, G722, or
450 concurrent G.729 calls
• vCPU: 8 with 2.5 GHz/CPU
Reservation
• vRAM: 16 GB
• vDisk: C: 100 GB, D: 150
GB, E: 300 GB
• One E drive with 300 GB SAS 10 K/15K RPM
RAID5 HDD for database storage and local call
storage. Disk space must be calculated based on
the retention policy on the local drive.
• Apache 2.4.x; Open JDK 1.8.x
• IOPS (input/output operations per second) a
minimum of 1000
• Two 1 Gbps NIC cards
May 2020 Deploying Harmony Workforce Optimization on Unified Contact Center Enterprise 36
Comments on this document? infodev@avaya.com
• Apache 2.4.x; Open JDK
1.8.x
• IOPS (input/output
operations per second) a
minimum of 1000
• vNIC: 2
Table continues…

Hardware requirements
Server Specifications VMware (ESXI 5, 5.5, and 6)
requirements
Multi box
deployment —
Application and
Database server
Supports 150 to
500 concurrent
calls.
• Intel/AMD 64–bit Dual CPU Quad Core (Total 8
Core) with 2.5 GHz
• 16 GB RAM
• One C drive with 100 GB SAS 10 K/15K RPM
RAID1 or RAID5 HDD for Operating System,
Database and System Databases
• One D drive with 300 GB SAS 10 K/15K RPM
RAID5 HDD for web application, dumps, log files,
and configuration files
• One E drive for database storage. Disk space
must be calculated based on database sizing.
• Apache 2.4.x; Open JDK 1.8.x
• IOPS (input/output operations per second) a
minimum of 2000 - for up to 1000 concurrent
recordings, add additionally 300 IOPS for every
additional 500 concurrent recordings.
• Two 1 Gbps NIC cards
• vCPU - 8 with 2.5
GHz/CPU Reservation.
Total 20,000 Mhz - CPU
Reservation
• vRAM - 16 GB
• vDisk - C: 100 GB, D: 300
GB, E: disk space must be
calculated based on
database sizing.
• Apache 2.4.x; Open JDK
1.8.x
• IOPS (input/output
operations per second) a
minimum of 2000 - for up to
1000 concurrent
recordings, add additionally
300 IOPS for every
additional 500 concurrent
recordings.
Multi box
deployment —
Recorder server
Supports more than
500 concurrent
agents.
• Intel/AMD 64–bit Dual CPU Quad Core (Total 8
Core) with 2.5 GHz
• 16 GB RAM
• 2012 R2 64 bit Operating System with latest
Service Pack and 2016 64 bit Operating System
One C drive with 100 GB SAS 10 K/15K RPM
RAID1 or RAID5 HDD for Operating System,
Database and System Databases
• One D drive with 150 GB SAS 10 K/15K RPM
RAID5 HDD for web application, dumps, log files,
and configuration files
• One E drive with 300 GB SAS 10K/15K RPM
RAID5 HDD for local call storage.
• Apache 2.4.x; Open JDK 1.8.x
• IOPS (input/output operations per second) a
minimum of 1000
• Two 1 Gbps NIC cards
• vNIC - 2
• vCPU - 8 with 2.5
GHz/CPU Reservation
• vRAM - 16 GB
• vDisk - C: 100 GB, D: 150
GB, E: 300 GB
• Apache 2.4.x; Open JDK
1.8.x
• IOPS (input/output
operations per second) a
minimum of 1000
• vNIC - 2
Table continues…
May 2020 Deploying Harmony Workforce Optimization on Unified Contact Center Enterprise 37
Comments on this document? infodev@avaya.com

Planning and preconfiguration
Server Specifications VMware (ESXI 5, 5.5, and 6)
requirements
Multi box
deployment —
Application and
Database server
Supports more than
500 concurrent
agents.
• Intel/AMD 64–bit Dual CPU Quad Core (Total 8
Core) with 2.5 GHz
• 16 GB RAM
• 2012 R2 64 bit Operating System with latest
Service Pack and 2016 64 bit Operating System
One C drive with 100 GB SAS 10 K/15K RPM
RAID1 or RAID5 HDD for Operating System,
Database and System Databases
• One D drive with 300 GB SAS 10 K/15K RPM
RAID5 HDD for web application, dumps, log files,
and configuration files
• Apache 2.4.x; Open JDK 1.8.x
• IOPS (input/output operations per second) a
minimum of 1500 - for up to 1000 concurrent
recordings, add additionally 300 IOPS for every
additional 500 concurrent recordings for database
server.
• IOPS (input/output operations per second) a
minimum of 500 for web application server.
• Two 1 Gbps NIC cards
• vCPU - 8 with 2.5
GHz/CPU Reservation.
Total 20,000 Mhz - CPU
Reservation
• vRAM - 16 GB
• vDisk - C: 100 GB, D: 300
GB, E: disk space must be
calculated based on
database sizing.
• Apache 2.4.x; Open JDK
1.8.x
• IOPS (input/output
operations per second) a
minimum of 1500 - for up to
1000 concurrent
recordings, add additionally
300 IOPS for every
additional 500 concurrent
recordings for database
server.
• IOPS (input/output
operations per second) a
minimum of 500 for web
application server.
WFM database server specifications:
Number of
agents
supported
Upto 400 • 4 core processor
400 to 1500 • 4 core processor
Specifications Operating system and SQL server
• 8 GB memory
• 80 GB storage space required for
database after 3 years
• 16 GB memory
• 120 GB storage space required for
database after 3 years
• vNIC - 2
specifications and recommendations
• Windows server 2012 R2/2016 english
version GUI mode
• All windows updates applied.
• Fixed IP.
• Fast storage, write stall <=5 ms and read
stall <=20 ms under sustained load.
• Microsoft SQL server 2008 R2/2016
(including Analysis Services and
Workstation components) with latest
updates.
• All databases must be case insensitive.
Collation
Table continues…
May 2020 Deploying Harmony Workforce Optimization on Unified Contact Center Enterprise 38
Comments on this document? infodev@avaya.com

Hardware requirements
Number of
agents
supported
1500 to 4000 • 6 core processor
4000 to
10000
10000 to
20000
20000 and
above
Specifications Operating system and SQL server
• 32 GB memory
• 180 GB storage space required for
database after 3 years
• 8 core processor
• 64 GB memory
• 320 GB storage space required for
database after 3 years
• 16 core processor
• 128 GB memory
• 1 TB storage space required for
database after 3 years
• 28 core processor
• 256 GB memory
• 5 TB storage space required for
database after 3 years
specifications and recommendations
SQL_Latin1_General_CP1_CI_AS is
recommended. Turkish does not work.
WFM web server specifications
Servers
1 or 2 servers
where the
second server is
required if High
Availability (HA)
option is
available.
Supports up to
400 agents.
1 or 2 servers
where the
second server is
required if HA
option is
available.
Supports 400 to
1500 agents.
Specifications Operating system and SQL server
• 4 core processor
• 8 GB memory
• 100 GB storage space and HA
optional
• 4 core processor
• 16 GB memory
• 120 GB storage space and HA
optional
specifications and recommendations
• Windows server 2012 R2/2016 english
version GUI mode with latest Powershell
• All Windows updates applied.
• Fixed IP.
• Windows server must be configured as an
application server enabling Internet
Information Server (IIS) and ASP.NET
• Latest Microsoft.NET framework with latest
updates from Windows.
• Acrobat PDF reader for easy access to
reports.
Table continues…
May 2020 Deploying Harmony Workforce Optimization on Unified Contact Center Enterprise 39
Comments on this document? infodev@avaya.com

Planning and preconfiguration
Servers Specifications Operating system and SQL server
specifications and recommendations
1 or 2 servers
where the
second server is
required if HA
option is
available.
Supports 1500
to 4000 agents.
1 or 3 servers
where the
second and third
servers are
required if HA
option is
available.
Supports 4000
to 10000 agents.
4 servers
• 8 core processor
• 32 GB memory
• 180 GB storage space and HA
optional
• 16 core processor for server 1 and 2,
8 core for server 3
• 64 GB memory for server 1 and 2, 16
GB for server 3
• 180 GB storage space and HA
optional
• 8 core processor
Supports 10000
to 20000 agents.
6 servers
Supports more
than 20000
agents.
• 16 GB memory
• 180 GB storage space and HA
mandatory
• 8 core processor
• 16 GB memory
• 180 GB storage space and HA
mandatory
WFM worker server specifications
The worker server performs long running or heavy asynchronous task executions and
computations and is mandatory for all new installs from Teleopti WFM 8.6 version. You can add
more servers to scale up and meet increased load so that the application distributes the load
across these servers and no external load balancer is needed. You can also scale up using one or
more powerful machines, but with no High Availability.
May 2020 Deploying Harmony Workforce Optimization on Unified Contact Center Enterprise 40
Comments on this document? infodev@avaya.com

Hardware requirements
Servers Specifications Operating system and SQL server
specifications and recommendations
1 or 2 servers
where the
second server is
required if High
Availability (HA)
option is
available.
Supports up to
400 agents.
1 or 2 servers
where the
second server is
required if HA
option is
• 4 core processor
• 8 GB memory
• 100 GB storage space and HA
optional
• 4 core processor
• 16 GB memory
• 120 GB storage space and HA
optional
• Windows server 2012 R2/2016 english
version GUI mode with latest Powershell
• All Windows updates applied.
• Fixed IP
• Windows server must be configured as an
application server enabling Internet
Information Server (IIS) and ASP.NET
• Latest Microsoft.NET framework with latest
updates from Windows.
available.
Supports 400 to
1500 agents.
1 or 2 servers
where the
second server is
required if HA
option is
• 6 core processor
• 16 GB memory
• 180 GB storage space and HA
optional
available.
Supports 1500
to 4000 agents.
1 or 3 servers
where the
second and third
servers are
required if HA
option is
available.
Supports 4000
to 10000 agents.
4 servers
Supports 10000
to 20000 agents.
• 8 core processor
• 16 GB memory
• 180 GB storage space and HA
optional
• 8 core processor
• 32 GB memory
• 180 GB storage space and HA
mandatory
Table continues…
May 2020 Deploying Harmony Workforce Optimization on Unified Contact Center Enterprise 41
Comments on this document? infodev@avaya.com

Planning and preconfiguration
Servers Specifications Operating system and SQL server
specifications and recommendations
6 servers
• 8 core processor
Supports more
than 20000
agents.
• 32 GB memory
• 180 GB storage space and HA
mandatory
Optional modules
Desktop Monitor client machine specifications:
• Windows 10 (32–bit or 64–bit) with latest service packs and security updates
• 4 GB minimum and 4+ GB recommended
• 1280 x 1024 minimum graphics display resolution
• Microsoft .NET Framework 4.5
• Microsoft Visual Studio 2008 Professional or Developers Edition SP1 (Development/Studio
only)
Software requirements
Table 1: Harmony Workforce Optimization software
Software
Harmony Workforce Optimization 5.3 -
Table 2: Operating systems and software
Software
Windows Server 2012 R2 (64–bit OS) with
Table 3: Database
Software
SQL Server 2012, 2016 (64–bit) Standard
Supported version Location Reference
latest service pack, 2016
(64–bit OS), 2017 (64–bit
OS), and 2019
Supported version Notes
- -
Supported version Notes
Edition, 2017 (64–bit) Enterprise
Edition, and SQL Server 2019
May 2020 Deploying Harmony Workforce Optimization on Unified Contact Center Enterprise 42
Comments on this document? infodev@avaya.com

Table 4: Reporting services
Software Supported version Notes
Adobe Reader 8.0 or later -
Table 5: Client software
Software Supported version Notes
Windows Operating System 10 with 32–bit and 64–bit -
Internet Explorer 11.7 -
Mozilla FireFox 75 -
Google Chrome 80 -
Microsoft Edge 44
Safari 10.1.0 and above -
Citrix or terminal services • Citrix 2019
-
• Terminal services on Windows
server 2016
HTML 5 media player NA -
Graphic and sound card Depends on compatibility with
-
customer site.
Software requirements
Table 6: Third party software
Utilities
Supported
Location Reference
versions
Wireshark 2.2.3
Windows 64–
bit
Server on which the recorder is installed. For example,
C:\Program Files\WireShark.
Download Wireshark software from https://
www.wireshark.org/download.html.
Note:
While installing Wireshark, selecting the option to
install WinPCap installs both Wireshark and
WinPCap.
WinPCap 4.1.3 Server on which the recorder is installed. For example,
C:\Program Files(x86)\WinPCap.
Notepad++ Latest version All servers.
7 Zip Latest version All servers.
Table continues…
May 2020 Deploying Harmony Workforce Optimization on Unified Contact Center Enterprise 43
Comments on this document? infodev@avaya.com

Planning and preconfiguration
Utilities Supported
versions
Java
security
files
Microsoft
Visual C++
2017
Update 3
Redistributa
ble
Microsoft
Visual C++
2017 Update
3
Redistributabl
e Package
(x86)
Microsoft
ODBC
Driver 13
for SQL
Server
Location Reference
Download Java security files local_policy.jar
and US_export_policy.jar from http://
www.oracle.com/technetwork/java/javase/downloads/
jce8-download-2133166.html.
Note:
Extract the jce_policy-8.zip file and place Java
security files local_policy.jar and
US_export_policy.jar files on a local folder.
Server on which the recorder components are
installed.
Download the redistributable from the location https://
support.microsoft.com/en-us/help/2977003/the-latestsupported-visual-c-downloads.
Note:
If you are installing Harmony Workforce
Optimization recorder components on a 2016
Windows server, ensure you download and install
the redistributable manually. You will encounter
an issue if you install the redistributable from the
installer.
Server on which the recorder components are
installed.
Download the driver from the location https://
www.microsoft.com/en-us/download/details.aspx?
id=50420.
Note:
If you are installing Harmony Workforce
Optimization recorder components on a 2016
Windows server, ensure you download and install
the driver manually. You will encounter an issue if
you install the driver from the installer.
Table continues…
May 2020 Deploying Harmony Workforce Optimization on Unified Contact Center Enterprise 44
Comments on this document? infodev@avaya.com

Network requirements
Utilities Supported
versions
Microsoft
Command
Line Utilities
13.1 for
SQL Server
JTAPI client Server on which the recorder components are
Location Reference
Server on which the recorder components are
installed.
Download the utility from the location https://
www.microsoft.com/en-us/download/details.aspx?
id=53339.
Note:
If you are installing Harmony Workforce
Optimization recorder components on a 2016
Windows server, ensure you download and install
the utility manually. You will encounter an issue if
you install the utility from the installer.
installed.
Network requirements
See Installing
JTAPI client on
page 49.
• Deployment models must use Fast Ethernet LAN connections. Minimum 1000BASE-T is
preferred.
• Multisite deployments must use T1, E1, MPLS, or its equivalent connection to utilize the
bandwidth between site locations.
• Each recording server must install two 1-Gbps network interface cards (NICs). Each NIC
must have a distinct static IP address. Use one card for standard network access and the
other as a packet sniffing interface.
• You must direct the SPAN traffic in your SPAN configuration to the IP address of the NIC.
When you run the Harmony Workforce Optimization installer, the packet sniffing NIC is
referred to as the Voice NIC.
• You must configure the Session Initiation Protocol (SIP) and Real-time Transport Protocol
(RTP) traffic to route to the Voice NIC of the recording server in the SPAN configuration.
May 2020 Deploying Harmony Workforce Optimization on Unified Contact Center Enterprise 45
Comments on this document? infodev@avaya.com

Planning and preconfiguration
Preinstallation checklist
No. Task Reference
1 Ensure that the servers with required operating system and
Windows service packs are available, as per system
requirements. The Windows server should have all the
latest patches.
2 Ensure that your network administrator enables the Data
Network Interface Card (NIC) and Packet Sniffer or Voice
NIC on the servers where the recorder is installed.
3 Ensure that network considerations are met. See Network requirements on
4 Ensure that your network administrator configures a valid
mail server.
5 Ensure that the sound card is available on client machines
to listen to live and recorded interactions.
6 Install SQL 2012/2016 (64–bit) standard edition/2017 (64–
bit) enterprise edition, with the latest service pack on the
server where you want to create the database for the
Harmony Workforce Optimization application. Also, ensure
that the SQL server agent is running.
Note:
While installing SQL 2012/2016 (64–bit) standard
edition, on the Feature Selection screen, ensure you
select only the Database Engine Services check
box.
-
-
page 45.
-
-
-
Ensure that you do not install the SQL server and the
Harmony Workforce Optimization components on the
same drive to avoid performance issues.
7 Enable TCP/IP service on the server where SQL is
installed irrespective of the SQL edition. Restart the SQL
service after enabling the TCP/IP service.
8 Obtain the Harmony Workforce Optimization software. See Downloading software
9 Install the mandatory third party utilities such as Wireshark,
WinPCap, 7 Zip, Microsoft Visual C++ 2017 Update 3
Redistributable Package (x86), Microsoft ODBC Driver 13
for SQL Server, Microsoft Command Line Utilities 13.1 for
SQL Server, and Microsoft SQL Server 2012 Native Client
(x64) 11–4.
Notepad ++ is an optional third party utility that you can
install to analyze and troubleshoot log files.
-
from PLDS on page 48.
See Software requirements on
page 42.
Table continues…
May 2020 Deploying Harmony Workforce Optimization on Unified Contact Center Enterprise 46
Comments on this document? infodev@avaya.com

No. Task Reference
Preinstallation checklist
10 Download Java security files to a local folder on the server
where you want to install the Harmony Workforce
Optimization software.
11 Ensure that you assign metrics to NICs for a FQDN based
installation with multiple NICs.
12 Ensure there is enough space in the drive in which you
want to store voice files. The required space depends on
the number of interactions you want to store.
13 Ensure that your network administrator configures
spanning on Virtual Local Area Network (VLAN), Gateway,
or Port level on the recording servers.
14 Ensure you enable ports based on your specific
deployment configuration.
15 Ensure that Windows updates are completed on all the
servers before installing Harmony Workforce Optimization.
Ensure that Windows Automatic updates is a planned
activity.
16 Install and run antivirus before or after you install Harmony
Workforce Optimization. Ensure you disable antivirus
before installing Harmony Workforce Optimization.
Ensure that scanning is done during the lean period or non
production hours.
17 Ensure that the server on which you are installing Harmony
Workforce Optimization has a working VBScript engine by
executing any sample VBScript file. McAfee 10 blocks the
VBScript engine present on the Windows server. If you
encounter issues with VBScript on the server, uninstall
McAfee 10 version and install the same after Harmony
Workforce Optimization installation.
See Software requirements on
page 42.
See Assigning metrics to the
Network Interface Cards on
page 47.
-
-
-
-
-
See Install or upgrade
program fails on page 190.
Assigning metrics to the Network Interface Cards
About this task
Metrics are assigned to network interface cards (NICs) when the routing table contains multiple
routes for the same destination. For a FQDN based installation with multiple NICs, assign a metric
value higher than 10 to set priority to get the data NIC IP address.
Note:
Ensure that you do not assign a metric value to the data NIC.
Procedure
1. Log in to the server where the Recorder is installed.
May 2020 Deploying Harmony Workforce Optimization on Unified Contact Center Enterprise 47
Comments on this document? infodev@avaya.com

Planning and preconfiguration
2. Click Start > Control Panel > Network and Sharing Center.
3. Click Change adapter settings.
4. Right-click the network adapter on which the voice traffic comes.
5. Click Properties.
6. Double-click the Internet Protocol Version 4 (TCP/IPv4).
7. Click the Advanced tab period.
8. Clear Automatic Metric.
9. In the Interface Metric field, enter a value higher than 10.
10. Click OK.
11. Click OK.
Registering for PLDS
Procedure
1. Go to the Avaya Product Licensing and Delivery System (PLDS) website at https://
plds.avaya.com.
The PLDS website redirects you to the Avaya single sign-on (SSO) webpage.
2. Log in to SSO with your SSO ID and password.
3. On the PLDS registration page, register as:
• An Avaya Partner: Enter the Partner Link ID. To know your Partner Link ID, send an
email to prmadmin@avaya.com.
• A customer: Enter one of the following:
- Company Sold-To
- Ship-To number
- License authorization code (LAC)
4. Click Submit.
Avaya sends the PLDS access confirmation within one business day.
Downloading software from PLDS
Procedure
1. In your web browser, type http://plds.avaya.com to go to the Avaya PLDS website.
2. On the PLDS website, enter your Login ID and password.
3. On the Home page, select Assets.
May 2020 Deploying Harmony Workforce Optimization on Unified Contact Center Enterprise 48
Comments on this document? infodev@avaya.com

4. Select View Downloads.
Preinstallation checklist
5.
Click the search icon (
6. In the Search Companies dialog box, do the following:
a. In the %Name field, type Avaya or the Partner company name.
b. Click Search Companies.
c. Locate the correct entry and click the Select link.
7. Search for the available downloads by using one of the following:
• In Download Pub ID, type the download pub ID.
• In the Application field, click the application name.
8. Click Search Downloads.
9. Scroll down to the entry for the download file, and click the Download link.
10. Select a location where you want to save the file, and click Save.
11. (Optional) If you receive an error message, click the message, install Active X, and
continue with the download.
12. (Optional) When the system displays the security warning, click Install.
When the installation is complete, PLDS displays the downloads again with a check mark
next to the downloads that have completed successfully.
) for Company Name.
Installing JTAPI client
About this task
Use this procedure to install JTAPI client on the Harmony Workforce Optimization recording
server. The default location where JTAPI client installs the JTAPI.jar file is C:/Program
Files/Cisco/JTAPI64Tools/lib/jtapi.jar.
Procedure
1. Log in to the Unified Cisco Communication Manager interface..
2. Navigate to Application > Plugins.
3. Click Find and search for Cisco JTAPI 64–bit Client for Windows.
4. Click Download and save the CiscoJTAPIClient.exe file.
5. Double-click the CiscoJTAPIClient.exe file and click Next.
6. Read the current version and click Next.
7. Click Next to install the library files in the default location.
8. Click Next to place the sample applications and documents in the default location.
May 2020 Deploying Harmony Workforce Optimization on Unified Contact Center Enterprise 49
Comments on this document? infodev@avaya.com

Planning and preconfiguration
9. For Cisco TFTP IP address, type the IP address of server where the Unified
Communication Manager is installed.
10. Click Yes, I want to view the readme file.
11. Click Finish.
May 2020 Deploying Harmony Workforce Optimization on Unified Contact Center Enterprise 50
Comments on this document? infodev@avaya.com

Chapter 7: Deployment
Single box installation
Installing Harmony Workforce Optimization
Before you begin
• Install SQL 2012/2016 standard edition/2017 (64–bit) enterprise edition with the latest service
pack and ensure the SQL agent is running.
• Install third-party software utilities.
Procedure
1. Run the Harmony_5_3_0.exe file as an administrator.
Note:
The installer displays a message to install Microsoft Visual C++ 2017 Update 3
Redistributable Package (x64), Microsoft ODBC Driver 13 for SQL Server, Microsoft
Command Line Utilities 13.1 for SQL Server, and Microsoft SQL Server 2012 Native
Client (x64) 11–4. The message is not displayed if the software is already installed.
Click Install.
2. On the Welcome screen, click Next.
3. On the License Agreement screen, select I accept the terms in the license agreement,
and then click Next.
4. On the Setup Type screen, select one of the following:
• Standard
• Custom
5. Click Next.
6. (Optional) If you select the Standard option in the Standard Setup screen, do the
following:
a. Select the Web Application Role check box.
b. Select the Web and SysAdmin check boxes.
c. Select the Database Role check box.
May 2020 Deploying Harmony Workforce Optimization on Unified Contact Center Enterprise 51
Comments on this document? infodev@avaya.com

Deployment
d. Select the Speech check box.
e. Select the Recording Role check box.
f. In the Recording Environment section, select the Cisco check box.
g. Select Unified Communication Manager from the Select Cisco PBX drop down
menu.
h. Click Next.
Note:
The installer displays a message to install Zulu-8.23.0.4 JDK 8.0.144.
i. Click Yes to install Zulu-8.23.0.4 JDK 8.0.144.
j. Select the folder where the java security files are located and click OK.
k. Select UCCE from the ACD drop down menu.
l. (Optional) Select Cisco CUBE from the Gateway drop down menu.
7. Click Next.
8. (Optional) If you select the Custom option in the Custom Setup screen, do the following:
a. In the Web Application section, select the Web and SysAdmin check boxes.
b. In the Database section, select the Database check box.
c. In the Utilities section, select the Log Manager, Process Checklist, Packet Sniffer,
Screen Capture, and Speech check boxes.
d. In the Adapters section, select the SIP adapter and Cisco adapter check boxes.
e. In the Recorder section, select the Recorder, Unified Messaging, and Media
Manager check boxes.
f. Click Next.
Note:
The installer displays a message to install Zulu-8.23.0.4 JDK 8.0.144.
g. Click Yes to install Zulu-8.23.0.4 JDK 8.0.144.
h. Select the folder where the java security files are located and click OK.
9. Click Next.
10. On the Configuration screen, configure the required fields.
11. Click Next.
12. On the Database Settings screen, configure the required fields.
13. Click Next.
The system displays the Installation Summary screen. You can click Back to review or
change any installation setting.
May 2020 Deploying Harmony Workforce Optimization on Unified Contact Center Enterprise 52
Comments on this document? infodev@avaya.com

Single box installation
14. On the Installation Summary screen, review the installation settings, click Install.
You can click Cancel anytime to cancel the installation.
The installer displays the InstallShield Wizard Completed screen, when the installation is
complete.
15. (Optional) Select the Show the Windows Installer log check box to view and save the
installation log.
16. Click Finish.
Next steps
Restart all the services with the administrator user privileges.
Standard Setup field descriptions
Name Description
Web Application Role The role to install and access the web application. The options are:
• WebApp Service: You are authorized to access the Harmony
Workforce Optimization application.
• SysAdmin: You are authorized to access the SysAdmin module.
Database Role The role to create database. By default, the installation creates two
databases, one for Host and another for Tenant. A database role is
a collection of permissions and privileges that can be assigned to
one or more users. SQL must be installed before Harmony
Workforce Optimization installation.
Recording Role The role to install and enable the recording facility in the product.
The options are:
• Recording Environment: The option to choose Cisco as the
recording environment.
• Cisco PBX: The option to choose Unified Communication
Manager as the Cisco PBX.
• Automatic Call Distributor (ACD): The option to choose UCCE
as the ACD.
• Gateway: The option to choose Cisco CUBE as the gateway.
Custom Setup field descriptions
Web Application
Name
Web The option to install the Harmony Workforce Optimization web
SysAdmin The option to install the SysAdmin application.
Analytics The option to install Analytics.
Description
application.
May 2020 Deploying Harmony Workforce Optimization on Unified Contact Center Enterprise 53
Comments on this document? infodev@avaya.com

Deployment
Recorder
Name Description
Recorder The option to install the Recorder component to record interaction.
Unified Messaging The option to install the Unified Messaging component to act as
proxy between the Screen Capture and Recorder components.
Media Manager The option to install the Media Manager component to encrypt,
playback, and monitor live interactions.
Utilities
Name Description
Log Manager The option to install the Log Manager component to manage log
files of all the components.
Process Checklist The option to install the Process Checklist component to monitor the
status of all the components.
Packet Sniffer The option to install the Packet Sniffer component to sniff the
packets in the network.
Screen Capture The option to install the Screen Capture application to capture agent
desktop.
Speech The option to install Speech component to analyze interaction
transcript.
Adapters
Name
SIP adapter The option to install SIP adapter for Unified Contact Center
Cisco adapter The option to install Cisco adapter UCCE on UCM active and
Description
Enterprise UCCE on Unified Communications Manager (UCM)
active deployments.
passive deployments.
Database
Name
Database The option to install the database. By default, the installation creates
Description
two databases, one for Host and another for Tenant.
Configuration field descriptions
Name
Installation Path The location for installing the product Harmony Workforce
Description
Optimization. All components get extracted to this location, and
each folder has an executable file and dependent files. The default
installation path is C:\Harmony.
Table continues…
May 2020 Deploying Harmony Workforce Optimization on Unified Contact Center Enterprise 54
Comments on this document? infodev@avaya.com

Single box installation
Name Description
Logs Path The location of the log files. A log file records the event occurrence
during a software or product runtime. By default, the logs folder is
located at C:\Logs.
WFO_Home Path The location of the master database. Database files, such as mdf
and ldf, are saved at this location. By default, WFO_Home Path is
located at C:\WFO_Home.
Voice Drive The drive where the voice folder is created to store interaction data.
The recorder records interactions and stores voice files, such as
bwd and fwd, and screens in the voice folder.
WebLM IP Address / Hostname The IP address or hostname of the server where WebLM is installed
so that the SysAdmin connects to WebLM to fetch and validate the
licenses.
Server IP Address / Hostname The IP address or hostname of the server on which you want to
install one or all of the following:
• Web application
• Database
• Recorder and Harmony Workforce Optimization components
Proxy Server IP Address /
Hostname
The IP address or hostname of the server on which you want to
install the Harmony Workforce Optimization web application,
irrespective of single-box or multibox deployments. The
HarmonyWebProxy service is installed as a component, and the
Apache24 folder is created in the installation path.
Proxy Port Number The port number of the proxy server that enables web login and call
playback. The default port is 80. Changing the port number requires
change in the parameter configurations for components such as
Recorder, Media Manager, and Messaging.
Note:
Do not use port number 443.
Server FQDN The fully qualified domain name of the server on which you want to
install one or all of the following:
• Web application
• Database
• Recorder and Harmony Workforce Optimization components
Note:
For IP-based installation, ensure that you configure FQDN with
an IP address. Else, in multibox deployments, you will
encounter issues when importing SSL certificates.
May 2020 Deploying Harmony Workforce Optimization on Unified Contact Center Enterprise 55
Comments on this document? infodev@avaya.com

Deployment
Database Settings field descriptions
Name Description
Database Server IP Address / Hostname The IP address or hostname of the server where
you are creating the database. You can also point to
an existing database.
Named Instance The option to install the database using the named
instance mode. You can point to a named instance
of the SQL installation and enter the name of the
instance.
Port Number The port number of the server where the database
is installed. The default port number is 1433.
Failover Database IP Address / Hostname The IP address or hostname of the server that acts
as a secondary database server when the primary
database server fails.
Windows authentication credentials of current
user
SQL server authentication credentials The option to install the database using SQL server
The option to install the database using Windows
Authentication credentials of the current user.
You must have a Windows domain account for the
Harmony Workforce Optimization application
services.
authentication. You can connect to the database or
login as the database administrator. The installer
creates the following users in the database:
• harmonyadmin: Username used to create
databases and database tables.
• harmonysec: Username used for encryption and
decryption services.
• harmony: Username used for all components to
connect to the database.
• sa: Username with superadmin privileges.
Note:
A user with system administrator privileges
must be created if the sa user is not available.
Login ID The username to access the database.
Password The password to access the database.
Name of database catalog The name of the database that you want to create.
May 2020 Deploying Harmony Workforce Optimization on Unified Contact Center Enterprise 56
Comments on this document? infodev@avaya.com

Harmony Workforce Optimization multibox installation
Harmony Workforce Optimization multibox installation
Harmony Workforce Optimization multibox installation depends on the following factors:
• The number of concurrent calls
• The number of web application users including agents, supervisors, and quality managers.
If the number of concurrent calls ranges from 150 to 500, install the following on separate servers:
• A Recorder and other Harmony Workforce Optimization components
• The web application and database
If the number of concurrent calls are more than 500, install:
• One recorder and other Harmony Workforce Optimization components on one server for
each 500 concurrent calls.
• The web application on a separate server.
• The database on a separate server.
You can install the Harmony Workforce Optimization application using the following two methods:
• Standard: Choose the telephony platform, automatic call distributor, and dialer in the
Recording Role option. Harmony Workforce Optimization automatically installs the relevant
recorder components.
Table 7: If the number of concurrent calls range from 150 to 500
Server Role Notes
Server 1 - Web Application Role
- Database Role
Server 2 - Recording Role Installs the Recorder and other
Table 8: If the number of concurrent calls are more than 500
Server Role Notes
Server 1 - Database Role Installs the database.
Server 2 - Web Application Role Installs the web application.
Server 3 - Recording Role For each 500 concurrent calls,
Installs the web application and
database.
Harmony Workforce
Optimization components.
install a new recorder server.
Installs the Recorder and other
Harmony Workforce
Optimization components.
• Custom: Choose individual components that you want to install for any deployment.
May 2020 Deploying Harmony Workforce Optimization on Unified Contact Center Enterprise 57
Comments on this document? infodev@avaya.com

Deployment
Table 9: If the number of concurrent calls range from 150 to 500
Server Component Notes
Server 1 - Web
- Database
Server 2 - Recorder
- Utilities
- Adapters
Table 10: If the number of concurrent calls are more than 500
Server Role Notes
Server 1 - Database Install the database.
Server 2 - Web Install the web application.
Server 3 - Recorder
- Utilities
- Adapters
Installs the web application and
database.
Installs the Recorder, Utilities,
and Adapters.
For each 500 concurrent calls,
install a new recorder server.
Installs the Recorder, Utilities,
and Adapters.
Related links
Installing Harmony Workforce Optimization on page 58
Installing Harmony Workforce Optimization
Before you begin
• Install SQL 2012/2016 standard edition/2017 (64–bit) enterprise edition with the latest service
pack and ensure the SQL agent is running.
• Install third-party software utilities.
Procedure
1. Run the Harmony_5_3_0.exe file as an administrator.
Note:
The installer displays a message to install Microsoft Visual C++ 2017 Update 3
Redistributable Package (x64), Microsoft ODBC Driver 13 for SQL Server, Microsoft
Command Line Utilities 13.1 for SQL Server, and Microsoft SQL Server 2012 Native
Client (x64) 11–4. The message is not displayed if the software is already installed.
Click Install.
2. On the Welcome screen, click Next.
3. On the License Agreement screen, select I accept the terms in the license agreement,
and then click Next.
May 2020 Deploying Harmony Workforce Optimization on Unified Contact Center Enterprise 58
Comments on this document? infodev@avaya.com

Harmony Workforce Optimization multibox installation
4. On the Setup Type screen, select one of the following:
• Standard
• Custom
5. Click Next.
6. (Optional) If you select the Standard option in the Standard Setup screen, do the
following:
a. Select the Web Application Role: check box.
b. Select the Web and SysAdmin check boxes.
c. Select the Database Role check box.
d. Select the Speech check box.
e. Select the Recording Role check box.
f. In the Recording Environment section, select the Cisco check box.
g. Select Unified Communication Manager from the Select Cisco PBX drop down
menu.
h. Click Next.
Note:
The installer displays a message to install Zulu-8.23.0.4 JDK 8.0.144.
i. Click Yes to install Zulu-8.23.0.4 JDK 8.0.144.
j. Select the folder where the java security files are located and click OK.
k. Select UCCE from the ACD drop down menu.
l. (Optional) Select Cisco CUBE from the Gateway drop down menu.
7. Click Next.
8. (Optional) If you select the Custom option in the Custom Setup screen, do the following:
a. In the Web Application section, select the Web and SysAdmin check boxes.
b. In the Database section, select the Database check box.
c. In the Utilities section, select the Log Manager, Process Checklist, Packet Sniffer,
Screen Capture, and Speech check boxes.
d. In the Adapters section, select the SIP adapter and Cisco adapter check boxes.
e. In the Recorder section, select the Recorder, Unified Messaging, and Media
Manager check boxes.
f. Click Next.
Note:
The installer displays a message to install Zulu-8.23.0.4 JDK 8.0.144.
May 2020 Deploying Harmony Workforce Optimization on Unified Contact Center Enterprise 59
Comments on this document? infodev@avaya.com

Deployment
10. On the Configuration screen, configure the required fields.
11. Click Next.
12. On the Database Settings screen, configure the required fields.
13. Click Next.
14. On the Installation Summary screen, review the installation settings, click Install.
15. (Optional) Select the Show the Windows Installer log check box to view and save the
g. Click Yes to install Zulu-8.23.0.4 JDK 8.0.144.
h. Select the folder where the java security files are located and click OK.
9. Click Next.
The system displays the Installation Summary screen. You can click Back to review or
change any installation setting.
You can click Cancel anytime to cancel the installation.
The installer displays the InstallShield Wizard Completed screen, when the installation is
complete.
installation log.
16. Click Finish.
Next steps
Restart all the services with the administrator user privileges.
Standard Setup field descriptions
Name
Web Application Role The role to install and access the web application. The options are:
Database Role The role to create database. By default, the installation creates two
Description
• WebApp Service: You are authorized to access the Harmony
Workforce Optimization application.
• SysAdmin: You are authorized to access the SysAdmin module.
databases, one for Host and another for Tenant. A database role is
a collection of permissions and privileges that can be assigned to
one or more users. SQL must be installed before Harmony
Workforce Optimization installation.
Table continues…
May 2020 Deploying Harmony Workforce Optimization on Unified Contact Center Enterprise 60
Comments on this document? infodev@avaya.com

Harmony Workforce Optimization multibox installation
Name Description
Recording Role The role to install and enable the recording facility in the product.
The options are:
• Recording Environment: The option to choose Cisco as the
recording environment.
• Cisco PBX: The option to choose Unified Communication
Manager as the Cisco PBX.
• Automatic Call Distributor (ACD): The option to choose UCCE
as the ACD.
• Gateway: The option to choose Cisco CUBE as the gateway.
Custom Setup field descriptions
Web Application
Name Description
Web The option to install the Harmony Workforce Optimization web
application.
SysAdmin The option to install the SysAdmin application.
Analytics The option to install Analytics.
Recorder
Name
Recorder The option to install the Recorder component to record interaction.
Unified Messaging The option to install the Unified Messaging component to act as
Media Manager The option to install the Media Manager component to encrypt,
Description
proxy between the Screen Capture and Recorder components.
playback, and monitor live interactions.
Utilities
Name
Log Manager The option to install the Log Manager component to manage log
Process Checklist The option to install the Process Checklist component to monitor the
Packet Sniffer The option to install the Packet Sniffer component to sniff the
Screen Capture The option to install the Screen Capture application to capture agent
Description
files of all the components.
status of all the components.
packets in the network.
desktop.
May 2020 Deploying Harmony Workforce Optimization on Unified Contact Center Enterprise 61
Comments on this document? infodev@avaya.com

Deployment
Adapters
Name Description
SIP adapter The option to install SIP adapter for Unified Contact Center
Enterprise UCCE on Unified Communications Manager (UCM)
active deployments.
Cisco adapter The option to install Cisco adapter UCCE on UCM active and
passive deployments.
Database
Name Description
Database The option to install the database. By default, the installation creates
two databases, one for Host and another for Tenant.
Configuration field descriptions
Name Description
Installation Path The location for installing the product Harmony Workforce
Optimization. All components get extracted to this location, and
each folder has an executable file and dependent files. The default
installation path is C:\Harmony.
Logs Path The location of the log files. A log file records the event occurrence
during a software or product runtime. By default, the logs folder is
located at C:\Logs.
WFO_Home Path The location of the master database. Database files, such as mdf
and ldf, are saved at this location. By default, WFO_Home Path is
located at C:\WFO_Home.
Voice Drive The drive where the voice folder is created to store interaction data.
The recorder records interactions and stores voice files, such as
bwd and fwd, and screens in the voice folder.
WebLM IP Address / Hostname The IP address or hostname of the server where WebLM is installed
so that the SysAdmin connects to WebLM to fetch and validate the
licenses.
Server IP Address / Hostname The IP address or hostname of the server on which you want to
install one or all of the following:
• Web application
• Database
• Recorder and Harmony Workforce Optimization components
Proxy Server IP Address /
Hostname
The IP address or hostname of the server on which you want to
install the Harmony Workforce Optimization web application,
irrespective of single-box or multibox deployments. The
HarmonyWebProxy service is installed as a component, and the
Apache24 folder is created in the installation path.
Table continues…
May 2020 Deploying Harmony Workforce Optimization on Unified Contact Center Enterprise 62
Comments on this document? infodev@avaya.com

Harmony Workforce Optimization multibox installation
Name Description
Proxy Port Number The port number of the proxy server that enables web login and call
playback. The default port is 80. Changing the port number requires
change in the parameter configurations for components such as
Recorder, Media Manager, and Messaging.
Note:
Do not use port number 443.
Server FQDN The fully qualified domain name of the server on which you want to
install one or all of the following:
• Web application
• Database
• Recorder and Harmony Workforce Optimization components
Note:
For IP-based installation, ensure that you configure FQDN with
an IP address. Else, in multibox deployments, you will
encounter issues when importing SSL certificates.
Database Settings field descriptions
Name
Database Server IP Address / Hostname The IP address or hostname of the server where
Named Instance The option to install the database using the named
Port Number The port number of the server where the database
Failover Database IP Address / Hostname The IP address or hostname of the server that acts
Windows authentication credentials of current
user
Description
you are creating the database. You can also point to
an existing database.
instance mode. You can point to a named instance
of the SQL installation and enter the name of the
instance.
is installed. The default port number is 1433.
as a secondary database server when the primary
database server fails.
The option to install the database using Windows
Authentication credentials of the current user.
You must have a Windows domain account for the
Harmony Workforce Optimization application
services.
Table continues…
May 2020 Deploying Harmony Workforce Optimization on Unified Contact Center Enterprise 63
Comments on this document? infodev@avaya.com

Deployment
Name Description
SQL server authentication credentials The option to install the database using SQL server
authentication. You can connect to the database or
login as the database administrator. The installer
creates the following users in the database:
• harmonyadmin: Username used to create
databases and database tables.
• harmonysec: Username used for encryption and
decryption services.
• harmony: Username used for all components to
connect to the database.
• sa: Username with superadmin privileges.
Note:
A user with system administrator privileges
must be created if the sa user is not available.
Login ID The username to access the database.
Password The password to access the database.
Name of database catalog The name of the database that you want to create.
May 2020 Deploying Harmony Workforce Optimization on Unified Contact Center Enterprise 64
Comments on this document? infodev@avaya.com

Chapter 8: Configuration
Configure browser settings for SSL
Configuring settings for Internet Explorer
About this task
Use this procedure to import the self-signed certificate to the browser trust store. In a multibox
deployment with SSL support, call playback takes place only when the browser sources the selfsigned certificates from the browser trust store.
Procedure
1. In the address bar of your browser, type the IP address of the server where the media
manager and the recorder is installed with the https protocol.
The systems displays the following error message: There is a problem with this
website's security certificate.
2. Click Continue to this website (not recommended).
3. On the address bar, click Certificate error.
4. In the Untrusted Certificate popup, click View certificates.
5. In the Certificate window, click Install Certificate.
6. Click Next.
7. In Certificate Store, select Place all certificates in the following store, and click Browse.
8. Select the Show physical stores check box.
9. Click Trusted Root Certification Authentications and click OK.
10. Click Next.
11. Click Finish.
12. In the Security Warning dialog box, click Yes.
The system displays the message: The import was successful.
Next steps
Restart your Internet Explorer browser.
May 2020 Deploying Harmony Workforce Optimization on Unified Contact Center Enterprise 65
Comments on this document? infodev@avaya.com

Configuration
Configuring settings for Google Chrome
About this task
Use this procedure to import the self-signed certificate to the browser trust store. In a multibox
deployment with SSL support, call playback takes place only when the browser sources the selfsigned certificates from the browser trust store.
Before you begin
Download the certificate to your local server.
Procedure
1. In your browser address bar, type the IP address of the server where the media manager
and the recorder is installed with the https protocol.
The system displays an error message.
2. On the address bar, click the View site information ( ) icon.
3. Click Details.
4. Click View Certificate.
The system displays the Certificate pane.
5. Click the Details tab and click Copy to File.
6. Click Next.
7. Select Base64 encoded X.509 (.CER).
8. Click Next.
9. Click Browse and specify the file name that you want to export to the desktop.
10. Click Save.
11. Click Next and click Finish.
The system displays the message that the export is successful.
12. Click OK.
13. Go to the saved folder and double click the certificate.
14. Click Install Certificate.
15. Click Next.
16. Select the Place all certificates in the following store check box.
17. Click Browse and select Trusted Root Certification Authorities.
18. Click Next.
19. Click Finish.
20. The system displays the Security dialog box.
May 2020 Deploying Harmony Workforce Optimization on Unified Contact Center Enterprise 66
Comments on this document? infodev@avaya.com

Configure browser settings for SSL
21. Click Yes.
The system displays the message that the import is successful.
22. Click OK.
Next steps
Restart your Google Chrome browser.
Configuring settings for Mozilla Firefox
About this task
Use this procedure to import the self-signed certificate to the browser trust store. In a multibox
deployment with SSL support, call playback takes place only when the browser sources the selfsigned certificates from the browser trust store.
Procedure
1. In your browser address bar, type the IP address of the server where the media manager
and the recorder is installed with the https protocol.
The system displays an error message.
2. Do one of the following whichever is displayed for your version of Firefox:
• Click the Advanced button.
• Click I Understand the Risks.
3. Click Add Exception.
4. Click Confirm Security Exception.
The system automatically imports the root signer certificate into the Firefox certificate trust
store.
5. Close all instances of Firefox in your system.
Next steps
Restart your Mozilla Firefox browser.
May 2020 Deploying Harmony Workforce Optimization on Unified Contact Center Enterprise 67
Comments on this document? infodev@avaya.com

Configuration
Configure log values
Modifying default values for logs
About this task
The logs folder contains log files that help in debugging issues. However, the default limit for the
number of log files is 20 and the size for each log file is 40 MB.
Use this procedure to change the default value for log file size and the number of the log files.
Procedure
1. Go to the WFO_Home folder located at C:\WFO_Home if you have not changed the default
location during installation.
2. In the ICMCommon.properties file, update the following parameters:
• NoOfLogFiles
• LogFileSize
3. Click Save.
4. Restart the Harmony Workforce Optimization components.
Configure SysAdmin
Logging on to SysAdmin
About this task
Before you login into the SysAdmin application for the first time, ensure you clear the browser
cache.
Procedure
1. Open a compatible web browser on your computer.
2. Type the IP address of SysAdmin server in the standard dotted-decimal notation.
For example, http://<ServerIP>/sysadmin/ where server IP is the IP address of the
server where the web application is installed.
3. Type your User Name and Password.
The default user name is admin and the default password is harmony1@3.
4. Click Login.
May 2020 Deploying Harmony Workforce Optimization on Unified Contact Center Enterprise 68
Comments on this document? infodev@avaya.com

Configure SysAdmin
If you are logging in to the SysAdmin application for the first time, change the password
and make a note of the new password. There is no reset mechanism to change the
password.
Importing the license file
About this task
When you login into the SysAdmin application for the first time, you must import the license (xml)
file that you generated from PLDS.
Procedure
1. Log in to SysAdmin for the first time.
2. On the License Configuration page, type the Mac ID of the machine on which the
SysAdmin application is installed.
3. Click Browse to browse for the license file.
4. Click Import.
The License page is displayed with license details such as file name, name of the person
who imported the file, and the date and time when the file was imported.
5. On the License page, click on the license file to download it.
Configuring Harmony for hosted or premise deployments
About this task
When you login into the SysAdmin application for the first time, configure the following types of
deployments:
• Hosted: Supports single and multi-tenancy capability.
• Premise: Allows deployment from a premise infrastructure. Premise deployments also
support single and multi-tenancy capability where multiple tenants can be based out of
different geographical locations within an organization.
Procedure
1. Log in to SysAdmin for the first time.
2. In the Type of Deployment? section, select one of the following:
• Hosted
• Premise
3. In the Mode of Tenants? section, select one of the following:
• Single Tenant
• Multiple Tenant
May 2020 Deploying Harmony Workforce Optimization on Unified Contact Center Enterprise 69
Comments on this document? infodev@avaya.com

Configuration
4. For premise type of deployment with single tenant, enter the appropriate information in the
fields.
5. Click Save.
Next steps
Configure tenants for the following:
• Hosted type of deployment with single or multiple tenants.
• Premised type of deployment with multiple tenants.
Harmony on premise deployment field descriptions
Configure Tenant
Name Description
Tenant Name The name of the tenant.
Alias The tenant alias.
Tenant Code The code of the tenant.
Address The address of the tenant.
Country The country of the tenant.
State/Province The state or province of the tenant.
City The city of the tenant.
Configure Tenant Administrator
Name
First Name The first name of the tenant administrator.
Last Name The last name of the tenant administrator.
Username The username the tenant administrator uses to log
Email The email address of the tenant administrator.
Phone The phone number of the tenant administrator.
Description
into the application.
Adding tenants
About this task
Use this procedure to create and manage tenants by configuring the following:
• Tenant details such as tenant name, alias, address, and status.
• Contact details such as email and phone.
• User management to manage tenant administrators.
• License details such as available licenses, purchased licenses, edition, and license expiry
date.
May 2020 Deploying Harmony Workforce Optimization on Unified Contact Center Enterprise 70
Comments on this document? infodev@avaya.com

• Asset mapping to map assets such as database, web application, recorder, and other
components.
• Drive mapping to map storage drives for interactions.
• Tenant summary to view the summary of the details configured for a tenant.
Procedure
1. Log in to SysAdmin.
2. Click Tenant Management > Tenant Administration > Add Tenant.
Adding tenant details
Procedure
1. Log in to SysAdmin.
2. Click Tenant Management > Tenant Administration > Add Tenant.
3. Click Tenant Details.
Configure SysAdmin
4. On the Add New Tenant page, enter the appropriate information in the fields.
5. Click Save.
Tenant details field descriptions
Name
Tenant Name The name of the tenant. It is a best practice to
Default The option to specify whether the tenant you are
Alias The unique tenant alias. The length of the tenant
Tenant code The tenant code.
Address 1 The address of the tenant.
Address 2 The address of the tenant.
Description
follow a naming convention while configuring the
tenant name. You can prefix or suffix the tenant
name with the location. For example, ABC_HYD,
ABC_DELHI.
Note:
Ensure that you add the tenant name without a
space. You can use the underscore symbol in
between words to represent a space.
adding is the default tenant. The tenant dashboard
displays the details of the default tenant every time
you log in to the application.
alias ranges from a minimum of 3 characters to a
maximum of 50 characters.
Table continues…
May 2020 Deploying Harmony Workforce Optimization on Unified Contact Center Enterprise 71
Comments on this document? infodev@avaya.com

Configuration
Name Description
Country The country of the tenant
State/Province The state or province of the tenant.
City The city of the tenant.
Zone The zone or area of the tenant.
Notes The option to add comments or notes about the
tenant.
Adding contact details
Procedure
1. Log in to SysAdmin.
2. Click Tenant Management > Tenant Administration > Add Tenant.
3. Click Contact Details.
4. On the Contact Details page, click Add Contact.
5. On the Add New Contact page, enter the appropriate information in the fields.
6. Click Save.
Tenant contact details field descriptions
Name
Tenant Name The name of the tenant.
Email The email address of the tenant. The SysAdmin
Phone The phone number of the tenant,
Contact Type The option to group the tenant under a category.
Description
login credentials are sent to this email address.
The categories are:
• General
• Finance
• IT
• Others
Adding users
About this task
Use this procedure to add one or more tenant administrators to manage tenants in your absence.
The tenant administrators you add can manage only tenant details and alerts.
May 2020 Deploying Harmony Workforce Optimization on Unified Contact Center Enterprise 72
Comments on this document? infodev@avaya.com

Note:
The username and password created for this user is used to login to the Harmony Workforce
Optimization application.
Procedure
1. Log in to SysAdmin.
2. Click Tenant Management > Tenant Administration > Add Tenant.
3. Click User Management.
4. On the Users page, click Add User.
5. On the Add New User page, enter the appropriate information in the fields.
6. Click Save.
Note:
Make a note of the password generated to notify the tenant administrator.
Users field descriptions
Configure SysAdmin
Name Description
First Name The first name of the user.
Last Name The last name of the user.
Username The user name used to log in to the Harmony
Workforce Optimization application.
Email The email address of the user.
Phone The phone number of the user.
Configuring license details
Procedure
1. Log in to SysAdmin.
2. Click Tenant Management > Tenant Administration > Add Tenant.
3. Click License Details.
4. On the License Details page, enter the appropriate information in the fields.
5. Click Save.
May 2020 Deploying Harmony Workforce Optimization on Unified Contact Center Enterprise 73
Comments on this document? infodev@avaya.com

Configuration
Tenant license details field descriptions
Name Description
Available Master Licenses The number of overall master licenses purchased or
available in the system. In case of multi-tenant
environment, the tenant licenses are a subset of the
overall master licenses.
Harmony Edition The edition purchased by the tenant. Each edition
comes with a set of default modules that cannot be
revoked.
Purchased Licenses The total number of licenses purchased by the
tenant.
Expiry Date The date when the license of the tenant expires.
Module Name The modules available for the tenant based on the
license that the tenant purchased.
Mapping assets
About this task
Tenant administrators can map assets to one or more tenants based on the service type, node,
and capacity of an asset.
Procedure
1. Log in to SysAdmin.
2. Click Tenant Management > Tenant Administration > Add Tenant.
3. Click Asset Mapping.
4. Select the check box next to the asset that you want to map to the tenant.
5. Click Save.
Asset mapping field descriptions
Name
Group By The option to group the fields for asset mapping by:
Asset IP The IP address of the asset, server, or machine.
Asset Name The name of the asset, server, or machine.
Description
• Asset IP
• Asset Name
• Service Type
• Service Node
Table continues…
May 2020 Deploying Harmony Workforce Optimization on Unified Contact Center Enterprise 74
Comments on this document? infodev@avaya.com

Configure SysAdmin
Name Description
Service Type The service type installed on the asset. The
component type can be database, web application,
adapter, service, or recorder.
Service Node A single instance of a component installed on the
asset.
Adding storage drive for Windows
About this task
Use this procedure to create storage drives for Windows.
Procedure
1. Log in to SysAdmin.
2. Click System Administration > Configuration > Storage Drives.
3. Click Add Storages.
4. On the Add New Storage page, configure the following:
a. Storage Name: Enter a storage name that you want to add.
b. Storage Location: Select Windows as the storage location.
c. Storage Path: Enter the storage path or drive to store interactions.
d. Asset: Select the asset that you want to associate the storage with.
e. Storage Type: Select the storage type to define the primary or secondary storage.
f. Active: Click to activate the storage drive.
5. Click Save & Close.
Windows storage drive field description
Name
Storage Name The name of the storage you want to add.
Storage Location The type of storage location you want to select. The
Storage Path The storage path or drive to store interactions.
Asset The asset for which you want to add the storage
Description
option are:
• Windows
• Amazon S3
drive.
Table continues…
May 2020 Deploying Harmony Workforce Optimization on Unified Contact Center Enterprise 75
Comments on this document? infodev@avaya.com

Configuration
Name Description
Storage Type The type of storage location. The options are:
• Primary
• Secondary
Data is stored in the secondary location only when
the primary location fails or is unavailable.
Active The option to specify the status of the storage drive.
Configuring a persistent connection for storage drives
About this task
Use this procedure to configure a persistent connection between the following drives:
• Harmony Workforce Optimization
• Network Attached Storage (NAS) or Storage Area Networks (SAN)
To retrieve call data, the NAS or SAN drive must be connected to the server where Harmony
Workforce Optimization is installed.
Procedure
1. On the Harmony Workforce Optimization server, click Start > Run > Task Scheduler.
The system displays the Windows Task Scheduler screen.
2. On the menu bar, click Action > Create Task.
3. On the General tab, do the following:
a. In the Name field, type a name for the task.
b. Click Change User or Group and add System as the user account.
c. Select the Run with highest privileges check box.
4. On the Trigger tab, do the following:
a. Click New.
b. Select the Daily option.
c. Select the Request task every check box and select 10 minutes from the drop-down
list.
Retain the default setting for duration of 1 day.
d. Select the Stop task if it runs longer than: check box.
Retain the default setting of 3 days.
e. Select the Enabled check box.
f. Click OK.
May 2020 Deploying Harmony Workforce Optimization on Unified Contact Center Enterprise 76
Comments on this document? infodev@avaya.com

Configure SysAdmin
5. On the Actions tab, do the following:
a. Click New.
b. In the Program/script field, click Browse and navigate to the location C:\Windows
\system32\net.exe
c. In the Add arguments (optional) field, type use K: \\<IP address of the
NAS or SAN drive>\<storage drive>\ <password> /
user:<username> /persistent:yes.
d. Click OK.
K:\ drive is created on the Harmony Workforce Optimization server and is mapped to
the NAS or SAN drive.
Adding storage drive for Amazon S3
About this task
Use this procedure to create cloud based storage support for Amazon S3 to store voice, screens,
and XML metadata.
Procedure
1. Log in to SysAdmin.
2. Click System Administration > Configuration > Storage Drives.
3. Click Add Storages.
4. On the Add New Storage page, configure the following:
a. Storage Name: Enter a storage name that you want to add.
b. Storage Location: Select Amazon S3 as the storage location.
c. Bucket Name: Enter the name of the bucket on Amazon S3.
d. Folder Name: Enter the folder name within the bucket on Amazon S3.
e. Region: Select the region where the bucket on Amazon S3 is located.
f. Access Key ID: Enter the access key ID provided by Amazon S3.
g. Secret Access Key: Enter the secret access key provided by Amazon S3.
h. Validate Connection: Click to validate connection with Amazon S3.
i. Connectivity Status: The option that displays the connectivity status between Media
Manager and Amazon S3.
j. Storage Type: Select the storage type to define the primary or secondary storage.
k. Active: Click to activate the storage drive.
5. Click Save & Close.
May 2020 Deploying Harmony Workforce Optimization on Unified Contact Center Enterprise 77
Comments on this document? infodev@avaya.com

Configuration
Related links
Amazon S3 storage field description on page 78
Amazon S3 storage field description
Name Description
Storage Name The name of the storage you want to add.
Storage Location The type of storage location you want to select. The
options are:
• Windows
• Amazon S3
Bucket Name The name of the bucket on Amazon S3 where you
want to store the interactions.
Note:
To avoid the risk of losing data access,
Harmony Workforce Optimization disables this
field if the connection validation is successful
after saving.
After establishing a successful connection
validation with Amazon S3, if the bucket name
is modified in Amazon S3, you cannot
playback the interactions that were previously
stored in that storage from Harmony Workforce
Optimization. Ensure that the bucket name is
identical in Amazon S3 and Harmony
Workforce Optimization.
Folder Name The folder or folder structure that you create within
the bucket on Amazon S3. For example, you can
create folder to group interaction storage based on
the storage action type.
Note:
To avoid the risk of losing data access,
Harmony Workforce Optimization disables this
field if the connection validation is successful
after saving.
After establishing a successful connection
validation with Amazon S3, if the folder name
is modified in Amazon S3, you cannot
playback the interactions that were previously
stored in that storage from Harmony Workforce
Optimization. Ensure that the folder name is
identical in Amazon S3 and Harmony
Workforce Optimization.
Table continues…
May 2020 Deploying Harmony Workforce Optimization on Unified Contact Center Enterprise 78
Comments on this document? infodev@avaya.com

Configure SysAdmin
Name Description
Region The region where the bucket on Amazon S3 is
located.
Note:
To avoid the risk of losing data access,
Harmony Workforce Optimization disables this
field if the connection validation is successful
after saving.
Access Key ID The access key ID provided by Amazon S3.
Show Access Key ID The option to view the access key ID that is
encrypted.
Secret Access Key The secret access key provided by Amazon S3.
Show Secret Access Key The option to view the secret access key that is
encrypted.
Validate Connection The option to check if the bucket name, access key
ID, and secret access key are valid.
Connectivity Status The option that displays the connectivity status. The
options are:
• Successful: Harmony Workforce Optimization
displays this status when the credentials and
bucket details are valid.
• Failed: Harmony Workforce Optimization displays
this status when the credentials and bucket
details are invalid.
• Unknown: Harmony Workforce Optimization
displays this status when you are creating the
Amazon S3 drive and the credentials and bucket
details are not validated.
Storage Type The type of storage location. The options are:
• Primary
• Secondary
Data is stored in the secondary location only when
the primary location fails or is unavailable.
Active The option to specify the status of the storage drive.
Related links
Adding storage drive for Amazon S3 on page 77
May 2020 Deploying Harmony Workforce Optimization on Unified Contact Center Enterprise 79
Comments on this document? infodev@avaya.com

Configuration
Mapping storage drives
About this task
Use this procedure to map storage drives to define the storage location of interactions for a tenant.
Procedure
1. Log in to SysAdmin.
2. Click Tenant Management > Tenant Administration > Add Tenant.
3. Click Drive Mapping.
4. On the Drive Mapping page, select the check box next to the storage names that define
the storage drives for this tenant.
5. Click Save.
Mapped drives field description
Name Description
Storage Name The storage name created by the System
Administrator.
Storage Location The storage location as specified by the System
Administrator. The options are:
• Windows
• Amazon S3
Storage Path The storage path or drive where interactions are
stored. This option is predefined by the System
Administrator.
Connectivity Status The option that displays the connectivity status
between Media Manager and Amazon S3. The
options are:
• Successful
• Failed
• Unknown
This option is not applicable if the type of storage
location is Windows.
Table continues…
May 2020 Deploying Harmony Workforce Optimization on Unified Contact Center Enterprise 80
Comments on this document? infodev@avaya.com

Name Description
Storage Type The type of storage as specified by the System
Administrator. The options are:
• Primary
• Secondary
Data is stored in the secondary location only when
the primary location fails or is unavailable.
Asset The IP address of the server where the storage
drive for Windows is created by the System
Administrator.
This option is not applicable if the type of storage
location is Amazon S3.
Viewing tenant summary
Procedure
Configure SysAdmin
1. Log in to SysAdmin.
2. Click Tenant Management > Tenant Administration > Add Tenant.
3. Click Tenant Summary.
4. On the Summary Details page, view the tenant summary details.
5. Click Save.
Modifying tenant status
Procedure
1. Log in to SysAdmin.
2. Click Tenant Management > Tenant Administration > Add Tenant.
3. Click Tenant Details.
4. On the Add New Tenant page, change the tenant status from Draft to Active.
5. Click Save.
May 2020 Deploying Harmony Workforce Optimization on Unified Contact Center Enterprise 81
Comments on this document? infodev@avaya.com

Configuration
Configure parameters for Unified Contact Center Enterprise UCCE on United Communication Manager
No. Task Reference Notes
1 Use any one the following
procedures to configure parameters
for components and adapters:
• Configuring component parameters
• Performing bulk actions
2 Configure the Webapp parameters. See Webapp
3 Configure Cisco adapter and SIP
adapter parameters for active
recording.
4 Configure Cisco adapter parameters
for passive recording..
5 Configure the messaging parameters
for on-demand recording.
6 Configure the media manager
parameters for call encryption.
7 Configure the recorder parameters. See Recorder
See:
• Configuring
component
parameters on
page 83
Performing bulk
•
actions on page 84
parameters on
page 85.
See:
• Cisco adapter
parameters on
page 86
• SIP adapter
parameters on
page 85
See Cisco adapter
parameters on
page 86.
See Messaging
parameters on
page 87.
See Media manager
parameters on
page 88.
Parameters on
page 89.
Table continues…
May 2020 Deploying Harmony Workforce Optimization on Unified Contact Center Enterprise 82
Comments on this document? infodev@avaya.com

Configure parameters for Unified Contact Center Enterprise UCCE on United Communication Manager
No. Task Reference Notes
8 Configure the following component
parameters:
• Log Manager
• Process Checklist
• Packet Sniffer
• System Administration
• Analytics
Related links
Configuring component parameters on page 83
See:
• Log Manager
parameters on
page 194
• Process checklist
parameters on
page 195
Packet Sniffer
•
parameters on
page 196
System
•
Administration
parameters on
page 198
Analytics
•
parameters on
page 201
Configuring component parameters
About this task
Every component has a corresponding service that starts and stops the processing of the
component. After installing Harmony Workforce Optimization, you must configure few mandatory
parameters for each of the components to start the service.
Procedure
1. Log in to SysAdmin.
2. Click System Administration > Configuration.
3. To configure parameters for a component, click the Component tab and do the following:
a. In the Component field, select a component.
b. In the Asset field, select the asset you want to configure.
c. In the Node field, select the node you want to configure.
4. In the Value column, click to type the values for the mandatory parameters.
The systems accepts the default value for the parameters that are not mandatory.
5. Click Save.
May 2020 Deploying Harmony Workforce Optimization on Unified Contact Center Enterprise 83
Comments on this document? infodev@avaya.com

Configuration
Next steps
Restart the component service after configuring the parameters.
Component parameters field descriptions
Name Description
Component The components and adapters available for
Harmony Workforce Optimization. The options are:
• Analytics
• Media Manager
• Process Checklist
• Messaging
• Recorder
• Log Manager
• Packet Sniffer
• Speech
• SysAdmin
• WebApp
• SIP adapter
• Cisco adapter
Asset The server where the selected component is
installed.
Node A single instance of the selected component
installed on the selected server or assets.
Performing bulk actions
About this task
Use this procedure to download the parameter configurations for a component in an excel
spreadsheet. You can change the parameter values and import the spreadsheet. The spreadsheet
you download highlights all the mandatory parameters in red color. You cannot import the
spreadsheet if the mandatory values highlighted in red are not configured.
Procedure
1. Log in to SysAdmin.
2. Click System Administration > Configuration.
3. To configure parameter for a component, click the Component tab.
4. In the Component field, select a component.
May 2020 Deploying Harmony Workforce Optimization on Unified Contact Center Enterprise 84
Comments on this document? infodev@avaya.com

Configure parameters for Unified Contact Center Enterprise UCCE on United Communication Manager
5. Click Bulk Action.
6. Click Download to download the template and change the parameter values in an excel
spreadsheet.
7. Click Browse to select the updated spreadsheet you want to import.
8. Click Bulk Import.
9. To update system level component parameter values for a node, click the Service tab and
do the following:
a. In the Component field, select a component.
b. In the Asset field, select an asset.
10. Click Bulk Action.
11. Click Download to download the template and change the parameter values in an excel
spreadsheet.
12. Click Browse to select the updated spreadsheet you want to import.
13. Click Bulk Import.
Webapp parameters
The table lists the parameters you must configure for Webapp component. For detailed description of each
parameter, refer to Appendix: Parameter descriptions.
Use the Configuring component parameters or the Performing bulk actions procedure to configure
parameters.
Group
Mail Configuration mail.smtp.host IP address or the hostname of the email exchange
Parameters Value
server.
mail.smtp.port Port number of the email exchange server.
mail.smtp.auth Email server authentication.
mail.smtp.username Username of the user whose default sender email
address is used.
mail.smtp.password Ppassword of the user whose default sender email
address is used.
mail.default.fromName Name of the user that appears in the From list of the
email.
mail.default.fromAddress Default sender email address that is used to send
emails.
SIP adapter parameters
The table lists the adapter parameters required for active and passive recording. For detailed description of
each parameter, refer to Appendix: Parameter descriptions.
Use the Configuring component parameters or the Performing bulk actions procedure to configure
parameters.
May 2020 Deploying Harmony Workforce Optimization on Unified Contact Center Enterprise 85
Comments on this document? infodev@avaya.com

Configuration
Group Parameter Value Active/
Alerts HTTPAlertsEnabled True Active
AlertManagerIPAddress IP address of the server on which the
SysAdmin is installed.
AlertManagerPort 9495 Active
Component
Options
Debug LogLevel Trace Active
IPOffice
Recording
SitesList Comma separated site aliases to be
supported by the SIP adapter instance.
VoiceIpAddress IP address of the server where the SIP
adapter is installed.
MaxNumOfTrunks To configure the maximum number of trunks.
Retain the default value that is 5.
TraceOptionMessages True Active
IPOActiveEnabled False Active
Passive
Active
Active
Active
Active
Cisco adapter parameters
The table lists the adapter parameters required for active and passive recording. For detailed description of
each parameter, refer to Appendix: Parameter descriptions.
Use the Configuring component parameters or the Performing bulk actions procedure to configure
parameters.
Group
Application Application Harmony Active/Passive
Common JTAPIEnabled True Active/Passive
CTI CTIProtocolVersion Protocol version to connect to UCCE.
Parameter Value Active/
Passive
HTTPAlertsEnabled True Active/Passive
AlertManagerIPAddress IP address of the server on which the
SysAdmin is installed.
AlertManagerPort 9495 Active/Passive
HostDataIP IP address of the server where the Cisco
adapter service is running.
SitesList Comma separated site aliases to be
supported by the Cisco adapter instance.
Retain the default value that is 14.
SendAgentCallInfo False Active/Passive
SendAgentCallStateInfo False Active/Passive
SendAgentCallRTPInfo False Active/Passive
Active/Passive
Active/Passive
Active/Passive
Active/Passive
Table continues…
May 2020 Deploying Harmony Workforce Optimization on Unified Contact Center Enterprise 86
Comments on this document? infodev@avaya.com

Configure parameters for Unified Contact Center Enterprise UCCE on United Communication Manager
Group Parameter Value Active/
Passive
SendAgentCallTransferInfo False Active/Passive
SendAgentCallConfInfo False Active/Passive
SendAgentCallFailedInfo False Active/Passive
JTAPI SendPhoneExtInfo True Active/Passive
SendJTAPIAgentLoginInfo False Active/Passive
SendJTAPIAgentKeyPress
edInfo
JTAPILineInstance JTAPI line instance for UCCE
True Active/Passive
Active/Passive
deployments. The default value is 0. Set
the value to 1.
Messaging parameters
The table lists the adapter parameters required for active and passive recording. For detailed description of
each parameter, refer to Appendix: Parameter descriptions.
Use the Configuring component parameters or the Performing bulk actions procedure to configure
parameters.
Group
Alert
Configuration
Oceana
Provisioning
Configuration
UM_Core nat.apacheIP IP address where Apache is running for the Screen
UM_Core_IP_Po
rts
Parameter Value Active/
AlertManagerPort 9495 Active/
HTTPAlertsEnabledTrue Active/
AlertManagerIPAd
dress
DomainReplaceStringA dummy domain name for Call Center Elite on
proxyIP Host name or IP address where the web application
HarmonyRMSAppli
cation
MessagingServerIPIP address where the Messaging service is running. Active/
RecorderServerIP IP address where the recorder server is running to
IP address of the server on which the SysAdmin is
installed.
Communication Manager deployments.
Capture to connect to the Unified Messaging
component.
server is deployed.
bOffice is the default value. Active/
send the Screen Login information to the recorder.
Passive
Passive
Passive
Active/
Passive
Active/
Passive
Active/
Passive
Active/
Passive
Passive
Passive
Active/
Passive
Table continues…
May 2020 Deploying Harmony Workforce Optimization on Unified Contact Center Enterprise 87
Comments on this document? infodev@avaya.com

Configuration
Group Parameter Value Active/
EDServiceIPAddressIP address where Media Manager is running to
encrypt and decrypt screens.
UM_Core_Sched
uler
UM_Core_Locati
ons
ScreenStorageIPA
ddress
dtaNotifier Cron expression for the Desktop Monitor
uploadLocation Location for temporary storage of screen capture
IP address where Unified Messaging is running to
move the screens from the agent desktop to a local
storage drive.
application. The default value is 0 0/1 * 1/1 * ?.
Note:
Ensure you change the value by replacing 1
with another number. For example, 0 0/2 * 1/1
* ?.
images. For example D:\\voice\\screen or
D:/voice/screen.
Passive
Active/
Passive
Active/
Passive
Active/
Passive
Active/
Passive
logdumpLocation Log file dump location for the Screen Capture
application. For example D:\\dump or D:/dump.
Media manager parameters
The table lists the adapter parameters required for active and passive recording. For detailed description of
each parameter, refer to Appendix: Parameter descriptions.
Use the Configuring component parameters or the Performing bulk actions procedure to configure
parameters.
Group
Alert
Configuration
Component
Options
Parameter Value Active/
Passive
AlertManagerPort 9495 Active/
Passive
HTTPAlertsEnabled True Active/
Passive
AlertManagerIPAddress IP address of the server on which the
SysAdmin is installed.
StorageAddressesList List of storage addresses to pick calls for
video generation.
StorageManagerInstanc
eNumber
NoOfStorageManagerIn
stances
Storage Manager instance that is running. Active/
Total number of Storage Manager instances
that are running. For example, 2.
Active/
Passive
Active/
Passive
Passive
Active/
Passive
Active/
Passive
Table continues…
May 2020 Deploying Harmony Workforce Optimization on Unified Contact Center Enterprise 88
Comments on this document? infodev@avaya.com

Configure parameters for Unified Contact Center Enterprise UCCE on United Communication Manager
Group Parameter Value Active/
Passive
StorageManagerAction Storage manager actions such as archive,
compress, copy, move, and purge. You can
configure multiple actions separated by a
comma. Do not replace the Purge action with
Delete. :
StorageManagerName Storage Manager name. For example, SM1. Active/
EDServiceIPAddress IP address of the server where the Media
Manager service is running to perform
encryption and decryption of recorded
interactions.
Debug EnableSecurity True to enable and False to disable
encryption or decryption for a call.
SecureDBUsername Secure database user name for encrypting
and decrypting interactions. The user name
is harmonysec.
Active/
Passive
Passive
Active/
Passive
Active/
Passive
Active/
Passive
SecureDBPassword Secure database password for encrypting
and decrypting interactions.
LogLevel Trace Active/
IISServerHost Host name or IP address of the server where
IIS is installed.
WorkingDir Current working directory folder where the
recorder stores interaction data.
Server Ports IISServerPort 44.3 Active/
Storage
Configuration
StoragePath Location to store non encrypted audio files
and screens. For example, D:\Voice.
SecureStoragePath Location to store encrypted audio files and
screens. For example, D:\Secure.
Active/
Passive
Passive
Active/
Passive
Active/
Passive
Passive
Active/
Passive
Active/
Passive
Recorder Parameters
The table lists the adapter parameters required for active and passive recording. For detailed description of
each parameter, refer to Appendix: Parameter descriptions.
Use the Configuring component parameters or the Performing bulk actions procedure to configure
parameters.
Group
Adapter Configuration DelayedExtendedCallInfoTrue Active/
May 2020 Deploying Harmony Workforce Optimization on Unified Contact Center Enterprise 89
Parameter Value Active/
Passive
Passive
Table continues…
Comments on this document? infodev@avaya.com

Configuration
Group Parameter Value Active/
UseCTIIntegration True Active/
SaveCTICallIDInConnec
False Active/
ted
UpdateICMFromWrapUpTrue Active/
Alert Configuration AlertManagerPort 9495 Active/
HTTPAlertsEnabled True Active/
AlertManagerIPAddress IP address of the server on which the
SysAdmin is installed.
Debug LogLevel Trace Active/
LogDatabaseQueries True Active/
LogCTIOSKeepAliveMe
True Active/
ssages
LogCTIOSHTTPMessagesTrue Active/
Recording DriveSelect Current working directory folder where
the recorder stores interaction data.
For example, D:\. .
Passive
Passive
Passive
Passive
Passive
Passive
Active/
Passive
Passive
Passive
Passive
Passive
Active/
Passive
MaxNoOfLinesForRecor
ding
Maximum number of lines that the
Recorder records per station for an
Active/
Passive
agent. The default value is 6. If there
are no multiple lines, configure the
value as 1.
VoiceIPAddress1 Vice NIC IP address for passive
recording and adapter server IP
address in case of active recording.
RecorderPacketFilterString(((ip proto TCP) and (((tcp port 2000 or
5060)for SIP and SPAN recording.
Active/
Passive
(ip proto UDP))for Communication
Manager, AES, and IP Office, TAPI,
and SPAN recording. This is the
default value.
AvayaIntegration False Active/
Passive
RTCPProcessingEnabledTrue for passive recording and False
for active recording.
Active/
Passive
Table continues…
May 2020 Deploying Harmony Workforce Optimization on Unified Contact Center Enterprise 90
Comments on this document? infodev@avaya.com

Configure dynamic parameter for Unified Contact Center Enterprise UCCE on Unified Communication Manager
Group Parameter Value Active/
Passive
LoginAgentOnPhoneExt
TableAdd
SpeakerSeparation False for active deployments and True
UseTenantNameInVoice
CaseID
SIPRecording VoiceStreamRecordingE
nabled
Screen Capture ScreenCaptureEnabled True Active/
Silent Monitor PublicIPAddress IP address used for live monitoring as
ApplicationServerIPAddr
ess
AppServerPort 80 Active/
Storage Configuration StoragePath Location to store audio files. For
True Active/
Passive
Active/
for passive deployments.
True Active/
True for active recording and False for
passive recording.
the IP address of the server where
recorder is running.
IP address of the web application
server.
example, D:\Voice.
Passive
Passive
Active/
Passive
Passive
Active/
Passive
Active/
Passive
Passive
Active/
Passive
Messaging ScreenCaptureProxyIPA
ddress
IP address of the Unified Messaging
component or screen capture proxy so
that the recorder can send all screen
capture events.
Active/
Passive
Configure dynamic parameter for Unified Contact Center
Enterprise UCCE on Unified Communication Manager
No.
Task Reference Notes
1 Configure dynamic parameters for
the recorder.
• For active recording, connect
Recorder to a Cisco adapter and a
SIP adapter.
See Configuring
dynamic parameters for
the recorder on
page 93 and
Configuration values for
dynamic recorder
parameter on page 93.
Table continues…
May 2020 Deploying Harmony Workforce Optimization on Unified Contact Center Enterprise 91
Comments on this document? infodev@avaya.com
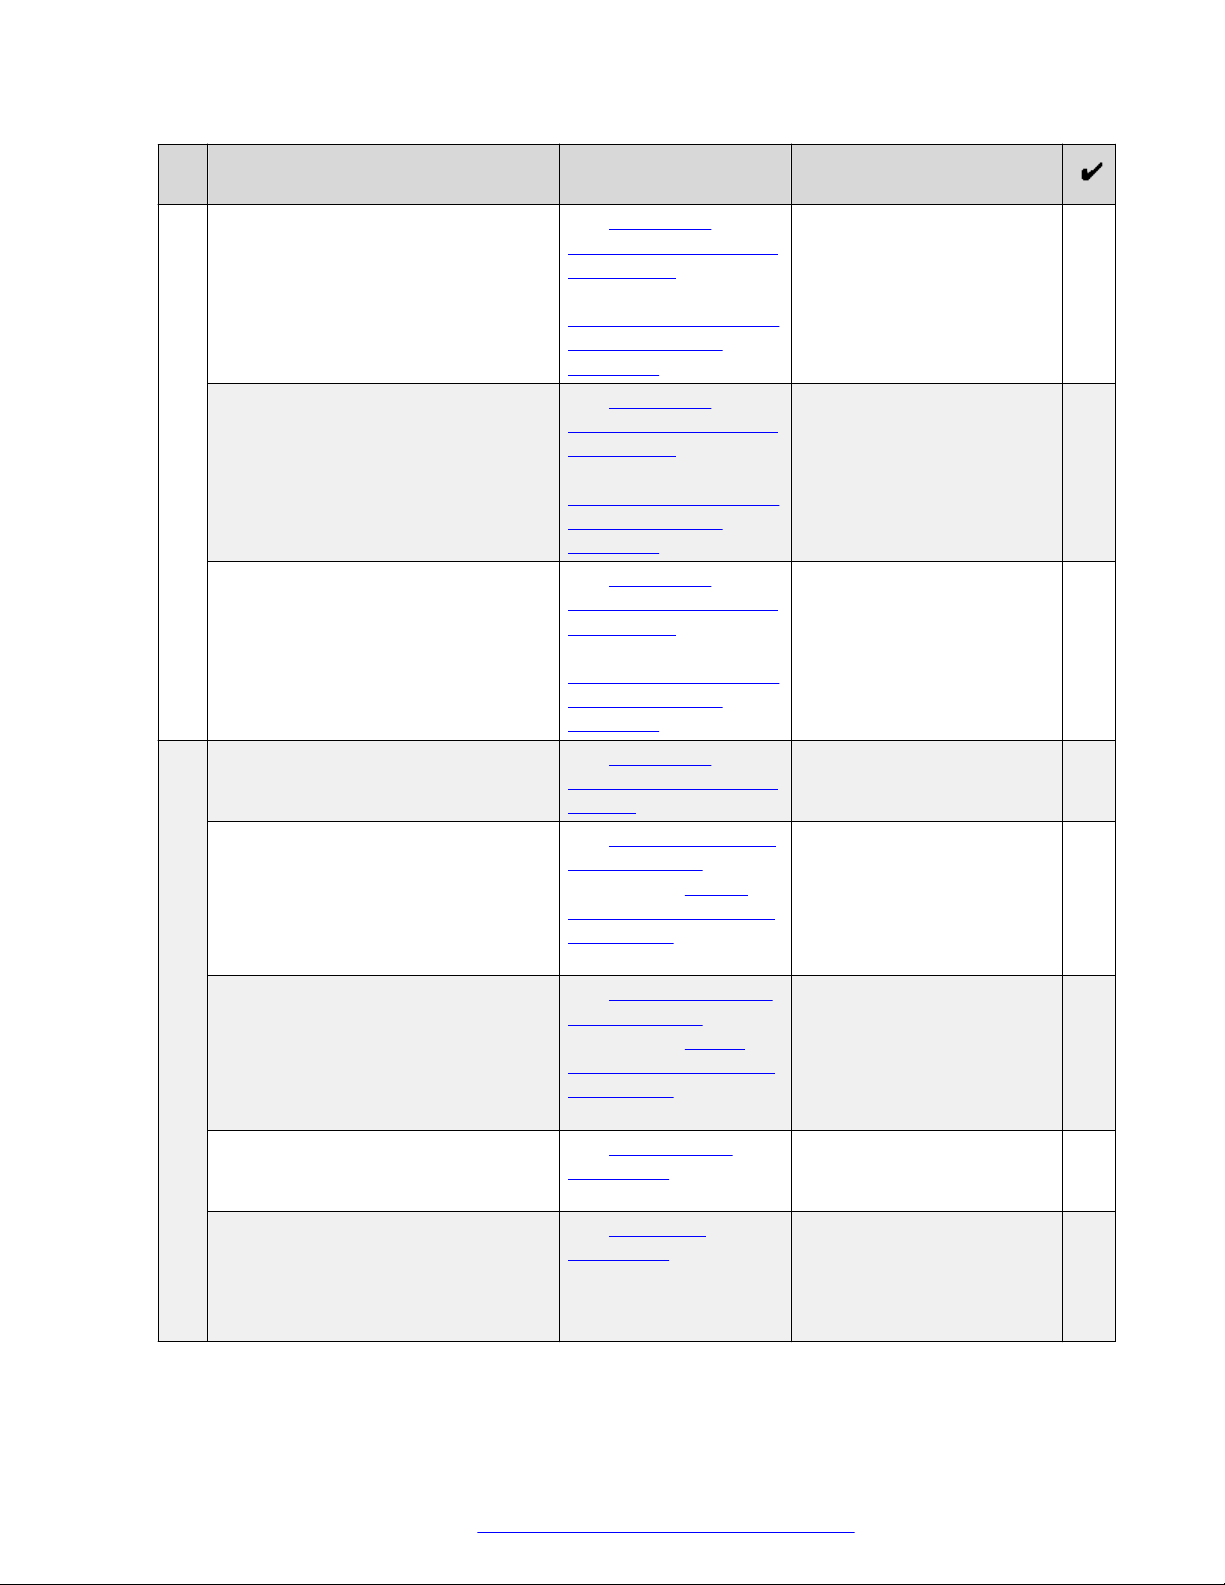
Configuration
No. Task Reference Notes
• For passive recording, connect
Recorder to a Cisco adapter.
• For on-demand recording, connect
Recorder to the Messaging service.
• For call encryption, connect
Recorder to the Media Manager
service.
2 Configure dynamic parameters for
adapters.
• For active recording, configure
cluster for SIP adapter.
• For active recording, configure
tenant for SIP adapter.
• For active recording, configure
Cisco adapter.
• For the Messaging component to
connect to the Recorder, Media
Manager, and the web application,
configure dynamic parameters for
Messaging.
See Configuring
dynamic parameters for
the recorder on
page 93 and
Configuration values for
dynamic recorder
parameter on page 93.
See Configuring
dynamic parameters for
the recorder on
page 93 and
Configuration values for
dynamic recorder
parameter on page 93.
See Configuring
dynamic parameters for
the recorder on
page 93 and
Configuration values for
dynamic recorder
parameter on page 93.
See Configuring
dynamic parameters for
adapter on page 97.
See Configuring cluster
for SIP adapter on
page 95 and Cluster
configuration values for
SIP adapter on
page 95.
See Configuring tenant
for SIP adapter on
page 96 and Tenant
configuration values for
SIP adapter on
page 97.
See Cisco adapter
parameters on
page 98.
See Messaging
parameters on
page 98.
May 2020 Deploying Harmony Workforce Optimization on Unified Contact Center Enterprise 92
Comments on this document? infodev@avaya.com

Configure dynamic parameter for Unified Contact Center Enterprise UCCE on Unified Communication Manager
Related links
Configuring dynamic parameters for the recorder on page 93
Configuring cluster for SIP adapter on page 95
Configuring tenant for SIP adapter on page 96
Configuring dynamic parameters for adapter on page 97
Restarting the components on page 99
Configuring dynamic parameters for the recorder
About this task
Use this procedure to connect the recorder to an adapter or service. Based on the deployment,
create multiple sets so that the recorder gets connected to the relevant adapters and services.
You can configure specific parameters for an adapter or service.
Procedure
1. Click System Administration > Configuration.
2. Click the Dynamic tab.
3. In the Component field, select a component.
Note:
This field applies only to recorder.
4. Select the Dynamic Type as Adapter or Service.
5. In the Asset field, select an asset.
6. In the Node field, select a node.
7. In the No. of Sets field, type the number of sets you want to create.
8. Click Create Sets.
Related links
Configure dynamic parameter for Unified Contact Center Enterprise UCCE on Unified
Communication Manager on page 91
Configuration values for dynamic recorder parameter on page 93
Configuration values for dynamic recorder parameter
Adapter sets
The table below lists the two adapter sets you must create for the recorder to connect to SIP adapter and
Cisco adapter. For on-demand recording, create another adapter set for the recorder to connect to the
Messaging component.
May 2020 Deploying Harmony Workforce Optimization on Unified Contact Center Enterprise 93
Comments on this document? infodev@avaya.com

Configuration
Parameter Value
Component Recorder
Dynamic Type Adapter
Asset Name of the server where the recorder is installed
Node Name of the instance of the recorder installed on the selected
server or asset.
No of Sets 3
Adapter Dynamic Set 1
Name SIP adapter
ServerAddress The IP address of the server where SIP adapter is installed.
ServerPort 33014
Is Critical True
Adapter Dynamic Set 2
Name Cisco adapter
ServerAddress The IP address of the server where Cisco adapter is installed
ServerPort 34201
ServerLocalPort 33355
IsCritical True
WebURLString /CiscoAdapter/MonitorSitesRecorderRequest
Adapter Dynamic Set 3
Name Unified Messaging
ServerAddress The IP address of the server where the Unified Messaging
component is installed.
ServerPort 33022
IsCritical False
Service sets
For call encryption, create a service set for the recorder to connect to the Media Manager component.
Parameter Value
Component Recorder
Dynamic Type Service
Asset Name of the server where the recorder is installed
Node Name of the instance of the recorder installed on the selected
server or asset.
No of Sets 1
Service Dynamic Set 1
Name Media Manager
Table continues…
May 2020 Deploying Harmony Workforce Optimization on Unified Contact Center Enterprise 94
Comments on this document? infodev@avaya.com

Configure dynamic parameter for Unified Contact Center Enterprise UCCE on Unified Communication Manager
ServerAddress The IP address of the server where the Media Manager
component is installed.
ServerPort 33047
Related links
Configuring dynamic parameters for the recorder on page 93
Configuring cluster for SIP adapter
About this task
Use this procedure to configure a cluster for SIP adapter to establish a SIP channel between
Unified Communication Manager (UCM) and SIP adapter. UCM, then forks voice stream events to
the SIP adapter
Procedure
1. Click System Administration > Configuration.
2. Click the Dynamic tab.
3. In the Component field, select SIP adapter.
4. Select the Dynamic Type as Cluster.
5. In the Asset field, select an asset.
6. In the Node field, select a node.
7. In the No. of Sets field, type 1 to create a set.
8. Click Create Sets.
Next steps
Restart the component service after configuring the parameters.
Related links
Configure dynamic parameter for Unified Contact Center Enterprise UCCE on Unified
Communication Manager on page 91
Cluster configuration values for SIP adapter on page 95
Cluster configuration values for SIP adapter
Parameter Value
Component SIP adapter
Dynamic Type Cluster
Asset Name of the server where the SIP adapter is installed
Node Name of the instance of the SIP adapter installed on the
selected server or asset.
Table continues…
May 2020 Deploying Harmony Workforce Optimization on Unified Contact Center Enterprise 95
Comments on this document? infodev@avaya.com

Configuration
Parameter Value
No of Sets 1
Adapter Dynamic Set 1
Name SIP adapter
MaxNumOfTrunks 5
SIPTranport TCP
CallManagerList1 The IP address of the server where the primary Unified
Communication Manager (UCM) is installed.
CallManagerList2 The IP address of the server where the backup Unified
Communication Manager (UCM) is installed.
FirstTrunkDN 101010. The trunk DN configured in UCM trunk.
Related links
Configuring cluster for SIP adapter on page 95
Configuring tenant for SIP adapter
About this task
Procedure
1. Click System Administration > Configuration.
2. Click the Dynamic tab.
3. In the Component field, select SIP adapter.
4. Select the Dynamic Type as Tenant.
5. In the Asset field, select an asset.
6. In the Node field, select a node.
7. In the No. of Sets field, type 1 to create a set.
8. Click Create Sets.
Next steps
Restart the component service after configuring the parameters.
Related links
Configure dynamic parameter for Unified Contact Center Enterprise UCCE on Unified
Communication Manager on page 91
Tenant configuration values for SIP adapter on page 97
May 2020 Deploying Harmony Workforce Optimization on Unified Contact Center Enterprise 96
Comments on this document? infodev@avaya.com

Configure dynamic parameter for Unified Contact Center Enterprise UCCE on Unified Communication Manager
Tenant configuration values for SIP adapter
Parameter Value
Component SIP adapter
Dynamic Type Tenant
Asset Name of the server where the SIP adapter is installed
Node Name of the instance of the SIP adapter installed on the
selected server or asset.
No of Sets 1
Adapter Dynamic Set 1
IncludeURLPattern The trunk DN present in SIP URL. The default value is 101010.
Tenant The name of the tenant to which the pattern belongs.
Related links
Configuring tenant for SIP adapter on page 96
Configuring dynamic parameters for adapter
About this task
Use this procedure to configure parameters that connect the adapter with the ACD or PBX server.
For the Messaging component, configure dynamic parameters to connect to the Recorder, Media
Manager, and the web application.
Procedure
1. Log in to SysAdmin .
2. Click System Administration > Configuration.
3. Click the Dynamic tab.
4. In the Component field, select the adapter for which you want to configure parameters.
The system populates the Dynamic Type based on the adapter you select.
5. In the Asset field, select an asset.
6. In the Node field, select a node.
7. In the No. of Sets field, type the number of sets you want to create.
8. Click Create Sets.
Next steps
Restart the component service after configuring the parameters.
Related links
Configure dynamic parameter for Unified Contact Center Enterprise UCCE on Unified
Communication Manager on page 91
May 2020 Deploying Harmony Workforce Optimization on Unified Contact Center Enterprise 97
Comments on this document? infodev@avaya.com

Configuration
Cisco adapter parameters on page 98
Messaging parameters on page 98
Cisco adapter parameters
CTI
Name Description
PrimaryCTIHostName To configure the primary Unified Contact Center
Enterprise UCCE server IP address.
PrimaryCTIPort To configure the port number of Unified Contact
Center Enterprise UCCE server. The default value
is 42027.
BackUpCTIHostName To configure the backup Unified Contact Center
Enterprise UCCE server IP address.
BackUpCTIPort To configure the port number of the backup Unified
Contact Center Enterprise UCCE server. The
default value is 42027.
TenantAlias To configure the tenant alias to which the Cisco
adapter must be associated.
JTAPI
Name
PrimaryCMHostName To configure the primary Cisco Unified
BackUpCMHostName To configure the backup Cisco UCM server IP
CM_CTI_Username To configure the application username present in
CM_CTI_Password To configure the application user password present
TenantAlias To configure the tenant alias to which the Cisco
Related links
Configuring dynamic parameters for adapter on page 97
Description
Communications Manager (UCM) server IP
address.
address.
Cisco UCM for JTAPI connection.
in Cisco UCM for JTAPI connection.
adapter must be associated.
Messaging parameters
Parameter
Tenant To configure the tenant to which the Messaging
Description
component must be associated.
Table continues…
May 2020 Deploying Harmony Workforce Optimization on Unified Contact Center Enterprise 98
Comments on this document? infodev@avaya.com

Configure dynamic parameter for Unified Contact Center Enterprise UCCE on Unified Communication Manager
Parameter Description
wrapupTime To configure the wrap up time for screens in
minutes.
bandwidth To configure the bandwidth required for screen
upload. This parameter must be configured based
on what is configured for the maxPermitSize
parameter.
maxPermitSize To configure the maximum number of concurrent
screens to upload.
timeToUpload To configure the time to resume screen upload once
the maximum size for screen upload is reached.
proxyIP To specify the host name or IP address of the
server where the web application is deployed. You
can view screen captures while monitoring live
interactions.
proxyPort To specify the port number where the web
application server or Apache server is running.
proxyProtocol To specify the host protocol (http or https) where the
web application server or Apache server is installed.
EDServiceIPAddress To configure the IP address of the server where
Media Manager is running to encrypt and decrypt
screens.
EDServicePort To configure the port number for Media Manager.
The default value is 33047.
RecorderServerIP To specify the IP address of the server where the
recorder is running to send the Screen Login
information to the recorder.
RecorderServerPort To configure the port number for recorder. The
default value is 33024.
SecondaryRecorders To specify the IP address of the server where the
secondary recorder is running.
Related links
Configuring dynamic parameters for adapter on page 97
Restarting the components
Procedure
1. Log in to the server that hosts the web application components.
2. Click Start > Run > services.msc
3. Right-click the component and click Restart.
May 2020 Deploying Harmony Workforce Optimization on Unified Contact Center Enterprise 99
Comments on this document? infodev@avaya.com

Configuration
Related links
Configure dynamic parameter for Unified Contact Center Enterprise UCCE on Unified
Communication Manager on page 91
Configure the node name for DNS deployments
Node name configuration checklist
No. Task Reference Notes
1 Stop all the Harmony Workforce
Optimization components.
2 Change the node name for
components.
3 Start the Harmony Workforce
Optimization components.
See Stopping the Harmony
Workforce Optimization
components on page 100.
See Changing the node
name on page 100.
SeeStarting the Harmony
Workforce Optimization
components on page 101.
Stopping the Harmony Workforce Optimization components
Procedure
1. Log in to the server that hosts the Harmony Workforce Optimization components.
2. Click Start > Run > services.msc.
3. Right-click the component and click Stop.
Changing the node name
About this task
Use this procedure to change the node name in the ini file of the Harmony Workforce
Optimization components: Every component has a corresponding ini file named after the
component name. The ini file for the recorder is located at <Installation Path>\Harmony
\Recorder\recorder.ini.
Procedure
1. Log in to the server where the Harmony Workforce Optimization application is installed.
2. Go to <Installation Path>\Harmony to view the component folders.
May 2020 Deploying Harmony Workforce Optimization on Unified Contact Center Enterprise 100
Comments on this document? infodev@avaya.com
Loading...