

Page 1

Part No. P0937240 02
Return
to Menu
Business Communications
Manager 2.5
Telephone Features
Programming Guide
Page 2

2
Copyright © 2001 No rtel Networks
All rights reserved.
The information in this document is subject to change without notice. The statements, configurations, technical data, and
recommendations in this document are believed to be accurate and reliable, but are presented without express or implied warranty.
Users must take full responsibility for their applications of any products specified in this document. The information in this
document is proprietary to Nortel Networks NA Inc.
Trademarks
NORTEL NETWORKS is a trademark of Nortel Networks.
Microsoft, MS, MS-DOS, Windows, and Windows NT are registered trademarks of Microsoft C orporation.
All other trademarks and registered trademarks are the property of their respective owners.
P0937240 02
Page 3

Contents
Preface . . . . . . . . . . . . . . . . . . . . . . . . . . . . . . . . . . . . . . . . . . . . . . . . . . . . . . 15
Before you begin . . . . . . . . . . . . . . . . . . . . . . . . . . . . . . . . . . . . . . . . . . . . . . . . . . . . . 15
Emergency 911 Dialing . . . . . . . . . . . . . . . . . . . . . . . . . . . . . . . . . . . . . . . . . . . . . 15
Text conventions . . . . . . . . . . . . . . . . . . . . . . . . . . . . . . . . . . . . . . . . . . . . . . . . . . . . . 15
Acronyms . . . . . . . . . . . . . . . . . . . . . . . . . . . . . . . . . . . . . . . . . . . . . . . . . . . . . . . . . . . 16
Related publications . . . . . . . . . . . . . . . . . . . . . . . . . . . . . . . . . . . . . . . . . . . . . . . . . . 17
Chapter 1
Introduction . . . . . . . . . . . . . . . . . . . . . . . . . . . . . . . . . . . . . . . . . . . . . . . . . . 19
Unified Manager . . . . . . . . . . . . . . . . . . . . . . . . . . . . . . . . . . . . . . . . . . . . . . . . . . . . . 19
Telephone types . . . . . . . . . . . . . . . . . . . . . . . . . . . . . . . . . . . . . . . . . . . . . . . . . . . . . . 19
Telephone installation . . . . . . . . . . . . . . . . . . . . . . . . . . . . . . . . . . . . . . . . . . . . . . . . . 20
Name a telephone or a line . . . . . . . . . . . . . . . . . . . . . . . . . . . . . . . . . . . . . . . . . . . . . 23
Extension numbers . . . . . . . . . . . . . . . . . . . . . . . . . . . . . . . . . . . . . . . . . . . . . . . . . . . 23
Line assignment . . . . . . . . . . . . . . . . . . . . . . . . . . . . . . . . . . . . . . . . . . . . . . . . . . . . . 24
Prime line . . . . . . . . . . . . . . . . . . . . . . . . . . . . . . . . . . . . . . . . . . . . . . . . . . . . . . . . . . . 24
Private line . . . . . . . . . . . . . . . . . . . . . . . . . . . . . . . . . . . . . . . . . . . . . . . . . . . . . . . . . . 24
Target line . . . . . . . . . . . . . . . . . . . . . . . . . . . . . . . . . . . . . . . . . . . . . . . . . . . . . . . . . . 24
Overflow call routing . . . . . . . . . . . . . . . . . . . . . . . . . . . . . . . . . . . . . . . . . . . . . . . 24
Telephone buttons . . . . . . . . . . . . . . . . . . . . . . . . . . . . . . . . . . . . . . . . . . . . . . . . . . . . 25
One-line and two-line displays . . . . . . . . . . . . . . . . . . . . . . . . . . . . . . . . . . . . . . . 26
Buttons under the display . . . . . . . . . . . . . . . . . . . . . . . . . . . . . . . . . . . . . . . . . . . 26
Memory buttons . . . . . . . . . . . . . . . . . . . . . . . . . . . . . . . . . . . . . . . . . . . . . . . . . . 27
Program buttons . . . . . . . . . . . . . . . . . . . . . . . . . . . . . . . . . . . . . . . . . . . . . . . . . . 27
Contents 3
Chapter 2
Answer calls . . . . . . . . . . . . . . . . . . . . . . . . . . . . . . . . . . . . . . . . . . . . . . . . . . 29
Ring types . . . . . . . . . . . . . . . . . . . . . . . . . . . . . . . . . . . . . . . . . . . . . . . . . . . . . . . . . . 29
Distinctive Line Ring . . . . . . . . . . . . . . . . . . . . . . . . . . . . . . . . . . . . . . . . . . . . . . . 29
Call Ringing . . . . . . . . . . . . . . . . . . . . . . . . . . . . . . . . . . . . . . . . . . . . . . . . . . 29
Call Answering . . . . . . . . . . . . . . . . . . . . . . . . . . . . . . . . . . . . . . . . . . . . . . . . 30
Line buttons . . . . . . . . . . . . . . . . . . . . . . . . . . . . . . . . . . . . . . . . . . . . . . . . . . . . . . . . . 30
What line indicators mean . . . . . . . . . . . . . . . . . . . . . . . . . . . . . . . . . . . . . . . . . . . 30
Information about a call on the display . . . . . . . . . . . . . . . . . . . . . . . . . . . . . . . . . . . . 30
Call Information for a specific call . . . . . . . . . . . . . . . . . . . . . . . . . . . . . . . . . . . . . 31
View Call Information before or after answering . . . . . . . . . . . . . . . . . . . . . . . . . . 31
View Call Information for a call on hold . . . . . . . . . . . . . . . . . . . . . . . . . . . . . . . . . 31
Make Call Display information appear automatic ally at a telephone . . . . . . . . . . . 32
Change which call information appears first . . . . . . . . . . . . . . . . . . . . . . . . . . . . . 32
Telephone Features Programming Guide
Page 4

4 Contents
Priority Call . . . . . . . . . . . . . . . . . . . . . . . . . . . . . . . . . . . . . . . . . . . . . . . . . . . . . . . . . 32
Answer calls at a prime telephone . . . . . . . . . . . . . . . . . . . . . . . . . . . . . . . . . . . . . . . . 32
Chapter 3
Make a call . . . . . . . . . . . . . . . . . . . . . . . . . . . . . . . . . . . . . . . . . . . . . . . . . . . 39
Line pools . . . . . . . . . . . . . . . . . . . . . . . . . . . . . . . . . . . . . . . . . . . . . . . . . . . . . . . . . . 41
Line buttons . . . . . . . . . . . . . . . . . . . . . . . . . . . . . . . . . . . . . . . . . . . . . . . . . . . . . . . . . 42
Select how you dial your calls . . . . . . . . . . . . . . . . . . . . . . . . . . . . . . . . . . . . . . . . . . . 42
Receive a busy signal on an internal call . . . . . . . . . . . . . . . . . . . . . . . . . . . . . . . . . . . 43
Create a Conference Call . . . . . . . . . . . . . . . . . . . . . . . . . . . . . . . . . . . . . . . . . . . . . . 45
Central answering position (CAP) module . . . . . . . . . . . . . . . . . . . . . . . . . . . . . . 33
Customize your CAP module . . . . . . . . . . . . . . . . . . . . . . . . . . . . . . . . . . . . . 34
Monitor telephones with the CAP modul e . . . . . . . . . . . . . . . . . . . . . . . . . . . 34
Release button . . . . . . . . . . . . . . . . . . . . . . . . . . . . . . . . . . . . . . . . . . . . . . . . 35
Pick up a call ringing at another telephone . . . . . . . . . . . . . . . . . . . . . . . . . . . . . . 35
Directed Pickup . . . . . . . . . . . . . . . . . . . . . . . . . . . . . . . . . . . . . . . . . . . . . . . . 35
Group Pickup . . . . . . . . . . . . . . . . . . . . . . . . . . . . . . . . . . . . . . . . . . . . . . . . . 35
Change a telephone’s pickup group . . . . . . . . . . . . . . . . . . . . . . . . . . . . . . . . 36
Trunk Answer . . . . . . . . . . . . . . . . . . . . . . . . . . . . . . . . . . . . . . . . . . . . . . . . . 36
Answer buttons . . . . . . . . . . . . . . . . . . . . . . . . . . . . . . . . . . . . . . . . . . . . . . . . 36
Listen to a call as a group . . . . . . . . . . . . . . . . . . . . . . . . . . . . . . . . . . . . . . . . . . . 37
Cancel Group Listening . . . . . . . . . . . . . . . . . . . . . . . . . . . . . . . . . . . . . . . . . 38
Use a line pool to make a call . . . . . . . . . . . . . . . . . . . . . . . . . . . . . . . . . . . . . . . . 41
Program a line pool feature code . . . . . . . . . . . . . . . . . . . . . . . . . . . . . . . . . . . . . 42
Standard dial . . . . . . . . . . . . . . . . . . . . . . . . . . . . . . . . . . . . . . . . . . . . . . . . . . . . . 42
Automatic dial . . . . . . . . . . . . . . . . . . . . . . . . . . . . . . . . . . . . . . . . . . . . . . . . . . . . 42
Pre-dial . . . . . . . . . . . . . . . . . . . . . . . . . . . . . . . . . . . . . . . . . . . . . . . . . . . . . . . . . 43
Priority Call . . . . . . . . . . . . . . . . . . . . . . . . . . . . . . . . . . . . . . . . . . . . . . . . . . . . . . 43
Program a telephone to make priority calls . . . . . . . . . . . . . . . . . . . . . . . . . . 43
Make a priority call . . . . . . . . . . . . . . . . . . . . . . . . . . . . . . . . . . . . . . . . . . . . . 43
Ring Again . . . . . . . . . . . . . . . . . . . . . . . . . . . . . . . . . . . . . . . . . . . . . . . . . . . . . . . 44
Turn on Ring Again . . . . . . . . . . . . . . . . . . . . . . . . . . . . . . . . . . . . . . . . . . . . . 44
Cancel Ring Again . . . . . . . . . . . . . . . . . . . . . . . . . . . . . . . . . . . . . . . . . . . . . 45
Message . . . . . . . . . . . . . . . . . . . . . . . . . . . . . . . . . . . . . . . . . . . . . . . . . . . . . . . . 45
Disconnect one party . . . . . . . . . . . . . . . . . . . . . . . . . . . . . . . . . . . . . . . . . . . . . . 45
Separate holding of two calls . . . . . . . . . . . . . . . . . . . . . . . . . . . . . . . . . . . . . . . . 46
Put a conference on hold . . . . . . . . . . . . . . . . . . . . . . . . . . . . . . . . . . . . . . . . . . . 46
Split a conference . . . . . . . . . . . . . . . . . . . . . . . . . . . . . . . . . . . . . . . . . . . . . . . . . 47
Leave a conference call . . . . . . . . . . . . . . . . . . . . . . . . . . . . . . . . . . . . . . . . . . . . 47
P0937240 02
Page 5

Contents 5
Chapter 4
Time-saving features . . . . . . . . . . . . . . . . . . . . . . . . . . . . . . . . . . . . . . . . . . . 49
Autodial . . . . . . . . . . . . . . . . . . . . . . . . . . . . . . . . . . . . . . . . . . . . . . . . . . . . . . . . . . . . 49
Select a line for Autodial . . . . . . . . . . . . . . . . . . . . . . . . . . . . . . . . . . . . . . . . . . . . 49
Use intercom as the line for Autodial . . . . . . . . . . . . . . . . . . . . . . . . . . . . . . . 50
Last Number Redial . . . . . . . . . . . . . . . . . . . . . . . . . . . . . . . . . . . . . . . . . . . . . . . . . . . 51
Prevent Last Number Redial . . . . . . . . . . . . . . . . . . . . . . . . . . . . . . . . . . . . . . . . . 51
Speed Dial . . . . . . . . . . . . . . . . . . . . . . . . . . . . . . . . . . . . . . . . . . . . . . . . . . . . . . . . . . 51
System Speed Dial codes . . . . . . . . . . . . . . . . . . . . . . . . . . . . . . . . . . . . . . . . . . . 52
Personal Speed Dial . . . . . . . . . . . . . . . . . . . . . . . . . . . . . . . . . . . . . . . . . . . . . . . 52
Saved Number Redial . . . . . . . . . . . . . . . . . . . . . . . . . . . . . . . . . . . . . . . . . . . . . . . . . 53
Save a number . . . . . . . . . . . . . . . . . . . . . . . . . . . . . . . . . . . . . . . . . . . . . . . . . . . 53
Dial a saved number . . . . . . . . . . . . . . . . . . . . . . . . . . . . . . . . . . . . . . . . . . . . 53
Prevent Saved Number Redial . . . . . . . . . . . . . . . . . . . . . . . . . . . . . . . . . . . . . . . 53
Chapter 5
Handling calls. . . . . . . . . . . . . . . . . . . . . . . . . . . . . . . . . . . . . . . . . . . . . . . . . 55
Use Hold . . . . . . . . . . . . . . . . . . . . . . . . . . . . . . . . . . . . . . . . . . . . . . . . . . . . . . . . . . . 55
Retrieve a held call . . . . . . . . . . . . . . . . . . . . . . . . . . . . . . . . . . . . . . . . . . . . . . . . 55
Hold automatically . . . . . . . . . . . . . . . . . . . . . . . . . . . . . . . . . . . . . . . . . . . . . . . . . 55
Listen on hold . . . . . . . . . . . . . . . . . . . . . . . . . . . . . . . . . . . . . . . . . . . . . . . . . . . . 55
Hold a call exclusively . . . . . . . . . . . . . . . . . . . . . . . . . . . . . . . . . . . . . . . . . . . . . . 56
Call Queuing . . . . . . . . . . . . . . . . . . . . . . . . . . . . . . . . . . . . . . . . . . . . . . . . . . . . . 56
Transfer calls . . . . . . . . . . . . . . . . . . . . . . . . . . . . . . . . . . . . . . . . . . . . . . . . . . . . . . . . 56
Transfer external calls . . . . . . . . . . . . . . . . . . . . . . . . . . . . . . . . . . . . . . . . . . . . . . 57
Cancel a transfer . . . . . . . . . . . . . . . . . . . . . . . . . . . . . . . . . . . . . . . . . . . . . . . . . . 57
Camp-on . . . . . . . . . . . . . . . . . . . . . . . . . . . . . . . . . . . . . . . . . . . . . . . . . . . . . . . . 58
Call Park . . . . . . . . . . . . . . . . . . . . . . . . . . . . . . . . . . . . . . . . . . . . . . . . . . . . . . . . . . . 59
Park a call . . . . . . . . . . . . . . . . . . . . . . . . . . . . . . . . . . . . . . . . . . . . . . . . . . . . . . . 60
Retrieve a parked call . . . . . . . . . . . . . . . . . . . . . . . . . . . . . . . . . . . . . . . . . . . 60
Callback . . . . . . . . . . . . . . . . . . . . . . . . . . . . . . . . . . . . . . . . . . . . . . . . . . . . . . . . . . . . 61
Chapter 6
Forward your calls . . . . . . . . . . . . . . . . . . . . . . . . . . . . . . . . . . . . . . . . . . . . . 63
Call Forward . . . . . . . . . . . . . . . . . . . . . . . . . . . . . . . . . . . . . . . . . . . . . . . . . . . . . . . . 63
Cancel Call Forward . . . . . . . . . . . . . . . . . . . . . . . . . . . . . . . . . . . . . . . . . . . . . . . 63
Override Call Forward . . . . . . . . . . . . . . . . . . . . . . . . . . . . . . . . . . . . . . . . . . . . . 64
Change the automatic Call Forward settings . . . . . . . . . . . . . . . . . . . . . . . . . . . . 64
Change Call Forward no answer . . . . . . . . . . . . . . . . . . . . . . . . . . . . . . . . . . . . . . 64
Change the delay before a call is forwarded . . . . . . . . . . . . . . . . . . . . . . . . . . . . . 64
Call Forward on busy . . . . . . . . . . . . . . . . . . . . . . . . . . . . . . . . . . . . . . . . . . . . . . 64
DND on Busy . . . . . . . . . . . . . . . . . . . . . . . . . . . . . . . . . . . . . . . . . . . . . . . . . . . . 64
Telephone Features Programming Guide
Page 6

6 Contents
Chapter 7
Communicating in the office. . . . . . . . . . . . . . . . . . . . . . . . . . . . . . . . . . . . . 69
Page . . . . . . . . . . . . . . . . . . . . . . . . . . . . . . . . . . . . . . . . . . . . . . . . . . . . . . . . . . . . . . 69
Messages . . . . . . . . . . . . . . . . . . . . . . . . . . . . . . . . . . . . . . . . . . . . . . . . . . . . . . . . . . 71
Voice Call . . . . . . . . . . . . . . . . . . . . . . . . . . . . . . . . . . . . . . . . . . . . . . . . . . . . . . . . . . . 75
Call Forward and voice mail . . . . . . . . . . . . . . . . . . . . . . . . . . . . . . . . . . . . . . . . . 65
Line Redirection . . . . . . . . . . . . . . . . . . . . . . . . . . . . . . . . . . . . . . . . . . . . . . . . . . 65
Allow a telephone to redirect calls . . . . . . . . . . . . . . . . . . . . . . . . . . . . . . . . . 66
How Line Redirection is different from Call Forward . . . . . . . . . . . . . . . . . . . . 66
Turn on Line Redirection . . . . . . . . . . . . . . . . . . . . . . . . . . . . . . . . . . . . . . . . . 66
Cancel Line Redirection . . . . . . . . . . . . . . . . . . . . . . . . . . . . . . . . . . . . . . . . . 67
Turn the redirect ring for a telephone on or off . . . . . . . . . . . . . . . . . . . . . . . . 67
Make a page announcement . . . . . . . . . . . . . . . . . . . . . . . . . . . . . . . . . . . . . . . . . 69
Page Shortcuts . . . . . . . . . . . . . . . . . . . . . . . . . . . . . . . . . . . . . . . . . . . . . . . . . . . 69
Activate and deactivate the Page feature . . . . . . . . . . . . . . . . . . . . . . . . . . . . . . . 70
Create page zones . . . . . . . . . . . . . . . . . . . . . . . . . . . . . . . . . . . . . . . . . . . . . . . . 70
Using Page with external equipment . . . . . . . . . . . . . . . . . . . . . . . . . . . . . . . 71
Send a message . . . . . . . . . . . . . . . . . . . . . . . . . . . . . . . . . . . . . . . . . . . . . . . . . . 71
Cancel a message you have sent . . . . . . . . . . . . . . . . . . . . . . . . . . . . . . . . . . 72
Review your messages . . . . . . . . . . . . . . . . . . . . . . . . . . . . . . . . . . . . . . . . . . . . . 72
Reply to a message . . . . . . . . . . . . . . . . . . . . . . . . . . . . . . . . . . . . . . . . . . . . 72
Reply to a message using an analog telephone connected to an ASM . . . . . 73
Remove items from your message list . . . . . . . . . . . . . . . . . . . . . . . . . . . . . . 73
Remove items from your message list using an analog telephone connected to an ASM
73
View messages you have sent . . . . . . . . . . . . . . . . . . . . . . . . . . . . . . . . . . . . 74
Make a Voice Call . . . . . . . . . . . . . . . . . . . . . . . . . . . . . . . . . . . . . . . . . . . . . . . . . 75
Mute Voice Call tones . . . . . . . . . . . . . . . . . . . . . . . . . . . . . . . . . . . . . . . . . . . . . . 75
Answer a Voice Call using Handsfree Answerback . . . . . . . . . . . . . . . . . . . . . . . . 75
Voice Call Deny . . . . . . . . . . . . . . . . . . . . . . . . . . . . . . . . . . . . . . . . . . . . . . . . . . . 76
Cancel Voice Call Deny . . . . . . . . . . . . . . . . . . . . . . . . . . . . . . . . . . . . . . . . . 76
Chapter 8
Track your incoming calls. . . . . . . . . . . . . . . . . . . . . . . . . . . . . . . . . . . . . . . 77
Call Log . . . . . . . . . . . . . . . . . . . . . . . . . . . . . . . . . . . . . . . . . . . . . . . . . . . . . . . . . . . 77
P0937240 02
Call Log options . . . . . . . . . . . . . . . . . . . . . . . . . . . . . . . . . . . . . . . . . . . . . . . . . . 77
Log a call manually . . . . . . . . . . . . . . . . . . . . . . . . . . . . . . . . . . . . . . . . . . . . . 78
Delete old log items . . . . . . . . . . . . . . . . . . . . . . . . . . . . . . . . . . . . . . . . . . . . 78
View your Call Log . . . . . . . . . . . . . . . . . . . . . . . . . . . . . . . . . . . . . . . . . . . . . 78
View a Call Log item . . . . . . . . . . . . . . . . . . . . . . . . . . . . . . . . . . . . . . . . . . . . 78
Erase log items . . . . . . . . . . . . . . . . . . . . . . . . . . . . . . . . . . . . . . . . . . . . . . . . 79
Page 7

Contents 7
Make a call using Call Log . . . . . . . . . . . . . . . . . . . . . . . . . . . . . . . . . . . . . . . 79
Create a password to your Call Log . . . . . . . . . . . . . . . . . . . . . . . . . . . . . . . . 79
Change your Call Log password . . . . . . . . . . . . . . . . . . . . . . . . . . . . . . . . . . . 80
Delete an assigned password . . . . . . . . . . . . . . . . . . . . . . . . . . . . . . . . . . . . . 80
Program a telephone to log calls automatically . . . . . . . . . . . . . . . . . . . . . . . 80
Chapter 9
Customize your telephone . . . . . . . . . . . . . . . . . . . . . . . . . . . . . . . . . . . . . . 83
Adjust the contrast on the display . . . . . . . . . . . . . . . . . . . . . . . . . . . . . . . . . . . . . . . . 83
Change the language on the display . . . . . . . . . . . . . . . . . . . . . . . . . . . . . . . . . . . . . . 83
Change the type of ring . . . . . . . . . . . . . . . . . . . . . . . . . . . . . . . . . . . . . . . . . . . . . 84
Adjust the Ring volume . . . . . . . . . . . . . . . . . . . . . . . . . . . . . . . . . . . . . . . . . . . . . 84
Button Inquiry . . . . . . . . . . . . . . . . . . . . . . . . . . . . . . . . . . . . . . . . . . . . . . . . . . . . . . . 84
Programming feature codes . . . . . . . . . . . . . . . . . . . . . . . . . . . . . . . . . . . . . . . . . . . . 85
Erase a feature button . . . . . . . . . . . . . . . . . . . . . . . . . . . . . . . . . . . . . . . . . . . . . . 85
Default button assignments . . . . . . . . . . . . . . . . . . . . . . . . . . . . . . . . . . . . . . . . . . . . . 86
Rules of default button assignment . . . . . . . . . . . . . . . . . . . . . . . . . . . . . . . . . . . . 86
T7316 Button mapping . . . . . . . . . . . . . . . . . . . . . . . . . . . . . . . . . . . . . . . . . . . . . 87
T7316 and T7208 telephone button defaults . . . . . . . . . . . . . . . . . . . . . . . . . 88
M7324 Button mapping . . . . . . . . . . . . . . . . . . . . . . . . . . . . . . . . . . . . . . . . . . . . . 88
M7324(N) telephone button defaults . . . . . . . . . . . . . . . . . . . . . . . . . . . . . . . 89
T7100 telephone button defaults . . . . . . . . . . . . . . . . . . . . . . . . . . . . . . . . . . 90
Move line buttons . . . . . . . . . . . . . . . . . . . . . . . . . . . . . . . . . . . . . . . . . . . . . . . . . 90
Hide the message or calls indication . . . . . . . . . . . . . . . . . . . . . . . . . . . . . . . . . . . 91
Restore the messages and calls indication . . . . . . . . . . . . . . . . . . . . . . . . . . 91
Chapter 10
Hunt Groups. . . . . . . . . . . . . . . . . . . . . . . . . . . . . . . . . . . . . . . . . . . . . . . . . . 93
Members of the group . . . . . . . . . . . . . . . . . . . . . . . . . . . . . . . . . . . . . . . . . . . . . . . . . 94
Distribution mode . . . . . . . . . . . . . . . . . . . . . . . . . . . . . . . . . . . . . . . . . . . . . . . . . 94
Chapter 11
Telephone features . . . . . . . . . . . . . . . . . . . . . . . . . . . . . . . . . . . . . . . . . . . . 95
Moving telephones . . . . . . . . . . . . . . . . . . . . . . . . . . . . . . . . . . . . . . . . . . . . . . . . . . . . 95
Hunt Groups . . . . . . . . . . . . . . . . . . . . . . . . . . . . . . . . . . . . . . . . . . . . . . . . . . . . . . . . 95
Prevent calls from ringing at your telephone . . . . . . . . . . . . . . . . . . . . . . . . . . . . . . . . 95
Use Do Not Disturb . . . . . . . . . . . . . . . . . . . . . . . . . . . . . . . . . . . . . . . . . . . . . . . . 96
Cancel Do Not Disturb . . . . . . . . . . . . . . . . . . . . . . . . . . . . . . . . . . . . . . . . . . . . . 96
Stop calls . . . . . . . . . . . . . . . . . . . . . . . . . . . . . . . . . . . . . . . . . . . . . . . . . . . . . . . . 96
Refuse to answer a call . . . . . . . . . . . . . . . . . . . . . . . . . . . . . . . . . . . . . . . . . . . . . 96
Turn Privacy on or off for a call . . . . . . . . . . . . . . . . . . . . . . . . . . . . . . . . . . . . . . . . . . 96
Create a conference call by releasing privacy . . . . . . . . . . . . . . . . . . . . . . . . . . . . 97
Telephone Features Programming Guide
Page 8

8 Contents
Handsfree and Mute . . . . . . . . . . . . . . . . . . . . . . . . . . . . . . . . . . . . . . . . . . . . . . . . . . 97
Hearing aid compatibility . . . . . . . . . . . . . . . . . . . . . . . . . . . . . . . . . . . . . . . . . . . . . . . 99
Call Duration Timer . . . . . . . . . . . . . . . . . . . . . . . . . . . . . . . . . . . . . . . . . . . . . . . . . . . 99
Accidental disconnect . . . . . . . . . . . . . . . . . . . . . . . . . . . . . . . . . . . . . . . . . . . . . . . . . 99
Disconnect supervision . . . . . . . . . . . . . . . . . . . . . . . . . . . . . . . . . . . . . . . . . . . . . . . . 99
Time . . . . . . . . . . . . . . . . . . . . . . . . . . . . . . . . . . . . . . . . . . . . . . . . . . . . . . . . . . . . . . . 99
Background Music . . . . . . . . . . . . . . . . . . . . . . . . . . . . . . . . . . . . . . . . . . . . . . . . . . . 100
Make a call private . . . . . . . . . . . . . . . . . . . . . . . . . . . . . . . . . . . . . . . . . . . . . . . . 97
Answer calls without lifting the handset . . . . . . . . . . . . . . . . . . . . . . . . . . . . . . . . . 97
Make calls without lifting the handset . . . . . . . . . . . . . . . . . . . . . . . . . . . . . . . . . . 97
Mute Handsfree . . . . . . . . . . . . . . . . . . . . . . . . . . . . . . . . . . . . . . . . . . . . . . . . . . . 98
Change a normal call to handsfree . . . . . . . . . . . . . . . . . . . . . . . . . . . . . . . . . . . . 98
Change a handsfree call to a normal call . . . . . . . . . . . . . . . . . . . . . . . . . . . . . . . 98
Handsfree . . . . . . . . . . . . . . . . . . . . . . . . . . . . . . . . . . . . . . . . . . . . . . . . . . . . . . . 98
Change Handsfree for a telephone . . . . . . . . . . . . . . . . . . . . . . . . . . . . . . . . . . . . 98
Handsfree Answerback . . . . . . . . . . . . . . . . . . . . . . . . . . . . . . . . . . . . . . . . . . . . . 99
Cancel Background Music . . . . . . . . . . . . . . . . . . . . . . . . . . . . . . . . . . . . . . . . . 100
Chapter 12
System features . . . . . . . . . . . . . . . . . . . . . . . . . . . . . . . . . . . . . . . . . . . . . . 101
ISDN . . . . . . . . . . . . . . . . . . . . . . . . . . . . . . . . . . . . . . . . . . . . . . . . . . . . . . . . . . . . . 10 1
Network name display . . . . . . . . . . . . . . . . . . . . . . . . . . . . . . . . . . . . . . . . . . . . . 101
Name and number blocking . . . . . . . . . . . . . . . . . . . . . . . . . . . . . . . . . . . . . 101
Use alternate or scheduled services . . . . . . . . . . . . . . . . . . . . . . . . . . . . . . . . . . . . . 102
Restriction service . . . . . . . . . . . . . . . . . . . . . . . . . . . . . . . . . . . . . . . . . . . . . . . . 102
Ringing service . . . . . . . . . . . . . . . . . . . . . . . . . . . . . . . . . . . . . . . . . . . . . . . . . . 102
Routing service . . . . . . . . . . . . . . . . . . . . . . . . . . . . . . . . . . . . . . . . . . . . . . . . . . 102
Turning services on and off . . . . . . . . . . . . . . . . . . . . . . . . . . . . . . . . . . . . . . . . . 102
Turn services on and off using feature codes . . . . . . . . . . . . . . . . . . . . . . . . . . . 103
View active services from a two-line display telephone . . . . . . . . . . . . . . . . . . . 103
View active services from a one-line display telephone . . . . . . . . . . . . . . . . . . . 104
User passwords . . . . . . . . . . . . . . . . . . . . . . . . . . . . . . . . . . . . . . . . . . . . . . . . . . . . . 105
Registration password . . . . . . . . . . . . . . . . . . . . . . . . . . . . . . . . . . . . . . . . . . . . . 105
Log password . . . . . . . . . . . . . . . . . . . . . . . . . . . . . . . . . . . . . . . . . . . . . . . . . . . 105
Special telephones . . . . . . . . . . . . . . . . . . . . . . . . . . . . . . . . . . . . . . . . . . . . . . . . . . 105
Direct dial . . . . . . . . . . . . . . . . . . . . . . . . . . . . . . . . . . . . . . . . . . . . . . . . . . . . . . 105
Change direct dial telephone assignments . . . . . . . . . . . . . . . . . . . . . . . . . . 106
Hotline . . . . . . . . . . . . . . . . . . . . . . . . . . . . . . . . . . . . . . . . . . . . . . . . . . . . . . . . . 106
Hotline bypass . . . . . . . . . . . . . . . . . . . . . . . . . . . . . . . . . . . . . . . . . . . . . . . 106
Make a telephone a hotline telephone . . . . . . . . . . . . . . . . . . . . . . . . . . . . . 106
Control telephone . . . . . . . . . . . . . . . . . . . . . . . . . . . . . . . . . . . . . . . . . . . . . . . . 107
Set lock . . . . . . . . . . . . . . . . . . . . . . . . . . . . . . . . . . . . . . . . . . . . . . . . . . . . . . . . 107
P0937240 02
Page 9

Contents 9
Change Set Lock programming for a telephone . . . . . . . . . . . . . . . . . . . . . . . . . 107
Auxiliary ringer . . . . . . . . . . . . . . . . . . . . . . . . . . . . . . . . . . . . . . . . . . . . . . . . . . . . . . 107
Turn the auxiliary ringer on or off . . . . . . . . . . . . . . . . . . . . . . . . . . . . . . . . . . . . 107
Host System dialing signals . . . . . . . . . . . . . . . . . . . . . . . . . . . . . . . . . . . . . . . . . . . . 108
Link . . . . . . . . . . . . . . . . . . . . . . . . . . . . . . . . . . . . . . . . . . . . . . . . . . . . . . . . . . . 108
Prevent a telephone from using Link . . . . . . . . . . . . . . . . . . . . . . . . . . . . . . 108
Pause . . . . . . . . . . . . . . . . . . . . . . . . . . . . . . . . . . . . . . . . . . . . . . . . . . . . . . . . . 108
Long Tones . . . . . . . . . . . . . . . . . . . . . . . . . . . . . . . . . . . . . . . . . . . . . . . . . . . . . 108
Run/Stop . . . . . . . . . . . . . . . . . . . . . . . . . . . . . . . . . . . . . . . . . . . . . . . . . . . . . . . 109
Wait for Dial Tone . . . . . . . . . . . . . . . . . . . . . . . . . . . . . . . . . . . . . . . . . . . . . . . . 109
Pulse or tone dialing . . . . . . . . . . . . . . . . . . . . . . . . . . . . . . . . . . . . . . . . . . . . . . . . . 109
Pulse dialing for a call . . . . . . . . . . . . . . . . . . . . . . . . . . . . . . . . . . . . . . . . . . . . . 110
Access your system from an external location . . . . . . . . . . . . . . . . . . . . . . . . . . . . . 110
Direct Inward System Access (DISA) . . . . . . . . . . . . . . . . . . . . . . . . . . . . . . . . . 110
Class of Service (COS) . . . . . . . . . . . . . . . . . . . . . . . . . . . . . . . . . . . . . . . . 110
Class of Service (COS) passwords . . . . . . . . . . . . . . . . . . . . . . . . . . . . . . . 111
Change your Class of Service . . . . . . . . . . . . . . . . . . . . . . . . . . . . . . . . . . . 111
Maintain security . . . . . . . . . . . . . . . . . . . . . . . . . . . . . . . . . . . . . . . . . . . . . . . . . 111
Remote access over the public network . . . . . . . . . . . . . . . . . . . . . . . . . . . . . . . 111
Tones . . . . . . . . . . . . . . . . . . . . . . . . . . . . . . . . . . . . . . . . . . . . . . . . . . . . . . . . . . 112
Voice mail . . . . . . . . . . . . . . . . . . . . . . . . . . . . . . . . . . . . . . . . . . . . . . . . . . . . . . . . . 112
Service provider features . . . . . . . . . . . . . . . . . . . . . . . . . . . . . . . . . . . . . . . . . . . . . . 113
Call Forward . . . . . . . . . . . . . . . . . . . . . . . . . . . . . . . . . . . . . . . . . . . . . . . . . . . . 113
Cancel Call Forward . . . . . . . . . . . . . . . . . . . . . . . . . . . . . . . . . . . . . . . . . . . . . . 113
Call the number where your calls are forwarded . . . . . . . . . . . . . . . . . . . . . 113
Automatic Call Back . . . . . . . . . . . . . . . . . . . . . . . . . . . . . . . . . . . . . . . . . . . . . . 113
Automatic Recall . . . . . . . . . . . . . . . . . . . . . . . . . . . . . . . . . . . . . . . . . . . . . . . . . 114
Chapter 13
Hospitality Services. . . . . . . . . . . . . . . . . . . . . . . . . . . . . . . . . . . . . . . . . . . 115
Types of telephone set . . . . . . . . . . . . . . . . . . . . . . . . . . . . . . . . . . . . . . . . . . . . . . . . 115
Common set . . . . . . . . . . . . . . . . . . . . . . . . . . . . . . . . . . . . . . . . . . . . . . . . . . . . 115
Room set . . . . . . . . . . . . . . . . . . . . . . . . . . . . . . . . . . . . . . . . . . . . . . . . . . . . . . . 115
Hospitality Services (HS) admin set . . . . . . . . . . . . . . . . . . . . . . . . . . . . . . . . . . 115
Alarm time (AL) feature . . . . . . . . . . . . . . . . . . . . . . . . . . . . . . . . . . . . . . . . . . . . . . . 116
Program the Alarm time feature . . . . . . . . . . . . . . . . . . . . . . . . . . . . . . . . . . . . . 116
Change or cancel an Alarm time . . . . . . . . . . . . . . . . . . . . . . . . . . . . . . . . . . . . . 116
Cancel an alarm . . . . . . . . . . . . . . . . . . . . . . . . . . . . . . . . . . . . . . . . . . . . . . 117
Turn off an Alarm . . . . . . . . . . . . . . . . . . . . . . . . . . . . . . . . . . . . . . . . . . . . . 117
Hospitality Services admin alarm feature . . . . . . . . . . . . . . . . . . . . . . . . . . . . . . 117
Room occupancy . . . . . . . . . . . . . . . . . . . . . . . . . . . . . . . . . . . . . . . . . . . . . . . . 118
Programming the state of a room set . . . . . . . . . . . . . . . . . . . . . . . . . . . . . . 118
Telephone Features Programming Guide
Page 10

10 Contents
Room condition . . . . . . . . . . . . . . . . . . . . . . . . . . . . . . . . . . . . . . . . . . . . . . . . . . 118
Hospitality passwords . . . . . . . . . . . . . . . . . . . . . . . . . . . . . . . . . . . . . . . . . . . . . 120
Chapter 14
Portable telephone and handset features . . . . . . . . . . . . . . . . . . . . . . . . . 121
Portable telephones . . . . . . . . . . . . . . . . . . . . . . . . . . . . . . . . . . . . . . . . . . . . . . . . . . 121
Portable telephone features . . . . . . . . . . . . . . . . . . . . . . . . . . . . . . . . . . . . . . . . 122
Chapter 15
Troubleshooting . . . . . . . . . . . . . . . . . . . . . . . . . . . . . . . . . . . . . . . . . . . . . . 125
Room condition from a room set . . . . . . . . . . . . . . . . . . . . . . . . . . . . . . . . . 119
Room condition with a Hospitality service admin set . . . . . . . . . . . . . . . . . . 119
Desk admin password . . . . . . . . . . . . . . . . . . . . . . . . . . . . . . . . . . . . . . . . . 120
Room condition password . . . . . . . . . . . . . . . . . . . . . . . . . . . . . . . . . . . . . . 120
Directed Call Pickup . . . . . . . . . . . . . . . . . . . . . . . . . . . . . . . . . . . . . . . . . . . 123
Group Pickup . . . . . . . . . . . . . . . . . . . . . . . . . . . . . . . . . . . . . . . . . . . . . . . . 123
Wireless Portable Language Selection . . . . . . . . . . . . . . . . . . . . . . . . . . . . . 123
Wireless Call Forward No Answer enhancement . . . . . . . . . . . . . . . . . . . . . 123
Alarm codes . . . . . . . . . . . . . . . . . . . . . . . . . . . . . . . . . . . . . . . . . . . . . . . . . . . . . . . . 125
Report and record alarm codes . . . . . . . . . . . . . . . . . . . . . . . . . . . . . . . . . . . . . 125
Test the telephone . . . . . . . . . . . . . . . . . . . . . . . . . . . . . . . . . . . . . . . . . . . . . . . . 125
Test the telephone display . . . . . . . . . . . . . . . . . . . . . . . . . . . . . . . . . . . . . . 125
Test the telephone buttons . . . . . . . . . . . . . . . . . . . . . . . . . . . . . . . . . . . . . . 126
Test the speaker in the telephone handset . . . . . . . . . . . . . . . . . . . . . . . . . . 126
Test the telephone headset . . . . . . . . . . . . . . . . . . . . . . . . . . . . . . . . . . . . . . 126
Test the telephone speaker . . . . . . . . . . . . . . . . . . . . . . . . . . . . . . . . . . . . . . 126
Test the power supply to a telephone . . . . . . . . . . . . . . . . . . . . . . . . . . . . . . 127
Appendix A
Feature Codes . . . . . . . . . . . . . . . . . . . . . . . . . . . . . . . . . . . . . . . . . . . . . . . 129
Features sorted by activation code . . . . . . . . . . . . . . . . . . . . . . . . . . . . . . . . . . . 133
Appendix B
Common display prompts and error messages . . . . . . . . . . . . . . . . . . . . 137
Index . . . . . . . . . . . . . . . . . . . . . . . . . . . . . . . . . . . . . . . . . . . . . . . . . . . . . . . 141
P0937240 02
Page 11

Figures
Figure 1 T7100, T7208, T7316, M7324 and M7324N telephones . . . . . . . . . . . . . 20
Figure 2 Installing a T7316 telephone (North America) . . . . . . . . . . . . . . . . . . . . . 21
Figure 3 Mounting a T7316 telephone with a stand on the wall . . . . . . . . . . . . . . 22
Figure 4 Mounting a T7316 telephone without a stand on the wall . . . . . . . . . . . . 23
Figure 5 Display buttons . . . . . . . . . . . . . . . . . . . . . . . . . . . . . . . . . . . . . . . . . . . . 26
Figure 6 CAP module with M7324 and M7324N telephones . . . . . . . . . . . . . . . . . 34
Figure 7 Button assignment on the T7316 telephone . . . . . . . . . . . . . . . . . . . . . . 87
Figure 8 Button assignment on the M7324 telephone . . . . . . . . . . . . . . . . . . . . . . 89
Figures 11
Teleph one Features Programmi ng G uide
Page 12

12 Figures
P0937240 02
Page 13

Tables
Table 1 Telephone buttons . . . . . . . . . . . . . . . . . . . . . . . . . . . . . . . . . . . . . . . . . . 25
Table 2 Telephone button functions . . . . . . . . . . . . . . . . . . . . . . . . . . . . . . . . . . . 25
Table 3 Substitutes for buttons on a one-line display telephone . . . . . . . . . . . . . . 26
Table 4 Language options . . . . . . . . . . . . . . . . . . . . . . . . . . . . . . . . . . . . . . . . . . . 83
Table 5 T7316 button assignment template . . . . . . . . . . . . . . . . . . . . . . . . . . . . . 88
Table 6 T7208 button assignment template . . . . . . . . . . . . . . . . . . . . . . . . . . . . . 88
Table 7 M7324(N) button assignment template . . . . . . . . . . . . . . . . . . . . . . . . . . 89
Table 8 Tones and what they mean . . . . . . . . . . . . . . . . . . . . . . . . . . . . . . . . . . 112
Table 9 Features available to a portable telephones in the system . . . . . . . . . . 122
Table 10 Features sorted by feature name . . . . . . . . . . . . . . . . . . . . . . . . . . . . . . 129
Table 11 Features sorted by activation code . . . . . . . . . . . . . . . . . . . . . . . . . . . . 133
Tables 13
Teleph one Features Programmi ng G uide
Page 14

14 Tables
P0937240 02
Page 15

Preface
This guide provides information about how to program a Business Communications Manager
telephone. This in formation inclu des items s uch as prog ramming pe rsonal sp eed dials , tran sferrin g
a call, and using special features. Some of the features included in the Business Communications
Manager telephone syst em ar e:
• conference call s
• group listening
• group pickup
• directed pickup
• call tracking
This guide is aimed at the day-to-day oper at ors of the Business Communications Ma nager
telephone system.
Before you begin
15
Plan the programming changes you want to make before you begin. Record the changes so that
you have the information at hand. For example, before you program system speed dial numbers,
create a record so that you have all the numbers and codes availa ble.
Programming applies to both North America and International telephones in your Business
Communications Manager system.
Emergency 911 Dialing
Emergency 911 Dialing is the capability to access a public emergency response system.
State and local re qui rements for support of Emergency 911 Dialing service by Customer Pre mi se s
Equipment vary. Ask your local telecommunications service provider about compliance with
applicable laws and regulations.
Emergency 911 Dialing may not apply to International systems.
Te xt conventions
This guide uses the following text conventions:
angle brackets < > Indicate the generic title on the telephone display.
Example: When querying a feature button.
Bold
<Feature name>
Indicates a programming level within the telephone menu.
Example: Terminal & Sets programming level
appears in angle brackets.
.
Telephone Featur es Pr ogramming Guide
Page 16

16 Preface
ClearDisplay font
italic text Indicates new terms and book titles.
Forward slash /
Acronyms
This guide uses the following acronyms:
AL Alarm
ASM Analog Station Module
ATA Analog Terminal Adapter
BLF Busy Lamp Field
BRI Basic Rate Interface
CAP Central Answering Position
Indicates what appears on the telephone display.
Example:
Example: Business Communicat ion s Manager Telephone
Feature Card.
Separates names where two actions are assigned to one button.
Example:
CALL
.
Run/Stop.
CFB Call Forward on Busy
CFAC Call Forward All Calls
CFNA Call Forward No Answer
CLID Calling Line Identification
COS Class of Service
DID Direct Inward Dial
DISA Direct Inward System Access
DN Directory Number (Extension Numb er)
DND Do Not Disturb
DLR Distinctive Line Ring
DRP Distinctive Ring Pattern
DRT Delayed Ring Transfer
ERC Express Routing code
HS Hospitality S ervices
IP Internet Protocol
ISDN Integra ted Services D igital Network
ISO International Organization for Standardization
PBX Priv ate Branch Exchange
PRI P r im ary Rate Int erface
P0937240 02
Page 17

RC Room Condition
RJXX Registered Jack XX (Where XX is used to denote numbers, for
RO Room Occupancy
SLR Selective Line Redirection
URL Unif or m Resou rce Locator
Related publications
For more infor ma ti on about using Business Communications Ma nager 2.5, refer to the follo wing
publications:
• Business Communications Manager Installation and Maintenance Guide
• Business Communications Manager Programming Operations Guide.
This document provides more information about using Unified Manager.
• Business Communications Manager DECT Installation and Maintenance Guide
Preface 17
example: 45 or 5.)
Telephone Featur es Pr ogramming Guide
Page 18

18 Preface
P0937240 02
Page 19

Chapter 1
Introduction
Your Business Communications Manager telephone system has many features that you can
customize to keep up with changes in your workplace.
Unified Manager
Unified Manager is the tool used to program settings for the system telephony features, and
settings for each telephon e and external li nes. Multiple levels of prog ramming are a ccessible
through Unified Manager. You access the Business Communications Manager Unified Manager
from your web browser. For more information about navigation and making selections using
Unified Manager, see the Business Communications Manager Programming Operations Guide.
Telephone types
Figure 1 shows the three different Business Series Terminal s, as well as the M7324 and M7324N
telephones. See “T7100, T7208, T7316, M7324 and M7324N telephones” on page 20.
19
Telephone Featur es Pr ogramming Guide
Page 20

20 Chapter 1 Introduction
Figure 1 T7100, T7208, T7316, M7324 and M7324N telephones
T7100
T7316
1
7
1
M7324N
2
7
5
6
4
2
3
5
6
4
2
5
6
1
1
3
3
7
7
1
4
2
3
6
1
5
7
4
T7208
2
5
6
M7324
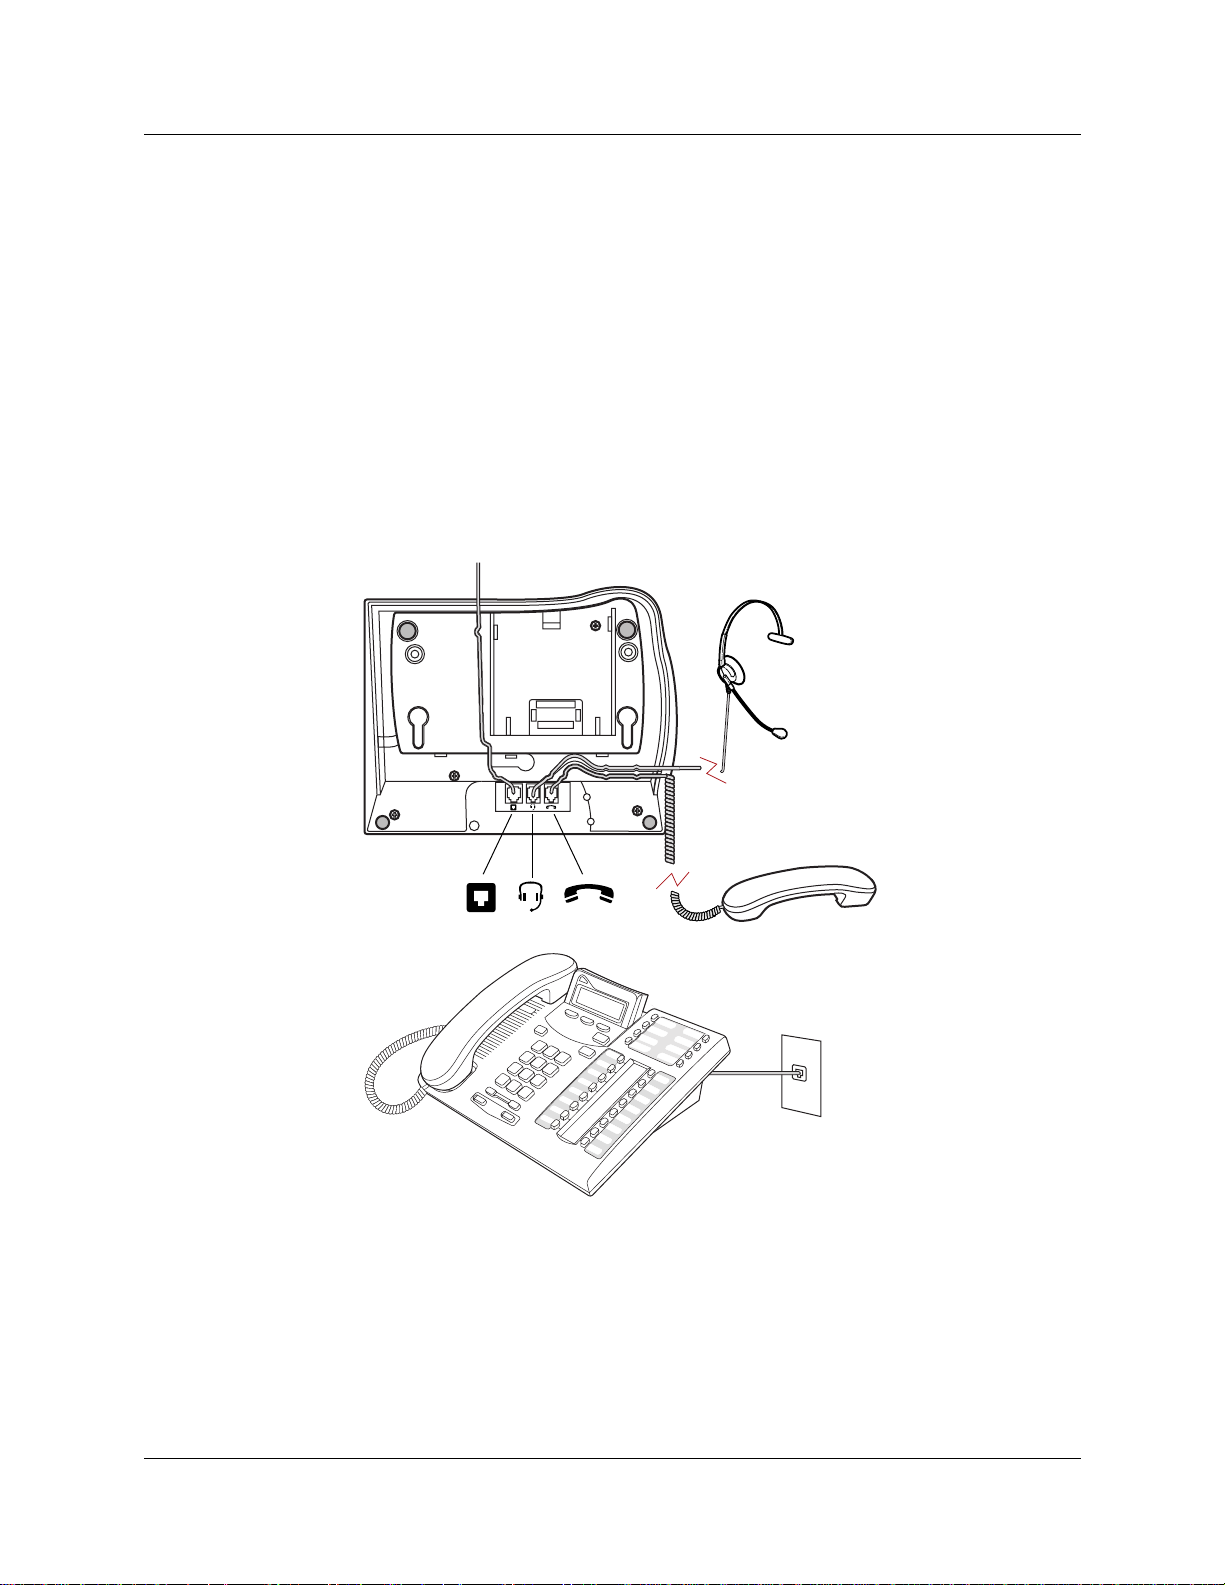
Telephone installation
If you are connecting a Busine ss Communications Mana ger telephone for t he firs t time, refer to the
following illustrations and ste ps.
1 Disconnect the line cord from the wall socket before trying to carry out any work on the
telephone.
2 To remo v e an y o f the cords, press the r eleas e lat ch on t he plug a nd care full y pu ll th e plug from
the socket.
P0937240 02
4
Page 21
Chapter 1 Introduction 21
3 Connect the handset cord to the jack labelled with the telephone icon and route the cord as
shown.
4 If you are using a headset, route the cord along the channel in the base and connect the cord to
the telephone jack that is lab elled with th e headset icon.
5 Route the line cord through the support and connect the cord to the telephone jack that is
labelled with the jack icon.
6 Attach the support using either pair of slots; to rai se the back of the telephone to its highest
position, use these slots.
7 When the above work is complete, plug the line cord back into its wall socket.
Figure 2 shows the T7316 installation procedure . See “Installing a T7316 telephone (North
America)” on page 21.
Figure 2 Installing a T7316 teleph one ( North Amer ic a)
Figure 3 shows the T7316 and stand wall mounting procedure. See “Mounting a T7316 telephone
with a stand on the wall” on page 22.
Telephone Features Programmi ng Guide
Page 22

22 Chapter 1 Introduction
Figure 3 Mounting a T7316 telephone wi th a stand on the wall
Figure 4 shows the T7316 without a stand wall mounting procedure. See “Mounting a T7316
telephone without a stand on the wall” on page 23.
P0937240 02
Page 23
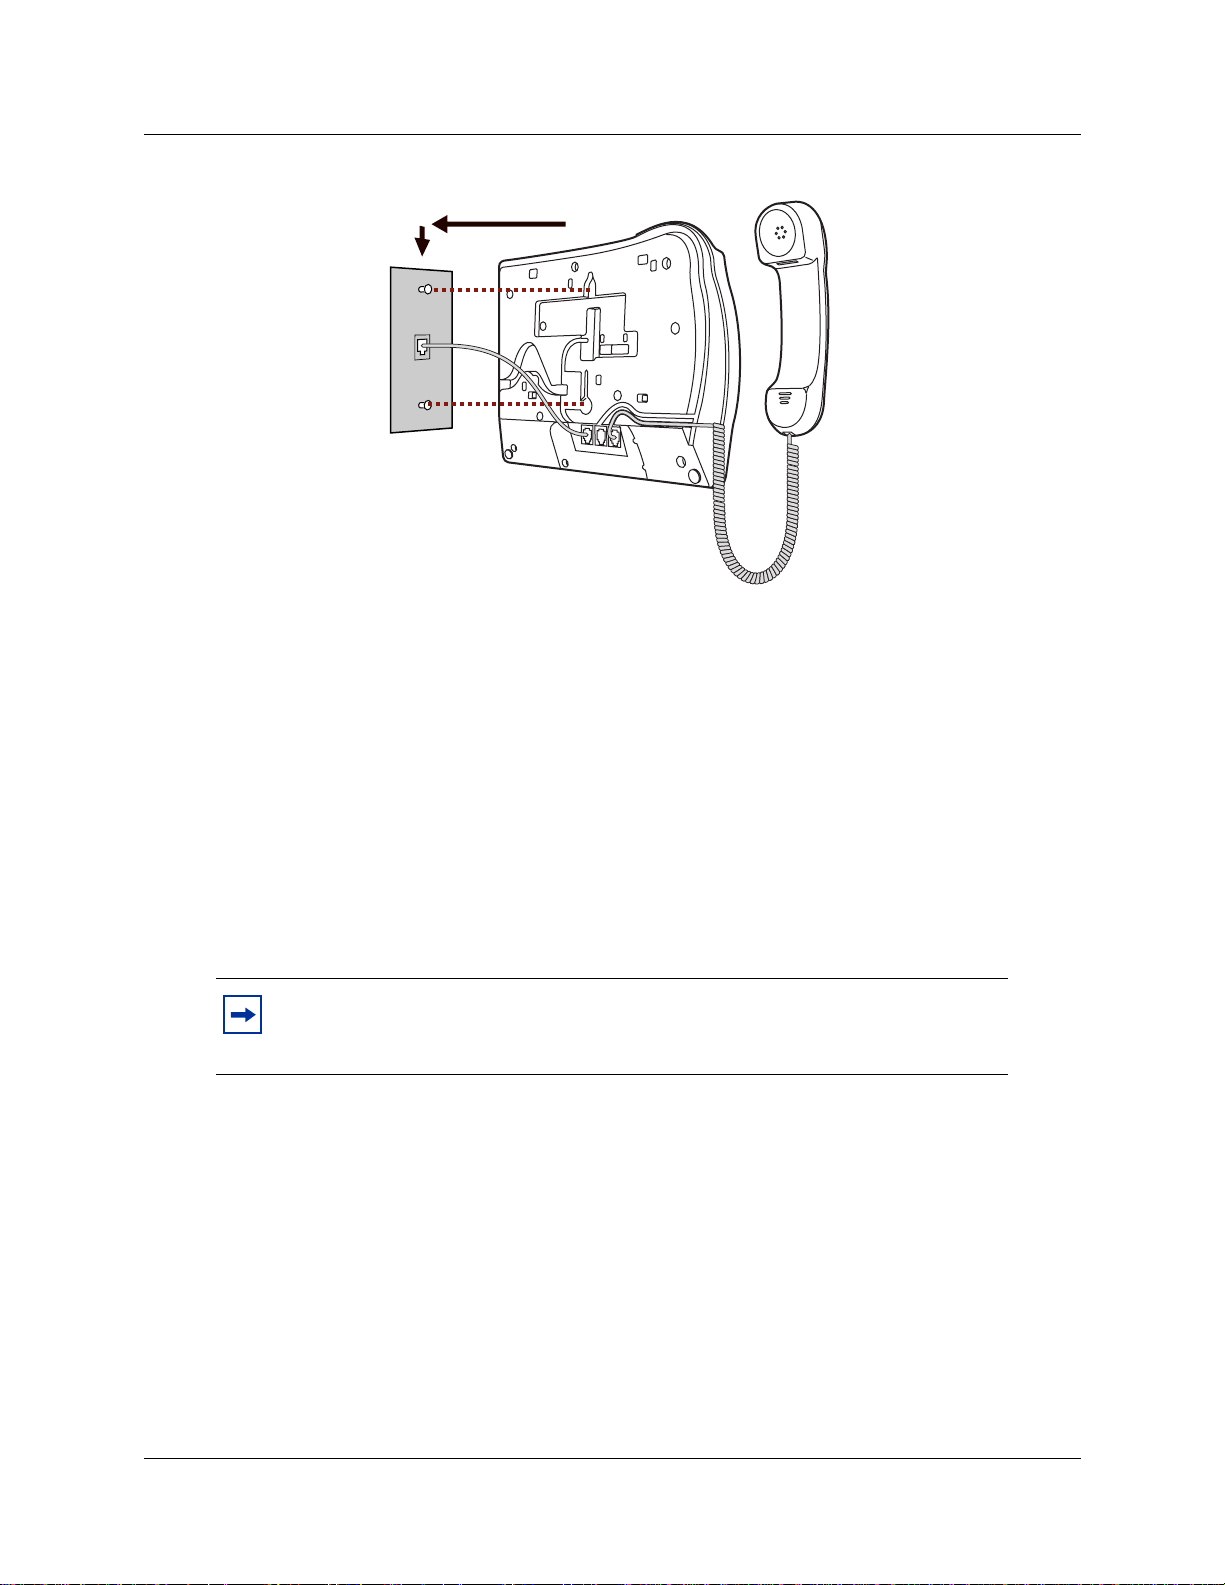
Figure 4 Mounting a T7316 telephone without a stand on the wall
Name a telephone or a line
Chapter 1 Introduction 23
You can assign names to identify external lines, target lines, and your colleagues’ telephones.
During a call, the name (if programmed) appears on the telephone display instead of the external
line number or internal telephone number of the caller. You need to start a Unified Manager
session to progra m this f eatur e. F or mo re inf ormati on about progra mming u sing Uni f ied Mana ger,
see the Business Communications Manager Programming Operations Guide.
Telephone names and line names can contain both letters and numbers, but cannot be longer than
seven characters. You cannot use the # and * symbols.
Note: You can give the same name to a telephone and a line in your system. Use
initials, abbre v iati ons, or e ven nicknames to give each t elepho ne a un ique na me t o
avoid confusion.
Extension numbers
Each telephone in the system has an extension number. The length of extension numbers in your
system can range from two to seven digits. All numbers in your system are the same length. Your
installer assigns the length of extension numbers, called the extension length. The default
extension length is three.
To find out your internal number, use the Button Inquiry feature (≤•‚) from an intercom
button. On the T7100 telephone, Button Inquiry shows your internal number followed by the
function assigned to the memory button.
Telephone Features Programmi ng Guide
Page 24

24 Chapter 1 Introduction
Line assignment
You can assign any of the lines in your system to any of your telephones. Your installer assigns
lines to telephones. Assignments for lines are:
• appear only
• appear and ring
• ring only
Lines assigned to a telephone automatically have a line button on that telephone, when a button is
available. The T7100 telephone has no line buttons.
Prime line
You can program your telephone to select an internal, or external line, or a line pool automatica lly
when you lift the handset. This is your prime line.
Private line
A priv at e lin e is limit ed to a sele cted t eleph one. You can pick up calls put on hold, or not ans were d
on a private line, only at the prime telephone.
Target line
A target line routes a call directly to a selected telephone, or group of telephones. Target lines are
only for incoming calls. A single incoming li ne can provide connections to sev eral diff er ent target
lines. Target lines allow each person or department in the office to have their own number without
having a separate external line for each number.
Overflow call routing
If a call comes in to a target line that is busy, the system routes the call to the prime telephone for
that target line. If there is no prime telephone assigned to the target line, or if you cannot direct a
call to a target line, the call goes to the prime telephone for the external line.
Overflow routing for incomin g calls uses the r o uting servi ce programm ed by your instal ler.
Service must be active for overf low routing to operate. Overf low routing is no t available in normal
service.
P0937240 02
Note: When you make a call and the programmed route is busy, you hear the
expensive route warning tone and see a display indicating the use of an expensive
route. To avoid using the normal, expensive route, release your call.
Because overflow routing directs calls using different li n e pools, a call might be
affected by different line filters.
Page 25
Telephone buttons
This guide shows the Business Series Terminals buttons. Table 1 shows which buttons to use on the
differen t types of Nortel Networks telep hones. See “Telephone buttons” on page 25.
Table 1 Telephone buttons
Chapter 1 Introduction 25
Button Name T7100, T7208, T7316
Feature
Handsfree Bottom right-hand button
Mute
Hold
Volume Control
Release
You can enter ≤,
≤
©
≥
√
®
Ä
, or ƒ and the code to use a feature. For example: Press
M7100, M7208, M7310,
M7324
Ä
©
©
ú
Ã
¨
M7100N, M7208N,
M7310N, M7324 N
ƒ
©
©
˙
√
®
≤·°⁄ to access your mailbox.
The T7100telephone works differently from other telephones on your system because it does not
have l ine b u ttons. Where ot her t elepho nes ca n r equire that you se lect a line b utt on to a nswe r a ca ll,
on the T7100 telephone you pick up the handset. Where other telephones require you to select a
line button to take a call off hold, you press ≥ on the T7100 telephone.
On T7100 telephones, you can answer a second call by pressing ≤. Your active call is put on
hold and you connect to the waiting call. You can have no more than two active calls at one time.
The T7100 telephone does not have a © button.
T abl e 2 show s the but tons and their functions for each telephone . See “T el ephone but ton functions ”
on page 25.
Table 2 Telephone button functions
1
Dial pad Used for dialing numbers and for entering numbers and letters when
2
Display Shows instructions for cal ling and programmin g.
3
Display buttons The current use appears on t he display above each button.
4
Memory buttons Dial a number or feature code stored on the button.
5
Feature button Allows you to enter a feature code while using or programming the
6
Hold button Puts an active call on hold.
7
Release button Hangs up an active call or ends programming.
you are programming.
telephone.
For more info rmation about telephone buttons, refer to your Telephone User Card.
Telephone Features Programmi ng Guide
Page 26
26 Chapter 1 Introduction
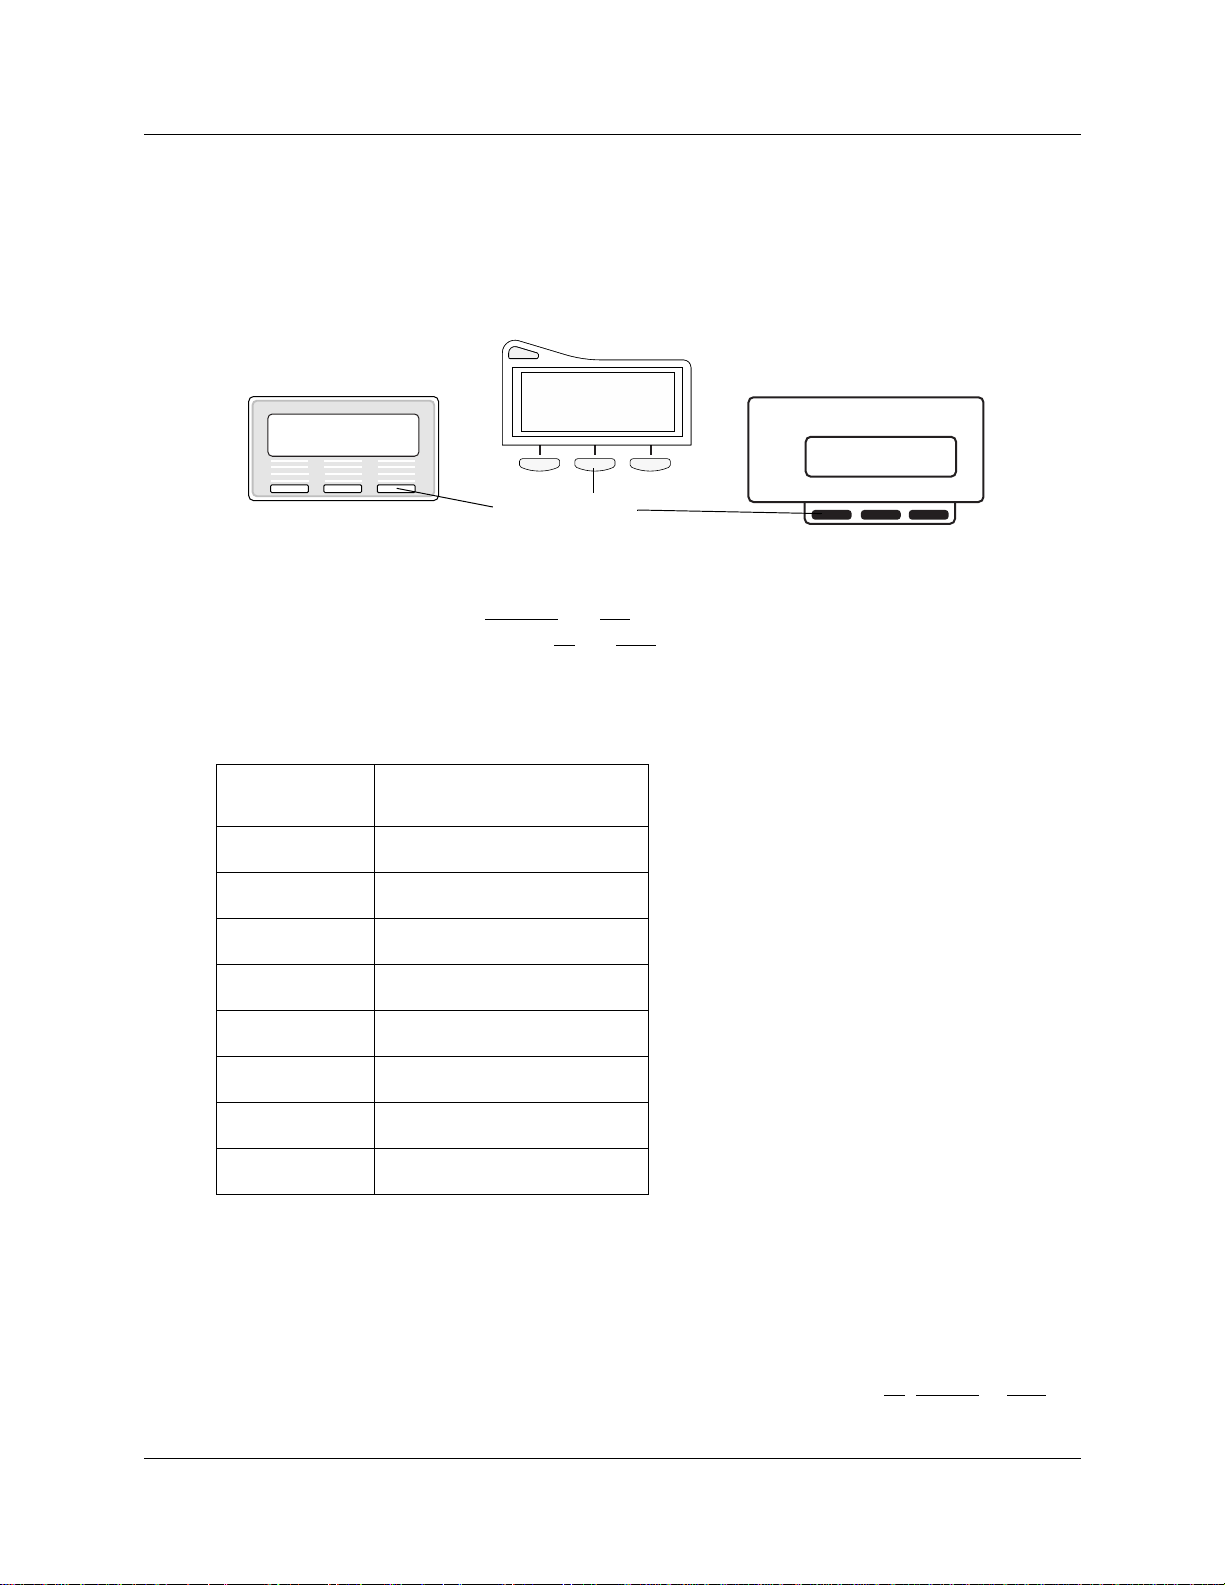
One-line and two-line displays
The T7100 and T7208 telephones have a one-line display. The T7316 and M7324(N) telephones
have a second line on the di splay which shows the functions of the three buttons below it. Figure 5
shows the different types of telephone display buttons. See “Display buttons” on page 26.
Figure 5 Display buttons
Contrast level 2
DOWN UP OK
Contrast level 2
DOWN UP OK
Contrast level 2
DOWN UP OK
Display buttons
Some display buttons, such as
TRANSFR
display. Other display b u ttons, such as
and
OK
ALL
, are shortcuts that are only available on a two-line
and
, perform a function necessar y to proceed . Table
SHOW
3 shows display button functions and dial pad buttons on a one-line display telephone. See
“Substitutes for b uttons on a one-line display teleph one” on page 26.
Table 3 Substitutes for buttons on a one-line display telephone
Dial pad buttons on a T7100
Display buttons
OK
QUIT
ADD
SHOW
CANCEL
VIEW
OVERRIDE
BKSP
and T7208 telephones
≥ or
® or
ú
¨
•
£
£
£
£
√ or
Ã
All examples in this guide show the two-line display.
Buttons under the display
The three display buttons are for telephone features. The programming session determines what
the display shows and what each but t on does. Some display instructions are
this guide, display button instructions appear underlined.
P0937240 02
OK, CHANGE
or
COPY
. In
Page 27

Chapter 1 Introduction 27
Memory buttons
You can use memory buttons as answer, autodial, line, and programmed feature buttons. Line,
intercom and answer b uttons must have indicators. The T7316, T7208 and M7324(N) telephones
have memory buttons with indicators. The T7316 telephone also has memory buttons without
indicators. There is a single memory button, wit hout an indicator, on the T7100 telephone.
Program buttons
Press the ≤ button on the telephone followed by an activation code for personal programming.
For a summary of all the Featu re button programming, refer to Appendix A, “Feature Codes,” on
page 129.
Telephone Features Programmi ng Guide
Page 28

28 Chapter 1 Introduction
P0937240 02
Page 29

Chapter 2
Answer calls
There are three indications of an incoming call:
• ringing
• a line button flashing
• a message on the display
You do not always receive all three indications for any distinct call. For example, you can have a
line set up not to ring at your telephone. If so, you see only a flashing line button. There are many
possible combinations, depend ing on your system set up. For more informatio n abo ut the use of
lines, see “Line buttons” on page 42.
Ring types
There are several different types of ring.
29
A double beep e v ery t en seco nds A call is camped to your telephone.
A long single ring There is an external call on the li ne for you.
A shorter double ring There is an internal call on the line for you, or a call
is being transferred to you.
A brief single ring A call arriving on an external line is redirected to a
telephone outside of your system. You cannot
answer this call.
Three beeps descending in tone You are receiving a priority call.
Distinctive Line Ring
There are four Distinctive Ring patterns (DRP) for incoming calls.
DRP 4 Highest priority
DRP 3 2nd highest priority
DRP 2 3rd highest priority
DRP 1 Lowest priority
Call Ringing
When more than one call rings at a telephone, highest propr ity DR P rings through first.
Telephone Featur es Pr ogramming Guide
Page 30

30 Chapter 2 Answer calls
Call Answering
When more than one call rings a t a telephone, the user lifts the handset and automatically answers
the call wit h th e highest priori ty.
Note: External calls have a highe r priority t ha n internal calls.
You cannot press ≤•fl to change the ri ng type on a t elephone whe n
the Distinctive Line Ring feature is in service.
For more information about the Distinctive Line Ring feature, refer to the Business
Communications Manag er Programming Operat ions Guide.
Line buttons
For each line as signed to your telephone , you ha ve one line b utton. Press the flash ing line b utto n to
select the line you want to answer. Having several line b utton s gi ves you immediate access to more
than one line.
The T7100 telephone has two intercom paths, instead of line buttons, to answer calls. You can
assign two lines to each T7100 telephone. You can press ≥ to switch between two calls , one
activ e and one on hold.
What line indicators mean
Ω Flashing on and off for equal
lengths of time
Ω Flashing on and off more
quickly
Ω Flashing on for longer than off A person has put a call on hold on that line.
Ω On, but not flas hing You are connected to the call on that line or the
Off The line is fr ee.
There is an incoming call on the line.
You have placed a call on hold.
line is in use.
Information about a call on the display
If you subscribe to Call Display services from your local telephone company, one line of
information about an external caller appears on the display after you answer a call. Depending on
the setting and the external information available, either the caller name or telephone number
appears on the display. When you transfer an externa l call to anot her te lephone in your system, th e
same information appears on the recipient’s telephone display.
Depending on the services you subscribe to, Call Display information can contain up to three
parts:
P0937240 02
Page 31

Chapter 2 Answer calls 31
• the name o f the caller
• the number of the caller
• the name o f the line in your system that the cal l is o n
For each telephone, you can determine which information appears on the display first.
Call Display information becomes available between the first and second ring of an incoming call.
If you answer before the Call Disp lay informat ion appears on your display, press ≤°⁄⁄ to
view the line number or line name. To use logging features with Call Display, see “Call Log” on
page 77.
Call Information for a specific call
Call Informat ion allows you to see information ab o ut incoming ca lls. This information is more
detailed than the Call Display information you can receive automatically. For external calls, you
can see the caller name, telep hone number , and the l ine name. For an internal call, you can see the
caller name and the internal number. You can see information for ringing, answered, or held calls.
Call Log shows the same information as Call Information, with the date and time of the call, and
the number of times the caller called.
View Call Information before or after answering
To find out who is calling or to view information about your current call:
1 Press ≤°⁄⁄.
for more information about an external cal l.
2 Press £ or
Call Display information appears between the first and second ring of an incoming call. If you
answer before the Call Displa y informati on appears on your display, and you press ≤°⁄⁄,
you see only the line number or line name.
VIEW
View Call Information for a call on hold
Select a call.
1 Press ≤°⁄⁄. The display shows
2 Select the line on hold. Information about the call appears on the display.
to display more information about an external call.
3 Press £ or
VIEW
Note: If your telephone automatically shows Call Display information
for a call, press ≤°⁄⁄ before you press £ or
information about the call.
Ω
VIEW
for more
Telephone Features Programmi ng Guide
Page 32

32 Chapter 2 Answer calls
Make Call Display information appear automatically at a telephone
Each telephone that rings for an exte rnal line can sho w Call Displa y information for that line. After
answering a call, Call Display information appears on th e display of the telephone t h at answered
the call. Your installer or customer se rvice representative can program telephones to h ave
automatic Call Display.
Change which call information appears first
If the information is not available from your t el ephone company, you can see Unknown name or
Unknown number on the display. If the caller bl o cks that information you can see Private name or
Private number on the display.
You need to start a Unified Manager session to program this feature. For more information about
programming using Unified Manager, see the Business Communications Manager Programming
Operations Guide.
Priority Call
If you receive a priority call and your telephone has no free internal lin e buttons, you cannot
transfer the pri ority call, you must acc ept or relea se it.
Answer calls at a prime telephone
The prime telephone is normally the attendant’s telephone. T he installer or custome r s e rvice
representative progra m s a prime telep hone for a line. Calls not answe red at their normal
destinations transfer to the prime telephone. Business Communications Manager allows for a
prime telephone fo r each li ne if needed. The prime telephone displ ay gives information about the
call, as in the following examples.
DND from 221
DND transfer
DRT Line001
Line061 callback
CALLBCK
P0937240 02
The person at telephone 221 has forwarded a call to you using
Do Not Disturb.
The system has transferred a call to you from a telephone with
Do Not Disturb turned on.
No person answered this call so the system transferred it to you.
A person camped, parked or tr ans fer red a call on line 061, but
no one has answered the c all. Press
connect to the call.
CALLBCK
or the line b utton t o
Page 33

Chapter 2 Answer calls 33
Line061 to prime
There is no telephone that can receive a call on line 061 so the
system has transferred it to you.
Line002>Line052
The call coming in on line 002 for target line 052 has come to
you because Line 052 is busy.
For other displays, see Appendix B, “Common display prompts and error messages,” on
page 137.
Central answering position (CAP) module
A CAP module is an add-on device that provides 48 additional memory or line buttons. You can
connect one or two CAP modul es to the telephone to incr ease the number of lines it can h andle. A
CAP can monitor system tel ephone status, answer external calls on up to 120 lines, and send up to
30 messages to other sy s te m telephone s .
A central answering positio n (CAP) is an M7324 or M7324N t elepho ne and a CAP module (s) tha t
your installer or customer service representative programmed as a CAP. You can have up to five
telephones programmed as CAPs connected to Business Communications Manager. The CAP is
best as the prime telephone and direct-dial telephone for the lines and telephones. Refer to “CAP
module with M7324 and M7324N telephones” on page 34.
Telephone Features Programmi ng Guide
Page 34

34 Chapter 2 Answer calls
Figure 6 CAP module with M7324 and M7324 N telep hone s
M7324 telephone
CAP Module
M7324N telephone
CAPN Module
Customize your CAP module
When a CAP module is first plugged into your telephone, some of the module buttons are
automatically pr ogrammed t o dial an i nterna l number. You can program an y of t he buttons on your
CAP module that do not select lines to dial internal or external numbers automatically.
If your installe r has programmed the CAP module for your system, you can move external lines to
the CAP mo du le by using
You can program feat ures on CAP module buttons. See Chapter 4, “Time-saving features,” on
page 49 and Chapter 9, “Customize your telephone,” on page 83 for information about
programming memory buttons. You cannot assign any buttons on a CAP module as answer
buttons.
Monitor telephones with the CAP module
The indicators Ω next to internal autodial buttons on your CAP module show the status of the
telephones in your system.
P0937240 02
≤•°⁄. See “Move l ine butto ns” on page 90.
Page 35

Chapter 2 Answer calls 35
The indicator is on when the telephone has:
• an active call
• Do Not Disturb turned on
The indicator is off when a telephone ha s:
• no active call
• a call on hold and no other active call
Release button
Press ®to end a call. You do not have to put the handset down. ® also ends feature
programming.
While you are on a cal l, do no t p ress ® to end a feature you are usi ng. If you do, you disconnect
the call. Use ≤ instead.
Pick up a call ringing at another telephone
You can answer a call ringing at another telephone by using Directed Pickup or Group Pickup.
Directed Pickup
You can answer any te lephone tha t i s ringing in your system.
1 Press ≤ ‡fl.
2 Enter the internal number of the ringing te lephone. You cannot use Call Pickup to answer
private lines.
Answer the telephone th at has a flashing indicator for the call, or use Trunk Answer. You can
answer a call that is transferred to an intercom button on another telephone. When the auxiliary
ringer is ringing, but the call is not ringing at a telephone, you cannot answer the call using
Directed Pickup.
Note: Directed Pickup can retrieve calls that are ringing on an Answer
extension. Altho ugh you can enter the extensi on number of the telephone
you hear ringing, it is possible the calls you are answering are from
another telephone .
Group Pickup
Your system can support nine pickup groups. As a member of a pickup group, you can pick up a
call that is ringing at any telephone in your pickup group.
Press ≤‡fi to pick up.
Telephone Features Programmi ng Guide
Page 36

36 Chapter 2 Answer calls
You cannot use Group Pickup to retrieve a camped call.
With more than one incoming call at a telephone in a pickup group, a call ringing on an external
line is answered first, followed by calls on the prime line, an d last, calls on intercom l ines.
Change a telephone’s pickup group
To place and retriev e telephones in and out of pickup groups, you need to start a Unified Manager
session to program the f eat ure. For more information about programming using Uni fied Manager,
see the Business Communications Manager Programming Operations Guide.
Already joined
You are connected to the telephone that made the call you are
trying to pick up. This display appears if you are on a call to a
colleague, your colleague dials the number of a telephone in
your pickup group, and you try to pick up that call.
Pickup denied
There is no call to pick up, or the call has been answered
or
you have tried to pick up a call on a person’s private line.
Pickup:
Enter the internal number of the telephone that is ringing. (Y ou
can use an in ternal autodial button to do this.)
If you decide not to answer a ringing call after you have
activated Directed Pickup, press ≤.
Trunk Answer
The Trunk Answer feature allows you to answer a ringing call in any area in the system from any
telephone in the system. The line you are answering does not have to appear or ring at the
telephone you are using.
Trunk Ans wer works only with ca lls that are ring ing on line s for which a Ringing Ser vice sche dule
is active, and if your installer or cus tomer service repres ent ative ena bled Trunk Answer. If there is
more than one incoming call on lines in a Ringing Service, the Trunk Answer feature picks up the
external ca ll that has been ringing the longest.
Line denied
Pickup denied
Answer buttons
You can use an answer button to monitor calls on another person’s telephone. All calls to the
monitored telephone appear on the Answer button.
P0937240 02
You have tried to pick up a call on a person’s private line.
The call that is ri nging is on a line that is not in a Ringing
Service.
Page 37

Chapter 2 Answer calls 37
Answer buttons help attendants to mon ito r incoming ca lls for one or several other people. For
example, an attendant can have line appearances for three different managers on the answer
buttons of the telephone.
When an attendant answer s a call for manager A the appearance stops at that manager’s set. This
flexibility allows for another (simultaneous) call to come in o n the same line. The same is true for
manager B and manager C. When incoming call traffic increases, the calls can route to a Hunt
Group to optimize call handling. For more information about Hunt Groups see Chapter 10, “Hunt
Groups,” on page 93.
The Answer button s etti ng in Fea ture s ettings progra mming a llows you to determine wh at type s of
calls ring at the telephone. Your options are:
• basic
• enhanced
• extended
For more infor ma tion about programming Answer buttons, see the Business Communications
Manager Programming Operations Guide.
T7100 telephones ha ve no Answer button s assigned to monitor other sets, but you can mo nit or
them.
You cannot make calls using Answer buttons.
If two or more calls are ringing at a person’s telephone, the first call appears on the at tendant’s
Answer button. Any additional calls appear on intercom b uttons, if they are a vailable.
Note: More than one attendant can have an Answer button for a single
telephone, allowing two or more attendants to handle calls for a busy
person.
Each telephone can handle calls for up to eight other people using a
separate Answer button for each person .
Listen to a call as a group
To allow people in your office to listen in on a call using Group Listening, press ≤°‚¤.
You hear the caller’s voice through your telephon e’s speaker. Continue to speak to the caller
through the telephone handset. Your telephone’s microphone is off, so the caller does not hear
people in your office.
Telephone Features Programmi ng Guide
Page 38

38 Chapter 2 Answer calls
Cancel Group Listening
Group Listening cancels automatically when you hang up, or when you press ≤£°‚¤
Note: Keep the handset away from th e speaker , or you can hear feedback.
The higher the volume, the more the feedback. Press ® to prevent
feedback when hanging up.
P0937240 02
Page 39

Chapter 3
Make a call
The follo wing are different w a ys to make a call, depending on the programming and the type o f
call:
• Pick up the handset and dial. Business Communications Manager supports three methods of
dialing. See “Select how you dial your calls” on page 42.
• Pick up the handset, press a line button, and dial (if the call is not on your prime line).
• Press ≈ and dial (to talk without using the handset). See “Handsfree and Mute” on page 97.
• Press a line or intercom button, then press the handsfree button and dial (to talk without the
handset. The speaker is active and the micr ophone is muted until you selec t the hand sfree
button or pick up the handset).
• Press a line or intercom button and dial (to talk without the handset and if Automatic
Handsfree is programmed on your telephone).
• Use one of the feature s that make dialing easier. See Chapter 4, “Time-saving features,” on
page 49.
39
221 busy
PRIORITY LATER
9__
QUIT BKSP
95551234
TRANSFR
Already joined
Calling 221
PRIORITY LATER
Can't ring again
The telephone you have called has no internal lines available.
Press
LATER
to use the Ring Again or Message features or press
PRIORITY
to make a priority call.
You are dialing using Pre-dial. To erase an incorrect digit, press
the left end of √ or
. When the number is
BKSP
complete, select a line or lift the handset.
This prompt remains on your di splay whil e you are on a call you
have dialed. To transfer the call, press
TRANSFR
.
Your telephone is connected to the telephone you are tr ying to
call. Check your active line buttons, and return to that call.
Wait for the telephone to be answered. If no one answers, press
to use the Ring Again feature (“Ring Again” on page 44)
LATER
or Message feature (“Messages” on page 71), or press
PRIORITY
to make a priority call.
You cannot use Ring Again on your current call. You can use
Ring Again while you have a busy signal on an internal call or
line pool request or while an internal call is ringing.
Do not disturb
PRIORITY LATER
The telephone you are calling has Do Not Disturb turned on.
Press
PRIORITY
to use the Ring Again or Message s features, or press
LATER
to make a priority call.
Telephone Featur es Pr ogramming Guide
Page 40

40 Chapter3 Make a call
Expensive route
Hidden number
Line denied
Line061
TRANSFR
No last number
No line selected
Not in service
You have dialed a number, but the least expensive route
programmed for the system is busy. Unless you release the call,
the number goes through on a more expensive route.
The last number you dialed or the number you saved for Saved
Number Redial was a speed dial number that displayed a name
instead of the number. You dialed the number correctly, but it is
not visible.
You have tried to use another person’s private line.
Enter the digits of the number you want to dial.
You have not dialed an external telephone number since the last
power interruption or system reset.
Either you hav e no prime line or your prime line is b usy. Select a
line manually before dia li ng.
You have entered the number of a telephone that is not in
service.
On another call
LATER
Restricted call
Ring Again?
YES NO EXIT
Select a line
Send message?
YES NO
The telephone you have called is on anothe r cal l . Press
LATER
to
use the Ring Again or Message features.
System programming has a restriction configured for the call
you are trying to make. A possible reason is time-of-day
restriction s for some call s.
to use Ring Again. Press NO to send a message. See
YES
Press
“Messages” on page 71 and “Turn on Ring Again” on page 44.
Either you have no prime line, or the prime line is in use, or the
line programmed for an autodial number, speed dial number, or
Hotline is in use. Sel ect a line and dial again.
Press
to send a message. See Messages.
YES
P0937240 02
Page 41

Chapter 3 Make a call 41
Denied in Admin
For other displays, see Appendix B, “Common display prompts and error messages,” on
page 137.
Line pools
A line pool allo ws eac h tel ephone access to extern al lines from a group (or pool) of external lines.
To access a line pool:
• press an intercom button and enter a line pool access code
• press a memory b utton prog rammed with t he lin e pool f eatur e code a nd a li ne p ool acc ess co de
A line pool is a group of e xtern al lines sha red by man y tele phones. You can use a line in a li ne pool
to make an external call.
The system can support 15 line pools plus six PRI pools, and depending on system programming,
a telephone can acces s any number of these line pool s.
A line pool access code is the number y ou d ial t o get a li ne pool . The a ccess code c an b e up t o four
digits long. You can have several different line pools for your system, each one giving you access
to a different set of external lines. Line pools is one way of sharing lines across telephones in a
system.
The Last Num b er is not allowed.
Your installer programs the access codes for line pools and gives each telephone access to a line
pool.
Everyone in the office can have a list of the access codes for line pools their telephones can use.
Use a line pool to make a call
1 Press ≤fl›.
2 Enter a line pool access code.
If you have a free internal line, you can make a call using a line pool without entering the feature
code first.
1 Select an internal line (intercom).
2 Dial the line pool access code.
Note: I f no line s are a v ailab le in the line pool , you can use Ring Again at the b us y
tone. The system will inform you when a line in the line pool becomes available.
See “Ring Again” on page 44.
Telephone Features Programmi ng Guide
Page 42

42 Chapter3 Make a call
Program a line pool feature code
When you program a b u tton with t he line pool featu re cod e, you must enter a l ine po ol ac ces s code
after the feature code. The programmed line pool bu tton accesses a specific line pool, not the line
pool feature. See “Programming feature codes” on page 85 for more information.
If you program a button with an indicator to access a line pool, the indicator for the line pool
button turns on when all the lines in a line pool are busy. The indicator turns off when a line
becomes available.
Line buttons
There is one line button for ea ch line assigned to y our telephone. Press the li ne button to se lect the
line you want to answer or use to make a call. As you have several line buttons, you can access
more than one line.
The T7100 telephone h as two intercom paths, instea d of li ne buttons, to answer a nd ma k e calls. A
T7100 can have two lines. You can press ≥ to swi tch between two calls, one active and one on
hold.
Select how you dial your calls
To select a dialing mode:
1 Press ≤•°¤.
until the dialing mode you want appears.
2 Press £ or
3 Press ≤ or
You cannot program the dialing modes feature code on a memory button.
Standard dial
Standard dial allows you to make a call by selecting a line and dialing the number. If you have a
prime line, it is selec ted automatically when you lift the handset or press the handsfree button.
You cannot use Standard dial on a T7100 telephone unless you pick up the handset first. If you
have a T7100 telephone, use the Automatic dial or Pre-dial feature for on-hook dialing.
Automatic dial
Automatic dial allows you to dial a number without selecting a line. Your prime line is selected
when you start diali ng a numbe r. Automatic dial does not work if your te lephone has no prime l ine
or when your prime line is in use.
NEXT
to select the dialing mode.
OK
Telephones connected to an Analog Terminal Adaptor (ATA2) or an Analog Station Module
(ASM) cannot use Automatic dial.
P0937240 02
Page 43

Pre-dial
Pre-dial allows you to enter a telephone number, check it, then change it before making the call.
The call does not dial until you select a line or line pool, or pick up the handset. You can pr e-dial
both external an d internal nu m bers. You must, however, select the correct type of line (external or
internal) for the type of number you have entered.
Note: If your telephone starts ringing while you are pre-dialing a number, you
can stop the ringing by turning on Do Not Disturb (≤°fi). Do Not Disturb
entered while dialing does not affect the numbers you are enteri n g .
You cannot pre-dial a telephone number if all the lines on your telepho ne are b usy.
Receive a busy signal on an internal call
When the internal number you dialed is busy there are three poss ibilities:
• Priority Call
• Ring Again
• Message
Chapter 3 Make a call 43
Priority Call
If you get a busy signal or a Do Not Disturb message when you call someone in your office, you
can interrupt their call by using the Priority Call feature. Use this feature for urgent calls only.
Program a telephone to make priority calls
You need to start a Unified Manager session to program this feature. For more information about
programming using Unified Manager, see the Business Communications Manager Programming
Operations Guide.
Make a priority call
To make a prio rity call:
1 Press ≤fl·.
2 Wait for a connection, then speak.
A person who receives a prior ity c all whi le on anothe r cal l has e ight s econds to acc ept or block th e
call. For information about blocking calls see “Stop calls” on page 96. If the person does nothing,
the priority call feature puts their active call, including conference parties, on Exclusive Hold and
connects your call.
Telephone Features Programmi ng Guide
Page 44

44 Chapter3 Make a call
When you make a priority call, the display may show the following:
Call blocked
You tried to place a priority call to another telephone in your
system. The person you called has blocked your call. Try to ca ll
later.
Please wait
The party you are calling has eight seconds to decide to accept
or reject your priority call.
Priority denied
The telephone you are calling is receiving a priority call at the
same time or cannot receive priority calls.
You can make a priority call only while your telephone displ ay shows the follo w i ng:
221 busy
PRIORITY LATER
Calling 221
PRIORITY LATER
Do not disturb
PRIORITY LATER
On another call
PRIORITY LATER
Ring Again
Use Ring Again when you call a person on your system and their telephone is busy or there is no
answer. Ring Again can tell you when they hang up or next use their telephone. You can use Ring
Again to tell you when a busy line pool becomes available.
Turn on Ring Again
To turn on Ring Again, press ≤¤ before you hang up.
Using Ring Again cancels any previous Ring Again requests at your telephone.
P0937240 02
Page 45

Cancel Ring Again
Press ≤£¤ to cancel a Ring Again request.
Chapter 3 Make a call 45
Can't ring again
Ring Again?
YES NO EXIT
You cannot use Ring Again on your current call. You can use
Ring Again while you have a busy signal on an internal call or
line pool request, or whi le an int ernal call is ringing.
Press
YES
message.
Message
When using Priority Call and Ring Again don’t work, you can leave a message on the person’s
display. For more information, refer to “Messages” on page 71.
Create a Conference Call
You can talk to two people at the same time.
1 Make sure you have two calls, one active and one on hold.
2 Press ≤‹.
3 Press the held line. (This action is automatic on the T7100 telephone.)
to use Ring Again. Press NO if you select to send a
You can create a conference when you are on a call:
1 Put the call on hold. (This action is no t necessa ry when th e Automatic Hold fea ture is av ai lable
on your system.)
2 Make a second call.
3 Press ≤‹.
4 Press the held line.
Only the person who established the conference can use the procedures described in this section.
Note: You can create a conference by releasing privacy on a call. See “Turn
Privacy on or off for a call” on page 96.
Disconnect one party
You can disconnect one party from a conference and continue talking to the other.
Telephone Features Programmi ng Guide
Page 46

46 Chapter3 Make a call
On a T7208, T7310, T7316 or M7324(N) telephone:
1 Press the line button of the call that you want to disconnect. The second call is automatically
put on hold.
2 Press ® to disconnect the first call.
3 Press the button of the held line to reconnect with the second call.
On a T7100 telephone:
1 Press ≤£‹ to put the first call on hold.
2 Press ≥ to put the second call on hold.
3 Press ® to disconnect the second call.
4 Press ≥ to reconnect with the first call.
or
1 Press ≤£‹and then press ≥ to put the second call on hold.
2 Press ® to disconnect the first call.
3 Press ≥ to reconnect with the second call.
Separate holding of two calls
For all system telephones except the T7100 telephone, you can place the two people in a
conference call on h old sep arately, so that they cannot talk to each other.
1 Press the li ne button of one call. The other call is automatically put on hold.
2 Press ≥. The second call is put on hold.
Now you can re-establish the conference.
3 Take one call off hold.
4 Press ≤‹.
5 Take the remaining call off hold.
Put a conference on hold
You can put a conference on hold , allo wing the other tw o people to conti nue speak ing to ea ch other
by pressing ≥.
You can rejoin the conference by pressing either of the held line buttons.
For the T7100 tele phone, press ≥.
P0937240 02
Page 47

Chapter 3 Make a call 47
Split a conference
You c an speak with one caller while the ot her call is on h old. You c an switch b etween calls using
≥.
On a T7208, T7310, T7316 or M7324(N) telephone:
1 Press the line button of the cal ler wit h whom you w ant to s peak. T he other call is automati cally
put on hold.
2 Press ≤‹to re-establish the conference.
On a T7100 telephone:
1 Press ≤£‹. The first call is put on hold.
2 Press ≥ to switch between calls.
3 Press ≤‹ to re-esta b lish the conference.
Leave a conference call
You can remove yourself from a conference, and connect the other two callers.
Enter the Transfer feature code ≤‡‚.
When you remove yourself from a conference using the Transfer feature, and both calls are from
outside your system, one of t he calls must hav e co me to you on a discon nect super vised line , or the
call disconnects.
3 parties only
You are trying to add a fourt h party t o your conferen ce call, or to
join two conferenc es together. Release one call from the
conference before add in g another, or keep the two conferences
separate.
Conference busy
You have tried to make a conference call, but your system is
handling its maximum number of conference calls.
Line001 221
TRANSFR
Press held line
You are on a conference with th e tw o line s or t eleph ones sh o wn .
You can drop out of the conference and leave the other two
parties connected (Unsupervised Conference) by pressing
TRANSFR
or entering the Transfer feature code.
You have activated the Conference feature with one call active
and another on hold. Press the held line to bring that per son into
the conference.
For other displays, see Appendix B, “Common display prompts and error messages,” on
page 137.
Telephone Features Programmi ng Guide
Page 48

48 Chapter3 Make a call
P0937240 02
Page 49

Chapter 4
Time-saving features
This chapter shows you some time-saving features such as:
• Autodial
• Last Number Redial
• Speed Dial
• Saved Number Redial
Autodial
You can program memory buttons for one-touch dialing of inte rna l or exte rna l tele phone numbers.
You cannot use buttons for lines, answer or Handsfree/Mute as autodial buttons.
If the power to your Business Communications Manager system is off for more than three days,
autodial numbers and some other system programming can be lost from the memory.
49
To add an autodial button:
1 Press ≤•⁄ to program an external number or ≤•¤ for an internal number.
2 Select a button and then dial the number.
When programming Autodial you can use the foll owing:
• Last Number Redial
• Saved Number Redial
• destination codes (select an intercom button as the line)
Select a line for Autodial
To select a line for an external number, pr ess the line or intercom button before you enter the
number. To select a line pool, press a programmed line pool button, or press an intercom button,
and enter a line pool access code.
If you selec t a line before pressing the autodial button, the call goes out on that line instead of the
line that is part of the aut odialer programming.
For the T7100 telephone, program an external autodialer by using a line and not a line pool.
Note: If you do not include a li ne selection in an autodial number, the call uses
your prime line (if you have one).
Telephone Featur es Pr ogramming Guide
Page 50

50 Chapter4 Time-saving features
Use intercom as the line for Autodial
If you press an intercom button as the line for an external autodial number, you must include a
valid l in e pool access code or a destination code. If access c odes for line pool or dest ination codes
change, remember to reprogram autodial numbers.
987___
QUIT BKSP OK
Autodial full
Button erased
Enter digits
QUIT OK
Intercom #: ___
QUIT
Invalid number
Continue to enter digits until the number is complete. Press
√ or
Press ≥ or
to erase an incorrect digit.
BKSP
when you finish.
OK
The memory allocated to autodial numbers in your system is
full.
While programming e xtern al Aut odial , you e rased the b utton by
pressing ≥ or
before entering any digits.
OK
Enter the number you want to progra m (selecti ng the line first if
necessary) exactly as if you were making a call.
Enter the internal telephone number you want to program.
You are programming an internal autodial button and have
entered a number th at is not an internal numbe r on your system.
Enter a vali d internal numbe r . If the number you are enter ing is a
destination code, use external autodial.
Press a button
QUIT
Program and HOLD
Program and OK
QUIT OK
Programmed
For other displays, see Appendix B, “Common display prompt s and er ror messages,” on
page 137.
P0937240 02
Press the memory button yo u want to program.
Enter the number you want to program on the button, then press
≥.
Enter the number you want to program on the button, then press
≥ or
. You can include a line or line pool selection in an
OK
autodial sequence by selecting the line before entering any
digits.
The number is correctly stored on the button.
Page 51

Last Number Redial
Press ≤fi to redial the last external number you dialed.
Last Number Redial records a maximum of 24 digits.
Note: If you have a Last Number Redial button programmed, use Button Inquiry
(≤•‚), then press th e Last Number Redial button followed by (£) to
check the last number before you dial it.
Prevent Last Number Redial
Last Number Redial can be restricted at individual telephones.
You need to start a Unified Manager session to program this feature. For more information about
programming using Unified Manager, see the Business Communications Manager Programming
Operations Guide.
Chapter 4 Tim e- savi ng feat ur es 51
Hidden number
No last number
Note: You can copy a number on an autodial button using Last Number Redial.
Speed Dial
Business Communications Manager provides two types of speed dialing:
• system
• personal
System Speed Dial programming allows you to assign two-digit speed dial codes to the external
numbers called most often. Personal Speed Dial programming allows users to program their own
speed dial numbers.
The last number you dialed was a speed dial number that
displayed a name instead of the number. The number dials
correctly, but does not appear on the display.
You have not dialed an external telephone number since the last
power interruption or system reset.
Speed dial numbers are subject to the same restriction filters as normally dialed numbers. Your
installer ca n program system spee d dial numbers to bypass dialing restricti ons.
To make a speed dia l cal l
1 Press≤‚ to quickly dial exter nal telephone numbers that programmed t o speed dial codes.
Telephone Features Programmi ng Guide
Page 52

52 Chapter4 Time-saving features
2 Enter the appropriate two-digit speed dial code.
System Speed Dial codes
System Speed Dial codes are numbered from 01 to 70. The installer assigns numbers to System
Speed Dial codes for t he all the system.
Note: There is no difference between usi n g User Speed Dial and using Sys tem
Speed Dial. Only the programming is different.
Personal Speed Dial
To add or change a Per sonal Speed Dial number on your telephone:
1 Press ≤•›.
2 Enter a two-digit code from 71 to 94 that you w ant to relate with a telephone number.
3 To in clude a line selection for this number, press the line or inter com button. To select a line
pool, press a programmed line pool button, or press an intercom button and enter a line pool
access code. For the T7100 te lephone, you can only select a line pool.
4 Enter the number you want to program.
.
5 Press ≥ or
01:9___
CANCL BKSP OK
Enter digits
QUIT OK
Invalid code
OK
Continue en tering the numb er you want to program. You can
change the number by pressing
are finished, p ress ≥ or
Enter the telephone number you wa nt to program exactly as if
you were dialing i t normally. When you are finished, press ≥
.
or
OK
You have entered a code outside the code range (01-70 for
system, 71-94 for personal).
No number stored
There is no number stored on the speed dial code you have
dialed.
Program and HOLD
If you want to program a li ne or line pool sel ection for t his speed
dial number, select the line or line pool. If not, enter the
telephone number e xactly as if you were dialing it normally.
When you are finishe d, press ≥.
Program and OK
QUIT OK
If you want to program a li ne or line pool sel ection for t his speed
dial number, select the line or line pool. If not, enter the
telephone number you want to program exactly as if you were
dialing it normally. When you are finished, press
OK
.
or √. When you
BKSP
.
OK
P0937240 02
Page 53

Chapter 4 Tim e- savi ng feat ur es 53
Select a line
Unknown number
For other displays, see Appendix B, “Common display prompts and error messages,” on
page 137.
There is no line related with the speed dial number you are
trying to use. Sel ect a f ree e xternal l ine or li ne pool a nd enter the
speed dial feature code again.
The system cannot dial the number stored. Reprogram the
number.
Saved Number Redial
You can save the number of the external call you are on (provided you dialed the call) so that you
can call it again later. Each telephone can save one n u mber at a time with Saved Number Redial,
but not one number for each line.
Note: You can copy a number on an autodial button using Saved Number Redial.
Save a number
To sa ve a number, press ≤fl‡ while you are on the call.
Saved Number Redial records a maximum of 24 digits.
Dial a saved number
To dial a saved number, press ≤fl‡ when you are not on a call.
If you have a programmed Sa v ed Number Redial b utt on, you can use Button Inqui ry ( ≤•‚)
to check the last number before you dial it.
Prevent Saved Number Redial
Saved Number Redial can be restricted at individual telephones.
Telephone Features Programmi ng Guide
Page 54

54 Chapter4 Time-saving features
You need to start a Unified Manager session to program this feature. For more information about
programming using Unified Manager, see the Business Communications Manager Programming
Operations Guide.
Hidden number
No number saved
You have sav ed a speed dial numb er that displays a name instead
of the number. The number dials correctly, but does not appear
on the display.
You have t ried to save the number of an incoming call. You can
only save numbers that you have dialed.
P0937240 02
Page 55

Chapter 5
Handling calls
This chapter sho ws you how to:
• handle many calls at a time
• transfer calls
• park a call
Use Hold
You can put a call on hold by pressing ≥.
When a call is on hold, the button indicator flashes on all telephones that have access to that line.
Any of these telepho nes can retrie ve the call.
On the T7100 telephone, ≥ changes between two lines; one active, one on hold. The T7100
telephone cannot retrieve a call placed on hold by another telephone.
55
Retrieve a held call
You can connect to a call on hold by pressing the flashing line button of the held call.
Hold automatically
If a line is programmed with full autohold, you can switch from one call to another and have your
calls put on hold automatically.
Press the line button of the second caller. The current caller is put on hold automatically.
Listen on hold
If your call is placed on hold, you can hang up the handset while you wait for t he other person to
return.
1 Press ≥.
2 Hang up the handset.
3 Press the line button of t he call. You can hear indications from the far end that you are on hold
(for example, tones or music).
Telephone Featur es Pr ogramming Guide
Page 56

56 Chapter5 Handling calls
4 When the person returns, lift the handset to continue the conversation.
Note: With Automatic Handsf ree assigned to your telephone, you can use the
Handsfree/Mute featu r e instead of Listen on Hold.
Hold a call exclusively
You can put a call on Exclusive Hold so that you can retrieve it only at your telephone.
Press ≤‡· or ≤≥. The line appears busy on all other telephones, and the call cannot
be picked up by another person in the office.
On hold: LINENAM
Call Queuing
If you hav e more than one call r inging at your te lephone, y ou can select the call that h as the hi ghest
priority by press ing ≤°‚⁄.
Call Queuing answers incoming externa l c alls before ca llback, cam ped, and tran sferred call s.
Transfer calls
Transfer allows you to direct a call to a telephone in your system, within the Business
Communications Manager network, or external to your system.
1 To transfer a call, press ≤‡‚.
2 Call the person to whom you want to transfe r the cal l.
3 If you want to ta lk to the person , wait for the p erson to answ er and speak to person bef ore
continuing.
You have placed one or more calls on hold. The name of the line
held the longest appe ars on the display.
4 When you are ready to complete the transfer, press ® or
You cannot use Last Number Redial, Saved Number Redial, a speed dial code, Priority Call or
Ring Again to dial the number for a transfer.
The way a private network call is routed determines if it is possible for the system to return a
transferred call to you when the transferred call is not answered. When transferring a call to a
private network destinati on, remain on the line until the person to whom you are transfe rr ing the
call answers.
You cannot use the Line Pool feature code to access a line pool for a transfer. To use a line pool,
use a programmed line pool button, or press an intercom button, and enter a line poo l access code.
P0937240 02
JOIN
.
Page 57

Chapter 5 Handling calls 57
If an auxiliary ring er i s p rogrammed to ring for calls on a n external line, and you tra nsfer a call on
that line without announcing the transfer, the auxiliary ringer rings for the transferred call.
Transfer external calls
If you transfer an external call to a busy telephone, or if there is no answer, the call automatically
rings again at the telephone that performed the tr ansfer. The display indicates that the telephone
was busy or that no one answered.
When you transfer an external call to an external number, the external call you are trying to
transfer must be an incoming c all on a disconnect supervision line.
While on a conference call, you can leave the conference and connect two callers using the
Transfer feature. If the other people are from outside the system, at least one of the callers must
have called you and both of the calls mu st be on disconnect supe rvision lines.
Note: T r ansfe r by Ho ld on DID l ines is not sup ported . After a nswe ring a call , the
line appearances on all other sets are free immediately to take other calls. This
allows you to receive a greater number of calls. Use the Call Park feature to
transfer a call.
In some conditions, you can experience lower volume levels when transferring an external call to
an external te lephone, or when transferring tw o external caller s from a conference call.
Cancel a transfer
You can reconnect to the person you are trying to transfer before the transfer is complete.
.
1 Press ≤£‡‚ or
2 If you do not reconnect to your original call, press ® and then press the held line.
221>222
CANCL RETRY JOIN
221 no reply
CALLBCK
Do not disturb
CANCL RETRY JOIN
CANCL
You are talking to the person you want to transfer the call to.
if you decide to transfer the call to another person.
RETRY
Press
Press ® or
to transfer the call.
JOIN
The person to whom you tried to transfer a call did not answer.
Press
CALLBCK
or the flashing line b utton to re connec t to the call.
On the T7100 telephone, lift the handset.
The person to whom you tried to transfer a call has Do Not
to transfer the call.
Disturb active on their te lephone. Press
Press
to transfer the call t o another person . Press
RETRY
JOIN
CANCL
or
the flashing line butt on to reco nne ct to the call (on the T7100
telephone, press ≤£‡‚).
Invalid number
CANCL RETRY
You entered an invalid internal number. Press
the number again.
Telephone Features Programmi ng Guide
RETRY
and enter
Page 58

58 Chapter5 Handling calls
Line061 hung up
Line061>221
CANCL RETRY JOIN
Not in service
CANCL RETRY
Restricted call
CANCL RETRY
Still in trnsfer
CANCL RETRY
Transfer denied
CANCL RETRY
The external caller you were transferring hung up before the
transfer was complete.
to transfer the call on line 061 to tel ephone 221. Pres s
JOIN
Press
if, after talking to the person at e xten sion 221, you decide
RETRY
to transfer the call to another person.
The telephone to whic h you ar e trying to transfer a call is out of
service.
You cannot transfer the call because of telephone or line
restrictions.
Complete the transfer in prog ress before yo u ac ce ss a new
feature, answer another call or select an outgoing line.
Your transfer does not function for one of these reasons:
All the resources needed to per form a transfer are in use. Try
again later.
You have tried to tr an sfer an external call to another external
party. Some restriction s apply.
You cannot transfer your conference call.
Transfer to:2___
CANCL RETRY
Press
if you entered the wrong internal number or if the
RETRY
person to whom you are transferring the call is not available.
For other displays, see Appendix B, “Common display prompts and error messages,” on
page 137.
Camp-on
You can transfer an external call to another telephone whe n all the lines assigned to th at telephone
are busy.
1 Press ≤°¤.
2 Dial the number of the telephone to which you want to camp the call.
Camped calls appear on a line button on the receiving telephone, if one is available. If there is no
line button available, you receive a message on the display and hear Camp-on tones.
P0937240 02
Page 59

Chapter 5 Handling calls 59
Each telephone in your system can handle one camped call at a time.
221 DND
CALLBCK
Camp denied
Camp to:
CANCL
Camped: 221
CALLBCK
Line061 hung up
Not in service
CALLBCK
The person to whom you redirec te d a call has Do Not Disturb
activ e on the telephone. The call has come back to you. Press the
CALLBCK
button or the line b utton to reconne ct to the ca ll. On the
T7100 telephone, just pick up the handset.
You have tried to camp an internal call. You can camp external
calls only.
Dial the number of the inter nal telephone to which you want to
camp the call.
The telephone to which you camped a call did not answer the
call. The call has come back to you. Press
CALLBCK
or the line
button to reconnect to the call. On the T7100 telephone, just
pick up the handset.
A call you camped has come back to you, but the caller hung up
before you can reconnect.
The telephone to whic h you have camped a call is out of service
or is used for programming. The call has come back to you.
Press
CALLBCK
or the line button to reconnect to the call. On the
T7100 telephone, just pick up the handset.
Release a call
For other displays, see Appendix B, “Common display prompts and error messages,” on
page 137.
Call Park
When you park a call, the system assigns one of 25 codes for the retrieval of the call. These codes
include the Call Park prefix, which can be any digit from 1 to 9, and a two-digit call number
between 01 and 25. For example, if the Call Park prefix is 1, the first parked call is assig ned Call
Park retrieval code 101.
The system assigns Call Park codes in sequence, from the lowest to the highest, until all the codes
are used. A round-robin method means the use of dif feren t of codes ensure s a call reaches the right
person, especially when more than one incoming cal l is par k ed.
The highest call nu mber (the Call P ark pref i x fol lo w ed by 25) is used only by an alog t elepho nes or
devices connected to the system using an ATA2 or an ASM. Analog telephones or devices cannot
use the other Call Park codes.
The line that the camped call is on is in use or that line does not
appear at your telephone. Release the line or release an internal
line.
Telephone Features Programmi ng Guide
Page 60

60 Chapter5 Handling calls
Your installer programs both the Call Park prefix and the delay before parked calls return to the
originating telephone. External calls parked for longer than the programmed delay return to your
telephone.
Park a call
You can interrupt a call to retrieve it from any telephone in your system.
1 Press ≤‡›.
PAGE
2 Press
Retrieve a parked call
1 Select an internal line. (On the T7100 telephone, pick up the handset.)
2 Dial the Call Park retrieval code.
Your system installer can disable Call Park.
to announce the retrieval code on your telephone display.
Already parked
No call to park
Invalid number
No call on: 101
Park denied
Parked on: 402
PAGE EXIT
Parking full
The person you were talkin g to has park ed your call . You cannot
park the same call.
You have tried to use Call Park with no active call on your
telephone. If the call you want to park is on hold, reconnect to
the call before you park it.
You have entered an invalid retrieval code.
There was no call on the re trieval code you entered.
You have tried to park a conference call. Split the conference
and park the calls separately. The person who retrieves the calls
can reconnect the conference.
to
Record the code show n. Use Page (≤fl‚) or press
PAGE
announce the call and its retrieval code.
All available retrieval codes are in use. Transfer the ca ll or take
a message instead.
For other displays, see Appendix B, “Common display prompts and error messages,” on
page 137.
P0937240 02
Page 61

Callback
When you direct a call you have answered to another telephone, the system monitors the call to
make sure it is answered. If no one answers the call within a set length of time, the system returns
it to you.
Callback generate s many dif fere nt display s. Most occ ur after a set dela y and are li sted in th e inde x.
Some occur immediately if the telephone to which you direct a call is out of service or not
available. These differ ent display s are listed w ith the descriptions of the specific feature s such as
Transf er or Camp-on.
Chapter 5 Handling calls 61
Telephone Features Programmi ng Guide
Page 62

62 Chapter5 Handling calls
P0937240 02
Page 63

Chapter 6
Forward your calls
If you leave your desk but want to receive calls at another location, you can forward your calls to
an internal or external telephone.
Call Forward
When you use Call Forward, all calls go to the destination you select, regardless of Forward on
busy (CFB) and Forward no answer (CFNA) feature programming.
To forward calls:
1 Press ≤›.
2 Enter the number of the telephone to which you want yo ur calls forwarded.
To forward your calls to an external destination you must enter the route plus the dialing digits of
the external telepho ne. For example, if you need to dial 9 for external calls, then you must enter 9
plus the dialing digits to forward your calls to an external number.
63
Alternatively, you can use Line Redirection to forward calls outside the system. Line Redirection
takes priority over Call Forward.
Cancel Call Forward
Press ≤£› to cancel Call Forward .
To allo w ex terna l desti nati on progr amming you need to start a Uni f ied Manager session. You must
assign Program Allow redirect to Yes for each telephone. For more information about
programming using Unified Manager, see the Business Communications Manager Programming
Operations Guide.
If the telephone to which you forwarded your calls does not have the same external lines as your
telephone, the forw ar ded calls appear on intercom b uttons.
Forwarded ca lls do not ring b ut the l ine ind icato r f lashes on the t elepho ne. You can answer the cal l
by pressing the button next to the flashing indicator.
Note: If you set up forward loops from one telephone to another in a circle, this
can result in unanswer ed calls at any location.
Telephone Featur es Pr ogramming Guide
Page 64

64 Chapter 6 Forw ard yo ur ca ll s
Override Call Forward
When you call a person who has Call Forward to your extension, your call rings at that person’s
telephone.
Change the automatic Call Forward settings
The Call Forwar d feature allows for programming of calls not answered or whe n the line is busy.
You can define the number of times the telephone rings before call forwa rding occurs. Pr o gr am
this feature by starting a Unified Manager session.
Change Call Forward no answer
The Call Forward no answer feature redirects ca lls to another telephone in your system.
Line Redirection takes priority over Call Forward no answer.
For more information about changing Call Forward no answer using Unified Manager, see the
Business Communications Manager Programming Operations Guide.
Change the delay before a call is forwarded
You can assign the number of times th at an inc oming ca ll rings at your tel ephone before th e system
forwards the call. To estimate the delay time in seconds, multiply the number of rings by six. For
more information see the Business Communications Manager Programming Operations Guide.
Call Forward on busy
The Call Forw ard on b u sy featu re redir ects ca lls to a nother t elephone o n your sys tem when you are
busy on a call, or when you ha ve Do Not Disturb act iv ated at your telephone. F or more information
about changing Call Forward on busy using Unified Manager, see the Business Communications
Manager Programming Operations Guide.
Line Redirection takes priority over Call Forward on busy. The Call Forward feature or Call
Forward program ming do not affect cal ls redirected by Line Redirection.
Telephones that have Call Forward on busy active can receive priority calls. If you are busy on a
target line call, another call to that target line redirects to the prime telephone for that target line .
DND on Busy
When you are busy on a call and a second call comes in, your telephone alerts you to the second
call with a light ring. If you find this second call and ring is disruptive, you can prevent a second
call by assigning Do Not Disturb (DND) on Busy to your extension.
P0937240 02
Page 65

Chapter 6 For wa rd your call s 65
If you use DND on Busy, the line indicator for an external incoming call flashes, but your
telephone does not ring. I nternal and private network callers hear a b usy tone instead of ringing
when you ar e on the telephone. External callers are transferred to the prime set used in your
system. For more informati on about changing Do Not Dist urb on Bus y using Unif ied Manager , see
the Business Communications Manager Programming Operations Guide.
Forward on Busy takes priority over DND on Busy.
If an external call uses a target line, the call is processed according to the programming of the
target line. If the target line is busy, the caller hears a busy tone or routes the call to the prime set
for the target line, even with DND on Busy programming for the telephone.
Call Forward and voice mail
If you want a voice mail system to pick up unanswered calls automatically:
• use the internal number of your voice mail as the destination when you program Forward no
Answer and Forward on busy
or
• if your voice mes saging system or service automatic ally retrieves calls , make the ring delay
greater than the delay used by your voice mail system
Forward denied
Forward>221
CANCL
Not in service
For other displays, see Appendix B, “Common display prompts and error messages,” on
page 137.
There are several reasons why you can get this message. For
example, you cannot forward your calls to a telephone that has
Call Forward programmed to y our telephone.
Your calls are being forwarded to telephone 221.
Two or more telephones are linked in a forwarding chain, and
one is out of service or use d for programming.
Line Redirection
Line Redirection allows you to send your external calls to a telephone outside the office. You can
decide to redirect all, or some of, your external lines.
Line Redirection takes priority ove r the Call Forward feature. If both features are acti ve on a set,
incoming extern al call s on redir ecte d lines ro ute to the indicated Select ive Line Redirectio n (SLR)
external destination. Incoming internal calls go forward to the indicated Call Forward destination.
You cannot use the Line Redirection feature on either a T7100 teleph one or a telep hone connec ted
to an ATA2 or an ASM.
Telephone Features Programmi ng Guide
Page 66

66 Chapter 6 Forw ard yo ur ca ll s
You redirect lines at a telephone, but aft er redire ction programmi ng, the lines redirect for the ent ire
system.
You can redirect only lines that appear at line button s on your telephone.
You can answer the telephone if it rings while you are programming Line Redirection; however,
none of the call handling features are available until the feature times out. If you need to use a
feature to process the call, quit Line Redirection programming by pressing ≤. Do not press
® or you disconnect the call you are trying to redirect.
While you are programming Line Redirection, you do not receive any indi cation of calls that d o
not actually ring at your telephone.
Be careful with redirection loops. If for example, you redirect your li nes to your branch office and
your branch office redirects its lines to you, you can create a redirection loop. If these calls are
long distance, there can be cha rges.
In some conditions, callers can experience lower volume levels when you redirect calls to an
external location.
Allow a telephone to redirect calls
You can turn a telephone’s ability to redirect calls on and off.
You need to start a Unified Manager session to program this feature. For more information about
programming using Unified Manager, see the Business Communications Manager Programming
Operations Guide.
How Line Redirection is different from Call Forward
Call Forward forwards all calls that arrive at a selected telephone to an int ernal or external
telephone. Line Redirection redirects only the lines you define, no matter which telephones they
appear on, to a telephone outside the system.
Line Redirection tak es pri ority over Call Forward.
Turn on Line Redirection
To turn on Line Redirection:
1 Press ≤°›.
2 Select the outgoing line to use for redirected calls.
3 Enter the number you need to redirect call to . To enter the telephone number to which you
want to redir ect calls, use one of the fol lowin g me thods:
• Press an external autodial button.
• Enter an external telep ho n e number (using no mor e than 2 4 digits) then press ≥ or
P0937240 02
OK
.
Page 67

Chapter 6 For wa rd your call s 67
• Press ≥ or OK if the line you have selected as the out goi ng l ine is a private network line
that does not require you to dial digits.
4 Select the lines to redirect.
to redirect all your lines, ensure that you wai t until all the lines on your telephone
If you use
light up before pressin g ≥ or
ALL
. If you press ≥ or
OK
before all the lines light up, tho se li nes
OK
not lit do not redirect.
You can continue to use the line selec te d for redirecting calls on other lines when the line is not
busy on a redirected call. To avoid redirection failing because the selected line is in use, select a
line pool with se veral lines in it. The system does not check that the number you give for line
redirection is a valid one. If you redirect to an invalid number, redirection fails. To avoid a
redirections failure, use an autodial button to enter the redirection number. You must program
autodial buttons used for line redirection to use a specific line.
Cancel Line Redirection
To cancel Line Redirection:
1 Press ≤£°›.
2 Select the lines you no longer want to redirect.
Turn the redirect ring for a telephone on or off
You can program a telephone to ring briefly (200 milliseconds) when you redirect a call on one of
its lines.
You need to start a Unified Manager session to program this feature. For more information about
programming using Unified Manager, see the Business Communications Manager Programming
Operations Guide
Note: If a telephone has redirect ring enabled, it rings briefly for redirected calls
on one of its lines when another telephone has set up the line re dir ection.
The follo wing displays appear when redirecting lines:
Intercom
Line Redirection
QUIT ADD REMOVE
You selected the intercom butto n as the facility on which to
place the call. Enter a line pool code or a destination code.
Press • or
to begin redirection. Press £ or
ADD
REMOVE
to
cancel a previous redirection.
No line to use
You have one external line on your telephone, but you need a
second line to perform li ne redirection. Redirect your e xternal
line using a line poo l as the outgoing line.
Telephone Features Programmi ng Guide
Page 68

68 Chapter 6 Forw ard yo ur ca ll s
Outgoing line
Pool code: ___
QUIT
Redir by 221
OVERRIDE
Redirect denied
Select line out
QUIT
Select line(s)
QUIT ALL
Select line(s)
ALL OK
You are trying to redirect a line and the line you have selected is
the outgoing line you have selected as a destination. You cannot
redirect a line to itself. Select another line.
Enter a vali d line pool access code.
You have tried to redirect a line, but another person has
redirected th at line. Press • or
OVERRIDE
to override the
previous redirection and redirect the line.
You can redirect calls only on individual lines.
Select the line used to redirect calls out of the sys te m.
Press the lines to redir ec t . To release a line sele ction, press the
line to redirect again. Press ALL
Continue to press the lines to redirect. Press ≥ or
to redirect all your lines.
OK
when
finished.
Unequipped line
The line you are trying to redirect cannot be redirected because
the hardware does not support redirection.
The follo wing displays appear when canceling redirection:
Select line(s)
QUIT ALL
Select line(s)
ALL OK
Press the lines that no long er need redi rection. The lines light up
when pressed. After you canc el re direc tion f or a l ine you cannot
to cancel
restore it by pressing the line again. Press
redirection for all your lines. When finished, press ≥ or
ALL
OK
Continue to press the lines that no longer need redir ection. Pre ss
when finished.
≥ or
OK
For other displays, see Appendix B, “Common display prompts and error messages,” on
page 137.
.
P0937240 02
Page 69

Chapter 7
Communicating in the office
There are several features for communi cating in the workplace, such as:
• Page
• Message
• Voic e Cal l
Page
The Page feature al lows you to mak e announcements ov e r t he Business Communications Man ager
system using the telephone speakers, or a loudspeaker system if one is avai lable.
Make a page announcement
To make a page announceme nt:
69
1 Press ≤fl‚.
2 Enter a page type. Page types are:
⁄ through the telephone speakers (internal page)
¤ through an external speaker (external page)
‹ both internal and external (combined page)
3 If necessary, select a zone. Press ‚ for all zones.
4 Make your announcement.
5 Press ®.
Page Shortcuts
Instead of entering the Page feature code followed by the page type, you can enter the following
shortcut codes.
All ≤fl‚
Internal ≤fl⁄ + zone (0 to 6)
External ≤fl¤
Combined ≤fl‹ + zone (0 to 6)
Telephone Featur es Pr ogramming Guide
Page 70

70 Chapter7 Communicating in the office
E
A
P
S
P
P
Activate and deactivate the Page feature
You need to start a Unified Manager session to program this feature. For more information about
programming using Unified Manager, see the Business Communications Manager Programming
Operations Guide.
Create page zones
A zone is any group of telep hones that you want to group together for paging, regardless of their
location. You can assign one of six zones to each telephone. The maximum number of telephones
in a page zone is 50.
You need to start a Unified Manager session to program this feature. For more information about
programming using Unified Manager, see the Business Communications Manager Programming
Operations Guide.
You can make a telephone part of a page zone when the telephone has Page assig n ed as Y
(Yes).
Your installer programs the following options:
• a tone sounds before a page ann ouncement begins
• the maximum number of seconds a page announcement can last bef ore it automatically times
out
Note: If a telephone has redirect ring enabled, it rings briefly for redirected calls
on one of its lines when another telephone has set up the line re dir ection.
nter zone:___
LL
Invalid zone
age choice:
ETS SPKR BOTH
Enter the required page zon e numb er (0- 6) or press
You have entered a page zone code that is not between 0 and 6.
Select the type of page you want. See the list in “Make a page
announcement” on page 69.
ALL
.
age timeout
aging ALL
The time allocated for paging has expired.
You are making a page. The display sho ws th e page zone you ha v e
selected. Press ≤ or ® when finished.
P0937240 02
Page 71

Chapter 7 Com municating in the office 71
P
aging busy
For other displays, see Appendix B, “Common display prompt s and er ror messages,” on
page 137.
Using Page with external equipment
When you make a page that uses e xt ernal paging e quipment (e xter nal pag e or combined p age), the
Long Tones featur e automat ical ly activate s for the e xt ernal paging sys tem only. This allows you to
control optional equipment with the Long Tones feature.
Messages
The Messages feature allows you to leave a message on the display of another telephone in your
system or to analog telephones connected to an Analog Station Module (ASM). The Messages
feature indicates if you have any messages waiting.
A page is being made in the page zone you ha ve requested.
Note: You can make an announcement to one person by placing a voice call to
their telephone.
The Messages feature uses a message waiting list to keep a record of your internal messages and
your (external) voice mail messages (if you have access to Business Communications Manager
Voice Messaging service with visual message waiting indication).
Send a message
You can leave a message on the display of another telephone in your system. You can send up to
four messages to different telephones, including your message center. If your telephone is a
direct-dial telephone or a CAP, you can send up to 30 messages.
Only the assigned direct-dial telephone for an analog telephone connected to an ASM can send
messages to analog telephones by pressing ≤⁄. Depending on the programming setup, the
analog telephone provides either a Stutt er ed Dial Tone or a Mes sag e Waiting Lamp to tell the user
of messages waiting.
For analog telephones connected to an ASM, the message waiting indicator remains on until the
user enters
feature assigned as Yes, the message wai ting i ndicat or tur ns off automatical ly aft er you a nswer t he
reply call, no matter where y ou answer the call. For more information about the Message Reply
Enhancement feature, see the Business Communications Manager Programming Operations
Guide.
û£ßÞ
. If the analog telephone has the Message Reply Enhancement
Telephone Features Programmi ng Guide
Page 72

72 Chapter7 Communicating in the office
To send a message:
1 Press ≤⁄.
2 On a telephone with a two- line display, press
with a one-line display.)
3 Enter the internal number of the person you want to send the message. The person’s display
reads
Message for you
.
4 On analog telephones connected to an ASM, the message waiting indicator is activated.
Cancel a message you have sent
To cancel a messa ge:
. (This step is not necessary on a telephone
ADD
1 Press ≤£⁄. The display reads
Cancel for:
.
2 Enter the internal number of the person you sent the message.
Review your messages
You can receive up to four messages from different telephones, including your message center. A
single message from your message center can represent se veral messages.
On a telephone with a one-line display:
1 Press ≤flfi.
The display sho ws the first message.
2 Press • or £ to move through your messages.
On a telephone with a two-l ine display:
.
1 Press
2 Press
Reply to a message
MSG
The display sho ws the first message you received.
to move through your messages.
NEXT
You can call the person who sent a message, or your message center, while you are viewing the
message.
If your reply to a message is forwarded or is answered at another telephone using the Call Pickup
feature, the message remains on your telephone until you cancel it or contact the telephone that
sent the message.
Press ‚ to reply to a message on a telephone with a one-line display.
P0937240 02
Page 73

Chapter 7 Com municating in the office 73
Press
to reply to a message on a tele phone with a two-line displ ay.
CALL
If you want to call you r messa ge cent er using a line differ ent from the programmed line, exit your
message list and dial the message center telephone number using normal dialing methods.
Reply to a message using an analog telephone connected to an ASM
On an analog telephone connected to an ASM, press
û¥ßÞ
automatically retrieves and connects the user to the olde st message sender. (The message can
originate from either the assigned direct-dial telephone or the int er n al voice mail system .)
If the analog telephone has th e Message Reply Enhancement feature set to Yes, and the sender is
the assigned direct-dial telephone, the message waiting indicator turns off automatically after
answering the reply call, no matter f rom where the c all is answered .
For analog telephones connected to an ASM, using the Message Waiting Reply feature
(
û¥ßÞ
), retrieves only internal messages sent to the user.
Analog telephones connected to an ASM cannot retrieve external message s by using the Message
Waiting Reply feature (
û¥ßÞ
). For external messages, users must call back the
external voice mail center to retrieve their m essages. When this happ ens, the mes sage waitin g
indicator on the analog telephone is turne d off automatically.
. The system
If Voice Messaging is not installed on your system, only the assigned direct-dial telephone can
send messages to an analog telepho ne conn ected to an ASM using ≤⁄. The analog telephone
can in turn enter a single digit access code to reach the assigned direct-dial telephone and retrieve
messages.
If the assigned direct-dial telephone of an analog telephone connected to an ASM changes,
messages sent by the previous assigned direct-dial telephone remain in the incoming message list
of the analog telephone until you retrieve them.
Remove items from your message list
You can erase a message while you are vi e w ing it in you r messag e lis t. If th e mess age is from your
message cent er, this action only erases the m essage notifica tion at your telepho n e. To erase the
message at y our message center, refer to your messag e center documentation.
To remove items from your message list on a telephone with a one-li ne display, press ≥.
To remove items from your message list on a telephone wit h a two-line display, press
ERASE
.
Remove items fr om y our message list using an analog telephone connected to an ASM
To remove both internal and external messages on an analog telephone connected to an ASM,
press
û£ßÞ
to invoke the Cancel Message Waiting feature.
Telephone Features Programmi ng Guide
Page 74

74 Chapter7 Communicating in the office
C
C
N
L
N
M
M
S
M
M
M
N
N
On analog telephones connected to an ASM, the Cancel Message Waiting feature cancels the
oldest message rec eived. The syst em no longe r provides eithe r a Stut te red Dial Tone or a Mes sag e
Waiting Lamp if there are no messages waiting.
View messages you have sent
On a telephone with a two-line display, you can view the messages you have sent.
1 Press ≤⁄.
to view your first sent message.
2 Press
3 Press
SHOW
to view the rest of your sent messages.
NEXT
ancel denied
leared>LINENAM
EXT
In use: 221
061:LINENAMVMsg
EXT CALL CLEAR
essage denied
essage list
HOW ADD EXIT
essage to:
You have entered an invalid number when trying to cancel a
message.
You have cleared an extern al mess age from your message waiting
list. The message exists in your message center until you erase it
there.
You are trying to call from your message waiting l ist. The line tha t
you are trying to use is in use by the identif ied use r in your system.
You are viewing your message list. The display sho w s the number
and name of the line used for your message.
You have tried to send a message to an invalid internal number or
to a telephone that is out of service.
appears when you have remaini ng messa ges. Press
SHOW
review messages you have sent. Press
to send a new message.
ADD
SHOW
to
Enter the internal number of the telephone to which you want to
send a me ssage.
essages & Calls
SG CALLS
o button free
o number stored
You have one or more messages and one or more new Call Logs.
Press ≤°‚fl to change the first line of the display to the
current ti m e an d da te .
You have no line button free with which to reply to a message.
There has been no number programmed for the message center.
Contact your voic e messagi ng service provider.
P0937240 02
Page 75

Chapter 7 Com municating in the office 75
S
N
T
Y
tart of list
EXT
heir list full
our list full
For other displays, see Appendix B, “Common display prompt s and er ror messages,” on
page 137.
Voice Call
You can make an announcement or begin a conversation through the speaker of another telephone
in the system .
Make a Voice Call
You are at the beginning of your list of messages. Press
move through your messages.
You are trying to send a message to a user whose message waiti ng
list is full.
You have tried to send a message but your telephone’s list of sent
messages is full. Cancel one of the messages you have sent, if
possible, or wait until you have received a reply to one of those
messages.
NEXT
to
To make a Voice Call:
1 Press ≤flfl.
2 Follow the instructions on the displa y.
Mute Voice Call tones
When a voice call begins at your telephone, you hear a beep every 15 seconds as a reminder that
the microphone is on. To stop the beep, pick up the handset or press the handsfree button.
Answer a Voice Call using Handsfree Answerback
With Handsfree Answerback assigned to your telephone, you can respond to a voice call without
touching the telephone.
When a person makes a v oice cal l to you, jus t start tal king. The micro phone on th e telephone picks
up your voice .
After you have answered a voice call, you can put the call on hold, transfer it, or treat the call as a
normal call.
Handsfree Answerback is not available to the T7100 tel ephone.
Telephone Features Programmi ng Guide
Page 76

76 Chapter7 Communicating in the office
Voice Call Deny
Press ≤°° to turn off the Voice Call feature on your te lephone.
Voice calls ring like normal internal calls. Your other calls continue normally.
Cancel Voice Call Deny
Press ≤£°° to cancel the Voice Call Deny feature.
Dial voice call
Microphone muted
No voice call
Voice call
Dial the internal number or press the internal autodi al button of th e
person you want to speak to.
Your handsfree microphone is on the mute setting. Press © or
pickup your hands et to respond to the voice call.
The telephone receiving the call cannot accept voice calls for one
of the following reasons: the telephone is active or ringing with
another call; Call Forward is on; Do Not Disturb is on; Voice Call
Deny is on; it is not a Business Communications Manager
telephone.
Your call continues as a normal ringing call.
The line is open fo r you to speak.
P0937240 02
Page 77

Chapter 8
Track your incoming calls
You can track information about calls using a Call Log. This chapter shows you a Call Log, and
how to use it.
Call Log
If your system has the appropriate equipment and you subscribe to the call information feature
supplied by your service provider, you can record information about calls on an external line. The
line must appear on that telephone before you can log it, but it does not have to be a ringing line.
ISDN service packages that come with calling line identification (CLID) can supply the same
feature.
Call Log creates a record of incoming e xt e r nal calls. For each call, the log can contain:
• sequence number in the Call Log
• name and number of the caller
• indication if the call was long distance
• indication if the call was answered and by whom
• time and date of the call
• number of repeated calls from the same source
• name of the li ne on which the call came
77
Call Log can help you to
• keep track of discarded calls or calls not answered
• track patt e rns for your callers (for example volume of calls and geographic area of calls)
• record caller information quickl y and accurately
• build a personal telephone directory from log items
Information such as lo ng distance indicator and the call er’s name and number, may not show in the
log. The appearance depends on the Call Dis play services provided by your loc al tel ephone
company and th e caller’s local telephone company.
To use the feat ures on the following pages, your telephone must have spaces availabl e in its Call
Log. Your installer programs each telephone with an appropriate number of spaces.
Call Log options
You can select the type of calls to store in your Cal l Log. Select from fou r Autolo g option s:
answered
,
Unanswerd by me, Log all calls, No autologging
.
No one
Telephone Featur es Pr ogramming Guide
Page 78

78 Chapter8 Track your incoming ca lls
To use Call Log:
1 Press ≤•°›. The display shows the current option.
to change the option.
2 Press £ or
3 Press ≥ or
NEXT
to select the displ ay option.
OK
Log a call manually
If your calls are not automatically logged, you can manually log call information when connected
to an external call. You can store information for your current call for future reference. For
example, you can:
• record a caller’s information without using paper and pencil
• record only selected calls as opposed to logging all calls
• quickly record call information before a caller hangs up
Press ≤°⁄‹ to log an external call manu ally.
Delete old log items
Your log has a set number of items that it can hold. When the log is ful l, you can no longer l og ne w
calls. When your log is full, the Autobumping function automatically deletes the oldest Call Log
item when a new call is logged.
Press ≤
Press ≤
¡ÚÞ
£¡ÚÞ
to enable autobumping.
to disable autobumping.
View your Call Log
To view y our log:
1 Press ≤
¡ÚÛ
. The display shows the number of previo usly read items (old) and the
number of new items in the log.
2 Press
3 Press
¥
â
to view old items; press £ or
OLD
or
RESUME
to display the last item you viewed, the last time you accessed your Call
to view new items.
NEW
or
Log.
When you subscribe to Call Display services from your local telephone company, names and
numbers for external callers appear on the display.
View a Call Log item
Press √ or
P0937240 02
to view the information for a call log item.
MORE
Page 79

Chapter 8 Tr ack your incoming calls 79
Erase log items
You must erase log items that you have read, to make space for new items in your log.
1 Display the item you want to erase.
.
2 Press ≥ or
ERASE
3 Press ® to exit.
If you accidentally erase an item, you can retrieve the item.
after accidentally erasing an item.
1 Press ≥ or
UNDO
2 Press ® to exit.
Make a call using Call Log
You can place calls from within your Call Log. Th e number s tored fo r a call can v ary dep ending on
the type of call. For example, if the call came from a Centrex or PBX system, you can trim the first
few numbers before you make the call. If the number you want to call is long distance, or if you
want to use a line pool, you may need to add numbers.
To place a call:
1 Display the log item for the call you want to place.
2 Display the related telephone number.
3 Press √ or
one time for every digit that you want to remove.
TRIM,
4 Dial any additional digits required.
5 Press an external line or line pool button.
6 Lift the handset or press Handsfree.
Create a password to your Call Log
To access your Call Log through a password:
1 Press ≤
¥¡Þ
2 Enter your four-digit pas sword. The disp lay shows
3 Re-enter your four-digit password. The display shows
change.
To enter Call Log using a password:
. The displays shows
New passwrd:
Repeat New:
.
.
Password changed
, to confirm the
1 Press ≤
Password:
¡ÚÛ
.
to enter Call Log. If you have pr ogr amme d a password, the display shows
2 Enter your four-digit pas swo rd.
Telephone Features Programmi ng Guide
Page 80

80 Chapter 8 Track your incoming cal ls
If you do not reme mber your Call Log password , progra mming from Unified Manager c a n delete
the password. For more information about programming using Unified Manager, see the Business
Communications Manager Programming Operations Guide.
Change your Call Log password
1 Press ≤
¥¡Þ
2 Enter your old password. The display shows
. The display shows
Old passwrd:
New passwrd:
3 Enter your new four-digit password. The display shows
4 Re-enter your password. The display shows
Password changed
.
.
Repeat New:
.
to confirm the change.
Delete an assigned password
1 Press ≤
¥¡Þ
. The display shows
Old passwrd:
2 Enter your old password. The display shows
. The display shows
3 Press ≥ or
OK
No pswd assigned
New passwrd:
.
.
, to confirm the change.
Program a telephone to log calls automatically
Your installer can program each telephone to automatically log calls coming in on a line.
1:Unknown name
1:Unknown number
The caller's name is not available.
The caller’s number is not available .
12:KATE SMITH
NEXT ERASE MORE
12øKATE SMITH
NEXT ERASE MORE
12¤KATE SMITH
NEXT ERASE MORE
49/1234567890123
NEXT ERASE MORE
Call(s) bumped
P0937240 02
_ indicates a new item.
indicates that the call was answered.
ø
indicates a long distance call.
¤
indicates the stored number was trimmed to its final 11 digits.
/
Press
Ã
or
to show additional information about
MORE
the call.
One or more log entries are deleted by the Autobumping feature
while you are viewing at the Call Log.
Page 81

Chapter 8 Tr ack your incoming calls 81
Hold or release
In use: SETNAME
Jan 4 9:00a 3X
NEXT ERASE MORE
Line061 ø227
NEXT ERASE MORE
Line061 øLogit
NEXT ERASE MORE
Line061
NEXT ERASE MORE
Messages & Calls
MSG CALLS
Hold or releas e your active call before entering Ca l l Log.
The external line is in use.
The repeat call counter, shown with time and date, indicates the
number of calls you have received from the same caller.
This call was answered at another telephone (227).
This call was logged manually.
This call was not answered.
There are one or more items in your message waiting list, and
there are one or more new item s in your Call L og. Press
≤
¡âß
to change the first line of the display to the current
time and date.
New calls begin
You have viewed your last old log item and now you can view
your new log items.
No info to log
No log assigned
No resume item
No informat io n is available for the call.
No log space has been assigned to the telephone.
The resume item has been removed because of Autobumping,
repeat call update, or log rea ll oca tion while you are looking at
the Call Log.
For other displays, see Appendix B, “Common display prompts and error messages,” on
page 137.
Telephone Features Programmi ng Guide
Page 82

82 Chapter 8 Track your incoming cal ls
P0937240 02
Page 83

Chapter 9
Customize your telephone
You can customize your telephone to suit your ne eds. You can check the functions of b ut tons using
button inquiry. You can also:
• change the contrast of display
• change the language
• adjust the ring type and volume
• change button assignment
Adjust the contrast on the display
1 Press ≤•‡.
2 Pr e ss a number on the dial pad to select the contrast level you prefer.
3 Press ≥ to save your settin g.
83
and
On a two-line telephone, you can use the
number of contrast levels available varies from one telephone mo del to another.
UP
DOWN
Change the language on the display
You can select the language that appears on the display of each telephone. System software
supports four language options: Primary, Alternate, Alternate 2, and Alternate 3. All telephones
default to the Primary language at installation. Table 4 shows the different language options
available to each telephone. See “Language options” on page 83.
Table 4 Language options
Language feature code Language
≤•fi‚⁄
≤•fi‚¤
≤•fi‚‹
≤•fi‚›
If you program ≤•fi‚⁄ to a memory b ut ton, yo u can press that b utt on unt il t he l anguage
you want appears on the display. You cannot program ≤•fi‚¤, ≤•fi‚‹ or
≤•fi‚› to a memory button.
Language - Primary
Language - Alternate
Language - Alternate 2
Language - Alternate 3
display buttons to adjust the contrast. The
Telephone Featur es Pr ogramming Guide
Page 84

84 Chapte r 9 Customize your telephone
Change the type of ring
You can select one of four different rings for your t elephone. This selection makes it eas ie r to
identify your telephone in an open office.
1 Press ≤•fl.
2 Press ⁄, ¤, ‹, ›, or
NEXT
You hear the selected ring for two seconds.
3 Repeat until you hear the ring you like, then press ≥ or
Adjust the Ring volume
1 Press ≤•°‚.
The telephone rings.
to adjust the volume: left end to decrease, and right end to increase.
2 Press √
Button Inquiry
.
.
OK
You can check the function of any line, intercom, or programmed button on your Business
Communications Manager telephone by pressing
≤•‚ and a button. On the T7100
telephone, Button Inquiry shows your internal number followed by the function assigned to your
single memory b u tton.
061 <LINENAME>
SHOW OK
123456789012345...
VIEWâOK
221 <SETNAME>
NEXT VIEWâ
<Feature name>
SHOW OK
Press a button
EXIT
The display sho ws the number and name of the line. Press
to view the redirection status of the line.
Press £ or press
long to fit on the display. Press ≥ or
VIEWâ
or
to view a number that is too
áVIEW
when done.
OK
The display shows the directory number of the telephone, and
to see the first line as signed to
the assigne d na me. Press
NEXT
ring at the intercom button.
The name of the feature assigned to a button appears on the
for
display when you press the b ut ton . Press £ or
SHOW
additional information.
when
Press the button you want to check. Press ≤ or
EXIT
finished.
SHOW
For other displays, see Appendix B, “Common display prompts and error messages,” on
page 137.
P0937240 02
Page 85

Programming feature codes
You can program a feature code to a memory button.
Any memory button not programmed as an exte rnal or internal line, target line, Answer button , or
Handsfree/Mute button, is available for feat ures.
1 Press ≤•‹.
2 Pr e ss the memo ry button you want to program wit h a feature.
3 Enter the appropriate feature code you want to assign to the button.
You cannot program the following feature codes on a memory button: Long Tones and any code
beginning wit h • except ≤•fi‚⁄ (Language Option) and ≤•‡ (Contrast
Adjustment).
Note: When yo u progra m a but ton with the line pool f eature cod e, you must ente r
a line pool access code after the feature code. The pr ogrammed line pool button
accesses a specific line pool, not the line pool feature.
Chapter 9 Cu sto mi ze yo ur tel eph one 85
Erase a feature button
1 Press ≤•⁄.
2 Press the feature button.
to erase the button.
3 Press ≥ or
<Feature name>
SHOW OK
Enter code:
F__
QUIT CLEAR
Feature code:
QUIT
Feature moved
OK
The name of the feature assigned to a button appears on the
display when you press the button.
more information available.
Press £ or
If you are checking a speed dial but ton, enter the tw o-digit spe ed
dial code that you w ant to check.
Enter the feature code, or press ® or
programming or
accepts the entry when you enter a valid feature code.
Press ≤ and enter the feature code you want to assign to the
button. Check that the code is valid.
You have prog ra mmed a button with a f eature programmed on
another but ton. The feature has moved to the button you just
programmed. The original button is now blank.
for additional information.
SHOW
to clear the numbers entered. The system
CLEAR
SHOW
appears when there is
to end
QUIT
Telephone Features Programmi ng Guide
Page 86

86 Chapte r 9 Customize your telephone
Press a button
EXIT
Program and HOLD
Press the button you want to check. Press ≤ or
finished.
Enter the number you w a nt t o pr ogr am and pres s ≥. To erase
the button, press ≥.
Program and OK
QUIT OK
Enter the number you want to program and press
the button, just press ≥ or
For other displays, see Appendix B, “Common display prompts and error messages,” on
page 137.
Default button assignments
During Startup, the installer chooses one of the available templates. Default features are assigned
automatically t o the p rogrammab le b utt ons on t elephones in t he syst em, and vary with t he temp late
and the telephone. The default features appear in the follo wi ng tables in this chapter.
Rules of default button assignment
OK
EXIT
when
. To erase
OK
.
Line and Intercom buttons assigned by default templates can be changed in programming.
Handsfree/Mute and answer button features are not assigned by default. If these features are
defined, however, they are automatically assigned to specific buttons, as described on this and the
following page. None o f these b utto ns are avail able on the T7100 telephones. Refer to “T7316 and
T7208 telephone button defaults” on page 88.
The T7316 and T7208 telephones can have up to eight Intercom buttons. They appear above the
Handsfree button at the bottom right-hand corner on your telephone.
Each telephone can have up to four answer buttons. They appear above Intercom buttons in the
right column and continue up from the bottom in the left column, replacing the features on those
buttons.
External line buttons appear in ascending line order, starting at the top button in the left column
(the top button on the T7208 telephone). If more than eight external l in es are assigned to a T7316
telephone, or more than 12 to a M7324(N) telephone, assignment continues down the buttons on
the right column, erasing th e feature codes on those butt ons. Line b uttons ha ve pri ority ov er feature
access buttons except for the Handsfree, Intercom, or answer buttons.
P0937240 02
Page 87

Chapter 9 Cu sto mi ze yo ur tel eph one 87
T7316 Button mapping
Button mapping for the T7316 telephone is unique because this telep hone has more buttons than
the other telephone t ypes. Inte rnal autodi al numbers ar e assigne d to b uttons, 1 1, 13, 15, 17, 19, a nd
21. Programmed e xternal l ine b uttons a ppear in de scending l ine order starti ng with b utton 1 . When
more than five external lines are programmed, assignment continues on button 6 and continues in
descending order.
Programmed intercom buttons appear on buttons 9 and 10. When you require more than two
intercom buttons, you can use button 8. When the Handsfree feature is programmed to your
telephone, the feature appears on button 10, moving intercom button(s) up one position.
Programmed telephone features are assigned to the remaining available buttons. Default internal
autodial numbers are assigned to the eight programmable buttons at the top of your T7316
telephone . Figure 7 shows the button number assign ments on the T7316 telephone. See “Button
assignment on the T7316 telephone” on page 87.
Figure 7 Button assignment on the T7316 telephone
11
13
15
01
02
03
04
05
23
25
27
29
31
33
24
26
17
19
21
06
07
08
09
10
Telephone Features Programmi ng Guide
Page 88

88 Chapte r 9 Customize your telephone
T7316 and T7208 telephone button defau lts
The default button assignments for the T7316 and T7208 telephones depend on the template
applied. Table 5 shows the button assignment template for the T7316 telephone. See “T7316
button assignment template” on page 88. Refer also to “Telephone buttons” on page 25.
Table 5 T7316 button assignment template
PBX Button Number DID
DND 01 Line
Transfer 02 Transfer
Call Forward 03 Call Forward
Pick-Up 04 Pick-Up
Page-General 05 Page-General
Conference 06 Conference
Last No. Redial 07 Last No. Redial
Intercom 08 Intercom
Intercom 09 Intercom
Handsfree/Mute 10 Handsfree/Mute
Table 6 shows the button assignment template for the T7208 telephone. See “T7208 b ut ton
assignment te m p la te ” on page 88.
Table 6 T7208 button assignment template
PBX Button Numbers DID
Pick-Up 01 Line
Transfer 02 Transfer
Last No. Redial 03 Last No. Redial
Page-General 04 Page-General
Conference 05 Conference
Intercom 06 Intercom
Intercom 07 Intercom
Handsfree/Mute 08 Handsfree/Mute
M7324 Button mapping
Button mapping for the M7324 telephone is unique because this telephone has a different layout
and more buttons than the other telephone types. Programmed external line buttons appear in
descending line order starting with button 1.
Programmed intercom buttons appear on buttons 23 and 24. When you require more than two
intercom buttons, you can use button 22. When the Handsfree feature is programmed to your
telephone, the feature appears on button 24, moving intercom button(s) up one position.
P0937240 02
Page 89

Chapter 9 Cu sto mi ze yo ur tel eph one 89
Programmed telephone features are assigned to the remaining available buttons. Figure 8 shows
the button number assignments on the M7324 telephone. See “Button assignment on the M7324
telephone” on page 89.
Figure 8 Button assignment on the M7324 telephone
01
02
03
04
05
06
07
08
09
10
11
12
13
14
15
16
17
18
19
20
21
22
23
24
M7324(N) telephone button defaults
The default b utton as signments f or the M7324(N) telephone de pend on the te mplate appl ied. Table
7 shows the but ton assignment template for the M7324(N) telephone. See “M7324(N) b utton
assignment te m p la te ” on page 89. Refer also to “Telephone buttons” on page 25.
Table 7 M7324(N) button assignment template
PBX Button number DID
º
º
º
º
º
º
º
º
º
º
01
02
03
04
05
06
07
08
09
10
ºLine <xx>
º
º
º
º
º
º
º
º
Telephone Features Programmi ng Guide
Page 90

90 Chapte r 9 Customize your telephone
º
º
°
§
µ
ºSaved No.
¶
Ï
Å
¹
Æ
Æ
11
12
13
14
15
16
17
18
19
20
21
22
23
24
º
º
°
§
µ
ºSaved No.
¶
Ï
Å
¹
Æ
Æ
T7100 telephone button defaults
For all templates assigned to the T7100, the one programmable button on the T7100 telephone is
µ
.
Note: The default Page button activates the External Page option
(≤fl¤).
Move line buttons
You can move external lines to different buttons on your telephone.
1 Press ≤•°⁄.
2 Press the line button you want to move.
3 Press the button to which you want to move the line.
4 Press ®.
You cannot move intercom, answer or Handsfree/Mute buttons on a CAP module.
Exchanged
Invalid location
The two buttons you selected have exchanged position.
You tried to move a line to a button that cannot be a line button,
such as an intercom button, Handsfree/Mute button, or an
answer button.
P0937240 02
Page 91

Chapter 9 Cu sto mi ze yo ur tel eph one 91
Move line from:
Move line to:
Press the button of the line you want to move. Press ≤ or
when you have finished moving lines.
QUIT
Press the button you want to move the line to. Neither of the
buttons is erased. The lines, or the line an d feature, switch
places.
Press a line
The button you are trying to move is not a line button. If you are
trying to switch a line and a feature, move the line to the feature
button and not the feature button to the line.
Hide the message or calls indication
The display that shows you have messages or calls can be replaced with the curre nt time and date.
If you are using a telephone with a one-line display, the message or call indication is hidden.
1 Press ≤°‚fl.
The current time and date appears on the first line of the display.
2 Press
calls.
or ≤flfi to see your messages, or press
MSG
or ≤°⁄¤ to see your
CALLS
Restore the messages and c al ls indication
You can retrieve yo ur messag e an d call infor mation by using t he disp lay buttons that appe ar on t he
second line of the display.
Press ≤£°‚fl to retrieve a message and call information.
Telephone Features Programmi ng Guide
Page 92

92 Chapte r 9 Customize your telephone
P0937240 02
Page 93

Chapter 10
Hunt Groups
The Hunt Groups feature allows access to a group of Business Communications Manager
telephones by entering a single extension number. This ensures that calls easily route to the
appropriate group.
Hunt Groups are used in conditions where a group of people performing the same task answer a
number of related telephone quer ies. Some typical uses of Hunt Groups are:
• a sales department answering questions on product prices or ava ilability
• a support department answering questions describing the operation of a product
• an emergency department answering cal ls for help
As an example, consider Hunt Gr oups that route calls t o a support service s uch as a help line for a
software comp any. Specialists handling Product A can be in one group, and specialists handling
Product B can be in another group. Incoming cal ls hunt for the next availa ble telephone in the
group. If no telephone is available, the call is placed in a queue or is routed to an overflow
telephone.
93
You need to start a Unified Manager session to program this feature. For more information about
programming using Unified Manager, see the Business Communications Manager Programming
Operations Guide.
You can make programming changes to the following Hunt Group settings:
• members of a group and member position in a group
• line assig ned to a group
• distribution of incoming ca lls
• how long the system looks for availa ble members
• where a call goes if all members are busy
Features affected by Hunt Groups include:
• Call Forward All Calls
• Call Forward No Answer
• Call Forward on Busy
• Group Pickup
• Transfer via Hold
• Priority Call
• Line Redirection
• Page Zones
• Voic e Cal l
Telephone Featur es Pr ogramming Guide
Page 94

94 Chapter 10 Hunt Groups
Members of the group
Members of the group c an b e any telephones in the system or portable tel ephones. Each telephone
can be in more than one Hunt Gro up, and consi dered a memb er in each Hun t Group, increa sing the
total number of members in the system.
There is only one appearance of the same Hunt Group on a set. Hunt Group extension numbers
cannot be members of other Hunt Groups . An extensi on number can be rela ted with a member of a
Hunt Group and is called a member extension number.
Distribution mode
There are three modes of call distribution:
• Broadcast—rings e ve ry set in the group at th e same time. Cal ls are h andled one at a ti me; other
calls are put in a queue. When a call is picked up, the call next in the queue is shown to the
Hunt Group without having to wait for queue time-out.
In Broadcast mode you can program all the attendants in the group to share the load of
answering large volumes of calls. All sets automatically display the calling line identification
(CLID), if available. A known e xample is a fund raisi ng campa ig n where a grou p of op erators
are waiting to take each call as it comes in.
• Sequential—starts the cal l at the f ir st set in the Hunt Group and distr ibution is complete when
the first free set is found. Simultaneous calls can be shown. Distribution is order based.
In Sequential mode, you can progr am your top salespe rson to be the f ir st member of the group
to receive incoming calls.
• Rotary (Cyclic)—the call starts at the set after the one which answered the last call.
Distribution is complete when the next free set is found. Simultaneous calls can be shown.
Distribution is order based.
In Rotary (Cyclic) mode, you c an ensure that al l your he lp line people recei v e call s on an eq ual
basis, instead of one person receiving most of the calls. The call rings at one set at a time in a
rotation.
If a Hunt Group has available members but no one answers the call, the call routes through the
Hunt Group list until either a person answers the call or the queue time-out occurs. In the second
case, the call routes to the overflow position. After a call goes to the overflow position it is no
longer a Hunt Group call.
For information about Hunt Groups, see the Business Communications Manager Programming
Operations Guide.
P0937240 02
Page 95

Chapter 11
Telephone features
This chapter sho ws you how to:
• move a telephone
• prevent a call from ringing at a telephone
• turn Privacy on and off
• use the Handsfree and Mute features
• time a call
• recover from an accidental disconnect
• play music in the background
Moving telephones
95
Caution: You can be require d by l a w to repor t any telephone mo v es to yo ur loc al
telecommunications carrier or 911 service provider. Fo r more deta ils, ask your
local carrier, your local 911 service provider, and/or your local
telecommunications service provider .
When automatic telephone relocation is enabled in programming by your installer, you can move
your telephone from one jack to another without losing any of its custom programming.
Hunt Groups
Business Communications Manager allows you to establish Hunt Groups in your system. A Hunt
Groups is a group of telephones that is accessible by entering a extension number . The Hunt
Groups feature ensures calls route to the appropriate people. For more information about Hunt
Groups see Chapter 10, “Hunt Groups,” on page 93.
Prevent calls from ringing at your telephone
You can prevent call s from ringing at your te le phone, either when you are a way from your desk or
while on another call with the Do Not Disturb (DND) feature.
Telephone Featur es Pr ogramming Guide
Page 96

96 Chapter 11 Telephone features
Use Do Not Disturb
After you turn Do Not Disturb on, calls are forwarded to the prime telephone when there is no
other telephone on which the line appears. If there is another telephone that shares the same line,
the call can be answered by that person. (The Delayed Ring Transfer feature transfers all calls not
answered, to the prime telephone after a defined time.)
Do Not Disturb prevents voice calls from alerting at your telephone. Voice calls appear as normal
intercom cal ls.
Cancel Do Not Disturb
Press ≤£°fi to cancel Do not Disturb.
Allow calls
Your telephone receives calls normally.
Stop calls
Press ≤°fi to stop calls from r inging at your telephone.
You only receive prio rity ca lls at your te lephon e. A li ne b utt on fla shes whe n you rece i v e a c all, but
the call does not ring.
Refuse to answer a call
If your telephone rings whil e you are on a cal l , you can refuse to answer the second call, even if i t
is a priority call.
To refuse a call, press ≤°fi while your telephon e i s ringing.
Turn Privacy on or off for a call
You can configure lines in your system to have automatic privacy. With a line not programmed
with pri va cy, anyone with the line assigned to thei r tele phone can join your call b y pressi ng the l ine
button. With a line programmed with privacy, one person at a time can use the line.
Privacy control cannot be for internal or conference calls.
When another telephon e joins a ca ll, the pa rticipa nts on the ca ll hear a tone, an d a message app ears
on the telephone display. It is not possible to join a call without everyone hearing this tone.
P0937240 02
Note: The Privacy fe ature does not apply to target line calls.
Page 97

Chapter 11 T elephone features 97
Create a conference call by releasing privacy
With a line programmed with privacy, you can turn privacy off to allow another person with the
same line to joi n in your conversation an d form a confere nce. All the rules for a conference apply
but there is one line in use, instead of the normal two. This means that you cannot split a
conference set up using Priv acy.
1 Press ≤°‹.
2 Tell the other person to press the line button and join your conversation.
Only two Business Communications Manager telephones and the external caller can take part in
this kind of conference.
Make a call private
With a line programmed not to have privacy, you can turn privacy on for a call, preventing other
people with the same line from joini ng.
Press ≤°‹ to make a private call.
Handsfree and Mute
You must assign the ability to use Handsfr ee to on or of f for ea ch telephone. Al so program th e type
of Handsfree. See “Change Handsfr ee for a telephone” on page 98. You must also turn on
Handsfree for a telephone to use a headset.
Answer calls without lifting the handset
1 Press the line button for the ringing call.
2 Press the handsfree button. The telephone’s internal microphone and speaker automatically
turn on.
Handsfree is not available for a T7100 telephone.
Note: Direct your voice toward the telephone. The nearer you are to the
telephone, the easier it is for the microphone to transmit your voice to
your listener.
Make calls without lifting the handset
1 Press the handsfree button. The telephone’s internal microphone and speaker automatically
turn on.
2 Dial your call.
3 Speak normally.
Telephone Features Programmi ng Guide
Page 98

98 Chapter 11 Telephone features
Mute Handsfree
1 Press © to switch off the telephone microphone so that you can speak to a person in your
office while you are on a handsfree call. The display reads
2 Press the handsfree button to turn the microphone back on again and continue your handsfree
call.
Change a normal call to handsfree
1 Press the handsfree button.
2 Hang up the handset.
Change a handsfree call to a normal call
To switch from handsfree, lift the handset.
Handsfree
The indicator next to the handsfree button is solid when you have Handsfree turned on. It flashes
when you mute the microphone.
Microphone Muted
.
Wait for you r caller to fini sh speaking before you spe ak. Th e mi crophone and speaker cannot both
be on at the same time. Your caller’s voice can be cut off if you both speak at the same time.
Interruptions such as a tapping pencil can be loud enough to turn on your microphone and cut off
your caller’s speech.
To prevent an echo, keep the area around your telephone free of paper and other objects that can
screen your microphone. Turn down the microphone’s volume (press the left end of √
while speaking) to pre v ent fe edback. When you chan ge the v olume le v el, bot h the microphon e and
speaker volume adjust to prevent feedback problems.
Position the telep hone so that any una voidable loca l noi se (such as an air conditio ner) is behind it.
This position limits the amount of back ground noise.
Note: In open office environments , use the handset when handsfree
communication is not necessary or when you need privacy during a call.
Another option is to use a headset.
Change Handsfree for a telephone
You can program the type of Handsfree used with each telephone or activate Handsfree
Answerback.
You need to start a Unified Manager session to program this feature. For more information about
programming using Unified Manager, see the Business Communications Manager Programming
Operations Guide.
P0937240 02
Page 99

Handsfree Answerback
Handsfree Answerback allows you to answer a voice call without lifting the handset. Handsfree
Answerback is always turned off for a T7100 telephone.
You can turn Handsfree Answerback on or off for a telephone programmed to use Handsfree. You
need to star t a Unified Manager session to progra m this fea ture. For more information about
programming using Unified Manager, see the Business Communications Manager Programming
Operations Guide.
Hearing aid compatibility
The handsets on all system telephones are compatible with hearing aids as defined in the FCC
rules, Part 68, section 68.316. Not all hearing aids are optimized for use with a telephone.
Call Duration Timer
Press ≤‡‡ to see how long you were on your last call, or how long you have been on your
current call.
Chapter 11 T elephone features 99
221 02:47
Line061 01:45
The display shows the last call you made, or the current call, and
the total elapsed time in minutes and seconds.
You parked your last call. You cannot see the length of time a
call was parked.
Accidental disconnect
If you accidentall y drop the handse t back in to the tele phone cr ad le whil e answe ring a call , you ca n
retrieve the call.
Pick up the handset again or press the handsfr ee butt on within one sec ond to reconnect to you r call.
Disconnect supervision
When disconnect supervision is assigned to a line, the system detects when an external caller
hangs up and releases the line for other uses. The installer assi gns disconnect supervision.
Time
Press ≤°‚‹ to display the current date and time while you are on a call.
Telephone Features Programmi ng Guide
Page 100

100 Chapter 11 Telephone features
Press ≤°‚fl to display the static time.
Press ≤ £°‚fl
to cancel the static time feature.
Background Music
Press ≤°fl to listen to music through your telephone speaker.
Your installer makes this feat ure avail able to all telephones in programming. You need to supply a
music source, such as a radio, which is attached to your system.
Warning: According to U.S. copyri gh t law, a license can be required fro m th e
American Society of Compos ers, Aut hors and Pu blishers or a simila r or ganizat ion
if radio or TV broadcasts are transmitted through the Background Music feature
of this telecommunication system.
Nortel Networks hereby disclaims any liability occurring as a result of f ailure to
get a license.
Cancel Background Music
Press ≤£°fl. The music stops automatically if you make or answer a call.
P0937240 02
 Loading...