

Page 1

Part No. P0987357 02
Business Communications Manager 2.5
Upgrade Guide
Page 2

2
How to get help
USA and Canada
Authorized Distributors - ITAS Technical Support
Telephone:
1-800-4NORTEL (1-800-466-78 35)
If you already have a PIN Code, you can enter Express Routing Code (ERC) 196#.
If you do not yet have a PIN Code, or for general questions and first line support, you can enter
ERC 338#.
Website:
http://www.nortelnetworks.com/itas/
email:
naitas@nortelnetworks.com
Presales Support (CSAN)
Telephone:
1-800-4NORTEL (1-800-466-78 35)
Use Express Routing Code (ERC) 1063#
EMEA (Europe, Middle East, Africa)
Technical Support - CTAS
Telephone:
00800 800 89009 or 33 4 9296 1341
Fax:
33 49296 1598
email:
emeahelp@nortelnetworks.com
CALA (Caribbean & Latin America)
Technical Support - CTAS
Telephone:
1-954-858-7777
email:
csrmgmt@nortelnetworks.com
APAC (Asia Pacific)
Technical Support - CTAS
Telephone:
+61 388664627
Fax:
+61 388664644
email:
asia_support@nortelnetworks.com
P0987357 02
Page 3

Business Communications Manager 2.5 Upgrade
To perform the Business Communications Manager upgrade
1. Determine whether you can perform the upgrade
You can perform the upgrade on a Business Communications Manager platform only. Do not
perform the upgrade on an Enter prise Edge 1.0 hardwa re platform. To det ermine whether you have
an Enterprise Edge or a Business Communications Manager platform, check the Comm Port
connectors. If the ports are multicolored you have a Business Communications Manager platform
and can perform the upgrade. If the ports are not multicolored, you have an Enterprise Edge 1.0
hardware platform and cannot perform the upgrade.
2. Ask the system a dministrator to request that subscribers delete their old
voicemail messages
Ask the System Administrator to request that subscribers delete their old voicemail messages.
Fewer messages enable s the system to upgrade faster. During the upgrade, the message storage
format is converted to a new format (from SBC to G711.)
3
3. Record the 2.0.3 configuration data
Use the tables in “Business Communications Manager 2.0.3 Configuration Information” on page
39 to record your 2.0 .3 s etti ngs. Aft er th e upgr ade, you must confi rm tha t set tings mar ked wit h
are present on the system. I f not , rea ppl y the settings using the val ues you r ecorded in these tables.
?
4. Print the Call Center Reporting Configuration Report
If you use Call Center Reporting, print the Configuration Report so you have a record of your
configuration. Have the report handy during the upgrade. After the upgrade is complete you must
manually r e-enter the settings for skillset statistical thresholds, print schedules and wallboard
information.
5. Perform the upgrade
Follow the instructions:
• “Performing the upgrade” on page 7
• “Installing the DRAM” on page 33
• “Installing the MS-PEC III cards” on page 37
Business Communications Manager 2.5 Upgrade Guide
Page 4

4 Business Communications Manager 2.5 Upgrade
6. Verify the upgrade is successful and reapply the configuration data
Follow the instructions for the “Post-upgrade system check” on page 23 and confirm that settings
marked with
Information” on page 39 are pres ent on the s ystem. If not , reapply the settings using the v alues you
recorded in these tables.
?
that you recorded in the “Business Communicati ons Manager 2.0.3 Confi guration
7. Upgrade the clients
Follow the instructions “Upgrading clients” on page 28. You must upgrade the client applications.
Note: After you upgrade your Business Communications Manager system to 2.5 you
cannot return it to 2.0.3. After you start the upgrade, do not stop or interrupt the upgrade.
P0987357 02
Page 5

Business Communications Manager 2.5 Upgrade 5
Prerequisites for installing the upgrade
Warning: When you ins ert or remove the MS-PEC c ards, be care ful not to contact
the MS-PE C cards with the MSC Printed Circuit B oard. Incorre ct handling of the
MS-PEC cards during installation can result in the loss of telephony programming.
Note: During the upgrade, your Business Communications Manager system,
including the telephony resources, is not functional.
Caution: You must wear an antistatic grounding strap at all times when you
handle electronic components. Failure to do so can result in damage to the
equipment or loss of telephony programming.
For your system
• Your Business Communications Manager system must be at 2.03. If your system is not at
2.03, refer to the Readme.html file on the 2.03 upgrade CD.
Note: Fax over IP is not av ailab le for Busine ss Communic ation s Manager 2.5. If yo u
use Fax over IP, assess the impact of losing this capability before you begin the
upgrade.
• Do not pre-install the DRAM or the MS-PEC III cards. You install these during the upgrade.
Note: If there are any mapped network drives on Business Communic ations Manage r
that are used by BRU, disconnect (unmap) these drives using VNC before you start
the upgrade.
• Log out of any VNC sessions and quit any open Windows applications.
Note: Do not open any VNC or Unified Manager sessions while you perform the
upgrade. These sess ions can interfe re with the prog ress of the u pgrade. VNC a ccess to
the system is not automatically enabled in Business Communications Manager 2.5.
For the computer you use to do the upgrade
• Make sure your browser is s et to c hec k for ne wer ver sions o f stor ed pages on ever y visi t to t he
page, and you have cookies enabled. Refer to your browser’s online Help for details.
Warning: Netscape is not supported to perform this upgrade. Only Internet Explorer
5.0 or 5.5 is supported.
• You must use a computer that is on the same network as your Business Communications
Manager system.
Business Communications Manager 2.5 Upgrade Guide
Page 6

6 Business Communications Manager 2.5 Upgrade
• We strongly recommend that you use a computer that is within the same subnet as the
Business Communications Manager system that you are upgrading.
• You must know how to share folders. If you use Windows 95, 98 or Me, you must enable file
sharing. Refer to your Windows system documentation for how to share folders.
For VoIP Trunking
• Check the VoIP Remote Gateways that are configured on the Business Communications
Manager 2.0.3 system. The Business Communications Manager system allows Remote
Gateway names that are a maximum of 15 chara ct er s. If you ha ve any Remote Gateways with
names that are longer tha n 15 chara cters , or that contai n space s, rename the Remote Ga teways
so they are a maximum of 15 characters long and do not contain spaces. To rename the
Remote Gateway, in Unified Manager remove the Remote Gateway and re-enter the Remote
Gateway wi th the modified name.
For voicemail
• If you change the time zone setting for the Business Communications Manager system, all
voicemail messages stored before the time zone change will be inaccessible. It is highly
recommended that yo u sele ct the time zone as one o f the f irst items configur ed on the Busin ess
Communications Manager and that you do not change it. If it is necessary to change the time
zone, notify subscribers to delete all stored messages in their mailboxes. You must reboot the
Business Communications Manager system after you change the time zone. This information
applies to Business Communications Manager 2.0.3 and 2.5 systems.
You are now ready to start the upgrade. The upgrade can take approximately two to three hours.
Note: A backup of the core telephony configuration is performed during the upgrade
process. This backup is used during the upgrade to restore the core telephony
configuration, if necessary. This backup can be used on BCM systems that have been
upgraded from BCM 2.0.3 to BCM 2.5 but it cannot be used on systems that were
purchased with BCM 2.5 software.
P0987357 02
Page 7

Performing the upgrade
Note: If the upgra de is int erru pted bef ore you ha ve en tered all the inf ormati on, you must
restart the upgrade. If the upgrade is interrupted after you have entered all the
information, you must re-connect to the upgrade.
1 Insert the Disk 1 CD into your CD-ROM drive.
You must install Disk 1 before you install Disk 2.
If your CD-ROM drive i s conf igure d to run a utoma ticall y, the BCM 2.5 Upgrade Wizar d page
appears. If your CD-ROM drive does not run automatically, double-click index.html.
The BCM 2.5 Upgrade Wizard page appears.
Business Communications Manager 2.5 Upgrade 7
2 Click the Begin Upgrade button.
The Pre-Upgrade Checklist page appears.
Note: During the upgrade:
• Do not use your browser’s Back, Forward or Refresh buttons.
• Do not open any documents or web pages that can use the browser window.
Business Communications Manager 2.5 Upgrade Guide
Page 8

8 Business Communications Manager 2.5 Upgrade
3 After you read the upgrade conditions, click the Next button.
The Validate BCM Address Page appears.
Note: If at any time you see a “Page not displayed or Int er nal Server Error” mes sage:
• Close your browser. DO NOT click Refresh.
• Remove and reinsert the CD if your CD-ROM runs automatically, or
double-click index.html to resume the upgrade.
The BCM 2.5 Upgrade Wizard page appears.
• Click the Reconnect to Upgrade button.
• Follow steps 4 through 8. You return to the page where the upgrade
currently is and can continue the procedure.
4 In the BCM Address box type the IP address, DNS, network name or the Fully Qualified
Domain Name of the Business Communications Manager sys te m. It is recommended that you
use the IP address.
5 Click the Validate BCM Address button.
The Enter Network Password dialog box appears.
6 In the User name box type your Business Communications Manager user name.
The default Business Communications Manager user name is supervisor. If you cannot use
your Business Communications Manager user name, use the default user name. When the
upgrade is complete, you can resume using your user name.
7 In the Password box type your Business Communications Manager password.
The default Business Communications Manager password is visor. If you cannot use your
Business Communications Man ager pa ssword, use the defa ult pa ss wo rd. When the upgrade is
complete, you can resume using your password.
8 Click the OK button.
A message appears that the address is validated.
P0987357 02
Page 9

9 Click the OK button.
The Sharing Your CD-ROM page appears.
Business Communications Manager 2.5 Upgrade 9
10 Follow the steps for sh aring yo ur fold er. Refer to yo ur syst em documenta tion fo r how to shar e
folders.
11 Click the Next button.
The Connect to Upgrade CD page appears.
12 In the Host box type the IP address, DNS, network name or Fully Qualified Domain Name of
the computer you are using.
13 In the Share Name box type the share name you created for the installation files when you
created the shared folder.
Business Communications Manager 2.5 Upgrade Guide
Page 10

10 Business Communications Manager 2.5 Upgrade
14 In the User Name box type your hostname\username or domainname\username.
Note: Be sure to type the information in the User Name box as
hostname\username or domainname\username.
15 In the Password box type your password.
16 Click the Connect to CD button .
In the lower frame a message appears that you are connected.
Note: Check that you are connected before you go to the next step.
17 Click the Next button.
The Prepare BCM page appears.
P0987357 02
Page 11

Business Communications Manager 2.5 Upgrade 11
18 Click the Prepare BCM Now button.
The status is shown in the lower fr ame. The Upgrade Preparation page appears.
19 Click the Next button.
The Verifying System Requirements & MSC Core page appears.
Business Communications Manager 2.5 Upgrade Guide
Page 12
12 Business Communications Manager 2.5 Upgrade
20 Click the Next button.
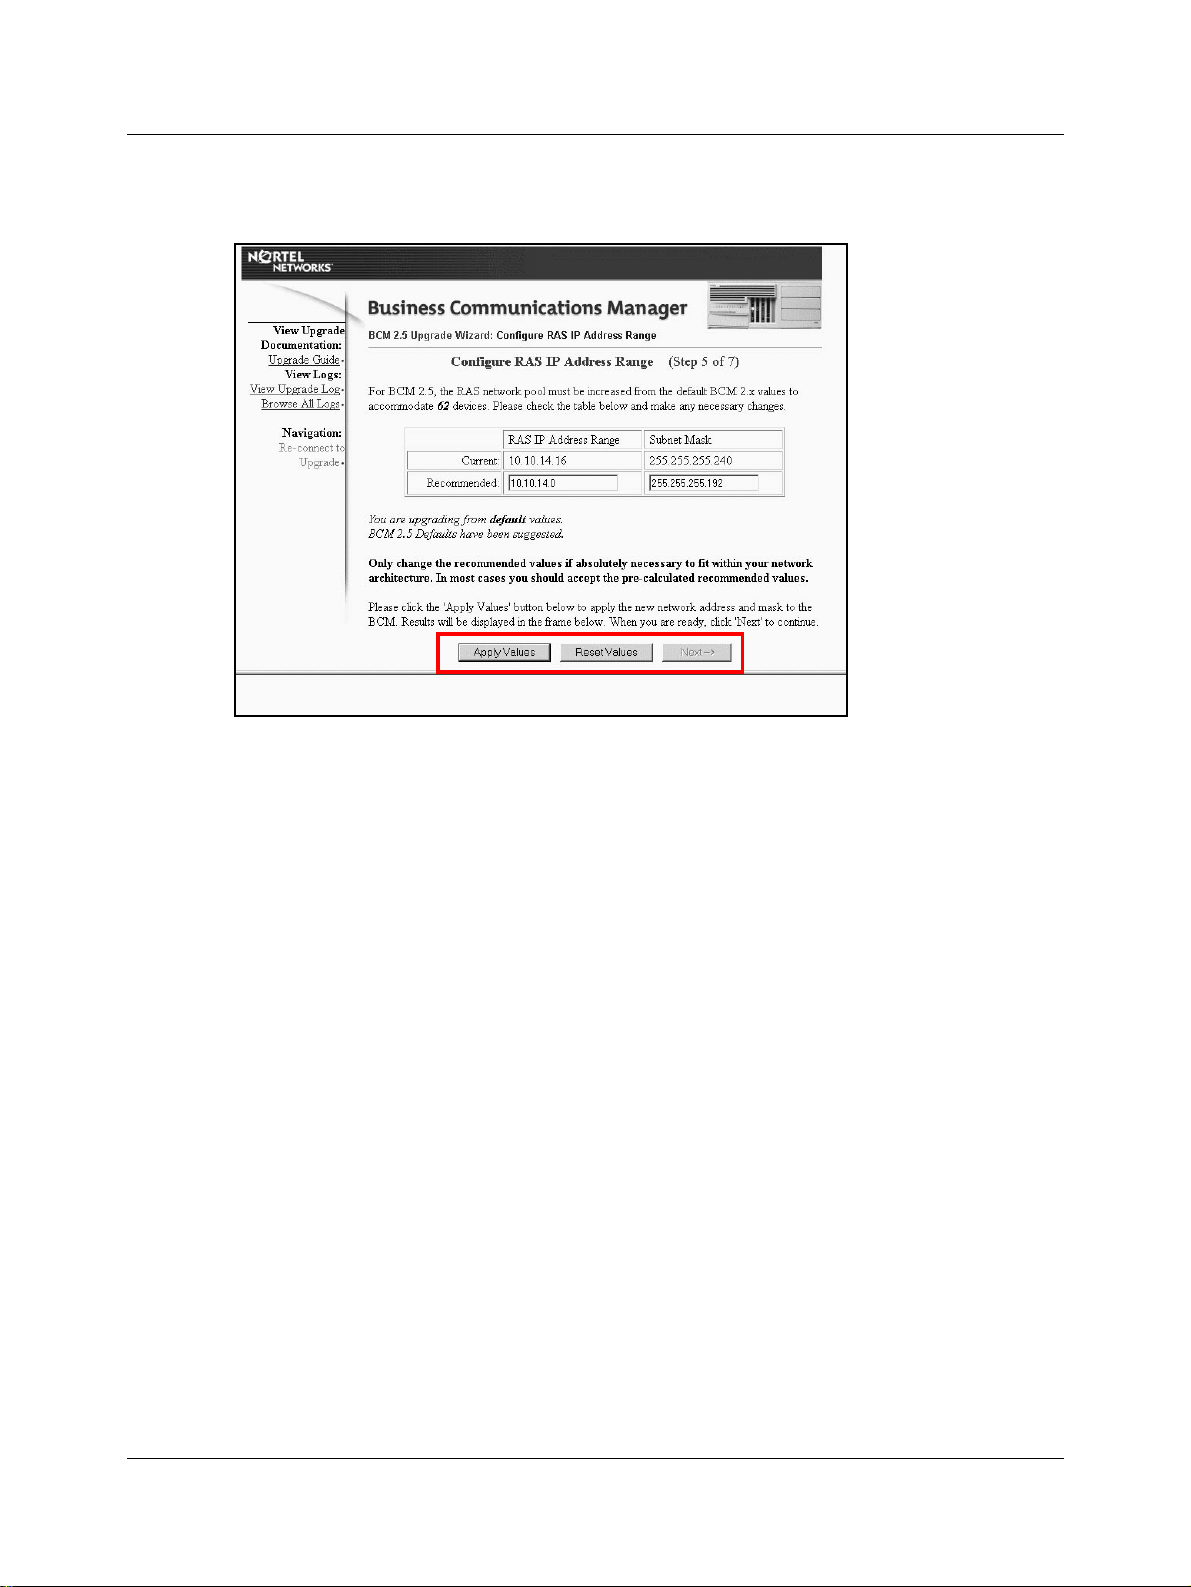
The Configure RAS IP Address Range page appears.
21 Make sure that the Network Range and the Network Mask values in the Recommended boxes
are accurate, then click the Apply Value s button.In most cases you can accept the accept the
settings that are shown.
22 Click the Next button.
The Settings page appears.
P0987357 02
Page 13

Business Communications Manager 2.5 Upgrade 13
23 Your MSC core variant is automatically detected.
From the Region list box select your region. Select the setting you had for Country for
Business Communications Manager 2.0.3.
24 If you use IPX routing, select Yes.
If you do not use IPX routing, leave this at the default setting of No.
25 Click the Next button.
A message appears that confirms the core that will be uploaded.
Business Communications Manager 2.5 Upgrade Guide
Page 14
14 Business Communications Manager 2.5 Upgrade
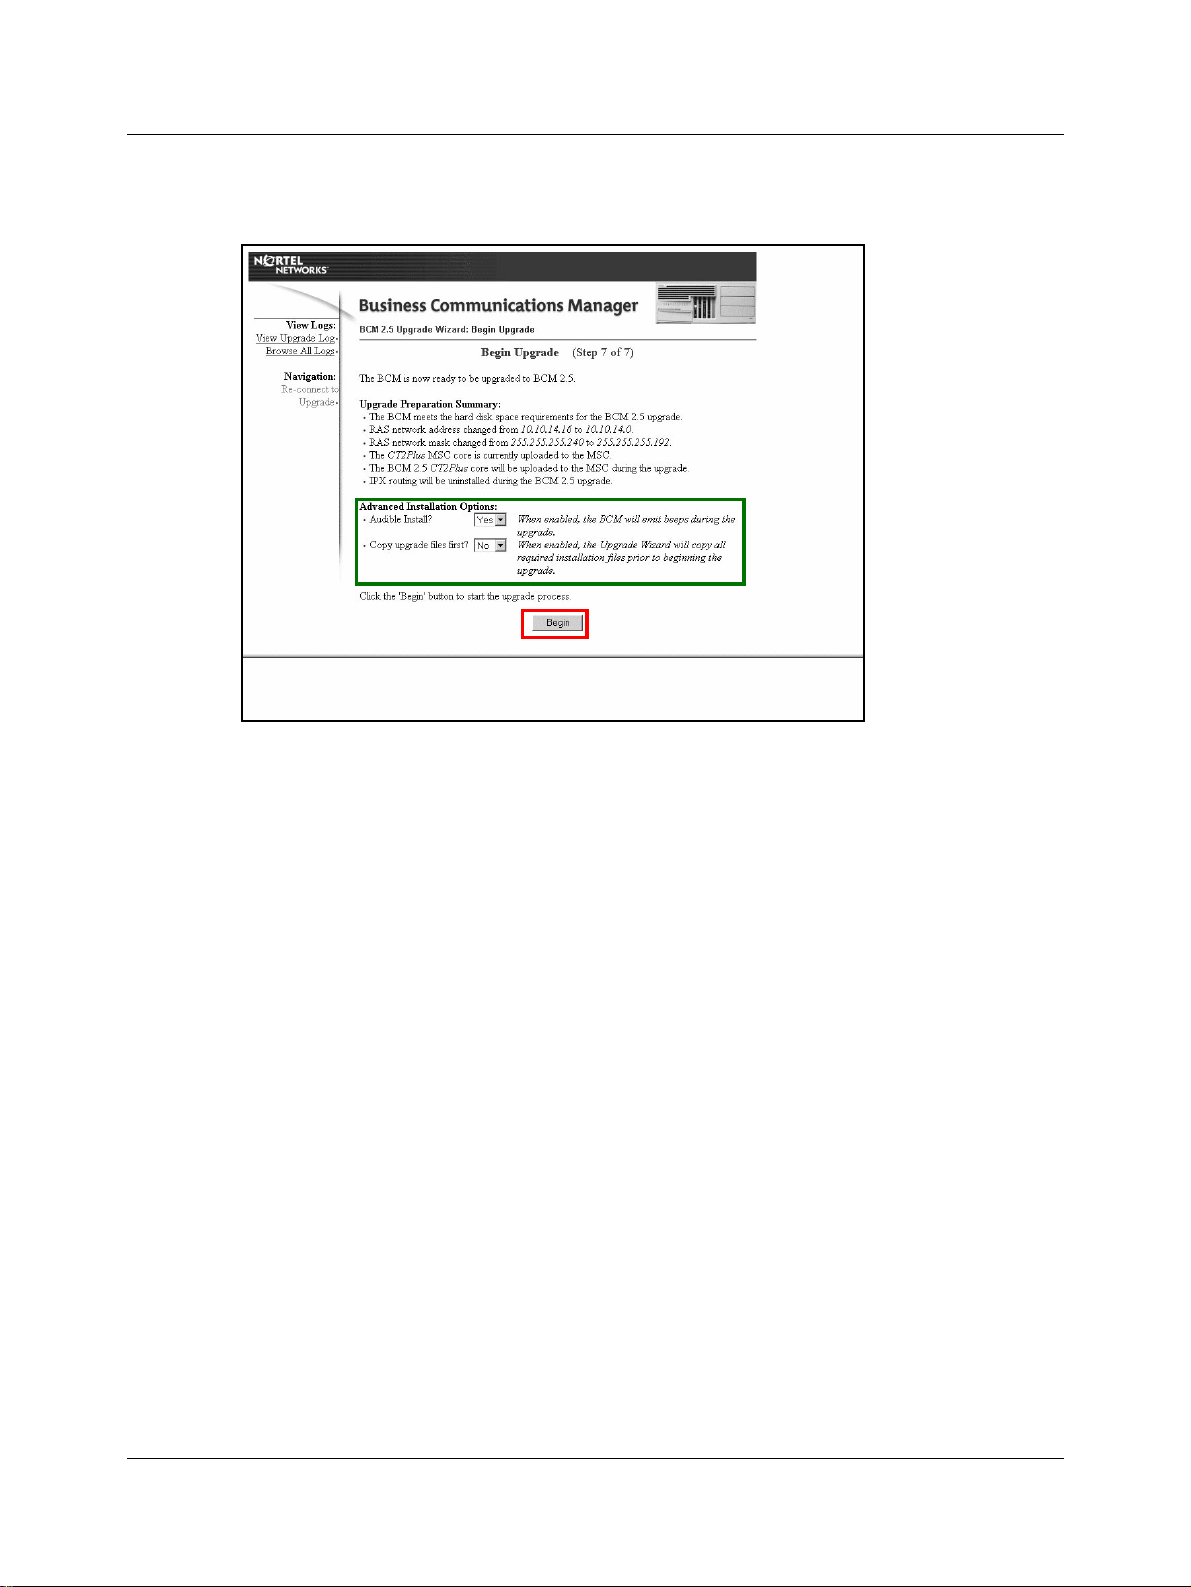
26 Click the OK button.
The Begin Upgrade screen appears.
27 If you want audio notification during the upgrade, leave the Audible Install as Yes
or
if you do not want audio notification, from the Audible Install list box select No.
Yes is the default.
28 Choose the Copy upgrade files first option if you want to disconnect your computer from the
network after you start the upgrade.
If you want to copy the installat ion fil es befo re you inst all the m, from the Copy upg rade f il es
first list box select Yes
or
if you do not want to copy the installation files, leave Copy upgrade files first as No.
There is no noticeable difference in the upgrade if you select Yes.
If you are upgrading several Business Communications Manager systems, choose the Copy
upgrade files first option. Then you can disconnect from your first Business Communications
Manager and start another upgrade.
Do not disconnect until you reach step 30.
P0987357 02
Page 15

Business Communications Manager 2.5 Upgrade 15
29 Click the Begin button.
The Starting Upgrade page appears. The progress is shown in the lower frame.
While the Business Communications Manager restarts, the Please Wait page appears.
The estimated remaining time is shown.
30 If you selected the Copy upgrade files first option in step 28, you can disconnect your
computer now and let the upgrade continue.
Business Communications Manager 2.5 Upgrade Guide
Page 16

16 Business Communications Manager 2.5 Upgrade
The Upgrade Progress page appears. The status bar shows the progress of the upgrade.
Note: The Uploading MSC Core step can take between 40 minutes to an hour to
complete.
When the upgrade is complete, the BCM 2.5 Software Upgrade Complete page appears.
A message appears that says the BCM is halted and ready to begin the hardware upgrade. If
them message does not appear after 10 minutes, proceed with the hardware upgrade without
waiting for the message.
P0987357 02
Page 17

Business Communications Manager 2.5 Upgrade 17
31 Click the OK button.
32 Power down the Business Communications Manager system.
33 Install the DRAM and the MS-PEC III cards according to “Installing the DRAM” on page 33
and “Installing the MS-PEC III car ds” on page 37.
34 Reapply power to the Business Communications Manager system.The system reboots. This
can take several minutes. The Upgrade Progress page appears. The progress bar shows the
system is performing the upgrade clean-up and verification. This can take up to 30 minutes.
35 If the telephony pr ogrammin g da ta is not u pgraded su ccessf ully , a messa ge app ear s tha t warns
you that there is a potential loss of telephony programming data.
Click the Retry button to resto re the telephony programming data
or
click the Ignore button if you do not want to restore the telephony programming data.
Business Communications Manager 2.5 Upgrade Guide
Page 18

18 Business Communications Manager 2.5 Upgrade
The BCM 2.5 Software & Hardware Upgrade Complete page appears.
36 Close the browser window.
37 Remove Disk 1 from the CD-ROM and insert Disk 2.
If your CD-ROM drive is configured to run automatically, the BCM Documentation Upgrade
CD page appears. If your CD-ROM drive does not run automatically, double-click
index.html.
The BCM 2.5 Software Upgrade Disk 2 page appears.
P0987357 02
Page 19

38 Click the Begin Upgrade button.
The Connect to BCM page appears.
Business Communications Manager 2.5 Upgrade 19
39 In the BCM Address box type the IP ad dress , DNS, network na me or F ully Qual ifie d Domain
Name of your Business Communica tions Manag er and clic k the Connect button. IP address is
recommended.
The Enter Network Password dialog box appears.
40 In the User name box type your Business Communications Manager user name.
The default Business Communications Manager user name is supervisor. If you cannot use
your Business Communications Manager user name, use the default password. When the
upgrade is complete, you can resume using your user name.
41 In the Password box type your Business Communications Manager password.
The default Business Communications Manager password is visor. If you cannot use your
Business Communications Man ager pa ssword, use the defa ult pa ss wo rd. When the upgrade is
complete, you can resume using your password.
42 Click the OK button.
A message appears that you are connected to the Business Communications Manager 2.5
system.
Business Communications Manager 2.5 Upgrade Guide
Page 20

20 Business Communications Manager 2.5 Upgrade
43 Click the OK button.
The Map your shared local CD drive page appears.
44 In the Host box type the IP address, DNS, network name or Fully Qualified Domain Name of
the computer you are using.
45 In the Share Name box type the share name you created for the installation files when you
created the shared folder.
46 In the User Name box type hostname\username or domainname\username.
Note: Be sure to type the information in the User Name box as
hostname\username or domainname\username.
47 In the Password box type your password.
48 Click the Connect to CD button .
In the lower frame a message appears that you are connected.
P0987357 02
Page 21

Business Communications Manager 2.5 Upgrade 21
49 Click the Next button.
The Apply the Documentation and Clients Upgrade page appears.
50 Click the Apply the BCM 2.5 Software Upgrade Disk 2 button.
The lower frame shows the progress of the upgrade. When the upgrade is complete, the
Disconnect page appears.
Business Communications Manager 2.5 Upgrade Guide
Page 22

22 Business Communications Manager 2.5 Upgrade
51 Click the Disconnect CD button.
The Congratulations page appears.
52 Click the Use Unified Manager button and continue to configure your system.
53 Start Unified Manager, and verify that all the settings you re corded in the “Business
Communications Manager 2.0.3 Configuration Information” on page 39 are applied.
If Unified Manager doesn’t start, refer to “If you cannot access Unified Manager after the
upgrade” on page 23.
54 If necessary, install the settings you recorded in “Business Communications Manager 2.0.3
?
Configuration Information” on page 39 that are marked with a
55 After you complete the upgrade, you must upgrade the Business Communications Manager
clients on each subscriber’s computer by following the instructions in “Upgrading clients” on
page 28. Then start Unified Manager and go to the Install Clients page. From the Install
Clients page you can install the new Business Communications Manager 2.5 Client software
on each subscriber’s computer. Depending on the subscriber’s expertise, you can ask them to
upgrade th e clients.
Note: Call Center Administrators: If you are using Business Communications
Manager 2.0 and you have Disable Overflow Steps selected for any skillsets, when you
upgrade to Business Communications Manager 2.5, the overflow rules are enabled when
the upgrade process is complete. This is because you cannot disable overflow rules in
Business Communications Manager 2.5.
.
P0987357 02
Page 23

Business Communications Manager 2.5 Upgrade 23
Post-upgrade system check
After you complete the upgrade:
• check that Unified Manager is accessible
• check that the configuration information is applied
• check that telephony programming is correct
• check that voicemail is functioning correctly
• check that OSPF routing is functioning correctly
• reset the Al arm Manager
Check that Unified Manager is accessible
If you cannot access Unified Manager after the upgrade
1 Using Internet Explorer, go to the Business Communication Manager home page at
http://bcm-ipaddress:6800.
2 Click the Product support and Maintenance icon.
3 If you are pr ompted to, enter the Unified Manager U ser Name an d Password.
4 Click the Maintenance Tools link.
5 Click the Execute a command link.
6 Enter the com mand sc config pep start= disabled to set Policy Service to manual start.
Be sure to enter this exact command, including spaces.
7 Enter the com mand shutdown /y /l /c /r to restart the Business Communications Manager
system.
Check the configuration information
To check your configuration information
1 Refer to the in formation you entered in “Business Communications Manager 2.0.3
Configuration Information” on page 39.
?
2 Confirm that settin gs marked with
values you recorded.
Pay specific attention to:
• OSPF Authentication Type in IP Routing
• the number of WAN resources in Media Services Card configuration settings
• all DHCP settings
• NAT rules
• if IPX networking is enabled, all IPX network numbers and other IPX configuration
settings
• static routes
are present on the syste m. If not, reapp ly them using the
Business Communications Manager 2.5 Upgrade Guide
Page 24

24 Business Communications Manager 2.5 Upgrade
3 If you think telephony programming was lost during the upgrade, reboot the Business
Communications Manager system after the upgrade is complete with Disk 1 and Disk 2. You
can reboot through Unified Manager or by cycling the power on the Business
Communications Manager system. You can tell if telephony programming was lost if you
receive an error message during the upgrade, or if your phones flash for longer than 10 or 15
minutes after the upgrade is complete.
4 Check the configuration of the MS-PECs:
• In Unified Ma nager, click the Resources key.
• Click the Media Services Card heading.
• Click the MS-PEC Information tab.
• Check that the information shown for the MS-PECS is correct .
P0987357 02
Page 25

Business Communications Manager 2.5 Upgrade 25
Check the telephony programming
If the telephones connected to the Business Communications Manager system continuously flash
after the upgrade for longer than 10 to 15 minutes, you must upload the MSC Core Telephony
software and restore the telephony programming.
To upload the MSC Core Telephony software
1 Telnet to Business Communications Manager.
Log on using the supervisor or ee_admin password.
2 Select Platform Initialization.
3 Select the option for the appropriate MSC Core Telephony software.
4 After the upload is complete, use the BRU (Backup Restore Utility) to restore the MSC Core
Telephony configuration data onto the system.
On a telephone on your sy stem, check that the correct date is displayed. If th e date has reverted to
Jan 1 2000, it indicates a telephony restore is necessary.
To restore the telephony programming
1 In Unified Ma nager, click the Services key.
2 Click the Telephony Services heading.
3 On the Tools menu click Restore option and follow the prompts.
Business Communications Manager 2.5 Upgrade Guide
Page 26

26 Business Communications Manager 2.5 Upgrade
Check voicemail
To check whether the voicemail DN has changed after you hav e restored the MSC Core Telephony
data:
1 On a telephone on your system, press ≤·°fito display the voic email DN.
2 Compare the DN shown to the voicemail DN you recorded in “System settings” on page 39.
If the voicemail DN has changed, you must reconfigure the Telephony programming of the
MSC Core Telephony software to use the new voicemail DN.
3 Change to the new voicemail DN:
• the Call Forward No Answer and Call Forward Busy settings for each station that has a
voice messaging mailbox
• the voicemail DN that Console Service uses, if you use Console Service. This setting is in
the Unified Manager configuration settings.
Check OSPF and RIP routing protocols
If the OSPF routing protocol is selected for a network adapter and the physical network interface
has been disconnected and reconnected, the OSPF routing may not function correctly. This
problem only occurs if the physical network interface is disconnected and reconnected.
If the RIP routing protocol is selected for a network adapter, the IP Routing and the specified
network adapter may not displ ay a t ab for the heading RIP Parameters. You do not have to do this
procedure for RIP routing to function correctly. You must do this procedure, however, if the
system adm inistrator needs to modify the RIP parameters for the adapter.
To re-establish OSPF and RIP routing protocols
1 Start Unified Manager.
2 Click the Services key.
3 Click the IP Routing heading.
P0987357 02
Page 27

Business Communications Manager 2.5 Upgrade 27
4 For the specified network adapter, from the Routing Protocol list box select None and then
select OSPF.
Reset the Alarm Manager
If the Alarm Backup Batch Job is scheduled, click the Alarm Backup Batch Job tab, and set the
Batch Job status to stop, then reset it to start. If the Batch Job status it already set to stop, set it to
start, then set it to stop, and reset it to start.
Business Communications Manager 2.5 Upgrade Guide
Page 28

28 Business Communications Manager 2.5 Upgrade
Upgrading clients
After you upgrade Business Communications Manager, follow these procedures to upgrade
Business Communications Manager clients on each subscriber’s computer. Every client must be
upgraded. Depending on the subscribers’ expertise, you can ask them to upgrade the clients.
Attendant Console, i2050 Software Phone, and Personal Call
Manager
1 On the Subsc riber’s computer, clic k the Start button, point to Settings and click Control
Panel.
The Control Panel window appears.
2 Double-click the Add/Remove Programs icon.
The Add/Remove Programs Properties dialog box appears.
3 From the list of installed programs, select the program you want to uninstall, either Attendant
Console, i2050 Software Phone or Personal Call Manager.
4 Click the Add/Remove button.
Follow steps 3 and 4 to remove another of these clients.
5 On the Unified Manager main page, click the Install Clients button.
The Download Client Applications page appears.
6 Download the desktop clients according to the instructions on the Download Client
Applications page, and configure the clients according to your system documentation.
Call Detail Recording
Do not uninstall any earlier versions of Call Detail Recording before you install the new version.
Unified Messaging
Before you install Business Communications Manager 2.5 Unified Messaging, uninstall any
earlier versions of Un ified Messaging.
1 On the Subsc riber’s computer, clic k the Start button, point to Settings and click Control
Panel.
The Control Panel window appears.
2 Double-click the Add/Remove Programs icon.
The Add/Remove Programs Properties dialog box appears.
3 From the list of installed programs, select Unified Messaging.
4 Reboot the computer.
5 On the Subsc riber’s computer, clic k the Start button, point to Settings and click Control
Panel.
The Control Panel window appears.
P0987357 02
Page 29

Business Communications Manager 2.5 Upgrade 29
6 Double-click the Printers folder.
The Printers window appears.
7 Right-click Unified Messaging fax and select Delete.
A message appears that asks you to confirm the deletion.
8 Click the Yes button.
9 Close the Printers window. double-click the Mail and Fax icon. Depending on which
operating system you use, this icon can also be called Mail.
The MS Exchange Server Properties dialog box appears, with the Services tab displayed.
10 In the list of services that are set up for the profile , remove:
• Voicemail Address Book
• Voicemail F olders
• Voicemail Messaging
11 Follow the procedure for removing the messaging components that applies to the client
installed on the computer.
Outlook 97
1 On the Outlook window, on the Tools menu click Options.
The Options dialog box appears.
2 Click the General tab.
3 Click the Add-In Manager button.
4 If any of the these items a ppear in the list, delete t hem:
• Unified Messaging Help Extension
• Unified Messaging Strip Extension
• Mailbox Manager
Outlook 98/2000
1 On the Outlook window, on the Tools menu click Options.
The Options dialog box appears.
2 Click the Other tab.
3 Click the Advanced Options button.
4 If any of these items appear in the list, delete them:
• Unified Messaging Help Extension
• Unified Messaging Strip Extension
• Mailbox Manager
5 Reboot the computer.
6 On the Unified Manager main page, click the Install Clients button.
The Download Client Applications page appears.
Business Communications Manager 2.5 Upgrade Guide
Page 30

30 Business Communications Manager 2.5 Upgrade
7 Download t he CallPilot Unified Messa ging accord ing to the inst ructions on th e Download
Client Applications page, and configure it according to the Business Communications
Manager 2.5 CallPilot Unified Messaging Installation and Maintenance Guide.
LAN TAPI
The 2.0 LAN TAPI software is replaced the Business Communications Manager 2.5 system by
LAN CTE Client.
1 On the computer where the LAN TAPI client software is installed, click the Start button and
click Run.
The Run dialog box appears.
2 In the Open box type tcmsetup /c /d and click the OK button.
3 On the Unified Manager main page, click the Install Clients button.
The Download Client Applications page appears.
4 Download t he LAN CTE according to th e instructions on the Download Client Applicati ons
page. When the install program asks you whether you want to install the Telephony Service
Provider, click the Yes button. You must provide the machine name or IP address of the
Business C ommunications Man ager system.
Call Center Reporting
Have the Call Center Reporti ng Confi gurati on Report avail able. You must re-e nter t he sett ings f or
the skillset statistical thresholds, print schedules and wallboard information from the settings
shown in the Configuration Report.
1 On the computer that has Call Center Reporting installed, click the Start button, point to
Settings and click Control Panel.
The Call Center window appears.
2 Double-click the Add/Remove Programs icon.
The Add/Remove Programs Properties dialog box appears.
3 From the list of installed programs, select Call Center Reporting.
4 Click the Add/Remove button.
A message appears that asks you if t o confirm the uninstall.
5 Click the Yes button.
6 In Windows Explorer, go to the Call Center Reporting folder.
By default, this folder i s located at \Program Files\Nortel Networks\Call Center Rep orting.
P0987357 02
Page 31

Business Communications Manager 2.5 Upgrade 31
7 Select the files you want to delete:
• If you do not want to retain the old statistical files, or if the computer you are using is a
client computer and does not have a stats folder, select all of the files in the Call Center
Reporting folder.
Note: If you want to r etai n the old s tati stica l fi les, selec t all of t he fi les in th e Ca ll
Center Reporting folder except for the stats f older.
8 Right-click the list of files you selected and click Delete.
A message appears that asks you to confirm the deletion.
9 Click the Yes button.
10 On the Unified Manager main page, click the Install Clients button.
The Download Client Applications page appears.
11 Download Call Center Reporting Master Client or Call Center Multiple Client according to the
instructions on the Download Client Applications page, and configure it according to the
Nortel Networks Call Center Reporting Set Up and Operation Guide.
12 To uupload the Agent, Line and Skillset Configuration details, log on to Call Center
Reporting, and on the Agent, Skillset and Line tabs click the Upload button.
13 Re-enter th e settings for the skillset statistic al thresholds, print schedules and wallboard
information from the settings shown in the Configuration Report.
Business Communications Manager 2.5 Upgrade Guide
Page 32

32 Business Communications Manager 2.5 Upgrade
P0987357 02
Page 33

Installing the DRAM
Danger: Electrical shock warning.
Disconnect the power cord, telephone cables and network cables before opening the unit.
Read and follow the installation instructions carefully.
Tools required
Before you install the DRAM, ensure you have the following equipment:
• Phillips screwdriver #2, with a blade 3.5 in. long
• 3/16 inch slot screwdriver
• antistatic grounding strap
Caution: You must wear an antistatic grounding strap at all times when you handle
electronic components. Failure to do so can result in damage to the equipment.
33
Installing the DRAM
To install the DRAM, you must ensure the system is safely disconnected from the trunk lines and
shut down. Next, you can remove the top of the Business Communications Manager base unit to
access the inside of it.
To install the DRAM
1 Attach one end of the grounding strap to your wrist and the other end to a grounded metal
surface.
2 Remove the two screws from the cover, at the back of the unit.
3 Lift the back of the cover and slide it back and up.
Business Communications Manager 2.5 Upgrade Guide
Page 34

34 Installing the DRAM
Opening the top of the unit
Lift the
cover at the
rear of the
unit
Danger: Risk of shock. Disconnect the power cord, telephone cables and net work cabl es
before opening the unit. Read and follow insta ll at ion instr uct i ons car ef ull y.
Installing the DRAM
Notes Layer:
Remember to Hide the Single Power Supply Layer
When Dual Power Layer and Dual Fan Layer are Visible!
4 Slide the DRAM, edge connectors first, into the slot.
P0987357 02
Note: The DRAM has two notches on the edge connector. Position the DRAM so
that one of the notches is on the side of the slot nearest to the Business
Communications Manager cards.
Page 35

Installing the DRAM 35
5 Carefully push the DRAM down until the fastening tabs clip to the side of the DRAM.
Note: Do not force the DRAM into its slot. If the DRAM does not slide in easily,
check the alignment of the DRAM.
6 If you are going to install the optional MS-PEC III cards, do not replace the cover of the unit.
Go to “Installing the MS-PEC III cards” on page 37
or
if you are not going to i nstall t he optiona l MSP-PEC III cards, re place the cover of th e unit and
restore the unit to operation.
Business Communications Manager 2.5 Upgrade Guide
Page 36

36 Installing the DRAM
P0987357 02
Page 37

Installing the MS-PEC III cards
Warning: Possible data loss. Inc orrec t handl in g of the MS-PEC ca rds dur in g insta llat ion
can result in the lo ss of telep hony pr ogram ming. Wh en you i nsert or r emove th e MS-PEC
cards, be careful not to contact the MS-PEC cards with the MSC Printed Circuit Board.
Tools required
Before you install the MS-PEC III cards, ensure you have the following equipment:
• Phillips screwdriver #2, with a blade 3.5 in. long
• 3/16 inch slot screwdriver
• antistatic grounding strap
Caution: You must wear an antistatic grounding strap at all times when you handle
electronic components. Failure to do so can result in damage to the equipment or loss
of telephony programming.
37
To install the MS-PEC III cards
1 Attach one end of the grounding strap to your wrist and the other end to a grounded metal
surface.
2 Remove the MS-PEC I cards by gras pin g the top edge of t he card a nd pulli ng it up ward . Refer
to “Removing or installing an MS-PEC card” on page 38. When you remove the MS-PEC I
cards, be careful not to contact the M S-PEC I cards with the MSC Printed Circuit Board.
3 Decide which slot you are going to install the MS-PEC III cards i nto on the MSC board. If you
have two MS-PEC III cards, put them in the slots furt hest away from the front face plat e of the
unit.
4 Line an MS-PEC III card up between the rails of the slot.
5 Carefully push the MS-PEC III card down into the slot until it is firmly seated. Refer to
“Removing or installin g an MS-PEC c ard” on page 38. When you inse rt the MS-PEC cards, be
careful not to contact the MS-PEC III cards with the MSC Printed Ci rcuit Board.
Note: Do not force the card into its slot. If the MS-PEC III ca rd does not slide in easily,
check the alignment.
6 Replace the cover of the unit.
Business Communications Manager 2.5 Upgrade Guide
Page 38

38 Installing the MS-PEC III cards
Removing or installing an MS-PEC card
P0987357 02
Page 39

Business Communications Manager 2.0.3 Configuration Information
Before you upgrade your system to 2.5, use these tables to record your 2.0.3 settings. After the upgrade,
confirm that the settings marked with
you record in these tables.
System settings
System name
Time zone
Country
Voicemail DN
Passwords
?
are present on the system. If not, reapply them using the values
39
BCM account (default: ee_admin)
Voicemail/CallPilot password
VNC password
Unified Manager user ID
(default: supervisor)
Unified Manager password
(default: visor)
Note: The CallPilot password is the last 4 di gits of the Voicemail password.
If the CallPilot password is 0000, you will be prompted to change it the first time you access
CallPilot Manager.
Alarm Backup
Alarm Backup Batch Job Day
Alarm Backup Batch Job Time
?
?
Alarm Database Max Number Record
Business Communications Manager 2.5 Upgrade Guide
Page 40

40 Business Communications Manager 2.0.3 Configuration Information
Networking settings
Record the IP addresses for the hardware profile you use.
Hardware Profile 1
LAN 1
WAN . .
Hardware Profile 2
LAN 1
LAN 2 . .
V.90 . .
Hardware Profile 3
LAN 1
LAN 2 . .
WAN 1 (V35_PPP/frame) . .
WAN 2 (X21_PPP/frame) . .
Hardware Profile 4
LAN 1
LAN 2 . .
.
.
.
.
.
.
.
.
.
.
.
.
.
.
.
.
.
.
.
Telephony
Use these tables to record your telephony settings.
Mobility protocol Etiquette CT2+ Not applicable for Europe
Carrier protocol T1 E1
Region
Software version
Template
DN length (3 - 7)
Start DN
Resources configured on Media Services Card
Number of Voice Ports
Number of Fax Ports (0 - 2)
WAN channels enabled (0 or 8)
P0987357 02
?
Page 41

Business Communications Manager 2.0.3 Configuration Information 41
VoIP Gateway
Local Gateway (select one) LAN 1 LAN 2 WAN 1 WAN 2
Codec preference order (rank them from 1st to 5th)
_____ G.729 _____ G.723-5.3kbits/s _____ G.723-6.3kbits _____ G.711-uLaw _____ G.711-aLaw
Remote Gateways
Name Destination QoS monitor Transmit
threshold
Receive
threshold
Destination digits
Business Communications Manager 2.5 Upgrade Guide
Page 42

42 Business Communications Manager 2.0.3 Configuration Information
Data settings
DHCP mode
DHCP status
DHCP ranges
(Adapter: start IP address - end IP address)
DHCP excluded ranges
(Adapter: start IP address - end IP address)
?
?
Enabled Disabled
?
?
DNS Status Enabled Disabled
IP Domain name
Primary Server IP Address
Secondary server IP Address
IP Routing
IP Routing Status Enabled Disabled
OSPF Router ID
OSPF Router Area ID
OSPF Authentication type
OSPF Routing Protocol LAN 1 LAN 2 WAN 1 WAN 2
RIP Routing Protocol LAN 1 LAN 2 WAN 1 WAN 2
WINS node type (0 - 8)
P0987357 02
?
None Password
Page 43

Business Communications Manager 2.0.3 Configuration Information 43
DHCP Scope information
For each adapter, record:
Adapter
DHCP Scope status
DNS Server
WINS Server
Default Gateway
Lease Time (in seconds)
Adapter
DHCP Scope status
DNS Server
WINS Server
Default Gateway
Lease Time (in seconds)
Adapter
DHCP Scope status
DNS Server
WINS Server
Default Gateway
Lease Time (in seconds)
?
?
?
Adapter
DHCP Scope status
DNS Server
WINS Server
Default Gateway
Lease Time (in seconds)
?
Business Communications Manager 2.5 Upgrade Guide
Page 44

44 Business Communications Manager 2.0.3 Configuration Information
Static Routes ?
Adapter Destination
Address
Destination Mask Next Hop Router Metric Value
SNMP Status Enabled Disabled
QoS Status Enabled Disabled
QoS Monitor Status Enabled Disabled
Web Cache Server Address
Cache Mode
Net Link Manager Status Enabled Disabled
Primary WAN Connection Permanent Dialup
Next Hop On Primary Link
Alarm Service Status Enabled Disabled
Alarm Manager - Max Number Record
NAT Status Enabled Disabled
IP Firewall Filter Status Enabled Disabled
?
P0987357 02
Page 45

Business Communications Manager 2.0.3 Configuration Information 45
User Manager
You can make additional copies of this page.
User Name Password
Business Communications Manager 2.5 Upgrade Guide
Page 46

46 Business Communications Manager 2.0.3 Configuration Information
IP Firewall Filters
Adapter type __________
Logging Settings
Logging Enabled Disabled
Logging Level 1 2 3
Log Viewing Options
Start date Month Day Year
End date Month Day Year
Default Rules Status
Input Filters’ Rule Order
Input Filters’ Rule Setting
Rule Name
Stateful
Disposition
Protocol
Source IP Type
Source IP
Source Range Mask
Source Port Range
Destination IP Type
Destination IP
Destination Range Mask
Destination Port Range
Source Routing
IP Options
Quick
Output Filters’ Rule Order
Output Filters’ Rule Setting
Rule Name
P0987357 02
Page 47

Stateful
Disposition
Protocol
Source IP Type
Source IP
Source Range Mask
Source Port Range
Destination IP Type
Destination IP
Destination Range Mask
Destination Port Range
Source Routing
Business Communications Manager 2.0.3 Configuration Information 47
IP Options
Quick
Note: You can copy these pages to record additional adapter settings.
Business Communications Manager 2.5 Upgrade Guide
Page 48

48 Business Communications Manager 2.0.3 Configuration Information
IPX Settings ?
If you use IPX, record these settings and verify t hem after the upgrade.
IPX Routing Status ?
Internal Network Number ?
IPX Log Level ?
RIP Log Level ?
SAP Log Level ?
IPX adapter settings ?
Adapter
Interface Name
Input filter action
Output filter action
Network number
Frame type
Adapter
Interface Name
Input filter action
Output filter action
Network number
Frame type ?
?
?
?
?
?
?
?
?
?
?
?
Adapter
Interface Name
Input filter action
Output filter action
Network number
Frame type
P0987357 02
?
?
?
?
?
?
Page 49

49
incoming remote access )
LLDial Interface # DNS value IP addre ss ass igne d (for
password
ISDN Dial Up Connections
Telephone number User name Password Incoming interface
Page 50

50
Public Port
Range
Mask
Public IP Type Public IP Public Range
Range
Network Address Translation (NAT) Rule Settings ?
Adapter Direction Protocol Private IP Type Private IP Private Port
 Loading...