

Page 1

Avaya 1408 and 1416 Telephones connected to Integral Enterprise - User
Guide
16-603463
Issue 1.09
January 2010
Page 2

©
2009 Avaya Inc.
All Rights Reserved.
Notice
While reasonable efforts were made to ensure that the information in
this document was complete and accurate at the time of printing, Avaya
Inc. can assume no liability for any errors. Changes and corrections to
the information in this document might be incorporated in future
releases.
Note:
Using a cell, mobile, or GSM phone, or a two-way radio in close
proximity to an Avaya IP telephone might cause interference.
During a power surge, EFT or ESD, calls may be dropped. After a
power surge, EFT or ESD, it is normal for the phone to restart.
Documentation disclaimer
Avaya Inc. is not responsible for any modifications, additions, or
deletions to the original published version of this documentation unless
such modifications, additions, or deletions were performed by Avaya.
Customer and/or End User agree to indemnify and hold harmless
Avaya, Avaya's agents, servants and employees against all claims,
lawsuits, demands and judgments arising out of, or in connection with,
subsequent modifications, additions or deletions to this documentation
to the extent made by the Customer or End User.
Link disclaimer
Avaya Inc. is not responsible for the contents or reliability of any linked
Web sites referenced elsewhere within this documentation, and Avaya
does not necessarily endorse the products, services, or information
described or offered within them. We cannot guarantee that these links
will work all the time and we have no control over the availability of the
linked pages.
Warranty
Avaya Inc. provides a limited warranty on this product. Refer to your
sales agreement to establish the terms of the limited warranty. In
addition, Avaya’s standard warranty language, as well as information
regarding support for this product, while under warranty, is available
through the Avaya Support Web site:
Licenses
USE OR INSTALLATION OF THE PRODUCT INDICATES THE END
USER'S ACCEPTANCE OF THE TERMS SET FORTH HEREIN AND
THE GENERAL LICENSE TERMS AVAILABLE ON THE AVAYA WEB
http://www.avaya.com/support/LicenseInfo/ ("GENERAL
SITE
LICENSE TERMS"). IF YOU DO NOT WISH TO BE BOUND BY
THESE TERMS, YOU MUST RETURN THE PRODUCT(S) TO THE
POINT OF PURCHASE WITHIN TEN (10) DAYS OF DELIVERY FOR
A REFUND OR CREDIT.
Avaya grants End User a license within the scope of the license types
described below. The applicable number of licenses and units of
capacity for which the license is granted will be one (1), unless a
different number of licenses or units of capacity is specified in the
Documentation or other materials available to End User. "Designated
Processor" means a single stand-alone computing device. "Server"
means a Designated Processor that hosts a software application to be
accessed by multiple users. "Software" means the computer programs
in object code, originally licensed by Avaya and ultimately utilized by
End User, whether as stand-alone Products or pre-installed on
Hardware. "Hardware" means the standard hardware Products,
originally sold by Avaya and ultimately utilized by End User.
License types
Designated System(s) License (DS). End User may install and use
each copy of the Software on only one Designated Processor, unless
a different number of Designated Processors is indicated in the
Documentation or other materials available to End User. Avaya may
require the Designated Processor(s) to be identified by type, serial
number, feature key, location or other specific designation, or to be
http://www.avaya.com/support
provided by End User to Avaya through electronic means established
by Avaya specifically for this purpose.
Shrinkwrap License (SR). With respect to Software that contains
elements provided by third party suppliers, End User may install and
use the Software in accordance with the terms and conditions of the
applicable license agreements, such as "shrinkwrap" or "clickwrap"
license accompanying or applicable to the Software ("Shrinkwrap
License"). The text of the Shrinkwrap License will be available from
Avaya upon End User’s request (see “Third-party Components" for
more information).
Copyright
Except where expressly stated otherwise, the Product is protected by
copyright and other laws respecting proprietary rights. Unauthorized
reproduction, transfer, and or use can be a criminal, as well as a civil,
offense under the applicable law.
Third-party components
Certain software programs or portions thereof included in the Product
may contain software distributed under third party agreements ("Third
Party Components"), which may contain terms that expand or limit
rights to use certain portions of the Product ("Third Party Terms").
Information identifying Third Party Components and the Third Party
Terms that apply to them is available on the Avaya Support Web site:
http://www.avaya.com/support/ThirdPartyLicense/
Preventing toll fraud
"Toll fraud" is the unauthorized use of your telecommunications system
by an unauthorized party (for example, a person who is not a corporate
employee, agent, subcontractor, or is not working on your company's
behalf). Be aware that there can be a risk of toll fraud associated with
your system and that, if toll fraud occurs, it can result in substantial
additional charges for your telecommunications services.
Avaya fraud intervention
If you suspect that you are being victimized by toll fraud and you need
technical assistance or support, call Technical Service Center Toll
Fraud Intervention Hotline at +1-800-643-2353 for the United States
and Canada. For additional support telephone numbers, see the Avaya
Support Web site:
Suspected security vulnerabilities with Avaya Products should be
reported to Avaya by sending mail to: securityalerts@avaya.com.
Trademarks
All other trademarks are the property of their respective owners.
Downloading documents
For the most current versions of documentation, see the Avaya Support
Web site:
Contact Avaya Support
Avaya Inc. provides a telephone number for you to use to report
problems or to ask questions about your product. The support
telephone number is 1-800-242-2121 in the United States. For
additional support telephone numbers, see the Avaya Web site:
www.avaya.com/support
http://www.avaya.com/support
http://www.avaya.com/support/
http://
2 1408/1416 User Guide January 2010
Page 3

Contents
Chapter 1: Introduction............................................................................................................7
Introduction to the 1400 ISDN Telephone Introduction to the 1400 Series Digital Deskphones......................7
Overview of phone buttons and features..........................................................................................................7
About LEDs....................................................................................................................................................10
Icons in the telephone display........................................................................................................................11
About this manual..........................................................................................................................................12
Chapter 2: Making calls..........................................................................................................13
Introduction to making calls............................................................................................................................13
Calling an internal call number........................................................................................................................13
Calling an external call number......................................................................................................................13
Calling with a destination key..........................................................................................................................14
Calling a person from the call log....................................................................................................................14
Calling a person from the phone book entry..................................................................................................14
Calling a person from a central phone book entry *........................................................................................15
Calling using the speakerphone......................................................................................................................15
Requesting automatic callback......................................................................................................................16
Requesting automatic redialing......................................................................................................................16
Joining another call (cut-in)*............................................................................................................................17
Chapter 3: Handling calls......................................................................................................19
Introduction to handling calls..........................................................................................................................19
Answering a call..............................................................................................................................................19
Answering a call ringing at another phone (pick-up)......................................................................................19
Putting a call on hold......................................................................................................................................20
Muting a call....................................................................................................................................................20
Deactivating your telephone display..............................................................................................................20
Transferring a call............................................................................................................................................21
Answering an additional call (second call)......................................................................................................21
Turning second incoming call on or off............................................................................................................22
Referring back during a call (consultation call)..............................................................................................22
Chapter 4: Call diversion........................................................................................................23
Introduction to call diversion............................................................................................................................23
Diverting calls..................................................................................................................................................23
Automatic call diversion *................................................................................................................................24
Defining automatic call diversion *..................................................................................................................24
Diverting calls automatically *........................................................................................................................25
Chapter 5: Follow-me..............................................................................................................27
Introduction to follow-me *..............................................................................................................................27
Preparing follow-me on your own telephone..................................................................................................27
Activating follow-me on another telephone....................................................................................................27
Switching off follow-me on your own telephone..............................................................................................28
Switching off follow-me on another telephone................................................................................................28
Chapter 6: Three-party conference........................................................................................29
Introduction to three-party conference calls....................................................................................................29
Making a conference call................................................................................................................................29
1408/1416 User Guide January 2010 3
Page 4

Contents
Talking with one participant in a conference call............................................................................................29
Connecting conference participants with each other......................................................................................30
Ending the conference call..............................................................................................................................30
Chapter 7: Multiple conference *............................................................................................31
Introduction to multiple conference calls........................................................................................................31
Adding a participant to a multiple conference call..........................................................................................32
Adding a participant by referring back............................................................................................................32
Adding a waiting participant to a multiple conference....................................................................................33
Answering a call in a multiple conference......................................................................................................33
Transferring a multiple conference call as controller......................................................................................33
Ending the multiple conference call as controller............................................................................................34
Referring back as passive participant on a multiple conference call..............................................................34
Disconnecting from a multiple conference call as passive participant............................................................35
Chapter 8: Managing the call log..........................................................................................37
Call log............................................................................................................................................................37
Viewing the call log..........................................................................................................................................37
Removing an entry from the call log................................................................................................................38
Adding an entry from the call log to the phone book......................................................................................38
Chapter 9: Managing the phone book..................................................................................39
Introduction to the phone book........................................................................................................................39
Creating a new entry in the phone book........................................................................................................39
Adding an entry from the call log to the phone book......................................................................................40
Editing an entry in the phone book..................................................................................................................40
Deleting an entry............................................................................................................................................41
Chapter 10: Voicemail System................................................................................................43
Introduction to voicemail................................................................................................................................43
Diverting calls to voicemail..............................................................................................................................43
Managing voice messages *..........................................................................................................................43
Deleting all messages....................................................................................................................................44
Chapter 11: Partners..............................................................................................................45
Introduction to partners..................................................................................................................................45
Setting up partner names................................................................................................................................45
Calling partners..............................................................................................................................................46
Answering a call for a partner........................................................................................................................46
Assigning partners to another key..................................................................................................................46
Hiding partner keys........................................................................................................................................47
Activating partner beep..................................................................................................................................48
Assigning partners on the button module*......................................................................................................49
Diverting your calls to a partner......................................................................................................................49
Diverting partner calls to your telephone........................................................................................................50
Diverting calls from one partner to another *..................................................................................................51
Diverting partner calls to partners, extended *................................................................................................52
Setting the deputy key *..................................................................................................................................53
Adding a partner to a partner group *..............................................................................................................53
Removing a partner from a partner group *....................................................................................................54
Restricting partner signaling *........................................................................................................................55
Reserving a line as executive line..................................................................................................................55
Setting up a connection for a partner..............................................................................................................56
Filtering *........................................................................................................................................................56
4 1408/1416 User Guide January 2010
Page 5

Contents
Dealing the filtering function as an executive *......................................................................................57
Dealing the filtering function as a secretary *........................................................................................57
Chapter 12: Private User Mobility..........................................................................................59
Private User Mobility *....................................................................................................................................59
Logging on to the telephone............................................................................................................................59
Logging off the telephone................................................................................................................................60
Chapter 13: Favorite screen..................................................................................................61
Introduction to favorite screen........................................................................................................................61
Toggling between the favorite screen and the telephone status....................................................................61
Displaying the favorite screen in the idle mode..............................................................................................61
Entering a function into the favorite screen....................................................................................................62
Entering a destination into the favorite screen................................................................................................62
Deleting a function or a destination from the favorite screen..........................................................................63
Chapter 14: Customizing your telephone............................................................................65
Introduction to customizing your telephone....................................................................................................65
Setting parameters for your telephone............................................................................................................65
Turning acoustic signaling on or off........................................................................................................65
Changing the acoustic signaling............................................................................................................66
Setting the ringing tone melody..............................................................................................................67
Setting the contrast and the brightness..................................................................................................68
Setting the language..............................................................................................................................68
Adjusting the setting for handsfree operation........................................................................................68
Displaying your name and call number on your telephone....................................................................69
Setting key beep tones to on or off........................................................................................................69
Displaying time zones *..........................................................................................................................70
Saving emergency numbers..................................................................................................................70
Function and Destination keys........................................................................................................................71
Function and destination keys................................................................................................................71
Assigning functions to keys....................................................................................................................72
Creating a destination key......................................................................................................................73
Assigning a destination from the phone book to a key..........................................................................73
Changing an existing destination............................................................................................................74
Deleting key assignments......................................................................................................................75
Setting up a macro (diversion and pick-up)............................................................................................76
Relocating the telephone................................................................................................................................77
Saving personal data......................................................................................................................................77
Saving personal data..............................................................................................................................77
Saving data locally..................................................................................................................................78
Saving data locally automatically............................................................................................................78
Saving data centrally..............................................................................................................................79
Allowing/barring central data saving......................................................................................................79
VIP functions..................................................................................................................................................80
Preparing VIP functions..........................................................................................................................80
1. Using the executive telephone as a two-way intercom system to the secretary................................80
Setting up the executive telephone........................................................................................................80
Setting up the secretary telephone........................................................................................................81
2. Making announcements from the executive telephone......................................................................82
Setting up the executive telephone........................................................................................................82
Setting up the secretary telephone........................................................................................................83
Using the VIP functions..........................................................................................................................83
Making anonymous calls................................................................................................................................84
1408/1416 User Guide January 2010 5
Page 6

Contents
Accepting calls automatically (Handsfree answer back)................................................................................85
Turning direct dialing on or off........................................................................................................................85
Turning CSTA Answer Call on or off *............................................................................................................86
Chapter 15: Using the Avaya Menu........................................................................................89
Introduction to the Avaya menu......................................................................................................................89
Managing call charges....................................................................................................................................89
Introduction to call charges....................................................................................................................89
Displaying charges during a call............................................................................................................89
Viewing the charge display....................................................................................................................90
Deleting call charges..............................................................................................................................90
Switching the charge display to units....................................................................................................90
Recording charges for private calls and projects *................................................................................91
Locking the telephone....................................................................................................................................91
Telephone lock........................................................................................................................................91
Changing the PIN..................................................................................................................................92
Locking the telephone............................................................................................................................92
Unlocking the telephone........................................................................................................................93
Setting automatic locking *....................................................................................................................93
Managing appointments..................................................................................................................................94
Appointments (reminders)......................................................................................................................94
Entering a new appointment..................................................................................................................94
Acknowledging an appointment..............................................................................................................95
Viewing appointments............................................................................................................................95
Deleting an appointment........................................................................................................................95
Chapter 16: Menus..................................................................................................................97
Menu overview................................................................................................................................................97
Menu settings overview..................................................................................................................................99
Chapter 17: Appendix Remote features..............................................................................103
Introduction to remote features.......................................................... .......................................................... 103
Calling remote using the system *........................................................ ........................................................103
Changing call diversion remotely *................................................................................................................103
Chapter 18: Auxiliary devices..............................................................................................105
Introduction to auxiliary devices....................................................................................................................105
Button module BM32.................................................................. ..................................................................105
Using the button module BM32.......................................................... .......................................................... 106
Using a headset............................................................................................................................................107
About operating cordless headsets....................................................... ....................................................... 107
Chapter 19: Appendix Contact Center........................................ ........................................ 109
Contact Center buttons..................................................................................................................................110
Chapter 20: Abbreviations....................................................................................................113
Index.......................................................................................................................................115
6 1408/1416 User Guide January 2010
Page 7

Chapter 1: Introduction
Introduction to the 1400 ISDN Telephone Introduction to the 1400 Series Digital Deskphones
The Avaya 1400 Series telephones are ISDN telephones for use with the Integral Enterprise
call processing system. The 1400 Series Digital Deskphones are for use with the Avaya Aura
Communication Manager call processing system. This user guide is written for the 1408 and
1416 Digital Deskphones. These deskphones put convenient features and capabilities at your
fingertips, including a phone screen to view and manage your calls, a contacts list, a call log,
a menu of options and settings to customize your phone, and access to your voice mail. They
put convenient features and capabilities at your fingertips, including a display to view and
manage your calls, a Call Log, a personal as well as a central phone book, a menu of options
and settings to customize your phone, and access to your voice mail.
Not all features described in this user guide may be available on your telephone. If you find
that a feature is not available, contact your system administrator.The descriptions of such
optional features are marked with an asterisk in the title.
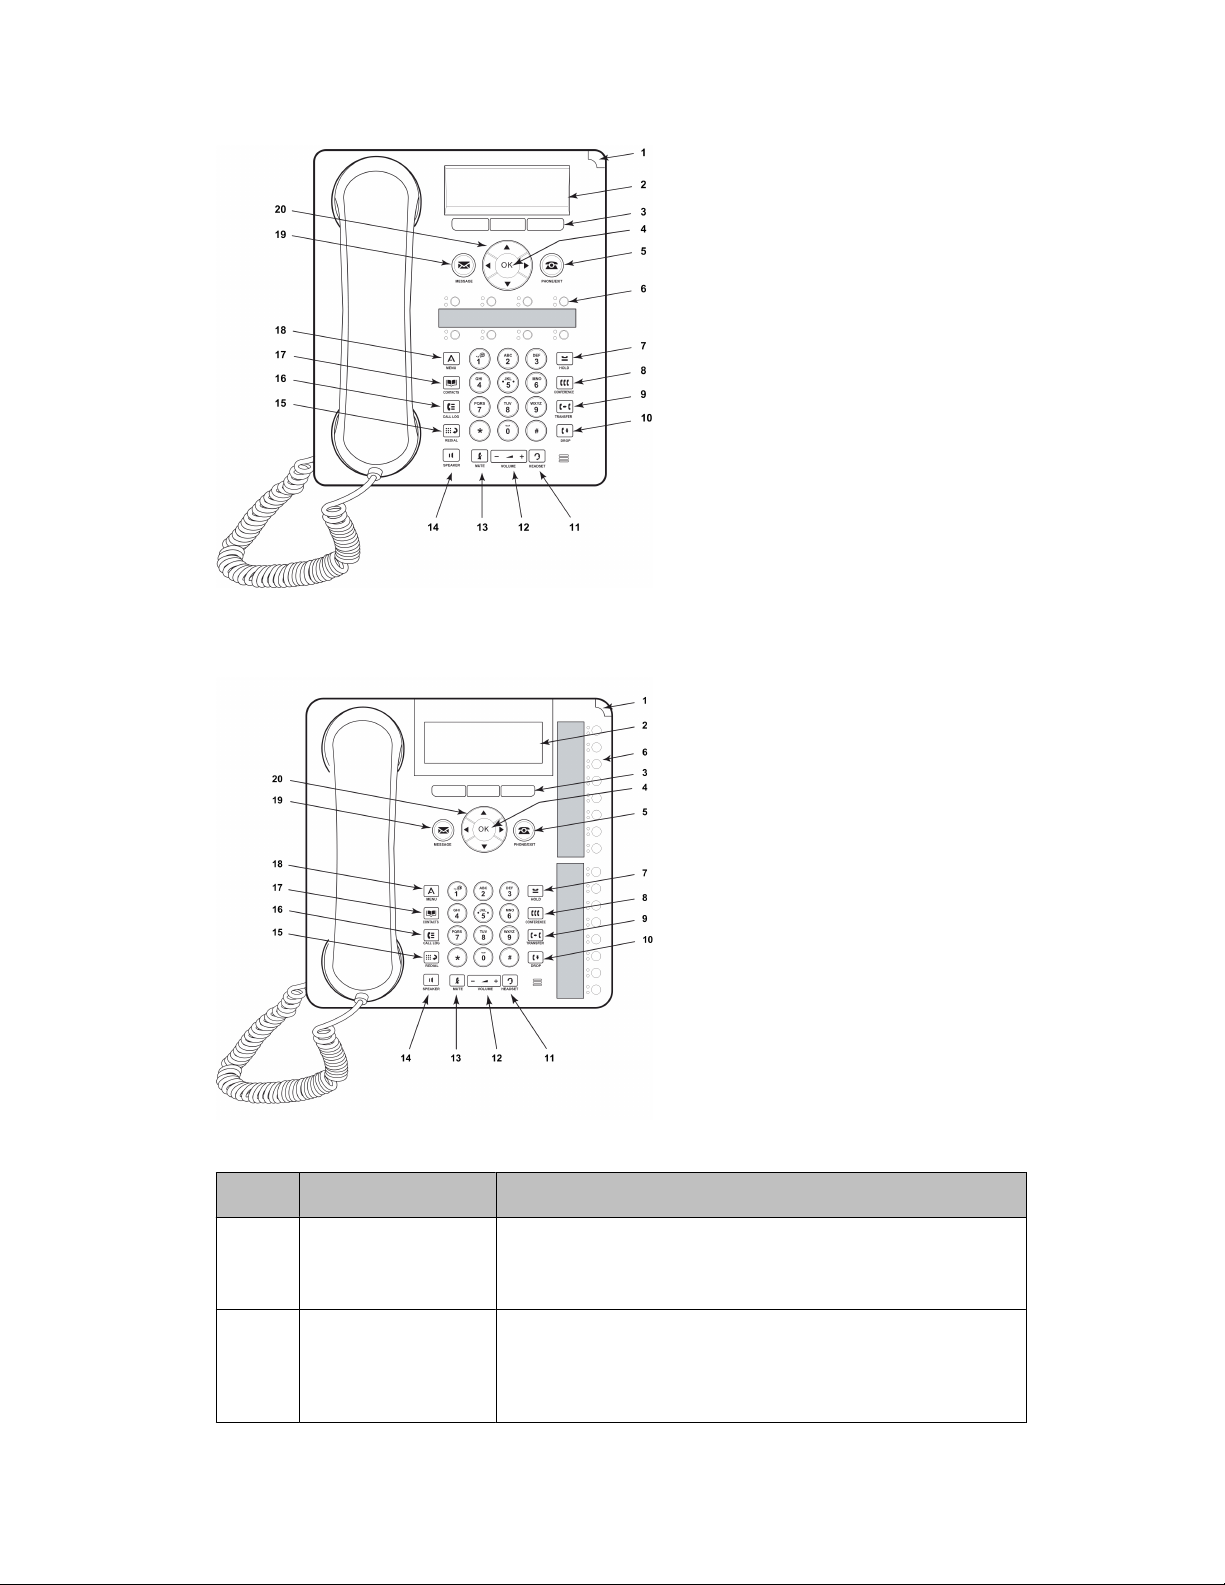
Overview of phone buttons and features
Avaya 1408 Telephone
™
1408/1416 User Guide January 2010 7
Page 8
Introduction
Avaya 1416 Telephone
No.
Name Description
1 Call/Message
Waiting Indicator
This light flashes when you receive an incoming call.
Additionally it indicates you have voicemail
messages waiting.
2 Phone Display There are 3 (1408) or 4 (1416) lines in the phone
display. The phone display presents calling or called
party identification, user options, and other
information relevant to using the phone.
8 1408/1416 User Guide January 2010
Page 9

Overview of phone buttons and features
No. Name Description
When the phone is idle, the top line shows the
number of missed calls. The top line also shows the
phone number and name you set and the date and
time.
The middle line (1408) or two lines (1416) display
status information.
The bottom line displays the softkey labels.
3 Softkeys Press the softkeys to select the softkey labels. The
softkey labels show you the action that each softkey
produces. The labels and the actions vary depending
on the object that is selected.
4 OK Press the OK button to open a selected menu item
or confirm an input.
5 Phone/Exit Press the Phone/Exit button to return back to the idle
display from a menu.
6 Function keys /
Destination keys /
Partner keys
There are 8 (1408) or 16 (1416) keys that can be
programmed as either function keys or destination
keys. Press a labeled function key to enable or
disable that function. The function keys provide the
same functions that are available in the menu. When
a call number is programmed on the key press the
key to dial the destination. (Partners are special
destinations, see chapter Partners for more
information)
7 Hold Press the Hold button (R button) to put the active call
on hold or to toggle between an active call and a call
on hold.
8 Conference Press the Conference button to add another party to
an existing call.
9 Transfer Press the Transfer button to transfer a call to another
number.
10 Drop Press the Drop button to drop the active call. While
on a conference call, press the Drop button to drop
the call party which is marked in the display from the
conference call.
11 Headset Press the Headset button to use the headset if it is
connected. Only HIS headset cords are compatible
with your phone.
12 Volume Press + or - on the Volume button while active on the
handset, headset or speaker to adjust the volume.
While not on a call, press + or - to access the audio
settings menu.
1408/1416 User Guide January 2010 9
Page 10
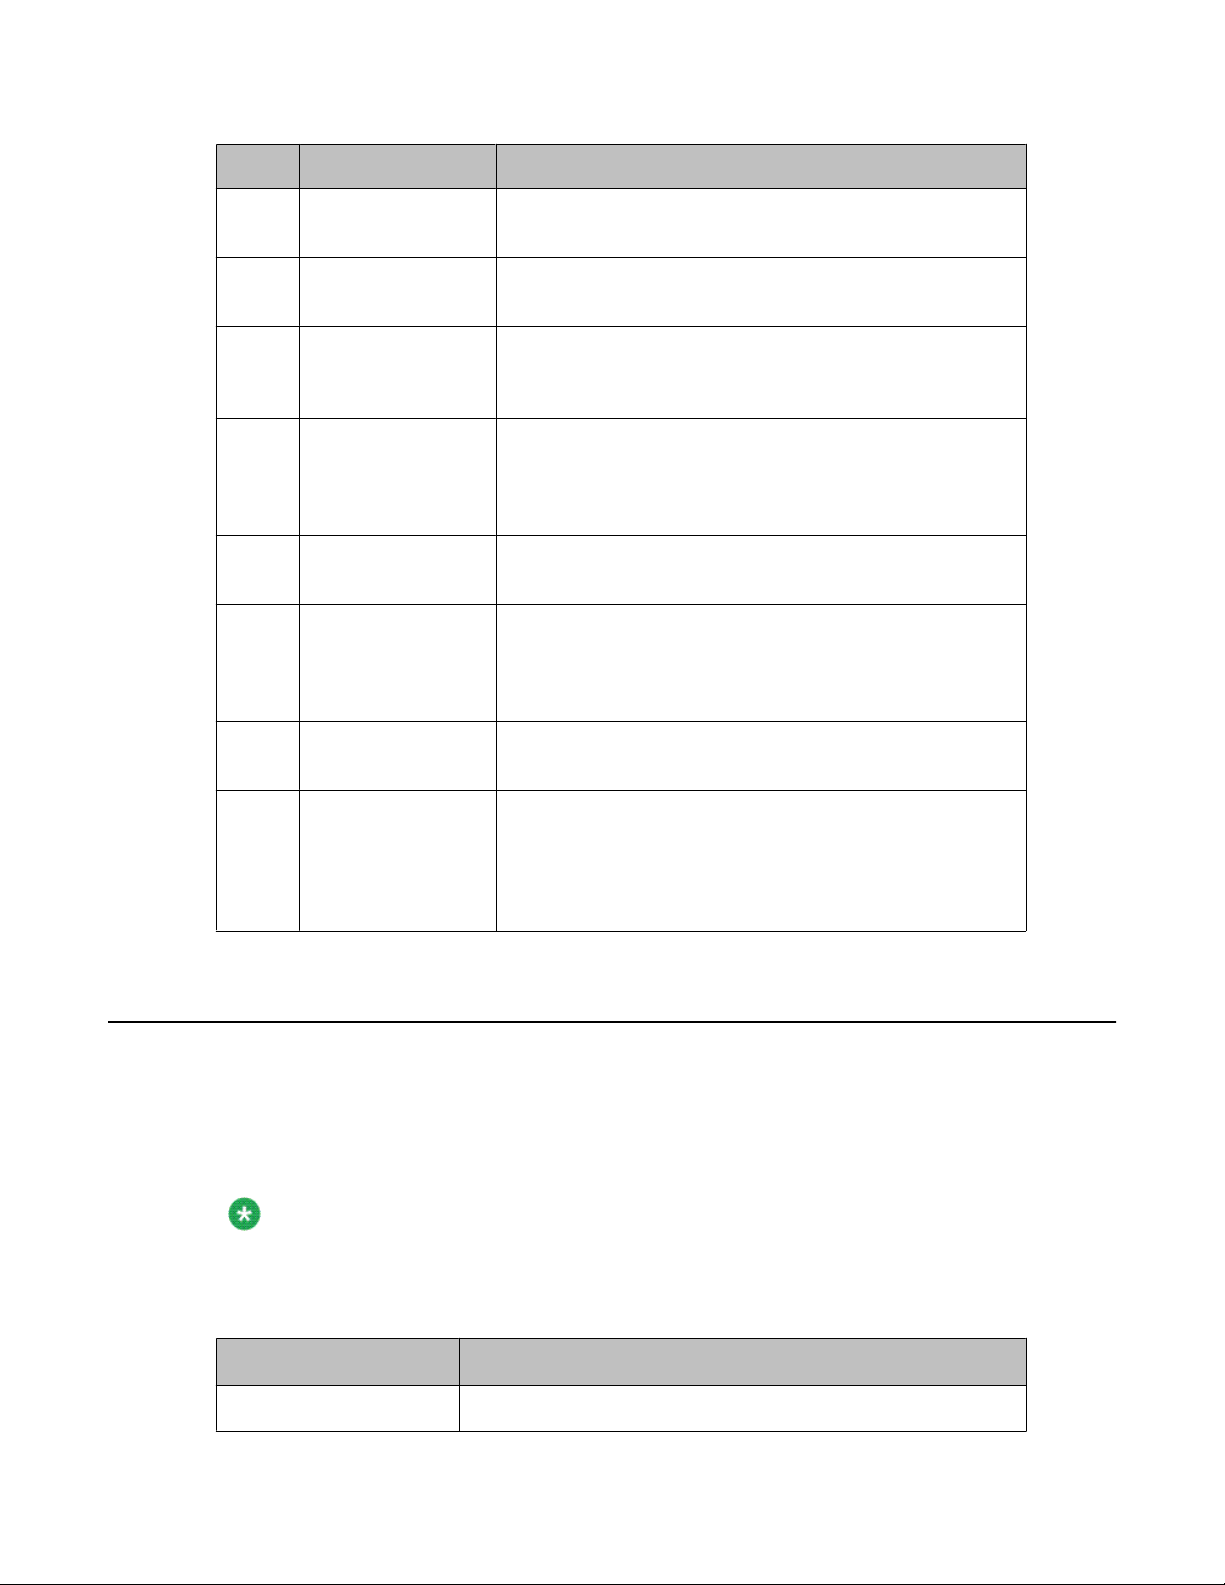
Introduction
No. Name Description
13 Mute Press the Mute button to mute a call in progress. To
take a call off mute, press Mute again.
14 Speaker Press the Speaker button to activate the loudspeaker
or the handsfree equipment.
15 Redial Press the Redial button to either dial the last number
you dialed or display the redial list from which you can
select a number to redial.
16 Call Log Press the Call Log button to view a list of your
outgoing, incoming, and missed calls. The icon on the
Call Log button is illuminated when you have missed
calls.
17 Phone book /
18 Avaya Menu Press the A button to access the Avaya menu. The
19 Message Press the Message button to connect directly to your
20 Navigation
About LEDs
Each function, partner or destination key has two LEDs, one green and one red, to indicate
the status of the function or partner. The status is identified by whether the LED is on, off, or
blinking as described in the following tables.
Contacts
Arrows
Press the Phone book / Contacts button to view the
entries in your phone book or contact list.
Avaya menu provides options that allow you to
customize phone settings, configure call logging and
select the display language.
voicemail system.
Press the up and down navigation arrows to scroll
through lists. Press the right and left navigation
arrows to navigate between different views of an
application, to move the cursor during text input, or
to turn an option on or off.
Note:
If a key is assigned to a destination the LEDs are always off.
Table 1: Function key LEDs
LED
Steady red Function is active, e. g. the ringing tone is silenced.
10 1408/1416 User Guide January 2010
Description
Page 11
Icons in the telephone display
LED Description
Off Function is not active.
Table 2: Partner key LEDs
LED Description
Steady green Partner has set partner diversion.
Blinking red very fast Partner receives two calls in parallel (50 ms on, 50 ms
off).
Blinking red fast Partner receives a call, either in idle state or while on a
call (200 ms on, 50 ms off)
Steady red Partner is on a call.
Related topics:
Introduction to partners on page 45
Icons in the telephone display
Icons are provided in the phone display to indicate the state of a call and navigation choices.
The icons that appear in the phone display are described in the following table.
Icon
#X Number of calls missed, where # represents the number.
Description
Call forward, Send All Calls, or EC500 is active. (These
features are available if they have been administered for your
telephone.)
Incoming call is ringing.
Call is active.
Call is on hold.
Call is on soft hold (when using Conference or Transfer
feature).
Conference is active.
Conference is on hold.
Scroll left for other options.
Scroll right for other options.
1408/1416 User Guide January 2010 11
Page 12

Introduction
Icon Description
About this manual
Descriptions of optional features are marked with an asterisk in the title. For more information
about the optional features, see your system administrator.
All the descriptions in this user guide assume a standard assignment of the function keys. If
you re-assign the function keys, the procedures may change from those provided in this guide.
Scroll up or down for other options.
12 1408/1416 User Guide January 2010
Page 13

Chapter 2: Making calls
Introduction to making calls
Use the procedures provided in this chapter to make calls from your telephone.
Note that when you make a call, you can either dial the number and then lift the handset, or
lift the handset and then dial the number. Both orders are correct. However, if you lift the
handset first and then dial the number, you will not be able to correct a dialing error.
Calling an internal call number
1. Enter the desired call number.
2. Lift the handset.
Calling an external call number
1. Enter the external line code, for example 0.
2. Enter the desired call number.
3. Lift the handset.
1408/1416 User Guide January 2010 13
Page 14

Making calls
Calling with a destination key
1. Press the destination key for the desired subscriber.
2. Lift the handset.
Related topics:
Assigning functions or call numbers to keys
Calling a person from the call log
1. Press the Call Log or the Redial button.
2. Press the left/right arrow button, to select the appropriate list.
3. Select the desired call number.
4. Lift the handset.
Related topics:
Call log on page 37
Calling a person from the phone book entry
1. Press the Phone book / Contacts button.
2. Select the entry you want to dial.
Note:
To reach the entry more quickly, you can also enter one or more of the first letters
of the name.
14 1408/1416 User Guide January 2010
Page 15

Calling a person from a central phone book entry *
You can also search for a name or call number by using an asterisk “*” as a wild
card (as you can on your PC). For example, if you input *mobile, all entries
which include the string “mobile” will be displayed.
3. Lift the handset.
Related topics:
Introduction to the phone book on page 39
Calling a person from a central phone book entry *
1. Press the Phone book / Contacts button.
2. Press the Main softkey.
3. Enter one or more of the first letters of the name.
4. Select the entry you want to dial.
5. Lift the handset.
Related topics:
Introduction to the phone book on page 39
Calling using the speakerphone
The Monitoring function allows you to hear the person you are on a call with through the
loudspeaker. The Handsfree function provides the Monitoring function and the ability to
speak using the phone's built-in microphone, rather than the handset.
Both functions are operated by means of the Speaker button.
1. Enter the desired call number.
2. Press the Speaker button.
3. To adjust the volume, press + or - on the Volume button.
4. Do one of the following:
1408/1416 User Guide January 2010 15
Page 16

Making calls
a. To continue the call using the handset, lift the handset. To return to the
speakerphone, press the Speaker button once more.
b. To end the call, press the Speaker button.
Requesting automatic callback
If an internal call number you dialed is busy or unanswered, use this procedure if you want
your telephone system to call you back when the number is no longer busy.
1. Select the Automatic Callback menu item or Callback function key.
2. Press the OK button.
3. Replace the handset.
Your telephone system calls you back as soon as the called number is free or free
again.
4. Lift the handset
Your telephone system calls the dialled call number again.
5. To delete the automatic callback again:
a. Press the Callback softkey
b. Select the desired callback request.
c. Press the Details softkey.
d. Press the Delete softkey.
Requesting automatic redialing
If the call number you dialed is busy, you can select Automatic redial to dial the busy
number every 30 seconds.
1. Select the Automatic redial menu item.
2. Press the OK button.
16 1408/1416 User Guide January 2010
Page 17

The status information Redial repeat every 30 s is shown.
3. Replace the handset, if you have lifted it.
Automatic redial is stopped if you press any button or lift the handset. After you have finished
you will be asked Continue redial ?
Joining another call (cut-in)*
You call an internal extension. The user is already on a call. Use this feature to join the call.
This feature may not be available. Your system administrator must configure it for your
extension as well as for the extension of the other person. See your system administrator for
more information.
Joining another call (cut-in)*
1. Select the Cut-in menu item.
Each person on the call will hear a cut-in tone.
2. To disconnect from the call, select Cut-in again, press the Drop button, or replace
the handset.
1408/1416 User Guide January 2010 17
Page 18

Making calls
18 1408/1416 User Guide January 2010
Page 19

Chapter 3: Handling calls
Introduction to handling calls
When you receive an incoming call your telephone rings, the Incoming Call LED flashes and
the call is indicated in the display.
You can lift the handset or use the Speaker button and talk with the handset on-hook. You are
also able to answer an incoming call ringing at another telephone in your telephone system,
or put an incoming call on hold until you are able to answer the call.
Internal and external calls have different ringing tones.
Answering a call
To answer a call, lift the handset or press the Speaker button to use the speakerphone.
Answering a call ringing at another phone (pick-up)
1. Enter the number of the ringing telephone with your handset on-hook.
The status message Pick-up is shown in the display.
2. Select Pick-up .
3. Press the OK button and wait until the call is signalled at your phone.
4. Lift the handset.
If you want to pick up calls for a particular telephone, you can set up a macro. So you can press
a single key to answer calls ringing at that telephone. See chapter Setting up a macro (diversion
and pick-up) for more information.
1408/1416 User Guide January 2010 19
Page 20

Handling calls
You can also pick up calls by entering a code, if your telephone system is administered for the
pick-up function. See your system administrator for more information.
Related topics:
Setting up a macro (diversion and pick-up) on page 76
Putting a call on hold
You can put an active call on hold or an incoming call that you have not yet answered. When
you put an incoming call on hold, the ringing tone is turned off, and the call LED continues to
flash. Putting an incoming call on hold is useful when you are performing another task, such
as editing a phone book entry, that you want to complete before you answer the call.
1. Press Hold button, the active call will be keep on hold and you get a possibility to
call another subscriber.
2. Press Drop key to return back to the call or select the call on hold and press OK.
Muting a call
1. Press the Mute button during a call so that the other person cannot hear you.
2. Press the Mute button again to unmute the call.
Deactivating your telephone display
Use this procedure to deactivate the call number of caller in the display. An example of when
you might want to do this is if you do not want the name or number of the person with whom
you are talking to appear in your telephone display.
1. Press the Display softkey.
20 1408/1416 User Guide January 2010
Page 21

The display is deactivated and the call number is not stored in all the call log lists.
2. To reactive the display, press the Display softkey again.
Note:
When you deactivate your telephone display, the call number is not stored in the call log.
Transferring a call
1. Select new call to ....
2. Press the OK button.
Your first call is put on hold.
3. Dial the appropriate call number.
Transferring a call
4. When the party answers, announce the call.
If the party does not answer, press the Drop button to return to the call on hold.
5. Press the Transfer button or hang up.
Answering an additional call (second call)
The feature Second call is activated on your telephone.
Use this procedure to answer an incoming call while on another call.
1. While on a call, select the number or name of the second call in the display.
2. Press the OK button.
You are connected to the second call and the first call is put on hold.
To end the first call instead, press the Drop button.
1408/1416 User Guide January 2010 21
Page 22

Handling calls
Turning second incoming call on or off
If you do not want to answer an additional call (second call) during a call, you can deactivate
the second call.
1. Select Second call in the display.
2. Press the OK button.
3. Press the On/Off softkey.
4. Press the Done softkey.
5. To activate the second call again from the Avaya Menu select Settings > Display/
Acoustics > Second call and change the setting with the On/Off softkey.
Referring back during a call (consultation call)
Use this procedure to make a consultation call while on a call.
1. Select new call to ....
2. Press the OK button.
Then your first call is on hold.
3. Enter the call number of the person whom you want to consult.
4. If the second call is not answered, you can return to the first by pressing Drop.
22 1408/1416 User Guide January 2010
Page 23

Chapter 4: Call diversion
Introduction to call diversion
You can divert your calls to someone else.
Different kinds of call diversion are possible:
• to: first destination unconditional
• to: alternative destination unconditional
• on busy: destination only when you are busy
• Ex.aft.time : destination for delayed call diversion (after time) only for external calls *.
• Int.aft.time: destination for delayed call diversion (after time) only for internal calls *.
• Double call: you set up your telephone so that another telephone rings together with
it at the same time *.
* You need a special authorization to use this kinds of the feature. Please refer to your system
administrator
If you have activated delayed call diversion, you may decide from case to case to answer a
call yourself or to divert it after a certain time.
A particularly convenient way to set up a call diversion is to use a macro. You can then enable or
disable this call diversion by pressing a single key.
Related topics:
Setting up a macro (diversion and pick-up) on page 76
Diverting calls
You want to divert your calls to someone else.
1. Press the Avaya Menu button.
2. Select Divert call .
3. Press the OK button.
1408/1416 User Guide January 2010 23
Page 24

Call diversion
4. Select the appropriate kind of diversion.
5. Enter the desired call number.
6. Press the OK button.
The status information DIV to call number appears in the display and the LED lights
up.
7. To withdraw the diversion, select the appropriate status information and press the
OK button .
Related topics:
Diverting calls to voicemail on page 43
Automatic call diversion *
Call diversion can be set in advance for a certain time slot. It is controlled by times and
weekdays.
You need an appropriate authorization for this feature. Please ask your system administrator.
Two alternative destination numbers with different time slots can be programmed.
Automatic call diversion can override a call diversion that was set up manually. Once the
automatic call diversion has finished, the manual call diversion becomes active again.
Call diversion on busy, Delayed call diversion and Double Call cannot be controlled using time
slots.
First you have to define the time slot by Start time, Stop time and weekday. Afterwards you
can activate or deactivate it.
Defining automatic call diversion *
Use this procedure to define the call number, time slot and weekdays, when you want all your
calls diverted automatically.
1. Press the Avaya Menu button.
2. Select Divert call .
3. Press the OK button.
4. Set automatic
24 1408/1416 User Guide January 2010
Page 25

Diverting calls automatically *
5. Press the OK button.
6. Enter the desired call number.
7. Select Start time.
8. Enter the time with hour and minutes.
9. Select Stop time.
10. Enter the time with hour and minutes.
11. Select weekday.
12. Press the OK button.
13. Select the appropriate pattern, for instance Mo-Fr.
If you scroll down you can also set the properties for the second automatic call
diversion.
Diverting calls automatically *
Use this procedure to automatically divert your incoming calls according to the time slot,
weekday, and call number you have defined.
1. Press the Avaya Menu button.
2. Select Divert call .
3. Press the OK button.
4. Select Automatic 1 or alternative Automatic 2.
5. Press the OK button.
The status message DIV to call number appears in the display and the LED lights
up.
6. To withdraw the diversion, select the appropriate status information and press the
OK button .
1408/1416 User Guide January 2010 25
Page 26

Call diversion
26 1408/1416 User Guide January 2010
Page 27

Chapter 5: Follow-me
Introduction to follow-me *
When you are going to visit several colleagues one after the other and don't want to miss any
call arriving meanwhile, you use the follow-me function.
This function allows you to use other telephones to set up or change the call diversion on your
telephone.
You need to prepare this function on your own telephone first.
The follow-me function is prepared, activated and switched off by means of particular codes.
The first one is used on your own telephone, the second on other telephones. Please ask your
system administrator for the appropriate codes.
Preparing follow-me on your own telephone
1. Lift the handset.
2. Press the asterisk * .
3. Enter the first code.
4. Replace the handset.
Activating follow-me on another telephone
When you arrive at the other telephone, you activate the prepared follow-me function, to divert
your incoming calls to this other telephone.
1408/1416 User Guide January 2010 27
Page 28

Follow-me
1. Lift the handset.
2. Press asterisk * .
3. Enter the second code.
4. Dial your own call number.
5. Replace the handset.
Switching off follow-me on your own telephone
When you are back at your own telephone, you switch off the follow-me function.
1. Lift the handset.
2. Press hash # .
3. Enter the first code.
4. Replace the handset.
Switching off follow-me on another telephone
If you don't want to return to your own telephone, you can switch off the follow me function on
another telephone.
1. Lift the handset.
2. Press hash # .
3. Enter the second code.
4. Dial your own call number.
5. Replace the handset.
28 1408/1416 User Guide January 2010
Page 29

Chapter 6: Three-party conference
Introduction to three-party conference calls
You can use a three-party conference call to speak with two people at different locations on
the same call. If the Multiple Conference feature has been enabled in your telephone system,
up to seven people can be included in the conference call.
A conference between a call waiting (second call) and the first talking party is not possible.
Related topics:
Introduction to multiple conference calls on page 31
Making a conference call
1. While active on a call, press the Conference button.
2. Enter the call number for the additional participant or use phone book/
destination key.
When the additional participant answers, you are in a three-party conference.
3. If the additional participant does not answer, press the Drop button to return to the
first call.
If you use the new call to … menu item to call the additional participant, you can first talk to
the participant privately while the first caller is on hold. Then use the Conference button to
connect all participants.
Talking with one participant in a conference call
Use this procedure if you are on a three-party conference call and want to talk privately with
one participant.
1408/1416 User Guide January 2010 29
Page 30

Three-party conference
1. Select the call number menu item of the participant with whom you want to talk
privately.
2. Press the OK button.
You can talk privately with the desired participant, while the other call is on hold.
3. To return to the conference press the Conference button or select conference with
from the menu.
Connecting conference participants with each other
If you are on a three-party conference call and want to connect the other participants to each
other, press the Transfer button or replace the handset.
Ending the conference call
Press the Drop button.
30 1408/1416 User Guide January 2010
Page 31

Chapter 7: Multiple conference *
Introduction to multiple conference calls
If the Multiple conference feature has been enabled in your telephone system for your
extension, you can include up to seven people in a conference call. (Otherwise you can use
the three party conference.) The person who is responsible for initiating the conference is the
controller. The others are passive participants.
Controller
The controller manages the conference and controls all participants and their status by means
of the List of all conf. users. When the third participant is added in the conference, the List
of all confer. users menu item appears. It shows the number of conference participants as
well as name, call number and status of each. There are three possible status values:
• No details: the participant is taking part in the conference.
• X : the participant is on hold, when he has initiated a refer-back for example.
• ! : the participant is taking part in the conference on behalf of another previous
participant.
If there are only three participants in the multiple conference, the display is almost identical to
the display of a three-party conference. Instead of the List of all confer. users menu item the
conference participants are shown in the status information.
During a multiple conference, the controller can neither transfer calls nor cut in on calls.
The controller can usually have one connection on hold or eight connections on hold if Hold/
Retrieve is enabled.
Passive participants
Passive conference participants are added to the multiple conference by the conference
controller. Their displays indicate the status information Conference.
Passive participants cannot set up another conference, but they can ...
• ... enter their connection in another conference.
• ... enter their connection in the queue by refer-back and then switch back to the
conference.
• ... transfer their conference connection to another subscriber by refer-back.
• ... end their participation in the conference.
Related topics:
Introduction to three-party conference calls on page 29
1408/1416 User Guide January 2010 31
Page 32

Multiple conference *
Adding a participant to a multiple conference call
1. While active on a call, press the Conference button.
The multiple conference is put on hold.
2. Enter the call number for the additional participant.
When the additional participant answers, the multiple conference is reactivated
including the new one. When the third participant is added in the conference, the
List of all confer. users menu item appears.
3. If the additional participant does not answer, press the Drop button to reactivate the
multiple conference.
If you use the new call to … menu item instead to call the additional participant, you can first
talk to this participant privately while the conference call is on hold. Then use the Conference
button to reactivate it including the new participant.
Adding a participant by referring back
Use this procedure to add a participant to your multiple conference call via a consultation call.
If you select the new call to .... menu item to call the additional participant, you can first talk
privately while the others are waiting and afterwards build the conference with the Conference
button.
1. Select new call to ....
2. Press the OK button.
The multiple conference is put on hold.
3. Enter the call number for the additional participant.
When the additional participant answers you can talk privately, while the conference
call is on hold. If the additional participant doesn't answer press the Drop button to
return to the multiple conference call.
4. Press the Conference button
The multiple conference is reactivated including the new participant. When the third
participant is added, the List of all confer. users menu item appears.
32 1408/1416 User Guide January 2010
Page 33

Adding a waiting participant to a multiple conference
Adding a waiting participant to a multiple conference
You are controller of a multiple conference having several waiting participants. That is, there
are several refer-backs waiting. You can switch from one to another.
1. Select the appropriate refer-back back to ....
2. Press the OK button.
You are now reconnected with the waiting participant. The multiple conference is
put on hold.
3. Press the Conference button
The waiting participant is added to the conference and the multiple conference is
reactivated.
To disconnect this connection instead, press the Drop button.
To switch back to the waiting conference call, select Back to conference .
Answering a call in a multiple conference
Use this procedure to answer an additional call while you are controller of a multiple
conference.
1. Select the appropriate status information call number of the calling person.
2. Press the OK button.
You are now connected with the new calling person. The multiple conference is put
on hold.
3. Press the Conference button, if Hold/Retr is activated.
The new caller is added to the multiple conference and the multiple conference is
reactivated.
Transferring a multiple conference call as controller
Use this procedure to leave a multiple conference as controller without ending it.
1408/1416 User Guide January 2010 33
Page 34

Multiple conference *
1. Select Transfer conference ....
2. Press the OK button.
The multiple conference continues without a controller, but at the original controller’s
responsibility.
When you are in the state Hold/Retrieve locked/disabled, you can alternatively replace the
handset.
Ending the multiple conference call as controller
To end a multiple conference call as controller, replace the handset or press the Drop button.
Referring back as passive participant on a multiple conference call
Use this procedure to make a consultation call while on a multiple conference call as passive
participant.
1. Select new call to ....
2. Press the OK button.
The controller is made aware of this in the List of all confer. users.
3. Enter the call number of the new conference participant.
4. Once you are connected to this person, you can replace the handset to transfer the
conference connection.
The controller is made aware of this in the List of all confer. users.
5. To return to the multiple conference, if the called person does not answer, press the
Drop button.
34 1408/1416 User Guide January 2010
Page 35

Disconnecting from a multiple conference call as passive participant
Disconnecting from a multiple conference call as passive
participant
To disconnect from a multiple conference call as passive participant, replace the handset or
press the Drop button.
1408/1416 User Guide January 2010 35
Page 36

Multiple conference *
36 1408/1416 User Guide January 2010
Page 37

Chapter 8: Managing the call log
Call log
You can use the call log to view a list of your recent calls or view separate lists of your outgoing,
answered, or missed calls. Icons indicate the history of the calls:
Icon call log list max. number of entries
>>
>> Outgoing calls (redial list) maximal 10 calls
The most recent entry is at the top of each list. If you select one entry and press the Details
softkey, you get a detailed display, including the time of the selected call.
You can selectively retrieve individual numbers and, if necessary, dial them. You can easily
transfer a call number from the call log into your phone book.
Related topics:
Calling a person from the call log on page 14
Viewing the call log
All calls
Missed calls (call list) maximal 30 calls
Answered calls maximal 10 calls
You can view a separate list of all, answered, outgoing, or missed calls.
1. Press the Call Log button.
2. Press the left/right arrow button, to select the appropriate list.
3. Select the appropriate entry.
4. Press the Detailed softkey or the ok button.
1408/1416 User Guide January 2010 37
Page 38

Managing the call log
The detailed display of the appropriate entry is shown.
Removing an entry from the call log
1. Press the Call Log or the Redial button.
2. Press the left/right arrow button, to select the appropriate list.
3. Select the desired call number.
4. Press the OK button.
5. Press the Delete softkey.
The entry is deleted immediately without confirmation prompt.
Adding an entry from the call log to the phone book
1. Press the Call Log or the Redial button.
2. Select the desired call number.
3. Press the Details softkey.
4. Press the Down navigation button
5. Press the More button
6. Press the +Contact softkey.
7. Enter a name if required.
8. Press the Save softkey.
If an entry with the same call number already exists in the phone book, the status information
Number already exists is displayed.
38 1408/1416 User Guide January 2010
Page 39

Chapter 9: Managing the phone book
Introduction to the phone book
Your telephone has a personal phone book. There you can store up to 268 phone numbers
with their associated names, which are available only on your telephone.
You can then dial phone book numbers quickly and easily. You can modify the individual phone
book entries yourself.
If you have authorization to access the main phone book, you can also find and dial entries
there.
Entries from the redial list, call list and call log can be quickly and easily saved in the phone
book. You can easily assign a phone book entry to a destination key.
Related topics:
Calling a person from the phone book entry on page 14
Calling a person from a central phone book entry * on page 15
Creating a new entry in the phone book
The number of free slots in your local phone book are displayed in the phone book status line.
Note:
You can add a caller's phone number to the phone book while you are talking to them: Press
the +Contact softkey.
1. Press the Phone book / Contacts button.
2. Press the New softkey.
3. Enter name and call number.
Additionally you can enter a remark in the input field Rem. (max. 12 letters).
4. Press the OK button.
5. Press the Save softkey.
1408/1416 User Guide January 2010 39
Page 40

Managing the phone book
Adding an entry from the call log to the phone book
1. Press the Call Log or the Redial button.
2. Select the desired call number.
3. Press the Details softkey.
4. Press the Down navigation button
5. Press the More button
6. Press the +Contact softkey.
7. Enter a name if required.
8. Press the Save softkey.
If an entry with the same call number already exists in the phone book, the status information
Number already exists is displayed.
Editing an entry in the phone book
1. Press the Phone book / Contacts button.
2. Select the entry you want to edit.
3. Press the OK button.
4. Edit the entry.
5. Press the Save softkey.
Note:
To reach the entry more quickly, you can also enter one or more of the first letters of the
name.
You can also search for a name or phone number by using an asterisk "*" as a wild card (as
you can on your PC). For example, if you input "*mobile", all entries which include the string
"mobile" will be displayed.
40 1408/1416 User Guide January 2010
Page 41

Deleting an entry
1. Press the Phone book / Contacts button.
2. Select the entry you want to delete.
3. Press the More softkey.
4. Press the Delete softkey.
Deleting an entry
1408/1416 User Guide January 2010 41
Page 42

Managing the phone book
42 1408/1416 User Guide January 2010
Page 43

Chapter 10: Voicemail System
Introduction to voicemail
Callers can leave messages for you similar to an answering machine, if a voicemail system is
connected to your telephone system. You can call to retrieve these voice messages. Further
more you can receive conventional text messages from a server.
The light at the right upper corner of your telephone indicates that you have voicemail
messages waiting.
Diverting calls to voicemail
Use the procedure Diverting calls and enter the call number of your voicemail system as
destination.
To withdraw the diversion, select the appropriate status information and press the OK button.
Related topics:
Diverting calls on page 23
Managing voice messages *
The light at the right upper corner of your telephone indicates that you have voicemail
messages waiting.
1. Press the Message button.
2. Select to the desired entry.
3. Press the OK button.
Your telephone switches to handsfree and dials the call number of the voicemail
system. Then you are guided through the operations of the voicemail system.
4. To listen the voice message, follow the advice of your voicemail system.
5. To delete the voice message, press the Clear softkey.
1408/1416 User Guide January 2010 43
Page 44

Voicemail System
The appropriate entry flashes. Press the Clear button once more or the OK button to
confirm.
Deleting all messages
The light at the right upper corner of your telephone indicates that you have voicemail
messages waiting.
1. Press the Message button.
2. Select Delete all messages.
3. Press the OK button.
The selected menu item starts flashing.
4. Press the OK button to confirm.
44 1408/1416 User Guide January 2010
Page 45

Chapter 11: Partners
Introduction to partners
Your system administrator can link together up to 16 telephones in your telephone system to
create a partner group. You can set up your telephone so that you hear a short tone when
one of your partners is called (partner beep). You can also set up and, if required, delete several
partner diversions by pressing a few keys. To do this, the Deputy key function key must be
set up.
By default, all partners are assigned to function keys, also referred to as partner keys. The
LEDs of the partner keys provide information about your partners' activities.
Related topics:
About LEDs on page 10
Assigning functions to keys on page 72
Creating a destination key on page 73
Setting up partner names
You can allocate a long and a short name to each partner call number.
1. Press the Avaya Menu button.
2. Select Settings.
3. Press the OK button.
4. Select Applications/Partner.
5. Press the OK button.
6. Select Partner …
7. Press the OK button.
8. Select Adapt my partners….
9. Press the OK button.
10. Select Set partner name.
1408/1416 User Guide January 2010 45
Page 46

Partners
11. Press the OK button.
12. Select the call number of the desired partner.
13. Press the OK button.
14. Select Long name.
15. Enter the appropriate name.
16. Select Short name.
17. Enter the appropriate name.
18. Press the Done softkey.
Calling partners
1. Press the appropriate partner key.
2. Talk using the speakerphone, or lift the handset to talk using the handset.
Answering a call for a partner
When a partner's telephone rings, the corresponding LED on your telephone flashes. You can
pick up that call and answer as deputy.
1. Press the Partner key and wait until the call reaches your own telephone.
2. Lift the handset.
Assigning partners to another key
By default, all partners are assigned to the function keys. Use this procedure to assign a partner
to a different key.
46 1408/1416 User Guide January 2010
Page 47

1. Press the Avaya Menu button.
2. Select Settings.
3. Press the OK button.
4. Select Applications/Partner.
5. Press the OK button.
6. Select Partner …
7. Press the OK button.
8. Select Adapt my partners….
9. Press the OK button.
10. Select Change Partner position.
11. Press the OK button.
12. Select the desired partner.
13. Press the OK button.
Hiding partner keys
14. Press the partner or function key that you want to assign.
The previous key assignment is displayed.
15. Press the Save softkey.
The partner is now assigned to the new key.
Hiding partner keys
Use this procedure to hide the partner signaling for one of your partners.
1. Press the Avaya Menu button.
2. Select Settings.
3. Press the OK button.
4. Select Applications/Partner.
5. Press the OK button.
6. Select Partner …
7. Press the OK button.
8. Select Adapt my partners….
9. Press the OK button.
10. Select Hide/show partner keys .
1408/1416 User Guide January 2010 47
Page 48

Partners
11. Select the partner key whose partner signalling you don't want to get any longer.
12. Press the Change softkey.
13. Press the Done softkey.
Activating partner beep
Use this procedure if you want to hear a short tone (beep) every time your partner is called.
1. Press the Avaya Menu button.
2. Select Settings.
3. Press the OK button.
4. Select Applications/Partner.
5. Press the OK button.
6. Select Partner …
7. Press the OK button.
8. Select Adapt my partners….
9. Press the OK button.
10. Select Set partner beep....
11. Press the OK button.
12. Select the partner for whom you want to activate the partner beep.
13. Press the OK button.
14. Select Audio.
15. Press the Change softkey several times to select one of the following:
• Beep
• Ringing tone
• off
16. Press the Done softkey.
If you set Ringing tone instead of Beep, the normal ringing tone sounds on your
telephone when your partner is called.
48 1408/1416 User Guide January 2010
Page 49

Assigning partners on the button module*
Assigning partners on the button module*
Use this procedure to transfer all your partners from your telephone's keys to the keys of a
button module.
Note:
The button module is not supplied as standard with your telephone.
1. Press the Avaya Menu button.
2. Select Settings.
3. Press the OK button.
4. Select Applications/Partner.
5. Press the OK button.
6. Select Partner …
7. Press the OK button.
8. Select Adapt my partners….
9. Press the OK button.
10. Select Assign partner to DSS module.
The partners are transferred to the LEDs of the button module in their current order.
The previous key assignments on the buttons are overwritten.
11. Select Assign partner to telephone in order to transfer the partners back to the
telephone. The former key assignments of the button module are re-established.
Diverting your calls to a partner
Use this procedure to divert your calls from outside the partner group to one of your partners.
1. Press the Avaya Menu button.
2. Select Settings.
3. Press the OK button.
4. Select Applications/Partner.
1408/1416 User Guide January 2010 49
Page 50

Partners
5. Press the OK button.
6. Select Partner …
7. Press the OK button.
8. Select Set/delete partner div ….
9. Press the OK button.
10. Select Partn. div. from my phone....
11. Press the OK button.
12. Select the partner to whom you want to divert calls, displayed with off
13. Press the OK button.
14. Select on
15. Press the OK button.
The partner diversion is now activated, displayed in the status information.
Related topics:
Setting up a macro (diversion and pick-up) on page 76
Diverting partner calls to your telephone
You want to answer calls on behalf of your partners. Use this procedure to divert their calls to
your own telephone.
1. Press the Avaya Menu button.
2. Select Settings.
3. Press the OK button.
4. Select Applications/Partner.
5. Press the OK button.
6. Select Partner …
7. Press the OK button.
8. Select Set/delete partner div ….
9. Press the OK button.
10. Select Partner div. to my phone....
11. Press the OK button.
12. Select the partner, whose calls you want to divert to your telephone, displayed with
off
50 1408/1416 User Guide January 2010
Page 51

Diverting calls from one partner to another *
13. Press the OK button.
14. Select on .
15. Press the OK button.
Partner diversion is now activated. The appropriate LED flashes.
Related topics:
Setting up a macro (diversion and pick-up) on page 76
Diverting calls from one partner to another *
If you have the appropriate authorization, you can set up a partner diversion from any partner to
another.
1. Press the Avaya Menu button.
2. Select Settings.
3. Press the OK button.
4. Select Applications/Partner.
5. Press the OK button.
6. Select Partner …
7. Press the OK button.
8. Select Set/delete partner div ….
9. Press the OK button.
10. Select Partnerdiv. from/to others.
11. Press the OK button.
12. Select Set partner division.
13. Press the OK button.
All partner are displayed.
14. Select one of the partners as source for the diversion.
All possible combinations with this source partner are displayed.
15. Select the combination with the target partner to whom you wish to divert calls.
16. Press the OK button.
The selected combination is displayed with off.
17. Press the Change softkey.
The selected combination is displayed with on
18. Press the Done softkey.
1408/1416 User Guide January 2010 51
Page 52

Partners
Partner diversion is now activated.
Diverting partner calls to partners, extended *
If you have the appropriate authorization, you can divert any call of a partner group to any call
number for another partner. This means that call diversion can be activated to a partner's
mobile or home call number.
A maximum of five status displays for extended partner diversion can be displayed. Partner
names are replaced by the number in extended partner diversion.
1. Press the Avaya Menu button.
2. Select Settings.
3. Press the OK button.
4. Select Applications/Partner.
5. Press the OK button.
6. Select Partner …
7. Press the OK button.
8. Select Set/delete partner div ….
9. Press the OK button.
10. Select CFF partner diversion key 1..5.
11. Press the OK button.
12. Press the Enter softkey.
13. Select the partner whose calls shall be diverted.
14. Press the OK button.
15. Enter the call number.
16. Press the OK button.
17. The function key is allocated.
Related topics:
Setting up a macro (diversion and pick-up) on page 76
52 1408/1416 User Guide January 2010
Page 53

Setting the deputy key *
1. Press the Avaya Menu button.
2. Select Settings.
3. Press the OK button.
4. Select Applications/Partner.
5. Press the OK button.
6. Select Partner …
7. Press the OK button.
8. Select Set/delete partner div ….
9. Press the OK button.
Setting the deputy key *
10. Select Set deputy key.
11. Press the OK button.
12. Press Deputy to select the partner, from whom you want to divert .
13. Press the OK button.
14. Select partner and select all partners you want to define as your deputies and turn
them to on.
15. Press the OK button.
16. Now the deputies are selected, you need to program the function key “deputy key” to
activate/deactivate of defined deputy diversion.
Related topics:
Setting up a macro (diversion and pick-up) on page 76
Function and destination keys on page 71
Adding a partner to a partner group *
Use this procedure to add a new partner to your partner group.
The phone numbers of the subscribers in the partner groups must be set up by your system
administrator.
1408/1416 User Guide January 2010 53
Page 54

Partners
1. Press the Avaya Menu button.
2. Select Settings.
3. Press the OK button.
4. Select Applications/Partner.
5. Press the OK button.
6. Select Partner …
7. Press the OK button.
8. Select Adapt partner group size.
9. Press the OK button.
10. Select Expand partner group.
11. Press the OK button.
12. Enter the call number of the partner you want to add to your partner group.
13. Press the key to which you want to assign the new partner.
Removing a partner from a partner group *
1. Press the Avaya Menu button.
2. Select Settings.
3. Press the OK button.
4. Select Applications/Partner.
5. Press the OK button.
6. Select Partner …
7. Press the OK button.
8. Select Adapt partner group size.
9. Press the OK button.
10. Select Reduce partner group.
11. Press the OK button.
54 1408/1416 User Guide January 2010
Page 55

12. Select the partner who you want to remove.
13. Press the Delete softkey.
Restricting partner signaling *
Use this procedure if you don't want the partners displays to show whether you are on a call,
whether you are being called, whether a call diversion exists for you, etc.
The "Restrict partner signaling" function must be enabled by your system administrator.
1. Press the Avaya Menu button.
2. Select Settings.
3. Press the OK button.
Restricting partner signaling *
4. Select Applications/Partner.
5. Press the OK button.
6. Select Partner …
7. Press the OK button.
8. Select Adapt partner group size.
9. Press the OK button.
10. Select Restrict signaling Off.
11. Press the Change softkey.
The display switches to On.
12. Press the Save softkey.
13. To enable partner signaling again select Restrict signaling On.
Reserving a line as executive line
You can reserve an external line for another partner (executive) using your telephone. In this
way, for example, a secretary can reserve a line for the boss.
The Executive function key must be set up on the secretary's telephone by the administrator.
1408/1416 User Guide January 2010 55
Page 56

Partners
1. Press the Executive key.
2. Press the partner key of the partner for whom you want to reserve a line.
3. Press the OK button.
The status message Line busy appears in the display of the partner telephone.
The partner can continue to dial as usual.
Related topics:
Assigning functions to keys on page 72
Setting up a connection for a partner
Your partner (executive) asked you to set up a connection substitutionally.
Filtering *
Filtering is a function for executives and their secretaries or receptionists. Filtering groups are
formed with several executives and several secretaries for this purpose. An incoming call for
an executive is initially signaled at the secretary's telephones. If required, it can subsequently
be transferred to the executive. The filtering function is a special partner diversion.
1. Make a call to the appropriate call number.
2. Select New call to...
3. Press the OK button.
4. Press the partner key.
5. Replace the handset.
The partner is connected to the other party. Your own telephone is free again. This
procedure is like Transferring a call with the help of the partner key, further more
you don't need to wait for the other person answering.
The executives activate the filtering function for external or internal or for all calls. In general,
the secretaries can switch on or off to control their readiness to receive a call. When filtering
is active, a filtered call is signaled at all active secretary's telephones in the filtering group. The
connection is established to the receptionist who accepts the call first.
56 1408/1416 User Guide January 2010
Page 57

The system administrator initializes the filtering function and sets up the filtering groups.
Filtering can be activated for one executive to several receptionists. One receptionist can deal
filtering for several executives.
You as a member can assign the function keys for filtering, only if the filtering function has been
initialized by your administrator. You can set up the names and a partner beep. But you cannot
alter the filtering group.
Related topics:
Assigning functions to keys on page 72
Dealing the filtering function as an executive *
Your telephone has two toggle function keys INT and EXT with LEDs. The display shows you:
• < which receptionists are ready to get your incoming calls.
• > which other executives have diverted their incoming calls.
Filtering *
1. To activate the filtering function for incoming external or internal calls or all calls,
press the Ext or the Int function key or both of them.
2. To withdraw the filtering function, press the appropriate key once more.
Dealing the filtering function as a secretary *
Your telephone has a FILTER function key. The according LED as well as the status display
remain active as long as filtering is active for at least one executive. Furthermore the display
shows you
• > which executives have diverted their incoming calls.
• < which other receptionists are also active for filtering.
1. To activate the filtering function, press the Filter function key.
2. To accept a signaled call, lift the handset or press the Speaker button.
3. To transfer an accepted call to the executive, press the appropriate partner key and
the Transfer button or replace the handset.
4. To deactivate the filtering function, press the Filter function key again.
1408/1416 User Guide January 2010 57
Page 58

Partners
58 1408/1416 User Guide January 2010
Page 59

Chapter 12: Private User Mobility
Private User Mobility *
The Private User Mobility feature allows you to log on to any telephone inside the telephone
system and have access to your personal settings (call list, redial, call diversion, and callbacks).
Callers will reach you on this telephone when they dial your call number. Charging units
incurred are allocated to your call number.
To use the PUM function, it must be enabled in the telephone system. Furthermore two function
keys must have the functions Log on and Log off assigned to them (look at the UsersGuide).
This function is protected by the same PIN as the locking function. To use PUM, this PIN have
exact six digits.
Related topics:
Assigning functions to keys on page 72
Changing the PIN on page 92
Logging on to the telephone
1. Press the Log in user function key.
2. Enter your personal call number.
3. Select Password:.
4. Enter your PIN.
The PIN is displayed by asterisks *.
5. Select Log in user.
6. Press the OK button.
A status message appears in the display. You are now logged in to this telephone
and you can use it exactly like your own set.
1408/1416 User Guide January 2010 59
Page 60

Private User Mobility
Logging off the telephone
Press the Log out user function key.
Your personal settings (call list, redial, call diversion, callbacks entered) are cleared.
Note:
You are logged off automatically if another subscriber logs on to this telephone.
60 1408/1416 User Guide January 2010
Page 61

Chapter 13: Favorite screen
Introduction to favorite screen
In the favorite screen you can gather functions and destinations that you use frequently. A
maximum of twelve entries are possible. Then you can reach these functions or destinations
very easily.
In addition to providing another way of accessing the features, you can use the favorite screen
to confirm the features programmed on the feature buttons if, for example, a feature button
label is missing or labeled incorrectly.
Toggling between the favorite screen and the telephone status
Press the left/right arrow button.
Displaying the favorite screen in the idle mode
You can set your telephone to show the favorite screen in the idle mode instead of the telephone
status.
1. Press the Avaya Menu button.
2. Select Settings.
3. Press the OK button.
4. Select Display/Acoustics.
5. Press the OK button.
1408/1416 User Guide January 2010 61
Page 62

Favorite screen
6. Select Favorite screen active Off.
7. Select On/Off softkey.
8. Press the Save softkey.
Entering a function into the favorite screen
You can add your favorite functions into the favorite screen for easy access.
1. Press the Avaya Menu button.
2. Select Settings.
3. Press the OK button.
4. Select Keys.
5. Press the OK button.
6. Select Set function keys.
7. Press the OK button.
8. Select the favorite function, which you want to add.
9. Press the OK button.
10. Select Add to Favorite Screen.
11. Press the OK button.
Related topics:
Assigning functions to keys on page 72
Entering a destination into the favorite screen
You can add a destination into the favorite screen.
1. Press the Avaya Menu button.
2. Select Settings.
3. Press the OK button.
62 1408/1416 User Guide January 2010
Page 63

Deleting a function or a destination from the favorite screen
4. Select Keys.
5. Press the OK button.
6. Select Set destination keys ....
7. Press the OK button.
8. Select Edit destination key ....
9. Press the OK button.
10. Select Press destination key.
11. Press the OK button.
12. Press the appropriate destination key.
13. Select Add to Favorite Screen.
14. Press the OK button.
Related topics:
Assigning a destination from the phone book to a key on page 73
Deleting a function or a destination from the favorite screen
You can remove seldom used functions or destinations from the favorite screen.
1. Press the left/right arrow button, to select the favorite screen.
2. Select the function or the destination that you wish to delete.
3. Press the Delete softkey.
Caution: The entry is deleted without confirmation.
1408/1416 User Guide January 2010 63
Page 64

Favorite screen
64 1408/1416 User Guide January 2010
Page 65

Chapter 14: Customizing your telephone
Introduction to customizing your telephone
This section provides procedures to set parameters for your telephone, such as the ring tone
melody and language. It also provides procedures to manage your function and destination
keys, save personal data, manage VIP functions, make anonymous calls, and turn direct
dialing on or off. These procedures are performed using options provided in the Avaya menu.
Setting parameters for your telephone
Turning acoustic signaling on or off
You can set the signal tone, ringing tone, and VIP ringing tone to on or off. When for instance the
ringing tone is turned off, you will hear only a short beep when you are called.
1. Press the Avaya Menu button.
2. Select Settings.
3. Press the OK button.
4. Select Display/Acoustics.
5. Press the OK button.
6. Select Do not disturb.
7. Press the OK button.
8. Select one of the following:
• Signal tone
• Ringing tone
• VIP ringing tone
9. Press the On/Off softkey.
1408/1416 User Guide January 2010 65
Page 66

Customizing your telephone
10. Press the Done softkey.
11. To reactivate one of these tones, scroll to the relevant menu item and press On/
Off softkey again.
Changing the acoustic signaling
Use this procedure to change the volume of several tones. You can change the individual
settings during a call by pressing + or - on the Volume button.
1. Press the Avaya Menu button.
2. Select Settings.
3. Press the OK button.
4. Select Display/Acoustics.
5. Press the OK button.
6. Select Set acoustics.
7. Press the OK button.
8. Select the tone you want to change.
• Handset
• Loudspeaker
• Ringing tone
• Alerting Tone
• Signal Tone
• Headset volume
9. Increase or reduce the volume by pressing + or - on the Volume button
The new setting sounds immediately to be checked.
10. Press the Save softkey.
Note:
You can also change any setting by pressing the numeric key of the desired setting, the right
or left Navigation arrows, or the + or - on the Volume button.
66 1408/1416 User Guide January 2010
Page 67

Setting the ringing tone melody
You can assign different melodies to incoming calls (internal, external, VIP and partner / line).
1. Press the Avaya Menu button.
2. Select Settings.
3. Press the OK button.
4. Select Display/Acoustics.
5. Press the OK button.
6. Select Set acoustics.
7. Press the OK button.
8. Select Select ringer melody.
9. Press the OK button.
Setting parameters for your telephone
10. Select the call type you want to change.
• Internal calls
• External calls
• VIP calls
• Partner/Line
11. Press the OK button.
12. Select the melody you want.
13. Press the OK button.
The new ringing melody is played.
Note:
You can change the melody’s playback speed under Set melody.
Related topics:
Introduction to handling calls on page 19
1408/1416 User Guide January 2010 67
Page 68

Customizing your telephone
Setting the contrast and the brightness
1. Press the Avaya Menu button.
2. Select Settings.
3. Press the OK button.
4. Select Display/Acoustics.
5. Press the OK button.
6. Select Set contrast or Set brightness.
7. Increase or reduce the contrast or brightness with the right or left navigation button.
8. Press the Done softkey.
If you want to reset the acoustic and contrast settings to the as-supplied status, select Default
setting and confirm with the OK button.
Setting the language
1. Press the Avaya Menu button.
2. Select Settings.
3. Press the OK button.
4. Select Display/Acoustics.
5. Press the OK button.
6. Select Switch language .
7. Press the OK button.
8. Select the language you want to use for display texts.
9. Press Select softkey.
Adjusting the setting for handsfree operation
You can adjust the handsfree settings for the conditions prevailing in your office and
surroundings.
68 1408/1416 User Guide January 2010
Page 69

Setting parameters for your telephone
1. Press the Avaya Menu button.
2. Select Settings.
3. Press the OK button.
4. Select Display/Acoustics.
5. Press the OK button.
6. Select Set handsfree.
7. Press the Change softkey to select one of the following.
• echo
• normal
• muffled
8. Press the Done softkey.
9. Select Handsfree.
Displaying your name and call number on your telephone
You can save your name and call number to have it shown on the display.
1. Press the Avaya Menu button.
2. Select Settings.
3. Press the OK button.
4. Select Display/Acoustics.
5. Press the OK button.
6. Select Set own call number.
7. Press the OK button.
8. Enter your telephone's name and call number.
9. Press the Save softkey.
Setting key beep tones to on or off
You can have every press of a key signaled by a beep (key beep).
1408/1416 User Guide January 2010 69
Page 70

Customizing your telephone
1. Press the Avaya Menu button.
2. Select Settings.
3. Press the OK button.
4. Select Keys.
5. Press the OK button.
6. Select Key beep (off).
7. Press the OK button.
8. Press the On/Off softkey.
9. Press the Done softkey.
10. To turn the key tone off again, switch the function to Key beep (Off) again.
Displaying time zones *
You can set the time zone so that the current date and time of one of 26 cities from around the
world appears in your telephone display.
The time that your telephone shows for a city can differ from the actual time in that city due to
differences in summer and winter times in the various countries.
1. Press the Avaya Menu button.
2. Select Time zones....
3. Press the OK button.
4. Select the appropriate city.
5. Press the OK button.
Saving emergency numbers
You can save ten call numbers that you can dial even if your telephone is locked.
Caution:
The emergency numbers must also be set up in your telephone system, otherwise they
cannot be selected when the telephone is locked!
70 1408/1416 User Guide January 2010
Page 71

Function and Destination keys
Note:
When using the central lock in your telephone system, the emergency numbers are those
defined in your telephone system, not the emergency numbers you saved on your telephone.
1. Press the Avaya Menu button.
2. Select Settings.
3. Press the OK button.
4. Select Security.
5. Press the OK button.
6. Select Set emergency numbers.
7. Press the OK button.
8. Select one of the following:
• Emergency destin. SOS 1
• .....
• Emergency destin. SOS 10
9. Press the OK button.
10. Enter name and call number.
11. Press theAssign softkey.
12. Press the function key to which you want to assign the emergency number. You can
now see which function or call number was previously assigned to the key.
13. Press the Save softkey.
If you press the function key to which the emergency number is assigned, your telephone will
automatically switch to handsfree operation and dial the saved emergency number.
Function and Destination keys
Function and destination keys
Use the buttons as function keys or as destination keys. Partner keys are special destination
keys.
1408/1416 User Guide January 2010 71
Page 72

Customizing your telephone
Related topics:
Setting the deputy key * on page 53
Using the button module BM32 on page 106
Assigning functions to keys
Functions which you use frequently can be assigned to programmable function keys. You can
then execute these functions simply by pressing the appropriate keys.
1. Press the Avaya Menu button.
2. Select Settings.
3. Press the OK button.
4. Select Keys.
5. Press the OK button.
6. Select Set function keys.
7. Press the OK button.
8. Select function you want to assign to the key.
9. Press the OK button.
10. Press the key to which you want to assign the new function. You can now see the
function or call number previously assigned to the key.
11. Press the Save softkey.
Note:
A partner key can not be simply overwritten. If the key you want is previously set
as partner key, this assignment must be cleared, before you can assign a different
destination or a function.
Related topics:
Entering a function into the favorite screen on page 62
Reserving a line as executive line on page 55
Introduction to partners on page 45
Filtering * on page 56
Private User Mobility * on page 59
72 1408/1416 User Guide January 2010
Page 73

Creating a destination key
1. Press the Avaya Menu button.
2. Select Settings.
3. Press the OK button.
4. Select Keys.
5. Press the OK button.
6. Select Set destination keys.
7. Press the OK button.
8. Confirm Set new destination with OK button.
9. Enter name and call number.
10. Press the Assign softkey.
Function and Destination keys
11. Press the key to which you want to assign the new destination. You can now see
the function or call number previously assigned to the key.
12. Press Save softkey.
Note:
A partner key can not be simply overwritten. If the key you want is previously set
as partner key, this assignment must be cleared, before you can assign a different
destination or a function.
Note:
To create a destination key, you can also press an unassigned key in idle mode,
and then enter the call number you want to assign to that key
Related topics:
Introduction to partners on page 45
Assigning a destination from the phone book to a key
1. Press the Avaya Menu button.
2. Select Settings.
3. Press the OK button.
1408/1416 User Guide January 2010 73
Page 74

Customizing your telephone
4. Select Keys.
5. Press the OK button.
6. Select Set destination keys.
7. Press the OK button.
8. Confirm Set new destination with the OK button.
9. Select Copy phone book entry.
10. Press the OK button.
11. Select the entry you want to assign to the key.
To go to the desired entry more quickly, you can also enter one or more of the first
letters of the name.
Note:
You can also directly press an unassigned key in idle mode to open this menu
item.
Note:
12. Press the OK button. The name and call number are displayed and can be edited
as required.
13. Press the Assign softkey.
14. Press the key to which you want to assign a new destination. You can now see the
function or call number previously assigned to the key.
15. Press the Save softkey.
Related topics:
Entering a destination into the favorite screen on page 62
Changing an existing destination
1. Press the Avaya Menu button.
2. Select Settings.
3. Press the OK button.
4. Select Keys.
5. Press the OK button.
6. Select Set destination keys.
7. Press the OK button.
74 1408/1416 User Guide January 2010
Page 75

Function and Destination keys
8. Select Edit destination key.
9. Press the OK button.
10. Press the key that you want to edit. You can now change the name and the call
number.
11. Press Save softkey.
Note:
A partner key can not be simply overwritten. If the key you want is previously set
as partner key, this assignment must be cleared, before you can assign a different
destination or a function.
Note:
You can also change the existing destination by pressing the associated function
key and select the Edit destination key menu item.
Deleting key assignments
1. Press the Avaya Menu button.
2. Select Settings.
3. Press the OK button.
4. Select Keys.
5. Press the OK button.
6. Select one of the following:
• Set destination keys
• Set function keys
7. Press the OK button.
8. Select one of the following:
• Delete destination key
• Delete entry
9. Press the OK button.
10. Press the key whose assignment you want to delete.
You can now see the function or call number previously assigned to the key.
11. Press Delete softkey.
The key is now free again.
1408/1416 User Guide January 2010 75
Page 76

Customizing your telephone
Setting up a macro (diversion and pick-up)
You can assign multi-step macro functions to your telephone’s function keys, the multi-step
macro functions are applicable to the Avaya 1416 Telephone. This means that you can, for
example, activate and deactivate a fixed call diversion by pressing a single key. If you assign
a partner diversion to a function key, you can activate a partner diversion or switch between
two fixed diversion destinations by pressing a single key.
1. Press the Avaya Menu button.
2. Select Settings.
3. Press the OK button.
4. Select Keys.
5. Press the OK button.
6. Select Set macro function.
7. Press the OK button.
8. Select the macro function you want to assign to the key.
• Call diversion 1 or
• Call diversion 2 or
• Call pick-up 1 or
• Call pick-up 2
9. Press the OK button.
10. Enter the phone number, to which you want to divert calls (call diversion) or from
which you want to pick-up calls on your telephone (pick-up).
11. Press the Assign softkey.
12. Press the key to which you want to assign the macro function. You can now see the
function or call number previously assigned to the key.
13. Press the Save softkey.
Related topics:
Answering a call ringing at another phone (pick-up) on page 19
Introduction to call diversion on page 23
Diverting partner calls to your telephone on page 50
Diverting your calls to a partner on page 49
Setting the deputy key * on page 53
Diverting partner calls to partners, extended * on page 52
76 1408/1416 User Guide January 2010
Page 77

Relocating the telephone
1. Press the Avaya Menu button.
2. Select Settings.
3. Press the OK button.
4. Select Security.
5. Press the OK button.
6. Select Relocate.
7. Press the OK button.
The data is saved locally in the telephone. The status message Relocation
prepared appears.
Relocating the telephone
8. Plug the telephone in at the new location.
The status message Relocation initiated appears on the idle telephone display.
When the relocation is finished, Telephone relocated appears.
9. To cancel the relocation, select Security > Relocate > OK.
Saving personal data
Saving personal data
For security, you can save your personal telephone settings both locally in the telephone itself
and - if enabled by your system administrator - centrally in your communication server. In the
communication server, your data is protected with a password. Your system administrator can
save or copy your personal telephone data from a central location. But you are able to block
central data saving.
1408/1416 User Guide January 2010 77
Page 78

Customizing your telephone
Saving data locally
1. Press the Avaya Menu button.
2. Select Settings.
3. Press the OK button.
4. Select Security.
5. Press the OK button.
6. Select Save data.
7. Press the OK button.
8. Select Save data locally.
9. Press the OK button.
Saving data locally automatically
1. Press the Avaya Menu button.
2. Select Settings.
3. Press the OK button.
4. Select Security.
5. Press the OK button.
6. Select Save data.
7. Press the OK button.
8. Select Save data at [00:00].
9. Enter time at which you want the local data to be saved.
10. Select Done.
78 1408/1416 User Guide January 2010
Page 79

Saving data centrally
1. Press the Avaya Menu button.
2. Select Settings.
3. Press the OK button.
4. Select Security.
5. Press the OK button.
6. Select Save data.
7. Press the OK button.
8. Select Save data centrally.
9. Enter your PIN.
The PIN appears as asterisks "*" in the display.
Saving personal data
10. Press Done softkey.
Allowing/barring central data saving
1. Press the Avaya Menu button.
2. Select Settings.
3. Press the OK button.
4. Select Security.
5. Press the OK button.
6. Select Save data.
7. Press the OK button.
8. Select Save centrally.
9. Press the OK button.
10. Enter your PIN.
11. Press Change softkey.
12. Press Done softkey.
1408/1416 User Guide January 2010 79
Page 80

Customizing your telephone
VIP functions
Preparing VIP functions
You can set up special functions between telephones of your system, provided you have made
the appropriate preparations. To do this, certain pre-settings on both the sending and the
receiving telephone have to be the same. Two typical applications of the VIP function are
described:
1. Using the executive telephone as a two-way intercom system to the secretary.
2. Announcements from the executive telephone
The sending telephone is called the executive telephone and the receiving telephone the
secretary telephone.
1. Using the executive telephone as a two-way intercom system to the secretary
Setting up the executive telephone
1. Press the Avaya Menu button.
2. Select Settings.
3. Press the OK button.
4. Select VIP.
5. Press the OK button.
6. Enter the current PIN.
7. Press the OK button.
8. Select Send VIP functions.
9. Press the Change softkey several times, if necessary, until the setting Authorized
is displayed.
10. Select Set VIP partner.
80 1408/1416 User Guide January 2010
Page 81

VIP functions
11. Select one of the following:
• Entry from phone book
• Entry from key assignment
• Ind.emerg.call
• Partner
12. Press the OK button.
13. Select the entry for the secretary telephone.
14. Press the OK button.
15. Select sent to user.
16. Press the Change softkey several times, if necessary, until the setting Ann.&Ackn.
is displayed.
Note:
If you select on instead of Ann.&Ackn. only the VIP ring tone will be heard on
the secretary phone when the secretary phone is called by the executive phone.
Several settings have to be made on the secretary phone for this purpose.
17. Press the Done softkey.
Setting up the secretary telephone
1. Press the Avaya Menu button.
2. Select Settings.
3. Press the OK button.
4. Select VIP.
5. Press the OK button.
6. Enter the current PIN.
7. Press the OK button.
8. Select Recv.VIP.
9. Press the Change softkey several times, if necessary, until the setting you want is
displayed.
• all callers if you want VIP functions to be possible for all subscribers
• Authorized if you want VIP functions to only be available to subscribers
you specify or have already specified in the Set VIP partner menu.
10. Select Set VIP partner.
1408/1416 User Guide January 2010 81
Page 82

Customizing your telephone
11. Select one of the following:
12. Press the OK button.
13. Select the entry for the executive telephone.
14. Press the OK button.
15. Select receive from user (off).
16. Press the Change softkey.
17. Press the Done softkey.
• Entry from phone book
• Entry from key assignment
• Ind.emerg.call
• Partner
2. Making announcements from the executive telephone
Setting up the executive telephone
1. Press the Avaya Menu button.
2. Select Settings.
3. Press the OK button.
4. Select VIP.
5. Press the OK button.
6. Enter the current PIN.
7. Press the OK button.
8. Select Send VIP functions.
9. Press the Change softkey several times, if necessary, until the setting Authorized
is displayed.
10. Select Set VIP partner.
11. Select one of the following:
• Entry from phone book
• Entry from key assignment
82 1408/1416 User Guide January 2010
Page 83

VIP functions
• Ind.emerg.call
• Partner
12. Press the OK button.
13. Select the entry for the secretary telephone.
14. Press the OK button.
15. Select sent to user.
16. Press the Change softkey several times, if necessary, until the setting announcem.
is displayed.
Note:
If you select on instead of announcem. only the VIP ring tone will be heard on
the secretary phone when the secretary phone is called by the executive phone.
Several settings have to be made on the secretary phone for this purpose.
17. Press theDone softkey.
Setting up the secretary telephone
The secretary telephone is set up exactly like the secretary telephone in an Intercom
configuration described above.
Using the VIP functions
After having made one of the preparations
1. Using the executive telephone as a two-way intercom system to the secretary
2. Making announcements from the executive telephone
you can use the VIP functions:
1. Press the relevant destination key for the secretary telephone or select the phone
book entry.
2. Press the Speaker button or lift the handset.
“Intercom”: "Handsfree" is automatically activated on the secretary telephone. The
two parties can now speak to each other.
1408/1416 User Guide January 2010 83
Page 84

Customizing your telephone
"Announcement": The loudspeaker is activated on the secretary telephone. You can
make an announcement.
Note:
You can program an “Announcement" function key. This considerably shortens the process
of configuring VIP announcement with reply. Press this function key and enter the call
number or press a destination key. If the called subscriber has activated "Receive VIP", the
call leads to "announcement with reply". Both the calling and called subscriber receive a
conversation window.
This feature may not be available. Your system administrator must configure it for your
extension as well as for the extension of the other person. See your system administrator
for more information.
Making anonymous calls
You can determine whether your phone number is to be shown to the other parties. This
function must be enabled in the communication server.
1. Press the Avaya Menu button.
2. Select Settings.
3. Press the OK button.
4. Select Dial settings.
5. Press the OK button.
6. Select Anonymous (Off).
7. Press the OK button.
8. Press the On/Off softkey.
9. Press the Done softkey.
Anonymous call appears in the status display.
Note:
If you want the other parties to be able to see your phone number again, switch the function to
Anonymous (Off) again.
84 1408/1416 User Guide January 2010
Page 85

Accepting calls automatically (Handsfree answer back)
Accepting calls automatically (Handsfree answer back)
You can set up your telephone so that incoming internal calls are accepted automatically. If
you receive a call, you will hear a short signal tone and your telephone's microphone and
loudspeaker are activated immediately. This means that you can speak to the caller right away.
1. Press the Avaya Menu button.
2. Select Settings.
3. Press the OK button.
4. Select Applications.
5. Press the OK button.
6. Select Answer Call.
7. Press the OK button.
8. Select Handsfree AB...
9. Press the left/right arrow button, to toggle the option.
10. Press the On/Off softkey.
11. Press the Save softkey.
The status information Handsfree answer back appears on the display.
Next steps
Note:
If you want to switch “Handsfree answer back” off again, switch the function to Handsfree
answer back (on) again.
Turning direct dialing on or off
By default, direct dialing is set to on. Then dialing begins immediately when the first digit or a
destination is pressed.
You can turn this setting off. Then you can type in a whole call number first and then dial it as a
block. You can then check the call number again and correct it if necessary.
1. Press the Avaya Menu button.
2. Select Settings.
1408/1416 User Guide January 2010 85
Page 86

Customizing your telephone
3. Press the OK button.
4. Select Dial settings.
5. Press the OK button.
6. Select Direct dial. You can set the following parameters:
7. Press the OK button.
8. Press the On/Off softkey.
9. Press the Done softkey.
10. To reactivate direct dialing turn the function to Direct dial (On) again.
• Direct destination dial
• Direct digital dial
• Refer-Back destination
• Headset
Turning CSTA Answer Call on or off *
The Computer Service Telephone Application (CSTA) links your telephone network and your
PC network together.
When the CSTA Answer Call function is activated in your telephone system a CSTA Answer
Call icon appears on your PC monitor screen. You can select this icon to answer an incoming
call on your telephone in handsfree mode.
1. Press the Avaya Menu button.
2. Select Settings.
3. Press the OK button.
4. Select Applications .
5. Press the OK button.
6. Select Answer Call....
a. Select CSTA Answer Call.
b. Press OK.
7. Press the OK button.
8. Enter your PIN.
86 1408/1416 User Guide January 2010
Page 87

9. Select one of the following: On or Off.
10. Select the Done softkey.
Turning CSTA Answer Call on or off *
1408/1416 User Guide January 2010 87
Page 88

Customizing your telephone
88 1408/1416 User Guide January 2010
Page 89

Chapter 15: Using the Avaya Menu
Introduction to the Avaya menu
This chapter provides the procedures to manage call charges, lock your telephone, manage
your appointments, and customize your telephone. These procedures are performed using
options provided in the Avaya menu.
Managing call charges
Introduction to call charges
All call charges incurred since the last reset are stored and totaled in your telephone system.
You can view the charges for your last four calls and delete the charges shown in the display.
You can also have the current charges displayed during a call in units or in currency.
Furthermore, your system also record and account for the call charges for single projects or
private calls separately.
Displaying charges during a call
1. Press the Avaya Menu button.
2. Select Charges.
3. Press the OK button.
4. Select Charges (off).
5. Press the Change softkey.
The charges will appear in the top line of the display while on a call.
1408/1416 User Guide January 2010 89
Page 90

Using the Avaya Menu
Viewing the charge display
1. Press the Avaya Menu button.
2. Select Charges.
3. Press the OK button.
The charges for the last call are selected.
4. To view charges for one of the last four calls, select the appropriate line.
5. To view the total charges, select Total call charg.
Deleting call charges
1. Press the Avaya Menu button.
2. Select Charges.
3. Press the OK button.
4. Select Delete single counter.
5. Press the OK button.
Note:
If you want to clear the totals for all calls, you must have this function enabled by your system
administrator.
Switching the charge display to units
1. Press the Avaya Menu button.
2. Select Charges.
3. Press the OK button.
4. Select Charge displ. (amount).
90 1408/1416 User Guide January 2010
Page 91

5. Press the Change softkey.
6. Press the Done softkey.
Recording charges for private calls and projects *
You want to dial a number with a project PIN or private PIN.
1. Enter the external line code that is set up in your telephone system for dialing with a
project or private code, e.g. 1.
This external line code may have 1 to 5 digits.
2. Enter the code that is set up in your telephone system for private calls or the relevant
project, e.g. 3433.
This code may have 1 to 12 digits.
3. Enter the desired call number.
Locking the telephone
4. Lift the handset.
The charges for this call are now recorded and accounted in the system with the appropriate
project or private code.
Note:
For security reasons, the code is not shown in the display or in the redial or call list. The
number with the code cannot be transferred to the phone book. If you would like to call back a
call number from the redial or call list with a project code, you have to manually enter the
external line code and project code in the redial or call list display.
Locking the telephone
Telephone lock
Locking your telephone prevents unauthorized use during an absence. To unlock your
telephone, a Personal Identification Number (PIN) is required.
The following functions are still available when the telephone is locked:
• Answering calls,
• Dialing internal call numbers,
1408/1416 User Guide January 2010 91
Page 92

Using the Avaya Menu
• Dialing emergency call numbers,
• Activating and deactivating call diversions.
Changing the PIN
A PIN is required to unlock your telephone. Before you lock your telephone for the first time,
you must change the PIN from the default setting. Your PIN must be four to six digits; the first
digit cannot be 0 or 1; and it must not be identical to your call number. After you change your
PIN from the default setting, you can change it again at any time. If you forget your PIN, see
your system administrator.
If central locking is enabled in the system, the default PIN is "00000" (if five-digit) or "000000" (if
six-digit). Contact your system administrator for more information.
1. Press the Avaya Menu button.
2. Select Lock .
3. Press the OK button.
4. Select Change PIN.
5. Press the OK button.
6. Select Old PIN and enter the current PIN.
7. Select New PIN and enter the new one.
8. Press the Save softkey.
Related topics:
Private User Mobility * on page 59
Locking the telephone
Before you perform this procedure, you must change the PIN from it's default setting.
1. Press the Avaya Menu button.
2. Select Lock.
3. Press the OK button.
4. Press the OK button once more.
The status information Telephone locked is shown.
92 1408/1416 User Guide January 2010
Page 93

Unlocking the telephone
1. Select Telephone locked.
2. Press the OK button.
3. Enter the current PIN.
4. Press the Done softkey.
The status information is cleared.
Setting automatic locking *
If Automatic locking has been activated, the telephone will be locked every day at the same
time.
Locking the telephone
1. Press the Avaya Menu button.
2. Select Lock.
3. Press the OK button.
4. Select Automatic locking.
5. Press the OK button.
6. Scroll to the desired setting.
7. Press the OK button.
Note:
This lock function is only put into effect after the phone has returned to idle (where
applicable).
Automatic locking is not applied if the telephone has already been locked.
1408/1416 User Guide January 2010 93
Page 94

Using the Avaya Menu
Managing appointments
Appointments (reminders)
You can set your telephone to remind you of important appointments. You can be reminded of
up to 10 appointments. You can specify whether you wish to be reminded once or every day.
When the time of the appointment arrives, a signal tone sounds and the message you have
entered for the appointment appears in the display.
You can selectively delete appointments you have entered.
Appointment message
At the specified time, the signal tone sounds and the appointment message appears in the
display.
If you specified a call number when entering the appointment, it is shown in the display after
acknowledgement of the appointment signal. You then only need to lift the handset or press
the Speaker button to call the desired call number.
The Appointment expired message remains in the display until you have scrolled through
all the expired entries (marked with "!") in the Appointments menu.
Entering a new appointment
1. Press the Avaya Menu button.
2. Select Appointments.
3. Press the OK button.
4. Select the New softkey.
5. Select Time and enter the time.
6. Optionally select Date and enter the date (default is today).
7. Optionally select Text and enter the appointment message, to be displayed at the
specified time.
8. Optionally select Call no. and enter a call number, if you want to call someone at
the specified time.
9. Select Appointment.
10. Select the Change softkey.
94 1408/1416 User Guide January 2010
Page 95

11. Press the right/left button, to choose one of the following:
• off
• one-time appointment
• daily appointment
12. Press the OK button.
The new appointment is indicated as status information.
Acknowledging an appointment
Use this procedure to acknowledge an appointment. When the specified time is reached, a
signal tone sounds and the entered appointment message appears on the display.
1. Press the ok softkey to turn off the signal tone.
The status information Appointment expired appears in the display.
Managing appointments
If you specified a call number when entering the appointment, it is displayed now.
2. Lift the handset or press the Speaker button to dial the desired call number.
Viewing appointments
1. Press the Avaya Menu button.
2. Select Appointments.
3. Press the OK button.
The list of all entered appointments is shown, including the expired appointments.
Deleting an appointment
1. Press the Avaya Menu button.
2. Select Appointments.
3. Press the OK button.
1408/1416 User Guide January 2010 95
Page 96

Using the Avaya Menu
4. Select the desired appointment.
5. Press the OK button.
6. Press the Delete menu item.
96 1408/1416 User Guide January 2010
Page 97

Chapter 16: Menus
Menu overview
The following table contains an overview of the menu structure of the Avaya 1400 Series
telephones. The first three menu levels are shown. The menu structure shown here may differ
from the actual menu structure on your telephone. Deviations from the menu overview shown
here may arise due to the features used, the accessories in use and the assignment of the
function keys. Remarks and notes are shown in italic font.
Menu item in basic
menu
Call diversion to
to
on busy
Ex. aft. time
Int. after time
Double call
Automatic 1
Automatic 2
Set automatic to
One menu level lower One menu level lower
StartTime 1
StopTime 1
Weekday 1
to
StartTime 2
StopTime 2
1408/1416 User Guide January 2010 97
Page 98

Menus
Menu item in basic
One menu level lower One menu level lower
menu
Call diversion key 1 Number:
Call diversion key 2 Number:
Partner diversion Partner diversion from my
Appointments Appointment data (only if
appointment entered)
Weekday 2
Phone
Partner diversion to my
Phone
Partner diversion from/to
others
Set deputy key
Set/delete Partner
diversion
Partner diversion key 1
Partner diversion key 2
Enter new appointment
On NDL phones only as
soft key available
Charges Charge display for last
call
... for next-to-last call
... for third-last call
... for fourth-last call
Total call charg
Charges
Charge displ.
Time 00:00
Date XX.XX.XX
Text
Call no.
Appointments
Delete single counter
Lock Lock telephone
98 1408/1416 User Guide January 2010
Page 99

Menu settings overview
Menu item in basic
menu
Time zones Current time zones
Settings The complete settings
One menu level lower One menu level lower
Change PIN Old PIN
Automatic locking
Lock at 00:00
menu is shown in the
following separate table.
New PIN
Re-enter PIN
Save PIN
Menu settings overview
The following table contains an overview of the settings menu structure of the Avaya 1400
Series telephones. Three menu levels are shown starting with the appropriate settings
submenu.
Menu item in setting
menu
Display/Acoustics Second call
One menu level lower One menu level lower
Do not disturb Ringing tone
Signal tone
VIP ringing tone
Set acoustics Handset
Loudspeaker
Ringing tone
Alerting tone
Signal tone
1408/1416 User Guide January 2010 99
Page 100

Menus
Menu item in setting
menu
One menu level lower One menu level lower
Headset volume
Select Ringer melody…
Set contrast
Set brightness
Switch language Number and variety of
languages depends on
the software image
loaded in the telephone
Set handsfree
Set own call number Name
Call no.
Display date/time
Request time / partner /
DSS
Recogn. partial nos.
Favorite Screen active
Keys Set destination keys Set new destination
Edit destination key
Delete destination key
Set functions keys All possible functions are
listed
Set macro function (only
Call diversion 1
1416)
Call diversion 2
Call pick-up 1
Call pick-up 2
Going
Coming
Display key assignement
100 1408/1416 User Guide January 2010
 Loading...