

Page 1

© 2009 Avaya Inc.
All Rights Reserved.
Notice
While reasonable efforts were made to ensure that the information in this document was
complete and accurate at the time of printing, Avaya Inc. can assume no liability for any
errors. Changes and corrections to the information in this document may be incorporated in
future releases.
For full support information, please see the complete document, Avaya Support Notices for
Hardware Documentation, document number 03-600759.
To locate this document on our Web site, simply go to http://www.avaya.com/support and
search for the document number in the search box.
Documentation disclaimer
Avaya Inc. is not responsible for any modifications, additions, or deletions to the original published version of this documentation unless such modifications, additions, or deletions were
performed by Avaya. Customer and/or End User agree to indemnify and hold harmless Avaya,
Avaya’s agents, servants and employees against all claims, lawsuits, demands and judgments
arising out of, or in connection with, subsequent modifications, additions or deletions to this
documentation to the extent made by the Customer or End User.
Link disclaimer
Avaya Inc. is not responsible for the contents or reliability of any linked Web sites referenced
elsewhere within this documentation, and Avaya does not necessarily endorse the products,
services, or information described or offered within them. We cannot guarantee that these links
will work all of the time and we have no control over the availability of the linked pages.
Warranty
Avaya Inc. provides a limited warranty on this product. Refer to your sales agreement to
establish the terms of the limited warranty. In addition, Avaya’s standard warranty language,
as well as information regarding support for this product, while under warranty, is available
through the following Web site: http://www.avaya.com/support.
Copyright
Except where expressly stated otherwise, the Product is protected by copyright and other
laws respecting proprietary rights. Unauthorized reproduction, transfer, and/or use can be a
criminal, as well as a civil, offense under the applicable law.
Avaya support
Avaya provides a telephone number for you to use to report problems or to ask questions about
your product. The support telephone number is 1-800-242-2121 in the United States. For additional support telephone numbers, see the Avaya Web site: http://www.avaya.com/support.
1692 IP Conference Phone
Quick Reference Guide
1725-15648-001 Rev. A
16-603413
Issue 1
June 2009
Page 2
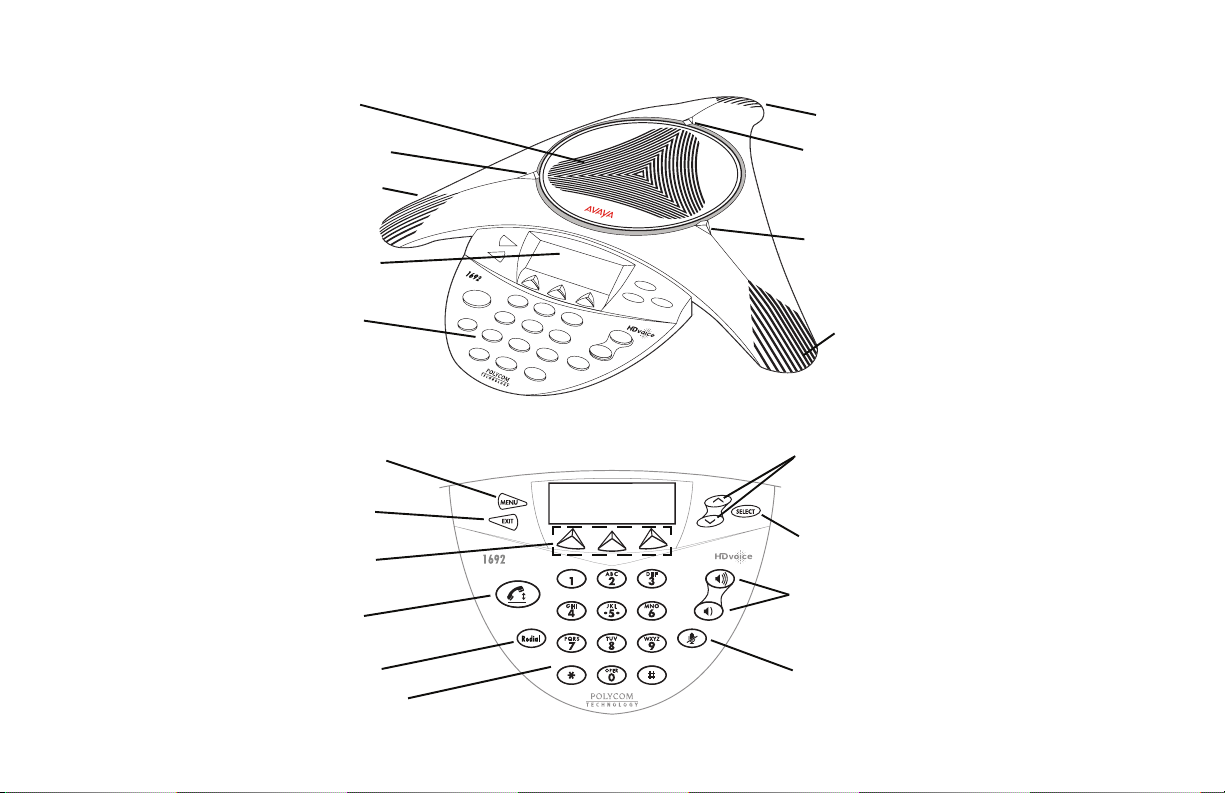
Avaya 1692 IP Conference Phone
M
Speaker
LED Indicator
icrophone
Graphic LCD
Display
Keypad
Menu Key
Exit Key
Soft Keys
Call Key
Redial Key
Dialing Keypad
Microphone
LED Indicator
LED Indicator
Microphone
Up/Down
Scroll Keys
Select Key
Up/Down
Volume Keys
Mute Key
Page 3

Using the Avaya 1692 IP Conference Phone
Place the phone in the middle of a room, unobstructed during use. Because the microphones
are very sensitive, do not cover the phone, block microphones, or shuffle papers near the
phone. Do not raise your voice excessively when speaking. The phone provides coverage of a
conference room up to approximately 20 feet (6.1 meters) by 20 feet (6.1 meters). The phone
with extension microphones provide coverage of a conference room up to approximately 20 feet
(6.1 meters) by 30 feet (9.1 meters).
If you want to Then
Place a new call
Redial the last number
called
1. Press the Call key and listen for a dial tone. The status LEDs turn green.
2. Enter the number of the party you want to call.
Press the Redial key.
Answer a call
End a call
Set up a conference
Hold a call
Return to the held call
Mute a call
Transfer a call
Drop a call
Adjust ringer volume
Adjust speaker volume
Your call status LEDs blink green as the incoming call rings. Press the Call key.
Press the Call key. The status LEDs turn off.
OR:
To terminate a call and obtain a dial tone to start a new call, press the Drop soft key.
1. During a call, press the Conf soft key (you might need to press the More soft key first,
if Conf is not visible). The call is placed on hold, and you receive a dial tone.
2. Dial the number of the third party in the conference.
3. Once the call is established, press the Conf soft key again to activate the conference.
During a call, press the Hold soft key (you might need to press the More soft key first, if
Hold is not visible). The status LEDs blink red to indicate that the call is on hold.
Select the call appearance using the Up/Down Scroll keys, and then press the Select key.
During a call, press the Mute key. The status LEDs turn red to indicate that the call is
muted. You can still hear the otherperson, but they cannot hear you.
To turn off Mute, press the Mute key again.
1. During a call, press the Transfer soft key (you might have to press the More soft key
first, if Transfer is not visible). The call is placed on hold.
2. Dial the number to which you want to transfer the call.
3. When you hear ringing, press the Transfer soft key again.
To cancel the transfer, use the Up/Down Scroll keys to select the call to be transferred,
and then press the Select key.
During a call, press the Drop soft key (you might have to press the More soft key first, if
Drop is not visible). The current call is terminated. You receive a dial tone so you can
start another call.
Note: While on a locally initiated conference call, the Drop soft key disconnects the last
person added to the call.
While the phone is idle, press the Up/Down Volume keys until the desired volume is
reached.
During a call, press the Up/Down Volume keys until the desired volume is reached.
Page 4

Avaya 1692 IP Conference Phone Options
Use the main menu to set phone options and view phone information.
If you want to Then
Access the main menu
From the main menu, the following options display:
• Personal Ringing—allows you to select one of five ring tones for your phone.
• Contrast Control—allows you to adjust the phone’s display area contrast level.
• System Information—displays phone and network settings.
Note: From the main menu, you can also log off the phone. Before you log off the
phone, or for more information about logging off, see your system administrator.
Use the Up/Down Scroll keys and the Select key to highlight and select the menu item
you want.
Update your phone’s
ring tone
Update the contrast
level
View system information
1. Press the Menu key.
2. To select the Personal Ringing option, press the Select key.
3. Use the Up/Down Scroll keys to select a ring pattern, and then press the Select key
or the Save soft key. To listen to a ring pattern, press the Listen soft key.
4. To exit and save your selection, press the Exit soft key.
5. To return to the idle screen, press the Exit key.
1. Press the Menu key.
2. Use the Up/Down Scroll keys to select Contrast Control, and then press the Select key.
3. To brighten the contrast, press the Up Scroll key. To dim the contrast, press the
Down Scroll key.
4. To save your selection, press the Save soft key. (To exit the contrast control without
saving any changes, press the Cancel soft key.)
5. To return to the idle screen, press the Exit key.
1. Press the Menu key.
2. Use the Up/Down Scroll keys to select System Information, and then press the
Select key.
3. Use the Up/Down Scroll keys to scroll through the list of settings.
Note: Up and down arrow symbols display on the screen next to the Up/Down Scroll
keys. Arrow symbols only display when there are more items to view above or
below the current display.
4. To return to the idle screen, press the Exit key.
 Loading...