

Page 1

IP Office 3.2
3701 Phone User Guide
[15-601083] Issue [1b] (1 June 2006)
Page 2

© 2006 Avaya Inc. All Rights Reserved.
Notice
While reasonable efforts were made to ensure that the information in this document was complete and accurate at the time of
printing, Avaya Inc. can assume no liability for any errors. Changes and corrections to the information in this document may be
incorporated in future releases.
Documentation Disclaimer
Avaya Inc. is not responsible for any modifications, additions, or deletions to the original published version of this documentation
unless such modifications, additions, or deletions were performed by Avaya.
Link Disclaimer
Avaya Inc. is not responsible for the contents or reliability of any linked Web sites referenced elsewhere within this
Documentation, and Avaya does not necessarily endorse the products, services, or information described or offered within
them. We cannot guarantee that these links will work all of the time and we have no control over the availability of the linked
pages.
License
USE OR INSTALLATION OF THE PRODUCT INDICATES THE END USER’S ACCEPTANCE OF THE TERMS SET FORTH
HEREIN AND THE GENERAL LICENSE TERMS AVAILABLE ON THE AVAYA WEBSITE AT
http://support.avaya.com/LicenseInfo/ (“GENERAL LICENSE TERMS”). IF YOU DO NOT WISH TO BE BOUND BY THESE
TERMS, YOU MUST RETURN THE PRODUCT(S) TO THE POINT OF PURCHASE WITHIN TEN (10) DAYS OF DELIVERY
FOR A REFUND OR CREDIT.
Avaya grants End User a license within the scope of the license types described below. The applicable number of licenses and
units of capacity for which the license is granted will be one (1), unless a different number of licenses or units of capacity is
specified in the Documentation or other materials available to End User. “Designated Processor” means a single stand-alone
computing device. “Server” means a Designated Processor that hosts a software application to be accessed by multiple users.
“Software” means the computer programs in object code, originally licensed by Avaya and ultimately utilized by End User,
whether as stand-alone Products or pre-installed on Hardware. “Hardware” means the standard hardware Products, originally
sold by Avaya and ultimately utilized by End User.
License Type(s): Designated System(s) License (DS).
End User may install and use each copy of the Software on only one Designated Processor, unless a different number of
Designated Processors is indicated in the Documentation or other materials available to End User. Avaya may require the
Designated Processor(s) to be identified by type, serial number, feature key, location or other specific designation, or to be
provided by End User to Avaya through electronic means established by Avaya specifically for this purpose.
Copyright
Except where expressly stated otherwise, the Product is protected by copyright and other laws respecting proprietary rights.
Unauthorized reproduction, transfer, and or use can be a criminal, as well as a civil, offense under the applicable law.
Third-Party Components
Certain software programs or portions thereof included in the Product may contain software distributed under third party
agreements (“Third Party Components”), which may contain terms that expand or limit rights to use certain portions of the
Product (“Third Party Terms”). Information identifying Third Party Components and the Third Party Terms that apply to them is
available on Avaya’s web site at: http://support.avaya.com/ThirdPartyLicense/
Avaya Fraud Intervention
If you suspect that you are being victimized by toll fraud and you need technical assistance or support, call Technical Service
Center Toll Fraud Intervention Hotline at +1-800-643-2353 for the United States and Canada. Suspected security vulnerabilities
with Avaya Products should be reported to Avaya by sending mail to: securityalerts@avaya.com.
For additional support telephone numbers, see the Avaya Support web site (http://www.avaya.com/support).
Trademarks
Avaya and the Avaya logo are registered trademarks of Avaya Inc. in the United States of America and other jurisdictions.
Unless otherwise provided in this document, marks identified by “®,” “™” and “
marks, respectively, of Avaya Inc. All other trademarks are the property of their respective owners.
Documentation information
For the most current versions of documentation, go to the Avaya Support web site (http://www.avaya.com/support) or the IP
Office Knowledge Base (http://marketingtools.avaya.com/knowledgebase/).
Avaya Support
Avaya provides a telephone number for you to use to report problems or to ask questions about your contact center. The
support telephone number is 1- 800- 242- 2121 in the United States. For additional support telephone numbers, see the Avaya
Web site: http://www.avaya.com/support.
SM”
are registered marks, trademarks and service
3701 Phone User Guide Page ii
IP Office 3.2 [15-601083] Issue [1b] (1 June 2006)
Page 3

Table Of Contents
Table Of Contents
Important Safety Information....................................................................................................1
Sensitive Electronic Environment.............................................................................................................1
Power Supply...........................................................................................................................................1
Safety Precautions...................................................................................................................................1
Usage.......................................................................................................................................................1
Avaya 3701 Telephone............................................................................................................... 2
Installation..................................................................................................................................3
Installation Location..................................................................................................................................3
Commissioning your Telephone...............................................................................................................3
Installing the Charger...............................................................................................................................4
Important Battery Information ..................................................................................................5
Charging the Batteries...............................................................................................................6
Charging and Operating Times.................................................................................................................6
Charge Display.........................................................................................................................................6
Battery Capacity Icon...............................................................................................................................6
Charge Warning.......................................................................................................................................6
Initial Setup and Operation .......................................................................................................7
Telephone Registration ............................................................................................................................7
Keys and Displays .....................................................................................................................8
Display Arrangement................................................................................................................................8
Icons ........................................................................................................................................................9
Text Line/Softkey Line..............................................................................................................................9
Illumination...............................................................................................................................................9
Softkeys and the Cancel Key..................................................................................................10
The Softkeys..........................................................................................................................................10
Softkey: Arrow Keys...............................................................................................................................10
Softkey: OK............................................................................................................................................10
Softkey: Menu........................................................................................................................................10
Softkey: Options.....................................................................................................................................10
Softkey: Esc...........................................................................................................................................11
Cancel Key.............................................................................................................................................11
Example: Menu ......................................................................................................................................11
Example: Telephone Book......................................................................................................................11
Entering a Telephone Number................................................................................................................11
Calling.......................................................................................................................................12
Telephone On/Off...................................................................................................................................12
Loudspeaker Volume..............................................................................................................................12
Handsfree...............................................................................................................................................12
Muting....................................................................................................................................................12
Making a Call..........................................................................................................................................13
Making a Call from the Last Number Redial List.....................................................................................14
Making a Call from the Telephone Book.................................................................................................14
Making a Call from the Caller List...........................................................................................................15
Making a SOS-Call.................................................................................................................................15
Muting Ringer.........................................................................................................................................15
Answering a Call ....................................................................................................................................16
Changes During a Connection................................................................................................................16
Consultation Call....................................................................................................................................16
Call Transfer...........................................................................................................................................17
Conference Call......................................................................................................................................17
Parking a Call.........................................................................................................................................17
3701 Phone User Guide Page iii
IP Office 3.2 [15-601083] Issue [1b] (1 June 2006)
Page 4

Retrieving a Parked Call.........................................................................................................................17
Placing a Call on Hold............................................................................................................................17
Message Waiting Indication for Voicemail.............................................................................18
The Menus: Operating Procedures ........................................................................................19
Menu Control..........................................................................................................................................19
Example.................................................................................................................................................19
Menu Timer............................................................................................................................................20
Menu: Telephone Book Settings ............................................................................................21
Entering Characters/Names...................................................................................................................21
Adding a New Entry................................................................................................................................22
Editing an Entry......................................................................................................................................22
Deleting an Entry....................................................................................................................................22
Deleting all Entries .................................................................................................................................22
Quick Call...............................................................................................................................................22
Transferring Phone Numbers to the Telephone Book.............................................................................23
Menu: Redial List .....................................................................................................................24
Menu: Key Lock .......................................................................................................................25
Menu: Caller List......................................................................................................................26
Accepted and Missed Calls....................................................................................................................26
Calling....................................................................................................................................................26
Menu: Ringer Settings.............................................................................................................27
Melody: Internal......................................................................................................................................27
Melody: External.....................................................................................................................................27
Volume...................................................................................................................................................27
Menu: Volume Settings ...........................................................................................................28
Earpiece.................................................................................................................................................28
Hands-Free............................................................................................................................................28
Menu: System........................................................................................................................... 29
Registering the Telephone to the DECT System ....................................................................................29
Selecting the DECT System...................................................................................................................29
Automatic Search System......................................................................................................................30
Deleting a System..................................................................................................................................30
Changing a System Name and Phone Number......................................................................................30
Equipment ID..........................................................................................................................................30
Menu: Telephone Options.......................................................................................................31
User Name.............................................................................................................................................31
Changing the Language.........................................................................................................................31
Emergency Call SOS Number................................................................................................................31
Voice Box...............................................................................................................................................31
Attention Tones......................................................................................................................................32
Charger Answer .....................................................................................................................................32
Silent Charging.......................................................................................................................................32
Display Contrast.....................................................................................................................................32
Menu: Security Functions.......................................................................................................33
Resetting the Telephone ........................................................................................................................33
Clear Phonebook....................................................................................................................................33
Changing the PIN...................................................................................................................................33
Read Only..............................................................................................................................................33
Menu: Shortcuts....................................................................................................................... 34
Ringer On/Off.........................................................................................................................................34
Silent Charging On/Off...........................................................................................................................34
User Name.............................................................................................................................................34
3701 Phone User Guide Page iv
IP Office 3.2 [15-601083] Issue [1b] (1 June 2006)
Page 5

Table Of Contents
Registering/De-registering......................................................................................................................34
Toggles the Ringer.................................................................................................................................34
Key Lock on ...........................................................................................................................................34
Accessories.............................................................................................................................. 35
Care and Maintenance.............................................................................................................36
Menu Tree.................................................................................................................................37
IP Office Shortcodes................................................................................................................ 38
3701 Phone User Guide Page v
IP Office 3.2 [15-601083] Issue [1b] (1 June 2006)
Page 6

Page 7

Important Safety Information
Sensitive Electronic Environment
Only use this product in countries where the appropriate authorities have given their authorization.
The CE symbol on the product certifies its conformity with the technical guidelines concerning user
safety and electro-magnetic compatibility valid at the time of approval; in accordance with European
directive No. 1999/05/EC.
This product complies with IP50 - according to IEC 529/EN 60 529.
Any radio-based equipment can potentially cause interference with other equipment and can be
interfered from other equipment. This also applies for DECT equipment. However due to the very low
transmission power level the changes for interference are very small. Research proves that operational
DECT phones normally don't influence electronic equipment however some precautions must be taken
into account for sensitive electronic equipment e.g. sensitive laboratory equipment. When DECT phones
operate in straight nearness of sensitive electronic equipment incidental influence can appear. You are
advised not to place the DECT phone on or close (less then 10 cm) to this kind of equipment, even in
standby mode.
Refer to other documentation supplied with the various parts of your phone system.
Power Supply
The mains voltage of the adapter should match the local mains voltage, this can be 110 V or 220 V.
Check if both voltages do match before installing the charger and adapter.
Safety Precautions
Do not open the phone or charger, this could expose you to high voltages. Have all repairs
carried out by authorized service personnel.
Do not allow the charger and the battery contacts to come into contact with conductive objects
such as keys, paper clips, rings or bracelets.
Do not allow the phone and charger to come into contact with water or chemicals.
Only use the plug-in AC adapter and battery type supplied.
Do not use AC adapters which are visibly damaged (cracked or broken housing) and keep the
ventilation slits on the plug-in AC adapters free.
Do not use the handsets in vehicles or in hazardous locations.
This product contains magnetic material. Be aware that small metallic objects may stick for
example to the loudspeaker. This may deteriorate the audio quality and can be harmful.
Usage
Like all other cordless phones, this phone uses radio signals which do not guarantee a connection set-up
under all circumstances. Generally, you should not rely exclusively on cordless phones when making
indispensable calls (e.g. medical emergencies).
3701 Phone User Guide Page 1
IP Office 3.2 [15-601083] Issue [1b] (1 June 2006)
Page 8

Avaya 3701 Telephone
This phone is only supported on the IP DECT system. IP DECT phone features include:
Speakerphone
Illuminated display (green)
SOS (Emergency) key for speed dialling an emergency number
Phone number lists and Voicemail indication
50 phone book entries in every phone, independent of the system phone book (no support for IP
Office system directory access)
Mute Capability
10 possible ring tones
4-level field strength display
Adjustable Speaker and phone volume, 3-levels
Manual and automatic key lock (1 minute timer)
Temporary ring tone muting
Silent charging
12 menu languages
Czech, Danish, Dutch, English, Finnish, French, German, Italian, Norwegian, Portuguese,
Spanish and Swedish. However, in the Czech and Norwegian language mode some
menu items may appear in the English language
Illuminated 3-line graphic display(96 x 33 pixels), variable 3-level contrast
Stand-by time: up to 200 hours
Talk time: up to 20 hours
Batteries: 3 AAA (NiMH) included with phone
Charge time: maximum six hours for empty batteries
Weight: 138g including batteries
Dimensions (L x B X H): 146 x 55 x 28 mm
3701 Phone User Guide Page 2
IP Office 3.2 [15-601083] Issue [1b] (1 June 2006)
Page 9
Installation
Installation Location
Place the charger on a flat, even surface. Do not install the charger, phone and accessories in the
proximity of:
Water, moisture or damp areas.
Sources of heat, direct sunlight or unventilated areas.
Devices which generate strong magnetic fields, electrical appliances, fluorescent lamps,
computers, radios, televisions or fax and telephones.
Areas where the phone can be covered, its ventilation is impaired and liquid can get inside.
Areas where there is excessive dust and areas subject to vibration, shock or extreme
temperature fluctuations.
Install/keep the phone and accessories out of reach of small children.
Commissioning your Telephone
Your phone is only operational after the batteries have been charged. You can then use the phone to
make and receive calls.
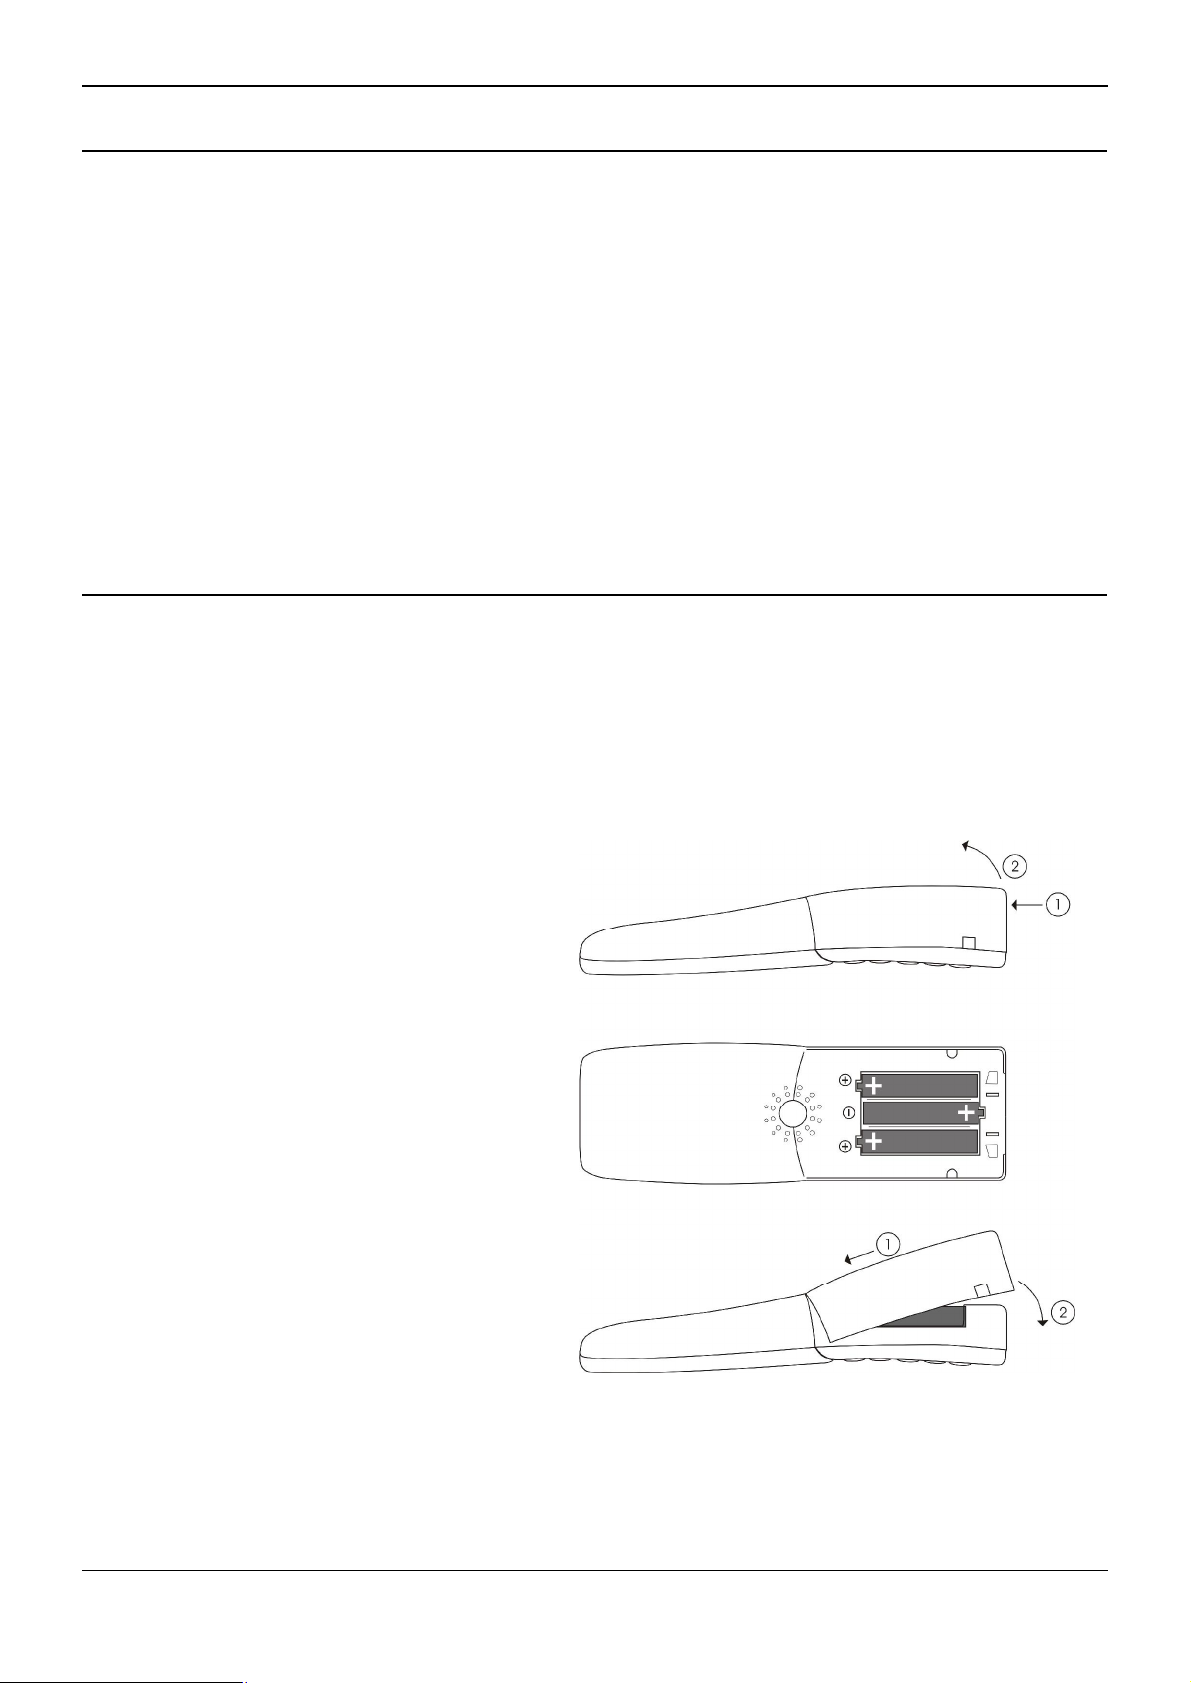
Placing the batteries in the telephone
The battery compartment is on the back of the phone. It takes the three type AAA batteries, which are
supplied.
Opening the battery compartment cover: Insert
a suitable item (e.g. the top of a ballpoint pan)
into the hole at the bottom of the compartment
cover(1). Push it in and lift the cover at the
same time (2).
Inserting the batteries:
Insert the batteries in the battery compartment,
taking care to observe the correct polarity. The
+ - poles of the batteries must correspond to
the + - markings in the battery compartment.
Closing the battery compartment cover:
Replace the cover by placing it on the
compartment at a slight angle (1) and pressing
it down until it clicks into place (2).
Note
If the batteries are inserted incorrectly,
the phone will not function, and may be
damaged.
3701 Phone User Guide Page 3
IP Office 3.2 [15-601083] Issue [1b] (1 June 2006)
Page 10

Installing the Charger
To operate the charger a mains connection is required. Check if the mains voltage matches the adapter
mains voltage.
Connect the cable on the plug-in AC adapter to the terminal on the bottom of the charger and plug the
AC adapter into the mains socket.
Mains plug
3701 Phone User Guide Page 4
IP Office 3.2 [15-601083] Issue [1b] (1 June 2006)
Page 11

Important Battery Information
Only use re-chargeable AAA NiMh battery of typical 800 mAh, 1.2 V. Never use a battery which
is damaged or worn out.
Heat or cold reduces the performance and life of the batteries. It is possible that a phone with hot
or cold batteries can be temporarily out of operation even if the batteries are fully charged.
Used batteries should be disposed of in accordance with local authority regulations.
Do not throw batteries in a fire.
Charging and Discharging
The batteries can be charged and discharged hundreds of times, but sooner or later they will be
worn out. If the operating time (i.e. talk and standby time) is significantly shorter than usual, then
it is time to replace the batteries.
To maintain optimum operating time, the batteries should be discharged from time to time by not
placing the phone in the charger but leaving it switched on until it switches itself off. Only use this
method to discharge the batteries.
Extreme temperatures influence the charging capability of the batteries.
3701 Phone User Guide Page 5
IP Office 3.2 [15-601083] Issue [1b] (1 June 2006)
Page 12
Charging the Batteries
Charge the batteries approximately 6 to 7 hours before using the phone. This protective measure
extends the service life of the batteries.
The maximum power output is only attained after three to five charge and discharge cycles.
When replacing the batteries, ensure the correct polarity. Use only re-chargeable AAA NiMh battery of
800 mAh, 1.2V. The manufacturer does not accept liability for malfunctions or damage caused by using
other battery types or normal batteries.
Charging and Operating Times
Charging time: (empty batteries) to full capacity in approximately six to seven hours.
Talk time: approximately 20 hours (with fully charged batteries).
Standby time: from 200 up to 300 hours (with fully charged batteries).
Charge Display
The charge status of the batteries is indicated on the display. This means:
batteries fully charged (80 – 100 %)
batteries 60 – 79 %
batteries 40 – 59 %
batteries 20 – 39 %
batteries 0 – 19 %
(frame flashes) batteries are empty: an alert tone is also given.
Battery Capacity Icon
When batteries are replaced, no icon will be displayed before a charging cycle has been completed,
except when almost empty batteries are inserted in the phone, then the icon will be shown immediately.
When the battery capacity icon is displayed, the indication is reliable.
If the charged batteries are inserted, the batteries can become hot during the first charge cycle, and if
the fully charged batteries are removed from the phone and inserted again, the batteries can become
overcharged.
Charge Warning
When the batteries’ capacity is almost exhausted, an acoustic warning is given in the form of 3 short
”beep” signals (only during a call). Upon receiving the beep approximately 5 minutes of talk time is left.
3701 Phone User Guide Page 6
IP Office 3.2 [15-601083] Issue [1b] (1 June 2006)
Page 13

Initial Setup and Operation
The phone can be manually registered on up to 5 different DECT systems. To do so, it has to be
registered to each IP DECT system.
Telephone Registration
Register the telephone on the Avaya IP DECT system as described in Menu: System.
3701 Phone User Guide Page 7
IP Office 3.2 [15-601083] Issue [1b] (1 June 2006)
Page 14
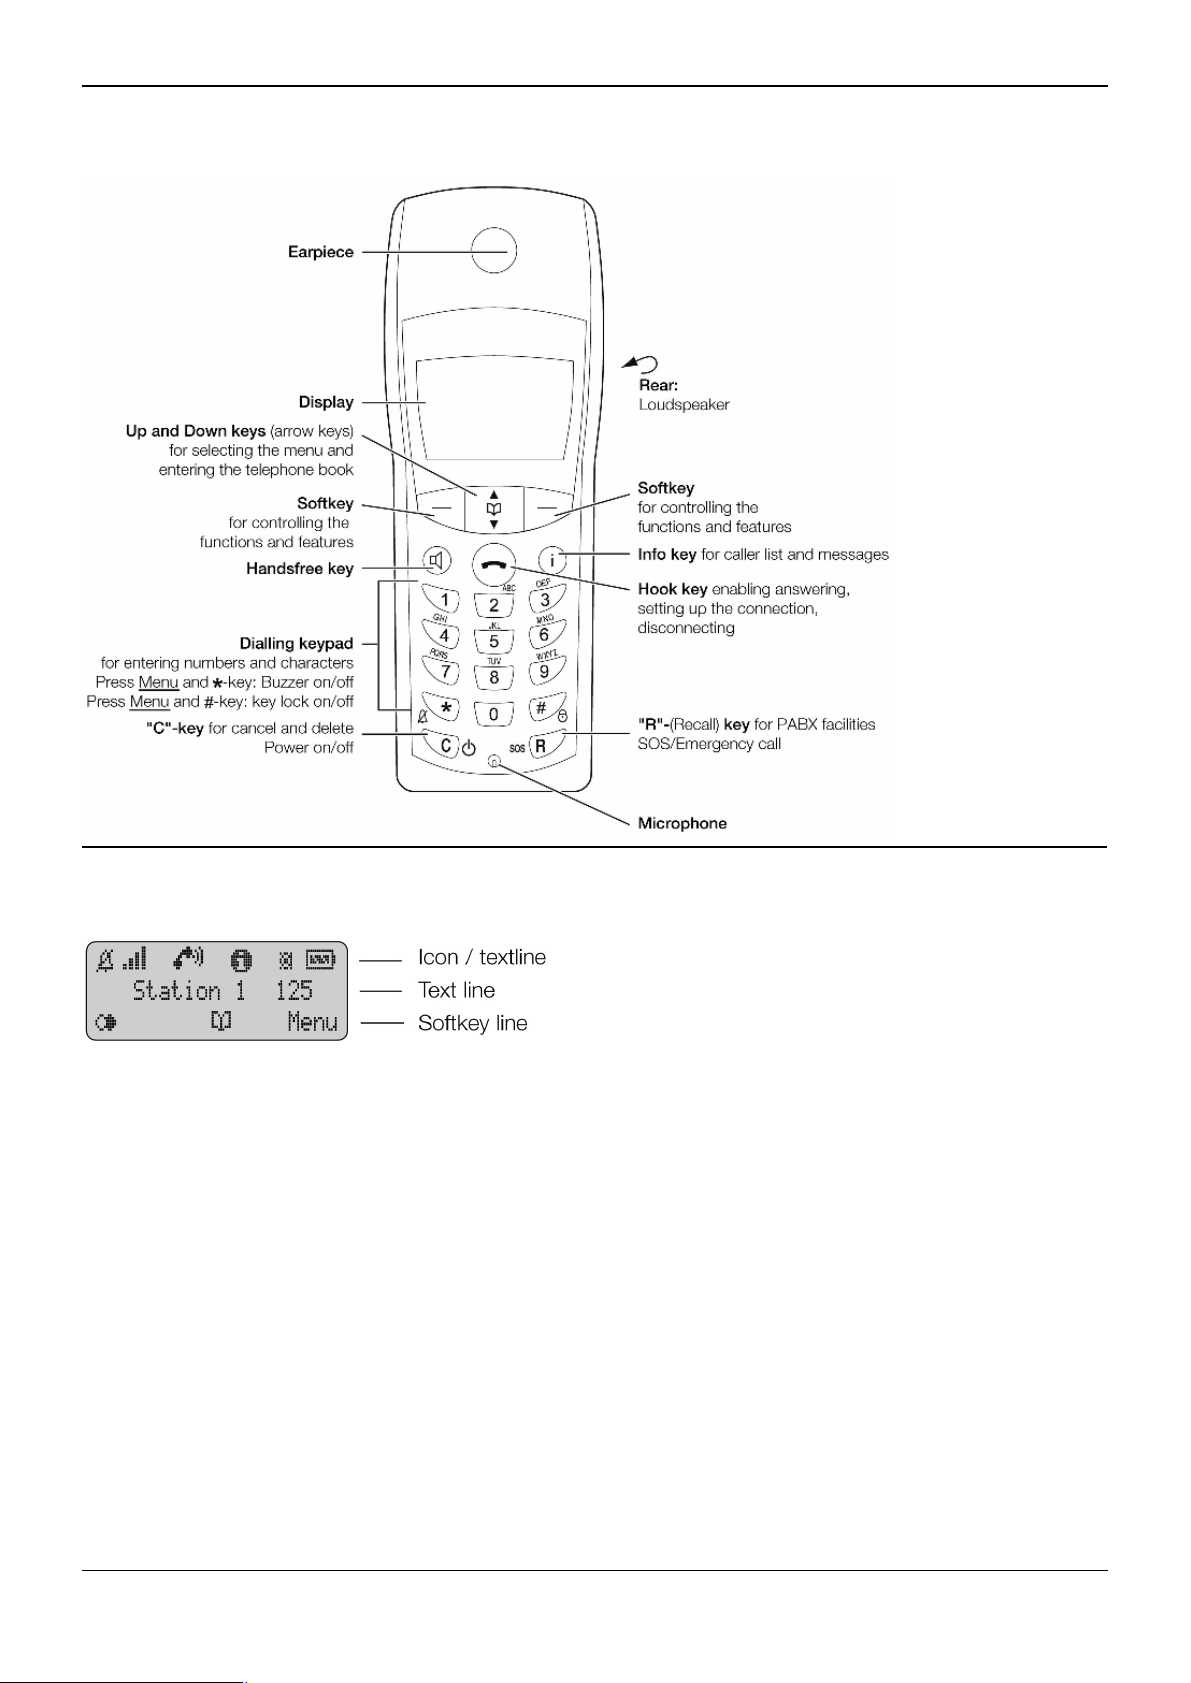
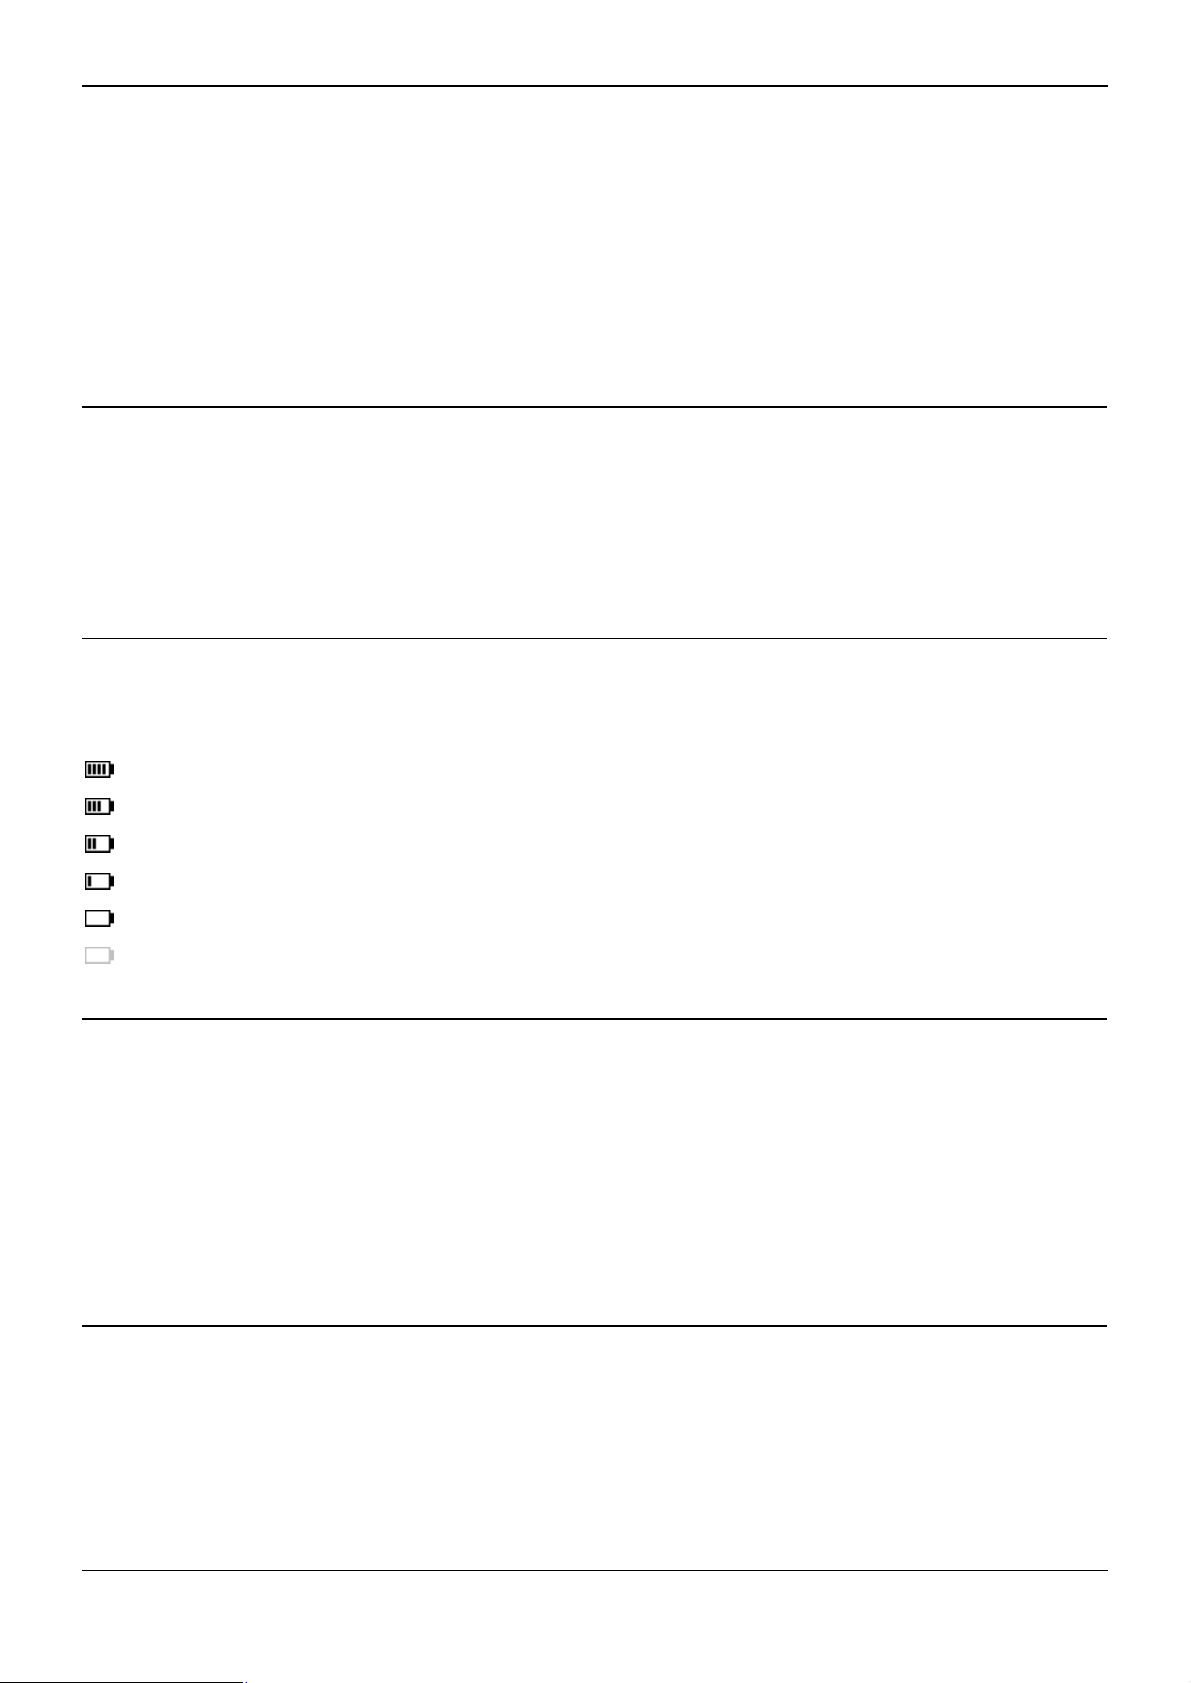
Keys and Displays
Display Arrangement
3701 Phone User Guide Page 8
IP Office 3.2 [15-601083] Issue [1b] (1 June 2006)
Page 15

Icons
Calling
Ringer de-activated
At least 2 bars: Good radio link
On: Phone has a connection
Flashing: Phone has an incoming call
On: Handsfree is activated
Flashing: Message in voicebox
Flashing: One or more missed calls in the caller list
Charge status of the batteries
On: Keypad is locked
Text Line/Softkey Line
In the top line of the display, information is given concerning the current status of the phone during a call
or in standby mode. When using the menus, this line displays an additional line of text containing the
name of the active menu. The text line displays important information about the current connection
status or menu lists and texts. In an idle state the top text line is replaced by the icon line. Below this icon
line the system name or your programmed name and the phone number of the phone are displayed.
Selection lists (e.g. caller list) and the features menu are displayed as a one-line excerpt. This line can
be moved up or down via the arrow keys to show the next menu entry or number.
The text and symbols on the softkey line refer to the keys below. The contents of the line changes
according to the operating state.
Illumination
The display is automatically illuminated when there is an incoming call or a key is pressed. The display
illumination is automatically switched off after 10 seconds if no key is pressed.
3701 Phone User Guide Page 9
IP Office 3.2 [15-601083] Issue [1b] (1 June 2006)
Page 16

Softkeys and the Cancel Key
The Softkeys
The four large keys below the display (see picture) are called the softkeys. The functions allocated to the
keys are shown on the bottom line of the display. The key function changes automatically according to
the phone state.
Softkey: Arrow Keys
Symbols are displayed above the arrow keys which identify the respective functionality of the arrow keys:
Opens the phone book. When a selection list (e.g. phone book or menu) is
displayed, the arrow keys move the cursor to the desired entry.
When entering phone numbers or names, changes can be made by moving the
position of the cursor. The arrow keys shift the cursor to the left or right.
Enables selection from the redial list.
Earpiece/loudspeaker: Volume.
Softkey: OK
OK is used to confirm the selected function. If a function only permits you to switch between two options,
OK causes this to take place. In the display, active settings (ON) are indicated by a ” ” at the end of the
line. In the case of settings that are not active (OFF), a ”-” appears at the end of the line.
Softkey: Menu
Using the Menu softkey on the left, you can access the main menu of the 3701 phone.
Softkey: Options
Using the Options softkey on the left, you can perform actions on the selected item in the menu you are
currently in.
3701 Phone User Guide Page 10
IP Office 3.2 [15-601083] Issue [1b] (1 June 2006)
Page 17
Calling
Softkey: Esc
The Esc softkey is used to quit the respective menu section which is displayed. The display then shows
the selection of the previous menu branch or the current idle/connection display.
Holding down Esc for a longer time (approximately 2 seconds) quits the present menu and returns to the
idle display.
Cancel Key
Pressing during editing names and/or numbers results in deleting the last entered character or digit.
Pressing for a longer period deletes the whole entry.
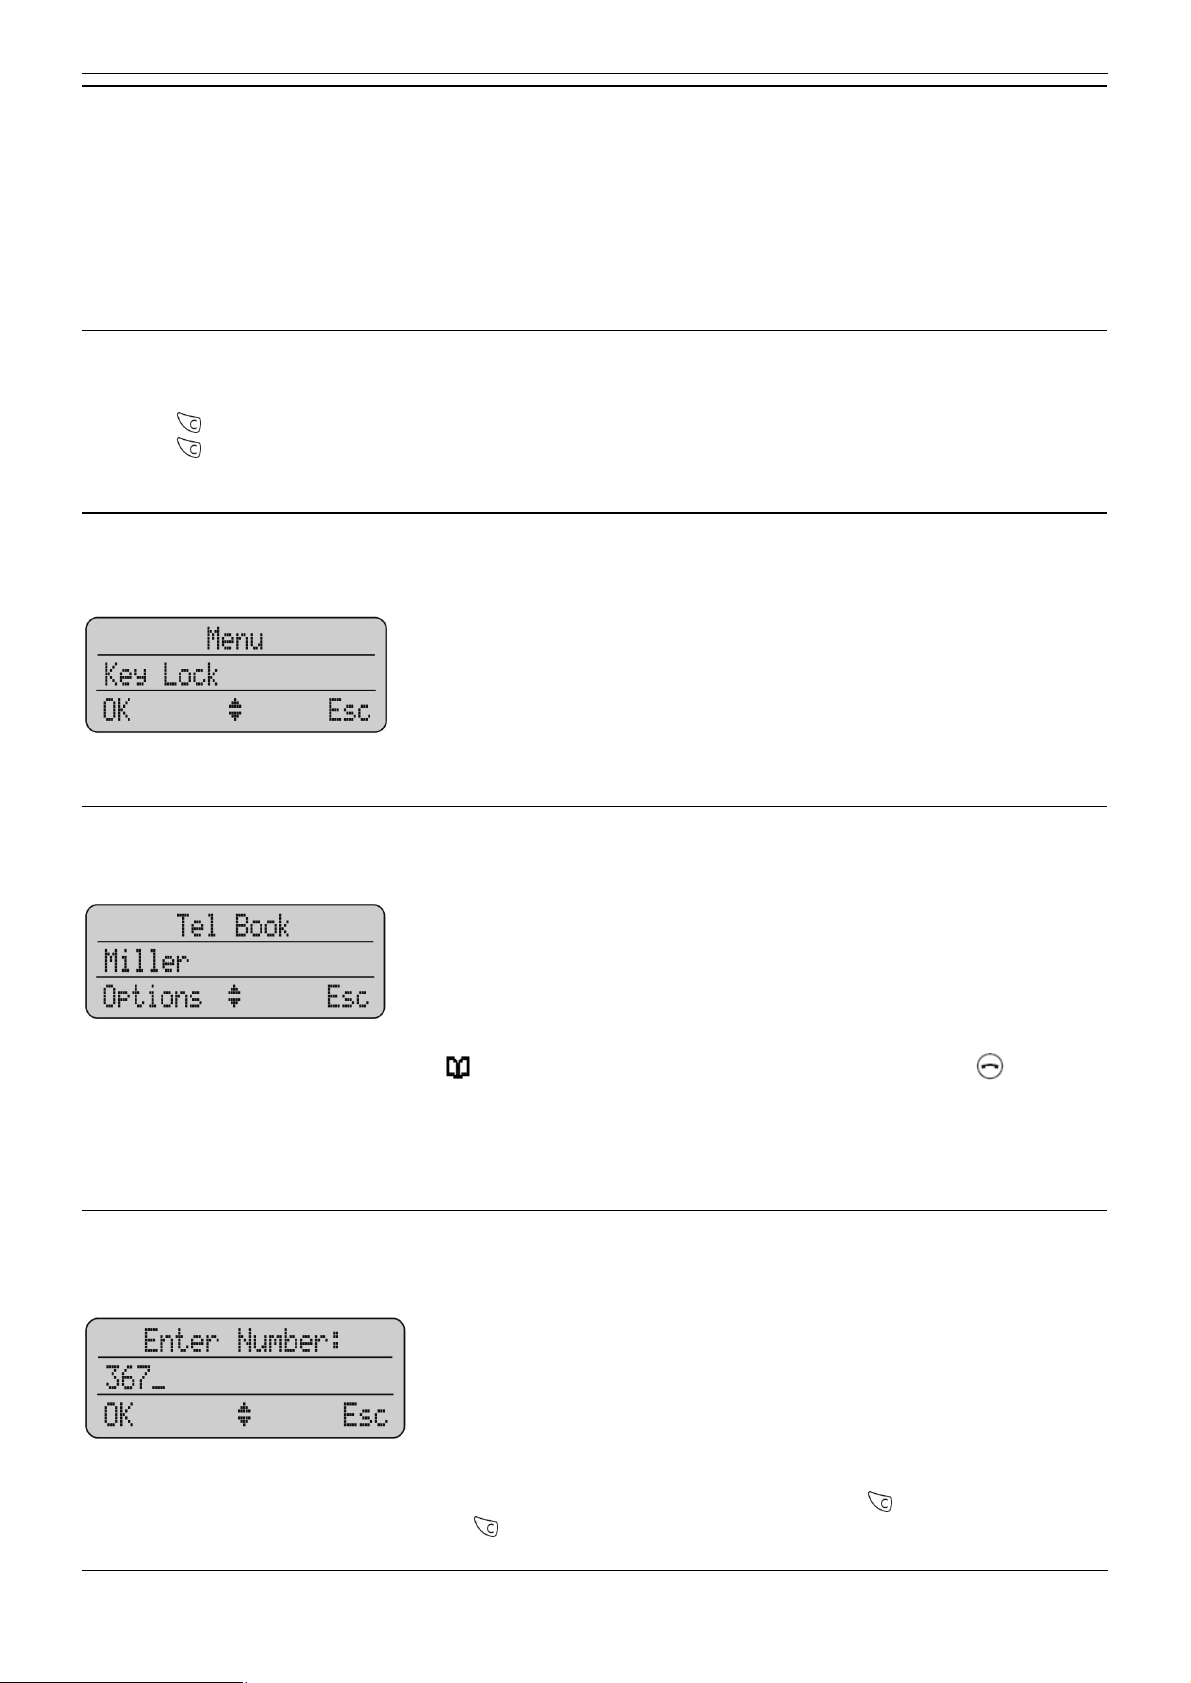
Example: Menu
Press Menu. Use the arrow keys to scroll through this list and confirm the desired function with OK.
Example: Telephone Book
If the phone book has been opened ( ), the arrow keys can be used to select a name and can be
used to dial.
To change entries, switch over to the next menu using the Options softkey and choose, for example,
Edit. Now you can edit the telephone number and then the name with which it is associated. To save
your changes, press OK at the end of each procedure.
Entering a Telephone Number
The arrow keys can be used to shift the input position (cursor) to the left or right. Additional characters
are always added in front of the flashing cursor. Press OK to confirm your entry, deletes individual
characters or the complete entry (press for a longer period).
3701 Phone User Guide Page 11
IP Office 3.2 [15-601083] Issue [1b] (1 June 2006)
Page 18

Calling
Telephone On/Off
To switch the phone off, press for more than 1 second, when it is in an idle state.
To switch the phone on, press for more than 1 second or place the phone in the charger.
Loudspeaker Volume
During a conversation you can change the volume of the earpiece or the loudspeaker with the arrow
keys in 7 steps. When the minimum or maximum value is reached, you will hear a beep. In the display a
bar will be shown which will increase/decrease in size symbolizing the actual volume setting.
Handsfree
To enable several people in a room to listen to a call, the telephone includes a handsfree feature. This
can be activated via .
For best results, the phone should be placed upright on a smooth, flat surface (e.g. a table top), leaving
the loudspeaker and microphone free. For best results keep about 0.5m distance between yourself and
the phone when speaking.
To switch off the function, press again.
Note
When the handsfree function is active, the hook icon is replaced by a loudspeaker icon.
Muting
During a call, you can deactivate the microphone of your phone using the Options softkey. Select Mute
with the arrow keys and press OK.
To activate the microphone again, press Unmute.
3701 Phone User Guide Page 12
IP Office 3.2 [15-601083] Issue [1b] (1 June 2006)
Page 19

Making a Call
Dialing:
Press and dial the phone number.
Pre-dialling:
Calling
Enter the phone number and press . You can use pre-dialling to chain telephone numbers from
different lists. Press Options, select one of the lists with the arrow keys and OK. Select a telephone
number from the list. A long press on the hook key will add the number to the number pre-dialled before.
Note
In pre-dialling, if the input cursor is positioned behind the telephone number, the number to be
chained will be suffixed to that phone number. If the input cursor is at any other point, the number
to be chained will be prefixed to the phone number.
Correcting an entry during pre-dialling:
: deleting individual digits; press for a longer period: deletes the whole phone number.
Note
Long key press on “#“ inserts P (for pause) in the pre-dial-mode.
3701 Phone User Guide Page 13
IP Office 3.2 [15-601083] Issue [1b] (1 June 2006)
Page 20

Making a Call from the Last Number Redial List
Selection: press the -softkey and then one of the arrow keys (several times if necessary) with the
telephone in an idle state. The last 10 phone numbers dialed are then displayed. The beginning/end of
the number redial list is marked by a dashed line.
Dialing: Press , the selected phone number is dialed.
Pre-dialling: If you press for a longer period, the selected phone number is entered into the pre-dial
mode. Digits can be added to the displayed phone number, as required (see Making a Call). To dial,
press . The pre-dial mode is terminated by pressing Esc.
You can call directly from the redial list or transfer a phone number to the telephone book (see Menu:
Redial list).
Making a Call from the Telephone Book
Selection: press the arrow keys with the telephone in an idle state. Use the arrow keys to select an
entry or type in the first character(s) of the name.
Dialing: press and the phone number is dialed.
Pre-dialling: If you press for a longer period, the selected phone number is taken up into pre-dialling.
To dial, press . The pre-dial mode is terminated by pressing Esc.
3701 Phone User Guide Page 14
IP Office 3.2 [15-601083] Issue [1b] (1 June 2006)
Page 21

Calling
Making a Call from the Caller List
The phone stores the phone numbers of the last 20 callers in the caller list (dependent on the
transmission of the phone number). If a call is not answered within 10 seconds the user is notified via the
text ”Missed calls” in the idle display and the flashing icon . This text will disappear when the caller list
is entered. Calls that are successfully established from the caller list will be removed from the list.
Selection: Press with the phone in an idle state. If there are new calls stored the list will open
immediately. Otherwise, select Caller List.
Dialing: Use the arrow keys to select an entry. Press and the phone number is dialed.
Pre-dialling: If is pressed for a longer period, the phone number is entered into the pre-dial mode.
Digits (e.g. a code) can be added as required. To dial a phone number, press . The pre-dial mode is
terminated by pressing Esc.
You can call back directly from the caller list or transfer a phone number to the phone book (See Menu:
Caller List).
Making a SOS-Call
This phone can be used to send emergency calls to a certain phone number. The number is stored in
the Menu: Telephone Option.
To make the emergency call, press SOS-/ for longer than 2 seconds.
Muting Ringer
During the call alert phase, it is possible to mute the ringer alert signal simply by pressing the softkey
Silence, now only the telephone icon is signalling the incoming call.
3701 Phone User Guide Page 15
IP Office 3.2 [15-601083] Issue [1b] (1 June 2006)
Page 22

Answering a Call
At an incoming call the number of the caller is displayed (if transmitted). If this number is already listed
as an entry in the phonebook, the corresponding name of this entry is displayed during an incoming call.
Press to answer the call or lift the telephone of the charger when ”Charger Answer” is enabled.
Reject rejects the call.
Silence mutes the ringer.
Changes During a Connection
During a connection the volume can be adjusted by pressing the arrow keys.
Options:
Mute switches off the microphone in the phone.
Caller List opens the Caller List.
Redial opens the Redial List.
After holding the call:
Retrieve switches back to the call on hold.
Consultation Call
During a connection another party can be consulted (Consultation call):
20. holds the first call. Now dial the other phone number.
20. Press again to switch back to the first caller (press to speak alternately with the other
parties).
20. transfers the first call to the consulted call party when you are connected to the consulted call
party.
3701 Phone User Guide Page 16
IP Office 3.2 [15-601083] Issue [1b] (1 June 2006)
Page 23

Call Transfer
To transfer a call to another caller.
5. You receive the call to your phone. Answer the call.
5. Press and enter the extension to transfer the call.
5. Press to hang up.
Conference Call
During a call you can create a conference between callers.
1. Press to hold the first call.
1. Dial the other phone number.
1. Press again to hold the second call.
1. Dial *47 (Conference Add) to create the conference. The parties will be in conference together
and the phone display will show conference.
Calling
Parking a Call
During a call, you can park a call:
4. You receive the call to your phone. Answer the call.
4. Press (this places the call on hold) then dial *37*N# (note N is a park slot number). For
example, *37*1234#. The park slot number can be of your choosing and is not system specified.
4. Press to hang up. You have now parked the call. This park slot number is needed to unpark
the call.
Retrieving a Parked Call
Press *38*N# (N is a park slot number). For example, *37*1234#. The park slot number is the
number the call is parked against.
The call will be connected to your phone.
Placing a Call on Hold
During a call you can place a call on hold.
Press places the call on hold. Press again to retrieve the call.
3701 Phone User Guide Page 17
IP Office 3.2 [15-601083] Issue [1b] (1 June 2006)
Page 24

Message Waiting Indication for Voicemail
When appears in the idle mode, the receiver has a message in his voice mail box. After listening to
all new voice mail messages, will disappear in idle mode.
In case the phone is switched off, is out of coverage or is in the charger while ”silent charging”, the
message waiting indication is updated after the phone is logged to the IP DECT system.
If the Voicemail Box number is configured, you are notified via the text "Voice Message" in the idle state
and the flashing info key. You can access your voicemail by pressing the Info key and selecting Voice
Box. Press OK to connect to your voicemail.
3701 Phone User Guide Page 18
IP Office 3.2 [15-601083] Issue [1b] (1 June 2006)
Page 25

The Menus: Operating Procedures
In this and subsequent sections, all features are activated via the Menu softkey. The individual operating
sequences are shown in short form, and then a short description follows.
Menu Control
The symbols have the following meaning:
Input of numbers or characters.
Operate arrow keys.
Menu Texts shown in this font represents a softkey.
Key Click In this way displayed texts indicate the menu item to be selected.
Press hook key.
Example
Saving user names: (in the next chapters, all representations of the operating sequences have the
following form.)
Menu Telephone Option OK User Name OK name OK
In this example:
2. Press Menu and then select Telephone Option with the arrow keys.
2. To confirm the selection, press OK.
2. Then select User Name with the arrow keys. To confirm again, press OK.
2. Now enter the name. To confirm, press OK. Instructions on entering the name can be found at
”Entering characters/names”.
3701 Phone User Guide Page 19
IP Office 3.2 [15-601083] Issue [1b] (1 June 2006)
Page 26

Menu Timer
The menu activation is time-monitored. If no entries are made within 60 seconds, then the menu is
automatically quit.
3701 Phone User Guide Page 20
IP Office 3.2 [15-601083] Issue [1b] (1 June 2006)
Page 27

Menu: Telephone Book Settings
The Telephone Book allows you to store up to 50 phone numbers and names. The entries in the phone
book are stored locally on the phone. The names are sorted alphabetically, therefore the phone book
offers an alphabetic search function. Entering the same phone number more than once is not accepted,
but the same name can be stored with different numbers.
An entry can consist of a maximum of 32 digits for the number and 16 characters for the name (refer to
Entering Characters/Names). The beginning/end of the phone book list is marked by a dashed line. If a
caller is listed in the phone book and the phone number has been transmitted for the incoming call, then
his name appears on the display.
Dialing: dial the selected entry by pressing . Pre-dialling is started by pressing for a longer period.
Options:
Predial number is entered into the pre-dial mode.
Dial the number is dialed immediately.
Details shows name and number of the entry.
Edit edits the entry.
Delete deletes the entry.
Quick Call direct access to the phonebook entry keys 1…9.
Entering Characters/Names
The following characters can be entered by pressing the keypad keys several times. The entry position is
automatically advanced if no entries are made for a short while or a new character is entered. Pressing
the -key switches from capitals to non-capitals and the same action switches back. While entering
characters the first display line shows all characters assigned to the key. The actual position is marked
by > <.
Key Capital letter Small letter
1 ?!1-+*/=&()%¿¡ ?!1-+*/=&()%¿¡
2 ABC2ДЕАБГЖЗ abc2деабгжз
3 DEF3ÈÉÊË def3èéêë
4 GHI4ÌÍÎÏ ghi4ìíîï
5 JKL5 jkl5
6 MNO6СЦТУФХШ mno6сцтуфхш
7 PQRS7ß pqrs7ß
8 TUV8ÜÙÚÛ tuv8üùúû
9 WXYZ9 wxyz9
0 (space) ,.0:;_”‘^~ (space) ,.0:;_”‘^~
* A’a a’A
# #@∂$£¥§<>{|}[\] #@∂$£¥§<>{|}[\]
3701 Phone User Guide Page 21
IP Office 3.2 [15-601083] Issue [1b] (1 June 2006)
Page 28
Adding a New Entry
>New Entry< OK phone number OK name OK
When entering the name, the keypad keys are automatically switched over to character input. A name
consists of maximum 16 characters.
Editing an Entry
select entry Options Edit OK short / long
new digits OK short/long new characters OK
Changes can be made by moving the cursor to the beginning or end of the entry via the arrow keys.
Delete characters by using the -key. Press Esc if you do not wish to change a phone number or a
name.
Deleting an Entry
select entry Options Delete OK
Deleting all Entries
Menu Security OK telephone PIN OK Clear Phonebook OK Sure? Yes
This function deletes all entries.
Quick Call
Activate an entry in the telephone book and then select Quick Call from the Options menu. Key in a onedigit number from 1 to 9 as your quick call number and confirm your selection by pressing OK.
Note
Quick call numbers can only be allocated once. To dial a number, press the key you have
allocated the number to and hold it down for a second or two while the phone is idle. The number
you wish to call will then be entered automatically in pre-dial mode. In the phone book the names
allocated to the quick call function have the corresponding quick call number in front of the
names. Removing a quick call number can only be performed by assigning a new quick call
number to the phone book entry in question without giving it any number. To delete the quick call
number use .
3701 Phone User Guide Page 22
IP Office 3.2 [15-601083] Issue [1b] (1 June 2006)
Page 29

Menu: Telephone Book Settings
Transferring Phone Numbers to the Telephone Book
Every selectable phone number in the ”caller list” or ”redial list” can be transferred to the phone book. To
do so, the Options softkey in the Caller list Menu or Redial List Menu is available for this purpose,
depending on the state of the phone. If OK is pressed, the phone number is stored immediately and is
treated as a new entry:
Options Add To OK Edit number/enter name OK
To edit a number, press OK and enter/edit a name for the phone number. Confirm by pressing OK. It is
not possible to store a phone number without an associated name.
When entering characters and numbers, the arrow keys can be used to shift the entry position to the left
or right.
The Esc softkey cancels the entry.
3701 Phone User Guide Page 23
IP Office 3.2 [15-601083] Issue [1b] (1 June 2006)
Page 30

Menu: Redial List
In the idle state, press and then one of the arrow keys (several times if necessary). You will see the last
10 internal and external parties dialled (phone number or name).
Dialing: dial the phone number by pressing . Pre-dialling is started by pressing for a longer period.
Options:
Dial dials the phone number selected.
Add to transfers the phone number to the telephone book or to the call filter.
Predial places the call in pre-dial mode, pressing will connect the call.
Delete OK Sure? OK deletes the selected entry.
Delete All OK Sure? OK deletes all entries.
3701 Phone User Guide Page 24
IP Office 3.2 [15-601083] Issue [1b] (1 June 2006)
Page 31

Menu: Key Lock
The keypad can be locked to prevent any accidental operation: press Menu, select Key Lock via the
arrow keys and confirm by pressing OK. A lock icon is then shown in the display.
To unlock the keypad, press the right softkey and then (as shown on the display).
Calls can be answered in the normal way when the key lock is active and all keys can be used. The key
lock is activated again after the call has been terminated.
3701 Phone User Guide Page 25
IP Office 3.2 [15-601083] Issue [1b] (1 June 2006)
Page 32

Menu: Caller List
Accepted and Missed Calls
Accepted and missed calls with a transmitted phone number, are entered into the caller list. A missed
call is a call which has not been answered and has been alerting for at least 10 seconds. When calls
have been missed the text ” Missed Calls” is shown in the display. If the caller is registered in the phone
book, the name is displayed.
The last 20 phone numbers are listed. Every additional phone number overwrites the oldest entry. When
a call back is successfully executed to an entry in the caller list, the entry is removed from the caller list.
The beginning/end of the caller list is marked by a special line.
Multiple calls with the same phone number are only stored once.
The following symbols at the end of the entries indicate the kind of call:
Missed call
Accepted call
Filtered call
Rejected call
Calling
Caller List OK Selection of a phone number…
Dialing: dial the phone number by pressing . Pre-dialling is started by pressing for a longer period.
Options:
Dial dials the phone number selected.
Add to transfers the phone number to the phone book or to the call filter.
Predial places the highlighted phone number into pre-dial mode. Press to make the call.
Delete OK Sure? OK deletes the selected entry.
Delete All OK Sure? OK deletes all entries.
3701 Phone User Guide Page 26
IP Office 3.2 [15-601083] Issue [1b] (1 June 2006)
Page 33

Menu: Ringer Settings
A different melody can be set for every type of call (internal and external).
Melody: Internal
Menu Ringer Settings OK Melody OK Internal OK or 0…9 OK
Select the melody for internal calls by entering a number 0…9 or use the arrow keys.
Melody: External
Menu Ringer Settings OK Melody OK External OK or 0…9 OK
Select the melody for external calls by entering a number 0…9 or use the arrow keys.
Volume
Menu Ringer Settings OK Volume Settings OK or 0…7 OK
The ringer signalling volume can be changed via digits 0 ... 7 or the arrow keys (0=off).
3701 Phone User Guide Page 27
IP Office 3.2 [15-601083] Issue [1b] (1 June 2006)
Page 34

Menu: Volume Settings
Earpiece
Menu Volume Settings OK Earpiece OK OK or 0…7 OK
The voice volume of the earpiece can be changed in 7 steps via digits 1…7 or the arrow keys.
Hands-Free
Menu Volume Settings OK Hands-free OK OK or 0…7 OK
The voice volume of the loudspeaker can be changed in 7 steps via digits 1…7 or the arrow keys.
3701 Phone User Guide Page 28
IP Office 3.2 [15-601083] Issue [1b] (1 June 2006)
Page 35

Menu: System
Registration Code
The phone can be manually registered on up to 5 different DECT systems. Before you can make a call
via the DECT system, the phone has to be registered to the system. A system ID and registration code
are necessary for the registration process. Ask the system administrator for the valid registration code.
When the phone is not subscribed to the system the display will show ”Please, subscribe”.
Note
This is for information only. Please contact your system administrator to register the phone.
All settings in this chapter are started by pressing the softkeys:
Menu System OK
Registering the Telephone to the DECT System
Subscription OK >Subscribe HS< OK PABX-PIN OK - Subscribe OK
or
Use PARK-Code PARK OK
or
Cancel OK
The following entries must be made when logging on:
PABX-PIN : this code is used to get access to the DECT System.
Use PARK-Code : a system ID should only be entered if you are at a location where two DECT systems
overlap.
Enter name : give the name of the DECT system to which you are registering. This will be shown on the
idle display. For information concerning the entry of characters, see Entering Characters/Names.
Internal No. : the phone number, assigned to your DECT phone can be entered here (ask your system
administrator for the phone number).
Selecting the DECT System
Subscription OK select a System Options Select OK
If the phone has been registered to several DECT systems, then you can select which one the phone is
to use. Select the system via the arrow keys before confirming ”Select”. By choosing Options Select,
the function automatic search is disabled. The selected system is shown in the idle display.
3701 Phone User Guide Page 29
IP Office 3.2 [15-601083] Issue [1b] (1 June 2006)
Page 36

Automatic Search System
Subscription OK Auto. Search OK
If you have registered your phone with several DECT systems and this function is active (” ”), then the
phone will automatically select one of the systems. Thus, your phone is automatically ”logged-in” to
another of your registered DECT systems, as soon as you move out of the effective range of the current
system. This function is disabled if a specific system is selected by the select option.
Deleting a System
Subscription OK select a System Options Delete OK Sure? Yes
Deleting subscription is only possible, when the phone is out of coverage from the system or when it is
not successfully registered to a system. Consequently, the phone can only be used on this system again
after completion of the registration process. Use the arrow key to select the system, before you choose
Options Delete. This function removes subscription information from your phone for the selected DECT
system.
Note
After execution of this function, the phone cannot be used on that DECT system anymore. To use it
again, you must go through the registration procedure at the DECT system and at the phone.
Changing a System Name and Phone Number
Subscription OK select a System Options Edit OK
System Name OK Local Phone number OK
You can select a system and then edit the name of the system and your phone number.
Equipment ID
IPEI OK
You can read the international phone identification.
3701 Phone User Guide Page 30
IP Office 3.2 [15-601083] Issue [1b] (1 June 2006)
Page 37

Menu: Telephone Options
All entries in this chapter are started by pressing the softkeys:
Menu Telephone Option OK
User Name
User Name OK Name OK
This function can be used to store the name of the phone user which is set by your system administrator.
You can change the User Name on the phone but this will revert to the system administrator configured
name upon a system reset. The user name consists of maximum 12 characters. The name is shown on
the idle display. Further information concerning the input of characters can be found at Entering
characters/names.
Changing the Language
Language OK English OK
Sets the desired display language. It is possible to select from 12 different languages.
Emergency Call SOS Number
Emergency Call OK number Options Save OK
The phone number for the SOS-function can be stored here.
Voice Box
Voice Box OK number Options Save OK
This is the number used to connect to your Voicemail. Do not change this number as you will be unable
to access Voicemail.
3701 Phone User Guide Page 31
IP Office 3.2 [15-601083] Issue [1b] (1 June 2006)
Page 38

Attention Tones
Attention tones OK
Key Click or Confirm tones or End of Menu or
Battery alarm or Coverage Warn / OK
If activated ” ” an acoustic warning signal is given when a key is pressed (Key Click), if a setting is
confirmed (Confirm tones), if the end of a menu list is displayed (End of Menu), if the battery charge
becomes too low (Battery alarm) or if there is a danger of losing the radio link (Coverage Warn).
Charger Answer
Charger Answer OK
When the function is enabled, you can answer incoming calls when the phone is placed in the charger,
e.g. by lifting it off the charger. The ” ” is shown when activated. The call is ended and the phone goes
on hook by placing it on the charger again.
Silent Charging
Silent Charging OK
If activated ” ” the phone does not setup and receive any calls while it is placed in the charger. The first
display line shows ”Silent Charging” when placed into the charger. While on Silent Charge calls are
directed to Voicemail (if configured). Calls are signalled again once it is taken out of the charger.
Display Contrast
Disp. Contrast OK OK
The display contrast can be changed via the arrow keys.
3701 Phone User Guide Page 32
IP Office 3.2 [15-601083] Issue [1b] (1 June 2006)
Page 39

Menu: Security Functions
The security functions are protected by a PIN code (4 digits).
The PIN entry is only necessary when read only is switched on. In the delivery state the PIN is set to
0.0.0.0. For additional security, **** is displayed when entering the PIN. Numbers which have been
entered can be deleted by pressing . If you have forgotten your PIN, please consult your system
administrator.
All entries in this chapter are started by pressing the softkeys:
Menu Security OK Enter PIN OK
Then select:
Resetting the Telephone
Default setting OK Sure? Yes
All functions with the exception of the phone book, the PIN and system registrations are deleted and
reset to the delivery state.
Clear Phonebook
Clear Phonebook OK Sure? Yes
This function deletes all entries in the phonebook.
Changing the PIN
Change PIN OK old PIN OK new PIN OK repeat new PIN OK
For additional security, the new PIN must be entered twice. The numbers of the PIN are displayed as
****.
Read Only
Read-Only OK
If read only is active ” ”, all features in the menu can be checked. The settings cannot be changed.
3701 Phone User Guide Page 33
IP Office 3.2 [15-601083] Issue [1b] (1 June 2006)
Page 40

Menu: Shortcuts
Several frequently used menu items can also be activated with shortcuts.
When the phone is idle, press one of the following key combinations within 3 seconds:
Ringer On/Off
Menu switches the ringer signalling off. The bell symbol appears in the display.
Menu switches the ringer signalling back on.
Silent Charging On/Off
Menu switches on your phone for ”Silent Charging”.
Menu switches ”Silent Charging” off.
User Name
Menu allows you to change the user name.
Registering/De-registering
Menu activates the registration menu (for registering/de-registering the phone with the DECT
system).
Toggles the Ringer
Menu toggles the ringer on/off.
Key Lock on
Menu switches the key lock on.
3701 Phone User Guide Page 34
IP Office 3.2 [15-601083] Issue [1b] (1 June 2006)
Page 41

Accessories
Battery: NiMh (Nickel-Metal Hydride) re-chargeable AAA battery of 800 mAh, 1.2V (Not available
from Avaya)
Avaya 3701 and 3711 Desktop Charger:
Avaya 3701 Phone Charger Rack:
A maximum of eight phones can be charged simultaneously. The charger rack is designed for
desktop use and for wall mounting.
Belt Clip
Belt clip and adapter for the phone. The adapter is clipped onto the phone.
Headset
The headset in combination with the belt clip makes handsfree phone usage possible.
3701 Phone User Guide Page 35
IP Office 3.2 [15-601083] Issue [1b] (1 June 2006)
Page 42

Care and Maintenance
Your phone is a product which meets high demands with regard to design. It should therefore be treated
with care. We want this product to give you pleasure for a long time and therefore make the following
suggestions.
Pay attention to all safety instructions. These instructions apply to the phone, charger and batteries as
well as the accessories.
To clean the phone:
2. Disconnect the mains plug on the charger.
2. Wipe the device using an anti-static cloth or a slightly moistened soft chamois leather.
2. Finally wipe with a dry cloth.
Notes
Never spray the phone with cleaning agents or solvents.
Clean the charge contacts on the phone and the charger by means of a fluff-free cloth.
If the phone or one of the accessory parties does not function perfectly, please contact your
supplier‘s customer service.
3701 Phone User Guide Page 36
IP Office 3.2 [15-601083] Issue [1b] (1 June 2006)
Page 43

Menu Tree
Key Lock
Ringer Settings
System
Telephone Options
Internal Melody
External
Volume Settings
Earpiece Volume Settings
Hands-free
Subscription
IPEI
User Name
Language
Emergency Call SOS Number
<Subscribe HS>
Auto.Search
IPO DECT
<Options / New>
<Options / Edit>
<Options / Delete>
Voice Box Telephone number
Attention Tones
Charger Answer
Silent Charging
Disp.Contrast
Security
Default settings
Clear phonebook
Change PIN
Read only
Key Click
Confirm tones
End of menu
Battery alarm
Coverage Warn
3701 Phone User Guide Page 37
IP Office 3.2 [15-601083] Issue [1b] (1 June 2006)
Page 44

IP Office Shortcodes
The following are the default short codes available to all users on IP Office. Your system administrator
may change these and/or add additional codes for other features and for speed dials.
The N where shown, should be replaced by the appropriate number. For example, with *07*N#, replace
N with the extension to which you want your calls forwarded when you have forwarding switched on.
*00 Cancel All Forwarding *32*N# Call Pick Up Extension
*01 Forward Unconditionally On *33*N# Call Queue
*02 Forward Unconditionally Off *34 Hold Music
*03 Forward On Busy On *35*N# Extn Login
*04 Forward On Busy Off *36 Extn Logout
*05 Forward On No Answer On *37*N# Park Call
*06 Forward On No Answer Off *38*N# Ride Call
*07*N# Forward to Number *39 Relay On
*08 Do Not Disturb On *40 Relay Off
*09 Do Not Disturb Off *41 Relay Pulse
*10*N# Do Not Disturb Exception Add *42 Relay On
*11*N# Do Not Disturb Exception Delete *43 Relay Off
*12*N# Follow Me Here *44 Relay Pulse
*13*N# Follow Me Here Cancel *45*N# Call Steel
*14*N# Follow Me To *46 Call Steel
*15 Call Waiting On *47 Conference Add
*16 Call Waiting Off *48 Voicemail Ringback On
*17 Voicemail Collect *49 Voicemail Ringback Off
*18 Voicemail On *50 Forward Hunt Group Calls On
*19 Voicemail Off *51 Forward Hunt Group Calls Off
*20*N# Set Hunt Group Night Service *52 Clear Call
*21*N# Clear Hunt Group Night Service *53*N# Call Pickup Members
*29 Toggle Calls *57*N# Forward On Busy Number
*30 Call Pick Up Any *70*N# Dial Physical Extn by Number
*31 Call Pick Up Group *71*N# Dial Physical Extn by ID
The table shows the shortcodes available to all users on IP Office.
3701 Phone User Guide Page 38
IP Office 3.2 [15-601083] Issue [1b] (1 June 2006)
Page 45

Index
A
accessories..............................................................35
answering a call.......................................................12
B
battery information.......................................3, 5, 6, 35
belt clip.....................................................................35
C
calling.................................................................12, 26
cancel key................................................................10
care and maintenance .............................................36
charger.......................................................3, 6, 31, 35
cleaning....................................................................36
conference...............................................................12
D
desktop charger.......................................................35
display..................................................................8, 31
do not disturb...........................................................38
F
fowarding .................................................................38
H
handsfree.................................................................12
headset....................................................................35
hold..........................................................................12
I
icons...........................................................................8
installation..................................................................3
K
keys..........................................................8, 10, 25, 34
L
location.......................................................................3
M
menu
caller list..............................................................26
key lock...............................................................25
operating procedures..........................................19
redial list..............................................................24
ringer settings .....................................................27
security functions................................................33
shortcuts .............................................................34
system.................................................................29
telephone book settings......................................21
telephone options ...............................................31
tree......................................................................37
volume settings...................................................28
missed calls .............................................................26
muting ......................................................................12
O
on/off............................................................12, 25, 34
P
parking ...............................................................12, 38
PIN...........................................................................33
power supply..............................................................1
R
redial ........................................................................24
registration .....................................................7, 29, 34
ringer settings ..........................................................27
S
safety information.......................................................1
security functions .....................................................33
setup ..........................................................................7
shortcodes ...............................................................38
softkeys....................................................................10
T
telephone book ........................................................21
V
voicemail............................................................18, 38
volume ...............................................................12, 28
3701 Phone User Guide Page 39
IP Office 3.2 [15-601083] Issue [1b] (1 June 2006)
Page 46

Performance figures and data quoted in this document are typical, and must be specifically confirmed in
writing by Avaya before they become applicable to any particular order or contract. The company
reserves the right to make alterations or amendments to the detailed specifications at its discretion. The
publication of information in this document does not imply freedom from patent or other protective rights
of Avaya or others.
Intellectual property related to this product (including trademarks) and registered to Lucent Technologies
have been transferred or licensed to Avaya.
All trademarks identified by the ® or ™ are registered trademarks or trademarks, respectively, of Avaya
Inc. All other trademarks are the property of their respective owners.
This document contains proprietary information of Avaya and is not to be disclosed or used except in
accordance with applicable agreements.
Any comments or suggestions regarding this document should be sent to "wgctechpubs@avaya.com".
© 2006 Avaya Inc. All rights reserved.
Avaya
Unit 1, Sterling Court
15 - 21 Mundells
Welwyn Garden City
Hertfordshire
AL7 1LZ
England
Tel: +44 (0) 1707 392200
Fax: +44 (0) 1707 376933
Web: http://www.avaya.com/ipoffice/knowledgebase
3701 Phone User Guide Page 40
IP Office 3.2 [15-601083] Issue [1b] (1 June 2006)
 Loading...