

Page 1

IP Office
Voicemail Pro
15-601063 Issue 20l - (03 March 2009)
Page 2

© 2009 AVAYA All Rights Reserved.
Notice
While reasonable efforts were made to ensure that the information in this document was complete and accurate at the time of
printing, Avaya Inc. can assume no liability for any errors. Changes and corrections to the information in this document may be
incorporated in future releases.
Documentation Disclaimer
Avaya Inc. is not responsible for any modifications, additions, or deletions to the original published version of this
documentation unless such modifications, additions, or deletions were performed by Avaya.
Link Disclaimer
Avaya Inc. is not responsible for the contents or reliability of any linked Web sites referenced elsewhere within this
Documentation, and Avaya does not necessarily endorse the products, services, or information described or offered within
them. We cannot guarantee that these links will work all of the time and we have no control over the availability of the linked
pages.
License
USE OR INSTALLATION OF THE PRODUCT INDICATES THE END USER’S ACCEPTANCE OF THE TERMS SET FORTH
HEREIN AND THE GENERAL LICENSE TERMS AVAILABLE ON THE AVAYA WEBSITE AT
http://support.avaya.com/LicenseInfo/ (“GENERAL LICENSE TERMS”). IF YOU DO NOT WISH TO BE BOUND BY THESE
TERMS, YOU MUST RETURN THE PRODUCT(S) TO THE POINT OF PURCHASE WITHIN TEN (10) DAYS OF DELIVERY
FOR A REFUND OR CREDIT.
Avaya grants End User a license within the scope of the license types described below. The applicable number of licenses and
units of capacity for which the license is granted will be one (1), unless a different number of licenses or units of capacity is
specified in the Documentation or other materials available to End User. “Designated Processor” means a single stand-alone
computing device. “Server” means a Designated Processor that hosts a software application to be accessed by multiple users.
“Software” means the computer programs in object code, originally licensed by Avaya and ultimately utilized by End User,
whether as stand-alone Products or pre-installed on Hardware. “Hardware” means the standard hardware Products, originally
sold by Avaya and ultimately utilized by End User.
License Type(s): Designated System(s) License (DS).
End User may install and use each copy of the Software on only one Designated Processor, unless a different number of
Designated Processors is indicated in the Documentation or other materials available to End User. Avaya may require the
Designated Processor(s) to be identified by type, serial number, feature key, location or other specific designation, or to be
provided by End User to Avaya through electronic means established by Avaya specifically for this purpose.
Copyright
Except where expressly stated otherwise, the Product is protected by copyright and other laws respecting proprietary rights.
Unauthorized reproduction, transfer, and or use can be a criminal, as well as a civil, offense under the applicable law.
Third-Party Components
Certain software programs or portions thereof included in the Product may contain software distributed under third party
agreements (“Third Party Components”), which may contain terms that expand or limit rights to use certain portions of the
Product (“Third Party Terms”). Information identifying Third Party Components and the Third Party Terms that apply to them is
available on Avaya’s web site at: http://support.avaya.com/ThirdPartyLicense/
Avaya Fraud Intervention
If you suspect that you are being victimized by toll fraud and you need technical assistance or support, call Technical Service
Center Toll Fraud Intervention Hotline at +1-800-643-2353 for the United States and Canada. Suspected security
vulnerabilities with Avaya Products should be reported to Avaya by sending mail to: securityalerts@avaya.com.
For additional support telephone numbers, see the Avaya Support web site (http://www.avaya.com/support).
Trademarks
Avaya and the Avaya logo are registered trademarks of Avaya Inc. in the United States of America and other jurisdictions.
Unless otherwise provided in this document, marks identified by “®,” “™” and “SM” are registered marks, trademarks and
service marks, respectively, of Avaya Inc. All other trademarks are the property of their respective owners.
Documentation information
For the most current versions of documentation, go to the Avaya Support web site (http://www.avaya.com/support) or the IP
Office Knowledge Base (http://marketingtools.avaya.com/knowledgebase/).
Avaya Support
Avaya provides a telephone number for you to use to report problems or to ask questions about your contact center. The
support telephone number is 1 800 628 2888 in the United States. For additional support telephone numbers, see the Avaya
Web site: http://www.avaya.com/support.
Voicemail Pro Page 2
15-601063 Issue 20l (03 March 2009)IP Office
Page 3

Contents
Voicemail Pro1.
..................................................................... 111.1 What is New
..................................................................... 131.2 Features of Voicemail Pro
..................................................................... 141.3 Supported Languages
..................................................................... 151.4 Number of Simultaneous Voicemail Users
Installing Voicemail Pro2.
..................................................................... 182.1 General Installation Requirements
............................................................................ 192.1.1 PC Specification
............................................................................ 232.1.2 Network Requirements
............................................................................ 242.1.3 Disk Space Requirements
............................................................................ 242.1.4 Web Server Operation
............................................................................ 242.1.5 Voicemail Email Connection
............................................................................ 242.1.6 ContactStore Operation
............................................................................ 252.1.7 Voicemail Pro Licenses
............................................................................ 262.1.8 User and Group Mailboxes
..................................................................... 272.2 Basic Voicemail Installation
2.2.1 Installing Compact Voicemail Pro Server and
............................................................................ 28
Client
2.2.2 Installing Typical Voicemail Pro Server and
............................................................................ 31
Client
2.2.3 Installing Custom Voicemail Pro Server and
............................................................................ 34
Client
2.2.4 Removing Software Features from a
............................................................................ 34
Voicemail Pro Installation
2.2.5 Configuring Windows 2003 to Work with Web
............................................................................ 35
Campaigns
............................................................................ 362.2.6 The Voicemail Pro Services
..................................................................... 382.3 Client Only Installation
............................................................................ 392.3.1 Installing the VoiceMail Pro Client Only
..................................................................... 412.4 Upgrading Voicemail Pro
............................................................................ 412.4.1 Upgrade from below version 3.2
............................................................................ 422.4.2 Upgrade from Version 3.2+
............................................................................ 432.4.3 Upgrade to Voicemail Pro
..................................................................... 442.5 Voicemail Email Installation
2.5.1 Installing VoiceMail Pro for SMTP Voicemail
............................................................................ 44
Email
............................................................................ 452.5.2 Domain Member
............................................................................ 492.5.3 Work Group Member
............................................................................ 562.5.4 Operation
..................................................................... 612.6 Centralized Voicemail Pro
............................................................................ 622.6.1 Planning Requirements
............................................................................ 622.6.2 Restrictions
............................................................................ 632.6.3 Licensing
2.6.4 Configuring the Remote System Voicemail
............................................................................ 64
Settings
..................................................................... 652.7 Text to Speech (TTS) Install
............................................................................ 662.7.1 Installing Generic Text to Speech
............................................................................ 662.7.2 Installing Avaya Text to Speech
............................................................................ 662.7.3 Using the Speak Text Action
............................................................................ 672.7.4 Text to Speech SAPI Controls
............................................................................ 702.7.5 Setting Up Text To Speech to Read Email
..................................................................... 712.8 UMS Web Services
............................................................................ 722.8.1 IMAP Installation
............................................................................ 752.8.2 Web Voicemail Installation
............................................................................ 822.8.3 Using Web Voicemail
............................................................................ 852.8.4 Using IMAP
..................................................................... 862.9 Troubleshooting
............................................................................ 862.9.1 Checking the Voicemail Pro Service
............................................................................ 882.9.2 The Voicemail Console
............................................................................ 902.9.3 Voicemail Pro User Log
............................................................................ 912.9.4 Tracing in Debug
Configuring Voicemail Pro3.
..................................................................... 983.1 IP Office Configuration
............................................................................ 983.1.1 Overview
............................................................................ 983.1.2 Identifying the Voicemail Server PC
............................................................................ 993.1.3 Configuring Voicemail for Individual Users
............................................................................ 1013.1.4 Configuring User Source Numbers
3.1.5 Setting Up Voicemail Transfer Options for a
............................................................................ 102
User
............................................................................ 1033.1.6 Voicemail Channel Reservations
............................................................................ 1053.1.7 Using Voicemail to Give Error Messages
..................................................................... 1063.2 Voicemail Pro Preferences
............................................................................ 1073.2.1 System Preferences
............................................................................ 1173.2.2 Control Panel Options
..................................................................... 1213.3 Fax Server Configuration
............................................................................ 1223.3.1 Fax Server Configuration
3.3.2 Setting the VoiceMail Pro System Fax
............................................................................ 123
Number
............................................................................ 1253.3.3 Setting up Fax Forwarding
............................................................................ 1253.3.4 Setting Up a User Defined Fax Number
............................................................................ 1263.3.5 Routing Fax Calls Using a Menu Action
3.3.6 Configuring an Analog Extension Number for
............................................................................ 127
Fax Use
............................................................................ 1283.3.7 Castelle Fax Server
Administration4.
..................................................................... 1324.1 Starting the Voicemail Pro Client
............................................................................ 1324.1.1 Logging in to the Voicemail Pro Server
..................................................................... 1354.2 Administrator Configuration
............................................................................ 1364.2.1 Changing Administrator Details
............................................................................ 1364.2.2 Deleting an Administrator
............................................................................ 1374.2.3 Resetting a Password
............................................................................ 1374.2.4 Releasing a Locked Administrator Login
..................................................................... 1384.3 General Administration
............................................................................ 1384.3.1 Changing the Inactivity Timeout
............................................................................ 1394.3.2 Changing Mailbox Operation Mode
............................................................................ 1404.3.3 Confirm Call Flow Download Window
............................................................................ 1404.3.4 Changing your Password
..................................................................... 1414.4 Routing Calls to Voicemail
............................................................................ 1424.4.1 Routing Calls to Voicemail
............................................................................ 1424.4.2 Transferring Calls to Voicemail
............................................................................ 1434.4.3 Using Short Codes to Access Voicemail
............................................................................ 1444.4.4 Using VM: to Access Voicemail
............................................................................ 1454.4.5 Voicemail Telephone Numbers
............................................................................ 1474.4.6 Example Call Flow
..................................................................... 1494.5 User Voicemail Access
............................................................................ 1504.5.1 Giving Users Button Access
............................................................................ 1524.5.2 Giving Users Access from Any Extension
4.5.3 Giving Users Access from an External
............................................................................ 153
Location
............................................................................ 1534.5.4 Creating a Trusted Location
..................................................................... 1544.6 Mailbox Access Controls
............................................................................ 1544.6.1 Telephony Operation Mode
............................................................................ 1554.6.2 Automatic Message Deletion
Contents
Voicemail Pro Page 3
15-601063 Issue 20l (03 March 2009)IP Office
Page 4

............................................................................ 1554.6.3 Personal Distribution Lists
..................................................................... 1564.7 Hunt Group Voicemail
............................................................................ 1574.7.1 Hunt Group Configuration in IP Office
............................................................................ 1584.7.2 Configuring Message Waiting Indication
............................................................................ 1594.7.3 Configuring Group Broadcast
............................................................................ 1604.7.4 Using a Short Code to Collect Voicemail
............................................................................ 1614.7.5 Out of Hours Operation
............................................................................ 1624.7.6 Configuring Announcements
............................................................................ 1644.7.7 Customizing Announcements
............................................................................ 1654.7.8 Hunt Group Queuing
............................................................................ 1664.7.9 Customizing a Hunt Group Call Flow
..................................................................... 1684.8 Recording Calls
............................................................................ 1694.8.1 Call Recording Warning
............................................................................ 1704.8.2 Changing the Recording Time
............................................................................ 1704.8.3 Voice Recording Library (VRL)
............................................................................ 1714.8.4 Manual Call Recording
............................................................................ 1754.8.5 Automatic Call Recording
..................................................................... 1814.9 Announcements
............................................................................ 1814.9.1 Mandatory Announcement Example
............................................................................ 1824.9.2 Personal Announcements
..................................................................... 1834.10 Support for Callers with Impaired Hearing
............................................................................ 1844.10.1 Installing Voicemail Pro TTY Prompts
............................................................................ 1844.10.2 Changing User Locale
4.10.3 Advice for Mailbox Owners Using a TTY
............................................................................ 184
Device
4.10.4 Changing the Language Setting for a TTY
............................................................................ 185
Device
..................................................................... 1874.11 Changing Language
............................................................................ 1874.11.1 Supported Languages
............................................................................ 1884.11.2 Changing the Language of System Prompts
............................................................................ 1894.11.3 Changing the Language of Custom Prompts
..................................................................... 1904.12 Mobile Twinning
............................................................................ 1914.12.1 Example Call Flow
..................................................................... 1934.13 Remote Voicemail Notification
............................................................................ 1944.13.1 Callback
............................................................................ 1964.13.2 Outcalling
Using the Voicemail Pro Client5.
..................................................................... 2015.1 The Main Voicemail Pro Window
..................................................................... 2025.2 Toolbar Icons
..................................................................... 2035.3 Saving Changes and Making them Live
..................................................................... 2035.4 Importing and Exporting Call Flows
..................................................................... 2045.5 Including Other Files
..................................................................... 2055.6 Start Points
............................................................................ 2075.6.1 Default Start Points
............................................................................ 2085.6.2 Using Start Points
............................................................................ 2105.6.3 Viewing Call Flows as Text
..................................................................... 2115.7 System Variables
............................................................................ 2135.7.1 User Defined Variables
..................................................................... 2155.8 Creating Modules
............................................................................ 2155.8.1 Running a Module
..................................................................... 2165.9 The Conditions Editor
............................................................................ 2175.9.1 Using the Condition Editor
............................................................................ 2205.9.2 Calendar
............................................................................ 2215.9.3 Week Planner
............................................................................ 2225.9.4 Condition
............................................................................ 2225.9.5 Compare
Voicemail Pro Actions6.
..................................................................... 2256.1 Connections
..................................................................... 2266.2 Available Actions
..................................................................... 2296.3 Standard Action Tabs
............................................................................ 2296.3.1 General
............................................................................ 2306.3.2 Entry Prompts
............................................................................ 2316.3.3 Using the Wave Editor
............................................................................ 2336.3.4 Specific
............................................................................ 2336.3.5 Reporting
............................................................................ 2346.3.6 Results
..................................................................... 2356.4 Basic Actions
............................................................................ 2366.4.1 Generic
............................................................................ 2396.4.2 Speak Text
............................................................................ 2406.4.3 Menu
............................................................................ 2426.4.4 Goto
............................................................................ 2436.4.5 Disconnect
............................................................................ 2436.4.6 Home
............................................................................ 2436.4.7 Module Return
..................................................................... 2446.5 Mailbox Actions
............................................................................ 2456.5.1 Get Mail
............................................................................ 2466.5.2 Leave Mail
............................................................................ 2476.5.3 Listen
............................................................................ 2486.5.4 Voice Question
............................................................................ 2496.5.5 Campaign
..................................................................... 2506.6 Configuration Actions
............................................................................ 2516.6.1 Edit Play List
............................................................................ 2516.6.2 Record Name
............................................................................ 2526.6.3 Play Configuration Menu
............................................................................ 2536.6.4 Select System Prompt Language
..................................................................... 2546.7 Telephony Actions
............................................................................ 2556.7.1 Variable Routing
............................................................................ 2576.7.2 Route Incoming Call
............................................................................ 2576.7.3 Route by Call Status
............................................................................ 2586.7.4 Transfer
............................................................................ 2596.7.5 Whisper
............................................................................ 2606.7.6 Call List
............................................................................ 2616.7.7 Dial by Name
............................................................................ 2626.7.8 Conferencing Center
............................................................................ 2636.7.9 Assisted Transfer
............................................................................ 2656.7.10 Alphanumeric
..................................................................... 2676.8 Miscellaneous Actions
............................................................................ 2686.8.1 eMail
............................................................................ 2696.8.2 Open Door
............................................................................ 2706.8.3 Alarm Set
............................................................................ 2706.8.4 Clock
............................................................................ 2716.8.5 Post Dial
............................................................................ 2726.8.6 VB Script
............................................................................ 2736.8.7 Remote Call Flow
..................................................................... 2746.9 Condition Actions
............................................................................ 2756.9.1 Test Condition
............................................................................ 2766.9.2 Set User Variable
............................................................................ 2776.9.3 Test User Variable
............................................................................ 2786.9.4 Test Variable
..................................................................... 2806.10 Database Actions
............................................................................ 2816.10.1 Database Open
............................................................................ 2816.10.2 Database Execute
............................................................................ 2826.10.3 Database Get Data
............................................................................ 2826.10.4 Database Close
..................................................................... 2836.11 Queue Actions
Voicemail Pro Page 4
15-601063 Issue 20l (03 March 2009)IP Office
Page 5

............................................................................ 2846.11.1 Queue ETA
............................................................................ 2856.11.2 Queue Position
Prompts7.
..................................................................... 2887.1 US English Intuity Prompts
..................................................................... 3017.2 English Non-Intuity Prompts
Voicemail Pro Examples8.
..................................................................... 3108.1 Using VB Script
............................................................................ 3118.1.1 VBScript Properties
............................................................................ 3178.1.2 VBScript Methods
..................................................................... 3368.2 IVR: Connecting Voicemail Pro to a Database
............................................................................ 3378.2.1 Example
..................................................................... 3468.3 Dial by Name
............................................................................ 3478.3.1 Example Call Flow
............................................................................ 3488.3.2 Adding a Record Name Module
............................................................................ 3498.3.3 Using the Name Table
............................................................................ 3498.3.4 Changing Full Names
..................................................................... 3508.4 Campaigns
............................................................................ 3518.4.1 Managing Campaigns
............................................................................ 3538.4.2 Customer Prompts
............................................................................ 3548.4.3 Customer Menu
............................................................................ 3558.4.4 Campaign Identification
............................................................................ 3558.4.5 Granting Access to a Campaign
............................................................................ 3578.4.6 Using the Web Campaign
Contents
Appendix9.
..................................................................... 3629.1 Installing IMS
............................................................................ 3639.1.1 IMS Limitations
............................................................................ 3649.1.2 IMS Components
............................................................................ 3659.1.3 IMS Client PC Requirements
............................................................................ 3669.1.4 IMS Server PC Requirements
............................................................................ 3679.1.5 IMS Server Installation
............................................................................ 3809.1.6 IMS Client Installation
............................................................................ 3989.1.7 Maintenance
............................................................................ 4099.1.8 Known Issues
..................................................................... 4189.2 Installing VoiceMail Pro as an ACM Gateway
..................................................................... 4209.3 Installing Networked Messaging (VPNM)
............................................................................ 4219.3.1 Requirements for VPNM
............................................................................ 4229.3.2 Installing VoiceMail Pro with VPNM Support
............................................................................ 4259.3.3 Configuring VPNM Preferences
............................................................................ 4289.3.4 Testing a VPNM Setup
..................................................................... 4299.4 IP Office to Avaya Interchange
............................................................................ 4299.4.1 Configuring the Avaya Intuity Audix
............................................................................ 4309.4.2 Configuring the Avaya Interchange
............................................................................ 4339.4.3 Configuring a DNS Server
............................................................................ 4339.4.4 Verification and Troubleshooting
...............................................................................437Index
Voicemail Pro Page 5
15-601063 Issue 20l (03 March 2009)IP Office
Page 6

Page 7

Chapter 1.
Voicemail Pro
Voicemail Pro Page 7
15-601063 Issue 20l (03 March 2009)IP Office
Page 8

Page 9

Voicemail Pro:
1. Voicemail Pro
The diagram illustrates a Voicemail Pro system with some of the setup options. Full details on the installation options
available are covered in the Installing Voicemail Pro section.
18
· IP Office Control Unit
The IP Office Voicemail Pro licenses are entered into the configuration of the IP Office system. The licenses are
required to activate Voicemail Pro features. An unlicensed Voicemail Pro service will run for two hours to allow
demonstration and testing. Licence keys are issued against and validated against the unique serial number of the
feature key dongle used by the the IP Office. For USB and parallel port feature key dongles, the dongle must be
installed on a PC running the IP Office Feature Key Server application.
· Voicemail Pro Server
The Voicemail Pro Service is installed on the Voicemail Pro server PC. This becomes the PC where messages and
other data are stored for the mailboxes and services provided by Voicemail Pro.
· Voicemail Pro Client
The Voicemail Pro Client is used to manage and configure the Voicemail Pro service. It can be installed on the
Voicemail Pro server PC or on a separate PC. Only one client can connect to the server at any time.
· Telephone Extension
For internal extensions, the voicemail server can be configure to send message waiting indication. By default this
is automatically done when the extension users own mailbox contains new messages.
· User's PC
The following applications can be used on a user's PC to access their messages:
· Phone Manager
IP Office Phone Manager can be used to display the number of new messages in a mailbox and to access that
mailbox. The Pro version of Phone Manager can also control the playback of the individual messages once a
mailbox has been accessed.
· Web Browser
If the Voicemail Pro server PC is also running Microsoft's IIS web server, users can access voicemail features.
· Web Campaigns
The web campaigns option can be used to collect spoken and key press responses to question from
callers and then display those responses to internal agents.
· Web Voicemail
For Voicemail Pro 4.2+, licensed users can be configured to access their own mailbox using a web
browser.
· Email Options
The voicemail server can interact with email systems in a number of ways:
Voicemail Pro Page 9
15-601063 Issue 20l (03 March 2009)IP Office
Page 10

· Voicemail Email
Using either a MAPI client such as Outlook on the server PC or a connection to an SMTP email server,
Voicemail Pro can send email messages when a user has a new message. The email can be a simple
alert or can include an attached copy of the message. This options does not support synchronization of
messages between the users email program and their voicemail mailbox.
· IMAP
IP Office 4.2+ supports licensed users accessing their mailbox from an IMAP compatible email program
such as Outlook. This option includes synchronization between the voicemail messages in the email
client and the voicemail mailbox.
· Integrated Messaging Systems (IMS)
IMS allows the voicemail server to interact with a Microsoft Exchange Server. Users require an IMS
client component to be installed into their copy of Outlook.
· ContactStore Server
The current IP Office Voice Recording Library (VRL) application is Avaya IP Office ContactStore. The application can
be installed on the Voicemail Pro Server in a separate hard disk partition or on a separate server. The diagram
illustrates the option of installing ContactStore on a separate server.
Voicemail Pro is supplied on two CDs. The first CD contains the Voicemail Pro software. The second CD contains Avaya IP
Office ContactStore.
· The standard Voicemail Pro CD includes the software components for generic Text To Speech (TTS). Voicemail Pro
ScanSoft TTS is supplied on a separate set of 5 CDs. For more information, see the Installing Text to Speech
section.
65
Voicemail Pro Page 10
15-601063 Issue 20l (03 March 2009)IP Office
Page 11

1.1 What is New
The following are summaries of the new features in IP Office Voicemail Pro releases.
Voicemail Pro:
Voicemail Pro 4.2
· IP Office Unified Messaging Service (UMS)
Two new methods for users to access their mailbox are now supported. The methods are mailbox access using
email applications that support IMAP (Internet Message Access Protocol) and mailbox access via web browsers.
The use of these requires the IP Office configuration to contain UMS Web Services licenses for the number of
required users.
· IMAP Service
72
The Voicemail Pro now includes an IMAP server. Users can then access their voicemail messages using email
clients such as Outlook and Lotus notes that support an IMAP Client. When connected, the IMAP client and
Voicemail Pro will synchronize messages in the mailbox with message files in the IMAP client. Playback is
through the sound facilities of the user PC.
· Web Voicemail Service
75
The Voicemail Pro web service allows users to access their mailbox using a web browser. This has been tested
with the Internet Explorer 7, Firefox 2 and Opera 9.10 PC browsers. This method of access requires Voicemail
Pro to be installed on a PC already running Microsoft's IIS web server. Users can select to have message
playback via an IP Office extension or through their PC's sound facilities.
· Test Variable Action
278
The existing Check Digits action has been replaced by a Test Variable action. This, in addition to offering the
capabilities of the Check Digits action, provides significant enhancements. In addition to being able to match the
user's DTMF input against a specified string offered by the Check Digits action, the Test Variable action allows
the testing of the contents of any system variable against known user extensions, hunt-groups, mailboxes and the
contents of another variable. This will allow callers to enter numbers via a menu action, that can be verified as
matching an existing extension or hunt groups prior to attempting to carry out transfers to otherwise potentially
non-existent numbers.
· Menu Action Invalid Input Handling
240
The Menu action has been enhanced. It now includes a control for the number of retries for the caller to make a
valid entry and an Invalid Input result for connection to following call flow actions. Also prompts can be selected
for playback whenever an invalid entry or entry timeout occurs.
· License and Service Status Display
When the Voicemail Pro client is connected to a Voicemail Pro server, the Help | About screen displays a list of
the licenses being used by the Voicemail Pro server. This license details include the validation status and capacity
of those licenses. The status of related services, for example the UMS IMAP server, are also listed.
· System Variable Length Increase
211
Previously the length of values stored by system variables has been limited to 64 characters. That maximum
length has been increased to 512 characters.
· Outcalling Configuration
In conjunction with Phone Manager 4.2, Voicemail Pro 4.2 allows users to adjust their outcalling settings through
using a visual menu within Phone Manager.
· Using the Phone Manager interface, users can now apply a delay between each notification call in an
escalation list.
71
Voicemail Pro Page 11
15-601063 Issue 20l (03 March 2009)IP Office
Page 12

Voicemail Pro 4.1
In conjunction with IP Office 4.1, Voicemail Pro 4.1 supports the following new features:
· Windows Vista Support
Those components of Voicemail Pro previously supported on Windows XP Pro are now also supported on Windows
Vista (excluding Vista Home Basic and Vista Home Premium). The Voicemail Pro client is supported on Vista. The
Voicemail Pro server is supported on Vista but not with IMS or Web Campaigns.
· Automatic Recording Mailbox for Hunt Groups
By default automatic recordings for hunt groups are routed to the hunt group mailbox. Previously this could not be
changed except through customized call flows on the Voicemail Pro. An alternate mailbox destination can now be
specified through the Hunt Group | Voice Recording tab.
· Automatic Recording Mailbox for Account Codes
By default automatic recordings for account codes are routed to the mailbox of the user making the call. Previously
this could not be changed except through customized call flows on the Voicemail Pro. An alternate mailbox
destination can now be specified through the Account | Voice Recording tab.
· Call Data Tagging on Transfer Actions
The Transfer action now supports fields for setting the transfer source and description to display on phones
receiving the transfer. The ability to associate call data for MS-CRM via Assisted Transfer actions is now also
supported on Transfer actions.
· Call Transfer Announcements
The Transfer and Assisted Transfer actions can be configured to announce the transfer to the caller. The
258 263
announcement uses the recorded name of the mailbox associated with the transfer if available or the number if
otherwise.
· LIFO/FIFO Mailbox Operation
The default message playback order of First In-First Out (FIFO) can now be changed to Last In-First Out (LIFO).
This is separately adjustable for new, old and saved messages. These are set through the System Preferences |
Housekeeping tab (Administration | Preferences | General ).
111 111
· Time in Queue and Time on System Variables
Two new variables can be used in Queued and Still Queued call flows. They are $TimeQueued for the time in the
queue and $TimeSystem for the time the call has been on the IP Office system.
· Castelle Fax Server Support
The Voicemail Pro can be configured to recognize faxes of this type left in user's email mailboxes and include
announcement of there presence in the user's mailbox prompts.
· Hunt Group/Account Code Call Recording Destination
Previously the destinations for automatic call recording triggered by hunt groups or account codes could not be
changed except through a custom Voicemail Pro call flow. The IP Office 4.1 configuration now allows the required
destination for the call recording to be specified.
· $DDI System variable for DDI Numbers
This variable is available on DDI calls passed from the IP Office to the Voicemail Pro.
· Variable Routing (replaces the CLI Routing Action)
The existing CLI Routing action has been replaced by the Variable Routing action. This action allows the call
routing to be based on matching specified values to system variables such as $CLI and $DDI. The numbers to
which matching is performed can include wildcards such as ? for a single digits and * for any digits.
19
176
176
176
176
258
258
111
211
128
176
211
255
255
Voicemail Pro 4.0
In conjunction with IP Office 4.0, Voicemail Pro 4.0 supports the following new features:
· Upgrade
You can now upgrade without having to remove previous versions of the software.
· Outcalling
When a new voice message is left in a user's mailbox, notification can be automatically sent to a selected external
number. Notification can be sent for all new messages or only messages marked as priority. If there is no response
to the first notification there is an escalation capability. A user can configure their outcalling settings using their
telephone handset. Details on how to configure outcalling for individuals can be found in the Intuity Mailbox guide.
· Personal & Hunt Group Announcements
Personal announcements can be recorded. A caller will hear the user's personal announcement before being
transferred to voicemail, if available.
· Channel Reservations
Specific functions can have voicemail channels reserved for their use. The channels are reserved in IP Office
Manager. By default there are no reserved channels.
· Automatic Recording
Incoming call routes can be configured to be automatically recorded.
Voicemail Pro Page 12
42
196
181
103
175
15-601063 Issue 20l (03 March 2009)IP Office
Page 13
Voicemail Pro: What is New
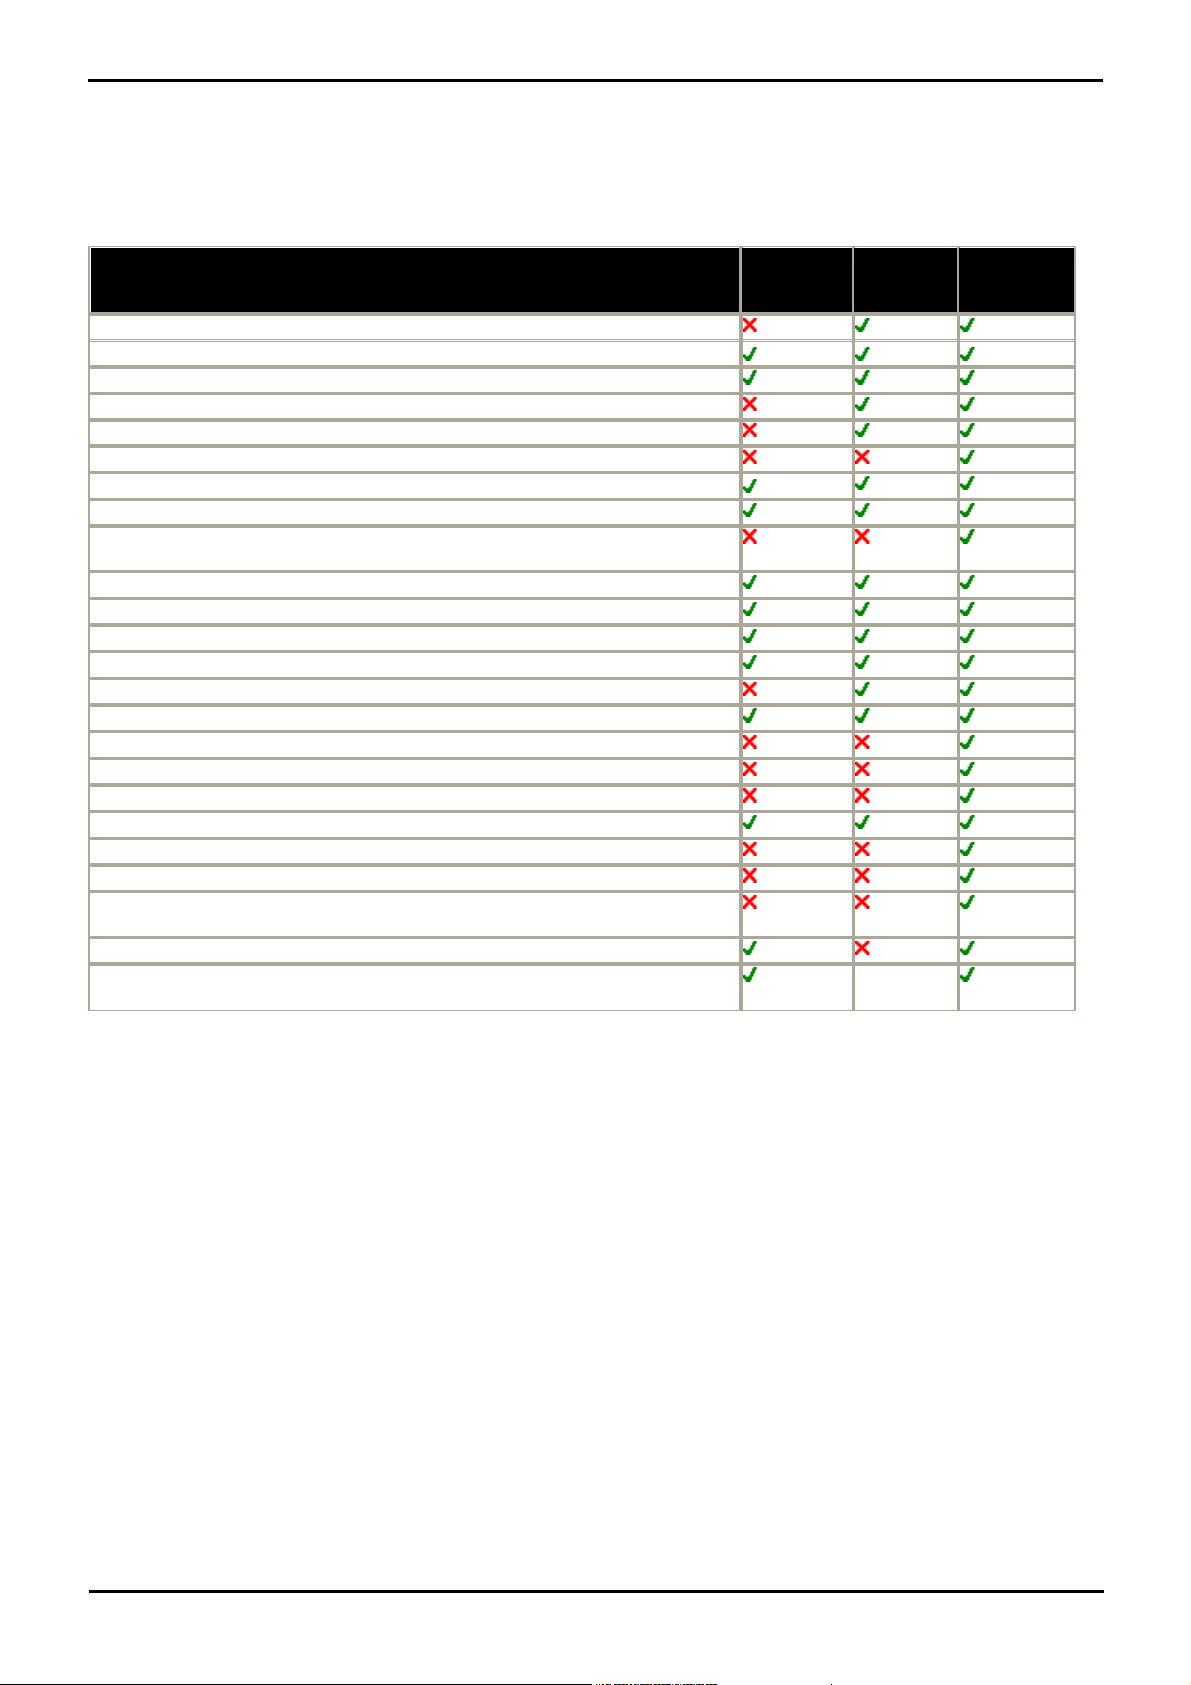
Feature
Embedded
Voicemail
Voicemail
Lite
Voicemail
Pro
Integration with Phone Manager Pro.
Create personal greetings.
1 only
1 only
9 max
Selection of voicemail transfer numbers
Play a greeting continuously.
Forward or copy a message to Email.
Listen to an Email using Text To Speech.
Send Email Notification.
*
Forward a voice message to another mailbox or multiple mailboxes.
Forward a voice message to multiple mailboxes using a Personal Distribution
List.
Forward a voice message with a header
Rewind Message
Fast forward a message
Skip a message
Pause a message
Skip Message
Set message priority
Control when old messages are automatically deleted.
Alphanumeric data collection
Give callers a choice of transfer options.
Call recording
Create Campaigns
Receive message notification at destinations configured by the user (known as
Outcalling).
Transfer to Fax
Reply to a message if CLI is available
Internal
Only
1.2 Features of Voicemail Pro
Voicemail Pro provides voicemail for every telephone on the system. Messages can be retrieved from a user's own
extension or from another telephone. Voice messages can also be forwarded to other voice mailboxes. Using Voicemail
Pro call flows can be created that can, for example, guide a caller to the correct extension.
Listed below are some of the differences between Embedded Voicemail, Voicemail Lite and Voicemail Pro. For a fuller
comparison, see the product description.
*Added in IP Office 4.2.
Voicemail Pro Page 13
15-601063 Issue 20l (03 March 2009)IP Office
Page 14

1.3 Supported Languages
Brazilian Portuguese: ptb > pt > en.
Greek: el > en.
Chinese (Cantonese): zzh > en > enu.
Hungarian: hu > en.
Chinese (Madarin): ch > en > enu.
Italian: it > en.
Danish: da > en.
Korean: ko > en.
Dutch: nl > en.
Latin Spanish: eso > es > enu > en.
English UK: en.
Norwegian: no > en.
English US: enu > en.
Polish: pl > en.
Finnish: fi > en.
Portuguese: pt > ptb > en.
French: fr > frc > en.
Russian: ru > en.
French Canadian: frc > fr > enu > en.
Spanish: es > eso > en.
German: de > en.
Swedish: sv > en.
Turkey
[1]
: trk > tr > enu > en.
The voicemail system provides prompts to callers and mailbox users based on the Locale that is set in the System form
of IP Office Manager.
If the necessary set of language prompts is not available, the nearest available match is used. The list shows the first
choice language prompts that Voicemail Pro will try to use, followed by the second choice and so on. For example, if
prompts for users with their locale set to French Canadian are not available, Voicemail Pro looks for French prompts
instead, then English US and finally English UK. The abbreviations shown in the table indicate the language prompt folder
used in order of precedence.
Voicemail Pro server prompts can be installed in the following languages:
1. Turkish prompts are not provided or installed but the Turkish locale is recognized. English (US) prompts are used if
· TTY (Teletype (Textphone)) is included in the list of installable languages even though it is not a language. TTY is a
text-based system that is used to provide service to users with impaired hearing or vision. For more information, see
Support for Callers with Impaired Hearing:Overview .
Individual users can have their own Locale setting. Voicemail then provides them with the appropriate language prompts
if they are available. This is set either through the IP Office Manager User form or through the language choice on some
telephones. For more information, see the appropriate telephone User Guide.
The availability of a language in voicemail does not necessarily indicate support for IP Office in a country that uses that
language. Contact your local Avaya office for details of which countries support IP Office.
· All Voicemail
For calls to voicemail, the locale that is passed to voicemail to determine the prompt to play (if available) is:
· The user locale, if set, is used if the caller is internal.
· The incoming call route locale, if set, is used if caller is external.
· If the the possible locales above are not set, the system locale is used.
· The short code locale, if set, is used and overrides the options above if the call is routed to voicemail using the
short code.
installed, otherwise English (UK). Fallback route added as part of Voicemail Pro 4.2.
183
Voicemail Pro Page 14
15-601063 Issue 20l (03 March 2009)IP Office
Page 15

Voicemail Pro: Supported Languages
IP Office
Maximum for
Voicemail Lite
Maximum for
Voicemail Pro
IP406 V2
420IP412430
IP500430
Small Office Edition
4
10
1.4 Number of Simultaneous Voicemail Users
All connections between the voicemail server and the IP Office are via the LAN using data channels. The maximum
number of data channels that can be used for voicemail operation at any moment are shown below.
Specific functions can have voicemail channels reserved for their use or may have channel restrictions. For more
information, see Voicemail Channel Reservations .
· Voicemail Pro Licenses
The actual number of ports available on Voicemail Pro is controlled by license keys entered through IP Office Manager.
For more information, see Voicemail Pro Licenses .
· The Voicemail Pro license enables 4 ports.
· Additional Voicemail Pro licenses can be added to enable further ports up to the maximum shown in the table.
· VoIP/VCM Channels
Though linked to the IP Office via a LAN connection, voicemail does not use VoIP VCM channels. The Voicemail Server
is seen as a device on the IP Office's TDM telephony interface.
· Calls to/from voicemail involving non-IP trunks and extensions do not use VCM channels.
· Calls to/from voicemail from IP trunks and extensions do use a VCM channel.
103
25
Voicemail Pro Page 15
15-601063 Issue 20l (03 March 2009)IP Office
Page 16

Page 17

Chapter 2.
Installing Voicemail Pro
Voicemail Pro Page 17
15-601063 Issue 20l (03 March 2009)IP Office
Page 18

2. Installing Voicemail Pro
Voicemail Pro 4.2 can be installed with the following IP Office systems:
· Small Office Edition.
· IP406 V2.
· IP412.
· IP Office 500
Voicemail Pro is not supported on an IP Office 500 running in IP Office Standard Edition mode. To use this
application an IP500 Upgrade Standard to Professional license is required.
There are a number of different types of Voicemail Pro installation that can be performed. Ensure that you have read the
appropriate section for the installation required before attempting the actual installation. Each type of installation may
have specific pre-requisites that must be completed before the Voicemail Pro software installation.
2.1 General Installation Requirements
Here is a list of general requirements for all types of installation.
· A PC with IP Office Manager and Microsoft .NET Framework versions 2.0 installed on it. If .NET 2.0 is not detected, you
will be prompted to install it before the Voicemail Pro installation proceeds.
· An IP Office Feature Key and if necessary (ie. for parallel and USB feature keys) a PC running the IP Office Feature Key
Server application. Refer to the IP Office Installation Manual for details.
· Licenses based on the serial number of the IP Office Feature Key. This should include:
· A license for Voicemail Pro and any additional ports is required. If Voicemail Pro Server is installed without a
license it will run for 2 hours and then shut down. For more information,
· For IP500 systems an Upgrade Standard to Professional license.
· Licenses for any other Voicemail Pro components being installed, see Voicemail Pro Licenses .
· The IP Office Voicemail Pro CD.
Tips
· Before you start to install Voicemail Pro it is advisable to check that the PC that you are using can connect to the IP
Office unit and that you can load and save a configuration file using IP Office Manager.
· Switch off any PC and hard disk sleep, power down, suspend, hibernation modes.
· The Voicemail Pro software needs to be installed using an account with full administrator rights on the PC. The service
subsequently runs under that account. We recommend that a specific account is created for this purpose and set so
that its password does not expire.
25
Voicemail Pro Page 18
15-601063 Issue 20l (03 March 2009)IP Office
Page 19

Installing Voicemail Pro: General Installation Requirements
Source
CD
IP Office Voicemail Pro 4.2 CD's (700459357)
ScanSoft TTS CD's (700293921)
DVD
IP Office 4.2 Applications DVD (700459340)
Languages
Chinese (Mandarin and Cantonese), Danish, German, Greek, English (UK), English (US), Spanish,
Latin Spanish, Finnish, French, French Canadian, Hungarian, Italian, Korean, Dutch, Norwegian,
Polish, Portuguese, Brazilian, Swedish.
IP500
IP Office Standard Edition, IP Office Professional Edition.
License
See below.
2.1.1 PC Specification
The PC specification given below are the absolute minimum. To avoid replacing the server when adding new applications
we recommend that at least a Pentium 4 2.8GHz or higher is used wherever possible.
This application requires various licenses entered into the IP Office configuration to control the features it offers and the
number of simultaneous connections, up to 30 on the IP412 and IP500 control units. The operation of Voicemail Pro can
be customized to provide special services.
The Voicemail Pro software can be installed as separate Voicemail Pro client and server parts. This allows the remote
administration of the Voicemail Pro server from a PC with just the Voicemail Pro client installed. A copy of the client is
automatically installed locally with the Voicemail Pro server.
The Voicemail Pro server part of the software consists of several components in addition to the core server software,
these are:
· Campaigns
The Voicemail Pro can be configured to run a campaign. This consists of a series of questions for which the
Voicemail Pro records the callers answer or key presses. The resulting recordings can then be played back by
users. The web aspect of campaigns allows user to perform this playback and processing of campaign recordings
via their web browser. This requires an IIS web server to be run on the same PC as the Voicemail Pro software.
· Text to Speech (TTS)
Through adding additional licenses, the Voicemail Pro is able to use the TTS functions of Windows to speak text
and numbers to callers in addition to recording prompts. This is intended mainly for scenarios where the Voicemail
Pro is obtaining text and number values from a customer database.
· UMS Web Voicemail
UMS allows users to access their voicemail mailbox using either an IMAP compatible email program or through
their web browser. UMS Web Voicemail requires the Voicemail Pro service to be installed on a server PC that has
IIS already present. It also installs PHP if not detected as already present.
· Integrated Messaging Service (IMS)
IMS allows synchronization between the users voicemail mailbox and their Microsoft Outlook via Microsoft
Exchange. IMS is not supported with UMS and vice versa.
· Installation on Windows Server Operating Systems
On many Windows server PC's, while the Windows Audio components are present by default they are not always
enabled. If this is the case the playback of voice prompts may be 'choppy' and the TTS (if installed) will not work. Note
however that enabling Windows Audio does not require the server PC to have a sound card installed.
1.Ensure that you have full administrator rights for the PC. This process will also require the PC to be restated.
2.In the Windows Control Panel select Sounds and Audio Devices.
3.If Windows Audio has not been enabled, select the Enable Windows Audio check-box.
Notes:
1. Use of the Large Fonts setting is not supported. Use of this option may cause options on some screens to become
inaccessible.
2. A 100Mbps network card is strongly recommended.
3. Free disk space requirements are also subject to the message storage required. For more information, see Disk
Space Requirements .
4. IMS and Web Campaigns options within Voicemail Pro are only supported on Windows Servers. Aspects of
operation such as Voicemail to Email, Integrated Messaging Pro (IMS), Web Campaigns, etc, are subject to further
requirements as listed in the relevant sections.
24
Voicemail Pro Page 19
15-601063 Issue 20l (03 March 2009)IP Office
Page 20
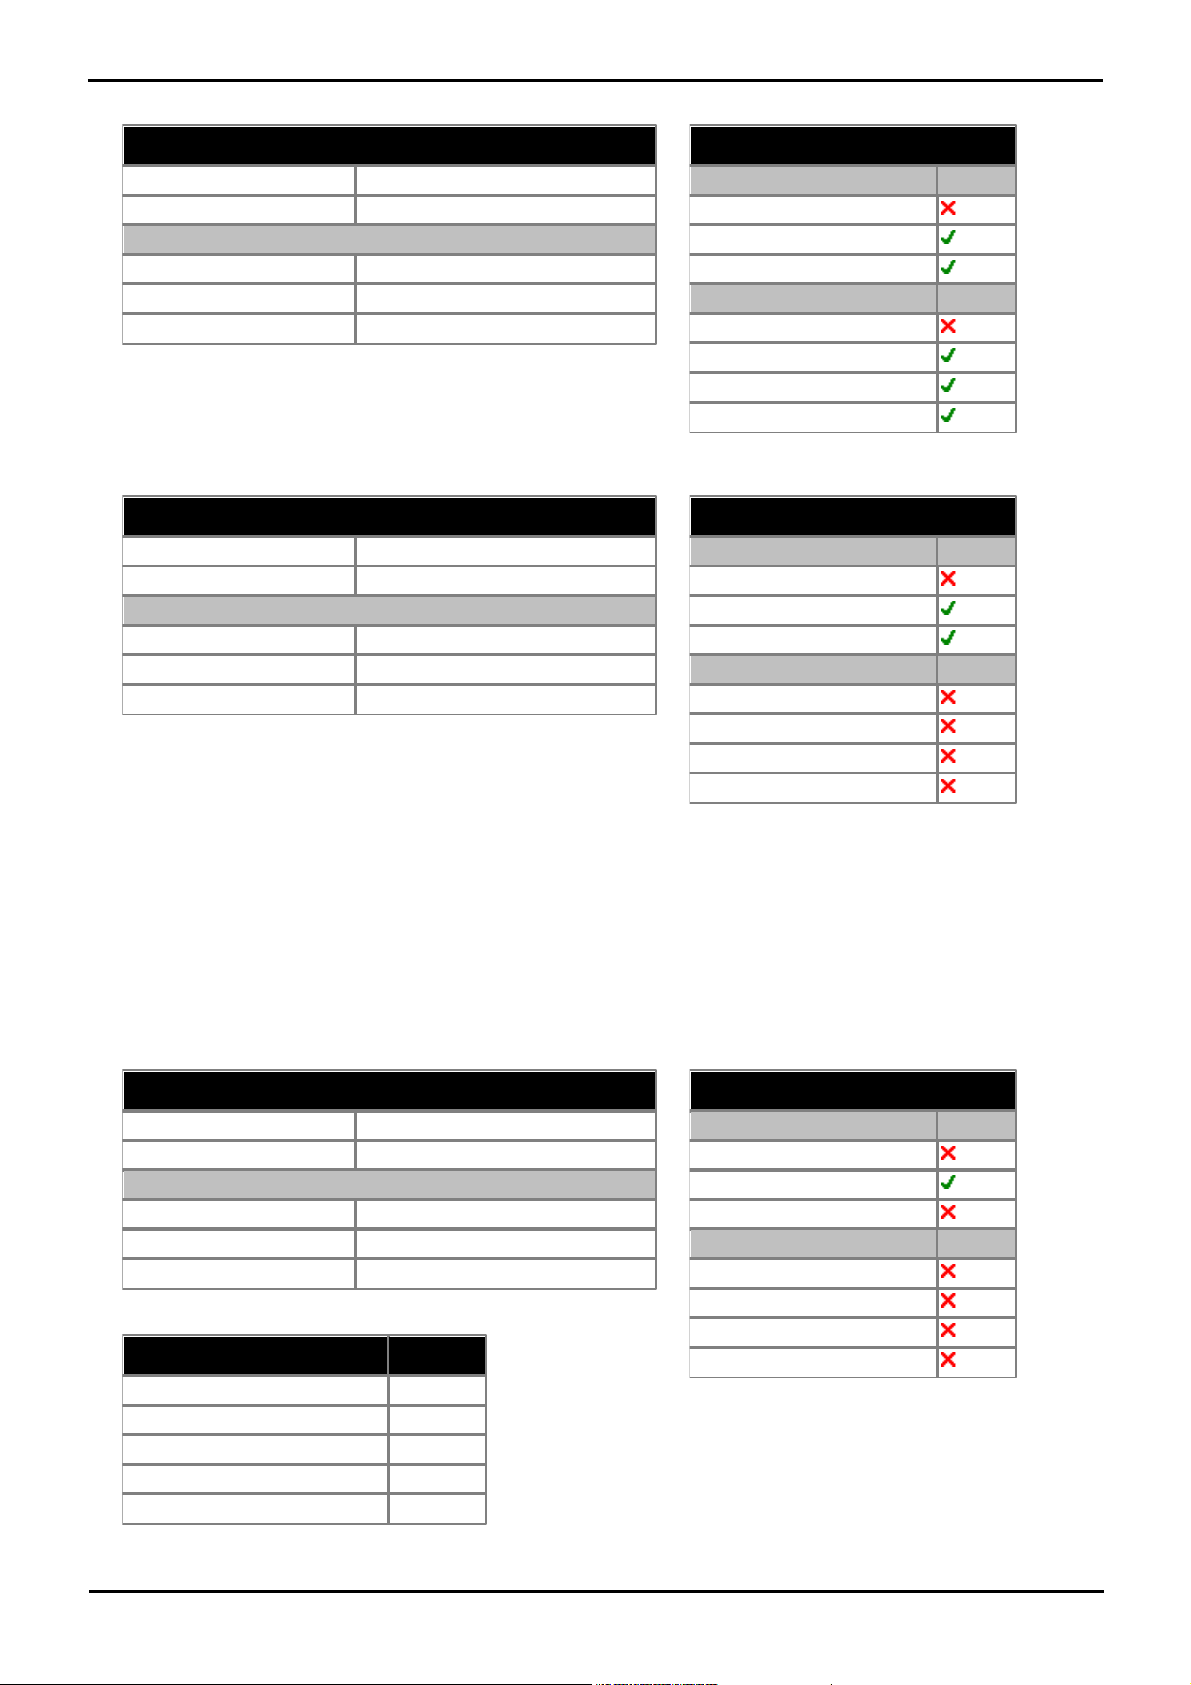
Basic Voicemail Pro
Minimum PC Requirements
RAM
256MB
Hard Disk Free Space
2GB*
Processor:
- Pentium
P4 1.4GHz
- Celeron
Any 1.7GHz
- AMD
Any 1.4GHz.
*Also allow 1MB per minute for message and prompt storage.
Operating System Support
Server OS:
2000 Server
2003 Server
2008 Server
Client OS:
2000 Professional
XP Professional
Vista Business/Enterprise
Vista Ultimate
Minimum PC Requirements
RAM
512MB
Hard Disk Free Space
2GB*
Processor:
- Pentium
P4 2.8GHz
- Celeron
Not tested.
- AMD
Athlon XP 3000+, Athlon 64
*Also allow 1MB per minute for message and prompt storage.
Non OS Applications
IMS
Microsoft Exchange 2000
Yes
Microsoft Exchange 2003
Yes
Microsoft Exchange 2007
No
Microsoft Outlook 2003*
Yes
Microsoft Outlook 2007*
Yes
Operating System Support
Server OS:
2000 Server
2003 Server
2008 Server
Client OS:
2000 Professional
XP Professional
Vista Business/Enterprise
Vista Ultimate
Voicemail Pro plus UMS Web Voicemail and/or Campaigns
· Both Web Campaigns and UMS Web Voicemail require the IIS web server on the voicemail server PC to be
enabled.
· Windows 2008 Server IIS does not support legacy IIS applications such as Campaigns by default. This is
rectified by reinstalling IIS from the Windows installation disk, and selecting Legacy IIS support.
· UMS Web Voicemail will install PHP is not detected as already installed.
· UMS (IMAP or Web Voicemail) cannot be installed if IMS is installed and vice versa.
Voicemail Pro plus IMS
Note that IMS is not supported with UMS.
Voicemail Pro Page 20
15-601063 Issue 20l (03 March 2009)IP Office
Page 21

Installing Voicemail Pro: General Installation Requirements
*Not supported in caching mode.
Voicemail Pro Page 21
15-601063 Issue 20l (03 March 2009)IP Office
Page 22
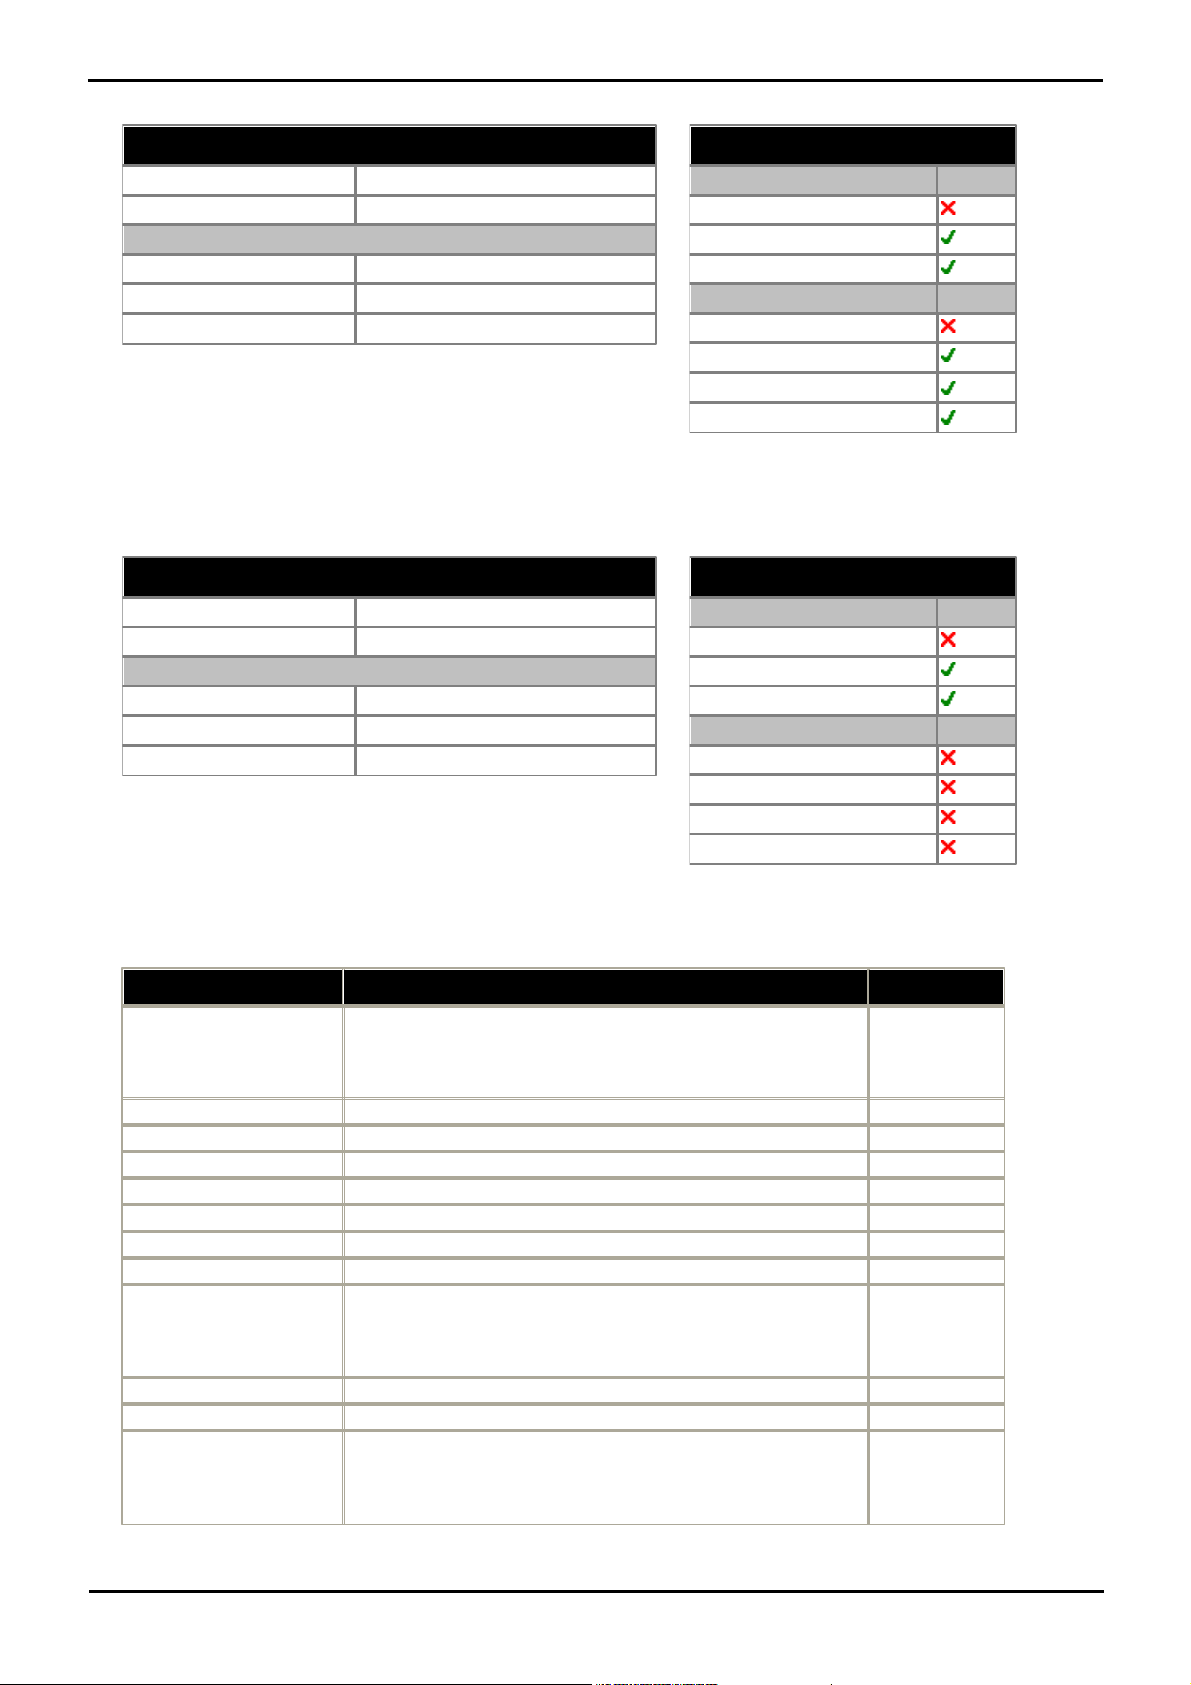
Voicemail Pro plus IVR and or TTS
Minimum PC Requirements: Basic Voicemail Pro
RAM
512MB
Hard Disk Free Space
20GB*
Processor:
- Pentium
P4 2.8GHz
- Celeron
Not tested.
- AMD
Athlon XP 3000+, Athlon 64
Also allow 1MB per minute for message and prompt storage.
*Generic TTS only. The current ScanSoft TTS provided with Voicemail
Pro is not supported on Vista.
Operating System Support
Server OS:
2000 Server
2003 Server
2008 Server
Client OS:
2000 Professional
XP Professional
Vista Business/Enterprise
*
Vista Ultimate
*
Minimum PC Requirements: Basic Voicemail Pro
RAM
512MB
Hard Disk Free Space
10GB*
Processor:
- Pentium
P4 2.8GHz
- Celeron
Not tested.
- AMD
Athlon XP 3000+, Athlon 64
Also allow 1MB per minute for message and prompt storage.
Operating System Support
Server OS:
2000 Server
2003 Server
2008 Server
Client OS:
2000 Professional
XP Professional
Vista Business/Enterprise
Vista Ultimate
Component
Location - %ProgramFiles%\Avaya\IP Office\
Ports
Voicemail Pro Service
Voicemail Pro\VM\vmprov5svc.exe
UDP 50791.
UDP 50795.
ALL 50801.
ALL 8089.
VMPro Database
Voicemail Pro\VM\VMPDBSvc.exe
VPIM Client
Voicemail Pro\VPIMClient.exe
VMPro VPIM DBSVR
Voicemail Pro\VPIM\vpimdbsvr.exe
VMPro VPIM Receiver
Voicemail Pro\VPIM\VPIMReceiver.exe
VMPro VPIM Server
Voicemail Pro\VPIM\VPIMServer3.exe
IMS Admin
Voicemail Pro\IMS\IMSAdmin.exe
IMS Service Restart
Voicemail Pro\IMS\IMSServiceRestart.exe
IMS Gateway Service
Voicemail Pro\IMS\UMServer.exe
TCP 445.
TCP 593.
UDP 445.
UDP 593
IMS Voice Service
Voicemail Pro\IMS\VMServer.exe
IMS Security
Voicemail Pro\VM\IMSSec.exe
IMS Client for Outlook
%ProgramFiles%\Avaya\IMS Client\UMSForm.exe
TCP 445.
TCP 593.
UDP 445.
UDP 593.
· If the database being queried is located on the VM Pro server the query speed of the database will be affected by
the amount of memory available. Please take into account the memory requirements of the database being
queried.
Voicemail Pro plus Compact Call Center
· VM Pro and CCC can be run on the same server up to a maximum of 25 agents, 8 ports of VM Pro. Any Dual Core
CPU of 2.4Ghz and higher is supported.
Ports
Voicemail Pro Page 22
15-601063 Issue 20l (03 March 2009)IP Office
Page 23

Installing Voicemail Pro: General Installation Requirements
2.1.2 Network Requirements
The PC should be configured and tested for TCP/IP networking.
We strongly recommend that the voicemail server PC is connected to the IP Office Control Unit directly or via a LAN
switch.
If directly connected, changing the settings of the PC network card to match the IP Office control unit can resolve some
issues. This should be done according to the PC or network card manufacturer's instructions. The options for IP Office
LAN ports are:
· IP412: Use LAN1 and half duplex.
· Small Office Edition, IP406 (V2) and IP500: Full duplex.
· All IP Office LAN ports are 10Mbps/100Mbps auto sensing.
If not directly connected, using any of the above settings must be supported and matched by the intervening network
equipment.
· The PC should have a fixed IP address. Although PCs in a DHCP network may retain the same IP address between
reboots this is not guaranteed.
· If the IP Office is acting as a DHCP server, it defaults to using 192.168.42.2 to 192.168.42.201 for DHCP clients.
This leaves 192.168.42.202 to 192.168.42.254 for devices that require fixed IP addresses.
Voicemail Pro Page 23
15-601063 Issue 20l (03 March 2009)IP Office
Page 24

2.1.3 Disk Space Requirements
The following are only approximations:
· At least 2GB of free disk space is required on the operating system drive (by default c:), regardless of to which drive
Voicemail Pro is actually installed.
· A compact Voicemail Pro installation requires 130MB.
· A typical installation requires approximately 255MB.
· A custom installation, including VPNM and IMS requires up to 2GB of disk space. However, prompts and recorded
messages consume an additional 1MB of disk space per minute.
· For Avaya IP Office Small Office Edition, you can expect to require at least 200 minutes of message recording
space, that is 200MB.
· For a busy environment you can expect to require at least 1000 minutes of message recording space, that is
1GB.
· If you are installing the Client only, you can expect to require at least 170MB.
2.1.4 Web Server Operation
If web browser access is required, the Microsoft IIS Web Server must be installed on the server PC before Voicemail Pro
is installed:
· Microsoft web server products run as services and require Voicemail Pro to also run as a service. This applies on
Windows 2003 or XP.
· Internet Information Server 5.0 or higher is required.
2.1.5 Voicemail Email Connection
Voicemail Email operation is supported using either MAPI or SMTP. MAPI requires the Voicemail Pro server PC to have a
MAPI-compliant email client installed. For information, see Installing Voicemail Email:Overview .
If Text to Speech is installed, email text to speech is supported using MAPI. For more information, see Setting up Text to
Speech to Read Email .
In both of the above cases, full email sending from the server PC to a user PC should be configured and tested before
Voicemail Pro is installed. Testing should use the same PC user account under Voicemail Pro is to be installed.
70
44
2.1.6 ContactStore Operation
The current IP Office Voice Recording Library (VRL) application is Avaya IP Office ContactStore. This application and its
installation are documented separately.
However:
· IP Office ContactStore should be installed after Voicemail Pro has been installed and its operation verified.
· IP Office ContactStore must use a separate hard disk partition for its message archiving from that used by
Voicemail Pro for current mailbox messages. Use of a separate hard disk or installation onto a separate server PC
are alternatives.
· The use of RAID 1 or RAID 5 are recommended.
· The use of a DVD recorder for long-term archiving is recommended.
· A figure of 7.2MB per hour for archived recordings is given.
· The archived messages held by IP Office ContactStore are accessed via web browser using the port address 8888.
This port address is not configurable and so it is necessary to ensure that it does not conflict with any other web
server service running on the same server PC.
Voicemail Pro Page 24
15-601063 Issue 20l (03 March 2009)IP Office
Page 25

Installing Voicemail Pro: General Installation Requirements
2.1.7 Voicemail Pro Licenses
The following License Keys can be used with Voicemail Pro. The license keys are entered into the IP Office configuration
using the IP Office Manager. If the Voicemail Pro server is installed without a license, it will run for 2 hours and then
shutdown.
· Voicemail Pro (4 ports)
This is the basic license for all Voicemail Pro operation and must be present. It also enables 4 ports.
· IP500 Upgrade Standard to Professional
The IP Office 500 does not support Voicemail Pro unless this license is present.
Additional Port Licenses
The port licenses control the number of ports (simultaneously connected calls into/from the Voicemail Pro server). Note:
The maximum number of ports supported for voicemail operation is set by the type of IP Office control unit. For more
information, see Number of Simultaneous Voicemail Users . Multiple port licenses can be used to achieve the number
of ports required.
· Additional Voicemail Pro (2 ports)
Enables 2 additional Voicemail Pro ports.
· Additional Voicemail Pro (4 ports)
Enables 4 additional Voicemail Pro ports.
· Additional Voicemail Pro (8 ports)
Enables 8 additional Voicemail Pro ports.
· Additional Voicemail Pro (16 ports)
Enables 16 additional Voicemail Pro ports.
Voicemail Pro Feature Licenses
These licenses enable the use of specific features within Voicemail Pro.
· Integrated Messaging
Enables operation of IMS with Voicemail Pro.
· VMPro VB Script
Enables use of VB Scripting through the VB Script action
· VMPro Database Interface
Enables database integration within call flows.
· VMPro TTS (Generic)
Enables use of text to speech facilities using the default Windows and third party TTS engines. One license per
simultaneous instance of TTS usage.
· VMPro TTS (ScanSoft)
Enables use of text to speech facilities using Avaya supplied TTS (ScanSoft) engines. One license per simultaneous
instance of TTS usage.
· Networked Messaging
Enables the use of Voicemail Pro Network Messaging.
· VMPro Recording Administrators
Allows call recordings to be transferred to a VRL (Voice Recording Library) application. The currently supported
application is ContactStore for IP Office.
· For centralized voicemail operation, a VMPro Recording Administrators license is required in each IP Office
system for which VRL support is required.
· UMS Web Services (IP Office 4.2+)
Allows the voicemail server to run IMAP and Web Voicemail services. The number of UMS Web Services licenses
set the number of users who can be configured to access either of those services.
15
Voicemail Pro Page 25
15-601063 Issue 20l (03 March 2009)IP Office
Page 26

2.1.8 User and Group Mailboxes
The voicemail server creates mailboxes based on the user and hunt group names that are entered in the IP Office
Manager application. Whenever the Voicemail Pro is restarted or the IP Office configuration is changed, new mailboxes
are created for any new names that are found.
This method of operation has the following consequences:
· Mailboxes are based on names
For all users and groups, if their name is changed or deleted, they are no longer associated with their former mailbox
and any associated Voicemail Pro start points.
· Voicemail is case sensitive
If a mailbox or start point name is entered incorrectly in IP Office Manager or Voicemail Pro, the intended operation will
not occur and the call may be disconnected.
· Voicemail removes spaces at the end of mailbox names
If spaces are left at the end of a mailbox user's name in IP Office Manager, when the mailboxes are created, the space
at the end of the name is dropped. When this occurs the mailbox cannot be found as there is a mismatch between the
user name and directory.
Voicemail Pro Page 26
15-601063 Issue 20l (03 March 2009)IP Office
Page 27

Installing Voicemail Pro: General Installation Requirements
2.2 Basic Voicemail Installation
When you complete a full Voicemail Pro installation you install the Voicemail Pro Server and Client together. With this
option you can select some or all Voicemail Pro features to install. You can choose a compact, typical or custom
installation.
Compact Installation
Choose the Compact option to install the minimum set of Voicemail Pro features. If only English language prompts are
required, this is the quickest way to install Voicemail Pro. For more information, see Installing Compact Voicemail Pro
Server and Client . The features installed are:
· The Voicemail Pro Client.
· The Voicemail Pro Server (installed as a Service on Windows 2003/XP Professional).
· Help files and .wav files for the Voicemail Prompts in English.
· Help files and wav files for the Voicemail Prompts in the Language closest to that of the target machine locale.
Typical Installation
Choose the Typical option to install the most commonly used Voicemail Pro features. This option is recommended for
most users.
· Everything in the compact installation.
· Voicemail Pro Campaign Web Component.
· All languages.
28
Custom Installation
Choose the Custom option if you would like to choose the Voicemail Pro features to install. This option is recommended
for advanced users only. The following features are pre-selected and will be installed unless you choose not to install
them:
· Voicemail Pro Client.
· Voicemail Pro Server (installed as a Service on Windows 2003/XP Professional).
· Voicemail Pro Campaign Web Component.
· Help files and .wav files for the Voicemail Prompts.
· Help files and .wav files for the Voicemail Prompts in the Language closest to that of the target machine locale.
· Other supported language options.
Voicemail Pro Page 27
15-601063 Issue 20l (03 March 2009)IP Office
Page 28

2.2.1 Installing Compact Voicemail Pro Server and Client
If you are upgrading an existing Voicemail System, see Upgrading a Voicemail Pro System .
The compact (basic) installation of Voicemail Pro provides:
· The Voicemail Pro Client.
· The Voicemail Pro Server (as either an executable program or service according to the Windows version).
· Appropriate prompts for the selected installation language.
· Help files and .wav files for Voicemail Prompts in English.
· Help files and .wav files for Voicemail Prompts in the language closest to that used by the locale of the target
machine.
This is the minimum set of components that you need to run Voicemail Pro. Of all of the setup types, compact Voicemail
Pro is likely to take up the smallest amount of space but this depends on the language selections.
The process for installing a compact Voicemail Pro Server and Client comprises the following key steps:
1. Completing the pre-installation steps described in this section.
2. Installing the Voicemail Pro software as described in this section.
Before you begin:
1. Log on to the server PC using the account under which you intend the Voicemail Pro server or service to run. This
account must have full administrator rights to the local PC.
· Recommendation: Create a new user account called Voicemail and give it full administrator rights on the
PC. This will help to identify the purpose of the account. Set the account password so that it does not expire.
2. In IP Office Manager, check that the correct licenses for Voicemail Pro are installed and show a status of Valid. For
basic Voicemail Pro, the licenses required are:
· Voicemail Pro (4 ports) plus Additional Voicemail Pro (X ports) licenses up to the total number of ports
required or supported by the IP Office.
· Installation on Windows Server Operating Systems
On many Windows server PC's, while the Windows Audio components are present by default they are not always
enabled. If this is the case the playback of voice prompts may be 'choppy' and the TTS (if installed) will not work. Note
however that enabling Windows Audio does not require the server PC to have a sound card installed.
1.Ensure that you have full administrator rights for the PC. This process will also require the PC to be restated.
2.In the Windows Control Panel select Sounds and Audio Devices.
3.If Windows Audio has not been enabled, select the Enable Windows Audio check-box.
41
Voicemail Pro Page 28
15-601063 Issue 20l (03 March 2009)IP Office
Page 29
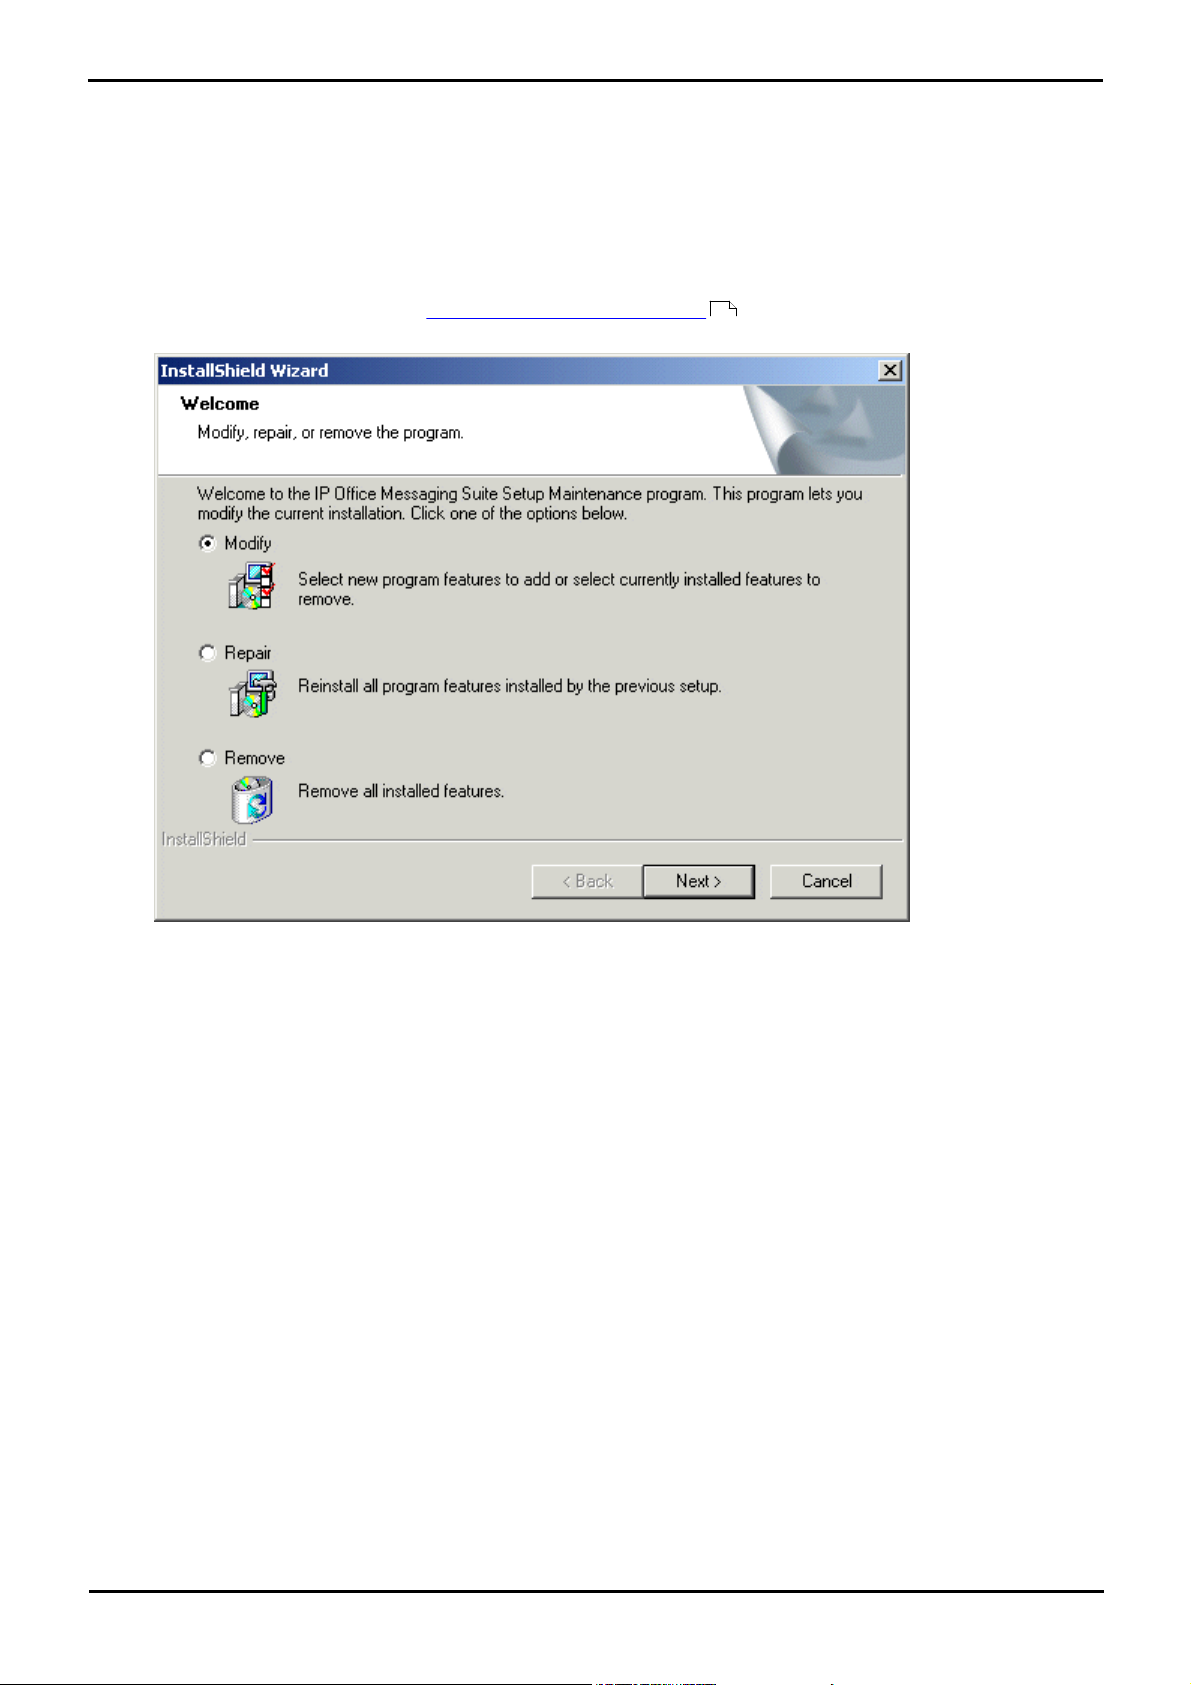
Installing Voicemail Pro: Basic Voicemail Installation
To install compact Voicemail Pro Server and Client:
1. Insert the IP Office Voicemail Pro CD. The installation should auto-start. If it does not auto-start, click Browse to
locate Setup.exe on the CD and then run it. The Choose Setup Language window opens.
2. Select the installation language. This language is used for the installation and for the default language prompts.
3. Click OK. Installation preparation begins.
4. Voicemail Pro 4.2+ requires Microsoft .NET 2.0 Framework. If this version is not detected, you are prompted to
install it. Click Yes to install Microsoft .NET 2.0 Framework.
If the following window opens, Voicemail Pro is already installed. You need to upgrade rather than install a new
version. For more information, see Upgrading a Voicemail Pro System . Otherwise the IP Office Voicemail Pro
installation starts and the Welcome window opens.
41
5. In the Welcome window, click Next. The Customer Information window opens.
6. In the Customer Information window, type a user name and the company name or use the default names that are
proposed. These settings do not affect Voicemail Pro when it is installed.
7. In the same window, choose the option that determines who should be able to use Voicemail Pro when it has been
installed. The recommended option is Anyone who uses this computer (all users).
8. In the Customer Information window, click Next. The Choose Destination Location window opens.
9. In the Choose Destination Location window, click Browse and locate the folder where the Voicemail Pro files are to
be installed. Otherwise, click Next to use the proposed folder. The Messaging Components window opens.
10. In the Messaging Components window, highlight Voicemail Pro (Full).
11. Click Next. The Setup Type window opens.
12. In the Setup Type window, select Compact.
13. Click Next. The Service Account Name window opens. Details of the default administrator account are already
filled in.
14. In the Service Account Name window, type the User Name and Password for the user account under which the
Voicemail Pro service should log on and run. This should be the Voicemail account created previously on the
domain and Exchange server. Alternatively, click Browse and select from the list of available PC or network
accounts.
15. Click Next. The Select Program Folder window opens. By default, the program folders are created in a folder called
IP Office. You can specify a different folder or select one from the list of existing folders. To specify a different
folder, type the folder name in the Program Folders box. Alternatively, to use an existing folder, highlight a name
in the list of existing folders.
16. Click Next. The account details that you have entered are verified.
17. If you entered a new user name, a message is displayed to ask if you want to create a new PC user account with
the specified name and password. Click Yes.
18. Click Next. A summary of the components that are about to be installed is shown. Check that this list is as
expected. If for any reason the details are not what you expect, click Back and make the necessary changes.
Voicemail Pro Page 29
15-601063 Issue 20l (03 March 2009)IP Office
Page 30

When you are satisfied that the details are correct, click Next to start copying the files.
19. The Setup Status window opens to keep you informed while the installation takes place.
20. When the installation is complete you are prompted to restart the computer. Choose Yes I want to restart my
computer now.
21. Click Finish to restart now.
22. When the computer restarts, log back in.
23. The IP Office Voicemail Pro - ACM Gateway Settings window opens. In the Mail Server box, type the name of the
mail server to use.
24. Choose Message Networking/Interchange to use Interchange or Modular Messaging to use Modular Messaging.
25. Click Next. The IP Office Voicemail Pro - Email Settings window opens.
26. Enter the name of the email account to use or click Browse and select an account to use.
27. Click Next. The IP Office Voicemail Pro SMTP Email Settings window opens.
28. In the Mail Server box, type the name of the SMTP mail server or use the name that is proposed. This should be
the fully qualified domain name.
29. In the Port Number box, type the number of the receiving port on the SMTP mail server. The default is 25.
30. To enforce server authentication, check the Server Requires Authentication box. This is optional. If you check
it you also need to provide the Account Name and Password that need to be entered. You can also choose whether
or not to set the Use Challenge Response Authentication option.
31. Click Finish. An attempt is made to validate the email settings. An error message is displayed when the attempt to
connect with an SMTP server fails.
32. Click OK to acknowledge the message. You have now finished installing the Voicemail Pro Server and Client
software. See Starting the Voicemail Pro Server .
36
Voicemail Pro Page 30
15-601063 Issue 20l (03 March 2009)IP Office
Page 31

Installing Voicemail Pro: Basic Voicemail Installation
2.2.2 Installing Typical Voicemail Pro Server and Client
If you are upgrading an existing voicemail system, see Upgrading a Voicemail Pro System .
This typical installation of Voicemail Pro provides:
· The Voicemail Pro Client.
· The Voicemail Pro Server (as either an executable program or a service).
· Web campaign components, including the IIS web server if it is not already installed.
· Options to install Help files and .wav files for the Voicemail Prompts in all supported languages.
The process for installing a typical Voicemail Pro comprises the following key steps:
1. Completing the pre-installation steps described in this section.
2. Installing the Voicemail Pro software as described in this section.
3. Configure Window 2003 to work with Web Campaigns. For more information, see Configuring Windows 2003 to
Work with Web Campaigns .
Before you begin:
1. Log on to the server PC using the account under which you intend the Voicemail Pro server or service to run. This
account must have full administrator rights to the local PC.
· We recommend that a new user account called Voicemail is created and given full administrator rights on the
PC. This will help identify the accounts purpose. We also recommend that the account is set so that its
password does not expire.
2. Check that the web server has been installed and is operating correctly. Test that its home page can be viewed
from other PCs on the customer's network, that is the PCs of users who will want to access campaign messages.
3. In IP Office Manager, check that the correct licenses for Voicemail Pro are installed and show a status of Valid. For
Voicemail Pro with Web Campaigns, the licenses required are:
· Voicemail Pro (4 ports) plus Additional Voicemail Pro (X ports) licenses up to the total number of port
required or supported by the IP Office control unit.
35
41
· Installation on Windows Server Operating Systems
On many Windows server PC's, while the Windows Audio components are present by default they are not always
enabled. If this is the case the playback of voice prompts may be 'choppy' and the TTS (if installed) will not work. Note
however that enabling Windows Audio does not require the server PC to have a sound card installed.
1.Ensure that you have full administrator rights for the PC. This process will also require the PC to be restated.
2.In the Windows Control Panel select Sounds and Audio Devices.
3.If Windows Audio has not been enabled, select the Enable Windows Audio check-box.
Voicemail Pro Page 31
15-601063 Issue 20l (03 March 2009)IP Office
Page 32

To install typical Voicemail Pro Server and Client:
1. Insert the IP Office Voicemail Pro CD. The installation should auto-start. If it does not auto-start, click Browse to
locate Setup.exe on the CD and then run it. The Choose Setup Language window opens.
2. Select the installation language. This language is used for the installation and for the default language prompts.
3. Click OK. Installation preparation begins.
4. Voicemail Pro 4.2+ requires Microsoft .NET 2.0 Framework. If this version is not detected, you are prompted to
install it. Click Yes to install Microsoft .NET 2.0 Framework.
If the following window opens, Voicemail Pro is already installed. You need to upgrade rather than install a new
version. For more information, see Upgrading a Voicemail Pro System . Otherwise the IP Office Voicemail Pro
installation starts and the Welcome opens.
41
5. In the Welcome window, click Next. The Customer Information window opens.
6. In the Customer Information window, type a user name and the company name or use the default names that are
proposed. These settings do not affect Voicemail Pro when it is installed.
7. In the same window choose the option that determines who should be able to use Voicemail Pro when it has been
installed. The recommended option is Anyone who uses this computer (all users).
8. In the Customer Information window, click Next. The Choose Destination Location window opens.
9. In the Choose Destination Location window, click Browse and choose the folder where the Voicemail Pro files are to
be installed. Otherwise, click Next to use the proposed folder. The Messaging Components window opens so that
you can choose the components that you want to install.
10. In the Messaging Components window, highlight Voicemail Pro (Full).
11. Click Next. The Setup Type window opens.
12. In the Setup Type window, select Typical.
13. Click Next. The Select the Web Server root directory window opens so that you can specify the folder where the
web campaign web pages are to be stored.
14. The default folder is C:\inetpub\wwwroot. To use the default folder, click Next. To specify a different folder,
type the path to the preferred folder location. Alternatively, click Browse and locate the folder to use.
15. Click Next. The Destination of the Web Script Directory window opens so that you can specify the folder where the
web campaign components are to be stored.
16. The default folder is C:\inetpub\scripts. To use the default folder, click Next. To specify a different folder, type
the path to the preferred folder location. Alternatively, click Browse and locate the folder to use.
17. The Service Account Name window opens. Details of the default administrator account might already be filled in.
18. In the Service Account Name window, type the User Name and Password for the user account under which the
VoicemailPro service should log on and run. This should be the voicemail account created previously on the domain
and Exchange server. Alternatively, click Browse and select from the list of available PC or network accounts or
click Next to use the proposed account details. The Select Program Folder window opens.
19. By default the program folders are created in a folder called IP Office. You can specify a different folder or select
Voicemail Pro Page 32
15-601063 Issue 20l (03 March 2009)IP Office
Page 33

Installing Voicemail Pro: Basic Voicemail Installation
one from the list of existing folders. To specify a different folder, type the folder name in the Program Folders box.
Alternatively, to use an existing folder, highlight a name in the list of existing folders.
20. Click Next. The account details that you have entered are verified. If you entered a new user name, a message is
displayed to ask if you want to create a new PC user account with the specified name and password. Click Yes. The
Select Program Folder window opens.
21. Select the program folder where you would like the icons for the Voicemail Pro components to be added. By default
the program icons are added to IP Office.
22. Click Next. A summary of the components that are about to be installed is shown. Check that this list is as
expected. Check that the required languages are listed. English is always listed in addition to the selected
installation language.
23. If for any reason the details are not what you expect, click Back and make the necessary changes. When you are
satisfied that the details are correct, click Next to start copying the files. The Setup Status window opens to keep
you informed while the installation takes place.
24. When the installation is complete you are prompted to restart the computer. Choose Yes, I want to restart my
computer now.
25. Click Finish to restart.
26. When the computer restarts, log back in.
27. When the server PC has restarted, the IP Office Voicemail Pro - Email Settings window opens so that you can
specify the name of the email account to use for outgoing SMTP e-mails from the Voicemail Pro server. In the
Accounts Details box, type the name of the email account to use. Alternatively, click Browse and select an account
to use.
28. Click Next. IP Office Voicemail Pro - SMTP Email Settings window opens so that you can specify details of the SMTP
server to which the Voicemail Pro server should send messages. A proposed server name might already be filled
in.
29. In the Mail Server box, leave the proposed name unchanged or type the name of the server to use. This should be
the fully qualified domain name.
30. In the Port Number box, type the number of the receiving port on the SMTP mail server. The default is 25.
31. To enforce server authentication, check the Server Requires Authentication box. This is optional. If you check it
you also need to provide the Account Name and Password that need to be entered. You can also choose whether
or not to set the Use Challenge Response Authentication option.
32. Click Finish. An attempt is made to validate the email settings. An error message is displayed when the attempt to
connect with an SMTP server fails.
33. Click OK to acknowledge the message. You have now finished installing the Voicemail Pro Server and Client
software. See Starting the Voicemail Pro Server .
34. If you are using IIS version 6 under Windows 2003 server, some configuration changes are required. For more
information, see Configuring Windows 2003 to Work with Web Campaigns .
36
35
Voicemail Pro Page 33
15-601063 Issue 20l (03 March 2009)IP Office
Page 34

2.2.3 Installing Custom Voicemail Pro Server and Client
If you are upgrading an existing voicemail system, see Upgrading a Voicemail Pro System .
A custom installation of Voicemail Pro provides everything that is included in a typical installation plus:
· The opportunity to install software features in addition to those included in the typical installation, for example
Integrated Messaging or Networked Messaging. For more information, see:
· Installing Voicemail Email:Overview .
· Installing Centralized Voicemail Pro:Overview .
· Installing Text to Speech Features:Overview .
· Installing Integrated Messaging:Overview .
· Installing Networked Messaging:Overview .
44
61
65
362
420
· The opportunity to choose not to install all of the components that are in a typical installation. For more information,
see Removing Software Features from a Voicemail Pro Installation.
34
· The opportunity to select the languages to use for the wav and help files.
· The opportunity to select the TTY prompts and install them. For more information, see Installing Voicemail Pro TTY
Prompts .
184
· The opportunity to select any languages that are not required and therefore to exclude them from the installation or
remove them if they have already been installed. This can save disk space.
Note that the list of custom components will be adjusted to hide Voicemail Pro components not supported by the
operating system.
· Windows 2008 Server IIS does not support legacy IIS applications such as Campaigns by default. This is rectified by
reinstalling IIS from the Windows installation disk, and selecting Legacy IIS support.
41
If you install the Web campaign component, you need to configure Window 2003 to work with Web Campaigns. For more
information, see Configuring Windows 2003 to Work with Web Campaigns .
35
2.2.4 Removing Software Features from a Voicemail Pro Installation
When you choose to install a custom version of Voicemail Pro you can select additional features to install, for example
IMS. You can also select any features that you do not want to install or actually want to remove. For example, if a feature
has already been installed, you can select it for removal.
To remove a software feature from a Voicemail Pro Installation:
1. Complete the steps for installing custom Voicemail Pro Server and Client. For more information, see Installing
Custom Voicemail Pro Server and Client .
2. When the Select Features window opens, uncheck any features that you do not want to install or that you want to
remove.
· Important - If you uncheck a feature that is already installed, it will be removed (uninstalled).
3. Continue the installation process as you would for installing custom Voicemail Pro Server and Client. For more information, see Installing Custom Voicemail Pro Server and Client .
34
34
Voicemail Pro Page 34
15-601063 Issue 20l (03 March 2009)IP Office
Page 35

Installing Voicemail Pro: Basic Voicemail Installation
2.2.5 Configuring Windows 2003 to Work with Web Campaigns
The following configuration changes are required for IIS version 6 running on a Windows 2003 server.
To configure Windows 2003:
1. Open the Windows Control Panel.
2. Select Administrative Tools > Computer Management.
3. Go to Services and Applications > IIS Manager > Web Sites > Default Web Site.
4. Under Web Sites, right-click Default Web Site and select Properties.
5. Select the Home Directory tab.
6. Under Application Settings section, set the Execute Permissions to Scripts and Executables.
7. Press OK twice.
8. Go to Web Service Extensions section under Web Sites.
9. Right-click and select Add a new web service extension....
10. In new web service extension, set the following values:
· Extension Name: campaigns.
· Required files: Click Add. Select the file type as CGI exe files and browse to the campaign.exe file location
specified during installation. This is usually c:\InetPub\wwwroot\scripts\campaign.exe or c:
\InetPub\scripts\campaign.exe.
· Set extension status to Allowed : Enable this option.
11. Press OK.
Voicemail Pro Page 35
15-601063 Issue 20l (03 March 2009)IP Office
Page 36

2.2.6 The Voicemail Pro Services
If Voicemail Pro has been installed successfully, if the server PC has been rebooted then the voicemail service is started
automatically. However it is useful to check the services and to know how to stop-start the services manually.
To check/restart the Voicemail Pro Service:
1. Open the Windows Control Panel.
2. Select Administrative Tools > Services.
3. The Voicemail Pro Service should be visible. Its Status should be Started and the Startup Type should be set
to Automatic.
· Other services will be present depending on the Voicemail Pro options installed. The services are:
· Voicemail Pro Service
This is the main Voicemail Pro service. Normally this is the only service that needs to be stopped and
restarted. It will stop and restart the other services that it uses.
· VMProDBService
This service is used for the Voicemail Pro database connectivity if licensed.
· IMS(Gateway), IMS(Voice) and IMS(Restart)
These services are used by the IMS components of Voicemail Pro if installed and licensed.
· VPNM Database Server, VPIM Receiver and VPNM Server
These services are used by the VPNM components of Voicemail Pro if installed and licensed.
4. Close Services.
To Initialize the Voicemail Pro Call Flow:
1. Select Start > Programs > IP Office > Voicemail Pro. The Voicemail Pro Client starts and the main window
opens.
2. Click the Save and Make Live icon.
3. Select Yes. The file root.vmp is created and made available to the Voicemail Pro server. This is the compiled noneditable version of the editable call flow.
4. Voicemail operation can now be tested from an extension by dialing *17.
Setting the Voicemail Services or PC to Restart Automatically
The following action is optional. If there is some fault causing the Voicemail Pro service to halt, that fault should be
investigated and fixed, however having the service or PC automatically restarted if possible will minimize the disruption to
the Voicemail Pro users.
1. Use the Windows control panel to select the Voicemail Pro Service.
2. Right-click on the service and select Properties.
3. Select the Recovery tab.
4. Use the options presented to either restart the service and or restart the PC should the operating system detect
that the Voicemail Pro service has halted.
Voicemail Pro Page 36
15-601063 Issue 20l (03 March 2009)IP Office
Page 37

Installing Voicemail Pro: Basic Voicemail Installation
Using a Batch File to Start Services
In some instances, certain computers might not respond quickly enough in order to start all of the Avaya services in the
correct order. In this circumstance, it can be advisable to create a batch file which will delay the start of these services
until the PC is fully running.
Avaya IP Office Services can be started successfully at system start-up using a scheduled task that initiates the batch file
below. This batch file ensures that the services will start successfully and in the proper order.
1. Set all Avaya services listed below to Manual start. Do not include Key Server.
2.Create the batch file below and save it to %SYSTEMROOT%. Only include lines for the services which are installed.
@echo off
rem Wait 60 seconds before execute.
timeout /t 60
net start VMProDBService
net start Voicemail Pro Service
net start IMS(Restart)
net start IMS(Voice)
net start IMS(Gateway)
3.Create a scheduled task to start the batch file at system start-up.
Voicemail Pro Page 37
15-601063 Issue 20l (03 March 2009)IP Office
Page 38

2.3 Client Only Installation
You can install the Voicemail Pro Client without the Voicemail Pro Server. This is known as a partial installation.
There is only one type of installation for the Voicemail Pro Client. Therefore you are not offered the choice of custom,
compact or typical during the installation process.
For information about Installing the Voicemail Pro Client only, see Installing the Voicemail Pro Client Only .
For information about installing the Voicemail Pro Client and Server together, see Installing Compact Voicemail Pro
Server and Client , or Installing Typical Voicemail Pro Server and Client .
28 31
39
Voicemail Pro Page 38
15-601063 Issue 20l (03 March 2009)IP Office
Page 39

Installing Voicemail Pro: Client Only Installation
2.3.1 Installing the VoiceMail Pro Client Only
You can install the Voicemail Pro Client on its own and use it to connect to a remote Voicemail Pro server.
To install the Voicemail Pro Client only:
1. Insert the IP Office Voicemail Pro CD. The installation wizard should auto-start. If it does not auto-start, browse to
and run Setup.exe on the CD. The Choose Setup Language window opens.
2. Select the installation language. This language is used for the installation and for the default language prompts.
3. Click OK. Installation preparation begins.
4. Voicemail Pro requires Microsoft .NET 2.0 Framework. If this version is not detected, you are prompted to install it.
Click Yes to install Microsoft .NET 2.0 Framework.
If the following window opens, Voicemail Pro is already installed. You need to upgrade rather than install a new
version. For more information, see Upgrading a Voicemail Pro System . Otherwise the IP Office Voicemail Pro
installation starts and the Welcome window opens.
41
5. In the Welcome window, click Next. The Customer Information window opens.
6. In the Customer Information window, type a user name and the company name or use the default names that are
proposed.These settings do not affect Voicemail Pro when it is installed.
7. In the same window choose the option that determines who should be able to use Voicemail Pro when it has been
installed. The recommended option is Anyone who uses this computer (all users).
8. In the Customer Information window, click Next. The Choose Destination Location window opens.
9. In the Choose Destination Location window, click Browse and choose the folder where the Voicemail Pro software is
to be installed. Otherwise, click Next to use the proposed folder. The Messaging Components window opens so that
you can choose the components that you want to install.
10. Highlight Voicemail Pro (Partial).
11. Click Next.
12. By default the program folders are created in a folder called IP Office. You can specify a different folder or select
one from the list of existing folders. To specify a different folder, type the folder name in the Program Folders box.
Alternatively to use an existing folder, highlight a name in the list of existing folders.
13. Click Next. The Start Copying Files window opens. Before any copying starts, you are presented with a summary of
the settings that you have chosen so far.
14. Review the settings to make sure that they are what you expect. Scroll down if necessary.
15. If the details are not what you expect, click Back and make the necessary changes.
16. When you are satisfied that the details are correct, click Next to start copying the files.
The Setup Status window opens to keep you informed while the installation takes place.
17. When the installation is complete you are prompted to restart your computer. Click Yes to restart now.
Voicemail Pro Page 39
15-601063 Issue 20l (03 March 2009)IP Office
Page 40

18. Click Finish.
19. When the computer restarts, log back in. You have now finished installing the Voicemail Pro Client software. You
can now start the Client and log in so that you start configuring remote Voicemail Pro servers. For more
information, see Starting the Voicemail Pro Client . If required, you can then add one or more administrator
users so that other administrators can work with the Voicemail Pro Client.
132 132
Voicemail Pro Page 40
15-601063 Issue 20l (03 March 2009)IP Office
Page 41

Installing Voicemail Pro: Client Only Installation
2.4 Upgrading Voicemail Pro
This section describes how to upgrade Voicemail Pro. The options available are:
· Upgrading from Voicemail Lite to Voicemail Pro. For information, see Upgrading from Voicemail Lite .
· Upgrading a Voicemail Pro version below 3.2 with the new version of software. For information, see Upgrading a
Voicemail Pro System .
· Upgrading a Voicemail Pro version 3.2 or higher with the new version of the software. For more information, see
Upgrade from 3.2 or higher .
41
42
2.4.1 Upgrade from below version 3.2
It is important that the settings of an existing Voicemail Pro are exported before any upgrade. Although folders that
contain prompts and messages are not affected by the upgrade process, the editable version of a customer call flow is
lost.
To upgrade from below version 3.2 to version 4.x+:
1.Export the Database
Before removing Voicemail Pro as part of an upgrade, you must create a backup copy of the call flow database. This
will contain any customizations made to the default call flow.
1.Start the Voicemail Pro Client.
2.From the File menu, select the option Import or Export.
3.Select the option Export call flows and click Next.
4.Enter a file path and file name ending in .mdb, for example C:\temp\backup.mdb. Click Next.
5.Click Finish to start the export then click Close to complete the export procedure.
6.Close the Voicemail Pro Client.
2.Back up the Registry
Any registry settings that are associated with Voicemail Pro need to be backed up.
1.Insert the Voicemail Pro CD for the new Voicemail Pro and cancel the install wizard that auto runs.
2.Right-click the CD drive and select Open.
3.Locate the file backupreg.bat and double-click it to run the application.
4.Check that the registry settings have been backed up. The batch file should have created 3 backup files in the
Windows Temp directory. Make sure that the following 3 files exist in that location:
· VMPro.arf
· NetAly.arf
· IMSGateway.arf
3.Remove Voicemail Pro
Any previous versions of Voicemail Pro must be removed before you start to install the new version.
1.Open the Windows Control Panel.
2.Select Add/Remove Programs.
3.Select IP Office Voicemail Pro and click Add/Remove.
4.From the options offered, select Remove and click Next.
5.Follow the prompts that you see on the screen during the removal process.
6.When the process has been completed, select the option Yes, I want to restart my computer now and click
Finish.
4.Restore the Registry
The Voicemail Pro registry settings that were backed up in step 2 needs to be restored.
1.Right-click the CD drive that contains the Voicemail Pro CD and select Open (reinsert the CD if necessary and
cancel the install wizard).
2.Locate the file restorereg.bat and double-click it to run the application. This restores the registry settings
previously associated with Voicemail Pro.
5.Install the New Software
For more information see Installing Voicemail Pro:Overview and then refer to the sections that relate to the type of
Voicemail Pro that you intend to install.
18
43
Voicemail Pro Page 41
15-601063 Issue 20l (03 March 2009)IP Office
Page 42

6.Restore the Database
The copy of the call flow database that contained any customizations made to the default call flow needs to be
restored.
1.Start Voicemail Pro.
2.From the File menu, select Import or Export. The Import or Export Call Flows window opens.
3.Select Import Call Flows.
4.Click Next.
5.Click the Browse button and locate the file that contains the backed up call flows.
6.Select the file and click Open.
7.In the Import or Export Call Flows window, click Next.
8.Click Finish to start importing the database.
9.Click Close to complete the import process.
10.Click on Save and Make Live to save the Call flows.
The new version of Voicemail Pro has been installed. Test that the system is running by dialing *17 from any extension.
You should hear the mailbox announcement.
2.4.2 Upgrade from Version 3.2+
You can directly upgrade versions of Voicemail Pro from Voicemail Pro 3.2 upwards. However we still recommend that
you follow the procedure for backing up the database before upgrading.
To upgrade from version 3.2 or higher:
1.Insert the new IP Office Voicemail Pro CD. The installation should auto-start. If it does not auto-start, click Browse
to locate Setup.exe on the CD and then run it. The Choose Setup Language window opens.
2.Select the installation language. The language selected is used for the installation.
3.Click OK. You are asked 'This setup will perform an upgrade of IP Office Voicemail Pro'. Do you want to continue?
4.Click Yes. The Upgrading the IP Office Voicemail Pro window opens.
5.Click Next to start the upgrade. The setup status window opens. The progress of the upgrade is indicated by a time
bar. When the InstallShield Wizard complete window opens.
6.Click Finish. The Email settings window opens.
7.Enter your email account details and click Next. The SMTP Email settings window opens.
8.Enter your SMTP Email details and click Finish. he SMTP settings entered will be validated. If an error occurs, the
validating configuration window opens containing the error . For more information, see SMTP Errors .
9.Click Yes when asked if you want to start the Voicemail Pro service.
The new version of Voicemail Pro has been installed. Test that the system is running by dialing *17 from any extension.
You should hear the mailbox announcement.
60
Voicemail Pro Page 42
15-601063 Issue 20l (03 March 2009)IP Office
Page 43

Installing Voicemail Pro: Upgrading Voicemail Pro
2.4.3 Upgrade to Voicemail Pro
You can upgrade from Voicemail Lite to Voicemail Pro. The process described here assumes that Voicemail Pro is being
installed onto the same PC that previously hosted Voicemail Lite. The steps described here will remove Voicemail Lite but
will not remove the existing mailbox messages and greetings.
To upgrade from Voicemail Lite to Voicemail Pro:
1.Remove Voicemail Lite
1.Make sure that Voicemail Lite is not running. It might be necessary to close the Voicemail Lite server program.
2.Open the Windows Control Panel and select Add/Remove Programs.
3.Select IP Office Admin Suite and click Change. The Welcome to the Installshield Wizard for IP Office Admin
Suite window opens.
4.Click Next. The Program Maintenance window opens.
5.Select Modify and click Next.
6.In the list of selected Features, click the option Voicemail Lite and select This feature will not be available.
The feature Voicemail Lite will have a red cross by the name. .
· Important - Do not uncheck any other boxes as this will also remove those features.
7.Click Next. The Ready to Modify the Program window opens.
8.Click Install. The Voicemail Lite program will be removed, which may take several minutes.
9.Click Finish to exit the InstallShield Wizard.
10.Click Close to close the Add/Remove Programs window.
11.Remove any shortcuts to VMLite.exe from Start > Programs > Startup.
2.Install the New Software
The next step is to install the Voicemail Pro software. For more information see Installing Voicemail Pro:Overview
and then refer to the sections that relate to the type of Voicemail Pro that you intend to install.
3.Move the Voicemail Lite Folders
This must be done before users start to use Voicemail Pro. As part of the upgrade procedure you need to move the
Voicemail Lite folders that contain any existing voicemail messages and mailbox greetings. This stage copies the
existing Voicemail Lite messages and greetings over the newly installed Voicemail Pro set.
4.Using Windows Explorer or My Computer, locate the folder C:\Program Files\Avaya\IP Office\Voicemail Server.
5.Copy all sub-folders and files in that folder.
6.Paste the sub-folders and files in the folder C:\Program Files\Avaya\IP Office\Voicemail Pro\VM. Replace any
existing folders.
7.Select the Mailbox Mode.
Voicemail Lite runs in IP Office mailbox mode. By default Voicemail Pro installs in Intuity mailbox mode. If required by
your users, you can set Voicemail Pro back to IP Office mailbox mode.
1.Start the Voicemail Pro Client.
18
2.Click the Preferences icon and select General.
3.On the General tab, change the Default Telephony Interface from Intuity to IP Office.
4.Click OK.
5.Click Save & Make Live.
The new version of Voicemail Pro has been installed. Test that the system is running by dialing *17 from any extension.
You should hear the mailbox announcement.
Voicemail Pro Page 43
15-601063 Issue 20l (03 March 2009)IP Office
Page 44

2.5 Voicemail Email Installation
Voicemail Email sends mailbox users who have been configured with an email address, an email whenever their mailbox
contains a new message. The notification email can contain an alert about the message or an attached copy of the
message.
· Although they are similar in concept, Voicemail Email and Integrated Messaging Service (IMS) are two different
components of Voicemail Pro and should not be confused.
Voicemail Email requires the voicemail server to be running under a user account that has access to either a MAPI
enabled email client program on the server PC or access to an SMTP email server.
SMTP: Simple Mail Transfer Protocol
This protocol allows the Voicemail Pro server to send outgoing emails to a specified SMTP server. Microsoft Exchange and most commercial email servers support SMTP to receive emails. SMTP for Voicemail Pro is therefore easy to implement in any business that has its own email server. For more information, see Installing Voicemail Pro for SMTP Voicemail Email
44
.
MAPI: Microsoft Windows Messaging Application Program Interface
This is a set of API's that allow MAPI applications to share information and messages. MAPI requires a MAPI compliant
email client program to be installed on the Voicemail Pro server. It also requires the Voicemail Pro service to be run using
a user account that is able to send emails via that MAPI client. Supported MAPI clients are:
· Outlook 2000, 2002, 2003, 2007
MAPI Voicemail Email can be used with Voicemail Lite and Voicemail Pro. For Voicemail Pro installed as a service (the
default on Windows 2000/2003/XP Professional), emails can be sent without having to open and run the MAPI email
client program. For Voicemail Pro installed as a server program, the email client program may have to be left open for
mail transfers to take place.
The exact method of integration between the voicemail server and the MAPI email client depends on whether the
voicemail server is part of a work group or a domain. This guide contains examples for both approaches.
The MAPI process described in this guide was based on Microsoft Windows 2000 Professional with Microsoft Outlook 2000
and Microsoft Outlook Express 5.5. Steps may differ depending on the version of Windows and email client used.
2.5.1 Installing VoiceMail Pro for SMTP Voicemail Email
To install Voicemail Pro for SMTP Voicemail Email
1. Obtain details of an email account that the Voicemail Pro service can use from whoever administrates the
customer's email server. The details required are:
· Email address.
· Server SMTP address.
· Account user name and password.
2. Install the Voicemail Pro software as required.
3. After the server PC restart, enter the Voicemail Pro SMTP email account settings when requested.
4. Configure the appropriate user accounts with the user's email address. For more information,see Configuring Email
Users and Groups for Voicemail Email.
Voicemail Pro Page 44
15-601063 Issue 20l (03 March 2009)IP Office
Page 45

Installing Voicemail Pro: Voicemail Email Installation
2.5.2 Domain Member
2.5.2.1 Installing VoiceMail Pro for MAPI VoiceMail Email as a Domain Member
Before you start to install the Voicemail Pro software, you must:
1. Create a voicemail domain account. For more information, see Creating a Voicemail Domain Account .
2. Configure Outlook. For more information, see Configuring Outlook for Internet Mail .
You are then ready to install Voicemail Pro for MAPI Voicemail Email as a Domain Member. This involves the following key
stages:
1. Install the Voicemail Pro software. For more information, see Installing the Voicemail Pro Software .
2. Change the SMTP settings, which are installed by default, to MAPI. For more information, see Switching Voicemail
Pro to MAPI .
48
51
2.5.2.2 Creating a Voicemail Domain Account
To create a Voicemail Domain Account
1. Make sure that the PC that will be running the voicemail server is a member of the domain. To join the domain you
will need the use of a log account with administrative permissions on the domain as well as the server PC, consult
the domain administrator.
· Windows 2000
Right click My Computer and select Properties. Select the Network Identification tab.
2. On the Exchange server:
· Create an account called Voicemail on the domain and an associated mailbox.
· Provide a secure password.
· Check the User Cannot Change Password and Password Never Expires boxes.
3. Log on to the voicemail server PC using a domain administrator account.
4. From the Control Panel, select Administrative Tools.
5. Select Computer Management | Local Users and Groups | Groups.
6. Double-click Administrators and select Add.
7. From the Look In list select the domain name.
8. In the Name window, locate and highlight Voicemail. Click Add followed by OK and OK to close.
45
47
Voicemail Pro Page 45
15-601063 Issue 20l (03 March 2009)IP Office
Page 46

2.5.2.3 Configuring Outlook for VoiceMail Email
To configure Outlook for Voicemail Pro email
1. On the desktop, right-click the Outlook icon and select Properties.
2. On the General tab, select Add.
3. Select Microsoft Exchange Server.
4. Click Next.
5. In the Server field, enter the name of the Exchange Server.
6. In the Mailbox field, enter Voicemail.
7. Click Next.
8. When you are asked if you travel with this computer, select No.
9. Click Next.
10. Click Finish.
11. Highlight the MS Exchange Settings and click Properties.
12. Highlight Microsoft Exchange Server and click Properties.
13. Click Check name and ensure that the name is resolved.
14. If the name is resolved, select Apply.
15. Click OK, OK and Close to shut the mail settings.
16. Do not continue until the name has been resolved correctly with the Exchange Server. If the name is not resolved,
check the account details with the Exchange Administrator.
17. Open Outlook and select Yes to register Outlook as the default email application.
18. Select Tools > Options.
19. Click the Preferences tab.
20. Click Email Options.
21. Uncheck Save copies of messages in Sent Items folder.
· You might want this option selected during initial setup to aid troubleshooting. However due to the size of wav
file message attachments you should uncheck it after installation testing is complete.
22. Log on to the Voicemail Pro Server PC using the voicemail account.
23. From Outlook, send a message direct to an extension user.
24. If this message is received correctly, you can continue installing the Voicemail Pro software. For more information,
see Installing the Voicemail Pro Software .
47
Voicemail Pro Page 46
15-601063 Issue 20l (03 March 2009)IP Office
Page 47

Installing Voicemail Pro: Voicemail Email Installation
2.5.2.4 Installing the VoiceMail Pro Software
To install the Voicemail Pro software
1. Log off and log back on using the Voicemail account and password.
2. Install the required Voicemail Pro software. For more information, see Installing Compact Voicemail Pro Server and
3. When the installation process requests a User Name and Password for the Voicemail Pro service, enter the
4. Restart the server PC when requested and log on using the Voicemail account.
5. When SMTP email details are requested, enter no values and ignore the error message following the SMTP check.
6. Start the Voicemail Pro server service. For more information, see Starting the Voicemail Pro Service .
7. Check that the basic voicemail services start and operate correctly.
8. The next step is to switch the Voicemail Pro to MAPI operation. For more information, see Switching Voicemail Pro
28 31
Client or Installing Typical Voicemail Pro Server and Client .
Voicemail account details.
to MAPI .
48
36
Voicemail Pro Page 47
15-601063 Issue 20l (03 March 2009)IP Office
Page 48

2.5.2.5 Switching VoiceMail Pro to MAPI
By default, the Voicemail Pro installation process assumes that SMTP will be used for Voicemail Pro email functions.
Therefore it requests an SMTP email account settings during installation setup. Voicemail Pro can use MAPI is a MAPI
compatible client is configured on the Voicemail Pro server and is accessible using the account under which the Voicemail
Pro server has been installed.
If you are installing IMS, use the IMS account previously created as part of the installation process. For more
information, see Installing IMS .
Some options are not available if you are working offline. You must be working online to use this feature.
To switch Voicemail Pro to MAPI
1.Start the Voicemail Pro Client.
2.Click Preferences and select General.
3.Click the MAPI tab.
362
4.The Use Email Protocol settings allow you to switch Voicemail Pro between MAPI and SMTP.
· If MAPI is selected, a valid MAPI profile and password must be entered in the fields above. That MAPI profile
must exist within the MAPI email client on the server PC and be useable by the account under which the
Voicemail Pro service is running.
· If SMTP is selected, the SMTP email account settings must be entered.
5.Click OK.
6.Click Save and Make Live.
Voicemail Pro Page 48
15-601063 Issue 20l (03 March 2009)IP Office
Page 49

Installing Voicemail Pro: Voicemail Email Installation
2.5.3 Work Group Member
2.5.3.1 Installing VoiceMail Pro for MAPI VoiceMail Email as a Work Group Member
Before you start to install the Voicemail Pro software, you must:
1. Create a voicemail user account. For more information, see Creating a Voicemail User Account .
2. Configure Outlook Express for Internet Mail. For more information, see Configuring Outlook Express for Internet
50
Mail .
3. Configure Outlook for internet mail. For more information, see Configuring Outlook for Voicemail Email .
4. Configuring Outlook for exchange server. For more information, see Configuring Outlook for Exchange Server .
The user name and password created are requested as part of the installation of the Voicemail Pro service. The process
described here assumes that Outlook is installed but has not been previously used or configured.
You are then ready to install the Voicemail Pro software. For more information, see Installing the Voicemail Pro Software
47
.
49
46
52
By default, Voicemail Pro is set to use SMTP for emails. You need to change this to MAPI. For more information see,
Switching Voicemail Pro to MAPI .
48
You also need to set the SMTP Email Account settings on the Voicemail Pro so that they match those of the customer's
email server. For more information, see Changing SMTP Email Account Settings .
55
2.5.3.2 Creating a Voicemail User Account
To create a Voicemail User Account
1. Log on to the server PC as the local administrator and create a new user. For this example the name of the user
account created used is Voicemail.
2. Set a secure password.
3. Clear User must change password at next logon and check Password never expires.
4. Click Create and then Close.
5. Right-click the New Account, and select Properties.
6. Select the Member Of tab.
7. Click Add.
8. In the Select Groups window, highlight Administrators and click Add. Click OK.
9. Continue with one of the following as appropriate to the installed MAPI client and method for sending email.
Voicemail Pro Page 49
15-601063 Issue 20l (03 March 2009)IP Office
Page 50

2.5.3.3 Configuring Outlook Express for Internet Mail
To configure Outlook Express for Internet Mail
1. Click the Outlook Express icon to start the Configuration wizard.
2. In the Display name box enter Voicemail.
3. Click Next.
4. Select I already have an e-mail address that I'd like to use and enter the address in E-mail address, eg.
voicemail@your_domain_name. Click Next.
5. Enter the name or address of the Incoming mail server and the Outgoing mail server. Note, if you enter the name,
you must ensure that the voicemail PC has the correct IP address of the DNS Server configured.
6. Click Next.
7. Enter the email account name and password, for example Voicemail. Select Remember password.
8. Click Next.
9. Click Finish to complete the wizard.
10. Open Outlook Express and select Tools > Options.
11. Click the General tab.
· Uncheck Send and Receive messages at Start up.
· Uncheck Check for new messages every.
12. Select the Send tab.
· Uncheck Save copy of sent messages in the 'Sent Items' folder.
· Check Send messages immediately.
· Under Mail Sending Format select Plain Text.
13. Click OK.
14. Log on to the server PC using the account that will be used for the Voicemail Pro server.
15. From Outlook or Outlook Express, send a message direct to an extension user.
16. If this message is received correctly, continue with installing the Voicemail Pro software.
Voicemail Pro Page 50
15-601063 Issue 20l (03 March 2009)IP Office
Page 51

Installing Voicemail Pro: Voicemail Email Installation
2.5.3.4 Configuring Outlook for Internet Mail
For the installation of Outlook to work correctly, the following setup process must be followed. Outlook can be configured
in two ways. Using the Wizard, prior to completing the steps below will cause Outlook not to send the messages
correctly.
To configure Outlook for Internet Mail:
1. Right-click the Outlook icon on the desktop and select Properties.
2. Select Add.
3. Select Internet Email and click OK.
4. For the Mail Account, enter Voicemail.
5. For User Information enter Voicemail as the Name and for the Email address enter your address, for example.
voicemail@your_domain_name.
6. Select the Servers tab. Enter the name or IP address of the Outgoing mail server and Incoming mail server.
7. The Incoming Mail Server details can be left blank as Outlook does not need to check for mail. Otherwise, enter
the account name and password for example, Voicemail. Select Remember password.
8. Select the Connection tab. Select Connect using my local area network (LAN). Click Next.
9. Click OK.
10. Click Next.
11. Accept the default path for file creation.
12. Select Next, then Finish and then Close.
13. Open Outlook.
14. On the Email Service Option Screen, select Internet Only.
15. Click Next.
16. Select Yes to register Outlook as the default email application.
17. Select Tools > Options.
18. Click the Preferences tab.
19. Click Email Options.
20. Uncheck Save copies of messages in Sent Items folder.
· You might want this option selected during initial setup and troubleshooting. Due to the size of wav file
message attachments it is advisable to uncheck it after installation is complete.
21. Log on to the server PC using the account that will be used for the Voicemail Pro server.
22. From Outlook or Outlook Express, send a message direct to an extension user.
23. If this message is received correctly, continue with installing the Voicemail Pro software.
Voicemail Pro Page 51
15-601063 Issue 20l (03 March 2009)IP Office
Page 52

2.5.3.5 Configuring Outlook for Exchange Server
This option may be configured if Outlook is to be configured to connect to the Exchange Server, using a valid user name
and password, while the Voicemail PC remains a member of a work group.
To configure Outlook for Exchange Server:
1. Create a new mailbox on the Exchange Server, for example Voicemail, and assign it the same password as has
been configured on the voicemail PC.
2. Clear User must Change password at Next Logon and select Password Never Expires.
3. On the voicemail PC, logon with the Voicemail account.
4. Right-click the Outlook icon on the desktop and select Properties.
5. Select Add.
6. Highlight Microsoft Exchange Server and click OK.
7. Type in the Microsoft Exchange Server name and enter Voicemail in the Mailbox field.
8. Highlight the MS Exchange Settings, Click Properties.
9. Highlight Microsoft Exchange Server. Click Properties.
10. Click Check name and ensure the name is resolved.
11. If the name is resolved, select Apply. Click OK, OK and Close to shut the Mail settings.
12. Do not continue until the name has been resolved correctly with the Exchange Server. If the name is not resolved,
check the account details with the exchange administrator.
13. Open Outlook and select Yes to register Outlook as the default email application.
14. Select Tools > Options.
15. Choose the Preferences tab. Click Email Options.
16. Uncheck Save copies of messages in Sent Items folder.
· You may want this option selected during initial setup and troubleshooting. Due to the size of wav file
message attachments deselect it once installation is complete.
17. Log on to the server PC using the account that will be used for the Voicemail Pro server.
18. From Outlook or Outlook Express, send a message direct to an extension user.
19. If this message is received correctly, continue with installing the Voicemail Pro software.
Voicemail Pro Page 52
15-601063 Issue 20l (03 March 2009)IP Office
Page 53

Installing Voicemail Pro: Voicemail Email Installation
2.5.3.6 Installing the VoiceMail Pro Software
To install the Voicemail Pro software
1. Log off and log back on using the Voicemail account and password.
2. Install the required Voicemail Pro software. For more information, see Installing Compact Voicemail Pro Server and
3. When the installation process requests a User Name and Password for the Voicemail Pro service, enter the
4. Restart the server PC when requested and log on using the Voicemail account.
5. When SMTP email details are requested, enter no values and ignore the error message following the SMTP check.
6. Start the Voicemail Pro server service. For more information, see Starting the Voicemail Pro Service .
7. Check that the basic voicemail services start and operate correctly.
8. The next step is to switch the Voicemail Pro to MAPI operation. For more information, see Switching Voicemail Pro
28 31
Client or Installing Typical Voicemail Pro Server and Client .
Voicemail account details.
to MAPI .
48
36
Voicemail Pro Page 53
15-601063 Issue 20l (03 March 2009)IP Office
Page 54

2.5.3.7 Switching VoiceMail Pro to MAPI
By default, the Voicemail Pro installation process assumes that SMTP will be used for Voicemail Pro email functions.
Therefore it requests an SMTP email account settings during installation setup. Voicemail Pro can use MAPI is a MAPI
compatible client is configured on the Voicemail Pro server and is accessible using the account under which the Voicemail
Pro server has been installed.
If you are installing IMS, use the IMS account previously created as part of the installation process. For more
information, see Installing IMS .
Some options are not available if you are working offline. You must be working online to use this feature.
To switch Voicemail Pro to MAPI
1.Start the Voicemail Pro Client.
2.Click Preferences and select General.
3.Click the MAPI tab.
362
4.The Use Email Protocol settings allow you to switch Voicemail Pro between MAPI and SMTP.
· If MAPI is selected, a valid MAPI profile and password must be entered in the fields above. That MAPI profile
must exist within the MAPI email client on the server PC and be useable by the account under which the
Voicemail Pro service is running.
· If SMTP is selected, the SMTP email account settings must be entered.
5.Click OK.
6.Click Save and Make Live.
Voicemail Pro Page 54
15-601063 Issue 20l (03 March 2009)IP Office
Page 55

2.5.3.8 Changing SMTP Email Account Settings
To change SMTP Email Account Settings:
1. Open the Windows Control Panel.
2. Select IP Office Voicemail Pro.
3. Select the SMTP Email Settings tab.
Installing Voicemail Pro: Voicemail Email Installation
4. Enter the settings to match the customer's email server and the email account configured on that server for the
Voicemail Pro service.
5. Click the Email Settings tab.
6. Enter the email address for the account setup on the customer's email server for the Voicemail Pro service.
7. Click Check to test the connection to the specified email account.
8. Click OK.
Voicemail Pro Page 55
15-601063 Issue 20l (03 March 2009)IP Office
Page 56

2.5.4 Operation
2.5.4.1 Configuring Email Users and Groups for Voicemail Email
Voicemail Email can be used with user mailboxes and hunt group mailboxes.
User or group email addresses can be specified only through IP Office Manager. The remaining settings, for example
email alert, can be set using any of the following methods:
· Through IP Office Manager.
For more information, see the IP Office Manager help or user guide.
· By logging in to the mailbox (for IP Office mode mailboxes).
Voicemail Lite or Voicemail Pro users who are have an IP Office mode mailbox can switch Voicemail Email on/off and
select the mode of Voicemail Email operation. The exact method for doing this depends on the type of telephone being
used. Mailbox owners can find more information in the IP Office Mailbox User Guide.
· Through a Voicemail Pro call flow that uses a Play Configuration Menu action.
For Voicemail Pro systems, the Play Configuration Menu action can be used to allow a caller set a user or group's
Voicemail Email alert mode. Note however that this action is not aware whether the user or group has an email
address set for the service. For more information, see Play Configuration Menu Action .
Other Phone Types and External Call Access
If no email address has been set for the user or group, the voicemail server responds with the message "Email is not
enabled for this mailbox".
After they log in to their mailbox, mailbox owners have the following options:
· *01 - Sets the Voicemail Email mode to Forward.
· *02 - Sets the Voicemail Email mode to Alert.
· *03 - Sets the Voicemail Email mode to Off.
Mailbox owners can find out more in the user guide for their type of mailbox.
252
Voicemail Pro Page 56
15-601063 Issue 20l (03 March 2009)IP Office
Page 57

Installing Voicemail Pro: Voicemail Email Installation
2.5.4.2 IP Office Manager Settings
The voicemail email settings are found on the Voicemail tab of the user
The voicemail email settings are also on the voicemail tab of the hunt group
Voicemail Email
The user's or group's email address.
Voicemail Email
· Off
Switches off the use of Voicemail Email. Note that other services using the email address such as Email TTS can still
operate.
· Copy
Send a copy of each new message as a wav file attachment to the email. The original message remains in the mailbox.
Forward and Copy should be used with care. Each 1 minute message will result in a 1MB wav file. This may impact on
the performance of the network and email connection.
· Forward
Send a copy of each new message as a wav file attachment to the email and delete the original message from the
mailbox. Note, this settings overrides all other actions such as message waiting indication and voicemail ringback.
· Alert
Send an email alert for each new voicemail message but do not attach a copy of the message.
· Voicemail Email Reading
This is part of TTS operation but uses the same email address as set for Voicemail Email.
Voicemail Pro Page 57
15-601063 Issue 20l (03 March 2009)IP Office
Page 58

2.5.4.3 How Voicemail Email Messages Look
Messages sent by a user or group's voicemail email settings contain the following:
· To
The user/group email address.
· From
The name and address setting of the email client account.
· Subject
Voicemail Message ('calling number' > 'user name') From:'calling number'.
· Body
If the user or group's Voicemail Email mode is set to Copy or Forward, the message body will contain "IP Office
Voicemail redirected message".
· Attachment
When using Copy or Forward mode, the message is attached as a wav file.
Messages sent via a Voicemail Pro eMail action are configurable, see The Voicemail Pro eMail Action .
59
Voicemail Pro Page 58
15-601063 Issue 20l (03 March 2009)IP Office
Page 59

Installing Voicemail Pro: Voicemail Email Installation
2.5.4.4 The Voicemail Pro Email Action
The eMail action in Voicemail Pro can be used to send messages via email in response to caller actions in the
voicemail call flow. The action can also attach a wav file.
In the example above, the eMail action follows a Voice Question action. The $ in the eMail action's Attach file to
email field instructs it to use the file recorded by the preceding Voice Question action.
The same method can be used with a Leave Mail action. Note however that the Leave Mail action must be set to a valid
target mailbox which will then have a copy of the message.
Alternatively, the eMail action can attach a prerecorded wav file by specifying the file name. That named file can be
created by an Edit Play List action.
Voicemail Pro Page 59
15-601063 Issue 20l (03 March 2009)IP Office
Page 60

2.5.4.5 SMTP Errors
Value
Meaning
1
An exception has occurred.
3
The process has run out of memory.
4
An error has occurred due to a problem with the message body or attachments.
5
There was a problem initiating the conversation with the mail server. Ensure the setting of
the Domain property is correct.
6
There was an error terminating the conversation with the SMTP mail server.
7
The "From" address was not formatted correctly or was rejected by the SMTP mail server.
Some SMTP servers will only accept mail from particular addresses or domains. SMTP mail
servers may also reject a from address if the server can not successfully do a reverse
lookup on the from address.
8
An error was reported in response to receipt address. The SMTP server may refuse to
handle mail for unknown recipients.
9
There was an error connecting to the SMTP mail server.
10
There was an error opening the file. If you have specified file attachments, ensure that they
exist and that you have access to them.
11
There was an error reading a file. If you have specified file attachments, ensure that they
exist and that you have access to them.
15
No mail server specified.
16
There was a problem with the connection and a socket error occurred.
17
Could not resolve host.
18
Connected but server sent back bad response.
19
Could not create thread.
20
Canceled as a result of calling the Cancel method.
21
The operation timed-out while the host was being resolved.
22
The operation timed-out while connecting.
24
ESMTP Authentication failed.
25
The selected ESMTP Authentication mode is not supported by the server.
26
ESMPT Authentication protocol error.
27
Socket Timeout error.
105
Invalid license key.
SMTP error logging can be enabled to generate a log of SMTP activity. For a default Voicemail Pro installation the activity
is logged in a file in C:\Program Files\Avaya\IP Office\Voicemail Pro\VM\logs. The file name includes a date
stamp for the day on which it is generated.
Enabling SMTP Error Reporting:
1. Stop the Voicemail Pro service
2. Start the Registry Editor.
3. Locate the registry key. This differs depending on the version of Voicemail Pro.
Voicemail Pro 3.2: Locate the key HKEY_LOCAL_MACHINE\SOFTWARE\Network
Alchemy\Voicemail\Directories.
Voicemail Pro 4.0+: Locate the key HKEY_LOCAL_MACHINE\SOFTWARE\Avaya\Media
Services\Directories.
4. From the menu bar select Edit.
5. Select New and then String Value.
6. Enter SMTPLogging.
7. Right-click on the new registry key SMTPLogging and select Modify.
8. Set the value to 1.
9. Close the Registry Editor.
10. Restart the Voicemail Pro service.
SMTP Error Codes
Voicemail Pro Page 60
15-601063 Issue 20l (03 March 2009)IP Office
Page 61

Installing Voicemail Pro: Voicemail Email Installation
2.6 Centralized Voicemail Pro
A single Voicemail Pro server on a central IP Office system can be used to provide voicemail services for other remote IP
Office systems. This is called Centralized Voicemail Pro.
Centralized Voicemail Pro requires the IP Office systems to be linked by an IP Office Small Community Network (SCN). To
avoid the likelihood of two Voicemail Pro servers answering for the same user, only one centralized Voicemail Pro server
can be installed on a single Small Community Network (SCN). For more information about restrictions that need to be
considered before installing Centralized Voicemail, see Restrictions .
Notes
· For information about small community networking and setting up VoIP lines, see the IP Office Manager User Guide.
· By default each IP Office is set to use a broadcast IP address to locate a voicemail server. It can therefore appear that
centralized voicemail is operating before the remote system is set to the Voicemail Type of Line.
· Leaving the systems in this arrangement rather than setting the remote system's Voicemail Type to Line can cause
problems and is not supported.
62
Voicemail Pro Page 61
15-601063 Issue 20l (03 March 2009)IP Office
Page 62

2.6.1 Planning Requirements
The following factors must be remembered during planning of the Centralized Voicemail Pro system:
· The voicemail Server PC is attached to the central system.
· A Feature key and Voicemail Pro license key are required for the central system hosting the Voicemail Pro.
· Small Community Networking (SCN) is required between the central system and remote systems. This document
assumes that this has already been set up and tested.
· On networked IP Office systems, it is possible for centralized voicemail to appear operational without Small
Community Networking. However, this operation tends to be unpredictable and so we support Centralized
Voicemail Pro only when using Small Community Networking.
· VCM modules or VoIP channels are required in the remote and central systems.
· The extension and group numbering on all systems must be unique.
· The extension and group names on all systems must be unique.
· We also recommend that all names and numbers (groups, line, services, etc) on the separate IP Office systems are
kept as unique as possible. This will reduce potential maintenance confusion.
2.6.2 Restrictions
· Voicemail Support - Centralized Voicemail using Voicemail Pro
Within a Small Community Network, a single Voicemail Pro can be used to provide voicemail services for all the IP
Office systems. For full details of installation and setup refer to the Voicemail Pro documentation. The Voicemail Pro is
licensed and hosted by a chosen central IP Office system and provides full operation for that system. The voicemail
features supported for the other remote IP Offices are listed below:
· For IP500 system, centralized voicemail does not require the remote systems to be running in IP500
Professional mode. Only the IP500 hosting the Voicemail Pro server is required to be IP500 Professional.
· User mailboxes.
· Call recording.
Recording of incoming call routes is only supported for destinations on the same IP Office system, not for remote
SCN destinations.
· Dial by Name.
· Auto Attendants.
· Breakout
Requires that the numbers used are routable by the system hosting the voicemail server.
· Announcements
Using IP Office 4.0 announcements. Pre-4.0 announcements are only supported for queues on the system hosting
the voicemail server.
· ContactStore
This application is supported but requires each individual IP Office to have a VMPro Recordings Administrator
license.
· UMS Web Services
Users for UMS Web Services (IMAP and or web voicemail) are licensed through the UMS Web Services license on
their host IP Office system. This applies even if the user remote hot desks to another system in the Small
Community Network.
Voicemail Pro Page 62
15-601063 Issue 20l (03 March 2009)IP Office
Page 63

Installing Voicemail Pro: Centralized Voicemail Pro
2.6.3 Licensing
The most commonly seen problem in Centralized Voicemail Pro is misunderstanding the licensing requirements.
· The voicemail licenses are entered on the central IP Office and validated against its Feature Key.
· The remote IP Office systems do not need any voicemail licenses except that for ContactStore if being used.
· By default each IP Office uses a broadcast address to locate a Feature Key Server PC and validate its licenses.
· Once a Feature Key Server has validated licenses with one IP Office it will not do validation for another IP Office
unless rebooted.
Given the above, we strongly recommend that in any multiple IP Office network, the License Server IP Address (
System form > System tab) on each IP Office is set to the specific address of its Feature Key server or blank if using a
serial port Feature Key. If a remote IP Office does not have a Feature Key Server (because it is not using any licenses)
enter 0.0.0.0.
It is important to note also that the Voicemail Pro server will operate for 2 hours without license validation. This can
cause Voicemail Pro and Centralized Voicemail Pro to appear operational following installation and to then stop.
Voicemail Pro Page 63
15-601063 Issue 20l (03 March 2009)IP Office
Page 64

2.6.4 Configuring the Remote System Voicemail Settings
After you have installed the centralized Voicemail Pro, you are ready to configure the remote system settings.
To configure the remote system Voicemail settings:
1. Start IP Office Manager and receive the configuration of the remote system.
2. Set the License Server IP Address to the address of the PC acting as the remote system's Feature Key Server
PC.
· This cannot be the same PC as the central system's Feature Key Server PC.
· If the remote system does not use any licenses, enter 0.0.0.0.
3. Double-click the System icon.
4. Select the Voicemail tab and set the following:
· Set the Voicemail Type to Centralized Voicemail (was previously called Line).
· Set the Voicemail Destination to the Outgoing Group ID set on the VPN line to the central system.
5. Load the configuration and reboot the remote IP Office.
6. Dial *17 at an extension on the remote IP Office. The call should ring the Voicemail Pro server and then access the
extensions mailbox.
Voicemail Pro Page 64
15-601063 Issue 20l (03 March 2009)IP Office
Page 65

Installing Voicemail Pro: Centralized Voicemail Pro
· Chinese.
· Dutch.
· English (UK).
· English (US).
· French.
· German.
· Italian.
· Korean.
· Norwegian.
· Brazilian Portuguese.
· Russian.
· Spanish.
· Latin Spanish.
2.7 Text to Speech (TTS) Install
The Voicemail Pro server is able to use the Text to Speech (TTS) feature to:
· Speak text in call flows using the Speak Text action. The text can include variables passed from other actions
including database actions.
· Support Email Text to Speech. This requires MAPI based Voicemail Email to have been set up and tested.
Voicemail Pro TTS requires the server PC to have a Microsoft SAPI 5 compatible TTS engine installed and a valid license
entry. Two IP Office licenses exist to enable Voicemail Pro support for TTS operation. These are:
· VM Pro Generic TTS
This license enables the Voicemail Pro server to use either Microsoft's own SAPI5 TTS engines or third-party SAPI 5
compatible TTS engines. The Microsoft TTS engines (Microsoft Sam, Mike, Mary and Simplified Chinese) are installed by
default as part of the Microsoft Windows installation. One license is required for each simultaneous instance of TTS
usage.
· VM Pro ScanSoft TTS
This license enables the Voicemail Pro server to use Avaya supplied TTS engines. These engines currently provide
better voice quality than the Microsoft TTS engines and support a wider range of languages. They are supplied on a set
of 5 CDs separate from the Voicemail Pro software CD. One license is required for each simultaneous instance of TTS
usage.
· Installation on Windows Server Operating Systems
On many Windows server PC's, while the Windows Audio components are present by default they are not always
enabled. If this is the case the playback of voice prompts may be 'choppy' and the TTS (if installed) will not work. Note
however that enabling Windows Audio does not require the server PC to have a sound card installed.
1.Ensure that you have full administrator rights for the PC. This process will also require the PC to be restated.
2.In the Windows Control Panel select Sounds and Audio Devices.
3.If Windows Audio has not been enabled, select the Enable Windows Audio check-box.
TTS licenses are enabled on a per port basis. This means that a four port voicemail could have two licenses enabled. If
both the Generic and ScanSoft TTS licenses are enabled in Manager, both of the TTS engines will be used by all four
voicemail ports on a first-come first-served basis. Due to this, the TTS engine used by a particular port for a particular
call cannot be guaranteed. To have one consistent engine used for all calls, make sure that there is only one valid TTS
license in Manager.
· Tip
For a customer demonstration, sales staff can use the Microsoft Speech SDK 5.1 which includes a TTS playback
application that enables you to play and compare different TTS engines without requiring Voicemail Pro. For example
you can compare the Avaya-ScanSoft TTS engine with the Microsoft TTS engine. If you install the application on a sales
laptop PC that has the ScanSoft TTS installed on it, you can then choose a TTS engine and produce a WAV file for the
specified TTS engine. The Microsoft Speech SDK is available from http://www.microsoft.com/speech/download/sdk51/.
The following languages are supported by the Avaya TTS engines:
· Multiple Language TTS Support
More than one language can be installed. A Select System Prompt Language action can then be used to switch TTS
to a different language from the selected default.
· Email Reading
When installed in parallel with Voicemail Email, Voicemail Pro TTS can be used to provide email reading to selected
mailbox users. For more information, see Voicemail Email:Overview and Setting Up Text To Speech to Read Email
70
.
44
Voicemail Pro Page 65
15-601063 Issue 20l (03 March 2009)IP Office
Page 66

2.7.1 Installing Generic Text to Speech
To install Text to Speech:
1.Install and test Voicemail Pro as normal.
2.Using IP Office Manager, add the VMPro TTS (Generic) license into the IP Office configuration. Send the new
configuration to the IP Office system.
3.Reload the IP Office configuration into IP Office Manager and check that the status of the license has changed to
Valid.
4.The Voicemail Pro installation includes the default Microsoft TTS engines (Microsoft Sam, Mike, Mary and Simplified
Chinese) as standard. If another third-party SAPI 5 compatible TTS engine is going to be used, install that
software.
5.If the system is licensed for generic TTS, Voicemail Pro will automatically discover any SAPI 5 installed engine. If
there is no 3rd party engine installed then the Microsoft 3rd party engine is used.
2.7.2 Installing Avaya Text to Speech
The Avaya TTS engine for Voicemail Pro is supplied on a set of CDs. Each CD contains a different set of languages.
However, in each case CD 1 is required to start the TTS engine installation process.
To install Avaya Text to Speech:
1.Install and test Voicemail Pro as normal.
2.Using IP Office Manager, add the VM Pro TTS (ScanSoft) license into the IP Office configuration. Send the new
configuration to the IP Office system.
3.Reload the IP Office configuration into IP Office Manager and check that the status of the license has changed to
Valid.
4.Insert the first Avaya TTS CD. The installation should auto-start.
5.Follow the prompts and install the required languages. Depending on the languages that you select, instructions to
insert the other CDs in the set may follow.
6.If the system is licensed for Avaya TTS, the ScanSoft engine is automatically used.
2.7.3 Using the Speak Text Action
One method of employing TTS is through adding a Speak Text action to a call flow. The text to be spoken is entered
in the action's Specific tab. This text can include combinations of:
· Typed text sentences.
· Voicemail Pro System Variables. For example:
· Entering $KEY would be replaced when spoken by the last digits dialed within the call flow by the caller.
· If using database interaction, entering $DBD[x] would be replaced by the current value of that database field.
· Entering $CLI would speak the caller's CLI, if available, back to them.
· SAPI 5 XML tags can be added to alter how the text is spoken. For example when 123 needs to be spoken as one
two three rather than "one hundred and twenty-three", enter <spell>123</spell>.
67
Voicemail Pro Page 66
15-601063 Issue 20l (03 March 2009)IP Office
Page 67

Installing Voicemail Pro: Text to Speech (TTS) Install
2.7.4 Text to Speech SAPI Controls
Windows TTS engines use Microsoft's SAPI (Speech Application Program Interface). This includes the use of XML tags in
the text to change how the text is spoken. For example, in the text This is the <volume level="90">text</volume>
to speak the items within < > brackets are XML tags used to change how the speech is spoken.
The following are samples of the SAPI XML controls supported by Voicemail Pro TTS. Further information on SAPI 5 can
be obtained from Microsoft support websites.
· Volume
Change the speech volume.
· Rate
Change the speech rate.
· Pitch
Change the speech pitch.
· Emph
Add emphasis to words.
· Spell
Spell out words and numbers literally.
· Silence
Add a period of silence.
· Partofsp
Change the usage of words.
68
68
68
68
69
69
69
Entering XML Tags
XML tags can be used in two ways, either nested or empty.
· Nest Tags: Example = <volume level="90">text</volume>
Nested tags consist of:
· An opening XML tag, in the example above <volume level="90">.
· The text to which the opening tag command should be applied.
· A closing XML tag. The closing tag use the same command as the opening tag, prefixed with / and no other
settings. In the example above this is </volume>.
· Empty Tags: Example = <volume level="90"/>All following text
An empty tag is not nested, its command and settings apply to all the following text. Empty tags are recognizable
by the / before the tags closing >.
Voicemail Pro Page 67
15-601063 Issue 20l (03 March 2009)IP Office
Page 68

Example SAPI XML Tags
Volume
Controls the volume of the speech. This tag can be nested or empty.
· Attributes:
· level=
Supports values between 0 and 100, being percentages of the system's set volume.
· Examples:
· <volume level="50"/> Speak allow following text at level 50.
· <volume level="50"> Speak this text at level 50</volume> and this as normal.
Rate
Controls the speed at which the text is spoken. This tag can be empty or nested.
· Attributes
Only one attribute may be applied within a tag.
· absspeed=
Sets the absolute speed for the speech in a range between -10 and 10 with 0 being normal speech.
· speed=
Sets a speed change that is added to the current speed.
· Examples:
· <rate absspeed="5"> Speak this text at rate 5</rate> and this text as normal.
· <rate absspeed="5"/> Speak all following text at rate 5.
· <rate speed="-5"/> Drop the current speech speed by 5.
Pitch
Controls the pitch at which the text is spoken. This tag can be empty or nested.
· Attributes
Only one attribute may be applied within a tag.
· absmiddle=
Sets the absolute pitch for the speech in a range between -10 and 10 with 0 being normal speech.
· middle=
Sets a pitch change that is added to the current speed.
· Examples:
· <pitch absmiddle="5"> Speak this text at pitch 5</rate> and this text as normal.
· <pitch absmiddle="5"/> Speak all following text at pitch 5.
· <pitch middle="-5"/> Drop the current speech pitch by 5.
Emph
Applies emphasis to a word or section of text. This tag must be nested.
· Attributes:
This tag has no attributes.
· Example:
· Say <emph>boo</emph>.
Voicemail Pro Page 68
15-601063 Issue 20l (03 March 2009)IP Office
Page 69

Installing Voicemail Pro: Text to Speech (TTS) Install
Spell
Spell forces the engine to speak any nested text literally rather than applying any speech rules. This is useful for
numbers where rather that than saying 3001 as three thousand and one for 3001, the speech required is three zero zero
one. This tag must be nested.
· Attributes
This tag has no attributes.
· Example:
· The telephone number is <spell>555 3468</spell>.
Silence
Inserts a period of silence. This tag must be empty.
· Attributes
· msec=
Sets the duration in milliseconds.
· Example:
· A short silence <silence msec="500"/> of half a second.
Partofsp
Forces the pronunciation of a word according to it usage if not correctly determined by the TTS speech engine or to
override the engine. This tag must be nested.
· Attributes:
· part=
Takes a value from noun, verb, modifier, function or interjection.
· Example:
· To <partofsp part="verb">record</partofsp> that <partofsp part="noun">record</partofsp> press 1.
Voicemail Pro Page 69
15-601063 Issue 20l (03 March 2009)IP Office
Page 70

2.7.5 Setting Up Text To Speech to Read Email
It is not possible to parse email without a license for TTS. Therefore, it is not possible to forward emails without a valid
TTS license.
In conjunction with MAPI email clients and Exchange server, TTS can be used to read new e-mails in a user's email inbox
when they access their voicemail mailbox.
This feature is supported only for Intuity mode. Users hear their new voicemail messages and then the number of
"Messages with text". Before each email is spoken, details of who it is from, when the message was sent and the size are
given. This allows large or non-urgent e-mails to be skipped.
· Email reading cannot be used for e-mails in HTML format. If HTML messages are received, all of the code will be
read out as a message.
To set up text to speech to read email:
1. Install and test Voicemail Pro for MAPI-based Voicemail Email operation with an Exchange Server.
2. To perform email reading, the Voicemail account created on the Exchange server for Voicemail Email must able to
access the individual users email mailboxes. This can be achieved by either:
· On the Exchange Server, ensure that Voicemail user account is granted rights to access all user email boxes,
or;
· Within each user's Outlook:
· Select Tools > Options.
· Select Delegates.
· Add the voicemail account as a delegate.
3. If you have not already done so, install and test TTS operation using a Speak Text action.
4. Using IP Office Manager, load the IP Office configuration and open the settings for each user.
5. In Voicemail Email, enter the user's email address. The same address is used for both Voicemail Email and Email
Reading services.
6. Select Voicemail Email Reading.
7. For systems upgraded from 2.0, where a + sign was used in front of the users email address to indicate Email TTS
usage, the + sign is automatically removed and the Voicemail Email Reading box is selected.
8. Click OK and merge the new configuration back to the IP Office system.
9. Send the user a test email. Then log into the user's voicemail mailbox and check whether following the voice
messages a new "message with text" is announced.
Voicemail Pro Page 70
15-601063 Issue 20l (03 March 2009)IP Office
Page 71

Installing Voicemail Pro: Text to Speech (TTS) Install
Feature
Web
Voicemail
IMAP
Client
Synchronization in realtime.
Playback via PC.
Playback via User Extension.
Save message Wav to PC.
Forward messages to other voicemail mailbox.
Forward messages to other email mailbox.
Undelete manually deleted messages.
Mark message as unread.
Change voicemail password.
Show Message Types
Web
Voicemail
IMAP
Client
- New (Unread).
- Old (read).
- Saved.
- Priority.
- Private.
- Deleted.
2.8 UMS Web Services
Voicemail Pro 4.2+ adds support for two UMS (Unified Messaging Service) options:
· IMAP Client Support
Users can then access their voicemail messages using email clients such as Outlook and Lotus notes that support
an IMAP Client. The Voicemail Pro server PC acts as the IMAP server.
· Web Voicemail Access
This option allows users to access the contents of their mailbox using a web browser. They can then playback
messages to their phone or through their PC. Web voicemail requires the voicemail service to also run IIS and
PHP.
Use of either of these services requires UMS Web Service licenses in the IP Office configuration. The license sets the
number of users who can be configured as users of either UMS service in the IP Office configuration.
· UMS or IMS
UMS services are a replacement for IMS. IMS is still supported but only on existing OS's as per Voicemail Pro 4.1.
Installation of UMS services and IMS on the same system is not supported.
Voicemail Pro Page 71
15-601063 Issue 20l (03 March 2009)IP Office
Page 72

2.8.1 IMAP Installation
Voicemail Pro 4.2+ support mailbox synchronization with email clients that can support IMAP (Internet Message Access
Protocol) accounts. Examples are Outlook, Outlook Express and Lotus Notes. Using this interface, users can view the
contents of their voicemail mailbox and play those messages through their computers audio facilities.
IMAP is supported for user mailboxes only. It cannot be used for hunt group mailboxes. The number of users that can be
configured for IMAP and/or web access is controlled by licenses.
Once configured, the IMAP folder and the user mailbox are synchronized whenever the IMAP folder is opened. The
method of indication of the different message types will depend on the email client being used and is not controlled by
the Voicemail Pro.
Voicemail Pro Page 72
15-601063 Issue 20l (03 March 2009)IP Office
Page 73

Installing Voicemail Pro: UMS Web Services
Installing the Voicemail Pro IMAP Server
The IMAP server is installed as a standard part of the Voicemail Pro service installation. It uses the IP address of the
Voicemail Pro server PC and runs on the standard IMAP port 143.
The only special consideration is to avoid having any other IMAP server running on the same PC.
Configuring the IP Office for IMAP
1.Start IP Office Manager.
2.Receive the configuration from the IP Office associated with the Voicemail Pro server.
3.In the Licenses section add the UMS Web Services license.
4.Merge the configuration back to the IP Office and then receive the configuration again.
5.In the Licenses section check that the License Status of the UMS Web Services license is now shown as
Valid.
6.Start the Voicemail Pro client
7.Select Help | About.
8.The screen should list the IMAP Server as Started and should show the number of UMS licenses.
Configure IP Office Users for UMS.
1.Start IP Office Manager.
2.Receive the configuration from the IP Office system hosting the user.
3.UMS can be enable in two ways:
· Through Individual User Settings:
1.Select User and then select the required user.
2.Select the Voicemail tab.
3.Enable UMS Web Services. Click OK.
· Through Licenses:
1.Select Licenses.
2.In the Manager navigation pane, double click on the UMS Web Services license.
3.The Select Web Service Users menu is shown.
4.Select the users for which UMS Web Services are required. Click OK.
4.Merge the configuration back to the IP Office.
Voicemail Pro Page 73
15-601063 Issue 20l (03 March 2009)IP Office
Page 74

Configuring a User Email account
IMAP Account Setting
IP Office Value
Incoming Server
Voicemail Pro server IP address or domain name address.
Account Name
User name or extension number.
Password
User voicemail code.
The exact method of configuration of an IMAP account depends on the IMAP client being used by the user. For example it
may be necessary to enable some field with dummy data in order for the email client to accept the account even though
those settings are not used by the Voicemail Pro IMAP server.
The general details that are required are:
Example: Outlook
1.Select Tools and then Options.
2.Select Mail Setup and then click E-mail Accounts.
3.Select Add a new e-mail account.
4.Select IMAP as the server type.
5.In Server Information for Incoming mail server and Outgoing mail server enter the IP address or domain name
address of the Voicemail Pro server PC.
6.In Logon Information enter the users extension number and voicemail code as the User Name and Password.
7.Click Next.
Example: Outlook Express
1.Select Tools and then Accounts.
2.Select Add and then Mail.
3.Enter a descriptive name such as Voicemail and click Next.
4.Enter an email address. This is not used but a value must be entered to move to the next screen. Click Next.
5.Set My incoming mail server is a to IMAP.
6.In the Incoming server field enter the IP address or domain name address of the Voicemail Pro server PC.
7.Enter a value in the Outgoing mail server field. This is not used but a value must be entered to move to the next
screen. Click Next.
8.For Account Name enter the user's extension number or name in the IP Office configuration.
9.For Password enter the user's Voicemail Code.
10.Click Next and then Finish.
Voicemail Pro Page 74
15-601063 Issue 20l (03 March 2009)IP Office
Page 75

Installing Voicemail Pro: UMS Web Services
2.8.2 Web Voicemail Installation
Voicemail Pro 4.2+ support web access to user mailboxes. Users are then able to play their messages, mark them as
saved or deleted, or forward messages to another mailbox. Playback is through the users own associate extension on the
IP Office system or through the audio facilities of the PC.
Web Voicemail Installation Requirements
The Web Voicemail component is selectable as part of a custom Voicemail Pro installation. Note the pre-requisites below
before doing the Web Voicemail installation.
· o IIS Web Server
Must be installed on the voicemail server PC before the Voicemail Pro 4.2 Web Voicemail component is installed.
· o PHP
Web Voicemail uses PHP. If an existing PHP is not detected, the Voicemail Pro installation will install its own
PHP.
· o UMS Web Services License
The use of Web Voicemail and the number of users who can be configured to access it are controlled by the UMS
Web Services license entered in the IP Office configuration.
· o Computer Name\URL
The computer name is used as part of its URL on the network. Ensure that the name is set to something that
appropriately indicates its purpose and that can be used as part of the URL for the web server within the
customers domain.
· o Remove IMS
Voicemail Pro UMS is not supported on systems that are using Voicemail Pro IMS. IMS must be removed before
UMS can be selected for installation.
User and Browser Requirements
For users to access Web Voicemail they require a web browser that meets the following requirements:
· o Javascript Enabled Web Browser
Web Voicemail is tested against the following browsers. Other browser may work so long as they support
javascript and CSS.
· Internet Explorer V6 SP1 or higher.
· Internet Explorer V7 or higher.
· Mozilla Firefox V2.0.0.2 or higher.
· Opera V9.10 or higher.
Voicemail Pro Page 75
15-601063 Issue 20l (03 March 2009)IP Office
Page 76

· PC Playback
Browser access allows the selection of message playback either via an IP Office extension or through the web
browser. Avaya test browser playback using Windows Media Player.
· o User Name and Password
Once enabled for UMS Web Services in the IP Office configuration, to log on using Web Voicemail, the user will
need to know their Name and Voicemail Code as set in the IP Office configuration. Note that this is the Name
and not the Full Name.
Voicemail Pro Page 76
15-601063 Issue 20l (03 March 2009)IP Office
Page 77

Installing Voicemail Pro: UMS Web Services
Voicemail Pro Software Installation with Web Voicemail Component
The Web Voicemail component is installed as part of a Custom Voicemail Pro installation. From the list of
1.Verify that IIS is installed and running on the voicemail server PC. Check that it can be browsed from user PC's.
· While the server can be browsed by IP address, the URL used by users will be based on the server's computer
name within the customer domain. Check that web server can be browsed from user PC's using the server's
computer name as part of the URL. If necessary change that name to accurate indicate its function.
2.Insert the Voicemail Pro CD.
3.When asked for the type of Voicemail Pro install to perform select Voicemail Pro (Full).
4.On the next screen select Custom.
5.In the list of components scroll down and select Web Voicemail. Do not change any of the other selections unless you
understand the requirements for those components.
· UMS Web Voicemail is not supported in conjunction with IMS. If one is selected for installation the other cannot be
selected.
6.Follow the remainder of the installation process and allow the voicemail server to reboot when required.
Configuring the IP Office for Web Services
1.Start IP Office Manager.
2.Receive the configuration from the IP Office associated with the Voicemail Pro server.
3.In the Licenses section add the UMS Web Services license.
4.Merge the configuration back to the IP Office and then receive the configuration again.
5.In the Licenses section check that the License Status of the UMS Web Services license is now shown as
Valid.
6.Start the Voicemail Pro client
7.Select Help | About.
8.The screen should list the Web Services as Started and should show the number of UMS licenses.
Configure IP Office Users for UMS.
1.Start IP Office Manager.
2.Receive the configuration from the IP Office system hosting the user.
3.UMS can be enable in two ways:
· Through Individual User Settings:
1.Select User and then select the required user.
2.Select the Voicemail tab.
3.Enable UMS Web Services. Click OK.
· Through Licenses:
1.Select Licenses.
2.In the Manager navigation pane, double click on the UMS Web Services license.
3.The Select Web Service Users menu is shown.
4.Select the users for which UMS Web Services are required. Click OK.
4.Merge the configuration back to the IP Office.
UMS Web Voicemail and ContactStore
It is possible to run ContactStore and UMS Web Voicemail on the same server PC. However some additional steps are
required following installation in order to allow browser access to both applications.
1.Install UMS web voicemail.
Voicemail Pro Page 77
15-601063 Issue 20l (03 March 2009)IP Office
Page 78

2.Install ContactStore.
3.Reboot the server.
4.Within services, stop the ContactStore service.
5.Using a web browser access a voicemail mailbox using UMS web voicemail.
6.Restart the ContactStore service.
7.Both application should now be accessible via web browser.
Voicemail Pro Page 78
15-601063 Issue 20l (03 March 2009)IP Office
Page 79

Installing Voicemail Pro: UMS Web Services
Playback Control
UMS message playback through the web browser is tested and supported with the Windows Media Player. It may work
with other audio playback controls but will not have been tested.
The following methods can be used to check that the audio playback is associated with the Windows Media Player.
Firefox
1.Select Tools | Options | Applications or Tools | Options | Content | File Types | Manage.
2.In the search box enter x-mplayer2.
3.Check that the Action is set to Use Windows Media Player or Use Windows Media Player plug-in Dynamic
Link Library.
Opera
1.Select Tools | Preferences.
Voicemail Pro Page 79
15-601063 Issue 20l (03 March 2009)IP Office
Page 80

2.Select Downloads and use the search box to find x-mplayer2.
3.Check that the setting is set to Use plug-in and Windows Media Player Plug-In Dynamic Link Library.
Internet Explorer
1.Internet Explorer uses the application associated with the wav file type for Windows.
2.Select My Computer.
3.Select Tools | Folder Options.
4.Select File Types.
Voicemail Pro Page 80
15-601063 Issue 20l (03 March 2009)IP Office
Page 81

5.Locate and select the WAV extension type.
Installing Voicemail Pro: UMS Web Services
6.Check that the details show Windows Media Player as the selected application for this file type.
Voicemail Pro Page 81
15-601063 Issue 20l (03 March 2009)IP Office
Page 82

2.8.3 Using Web Voicemail
The URL will be that of the voicemail server PC plus /voicemail. This will display the web voicemail login page.
1.Logon using your user name and voicemail code as set on the IP Office system. The System Administrator can
change these if necessary.
· Note: This is the user name set in the IP Office and used by Voicemail Pro. It is not the full name that is
shown on phones and used by IP Office Phone Manager and SoftConsole if set.
2.Note that multiple failures to login correctly can cause your access to Web Voicemail to be locked for 1 hour. If
necessary Web Voicemail access can be unlocked using the Voicemail Pro administration client (select Users,
right click on the user marked as Account Locked in the Web Voicemail column, enter a new password for the
user and click OK).
The interface shows the messages in your mailbox. Note that it is not updated in realtime. To check if new messages
have arrived in your mailbox since starting Web Voicemail, refresh the browser view using the browser controls.
The columns can be sorted by clicking on the column title. The currently selected sort column is shown by a V symbol
next to it.
Message Types
The following icons are used for different types of messages:
· Unread message
· Read message
Note that by default a read message is permanently deleted from the mailbox after 30 days unless changed to a
saved message.
· Deleted message
Manually deleted messages are automatically moved to the Trash folder. Deleted messages remain visible for at
least 24 hours after they were marked as deleted.
· Deleted messages are not accessible through the voicemail spoken prompts interface or Visual Voice.
· Deleted messages can be undeleted by marking them as saved, read or unread. They can then be moved
back out of the Trash folder. Moving a deleted message out of the Trash folder automatically changes it to
read.
· Saved message
Setting a message as saved stops it being automatically deleted after a period of time.
· Priority message
This icon is added the the message icon to indicate that the caller has set the message as a priority message.
Voicemail Pro Page 82
15-601063 Issue 20l (03 March 2009)IP Office
Page 83

Installing Voicemail Pro: UMS Web Services
Voicemail Pro Page 83
15-601063 Issue 20l (03 March 2009)IP Office
Page 84

Controls
· Select
Before performing many actions such as saving, deleting or forwarding, you can select the messages to which the
action should be applied.
· The select box at the top of the list of messages can be used to select/deselect all messages on the currently
displayed page.
· Save
Change the status of the selected messages to saved.
· Mark as read
Change the status of the selected messages to read. Changing the status of a message will override its previous
status including those marked as saved.
· Mark as unread
Change the status of the selected messages to unread. Changing the status of a message will override its previous
status including those marked as saved.
· Forward
Forward a copy of the selected message to another mailbox. When click, the type of mailbox (user or hunt group)
can be selected. The list of mailboxes is then shown and allows selection of multiple target mailboxes.
· Delete
Delete the selected messages. Manually deleted messages remain visible until the voicemail server next performs
its mailbox housekeeping. See the deleted message description above.
· Change password
This option allows you to change your voicemail mailbox code.
Playing Messages
To play a message just click on it. The message menu is displayed. The appearance of this will vary depending on
whether you select playback via the default media player on your computer or through an extension on the telephone
system.
Voicemail Pro Page 84
15-601063 Issue 20l (03 March 2009)IP Office
Page 85

Installing Voicemail Pro: UMS Web Services
2.8.4 Using IMAP
Most email clients that support IMAP display IMAP messages in a separate folder. The contents of that folder are
synchronized when the folder is viewed.
Note that the types of icons used and whether different icons are supported for different message statuses depends on
the email client used.
The following should be noted about the IMAP folder view:
· New messages are presented as a closed envelope.
· Read messages are presented as an open envelope.
· Priority messages are indicated as such.
· Private messages are not indicated as such.
· Saved messages are not indicated as such.
· Deleted messages are indicated as deleted but remain visible.
· The voicemail server does not actually delete messages until at least 24 hours after it was marked as deleted.
· Deleted messages are not accessible through the voicemail spoken prompts interface or Visual Voice.
· Deleted messages can be undeleted. Those messages are then available through all the mailbox interfaces.
· Moving a message in the IMAP folder to another folder in the Email client will cause the email to be copied to the
new folder and the original message is shown as deleted in the IMAP folder.
· The Voicemail Pro housekeeping settings for automatic deletion of different message types (New, Read, Saved)
are still applied.
· IMAP cannot be used to send or forward messages to other voicemail mailboxes.
Voicemail Pro Page 85
15-601063 Issue 20l (03 March 2009)IP Office
Page 86

2.9 Troubleshooting
2.9.1 Checking the Voicemail Pro Service
If Voicemail Pro has been installed successfully, if the server PC has been rebooted then the voicemail service is started
automatically. However it is useful to check the services and to know how to stop-start the services manually.
To check/restart the Voicemail Pro Service:
1. Open the Windows Control Panel.
2. Select Administrative Tools > Services.
3. The Voicemail Pro Service should be visible. Its Status should be Started and the Startup Type should be set
to Automatic.
· Other services will be present depending on the Voicemail Pro options installed. The services are:
· Voicemail Pro Service
This is the main Voicemail Pro service. Normally this is the only service that needs to be stopped and
restarted. It will stop and restart the other services that it uses.
· VMProDBService
This service is used for the Voicemail Pro database connectivity if licensed.
· IMS(Gateway), IMS(Voice) and IMS(Restart)
These services are used by the IMS components of Voicemail Pro if installed and licensed.
· VPNM Database Server, VPIM Receiver and VPNM Server
These services are used by the VPNM components of Voicemail Pro if installed and licensed.
4. Close Services.
To Initialize the Voicemail Pro Call Flow:
1. Select Start > Programs > IP Office > Voicemail Pro. The Voicemail Pro Client starts and the main window
opens.
2. Click the Save and Make Live icon.
3. Select Yes. The file root.vmp is created and made available to the Voicemail Pro server. This is the compiled noneditable version of the editable call flow.
4. Voicemail operation can now be tested from an extension by dialing *17.
Setting the Voicemail Services or PC to Restart Automatically
The following action is optional. If there is some fault causing the Voicemail Pro service to halt, that fault should be
investigated and fixed, however having the service or PC automatically restarted if possible will minimize the disruption to
the Voicemail Pro users.
1. Use the Windows control panel to select the Voicemail Pro Service.
2. Right-click on the service and select Properties.
3. Select the Recovery tab.
4. Use the options presented to either restart the service and or restart the PC should the operating system detect
that the Voicemail Pro service has halted.
Voicemail Pro Page 86
15-601063 Issue 20l (03 March 2009)IP Office
Page 87

Installing Voicemail Pro: Troubleshooting
Using a Batch File to Start Services
In some instances, certain computers might not respond quickly enough in order to start all of the Avaya services in the
correct order. In this circumstance, it can be advisable to create a batch file which will delay the start of these services
until the PC is fully running.
Avaya IP Office Services can be started successfully at system start-up using a scheduled task that initiates the batch file
below. This batch file ensures that the services will start successfully and in the proper order.
1. Set all Avaya services listed below to Manual start. Do not include Key Server.
2.Create the batch file below and save it to %SYSTEMROOT%. Only include lines for the services which are installed.
@echo off
rem Wait 60 seconds before execute.
timeout /t 60
net start VMProDBService
net start Voicemail Pro Service
net start IMS(Restart)
net start IMS(Voice)
net start IMS(Gateway)
3.Create a scheduled task to start the batch file at system start-up.
Voicemail Pro Page 87
15-601063 Issue 20l (03 March 2009)IP Office
Page 88

2.9.2 The Voicemail Console
The server program provides a console window that enables you to see messages between the voicemail server and the
IP Office. The nature of the messages may be useful in diagnosing problems. The Voicemail Pro Service can be run in
console mode if required for testing and diagnostics purposes.
· IMS and MAPI email activity is not supported when running the Voicemail Pro service in this way.
To run the service as a console:
1.Open the Windows Control Panel.
2.Select Administrative > Services.
3.Locate the Voicemail Pro Service.
4.Double-click the service to display its properties.
5.Click the Log On tab.
5.Under Log on as:, select Local System Account and then select Allow service to Interact with desktop.
6.Click OK.
7.Stop and restart the service using the icon. After the service restarts the Voicemail Professional Server console
window opens.
8.Click Run.
9.At an extension dial *17. Details of the Voicemail Pro activity should be displayed in the console window. To return to
normal operation, repeat the above process and set the Voicemail Pro Service back to its specific user account.
Voicemail Pro Page 88
15-601063 Issue 20l (03 March 2009)IP Office
Page 89

Installing Voicemail Pro: Troubleshooting
The console provides a number of commands. These commands affect only the display of messages within the console
window and do not alter the voicemail server operation in any way.
· Freeze
Halt the display of further messages. This is the default condition of the console when started.
· Run
Start the display of messages.
· Clear
Clear the display of messages.
· Campaigns
Displays messages relating to campaigns.
Voicemail Pro Page 89
15-601063 Issue 20l (03 March 2009)IP Office
Page 90

2.9.3 Voicemail Pro User Log
User authentication failures are logged in the event viewer, under VMPro User Log. The following details are logged:
· UserID
· Tool name
· IP address of the Client trying to log in.
To view the log details:
1.From the Control Panel, select Administrative Tools > Computer Management. The Computer Management
window opens.
2.In the System Tool directory, view the Event Viewer.
3.Click VMPro User Log to view the details.
Voicemail Pro Page 90
15-601063 Issue 20l (03 March 2009)IP Office
Page 91

Installing Voicemail Pro: Troubleshooting
2.9.4 Tracing in Debug
Many applications, including Voicemail Pro and IMS, output activity messages that are viewable in Debug View
(DbgView). This application can be downloaded from http://marketingtools.avaya.com/knowledgebase/tools/debug.
Installation
1.Download the zip file.
2.Unpack the files into a folder such as c:\debug on the server PC.
3.Run DbgView.exe.
4.Events are shown in the DbgView window. These can be logged to a file if required. The level of detail shown can
be filtered to show more or less activity.
Logging
1.Run DbgView.exe.
2.Select File | Log Preferences.
3.Set the logging details are required and click OK.
4.While DbgView is running the viewable trace is also copied to the specified file.
5.The debug log files can be opened in programs such as Wordpad.
Voicemail Pro Page 91
15-601063 Issue 20l (03 March 2009)IP Office
Page 92

Filtering
IMS
HKEY_LOCAL_MACHINE\SOFTWARE\AVAYA\Integrated Messaging
EnableTracing
This key must be enabled to allow tracing using the other keys below.
Voicemail
HKEY_LOCAL_MACHINE\SOFTWARE\AVAYA\Integrated
Messaging\Voicemail
EnableTracing
This key must be enabled to allow tracing using the other keys below.
ConstructorTracing
This provides some tracing for when certain COM objects are constructed. As a whole
it is not required for diagnostics.
DestructorTracing
This provides some tracing for when certain COM objects are destructed. As a whole it
is not required for diagnostics.
EnableConnectionTracing
Provides diagnostic for when a connection occurs (server to server or client to server).
EnableRefTracing
This indicates when the reference count for certain COM objects is changed (through
AddRef, Release).
1.Select View | Debug Filters.
2.Select the module for which you want to increase/decrease reporting.
3.In the right hand panel adjust the level of reporting.
4.Close the Configure Debug Filters window.
IMS Tracing
IMS tracing is enabled through a number of registry keys. The IMS server keys are set through HKEY_LOCAL_MACHINE
registry values. The IMS client keys are set through HKEY_CURRENT_USER. All the keys are all REG_DWORD values and
are disabled if not set or set to 0.
Voicemail Pro Page 92
15-601063 Issue 20l (03 March 2009)IP Office
Page 93

Installing Voicemail Pro: Troubleshooting
Gateway
HKEY_LOCAL_MACHINE\SOFTWARE\AVAYA\Integrated
Messaging\Gateway
Debugging
This key must be enabled to allow tracing using the other keys below.
ChannelEvtSinkTracing
Provide tracing about speech channel events received.
ConstructorTracing
This provides some tracing for when certain COM objects are constructed. As a
whole it is not required for diagnostics.
DestructorTracing
This provides some tracing for when certain COM objects are destructed. As a whole
it is not required for diagnostics.
EnableConnectionTracing
Provides diagnostic for when a connection occurs (server to server or client to
server).
EnableFunctionTracing
Generally used by the client software to trace out information about the functions
that are being executed.
EnableObjectTracing
Allows certain created COM objects to be traced.
EnableProxyTracing
When a client connects to a server, it connects through a proxy. This settings allows
information from the proxy to be traced.
EnableRefTracing
This indicates when the reference count for certain COM objects is changed (through
AddRef, Release).
EnableTagTracing
When certain internal objects are created, such as a channel object for speech
playback, this information is tracked. Using this setting every minute a trace occurs
of the object list.
FireEventTracing
Provide tracing about events that are sent from the server to its clients.
MailboxEvtSinkTracing
Provide tracing about mailbox events received.
MessageEvtSinkTracing
Provide tracing about message events received.
Voicemail Pro Page 93
15-601063 Issue 20l (03 March 2009)IP Office
Page 94

IMS Client Keys
HKEY_CURRENT_USER\Software\Avaya\Integrated Messaging\Client
EnableTracing
This key must be enabled to allow tracing using the other keys below.
ConstructorTracing
This provides some tracing for when certain COM objects are constructed. As a
whole it is not required for diagnostics.
DestructorTracing
This provides some tracing for when certain COM objects are destructed. As a whole
it is not required for diagnostics.
EnableFunctionTracing
Generally used by the client software to trace out information about the functions
that are being executed.
EnableObjectTracing
Allows certain created COM objects to be traced.
EnableProxyTracing
When a client connects to a server, it connects through a proxy. This settings allows
information from the proxy to be traced.
EnableRefTracing
This indicates when the reference count for certain COM objects is changed (through
AddRef, Release).
EnableTagTracing
When certain internal objects are created, such as a channel object for speech
playback, this information is tracked. Using this setting every minute a trace occurs
of the object list.
MAPIEventTracing
Allow tracing of MAPI events received from MAPI.
MessageProcessingTracing
Used for tracing what server commands the extension is using.
UMSEventTracing
Allow tracing of events received from the IMS server.
TimeAndTrace
Used for tracing how long certain MAPI events took to process.
All the keys are based on the component as follows:
· IMS (Voice) Server – “SOFTWARE\Avaya\Integrated Messaging\Voicemail” (e.g.
“HKLM\SOFTWARE\Avaya\Integrated Messaging\Voicemail”)
· IMS (Gateway) Server – “SOFTWARE\Avaya\Integrated Messaging\Gateway”
· IMS Administration – “SOFTWARE\Avaya\Integrated Messaging\Admin”
· IMS Client – “SOFTWARE\Avaya\Integrated Messaging\Client” (e.g. “HKCU\SOFTWARE\Avaya\Integrated
Messaging\Client”).
VM Server Specific
· "CtiNotifyTracing" – Provide tracing to indicate that a Cti event has occurred.
· "VmsNotifyTracing" – Provide tracing to indicate that a VMS API event has occurred.
Voicemail Pro Page 94
15-601063 Issue 20l (03 March 2009)IP Office
Page 95

Installing Voicemail Pro: Troubleshooting
Voicemail Pro Page 95
15-601063 Issue 20l (03 March 2009)IP Office
Page 96

Page 97

Chapter 3.
Configuring Voicemail Pro
Voicemail Pro Page 97
15-601063 Issue 20l (03 March 2009)IP Office
Page 98

3. Configuring Voicemail Pro
3.1 IP Office Configuration
3.1.1 Overview
The default IP Office configuration settings allow almost immediate voicemail operation as soon as a voicemail server is
running on the LAN. Those default settings are:
· Voicemail running on a PC accessible using a broadcast address of 255.255.255.255.
· Voicemail on for each user and hunt group on.
· No Voicemail Code set for any mailboxes. Until a code is entered for a mailbox, it can only be accessed from the user's
own extension.
· No Voicemail Email or Voicemail Help operation.
· No Voicemail Reception numbers set for user mailboxes.
· Hunt group mailboxes are created and used by default but there is no default message waiting indication or method for
collecting messages. A method for accessing each hunt group mailbox should be programmed. For more information,
see Hunt Group Voicemail:Overview .
156
Before you start to configure and customize Voicemail Pro you need to provide the IP Office Manager with details of the Voicemail Pro server PC. For more information see Identifying the Voicemail Server PC and also the IP Office Manager help.
The rest of the sections that follow describe how to configure settings in Voicemail Pro.
98
3.1.2 Identifying the Voicemail Server PC
By default the IP Office connects to the Voicemail Pro server by broadcasting on its own subnet.
To identify the Voicemail Server PC:
1.In IP Office Manager, select System.
2.Click the Voicemail tab.
3.The default Voicemail Type is Voicemail Lite/Pro. Make sure that this has not been changed.
4.Leave the Voicemail Destination box blank as this is not used with Voicemail Pro.
5.In the Voicemail IP Address box, change the default address (255.255.255.255) to the IP address of the PC on
which the voicemail server is running. If there is only one voicemail server on the network, you do not need to change
this.
6.Click OK to save any changes.
By default there are no Voicemail Channel Reservations. Specific functions can have voicemail channels reserved for
their use. For more information, see Voicemail Channel Reservations in the appendix.
103
Voicemail Pro Page 98
15-601063 Issue 20l (03 March 2009)IP Office
Page 99

3.1.3 Configuring Voicemail for Individual Users
Voicemail can be configured for each individual user in IP Office Manager.
To change voicemail configuration for an individual:
1.Open IP Office Manager.
2.In the Navigation pane, click User and select the individual user.
3.View the Voicemail tab.
Configuring Voicemail Pro: IP Office Configuration
4.(Optional) Enter a voicemail code between 1-15 digits in the Voicemail Code field. This is required when users
retrieve voicemail messages remotely, for example from another user's extension or from an external telephone.
· The Voicemail Code must be retyped in the Confirm Voicemail Code field to ensure it has been correctly entered.
5.(Optional) Voicemail can be turned off by unchecking the Voicemail On option. When on, the mailbox is used to
answer the user's unanswered or busy calls.
6.(Optional) When a user collects their messages they can hear an additional prompt if the Voicemail Help option is
checked. The prompt is 'For help at any time press 8'.
· If Voicemail Help is not selected, users can still press 8 at any time and hear the list of Voicemail features. This
setting turns on/off the audible help message. It does not disable the actual feature.
7.(Optional) When a new message is received, the voicemail server can call the user's extension whenever the extension
returns from off-hook to on-hook. The voicemail server will not ring the extension more than once every 30 seconds.
Check the Voicemail Ringback option to enable this feature.
8.(Optional) Voicemail email can be configured for an individual user. When a new message is received, the WAV file
created can be sent to an email account either by user selection or according to the set Voicemail Email Mode. The
sending of .wav files across a network creates a high loading on the network and networks servers. A one-minute
message requires a 1MB .wav file. The option Voicemail Email Reading is unavailable in Voicemail Lite.
· Voicemail Email - Enter the email address of the user.
· Select the Voicemail Email Mode from:
· Off: Voicemail messages or notifications are not automatically sent.
· Copy: A copy of the message is sent to the email account.
· Forward: Voicemail messages are sent to the email account and deleted from the Voicemail server.
· Alert: Notification that a new Voicemail message has been received is sent to the email account.
9.(Optional) When a caller reaches voicemail they can be given the option to be transferred to a different extension. The
greeting message needs to be recorded telling the caller the options available. The extension numbers that they can be
transferred to are entered in the fields:
· Reception/Breakout (DTMF 0)
The number to which callers are to be transferred if they are directed to voicemail and press 0. Usually this is the
reception number.
Voicemail Pro Page 99
15-601063 Issue 20l (03 March 2009)IP Office
Page 100

· Breakout (DTMF 2)
The number to which callers are to be transferred if they are directed to voicemail and press 2. This number might
be, for example, the number of a colleague of the mailbox owner whose extension was originally dialed.
· Breakout (DTMF 3)
The number to which callers are to be transferred if they are directed to voicemail and press 3. This number might
be, for example, the mobile or cell number of the mailbox owner whose extension was originally dialed.
10.Click OK to save the voicemail changes for the user.
11.Amend any other user details, then save and merge the configuration changes.
Voicemail Pro Page 100
15-601063 Issue 20l (03 March 2009)IP Office
 Loading...