


Audi Navigation System plus (RNS-E) 11.04
Audi Navigation Syste
Operating Instr

© 2004 AUDI AG
It has always been Audi’s policy to continuously improve its products. Audi, therefore, reserves the right to make changes in design and specifications, and to make additions or improvements in its products, without incurring any obligation to install them on products previously manufactured.
Text, illustrations and specifications in this book are based on the most up-to-date information available at the time of printing.
All rights reserved. May not be reproduced or translated in whole or in part without the written consent of AUDI AG. Specifications are subject to change without notice.
“BOSE” is a registered trademark of Bose Corporation.
Editorial deadline: 08/20/20
 Tips
Tips
This owner's manual is only manual for your vehicle.
 For the sake of the
Printed on environmentally rine, recyclable).
Printed in Germany
© 2004 AUDI AG
Introduction
You have decided on the Audi Navigation System plus - thank you very much for your confidence in us.
With this equipment, you are acquiring a highly developed technical system which offers various choices for entertainment and communication in addition to navigation. All the settings can be made centrally, using an easy-to-follow menu guide.
We recommend that you read this owner's manual carefully so that you quickly become completely familiar with all of the functions and possibilities of the system and are able to make full use of them while driving.
Should you have any further questions about the Audi Navigation System plus in your vehicle, please direct them to your Audi Dealer.
We hope you enjoy driving your car!
AUDI AG
2Table of contents
Table of contents
About this book . . . . . . . . . .
General operation . . . . . . . .
Overview . . . . . . . . . . . . . . . . . . . . . . .
Control unit with screen . . . . . . . . .
Important Notes . . . . . . . . . . . . . . . .
Switching on and off . . . . . . . . . . . .
Opening and closing display . . . . .
Anti-theft coding . . . . . . . . . . . . . . . .
General system operation . . . . . .
Controls . . . . . . . . . . . . . . . . . . . . . . .
Multi-function steering wheel . . . .
Display . . . . . . . . . . . . . . . . . . . . . . . . .
Orientation . . . . . . . . . . . . . . . . . . . . .
Orientation symbols . . . . . . . . . . . . .
Operating the speller . . . . . . . . . . . .
Control wheel . . . . . . . . . . . . . . . . . .
Drives . . . . . . . . . . . . . . . . . . . . . . . . . .
Introduction . . . . . . . . . . . . . . . . . . . .
CD changer . . . . . . . . . . . . . . . . . . . .
DVD navigation drive . . . . . . . . . . . .
MP3 player . . . . . . . . . . . . . . . . . . . . .
CD changer . . . . . . . . . . . . . . . . . . . .
Tips . . . . . . . . . . . . . . . . . . . . . . . . . . .
4
|
RADIO, CD . . . . . . . . . . . . . . . . . . |
55 |
|
|
RADIO . . . . . . . . . . . . . . . . . . . . . . . . . . |
56 |
|
7 |
Introduction . . . . . . . . . . . . . . . . . . . |
56 |
|
9 |
Band control button (frequency) . |
57 |
|
Main radio menu . . . . . . . . . . . . . . . |
58 |
||
9 |
Memory control button . . . . . . . . . |
61 |
|
9 |
Sound control button . . . . . . . . . . . |
62 |
|
11 |
Tuning control button . . . . . . . . . . |
62 |
|
12 |
Setup Radio (FM/AM range) . . . . . . |
65 |
|
13 |
Satellite Digital Audio Radio |
|
|
15 |
Service . . . . . . . . . . . . . . . . . . . . . . . . |
67 |
|
Setup Satellite radio |
70 |
||
15 |
|||
System information |
73 |
||
21 |
|||
|
|
||
27 |
CD/SD . . . . . . . . . . . . . . . . . . . . . . . . . . |
74 |
|
27 |
Introduction . . . . . . . . . . . . . . . . . . . |
74 |
|
Source control button |
77 |
||
29 |
|||
Main CD menu |
78 |
||
30 |
|||
CD list control button |
79 |
||
33 |
|||
Sound control button |
79 |
||
34 |
|||
CD control button |
80 |
||
34 |
|||
Setup CD |
82 |
||
35 |
|||
Main MP3 menu |
83 |
||
35 |
|||
MP3 list control button |
84 |
||
37 |
|||
Sound control button |
84 |
||
43 |
|||
MP3 ctrl control button |
85 |
||
48 |
|||
Setup MP3 |
88 |
||
|
Adjusting sound settings . . . . . . 92 Setting basic sound characteristics 92 DSP (Digital Signal Processing) . . . 93 Dynamic noise compensation . . . . 94 Volume settings . . . . . . . . . . . . . . . . 94
NAME, TEL . . . . . . . . . . . . . . . . . . |
97 |
NAME (directory) . . . . . . . . . . . . . . . 98 General safety precautions . . . . . . 98 Introduction . . . . . . . . . . . . . . . . . . . 98 Main directory menu . . . . . . . . . . . . 99
Telephone . . . . . . . . . . . . . . . . . . . . . . 105
General . . . . . . . . . . . . . . . . . . . . . . . . 105

Table of contents |
3 |
NAV, INFO . . . . . . . . . . . . . . . . . . 107
Navigation (NAV) . . . . . . . . . . . . . . . 108 General safety precautions . . . . . . 108 Introduction . . . . . . . . . . . . . . . . . . . 109 Main navigation menu . . . . . . . . . . 117 Memory control button . . . . . . . . . 134 Route control button . . . . . . . . . . . 139 Map control button . . . . . . . . . . . . . 142 Nav-Info control button . . . . . . . . . 150 Setup Navigation . . . . . . . . . . . . . . . 151
Information (INFO) . . . . . . . . . . . . . 163 Introduction . . . . . . . . . . . . . . . . . . . 163 Main information menu . . . . . . . . . 163
CAR, SETUP . . . . . . . . . . . . . . . . 167
CAR . . . . . . . . . . . . . . . . . . . . . . . . . . . . 168
Introduction . . . . . . . . . . . . . . . . . . . 168
SETUP . . . . . . . . . . . . . . . . . . . . . . . . . . 169 Introduction . . . . . . . . . . . . . . . . . . . 169 Settings control button . . . . . . . . . 170
Sound control button . . . . . . . . . . . 173 Display control button . . . . . . . . . . 173
Frequently Asked Questions
(FAQ) . . . . . . . . . . . . . . . . . . . . . . . . . . . 175 Self-help . . . . . . . . . . . . . . . . . . . . . . . 175 Warranty . . . . . . . . . . . . . . . . . . . . . . 176
Alphabetical index . . . . . . 179
General operation |
|
RADIO, CD |
|
NAME, TEL |
NAV, INFO |
CAR, SETUP |
|
|
|
|
|
|
|

4About this book
About this book
Equipment and illustrations
This book describes the equipment range specified for this model at the editorial deadline date as indicated on the inside of the back cover. Individual items of equipment may not yet be available at the time of printing or may only be offered in certain countries.
The illustrations are designed as schematic images. Some of the details on your vehicle may therefore look slightly different than illustrated in this manual.
Structure of the book
The contents are systematically structured in a color-coded layout to make it easier to locate specific topics and understand them.
Chapters, Table of Contents and Index
The contents of the book are divided into relatively small sections that are summarized in clearly arranged chapters (e.g. “System Operation”). To make it easier to use the book, we have identified the individual chapters with the color codes from the Audi Navigation System. Each color code is shown in the bottom margin of the chapter as well as in the headings and illustrations.
In front of each chapter, icons shaded with the background color code of that specific section help to make the book more attractive and also serve to differentiate the fonts and facilitate navigation.
The Table of Contents, organized into chapters, and the detailed Index at the end of the book help you to quickly find the information you need.
Sections
The information in most sections apply to all vehicles. However, since the equipment level is not the same on all vehicles, this book also contains sections which may not apply to your particular vehicle. When this is the case, the section will be identified, for
example: “Applies to vehicles: with Audi cd changer”. This way, you only have to read the sections which are applicable to your vehicle.
Although the information has been grouped into the appropriate sections, there are many possible equipment combinations which may be described in this book, but not installed on your vehicle.
These are listed as optional equipment and marked with an asterisk “*”.
®Registered trademarks are marked with ®. The absence of this symbol does not warrant unrestricted use of a term.
The paragraph continues on the next page.
The square marks the end of a paragraph.
Heading summaries and step-by-step instructions
Each section has its own heading.
Then follows a summary (in large, italic print), which tells you the subject matter of the section.
Under an illustration you will find step-by-step instructions (in relatively large print), which tell you what you must do. Each instruction is identified with a dash.
A descriptive section offering important and continuing information for each topic follows.
Special symbols in this book
Several symbols are used in this book. These symbols draw your attention to important information about a number of special subjects. Please familiarize yourself with the symbols and what they mean. 
About this book |
5 |

 WARNING
Text with this symbol contains information about safety and how to reduce the risk of serious personal injury or death.
Warning texts are the most important. Throughout this book you will find a double arrow followed by a warning symbol. This will refer you to a warning at the end of the section. You should pay particular attention to this warning.
 Note
Note
Text with this symbol contains information about avoiding damage to your vehicle.
A note lets you know that something may cause damage to your vehicle or equipment (for example, damage to the CD player) or that something could cause an accident (for example, a street could be slippery even if the temperature is around 40° F (5° C).
 For the sake of the environment
Text with this symbol contains important notes about the environment and how you can help protect it.
For the sake of the environment lets you know what you can do to help protect the environment (for example, how you can reduce fuel consumption).
 Tips
Tips
Text with this symbol contains special tips and other information about getting the most out of your vehicle and its features.
A tip makes you aware of important information which you may find useful. 
General operation |
|
RADIO, CD |
|
NAME, TEL |
NAV, INFO |
CAR, SETUP |
|
|
|
|
|
|
|
6
General operation |
7 |
|
|

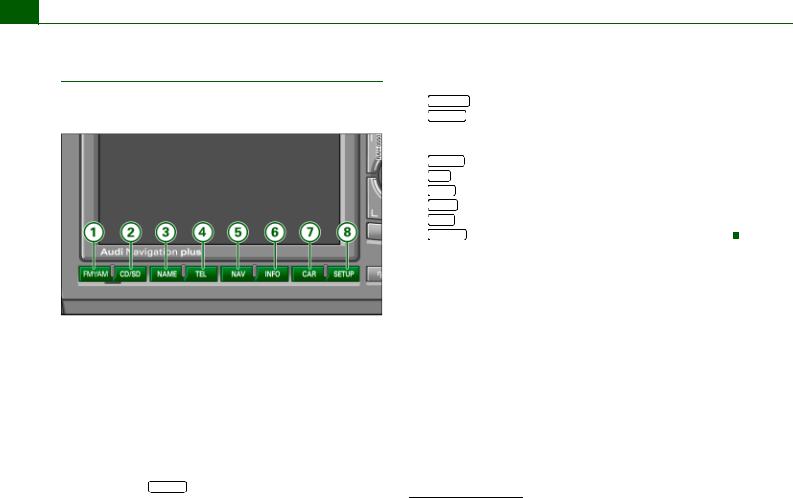
8Overview
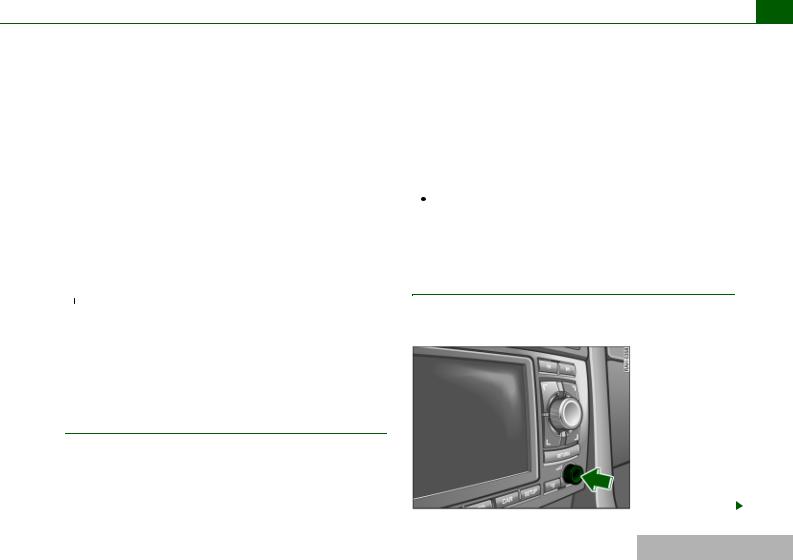
Fig. 1 Navigation System plus control unit
Overview 9
Overview
Control unit with screen
This overview is to assist you in familiarizing yourself with the controls and their functions.
A1 |
On/Off knob |
|
|
Switching on and off . . . . . . . . . . . . . . . . . . . . . . . . . . . |
11 |
|
Volume adjustment . . . . . . . . . . . . . . . . . . . . . . . . . . . . |
19 |
A2 |
Button ( ) for opening and closing the Display . . . . . . |
12 |
A3 |
Function buttons . . . . . . . . . . . . . . . . . . . . . . . . . . . . . . . . |
16 |
A4 |
Display . . . . . . . . . . . . . . . . . . . . . . . . . . . . . . . . . . . . . . . . |
27 |
A5 |
Forward/reverse buttons . . . . . . . . . . . . . . . . . . . . . . . . . |
18 |
A6 |
Control knob . . . . . . . . . . . . . . . . . . . . . . . . . . . . . . . . . . . |
17 |
A7 |
Control buttons . . . . . . . . . . . . . . . . . . . . . . . . . . . . . . . . . |
17 |
A8 |
button . . . . . . . . . . . . . . . . . . . . . . . . . . . . . . . . |
18 |
 Tips
Tips
Please note that this Operator's Manual describes only the Audi Navigation System plus and its components. You can find additional information on vehicle operation in your Owner's Manual.
Some the equipment shown is found only in certain model versions or is optional equipment 
Important Notes
Notes on Traffic Safety
To ensure driving safety, settings in the Navigation System must only be performed when the vehicle is parked.
The broad range of equipment in the Audio Navigation System provides a wealth of potential entertainment and a wide variety of information in addition to navigation.
Carry out your settings in the Navigation System only when the vehicle is stationary. Avoid using the Navigation System while you are driving so that you can devote your full attention to traffic. Use the controls on the multi-function steering wheel* page 21 while you are driving.

 WARNING
Pay attention first and foremost to your driving! As the driver of the vehicle, you have total responsibility for operating the vehicle safely. Therefore, when using the Navigation System functions, make certain that you always have complete control of your vehicle!
Traffic today requires your full and continuous concentration. As the driver, you bear complete responsibility for safety in traffic. Therefore, to ensure driving safety, settings in the Navigation
System must be performed only when the vehicle is parked.
General operation |
|
RADIO, CD |
|
NAME, TEL |
NAV, INFO |
CAR, SETUP |
|
|
|
|
|
|
|

10 Overview

 WARNING (continued)
The volume controls on the audio system should be selected to ensure that outside signals, such as police and fire truck sirens can always be heard - danger of accident! 
General information
Settings in the Navigation System should not be performed while you are driving the vehicle.
Fig. 2 Display: Warning
After the Navigation System has been switched onpage 11, a warning message is displayed fig. 2.
–Press the appropriate control button page 17 for either English, Español or Français, in case the display does not appear in the desired language fig. 2.
–Please read the warning message carefully and follow the instructions.
–Select Accept by pressing the control knob once you have read the warning message.
Always observe this message to avoid jeopardizing your own safety and that of others.
Perform settings only when the vehicle is parked in order to devote your full attention to driving safety.
Once you have confirmed the warning message, you may continue to adjust the Navigation System.

 WARNING
Traffic today requires your full and continuous concentration. As the driver, you bear complete responsibility for safety in traffic. To avoid accidents, never operate the Navigation System while driving! 
Instructions for care
The Navigation System requires regular attention.
Cleaning the display
– Clean the Navigation System Display with a soft clean cloth and a LCD cleaner.
Overview 11
Cleaning the controls
–First clean the controls with a brush to remove dust.
–Then wipe the controls with a clean, soft, slightly damp cloth.
Display
The Display can be cleaned with a professionally available “LCD cleaner”. The cloth should be slightly dampened with the cleaning fluid to clean the display.
Controls
The controls should be cleaned with a brush first so that no dirt is trapped between the buttons and the housing. We recommend giving the controls a final wipe with a cloth moistened with water and dish washing detergent.
 Note
Note
Treat the display with care. Pushing on it with your finger or touching it with sharp objects can cause dents or scratches. 
What happens when it is switched on?
When the system is switched on, the start screen appears. The output menu of the last selected main function is displayed. The last selected audio source is switched on automatically.
What happens when it is switched off?
When the equipment is switched off, the display darkens and the audio source is silenced. Settings that have already been made do not change.
 Tips
Tips
The display can be switched off in the Setup menu page 173, the operating mode selected remains active. 
Switching on/off manually
The Navigation System can also be turned on and off manually if necessary.
Switching on and off
Automatic switching on and off
The Navigation System switches on automatically after you turn on the ignition. When you remove your key from the ignition lock, the Navigation System will automatically switch off.
Fig. 3 Navigationssystem: ON/OFF knob
General operation |
|
RADIO, CD |
|
NAME, TEL |
NAV, INFO |
CAR, SETUP |
|
|
|
|
|
|
|
12 Overview
– Push the On/Off knob to switch it on and off fig. 3.
The Navigation System can also be switched on and off manually if necessary. If the Navigation System was switched off in this way with the ignition key removed, it is still available for about 30 minutes.
If the Navigation System was switched off manually, it is not switched on automatically the next time the ignition is turned on.
 Note
Note
To avoid discharging the battery, the Navigation System should not be switched on for an unnecessarily long time with the engine off. 
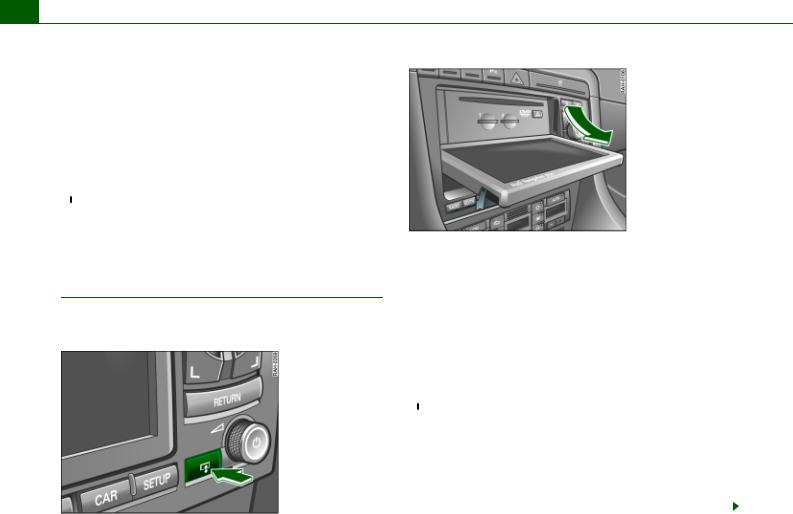
Opening and closing display
The display must be opened to access the drives located behind it.
Fig. 4 Navigation System: Button for opening and closing the display
Fig. 5 Display open: Access to the DVD drive and the MP3 card reader
–Press the button fig. 4 to open or close the displayfig. 5.
Opening the display provides access to the DVD navigation drive and the two card readers for SD/MMC memory cards fig. 5.
The display can also be closed using the function button, control buttons, the control knob, the  button or the Forward/Reverse button page 9.
The open display is automatically closed after about one minute.
 Note
Note
If the display cannot be closed, it is possible that objects in the vicinity of the display or an incorrectly inserted SD/MMC memory card is preventing it from being closed. Do not try to force the display closed.
To prevent damage to the Navigation System, no foreign bodies should be introduced into the DVD navigation drive or into the MP3
card reader.

Overview 13
 Tips
Tips
You can find information about the different drives starting on
page 34. 
Anti-theft coding
General
Effective safety measures in conjunction with the PIN prevent misuse of the equipment by unauthorized parties.
The electronic lock-up is operational, if:
the Navigation System is removed from the vehicle,
the Navigation System is disconnected from the vehicle current supply,
the battery is disconnected or
the electric fuse for the Navigation System is blown.
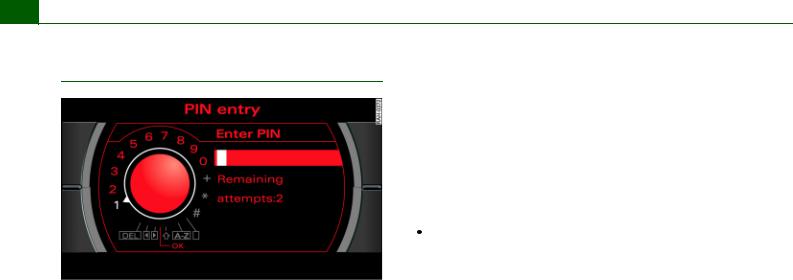
If the anti-theft coding has locked up the Navigation System for one of the reasons given, the speller display for entering the PIN
page 14, fig. 6 appears after the Navigation System is switched on.
After that, the Navigation System can only be operated again only by entering the correct PIN.
This PIN is attached to the equipment card along with the equipment number.
The PIN can be used for your equipment alone and cannot be changed.
 Note
Note
The “equipment card” should be removed and kept in a safe place - under no circumstances should it be kept in the vehicle. This makes the Audi Navigation System unusable by thieves. 
Applies to vehicles: with convenience coding
User-friendly radio coding
After the PIN is entered the first time, the Navigation System gets to know its vehicle.
If the power supply was interrupted, the Navigation System checks to see whether it is still its vehicle. If it is, the Navigation System is ready for use again after a few seconds.
It is no longer necessary to manually disable the electronic lock!
However, if the Navigation System is installed in another vehicle, the electronic lock must be cancelled by entering the PIN
page 14. 
General operation |
|
RADIO, CD |
|
NAME, TEL |
NAV, INFO |
CAR, SETUP |
|
|
|
|
|
|
|
14 Overview
Entering PIN
Fig. 6 Speller display: Entering PIN
–Switch the ignition on.
–Switch the Navigation System on if it is not switched on automatically page 11.
–Enter the PIN using the speller fig. 6.
–Confirm your entry with OK. The electronic lock is cancelled.
Unlocking the system (unlocking procedure)
Before you can enter the PIN again, the electronic lock must be cancelled. This happens automatically when the Navigation System has been switched on for about 60 minutes. If you do not insert the ignition key into the lock, the Navigation System switches off automatically after 30 minutes. When the Navigation System switches off automatically or is switched off, the unlocking process is cancelled and has to be started over.
When the unlocking process is complete, you have two more attempts to enter the correct PIN. If you enter the incorrect PIN again twice in succession, the procedure must be repeated.
 Tips
Tips
If you lose your PIN, contact an Audi dealership or authorized facility. 
You have two attempts to enter the correct PIN. The number of attempts is shown in the display. If you enter the incorrect PIN twice in succession, the message System is locked appears in the display.
General system operation |
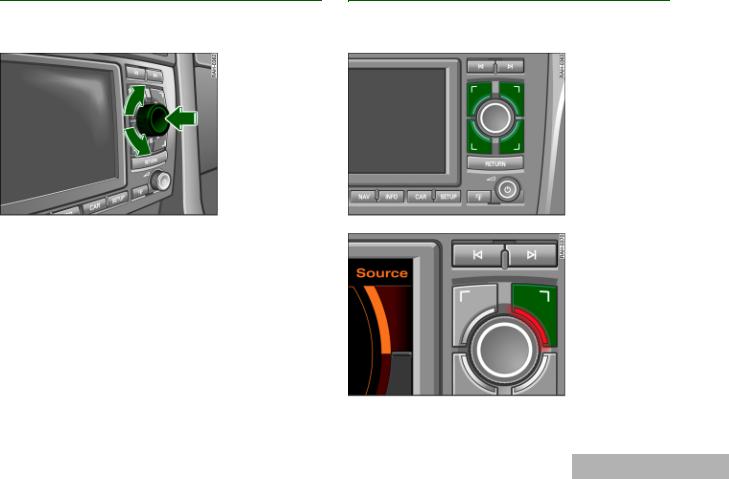
15 |
General system operation
Controls
Basic operating functions
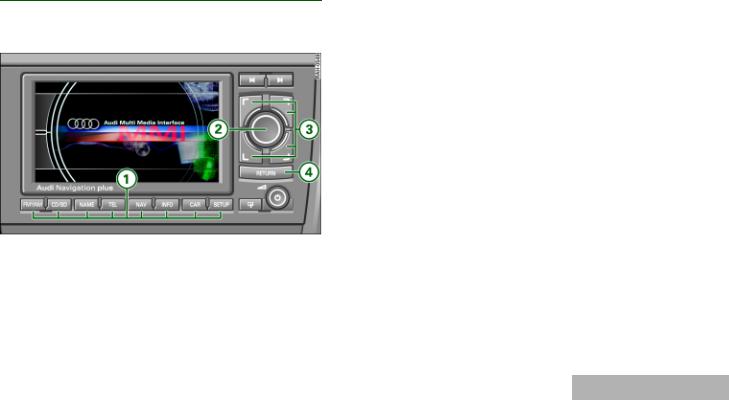
All the functions of the Navigation System can be operated with four basic rules.
2.Rotate and press the control knob A2 fig. 7 ( page 17) to make a selection in the Display.
3.Press one of the control buttons A3 fig. 7 ( page 17) to open one of the submenus in the particular main function. You can find the current submenus in the four corners of the display. The four corners of the display correspond to the four control buttons that are positioned around the control knob.
4.Press the  button A4 fig. 7 ( page 18) to cancel a selection not yet confirmed or to return to the next higher level.
In principle you only need to take note of the buttons described, along with their main functions. You will be led through the operating procedures with the help of the menus, which are mostly selfexplanatory. 
Fig. 7 Navigation System Controls
The buttons on the operating unit have been assigned the following four basic functions:
1.Press one of the function keys A1 fig. 7 ( page 16) to reach the desired main function (e.g. radio operation, navigation).
General operation |
|
RADIO, CD |
|
NAME, TEL |
NAV, INFO |
CAR, SETUP |
|
|
|
|
|
|
|
16 General system operation
Function buttons
The function buttons determine which main functions are shown in the display.
already activated function button. This opens special settings |
|
|
belonging to the main function just selected. |
|
|
A1 |
button . . . . . . . . . . . . . . . . . . . . . . . . . . . . . . . . . |
56 |
A2 |
button |
|
|
Running the CD drives . . . . . . . . . . . . . . . . . . . . . . . . . |
78 |
|
Running the MP3 player . . . . . . . . . . . . . . . . . . . . . . . . |
83 |
A3 |
button . . . . . . . . . . . . . . . . . . . . . . . . . . . . . . . . . . |
98 |
A4 |
button1) . . . . . . . . . . . . . . . . . . . . . . . . . . . . . . . . . . . |
105 |
A5 |
button . . . . . . . . . . . . . . . . . . . . . . . . . . . . . . . . . . . |
108 |
A6 |
button . . . . . . . . . . . . . . . . . . . . . . . . . . . . . . . . . . . |
163 |
A7 |
button . . . . . . . . . . . . . . . . . . . . . . . . . . . . . . . . . . . |
168 |
A8 |
button . . . . . . . . . . . . . . . . . . . . . . . . . . . . . . . . . |
169 |
Fig. 8 Navigation System: Function buttons
–Press a function button fig. 8 to reach the desired main function.
If the Navigation System is switched on, all main functions are active.
The main menu or a submenu assigned to this main function is shown in the display page 20, “History function”. When you press the function button again, you usually go the particular main menupage 20, “Home function”.
If you pressed the SETUP button in one of the main functions, you can leave that Setup menu by pressing the  button again page 169. The Setup function works in conjunction with an
1) Telephone is not installed.
General system operation |
17 |
Control knob
You can make a selection in the Display by turning and pressing the control knob.
Control buttons
The control buttons are logically assigned to the corners of the screen.
Fig. 9 Navigation
System: Control knob
Rotation function
–Rotate the control knob fig. 9 to select a menu item in the Display.
–Rotate the control knob clockwise or counter-clockwise to move the cursor up or down.
Pressing function
–Press the control knob fig. 9 to confirm the selection or entry.
If an arrow A2 page 29, fig. 23 is visible in the lower or upper Display corner, additional menu items can be called up by continuing to rotate the knob page 29. 
Fig. 10 Navigation System: Control buttons
Fig. 11 Navigation System: Assignment of control buttons and button symbols to the screen corners. 
General operation |
|
RADIO, CD |
|
NAME, TEL |
NAV, INFO |
CAR, SETUP |
|
|
|
|
|
|
|

18 General system operation
The four control buttons organized around the control knob page 17, fig. 10 are arranged to correspond to the bar-
shaped switch symbols in the screen corners: the top right screen corner corresponds to the top right control button page 17, fig. 11.
When you press a control button, a new menu group is displayed which is assigned thematically to the particular main function.
To make orientation easier, the activated control button is illuminated and the corresponding corner of the screen is highlighted in color. 
The  button is available in every menu application.
Using the  button, you can also deactivate the active side menu in the navigation map display page 144.
 Tips
Tips
If you activate the function button page 16 within a main function, the system will automatically jump to the main menu of that main function. Please note page 20, “Home function”. 
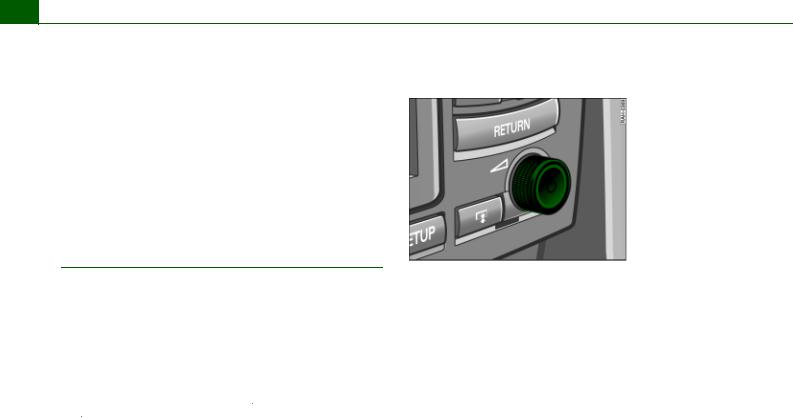
Forward/Reverse button
Return button
Fig. 12 Navigation
System: Return button
By pressing the  button you will jump back one level in the menu hierarchy within a main function.
A selection that has not been confirmed by pressing the control knob will be cancelled.
Fig. 13 Navigation System Forward/reverse button
Depending on the operating mode, the following functions are carried out with these buttons:
Main radio function is active
| A2 go to next station on the radio station list
| A1 go to previous station on the radio station list
General system operation |
19 |
If you would like to scroll in an active radio station list using the Forward/Reverse button, it is not necessary to show the station list in the Navigation System display.
If the radio memory list page 61 is shown in the Navigation System display, you can select a a station from the memory list by pressing the Forward/Reverse button.
Main CD function is active
Pressing the | button A2 calls up the next CD track. If the button is held down, fast forward is activated.
You can jump back to the previous track by pressing the | button A1 within the first 10 seconds of play time for a track. After 10 seconds it jumps to the start of the track. If the button is held down, reverse is activated.
If you would like to scroll in an active CD track list using the Forward/Reverse button or activate forward/reverse it is not necessary to show the CD operating menu in the Navigation System display.
Main MP3 function is active
Pressing the | button A2 calls up the next in the MP3 player. If the button is held down, fast forward is activated.
You can jump back to the previous track by pressing the | button A1 within the first 10 seconds of play time for a track. After 10 seconds it jumps to the start of the track. If the button is held down, reverse is activated.
If you would like to scroll in an active MP3 track list using the Forward/Reverse button or activate forward/reverse it is not necessary to show the MP3 operating menu in the Navigation System display. 
Adjusting volume
Fig. 14 Navigation System ON/OFF knob - adjusting volume
Volume can be adjusted by turning the ON/OFF button. The volume setting will be stored automatically.
If the volume is too high when the radio is turned on, it will be reduced automatically to a level set by the factory. If the volume is too low when the radio is turned on, it will be increased automatically to a level set by the factory.
 Tips
Tips
Volume can also be adjusted using the buttons on the multi-func- tion steering wheel* page 21. 
General operation |
|
RADIO, CD |
|
NAME, TEL |
NAV, INFO |
CAR, SETUP |
|
|
|
|
|
|
|
20 General system operation
Home function |
Start Navigation System Reset |
|
|
|
|
If you activate the function button within a main function, the system will automatically jump to the main menu of that main function.
In Navigation “Home function” depends on the route guidance selected: If you have activated route guidance with stopovers, you go to the menu for route planning by pressing the function button again page 139, fig. 146. If you have activated route guidance without stopovers page 139, you go to the main navigation menu (singe destination mode) by pressing the function button again. 
History function
The system recalls the previous settings.
When a function button is pressed, the system will switch to the most recently accessed menu level for the specific main function. This includes any sublevels that were opened. This excludes Setup menus.
The history memory is erased when the system moves into standby mode.
An example: You are currently on the Tuning radio menu and switch to the navigation menu by pushing the  button. If you press the
  button at this time, you will not jump to the main radio menu, but directly to the Tuning radio menu.
Fig. 15 Navigation
System ON/OFF knob
The following process will restart your Audi Navigation System and will allow complete functionality sytem to be restored.
–Press the ON/OFF knob to switch the Navigation System off.
–Press and hold the ON/OFF knob until the display reappears and turns black.
–Release the ON/OFF knob as soon as the display has turned black. After a few seconds, the Navigation System begins its restart, or you can switch it on manually
page 11. 
General system operation |
21 |
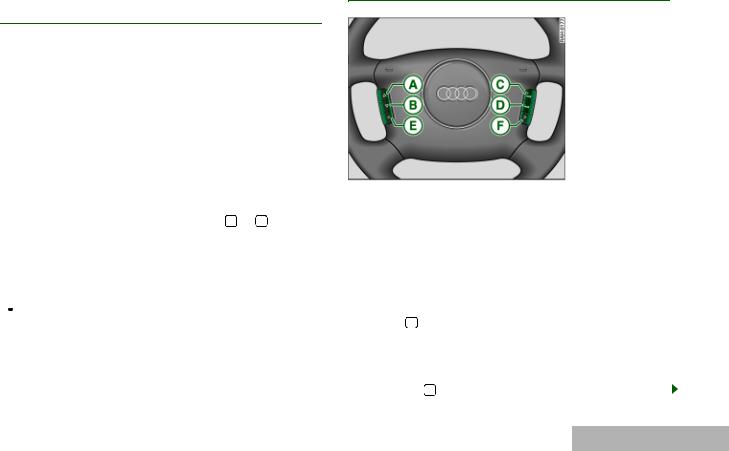
Multi-function steering wheel
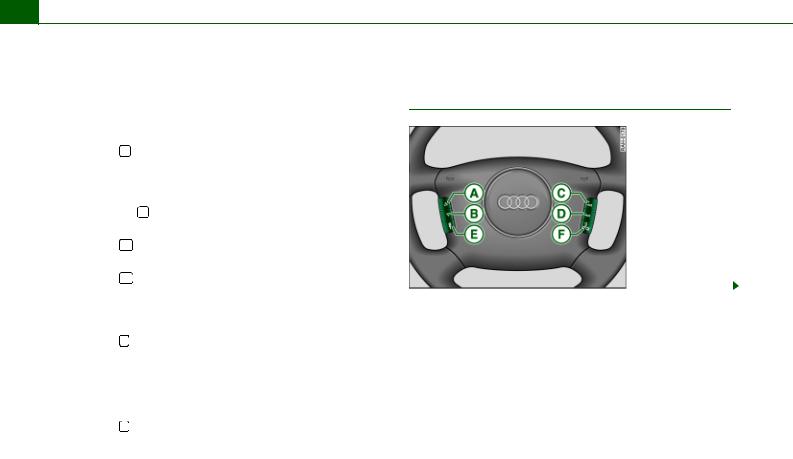
Applies to vehicles: with multi-function steering wheel
General
The multi-function steering wheel enables quick and easy operation of selected systems on the Navigation System.
To minimize driver distraction when operating the Navigation System and its components, buttons for controlling basic audio functions are placed on the multi-function steering wheel. However, this applies only if your vehicle equipment was installed at the factory.
Depending on the multi-function steering wheel in your vehicle, you can use audio functions.
You use the buttons to operate the function that is active at the time. For example, if you are listening to the radio, you can select the last/next station from the station list using the or button on the multi-function steering wheel with audio controls*.
The volume can be adjusted in each active function.
Of course, you can continue to use the audio functions from the Navigation System.
 Tips
Tips
If systems have not been installed in the vehicle, the button on the multi-function steering wheel* assigned to that system is inoperative. 
Applies to vehicles: with multi-function steering wheel with audio operation
Multi-function steering wheel with audio operation
Fig. 16 Multi-function steering wheel with audio operation
You can perform the following functions with this multi-function steering wheel:
Button |
Function |
Operating |
Application |
|
description |
mode |
|||
|
|
|||
|
|
|
Select the previous |
|
|
|
Radio |
station on the radio |
|
|
Press the |
|
station list a). |
|
A |
button |
|
Select the previous |
|
|
|
track for the audio |
||
|
|
CD or MP3 |
||
|
|
source you are listen- |
||
|
|
|
||
|
|
|
ing to. |
|
A |
Press and hold |
CD or MP3 |
Reverse |
|
the button |
||||
|
|
|
||
|
|
|
|
General operation |
|
RADIO, CD |
|
NAME, TEL |
NAV, INFO |
CAR, SETUP |
|
|
|
|
|
|
|
22 General system operation
Button |
Function |
Operating |
Application |
|
|
description |
mode |
|
|
||
|
|
|
|
||
|
|
|
Select the next station |
|
|
|
|
Radio |
on the radio station |
|
|
AB |
Press the |
|
list a). |
|
|
button |
|
Select the next track |
|
|
|
|
|
|
|
||
|
|
CD or MP3 |
for the audio source |
|
|
|
|
|
you are listening to. |
|
|
AB |
Press and hold |
CD or MP3 |
Fast forward |
|
|
the button |
|
|
|||
|
|
|
|
|
|
C |
Press the |
Radio, CD or |
Increase volume |
|
|
A |
button |
MP3 |
|
|
|
|
|
|
|
||
AD |
Press the |
Radio, CD or |
Reduce volume |
|
|
button |
MP3 |
|
|
||
|
|
|
|
||
|
|
Radio |
Frequency scan |
|
|
|
Press the |
|
Load the previous CD |
|
|
A |
CD |
if CD changer* is |
|
|
|
E |
button |
|
installed |
|
|
|
|
|
|
||
|
|
MP3 |
Switch to previous |
|
|
|
|
available MP3 drive |
|
|
|
|
|
|
|
|
|
|
|
Radio |
Frequency scan |
|
|
|
Press the |
CD |
Load the next CD if CD |
|
|
AF |
changer* is installed |
|
|
||
button |
|
|
|
||
|
MP3 |
Switch to next avail- |
|
|
|
|
|
|
|
||
|
|
able MP3 drive |
|
|
|
|
|
|
|
|
|
|
|
|
|
|
|
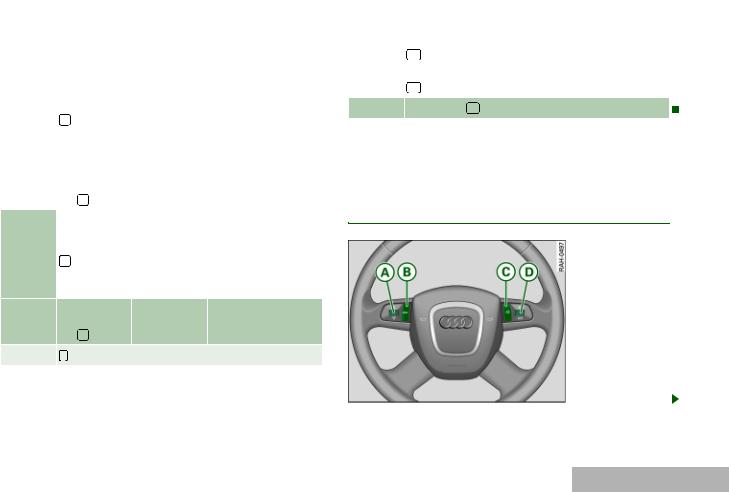
Applies to vehicles: with multi-function steering wheel with audio operation - version A
Multi-function steering wheel with audio operation - version A
Fig. 17 Multi-function steering wheel with audio operation (version A)
a)If the radio memory list is shown in the Navigation System display, a radio station can be selected from the list using the left menu thumbwheel.
General system operation |
23 |
You can perform the following functions with this multi-function steering wheel:
Button |
Function |
Operating |
Application |
|
description |
mode |
|||
|
|
|||
|
|
|
Select the previous |
|
|
|
Radio |
station on the radio |
|
|
Press the |
|
station list a). |
|
A |
button |
|
Select the previous |
|
|
|
track for the audio |
||
|
|
CD or MP3 |
||
|
|
source you are listen- |
||
|
|
|
||
|
|
|
ing to. |
|
|
Press and |
|
|
|
A |
hold |
CD or MP3 |
Reverse |
|
|
the button |
|
|
|
|
|
|
Select the next station |
|
|
|
Radio |
on the radio station |
|
A |
Press the |
|
list a). |
|
B |
button |
|
Select the next track |
|
|
|
|||
|
|
CD or MP3 |
for the audio source |
|
|
|
|
you are listening to. |
|
|
|
|
|
Press and
AB hold CD or MP3 Fast forward the button
AE button not applicable.
Button |
Function |
Operating |
Application |
|
description |
mode |
|||
|
|
|||
AC |
Press the |
Radio, CD or |
Increase volume |
|
button |
MP3 |
|||
|
|
|||
AD |
Press the |
Radio, CD or |
Reduce volume |
|
button |
MP3 |
|||
|
|
|||
|
|
|
|
AF Talk Button ( ) not applicable.
a)If the radio memory list is shown in the Navigation System display, a radio station can be selected from the list using the left menu thumbwheel.
Applies to vehicles: with multi-function steering wheel with audio operation - version B
Multi-function steering wheel with audio operation - version B
Fig. 18 with multifunction steering wheel with audio operation (version B)
General operation |
|
RADIO, CD |
|
NAME, TEL |
NAV, INFO |
CAR, SETUP |
|
|
|
|
|
|
|

24 General system operation
You can perform the following functions with this multi-function steering wheel:
Button |
Function |
Operating |
Application |
|
description |
mode |
|||
|
|
|||
|
|
|
Select the previ- |
|
|
Roll the left |
Radio |
ous/next station on the |
|
|
|
radio station list a). |
||
A |
menu thumb- |
|
|
|
|
Select the previ- |
|||
wheel |
|
|||
|
up/down |
CD or MP3 |
ous/next track for the |
|
|
|
audio source you are |
||
|
|
|
||
|
|
|
listening to. |
|
|
First press on |
|
Start station frequency |
|
|
left menu |
Radio |
||
|
scan forward |
|||
|
thumbwheel |
|
||
A |
|
|
||
Second press |
|
Stop station fre- |
||
|
|
|||
|
on left menu |
Radio |
||
|
quency scan |
|||
|
thumbwheel |
|
||
|
|
|
||
|
Press and hold |
|
|
|
A |
left menu |
CD or MP3 |
Fast forward |
|
|
thumbwheel |
|
|
|
AB |
button not applicable. |
|
||
|
|
|
|
|
Button |
Function |
Operating |
Application |
|
description |
mode |
|||
|
|
|||
AC |
Talk Button ( ) not applicable. |
|
||
|
Roll right |
|
|
|
AD |
menu thumb- |
Radio, CD or |
Increase or reduce vol- |
|
wheel up |
MP3 |
ume |
||
|
||||
|
or down |
|
|
|
|
|
|
Repeat the last naviga- |
|
AD |
Press the right |
Radio, CD or |
tion* announcement |
|
thumbwheel |
MP3 |
with active route guid- |
||
|
||||
|
|
|
ance |
|
|
|
|
|
|
a)If the radio memory list is shown in the Navigation System display, a radio station can be selected from the list using the left menu thumbwheel.
The menu thumbwheel functions apply to the equipment which is active at the time.
If you roll the left menu thumbwheel past several detents in CD operation, several tracks are jumped. 
General system operation |
25 |
Applies to vehicles: with multi-function steering wheel with audio operation - version C
Multi-function steering wheel with audio operation - version C
Fig. 19 Multi-function steering wheel with audio operation - version C
You can perform the following functions with this multi-function steering wheel:
Button |
Function |
Operating |
Application |
||
description |
mode |
||||
|
|
||||
|
|
|
|
Select the previous |
|
|
|
|
Radio |
station on the radio |
|
|
Press the |
|
station list a). |
||
A |
button |
|
Select the previous |
||
|
|
track for the audio |
|||
|
|
|
CD or MP3 |
||
|
|
|
source you are listen- |
||
|
|
|
|
||
|
|
|
|
ing to. |
|
|
Press and hold |
|
|
||
A |
the |
button |
CD or MP3 |
Reverse |
|
|
|
|
|
||
|
|
|
|
Select the next station |
|
|
|
|
Radio |
on the radio station |
|
A |
Press the |
|
list a). |
||
B |
|
button |
|
Select the next track |
|
|
|
||||
|
|
|
CD or MP3 |
for the audio source |
|
|
|
|
|
you are listening to. |
|
|
Press und |
|
|
||
A |
halten der |
CD or MP3 |
Fast forward |
||
B |
|
|
|||
|
|
button |
|
|
|
AE |
button not applicable. |
|
|||
|
|
|
|
|
|
General operation |
|
RADIO, CD |
|
NAME, TEL |
NAV, INFO |
CAR, SETUP |
|
|
|
|
|
|
|

26 General system operation
Button |
Function |
Operating |
Application |
|
description |
mode |
|||
|
|
|||
AC |
Press the |
Radio, CD, or |
Increase volume |
|
button |
MP3 |
|||
|
|
|||
AD |
Press the |
Radio, CD, or |
Reduce volume |
|
button |
MP3 |
|||
|
|
|||
|
|
|
|
AF button not applicable.
a)If the radio memory list is shown in the Navigation System display, a radio station can be selected from the list using the left menu thumbwheel.
Display 27
Display
Orientation
Main menu
The main menu or the previously active function menu appears in the display when a function button is pressed.
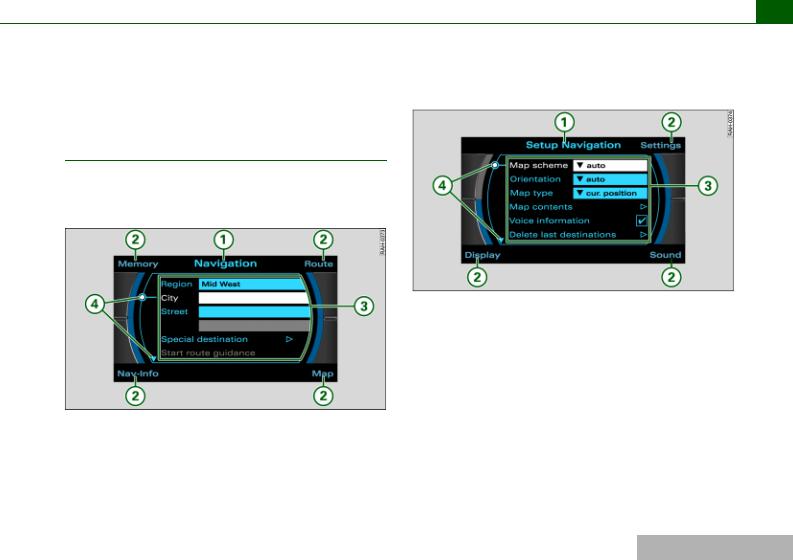
Fig. 21 Display overview: Setup main navigation menu
When you press a function button, the main menu or a submenu assigned to this main function is displayed page 16.
If you then press the  button, the appropriate main Setup menu is displayed fig. 21.
You can open the main Setup menu from a main menu or a submenu. For example, if you press the  button in the main
Fig. 20 Display overview: Main navigation menu navigation menu fig. 20 or in a navigation submenu page 28, fig. 22, you are shown the main Setup navigation menu fig. 21.
The functions in that menu which can be performed are shown in the center of the display. If your vehicle is not equipped with a particular function, no functions are offered in the main menu. You are shown an appropriate Note instead. 
General operation |
|
RADIO, CD |
|
NAME, TEL |
NAV, INFO |
CAR, SETUP |
|
|
|
|
|
|
|
28 Display
The display comprises the following areas identified in the illustrations page 27, fig. 20 and page 27, fig. 21:
A1 Title line
The title line shows the main function that you are currently in, e.g. Navigation page 27, fig. 20. If Setup is displayed on the title line as well, you are in a Setup menu page 27, fig. 21.
Switching between the individual main functions is carried out through the function keys page 16.
A2 Corners of the display
These functions depend on the menu you are currently in and are operated using the control buttons. The control buttons are logically assigned to the corners of the screen. The top right corner of the screen corresponds to the top right control button page 17.
A3 Display center
Radio station or track lists are displayed in the center of the display in radio, CD and MP3 operation. In Navigation, the individual destination mode is displayed. In the main Setup menus, a list of available functions is displayed.
A4 Orientation symbols
The different symbols in the display are used to select various additional functions page 29. 
Submenu
Fig. 22 Display: Navigation submenu
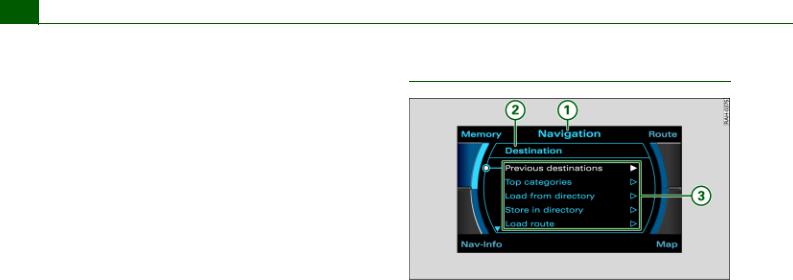
The submenu generally comprises the following areas identified in the illustration fig. 22:
A1 Title line
You are also shown the title line in the submenus that were opened for the individual main functions. This orients you as to which main function you are in.
A2 Submenu
The subtitle shows detailed information about the selected submenu option, such as Destination.
A3 Display center
In the center of the display, the available options in the particular submenu are listed or notes are displayed. 
 Loading...