

Audi A8, A6 Workshop Manual
Protected by copyright. Copying for private or commercial purposes, in part or in whole, is not
permitted unless authorised by AUDI AG. AUDI AG does not guarantee or accept any liability
with respect to the correctness of information in this document. Copyright by AUDI AG.
Service
Workshop Manual
Audi A6 2005 ➤
Audi A8 2003 ➤
Servicing automatic gearbox 09E, four-wheel drive
Edition 12.2011
Service Department. Technical Information

Protected by copyright. Copying for private or commercial purposes, in part or in whole, is not
permitted unless authorised by AUDI AG. AUDI AG does not guarantee or accept any liability
with respect to the correctness of information in this document. Copyright by AUDI AG.
Service
List of Workshop Manual Repair GroupsList of Workshop Manual
Repair GroupsList of Workshop Manual Repair Groups
Re pa ir G ro up
00 - Technical data
32 - Torque converter
37 - Controls, housing
38 - Gears, control
39 - Final drive - front differential
Technical information should always be available to the foremen and mechanics, because their
careful and constant adherence to the instructions is essential to ensure vehicle road-worthiness and
safety. In addition, the normal basic safety precautions for working on motor vehicles must, as a
matter of course, be observed.
All rights reserved.
No reproduction without prior agreement from publisher.
Copyright © 2012 Audi AG, Ingolstadt D3E804A684B

Protected by copyright. Copying for private or commercial purposes, in part or in whole, is not
permitted unless authorised by AUDI AG. AUDI AG does not guarantee or accept any liability
with respect to the correctness of information in this document. Copyright by AUDI AG.
Audi A6 2005 ➤ , Audi A8 2003 ➤
Servicing automatic gearbox 09E, four-wheel drive - Edition 12.2011
Contents
00 - Technical data . . . . . . . . . . . . . . . . . . . . . . . . . . . . . . . . . . . . . . . . . . . . . . . . . . . . 1
1 Repair instructions . . . . . . . . . . . . . . . . . . . . . . . . . . . . . . . . . . . . . . . . . . . . . . . . . . . . . . . . 1
1.1 General repair instructions . . . . . . . . . . . . . . . . . . . . . . . . . . . . . . . . . . . . . . . . . . . . . . . . . . 1
1.2 Special tools . . . . . . . . . . . . . . . . . . . . . . . . . . . . . . . . . . . . . . . . . . . . . . . . . . . . . . . . . . . . 3
2 Rules for cleanliness when working on the gearbox . . . . . . . . . . . . . . . . . . . . . . . . . . . . . . 11
3 Common faults . . . . . . . . . . . . . . . . . . . . . . . . . . . . . . . . . . . . . . . . . . . . . . . . . . . . . . . . . . 12
3.1 Jolting on overrun, delayed gear engagement when shifting to „D“ or „R“ when stationary, in
some cases sporadic fault in event memory „Reverse gear“ . . . . . . . . . . . . . . . . . . . . . . 12
3.2 Defective stator shaft bushes . . . . . . . . . . . . . . . . . . . . . . . . . . . . . . . . . . . . . . . . . . . . . . . . 13
3.3 Jolting under power and on overrun, entry in event memory „Torque converter lock-up clutch,
no transmission“ . . . . . . . . . . . . . . . . . . . . . . . . . . . . . . . . . . . . . . . . . . . . . . . . . . . . . . . . 14
4 Gearbox adaption for vehicles from model year 2006 onwards . . . . . . . . . . . . . . . . . . . . . . 15
32 - Torque converter . . . . . . . . . . . . . . . . . . . . . . . . . . . . . . . . . . . . . . . . . . . . . . . . . . 17
1 Torque converter . . . . . . . . . . . . . . . . . . . . . . . . . . . . . . . . . . . . . . . . . . . . . . . . . . . . . . . . 17
1.1 Draining torque converter . . . . . . . . . . . . . . . . . . . . . . . . . . . . . . . . . . . . . . . . . . . . . . . . . . 17
1.2 Checking torque converter . . . . . . . . . . . . . . . . . . . . . . . . . . . . . . . . . . . . . . . . . . . . . . . . . . 17
37 - Controls, housing . . . . . . . . . . . . . . . . . . . . . . . . . . . . . . . . . . . . . . . . . . . . . . . . . . 18
1 Securing gearbox to assembly stand . . . . . . . . . . . . . . . . . . . . . . . . . . . . . . . . . . . . . . . . . . 18
2 Dismantling and assembling planetary gearbox . . . . . . . . . . . . . . . . . . . . . . . . . . . . . . . . . . 19
2.1 Planetary gearbox - exploded view . . . . . . . . . . . . . . . . . . . . . . . . . . . . . . . . . . . . . . . . . . 20
2.2 Dismantling and assembling planetary gearbox . . . . . . . . . . . . . . . . . . . . . . . . . . . . . . . . . . 21
3 Dismantling and assembling body „I“ . . . . . . . . . . . . . . . . . . . . . . . . . . . . . . . . . . . . . . . . 47
3.1 Body „I“ - exploded view . . . . . . . . . . . . . . . . . . . . . . . . . . . . . . . . . . . . . . . . . . . . . . . . . . . . 48
3.2 Clutch „C“ - exploded view . . . . . . . . . . . . . . . . . . . . . . . . . . . . . . . . . . . . . . . . . . . . . . . . . . 49
3.3 Dismantling and assembling clutch „C“ . . . . . . . . . . . . . . . . . . . . . . . . . . . . . . . . . . . . . . . . 50
3.4 Piston/cylinder „D“ - exploded view . . . . . . . . . . . . . . . . . . . . . . . . . . . . . . . . . . . . . . . . . . 54
3.5 Dismantling and assembling piston/cylinder „D“ . . . . . . . . . . . . . . . . . . . . . . . . . . . . . . . . 55
3.6 Adjusting clearance of clutch „D“ . . . . . . . . . . . . . . . . . . . . . . . . . . . . . . . . . . . . . . . . . . . . 57
3.7 Planetary drive „II“ and „III“ - exploded view . . . . . . . . . . . . . . . . . . . . . . . . . . . . . . . . . . . . 61
3.8 Dismantling and assembling planetary drive „II“ and „III“ . . . . . . . . . . . . . . . . . . . . . . . . . . 62
4 Dismantling and assembling clutch „B“ . . . . . . . . . . . . . . . . . . . . . . . . . . . . . . . . . . . . . . . . 67
4.1 Clutch „B“ - exploded view . . . . . . . . . . . . . . . . . . . . . . . . . . . . . . . . . . . . . . . . . . . . . . . . . . 67
4.2 Dismantling and assembling clutch „B“ . . . . . . . . . . . . . . . . . . . . . . . . . . . . . . . . . . . . . . . . 68
5 Dismantling and assembling body „II“ . . . . . . . . . . . . . . . . . . . . . . . . . . . . . . . . . . . . . . . . 73
5.1 Body „II“ - exploded view . . . . . . . . . . . . . . . . . . . . . . . . . . . . . . . . . . . . . . . . . . . . . . . . . . 73
5.2 Dismantling body „II“ . . . . . . . . . . . . . . . . . . . . . . . . . . . . . . . . . . . . . . . . . . . . . . . . . . . . . . 74
5.3 Clutch „A“ - exploded view . . . . . . . . . . . . . . . . . . . . . . . . . . . . . . . . . . . . . . . . . . . . . . . . . . 77
5.4 Dismantling and assembling clutch „A“ . . . . . . . . . . . . . . . . . . . . . . . . . . . . . . . . . . . . . . . . 78
5.5 Clutch „E“ - exploded view . . . . . . . . . . . . . . . . . . . . . . . . . . . . . . . . . . . . . . . . . . . . . . . . . . 83
5.6 Dismantling and assembling clutch „E“ . . . . . . . . . . . . . . . . . . . . . . . . . . . . . . . . . . . . . . . . 84
5.7 Assembling body „II“ . . . . . . . . . . . . . . . . . . . . . . . . . . . . . . . . . . . . . . . . . . . . . . . . . . . . . . 88
38 - Gears, control . . . . . . . . . . . . . . . . . . . . . . . . . . . . . . . . . . . . . . . . . . . . . . . . . . . . 91
1 Oil pan, ATF strainer and mechatronic unit - exploded view . . . . . . . . . . . . . . . . . . . . . . . . 91
1.1 Removing and installing oil pan . . . . . . . . . . . . . . . . . . . . . . . . . . . . . . . . . . . . . . . . . . . . . . 93
1.2 Removing and installing ATF strainer . . . . . . . . . . . . . . . . . . . . . . . . . . . . . . . . . . . . . . . . 97
1.3 Removing and installing mechatronic unit - gearbox with 24 bolts on oil pan . . . . . . . . . . 99
1.4 Removing and installing mechatronic unit - gearbox with 13 bolts on oil pan . . . . . . . . . . 102
1.5 Removing and installing wiring harness in gearbox . . . . . . . . . . . . . . . . . . . . . . . . . . . . . . 105
2 Dismantling and assembling ATF supply unit . . . . . . . . . . . . . . . . . . . . . . . . . . . . . . . . . . 108
Contents i

Protected by copyright. Copying for private or commercial purposes, in part or in whole, is not
permitted unless authorised by AUDI AG. AUDI AG does not guarantee or accept any liability
with respect to the correctness of information in this document. Copyright by AUDI AG.
Audi A6 2005 ➤ , Audi A8 2003 ➤
Servicing automatic gearbox 09E, four-wheel drive - Edition 12.2011
2.1 ATF supply unit - exploded view . . . . . . . . . . . . . . . . . . . . . . . . . . . . . . . . . . . . . . . . . . . . 108
2.2 Renewing oil seal for torque converter . . . . . . . . . . . . . . . . . . . . . . . . . . . . . . . . . . . . . . . . 109
2.3 Removing and installing ATF supply unit . . . . . . . . . . . . . . . . . . . . . . . . . . . . . . . . . . . . . . 111
2.4 Removing and installing ATF pump in ATF supply unit . . . . . . . . . . . . . . . . . . . . . . . . . . . . 122
2.5 Removing and installing needle bearing for torque converter . . . . . . . . . . . . . . . . . . . . . . 124
39 - Final drive - front differential . . . . . . . . . . . . . . . . . . . . . . . . . . . . . . . . . . . . . . . . 126
1 Servicing front final drive . . . . . . . . . . . . . . . . . . . . . . . . . . . . . . . . . . . . . . . . . . . . . . . . . . 126
1.1 Front final drive - exploded view . . . . . . . . . . . . . . . . . . . . . . . . . . . . . . . . . . . . . . . . . . . . . . 126
1.2 Removing and installing flange shaft (right-side) with gearbox removed . . . . . . . . . . . . . . 127
1.3 Removing and installing flange shaft (left-side) . . . . . . . . . . . . . . . . . . . . . . . . . . . . . . . . . . 128
1.4 Renewing oil seal for flange shaft (right-side) . . . . . . . . . . . . . . . . . . . . . . . . . . . . . . . . . . 131
1.5 Renewing oil seal between final drive and gearbox housing . . . . . . . . . . . . . . . . . . . . . . . . 131
1.6 Renewing O-ring on cover for front final drive . . . . . . . . . . . . . . . . . . . . . . . . . . . . . . . . . . 134
1.7 Renewing oil seals for side shaft - gearbox with separate oil systems . . . . . . . . . . . . . . . . 135
1.8 Renewing O-rings for protective tube for side shaft - gearbox with common oil system . . 146
1.9 Renewing oil seal for selector shaft . . . . . . . . . . . . . . . . . . . . . . . . . . . . . . . . . . . . . . . . . . 155
2 Servicing transfer box . . . . . . . . . . . . . . . . . . . . . . . . . . . . . . . . . . . . . . . . . . . . . . . . . . . . . . 157
2.1 Exploded view - centre differential . . . . . . . . . . . . . . . . . . . . . . . . . . . . . . . . . . . . . . . . . . . . 157
2.2 Removing and installing centre differential housing with gearbox removed . . . . . . . . . . . . 158
2.3 Renewing ball bearing for self-locking centre differential . . . . . . . . . . . . . . . . . . . . . . . . . . 160
2.4 Renewing oil seal for flange shaft (rear) . . . . . . . . . . . . . . . . . . . . . . . . . . . . . . . . . . . . . . . . 161
3 Assessment of wear on gearbox components . . . . . . . . . . . . . . . . . . . . . . . . . . . . . . . . . . 164
3.1 Assessment of wear by checking ATF for colour and contamination . . . . . . . . . . . . . . . . . . 164
3.2 Clutch „C“ . . . . . . . . . . . . . . . . . . . . . . . . . . . . . . . . . . . . . . . . . . . . . . . . . . . . . . . . . . . . . . 165
3.3 Clutch „D“ . . . . . . . . . . . . . . . . . . . . . . . . . . . . . . . . . . . . . . . . . . . . . . . . . . . . . . . . . . . . . . 167
3.4 Planetary drive „II“ and „III“ . . . . . . . . . . . . . . . . . . . . . . . . . . . . . . . . . . . . . . . . . . . . . . . . 169
3.5 Clutch „B“ . . . . . . . . . . . . . . . . . . . . . . . . . . . . . . . . . . . . . . . . . . . . . . . . . . . . . . . . . . . . . . 171
3.6 Body „II“ . . . . . . . . . . . . . . . . . . . . . . . . . . . . . . . . . . . . . . . . . . . . . . . . . . . . . . . . . . . . . . . . 172
3.7 Clutch „A“ . . . . . . . . . . . . . . . . . . . . . . . . . . . . . . . . . . . . . . . . . . . . . . . . . . . . . . . . . . . . . . 175
3.8 Clutch „E“ . . . . . . . . . . . . . . . . . . . . . . . . . . . . . . . . . . . . . . . . . . . . . . . . . . . . . . . . . . . . . . 176
3.9 ATF supply unit . . . . . . . . . . . . . . . . . . . . . . . . . . . . . . . . . . . . . . . . . . . . . . . . . . . . . . . . . . 178
ii Contents

Protected by copyright. Copying for private or commercial purposes, in part or in whole, is not
permitted unless authorised by AUDI AG. AUDI AG does not guarantee or accept any liability
with respect to the correctness of information in this document. Copyright by AUDI AG.
Servicing automatic gearbox 09E, four-wheel drive - Edition 12.2011
00 – Technical data
1 Repair instructions
Overview
♦ ⇒ „1.1 General repair instructions“, page 1
♦ ⇒ „1.2 Special tools“, page 3
1.1 General repair instructions
Proper tools and the maximum possible care and cleanliness are
essential for satisfactory repairs. The usual basic safety precau‐
tions also naturally apply when carrying out repair work.
A number of generally applicable instructions for the various re‐
pair procedures - which were previously repeated at numerous
places in the Workshop Manual - are summarised here. They ap‐
ply to the work described in this Manual.
Audi A6 2005 ➤ , Audi A8 2003 ➤
1. Repair instructions 1
Protected by copyright. Copying for private or commercial purposes, in part or in whole, is not
permitted unless authorised by AUDI AG. AUDI AG does not guarantee or accept any liability
with respect to the correctness of information in this document. Copyright by AUDI AG.
Audi A6 2005 ➤ , Audi A8 2003 ➤
Servicing automatic gearbox 09E, four-wheel drive - Edition 12.2011
Gearbox
♦ Rules for cleanliness when working on the automatic gearbox
⇒ page 11
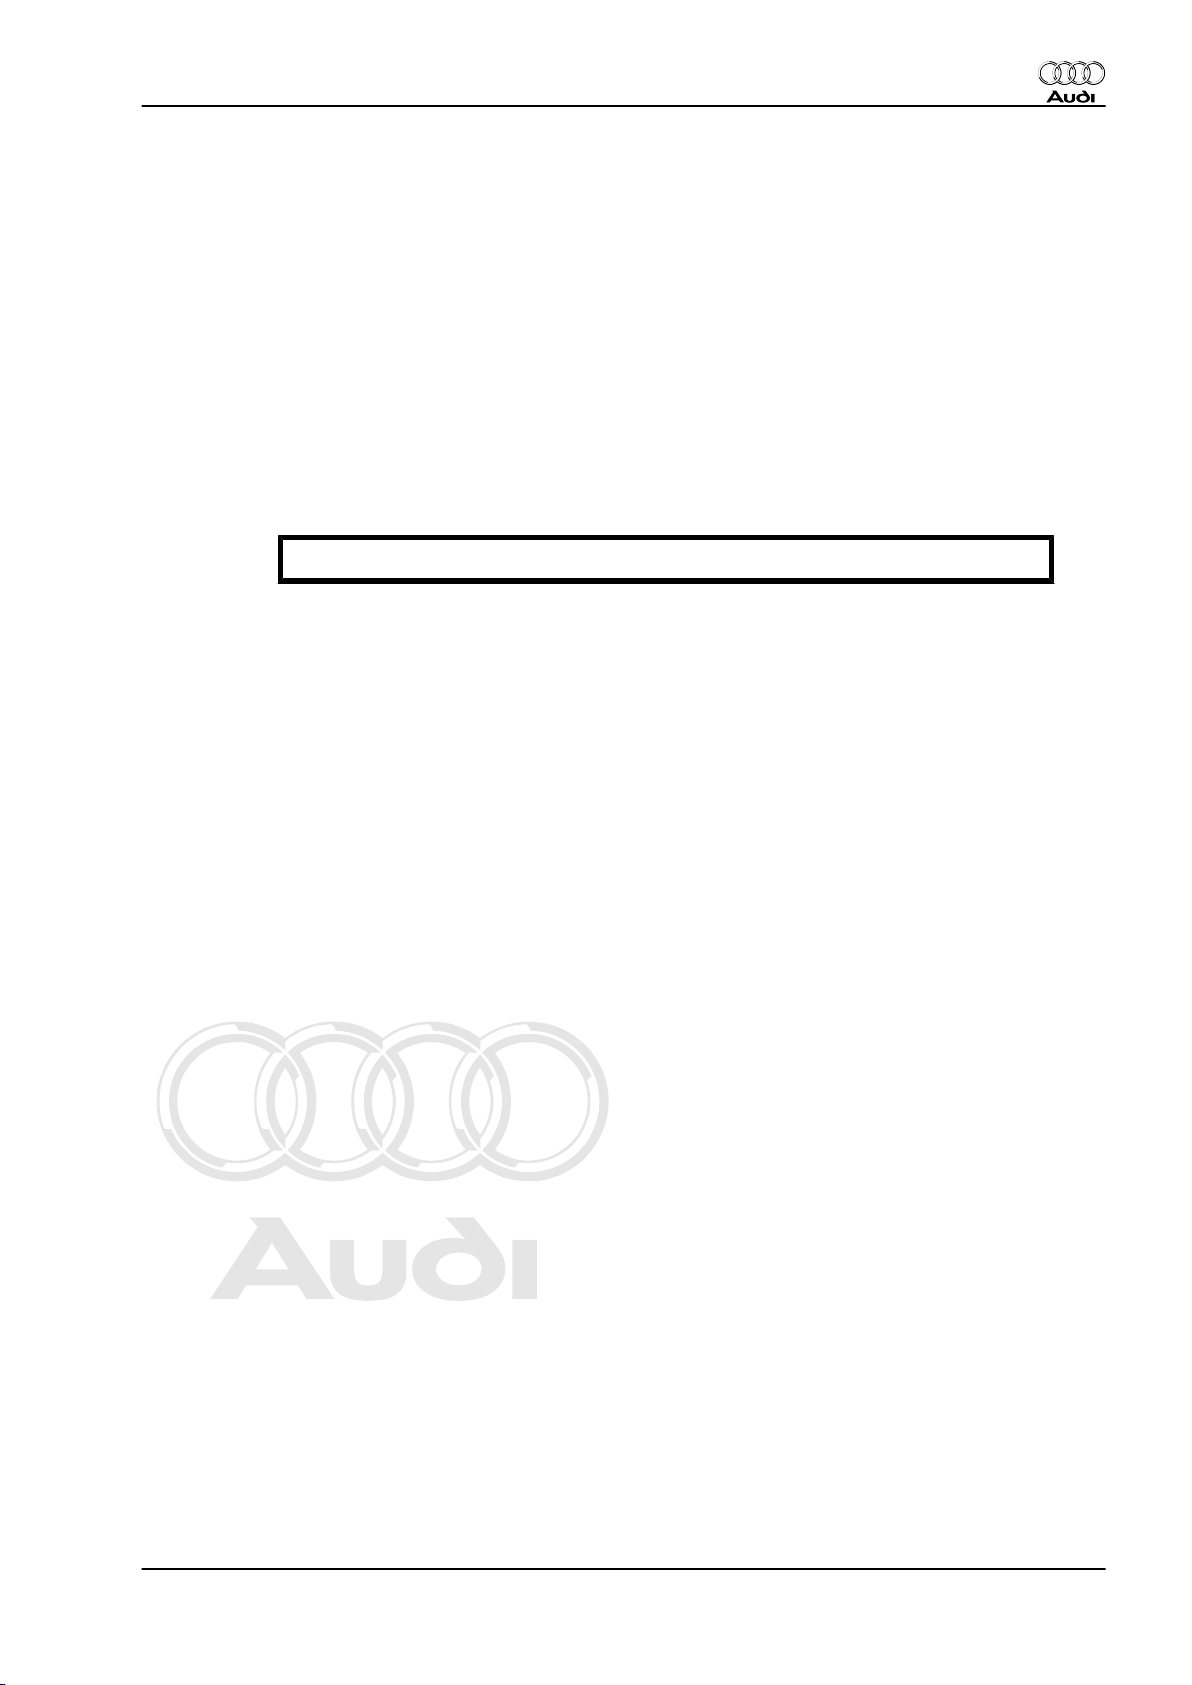
♦ If the gearbox has been removed from the vehicle and the
flange shaft (left-side) then removed, the torque converter
must be secured using the support bridge -30 - 211 A- to pre‐
vent it from falling out.
♦ Use only ATF or vaseline on all parts running in ATF. Other
lubricants will cause malfunction of the gearbox hydraulics.
♦ After the gearbox has been overhauled it should be installed
and operated as soon as possible to prevent any corrosion
forming on the new components.
♦ After installation, fill up and check all fluid levels. For capacities
and specifications refer to ⇒ Automatic gearbox 09E, fourwheel drive; Rep. gr. 00 .
Procedure if ATF is dirty
If the ATF and related components are very dirty (caused by worn
clutch linings):
♦ Dismantle and clean complete gearbox.
♦ Dismantle and check all clutches.
♦ Renew torque converter (cannot be cleaned).
♦ Renew mechatronic unit (cannot be cleaned).
♦ Clean ATF lines and ATF cooler and renew ATF strainer.
O-rings, seals, oil seals and gaskets
♦ Always renew O-rings, seals, oil seals and gaskets.
♦ After removing gaskets and seals, always inspect the contact
surface on the housing or shaft for burrs resulting from removal
or for other signs of damage.
♦ The open side of the oil seal should face the side containing
the fluid.
♦ Lightly lubricate the outer circumference and sealing lip of oil
seals with ATF before installing.
♦ Lightly lubricate O-rings with ATF or vaseline before installa‐
tion to prevent them getting crushed during assembly.
♦ Use only ATF or vaseline on all parts running in ATF. Other
lubricants will cause malfunction of the gearbox hydraulics.
♦ When installing a new oil seal, position the seal such that the
sealing lip does not contact the shaft in the same place as the
old seal (make use of installation depth tolerances).
♦ Completely remove old gaskets, clean sealing surfaces thor‐
oughly and renew gaskets.
Nuts, bolts
♦ Slacken bolts in reverse sequence to the specified tightening
sequence.
♦ Nuts and bolts which secure covers and housings should be
loosened and tightened in diagonal sequence and in stages if
no tightening sequence is specified.
♦ The tightening torques stated apply to non-oiled nuts and
bolts.
♦ Always renew self-locking bolts and nuts.
2 Rep. gr.00 - Technical data
Protected by copyright. Copying for private or commercial purposes, in part or in whole, is not
permitted unless authorised by AUDI AG. AUDI AG does not guarantee or accept any liability
with respect to the correctness of information in this document. Copyright by AUDI AG.
Servicing automatic gearbox 09E, four-wheel drive - Edition 12.2011
Locking elements
♦ Do not over-stretch circlips.
♦ Always renew circlips which have been damaged or over-
stretched.
♦ Circlips must be properly seated in the base of the groove.
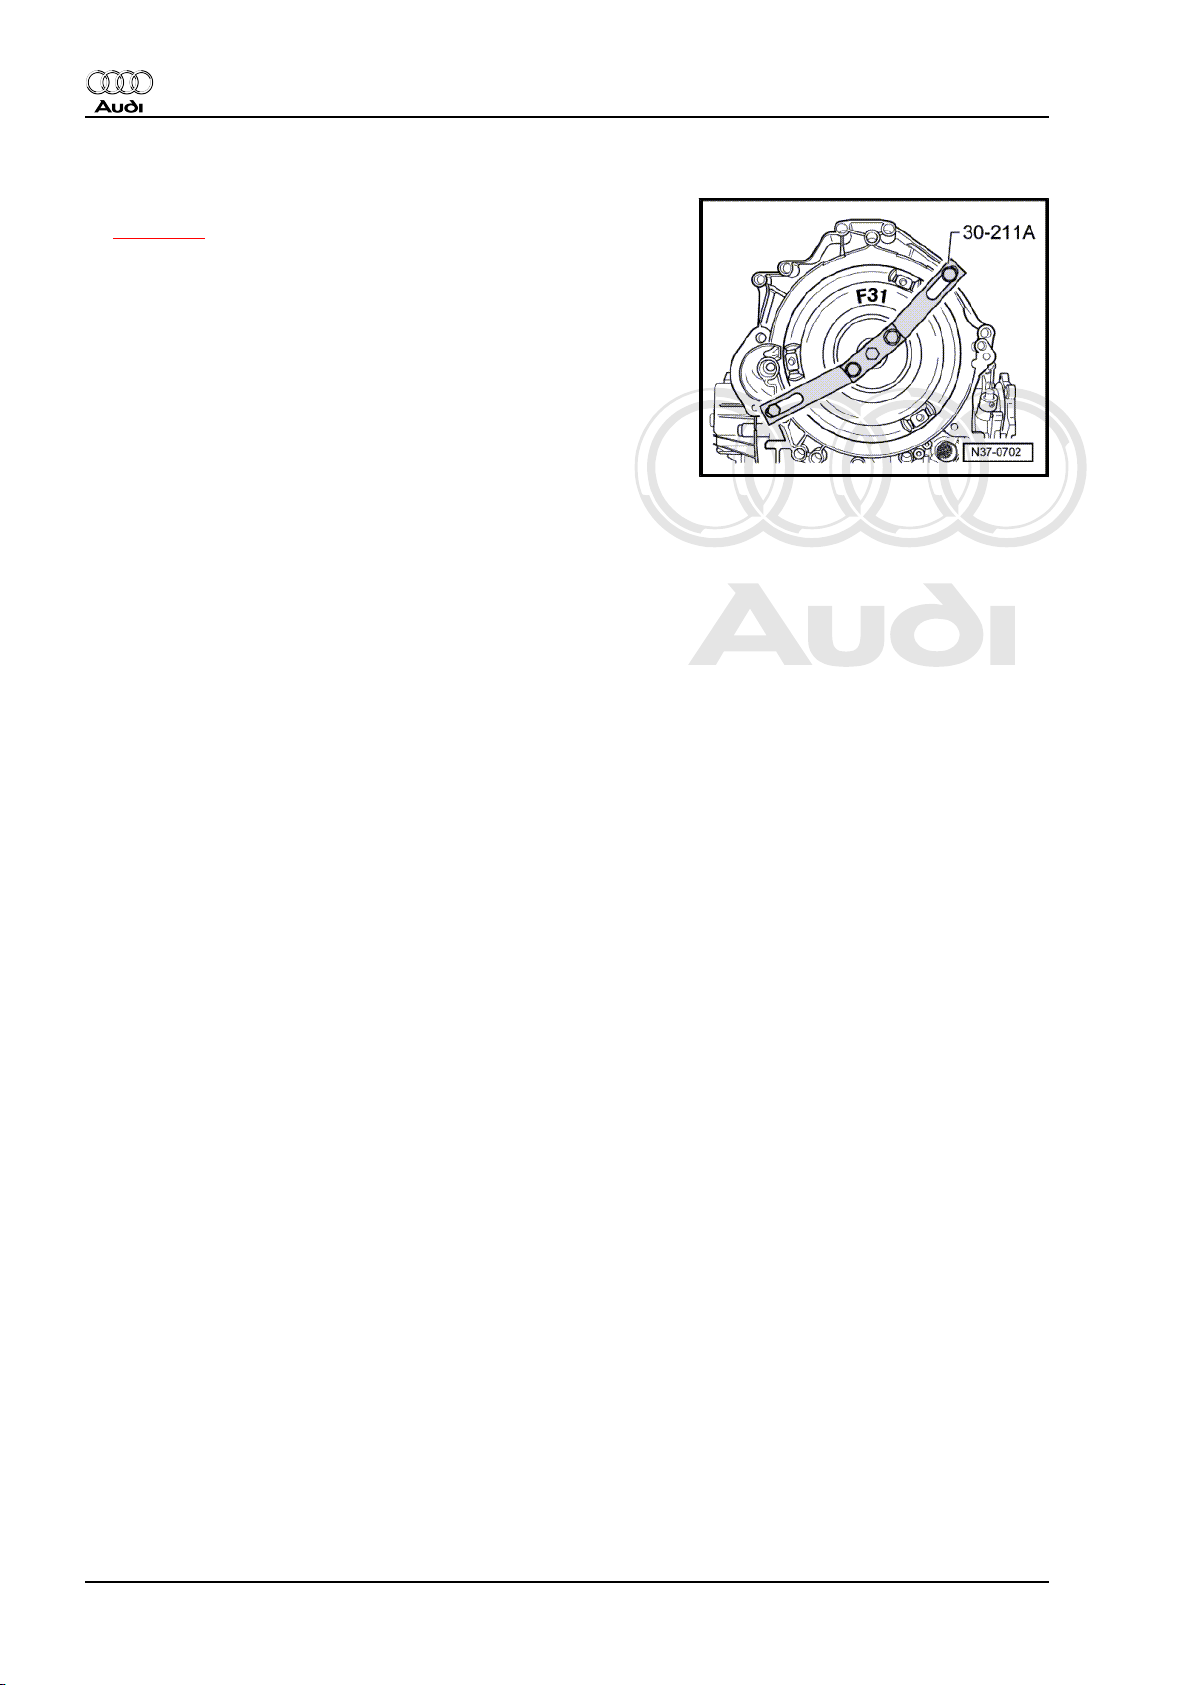
♦ Renew spring pins. Installation position: slot must be in line
with direction of force -arrow-.
Bearings
♦ Lightly lubricate bearings with ATF before inserting.
♦ Fit bearings and shims loosely with vaseline only. Other types
of lubricant will cause the gearbox hydraulics to malfunction.
ATF/oil pipes
♦ The oil pipes must be renewed if the gearbox is very dirty.
1.2 Special tools
Special tools
List of special tools used in this Workshop Manual ⇒ "Workshop
equipment and special tools"
Audi A6 2005 ➤ , Audi A8 2003 ➤
Special tools and workshop
equipment required
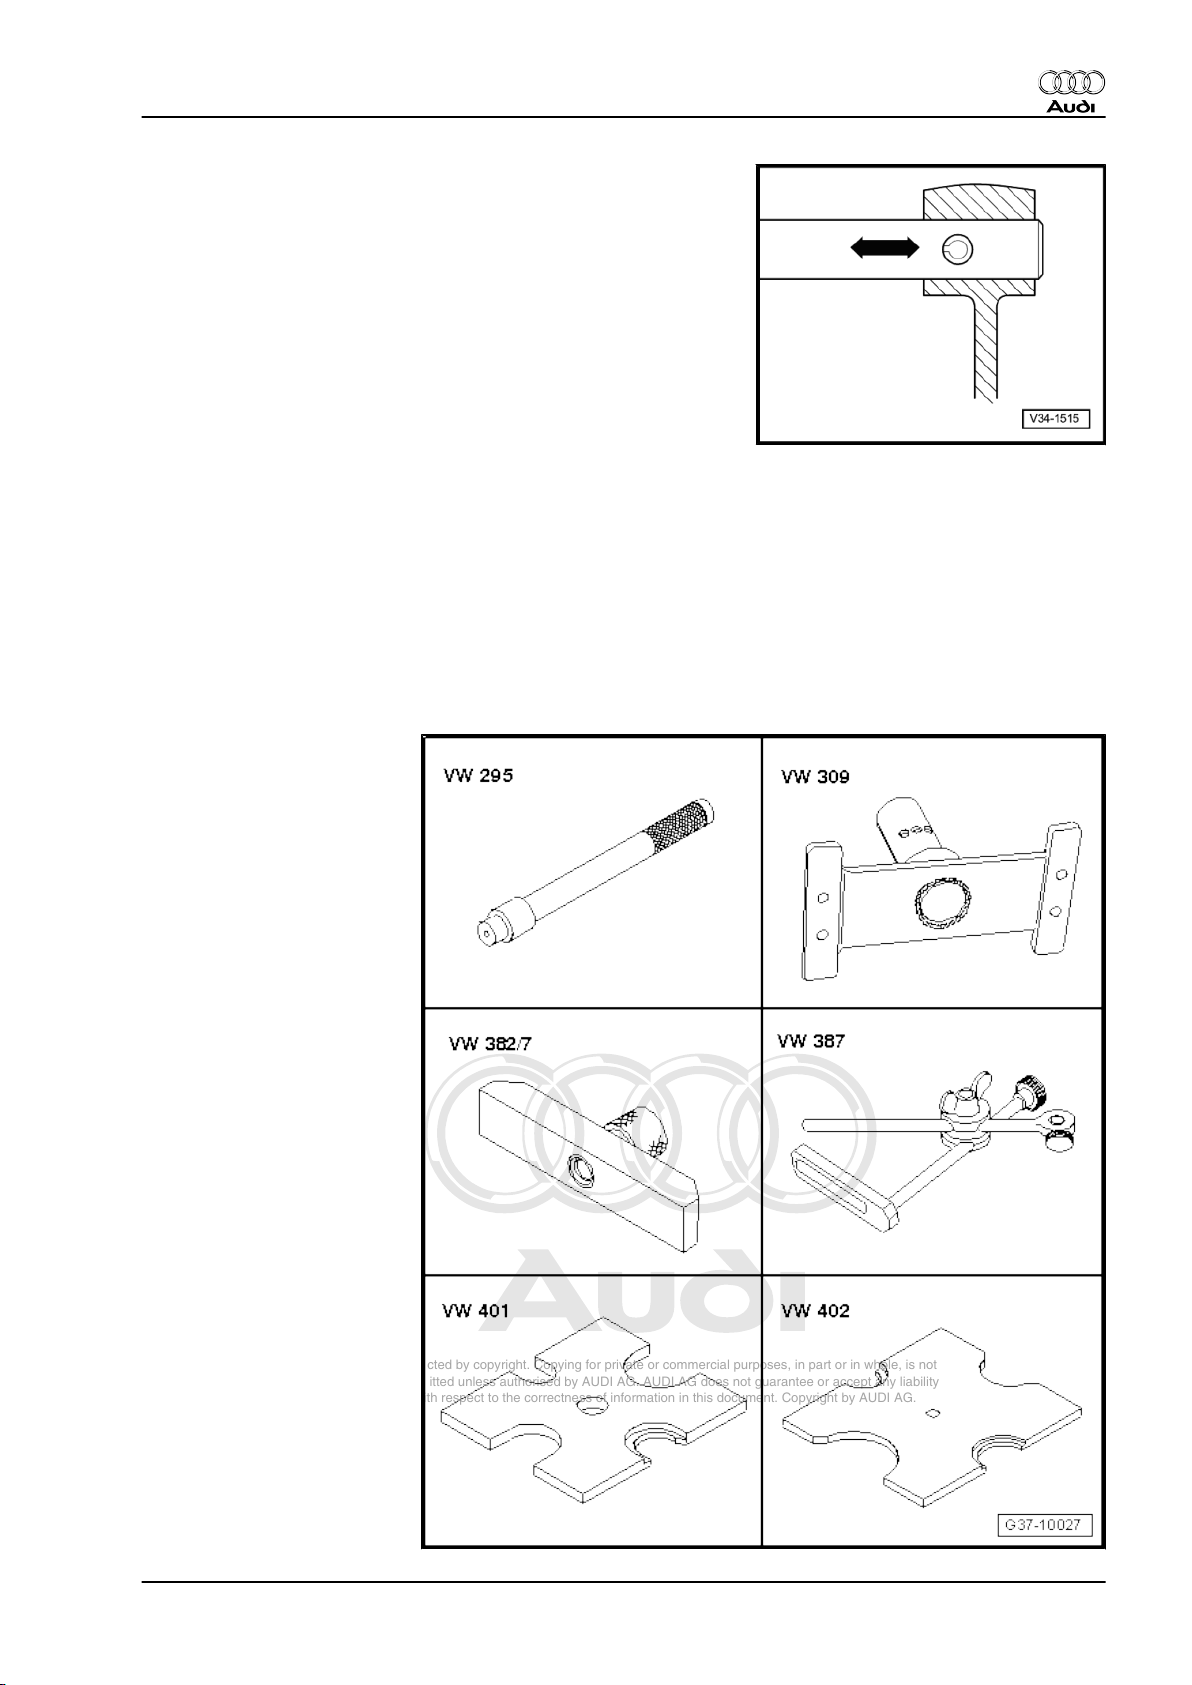
♦ Drift -VW 295-
♦ Support plate -VW 309-
♦ Measuring bridge -VW
382/7-
♦ Universal dial gauge brack‐
et -VW 387-
♦ Thrust plate -VW 401-
♦ Thrust plate -VW 402-
1. Repair instructions 3
Protected by copyright. Copying for private or commercial purposes, in part or in whole, is not
permitted unless authorised by AUDI AG. AUDI AG does not guarantee or accept any liability
with respect to the correctness of information in this document. Copyright by AUDI AG.
Audi A6 2005 ➤ , Audi A8 2003 ➤
Servicing automatic gearbox 09E, four-wheel drive - Edition 12.2011
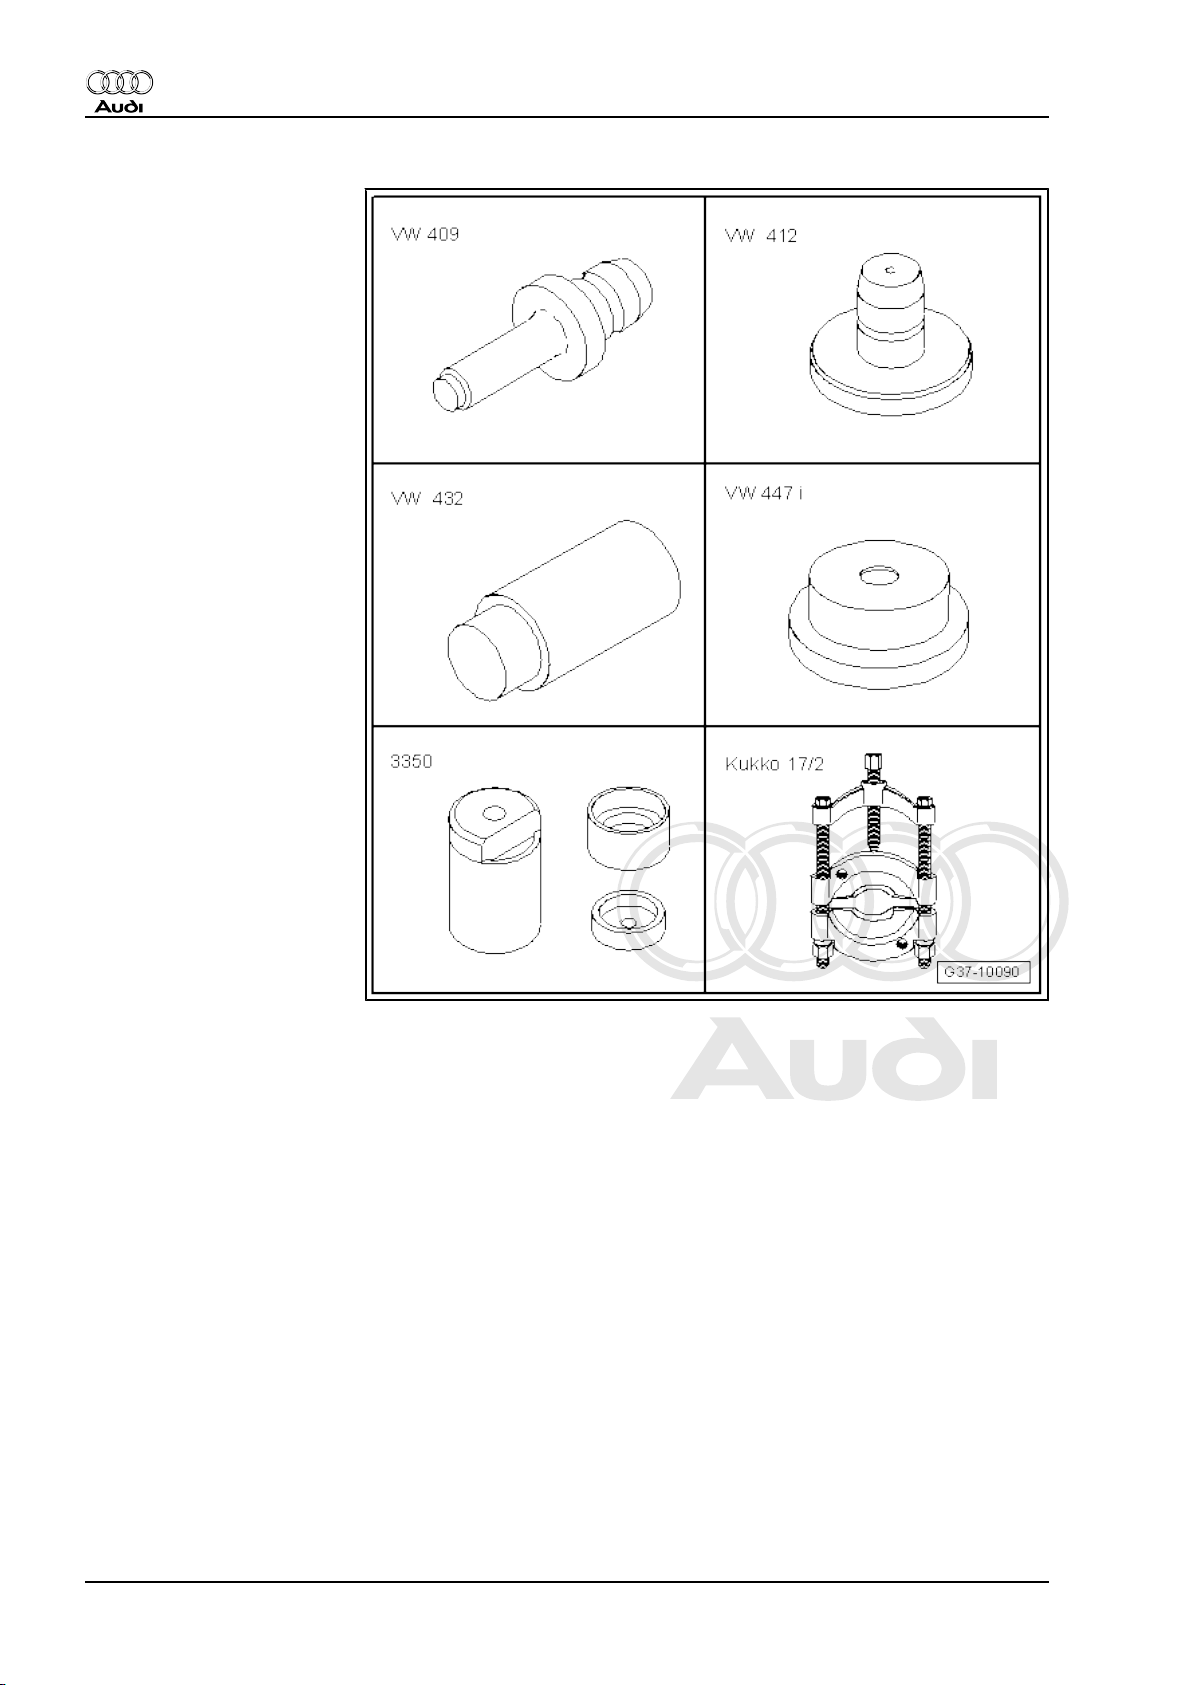
♦ Press tool -VW 409-
♦ Press tool -VW 412-
♦ Thrust piece -VW 432-
♦ Thrust plate -VW 447 i-
♦ Assembly tool -3350-
♦ Splitter 22 ... 115 mm -Kuk‐
ko 17/2-
4 Rep. gr.00 - Technical data
Protected by copyright. Copying for private or commercial purposes, in part or in whole, is not
permitted unless authorised by AUDI AG. AUDI AG does not guarantee or accept any liability
with respect to the correctness of information in this document. Copyright by AUDI AG.
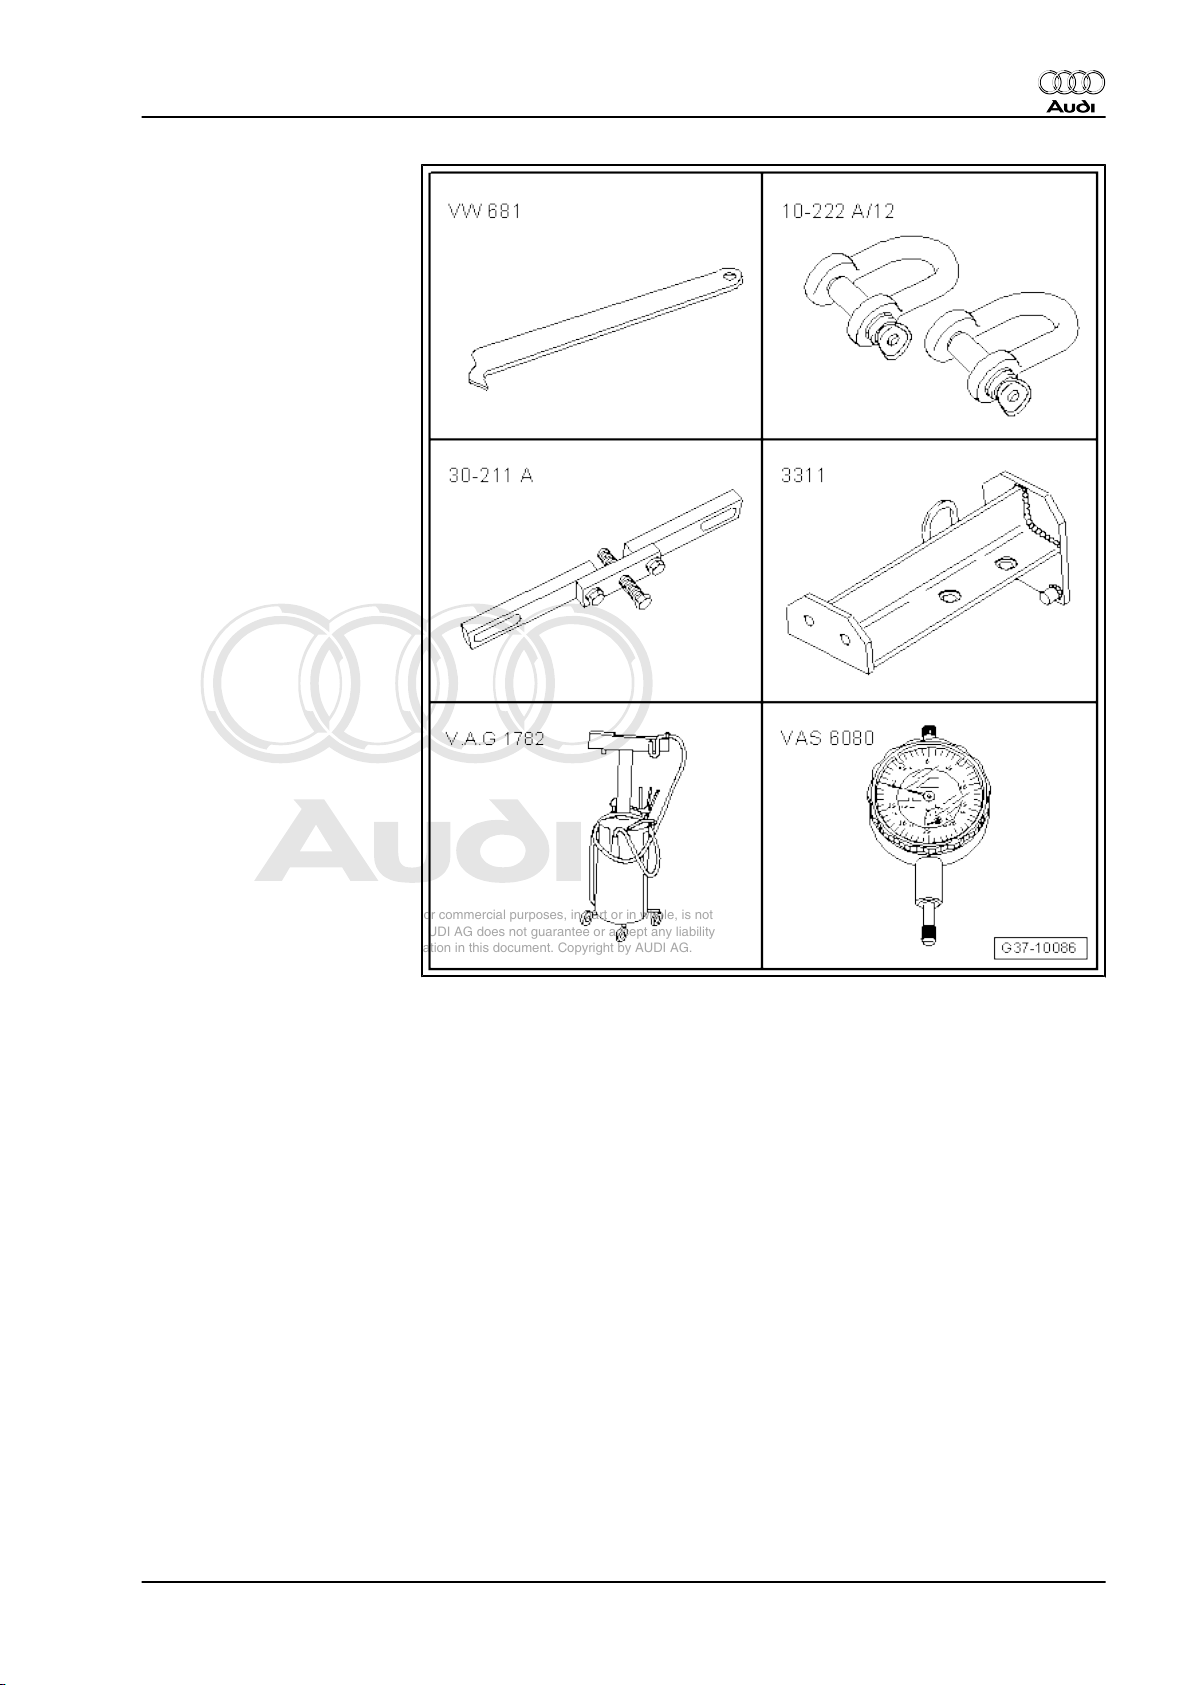
♦ Oil seal extractor lever -VW
681-
♦ Shackle -10 - 222 A/12-
♦ Support bridge -30 - 211 A-
♦ Hook and support tool
-3311-
♦ Used oil collection and ex‐
traction unit -V.A.G 1782-
♦ Dial gauge -VAS 6080-
Audi A6 2005 ➤ , Audi A8 2003 ➤
Servicing automatic gearbox 09E, four-wheel drive - Edition 12.2011
1. Repair instructions 5
Protected by copyright. Copying for private or commercial purposes, in part or in whole, is not
permitted unless authorised by AUDI AG. AUDI AG does not guarantee or accept any liability
with respect to the correctness of information in this document. Copyright by AUDI AG.
Audi A6 2005 ➤ , Audi A8 2003 ➤
Servicing automatic gearbox 09E, four-wheel drive - Edition 12.2011
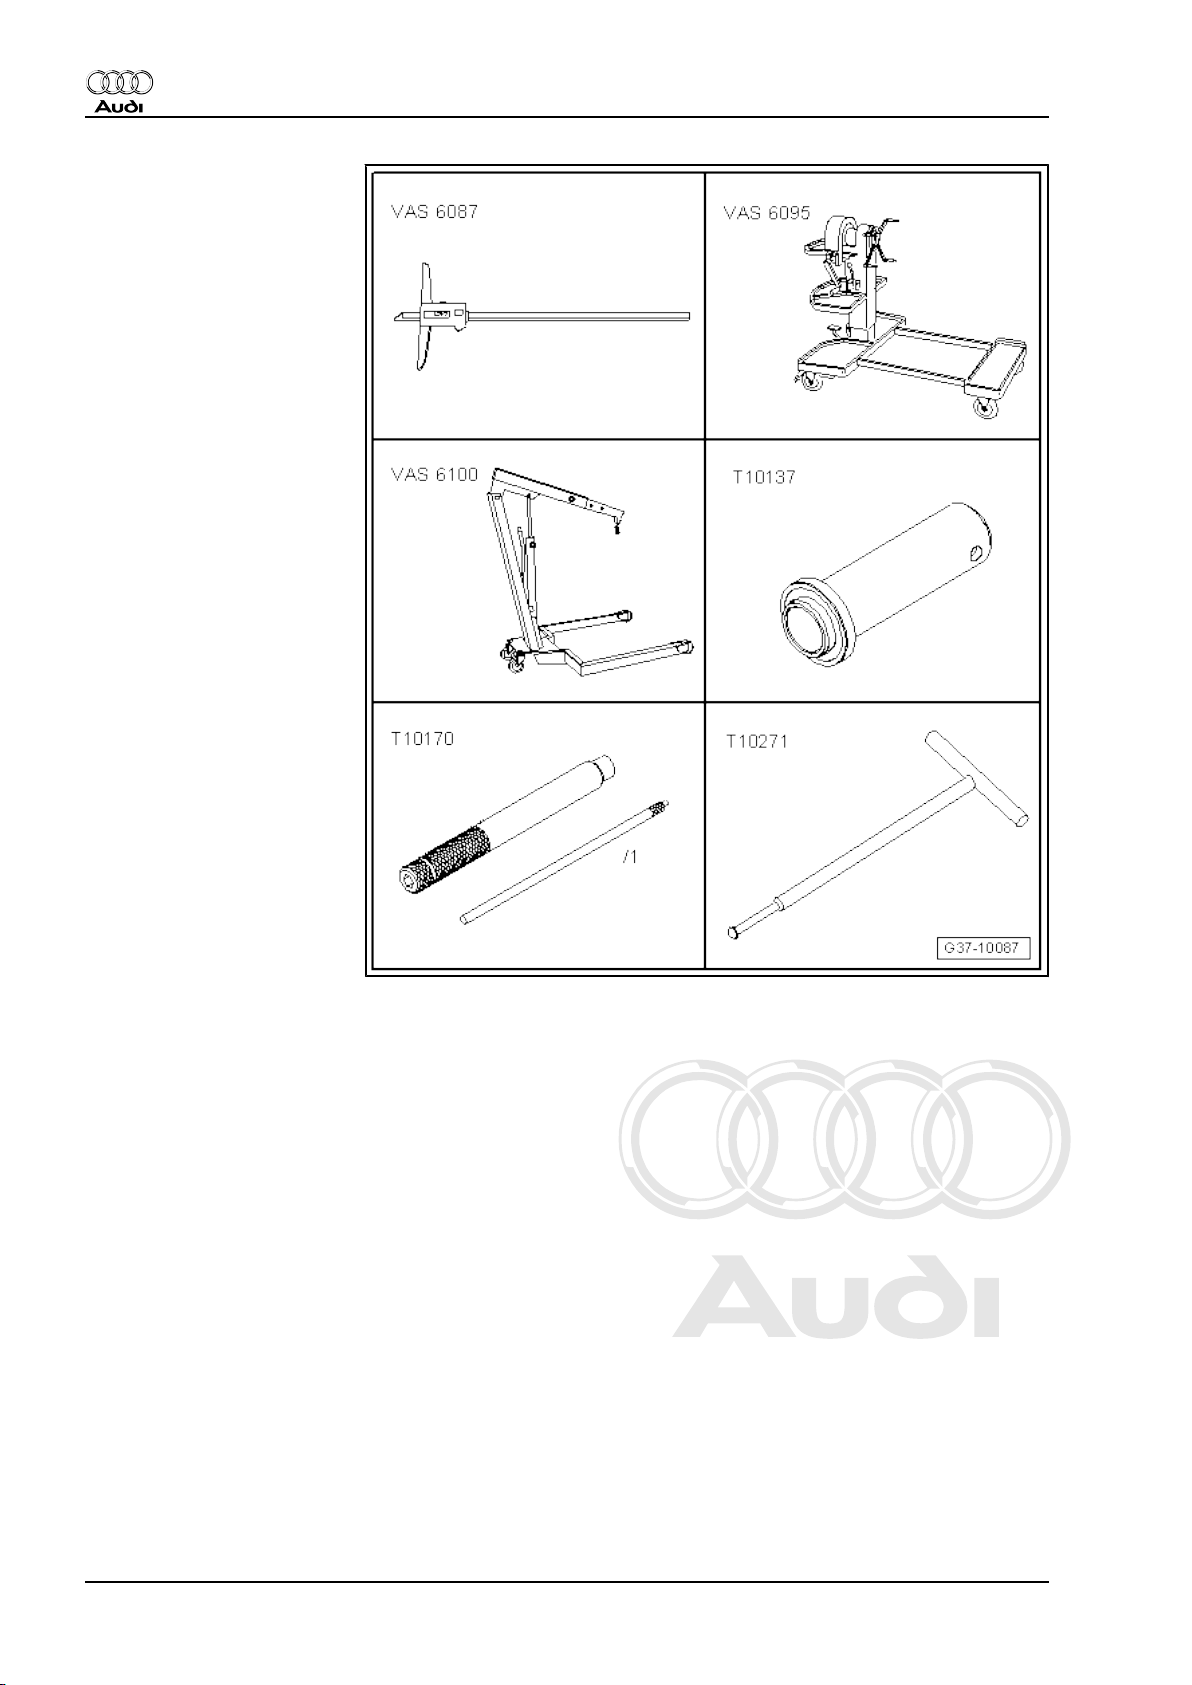
♦ Digital depth gauge -VAS
6087-
♦ Engine and gearbox sup‐
port -VAS 6095-
♦ Workshop hoist -VAS
6100-
♦ Thrust piece -T10137-
♦ Dial gauge extension -
T10170/1-
♦ Extractor tool -T10271-
6 Rep. gr.00 - Technical data
Protected by copyright. Copying for private or commercial purposes, in part or in whole, is not
permitted unless authorised by AUDI AG. AUDI AG does not guarantee or accept any liability
with respect to the correctness of information in this document. Copyright by AUDI AG.
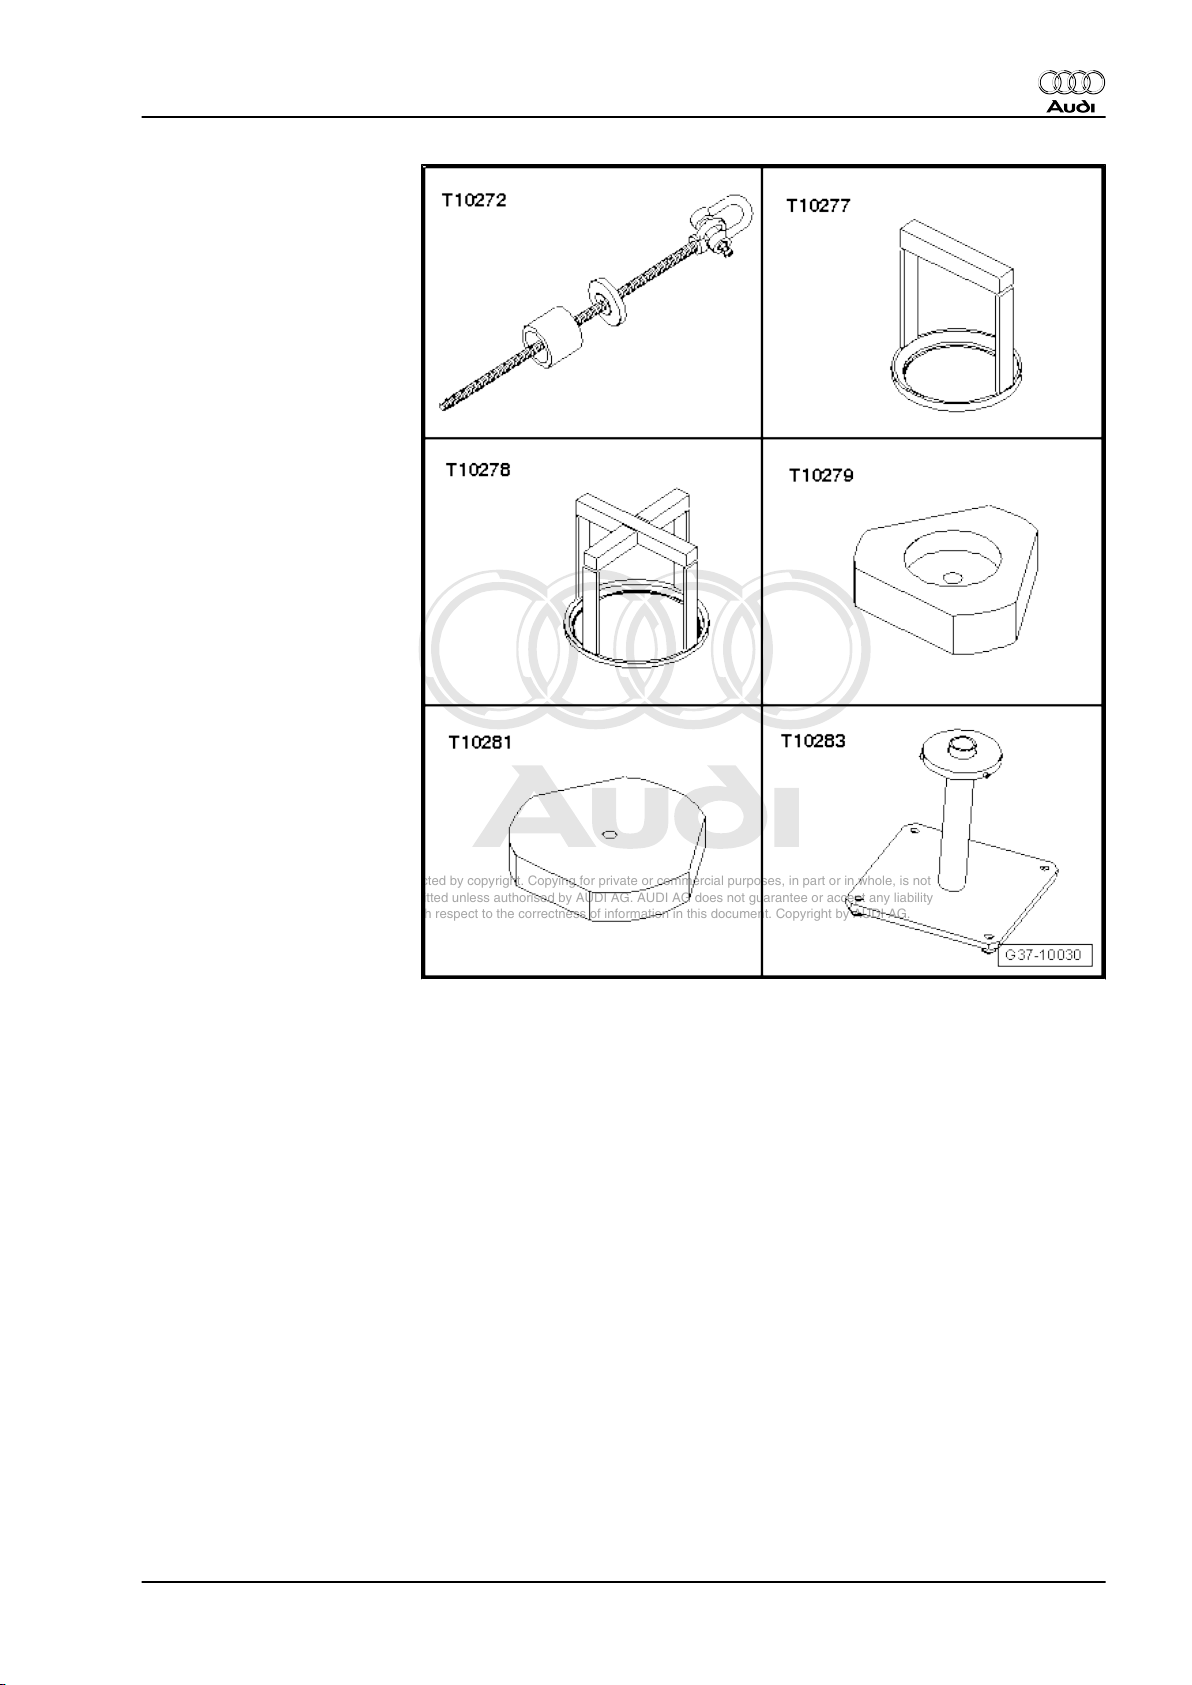
♦ Lifting device -T10272-
♦ Assembly jig -T10277-
♦ Assembly jig -T10278-
♦ Plate -T10279-
♦ Plate -T10281-
♦ Support -T10283-
Audi A6 2005 ➤ , Audi A8 2003 ➤
Servicing automatic gearbox 09E, four-wheel drive - Edition 12.2011
1. Repair instructions 7
Protected by copyright. Copying for private or commercial purposes, in part or in whole, is not
permitted unless authorised by AUDI AG. AUDI AG does not guarantee or accept any liability
with respect to the correctness of information in this document. Copyright by AUDI AG.
Audi A6 2005 ➤ , Audi A8 2003 ➤
Servicing automatic gearbox 09E, four-wheel drive - Edition 12.2011
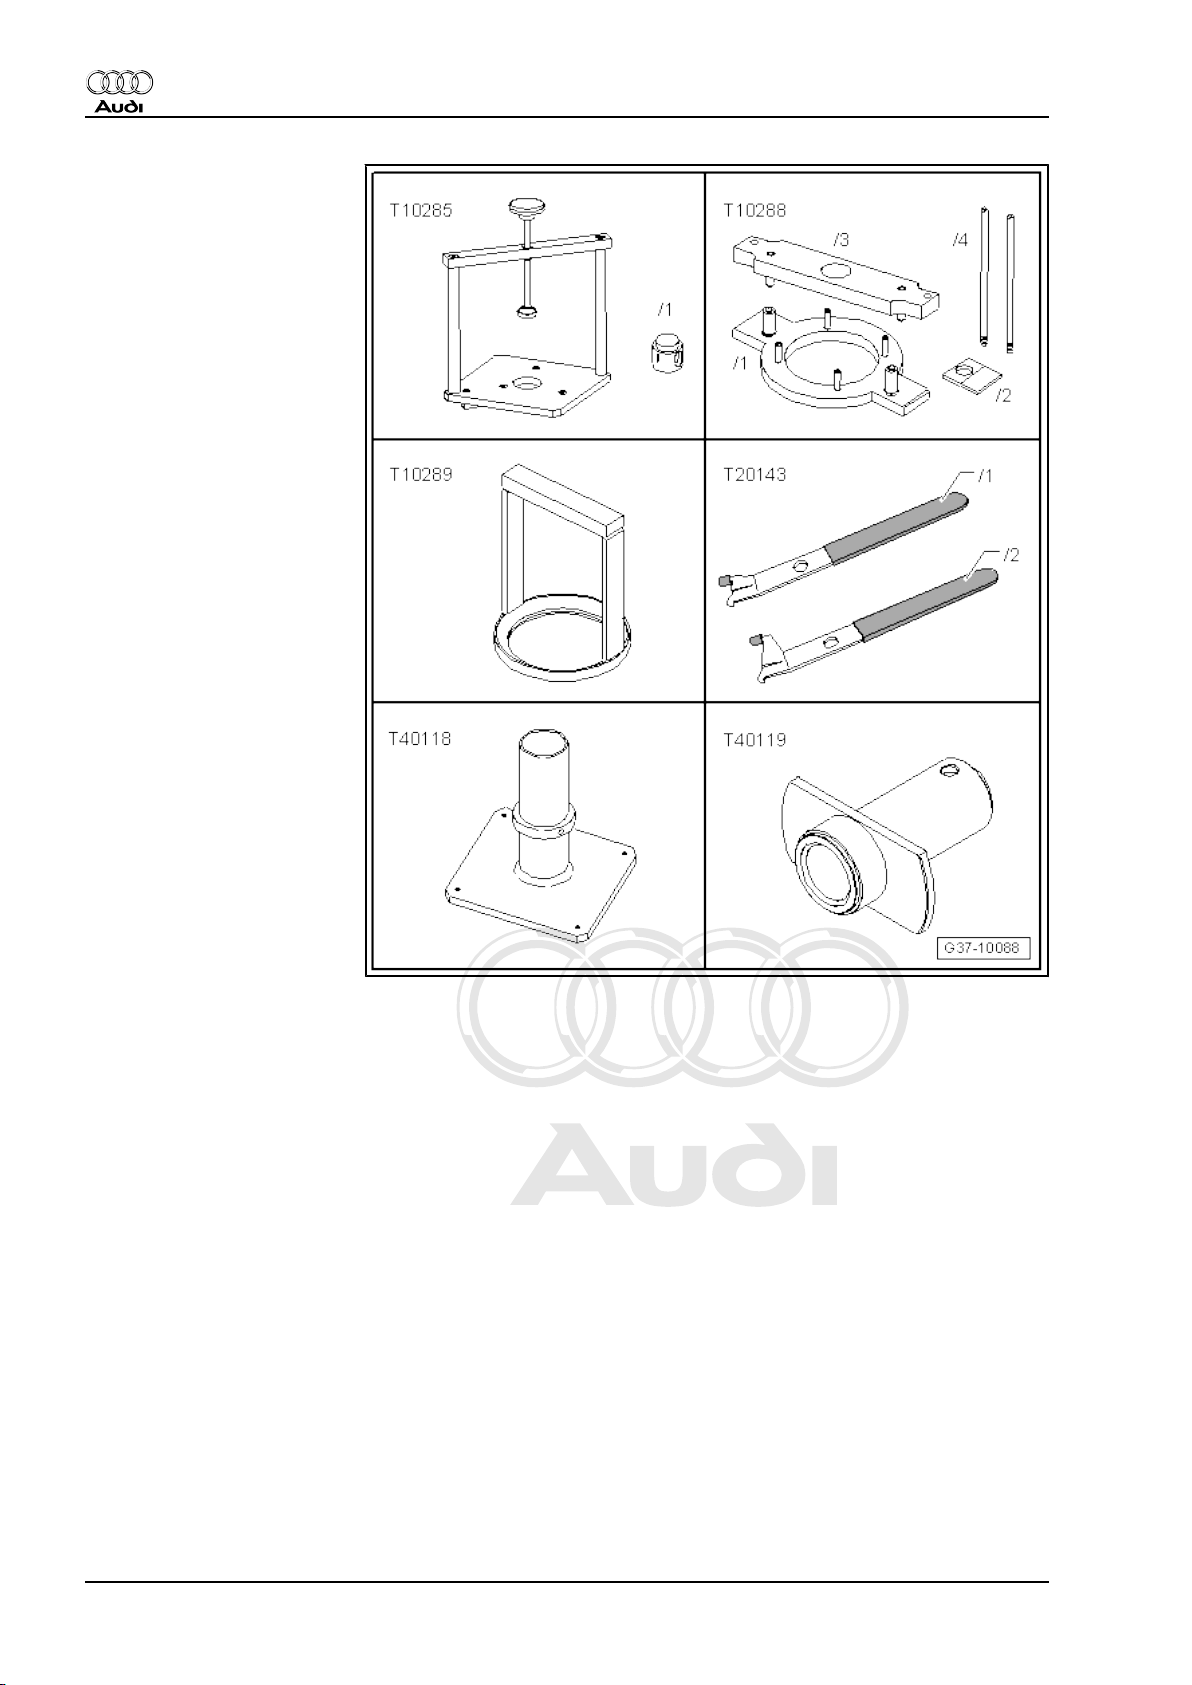
♦ Compressor tool -T10285-
♦ Guide pins M6 -T10288/4-
♦ Assembly jig -T10289-
♦ Extractor tool -T20143/2-
♦ Support -T40118-
♦ Thrust piece -T40119-
8 Rep. gr.00 - Technical data
Protected by copyright. Copying for private or commercial purposes, in part or in whole, is not
permitted unless authorised by AUDI AG. AUDI AG does not guarantee or accept any liability
with respect to the correctness of information in this document. Copyright by AUDI AG.
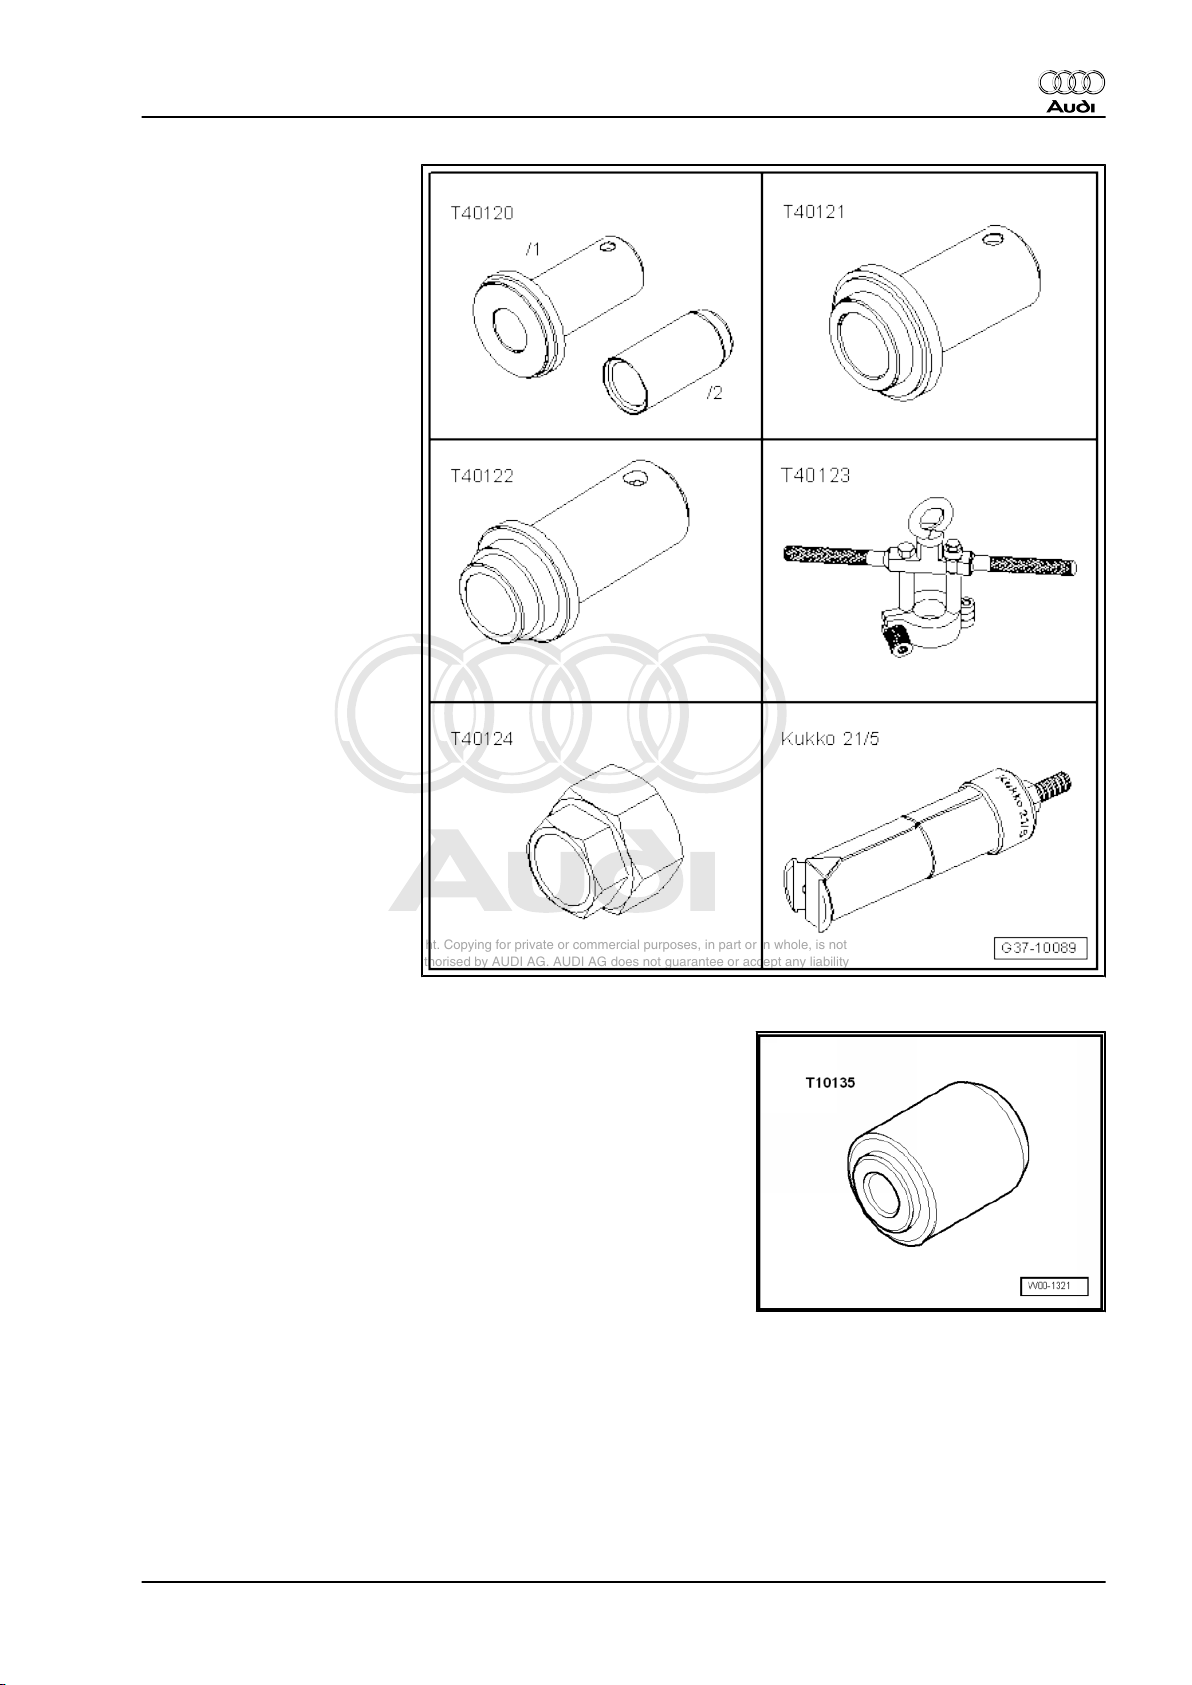
♦ Assembly tool -T40120-
♦ Thrust piece -T40121-
♦ Thrust piece -T40122-
♦ Puller for ATF supply unit -
T40123-
♦ Hexagon wrench -T40124-
♦ -1-internal puller -Kukko
21/5-
Audi A6 2005 ➤ , Audi A8 2003 ➤
Servicing automatic gearbox 09E, four-wheel drive - Edition 12.2011
♦ Thrust piece -T10135-
1. Repair instructions 9
Protected by copyright. Copying for private or commercial purposes, in part or in whole, is not
permitted unless authorised by AUDI AG. AUDI AG does not guarantee or accept any liability
with respect to the correctness of information in this document. Copyright by AUDI AG.
Audi A6 2005 ➤ , Audi A8 2003 ➤
Servicing automatic gearbox 09E, four-wheel drive - Edition 12.2011
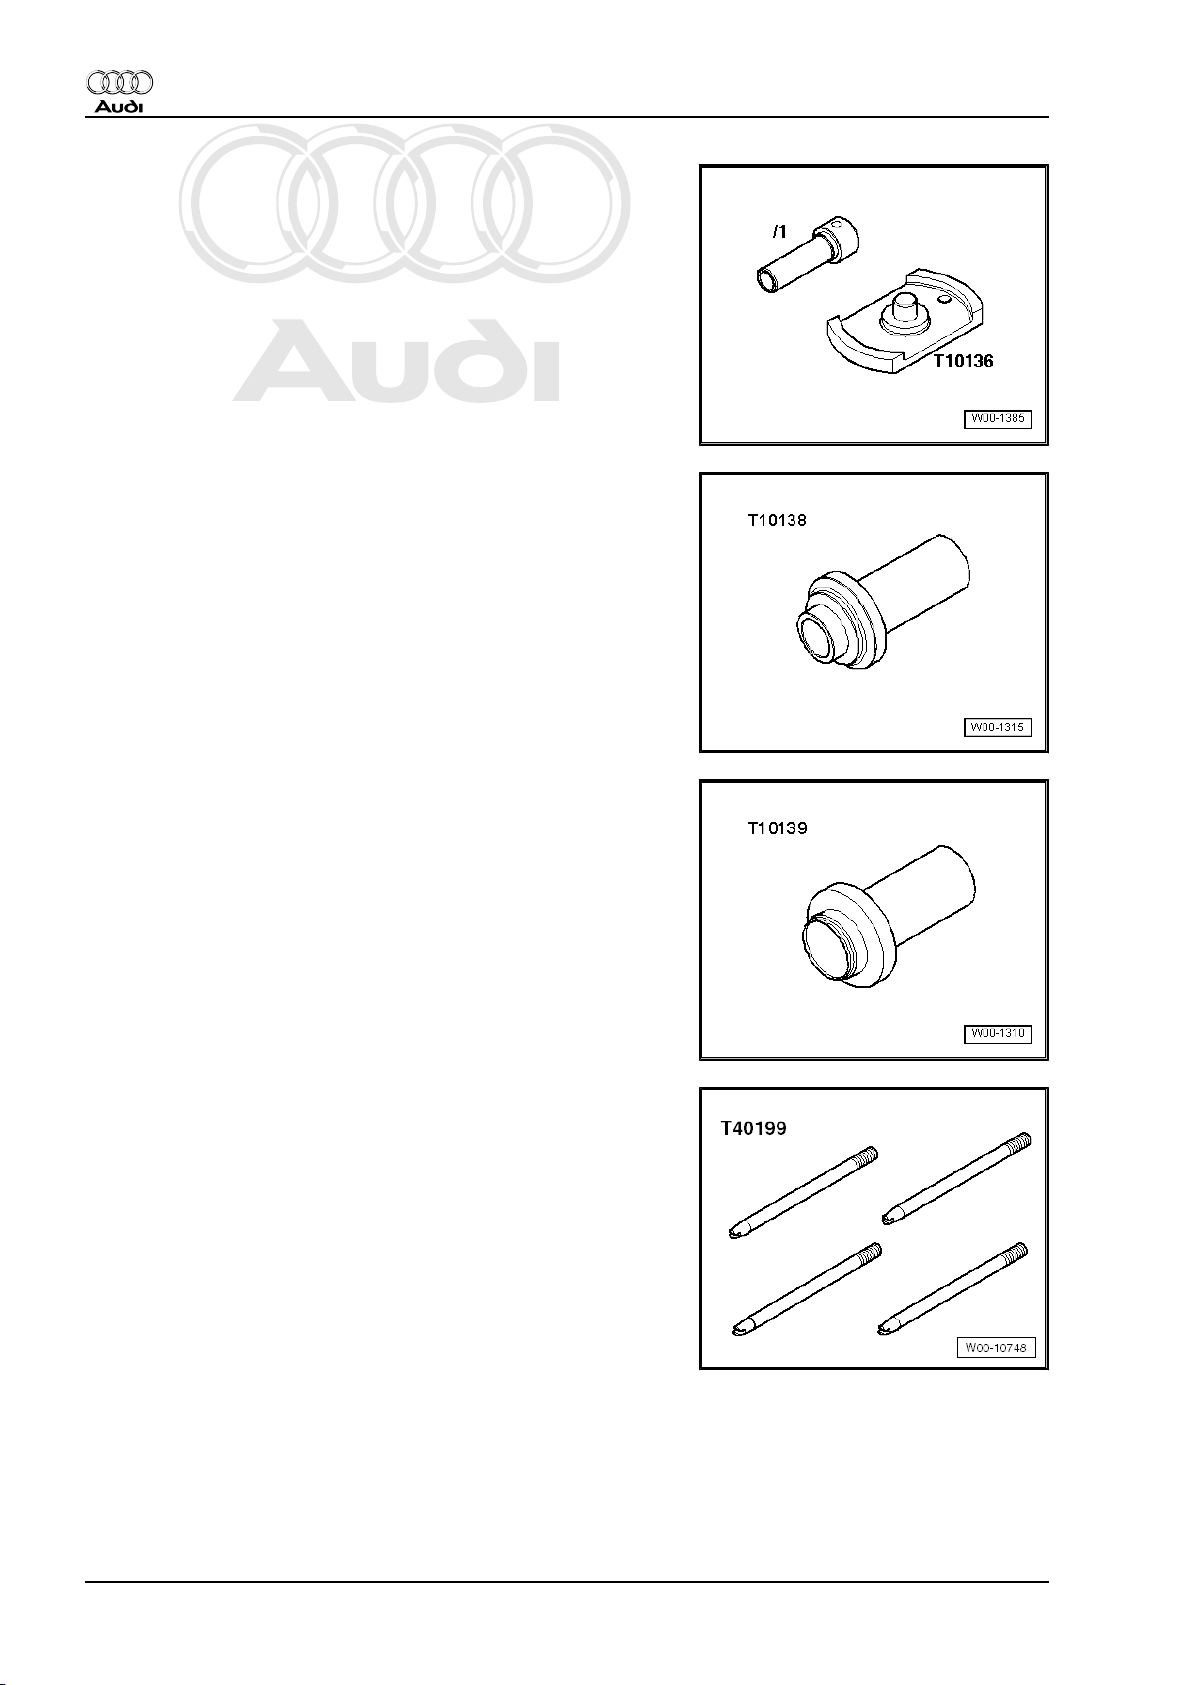
♦ Fitting tool -T10136-
♦ Thrust piece -T10138-
♦ Thrust piece -T10139-
♦ Guide pin -T40199-
♦ Hot air blower
♦ Safety goggles
♦ Sealing grease -G 052 128 A1-
♦ Vaseline
10 Rep. gr.00 - Technical data

Protected by copyright. Copying for private or commercial purposes, in part or in whole, is not
permitted unless authorised by AUDI AG. AUDI AG does not guarantee or accept any liability
with respect to the correctness of information in this document. Copyright by AUDI AG.
Servicing automatic gearbox 09E, four-wheel drive - Edition 12.2011
2 Rules for cleanliness when working
on the gearbox
♦ Thoroughly clean all joints and connections and the surround‐
ing areas before dismantling.
♦ Use cleaning fluid -D 009 401 04- to clean the gearbox and its
components.
♦ Use commercially available lint-free cloths for cleaning, such
as the „WYPALL X70 / WORKHORSE“ cloth from KimberlyClark Professional.
♦ Seal off open lines and connections immediately with clean
plugs or sealing caps from engine bung set -VAS 6122- im‐
mediately.
♦ Place removed parts on a clean surface and cover them over.
Use sheeting or lint-free cloths.
♦ Carefully cover or seal open components if repairs cannot be
carried out immediately.
♦ Only install clean components: do not remove replacement
parts from packaging until just before installation.
♦ Protect unplugged electrical connectors against dirt and mois‐
ture and make sure connections are dry when attaching.
Audi A6 2005 ➤ , Audi A8 2003 ➤
2. Rules for cleanliness when working on the gearbox 11
Protected by copyright. Copying for private or commercial purposes, in part or in whole, is not
permitted unless authorised by AUDI AG. AUDI AG does not guarantee or accept any liability
with respect to the correctness of information in this document. Copyright by AUDI AG.
Audi A6 2005 ➤ , Audi A8 2003 ➤
Servicing automatic gearbox 09E, four-wheel drive - Edition 12.2011
3 Common faults
Overview
♦ ⇒ „3.1 Jolting on overrun, delayed gear engagement when
shifting to D or R when stationary, in some cases sporadic fault
in event memory Reverse gear “, page 12
♦ ⇒ „3.2 Defective stator shaft bushes“, page 13
♦ ⇒ „3.3 Jolting under power and on overrun, entry in event
memory Torque converter lock-up clutch, no transmission “,
page 14
Note
♦
Before commencing fault-finding, interrogate the event mem‐
ory of the automatic gearbox control unit -J217- ⇒ Vehicle
diagnostic tester.
♦
Also interrogate the event memory of the engine control unit,
as fault messages from the engine control unit can lead to
malfunctioning of the gearbox ⇒ Vehicle diagnostic tester.
♦
Before commencing fault-finding, check the ATF level ⇒ Au‐
tomatic gearbox 09E, four-wheel drive; Rep. gr. 37 .
3.1 Jolting on overrun, delayed gear en‐
gagement when shifting to „D“ or „R“
when stationary, in some cases spora‐
dic fault in event memory „Reverse
gear“
♦ Possible fault:
ATF pump seized
Water in gearbox
Rectangular section seals worn
12 Rep. gr.00 - Technical data
Protected by copyright. Copying for private or commercial purposes, in part or in whole, is not
permitted unless authorised by AUDI AG. AUDI AG does not guarantee or accept any liability
with respect to the correctness of information in this document. Copyright by AUDI AG.
Servicing automatic gearbox 09E, four-wheel drive - Edition 12.2011
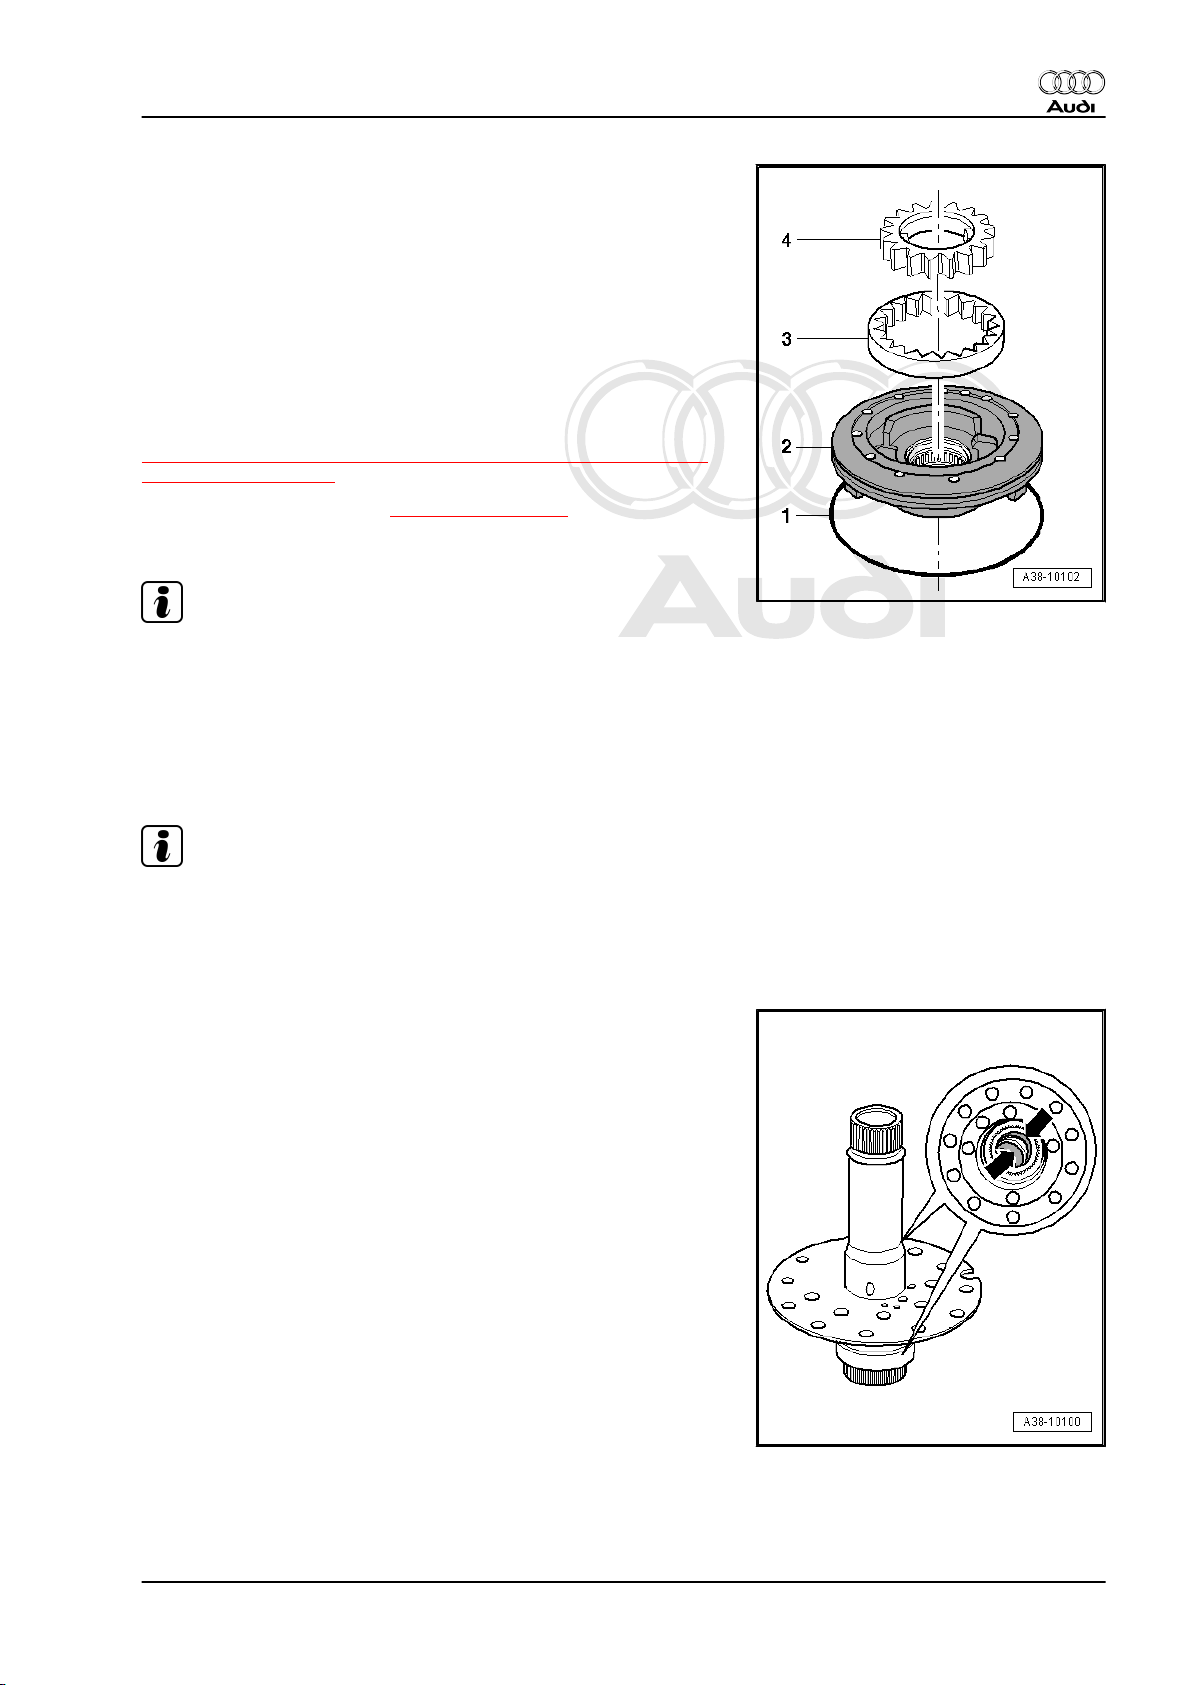
♦ Fault rectification:
– Check following parts of ATF pump and contact surface of ATF
supply unit for scoring or seizure marks:
2 - ATF pump housing
3 - Annulus
4 - ATF pump gear
If seizure marks are visible:
– Renew ATF supply unit.
Procedure if ATF is severely contaminated
⇒ „3.1 Assessment of wear by checking ATF for colour and con‐
tamination“, page 164 :
– Renew mechatronic unit ⇒ Item 15 (page 93) .
– Renew torque converter (cannot be cleaned).
Note
The mechatronic unit does not have to be renewed if the ATF is
only slightly contaminated.
Audi A6 2005 ➤ , Audi A8 2003 ➤
– Dismantle and clean complete gearbox.
– Clean ATF lines and ATF cooler.
– Dismantle and check all clutches.
Note
If the clutches are OK the mechatronic unit does not have to be
renewed.
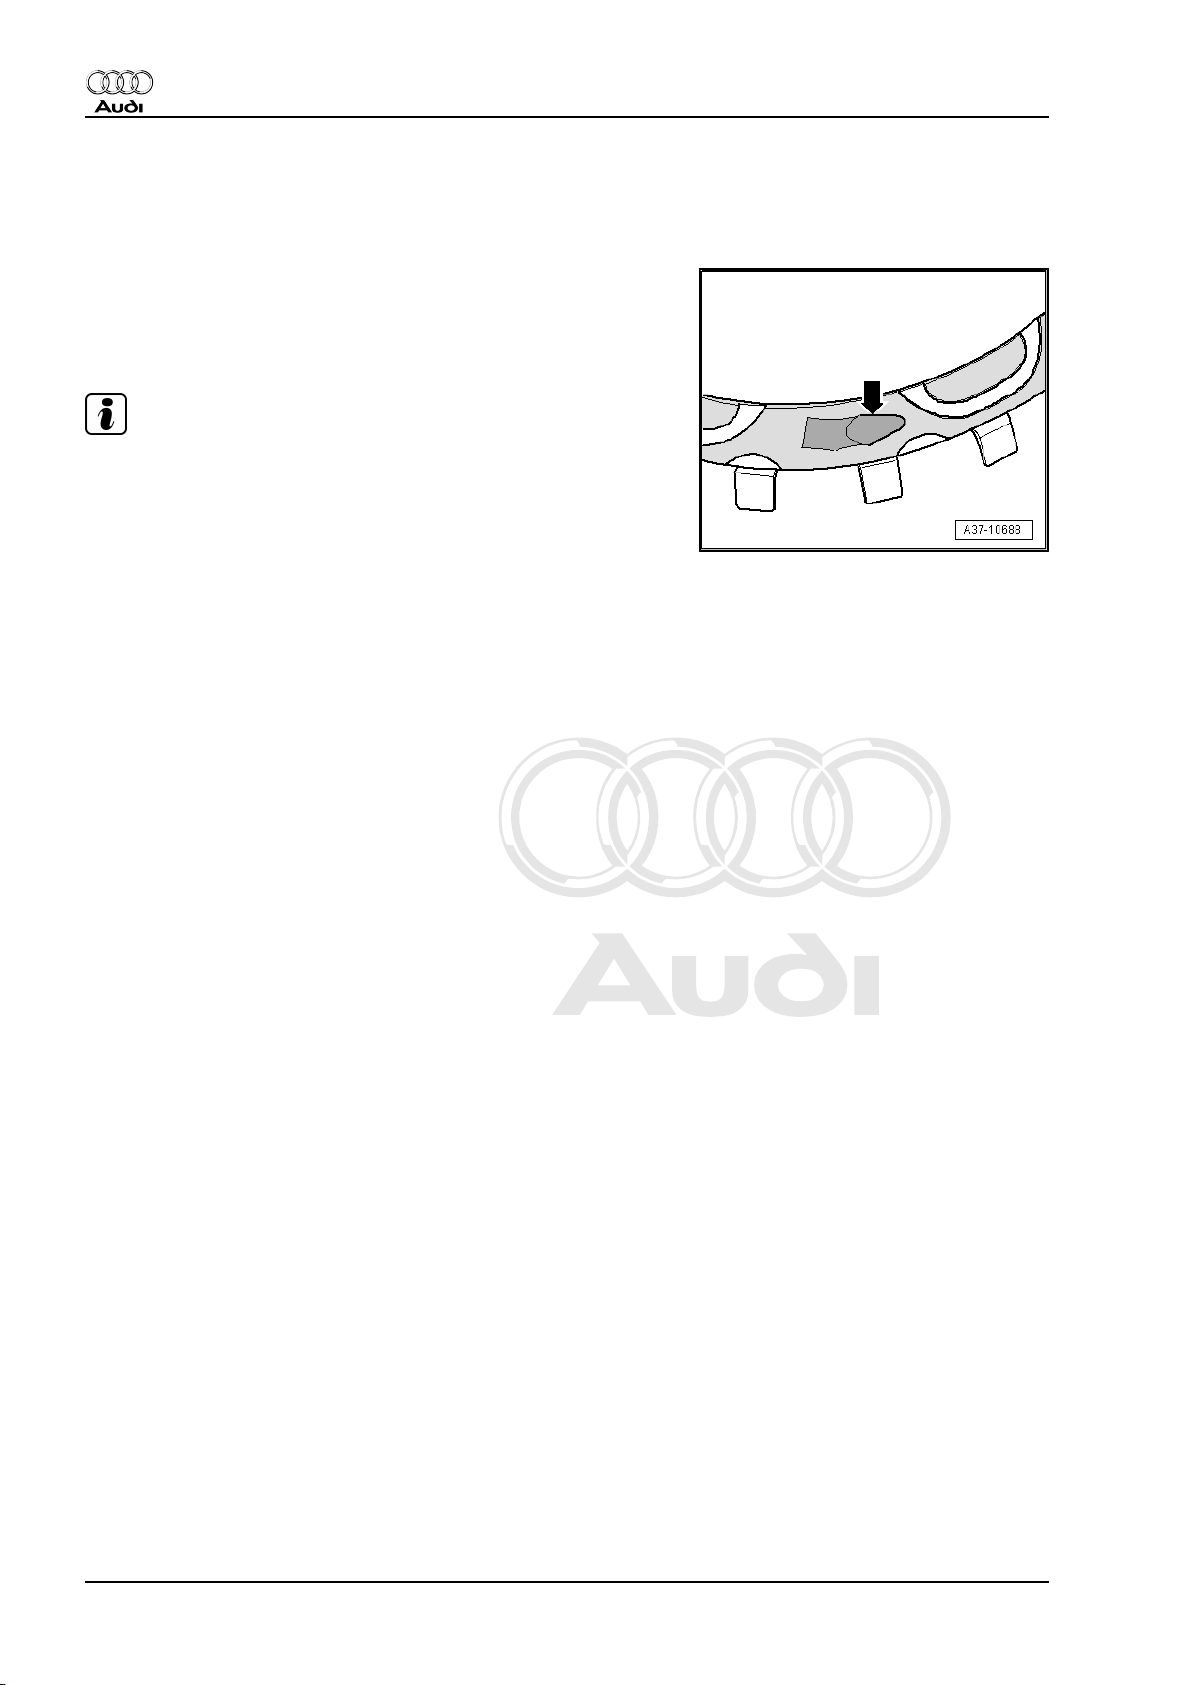
3.2 Defective stator shaft bushes
♦ Possible fault:
Brass bushes on stator shaft have seized, causing failure of clutch
„E“.
♦ Fault rectification:
– Check brass bushes -arrows- for scoring and seizure marks.
If seizure marks are visible:
– Renew ATF supply unit with stator shaft.
– Check rectangular section seals and input shaft of clutch „E“.
3. Common faults 13
Protected by copyright. Copying for private or commercial purposes, in part or in whole, is not
permitted unless authorised by AUDI AG. AUDI AG does not guarantee or accept any liability
with respect to the correctness of information in this document. Copyright by AUDI AG.
Audi A6 2005 ➤ , Audi A8 2003 ➤
Servicing automatic gearbox 09E, four-wheel drive - Edition 12.2011
3.3 Jolting under power and on overrun, en‐
try in event memory „Torque converter
lock-up clutch, no transmission“
♦ Possible fault:
Lining material on torque converter lock-up clutch split and bent
back, so no flush friction surface; pieces of lining broken off (gear‐
box codes GNT and GNU only).
Note
When the bent-back piece of lining is worn flat the torque con‐
verter lock-up clutch may function correctly again for a period of
time.
♦ Fault rectification:
– Renew torque converter.
– Renew ATF strainer ⇒ Automatic gearbox 09E, four-wheel
drive; Rep. gr. 38
14 Rep. gr.00 - Technical data

Protected by copyright. Copying for private or commercial purposes, in part or in whole, is not
permitted unless authorised by AUDI AG. AUDI AG does not guarantee or accept any liability
with respect to the correctness of information in this document. Copyright by AUDI AG.
Servicing automatic gearbox 09E, four-wheel drive - Edition 12.2011
4 Gearbox adaption for vehicles from
model year 2006 onwards
Note
This gearbox adaption is not possible on vehicles before model
year 2006. The software of the automatic gearbox control unit J217- in these vehicles does not support this function.
One of the essentials for optimum and consistent gear shifting,
apart from favourable design parameters, is the accurate control
of the selector elements. In order to keep the gear shift quality at
a consistently high level throughout the service life of the gearbox,
it is necessary to continuously adapt various open and closedloop control parameters and to store the calculated adaption
values. This process of adaptation or learning is referred to as
adaption.
The objective of gearbox adaption is to compensate for variations
in gearbox components during manufacture (i.e. tolerances) and
throughout their service life. The adaption values take the form of
offsets which can be added to or subtracted from the applied val‐
ues permanently stored in the gearbox control unit.
For a detailed description of adaption, please refer to ⇒ Self-study
programme No. 385 ; 6-speed automatic gearbox 09L / 0AT /
0B6 / 0BQ / 09E .
When should the adaption values be read / assessed / deleted
and when should an adaption drive be performed?
♦ Customer complains that gear shifts are rough
♦ After an ATF change
♦ After repairs to the clutches
♦ After installing a replacement mechatronic unit or gearbox
♦ After a software update
Audi A6 2005 ➤ , Audi A8 2003 ➤
♦ After certain repairs to the engine, e.g. after renewing the air
mass meter.
– It is important to follow closely all the instructions, work pro‐
cedures and conditions in the „Guided Functions“.
– Connect up ⇒ Vehicle diagnostic tester, select „Guided Func‐
tions“ and run function „J217 - Adaption values, checking /
adaption drive (Rep.Gr.38)“.
4. Gearbox adaption for vehicles from model year 2006 onwards 15
Protected by copyright. Copying for private or commercial purposes, in part or in whole, is not
permitted unless authorised by AUDI AG. AUDI AG does not guarantee or accept any liability
with respect to the correctness of information in this document. Copyright by AUDI AG.
Audi A6 2005 ➤ , Audi A8 2003 ➤
Servicing automatic gearbox 09E, four-wheel drive - Edition 12.2011
Note
♦
Before deleting any adaption values, always make an assess‐
ment and keep a record of the existing adaption values. Pre‐
vious adaption values can be an invaluable aid in establishing
the condition of the individual clutches and determining how
to proceed. It will be easier to establish the cause of the com‐
plaint if proper records of the adaption values are kept.
♦
After deleting the adaption values, an adaption drive must be
performed using the "Guided Functions" or "Guided Fault
Finding". If the adaption drive is not possible, for whatever
reason, an extensive road test must be performed. The con‐
ditions for the adaption should be met as far as possible, and
the quality of every gear shift should be assessed. If certain
gear shifts come to notice, the relevant selector elements can
be adapted individually.
General adaption conditions
Various driving modes and operating conditions are required to
prevail, depending on the type of adaption and which selector el‐
ement is to be adapted. Consequently, "adaption conditions" are
defined for each adaption process.
An adaption can be performed only if the defined adaption con‐
ditions have been met.
The criteria below apply during the adaption:
♦ The ATF temperature must be within a defined range.
♦ Defined gear or gear shift.
♦ The engine load must be within a defined range. A very low
engine load or a light throttle application is usually required.
♦ No fault memory entries in the gearbox control unit.
♦ A particular driving condition must prevail (e.g. throttle applied
or overrun mode, constant driving mode, vehicle stopped with
engine idling, etc.).
♦ Good road conditions, best possible road surface, no steep
uphill or downhill gradients, flat stretch of road.
16 Rep. gr.00 - Technical data
Protected by copyright. Copying for private or commercial purposes, in part or in whole, is not
permitted unless authorised by AUDI AG. AUDI AG does not guarantee or accept any liability
with respect to the correctness of information in this document. Copyright by AUDI AG.
Servicing automatic gearbox 09E, four-wheel drive - Edition 12.2011
32 – Torque converter
1 Torque converter
Overview
♦ ⇒ „1.1 Draining torque converter“, page 17
♦ ⇒ „1.2 Checking torque converter“, page 17
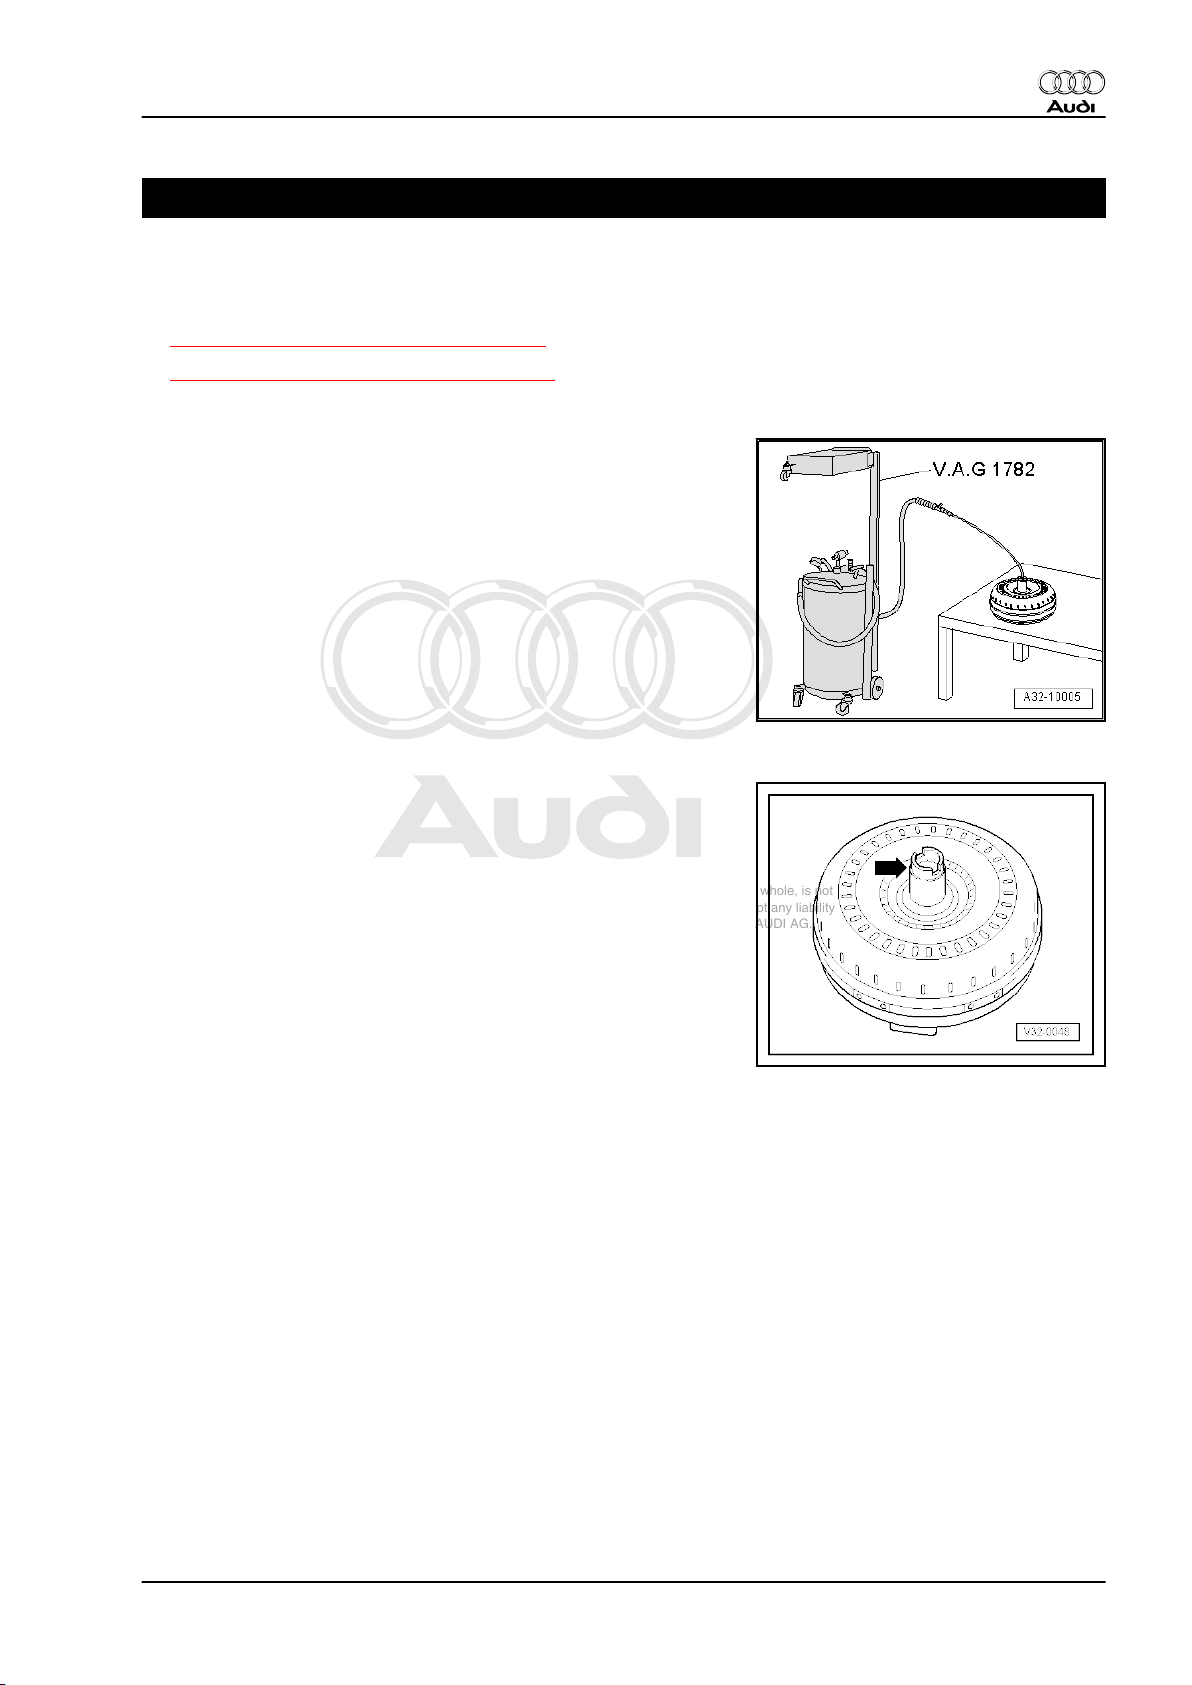
1.1 Draining torque converter
Drain the torque converter as follows if the ATF is very dirty due
to component wear, or when performing a major gearbox over‐
haul:
– Extract ATF from torque converter with used oil collection and
extraction unit -V.A.G 1782- .
Audi A6 2005 ➤ , Audi A8 2003 ➤
1.2 Checking torque converter
– Check hub -arrow- of torque converter for scoring.
If scoring is visible on the torque converter hub:
– Renew torque converter.
1. Torque converter 17

Protected by copyright. Copying for private or commercial purposes, in part or in whole, is not
permitted unless authorised by AUDI AG. AUDI AG does not guarantee or accept any liability
with respect to the correctness of information in this document. Copyright by AUDI AG.
Audi A6 2005 ➤ , Audi A8 2003 ➤
Servicing automatic gearbox 09E, four-wheel drive - Edition 12.2011
37 – Controls, housing
1 Securing gearbox to assembly stand
Procedure
• If the flange shaft (left-side) has been removed, the torque
converter must be secured using the support bridge -30 - 211
A- to prevent it from falling out.
– Attach support plate -VW 309- to hook and support tool
-3311- .
– Fit hook and support tool -3311- to attachment points on gear‐
box housing and secure in place.
– Use workshop hoist -VAS 6100- to attach gearbox to engine
and gearbox support -VAS 6095- .
Note
If the filled gearbox with oil pan is to be turned upside-down on
the engine and gearbox support, the gearbox housing and final
drive breathers must be sealed.
18 Rep. gr.37 - Controls, housing

Protected by copyright. Copying for private or commercial purposes, in part or in whole, is not
permitted unless authorised by AUDI AG. AUDI AG does not guarantee or accept any liability
with respect to the correctness of information in this document. Copyright by AUDI AG.
Servicing automatic gearbox 09E, four-wheel drive - Edition 12.2011
2 Dismantling and assembling planeta‐
ry gearbox
Overview
♦ ⇒ „2.1 Planetary gearbox - exploded view“, page 20
♦ ⇒ „2.2 Dismantling and assembling planetary gearbox“,
page 21
Note
♦
General repair instructions ⇒ page 1 .
♦
Rules for cleanliness when working on the automatic gearbox
⇒ page 11
♦
Coat O-rings and seals with ATF or vaseline. Other types of
lubricant will cause the gearbox hydraulics to malfunction.
♦
Fit bearings and shims loosely with vaseline only. Other types
of lubricant will cause the gearbox hydraulics to malfunction.
Audi A6 2005 ➤ , Audi A8 2003 ➤
2. Dismantling and assembling planetary gearbox 19
Protected by copyright. Copying for private or commercial purposes, in part or in whole, is not
permitted unless authorised by AUDI AG. AUDI AG does not guarantee or accept any liability
with respect to the correctness of information in this document. Copyright by AUDI AG.
Audi A6 2005 ➤ , Audi A8 2003 ➤
Servicing automatic gearbox 09E, four-wheel drive - Edition 12.2011
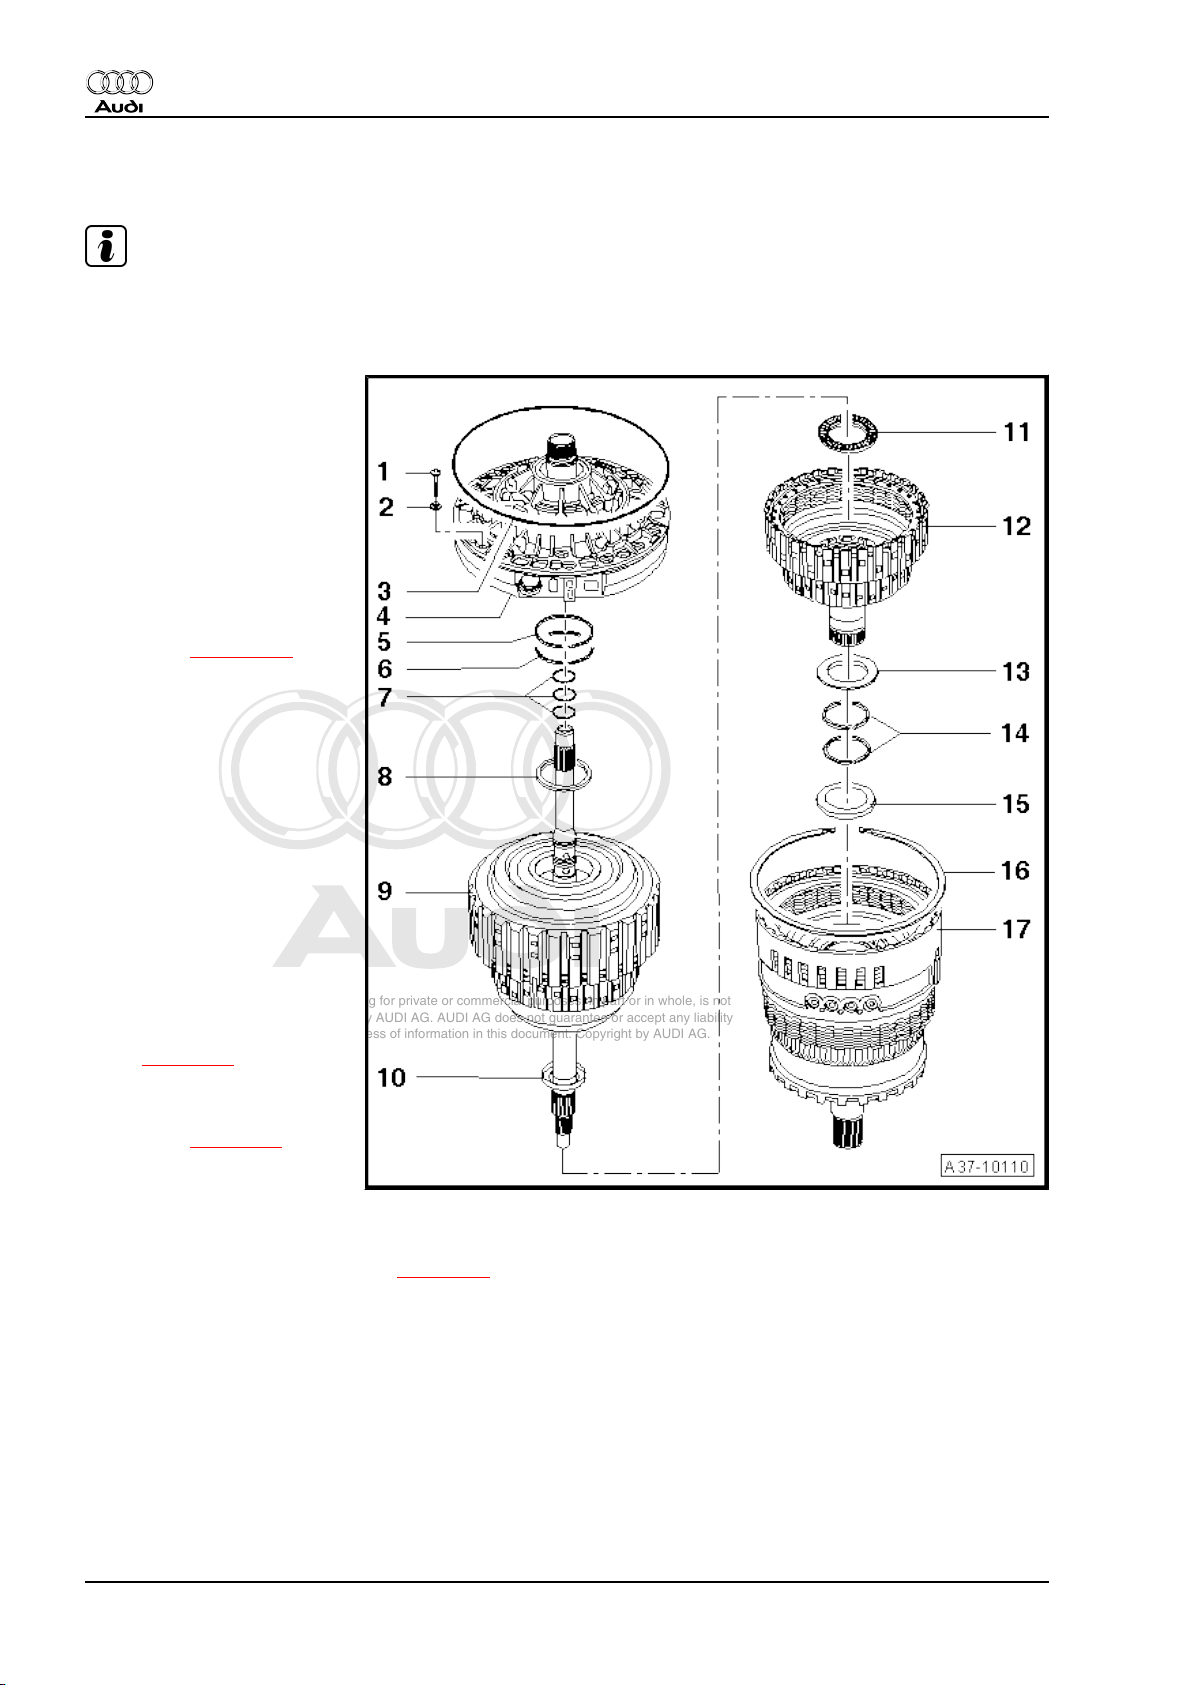
2.1 Planetary gearbox - exploded view
Note
Some of the components shown are supplied as part of an assembly group and cannot be ordered as separate
components ⇒ Electronic parts catalogue .
1 - Bolt
❑ 10 Nm
2 - Sealing washer
❑ Renew
3 - O-ring
❑ Renew
4 - ATF supply unit
❑ With ATF pump
❑ Dismantling and assem‐
bling ⇒ page 108
5 - Rectangular section seal
❑ For ATF supply unit
❑ Renew
❑ Hook ends together
6 - Rectangular section seal
❑ For ATF supply unit
❑ Renew
❑ Hook ends together
7 - Rectangular section seals
❑ For input shaft
❑ Renew
8 - Shim
❑ Determining thickness
9 - Body „II“
❑ Dismantling and assem‐
10 - Thrust washer
11 - Axial needle bearing
12 - Clutch „B“
❑ Dismantling and assembling ⇒ page 68
13 - Axial needle bearing
14 - Rectangular section seals
❑ Renew
15 - Flange washer
❑ Flange faces downwards towards clutch „C/D“
16 - Circlip
❑ For body „I“
❑ Must be re-used
⇒ page 36
bling ⇒ page 73
20 Rep. gr.37 - Controls, housing
Protected by copyright. Copying for private or commercial purposes, in part or in whole, is not
permitted unless authorised by AUDI AG. AUDI AG does not guarantee or accept any liability
with respect to the correctness of information in this document. Copyright by AUDI AG.
Servicing automatic gearbox 09E, four-wheel drive - Edition 12.2011
17 - Body „I“
❑ Dismantling and assembling ⇒ page 47
2.2 Dismantling and assembling planetary gearbox
Dismantling
– Secure gearbox to assembly stand ⇒ page 18 .
• The gearbox must be horizontal with the ATF oil pan facing
downwards.
– Place used oil collection and extraction unit -V.A.G 1782- be‐
low gearbox.
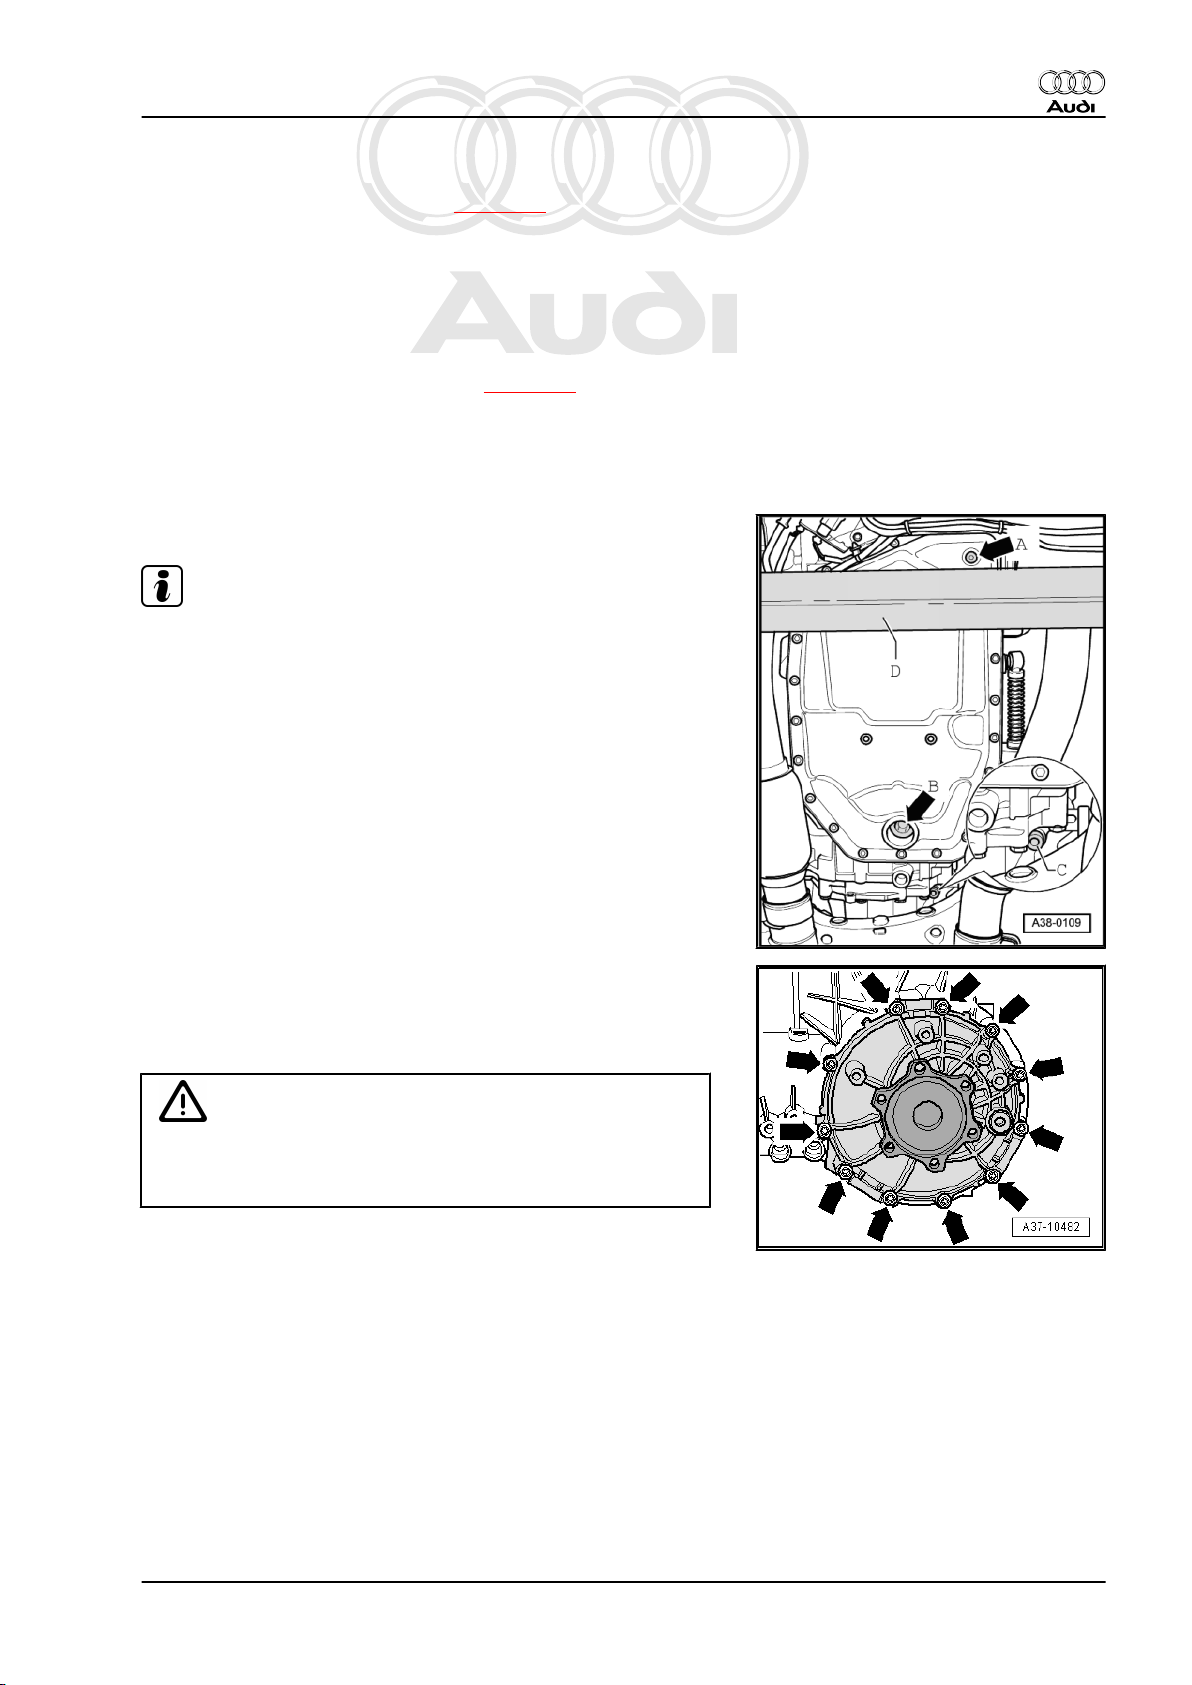
– Remove ATF drain plug -arrow A- and allow ATF to drain off.
Note
♦
Observe relevant disposal regulations.
♦
Some ATF always remains in the oil pan.
♦
-Arrow B- can be disregarded.
Audi A6 2005 ➤ , Audi A8 2003 ➤
– Remove drain plug -C- and allow gear oil to drain out of front
final drive.
– Loosen bolts -arrows- for cover for front final drive in diagonal
sequence and remove bolts.
– Catch escaping gear oil using used oil collection and extrac‐
tion unit -V.A.G 1782- .
Caution
Risk of accident.
♦ The differential is very heavy.
– Detach cover for front final drive together with differential.
2. Dismantling and assembling planetary gearbox 21

Protected by copyright. Copying for private or commercial purposes, in part or in whole, is not
permitted unless authorised by AUDI AG. AUDI AG does not guarantee or accept any liability
with respect to the correctness of information in this document. Copyright by AUDI AG.
Audi A6 2005 ➤ , Audi A8 2003 ➤
Servicing automatic gearbox 09E, four-wheel drive - Edition 12.2011
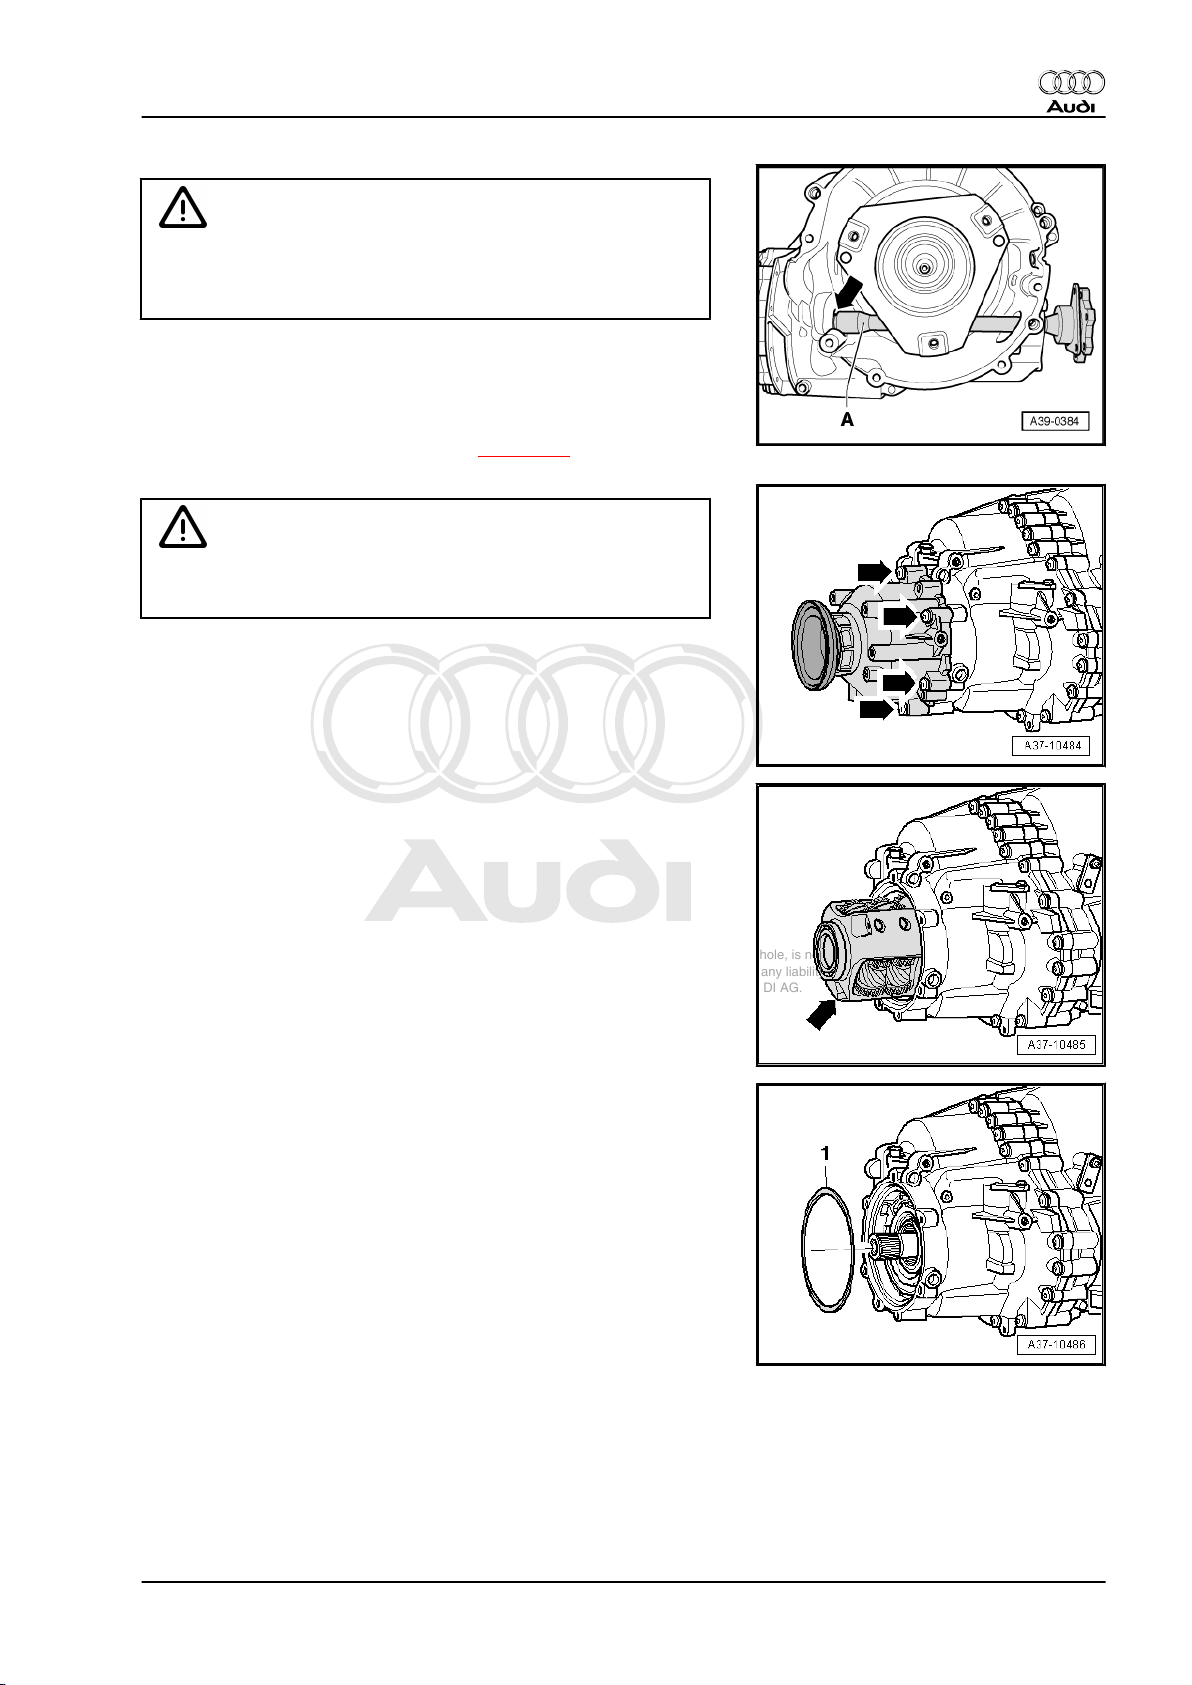
– Place cover for front final drive together with differential on a
soft surface.
– Lever flange shaft (right-side) off differential -arrows- using
two levers.
– Drive oil seal for flange shaft out of cover for front final drive
using a drift.
– Cover splines on flange shaft (left-side) -arrow- with insulating
tape to prevent damage to oil seal between final drive and
gearbox housing when pulling out flange shaft. Take care to
cover the splines completely, without creasing or overlapping
the tape.
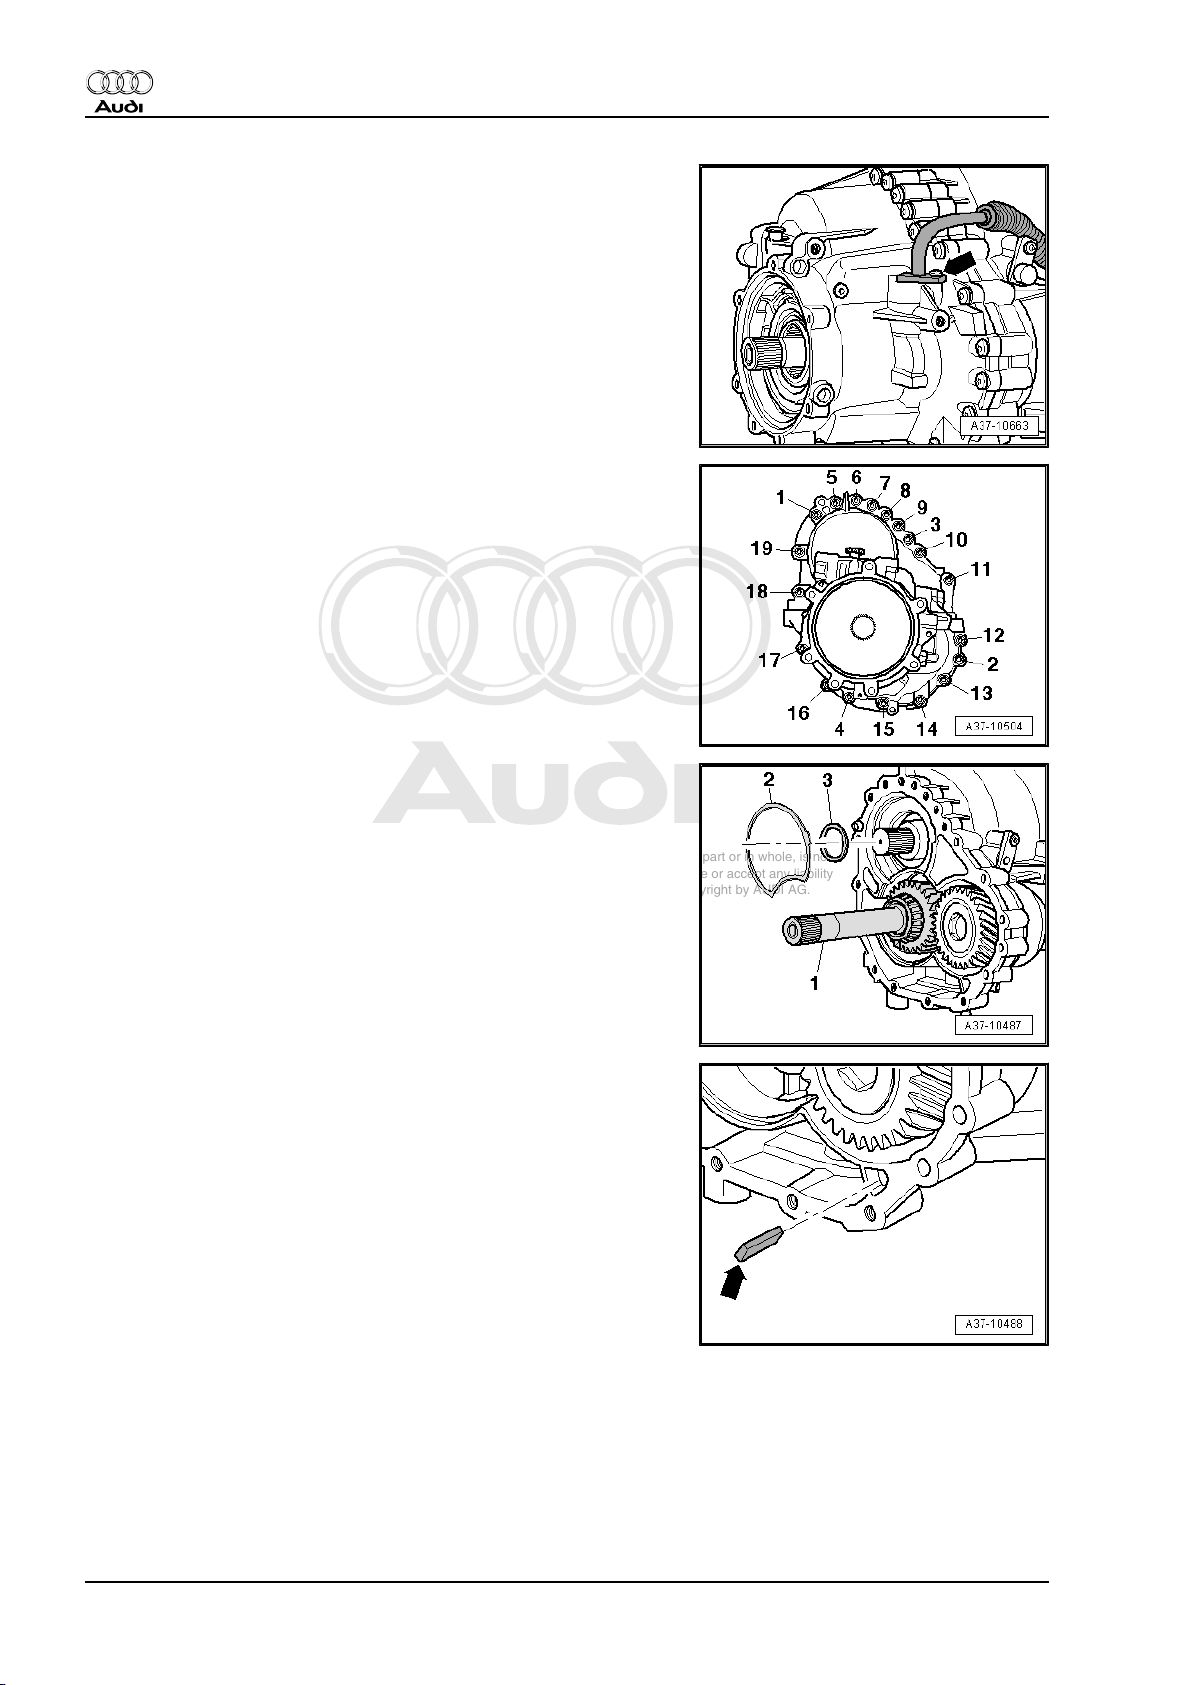
– Remove bolts -arrows- and detach baffle plate.
– Remove bolts -arrows- on mounting bracket for flange shaft
(left-side).
22 Rep. gr.37 - Controls, housing
Protected by copyright. Copying for private or commercial purposes, in part or in whole, is not
permitted unless authorised by AUDI AG. AUDI AG does not guarantee or accept any liability
with respect to the correctness of information in this document. Copyright by AUDI AG.
Servicing automatic gearbox 09E, four-wheel drive - Edition 12.2011
Caution
While pulling out the flange shaft (left-side), it must be held
centrally to avoid damaging the oil seal between the final drive
and the gearbox housing.
– Pull flange shaft -A- (left-side) out of gearbox, making sure that
shaft remains centered in opening at differential -arrow-.
– Remove torque converter.
– Extract ATF from torque converter ⇒ page 17 .
Caution
The self-locking centre differential can drop out of the gearbox
when the centre differential housing is removed.
– Loosen bolts -arrows- on housing for centre differential in di‐
agonal sequence and remove bolts.
– Slowly and carefully pull housing for centre differential off
gearbox.
Audi A6 2005 ➤ , Audi A8 2003 ➤
– Pull self-locking centre differential -arrow- off input shaft.
– Take off shim -1-.
2. Dismantling and assembling planetary gearbox 23
Protected by copyright. Copying for private or commercial purposes, in part or in whole, is not
permitted unless authorised by AUDI AG. AUDI AG does not guarantee or accept any liability
with respect to the correctness of information in this document. Copyright by AUDI AG.
Audi A6 2005 ➤ , Audi A8 2003 ➤
Servicing automatic gearbox 09E, four-wheel drive - Edition 12.2011
Gearbox with common gear oil system:
– Unscrew bolt -arrow- and detach oil line from intermediate
flange for front axle drive.
Continued for all gearboxes:
– Slacken bolts on intermediate flange for front axle drive in the
sequence -19 ... 1- and remove bolts.
– Take off intermediate flange for front axle drive and gasket.
– Take off intermediate pinion for front axle drive -1- with input
shaft.
– Take off shims -2- and -3-.
– Remove magnet -arrow- from gearbox housing.
– Turn gearbox on assembly stand.
• The ATF oil pan must face upwards.
24 Rep. gr.37 - Controls, housing
Protected by copyright. Copying for private or commercial purposes, in part or in whole, is not
permitted unless authorised by AUDI AG. AUDI AG does not guarantee or accept any liability
with respect to the correctness of information in this document. Copyright by AUDI AG.
Servicing automatic gearbox 09E, four-wheel drive - Edition 12.2011
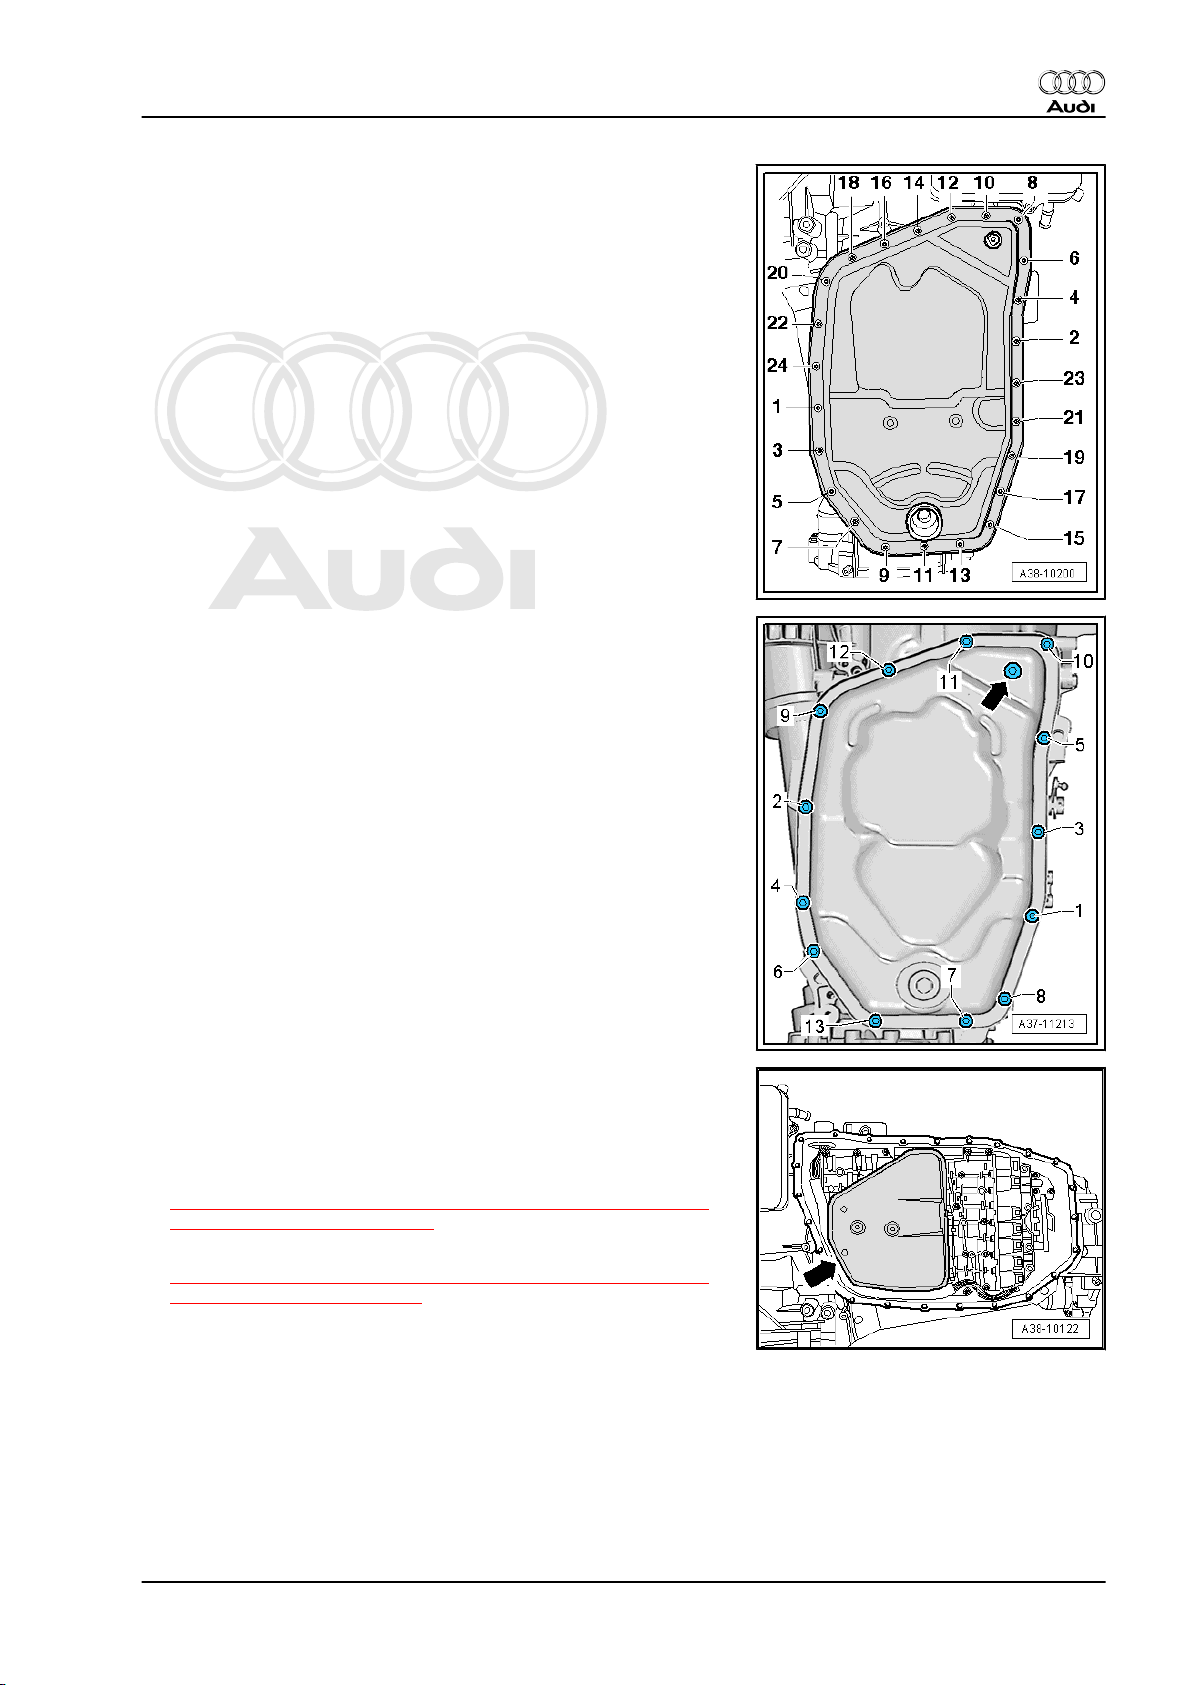
Gearbox with 24 bolts on ATF oil pan:
– Slacken bolts for ATF oil pan in the sequence -24 ... 1- and
remove bolts.
Gearbox with 13 bolts on ATF oil pan:
– Slacken bolts for ATF oil pan in the sequence -13 ... 1- and
remove bolts.
Audi A6 2005 ➤ , Audi A8 2003 ➤
Continued for all gearboxes:
– Take off ATF oil pan and gasket.
Depending on the type of oil pan, with either 13 or 24 bolts:
– Remove mechatronic unit (13 bolts on oil pan)
⇒ „1.4 Removing and installing mechatronic unit - gearbox with
13 bolts on oil pan“, page 102
– Remove mechatronic unit (24 bolts on oil pan)
⇒ „1.3 Removing and installing mechatronic unit - gearbox with
24 bolts on oil pan“, page 99
Continued for all vehicles:
2. Dismantling and assembling planetary gearbox 25
Protected by copyright. Copying for private or commercial purposes, in part or in whole, is not
permitted unless authorised by AUDI AG. AUDI AG does not guarantee or accept any liability
with respect to the correctness of information in this document. Copyright by AUDI AG.
Audi A6 2005 ➤ , Audi A8 2003 ➤
Servicing automatic gearbox 09E, four-wheel drive - Edition 12.2011
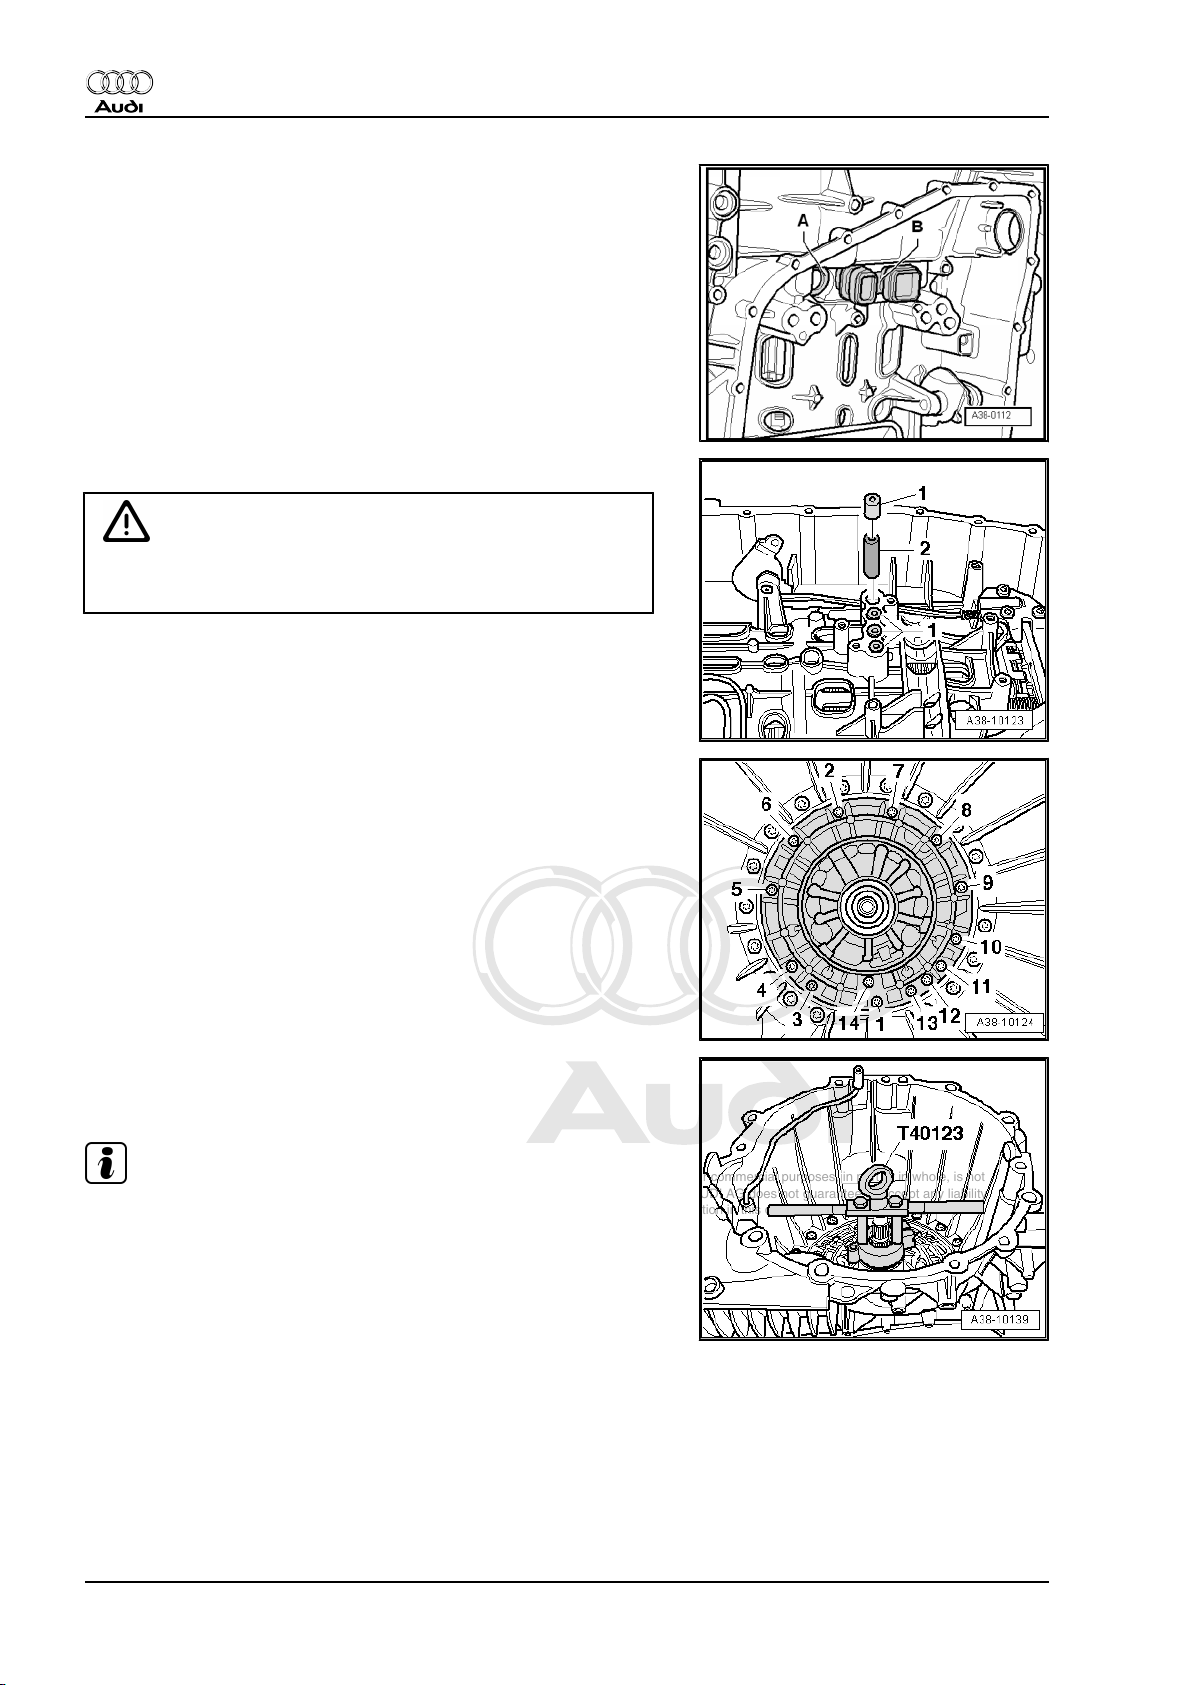
– Detach adapter -B- for mechatronic unit.
– Pull out gasket -A- for ATF strainer (if it has not already been
removed together with the ATF strainer).
– Pull out a total of four aluminium sleeves -1-.
Caution
The sealing sleeves -2- are of different lengths: note the orig‐
inal positions for re-installation.
– Pull out a total of four sealing sleeves -2- using extractor tool
-T10271- .
– Turn gearbox on assembly stand.
• The torque converter must face upwards.
– Slacken bolts for ATF supply unit in the sequence -14 ... 1-
and remove bolts.
– Remove bolts with sealing washers.
– Apply puller for ATF supply unit -T40123- to stator shaft.
– Detach ATF supply unit.
Note
If necessary, release ATF supply unit by tapping gently with a
rubber-headed hammer.
– Detach O-ring from ATF supply unit.
26 Rep. gr.37 - Controls, housing
 Loading...