

Page 1
®
starter guide
Easy steps for geing the most
from your AT&T U-verse TV,
High Speed Internet, and Voice services.
Get answers /
a.com/uversesupport
or chat live ...
Page 2
table of contents
$75
starter guide
Your important AT&T U-verse® information...........3
• For quick reference, record your important AT&T U-verse
information here
AT&T U-verse TV.................................................................... 4
• How to use the AT&T U-verse remote control
• Direct the show with your Total Home DVR®
• Program the DVR from your computer or mobile phone
• AT&T U-verse Online
• AT&T U-verse Mobile
• Find shows fast with Channel Shortcuts
• Watch four of your favorite shows at once with
My Multiview
• Other Multiview choices
• How to use Parental Controls
• Options menus offer bigger convenience
• U-verse Movies and Pay Per View programming
• Interactive features for TV, Internet, and Voice
• Quick tips about your AT&T U-verse service
AT&T U-verse High Speed Internet......................... 12
• Access your email from the Web
• Set up email on your home computer
• Access the entire national AT&T Wi-Fi Hot Spot network
• Get online protection with advanced safety features
AT&T U-verse VoiceSM....................................................... 16
• Set up your voice mailbox
• Listen to messages or change settings
• Access your mailbox online and by phone
• Turn off AT&T U-verse Messaging
• Change your PIN
• Link your wireless number and voice mailbox
• Important information
SM
SM
SM
when your friend orders
AT&T U-verse TV, Internet, and phone.
Love your U-verse?
Tell a friend, and you’ll BOTH get up to
information here for easy reference.
®
RESIDENTIAL GATEWAY INFORMATION
Manufacturer
SSID #
in gift cards
Learn more at a.com/referUverse.
Wireless key # (required for home Wi-Fi access)
Upgrade or add services anytime.
click att.com/myuverse
call ...
Please have your four-digit passcode available when calling.
, AT&T UID
Your AT&T U-verse primary member ID
allows you to manage your account online.
You can view and pay your bill, enroll in
paperless billing, sign up for Autopay,
upgrade your account, get updates
regarding your AT&T U-verse service, and
so much more.
quick fix guide
AT&T U-verse TV.............................................................. 21
• Resolve problems with your services
• Switch your TV screen setting from standard to
widescreen
• Program your remote to control up to four devices
• Change your TV’s input selection to match its
video source
• Three ways to connect your receiver to your TV
• Watch Help on Demand
AT&T U-verse High Speed Internet........................ 26
• Assure reliable security for your wireless home network
• Connect more computers to your wireless home network
AT&T U-verse Voice..........................................................27
• Create sub account voice mailboxes online
• Link your wireless number and your voice mailbox
• Change your PIN
• Get fast, affordable tech support
Support questions/additional resources..............27
Record your important AT&T U-verse
With all your key information in one place, it’s a snap to manage your account and get support when you need it.
For your own security, if you need
to record account passwords, write
GENERAL INFORMATION
them down separately and keep
Customer name on account
them in a safe place.
Billing account number (BAN)
AT&T U-verse primary member ID
(online account access ID)
VM PIN # and authentication code
AT&T U-verse password hint
Note: Password is the same as your AT&T email password.
For your secur ity, record acco unt passwords sepa rately
We’re always
here to help:
a.com/uversesupport
> Geing started:
Router password
Tech’s ID for promo code (P2R)
Your award-winning U-verse service was
and keep them in a safe place.
1.800.288.2020
> / care:
Please have your four-digit
passcode available when calling.
installed by
Tune your TV to ch-411
> Help Channel:
3
Page 3
TV user guide
TV user guide
• How to use the AT&T U-verse® remote control
• Direct the show with your Total Home DVR
• Program the DVR from your computer or mobile phone
• AT&T U-verse Online
• AT&T U-verse Mobile
SM
SM
• Find shows fast with Channel Shortcuts
• Watch four of your favorite shows at once
with My Multiview
• Other Multiview choices
• How to use Parental Controls
• Options menus offer bigger convenience
• U-verse Movies and Pay Per View programming
• Interactive features for TV, Internet, and Voice
• Quick tips about your AT&T U-verse TV service
®
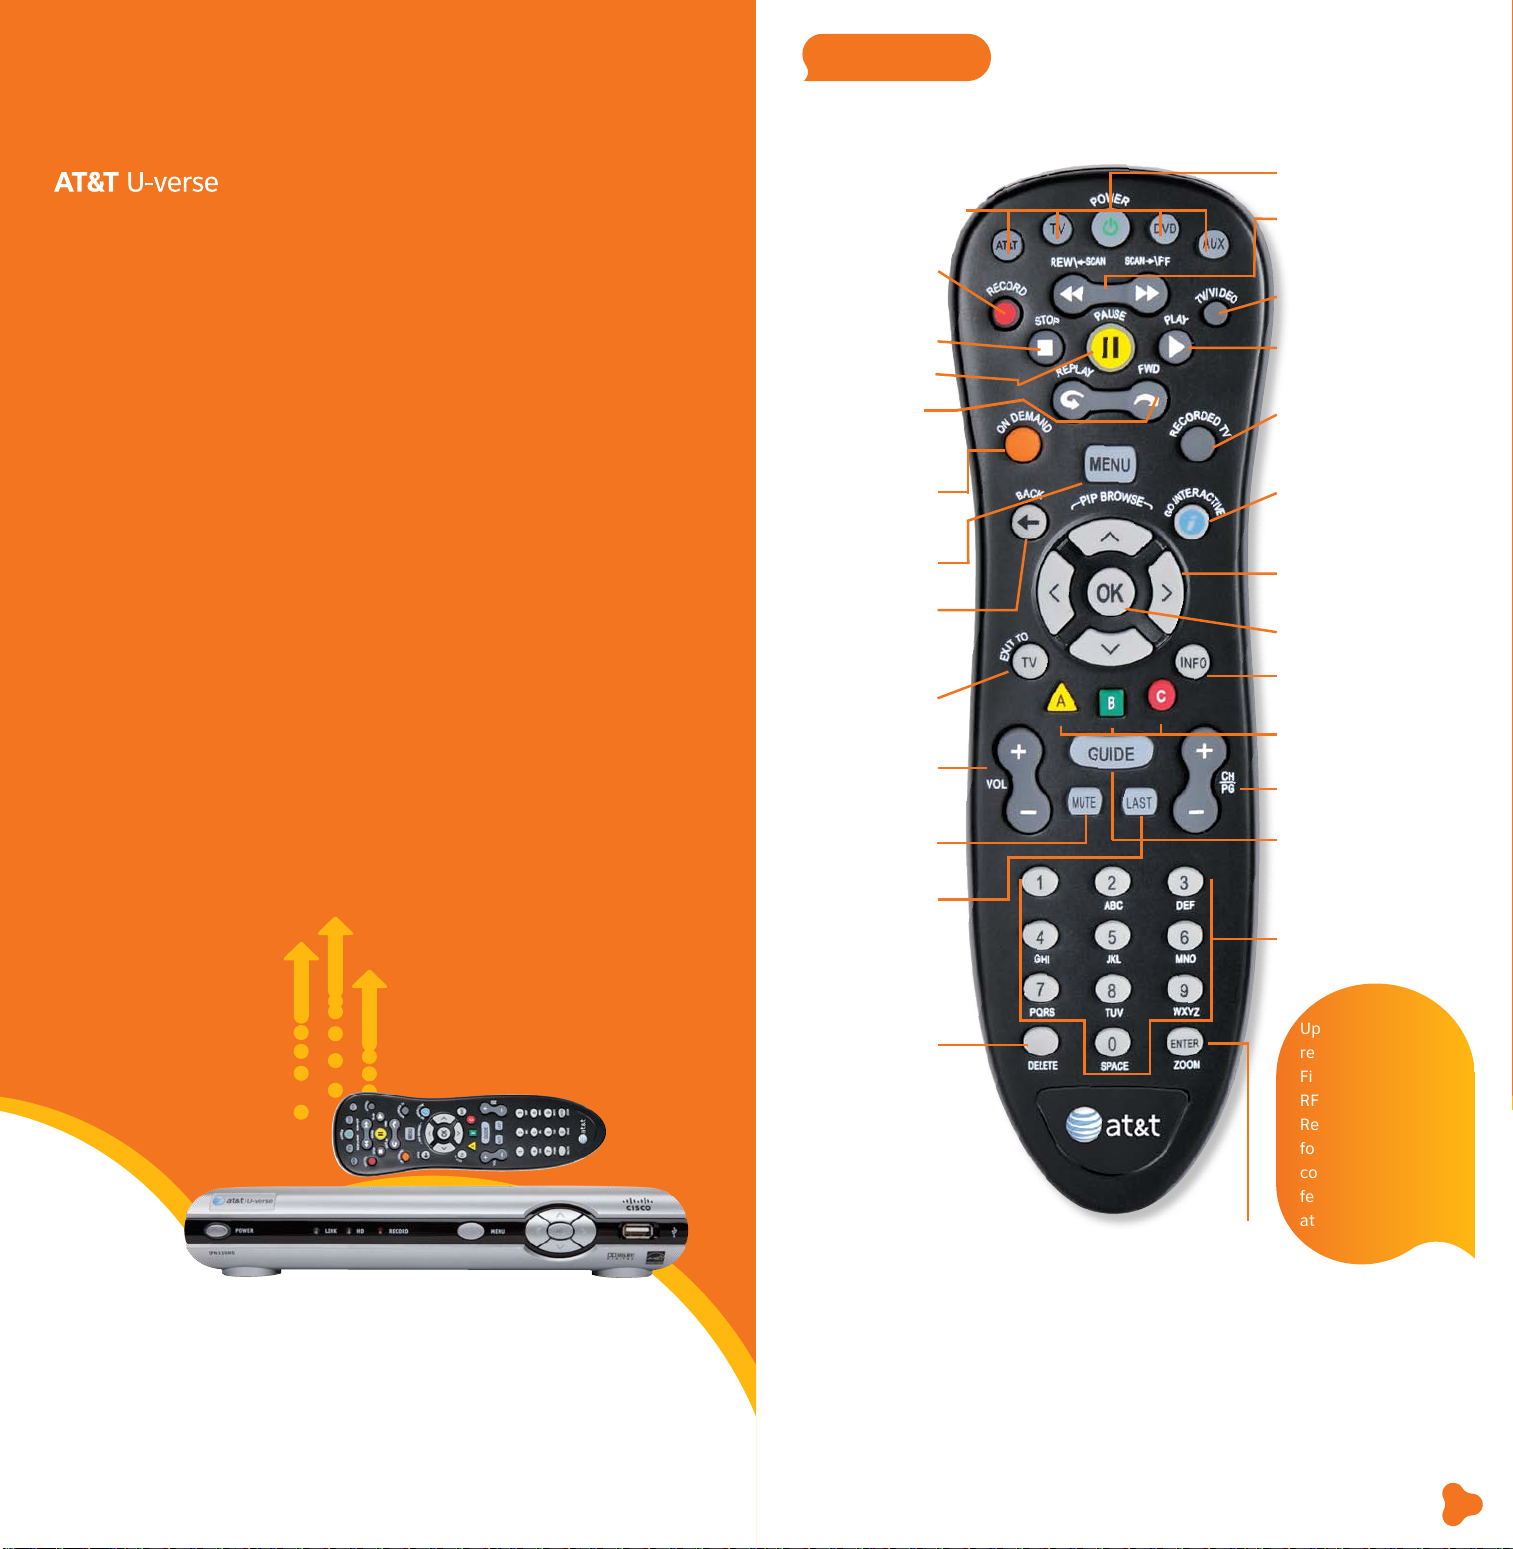
How to use the AT&T U-verse
Control devices with
mode buttons
Initiate program
recording
Stop program play
Pause program play
Jump forward
or backward by
interval
Go to On
Demand library
Go to main menu
screen
Return to previous
menu screen
Return to live TV
Change volume
Mute audio
®
remote control
Power on/off devices
Rewind or fast-forward
program
Allow navigation between
TV components (RGB,
HDMI, analog, other)
Start or resume
program play
Go to Recorded TV
program list
View online weather,
sports, stocks, and traffic
info in the U-bar
Navigate channels,
menus, and screens
Select onscreen
option
Display program
info screen
Access applications
(if available)
Channel/page guide
up or down
Go to interactive
program guide screen
Return to previously
viewed live TV
channel
Edit text on the
Search screen
Access screen
viewing options
Keypad for channel
and search functions
Upgrade to our
rechargeable Easy
Find Remote or our
RF Point Anywhere
Remote Control
for even more
convenience and cool
features. Learn more
at att.com/remotes.
Your remote can control up to four devices
At the time of installation, your remote was set up to control your AT&T HD-ready receiver.
The remote is also capable of controlling up to three other devices, such as the TV, DVD
player, or home theater system. You can access step-by-step instructions on how to
program your TV or other devices by pressing MENU on your remote control and scrolling
to Help and selecting System Set-up.
Visit a.com/uverse/newcustomer to learn more
Find answers 24/7: a.com/uversesupport
5
Page 4
TV user guide
TV like you’ve never seen before
One DVR, one experience, any receiver
Record up to four shows at once and record and play back shows in any room from a
single DVR.* Your AT&T U-verse HD-ready receiver with Total Home DVR®
> Record up to four shows at once on a single DVR and record and play back your
shows from any room in your home
> Schedule, update, or delete your recordings from any room in your home
> Pause your recorded show in one room and pick it up where you left off in another
> Pause, fast-forward, and rewind live TV
> Set Parental Controls for U-verse Movies, Pay Per View, and live or recorded shows
> To learn more, visit att.com/uversesupport
NOTE: BLUE CAPITAL LETTERS refer to buttons on the remote control.
2
or recorded shows from any receiver
1
lets you:
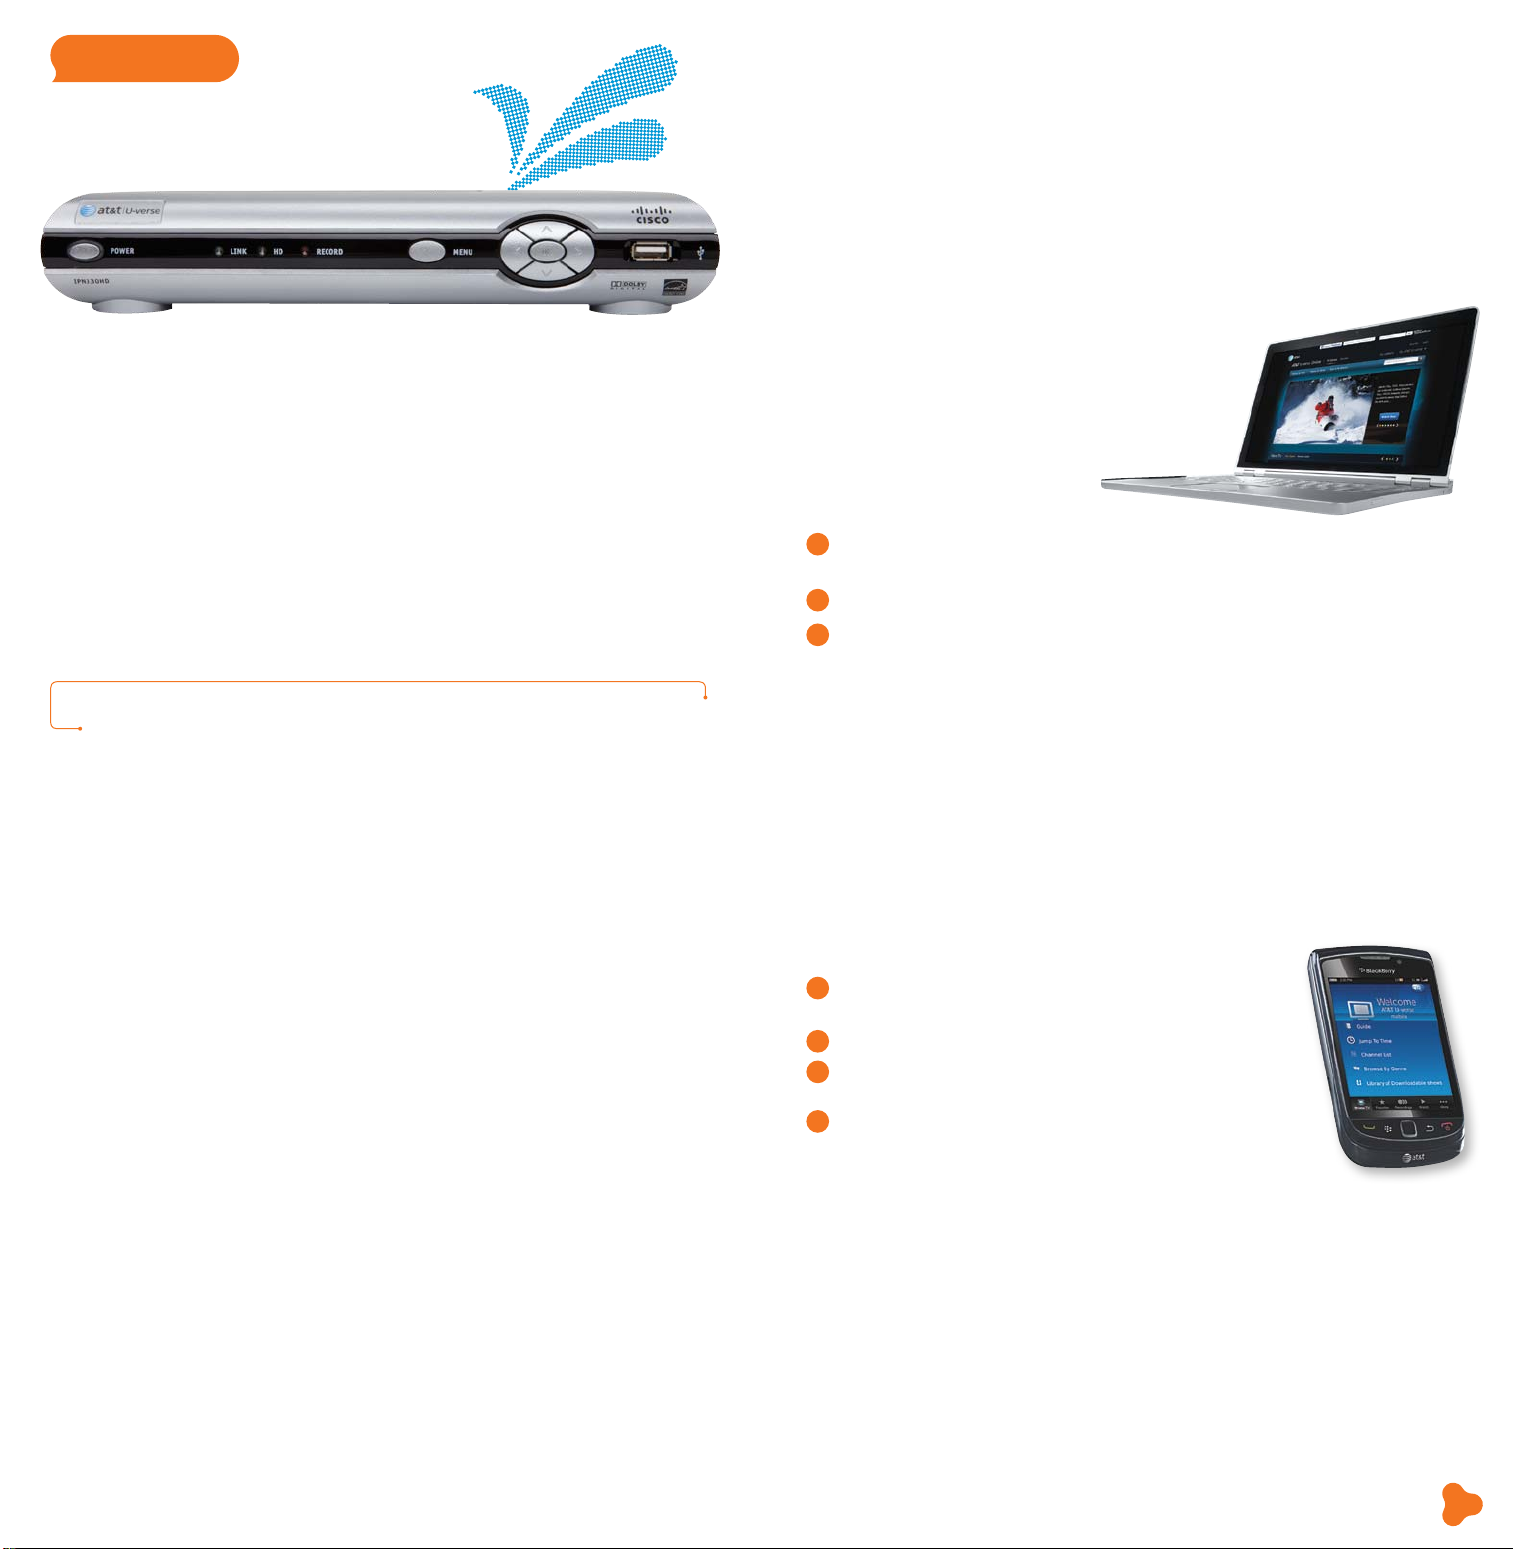
Have TV, will travel
Take the U-verse experience with you on your computer or mobile phone.
Watch hit TV shows and program the DVR
from your computer
With AT&T U-verse OnlineSM you can watch TV shows, movies, and videos on
your computer, with thousands of titles to choose from, at no extra
charge. Log on to att.net/uverseonline and you can:
> Watch hit TV shows, classic TV series, movies,
trailers, and other video clips online
> Manage your DVR recordings and settings
> Manage your AT&T U-verse account and
check your local TV listings
Here are the steps to program your DVR:
Go to att.net/uverseonline and log into your account by
1
clicking the U-verse Member Login button.
Click the What’s on U-verse TV link to see the Guide screen.
2
Here, you can use the onscreen Arrows to scroll the TV listings; select the day
3
or click Prime Time to jump to a specific day or evening-only viewing. You can also
type a title into the Search field to find a specific program.
Pause, fast-forward, and rewind live TV from any receiver
Your Total Home DVR stores up to 60 minutes of the live TV channel you’re watching,
on up to four of your receiver-connected TVs
channels, your DVR will begin storing the new program instead.) You can rewind live TV
by pressing REW. You can also freeze live TV for up to 60 minutes by pressing PAUSE
(press PLAY to restart).
Record the program you’re watching from any receiver
Press RECORD on your remote control to begin recording the program you’re
watching. The Record light on your receiver remains lit until recording stops
automatically at the program’s scheduled end time. You can also press STOP to end
recording at any time; press OK to confirm.
Schedule program or series recordings from the Guide from any receiver
Press GUIDE, then use UP/DOWN ARROWS to scroll to the program you want to
record. Press RECORD once to record a single show (one red dot appears); press
RECORD twice to record the whole series (three red dots appear); press RECORD
three times to cancel recording.
Search for a show or series you want to record from any receiver
Press MENU, select Live TV, and use the DOWN ARROW to select Search. Press
OK. Choose Options to narrow your search, or type the show title (use ARROWS
to highlight a letter, then press OK to select it). Highlight the show you want when it
appears, and press INFO to record a single episode or the whole series.
Watch your recordings from any receiver
Press RECORDED TV and select Browse Recordings to see a list of your recorded
SD or HD programs and series. Highlight a show and press OK to see a Program Info
screen, then select Play to watch the program.
2
at the same time! (When you change
Watch hit TV shows and program the DVR
from your mobile phone
AT&T U-verse MobileSM lets you manage your DVR schedule and recordings, browse
the TV guide, and, with a qualif ying AT&T U-verse TV plan, watch from a library of hit
shows on your smartphone.3 Take the AT&T U-verse experience with you! Learn more
TV
at att.com/getuversemobile. The app is a free download from Apple iTunes®, BlackBerry®,
App World, or Android Market™. Once you have the app, here’s how to
use it to program your DVR:
Through the guide, browse to find the show you would
1
like to record.
Select the show to bring up the Show Details page.
2
Select Record This Episode to record only this one episode
3
or Record Series to record the entire series.
You’ll receive confirmation that your recording is set when the
4
Show Detail page updates, replacing Record This Episode
with Cancel This Episode.
*DVR not included w ith U100 or U-ba sic packages. Models may vary. 1 Total Home DVR f unctio nality is available on up to
eight T Vs and requires a receiver for each additional TV at $7/mo. Pricing subject to change. 2 Available in select markets ,
and coming to all markets by fall 2011.
Visit a.com/uverse/newcustomer to learn more
3 Access to select content requires compatible device, qualifying U-verse T V plan or monthly subscription fee, and Wi -Fi
connection and/or cellul ar data connection. Available conte nt may vary by device and/or U-verse TV subsc ription and is
subject to change. Data charges may apply.
Find answers 24/7: a.com/uversesupport
7
Page 5

TV user guide
Find shows fast with Channel Shortcuts
Browse channels grouped by category and easily find the type of programming you like.
Access Channel Shortcuts two ways:
Press MENU. With Live TV selected, use DOWN ARROW to select Channel
1
Shortcuts. Press OK and use DOWN ARROW to select your category.
From the Guide screen, press ENTER.
2
With Display Channels selected, use
DOWN ARROW to pick a category and
press OK.
Watch four of your favorite shows at once
with My Multiview*
See only the channels you watch most (you’ll still see all channels in the Guide screen).
Press MENU and use the DOWN ARROW to select My Multiview and press OK.
1
Begin watching four of your Favorites (if already set). Press INFO and select
Add/Remove Channels and press OK to set or change your Favorites.
Scroll using UP/DOWN ARROWS and
2
See checked channels by selecting View Checked, then press OK. (Select
3
Uncheck All and press OK to clear the whole Favorite Channels list.)
Done? Select Save and then press OK.
4
press OK to check channels you want to see.
How to use Parental Controls
Once you have a personal identification number (PIN), you can restrict viewing by TV or
movie rating, all adult-only programming, who can rent U-verse Movies, and more.
Press MENU, then RIGHT ARROW to Options, then down to Parental Locking.
1
Press OK .
Use the remote’s number pad to enter your four-digit PIN and press OK (press
2
DELETE to clear an entry). You’ll have to enter your PIN twice. The Parental
Locking screen will appear with your locking options.
Be sure to scroll down to the second page if you want to lock adult-only content,
titles and posters from the standard channels, U-verse Movies, and purchases from
Account Manager.
Options menus offer bigger convenience
Watch TV the way you want by customizing your Guide screen view, what channels
you see, your onscreen language, sound settings, and more. There are two ways to
access Options:
Access Options from the Menu screen
to customize all your preferences
Here you can set favorite channels or
channels to hide, choose a parental locking
PIN, set your audio preferences, aspect ratio,
closed captioning, language settings, and
more. Press MENU on your remote. Use
ARROWS to select Options. Use ARROWS
to select the category of preferences you
want to change, and press OK.
Other Multiview1 choices
Tune to one channel to see available programming in a single genre—choose News
Multiview (ch-201, or 1201 HD), Kids Multiview (ch-301, or 1301 HD), or Sports
Multiview (ch-601, or 1601 HD). Subscribers to ESPN GamePlan can tune to channels
620 and 4400. Multiview will display all available channels in your TV package.
In any Multiview, you can:
> Press UP/DOWN ARROWS to scroll through the available channels or to
select a channel
> Press OK to replace the channel in the viewport with the selected channel
> Record a program by selecting one of the Multiview screens and pressing RECORD
Check out ch-400 for seasonal Multiviews.
NOTE: If you hide channels from view in the Guide screen, they will still display
in Multiview windows unless you block them with Parental Controls.
*A limited number of HD channels are not supported for display within My Multiview. 1 Channels/content available for
viewing in Multiview are based on TV package and additional programming purchased.
Access Options without changing the
channel or leaving the Guide screen
Change your onscreen language or enlarge
your view while watching live TV. Change
your Guide view, see your favorite channels,
or access Shortcuts to view the category of
channels you want to watch while the Guide
is visible. Press ENTER on your remote while
watching TV or from the Guide, use ARROWS
to choose the category of preferences you
want to change, and press OK.
U-verse Movies and Pay Per View
programming
AT&T U-verse On Demand offers Free On Demand,2 a huge selection of U-verse Movies
3
rentals,
or SHOWTIME®. Pay Per View offers you a front-row seat at exciting live sporting
events, concerts, and more.
your favorite shows.
Features subject to change. Simulated screen images for demonstration purposes only. 2 Free on Demand programming varies by
package subscription. Subscription to appropriate package and HD Technology Fee are required to access FREE and/or PREMIUM
HD On Demand titles. 3 U-verse Movies: Customer responsible for applicable charges. Once a U-verse movie is ordered, it cannot
be cancelled by remote or customer care. HBO®, Cinemax® and related channels and service marks are the property of Home Box
Office, Inc. 4 Event schedules subject to change. Once a Pay Per View is ordered, it cannot be cancelled by remote or customer
care. You will be billed and the event will air on your T V set.
plus Premium On Demand when you subscribe to HBO®, Cinemax®, STARZ®,
4
Visit att.net/uverseonline to see clips of some of
Visit a.com/uverse/newcustomer to learn more
Find answers 24/7: a.com/uversesupport
9
Page 6

TV user guide
Three ways to access U-verse Movies
Press ON DEMAND on your remote
1
control for one-touch access.
Press MENU and use ARROWS to
2
select On Demand, then U-verse
Movies. Press OK.
Press GUIDE, then use ARROWS or
3
CH/PG to select Channel 1. Press OK.
How to order Pay Per View
Press 1 0 2 on your remote to access
1
Pay Per View Channel 102, or press 1 0 6
to see PPV HD Channel 106, then press
OK. (You can also press GUIDE and use
ARROWS to select Channel 102 or 106.)
Select the program you want to order,
2
and press OK to reach a Program Info
screen with event time, pricing, and
how to order.
Interactive features for TV, Internet, and Voice
Access your TV’s interactive features
Add AT&T U-verse High Speed Internet
AT&T U-bar*
See the customized sports, stocks,
and weather content you’ve selected
on your AT&T U-verse Internet
homepage without leaving the TV
program you’re watching. Press the
GO INTERACTIVE button on your
remote control to launch U-bar.
AT&T Weather On Demand ch-227
Tune to Channel 227 using your
remote control or select it from the
Interactive screen. Choose a city in
the U.S. to see local conditions,
hourly temperatures, and a six-day
forecast, plus video, radar, and
satellite images.
*AT&T U-verse H igh Speed Internet account required.
1
and AT&T U-verse Voice
phone service to your AT&T U-verse TV
service—they work together.
Press MENU and use RIGHT ARROW
2
to select Interactive.
Use ARROWS to select More
3
Interactive and then the application
you want to use. Learn more about
these innovative features below.
SM
digital home
Caller ID notifications on TV
With AT&T U-verse Voice, you can
see who’s calling on your TV screen
without changing the channel.
Includes a Message Waiting indicator
so you know if they’ve left a message.
Tune to ch-9901 or select Services
from the Menu screen to set it up.
Call History ch-9900
Also with AT&T U-verse Voice, you
can view recent incoming calls on
your TV screen and initiate a call by
highlighting a number and pressing
OK on your remote control. Your
phone will ring and when you answer
it, your call will be connected.
1
Quick tips about your AT&T U-verse TV service
Best ways to locate channels quickly
> Press any ARROW to access your onscreen Picture-in-Picture browse bar
> Print a channel lineup guide for your area at att.com/channellineup
See what’s hot to watch now
> Press ON DEMAND on your remote control to access U-verse Movies
Chat with other members online
> Visit att.com/uversecommunity to post
messages and talk with other AT&T U-verse
members about TV features, programming,
and more
Watch exclusive AT&T U-verse channels
> Front Row Channel 100
Learn what’s coming up on Pay Per View
> Theatre Channel 200/1200
Watch U-verse Movies trailers,
interviews, and more
> Buzz Channel 300/1300
Go behind the scenes of
your favorite TV shows
> Sports Channel 600/1600
Get previews and an in-depth look
at all kinds of sports programming
> Help Channel 411
Get AT&T U-verse TV service help
> ATTention Channel 400
See news about our latest enhancements and more
Easy system setup
You can program your AT&T U-verse remote and set viewing aspect ratio
and Parental Controls using the System Set-up Tool:
> Press MENU on your remote and use ARROWS to select Help
> Press OK to select System Set-up
1 Caller I D on TV requires subscription to U-verse T V and U-verse Voice .
Visit a.com/uverse/newcustomer to learn more
Find answers 24/7: a.com/uversesupport
11
Page 7

internet
user guide
internet user guide
• Access your email from the Web
• Set up email on your home computer
• Access the entire national AT&T Wi-Fi Hot Spot network
• Get online protection with advanced safety features
• Important information
Featu res and screen appea rance subje ct to change.
AT&T U-verse High Speed Internet
Now that your AT&T High Speed Internet service is installed, every networked computer
in your home can share the same fast connection on a wireless home network. Use
this Starter Guide to access your email from the Web, set email up at home, use Wi-Fi
hotspots, and add free security software.
Access your email from the Web
Reading AT&T Mail via the Web is the preferred and recommended method for email
access. AT&T Mail via the Web lets you log into your email account anytime at home
and on the go from any computer via the Internet. Your emails, contacts, and calendar
are stored online without using space on your hard drive. Plus, you can set up your
AT&T Mail to collect messages from other email accounts so they’re all in one place.
Log in at att.net using your AT&T master ID or sub account member ID (email address)
and password, and click the Mail button.
Set up email on your home computer
Client-based email* (POP/SMTP) uses software like Outlook Express to download email
directly to your computer.
Open the email software you plan to use and enter the following information in the
account setup window:
> Email address: MemberID@att.net
> Incoming (POP): pop.att.yahoo.com
> Outgoing (SMTP): smtp.att.yahoo.com (SMTP authentication required)
> Incoming mail server: POP3
> Incoming mail port number: 995 [make sure Secure Connection (SSL) is checked]
> Outgoing mail port number: 465 [make sure Secure Connection (SSL) is checked]
> Set password authentication for outgoing mail
NOTE: If your email software doesn’t support SMTP authentication, you won’t be able
to send email from your AT&T account.
For more email support information visit att.com/email support
*There are numerous client-based email products supplied by non–AT&T third-par ty vend ors. Because of the variety of
products and ver sions available, suppor t for some functionality by AT&T technic al agent s may incur a fee. Alternatively,
AT&T also provides onl ine self-help for these appl ications. As always, we recommend that our customers use AT&T Mail
access via the Web, which provides a broad set of func tionality to manage and access email anywhere and anytime.
Find answers 24/7: a.com/uversesupport
13
Page 8

internet user guide
Access the entire national
AT&T Wi-Fi Hot Spot network*
Check your email, surf, shop, and
work on the go. If you’re running
Microsoft Windows® XP on your
laptop, connecting to an AT&T
Wi-Fi Hot Spot is quick and easy:
> On your laptop, go to your
control panel and click
Network Connections.
> Double-click Wireless Network
Connection and select View
Wireless Network.
> Choose the “attwifi” network
from the list of available
networks shown.
NOTE: You may see an alert that the Wi-Fi hotspot is an unsecured wireless network.
This is normal for public Wi-Fi hotspots.
> Click the Connect button at the bottom of the screen. Notice that the “attwifi”
network changes status to “Connected.”
> Open your browser. You’ll see an AT&T Wi-Fi login page.
> Log in using your AT&T master account ID (your email address) and select your
domain name (the name to the right of the @ symbol in your account ID).
> Enter your password, click to agree to the Terms of Service and Acceptable
Use Policy, and click the login button. That’s it! You’re now connected.
For information on how to connect using other operating systems and devices,
please visit attwifi.com and click on Learn More to visit the Frequently Asked
Questions page.
Find thousands of AT&T Wi-Fi Hot Spots
at attwifi.com/locations.
Get online protection with advanced
safety features
Visit att.software.yahoo.com to learn more about these security features:
> Anti-Spyware seeks out and removes programs that gather personal
information and slow down your computer
> Anti-Virus cleans and protects your computer against viruses, worms, and
Trojan horses
> Firewall shields your computer from unauthorized access
> Pop-Up Blocker stops many types of windows that open automatically
> Parental Controls let you put limits on what your children can do and see online
> AT&T Mail Protection prevents junk mail, UCE (unsolicited commercial email),
and UBE (unsolicited bulk email)
PC Health Check
PC Health Check is a free, easy-to-use diagnostic tool that will quickly assess
the health of your PC and its connection settings, as well as recommend
solutions to fix potential performance issues. Come back often and use our
spam-free PC Health Check to get peace of mind to help prevent issues and check on
your computer performance. Visit us at pccheck.att.com/healthycomputer.
See the complete AT&T U-verse High Speed
Internet Features Guide and more user guides
at att.com/userguides
*Access inclu des AT&T Wi- Fi Basic. Wi-Fi– enabled device required. Se e www. attwifi.com for details and locations.
Visit a.com/uverse/newcustomer to learn more
Maximize your speed
Visit att.com/tips to learn how to maximize the speed of your
AT&T U-verse High Speed Internet service.
Find answers 24/7: a.com/uversesupport
15
Page 9

voice
voice user guide
Set up your voice mailbox
Setting up your AT&T U-verse MessagingSM voice mailbox takes only a few minutes.
Dial *98 from your home phone.
1
Follow the prompts to set up a mailbox.
2
After creating your PIN, be sure to set up your authentication code. This will allow
3
you to reset your PIN over the phone if you forget it.
user guide
• Set up your voice mailbox
• Listen to messages or change seings
• Access your mailbox online and by phone
• Turn off AT&T U-verse Messaging
• Change your PIN
• Link your wireless number and voice mailbox
SM
Listen to messages or change seings
Accessing your mailbox online
Go to att.com/myuverse. Enter your AT&T U-verse® member ID
1
(email address) and password.
On the AT&T U-verse Account Overview page, go to the AT&T U-verse Voice section.
2
Click on Check Voicemail to view and play your messages.
3
Click Voicemail Settings then Voice Mailbox Preferences to view your options.
4
Accessing your mailbox by phone
> Dial *98 from your home phone
> If you’re away from home, dial your home number and press
voicemail greeting
to skip the
*
Turn off AT&T U-verse Messaging
Go to att.com/myuverse and enter your AT&T U-verse member ID
1
(email address) and password.
From the main page, go to the AT&T U-verse Voice section.
2
Click on the U-verse Voice Home Page.
3
Click the Voicemail link under Quick Settings in the left navigation bar.
4
Click the OFF button, then click Save.
5
NOTE: All Call Forwarding features that were set to go to voicemail will be disabled.
To change your Call Forwarding selections, select the Phone Features tab.
Change your PIN
(personal identification number)
To change your mailbox PIN at att.com/myuverse, enter your AT&T
1
U-verse member ID (email address) and password.
Locate the AT&T U-verse Voice section.
2
Select Change PIN.
3
Follow the instructions.
4
AT&T U-vers e saging may not be fully compatible with all AT&T wireless voicema il systems. Caller ID and Call Waiting
might not work simult aneously with AT&T U-verse Voice . Caller ID: Some call information may be blocked or other wise not
displaye d, including infor mation for some calls originating outside of the AT&T network and calls carried over facilities that
do not transmit Caller ID information.
Find answers 24/7: a.com/uversesupport
17
Page 10

voice user guide
AT&T Voicemail Viewer
Get your AT&T U-verse Messaging
listen to messages in any order, and even forward messages as email from your
smartphone.
AT&T Voicemail Viewer apps and desktop gadgets give you a simplified voice message
view from iPhone® and BlackBerry® devices, as well as iGoogle Homepage and
Windows® Vista Sidebar. To get started, visit att.com/vmviewer.
SM
delivered right to your desktop or smartphone,
Important information
Remote access
Although you can access your voicemail and manage your features while away from
home, calls can be placed only from your home. AT&T U-verse Voice
currently mobile.
Voicemail
When dialing into voicemail remotely, you may incur additional access charges for
non-local calls, hotel service charges, or cellular charges.
Call forwarding/call transfer
Per-minute rates apply if you forward or transfer to an international number or exceed
time under a defined minutes-per-month plan.
Linking Wireless from AT&T to your AT&T U-verse mailbox
When you add a wireless number to your AT&T U-verse Messaging voice mailbox, it
replaces your current wireless voice mailbox and any existing messages will be lost.
Prepaid service cannot be added to AT&T U-verse Messaging. Landline and wireless
numbers must be within the same service area. The Social Security number or Tax ID
provided during setup must match the one on your wireless account. AT&T U-verse
Messaging may not be fully compatible with all AT&T wireless voicemail systems.
AT&T U-verse Voice
AT&T U-verse Voice, including 911 dialing, will not function during a power outage
without battery backup power. AT&T U-verse service is compatible with many
monitored home alarms and medical monitoring systems.
SM
service is not
Link your wireless number and your
voice mailbox
When you have Wireless from AT&T, you can check your wireless and home phone
messages at the same time. To link up to two wireless numbers:
Go to att.com/myuverse.
1
Log in with your AT&T U-verse member ID (email address) and password.
2
Locate the AT&T U-verse Voice section.
3
Select the U-verse Voice Home Page.
4
Go to the Voicemail Settings tab, and select Integrate Wireless Voice Mail.
5
Click on Launch Wireless Integration Wizard and follow the instructions.
6
Visit a.com/uverse/newcustomer to learn more
See the complete AT&T U-verse Voice
Features Guide and more user guides
at att.com/userguides
Learn more
Visit att.com/uversevoicemail
for more information on setting up
and customizing your voicemail.
Para ver videos útiles en
español por Internet, visite
att.com/videosenespanol.
Find answers 24/7: a.com/uversesupport
19
Page 11

quick fix
guide
• AT&T U-verse® TV
• AT&T U-verse High Speed Internet
• AT&T U-verse Voice
SM
quick fix guide
AT&T U-verse® TV
Resolve problems with your AT&T
U-verse TV, Internet, or Voice services
Don’t have picture or sound, but TV and receiver are both turned on?
Press TV on your remote control.
1
2
Press TV/VIDEO to see TV programming.
If you’re still having trouble with your AT&T U-verse TV, Internet, or Voice services, try
resetting your TV receiver or residential/wireless gateway by unplugging it from the power
outlet in the wall. (See below for details for alternate reset if you have different equipment.)
NOTE: Unplugging the T V receiver or residential/wireless gateway will interrupt any
recordings in progress.
If the trouble is with only one TV
Turn off the receiver connected to that TV and unplug it.
1
Wait at least two minutes before plugging the receiver back in. Turn it on and retry
2
what you want to do.
If the trouble is with more than one TV, or with Internet or Voice service
Unplug the residential/wireless gateway from the power source. (See below for
1
alternate reset.)
Wait at least two minutes, then plug the residential/wireless gateway back in and
2
retry what you want to do.
Alternate reset: If your service is supported with a Home Network Hub and Power
Supply Unit (PSU with battery backup), then you will need to press the Reset button on
the left side of the PSU to reset AT&T U-verse service. The PSU may be located in the
garage or a closet near an outside wall.
Want more help? AT&T U-verse Getting Started has answers all in one place online
at att.com/startuverse. You can also chat live with an agent while getting started, or
call 1.800.288.2020 and say “U-verse Technical Support.”
Switch your TV screen seing
from standard to widescreen
Aspect ratio is the relationship of the screen’s width to its height. Standard TVs have a
4:3 aspect ratio; widescreen and HDTVs are 16:9. The steps below show how to switch
your AT&T U-verse receiver’s aspect ratio.
Widescreen Standard
Press MENU on your remote control, then use ARROWS to select Options,
1
then System Options, and then Aspect Ratio.
Use UP/DOWN ARROWS to choose 4:3 Standard Definition, Widescreen
2
Standard Definition, 720p High Definition, or 1080i High Definition depending
on your needs, then press OK.
Use ARROWS to select Continue, and press OK.
3
Find answers 24/7: a.com/uversesupport
21
Page 12

RGB
AUDIO
L
R
DIGITAL OUT
(OPTICAL)
VIDEO
OPTICAL
AUDIO
POWER
TO WALL
(VIDEO IN)
NETWORK
USB
HDMI
TO TV
Pb
Pr
Y
+12V
DC
VIDEO OUT
OPTICAL
POWER
TO TV
(VIDEO IN)
L
NETWORK
HDMI
TO WALL
Pb
Pr
Y
+12V
DC
R
USB
AUDIO OUT
quick fix guide
AT&T
DVD
AUX
TV
P
O
W
E
R
O
N
D
E
M
A
N
D
R
E
C
O
R
D
P
A
U
S
E
S
T
O
P
R
E
P
L
A
Y
F
W
D
P
L
A
Y
R
E
W
F
F
T
V
/
V
I
D
E
O
R
E
C
O
R
D
E
D
T
V
OK
B
A
C
K
G
O
I
N
T
E
R
A
C
T
I
V
E
P
I
P
B
R
O
W
S
E
A
B
C
MENU
+
+
–
–
VOL
CH
PG
1
2
3
4 5
6
7
8
9
TV
INFO
MUTE
LAST
ABC
DEF
GHI JKL MNO
PQRS
TUV WXYZ
DELETE
SPACE
ZOOM
ENTER
GUIDE
E
X
I
T
T
O
0
Program your remote to
control up to four devices
During installation, the AT&T button was set up to control your AT&T U-verse HD-ready
receiver. You can also control a TV plus up to two other devices such as a DVD player,
stereo receiver, or home theater in a box by programming the TV, DVD, and AUX mode
buttons. Once the devices are programmed, press the corresponding mode key on the
remote to control that device. To watch a video on how to program your remote, visit
att.com/uverseremote.
NOTE: The instructions below don’t require you to enter a manufacturer’s device
code because most codes are stored in the AT&T U-verse remote’s memory. If you’re
unable to add a device, or want to learn about advanced features like reassigning
mode buttons, refer to the remote’s manual provided at installation. For more info,
visit att.com/userguides.
How to assign devices to TV-DVD-AUX mode buttons
Power on the device to be programmed.
1
Point the remote control at the selected device.
2
Press and hold the mode key that matches the device you want to program (TV,
3
DVD, or AUX) along with the ENTER key. Hold both keys for one second, then
release. The four mode keys on the Remote Control flash twice to indicate you
are in search mode.
Search by pressing the SCAN/FF key repeatedly until the device turns OFF (the
4
selected mode key will flash once for each press of the SCAN/FF key). Pause briefly
between each key press to allow your device enough time to respond.
Press the POWER button on the remote to turn the device back on.
5
NOTE: If the device does not turn off and you have searched all available codes, the
selected mode key will flash 8 times. If this happens, please start over.
NOTE: If the device does not turn on, you may have pressed the SCAN/FF key too many
times. Press the REW/SCAN key to scan backwards and test the POWER button again.
Check VOLUME and MUTE. Do not test using REW/SCAN, SCAN/FF, FWD, or
6
EXIT. If there is any problem with any of the keys, press the SCAN/FF button and
search until you find a code that will operate all the functions properly.
Press the ENTER key to save the programming. The appropriate mode key will give a
7
long flash, indicating successful programming.
NOTE: If the programming is interrupted or inactive for more than 30 seconds, the mode keys
will flash eight times. This indicates the remote has left the programming mode and returned to
normal operation without saving any changes.
If you have an integrated or combination unit such as TV-DVD, TV-DVD-VCR, etc., each component
of the unit may need to be programmed separately by using the mode keys. For instance, for
a TV-DVD, search for the device code of TV and program into TV mode key, then search for the
Device Code of DVD and program into the DVD mode key.
Want more help? If you’re unable to add a device or want to learn about controlling
the volume on all devices using your remote, visit att.com/userguides. You can also
check the remote’s user manual provided at installation, or watch Help On Demand on
TV: Press MENU, select Help, then Help On Demand to see all program titles.
Visit a.com/uverse/newcustomer to learn more
Change your TV’s input selection to match
its video source
If you’re unable to see TV programs on your screen, first try pressing the TV/VIDEO
button on your remote control to change from Video 1 to Video 2 or Video 3. These
separate video inputs (Video 1, Video 2, and Video 3) must match the incoming video
source—the receiver, DVD player, or other device connected to the TV. If this doesn’t
solve the problem, depending on how your devices are connected, it may be that the
TV’s input selection does not correspond to the input of the AT&T U-verse® TV receiver.
See two examples of how to connect the AT&T U-verse HD-ready receiver to
your HDTV set below.
Check how your devices are connected to the TV
Every TV is different in the way the ports
are configured on the back of the T V and
in the way the menus are presented on
the TV screen. Most devices have ports
that require one or more of the cables
shown at right. The manuals for your
devices will have specific directions.
To connect your AT&T U-verse HD-ready
receiver to your HDTV set, the connection
is generally HDMI to HDMI (the highest
quality video/audio connection). You can
also use color-coded component RCA cables (some HDTV sets do not have an HDMI port)
that output audio/video signals from the receiver and plug into matching audio/video RCA
inputs on the back of your HDTV set.
If you’ve connected your TV input using Composite (yellow connector), S-Video, or
Coaxial, you won’t get an HD picture. HD is supported only via HDMI or Component
(red/green/blue). The same holds true for Dolby® Digital 5.1 surround sound, which is
available only via HDMI or TOS Link (optical). The Baseband (red and white connectors)
delivers sound only in stereo.
Check to see if the TV recognizes your video inputs correctly
Many newer TVs have an auto-detection system that will automatically detect everything
that’s connected to the various ports on the back of the TV. However, some TVs have to be
configured manually.
To change the video input selection manually, press TV/VIDEO on your remote control to
locate the video input menu for your specific TV.
The video input menu screen below shows checkboxes next to devices the TV is detecting.
This menu must match the inputs on the back of the TV where video components are
connected in order to correspond with Video 1, Video 2, or Video 3 on your remote
control. Follow the screen prompts to check/uncheck boxes for correct devices.
NOTE: Refer to your TV manufacturer’s guide to resolve issues specifically related to your TV
Find answers 24/7: a.com/uversesupport
HDMI cable
RCA cable
Coaxial cable
S-Video cable
.
23
Page 13

quick fix guide
Choose one of three easy ways to connect
your AT&T U-verse receiver to your TV
AT&T U-verse receiver output connector
L
VIDEO OUT
TO WALL
(VIDEO IN)
HDMI
NETWORK
Pb
Y
Pr
AT&T U-verse receiver output
HDMI
1
OPTICAL
S VIDEO
Some HDT Vs have a High-Definition Multimedia
Interface (HDMI) connector that provides the
digital and audio connection. This is the easiest
connection if your TV has an HDMI input port
NOTE: If your HDTV has an input port marked DVI
(Digital Visual Interface), you will need an HDMI-to DVI adapter and separate component RCA audio
connectors.
HDMI Input 1
Input connector on rear of TV
Color-coded component connectors
2
If your TV doesn’t have an HDMI or DVI input port, you can use color-coded
component video cables (Pr, Pb, and Y) for HD video signals. For audio, plug red
and white RCA connectors into the left/right audio input and output ports.
AT&T U-verse receiver output connectors
L
VIDEO OUT
TO WALL
(VIDEO IN)
HDMI
NETWORK
Pb
Y
Pr
Pr
OPTICAL
S VIDEO
PbPbY
AUDIO OUT
AUDIO OUT
LLR
R
R
TO TV
(VIDEO OUT)
TO TV
(VIDEO OUT)
POWER
USB
+12V
DC
POWER
USB
+12V
DC
Watch Help On Demand—tune to Channel
Get more out of your AT&T U-verse® service: Watch Help On Demand videos about
these topics on Channel 411, the Help Channel.
AT&T U-verse introduction
• Introduction to AT&T U-verse
• See how U-verse TV works!
• AT&T U-verse Voice
SM
Help with AT&T U-verse
service issues
• Remote control issues
• No picture
• No service—gear or cog error
• No service—red X or other error message
• Email issues
• Sound issues
• Picture quality issues—aspect ratio/HD
settings
• Picture freezing
• Wireless connectivity—issues with a PC
• Wireless connectivity—issues with a Mac®
• Voice issues
Understanding my AT&T U-verse bill
• AT&T U-verse billing
• AT&T U-verse online services &
paperless billing
AT&T U-verse digital video recorder
(DVR) & remote control
• How to use your DVR
• How to program your remote control
• Moving your AT&T U-verse equipment
• Equipment overview
• Remote control overview
• Total Home DVR®
• Remote control issues
AT&T U-verse features
• AT&T U-bar
• AT&T YP.com TV
• Games
• Public Education & Government
programming
• Media Share
• Multiview
AT&T U-verse how-to’s
• How to program your remote control
• How to use your DVR
• How to change channels
• How to use Program Guide
• How to use Picture-in-Picture
• How to use Search
• How to use Parental Locks
• How to use widescreen
• How to create favorite channels
• How to hide channels
• How to change languages
• How to record programs
• How to schedule recordings
• How to record series
• How to view recorded programs
• How to delete or cancel recordings
• How to use Web remote access
• How to order On Demand programs
• How to order PPV
• How to search for On Demand
programs
Internet & email
• Email issues
• Wireless connectivity—
issues with a PC
• Wireless connectivity—
issues with a Mac
AT&T U-verse VoiceSM
• Voice issues
• AT&T U-verse Messaging
• AT&T U-verse Voice
SM
Where’s my AT&T U-verse tech?
• Where’s my tech?
Pr
Pr Pb Y
Component Input 1 Audio Input 1
Y
Optical Input
R
L R
Input connectors on rear of TV
NOTE: Your hardware may be slightly different than pictured.
S-Video
3
If your TV has an S-Video port, you can connect your receiver to your TV using
an S-Video cable. For audio, you can use RCA cables or plug a single optical
cable into the optical ports.
Visit a.com/uverse/newcustomer to learn more
Visit Geing Started for online help!
Click att.com/startuverse to access step-by-step guidance and how-to tips at
our Getting Started page online. NOTE: AT&T U-verse online Help On Demand
videos require Windows Media® Player.
Questions?
Get answers 24/7 at att.com/uversesupport or talk live with an AT&T
representative. Or, download and install our free Troubleshoot & Resolve tool
at att.com/troubleshoot to manage your U-verse service online.
Sign up for free paperless billing! Conveniently store and retrieve up to 12
months of bills online while reducing your risk of identity theft. Log in now to your
online account or go to att.com/Ugreen and select Stop Paper Bills.
Find answers 24/7: a.com/uversesupport
25
Page 14

quick fix guide
F o r A dv an ce d Co nf ig ur at io n :
h t t p: // 19 2. 16 8. 1. 25 4
S y s te m Pa ss wo rd : 15 34 41 80 33
M a c A dd re ss : 00 21 7C 3C 79 F0
W i r e le ss N et wo rk K ey : 06 90 7 3 5 5 10
SN : 2 1 0 81 1 00 0 07 9
As semb ly N umb er 420 0-00 105 8- 00 0
LD
RE V: 4 8
F o r A dv an ce d Co nf ig ur a t i o n:
h t t p: // 19 2. 16 8. 1. 25 4
S y s te m Pa ss wo rd : 15 34 41 80 3 3
M a c A dd re ss : 00 21 7C 3C 79 F0
W i r e le ss N et wo rk K ey : 0 6 90 73 55 10
AT&T U-verse
High Speed Internet
Assure reliable security for your wireless
home network
The 10-digit number printed inside brackets on your residential/wireless gateway is
the encryption code (“pass key” or “Wireless Network Key”) needed to connect your
computers to the gateway. WPA (Wi-Fi Protected Access) is the underlying security
technology for the Wi-Fi (802.11b/g) standard on the residential/wireless gateway.
Location of
your gateway’s
10-digit Wireless
Network Key code
AT&T U-verse Voice
SM
Create sub account voice mailboxes online
Create up to eight sub account mailboxes, one for everyone in the family—
each with a unique PIN, greeting, and notification options.
Go to att.com/myuverse.
1
Log in with your AT&T U-verse® member ID (email address) and password.
2
Locate the AT&T U-verse Voice section.
3
Click on the U-verse Voice Home Page.
4
Go to the Voicemail Settings tab and select Voicemail Setup.
5
Select Create New Voice Mailbox to launch the voicemail setup wizard and follow
6
the instructions for setup.
Link your wireless number and your AT&T U-verse Voice mailbox
See page 17 for details.
Change your PIN (personal identification number)
See page 16 for details.
Get fast, affordable tech support
AT&T ConnecTech® offers installation, setup, and tech support for your wireless network,
regardless of your service provider or product manufacturer. Call 1.800.270.5103 to find
out more. Plus, get a complimentary PC health check! Visit pccheck.att.com/catalog.
Mac® OS X users: You may need to enter the “$” character on the Wireless Network Key
(for example, $0690735510). For directions on connecting Mac computers via USB cable, visit
att.com/startuverse and click Setup a Wireless Connection under U-verse Internet.
Connect more computers to your wireless
home network
You can connect more computers by Ethernet
or wirelessly.
NOTE: You will need to use your 10-digit Wireless
Network Key code. (See illustration above.)
> Connect an Ethernet cable from any available
Ethernet port on the residential/wireless gateway
to your computer’s Ethernet port.
> Connect wirelessly with a wireless-enabled
notebook or a computer with an 802.11b/g wireless
network adapter installed.
If your PC does not have built-in wireless capability
Install and configure your wireless adapter according to the manufacturer’s instructions.
Enter the network name—it’s the word “2WIRE” (in all capital letters), followed by
the last three digits of the gateway serial number (for example, 2WIRE079)—and the
encryption code or Wireless Network Key. (See the illustration above for the Wireless
Network Key location.)
Ethernet cable
Questions?
See the complete AT&T U-verse TV, High Speed Internet, and Voice Features
Guides and more user guides at att.com/userguides.
Here are other ways you can quickly learn more:
> Tune to video tutorials on Help Channel 411
> Print a channel guide at att.com/channellineup
> Click att.com/uversesupport
> Chat support.att.com/chat
> Call 1.800.288.2020, then say “Order AT&T U-verse services,” “Pay my bill,”
or “AT&T U-verse technical support”
> For current programming, visit att.net/uverseonline
Esta práctica guía rápida también está en español en att.com/userguides
(en inglés). Para ver videos útiles en español por Internet, visite
att.com/videosenespanol.
More resources
Visit these links for news, customer care, and AT&T community discussions:
facebook.com/uverse youtube.com/att
twitter.com/attcustomercare att.com/uversecommunity
Mac and Macintosh are registered trademarks of Apple Inc .
Visit a.com/uverse/newcustomer to learn more
Find answers 24/7: a.com/uversesupport
27
Page 15

©2011 AT&T Intellectual Property. All right s reserve d. AT&T, the AT&T logo and all other AT&T marks
containe d herein are trademarks of AT&T Intelle ctual Property and/or AT&T affiliate d companies.
ATT102410735-3 (6/11)
 Loading...