

Page 1
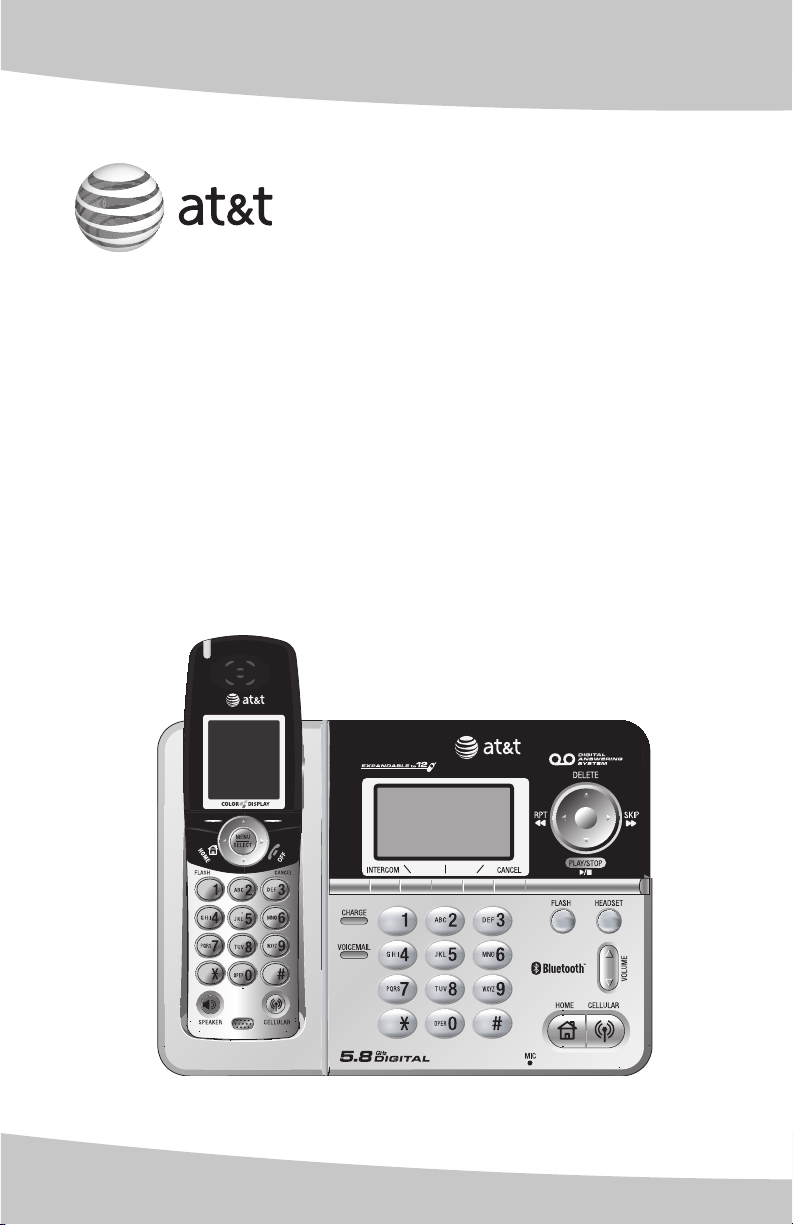
User’s manual
EP5632/EP5632-2
5.8 GHz digital cordless
answering system
with BLUETOOTH®
wireless technology
Page 2

Congratulations
on your purchase
of this AT&T product.
Before using this AT&T product, please
read the Important safety information
on pages 100-102 of this manual.
Please thoroughly read this user’s
manual for all the feature operations
and troubleshooting information necessary
to install and operate your new
AT&T product. You can also visit our
website at www.telephones.att.com or call
1 (800) 222-3111.
In Canada dial 1 (866) 288-4268.
Model #: EP5632/EP5632-2
Type: 5.8GHz cordless telephone answering system
with Bluetooth wireless technology
Serial #:
Purchase date:
Place of purchase:
Both the model and serial number of your AT&T product can be
found on the bottom of the telephone base.
Save your sales receipt and original packaging in case it is necessary
to return your telephone for warranty service.
© 2007 Advanced American Telephones. All rights reserved.
AT&T and the AT&T logo are trademarks of AT&T Knowledge Ventures,
licensed to Advanced American Telephones. Printed in China.
The BLUETOOTH® word mark and logos are owned by Bluetooth SIG, Inc. and any use of
such marks by Advanced American Telephones and its parent, VTech Holdings Limited,
is under license. VTech Holdings Limited is a member of Bluetooth SIG, Inc. Other
trademarks and trade names are those of their respective owners.
Page 3

Before you begin
you must install and charge the battery,
see page 14 for Battery installation instructions.
Please read and follow these instructions carefully:
• Use only the supplied rechargeable battery or
replacement battery.
• Observe the proper polarity orientation between the
battery and handset during the battery installation.
• Do not dispose the battery in a fire. Check with
local codes for special disposal instructions.
• Do not open or mutilate the battery. Released
electrolyte is corrosive and may cause damage to
the eyes or skin. It may be toxic if swallowed.
• Exercise care in handling batteries in order not to
create a short circuit with conductive materials such
as rings, bracelets, and keys. The battery or
conductor may overheat and cause harm.
• Charge the supplied battery or replacement battery
with this product only in accordance with the
instructions and limitations specified in this manual.
• Do not disassemble your telephone. There are no userserviceable parts inside. Refer to qualified service
personnel for servicing.
Page 4
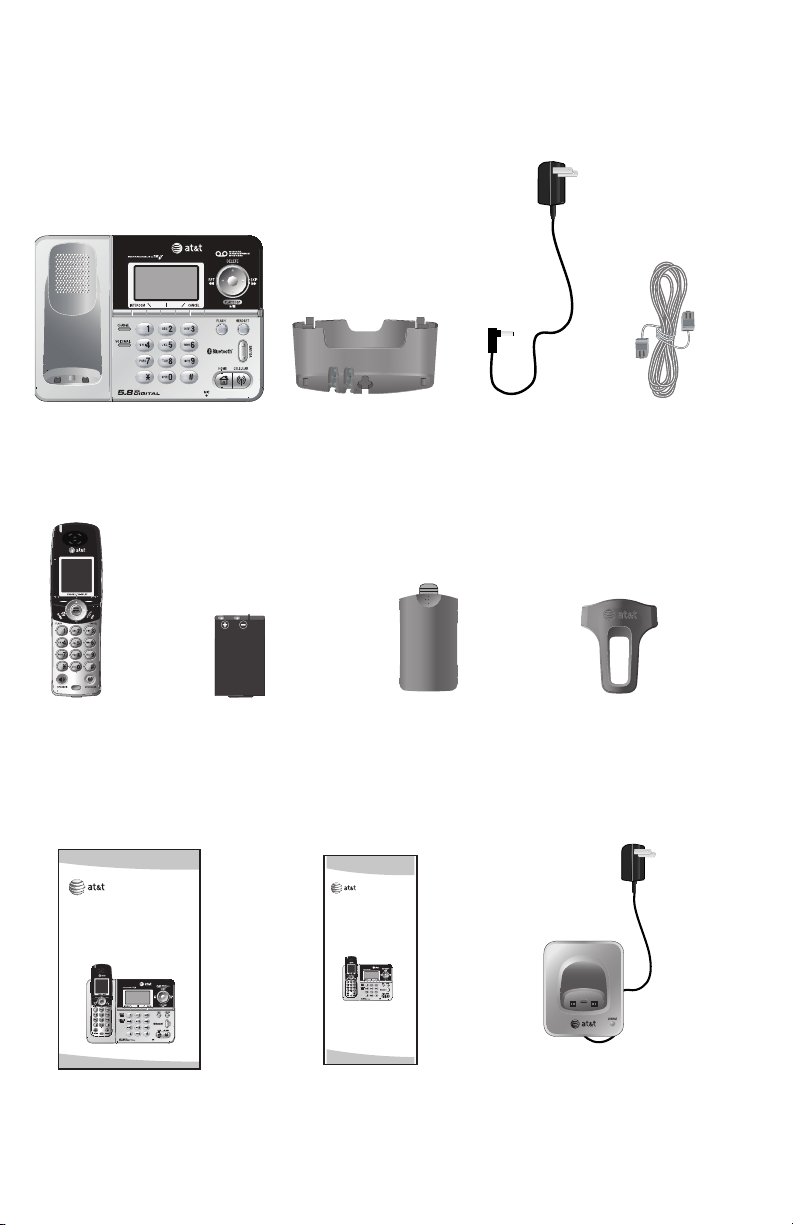
Parts checklist
User’s manual
EP5632/EP5632-2
5.8 GHz digital cordless
answering system
with BLUETOOTH®
wireless technology
BA
TTER
Y
PA
CK
80-5808-00-00
Quick start guide
EP5632/EP5632-2
5.8 GHz digital cordless
answering system
with BLUETOOTH®
wireless technology
Your new AT&T EP5632/EP5632-2 telephone system includes:
Telephone base
Cordless
telephone
handset
(1 for EP5632)
(2 for EP5632-2)
Mounting bracket
(attached to the
bottom of the
telephone base)
Handset battery
(1 for EP5632)
(2 for EP5632-2)
Power adapter Telephone
Handset battery
compartment
cover
(1 for EP5632)
(2 for EP5632-2)
line cord
Belt clip
(1 for EP5632)
(2 for EP5632-2)
User's manual
Quick start guide
Charger and power
adapter for additional
handset
(EP5632-2 only)
Page 5

Table of contents
Getting started
Quick reference guide .....................2
Handset status icons .......................4
Telephone base status icons .......5
Handset main menu .........................6
Telephone base main menu..........7
Installation setup................................8
Telephone base installation..........9
Desktop to wallmount
installation options ........................10
Wallmount to desktop
installation ......................................... 12
Battery installation &
charging .............................................. 14
Belt clip & optional headset ..... 15
Expanding your telephone
system ..................................................16
Adding new handsets
(optional) ...........................................17
Spare battery (optional) .............. 18
Bluetooth
Introducing BLUETOOTH ............. 19
Glossary of terms. .......................... 20
Bluetooth at Glance ...................... 21
Bluetooth Setup .............................. 22
Setup Cellular ............................. 23
Setup Headset ............................ 24
Managing your devices ................25
System setup
Handset Settings ............................. 30
Handset Ringers ..............................35
Handset Pictures ............................. 39
Handset Animations ...................... 40
Telephone base Settings .............41
Telephone base Ringers .............. 46
Answering System settings........49
Telephone operation
Telephone operations ...................55
Make a HOME call..........................56
CELLULAR calls .............................. 58
Volume control ................................ 60
Mute and Hold ................................. 61
Using HOME and
CELLULAR ..........................................62
Conferencing .....................................64
Intercom calls ................................... 66
Directory
Directory introduction .................. 67
Create new directory
entry ..................................................... 68
Search directory entries ............. 71
Edit directory entries .................... 72
Deleting directory entries ..........73
Call log
Caller ID information .....................74
Call log introduction .....................75
Memory match .................................76
Review call log.................................77
Dialing a call log entry ................ 78
Edit dialing options ........................ 78
Saving and deleting entries.......79
Play recorded messages ............. 80
Clear missed calls .......................... 81
Redial
Redial list ............................................82
Saving entries ................................... 83
Dialing and editing redial
entries .................................................. 84
Deleting entries ...............................85
Answering System
Operations
Answering system operations ..86
Call Screening .................................. 88
Call Intercept ....................................88
Delete messages ............................. 88
Record Memo ................................... 89
Remote Access ................................ 90
Appendix
Alert tones ......................................... 91
Troubleshooting .............................. 92
Important safety information....99
FCC Part 68 and ACTA ............. 102
FCC Part 15 .................................... 104
Limited warranty .......................... 105
Index .................................................. 108
Technical specifications ............ 111
Remote access wallet card ..... 112
Page 6
Getting started
Quick reference guide
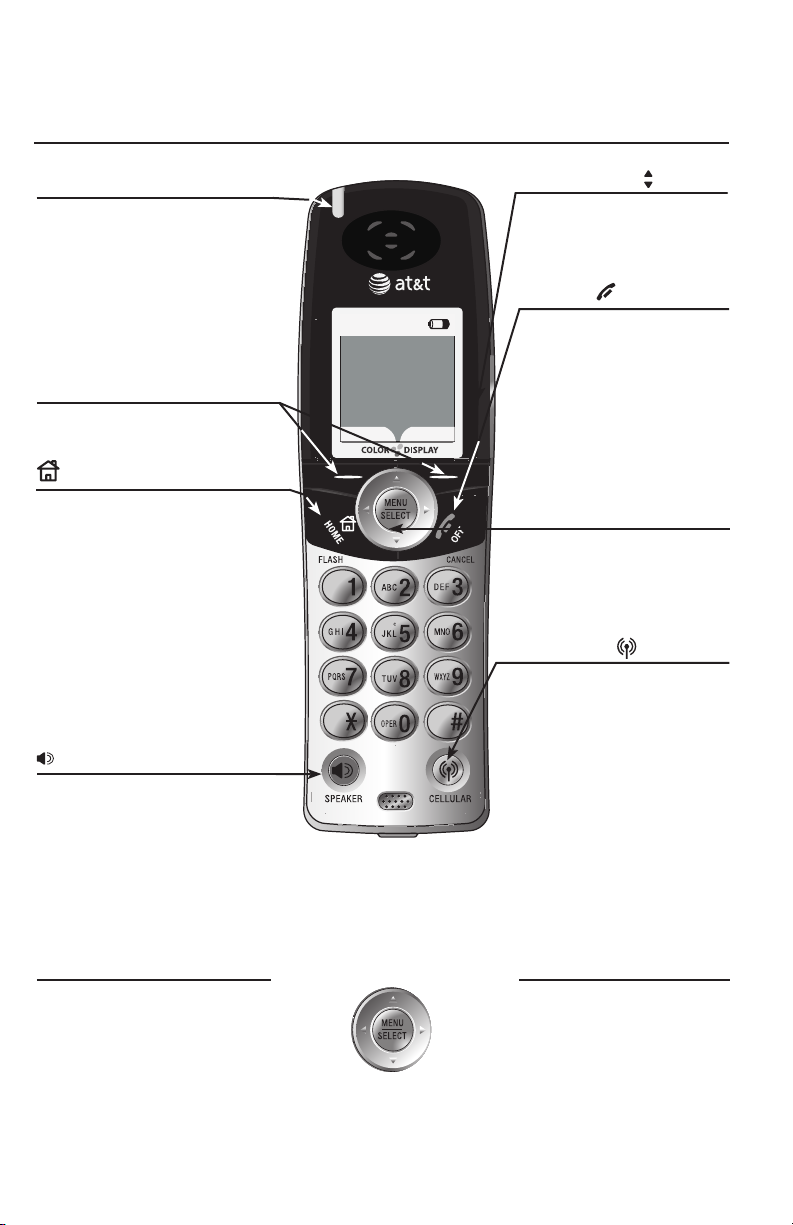
Handset
Status light
Flashes rapidly during an
incoming call.
Flashes slowly when there
is a new voice mail message
(page 33) or new message in
the answering system
(page 86).
Softkeys (2)
Press to select a menu item
displayed just above the key.
HOME/FLASH
Press to make or answer a
HOME call.
Flashes rapidly when there is rapidly when there is
an incoming HOME call.
Flashes slowly when a HOME
call is on hold.
During a HOME call, press to
receive an incoming call if
call waiting is activated
(page 57).
SPEAKER
Press to activate the
handset speakerphone. The
speakerphone is on When
the SPEAKER key is lit.
Press to resume normal
handset use (page 55).
12 :00A M
HAN DSE T 1
RED IAL
CAL LER ID
VOLUME
Press to increase or
decrease handset listening
volume while on a call.
OFF/CANCEL
During a HOME or
CELLULAR line call, press
to end the call.
While in a menu, press to
cancel an operation, back
up to the previous menu,
or exit the menu display
MENU/SELECT
Press to enter the main
menu (page 6). Press to
select, save, or set a desired
setting.
CELLULAR
Press to make or answer a
CELLULAR call.
Flashes rapidly when there
is an incoming CELLULAR
call.
Flashes slowly when a
CELLULAR call is on hold.
NavKeys (in brackets)
Press the UP, DOWN, LEFT
or RIGHT NavKeys to navigate
through the menus, highlight
items, and change settings.
Int'com
(LEFT)
Settings
(UP)
Directory
(DOWN)
2
Msgs.
(RIGHT)
Quick launch keys
When in idle mode, press
one of the NavKeys
to launch a handset feature:
• Settings (UP)
• Directory (DOWN)
• Intercom (LEFT)
• Messages (RIGHT)
Page 7
Getting startedGetting started
12:00 AM
MENU
CID
Quick reference guide
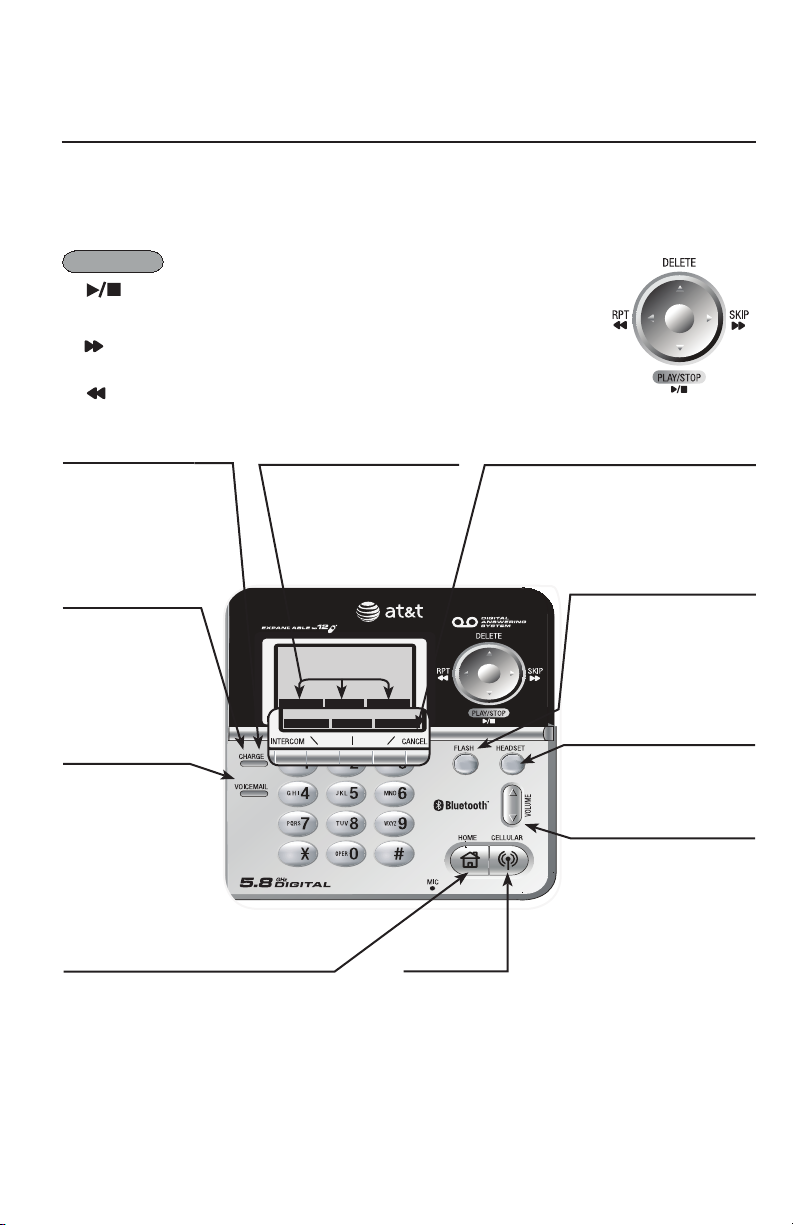
Telephone Base
Answering system keys and NavKeys (in brackets)
When in idle mode, press the answering system keys to operate the answering system.
When in a menu, press the UP, DOWN, LEFT or RIGHT NavKeys to navigate through the
menus, highlight items, and change settings.
PLAY/STOP
SKIP(RIGHT)
(DOWN)
Press to play or stop playing messages.
Flashes when there are new answering system
messages.
Press to skip to the next message.
RPT (LEFT)
DELETE (UP)
INTERCOM
Press to locate
a handset or
to initiate an
Press to repeat a message or twice to hear the
previous message.
Press to delete a recorded message.
SOFTKEYS (3)
Press to select a menu
item displayed just
above the key.
intercom (page
66).
CHARGE
On steady when
the handset is
properly positioned
to charge in the
telephone base.
12:00 AM
12:00 AM
REDIAL
redial
VOICEMAIL
Flashes when
you have new
voice mail on
your HOME line
(requires voice mail
service from your
local telephone
company).
HOME
Press to make or answer a HOME
call using the speakerphone.
On steady when in use.
Flashes rapidly when there is an
incoming HOME call.
Flashes slowly when a HOME call is
on hold.
MENU
CANCEL
Press to cancel an operation and/or
return to a previous menu.
Press and hold to return to the idle
screen.
FLASH
During a HOME line
call, press to receive
an incoming call if call
waiting is activated
CID
(page 57).
HEADSET
Press to use a Bluetooth
headset on the HOME
line.
VOLUME
Press to adjust the
listening volume on
the speakerphone or a
connected Bluetooth
headset.
CELLULAR
Press to make or answer a CELLULAR call
using the speakerphone.
On steady when in use.
Flashes rapidly when there is an incoming
CELLULAR call.
Flashes slowly when a CELLULAR call is on
hold.
3
Page 8

Getting started
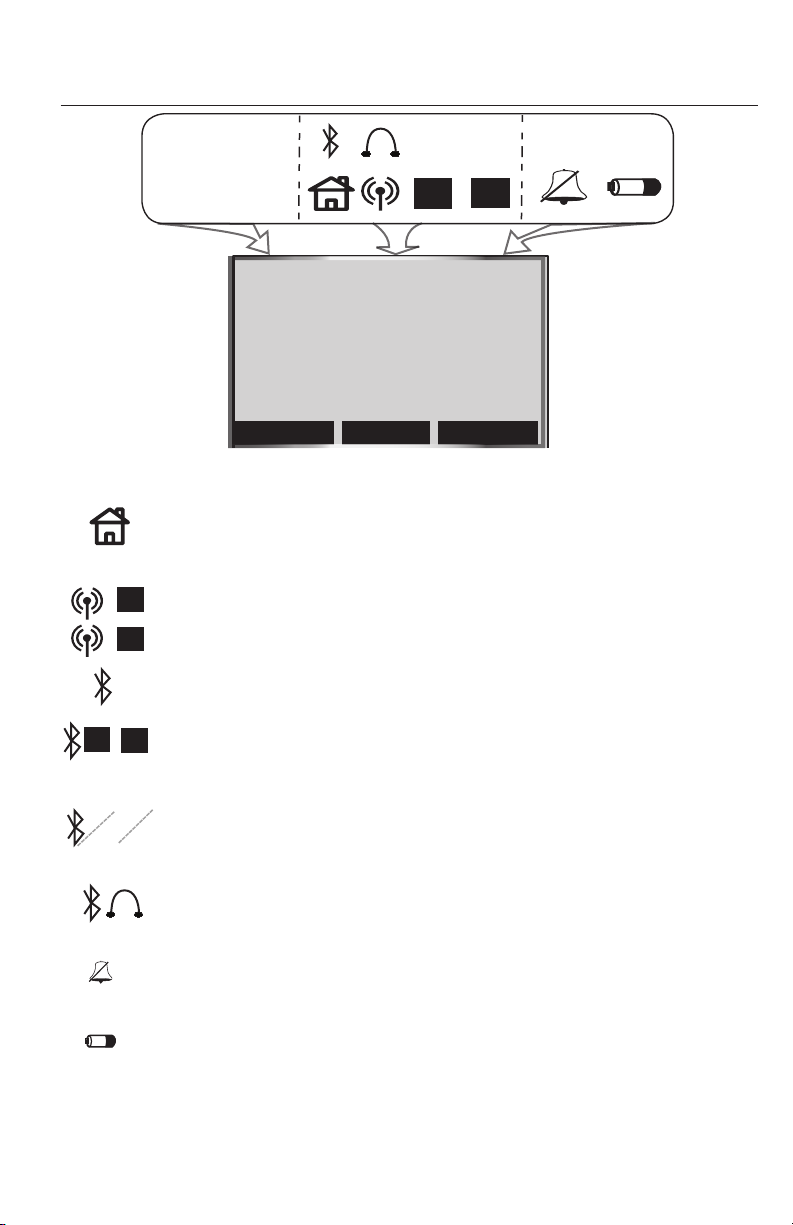
Handset status icons
12:00AM
12:00AM
HANDSET 1
2
1
12:00AM
1
2
2
1
2
1
REDIAL
Time - indicates the handset time.
New answering system message - alternates with the time when you
have a new answering system message.
New voice mail message - alternates with the time when you have a
new voice mail message.
HOME line - on steady when the HOME line is in use. Flashes slowly
when a HOME call is on hold. Flashes rapidly when there is an incoming
HOME call.
CELLULAR (cell phones 1 or 2) - depending on which cell phone is
active, on steady when the CELLULAR line is in use. Flashes slowly when
a CELLULAR call is on hold. Flashes rapidly when there is an incoming
CELLULAR call.
Bluetooth Active Devices - the telephone base is searching for the
Bluetooth device(s) on the Active Devices list (page 27).
Connected Active Devices - indicates that the Bluetooth device 1 and/
or 2 are connected and on the Active Devices list. On steady means that
the device is connected. Flashes when it is in the process of connecting
to the device.
Disconnected Active Devices - a line through the device number (1
and/or 2) indicates the device is disconnected from the telephone base.
Wireless Bluetooth headset in use on the HOME line. Flashes when a connected Bluetooth headset
is available to answer an incoming HOME call.
Ringer off - on steady when the HOME, CELL1, and CELL2 ringers are
off. Flashes when one or two of the HOME, CELL1, or CELL2 ringers
are off.
Battery status - shows the approximate battery charge level. Flashes
red when the battery is low and animates when charging.
CALLER ID
on steady when a Bluetooth headset is
4
Page 9
Getting startedGetting started
Telephone base status icons
ANS. OFF
1
12:00 AM
2
ANS. OFF
1
2
2
1
1
2
RED IAL
Answering system off - indicates that the answering system will not
answer incoming calls (page 50).
HOME line - on steady when the HOME line is in use. Flashes slowly
when a HOME call is on hold. Flashes rapidly when there is an incoming
HOME call.
CELLULAR (cell phones 1 or 2) - depending on which cell phone is active,
on steady when the CELLULAR line is in use. Flashes slowly when a
CELLULAR call is on hold. Flashes rapidly when there is an incoming
CELLULAR call.
Bluetooth Active Devices - the telephone base is searching for the
Bluetooth device(s) on the Active Devices list (page 27).
Connected Active Devices - indicates that the Bluetooth device 1 and/
or 2 are connected and on the Active Devices list. On steady means that
the device is connected. Flashes when it is in the process of connecting
to the device.
Disconnected Active Devices - a line through the device number
(1 and/or 2) indicates that the device is disconnected from the telephone
base.
Wireless Bluetooth headset in use on the HOME line. Flashes when a headset is available to answer
an incoming HOME call.
Ringer off - on steady when the HOME, CELL1, or CELL2 ringers are
off. Flashes when one or two of the HOME, CELL1, or CELL2 ringers are
off.
Battery status (optional, see page 18) - On steady when fully charged.
Animates when charging. Flashes in the event of a power failure when
the spare battery is discharging.
MEN U
CID
on steady when a Bluetooth headset is
5
Page 10
Getting started
Handset main menu
To enter the main menu:
1. Press MENU/SELECT when the handset is in idle mode.
2. Press the UP and DOWN Navkeys to select a handset feature menu, then
press MENU/SELECT to enter that menu.
To return to the idle mode, press and hold OFF/CANCEL.
Directory allows you to store and
search for names and numbers.
Directory
page 67
Di rec tory
Alice
Amy
Chris
Deborah
Jenny
Kristen
FIN D
1
NEW
Call Log allows you to review your
most recent incoming calls.
Call Log
page 75
Ca ll Log
Cha rli e J ohnson
1-888-883-2445
Jan 9 10:39AM
HOM E
OPT IONS
DEL ETE
Messages allows you to review
your answering system messages.
Messages
page 86
Me ssages
0 N ew Me ssages
10 Old Messages
PLAY
DEL ETE
Settings allows you to change
your handset settings.
Settings
Settings
page 30
Se ttings
Se t Time
Edit Handset Name
Show Handset Name
Keypad Tone
Language
Ringers allows you to setup ringers
for the HOME and CELLULAR lines.
Ringers
page 35
Rin gers
Rin ger for HOME
Rin ger for CELL 1
Rin ger for CELL 2
Record New R ing er
Pictures allows you to set the
wallpaper.
Pictures
page 39
Pic tures
SET
Intercom allows you to page the
telephone base and other handsets.
Intercom
page 66
In tercom
Gl obal Pag e
BAS E
HAN DSET 1
Animations allows you to choose
animated wallpapers.
Ani matio ns
Animations
page 40
6
Animations
SET
Page 11
Getting startedGetting started
Telephone base main menu
To enter the main menu:
1. Press the MENU softkey when the telephone base is in idle mode.
2. Press the UP and DOWN Navkeys to highlight a menu item, then press
the SELECT softkey to enter that menu.
To return to the idle mode, press and hold CANCEL.
Main Menu allows you to review
and setup features and settings.
Main Menu
Directory
Call Log
Answering System
Sel ect
page 7
Directory allows you to store and
search for names and numbers.
Directory 1
John Smith
Mary Brown
FIN D
page 67
Sel ect
Call Log allows you to review
your most recent incoming calls.
NEW
Call Log
Charlie johnson
1-888-883-2445
Jul 4 6:15pm
HOME
OPTIONS
page 75
DELETE
Answering System allows
you to review and change the
answering system settings.
Answering System
Answer On/Off
Announcement
Record Memo
Sel ect
page 86
Bluetooth allows you to set up and
manage your Bluetooth device(s).
Bluetooth
Set up Cellular
Set up Headset
Active Devices
Sel ect
page 22
Settings allows you to change the
telephone base settings.
Settings
Set Date
Set Time
Keypad Tone
Sel ect
page 41
Ringers allows you to setup ringers
for the HOME and CELLULAR lines.
Ringers
Ringer for HOME
Ringer for CELL1
Ringer for CELL2
Sel ect
page 46
Register Hansdet allows you to
register a new handset EP562
(purchased separately).
Main Menu
Settings
Ringers
Register Handset
Sel ect
page 17
7
Page 12
Getting started
Intercom
Intercom
Intercom
Intercom
®
In
te
rc
om
In
te
rc
om
In
te
rc
om
®
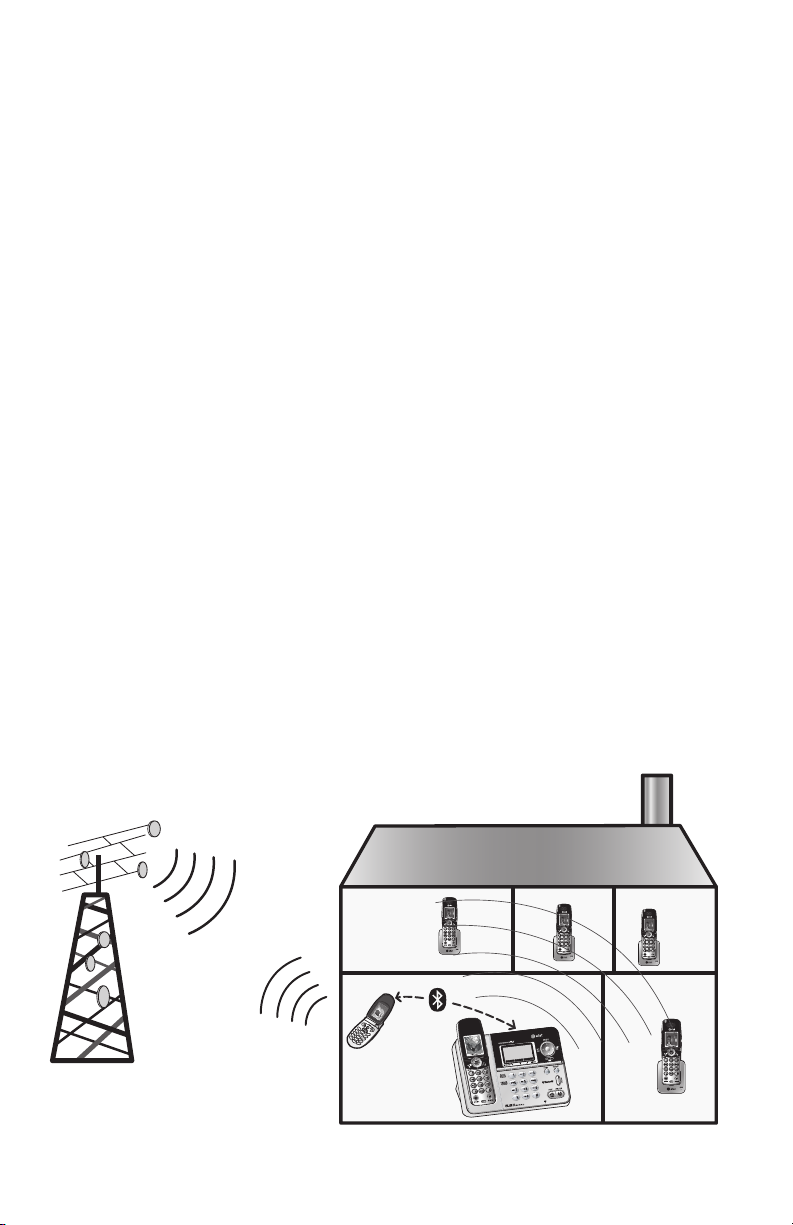
Installation setup
Install the telephone base close to a telephone jack and a power outlet not
controlled by a wall switch. The telephone base can be placed on a flat surface
or vertically mounted on the wall (see page 10). For optimum range and better
reception, place the telephone base in a central and open location.
Depending on the environmental conditions, make sure that your Bluetooth
enabled cellular phone is within 12 feet of where you install the telephone
base in order to maintain a reliable connection between your Bluetooth cell
phone, telephone base, and cell tower (see below).
Avoid placing the telephone base too close to:
• Communication devices such as: personal computers, computer routers,
television sets, VCRs, wireless routers (wireless broadband, Wi-Fi, or 802.11)
or other cordless telephones.
• Excessive heat sources.
• Noise sources such as a window with traffic outside, motors, microwave
ovens, refrigerators, or fluorescent lighting.
• Excessive dust sources such as a workshop or garage.
• Excessive moisture.
• Extremely low temperature.
• Mechanical vibration or shock such as on top of the washing machine or
work bench.
Cell tower
Cell phone
8
Telephone base
Page 13
Getting startedGetting started
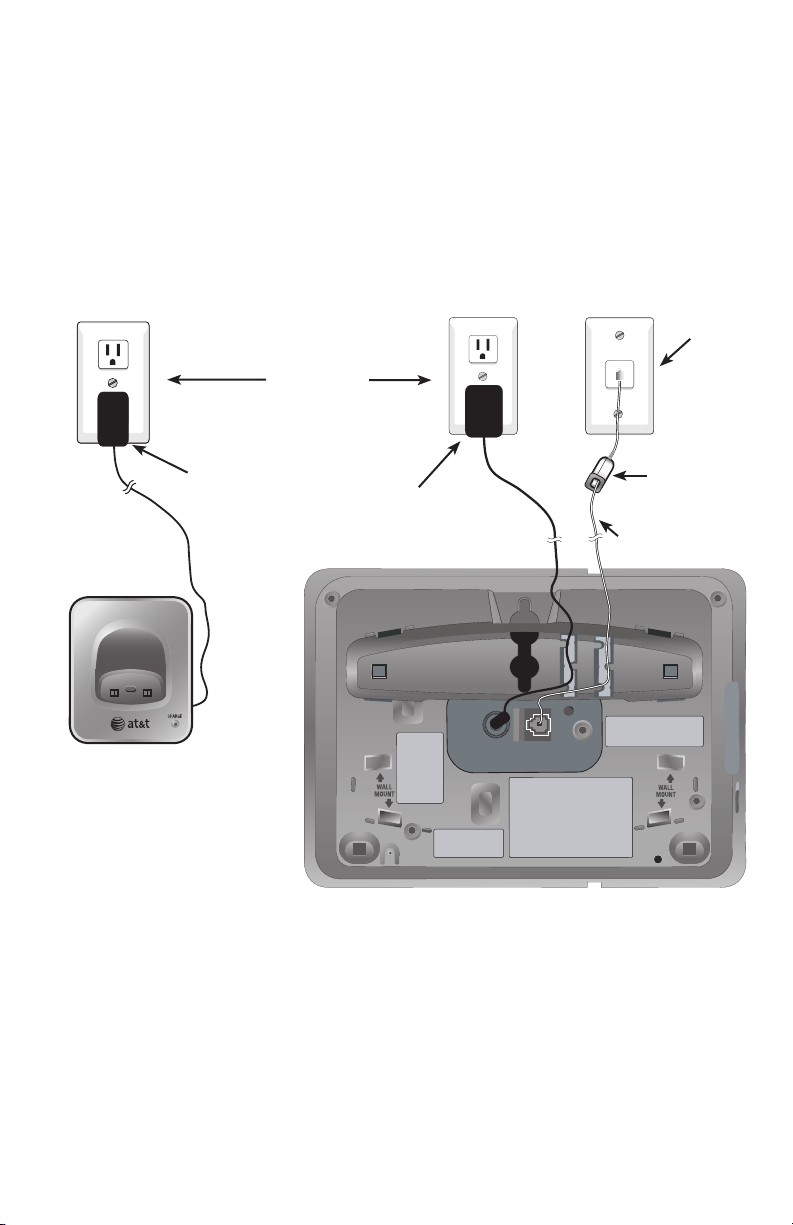
Telephone base installation
Install the telephone base as shown below. Make sure that the electrical outlet
is not controlled by a wall switch. Also, if you receive high speed internet
through your telephone line (commonly referred to as DSL), install a DSL filter
to the telephone line between the telephone base and the telephone wall jack.
Contact your DSL service provider for more information about DSL filters.
Telephone
wall jack
Electrical
outlet not
controlled
by a wall
switch
Additional
charger power
adapter for
the EP5632-2
Power adapter
DSL filter
For DSL users
(not included)
Telephone line cord
Additional
charger for
the EP5632-2
Telephone base with mounting
bracket installed for desktop use
IMPORTANT INFORMATION
1. Use only the power adapter supplied with this product. To order a
replacement power adapter, visit our website at www.telephones.att.com,
or call 1 (800) 222-3111. In Canada dial 1 (866) 288-4268.
2. The power adapter is intended to be correctly oriented in a vertical or floor
mount position.
9
Page 14
Getting started
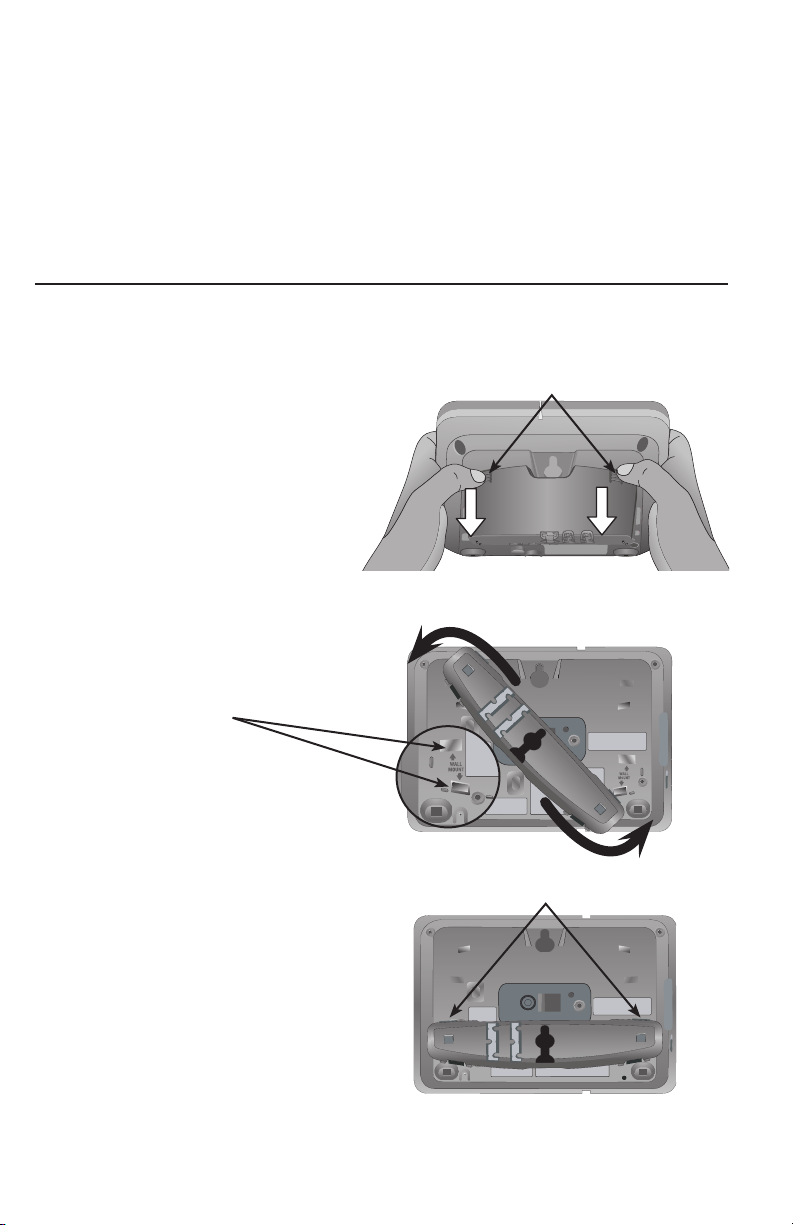
Installation options
The telephone base comes with the mounting bracket already installed for
desktop use. If wall mounting is desired, a telephone outlet wall mounting
plate with mounting studs is required. This mounting plate with studs may be
available for purchase from any hardware or consumer electronics retailers
and may require professional installation.
Desktop to wall mount installation
To install the telephone base in the wall mount position, make sure that you
first unplug all cords connected to the telephone base before you begin.
Tabs
1. Press on the tabs and
remove the bracket.
Desktop position
2. R o ta t e th e bra c ket
to the wa l l moun t
positio n, indicated by
the engravings.
3. Insert the center tabs
in first, then press the
bracket downwards until
the bracket clicks into
place and is secure.
Center tabs
Wall mount position
10
Page 15

Getting startedGetting started
Installation options
Desktop to wall mount installation (continued)
4. Plug the telephone line
cord and power adapter
plug into the telephone
base and place the
co rds in the bracket
grooves.
5. Plug the power adapter
and telephone line cord
into the wall outlets,
then align the mounting
studs on the telephone
outlet plate with the
mounting holes on the
bracket.
6. Place the te l ephone
base mounting holes
just above the mounting
studs, then s lide the
telephone base down
until it is secure.
Bracket grooves
Mounting holes
2
1
DSL filter
(for DSL users,
see page 9)
Mounting
studs
11
Page 16
Getting started
Installation options
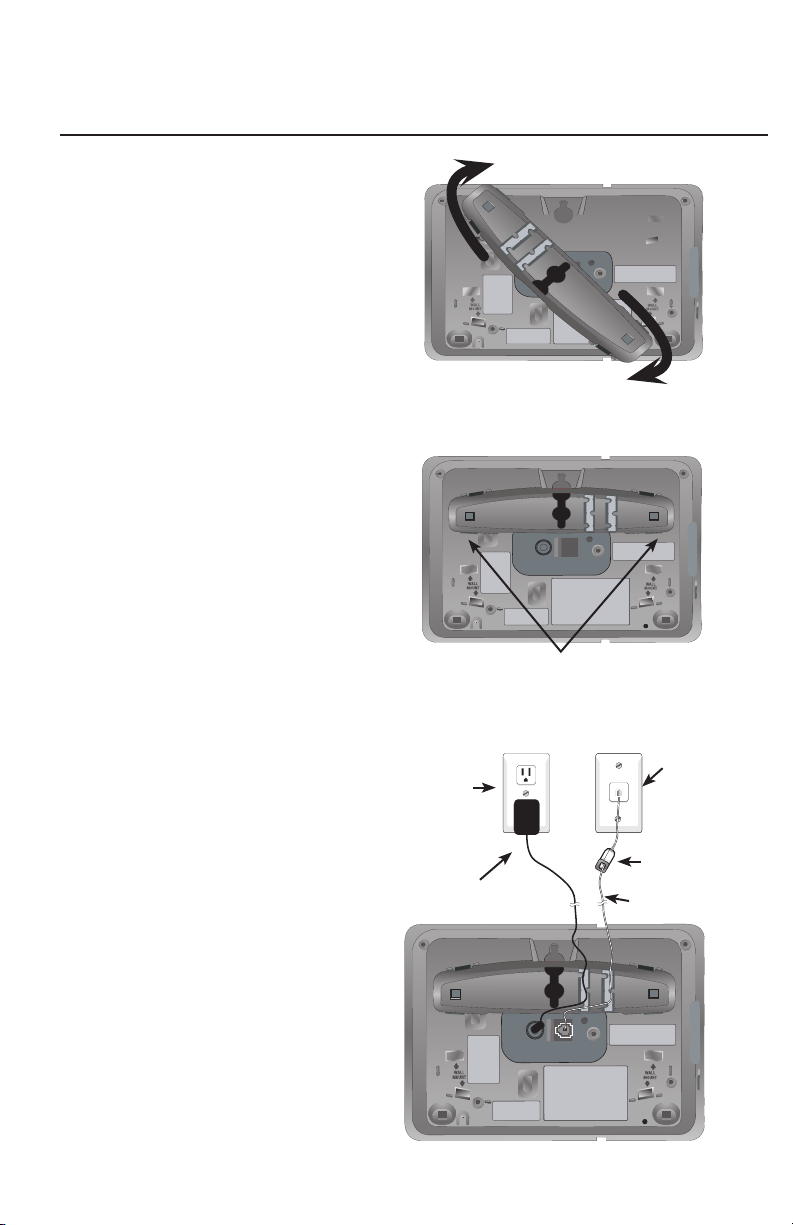
Wall mount to desktop installation
To change the telephone base from the wall mount position to desktop
position, make sure that you first unplug the power adapter and telephone
line cord from the wall outlets before you begin.
1. Slide the telephone base
upwards, then pull the
tel e phone base away
from the wall off of the
mounting studs.
2. Remove the telephone
line c o rd and power
adapter plug from the
telephone base.
1
2
Mounting
studs
3. Press on the outer tabs
to remove the bracket
fro m the tele p h on e
base.
Wall mount position
Outer tabs
12
Page 17
Getting startedGetting started
Installation options
Wall mount to desktop installation (continued)
4. Rotate the bracket to the
desktop position.
5. First insert the center
bracket tabs, then press
the bracket down w ards
unt il the bracket clicks
into place.
6. Plug the telephone line
cord into the telephone
base and telephone wall
jack, then plug the power
adapter plug into the
telephone base and to an
electrical wall outlet not
controlled by a wall switch
(see page 9).
Electrical
outlet not
controlled by
a wall switch
Power adapter
Desktop position
Center tabs
Telephone line
Telephone
wall jack
DSL filter
For DSL
users
(not included)
cord
13
Page 18
Getting started
BA
TTER
Y
PA
CK
80-5808-00-00
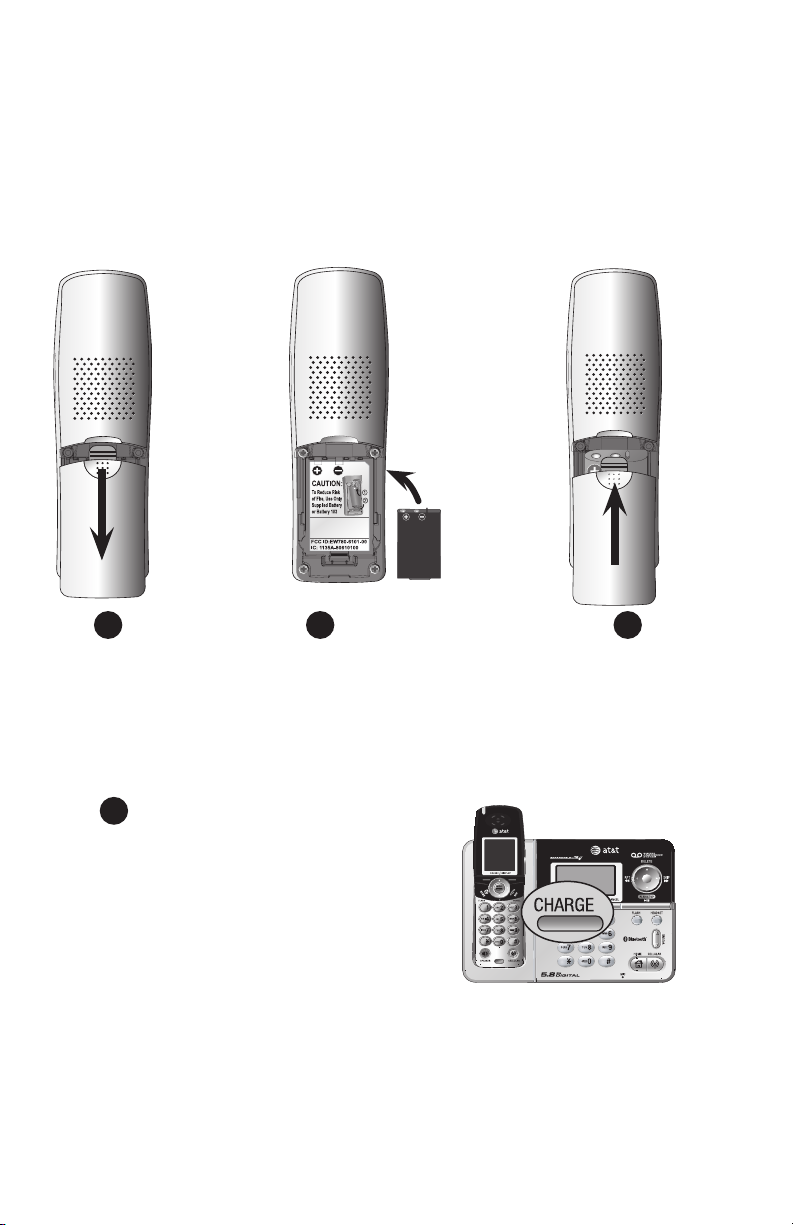
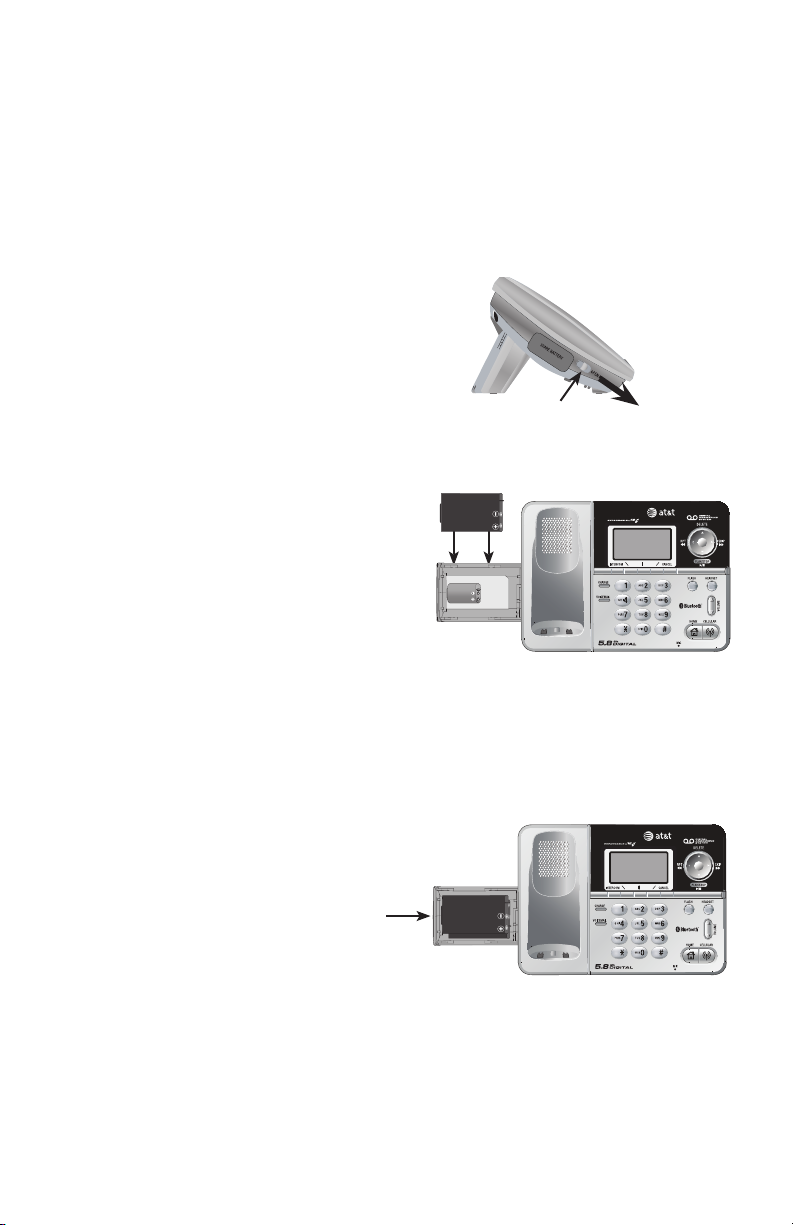
Battery installation & charging
Install the battery as shown below. After installing the battery, you can make
and receive short calls, but replace the handset in the telephone base or
additional charger when not in use. For optimal performance, charge the
handset battery for at least 16 hours before use. When fully charged, the
handset battery provides approximately five hours of talk time and three days
of standby time.
Step 1
Press the tab and
slide the battery
compartment
cover downwards.
Step 2
Insert the supplied battery as
indicated. Insert the top edge
(contacts and tab) in first,
then push downwards on the
lower portion of the battery.
Step 3
Align the cover flat
against the battery
compartment, then
slide it upwards
until it clicks into
place.
Step 4
Charge the handset face up in telephone
base, or place the handset in the
additional charger (EP5632-2 only). The
CHARGE light will be on when charging.
IMPORTANT INFORMATION
1. Use only the battery supplied with this product. To order a replacement
or spare battery (AT&T model 103, part number 89-0429-00-00) or
equivalent, visit our website at www.telephones.att.com, or call
1 (800) 222-3111. In Canada dial 1 (866) 288-4268.
2. See the Troubleshooting section on page 92 for charging issues.
14
Page 19
Getting startedGetting started
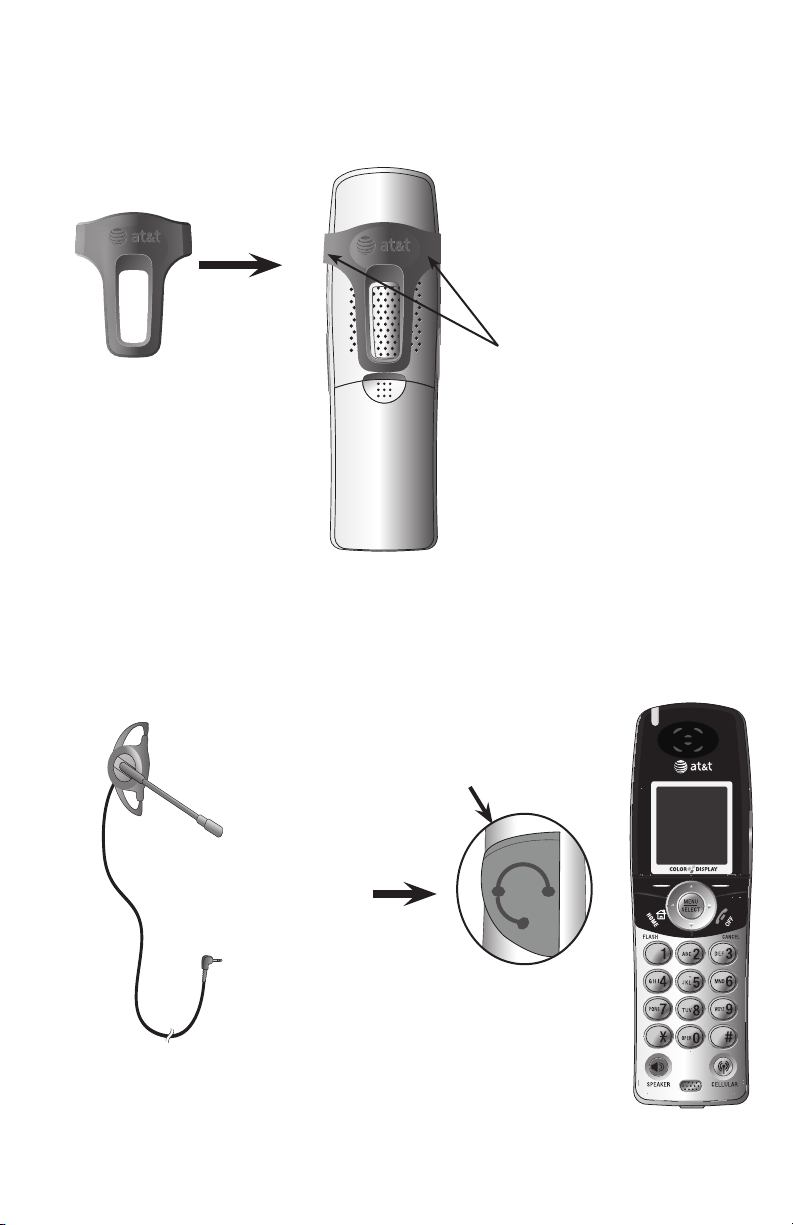
Belt clip & optional headset
Install belt clip as shown below, if desired.
Snap the belt
clip into the
notches on
both sides of
the handset.
For handsfree headset conversations, use any industry standard 2.5 mm
headset (purchased separately). For best results, use an AT&T 2.5 mm headset.
To purchase a headset, visit our website at www.telephones.att.com or call
1 (800) 222-3111. In Canada, dial 1 (866) 288-4268.
Lift the rubber
flap here.
Plug a 2.5 mm
headset into the
jack on the side of
the handset.
To release the belt clip from
the handset, press on both
flaps of the belt clip (as
shown).
Pull and unlock one flap
from the notch first before
detaching the whole belt
clip from handset.
15
Side of the
handset
Page 20
Getting started
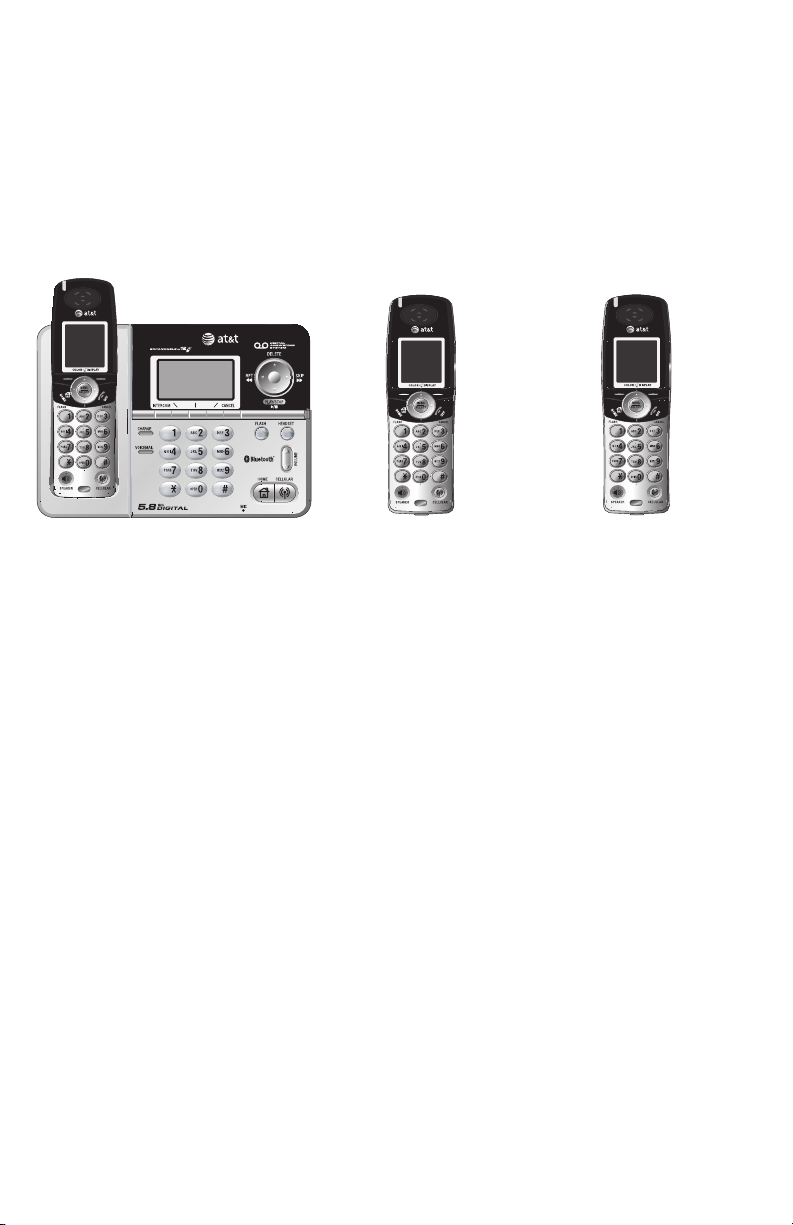
Expanding your telephone system
Your new AT&T EP5632/EP5632-2 telephone system can accommodate up to
12 cordless handsets. You can add new handsets to your telephone system
(EP562 purchased separately), but each handset must be registered with
the telephone base before use. To register new handsets to your telephone
system, see page 17.
The EP5632 telephone system comes
with one registered handset.
The EP5632-2 telephone
system comes with two
registered handsets.
Up to 12 handsets
(EP562 purchased
separately) can be
registered to your
telephone
system.
The handset provided with the EP5632 comes pre-registered as HANDSET 1.
The handsets provided with the EP5632-2, comes pre-registered as HANDSET
1 and HANDSET 2. Additional handsets registered to the telephone system
will be assigned in sequential order. For instance, if the telephone system
already has HANDSET 1 and HANDSET 2, and you register another handset,
it will become HANDSET 3.
In normal operating conditions, up to four handsets can be used at a time. For
example, two handsets can be on a HOME call (page 56), and two handsets
can be on a CELLULAR call (page 58). However, if a cordless handset is
experiencing interference or is almost out of range, the number of handsets
that can be used at a time may be reduced.
16
Page 21
Getting startedGetting started
Adding new handsets (optional)
Your telephone system can accommodate up to 12 handsets (AT&T model
EP562, purchased separately). Before using a newly purchased handset, it
must be first registered with the telephone base.
Register Handset
12:00AM
Place in
Charger
12:00AM
Register handset:
Press MENU in the
base. Find 'Register
Handset' in the main
menu. Press SELECT.
12:00AM
Registration
in progress...
NOTE: If you replace
a registered handset,
the new handset will
be assigned the next
available registration
number, rather than the
handset number of the
handset that you are
replacing.
Before registering an additional handset (EP562),
make sure that the handset battery is installed and
charged.
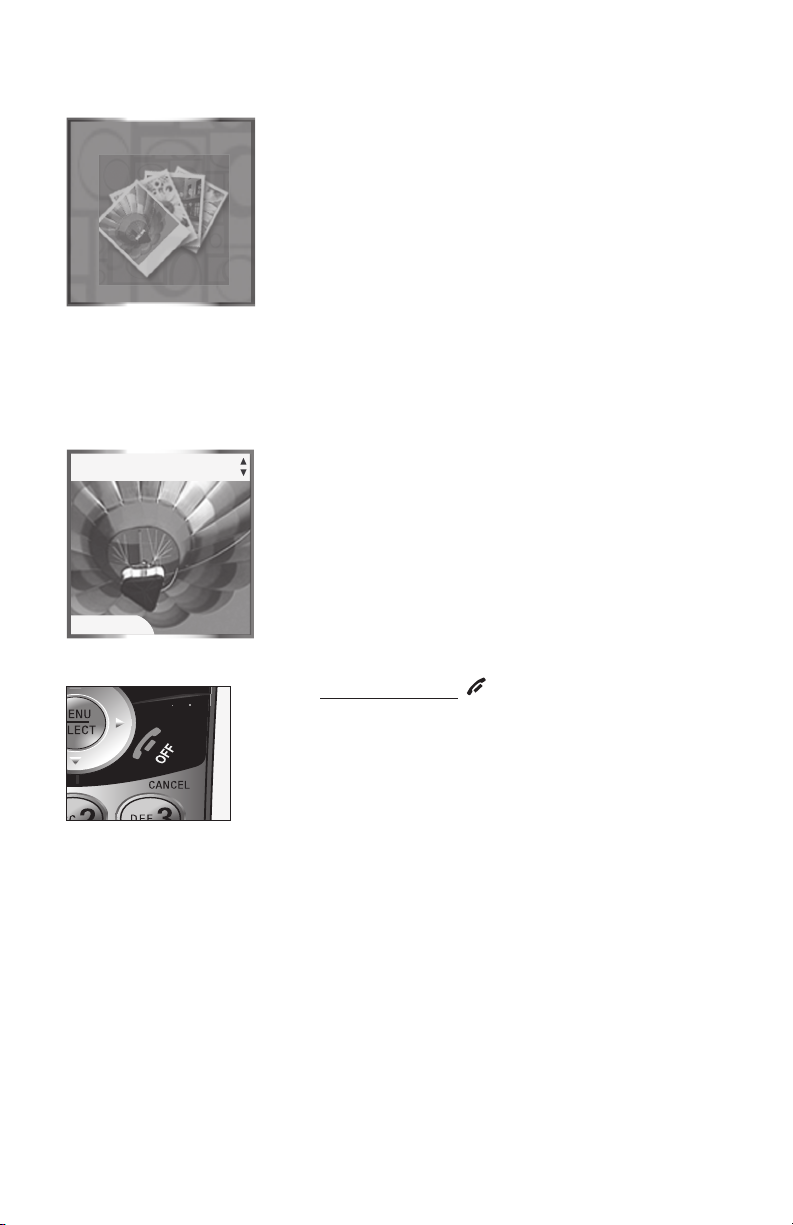
To register a new handset:
1. Place the unregistered handset in the telephone
base or charger.
2. Press the MENU softkey on the telephone base
while in idle mode.
3. Press the UP and DOWN Navkeys to highlight to highlightto highlight
Register Handset, then press the SELECT
softkey.
•
Registering Handset will appear on the
telephone base display.
•
Registration in progress... will appear on
the handset display.
•
The registration process may take up to 90
seconds to complete.
When the registration process is complete, the
telephone base and handset will generate a
confirmation tone. The newly registered handset will
be assigned the next available handset registration
number. For instance, if you already have two
registered handsets, HANDSET 1 and HANDSET 2,
the next registered handset will be HANDSET 3.
If Registration Failure appears on the handset
display, make sure the telephone base and
handset(s) are in idle mode, then repeat the above
steps. See the Troubleshooting section on page
92 for more information.
If you want your handsets in sequential order, you
must delete all the handset registrations (page
45), then re-register each handset as described in
the above steps.
17
Page 22
Getting started
CAUTION:
To Reduce Risk
of Fire, Use Only
Supplied Battery
or Battery 103
BA
TTER
Y
PA
CK
80-5808-00-00
CAUTION:
To Reduce Risk
of Fire, Use Only
Supplied Battery
or Battery 103
RE
CHAR
GEABLE
Ni-MH 3.6V 600mAh
WA
RNING
:
DO NO
T BURN OR
PUNCTURE BA
TTERIES
MADE IN CHINA
RE
CHAR
GEABLE
Ni-MH 3.6V 600mAh
WA
RNING
:
DO NOT BURN OR
PUNCTURE BA
TTERIES
MADE IN CHINA
Spare battery (optional)
You can keep a charged spare battery (AT&T
89-0429-00-00
, purchased separately) in the telephone base. The spare battery
model 103, part number
compartment is located on the side of the telephone base. The spare charged
battery allows you to quickly replace a low handset battery, or in the event of
a power failure, make and receive short calls for up to three hours, depending
on the amount of use.
To install and charge a spare battery:
1.
Locate the spare battery
compartment latch on the side
of the telephone base, then
slide the latch to the right.
Compartment latch
2.
Once the battery compartment
pops out, place the
spare battery inside the
compartment according
to the diagram inside the
compartment.
Us e o nly suppl ied recharg eable batte ry
or replacement battery (
pa r t nu m ber 8 9-0 4 29- 00-0 0, pur chas ed
separately).
AT&T
mo del 103 ,
3.
Push the compartment with
battery in it back into the
telephone base, until it clicks
into place.
When you have finished installing the spare battery, the battery charging icon
will appear in the top right corner of the telephone base display. It takes at least
24 hours for the spare battery to reach a full charge. Once the spare battery is
fully charged, you can keep it charged until needed.
18
Page 23

Bluetooth
Introducing BLUETOOTH
Your new AT&T EP5632/EP5632-2 telephone system with Bluetooth wirelessEP5632/EP5632-2 telephone system with Bluetooth wirelesstelephone system with Bluetooth wireless
technology has the following features:
• Pair up to eight Bluetooth enabled cell phones and/or headsets with the Pair up to eight Bluetooth enabled cell phones and/or headsets with the
telephone base.
• Connect a maximum of two cell phones to make and receive Connect a maximum of two cell phones to make and receive CELLULAR
calls. Only one cell phone can be active on a call at a time.
• Connect a Bluetooth enabled headset for making and receiving Connect a Bluetooth enabled headset for making and receiving HOME
calls.
• Conference Conference CELLULAR and HOME calls.
• Make and receive calls using your cell phone plan while utilizing the ease Make and receive calls using your cell phone plan while utilizing the ease
and comfort of your home telephone system.
IMPORTANT INFORMATION
• Refer to your cell phone's or headset's user's manual for more informationRefer to your cell phone's or headset's user's manual for more information
about its Bluetooth function.
• Operate your Bluetooth device within 12 feet from the telephone base.
Bluetooth technology operates best within a short range. Keeping within 12
feet will maintain the connection quality of the Bluetooth device with themaintain the connection quality of the Bluetooth device with the
telephone base.
• Make sure that your cellular phone has sufficient signal strength. You mayMake sure that your cellular phone has sufficient signal strength. You may
need to move the cellular phone and telephone base to a location where
the cellular signal strength may be stronger.
• Charge your Bluetooth cell phone while it is connected to the telephoneCharge your Bluetooth cell phone while it is connected to the telephone
base, as your cell phone's battery will discharge faster while it is connected
wirelessly to the telephone base.
• Monitor your cell phone's usage, as airtime is deducted from your cellularMonitor your cell phone's usage, as airtime is deducted from your cellular
plan for the duration of CELLULAR calls.
Refer to the Bluetooth Setup section (page 22) to learn how to set up
and manage your Bluetooth device(s). Refer to the Telephone operation
section (page 55) on how to operate your Bluetooth devices with your new
AT&T telephone system with Bluetooth wireless technology. Refer to the
Troubleshooting section (page 92) if you experience difficulty using the
telephone system.
19
Page 24

Bluetooth
Glossary of terms
Below are some terms used in this user’s manual to help you become familiar
with using your Bluetooth devices and your new AT&T telephone system.
Active Devices list - A maximum of two paired devices (two cellular phones
or one cellular phone and one headset) on the Active Devices list can be can be
connected to the telephone base, but only one cellular phone or headset can
be on a call at a time.
Bluetooth headset - Refers to a Bluetooth enabled headset.
Bluetooth cell phone - Refers to a mobile Bluetooth enabled cellular
telephone.
CELLULAR line - The communications service provided through your
Bluetooth enabled cellular telephone.
Connected - A Bluetooth device (cellular phone or headset) can only be
used when it is connected to the telephone base. When a Bluetooth device
is connected to the telephone base and active on the Active Devices list, it
will be ready for use.
Disconnected - An X in front of a device in the Active Devices list will
appear and a line will appear over devices 1 and/or 2 in the icon status bar
when a Bluetooth device is disconnected from the telephone base.
Discoverable mode - Before a Bluetooth device can be paired, it must be
set in this mode. When pairing your cellular phone, the telephone base will
be set in this mode. When pairing a headset, the headset must be set in this
mode. Depending on the manufacturer, this mode is sometimes referred to
as Find Me or Visibility.
HOME line - Your conventional telephone land line.
Paired Devices list - Once Bluetooth devices have been paired with the
telephone base, they will appear in the Paired Devices list. A maximum of
eight devices can be paired with the telephone base, but only two can be on
the Active Devices list.
Pairing - This refers to the process of Bluetooth devices registering device
information with each other. The telephone base must be paired with a
Bluetooth cellular phone or headset before the Bluetooth device(s) can be
used. Depending on the manufacturer, this is also referred to as Bonding.
PIN - By default, the PIN is 0000 for the telephone base and for most Bluetooth
devices. PIN information must be exchanged between Bluetooth devices before
they can be used. This is also known as a Passkey or Passcode.
20
Page 25

Bluetooth
Bluetooth at glance
NOTE: Before using
your Bluetooth device(s)
with the telephone base,
make sure that your
Bluetooth device(s) are not
connected to any other
device(s).
Connect to Device
Unable to connect.
Enable Auto Connect
Function?
YES No
The telephone base allows you to pair up to eight
Bluetooth devices. You can have a maximum of two
paired devices connected at anytime (two cellular
phones, or one cellular phone and one headset), but, but
only one cellular phone or headset can be on a call
at a time.
Once you have paired a device with the telephone
base, the pairing information will be stored on the
Paired Devices list (page 25). To use a paired device,
it must be connected and on the Active Devices list
(page 27).
When a device on the Active Devices list
becomes disconnected, the Auto Connect
function will automatically search for and reconnect to that device. If the telephone base is
unable to connect to the device, the Connect to
Device screen will appear on the display. Pressing
the YES softkey allows the Auto Connect
function to continue searching for the device.
Pressing the NO softkey ends the search, and the
device will remain disconnected.
To learn more about managing your Bluetooth
device(s), see the Managing your Devices section
(page 25). To help you setup your Bluetooth
device(s), please follow the instructions in each
section and refer to the Troubleshooting section
for help (page 92).
IMPORTANT INFORMATION
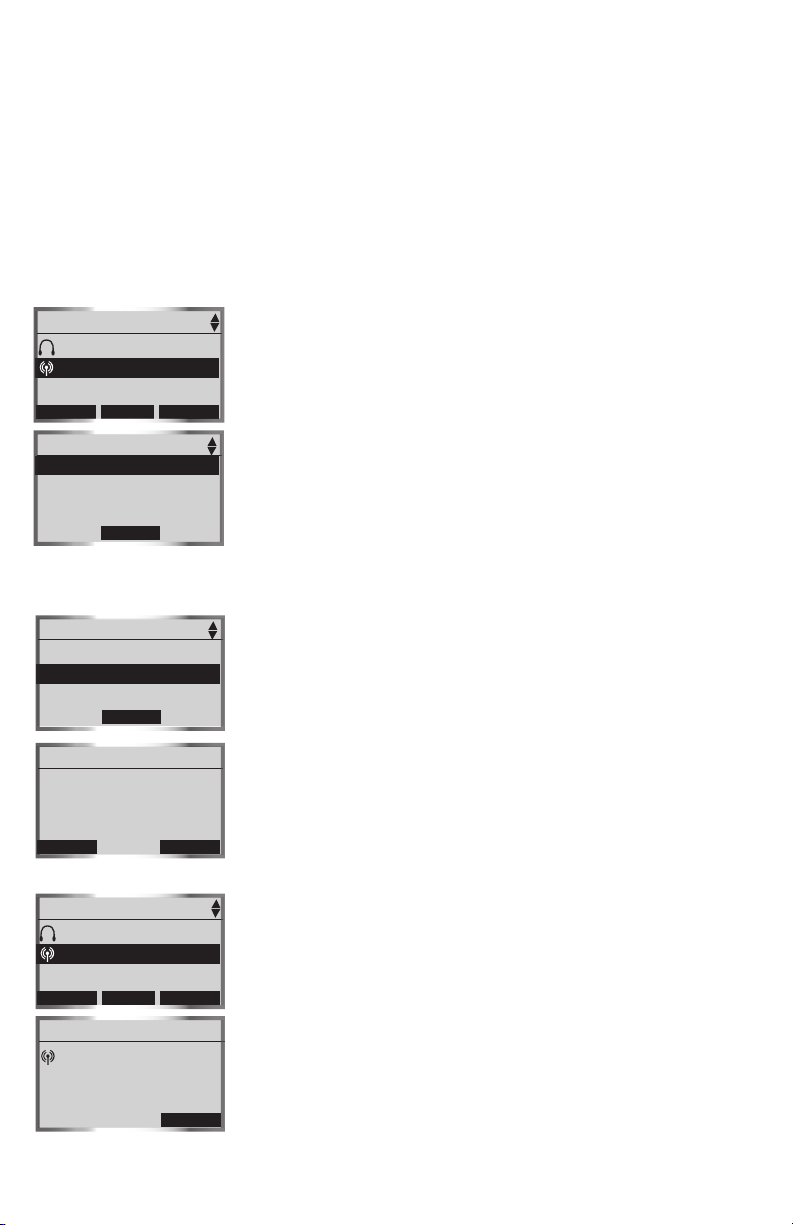
• Once you pair a device with the telephone base,
you do not have to repeat the pairing procedure
again, unless you delete the device from the
Paired Devices list (page 25).
• Press CANCEL on the telephone base at anytime
to return to a previous menu.
•
When adding, removing, or replacing a Bluetooth
on the Active Devices list, all connected devices
will temporarily disconnect until the action is
complete. It may take up to two minutes to
reconnect.
21
Page 26
Bluetooth
Bluetooth Setup
NOTE: To learn
how to operate your
Bluetooth devices with
the telephone base, see
the Telephone operation
section (page 55).
12:00 AM
REDI AL
Main Menu
Directory
Call Log
Answering System
Main Menu
Call Log
Answering System
Bluetooth
Bluetooth
Set up Cellular
Set up Headset
Active Devices
MENU
Sele ct
Sele ct
Sele ct
CID
To use a Bluetooth enabled cellular phone or
headset with your EP5632/EP5632-2, you must
first pair and connect your Bluetooth device(s)
with the telephone base. In then the Bluetooth Setup
section, you can setup a cellular phone (page 23)
and headset (page 24). InIn Managing your Devices
section, you can view and modify the information
about your Bluetooth device(s) (page 25).
To enter the Bluetooth menu:
1. Press the MENU softkey on the telephone base
while in idle mode.
2. Press the UP and DOWN Navkeys to highlight to highlightto highlight
Bluetooth, then press the SELECT softkey. You
can then select:
• Set up Cellular - set up a Bluetooth enabled
cellular phone (page 23).
• Set up Headset - set up a Bluetooth
enabled headset (page 24).
• Active Devices - replace, remove, view
the current status of, and connect to your
paired Bluetooth device(s) (page 27).
• Paired Devices - rename, delete, and view
information about your paired devices
(page 25).
• Change PIN - change the PIN of the
telephone base (page 29).
While in the Bluetooth menu:
• Press CANCEL to return to a previous menu.
• Press and hold CANCEL on the telephone base
to return to the idle screen.
See the Troubleshooting section on page 92 if you
experience difficulty pairing or connecting your
Bluetooth device(s).
22
Page 27
Bluetooth
NOTE: If you a
device connected to the
telephone base when
pairing, Connected
deviceswill be
temporarily disconnected
will appear on the display.
12:00 AM
REDI AL
Main Menu
Call Log
Answering System
Bluetooth
Bluetooth
Set up Cellular
Set up Headset
Active Devices
Set up Cellular
Set up Cellular
Discoverable Mode
STOP
Set up Cellular
MENU
Sele ct
Sele ct
Set your Cellular to
search for devices,
then press NEXT
Next
AT&T EP5632 in
PIN = 0000
Pairing complete
Connect to
Cellular?
YES No
Cellular setup
completed
CID
HELP
Set up Cellular
Before you begin, make sure that your Bluetooth
enabled cellular phone is not connected to any
other Bluetooth device. Refer to your cellularRefer to your cellular
phone's user's manual to learn how to search for
or add new Bluetooth devices.
To pair and connect a cellular phone:
1. Using the telephone base, press thepress the MENU
softkey while in idle mode.
2. Press thePress the UP and DOWN Navkeys to highlight to highlight
Bluetooth, then press the SELECT softkey to
enter the Bluetooth menu.
3. Press the SELECT softkey to enter the Set up
Cellular menu.
• If a device is already connected to the
telephone base, press the OK softkey to
temporarily disconnect the device(s) and
continue the pairing process.
4. Press the NEXT softkey to set the telephone
base in discoverable mode.
5. Using your cellular phone, turn on the Bluetooth
feature on your cellular phone, and search for or
add new devices.
6. Once your cellular phone has found the AT&T
EP5632 telephone base, select it.
7. Using your cellular phone, enter the PIN of the
telephone base (the default PIN is 0000) to
continue the pairing process.
8. Using the telephone base, press the YES softkey
to connect to your cellular phone when the
pairing process is complete.
• If successful, Cellular setup completed will
appear on the telephone base display.
• If you already have two devices on the Active
Devices list, press the YES softkey to connect
to your paired cellular phone. You will then
be prompted to replace an existing device on
the Active Devices list (page 27).
When a device is connected, thethe 1 and/or 2
status icons will appear on the display.
23
Page 28
Bluetooth
NOTE: If you have
a device connected
to the telephone base
when pairing, Connected
devices will be
temporarily disconnected
will appear on the display.
12:00 AM
REDI AL
MENU
Main Menu
Call Log
Answering System
Bluetooth
Sele ct
Bluetooth
Set up Cellular
Set up Headset
Active Devices
Sele ct
Set up Headset
Set your Headset
in Discoverable mode,
then press NEXT
Next
Headsets Found
Mary's Headset
FIND
PAIR
Set up Headset
Enter PIN:
0000
done
help
Headset setup
completed
CID
INFO
Eras e
Set up Headset
Before you begin, make sure that your Bluetooth
enabled headset is not connected to any other
Bluetooth device. Refer to your headset's user's Refer to your headset's user's
manual to determine the headset's PIN and how
to set your headset in discoverable mode.
To pair and connect a headset:
1. Using the telephone base, press thepress the MENU
softkey while in idle mode.
2. Press thePress the UP and DOWN Navkeys to highlight to highlight
Bluetooth, then press the SELECT softkey to
enter the Bluetooth menu.
3. Press the UP and DOWN Navkeys to highlight
Set up Headset, then press the SELECT
softkey.
• If a device is already connected to the
telephone base, press the OK softkey to
temporarily disconnect the device(s) and
continue the pairing process.
4. Using your headset, set your headset in
discoverable mode.
5. Using the telephone base, press the NEXT
softkey on the telephone base to search for
your headset.
6. Once the telephone base finds your headset,
select it and press the PAIR softkey. If telephone
base cannot find your headset, press the FIND
softkey to search again, and make sure that
your headset is in discoverable mode.
7. Enter the PIN of your headset, then press the DONE
softkey (for most headsets, the PIN is 0000).
8. When the pairing is complete, press the YES
softkey to connect to your headset.
• If successful, Headset setup completed will
appear on the telephone base display.
• If you have already one headset device on the
Active Devices list, press the YES softkey to
connect to your paired headset. You will then
be prompted to replace the existing headset
on the Active Devices list (page 27).
When a device is connected, thethe 1 and/or 2
status icons will appear on the display.
24
Page 29

Bluetooth
Managing your devices
NOTE: To use aTo use a
paired device, it must be
connected, and on the
Active Devices list
(page 27).
Paired Devices
John's Cell
Mary's Cell
Mary's Headset
RENA ME
Rename Device
Edit Name
John's Cell
done Eras e
NOTE: Only the
first 16 characters of the
device name appears on
the Paired Devices list.
INFO
DELE TE
Once you have paired a Bluetooth device, you can
rename, delete, and view the device's information
in the Paired Devices list.
Once a Bluetooth device is connected to the
telephone base, you can replace, remove or
disconnect the device from the Active Devices list
(page 27), and view the device's status information
(page 27).
Paired Devices
All paired devices are stored on the Paired Devices
list. Up to eight devices (any combination of cell
phones and headsets) can be paired with the
telephone base.
If a device is successfully paired, the icon (for
cell phone) or (for headset) and the name of the
device will be shown on the Paired Devices list.
Rename a paired device
1. Press the MENU softkey on the telephone base
while in idle mode.
2. Press the UP and DOWN NavKeys to highlight
Bluetooth, then press the SELECT softkey to
enter the Bluetooth menu.
3. Press the UP and DOWN NavKeys to highlight
Paired Devices, then press the SELECT softkey.
4. Press the UP and DOWN NavKeys to highlight
the name of the device to rename.
5. Press the RENAME softkey to rename a device.
• Press the LEFT and RIGHT Navkeys to move
the cursor left and right.
• Press the ERASE softkey to delete highlighted
characters.
• Use the dial pad to enter the name (up to 16
characters). See the character chart on page 68
for more information on how to enter a name.
6. Press the DONE softkey to save the setting.
25
Page 30
Bluetooth
Paired Devices
Mary's Headset
John's Cell
RENA ME
Delete Options
Delete Device
Delete All Devices
INFO
Sele ct
DELE TE
Delete a paired device
If you already have the maximum of eight paired
devices on the Paired Devices list, and you want
to add another device, you must delete a paired
device from the Paired Devices list.
To delete a paired device:
1. Press the MENU softkey on the telephone base
while in idle mode.
2. Press the UP and DOWN NavKeys to highlight
Bluetooth, then press the SELECT softkey to
enter the Bluetooth menu.
3. Press the DOWN NavKey to highlight Paired
Devices, then press the SELECT softkey.
4. Press the UP and DOWN NavKeys to highlight
the name of the device to delete.
5. Press the DELETE softkey.
6. Press thePress the SELECT softkey to delete the selected
device. Device Deleted will appear on the
display.
Delete Options
Delete Device
Delete All Devices
Sele ct
Delete Device List
Delete all paired
Bluetooth devices?
YES NO
Paired Devices
Mary's Headset
John's Cell
RENA ME
INFO
DELE TE
Device Info
Cellular
John's Cell
Bluetooth dev. addr:
0 0 1 a 1 a 1 1 a a a a
Delete all paired devices
If you delete all paired devices, you will need to
repeat the pairing process to connect a device.
To delete all the paired devices:
1. Repeat steps 1 through 5 in the above section.
2. Press the DOWN NavKey to highlight Delete
All Devices, then press the SELECT softkey.
3. Press the YES softkey to delete all the devices
in the Paired Devices list.
View device information
To view the information of a paired device:
1. Repeat steps 1 through 3 in the top section.
2. Press the UP and DOWN NavKeys to highlight
a device, then press the INFO softkey.
3. Press the BACK softkey to return to the Paired
Devices list.
back
26
Page 31
Bluetooth
NOTE: Connected
devices appear on the
Active Devices list
automatically.
Active Devices
Only devices on the Active Devices list can establish
a Bluetooth connection with the telephone base.
Although two paired devices can be connected to
the telephone base, only one Bluetooth cellular
phone or headset can be on a call at a time.
To enter the Active Devices list:
12:00 AM
REDI AL
Main Menu
Call Log
Answering System
Bluetooth
Bluetooth
Set up Cellular
Set up Headset
Active Devices
Active Devices
X 1 My Headset
P2 John's Cell
Connect
MENU
Sele ct
Sele ct
INFO
OPTIONS
CID
1. Press the MENU softkey on the telephone base
while in idle mode.
2. Press the UP and DOWN NavKeys to highlight
Bluetooth, then press the SELECT softkey to enter
the Bluetooth menu.
3. Press the DOWN NavKey to highlight Active
Devices, then press the SELECT softkey.
In the Active Devices list, you may see the following
status symbols:
• X in front of the device it means that it is
disconnected.
• Pin front of a device it indicates that it is
connected to the telephone base.
• ))) in front of a device indicates that the
telephone base is trying to connect to that
device.
While in the Active Devices list, you can select:
• CONNECT - press the CONNECT softkey to
connect to a disconnected device.
• DISCONN - press the DISCONN softkey to
disconnect a device.
• INFO - press the INFO softkey to view the
current status and full bluetooth device name
of a device.
• OPTIONS - press the OPTIONS softkey to
replace or remove a device.
If you experience difficulty using your Bluetooth
device(s), make sure that the device is on and notmake sure that the device is on and not
connected to any other Bluetooth device. See the
Troubleshooting section for more information
(page 92).
27
Page 32

Bluetooth
Replace an active device
Replacing a Bluetooth device on the Active Devices
list will replace an active device with a device from
the Paired Devices list.
Active Devices
X 1 My Headset
P2 John's Cell
DISCONN
INFO
Options
Device Options
Replace Device
Remove Device
Sele ct
Replace with:
John's Headset
Mary's Cell
Sele ct
INFO
Active Devices
X 1 My Headset
P2 Mary's Cell
DISCONN
INFO
Options
To replace an active device:
1. Press the MENU softkey on the telephone base
while in idle mode.
2. Press the UP and DOWN NavKeys to highlight
Bluetooth, then press the SELECT softkey to
enter the Bluetooth menu.
3. Press the DOWN NavKey to highlight Active
Devices, then press the SELECT softkey. The
screen will then display the active devices.
4. Press the UP and DOWN NavKeys to select
the device to replace, then press the OPTIONS
softkey.
5. Press the SELECT softkey to replace a device.
The selected device will now be disconnected.
• If you have other paired devices, you will be
prompted to select an already paired device.
• If you do not have other paired devices, see
pages 23 and 24.
6. Press the UP and DOWN NavKeys to select a
device, then press the SELECT softkey. The
selected device will then replace the previous
device to the Active Devices list.
Active Devices
X 1 My Headset
P2 John's Cell
DISCONN
INFO
Options
Device Options
Replace Device
Remove Device
Sele ct
Remove an active device
Removing an active device will only remove it from
the Active Devices list.
To remove an active device:
1. Follow steps 1 through 4 in the above section.
2. Press the DOWN NavKey to highlight Remove
Device.
3. Press the SELECT softkey to remove the device
from the Active Devices list.
28
Page 33

Bluetooth
NOTE: Devices on Devices on
the Active Device list
temporarily disconnect
during this process, but
automatically reconnect
afterwards. It may take up to
two minutes to reconnect.
Active Devices
X1 My Headset
2 (empty)
ADD
Add Device
Mary's Headset
John's Cell
sele ct
INFO
Add an active device
If you have only one active device, you can add
another paired device to the Active Devices list,
however you can only have one headset on the
Active Devices list.
To add an active device:
1. Press the MENU softkey on the telephone base
while in idle mode.
2. Press the UP and DOWN NavKeys to highlight
Bluetooth, then press the SELECT softkey to
enter the Bluetooth menu.
3. Press the UP and DOWN NavKeys to highlight
Active Devices, then press the SELECT softkey.
4. Press the UP and DOWN NavKeys to select
an empty device number, then press the ADD
softkey.
5. Press the UP and DOWN NavKeys to select one
of the paired devices.
6. Press the SELECT softkey. The paired device that
you selected will be added to the Active Devices
list.
Bluetooth
Active Devices
Paired Devices
Change PIN
Sele ct
Bluetooth
Active Devices
Paired Devices
Change PIN
Sele ct
Change PIN
0000
SET
Change PIN (of the telephone base)
The PIN is exchanged between the telephone base
(default is 0000) and your Bluetooth device(s).
To change the PIN:
1. Press the MENU softkey on the telephone base
to enter the main menu.
2. Press the UP and DOWN NavKeys to highlight
Bluetooth, then press the SELECT softkey to
enter the Bluetooth menu.
3. Press the UP and DOWN NavKeys to highlight
Change PIN, then press the SELECT softkey.
Enter your desired four-digit code by using the:
4.
• Dial pad keys (0-9).
• LEFT and RIGHT Navkeys to move the cursor
left or right.
• UP or DOWN Navkeys to increase or decrease
the number (0-9).
5. Press the SET softkey to save your setting.
29
Page 34

System setup
Handset settings
Settings
Settings
Set Time
Edit Handset Name
Show Handset Name
Keypad Tone
Language
In the handset Settings menu, you can change and
edit the handset settings. You can also clear the
voice mail indication, delete a handset registration
or restore the default settings.
To enter the Settings menu:
1. Press MENU/SELECT in idle mode to enter the
main menu.
2. Press the UP or DOWN Navkeys to select
Settings, then press MENU/SELECT to enter the
Settings menu. You can then select:You can then select:
• Set Time - manually set the handset time, if
you do not subscribe to caller ID (page 31).
• Edit Handset Name - edit the handset name
up to 15 characters (page 31)
• Show Handset Name - display the handset
name when in idle mode (page 32).
• Keypad Tone - turn the keypad tone on or
off (page 32).
• Language - change the handset language to
English, Spanish, or French (page 32).
• LCD Contrast - adjust the LCD screen
contrast to one of eight levels (page 33).
• Clear Voice Mail - clear the voice mail
indication (page 33).
• Default Settings - restore the handset
settings back to default (page 34).
• Delete Registration - delete the registration
of a handset (page 34).
After a setting has been saved or set, you will hear
a confirmation tone and the display will return to
the Settings menu.
While in the Settings menu:
• Press OFF/CANCEL to return to a previous
menu.
• Press and hold OFF/CANCEL on the telephone
base to return to the idle screen.
30
Page 35

System setup
Settings
Set Time
Edit Handset Name
Show Handset Name
Keypad Tone
Language
Set Time
12:00 AM
SET
Set Time
If you subscribe to caller ID service provided by
your local telephone company, the time will
automatically be set with an incoming HOME call.
To manually set the time:
1. Press MENU/SELECT in idle mode to enter the
main menu.
2. Press the UP or DOWN Navkeys to select
Settings, then press MENU/SELECT to enter the
Settings menu.
3. Press MENU/SELECT to select Set Time.
4. Use the dial pad (0-9) to enter the hour (01-12)
and minutes (00-59). Use the dial pad to enter 2
for AM and 7 for PM. You can also use the UP
and DOWN Navkeys to set the hour, mi n u t e s ,
and AM/PM.
5. Press the SET softkey or MENU/SELECT to save
the setting.
NOTES:
1. If Invalid Time appears on the display, make sure you are
entering 01-12 for the hour and 00-59 for the minutes.
2. If you do not subscribe to caller ID service, you will need to
set the time on each handset.
Edit Handset Name
HANDSET 2
SAVE
NOTE: If no characters
are entered for the handset
name, Name must not be
empty will be shown on
the display. Enter a name
for the handset.
ERA SE
Edit Handset Name
The handset name can be up to 15 characters
including spaces.
To edit the handset name:
1. Follow steps 1 and 2 in the above section.
2. Press the DOWN Navkey to highlight Edit
Handset Name, then press MENU/SELECT.
• Press the LEFT and RIGHT NavKey to move
the cursor left and right.
• Press the ERASE softkey to delete highlighted
characters.
• Use the dial pad to enter up to 15
alphanumeric characters (see page 68).
3. Press the SAVE softkey or MENU/SELECT to save
the setting.
31
Page 36

System setup
Show Handset Name
By default, the handset name is shown on the
display when in idle mode.
Settings
Edit Handset Name
Show Handset Name
Show Handset Name
Keypad Tone
Language
LCD Contrast
Show Handset Name
P
On
Off
SET
Keypad Tone
P
On
Off
SET
To change this setting:
1. Press MENU/SELECT in idle mode to enter the
main menu.
2. Press the UP or DOWN Navkeys to select
Settings, then press MENU/SELECT to enter the
Settings menu.
3. Press the UP and DOWN NavKeys to highlight
Show Handset Name, then press MENU/SELECT.
4. Press the UP and DOWN NavKeys to highlight
On or Off, then press the SET softkey or MENU/
SELECT to save the setting.
NOTE: If you change this setting to off, it will only affect that
handset.
Keypad Tone
By default, the handset beeps when you press a key.
To change the keypad tone setting:
1. Follow steps 1 and 2 in the above section.
2. Press the UP and DOWN NavKeys to highlight
Keypad Tone, then press MENU/SELECT.
3. Press the UP and DOWN NavKeys to highlight
On or Off, then press the SET softkey or MENU/
SELECT to save the setting.
Language
P
English
Español
Français
SET
Language
By default, the handset language is English. You
can select English, Spanish, or French to be used in
all screen displays.
To change the language setting:
1. Follow step 1 and 2 in the top section.
2. Press the UP and DOWN NavKeys to highlight
Language, then press MENU/SELECT.
3. Press the UP and DOWN NavKeys to highlight
English, Español or Français, then press the SET
softkey or MENU/SELECT to save the setting.
32
Page 37

System setup
LCD Contrast
You can adjust the handset LCD screen contrast
to one of eight levels to suit different lighting
conditions.
Settings
Edit Handset Name
Show Handset Name
Keypad Tone
Language
LCD Contrast
LCD Contrast
SET
To adjust the LCD contrast:
1. Press MENU/SELECT in idle mode to enter the
main menu.
2. Press the UP or DOWN Navkeys to select
Settings, then press MENU/SELECT to enter the
Settings menu.
3. Press the UP and DOWN NavKeys to highlight
LCD Contrast, then press MENU/SELECT.
4. Press the LEFT and RIGHT or UP and DOWN
NavKeys to increase and decrease LCD contrast.
5. Press the SET softkey or MENU/SELECT to save
the setting.
Clear Voice Mail
If you subscribe to voice mail service provided by
the local telephone company and you have new
voice mail, the VOICEMAIL light on the telephone
base and status light on the handset will flash,
and New Voice Mail and the will appear on all
handset screens. If your telephone system indicates
that there is new voice mail, but you are sure that
you have no new voice mail messages, you can
manually turn off the voice mail indication.
Settings
Show Handset Name
Keypad Tone
Language
LCD Contrast
Clear Voice Mail
Clear Voice Mail
Clear Voice Mail
Indication?
YES
NO
To manually turn off the voice mail indication:
1. Follow steps 1 and 2 in the above section.
2. Press the UP and DOWN NavKeys to highlight
Clear Voice Mail, then press MENU/SELECT. The
screen will display Clear Voice Mail Indication?
3. Press the YES softkey.
NOTES:
1. Clearing the voice mail indication does not delete any voice
mail messages.
2. If you subscribe to voice mail services, your local telephone
company may alert you to new voice mail with a stutter
(broken) dial tone.
3. Contact your local telephone company for more information
about voice mail services.
33
Page 38

System setup
Default Settings (restore settings)
You can restore the factory-set default settings for
all handset settings. Restoring the default settings
for a handset only affect that handset.
Settings
Keypad Tone
Language
LCD Contrast
Clear Voice Mail
Default Settings
Default Settings
Restore
Default Settings?
YES
Settings
Language
LCD Contrast
Clear Voice Mail
Default Settings
Delete Registration
Delete Registration
Delete Handset
Registration?
NO
To restore the default settings:
1. Press MENU/SELECT in idle mode to enter the
main menu.
2. Press the UP and DOWN Navkeys to select
Settings, then press MENU/SELECT to enter the
Settings menu.
3. Press the UP and DOWN NavKeys to highlight
Default Settings, then press MENU/SELECT. The
screen will display Restore Default Settings?
4. Press the YES softkey.
NOTE: Restoring the handset default settings does not
clear the redial list, directory, call log, messages, or reset the
time or handset name.
Delete Registration
Deleting a handset registration only deletes the
registration on that handset. Deleting a handset
registration is only necessary if you are replacing
your telephone base. To delete all the handset
registrations on the telephone base, see page 45.
To delete the registration on the handset:
1. Press MENU/SELECT in idle mode to enter the
main menu.
2. Press the UP and DOWN Navkeys to select
Settings, then press MENU/SELECT to enter the
Settings menu.
3. Press the UP and DOWN NavKeys to highlight
Delete Registration, then press MENU/SELECT.
The screen will display Delete Handset
Registration?
4. Press the YES softkey.
YES
NO
NOTES: After deleting the handset registration, the handset will
reset and display Place in Charger. To register a handset, see page
17.
34
Page 39

System setup
Handset Ringers
Ringers
Ringers
Ringer for HOME
Ringer for CELL 1
Ringer for CELL 2
Record New Ringer
In the handset Ringers menu, you can select a
ringer melody and adjust the ringer volume for
incoming calls to the HOME and CELLULAR lines
(pages 36 and 37). You can also record your own
ringer through the handset microphone (page 38).
To enter the Ringers menu:
1. Press MENU/SELECT in idle mode to enter the
main menu.
2. Press the UP and DOWN Navkeys to select
Ringers, then press MENU/SELECT to enter the
Ringers menu.
In the Ringers menu, you can select:
• Ringer for HOME - set the ringer volume and
melody for the HOME line. The default ringer
melody in Melody 1.
• Ringer for CELL 1 - set the ringer volume
and melody for the first connected cellular
phone in the Active Devices list (page 27).
The default ringer melody is Melody 2.
• Ringer for CELL 2 - set the ringer volume and
melody for the second connected cellular
phone in the Active Devices list (page 27).
The default ringer melody is Melody 3.
• Record New Ringer - record a customized
ringer.
After a setting has been saved or set, you will hear
a confirmation tone, and the display will return to
the Ringers menu.
While in the Ringers menu,
• Press OFF/CANCEL to return to a previous
menu.
• Press and hold OFF/CANCEL on the telephone
base to return to the idle screen.
35
Page 40

System setup
NOTE: Even if the
ringer volume is off, the
telephone base or handset
will ring at the lowest
volume setting during an
incoming intercom call.
Ringers
Ringer for HOME
Ringer for CELL 1
Ringer for CELL 2
Record New Ringer
Ringer Volume
SET
OFF
Ringer Volume
You can choose from six handset ringer melody
volume levels. The ringer can also be turned off so
the phone does not ring during incoming calls.
To adjust the handset ringer volume:
1. Press MENU/SELECT in idle mode to enter the
main menu.
2. Press the UP and DOWN Navkeys to select
Ringers, then press MENU/SELECT to enter the
Ringers menu.
3. Press the UP and DOWN NavKeys to highlight:
• Ringer for HOME - set the ringer volume
and melody for the HOME line.
• Ringer for CELL 1 - set the ringer volume
and melody for the first connected cellular
phone in the Active Devices list (page
27).
• Ringer for CELL 2 - set the ringer volume
and melody for the second connected
cellular phone in the Active Devices list
(page 27).
4. Press MENU/SELECT.
5. Press MENU/SELECT again to adjust the volume
setting.
6. To increase and decrease the handset ringer
volume:
• Press the UP and DOWN NavKeys, or
• Press the LEFT and RIGHT NavKeys, or
• Press the UP and DOWN volume controls on
the side of the handset
-OR-
Ringer Volume
Ringer Off
SET
OFF
To turn off the handset ringer:
• Press the OFF softkey, or
• Press the DOWN NavKey, LEFT NavKey, or
DOWN volume control on the side of handset
until Ringer Off is shown on the display.
7. Press the SET softkey or MENU/SELECT to save
the setting.
36
Page 41

System setup
DELET E
NOTE: Selecting,
recording, or deleting a
ringer melody on one
handset does not affect
the other handset(s) in
the system.
Ringer for HOME
Ringer Volume
Ringer Melody
Ringer Melody
Ringer for HOME
Melody 1
P Melody 2
Melody 3
Melody 4
SET
Ringer Melody
Delete Ringer?
Ringer Melody
You can select from eight traditional ringers and
13 musical polyphonic ringer melodies on each
handset.
Select a ringer melody
1. Press MENU/SELECT in idle mode to enter the
main menu.
2. Press the UP and DOWN Navkeys to select
Ringers, then press MENU/SELECT to enter the
Ringers menu.
3. Press the UP and DOWN NavKeys to highlight:
• Ringer for HOME - set the ringer volume and
melody for the HOME line.
• Ringer for CELL 1 - set the ringer volume
and melody for the first connected cellular
phone in the Active Devices list (page 27).
• Ringer for CELL 2 - set the ringer volume and
melody for the second connected cellular
phone in the Active Devices list (page 27).
4. Press MENU/SELECT.
5. Press the DOWN NavKey to highlight Ringer
Melody, then press MENU/SELECT. The current
ringer melody will be played.
6. Press the UP and DOWN NavKeys to highlight
a ringer. You will hear a sample of each ringer
melody when highlighted.
7. Press the SET softkey or MENU/SELECT to save
the setting.
Delete a ringer melody
1. Follow steps 1 through 5 in the above section.
2. Press the DELETE softkey. Delete Ringer? will
appear on the display.
3. Press the YES softkey to delete the melody.
YES
NO
NOTES:
1. You can only permanently delete the polyphonic ringer melodies.
The traditional ringers (melodies 1 through 8) cannot be deleted.
2. Deleting a ringer melody increases the available record time for your
own recordable ringer(s) (page 38).
37
Page 42
System setup
NOTE: For optimal
recording, place the
handset microphone nine
inches away from the
source that you wish to
record.
Ringers
Ringer for HOME
Ringer for CELL 1
Ringer for CELL 2
Record New Ringer
Record New Ringer
Press RECORD
to start recording
Remaining record
time 0:14
RECORD
Record New Ringer
Recording...
STOP
Record New Ringer
Recording Complete
Press SAVE
to save recording
or PLAY to review
SAVE
PLAY
Record New Ringer
Each recordable ringer can be up to 14 seconds.
Depending on the remaining record time, you can
record multiple ringers. To increase the record
time, you need to delete a ringer melody (see
page 37).
To record a ringer:
1. Press MENU/SELECT in idle mode to enter the
main menu.
2. Press the UP and DOWN Navkeys to select
Ringers, then press MENU/SELECT to enter the
Ringers menu.
3. Press the UP and DOWN NavKeys to highlight
Record New Ringer, then press MENU/SELECT.
4. Press the RECORD softkey to begin recording.
Record Ringer after tone will be shown on the
display, then you will hear tone.
5. Record your ringer melody, then press the STOP
softkey.
6. When you are finished recording you can:
• PLAY - press the PLAY softkey to review
the recorded ringer.
• SAVE - press to the SAVE softkey to save
the recorded ringer.
-OR-
• Press OFF/CANCEL to discard the new
recording and exit to the Record New
Ringer menu.
If you save the ringer, you will be prompted to
enter a name for the recorded ringer.
• Use the character chart (page 68) to enter
the ringer name (up to 10 characters),
then press the SAVE softkey to save your
recorded ringer.
Your new recorded ringer will appear in the
Ringer Melody list (page 37).
38
Page 43
System setup
Handset Pictures
Pictures
Pictures
SET
In the handset Pictures menu, you can select a
background image for a handset screen. These
images can also be programmed for individual
callers in the directory so that different images
will show when different callers call in (see
page 67).
To enter the Pictures menu:
1. Press MENU/SELECT in idle mode to enter the
main menu.
2. Press the UP and DOWN NavKeys to select
Pictures, then press MENU/SELECT to enter the
Pictures menu.
In the Pictures menu:
• Press the UP and DOWN NavKeys to select a
desired picture, then press the SET softkey to
save the setting.
After a choice or setting has been saved, you will
hear a confirmation tone, the screen will display
Wallpaper set, and return to the idle screen.
To exit the Pictures menu:
• Press and hold OFF/CANCEL to return to idle
mode.
39
Page 44

System setup
Handset Animations
Animations
Animations
Animations
SET
In the handset Animations menu, you can
select an animation for a handset screen.
These animations can also be programmed for
individual callers in the directory so that different
animations will show when different callers call
in (see page 67).
To enter the Animations menu:
1. Press MENU/SELECT in idle mode to enter the
main menu.
2. Press the UP and DOWN NavKeys to select
Animations, then press MENU/SELECT to enter
the Animations menu.
While in the Animations menu:
• Press the UP and DOWN NavKeys to select a
desired animation, then press the SET softkey
to save the setting.
After a choice or setting has been saved, you will
hear a confirmation tone and Wallpaper set will
appear on the display, then the screen will return
to the idle screen.
To exit the Animations menu:
• Press and hold OFF/CANCEL to return to idle
mode.
40
Page 45

System setup
Telephone base Settings
NOTE: To return to
a previous menu, press
CANCEL. To return to idle
mode, press and hold
CANCEL.
12:00 AM
REDI AL
Main Menu
Answering system
Bluetooth
Settings
MENU
Sele ct
CID
In the telephone base Settings menu, you can set
the date, set the time, keypad tone, language, and
LCD contrast. You can also clear the voice mail
indication, restore the default settings, and delete
handset registrations.
To enter the Settings menu:
1. Press MENU softkey in idle mode to enter the
main menu.
2. Press the UP and DOWN NavKeys to select
Settings, then press the SELECT softkey to enter
the Settings menu. You can then select:
• Set Date - manually set the date, if you do
not subscribe to caller ID (page 42).
• Set Time - manually set the time, if you do
not subscribe to caller ID (page 42).
• Keypad Tone - turn the keypad tone on or
off (page 43.)
• Language - change the telephone base
language to English, Spanish, or French
(page 43).
• LCD Contrast - adjust the LCD screen
contrast to one of eight levels (page 44).
• Clear Voice Mail - clear the voice mail
indication (page 44).
• Default Settings - restore the telephone
base settings back to default (page 45).
• Delete Handsets - delete the registration of
all handset (page 45).
After a choice or setting has been saved, you will
hear a confirmation tone and the screen will return
to the Settings menu.
To exit the Settings menu:
• Press CANCEL.
41
Page 46
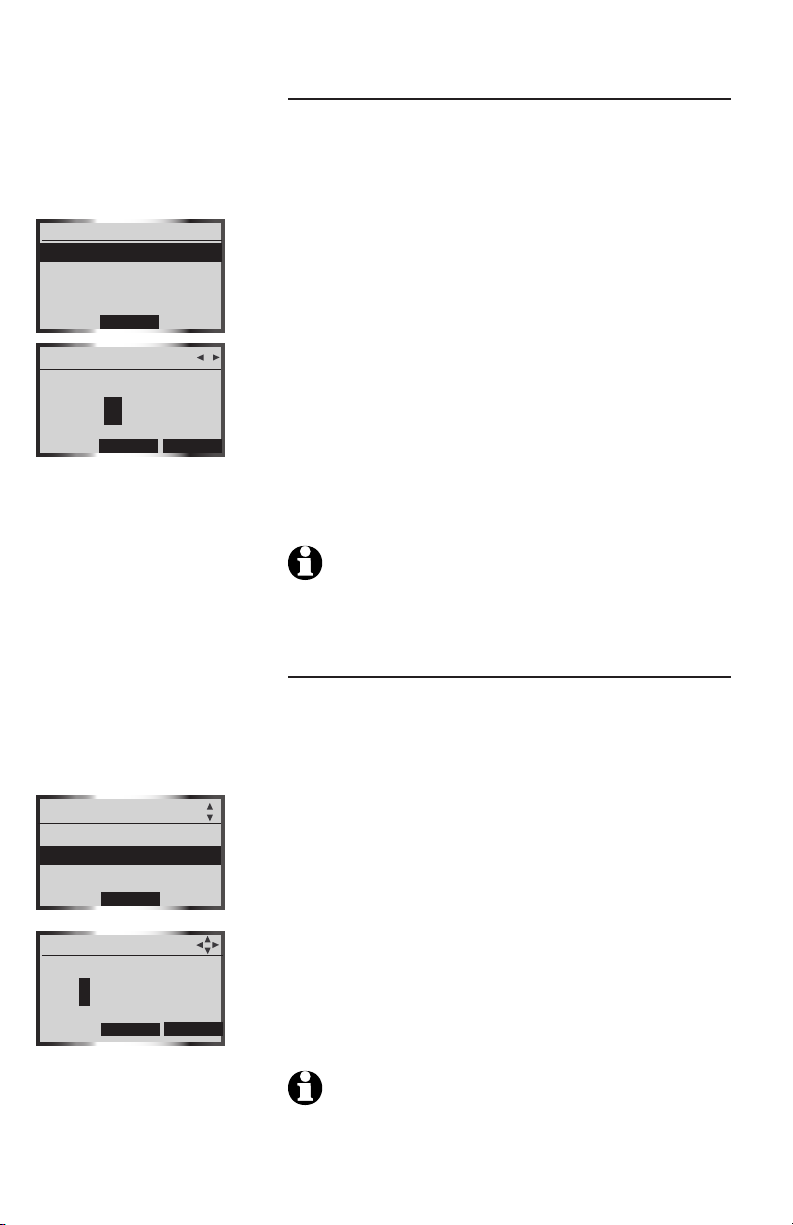
System setup
Set Date
If you subscribe to caller ID service provided by
your local telephone company, the time and date
will automatically be set with an incoming HOME
call.
Settings
Set Date
Set Time
Keypad Tone
Sele ct
Set Date
YYYY/MM/DD
2007/01/01
info
SET
Settings
Set Date
Set Time
Keypad Tone
Sele ct
Set Time
12:00 AM
info
SET
To manually set the date:
1. Press the MENU softkey in idle mode to enter
the main menu.
2. Press the UP and DOWN NavKeys to select
Settings, then press SELECT softkey to enter
the Settings menu.
3. Press the SELECT softkey to select Set Date.
4. Use the dial pad (0-9) to enter the month (01-
12), day (01-31), and year (2000-2099). You
can also use the UP and DOWN NavKeys to
set the year, month and year.
5. Press the SET softkey to save the setting.
NOTE: If Invalid Date appears on the display, make sure you
are entering 2000-2099 for the year, 01-12 for the month and 01-31
for the day.
Set Time
If you subscribe to caller ID service provided by
your local telephone company, the time and date
will automatically be set with an incoming HOME
call.
To manually set the time:
1. Follow steps 1 and 2 in the above section.
2. Press the UP and DOWN NavKeys to select Set
Time, then press the SELECT softkey.
3. Use the dial pad (0-9) to enter the hour (01-12)
and minutes (00-59), and the dial pad key 2 for
AM and key 7 for PM. You can also use the UP
and DOWN NavKeys to set the hour, minutes,
and AM/PM.
4. Press the SET softkey to save the setting.
NOTE: If Invalid Time appears on the display, make sure you
are entering 01-12 for the hours and 00-59 for the minutes.
42
Page 47
System setup
Keypad Tone
By default, the telephone base will beep when you
press a key. You can turn these keypad tones on
or off:
Settings
Set Date
Set Time
Keypad Tone
Sele ct
Keypad Tone
On
POff
Set
Settings
Set Time
Keypad Tone
Language
SELE CT
Language
English
P
Español
Français
Set
To change the keypad tone setting:
1. Press the MENU softkey in idle mode to enter the
main menu.
2. Press the UP and DOWN NavKeys to select
Settings, then press SELECT softkey to enter the
Settings menu.
3. Press the UP and DOWN NavKeys to select
Keypad Tone, then press the SELECT softkey.
4. Press the UP and DOWN NavKeys to highlight
On or Off.
5. Press the SET softkey to save the setting.
Language
By default, the telephone base language is English.
You can select English, Spanish, or French to be
used in all telephone base screen displays.
To change the language setting:
1. Press the MENU softkey in idle mode to enter the
main menu.
2. Press the UP and DOWN NavKeys to select
Settings, then press SELECT softkey to enter the
Settings menu.
3. Press the UP and DOWN NavKeys to highlight
Language, then press the SELECT softkey.
4. Press the UP and DOWN NavKeys to highlight
English, Español or Français.
5. Press the SET softkey to save the setting.
43
Page 48

System setup
LCD Contrast
You can adjust the telephone base LCD screen
contrast to one of eight levels to suit different
lighting conditions.
Settings
Keypad Tone
Language
LCD Contrast
SELE CT
LCD Contrast
SET
Settings
Language
LCD Contrast
Clear Voice Mail
SELE CT
Clear Voice Mail
Clear Voice Mail
Indication?
To adjust the LCD contrast:
1. Press the MENU softkey in idle mode to enter
the main menu.
2. Press the UP and DOWN NavKeys to select
Settings, then press SELECT softkey to enter
the Settings menu.
3. Press the UP and DOWN NavKeys to highlight
LCD Contrast, then press SELECT softkey.
4. Press the LEFT and RIGHT or UP and DOWN
NavKeys to decrease or increase the LCD
contrast.
5. Press the SET softkey to save the setting.
Clear Voice Mail
If you subscribe to voice mail services provided
by the local telephone company, the VOICEMAIL
light on the telephone base will flash when you
have a new voice mail message. If your telephoneIf your telephone
system indicates that there is voice mail, but
you are sure that you have no new voice mail
messages, you can manually turn off the voice
mail indication.
To manually turn off the VOICEMAIL light:
1. Follow steps 1 and 2 in the above section.
2. Press the UP and DOWN NavKeys to highlight
Clear Voice Mail, then press the SELECT
softkey.
3. Press the YES softkey to clear the voice mail
indication.
YES No
NOT ES:
1. Clearing the voice mail indication does not delete any
voice mail messages.
2. If you subscribe to voice mail services, your local telephone
company may alert you to new voice mail messages with a
stutter (broken) dial tone.
44
Page 49

System setup
Default Settings (restore settings)
You can restore the factory-set default settings of
the telephone base if desired. Restoring the default
settings only affect the telephone base.
Settings
LCD Contrast
Clear Voice Mail
Default Settings
SEle ct
Default Settings
Restore Default
Settings?
YES No
NOTE: If you replace
a handset, the new
handset will be assigned
the next available
registration number,
rather than the handset
number of the handset
that you are replacing.
To restore default settings:
1. Press the MENU softkey in idle mode to enter
the main menu.
2. Press the UP and DOWN NavKeys to select
Settings, then press SELECT softkey to enter the
Settings menu.
3. Press the UP and DOWN NavKeys to highlight
Default Settings, then press SELECT. The screen
will display Restore Default Settings?
4. Press the YES softkey to restore the telephone
base default settings.
NOTE: Restoring the base default settings does not clear
the directory, call log, answering system messages, active
devices, paired devices, redial list, or reset the time.
Delete Handsets
For your handset(s) to be numbered sequentially,
you need to delete all the handset registrations
from the telephone base. After you delete all the
handset registrations, you will need to individually
register each handset with the telephone base
(see page 17).
To delete all the handset registrations:
Settings
Clear Voice Mail
Default Settings
Delete Handsets
SEle ct
Delete Handsets
Delete Registration
of all handsets?
YES No
1. Press the MENU softkey on the telephone base
in idle mode to enter to the main menu.
2. Press the UP and DOWN NavKeys to select
Settings, then press SELECT softkey to enter
the Settings menu.
3. Press the UP and DOWN NavKeys to highlight
Delete Handsets, then press the SELECT softkey.
The screen will show Delete Registration of all
handsets?
4. Press the YES softkey.
After deleting the registrations of all handsets, see
page 17 for handset registration instructions.
45
Page 50

System setup
Telephone base Ringers
NOTE: To return to
a previous menu, press
CANCEL. To return to idle
mode, press and hold
CANCEL.
Main Menu
Bluetooth
Settings
Ringers
Sele ct
Ringers
Ringer for HOME
Ringer for CELL1
Ringer for CELL2
Sele ct
In the telephone base Ringers menu, you can
select a ringer melody and adjust the ringer
volume for incoming calls to the HOME and
CELLULAR lines.
To enter the Ringers menu:
1. Press the MENU softkey in idle mode to enter
the main menu.
2. Press the UP and DOWN NavKeys to select
Ringers, then press SELECT softkey to enter
the Ringers menu.
In the Ringers menu, you can select:
• Ringer for HOME - set the ringer volume
and melody for the HOME line. The default
ringer melody is Melody 1.
• Ringer for CELL 1 - set the ringer volume
and melody for the first connected cellular
phone in the Active Devices list (page 27).
The default ringer melody is Melody 2.
• Ringer for CELL 2 - set the ringer volume
and melody for the second connected
cellular phone in the Active Devices list
(page 27). The default ringer melody is
Melody 3.
After a setting has been saved or set, you will
hear a confirmation tone and the display will
return to the Ringers menu.
While in the Ringers menu:
• Press CANCEL to return to a previous menu.
• Press and hold CANCEL on the telephone base
to return to the idle screen.
46
Page 51

System setup
NOTE: Even if the
ringer volume is off, the
telephone base or handset
will ring at the lowest
volume setting during an
incoming intercom call.
Ringer Volume
You can choose from six ringer volume levels on
the telephone base. The ringer can also be turned
off so the telephone base will not ring during
incoming calls.
To adjust the telephone base ringer volume:
Main Menu
Bluetooth
Settings
Ringers
Sele ct
Ringers
Ringer for HOME
Ringer for CELL1
Ringer for CELL2
Sele ct
Ringer for HOME
Ringer Volume
Ringer Melody
Sele ct
Ringer Volume
SET
OFF
1. Press the MENU softkey in idle mode to enter
the main menu.
2. Press the UP and DOWN NavKeys to select
Ringers, then press SELECT softkey to enter the
Ringers menu.
3. Press the UP and DOWN NavKeys to highlight:
• Ringer for HOME - set the ringer volume and
melody for the HOME line.
• Ringer for CELL 1 - set the ringer volume
and melody for the first connected cellular
phone in the Active Devices list (page 27).
• Ringer for CELL 2 - set the ringer volume and
melody for the second connected cellular
phone in the Active Devices list (page 27).
4. Press the SELECT softkey.
5. Press the SELECT softkey again to select Ringer
Volume.
6. To increase or decrease the ringer volume:
• Press the UP and DOWN or LEFT and RIGHT
NavKeys.
-OR-
Ringer Volume
Ringer Off
SET
OFF
• Press the UP and DOWN volume controls
on the telephone base.
To turn off the telephone base ringer:
• Press the DOWN or LEFT NavKeys or the
DOWN volume control until the display
shows Ringer Off. You can also press the OFF
softkey.
7. Press the SET softkey to save the setting.
47
Page 52

System setup
Ringer Melody
You can select from eight traditional ringer
melodies on the telephone base.
Main Menu
Bluetooth
Settings
Ringers
Sele ct
Ringers
Ringer for HOME
Ringer for CELL1
Ringer for CELL2
Sele ct
Ringer for HOME
Ringer Volume
Ringer Melody
Sele ct
Ringer Melody
Melody 1
Melody 2
P
Melody 3
Set
To select a ringer melody:
1. Press the MENU softkey in idle mode to enter
the main menu.
2. Press the UP and DOWN NavKeys to select
Ringers, then press SELECT softkey to enter
the Ringers menu.
3. Press the UP and DOWN NavKeys to highlight
one of the options below, then press the
SELECT softkey.
• Ringer for HOME - set the ringer volume
and melody for the HOME line.
• Ringer for CELL 1 - set the ringer volume
and melody for the first connected cellular
phone in the Active Devices list (page
27).
• Ringer for CELL 2 - set the ringer volume
and melody for the second connected
cellular phone in the Active Devices list
(page 27).
4. Press the DOWN NavKey to highlight Ringer
Melody, then press the SELECT softkey. You
will then hear a sample of the ringer melody.
5. Press the UP and DOWN NavKeys to select the
desired ringer.
6. Press the SET softkey to save the setting.
48
Page 53

System setup
NOT E: To return to
a previous menu, press
CANCEL. To return to idle
mo de, press and ho ld
CANCEL.
Answering System settings
In the Answering System menu, you can set the
answering system on or off, change the outgoing
announcement, remote access code, the number
of rings, and the answering system message alert
tone. The answering system only answers incoming
HOME line calls.
Main Menu
Directory
Call Log
Answering System
Sele ct
Answering System
Answer On/Off
Announcement
Number of Rings
Sele ct
N OTE: To l e a r n
how t o o p e r a te t h e
answering system, see the
An sweri ng op eration s
section (page 86).
To enter the Answering System menu:
1. Press the MENU softkey in idle mode to enter
the main menu.
2. Press the UP and DOWN NavKeys to select
Answering System, then press the SELECT
softkey to enter the Answering System menu.
While in the Answering System menu, press the
UP and DOWN NavKeys to highlight one of the
items below, then press the SELECT softkey.
• Answer On/Off - set the answering system
on or off (page 50).
• Announcement - review, record, or delete
the outgoing announcement (page 51).
• Record Memo - see page 89.
• Number of Rings - set the number of rings
before the answering system answers an
incoming call (page 52).
• Call Screening - listen to an incoming caller
leaving a message (page 53).
• Remote Code - change the remote access
code (page 53).
• Msg Alert Tone - set the message alert tone
on or off when you have a new answering
system message (page 54).
After a setting has been saved or set, you will hear
a confirmation tone and the display will return to
the Answering System menu.
While in the Answering System menu:
• Press CANCEL to return to a previous menu
• Press and hold CANCEL on the telephone base
to return to the idle screen.
49
Page 54

System setup
Main Menu
Directory
Call Log
Answering System
Sele ct
Answering System
Answer On/Off
Announcement
Record Memo
sele ct
Answer On/Off
On
P
Off
Answer On/Off
By default, the answering system is on. When the
answering system is off, ANS. OFF appears on the
telephone base display. This means that incoming
calls will not be answered by the answering
system. However when the answering system is
off, you can still play recorded messages (page
86) or record a memo (page 89).
To turn the answering system on or off:o turn the answering system on or off:
1. Press the MENU softkey on the telephone base
to enter the main menu.
2. Press the UP and DOWN NavKeys to highlight
Answering System, then press the SELECT
softkey.
3 Press the SELECT softkey to select Answer
On/Off.
4. Press the UP and DOWN NavKeys to highlight
On or Off, then press the SET softkey to save
your selection.
Set
NO TE : When th e answ eri ng sys tem is off, th e
answering system will answer the incoming call after 10
rings and then prompt the user to enter the remote access
code (page 90).
50
Page 55

System setup
Announcement
The announcement is the message that callers hear
when the answering system answers an incoming
HOME call.
Main Menu
Directory
Call Log
Answering System
Sele ct
Answering System
Answer On/Off
Announcement
Record Memo
Sele ct
Announcement
Review Annc.
Record Annc.
Delete Annc.
Sele ct
NOT E: For op timal
aud i o qu a l ity w h en
r e c o r d i n g a n
an n ounc emen t, s pea k
fac i n g t o w a r d s th e
m i c ro p h o n e f r o m
a p p ro x i m a t e l y n i n e
in che s awa y from the
telephone base.
To review, record, or delete the announcement:
1. Press the MENU softkey on the telephone base
to enter the main menu.
2. Press the UP and DOWN NavKeys to highlight
Answering System, then press the SELECT
softkey.
3. Press the the DOWN Navkey to highlight
Announcement, then press the SELECT softkey.
4. Press the UP and DOWN NavKeys to highlight an
option below, then press the SELECT softkey.
• Review Annc. - plays your current
outgoing announcement. By default, the
announcement is preset with "Hello, please
leave a message after the tone."
• Record Annc. - records your own outgoing
announcement. See the section below to
learn how to record an announcement.
• Delete Annc. - deletes your current
outgoing announcement. If you delete the
announcement, the default announcement
will be used.
Recording an announcement
You can record an announcement up to 90
seconds.
To record an announcement:
1. Follow steps 1 through 3 in the above section.
2. Press the DOWN NavKey to highlightto highlight Record
Annc., then press the SELECT softkey.
3. After the tone, speak in a clear voice.
4. When you are finished recording your
announcement, press the STOP softkey or PLAY/
STOP .
The announcement you just recorded will be
played back and now used as your outgoing
announcement.
51
Page 56

System setup
Number of Rings
By default, the answering system answers an
incoming HOME call after four rings. You can set
the answering system to answer an incoming
HOME call after two, four, or six rings. You can
also select Toll Saver (see below).
Main Menu
Directory
Call Log
Answering System
Sele ct
Answering System
Announcement
Record Memo
Number of Rings
Sele ct
Number of Rings
Answer on 2 Rings
Answer on 4 Rings
P
Answer on 6 Rings
Set
NOTE: To stop the
answering system recording
an incoming caller at anytime,
press HOME/FLASH or
SPEAKER on the handset, or
HOME on the telephone
base.
To set the number of rings:
1. Press the MENU softkey on the telephone base
to enter the main menu.
2. Press the UP and DOWN NavKeys to highlight
Answering System, then press the SELECT
softkey to enter the Answering System menu.
3. Press the UP and DOWN NavKeys to highlight to highlight
Number of Rings, then press the SELECT
softkey. You can then select:
• Answer on 2 Rings - the answering system
answers the incoming call after two rings.
• Answer on 4 Rings - the answering system
answers the incoming call after four rings.
• Answer of 6 Rings - the answering system
answers the incoming call after six rings.
• Toll Saver - the answering system answers
a call after two rings when there are new
messages, and after four rings when there
are no new messages.
4. Press the UP and DOWN NavKeys to highlight
an option, then press the SET softkey to save
the setting.
52
Page 57

System setup
Call Screening
By default, Call Screening is on. Call Screening
allows you to listen to a caller leaving a message
on the answering system.
Answering System
Record Memo
Number of Rings
Call Screening
Sele ct
Call Screening
On
P
Off
Set
Answering System
Number of Rings
Call Screening
Remote Code
Sele ct
Remote Code
5000
SET
To change this feature's setting:
1. Press the MENU softkey on the telephone base
to enter the main menu.
2. Press the UP and DOWN NavKeys to highlight
Answering System, then press the SELECT
softkey to enter the Answering System menu.
3. Press the the DOWN Navkey to highlight Call
Screening, then press the SELECT softkey.
4. Press the UP and DOWN NavKeys to highlight to highlight
On or Off, then press the SET softkey to save the
setting.
Remote Code
By default, the Remote Code is 5000. To access
your answering system remotely from any touch
tone phone (page 90), you need to enter the four
digit remote access code.
To change the remote access code:
1. Press the MENU softkey on the telephone base
to enter the main menu.
2. Press the UP and DOWN NavKeys to highlight
Answering System, then press the SELECT
softkey to enter the Answering System menu.
3. Press the UP and DOWN NavKeys to highlight
Remote Code, then press the SELECT softkey.
4. Enter your desired four-digit code by using the:Enter your desired four-digit code by using the:
• Dial pad keys (0-9) to enter a code.
• LEFT and RIGHT NavKeys to move the cursor
left and right.
• UP and DOWN NavKeys to increase and
decrease the digit.
5. Press the SET softkey to save your setting.
53
Page 58
System setup
Msg Alert Tone
By default, Msg Alert Tone is off. When the
message alert tone and the answering system is
on, telephone base will beep every 10 seconds
when you have a new message on the answering
system.
Answering System
Call Screening
Remote Code
Msg Alert Tone
Sele ct
Msg Alert Tone
On
Off
P
Set
To change this setting:
1. Press the MENU softkey on the telephone base
to enter the main menu.
2. Press the UP and DOWN NavKeys to highlight
Answering System, then press the SELECT
softkey to enter the Answering System menu.
3. Press the UP and DOWN NavKeys
to highlight
Msg Alert Tone, then press the SELECT
softkey.
4. Press the UP and DOWN NavKeys to highlight
On or Off, then press the SET softkey to save
the setting.
NOTE: If the message alert tone is on, but the answering
system is off, the telephone base will not beep when there
are new messages.
54
Page 59

Telephone operations
Telephone operations
NOTE: You can only
use one Bluetooth device
on a call at a time, either
one cellular phone on the
CELLULAR line or one
headset on the HOME line
(page 56).
With your new AT&T 5632/5632-2 telephone system,
you can enjoy the ease and comfort of making and
receiving calls using your Bluetooth cellular phone
on the CELLULAR line with the telephone system.
You can also use your conventional telephone
landline to make and receive calls on the HOME
line.
Here are some quick instructions to get you started.
See the following sections for more details.
• To make or receive a call, pressTo make or receive a call, press HOME or
CELLULAR (pages 56-59).
• To end aTo end a HOME or CELLULAR call on a handset,
press OFF/CANCEL or cradle the handset in the
telephone base or charger.
• To end aTo end a HOME or CELLULAR call on the telephone
base, press HOME or CELLULAR on the
handset, depending on which line is in use.
• To use the handset speakerphone on aTo use the handset speakerphone on a HOME or
CELLULAR line call, press SPEAKER to switch
between speakerphone and normal handset
use.
• When entering a telephone number, presspress
OFF/CANCEL on the handset or CANCEL on the
telephone base to make corrections.
Your new telephone system allows you to
simultaneously make and receive calls on the HOME
and CELLULAR lines (pages 62-63), place calls on
hold (page 61), mute a call (page 61), conference
calls (page 64), and intercom between handset(s)
and the telephone base (page 66).
IMPORTANT INFORMATION
• If you turn off or disconnect your Bluetooth
enabled cellular phone or headset, you may
need to manually connect your device(s) to the
telephone base again. See your device's user's
manual for more information.
• If you experience difficulty operating the
telephone system, see the troubleshooting
section (page 92).
55
Page 60
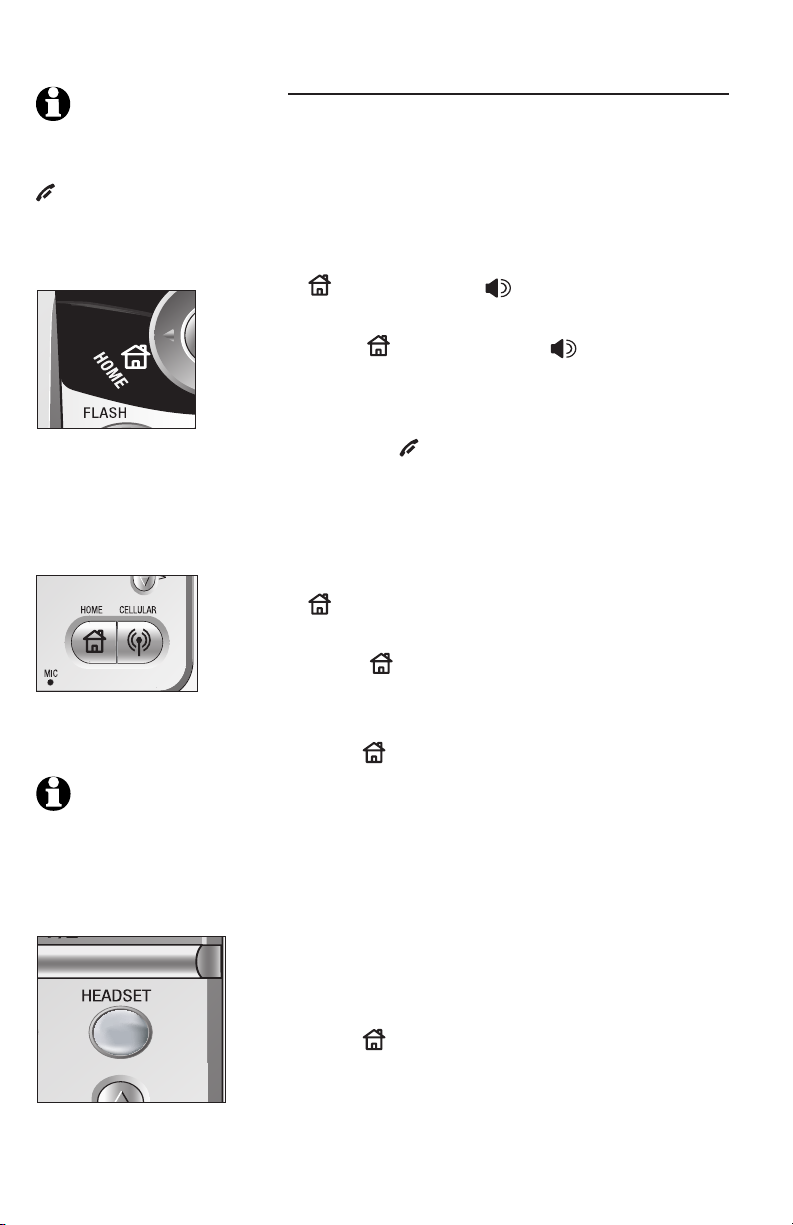
Telephone operations
NOTE: To erase the
last digit entered when
entering a telephone
number press
OFF/CANCEL on the
handset or CANCEL on
the telephone base.
Make a HOME call
You can make HOME calls using a handset and
telephone base. You can also use a wireless
Bluetooth enabled headset on HOME calls.
Using a handset
To make a HOME call:
• Enter the telephone number, then press
HOME/FLASH or SPEAKER.
–OR–
• Press HOME/FLASH or SPEAKER, then
enter the telephone number.
To end a HOME call:
• Press the OFF/CANCEL or return the handset
in the telephone base or charger cradle.
Using the telephone base
To make a HOME call:
• Enter the telephone number, then press
HOME.
–OR–
• Press HOME, then enter the telephone
number.
To end a HOME call:
NOTE: When using a
headset on a HOME call,
press HEADSET to switch
between headset use
and the telephone base
speakerphone.
• Press HOME.
Using a Bluetooth headset
To make a HOME call:
• Enter the telephone number first, then press
HEADSET on the telephone base.
–OR–
• Press HEADSET on the telephone base, then
enter the telephone number.
To end a HOME call:
• Press HOME.
–OR–
• Press the call button on your headset. See your
headset's user's manual for more information.
56
Page 61
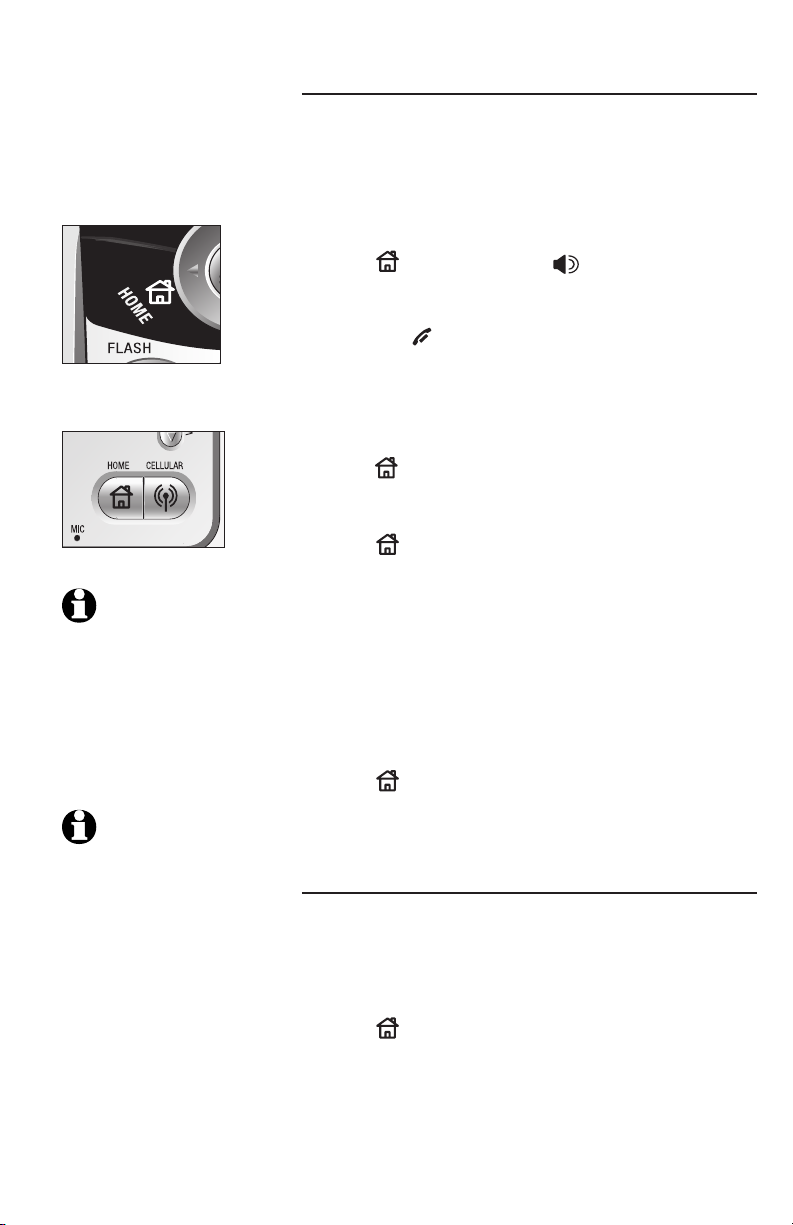
Telephone operations
Receive a HOME call
You can receive HOME calls using a handset or
telephone base. You can also use a wireless
Bluetooth enabled headset on HOME calls.
Using a handset
To receive an incoming HOME call:
• Press HOME/FLASH or SPEAKER.
To end a HOME call:
• Press the OFF/CANCEL or return the handset
in the telephone base or charger cradle.
Using the telephone base
To receive an incoming HOME call:
• Press HOME.
To end a HOME call:
• Press HOME.
Using a Bluetooth headset
NOTE: When using a
headset on the HOME line,
press HEADSET to switch
between headset use
and the telephone base
speakerphone.
NOTE: Refer to your
headset's user's manual
for more information on
using your headset's call
button.
To receive an incoming HOME call:
• Press HEADSET on the telephone base.
–OR–
• Press the call button on your headset.
To end a call on the HOME line:
• Press HOME.
–OR–
• Press the call button on your headset.
Call waiting on the HOME line
If you subscribe to call waiting service, you will
hear a short beep if you have an incoming HOME
call.
To answer a call waiting HOME call:
• Press HOME/FLASH on handset.
–OR–
• Press FLASH on the telephone base.
Contact your local telephone company for more
information about call waiting service.
57
Page 62
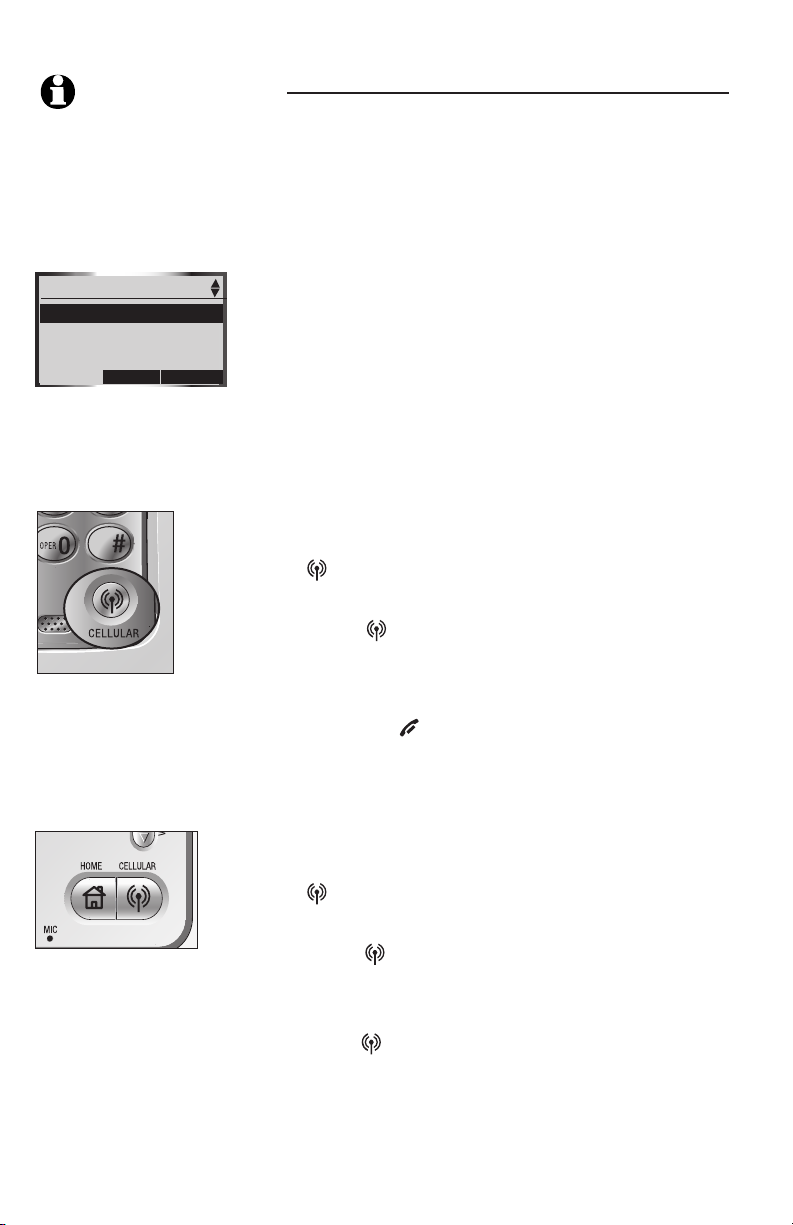
Telephone operations
NOTE: To use the
CELLULAR line, make
sure that a Bluetooth
enabled cellular phone
is connected to the
telephone base and on
the Active Devices list
(page 27).
Cellular
P1 John's Cell
P2 Mary's Cell
SELE CT
INFO
Make a CELLULAR call
You can connect a maximum of two Bluetooth
enabled cellular phones to the telephone base,
but only one cellular phone can be used on a
CELLULAR call at a time (see page 19).
If you only have one cellular phone connected
to the telephone base, it will automatically
be selected to make and receive CELLULAR
calls. However, if you have two cellular phones
connected to the telephone base and on the Active
Devices list (page 27), you will be prompted to
select a cellular phone before continuing to make
a CELLULAR call.
You can make CELLULAR calls using a handset
and telephone base.
Using a handset
To make a CELLULAR call:
• Enter the telephone number, then press
CELLULAR.
–OR–
• Press CELLULAR, enter in the telephone
number, and then press the DIAL softkey.
To end a CELLULAR call:
• Press the OFF/CANCEL or return the handset
in the telephone base or charger cradle.
Using the telephone base
To make a CELLULAR call:
• Enter the telephone number, then press
CELLULAR.
–OR–
• Press CELLULAR , enter in the telephone
number, and then press the DIAL softkey.
To end a CELLULAR call:
• Press CELLULAR.
58
Page 63
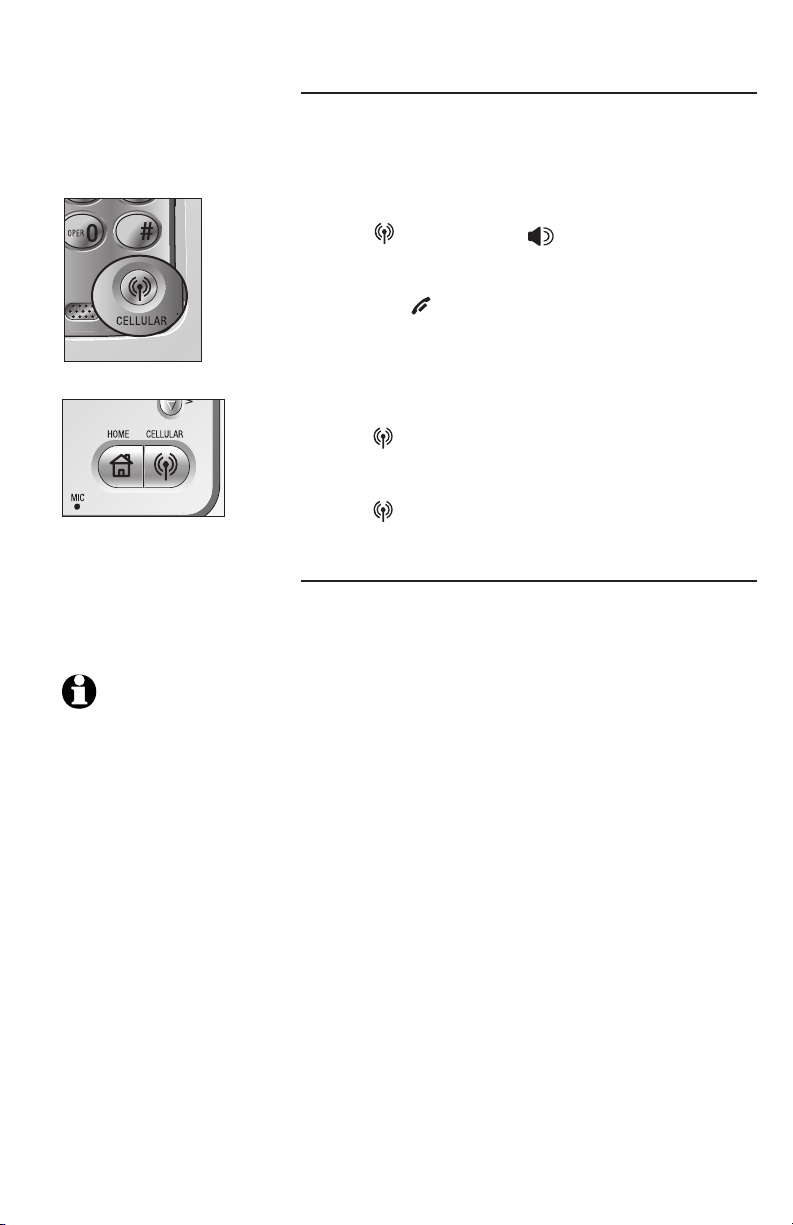
Telephone operations
Receive a CELLULAR call
You can receive CELLULAR calls using a handset
and telephone base.
Using a handset
To receive a CELLULAR call:
• Press CELLULAR or SPEAKER.
To end a CELLULAR call:
• Press the OFF/CANCEL or return the handset
in the telephone base or charger cradle.
Using the telephone base
To receive a CELLULAR call:
• Press CELLULAR.
To end a CELLULAR call:
• Press CELLULAR.
Call waiting on the CELLULAR line
If you subscribe to call waiting service provided by
your cellular service provider, you will hear one
or more beeps if you have an incoming CELLULAR
call.
NOTE: If you do
not answer an incoming
CELLULAR call while
already on a CELLULAR
call and you have voice
mail service active on
your cellular phone,
the incoming call may
be forwarded to your
cellular phone's voice
mail, depending on
your cellular voice mail
service. Contact your
cellular service provider
for more information.
To answer a call waiting CELLULAR call:
• Press the SWAP softkey on the handset or the
telephone base.
Contact your cellular service provider for more
information about call waiting service.
59
Page 64

Telephone operations
VOLUME
NOTE: If you silence
or ignore an incoming
HOME line call and the
answering system is on,
the answering system will
answer the incoming call.
NOTE: If you reject
an incoming CELLULAR
call and you have voice
mail service active on
your cellular phone, the
call will be forwarded
to your cellular phone's
voice mail.
Adjusting the listening volume
You can choose from six listening volume levels
on a handset and telephone base. For both the
HOME and CELLULAR lines, each time a volume
button is pressed, the listening volume is raised
or lowered by one level. When you are at the
highest and lowest volume levels, you will hear
a tone.
To adjust the listening volume while on a call:
Using a handset
• Press VOLUME on the side of the handset.
Using the telephone base
• Press VOLUME.
Silencing the ringers
When an incoming call rings on the HOME or
CELLULAR line, you can temporarily silence
the ringer on a handset, telephone base, or the
telephone system. Even if you silence the ringers,
you will still be able to answer the call on a
handset or on the telephone base. These features
only silence the ringers for the current incoming
call. The next incoming calls will ring according
to the volume setting.
To silence the ringers during an incoming call:
Incoming HOME calls
• Press the SILENCE softkey to silence the ringer
on that handset or on the telephone base.
• Press the IGNORE softkey to silence all the
ringers on all the handsets, including the
telephone base.
Incoming CELLULAR calls
• Press the SILENCE softkey to silence the ringer
on that handset or on the telephone base.
• Press the REJECT softkey to end the incoming
call. This will end the incoming CELLULAR
call.
You can also presspress OFF/CANCEL on the handset
or CANCEL on the telephone base to silence the
ringers of an incoming call
60
Page 65

Telephone operations
NOTE: When a call
is on hold the HOME key
and the status icon or
the CELLULAR key and
the status icon will
flash slowly, depending
on which line is on
hold.
Mute
While on a HOME or CELLULAR line call, you can
mute the microphone. This allows you to hear the
caller, but the caller will not be able to hear you.
To mute a call on a handset or telephone base:
• Press the MUTE softkey to silence the
microphone. MICROPHONE MUTED will appear
on the display.
To unmute a call on a handset or telephone base:
• Press the UNMUTE softkey to unmute the
microphone and resume the conversation.
Hold
When you place a HOME or CELLULAR call on hold,
the handset or telephone base that placed the call
on hold will beep every 30 seconds for 15 minutes,
unless there is call on another line. After 15 minutes,
the handset or telephone base that placed the call
on hold will ring for 30 seconds, and if the call is not
answered, the held call will end. In addition, if you are
using a Bluetooth headset on the HOME line and you
are out of range of the telephone base, the HOME call
will be placed on hold.
12:00AM
HANDSET 1
Home call on hold
REDIAL
CALLER ID
12:00 AM
Home call on hold
REDI AL
MENU
CID
To place a HOME call on hold:
• Press the HOLD softkey on the handset or
telephone base. Home call on hold will appear
on the display.
To resume a HOME call on hold:
• Press HOME/FLASH on the handset or
HOME on the telephone base.
To place a CELLULAR call on hold:
• Press the HOLD softkey on the handset or
telephone base. Cell call on hold will appear on
the display.
To resume a CELLULAR call on hold:
• Press CELLULAR on a handset or telephone
base.
61
Page 66

Telephone operations
NO TE : If you have
voice mail service active
on your cel lular phone,
and you do not answer
the incoming CELLULAR
cal l , the c a l l will be
answered by your cellular
ph o n e ' s voi c e m a i l .
Con t act your cellu l ar
service provider for more
information about voice
mail service.
Receive a CELLULAR call while on a HOME call
While on a HOME call and there is an incoming
CELLULAR call, CELLULAR, and
2
will flash on the handset and telephone base
1
or
display and you will hear a short beep.
To answer the incoming CELLULAR call:
• Press CELLULAR on the handset or telephone
base.
- The HOME call will automatically be placed
on hold and Home call on hold will appear
on the display.
To end the CELLULAR call:
• Press OFF/CANCEL on the handset or
CELLULAR on the telephone base.
- The HOME line will still be on hold.
To resume the HOME call on hold:
• Press HOME on the handset or telephone
base.
For information about the hold feature, see
page 61.
62
Page 67

Telephone operations
N O T E : I f t h e
answering system is on
and you do not answer
an incoming HOME call
while on the CELLULAR
line, the i n c o m i n g
HO ME line ca l l will
be an swered by the
answering system.
Receive a HOME call while on a CELLULAR call
While on a CELLULAR call and there is an incoming
HOME call, HOME and status icon will flash
on the handset and telephone base display and
you will hear a short beep.
To answer the incoming HOME call:
• Press
HOME on the handset or telephone
base.
- The CELLULAR line call will automatically be
placed on hold and Cell call on hold will
appear on the display.
To end the HOME call:
• Press OFF/CANCEL on the handset or HOME
on the telephone base.
- The CELLULAR line will still be on hold.
To resume the CELLULAR call on hold:
• Press CELLULAR on the handset or
telephone base.
For information about the hold feature, see
page 61.
63
Page 68

Telephone operations
Conferencing HOME and CELLULAR calls
While you are on HOME or CELLULAR call,
and the other line is on hold or in use, you can
conference the lines using a handset or telephone
base. When conferenced, you can end the HOME,
CELLULAR, or conference call.
NOTE: The OPTIONS
softkey is available when
are calls o n both HOME
and CELLULAR lines
To conference both HOME and CELLULAR calls:
1. Press the OPTIONS softkey on the handset or
telephone base.
2. Press the UP and DOWN NavKeys to select
Conf. both lines.
3. Press MENU/SELECT on the handset or the
SELECT softkey on the telephone base. The
HOME and CELLULAR lines will now be
conferenced.
To see a list of options for the handset or
telephone base while on the conference call:
1. Press the OPTIONS softkey on the handset or
telephone base. You can then select:
• Hold Conf. call - holds the conference
call.
• End Home call - ends the HOME line call.
• End Cell call - ends the CELLULAR line
call.
• End Conf. call - ends the conference call.
2. Press the UP and DOWN NavKeys to highlight
your desired choice, then press MENU/SELECT
on the handset or the SELECT softkey on the
telephone base.
N OT E : Ending a
co n f ere n ce call on a
han d set o r tele p hone
base when other handsets
or the te lep hon e bas e
are on th e con feren ce
ca l l, wi l l not end t h e
conf erence call, unless
you use the End Conf.
call option described on
the right.
To end a conference call:
• Press OFF/CANCEL on the handset or cradle
the handset in the telephone base or charger.
• Press HOME or CELLULAR on the
telephone base
–OR––OR–
• Use the End Conf. call option described in the
above section.
64
Page 69

Telephone operations
Call waiting while on a conference call
If you subscribe to call waiting service and you
receive an incoming HOME call while on a
conference call, you can answer the call waiting
HOME call by pressing:
• Press HOME/FLASH on handset.
–OR–
• Press FLASH on the telephone base.
The call waiting HOME call will join the conference
call with the CELLULAR call.
If you receive an incoming CELLULAR call while on
a conference call, you can answer the call waiting
CELLULAR call by pressing:
• Press the SWAP softkey on the handset or
telephone base.
The call waiting CELLULAR call will join the
conference call with the HOME call.
65
Page 70

Telephone operations
Intercom
Intercom
NOTE: Depending on
the number of handsets
in the system and if you
are using a handset or
telephone base, you will
have slightly different
intercom options.
NOTE: If you receive
an incoming HOME or
CELLULAR call while on
an intercom, you will hear
an alert tone and caller
information will appear on
the display. The intercom
call will be terminated if
you answer the call.
The intercom feature allows you to intercom between
handset(s) and the telephone base.
To enter the Intercom menu:
Using a handset
1. Press MENU/SELECT when the handset is in idle
mode.
2. Press the UP and DOWN NavKeys to select
Intercom, then press MENU/SELECT to enter
the Intercom menu.
Using the telephone base
• Press INTERCOM.
While in the Intercom menu, you can select:
• Global Page - initiates an intercom to all
handsets and the telephone base. This can
be used a handset locator.
• BASE - when using a handset, initiates an
intercom with the telephone base.
• Handset name - initiates an intercom with
that handset.
To answer an intercom call:
• Press the ANSWER softkey on the handset or
telephone base.
–OR––OR–
• Press SPEAKER on a handsetoron a handset or INTERCOM on
the telephone base. You can also press HEADSET
or the headset's call button, if available.
To silence an intercom call:
• Press the SILENCE softkey.
–OR–
• Press OFF/CANCEL on the handset or CANCEL
on the telephone base.
To end an intercom call:
• Press the END softkey.
–OR–
• Press OFF/CANCEL on the handset or INTERCOM
on the telephone base.
66
Page 71

Directory
Directory
Directory
In the Directory menu, you can store and search for
names and numbers. Directory entries are stored
separately on each handset and the telephone
base. The directory can store up to 100 entries,
with a maximum of 16 alphanumeric characters
(including spaces) and 32 digits.
The directory also allows you to assign a unique
ringer, picture, or animation for specific callers
(page 69), if you subscribe to caller ID service,
provided by your local telephone company.
To enter the Directory menu:
Using a handset
• Press MENU/SELECT when the handset is in idle
mode, then press MENU/SELECT to enter the
Directory menu.
Using the telephone base
• Press the MENU softkey when the telephone
base is in idle mode, then press the SELECT
softkey to enter Directory menu.
While in the Directory menu, you can:
• Create a new directory entry (page 68).
• Search for a directory entry by name (page 71).
• Edit a directory entry (page 72).
• Dial a directory entry (page 72).
• Delete an entry or the entire directory
(page 73).
To exit the Directory menu:
• Press and hold OFF/CANCEL on the handset
or CANCEL on the telephone base.
67
Page 72

Directory
Char
act
ers by number of
ke
y pr
esses
Dial
ke
y
1 2
3 4
5 6
7 8
9
spac
e
1
A B
C 2
a b
y
c
D E
F 3
d e
f
G H
I 4
g h
i
J K
L 5
j k
l
M N
O 6
m n
o
P Q
R S
7 p
q r
s
T U
V 8
t u
v
W X
Y Z
9 w
x z
0
*
? !
/ (
)
#
‘
, -
. &
NOTES:
1. Press CANCEL/OFF
at anytime to discard any
changes and return to
the Directory menu.
2. While creating or editing
an entry, if no keys
are pressed within 60
seconds, changes will
be discarded, and the
display will timeout and
return to idle screen.
Directory
Enter Name
J
Creating a new directory entry
Directory entries are unique to each handset and
telephone base.
To create a new directory entry:
Using a handset
1. Press MENU/SELECT when the handset is in idle
mode, then press MENU/SELECT to enter the
Directory menu.
2. Press the NEW softkey to create a new directory
entry.
3. Enter the name (up to 16 characters) by using
the dial pad (0-9). See the chart below.
• Each time a dial key is pressed, the
characters on that key will be displayed in
the highlighted character in order of the
number of key presses. For instance, for
the letter a, press the 2 dial pad key five
times.
• Press the LEFT and RIGHT NavKeys to
move the cursor left and right.
• Press the ERASE softkey to backspace and
delete a highlighted character.
DONE
NOTE: The cursor
moves to the right
automatically after two
seconds. It also moves to
the right when you press
another dial pad key or
press the RIGHT NavKey.
ERASE
68
Page 73

Directory
Directory
Enter Number
5
DONE
Directory
Charlie Johnson
888-883-2445
Rin ger:
Ani mation
SAVE
NOTE: You canYou can
choose from 26 pictures
and backgrounds and 5
animations.
ERASE
Freed om
ERASE
Creating a new directory entry (continued)
4. Press the DONE softkey or MENU/SELECT to
store the name.
5. Enter the telephone number (up to 32 digits) by
using the dial pad (0-9).
• Press the ERASE softkey to backspace and
delete a highlighted digit.
• Press the LEFT and RIGHT NavKeys to move
the cursor left and right.
• Press and hold # until a P appears on the
display to enter a two-second pause.
6. Press the DONE softkey or MENU/SELECT to
store the telephone number.
7. Press the SAVE softkey to save the directory
entry and return to the Directory menu.
–OR–
Press the UP and DOWN NavKeys to select:
• Edit the name - highlight the name, then
press MENU/SELECT to edit the name (see
step 3 on page 68).
• Edit the number - highlight the telephone
number, then press MENU/SELECT to edit the
number (see step 5).
• Assign a ringer - highlight Ringer, then press
the LEFT and RIGHT NavKeys to preview a
ringer melody. You can also press MENU/
SELECT to see the list of ringer melodies
(see steps 6 and 7 on page 37).
• Assign a picture or animation - highlight
Picture, then press the LEFT or RIGHT
NavKeys to preview a picture or a still
animation. You can also press MENU/SELECT
to see the full screen picture or animated
animation (see pages 39 and 40 for more
information).
When you are finished editing and customizing
the directory entry, press the SAVE softkey to
store the entry. The display will return to the
Directory menu.
69
Page 74

Directory
Creating a new directory entry (continued)
NOTES:
1. Press CANCEL/OFF
at anytime to discard any
changes and return to
the Directory menu.
2. While creating or editing
an entry, if no keys
are pressed within 60
seconds, changes will
be discarded, and the
display will timeout and
return to idle screen.
Using the telephone base
1. Press the MENU softkey when the telephone
base is in idle mode.
2. Press the SELECT softkey to enter the Directory
menu.
3. Press the NEW softkey to create a new directory
entry.
4. Enter the name (up to 16 characters) by using
the dial pad (0-9). See the character chart on
page 68.
• Each time a dial key is pressed, the
characters on that key will be displayed in
the highlighted character in order of the
number of key presses. For instance, for
the letter a, press the 2 dial pad key five
times.
• Press the LEFT and RIGHT NavKeys to move
the cursor left and right.
• Press the ERASE softkey to backspace and
delete a highlighted character.
5. Press the DONE softkey to store the name.
6. Enter the telephone number (up to 32 digits) by
using the dial pad (0-9).
• Press the LEFT and RIGHT NavKeys to
move the cursor left and right.
• Press the ERASE softkey to backspace and
delete a highlighted digit.
• Press and hold # until a P appears on the
display to enter a two-second pause.
7. Press the DONE softkey when you are finished
entering the telephone number.
8. Press the SAVE softkey to store the entry.
–OR–
Press the UP and DOWN NavKeys to highlight to highlight highlight
and edit the name or number (see steps 4 and
5), then press the SAVE softkey to store the
entry.
70
Page 75

Directory
NOTES:
1. Directory entries are stored in
alphabetical order by the first
letter in the first name.
2. If there is no name entry
matching your search, the
next closest matching name
entry in alphabetical order
will appear on the display.
Searching for directory entries
To search for directory entries on a handset or the
telephone base, enter the Directory then:
• Press the UP and DOWN NavKeys to scroll
through entries in alphabetical order.
• Press a dial pad key (0-9) to start a quick name
search.
• Press the FIND softkey to search for directory
entries by name.
To start a quick name search:
1. Enter the Directory menu from a handset or the
telephone base (see page 67).
2. Press a dial pad key (0-9).
The directory will display the first name beginning
with the first letter associated with the dial pad
key, if there is an entry in the directory that
begins with that letter. To see other names that
start with the letters on the dial pad key, keep
pressing the dial pad key. The names will be
shown in alphabetical order.
For example, if you have name entries Jennifer,
Jessie, Kevin and Linda in a directory:
• If you press 5 (JKL) once, Jennifer will be
highlighted.
• If you press 5 (JKL) twice Kevin will be
highlighted.
• If you press 5 (JKL) three times Linda will be
highlighted.
Directory 1
Alice
Amy
Chris
Deborah
Jenny
Kristen
FIND
NEW
To search for directory entries by name:
1. Enter the Directory menu from a handset or the
telephone base (see page 67).
2. Press the FIND softkey.
3. Enter a name using the dial pad keys (0-9). If
you have name entries such as Alice, Amy, Chris,
Deborah, Jenny, and Kristen in a handset or
telephone base directory and you enter:
• A in the Search for screen, and then press
the DONE softkey, Alice will be highlighted.
71
Page 76

Directory
NOTES:
1. Press CANCEL/OFF
at anytime to discard any
changes and return to
the Directory menu.
2. While creating or editing
an entry, if no keys
are pressed within 60
seconds, changes will
be discarded, and the
display will timeout and
return to idle screen.
Searching for directory entries (continued)
• AM in the Search for screen, and then
press the DONE softkey, Amy will be
highlighted.
• G in the Search for screen, and then
press the DONE softkey, Jenny will be
highlighted.
Edit a directory entry
In a handset directory, you can edit the name,
number, ringer, and picture or animation for an
entry. In the telephone base directory, you can
edit the name and number for an entry.
To edit a directory entry:
Using a handset
1. Press MENU/SELECT when the handset is in idle
mode, then press MENU/SELECT to enter the
Directory menu.
2. Press the UP and DOWN NavKeys to highlight highlight
an entry to edit, then press MENU/SELECT.
3. Press the EDIT softkey or MENU/SELECT to edit
the entry.
4. See step 7 on page 69 for instructions on how
to edit the name, number, ringer, and picture or
animation for a directory entry.
5. Press the SAVE softkey to save the entry. Entry
saved to Directory will appear on the display
and the details of that entry will be shown.
Using the telephone base
1. Press the MENU softkey when the telephone
base is in idle mode.
2. Press the SELECT softkey to enter the Directory
menu.
3. Press the UP and DOWN NavKeys to highlight
an entry, then press the SELECT softkey.
4. Press the EDIT softkey to edit the entry.
5. See step 6 on page 70 on how to edit the
telephone base directory entry.
6. Press the SAVE softkey to save the entry. Entry
saved to Directory will appear on the display
and the details of that entry will be shown.
72
Page 77

Directory
NOTES:
1. Once a directory entry
is deleted, it cannot be
recovered.
2. Deleting a directory entry
on one handset or on
the telephone base does
not affect the directories
on other handsets or the
telephone base.
Deleting directory entries
You can delete a selected directory entry or the
entire directory for that handset or telephone
base.
Delete one directory entry
1. Enter the Directory menu from a handset or the
telephone base (see page 67).
2. Press the UP or DOWN NavKeys to highlight an highlight an
entry to delete.
3. Press MENU/SELECT on the handset, or press
the SELECT softkey on the telephone base.
4. Press the DELETE softkey.
5. Press MENU/SELECT on the handset, or press the
SELECT softkey on the telephone base to delete
the entry.
You will hear a confirmation tone and the display
will show the name and number of the next
alphabetical entry in the directory.
Delete all directory entries
To delete the entire directory on a handset or on
the telephone base:
1. Enter the Directory menu from a handset or the
telephone base (see page 67).
2. Press the UP or DOWN NavKeys to highlight an highlight an
entry to delete.
3. Press MENU/SELECT on the handset, or press
the SELECT softkey on the telephone base.
4. Press the DELETE softkey.
5. Press the DOWN NavKey to highlight Delete All
Entries, then press MENU/SELECT on the handset
or the SELECT softkey on the telephone base.
6. Press the YES softkey. This will delete all the
directory entries, and the handset or telephone
base display will return to the main menu.
73
Page 78

Redial list
Information about caller ID with call waiting
Your new AT&T EP5632/EP5632-2 telephone system supports caller ID
services provided by most local telephone service companies. Depending on
your service subscription, you may see the caller’s number, or the caller’s
name and number which are sent by the telephone company after the first or
second ring. Caller ID allows you to see the name, number, date and time of
callers on the HOME and CELLULAR lines.
Caller ID with call waiting lets you see the name and telephone number of
the caller before answering the telephone, even when on another call. In
addition, the time and date are sent by the telephone and cellular service
provider company along with the caller ID information. These services are
available only if both you and the caller are in areas offering caller ID service,
and if both telephone companies use compatible equipment.
If you simultaneously receive incoming calls on the HOME and CELLULAR
line, the caller ID screen will divide into a top and bottom part. The top
part will display the HOME caller ID information, while the bottom part the
CELLULAR caller ID information.
Contact your local telephone company and cellular service provider if:
• You have both caller ID and call waiting, but as separate services (you may
need to combine these services).
• You have only caller ID service, or only call waiting service.
• You don’t subscribe to any caller ID or call waiting services.
You can use this product with regular caller ID service, or you can use this
product’s other features without subscribing to either caller ID or combined
caller ID with call waiting service.
7474
74
Page 79
Redial list
Call Log
Call Log
Call Log
12:00 AM
HANDSET 1
REDIAL
12:00 AM
REDI AL
MENU
CALLER ID
CID
In the Call Log menu, you can review a list of the
100 most recent incoming calls. Each handset and
the telephone base have their own unique Call
Log, meaning that the call log on one handset may
be different than the call log on another handset
or the telephone base.
To enter the Call Log menu:
Using a handset
• Press the CALLER ID softkey when the handset
is in idle mode.
–OR–
• Press MENU/SELECT when the handset is in idle
mode, then press the UP and DOWN NavKeys
to select Call Log, then press MENU/SELECT to
enter the Call Log menu.
Using the telephone base
• Press the CID softkey when the telephone base
is in idle mode.
–OR–
• Press the MENU softkey when the telephone
base is in idle mode, then press the UP and
DOWN NavKeys to highlight Call Log, then press
the SELECT softkey to enter the Call Log menu.
While in the Call Log menu, you can:
• Save a number to the Directory (page 79).
• Dial a telephone number (page 78).
• Play a recorded message (page 80).
• Delete a call log entry (page 79).
• Clear the missed calls indication (page 81).
To exit the Call Log menu:
• Press and hold OFF/CANCEL on the handset
or CANCEL on the telephone base.
7575
75
Page 80

Redial list
NOTE: If a Bluetooth
cellular device is deleted
from the Paired Devices list
and that device name was
included in a call log entry,
CELLULAR will appear as the
name in the call log entry,
instead of the device name.
Call Log information
If you subscribe to caller ID services, provided
by your local telephone company and/or cellular
service provider, the Call Log records your
incoming calls for both the HOME and CELLULAR
lines.
Although the call Log records the caller ID
information of both lines, CELLULAR line call log
entries only provide the number. The time and
date of the call will appear in the call log entry if
only the time is set. The Bluetooth name of the
cellular phone will also appear. However, if the
number on the incoming CELLULAR call matches
a number in the Directory, the name will be
retrieved from the matched directory entry.
Memory Match
Names in the Call Log will only be displayed if
the caller ID information is provided by your local
telephone company.
If the incoming telephone number matches the
last seven digits of a telephone number in the
directory, then the name from the directory
will appear in the call log entry. For example,
if Christine calls from 555-555-5555, and the
directory entry is Chris at 555-5555, then Chris
will appear in the call log entry.
7676
Page 81

Redial list
Reviewing the Call Log
In the Call Log, you may see the following status
icons:
• NEW - indicates that the entry is new and it
hasn't been reviewed.
• - indicates that a caller recorded a
message on the answering system.
• CW - indicates the call was a call waiting
call.
Call Log NEW
Charlie Johnson
1-888-883-2445
Jul 4 12:01 AM
HOME
OPTIONS
NOTE: When you have
new unreviewed calls, XX
Missed Calls will appear on
the display.
DELETE
To review the Call Log:
1. Enter the Call Log menu (see page 75).
2. Press the DOWN NavKey to review the most
recent to least recent entries.
In the Call Log, you can select the following:
• OPTIONS - allows you to change the dialing
options, save the entry to the directory (page
79), and clear the missed calls indication if
you have missed calls (page 81).
• DELETE - allows you to delete the call log
entry or all the entries (page 79).
• PLAY- allows you to play the recorded
message if the call log entry shows in
the icon status bar. Press the RIGHT NavKey
on the handset, or the PLAY softkey on
the telephone base to play the recorded
message.
Once you are finished reviewing the Call Log,
press and hold OFF/CANCEL on the handset or
CANCEL on the telephone base to return to the
idle screen.
7777
Page 82

Redial list
NOTE: Pressing the #
key when reviewing a call
log entry also modifies
the format as shown on
the right in step 4.
Dialing a call log entry
In the Call Log, you can dial a call log entry
telephone number on either the HOME or
CELLULAR line.
To dial the call log entry telephone number:
1. Enter the Call Log menu (see page 75).
2. Press the UP and DOWN NavKeys to select the
desired entry.
3. Press HOME/FLASH or SPEAKER on the
handset, or HOME on the telephone base.
–OR–
Press CELLULAR on the handset or on the
telephone base.
Dial options
You can change the dialing options of a call log
telephone number by using the OPTIONS softkey,
or by pressing the # key while in the Call Log.
To select the dialing options of an entry:
1. Enter the Call Log menu (see page 75).
2. Press the UP and DOWN NavKeys to select
a call log entry, then press the OPTIONS
softkey
3. Press MENU/SELECT on the handset or press
the SELECT softkey on the telephone base to
select Dial Options.
4. Press the UP and DOWN NavKeys to highlight
the desired dialing option, for instance:
• 555-5555
• 1-555-5555
• 555-555-5555
• 1-555-555-5555
5. Press MENU/SELECT on the handset or press
the SELECT softkey on the telephone base to
select the desired dialing option.
The digits of the selected entry will appear as
pre-dial digits. You can then save the entry, edit
the number, or dial the telephone number.
7878
Page 83

Redial list
NOTE: Deleting an
entry or message on a
handset or telephone
base will not affect the
call logs of the other
handset(s) or telephone
base.
NOTES:
1. If a recorded message
has been deleted and
you tried to play the
message as inidicated
in the call log entry,
Message not found will
appear on the display.
2. If you select Delete
all Entries, Delete all
Calls? will appear on
the display. Press the
YES softkey to delete
all entries.
Saving call log entries into the Directory
When viewing a call log entry, you can save the
entry into the Directory.
To save an entry into the Directory:
1. Enter the Call Log menu (page 75).
2. Press the UP and DOWN NavKeys to select an
entry to save to the Directory, then press the
OPTIONS softkey.
3. Press the UP and DOWN NavKeys to highlight
Save to Directory.
Using the handset
• Press MENU/SELECT to enter the directory
editing menu (see step 7 on page 69).
Using the telephone base
• Press the SELECT softkey to save the entry.
Deleting call log entries
In the Call Log, you can delete one entry or all
of the entries. You can also delete the recorded
message (if available) attached to the call log entry,
and delete both the entry and message.
To delete entries in the Call Log:
1. Enter the Call Log menu (see page 75).
2. Press the UP and DOWN NavKeys to select a call
log entry, then press the DELETE softkey.
3. Press the UP and DOWN NavKeys to select the
following options:
• Delete Entry - only deletes the selected call
log entry.
• Delete Msg - only deletes the recorded
message on the answering system of the
selected call log entry.
• Delete Entry & Msg - deletes both the call
log entry and recorded message on the
answering system.
• Delete All Entries - deletes all the entries in
the Call Log (see note).
4. Once you have selected an option, press MENU/
SELECT on the handset or press the SELECT
softkey on the telephone base (see note for
exception).
7979
Page 84

Redial list
NOTE: See the Answering
system operations section for
more information on how to
operate the answering system
features (page 86).
Play recorded messages in the Call Log
When a caller records a message on the answering
system, the recorded message icon, , appears
in the call log entry icon status bar. You can play
that recorded message from the handset or the
telephone base Call Log.
To play a recorded message in the Call Log:
Using a handset
1. Enter the Call Log menu (page 75).
2. Press the UP and DOWN NavKeys to find a call
log entry with the recorded message icon, .
3. Press the RIGHT NavKey (PLAY) to play the
recorded message. If the message was deleted
from the telephone base or another handset,
Message not found will appear on the display
and the Call Log will be updated on that
handset.
• Press the LEFT NavKey to repeat the
message.
• Press the STOP softkey to stop the
message.
• Press the DELETE softkey to delete the
message.
When the recorded message has finished, the
display will return to the call log entry.
Using the telephone base
1. Enter the Call Log menu (page 75).
2. Press the UP and DOWN NavKeys to find a call
log entry with the recorded message icon, .
3. Press the PLAY softkey to play the recorded
message.
• Press the REPEAT softkey to repeat the
message.
• Press the STOP softkey to stop the
message.
• Press the DELETE softkey to delete the
message.
When the recorded message has finished, the
display will return to the call log entry.
8080
Page 85

Redial list
Clear Missed Calls
You can clear the missed calls indication using
the call log option on the handset or telephone
base. Missed calls refers to unreviewed calls in the
Call Log.
To clear the missed calls indication:
1. Enter the Call Log menu (see page 75).
2. Press the UP and DOWN NavKeys to select a call
log entry, then press the OPTIONS softkey.
3. Press the UP and DOWN NavKeys to select
Clear Missed Calls, then press MENU/SELECT on
the handset or press the SELECT softkey on the
telephone base. The display will then return to
the Call Log.
8181
Page 86

Redial list
Redial list
The Redial list stores up to 20 entries on the
handset and telephone base. The first item in the
Redial list is the most recent telephone number
called. In the Redial list, you can dial the entry
on either the HOME or CELLULAR line, save the
entry into the Directory, or delete entries.
To enter the Redial menu:
1. Press the REDIAL softkey when the handset or
telephone base is in idle mode.
2. Press the UP and DOWN NavKeys to highlight
a redial entry. You can then:
• Dial the entry - press HOME SPEAKER
or CELLULAR on the handset or HOME,
HEADSET or CELLULAR on the telephone
base to dial the telephone number (page 84).
• SAVE - press this softkey to save the redial
entry into the Directory (page 83).
• DELETE - press this softkey to delete the
selected entry or all the redial entries
(page 85).
After an entry has been edited and/or saved, you
will hear a confirmation tone and the display will
return to the Redial list.
To exit the Redial list:
• Press and hold OFF/CANCEL on the handset
or CANCEL on the telephone base.
8282
Page 87

Redial list
Saving redial entries into the Directory
In the Redial list, you can save the telephone
number into the Directory on a handset or the
telephone base.
To save an entry into the Directory:
1. Press the REDIAL softkey when the handset or
telephone base is in idle mode.
2. Press the UP and DOWN NavKeys to select an
entry to save to the Directory, then press the
SAVE softkey. You will then be prompted to enter
a name.
3. Enter the name (up to 16 characters) by using
the dial pad keys (0-9). See step 3 on page 68 for
more information.
4. Press the DONE softkey or MENU/SELECT on
the handset when you are finished entering the
name.
5. If you used the telephone base to save the redial
entry, the entry is now stored in the Directory.
–OR–
If you used a handset, press the SAVE softkey to
store the entry (see step 7 on page 69 to learn
more about your options about customizing
directory entries).
8383
Page 88
Redial list
Dialing a redial entry
In the Redial list, you can dial a redial entry
telephone number using the HOME or CELLULAR
line.
To redial an entry:
1. Press the REDIAL softkey when the handset or
telephone base is in idle mode.
2. Press the UP and DOWN Navkeys to select a
redial entry.
3. Press HOME/FLASH or SPEAKER on the
handset, or HOME (HEADSET if available) on
the telephone base.
–OR–
Press CELLULAR on the handset or on the
telephone base.
Editing a redial entry
When a redial entry has been selected, you can
edit the entry and save it to the directory or dial
the telephone number.
To edit a redial entry
NOTE:
1. When editing the number,
you can also press and
hold # to enter a twosecond pause.
2. Display remains in predial mode after saving
the edited redial entry to
directory.
1. Press the REDIAL softkey when the handset or
telephone base is in idle mode.
2. Press the UP and DOWN Navkeys to select a
redial entry.
3. Press MENU/SELECT on the handset or press
the SELECT softkey on the telephone base to
put the selected entry to pre-dial mode (using
dial pad (0-9) to add additional digits.
• Press OFF/CANCEL on the handset or
CANCEL on the telephone to delete the last
digit.
• Press the PAUSE softkey to enter a two-
second pause.
4. Press the SAVE softkey to save the entry in the
Directory (see pages 68 and 69).
8484
Page 89

Redial list
NOTE: If you select
Delete all Entries, Delete
all Redial numbers? will
appear on the display.
Press the YES softkey to
delete all entries.
Deleting redial entries
In the Redial list, you can delete one entry or all
of the entries.
To delete entries in the Redial list:
1. Press the REDIAL softkey when the handset or
telephone base is in idle mode.
2. Press the UP and DOWN NavKeys to select a
redial entry, then press the DELETE softkey.
3. Press the UP and DOWN NavKeys to select:
• Delete Entry - only deletes the selected
redial entry.
• Delete All Entries - deletes all the entries in
the Redial list (see note).
4. Once you have selected an option, press MENU/
SELECT on the handset or press the SELECT
softkey on the telephone base (see note for
exception).
8585
Page 90
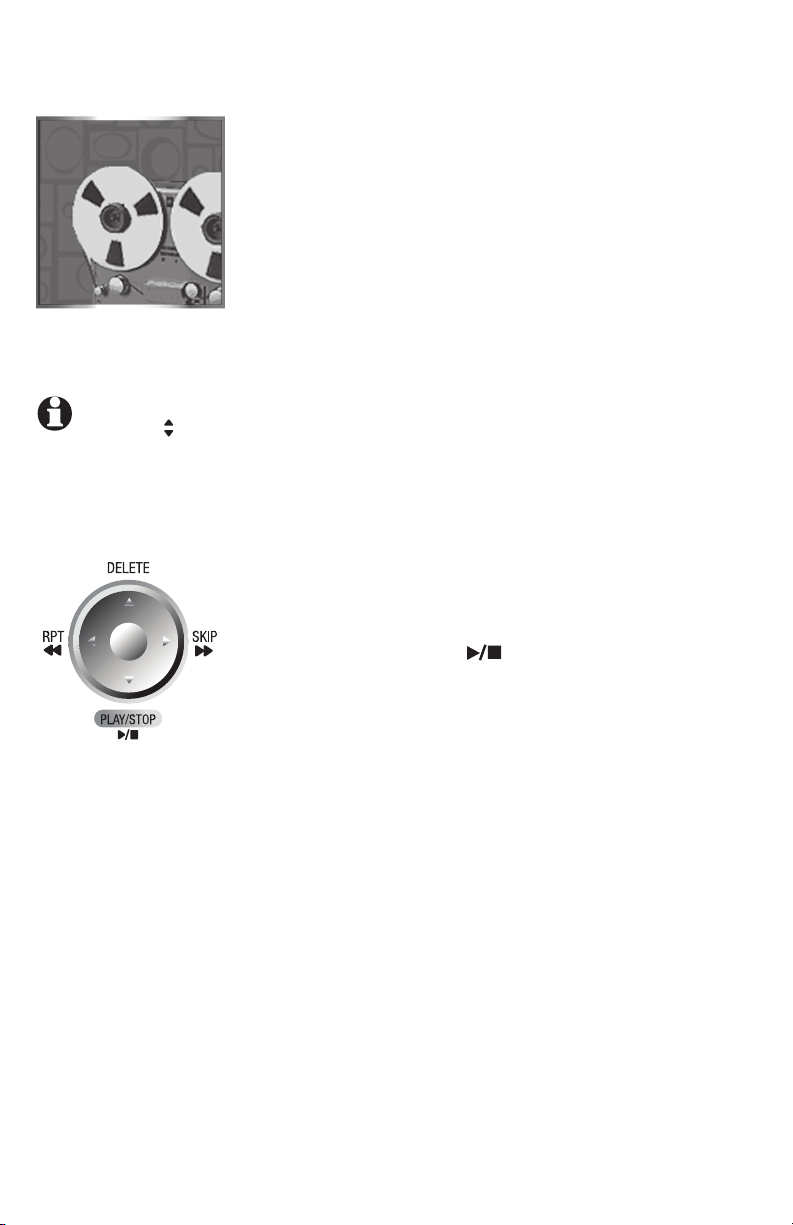
Answering system operations
Messages
Answering system operations
The answering system can record up to 99
messages, for a total of 15 minutes. The answering
system only answers calls on the HOME line.
When there are new messages (including memos)
on the answering system, the PLAY/STOP light on
the telephone base will flash, and the telephone
base display will indicate the number of new
messages. On a handset, the status indicator
light will flash and the display will show New
Message.
To play answering system messages:
NOTE: Press
VOLUME to adjust the
playback volume when
playing messages.
Using a handset
1. Press MENU/SELECT when the handset is in idle
mode.
2. Press the UP and DOWN NavKeys to select
Messages, then press MENU/SELECT to enter
the Messages menu.
3. Press the PLAY softkey.
Using the telephone base
• Press PLAY/STOP .
To learn how to setup the answering system, see
the Answering system setup section (page 49).
86
Page 91

Answering system operations
Message announcements
Before playing each message, the answering system
announces the day and time that the message was
received. The system will announce "Date and time
not set" if the clock is not set. To manually set the
time and day, see page 42.
If you have new messages, the system will announce
the number of new messages and play the oldest
message first. If you only have old messages, the
system will announce the number of old messages
and play the oldest message first. If you have
both new and old messages, the system will only
announce and play the number of new messages.
When messages are finished playing on the handset,
the screen will return to the Messages menu. When
messages are finished playing on the telephone
base, the system will return to idle mode.
Options during playback
When playing messages on the handset or telephone
base, you can adjust the playback volume, skip,
repeat, stop, or delete messages.
Messages NEW 1
Charlie Johnson
920
Apr il 18 2:3 5 PM
Dur ati on: 0:35
REPEAT
STOP
SKIP
DELETE
When playing messages using a handset:
• Press the VOLUME button on the side of the
handset to adjust the playback volume.
• Press the STOP softkey to stop the playback.
• Press RIGHT NavKey to skip to the next
message.
• Press LEFT NavKey to repeat the message
currently playing. Press twice to listen to the
previous message.
• Press the DELETE softkey to delete the message
currently being played back.
87
Page 92

Answering system operations
Options during playback (continued)
When playing messages using the telephone
base:
• Press the VOLUME button to adjust the playback
volume.
• Press SKIP to skip to the next message.
• Press RPT to repeat the message currently
playing. Press twice to listen to the previous
message.
• Press DELETE to delete the message currently
being played back.
• Press PLAY/STOP to stop the playback.
To delete all messages
You can only delete reviewed messages. Any new
messages must be played before you can delete
them. Any deleted messages cannot be retrieveddeleted messages cannot be retrieved
again.
To delete all old messages:
Using a handset
1. Press MENU/SELECT when the handset is in idle
mode.
2. Press the UP and DOWN NavKeys to select
Messages, then press MENU/SELECT to enter
the Messages menu.
3. Press the DELETE softkey.
4. Press the YES softkey to delete all messages.
Using the telephone base
1. Press DELETE while the telephone is idle (not
during a call, or during message playback).
2. Press the YES softkey to delete all messages.
Call Screening (on the telephone base)
If the answering system is on, you can listen to
a caller leaving a message on the answering
system. See page 53 for Call Screening setup.
88
Page 93

Answering system operations
NOTE: Speak facing
the MIC at the bottom
front of the telephone
base from about nine
inches away when
recording a memo.
Call intercept
If a caller is leaving a message on the answering
system, you can intercept the call by pressing
HOME/FLASH or SPEAKER on the handset,
or HOME or HEADSET (if available) on the
telephone base.
Record Memo
Memos are your own recorded messages used as a
reminder to yourself or for others in the household
using the same answering system. They are
saved, played back and deleted exactly like other
answering system messages.
To record a memo on the telephone base:
1. Press the MENU softkey when the telephone
base is in idle mode.
2. Press the UP and DOWN NavKeys to highlight
Answering System, then press the SELECT
softkey to enter the Answering System menu.
3. Press the UP and DOWN NavKeys to highlight
Record Memo, then press the SELECT softkey.
4. Record your memo after the tone. It can be up to
four minutes in length.
5. Press the STOP softkey or PLAY/STOP when
you are done recording. The display will then
return to idle mode.
89
Page 94
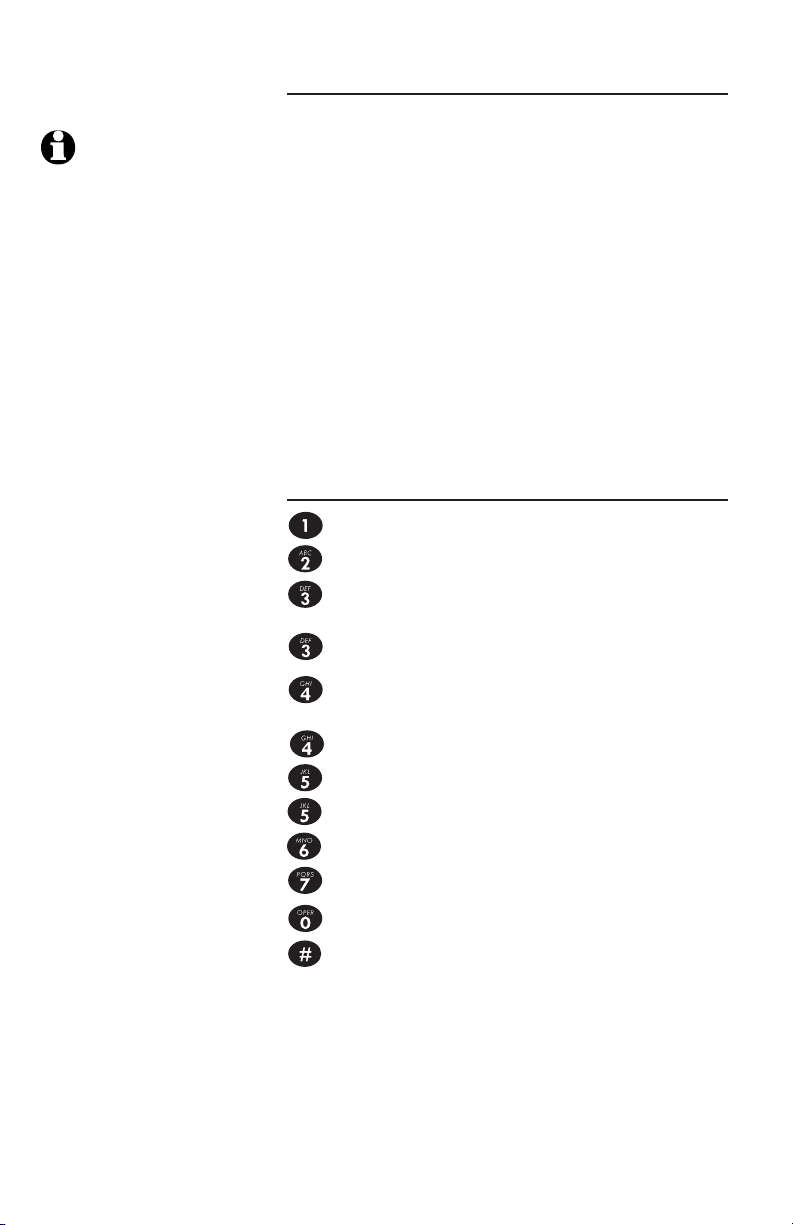
Answering system operations
NOT ES:
1. If you pause for more
th a n f our se cond s
during remote access,
a help menu listing all
features and commands
will be announced. If no
commands are entered
for approximately 20
seconds, the call will
end automatically.
2. If memory is full, the
sy stem w ill answe r
afte r 10 ri ngs, and
announce "Memory is
full, enter your remote
access code ." Enter
your re mote access
co de to e nte r t he
remote access mode.
Remote access
You can access your answering system remotely
by dialing your home telephone number from any
touch-tone telephone.
To remotely access your answering system:
1. Dial your telephone number from any touch
tone telephone.
2. At anytime when the answering system answers
the call, enter 5000 (default remote access
code, see page 53 to change this setting).
• If you have new messages, the system will
automatically announce the number of new
messages and then begin to play them.
3. Enter the following remote commands on a
touch tone phone.
Remote Command and Action
.....Plays all messages
.....Plays only new messages
.....Deletes the current message
(during playback)
.....Deletes all old messages
.....Repeats the current message
(during playback).
.....Press twice to hear the previous message.
.....Pause/resume message (during playback).
.....Hear a list of remote commands
.....Skips to the next message (during playback)
.....Records a new announcement
.....Turns the answering system on or off
.....To stop message playback
hang up
.....Save all undeleted messages
4. Hang up to end the call and save all
undeleted messages.
If desired, cut out the remote access wallet
card at the back of this user's manual for
quick reference.
90
Page 95

Appendix
Alert tones
Beep
Beep
Handset and telephone base alert tones
Beep-Beep-Beep
(three quick beep s)
Confirmation tone Handset registration or programming command
Handset battery is low. Place handset in telephone
base or charger to charge the battery.
successfully completed.
Out of Range tone The handset is out of range. Move it closer
Beeeeeeeeep
(long beep)
Beep
(telephone base
beeps every 10
seconds)
Beep
(telephone base
or handset beeps
every 30 seconds)
to the base.
Error tone (current operation has been
unsuccessful; try again).
There are new messages in the answering system
(only applies if the message alert tone feature is
turned on).
When a HOME or CELLULAR call is on hold, the
handset or telephone base that placed the call on
hold will beep every 30 seconds for 15 minutes.
91
Page 96

Appendix
Troubleshooting
If you have difficulty with your telephone system, please try the suggestions
below. For Customer Service, visit our website at www.telephones.att.com,
or call 1 (800) 222–3111. In Canada dial 1 (866) 288-4268.
I cannot pair my
cell phone to
the telephone
base.
I cannot pair my
headset to the
telephone base.
I cannot
connect my cell
phone with the
telephone base.
• Make sure the Bluetooth function of your cellular phone is turned on.
See your cell phone's user's manual for more information.
• Remove the AT&T EP5632 from your cell phone's handsfree device
history list (see you cell phone's user's manual for more information).
• Carefully follow the pairing instructions on page 23, making sure that
your cell phone is not connected to any other Bluetooth device(s).
• Turn off your cell phone, then turn it on again.
• Reset the telephone base. Unplug the unit’s electrical power. Wait
for approximately 15 seconds, then plug it back in. Repeat the above
suggestions.
• Make sure that your Bluetooth headset is in discoverable mode when
pairing with the telephone base. See your headset's user's manual for
more information on how to set your headset in discoverable mode.
• Carefully follow the pairing instructions on page 24, making sure that
your headset is not connected to any other Bluetooth device(s).
• Reset the telephone base. Unplug the unit’s electrical power. Wait
for approximately 15 seconds, then plug it back in. Repeat the above
suggestions.
• Make sure that the Bluetooth function of your cell phone is turned on.
See your cell phone's user's manual for more information.
• Make sure that your Bluetooth cell phone is not connected to any other
Bluetooth device(s).
• Turn off your cell phone, then turn it on again.
• Make sure that your cell phone is connected and on the Active Devices
list (page 27).
• For some cell phone's, you must authorize the AT&T EP5632 device in
your cell phone's Bluetooth feature. See your cell phone's user's manual
for more information.
• Manually connect your cell phone to the AT&T EP5632. Refer to your
cell phone's user's manual for more information.
I cannot connect
my headset with
the telephone
base.
• Make sure that your Bluetooth headset is not connected to any other
Bluetooth device(s).
• Make sure that your headset is connected and on the Active Devices
list (page 27).
92
Page 97

Appendix
I cannot put
my headset in
discoverable
mode.
I cannot find the
AT&T EP5632 on
my cell.
I don't know
how to search
for or add new
devices on my
cell phone.
• Refer to your headset's user manual for information on how to set your
headset in discoverable mode. For many headsets, they are by default
in discoverable mode. For other headsets, you may have to turn on the
headset and press and hold the call button for a certain time period.
• Make sure that the headset is not connected to any other device(s) in
order to successfully pair and connect to the telephone base.
• Carefully follow the pairing process on page 24.
• Reset the telephone base. Unplug the unit’s electrical power. Wait
for approximately 15 seconds, then plug it back in. Repeat the above
suggestions.
• Make sure that the telephone base is in discoverable mode. Carefully
follow the setup instructions on page 23.
• Make sure that you manually set your cell phone to find or search for
devices.
• Remove the AT&T EP5632 from your cell phone's handsfree device
history list (see your cell phone's user's manual for more information).
• Turn off your cell phone, then turn it on again.
• Reset the telephone base. Unplug the unit’s electrical power. Wait
for approximately 15 seconds, then plug it back in. Repeat the above
suggestions.
• Most cell phones have the Bluetooth feature in the connection or setup
menus. Please refer to your cell phone's user manual.
• In general, press the menu key on your cell phone, then look for the
Bluetooth menu, in the settings or connection menu. In the Bluetooth
menu, select the option to search for or add new devices.
My cell phone
disconnects with
the telephone
base.
My cell phone
is connected to
the telephone
base, but I
cannot make a
CELLULAR call.
• Turn off your cell phone, then turn it on again.
• Make sure that you are not using your cell phone when on a CELLULAR
call.
• Make sure that your cell phone is connected and on the Active Devices
list (page 27) and it is in idle mode when you are trying to make a
CELLULAR call.
• Make sure that your cell phone is compatible. For a list of compatible
devices visit www.telephones.att.com/Bluetooth.
• For some smartphones, make sure that the cellular function is turned
on.
93
Page 98

Appendix
Bluetooth
System Busy
appears on the
display.
The PIN on the
telephone base
does not work.
I cannot hear
any audio on
my telephone
system when
on a CELLULAR
call.
My telephone
system does not
work at all.
• Make sure that your cellular phone is in idle mode when connected and
on the Active Devices list.
• Make sure that your cellular phone or headset is not connected to any
other Bluetooth device.
• The EP5632/EP5632-2 can only use one Bluetooth device at a time.
• The default PIN is 0000.
• If you change the PIN on the telephone base, it will appear on the
telephone base display in the pairing process.
• Reset the telephone base. Unplug the unit’s electrical power. Wait for
approximately 15 seconds, then plug it back in.
• Turn off your cell phone, then turn it on again.
• Make sure the handset battery is installed and charged correctly (see
page 14). For optimum daily performance, return the cordless handset
to the telephone base after use.
• Make sure the power adapter is securely plugged into an outlet not
controlled by a wall switch.
• Make sure the telephone line cord is plugged firmly into the telephone
base and the modular wall jack.
• Reset the telephone base. Unplug the unit’s electrical power. Wait for
approximately 15 seconds, then plug it back in. Allow up to one minute
for the cordless handset and base to reset.
• Remove and re-insert the battery pack. If that still does not work, it may
be necessary to purchase a new battery pack.
There is no dial
tone.
• First, try all the above suggestions.
• Move the cordless handset closer to the telephone base. It might be out
of range.
• The telephone line cord might be malfunctioning. Try installing a new
telephone line cord.
• Disconnect the telephone base from the telephone jack and connect a
different telephone. If there is no dial tone on the telephone either, the
problem is in your wiring or local service. Contact your local telephone
company.
94
Page 99

Appendix
The battery
does not charge
in the handset
or the handset
battery does not
accept charge.
Low Battery is
displayed on
screen.
The telephone
does not ring
when there is an
incoming call.
• Make sure the handset is placed in the charger correctly. The CHARGE
light on the charger should be on.
• Remove the battery from the handset and install it in the spare battery
compartment on the side of the telephone base and let it charge for 16
hours. Then re-install the charged battery pack into the handset.
• If the cordless handset is in the charger or in the telephone base but
the CHARGE light is not on, refer to The charge light is off in the section
below.
• It may be necessary to purchase a new battery. Please refer to the
battery section of this user’s manual.
• The telephone might be malfunctioning. Please refer to the warranty
section of this user’s manual for further instruction.
• Place the handset in the base or charger for recharging.
• Remove and re-install the battery pack and use it normally until fully
discharged, then recharge the handset on the base or charger for 16
hours.
• If the above measures do not correct the problem, the battery pack may
need to be replaced.
• Make sure the ringer is on. (See page 36 for the handset and page 47 for
telephone base ringer volume).
• Make sure the telephone line cord and power adapter are plugged in
properly (page 9).
• The cordless handset may be too far from the telephone base. Move it
closer to the telephone base.
• There may be too many extension phones on the telephone line to allow
all of them to ring simultaneously. Try unplugging some of them.
• If the other telephones in your home are having the same problem, the
problem is in the wiring or local service. Contact the local telephone
company (charges may apply).
• Other electronic products can cause interference to your cordless
telephone. Try installing your telephone as far away as possible from the
following electronic devices: wireless routers, radios, radio towers, pager
towers, intercoms, room monitors, televisions, VCRs, personal computers,
kitchen appliances, and other cordless telephones.
• Test a working telephone at the telephone jack. If another telephone has
the same problem, the problem is in the telephone jack. Contact your
local telephone company (charges may apply).
• The telephone line cord might be malfunctioning. Try installing a new
telephone line cord.
• Re-install the battery pack and place the cordless handset in the
telephone base.
• Wait for the cordless handset to synchronize with the telephone base. To
be safe, allow up to one minute for this to take place.
95
Page 100

Appendix
I cannot dial out.
There is noise
or interference
during a
telephone
conversation.
-ORMy calls fade
out or cut in
and out when
I am using
the cordless
handset.
• Make sure there is a dial tone before dialing on the HOME line. It is
normal if the cordless handset takes a second or two to synchronize with
the telephone before producing a dial tone. Wait an extra second before
dialing.
• If the other telephones in your home are having the same problem, the
problem is in the wiring or local service. Contact your local telephone
company (charges may apply).
• Eliminate any background noise. Noise from a television, radio, or other
appliances may cause the telephone to not dial out properly. If you
cannot eliminate the background noise, first try muting the cordless
handset before dialing, or dialing from another room in your home with
less background noise.
• The handset may be out of range. Move it closer to the telephone base.
• Appliances or other cordless telephones plugged into the same circuit as
the telephone base can cause interference. Try moving the appliances or
telephone base to another outlet.
• Other electronic products can cause interference to your cordless
telephone. Try installing your telephone as far away as possible from the
following electronic devices: wireless routers, radios, radio towers, pager
towers, intercoms, room monitors, televisions, VCRs, personal computers,
kitchen appliances, and other cordless telephones.
• Microwave ovens operate on the same frequency as your telephone. It is
normal to experience static on your telephone while the microwave oven
is operating. Do not install this telephone in the same outlet or near a
microwave oven.
• If your telephone is plugged in with a modem or a surge protector,
plug the telephone (or modem/surge protector) into a different location.
If this solves the problem, re-locate your telephone or modem farther
apart from each other, or use a different surge protector.
• The layout of your home or office might be limiting the operating range.
Trying moving the base to another location, preferably a higher location
for better reception.
• Disconnect the telephone base from the modular jack and plug in a
corded telephone. If calls are still not clear, the problem is probably in
the wiring or local service. Contact your local service company (charges
may apply).
• Do you have DSL service? If yes, you need to have a DSL filter installed
at every telephone jack that has a telephone connected to it. Contact
your DSL service provider for filter information.
I hear other calls
when using the
telephone.
• Disconnect the telephone base from the telephone jack. Plug in a
different telephone. If you still hear other calls, the problem is probably
in the wiring or local service. Call your local telephone company.
96
 Loading...