

AT&T 854 Owner's Manual
--,:
,<
-<
-<
-<
-.-<
-<I
-l
IET-I
r-
-7
-?
QE.'
t Lrrf
ATgT
4-Lne
I nte rco
m/Speo
ke
rphon
e
Owner's
Monuol
-Lane
854 Features
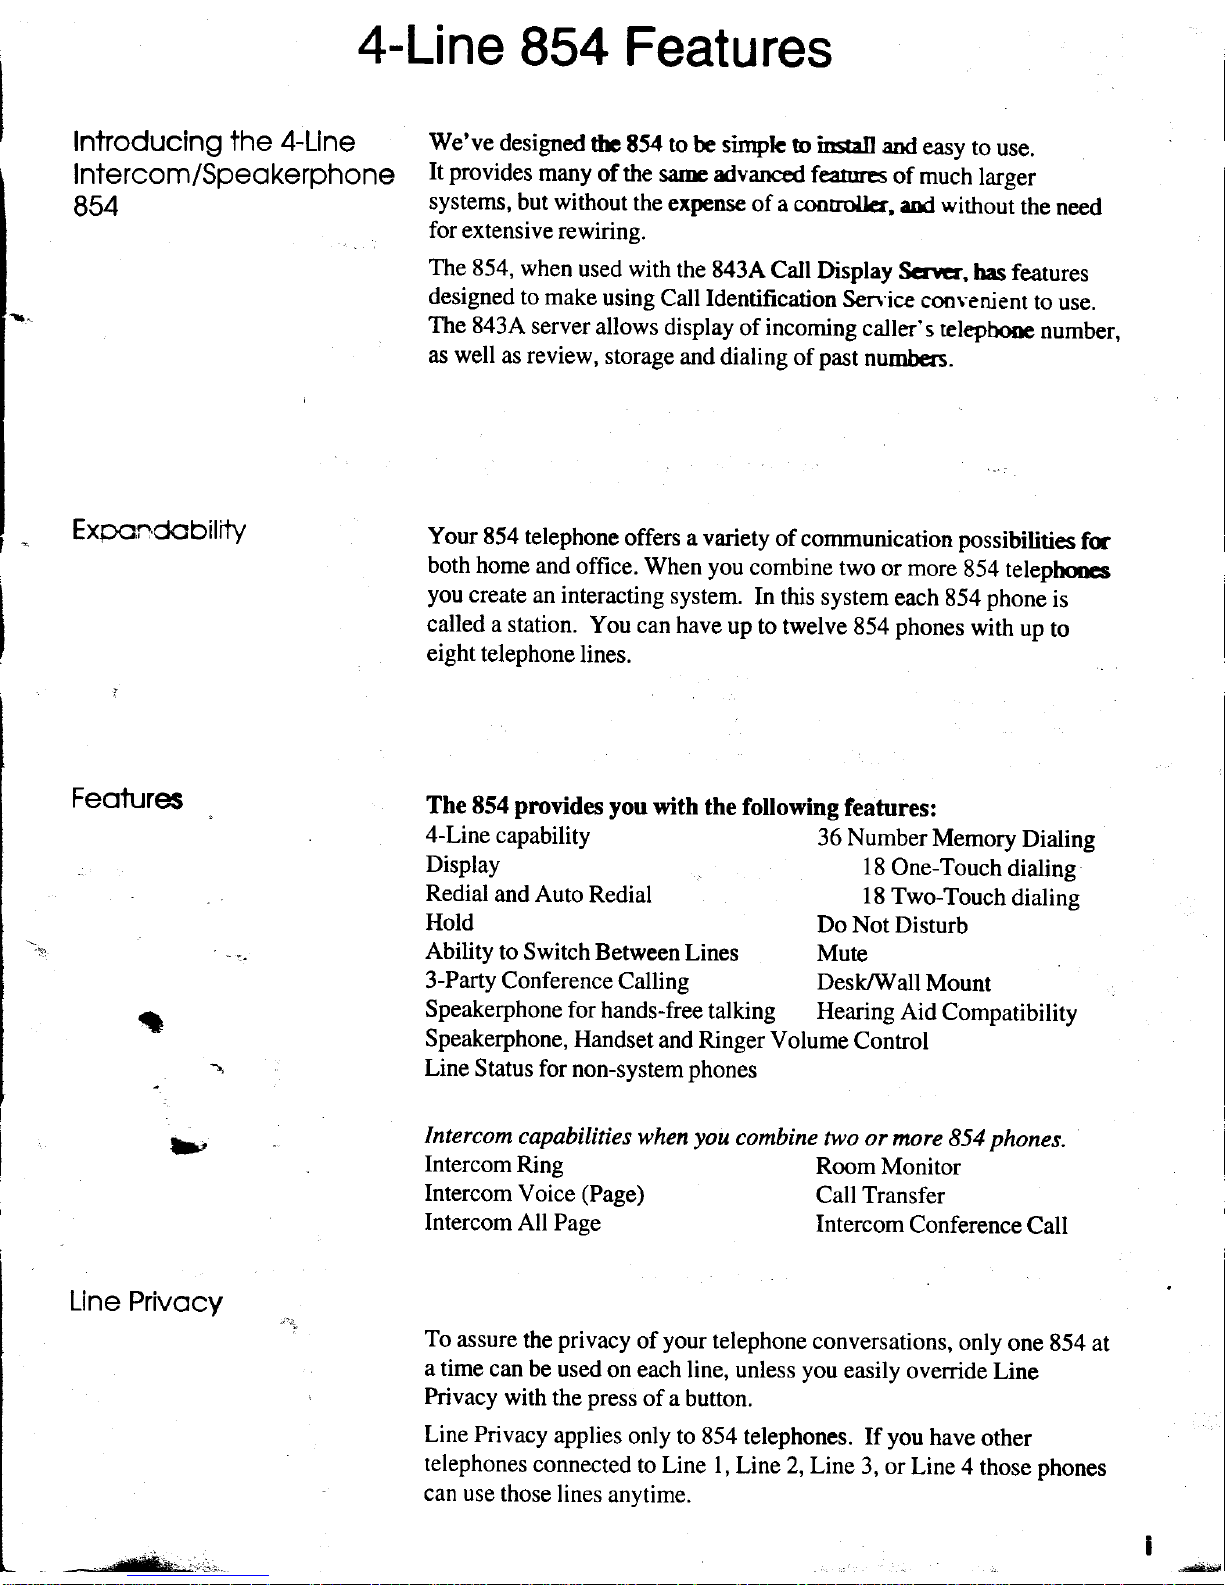
Introducing the 4-Line
We've
designed
fu t54
to
be sinpk
b
insrn
and
easy
to
use.
Intercom/Speokerphone
[t
provides
many
of the
sa'rrc advanced
feanres
of much
larger
854
systems,
but without
the
expense
of a coorroller,
and without
the
need
.
for
extensive
rewiring.
The
854,
when
used with
the 843A
Cdl
Display
Scrtcr,
has features
designed
to make
using call Identification
Sen'ice
co,ovenient
ro
use.
The 8434
server
allows
display
of
incoming
caller's
tetepbore
number,
as well
as review,
storage
and
dialing of
past
numbers.
-
ExponCobilrty
Your 854 telephone
offers a variety
of
communication possibilities
fc
both
home and
office.
When
you
combine
two
or more
854 telephocs
you
create
an interacting
system.
In this system
each
854
phone
is
called a station.
You can have
up to
twelve 854
phones
with
up
to
eight
telephone
lines.
Feofures
The
854
pmvides
you
with
the following
features:
4-Line
capability
36 NumberMemory
Dialing
Display
18
One-Touch
dialing
Redial
and Auto
Redial
18
Two-Touch
dialing
Hold
Do Not
Disturb
-."
Ability
to
Switch Between
Lines
Mute
3-Party Conference
Calling
Desk/Wall
Mount
(l
Speakerphone
for
hands-free
talking Hearing
Aid
Compatibility
Speakerphone,
Handset
and Ringer Volume
Control
1
Line
Status fornon-systemphones
lt
Intercom
capabilities
when
you
combine
two or
more 854
phones.
Intercom
Ring
Intercom
Voice
(Page)
Intercom
All Page
RoomMonitor
Call Transfer
lntercom
Conference
Call
Line
Privocy
'':
To
assure
the
privacy
ofyour
telephone conversations,
only
one 854 at
a time
can be
used
on each line, unless
you
easily
override
Line
,
Privacy
with
the
press
of a
button.
Line Privacy
applies
only to 854
telephones.
If
you
have
other
telephones
connected
to Line l,
Line 2,Line
3, or
Line 4
those
phones
can use
those
lines
anytime.
-.^r*-. .-

Safety
Information
A,
rporlont
Sofety
I nstrucfions
Always
follow basic
safety
precautions
when using this
product
to
reduce risk of injuy, fire, c clectric
shock.
1
Read and
understand
all
instructions
in
this
manual.
2
Follow
all
warnings and
instructions
marked
on
the
product.
3 Unplug
this
product
from the
wall outlet before cleaning.
Do
not
use liquid cleanen a
suol
cleaners,
use a
damp
cloth
for cleaning.
4
Do not use this
product
near
water, for example, near a
bath tub,
wash
bowl. htchen sinl or laundry tub, in
a
wet basement,
or
near a swimming
pool.
5
Do not
place
this
product
on an
unstable cart stand,
or tabla The
product
may
hll clsing serious damage to
the
product.
6
Slots and
openings
in the
cabinet and the back or
bottom rr€
provHed
fr
rrfrf
to
protect
it from
overheating,
these openings
must
not be blocked or covered.
The openings
should mcr
bc bbcked
by
placing
the
product
on the bed,
sofa,
rug, or other
similar surface.
This
product
should
never be
placcd
m or over a
radiator
or
heat register.
This
product
should
not be
placed
in a built-in
installation unless
propcr
venrilrtion
is
provided.
7 This
product
should be operated
only
from the type of
power
source
indic-d m tbe marking label. If
you
are
not
sure of the
type of
power
supply
to
your
home,
consult
your
dealer c lml
portr
comPany.
8 Do
not allow
anything
to rest on
the
power
cord. Do not locate
this
pro&crrbe
the cord will
be abused by
persons
walking
on it.
9 Do not
overload
wall outlets
and extension cords as
this can result in tb rist of firc c electric
shock.
10 Never
push
objects
of any
kind into this
product
through
cabid$ as
6c1' may touch dangerous voltage
points
or short
out
parts
that could
result
in
a risk of
fire or electric shoct
Netu
qill
liquid of any kind on the
product.
11 Toreducetheriskofelectricshock,donotdisassemblethisproduct,bot*eittoaqualifiedservicemanwhen
some
service or
repair
work is required.
Opening or removing @yers
ma!
e\Fios€
vou
to
dangerous
voltages
or other
risks. Incorrect
reassembly
can cause
electric shock
when
the
appliance is subsogcntly used.
12 Unplug
this
product
from the
wall outlet and refer servicing
to
q--r:tti
swice
personnel
under
the
follow-
ingconditions:
A.
When
the
power
supply cord
or
plug
is damaged or
frayed.
B. If
liquid
has been spilled
into the
product.
,:r
C.
Ifthe
product has been
exposed to rain or
water.
D.
If the
product
does
not operate
normally by following tbe opcrating
instructions.
Adjust only those controls,
that are covered
by
the operating
instructions because
improper
adjustment ofother controls
may result
in
damage
and
will
often
require
extensive
work by a
qualified
technician
to restore the
product
to normal operation.
E.
If the
product has been dropped
or the cabinet
has
been
damaged.
F.
If the
product exhibits
a distinct change
in
performance.
13 Avoid
using
a telephone
(other
than a cordless
type) during an elcctical
storm.
There may be a remote
risk of
electric
shock
from lightning.
14
Do not use
the telephone
to
report a
gas
leak
in
the
vicinity of the
leak.
.a
\
{
I
J
I
!
5
I
"nL
I
I
tl
SAVE
THESE INSTRUCTIONS
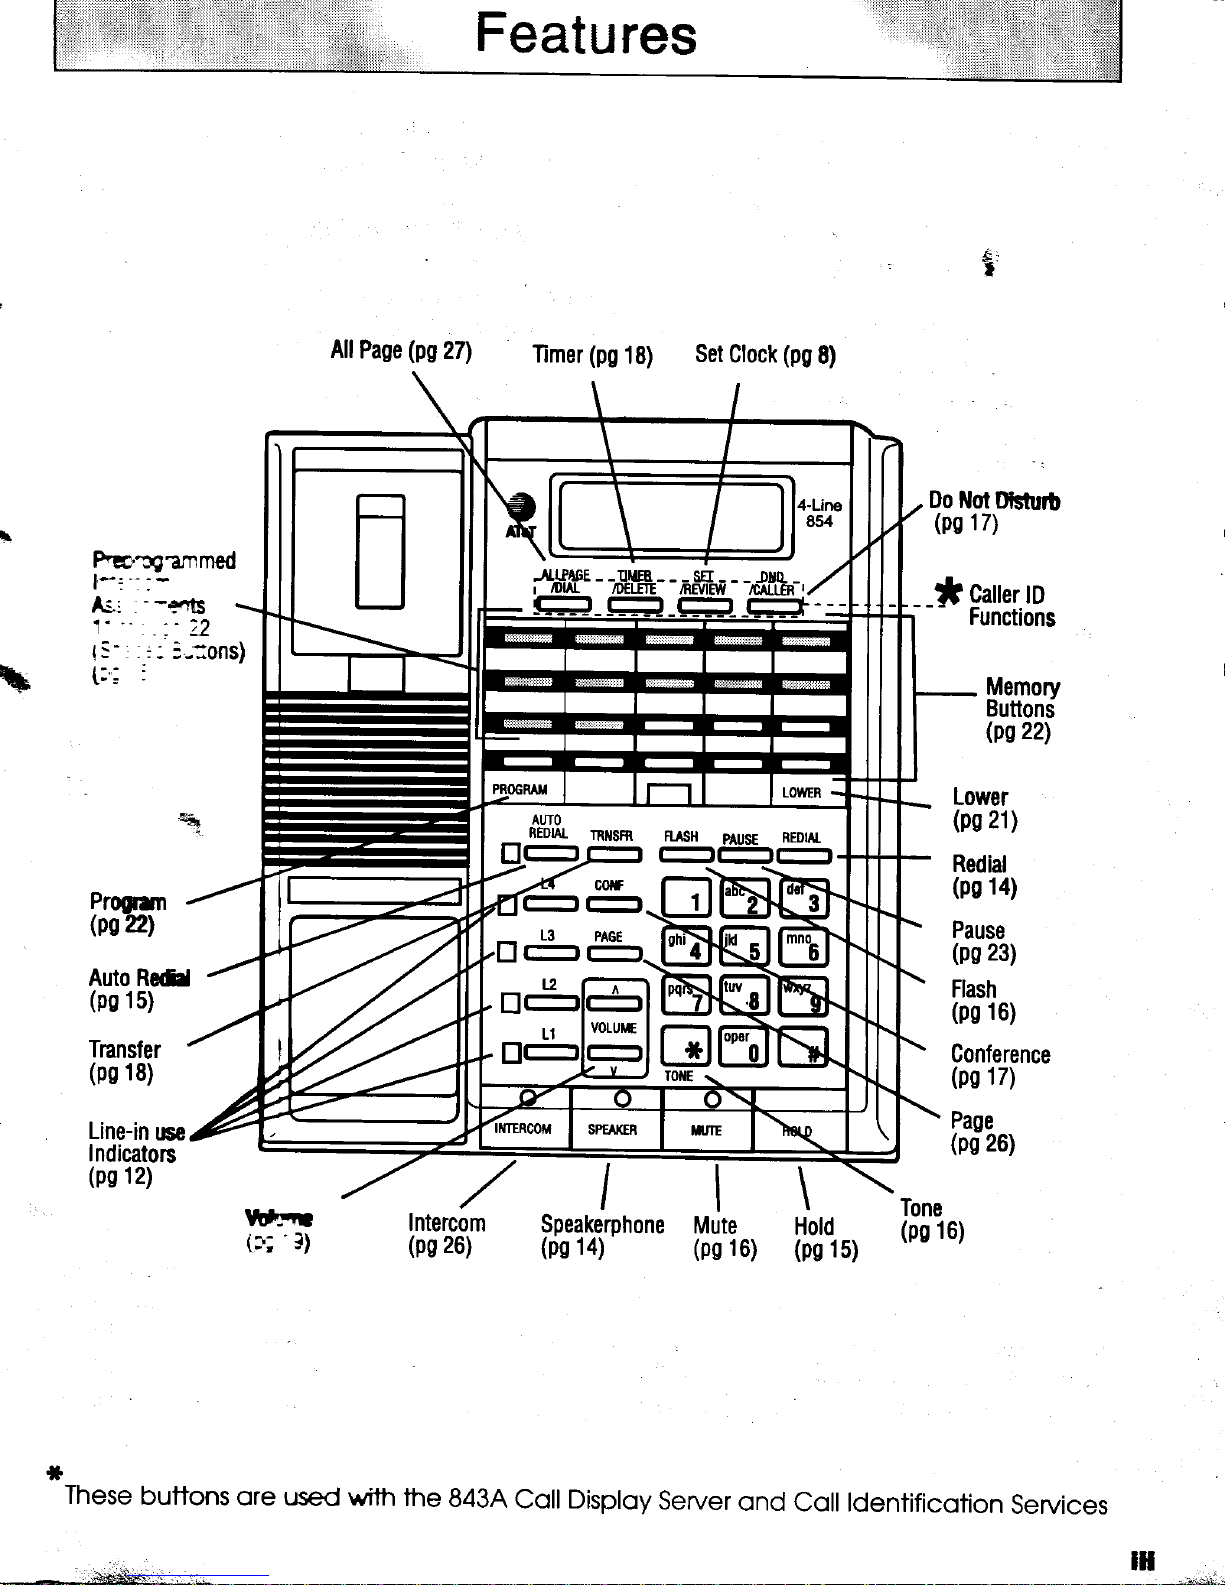
Features
tF
hc''ngzmmed
l-:".
lL',
1'"
-
:
--e"G
.
,_'22
Progrm
Os?2l
Auto RedJ
(ps
15)
AllPase
(pszn
(pg
Timer
AIJTO
REDIAL
-l-l
nilSfR
18)
- -,11ffi-
-nffiur
fuiSH
l-it-rr-l
Set
Clock
- -n*flF*-,
p
usE
(pg
8)
REDUT_
Do lrlot
(ps
*
- -
i
Lower
(ps
Redial
(ps
Pause
(ps
Flash
(ps
Dfshr6
17)
Catter
to
Functions
Memorv
Buttond
(ps22l
21
)
14)
23)
16)
Tnansfer
(pg
18)
Line-in
use
Indicators
(ps
12)
W,Fil
'3)
t3;
*
These
buttons
ore used
"/
Intercom
(ps
with the
26)
843,4
I
Speakerphone
(ps
14)
Coll Disploy
Server
Mute
(ps
16)
ond
Conference
(ps
17)
Page
(ps
26)
\-
Hold
(pg
1
5)
Tone
(ps
16)
Coll ldentifico1on
Services
ill

Table
of
Contents
Important
Safety Inform
ation
Features
top
and
side
Setting
up
your
system..........................
I
Parts checklist
.............
......................
z
Setting up
your
new
system..............
3
DesVlable
installation
.....................
4
Wall
mount
installation
....................
6
Assigning
intercom
numbers
............
7
Setting
clock
and
calendar................
8
Setting
dial
mode
...........9
Setting up
for
only two
or
three lines
................9
Setting
up a private
line
..................
l0
Changing
BATIERY
Display
........
l0
Operation
.......11
Indicator
lights
and display
messages
Making
and
answering
a call
Call
Privacy
Using the
Speakerphone
.................
Using Redial
AutoRedial
UsingHold
Switching
between
lines
.................
UsingMute
Using Flash
.........
Using Tone
.........
Making
a 3-party
conference
call
............
Using Do
Not
Disturb
Transferring
a call
..........
Answering
a transferred
call
............
Monitoring
the
length
of
a call
.......
Adjusting
RingerVolume
................
Adjusting
Volume.........
t2
l3
l3
t4
t4
l5
l5
l5
l6
t6
l6
l7
t7
l8
l8
l8
t9
l9
MemoryDialing
.........
.......20
Memory
features
..........21
One-Touch
Dialing
......22
l
Store
in
nEnpry
........,.............22
i
Did
...........
............22
Two-Touch
Dialing
.....22
Store
in
nprnory
.-....................
22
Did
...........
............22
Special
lvtennry
Features
..,.........,..
23
Dialing
long phone
numbers....
23
Erasing
a
stored
number
..........
23
Entering a dialing
delay
...........
23
Storine
teqbrarv
tone
signal
in
nErnory
................
23
Storing
a s*
itchhook
Flash
in
rEmory
.................
23
Interm
Oprth
Whar
torrslanldknow
aborJr
tbe
intercom
...................
25
Makine
and
ansrrering
an
i; -:--om
call
or
page
...............26
Paging=
tes............................27
Ansu'enng
an
ALLPAGE
...............
27
Monironng
a room
......
27
Making
an
intercom
conference
call
.............
............
2g
Dctermimng
1'our
intercom
number
..
2g
Appollrs
.....29
In
Case
of
Difficulty
.......................
30
Using
othcr
telephones
with
yun
854
................32
Expanding
your
854
system
...........
33
Centrex
operation
........34
AT&TLimited
Warranty
and
Maintenance
Informatio
n
....
37
FCC
Information...
Index
...........
39
Service
Return
Form
.......
40
Quick
Reference.
back
cover
i
i
!
.t
38
.
I
I
i
l
I
I
I
j
I
j
iv
iSj$r
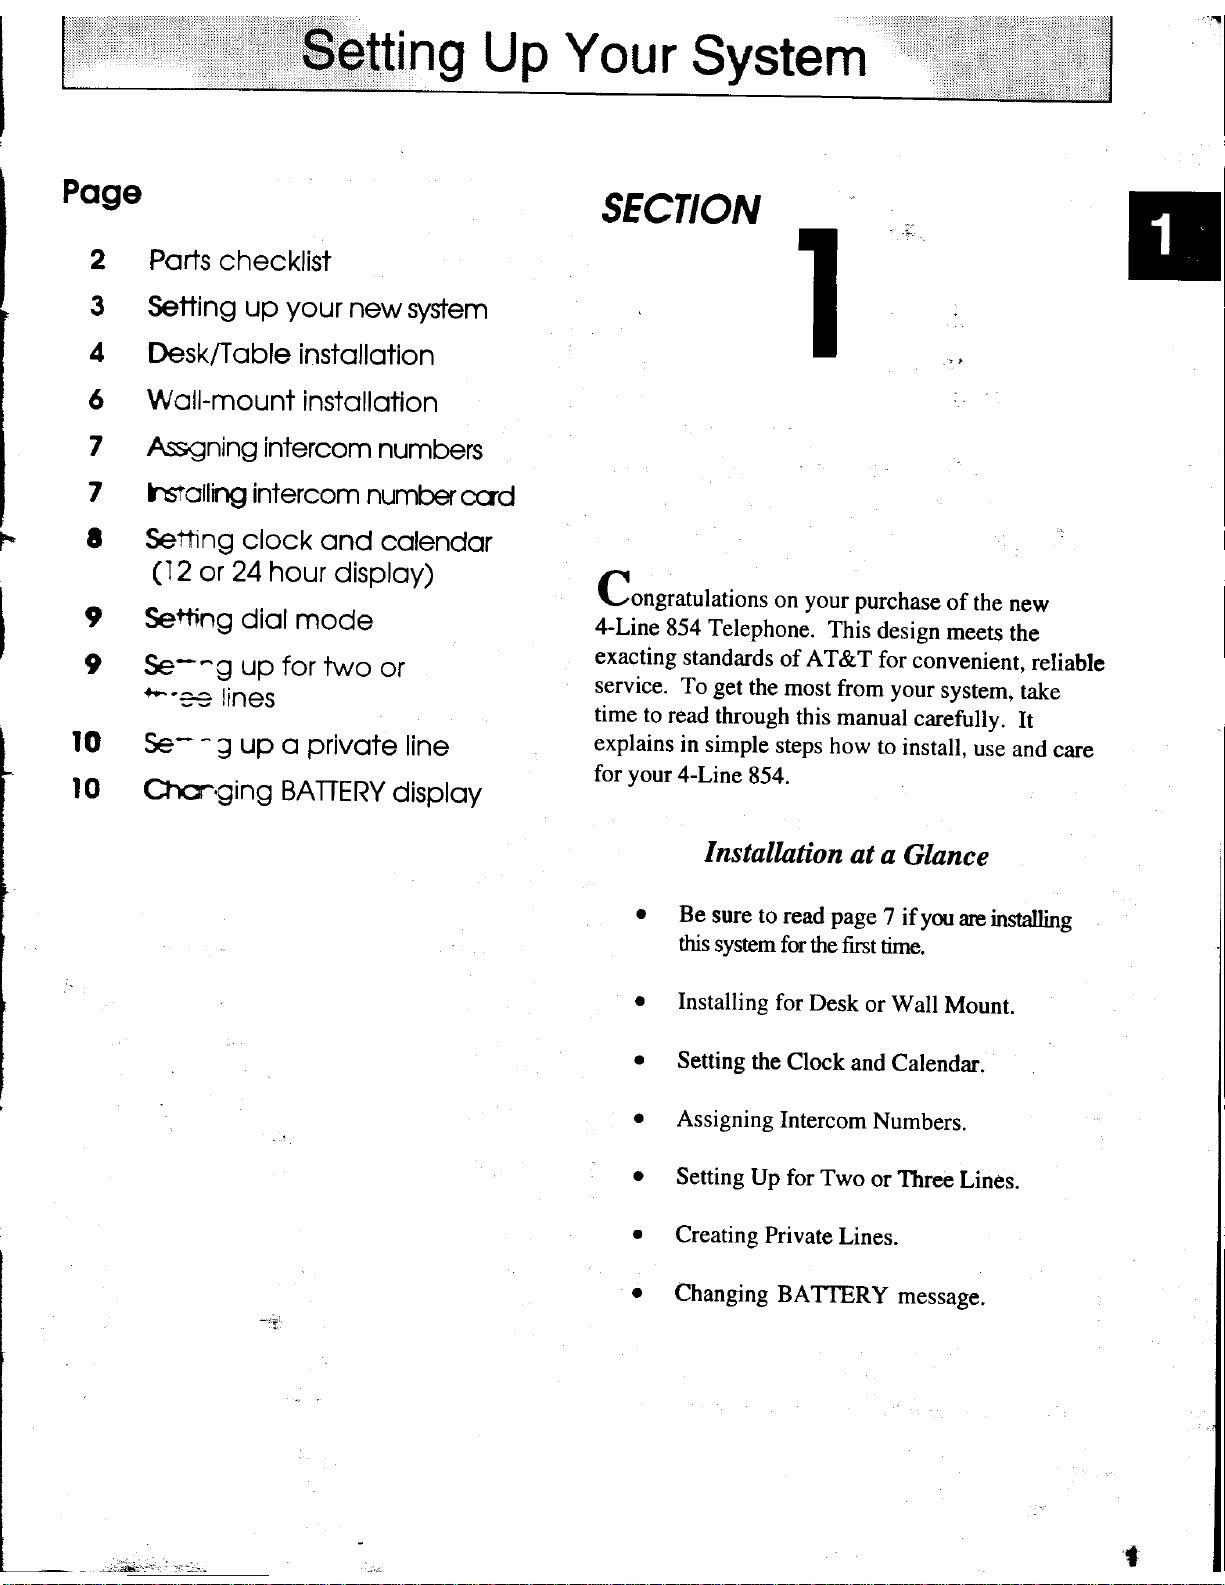
$etting
Up Your
System
Poge
2
3
4
6
7
7
t
Poris
checklist
Setting up
your
newsystem
Desk/Tqble
instqllotion
Woll-mount
instollotion
Assgning
intercom
numbers
hs1'ollnrg
intercom
number
ccrd
Sethng
clock
ond
colendor
(12
or 24hour
disploy)
Sertng
diol
mode
Se-^g
up for
two
or
b'=e
lines
lO
Se-
J
up
o
privote
line
l0
Chor,ging
BAIERY
disptoy
SECTION
11
(-ongratulations
on
your
purchase
of
the
new
4-Line
854
Telephone.
This
design
meets
the
exacting
standards
of AT&T
for
convenient,
reliable
service.
To get
the
most
from your
system,
take
time
to
read
through
this
manual
carefully.
It
explains
in simple
steps
how
to
install,
use
and
care
for
your
4-Line
854.
Installation
at
a
Glance
Be
sure to
read pageT
if
you
are installing
this
system
forttre
fint
time.
Installing
for Desk
or Wall
Mount.
Setting
the
Clock
and
Calendar.
Assigning
Intercom
Numbers.
Setting
Up for
Two
or Three
Lines.
Creating
Private
Lines.
Changing
BATTERY
message.
I
9
*

Parts
Checklist
Every 4-Line 854 telephone
should
include lhe following
componenfs:
Teleohone
Hondset
Coiled hondset cord
(l)
8" Block telephone line
cord
(2)
7'
Block telephone line
cord
AC odopter
Quick Reference
Cord
(nsiolled)
The
Quick Reference Cord
Cover
holds o two-sided
Quick Reference
Cord,
Be
sure to
leove
it in the
pnone.
DIAL MQD$:.:..'..
This telephone has a selectable
push-button
dial and
will work with either tone
or rotary
telephone
service.
You
can set it to work
directly with long distance or certain
other
services
that re4uire
tone signaling, including
some tone
activated
computer systems.
fr
Lheck
the hsr to
rnake
sure
you
have
all the
correct
paru
included with
the
telephone you
purchased.
You
should
save
your
protective
packaging
marerials
to
reuse if
you
move
or
need to ship a telephone.
We
have
provided
all necessary parts.
Howeuer. if
you
need additional parts
to
modernize or
expand
your
telephone
wiring,
AT&T
offers a complete
line
of do-it-yourself
products
-
including
jacks,
cords and
adapters
-
to make any
job
quick,
safe and
inexpensive.
Ask for them
where you
purchased
your
4-Line 85.1,
or call I 800 222-3lIl.
I
2
3
4
5
6
{
s
g
';
{
2
D,
This telephone is hearing-aid
compatible.
Setting
Up
Your
New
System
Instollolion
Checklist
Coulion
,
.
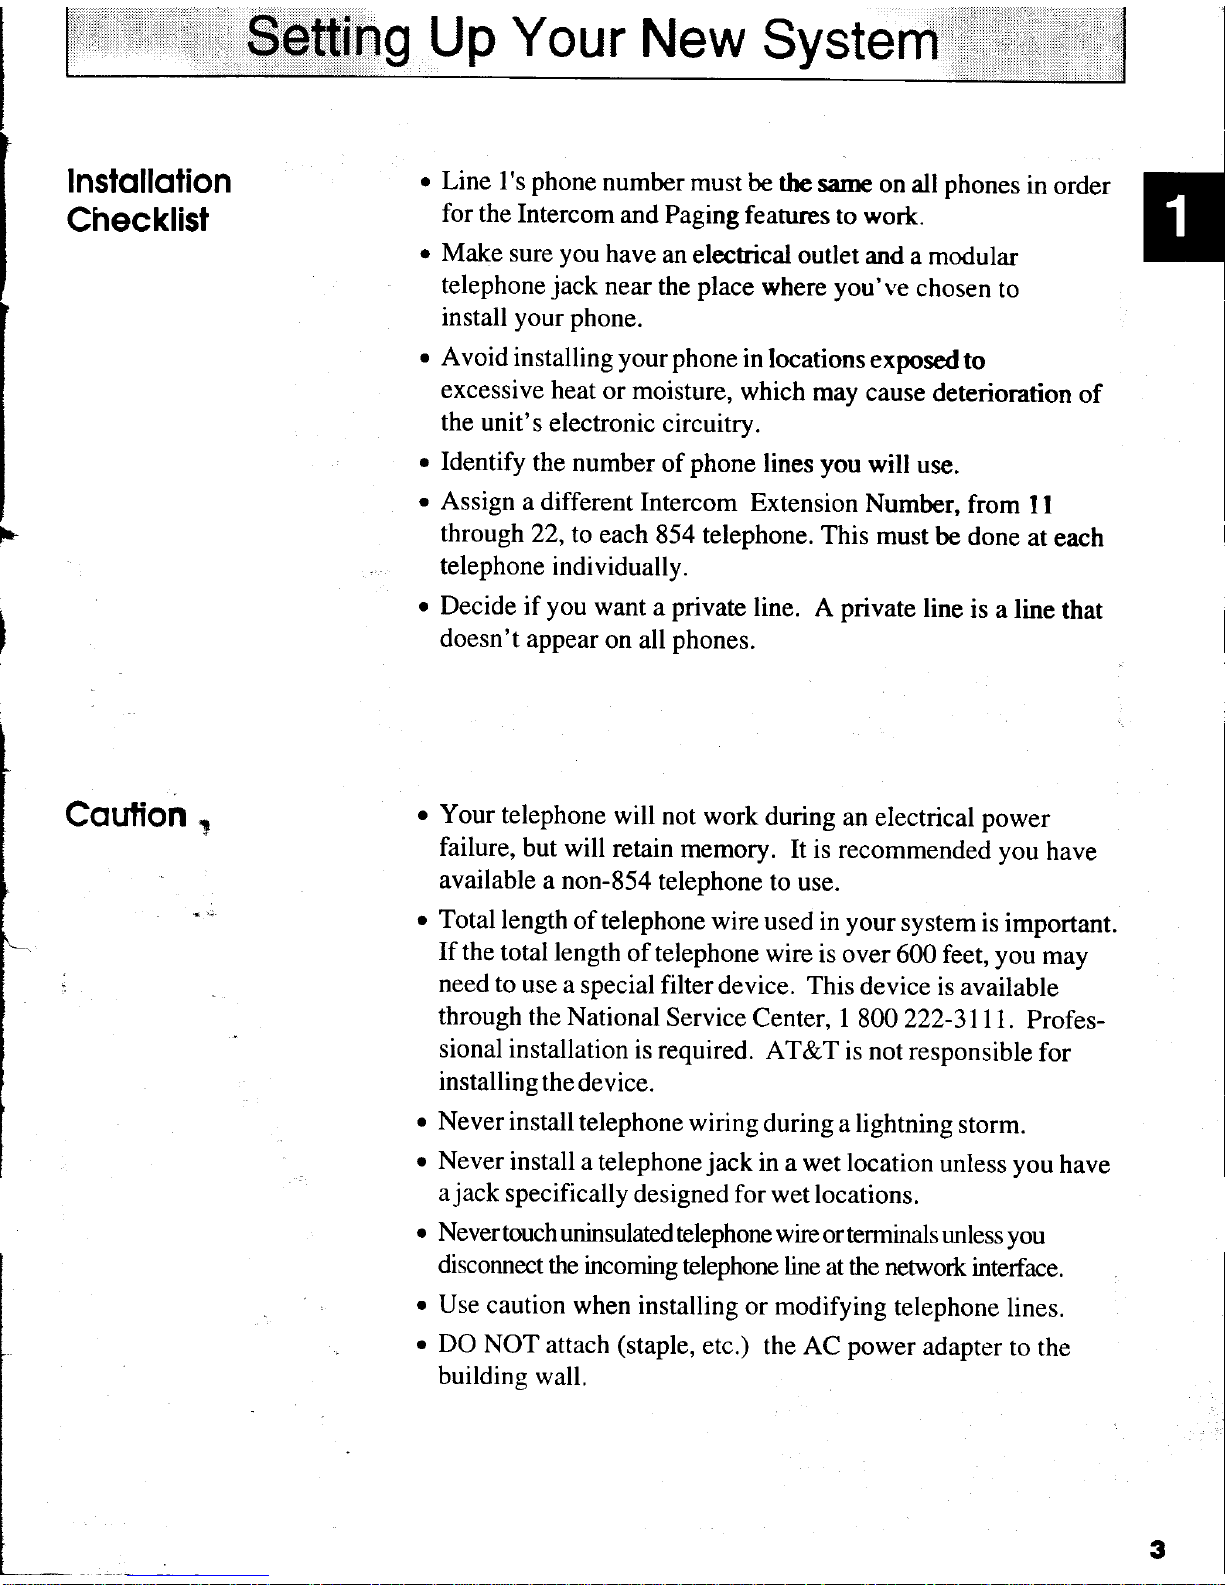
Line I's phone
number
must be tbe
sanre
on all phones
in
order
for the
Intercom
and
Paging features
to work.
.
Make sure
you
have
an
electrical outlet
and
a modular
telephone
jack
near
the
place
where
you've
chosen
to
install
your
phone.
.
Avoid
installing your
phone
in
locations
exposed
to
excessive
heat
or moisture,
which
may
cause
deterioration
of
the unit's
electronic
circuitry.
.
Identify
the
number
of
phone
lines
you
will
use.
.
Assign
a different
Intercom Extension
Number,
from
I I
through
22,to
each
854 telephone.
This
must
be done
at
each
telephone
individually.
o
Decide
if
you
want a
private
line.
A
private
line
is a line
that
doesn't
appear
on all
phones.
.
Your
telephone
will not work
during
an electrical power
failure,
but will
retain
memory.
It is recommended you
have
available
a non-854
telephone
to
use.
r
Total
length
of telephone
wire
used in
your
system
is important.
If the
total length
of telephone wire
is over
600 feet, you
may
need to
use a
special filter
device. This
device
is available
through
the
National
Service
Cenrer, I
800 ZZZ-31
1 1.
profes-
sional installation
is required.
AT&T
is not responsible
for
installing
the
device.
r
Never install
telephone
wiring
during a lightning
storm.
o
Never
install a
telephone
jack
in a wet location
unless
you
have
a
jack
specifically
designed for wet
locations.
o
Nevertouch
uninsulated
telephone
wire
orterminals unless you
disconnect
the
incoming
telephone line
at the network
interface.
.
Use
caution
when installing
or modifying
telephone
lines.
.
DO
NOT
attach
(staple,
etc.)
the AC
power
adapter
to
the
buildins
wall.
3
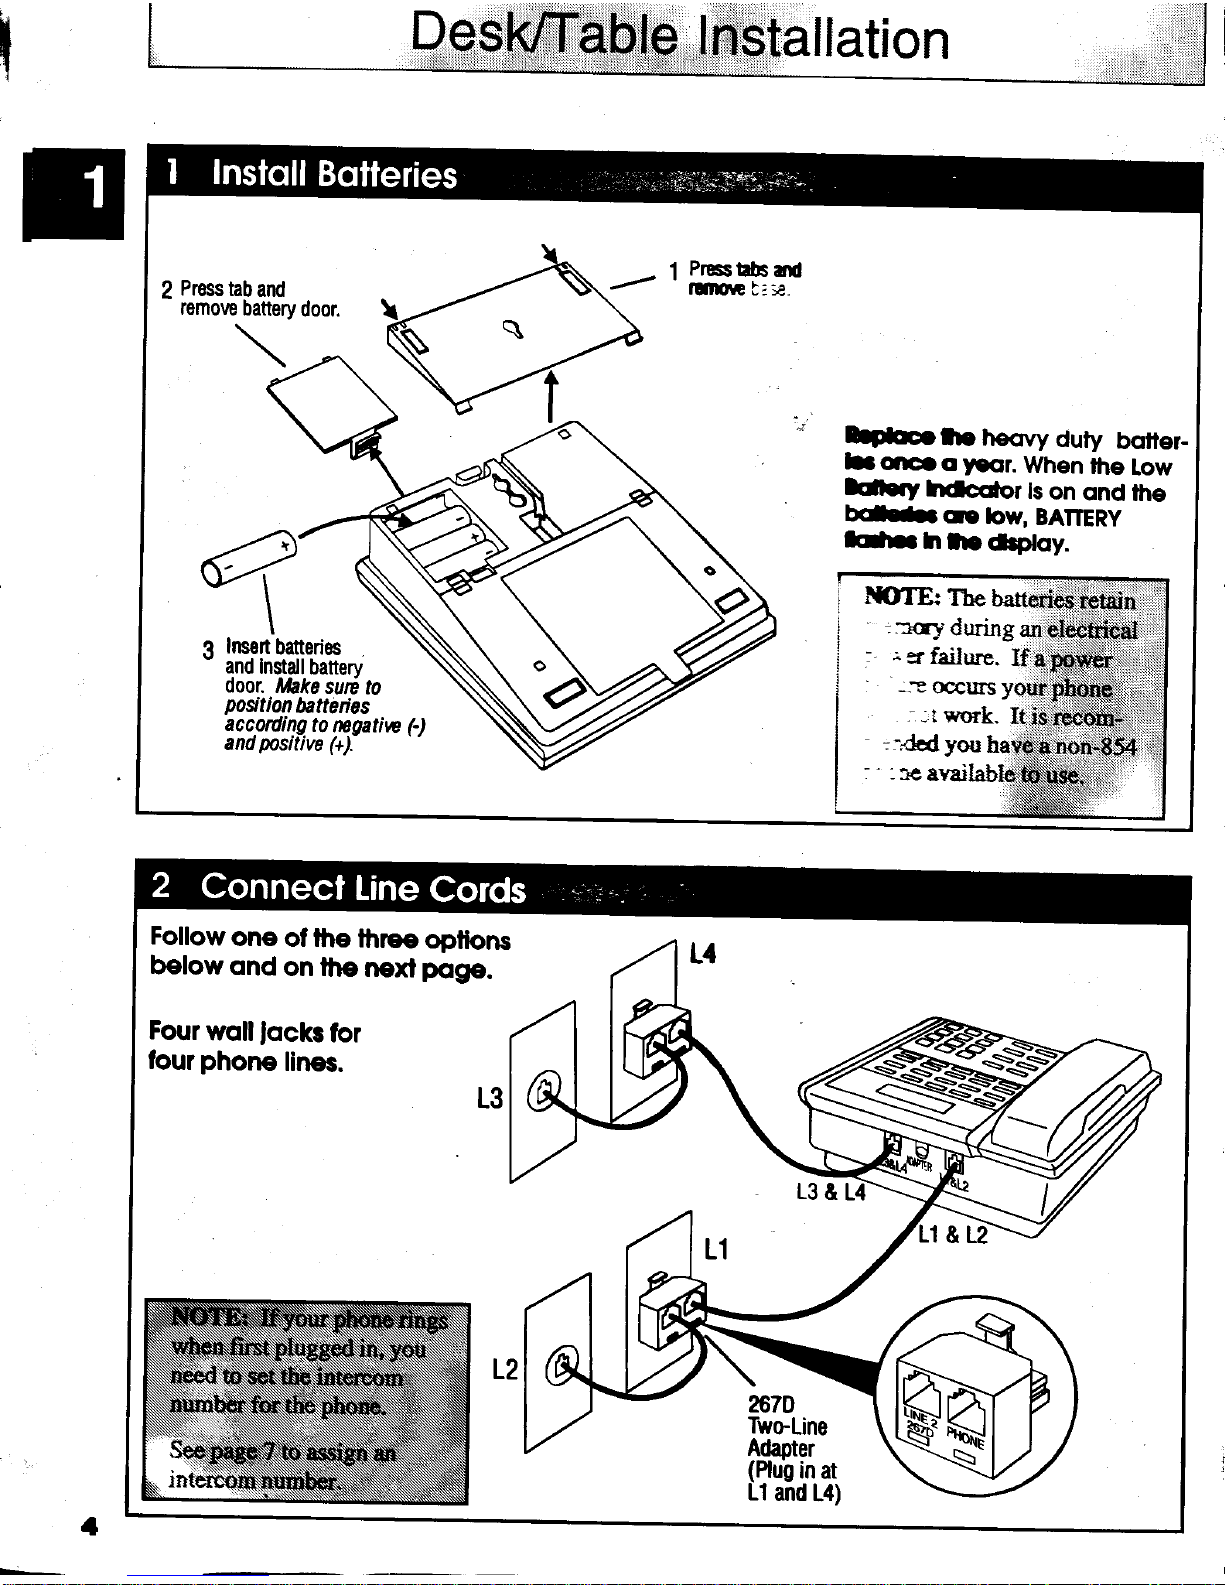
Instaf
lation
Follow
one
of the
thoe
opfions
below
ond
on the
next
pqge.
Four
wqll
focks
for
four
phorr
lircs.
267D
TwoLine
tuhpter
(Plug
in
at
Ll
and
L4)
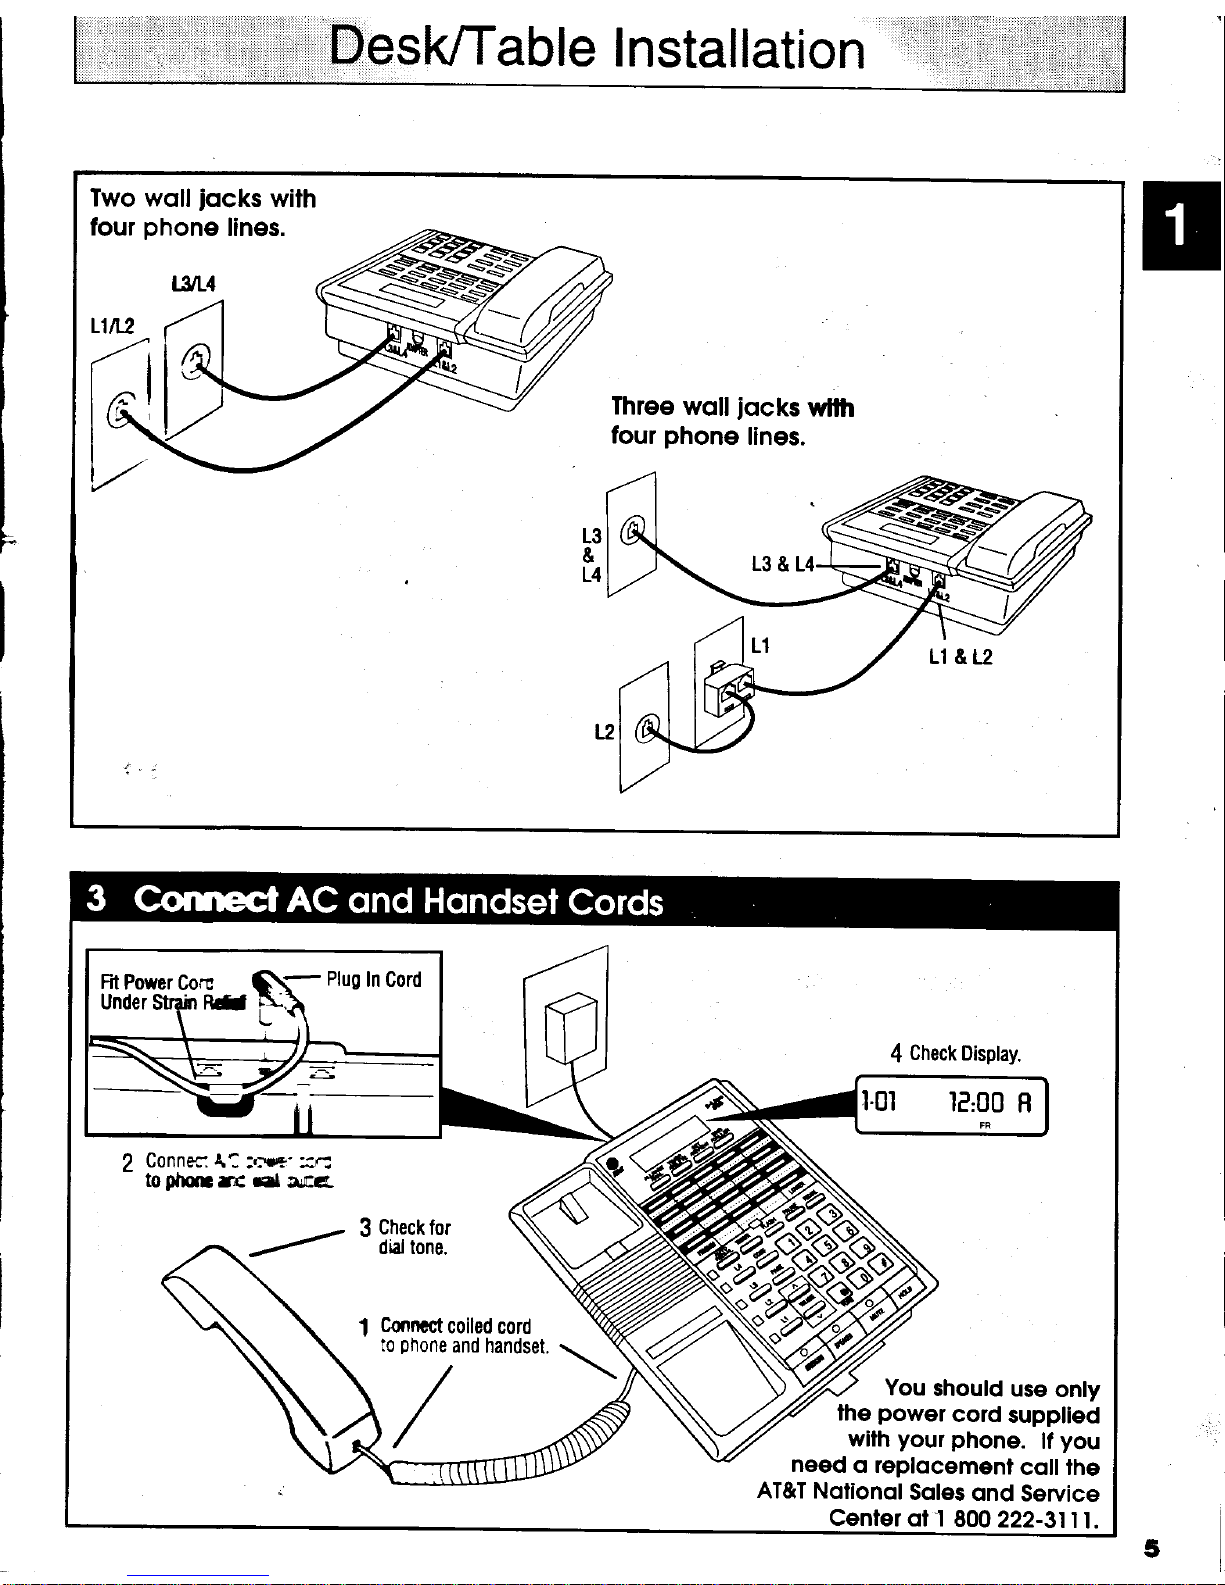
Desk/Table
I
nstal
lation
Iwo wolljocks
with
four
phone
lines.
Three
wolljocks
wllh
four
phone
lines.
Ft
power
Co.,,c
C1-
Plug
In Cord
%6&\
I
Connec
4!
:':ue-
=r:
toDlEnartr
*rl
a.aE
{
Check
Display.
You
should
use
only
lhe
power
cord
supplled
wilh
your phone.
lf
you
need
o replocement
coll fhe
AT&T NofionolSoles
ond
Service
Centerot
1
800
222-3ttt.
Cmncct
coiled
cord
!o
ghone
and
handset.
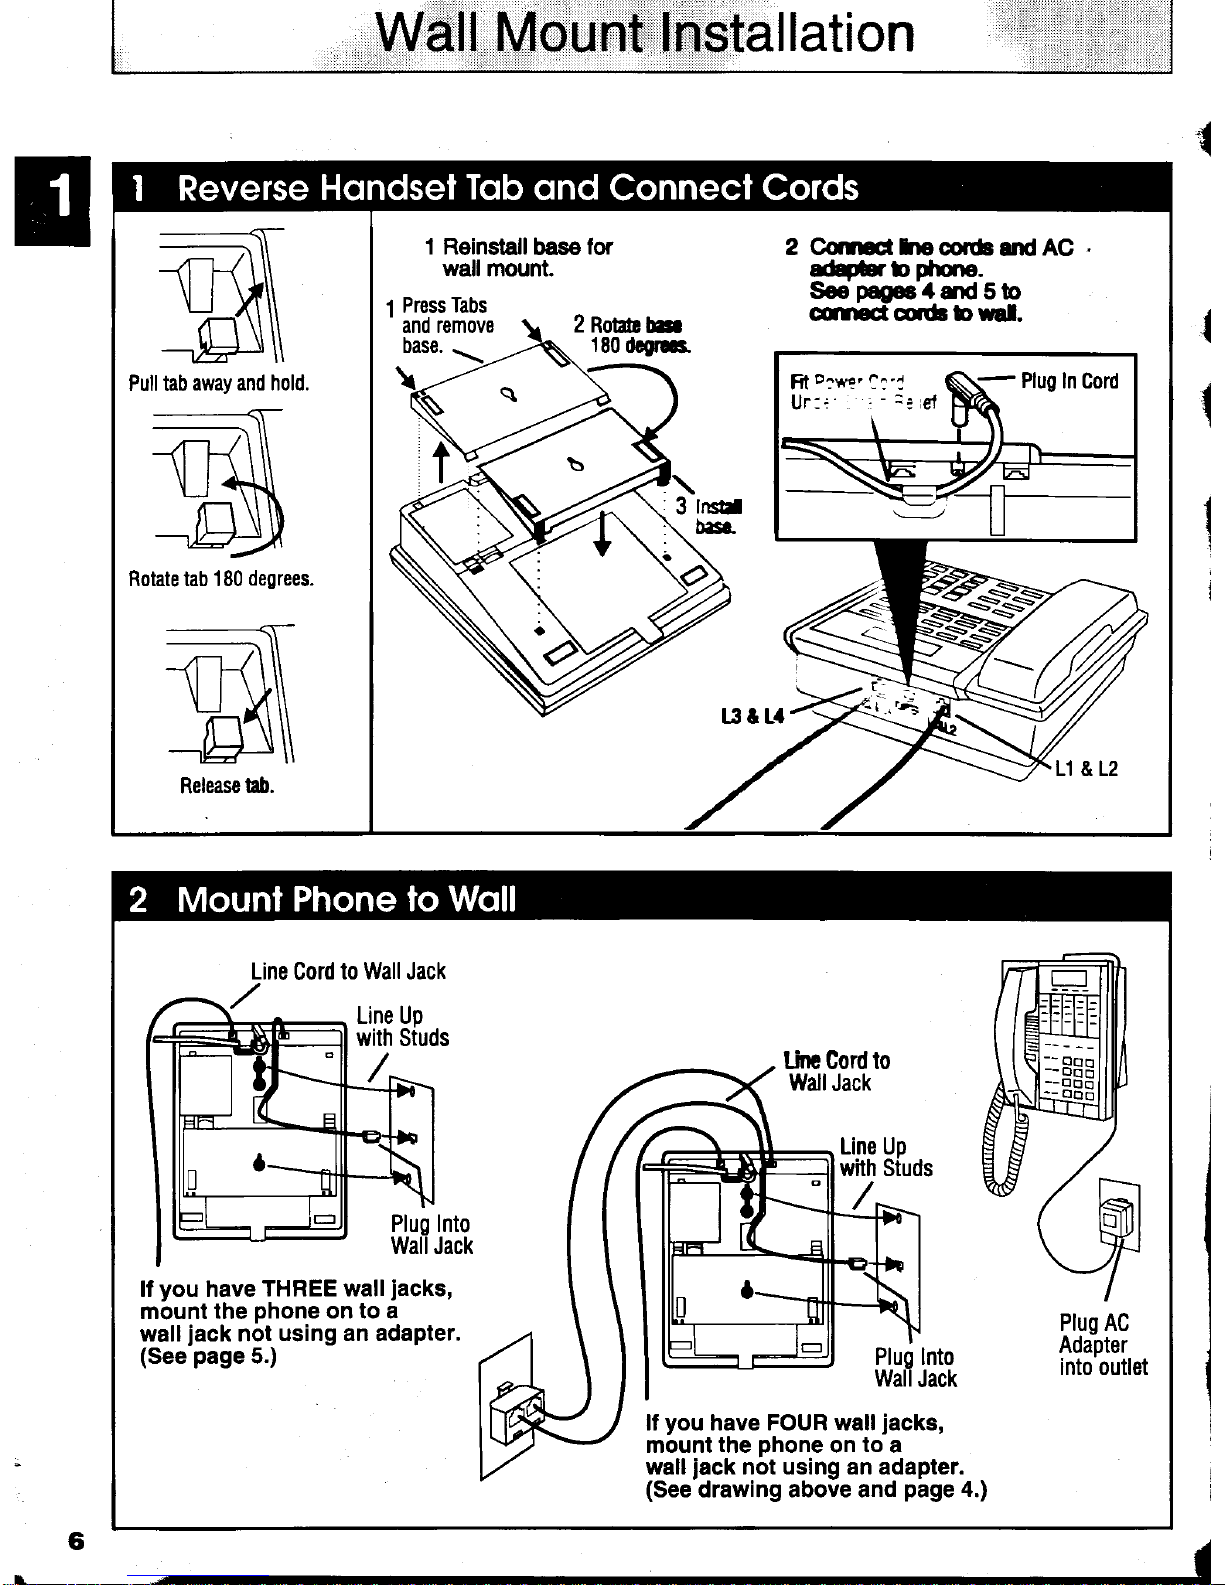
Wall Mount
Installation
Pull tab
away and hold.
Rotate tab 180
degrees.
-------{-
-lt
-ft{\\\
\l_M\\
tt-,
\
\\
Release hD.
1
Press
Tabs
ano remov8
2
RohbE
180
dcefG.
2 CqrEhocodsandAO
ad#b
phdto.
Se
pagr4md
5b
canroctqdrbual.
base.
t3&t4
Line
Cord
to Wall Jack
lf
you
have
THREE wall
jacks,
mount lhe
phone
on to a
walljack not
using an adapter.
(See
page
5.)
Plug AC
Adapter
into outlet
lf
you
have FOUR wall
jacks,
mount
the
phone
on
to
a
wall
jack
not using an adapter.
(See
drawing above and
page
4.)
I
,Setting
Up
Your
Phone
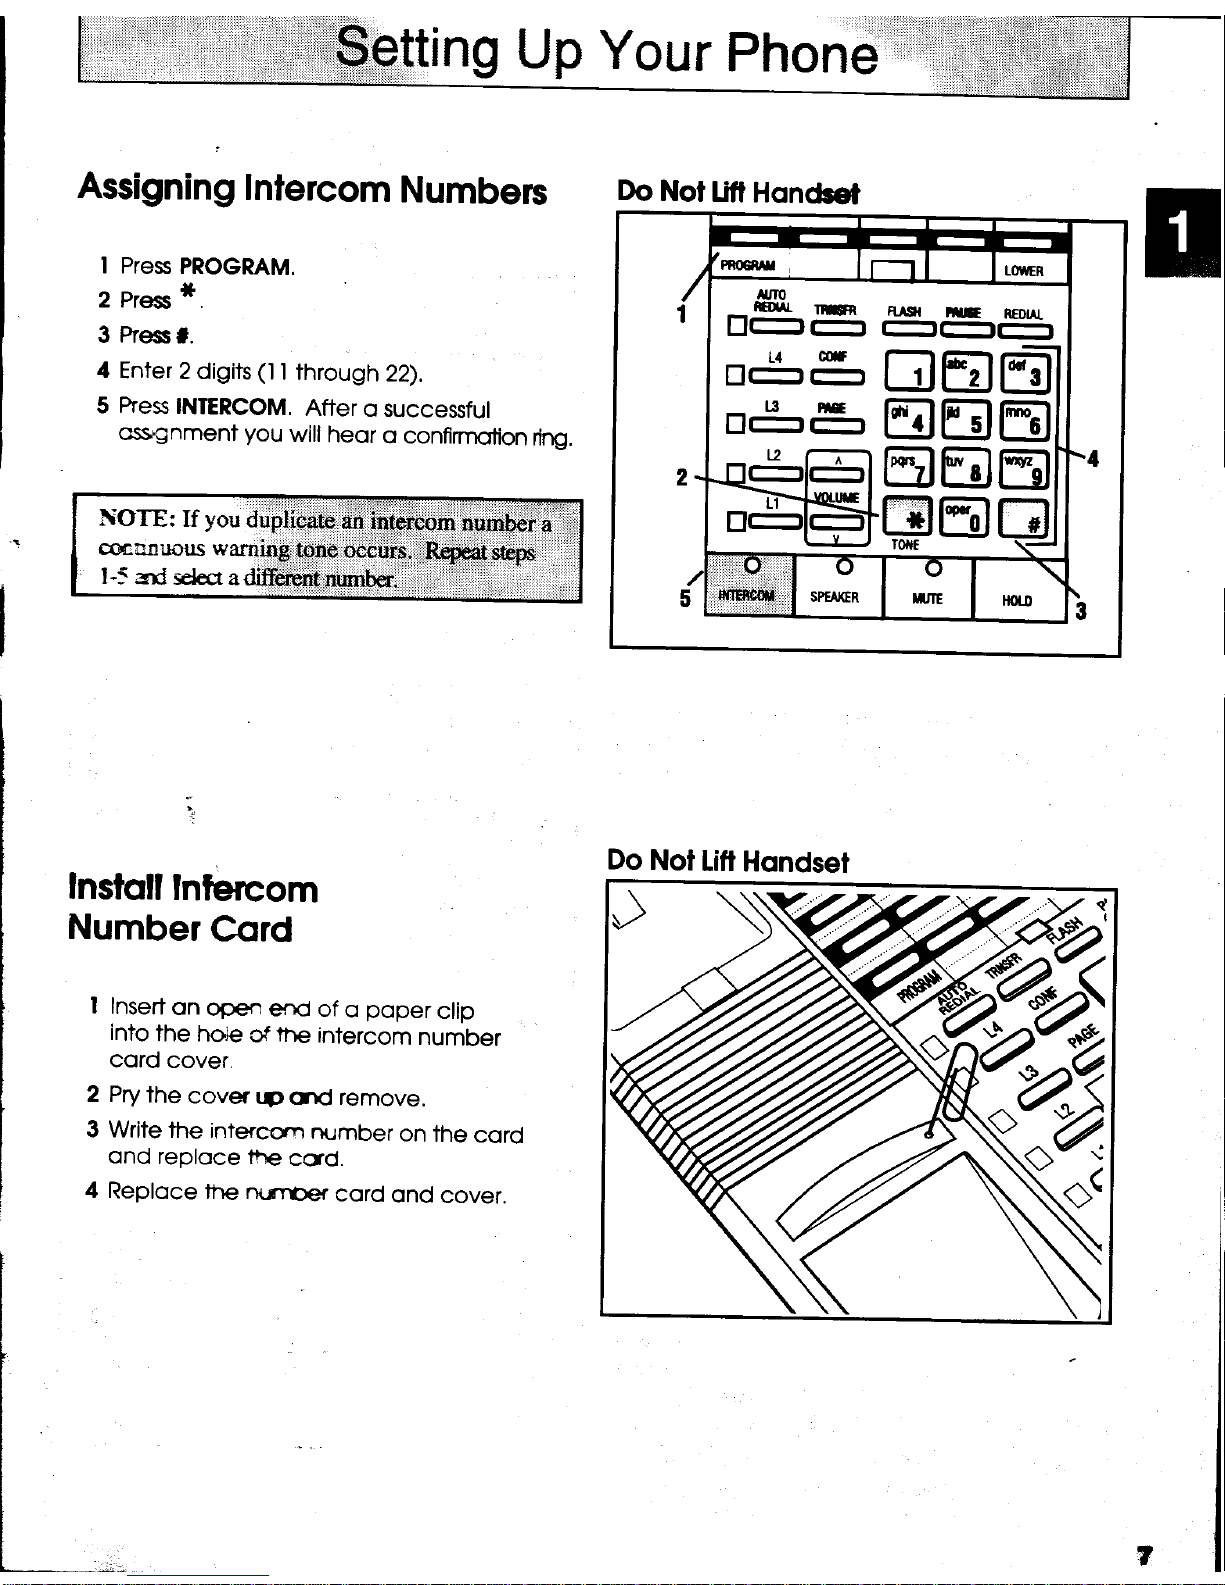
Assigning
Inlercom
Numberc
I Pres
PROGRAM.
2 Press
*
3
Press
L
4
Enter
2 digits
(l
I
through
22).
5
ftes
INIERCOM.
After
o successful
ossr'gnment
you
will
heor
o confinnotion
ring.
lfoTE:
tf
you
dupiicatu
*u i
*rcom'nu-#iii:'
cocrn'rrous
warning,
pne
occUiS,,r.$ryg1
steps
l-5
:rd
sdecr
adifferent;nwnber.
::::r:
:
lnstoll
lntercom
Number
Cord
I
Inserl
on
open
erxl
of
o
poper
clip
into
the ho,le
of
the
intercom
number
cord
cover
2 Pry
the
cover
r.p
and remove.
3 Write
the intercqr-r
rumber
on
the
cord
ond
reploce tt]e
cryd.
4
Reploce
t|€ nwrber
cord
ond
cover.
Do
Not
lifl
Hondsd
trggs5g
trA5EEEJ
Do
Nol
litl
Hondset
t
Setti
ng
LI,,H.....vdU
f.1rP h
one
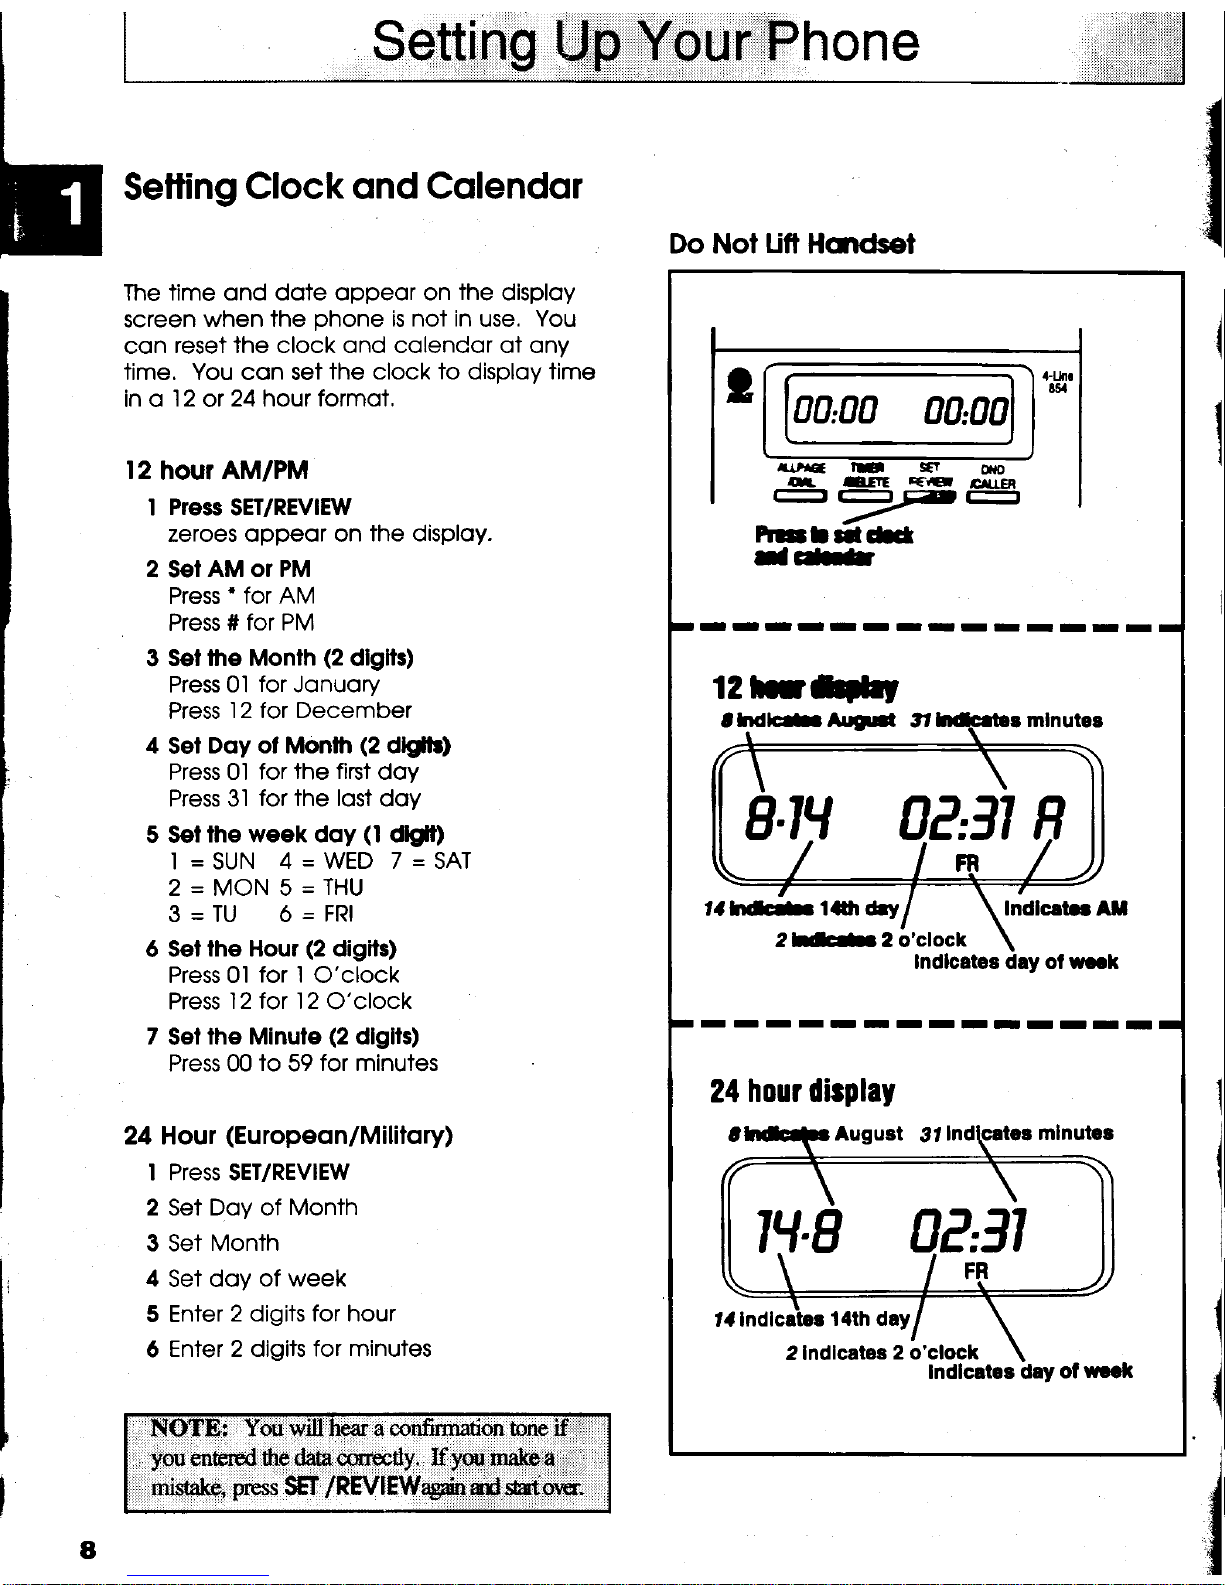
Setling
Clock ond
Colendor
The time ond dote oppeor on
the
disploy
screen
when the
phone
is not in
use.
You
con
reset the clock ond colendor of ony
time. You con set
the clock to disploy time
in o
l2
or
24 hour formot,
12
hour
AM/PM
I
Press
SET/REVIEW
zeroes oppeor on
the disploy.
2 SeT
AM or PM
Press'for
AM
Press
# for PM
3
Sef the Monfh
(2
dlglts)
Pres Ol
for
Jonuory
Press
l2 for December
4
Set
Doy ol Monlh
(2
dlgltr,
Press 0l for
the flrst
doy
Press 3l
for the lost
doy
5 Set
the week doy
(l
dlglt)
I
=SUN
4=WED 7=SAT
2=MON5=THU
3=TU 6=FRl
6 Set
the Hour
(2
digils)
Press 0l
for I
O'clock
Press
l2 for l2
O'clock
7
Set
the Minule
(2
dbirs)
Press 00
to
59
for minutes
24 Hout
(Eu
ropeon/M i litory)
l Press SET/REVIEW
2 Set Doy of Month
3 Set
Month
4
Set doy
of week
5 Enter
2 digits for hour
6
Enter 2 digits for minutes
{
8
ou *ill'lreara confomtrion bne
youcnelp4the:$el,
i.
If.y,n.l.ffi.e,,.,ili
al
SFr/REvtf\trffi;6, u6
Do Not Uft Hcndset
00,00
rutre:
lE
5
O€
e=)F-
Fn|3f
l|l-Ct
J*
-II-IIIIIIIIII
12 frlilrt
I--I'IIIIIIIII
24
hour display
0?,31
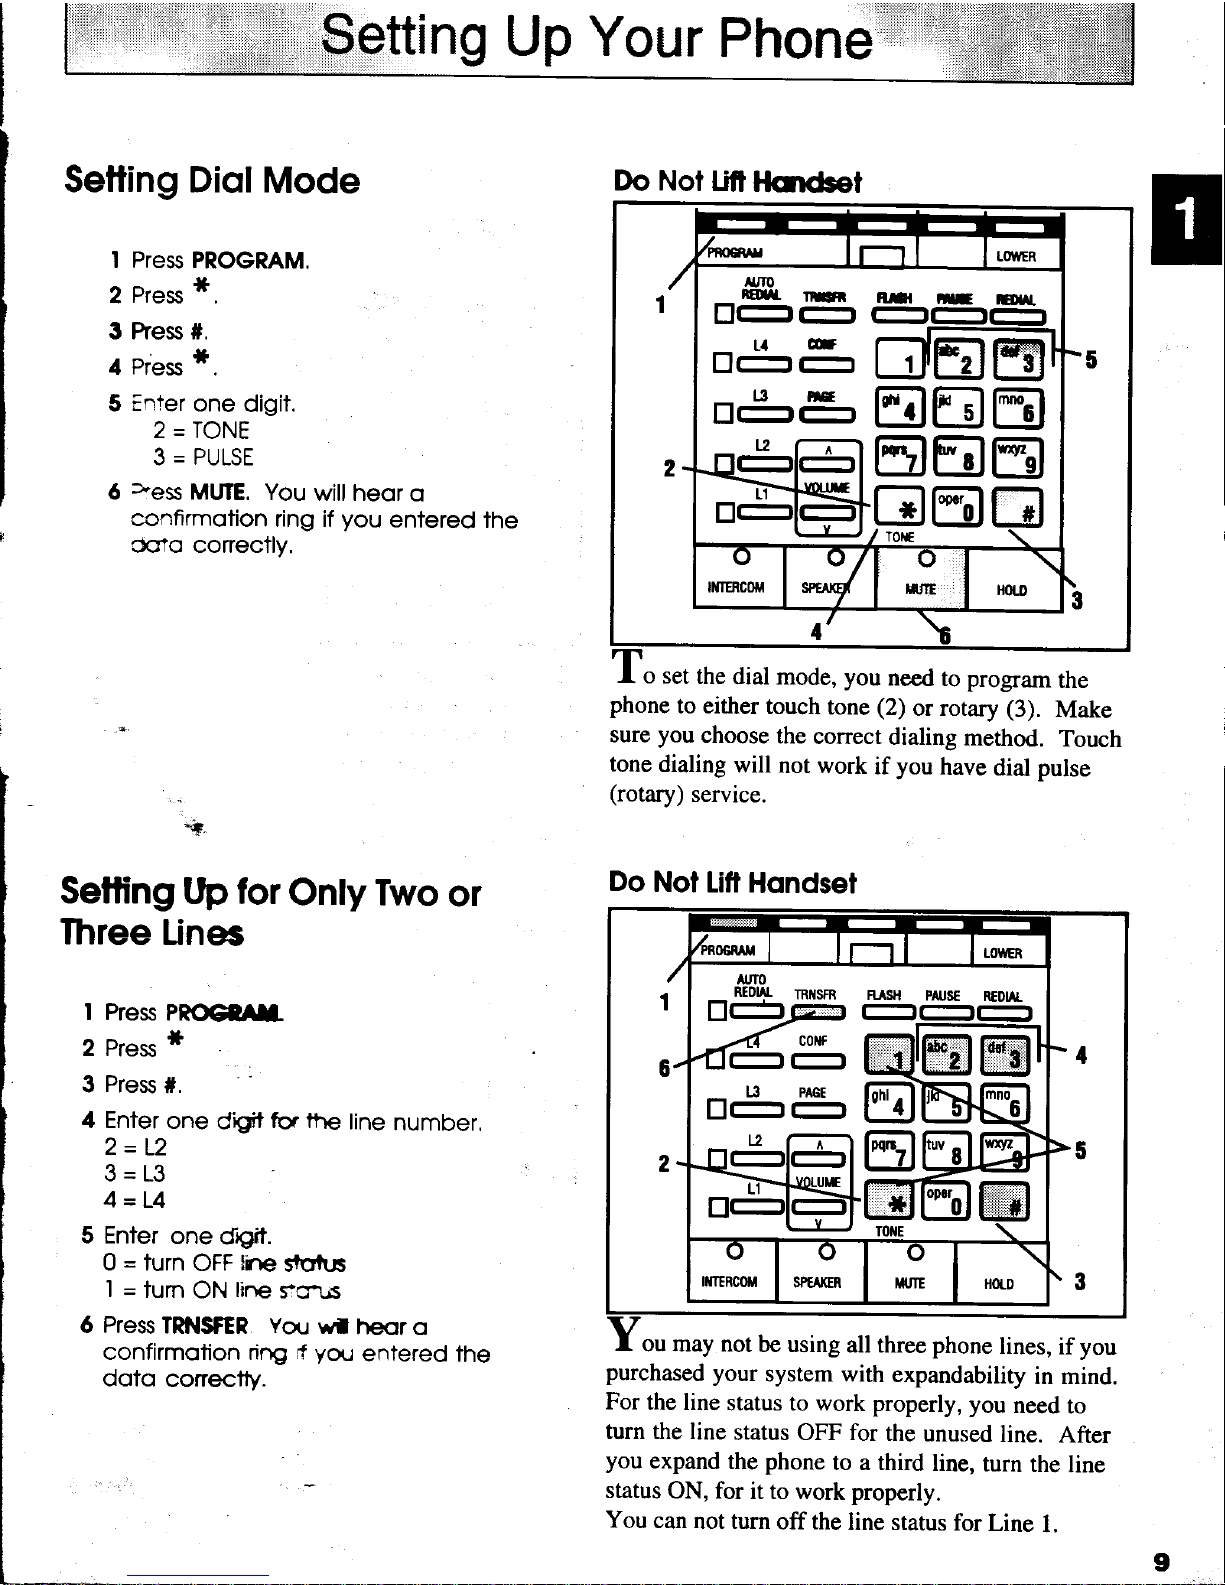
Setting
Up Your
Phone
I Pres PROGRAM,
2
Pres
*.
3 ftes #.
4
Press
*.
5
Enter
one
digit.
2 = TONE
?-Drilqtr
6
>'es
MUTE.
You
will heor
o
confirmotion
ring if
you
entered
the
Cslo conectly,
Setling Diol
Mode
o set
the
dial mode, you
need
to program
the
phone
to either
touch
tone
(2)
or rotary
(3).
Make
sure
you
choose
the
correct
dialing
method.
Touch
tone
dialing
will
not work
if
you
have
dial
pulse
(rotary)
service.
ou may not
be using
all three phone
lines,
if
you
purchased
your
system with
expandability
in mind.
For
the line
status to work properly,
you
need
to
turn the line
status OFF for
the
unused
line.
After
you
expand
the
phone
to a third
line,
turn
the
line
status
ON, for
it to work properly.
You
can
not turn
off the
line status
for
Line
l.
I
Do Not
Lifi
]lcndset
XJIO
_nan
rm
nrl|
tr-lr-r-
B
5
E
tr5588
Setling tJp
for
Only Two
or
Ihree
Linee
I Pres
PnOGtU.
2 Pres
*
3
Press
#.
'
:
4 Enter
one
difi
f€r the
line
number,
2=L2
3=13
4
=L4
5 Enter
one
dqil.
0 = turn
OFF
lle
strrtr.ls
I
=
turn
ON
line
s?crt.ls
6 Press
TRIIISFER
Yor.r
ufl
heor
o
confirmofion rirp
rf
you
entered
the
doto
conectty.
Do
Not
lifl
Hondset
RtDlAL
IRt{sfR RrsH
[t+r6
r-
 Loading...