

Page 1
2
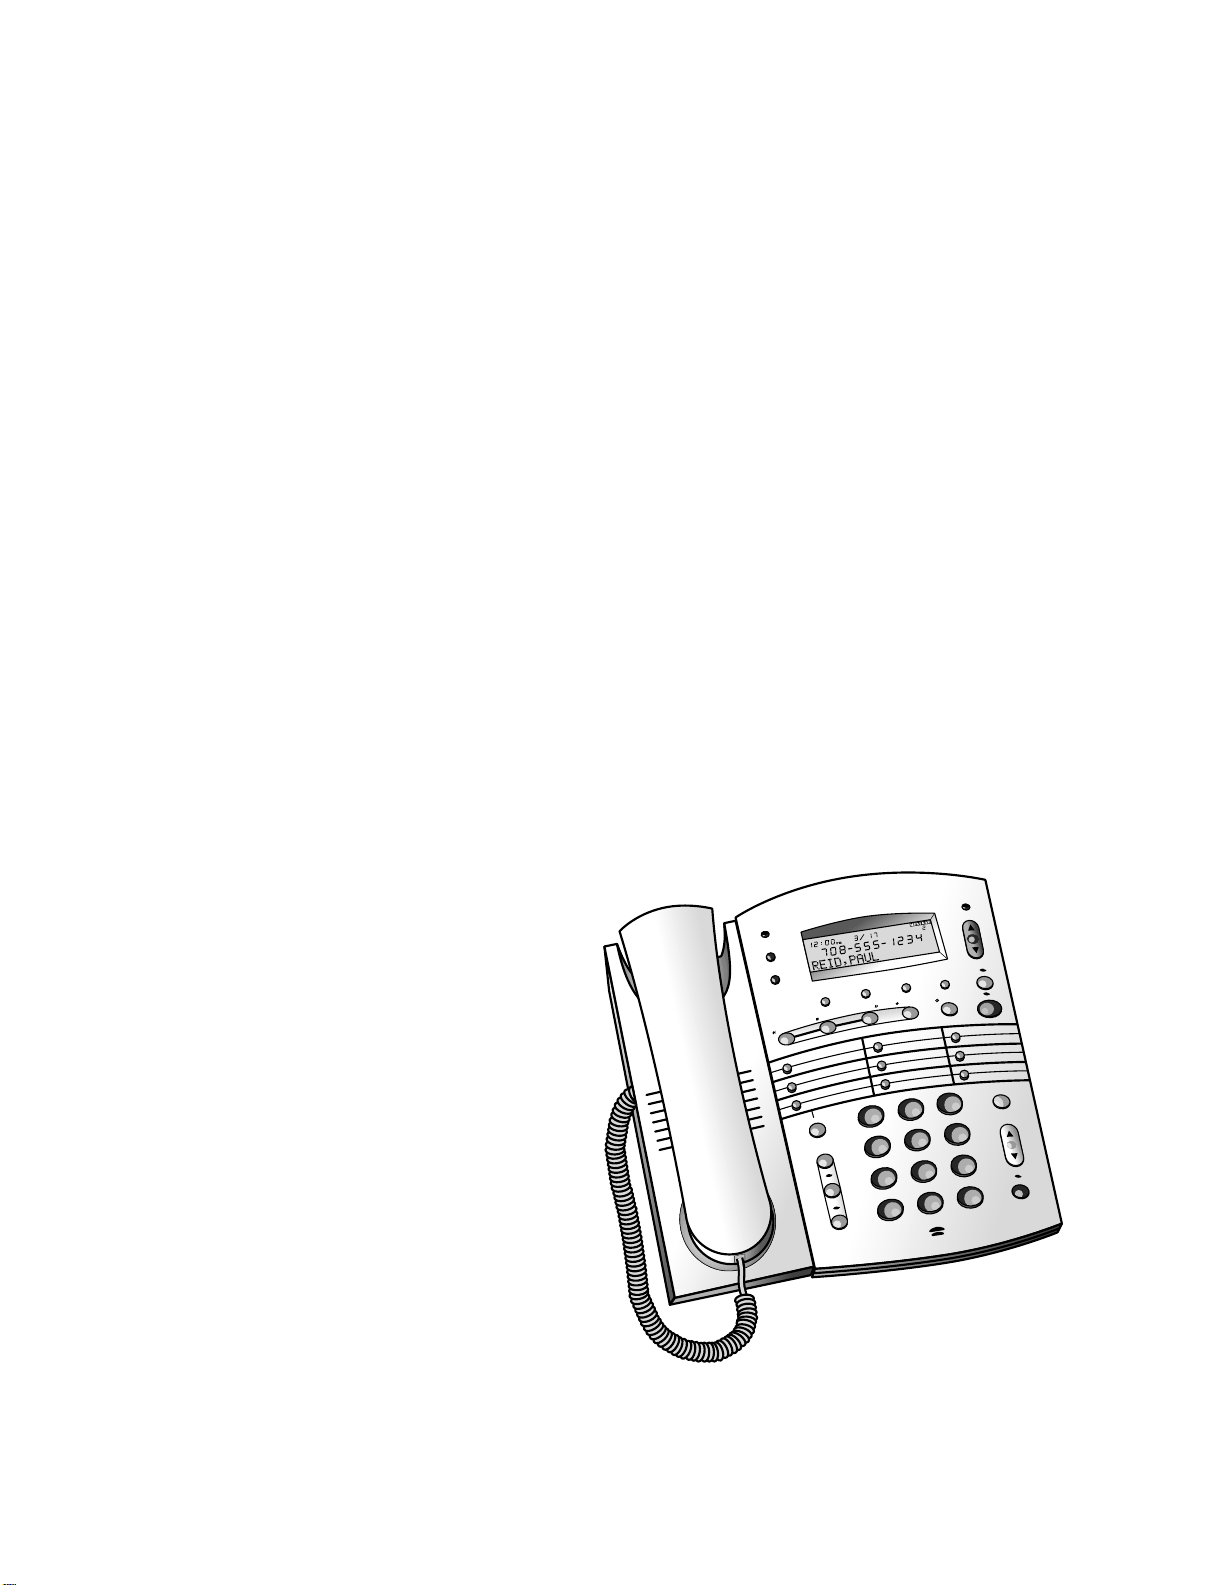
Digital Answering System
Telephone with Caller ID
and Speakerphone 1854
Fold open this paper for information about
this product's installation and operation.
Please read Part 1 — Important Product
Information, included in this package.
Part 2
LOW BATTERY
REMOVE
DISPLAY DIAL
REPEAT
PROGRAM
FEATURE
FLASH
NEW CALL
1854
CALL LIST
ON/OFF
CLOCK
ANNC
SELECT
RECORD
FWD
STOP
ABC
2
1
JKL
GHI
5
4
TUV
PQRS
8
7
MUTE
HOLD
TONE
OPER
*
PLAY
DELETE
LOWER
THIS NUMBER
DEF
(AUTO) REDIAL
3
VOLUME
MNO
6
WXYZ
9
SPEAKER
#
0
© 1998 Philips Consumer Communications L.P. All rights reserved.
Printed in Mexico. 848229415 Issue 1AT&T
Page 2
INSTALLATION
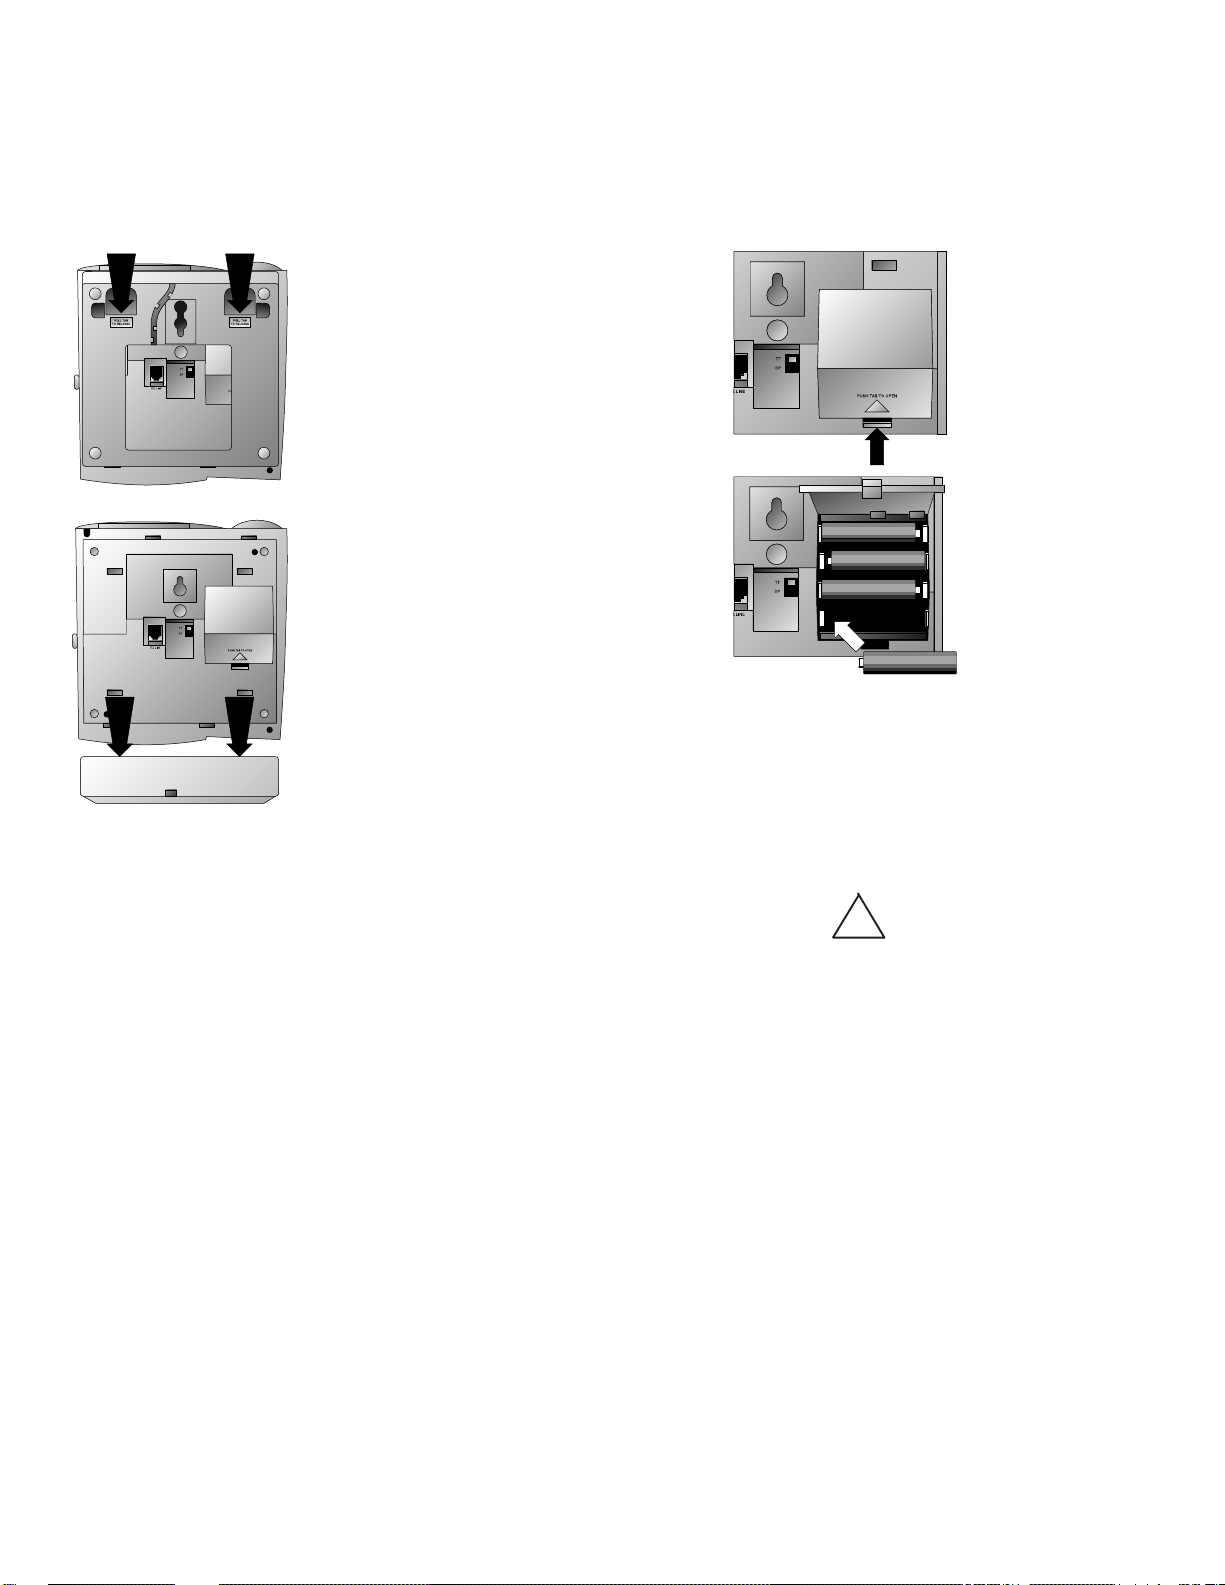
Remove the Base
Install the Batteries
Press in on tabs.
Open battery
compartment door
Install 4 AA batteries
Lift base off the phone.
SET UP SYSTEM
1 Install the batteries.
• Turn the unit upside down.
• Push in on the two tabs at the large
end of the base, and lift the base off
the phone.
• Press the battery compartment's tab,
and swing open the battery compartment door.
• Insert four AA batteries. Always use
four new batteries.
• Close the battery compartment door.
NOTE: When battery power is low, the
LOW BATTERY light is on. Replace the
batteries promptly to pr event the possibility of memory loss.
2 Set the Dial Mode switch.
Set the switch to TT (touch tone) or DP
(dial pulse) telephone service, depending on your telephone service.
TABLE/DESK INSTALLATION
1 Attach the base.
Turn the base so that the larger end is
toward the top of the telephone. Reattach the base by inserting the tabs into
the slots. Push down on the large end of
the base to lock the base into place.
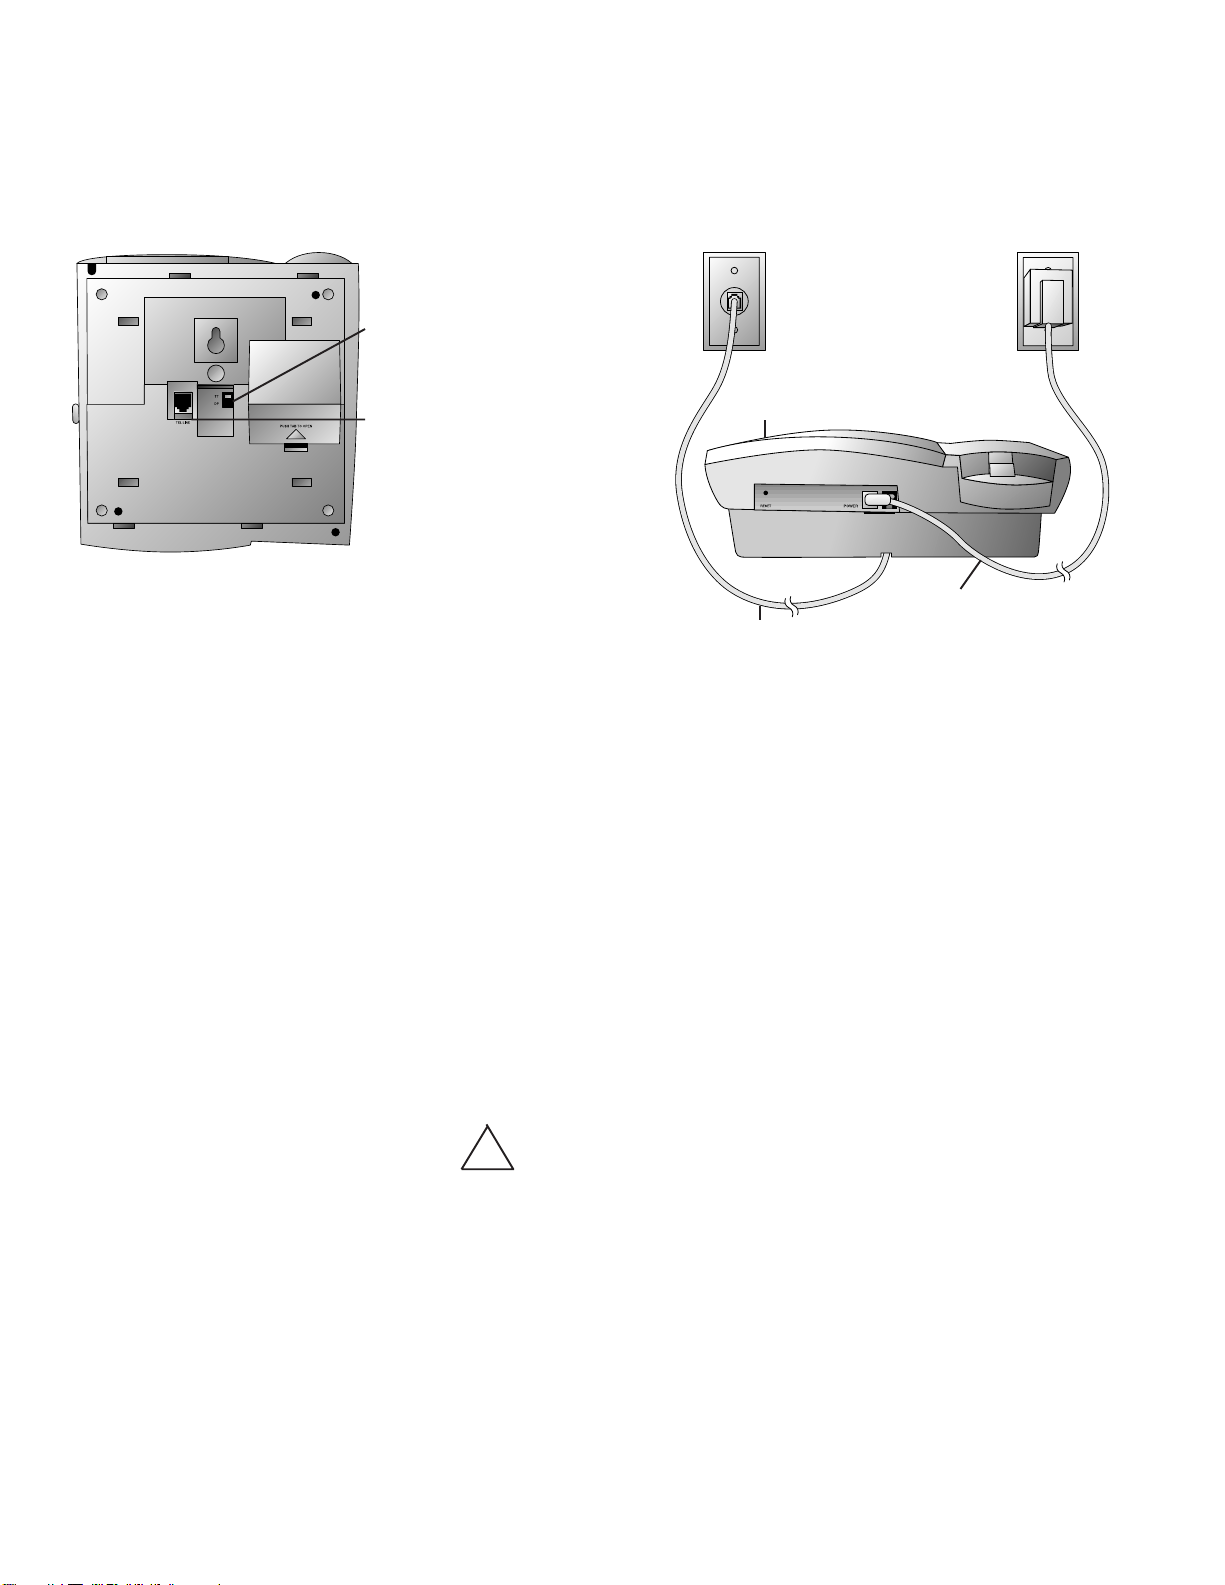
2 Connect the line cord to the telephone.
Plug one end of the cord into the jack
labeled TEL LINE on the bottom of the
phone. Place the line cord in the
channel on the base.
3 Connect the handset to the telephone.
Plug the coiled cord into the handset jack
on the side of the phone. Plug the other
end of the coiled cord into the handset,
then hang up.
4 Connect the line cord to a modular
jack.
5 Connect the power cord.
Use only the power cord supplied
!
with your system. If you need a
replacement cord, call 1 800 722 9125.
Fit the power cord behind the strain
relief tab. Then, plug the smaller end of
the power cord into the POWER jack
at the back of the system.
Plug the power cord into an electrical
outlet not controlled by a wall switch.
6 Wait for the system to initialize.
When the system is connected to AC
power, all the indicator lights flash on
and off. The Message Window counts
down from eight to zero.
After the system reaches zero, you can
complete installation by following
instructions in "Setting the Clock."
Page 3
INSTALLATION
Modular Jack
Dial Mode Switch
TEL LINE jack
WALL INSTALLATION
1 Wrap the line cord.
Wrap the line cord around the posts on
the inside of the base. Leave at least 3
inches free at each end of the line cord.
2 Attach the base.
Turn the base so that the larger end of
the base is toward the bottom of the
telephone. Attach the base by inserting
the tabs into the slots. Push down on
the large end of the base to lock it into
place.
3 Connect the line cord to the telephone.
Plug one end of the line cord into the
jack labeled TEL LINE on the bottom
of the phone.
4 Reverse the handset tab.
Hold down the switchhook, and slide the
tab up and out of its slot. Turn the tab
so that the end with the hook is up. Then
insert the tab back into its slot.
5 Connect the line cord to modular jack
and mount the phone on the wall
jack.
Reset Button
Telephone Line Cord
Plug the free end of the line cord into a
modular wall jack. Make sure the cord
snaps firmly into place. Place the phone
on the wall jack mounting studs and pull
down until it is securely held.
6 Connect the handset to the telephone.
Plug the coiled cord into the handset jack
on the side of the phone. Plug the other
end of the cord into the handset, then
hang up.
7 Connect the power cord.
Use only the power cord supplied
!
with your system. If you need a
replacement cord, call 1 800 722-9125.
8 Wait for the system to initialize.
When the system is connected to AC
power, all the indicator lights flash on
and off. The Message Window counts
down from eight to zero.
After the system reaches zero, you can
complete installation by following
instructions in "Setting the Clock."
Standard AC Outlet
Power Cord
SETTING THE CLOCK
1 Press C. The time is displayed.
2 Use the keypad to enter the time.
3 Press * for AM or # for PM.
4 Press C. The date is displayed.
5 Use the keypad to enter the date (for
example, press 7 0 7 for July 7).
6 Press C. The year is displayed.
7 Use the keypad to enter the year.
8 Press C. The system announces the
date and time.
SELECTABLE DIAL INFORMATION
This telephone has a push button dial
which will work with tone or dial pulse
(rotary) service. Even when set to dial
pulse service, the phone can be switched
temporarily to tone, for access to services
that require tone signaling, including some
tone-activated computer systems.
Page 4

TELEPHONE OPERATION
MAKING/ANSWERING CALLS
1 Lift the handset or press s.
2 To end a call, hang up or press s.
3 To switch from handset to speakerphone,
press s then hang up. To switch
from speakerphone to handset, lift the
handset.
RINGER VOLUME
Set the switch to LO, HI or OFF. Other
phones are not affected by this ringer setting.
HANDSET/SPEAKERPHONE VOLUME
During a call, press [ to increase
volume; press ] to decrease volume.
REDIAL
1 Lift the handset or press s.
2 Press a to dial the last number
called from this phone.
AUTO REDIAL
1 When you hear a busy signal, hang up
and press a. The phone will
continue redialing the number every
40 seconds up to 10 times.
2 When you hear the far end ringing, pick
up the handset or press s.
3 T o cancel Auto Redial at any time, press
a, lift the handset, or press
s.
HOLD
1 To put a call on Hold, press H.
2 To take a call off hold, press H, or
press s, or lift the handset of this
phone or an extension.
MUTE
1 Press M. The far-end party will not
be able to hear anything from your end,
but you will be able to hear the other
party.
2 To return to 2-way conversation, press
M again. Mute is also canceled when
you switch from handset to speakerphone or speakerphone to handset.
NEW CALL
1854
CALL LIST
LOW BATTERY
REMOVE
DISPLAY DIAL
FEATURE
SELECT
ANNC
CLOCK
ON/OFF
FLASH
Press / when you would normally
press the switchhook to activate special
subscriber services such as Call Waiting
or 3-Way Calling.
TEMPORARY TONE DIALING
If you have rotary telephone service, use
this feature to send tone signals required
by some tone activated services (such as
telephone banking).
1 Lift the handset or press s, and dial
the number.
2 Press *. All buttons pressed after
this will send tone signals.
3 When you hang up, the phone returns to
rotary dialing.
Access telephone
company subscriber
services.
Mute the microphone.
Put a call on hold.
Temporary Tone
PROGRAM
FLASH
MUTE
HOLD
1
GHI
PQRS
4
7
TONE
*
DEF
ABC
2
JKL
5
TUV
8
OPER
0
Microphone
3
MNO
6
WXYZ
9
LOWER
THIS NUMBER
#
(AUTO) REDIAL
VOLUME
SPEAKER
Redial last
number called.
Adjust speaker
volume.
Speakerphone.
Page 5

TELEPHONE MEMORY
Y ou can store up to 16 telephone numbers,
each up to 24 digits long, in the 8 one-touch
and 8 two-touch dialing locations. Remove
the plastic cover to fill in the directory card
after you store numbers in memory.
NOTE: You may choose to store
emergency telephone numbers in memory
locations. This feature is pr ovided only as
a convenience and the manufacturer
assumes no responsibility for customer
reliance upon the memory feature.
Although testing the programming of
emergency numbers is not recommended,
if you do make a call to an emergency
number:
• You must remain on the line and briefly
explain the reason for the call before
hanging up.
• Programming/testing of emergency
numbers should be performed in the
early morning or late evening (off-peak
hours).
STORING NUMBERS
1 Press p.
2 Enter the telephone number. To insert a
hyphen between digits, press S
once. To enter a 3-second pause, press
S twice. You can also store *, #,
and /.
3 Press a memory button to store a
number for one-touch dialing
— OR —
Press L and a memory button for
two-touch dialing.
You will hear 2 beeps and see the
display flash when the number is stored.
If you hear a long sequence of beeps and
see Es on the screen, the number has not
been stored. Repeat Steps 1-3.
Dialing a Memory Number
1 Lift the handset or press s.
2 Press a memory button to dial a one-
touch memory number
— OR —
Press L and a memory button to
press a two-touch memory number.
STORING LONG NUMBERS
You can store a number longer than 24
digits by dividing the number in half and
storing it in two locations
— OR —
Store part of the number in a memory
location and dial the rest manually.
VIEWING NUMBERS IN MEMORY
When the phone is not in use, press the
memory button (or press L and the
memory button) of the location where the
number is stored.
ERASING MEMORY NUMBERS
1 Press p.
2 Press the memory button (or press L
and the memory button, of the location
you want to erase).
STORING NUMBERS JUST DIALED
1 Press p.
2 Press a.
3 Press the memory button (or press L
and the memory button) of the location
where you want to store the number.
Memory locations.
Store numbers in
telephone memory.
LOW BATTERY
REMOVE
DISPLAY DIAL
PROGRAM
FLASH
FEATURE
MUTE
NEW CALL
1854
CALL LIST
ON/OFF
CLOCK
RECORD
SELECT
LOWER
THIS NUMBER
DEF
ABC
2
1
JKL
GHI
5
4
TUV
PQRS
8
7
OPER
TONE
HOLD
0
*
(AUTO) REDIAL
3
VOLUME
MNO
6
WXYZ
9
SPEAKER
#
Press before memory button
to access numbers stored in
"gray" locations.
Page 6

THIS NUMBER
REPEAT
STOP
FEATURE
RECORD
DELETE
CLOCK
PLAY
LOWER
ON/OFF
FWD
SELECT
1
2
3
4
5
6
7
8
9
*
0
#
PQRS
ABC
DEF
MNO
WXYZ
JKL
TUV
OPER
GHI
PROGRAM
(AUTO) REDIAL
VOLUME
SPEAKER
FLASH
MUTE
HOLD
TONE
1854
CALL LIST
NEW CALL
DISPLAY DIAL
REMOVE
LOW BATTERY
ANNC
CALLER IDENTIFICATION
The features described in this section are
available only if you subscribe to the Caller
Identification Service provided by your
local telephone company.
If your display shows NO DATA SENT
when you receive a phone call, then Caller
Identification Service is not active for your
phone. Contact your local telephone
company for further information, including information about monthly charges.
Your system may be unable to provide the
phone number and name of a caller if the
caller’s local phone company uses
equipment not compatible with your local
phone company , or if the call originated in
an area not covered by Caller
Identification Service.
SET AREA CODE
T o display local calls without an area code
1 Press p.
2 Press and release F until the screen
displays AREA CODE: ———.
3 Enter your area code.
4 Press S.
REVIEW CALL LIST
When there’s a new call in your call list,
the NEW CALL light is on.
1 Press { or }.
2 Continue to press and release {
or } to view all call entries.
MAKE A CALL FROM CALL LIST
1 Press and release { or }
until you reach the entry you want.
2 Press d, or lift the handset and
press d.
3 If the screen displays an area code, and
you don’t want to dial a “1” before the
number when it’s dialed, press L
before pressing d.
STORE A CALL LIST NUMBER
IN MEMORY
1 Press { or } until you see
the call entry you want.
2 Press p.
3 Press the memory button, or L and
the memory button, of the location where
you want to store the number.
REMOVE CALLS FROM CALL LIST
When the call list is full, the oldest call is
automatically replaced by the next
incoming call.
To remove a selected call
1 Press { or } until you see
the call entry you want.
2 Tap m to delete the displayed entry.
3 To delete all non-priority entries, press
and hold m until you hear the beep.
(For more information about priority
entries, see next column).
Time and date call was received.
SELECT PRIORITY ENTRIES
Your phone alerts you with a high-pitched
ring when you receive a priority call (see
"Priority Calling" in the Answering System section of this manual). You can have
up to 50 priority entries.
T o make a nonpriority call a priority entry
1 Press { or } until you see
the call entry you want.
2 Press * . The screen displays
PRIORITY. Priority calls are not
deleted, even when the call list is full.
To change a priority call to
non-priority listing
1 Press { or } until you see
the call entry you want.
2 Press *. The screen no longer displays
PRIORITY, and the entry can now be
erased (see “Remove Calls from Call
List”).
PLAY A MESSAGE FROM CALL LIST
1 Press { or } until you see
the call entry you want. If a message
was left with the call, the screen displays
MESSAGE in the upper right corner.
2 Press P. The system plays the message.
Position of call in
call record.
Light indicates new call.
Remove information from call list.
Move through call list.
Telephone number of caller
Display number in call list to dial.
Caller's name
Page 7

ANSWERING SYSTEM OPERATION
Record outgoing announcement.
Select settings for features.
Set clock or check time.
Use with other buttons to
change settings.
NEW CALL
1854
LOW BATTERY
CALL LIST
Repeat/replay messages.
Stop message playback.
Skip messages.
Record memo or telephone
conversation.
REMOVE
DISPLAY DIAL
REPEAT
FEATURE
STOP
PROGRAM
FLASH
MUTE
HOLD
SELECT
FWD
1
GHI
PQRS
4
TONE
ANNC
RECORD
CLOCK
DELETE
ON/OFF
PLAY
Turn answering
system On or Off.
Play messages.
LOWER
THIS NUMBER
2
JKL
DEF
3
MNO
ABC
5
TUV
7
8
OPER
0
6
WXYZ
9
#
(AUTO) REDIAL
VOLUME
Delete messages.
SPEAKER
*
Page 8

ANSWERING SYSTEM OPERATION
ANNOUNCEMENT OPTIONS
Announcements A and B are used when
you want the system to record callers'
messages.
Announcement AO (Announce Only) is
used when you want the system to play an
announcement and then hang up. This
option is often used by businesses. Even
if Announcement AO is selected, callers
who press * on a touch tone phone can
still leave a message.
Pre-Recorded Announcement
If you select Announcement A or B, but
do not record you own announcement, callers will hear a prerecorded voice say,
“Hello. Please leave a message after the
tone.” There is no prerecorded announcement for Announcement AO.
Call Match Announcement
Use Call Match announcement when you
want to play a special announcement for
certain callers (for example, calls from a
certain number, or calls whose identifying
information has been blocked). You can
also choose to have the system hang up
instead of letting the caller leave a message. Call Matching is available only when
you subscribe to Caller Identification
Service offered by your local telephone
company.
RECORD AN ANNOUNCEMENT
1 Prepare your announcement. Each
announcement can be up to 4 minutes long.
2 Press A.
3 Press and release S until you see
the letter of the announcement you want
to record (A, B, or O).
4 Press R. Begin speaking after you
hear the beep. Speak in a normal tone
of voice, about 9 inches from the
microphone.
5 Press S. The system plays your new
announcement. To hear the announcement again, press P.
6 Repeat Steps 3 to 5 to record another
announcement, or press S.
REVIEW AN ANNOUNCEMENT
1 Press A.
2 Press S one or more times to choose
the announcement you want to review
(A, B, or O). Stop when the announcement you want is displayed.
3 Press P. Y ou will hear the announcement.
4 Either repeat Steps 2-3 to review another
announcement, or press S.
DELETE AN ANNOUNCEMENT
Press D while the announcement is
playing.
SELECT ANNOUNCEMENT CALLERS HEAR
1 Press and release F until the screen
displays ANNC.
2 Press and release S until the screen
displays the announcement you want
callers to hear (A, B, or O). If you
select AO, you must record an announcement, as instructed in “Record an
Announcement.”
3 Press S to return to the message display.
SET SYSTEM TO ANSWER CALLS
To turn the system on or off, press O.
RING SELECT
1 Press and release F until the screen
displays RING SELECT.
2 Use the keypad to select the number of
times (1 to 7) the phone will ring before
the system answers a call. For example,
to select 3 rings, press 3.
3 T o select the T oll Saver , press 8 to have
the system ring 4 times when there are
no new messages, and 2 times when
there are messages
— OR —
Press 9 to have the system ring 6 times
when there are no new messages, and 4
times when there are messages.
4 Press S when you are done.
SET UP CALL MATCH ANNOUNCEMENT
1 Prepare your announcement.
2 Press A.
3 Press and release S until the screen
displays ANN: CALL MATCH.
4 To choose which callers will hear the
special announcement:
Enter the phone number of a particular
caller you want to hear the announcement
— OR —
Press # if you want all callers who block
name and number information to hear
the announcement.
5 Press R. Begin speaking after you
hear the beep. Speak in a normal tone
of voice, about 9 inches from the
microphone.
6 Press S. The system plays your new
announcement. To hear the announcement again, press P.
7 Press S when you are done.
REVIEW CALL MATCH
ANNOUNCEMENT
1 Press A.
2 Press and release S until the screen
displays CALL MATCH.
3 Press P. Y ou will hear the announcement.
4 Press S when you are done
— OR —
Press D while the announcement is
playing to delete it.
RING SELECT FOR CALL MATCHING
1 Press A.
2 Press and release S until the screen
displays CALL MATCH.
3 Press F.
4 Use the keypad to select the number of
times (1 to 7) the phone rings before the
system answers. To choose Toll Saver,
press 8 for 4 rings/2 rings; press 9 for
6 rings/4 rings. (For more information
about Toll Saver, see “Ring Select.”)
Page 9

ANSWERING SYSTEM OPERATION
NUMBER OF CALLS ANSWERED
BY CALL MATCHING
1 Press A.
2 Press and release S until the screen
displays CALL MATCH.
3 Press F twice.
4 Use the keypad to enter the number of
calls (1 to 9) for which you want to the
announcement played. Press # if you
always want the announcement played.
5 Press S.
AUDIBLE MESSAGE ALERT
Turn message alert on if you want the
system to beep every 15 seconds when you
have a message waiting.
1 Press and release F until the screen
displays ALERT.
2 Press 0 to turn Message Alert on
— OR —
Press 1 to turn Message Alert off.
3 Press S when you are done.
LISTEN TO MESSAGES
1 To listen to all messages press and
release P
— OR —
T o listen to new messages only , press and
hold P until the system begins
playing.
2 To repeat an entire message, during
playback press r.
3 To return to an earlier message,
during playback press and release r
until the screen displays the number of
the message you want.
4 To review part of a message, during
playback press and hold r for a few
seconds.
5 To skip to the next message, during
playback press f.
6 To skip part of a message, during
playback press and hold f for a few
seconds.
7 To stop playing messages, press S.
SAVE/DELETE MESSAGES
The system can save about 20 minutes of
announcements and messages, up to a
total of 50 messages.
To delete messages, hold down D
until the system announces “Messages
deleted.” If there are new messages among
those you are trying to delete, the system
beeps 5 times and does not delete any.
DELETE SELECTED MESSAGES
Press D while the selected message is
playing. The remaining messages are
renumbered.
CALL SCREENING
Use [ and ] to adjust volume
so you can hear a caller’s voice while he or
she is recording a message. The screen displays SPKR VOLUME and a number from
1 to 8 when the caller’s voice is audible.
If you don’t want to hear your announcement played when the system answers a
call,
1 Press and release F until the
screen displays ANNC MONITOR.
2 Press 0 to turn the monitor off
— OR —
Press 1 to turn the monitor on.
3 Press S when you are done.
To take the call, lift the handset of this
telephone or an extension. If the announcement does not stop immediately , press the
switchhook or S.
PRIORITY CALLING
Callers using a touch tone phone can
signal you with the Priority Calling Code
you give them. Your caller should
1 Dial your telephone number.
2 During announcement, enter Priority
Calling Code.
3 The system beeps twice, then pauses.
This sequence is repeated for 30 seconds,
until the phone is picked up.
4 If the phone is not picked up, the caller
can press * to leave a message.
CHANGE PRIORITY CALLING CODE
The Priority Calling Code is preset to 999.
1 Press and release F until the screen
displays P CALLING CODE.
2 The current code is displayed. Use the
keypad to enter a new code, any
number between 500 and 999 (except
the Remote Access Code).
3 Press S when you are done.
RECORD A MEMO
1 Press R. The system beeps and
begins recording.
2 Press S when you are done. The
memo is stored as a message, and can
be up to 4 minutes long.
RECORD A PHONE CONVERSATION
NOTE: This unit does not sound warning
beeps to let the other party know that the
call is being recor ded. To ensure that you
are in compliance with any state and federal regulations that concern recording a
telephone call, you should start the recor ding process and then inform the other party
that you are recording the call.
1 Press R at any time during a phone
conversation. The system can record up
to 4 minutes.
2 Press S to stop recording. The
recording is stored as a message.
SET REMOTE ACCESS CODE
The Remote Access Code is pr eset to 500.
1 Press and release F until the screen
displays ACCESS CODE. The current
code is displayed.
2 Use the keypad to enter a new code, any
number between 500 and 999 (except the
Priority Calling Code).
3 Press S when you are done.
WHEN MEMORY IS FULL
When memory is full, the system answers
calls after 10 rings and announces
“Memory is full” instead of playing your
announcement. When memory is full, you
must delete some or all of the messages
before any new messages can be recorded.
Page 10

ANSWERING SYSTEM OPERATION
Away From Home
You can use many answering system
features when you are away from home.
T o protect your privacy , most features can
only be used after you enter a 3-digit Remote Access Code. Enter commands
using the keys on any touch tone phone,
or by using Voice Activated Commands.
CONNECT WITH
THE ANSWERING SYSTEM
1 Dial your telephone number.
2 While the system is playing your
announcement, enter your Remote
Access Code. The system announces the
number of messages in each mailbox,
and beeps twice to indicate it is ready to
accept a command.
CHANGE REMOTE ACCESS CODE
From a Remote Location
1 Dial your telephone number.
2 During the announcement, enter your
current Remote Access Code.
3 After the 2 beeps, press 9 9. The
system announces “Enter new code.”
4 Enter the new Remote Access Code. If
the code is valid, the system beeps twice.
If the code is invalid, the system beeps
5 times.
PLAY MESSAGES
After the two-beep signal you can:
• W ait four seconds or press 7 to play all
of your messages.
• Press 6 to play new messages only.
SAVE MESSAGES
The system automatically saves messages
after playback.
DELETE MESSAGES
To delete only selected messages, press
3 while that message is playing
To delete all messages, press 33. The
system announces "Messages deleted."
NOTE: If you try to delete a group of
messages that includes new messages, the
system beeps five times and doesn't delete
any messages.
REPEAT
To repeat an entire message, press 2
while that message is playing.
To repeat part of a message, hold down
2. To resume playing, release 2.
FORWARD
T o skip an entire message, press 5 while
that message is playing.
To skip part of a message, hold down 5.
Release 5 to resume playing.
STOP
Press # to stop message playback.
RECORD A MEMO
After listening to your messages, you can
record a memo to be played back later.
1 Press *.
2 Begin speaking after the beep.
3 Press # when you are done. The memo
is saved as a message.
CHANGE THE ANNOUNCEMENT
1 Connect with the answering system.
2 After the two beeps, press 4 *.
4 When the system beeps, begin
recording your new announcement.
5 Press # when you are done. The
system beeps once and plays the new
announcement. To hear it again, press
41 after the 2 beeps.
TURN SYSTEM OFF
After the 2-beep signal, press 8 8, then
hang up, to turn off the answering system.
TURN SYSTEM ON
1 Dial your telephone number. After 10
rings, the system answers, announces
“The machine is off,” and beeps twice.
2 Press 0. The system announces, “The
machine is on,” and beeps twice. Hang
up.
3 If you hear 5 beeps instead of 2 beeps
when you press 0, the memory is full or
AO has been selected.
VOICE ACTIVATED COMMANDS
When a touch tone telephone is not available, you can still call your system to
listen to your messages. Use your voice
to enter the Remote Access Code, to
repeat a message, and to delete messages.
Speak quickly and loudly in response to
the prompts presented by the system as
described below. The system does not
recognize the actual words you are saying;
you could say any phrase that is easy for
you to remember, instead of saying "Enter
code," as long as you speak loudly.
Y ou can hang up any time during the call. The
system saves your messages, unless you
respond to the "Delete all messages?" prompt.
1 Dial your telephone number, listen to
the announcement, and remain silent
after the beep. If the system answers
after 10 rings (because it is off or the
memory is full ) remain silent after the
two-beep signal.
2 After 10 seconds the system prompts
“Enter remote access code.” Immediately respond “Enter code.”
3 You hear “First digit,” followed by
“Enter four,” “Enter five,” “Enter six,”
and so on. When you hear the first digit
of the Remote Access Code, immediately respond by saying “Enter code.”
4 For each digit in the Remote Access
Code, follow the procedure in Step 3.
5 If you enter the code correctly, the
system announces the number of
messages waiting, and begins to play
them. If there are no messages, the
system disconnects the call.
6 T o repeat a message, respond by saying
“Repeat message.”
7 To replay all messages, respond by
saying “Replay messages.”
8 To delete messages, remain silent until
the system prompts “Delete all
messages?” Respond by saying “Delete
messages.”
9 The system repeats Step 8 to verify
deletion of messages. If you remain
silent, messages are not deleted.
The system announces “The system
will now hang up,” and disconnects.
Page 11

IN CASE OF DIFFICULTY
If you have difficulty operating this phone,
try the suggestions below. If you still have
trouble, call 1 800 722-9125.
NO DIAL TONE
❥ Make sure all plugs are connected
properly. Inspect the line cord connections
at the modular jack and at the telephone.
Also inspect the coiled handset cord
connection at both ends.
❥ Unplug the telephone and connect it to
another modular jack.
CALL CANNOT BE DIALED
OR IS DIALED SLOWLY
If you have pulse dialing service, you cannot dial numbers with the switch set to TT
(touch tone). Set the switch to DP (dial
pulse, or rotary), then hang up and dial
again.
LIGHTS/MESSAGE WINDOW PROBLEMS
❥ Make sure all plugs are connected
properly. Inspect the line cord connections
at the modular jack and at the telephone.
Confirm that the power cord is plugged
securely into an electrical outlet that is not
controlled by a wall switch.
❥ If the ON/OFF light flashes rapidly,
memory might be full. Listen to and
delete messages.
❥ If the ON/OFF light flashes rapidly, the
system might be set to Announce Only
(AO), and no announcement is recorded.
If you recorded Announcement AO, it
might have been lost because of a power
failure. Either record a new Announcement AO, or switch to a different announcement.
❥ If the low battery light is on, make sure
the batteries are installed correctly.
❥ If the light remains on, replace all 4
batteries with new batteries.
TELEPHONE DOES NOT RING
❥ Make sure the ringer volume switch is
set in the LO or HI position.
❥ If there are several other telephones on
the same line, try disconnecting some of
the other telephones. Having too many
telephones connected can also create
problems such as low ringer volume, or
impaired sound quality during calls.
❥ If AC power is disconnected, the phone
will not ring.
SYSTEM ANSWERS CALLS BUT DOES
NOT TAKE MESSAGES
Announce Only (AO) might be selected.
Select Announcement A or B.
SYSTEM DOESN'T ANSWER AFTER
CORRECT NUMBER OF RINGS
❥ Make sure that the ON/OFF light is on.
❥ If the Toll Saver feature is on, the
number of rings changes from 4 to 2 or from
6 to 4 if you have a new message waiting.
SYSTEM DOES NOT DISCONNECT
The answering system will not always
disconnect if you answer the call from
another phone at the same time that the
system answers. To stop the answering
system, press S or quickly press and
release the switchhook on the phone you
are using.
MESSAGE WINDOW IS BLANK
Make sure the power cord is plugged
securely into an electrical outlet that is not
controlled by a wall switch.
Use only the power cord supplied
!
with your system. If you need a replacement cord, call 1 800 722 9125.
TIME AND DATE
FLASH IN MESSAGE WINDOW
If the clock stops running because of a
power failure, the time and date flash in
the Message Window to indicate that the
clock should be reset.
SYSTEM DOES NOT RESPOND TO
REMOTE COMMANDS
❥ Make sure you are entering the correct
Remote Access Code.
❥ If using voice-activated commands,
speak quickly and loudly.
❥ If power failed when the backup
batteries were missing, or battery power
was low, the Remote Access Code might
have returned to its factory setting of 500.
❥ If you are using dial buttons to enter
remote commands, make sure you are
calling from a touch tone phone. If you
hear clicks when you dial, you are using a
dial pulse phone.
❥ You might be using a telephone that
transmits only brief tones when the
buttons are pressed. Wait until the
announcement is over, and try again.
❥ There might be noise interference on the
line you are using. Press firmly on the
buttons.
MESSAGES ARE INCOMPLETE
❥ If a caller leaves a message longer than
4 minutes, part of it will be lost when the
system disconnects.
❥ If the caller pauses for more than 7
seconds, the system stops recording and
disconnects.
❥ If the memory fills up during a
message, the system stops recording and
disconnects the call.
"NO DATA SENT" IS DISPLAYED
❥ You must be a subscriber to telephone
company caller identification service. If
you are not, contact your local telephone
company.
❥ If the caller hangs up or if you answer
before the second ring, no information is
received from caller identification service.
❥ If you use Call Forwarding service to
forward a call, the 1854 does not receive
the caller identification information.
"ERROR" IS DISPLAYED
Static on the line might have caused an
incorrect or incomplete name or phone
number.
DISPLAY DIAL DOES NOT WORK
❥ You cannot dial "PRIVATE" or "OUT
OF AREA" calls using the display.
❥ Before you can dial from a displayed
number, you must provide your answering system with your area code. See "Set
the Area Code."
Page 12

IN CASE OF DIFFICULTY
❥ The system does not automatically add
"1" and the area code to local long distance
numbers. You cannot dial these numbers
from the display.
CALL MATCH ANNOUNCEMENT
NOT PLAYED
❥ Review the call match number and the
call match announcement.
❥ If the call match feature is set to play
the announcement 1, 2, or 3 times, it turns
itself off after receiving the specified number of call match calls.
OTHER PROBLEMS
Make sure you have followed all the
instructions in this manual to try to
correct the problem.
If you cannot correct the problem, press the
reset button, located on the back of the unit.
The button is recessed. Use the end of a
paper clip or similar object to press the
button.
If there is a problem with the system,
pressing the reset button will reset the
system, and may delete any messages as
well as your announcements. Record a
new announcement and your system
should be ready to answer calls and record
messages.
If the system is okay, pressing the reset
button has no effect on the answering
system, but will disconnect any call in
progress.
 Loading...