

Page 1

1
1818 Digital Ans w ering
System Speakerphone
Fold open this manual for information
about this product’s installation and
operation. Please also read Part 1 –
Important Product Information.
AT&T and the globe symbol are registered trademarks of AT&T Corp. licensed to Advanced American Telephones.
© 2001 Adv anced American Telephones. All rights reserved.
Printed in China. Issue 1AT&T 05/01
USER’S MANUAL
Part 2
Page 2
INSTALLATION
Before Y ou Install
Choose a location for the answering
system near a modular telephone jack and
a standard electrical outlet not controlled
by a wall switch.
Use only the power cord supplied
with this product.
If you need a replacement, call
1 800 222–3111.
Input: 120 V, 60 Hz.
Output: 6V AC, 350 mA.
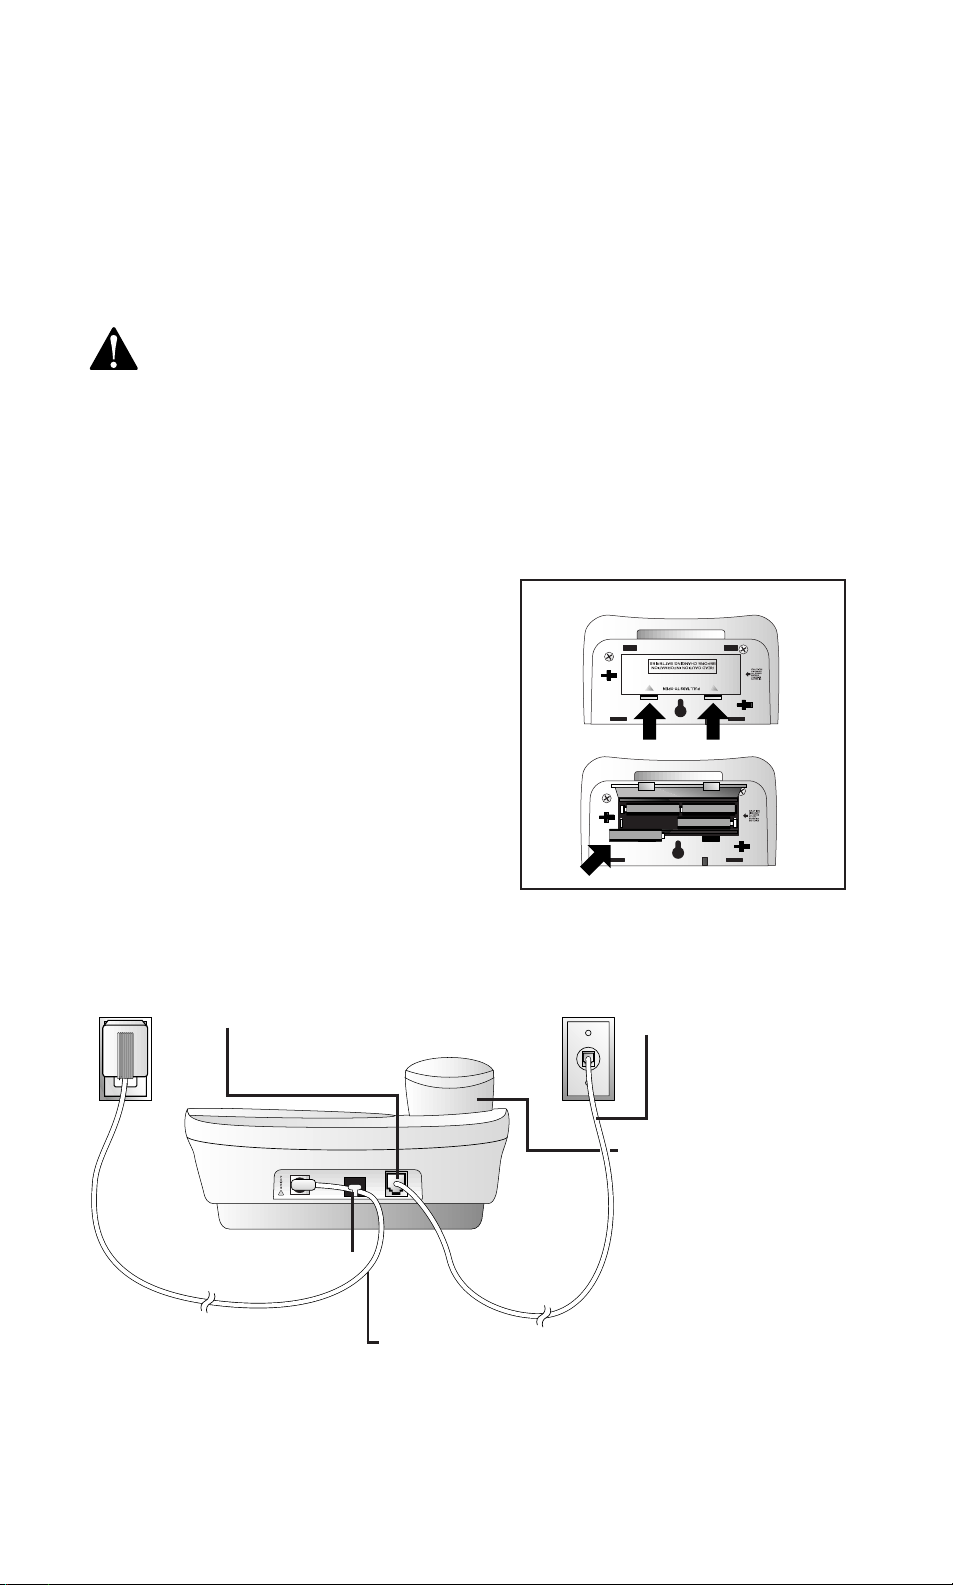
T able/Desk Installation
1 Remove the base.
Slide the base sideways as indicated by
the REMOVE arrow (see illustration on
page 2).
2 Install batteries as shown.
3 Reinstall the base.
T urn the base so the larger end
is toward the top of the telephone.
Insert the base tabs into the slots, then
slide sideways in the direction of the
INST ALL arro w to lock the base into
the phone. Turn the telephone right
side up; it should sit flat on your table
during use.
Batteries
• You should install four fresh AA alkaline
batteries in order to use this system in
case of a power failure. The batteries
are not necessary for operation other
than during a power failure.
• When battery power is low, the LOW
BATT light goes on. Replace the
batteries promptly, to be able to make
and answer calls, and receive and
access messages in a power failure.
Battery Installation (optional)
Standard
Electrical
Outlet
4 Connect the long line
cord to telephone.
Strain-relief tab
7 Connect the power cord.
The Message Window f lashes
to set the clock (see “Setting the Clock” in the ANSWERING
SYSTEM OPERATION section of this manual).
8 Check for dial tone.
Lift the handset and listen for a dial tone. If you don’t hear
a dial tone, see IN CASE OF DIFFICULTY.
Modular
Telephone
Jack
5 Connect the line cord
to a modular
wall jack.
6 Connect the handset to
the telephone.
Plug one end of the coiled
cord into the handset jack
on the side of the phone.
Plug the other end of the
coiled cord into the handset,
then hang up.
CL to indicate that you need
1
Page 3
INSTALLATION
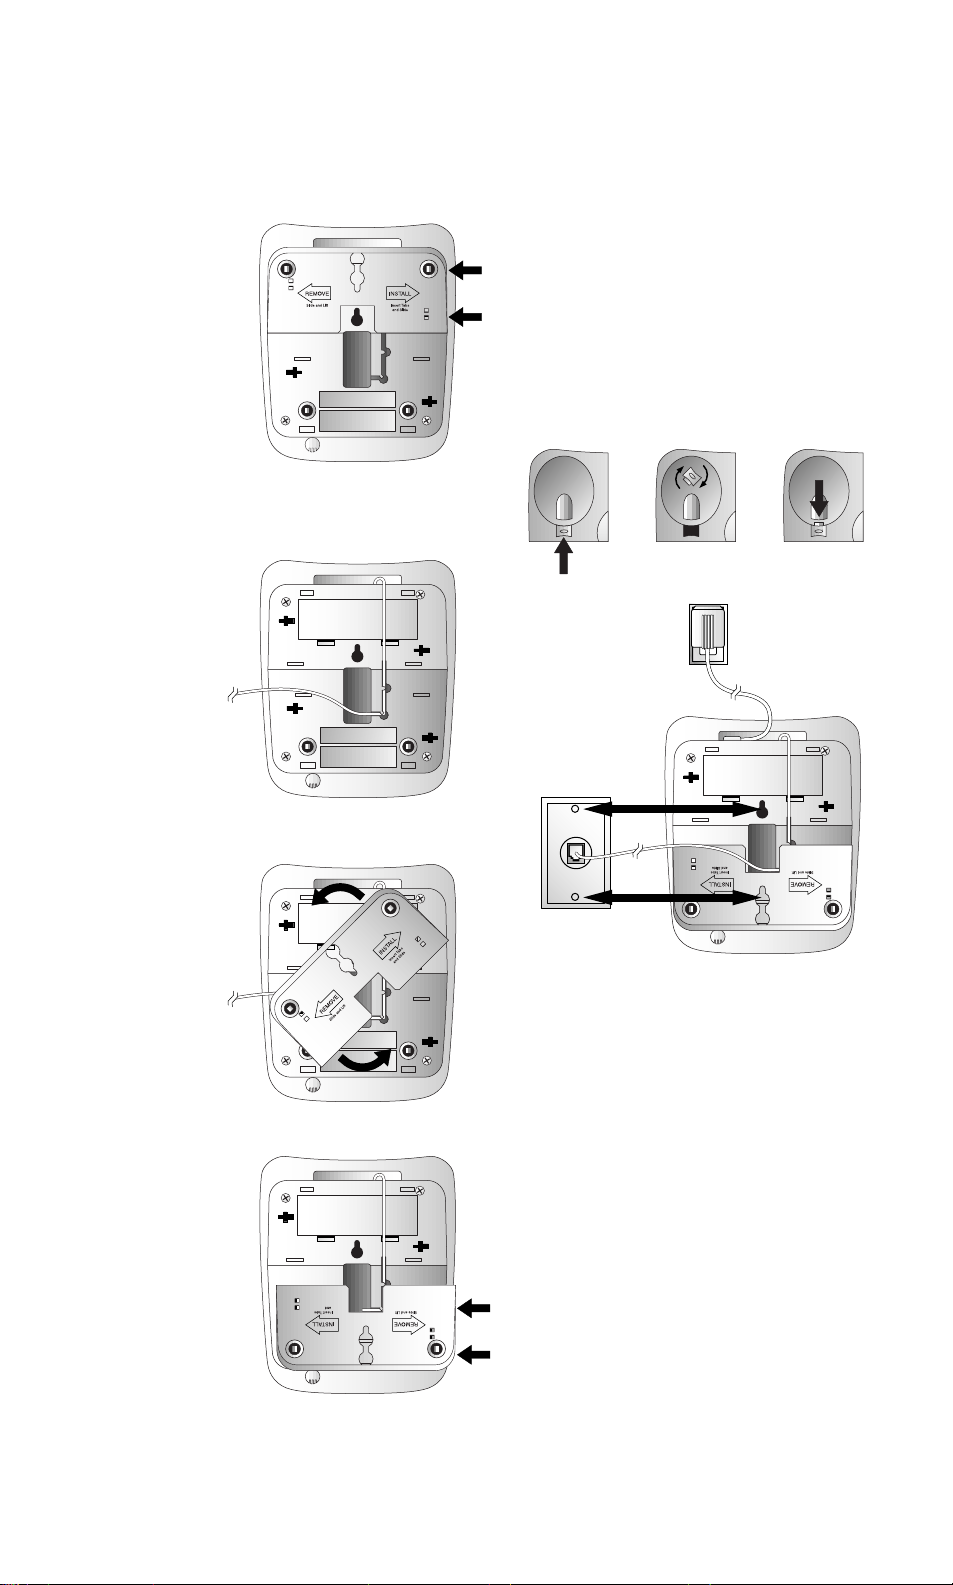
Wall Installation
1 Remove
the base.
Slide the base
sideways as
shown by
the REMOVE
arrow.
2 Install the batteries as shown
in Step 2 under Table/Desk
Installation.
3 Connect the
short line
cord to the
telephone.
Plug the short
line cord
into the
LINE jack
on the back
of the set. Feed
the cord through
the channel on the bottom of the set.
5 Reverse the handset tab.
To mount the telephone on a wall, you
must reverse the handset tab. This tab
holds the handset when you hang up.
Hold down the switchhook, and slide
the tab up and out of its slot (figure 1).
Turn the tab so that the end with the
“hook” is up (figure 2). Then insert
the tab back into its slot (figure 3).
figure 1 figure 2 figure 3
6 Connect the
line cord to
the modular
jack and
mount the
phone onto
the wall jack.
4 Reinstall
the base.
Turn the base
so that the
larger end
is toward
the bottom
of the
telephone.
Insert the base
tabs into the
slots. Then
slide sideways
in the
direction
of the
INSTALL
arrow to lock
the base onto
the phone.
Plug the free end of the line cord into
a modular wall jack. Make sure the
cord snaps firmly into place. Place the
phone on the wall jack mounting studs
and pull down until it is held securely.
7 Follow Steps 6–8 under Table/
Desk Installation.
2
Page 4

FEATURE SETUP
Turn System On/Off
Before proceeding to set up features, press
O to turn the system on. The PLAY/
STOP light is on or blinking when the
system is on.
Feature Setup
1 To enter Feature Setup mode, press and
hold S until the system announces
“Selected announcement is…”
2 Press and release S until the system
announces the feature you want to set.
3 Press and release or
until the system announces the setting
you want. Refer to the Feature
Summary for options.
4 Press and release S to set up the
next feature listed on the Feature
Summary
— OR —
Press and release P to exit
Feature Setup.
The new settings will be saved.
Feature Summary
Feature/System Announces Options
Announce Select Choose to record an announcement, or use the
pre-recorded announcement.
“Selected announcement is...” • Select “Announcement A” when you want the
system to record callers’ messages. Select
“Announce Only” when you want the system to
play an announcement and then hang up.
• If you select “Announcement A” and do not
record an announcement, the system plays the
pre-recorded announcement: “Hello. Please
leave a message after the tone.”
• If you select “Announce Only” and do not record
an announcement, the system will answer after
10 rings and announce “No announcement.”
See “Record Y our Announcement” under ANSWERING
SYSTEM OPERATION for recording instructions.
Number of Rings Choose how many times the line will ring before the
system answers a call.
“Number of rings is...” • Set for 2 to 7 rings, or choose Toll Saver 2/4 or Toll
Saver 4/6.
• When set to Toll Saver 2/4, the system answers
after four rings when you have no new messages
and after two rings when you do. Toll Saver 4/6
causes the system to answer after six rings when
you have no new messages and after four rings
when you do.
Audible Message Alert When this feature is on, the system beeps every 15
seconds when you have new messages.
Remote Access Code Change the Remote Access Code to any three digit
number from 500 to 999. Do not set to same number
as Priority Calling Code.
“Remote access code is...” • The Remote Access Code, preset to 500, allows
you to access many features of this answering
system remotely from a touch tone phone.
• The system will prompt you to repeat Steps 2
and 3 of Feature Setup until you have set all
three digits.
3
Page 5

FEATURE SETUP
Feature Summary (cont’d)
Feature/System Announces Options
Priority Call Code Change the Priority Call Code to any three-digit
number from 500–999. Code is preset to 999. Do
not set to same number as Remote Access Code. See
“Priority Calling Code” under ANSWERING SYSTEM
OPERATION for information about using this feature.
Announcement Monitor Choose ON to hear the announcement when your
system answers a call. Choose OFF to have it silent
on your end. (Your caller will still hear the
announcement.)
NOTE: Volume must be set to a level you can hear
to use Announcement Monitor.
Number Announce When this feature is on the system will announce the
(Please see NOTE below.)
caller’s telephone number between the second and
third rings.
NOTE: When the Number Announce feature is
on and Number of Rings is set for two rings or
Toll Saver 2/4, the unit will answer after three
rings to allow enough time for the system to
announce the caller’s telephone number.
Store Number When this feature is on, the system announces the
(Please see NOTE below.)
caller’s telephone number when it plays back a
message.
Accept Blocked Calls Choose ON to have the system accept all calls.
(Please see NOTE below.)
Choose OFF to have the system respond to “blocked”
calls with the pre-recorded announcement, “We’re
sorry, blocked calls to this number cannot be
accepted,” and hang up without recording a message.
Call Screening Set the system to play callers’ messages as they are
recorded (ON) or to remain silent while callers are
recording messages (OFF).
NOTE: Volume must be set to a level you can hear
to use Call Screening.
Ring Select Choose from four possible ringer tones. You will hear
“Selected ring is...” a sample as you change the setting.
NOTE: For this feature to work, you must subscribe to Caller Identification service
from your telephone service provider. There is a fee for this service, and it may not be
available in all areas.
Review Feature Setup
To review the current feature settings, press and release S.
4
Page 6

REMOTE OPERATION
Connect with the Answering System
You can access many features remotely
from a touch tone phone.
1 Dial your telephone number.
2 When the system answers, enter your
three-digit Remote Access Code during
or after the announcement. The system
announces the number of messages,
then begins message playback. If the
announcement continues to play after
Remote Access Commands
Function Command
Voice help menu Press 5.
Play all messages After the two beeps, wait four seconds for system to
automatically play back all messages, or press 1.
entering your code, wait for the
announcement to end or press # to
stop the announcement, then re-enter
the code.
3 To use a remote access command
(below), press 5 during message
playback and wait for the two-beep
signal.
4 Enter a remote access command.
Play new messages Press 2.
Repeat a message Press 4 while the message is playing.
Skip a message Press 6 while the message is playing.
Stop message playback Press 5.
Save message Hang up.
Delete message Press and release 3 while the message is playing.
Delete all messages After you have listened to all messages and heard
the two beeps, press 3 3.
Record announcement Press * 7; after beep, record announcement, press
5 to stop. System plays back announcement.
Review announcement Press 7.
Record memo Press #; speak after beep; press 5 to exit.
Set the clock Press * 8. Follow prompts to set day, time, and y ear.
Change remote access code Press * #. Follow prompts to set new code.
Turn system off Press * 0.
Turn system on When system is off, it answers after 10 rings,
announces “The machine is off,” then beeps twice.
Press * 0.
Memory full When the memory is full, the system answers after
10 rings, announces “Memor y is full,” then beeps
twice. Enter your Remote Access Code and delete
some or all messages. Press * 0 to make sure
system is on before hanging up.
End remote access call Press * 9. The system announces “The machine
will now hang up,” and disconnects the call.
5
Page 7

TELEPHONE OPERATION
Dial Mode
This phone comes set to operate with touch
tone service. If you have dial pulse (rotar y)
service, you will need to reset the dial mode.
If you hear clicks (not tones) when you dial,
you have dial pulse (rotary) service.
Hold
To put a call on hold, press
and release H. The LINE
STATUS light will blink when a
call is on hold.
To take a call off hold, press
and release H
— OR —
Press K
— OR —
Lift the handset of
this phone
— OR —
Lift the handset of
another phone on
the same line.
Flash
Press and release
F instead of
pressing the
switchhook to
activate telephone
company subscriber
services such as Call
Waiting or Three-Way
Calling.
Redial
Press and release R to dial the
last number you dialed. The last
number you dialed (up to 24
digits) is stored in redial memory
until you dial another number.
T emporary Tone
NOTE: If you have touch tone service, you
do not need to use the Temporary Tone
feature.
1 Dial the call, then press and release *.
Any buttons pressed after this send
touch tone signals.
2 After you hang up, the phone
automatically returns to dial pulse
(rotary) dialing.
To change to dial pulse mode:
1 Press and release G.
2 Press #, #, #, 3.
To change back to touch tone mode:
1 Press and release G.
2 Press #, #, #, 8.
Mute
To mute a call, press and
release m. The MUTE light
goes on.
To return to two-way
conversation, press and
release m.
Mute is canceled if you switch
from handset to speakerphone
or from speakerphone to
handset.
Ringer V olume
While not on a call,
use VOLUME + or to adjust the ringer
volume. Setting to
lowest level turns the
ringer off. You will
hear a three-beep
tone when the ringer
is turned off or set to
highest level.
Handset/
Speakerphone
Volume Control
While on a call or
listening to messages,
use VOLUME + or to adjust the listening
level. Press the top
arrow to increase
volume. Press the
bottom arrow to
decrease volume.
Making/Answering Calls
1 Lift the handset or press
K.
2 To end a call, hang up or
press K.
3 To switch from handset to
speakerphone, press
K, then hang up. To
switch from speakerphone
to handset, lift the handset.
6
Page 8

TELEPHONE MEMORY
This telephone can store up to 13 numbers
(up to 24 digits each). You can keep a record
of stored numbers on the directory card.
Storing One-Touch Numbers
1 Press G.
2 Dial the number you’re storing.
3 Press the one-touch location
where you want to store the
number.
Storing Memory
Numbers
1 Press G.
2 Enter the
telephone
number you want
to store. You will
hear a beep each
time you press a
button.
3 Press M.
4 Enter a digit
(0–9) where you
want to store the
number.
Dialing One-Touch Numbers
1 Lift the handset or press
K.
2 Press the one-touch
location.
Dialing Memory
Numbers
1 Lift the handset
or press K
and listen for a
dial tone.
2 Press M.
3 Press the
memory location
you want to dial
(0–9).
Erasing Memory Numbers
To erase any number from memory, store
another number in its place.
Storing a Pause in One-Touch
or Memory Numbers
You can insert a pause in the dialing
sequence by holding down the button
immediately before the desired pause
(you will hear one beep for each additional
pause entered). For example, to store 9,
pause, 555–1234, press and hold 9 until
you hear the second beep, then press
5, 5, 5, 1, 2, 3, 4.
7
Page 9

ANSWERING SYSTEM OPERATION
Set the Clock
You must set the clock once so that the
system announces the correct day and
time with your messages. After this, if you
subscribe to Caller ID, the system will
automatically reset the clock each time
new call information is received. (There is
a fee for Caller ID service, and it may not
be available in all areas.)
Press P to exit at any time while
setting the clock.
1 Press and hold C until the default
day is announced.
2 To change the day setting, hold down
or until the
correct day is announced. Then
release the button.
3 Press and release C. The current
hour setting is announced.
4 Repeat Steps 2 and 3 to set the hours,
minutes, and year .
5 The new day, time, and year are
announced.
To check the clock, press and release
C.
To review your announcement, press
and release .
NOTE: To erase your announcement
and return to the pre-recorded
announcement, press D while your
announcement is playing.
Answering Calls
When Announce Select is set to A and the
system answers a call, the caller hears the
announcement you recorded, followed by
a beep. After the beep, the system begins
recording your caller’ s message up to three
minutes long.
Call Screening/Intercept
In Feature Setup, you can set the system so
you can hear the callers’ messages as they
are recorded.
If you decide to speak with the caller, lift
the handset of this or any telephone on
the same line. The system stops recording
and resets to answer calls. If the system
doesn’t disconnect immediately, press and
release the telephone switchhook.
NOTE: In the event of a power failure,
see the instructions on the bottom of the
unit to reset the clock.
Record Y our Announcement
Before using this answering system, you
should record the announcement (up to
three minutes long) that callers will hear
when the system answers a call.
Callers can skip the announcement by
pressing #.
1 Press and hold . When the
system beeps, speak toward the
microphone normally, from about
nine inches away.
2 T o stop r ecording, release .
The system automatically plays back
your announcement.
Priority Call Code
If a caller enters the code you provide
(preset to 999) while your announcement
is playing, the system will alert you with a
special tone that a priority caller is on the
line. Lift the handset or press K to
take the call.
If you do not answer, the caller can press
5, wait for the double beep, press # and
leave a message.
Privacy Pla yback
You can listen to your messages privately
using the handset of this phone.
1 Press and hold # while lifting the
handset of this phone.
2 Release #, then press P to
listen to messages.
8
Page 10

ANSWERING SYSTEM OPERATION
Listen To, Save & Delete Messages
• The system automatically saves your
messages until you delete them. You
can store approximately 19 minutes of
messages, memos, and announcements
(up to a maximum of 100 messages).
• Before playing each message, the
system announces the day and time
the message was received. If Store
To operate the system, follow the instructions below. “Press” means press and quickly
release the button. “Hold” means hold the button down until you hear the system respond.
Press to turn the
system on or off.
Press to repeat
a message.
Press during time/
day announcement
to repeat previous
message.
Hold to play at
half speed.
Press to record
a memo or
telephone
conversation.
Off when system is
off. System will not
answer calls.
Number is set to ON, the system also
announces the caller’s telephone
number (see “Store Number” under
FEATURE SETUP). After playing the
last message, the system announces
“End of messages.”
• You cannot delete a message until it’s
been reviewed; deleted messages
cannot be recovered.
Message window
Set the clock
or check
clock settings.
Enter Feature Setup
menu or check
feature settings.
Press to delete
the message
that’s playing.
Hold to delete
all messages.
Press to skip all or
part of a message.
Hold to play twice
as fast.
On steadily when
system is on with
no new messages.
Blinks when
new messages
are pr esent.
Flashes quickly
when memory is
full. (Delete
messages to make
room for new
messages.)
Press to adjust
volume. System
beeps three times
at highest or
lowest setting.
Press to play only new
messages.
Hold to play all messages.
Press again to stop playback.
9
Page 11

ANSWERING SYSTEM OPERATION
Record a Memo
You can record a memo up to three
minutes long to be stored as an incoming
message.
1 Press and release . When
the system beeps, speak toward the
microphone.
2 T o stop recording, press P.
3 T o pla y the memo, press P.
Record a Phone Conversation
While on a call on the handset, you can
record a conversation to be stored as an
incoming message.
1 Press and release .
2 T o stop recording, press P.
3 T o play the r ecording, press P.
Memory Monitor
You can deter mine the system’s remaining
recording time.
1 If the system is on, press O to
turn the system off.
2 Press O again to turn the system
on. The system announces the
remaining recording time in minutes.
(If there is less than five minutes
remaining, the system announces,
“The machine is on. Less than five
minutes to record.”)
IN CASE OF DIFFICULTY
If you have difficulty operating this
product, try the suggestions below.
For Customer Service, visit our
website at www.telephones.att.com or
call 1 800 222–3111. Please retain your
receipt as your proof of purchase.
Messages Are Incomplete
• The system can accept messages up
to three minutes long. If a caller
leaves a very long message, part of it
might be lost when the system
disconnects the call after three
minutes.
• If the caller pauses for more than
seven seconds, the system stops
recording and disconnects the call.
• If the system’s memory fills up during
a message, the system stops recording
and disconnects the call.
System Will Not Record Messages
• When memory is full, saved messages
must be deleted before new messages
can be recorded.
• If Announce Only is selected, no
messages will be recorded.
Cannot Record a Conversation
You cannot record a conversation using
the speakerphone. You must use the
handset to record a conversation.
Incoming Messages are Not Heard
During Recording
• Press VOLUME + until volume is at
desired level.
• Make sure Call Screening is not set
to OFF.
System Takes Longer Than Usual
To Respond
If there are many messages recorded,
the system may take longer than usual to
respond audibly.
10
Page 12

IN CASE OF DIFFICULTY
System Does Not Respond To Remote
Commands
• Make sure you are calling from a
touch tone phone. When you dial a
number, you should hear tones. If you
hear clicks instead, the phone is not a
touch tone telephone.
• The answering system may not detect
the Remote Access Code while your
announcement is playing. Try waiting
until the announcement is over before
entering the code.
• There may be noise interference on
the phone line you are using. Press
dial buttons firmly.
• Make sure you are entering your
Remote Access Code correctly.
• You might be calling from a phone
that sends tones too short for your
answering system to detect.
• If there are many messages recorded,
the system may take longer than usual
to respond.
System Does Not Answer After Correct
Number of Rings
• If the Toll Saver feature is on, the
number of rings changes from four to
two, or six to four, when you have
new messages waiting.
• In some cases, the system might be
affected by the ringing system used
by the local telephone company.
• If the system’s memory is full or the
system is off, the system answers after
10 rings.
• When Number Announce is on and
Number of Rings is set to 2, system
answers after three rings so it can
announce caller’s number.
• If Announce Only is selected and no
announcement is recorded, system
answers after 10 rings and announces
“No announcement.”
Message Window Is Blank
• Make sure the power cord is securely
connected (and threaded through the
strain relief tab) to both the answering
system and an electrical outlet not
controlled by a wall switch.
• Press O to make sure the system
is on.
Message Window Displays
Delete
CL Clock needs to be reset
Flashing – System busy or in use
––
— OR —
Steady – System in Remote Access
mode
F Memory is full
No Dial Tone
Make sure all plugs are connected
properly. Check the line cord connections
at the modular jack and at the telephone.
Also check the coiled handset cord
connections at both ends.
Call Cannot Be Dialed, or
Is Dialed Slowly
• If you have pulse dialing service, you
cannot dial numbers with the dial
mode set to tone. See “Dial Mode” in
the TELEPHONE OPERATION section
of this manual for instructions. Set the
dial mode to pulse, then hang up and
dial again.
• If you have tone dialing service, you
may be able to use either tone or pulse
dialing mode. If you set the dial mode
to tone, numbers are dialed much more
quickly.
Telephone Does Not Ring
• Make sure the ringer volume is not
turned off. If the RINGER OFF light is
on, press VOLUME + to adjust the
ringer volume (see “Ringer V olume”
under TELEPHONE OPERATION for
details).
• If there are several other telephones
on the same line, try disconnecting
some of the other telephones. Having
too many telephones connected can
create problems such as low ringer
volume, or impaired sound quality
during calls.
Power Failure Recovery
If the system is disconnected from AC
power it will not operate unless you have
installed four fresh AA alkaline batteries.
Your announcement and messages are
retained in memory during a power failure
even without batteries, but you will need
to reset the clock.
If the message window displays CL, you
need to reset the clock. See the
instructions on the bottom of the unit.
11
Page 13

Printed in China. Issue 1AT&T 05/01
© 2001 Adv anced American T elephones. All rights reserved.
Printed in China. Issue 1AT&T 05/01
© 2001 Adv anced American T elephones. All rights reserved.
fold
○○○○○○○○○○○○○○○○○○○○○○○○○○○○○○
1
AS48 Digital Answering System
Remote Commands
To connect with your answering system:
1 Dial your telephone number from a touch tone phone.
2 When the system answers, enter your Remote Access Code.
The system announces the number of messages and begins
message playback.
3 Listen to your messages
— OR —
Press 5 during message playback and w ait f or the two-beep
signal before entering a remote command from inside this card.
Page 14

ONE KEY REMOTE COMMANDS
ONE KEY REMOTE COMMANDS
Play All Pla y New Delete
Voice Help/
Repeat Skip
Stop
Review
Clock
Review
Features
TWO KEY REMOTE COMMANDS
Turn system on or off *0
Delete all messages 33
Review announcement 7
Record announcement *7, speak after beep,
press 5 to stop
Change clock *8
End remote access call *9
Play All Pla y New Delete
Voice Help/
Repeat Skip
Stop
Review
Clock
Review
Features
TWO KEY REMOTE COMMANDS
Turn system on or off *0
Delete all messages 33
Review announcement 7
Record announcement *7, speak after beep,
press 5 to stop
Change clock *8
End remote access call *9
 Loading...