

Page 1

2
Two-Line Digital
MEMO
2 WAY
ON/OFF
L1 L2
Answering System
with Time/Day Stamp 1772
Fold open this paper for information about
this product's installation and operation.
Please read Part 1 — Important Product
Information, included in this package.
© Copyright 1998 Philips Consumer Communications L.P. All rights reserved.
VOLUME
MIC
Part 2
Printed in Mexico. Issue 1AT&T
848229241
CLOCK
DELETE
REPEAT
STOP
FORWARD
PLAY
LINE 1
LINE 2
Page 2

INSTALLATION
Install the Batteries For One Two-Line Wall Jack For Two Single-L
TEL SET jack
L1 OR L1/L2 jack
Two-line wall jack
Two-line phone with
single cord
Power cord
L1 OR L1/L2 jack
TEL SET jack
L
Line 1 jac
Two-line phone
single cord
INSTALL THE BATTERIES
Open the battery door on the bottom of the
unit by pulling on the tabs. Insert the batteries as indicated, then close the door.
BASIC CONNECTIONS
For one two-line wall jack
1 Plug one end of the phone line cord with
clear plugs into the system jack labeled
L1 OR L1/L2.
2 Plug the other end of the cord into the
two-line wall jack.
For two single-line wall jacks
1 Plug one end of the phone line cord with
blue plugs into the system jack labeled
L1 OR L1/L2. Plug the other end of
the cord into the wall jack for Line 1.
2 Plug one end of the line cord with clear
plugs into the system jack labeled L2.
Plug the other end of the cord into the
wall jack for Line 2.
To connect a two-line phone with a single
cord, plug the cord from the phone into the
TEL SET jack on the back of the
answering system.
NOTE: If a single line phone is connected
to the TEL SET jack, it can be used to make
and answer calls on Line 1 only.
OTHER CONNECTION OPTIONS
To use these installation options, you’ll
need to purchase a dual outlet adapter.
For two single-line phones
1 Plug the cord from the phone for Line 1
into the TEL SET jack on the answering
system.
2 Plug the cord from the phone for Line 2
into the dual outlet adapter.
3 Plug the cord from the L2 jack on the
answering system into the dual outlet
adapter.
4 Plug the dual outlet adapter into the
Line 2 wall jack.
For two-line phone with two cords
1 Plug the cord for Line 1 from the phone
into the TEL SET jack on the answering
system.
2 Plug the other phone cord into the dual
outlet adapter.
Page 3

INSTALLATION
ine Wall Jacks For Two-Line Phone with Two CordsFor Two Single-Line Phones
L2 jack
Power cord
Line 2 jack
L1 OR L1/L2 jack
TEL SET jack
Two single-line phones
Line 1 jack
L2 jack
Line 2 jack
with dual
outlet adapter
Power cord
Power cord
L1 OR L1/L2 jack
Two-line jack with
single jack adapter and
dual outlet adapter
Two-line phone with
two cords
3 Plug the cord from the L2 jack on the
system into the dual outlet adapter.
4 Plug the dual adapter into the Line 2 jack.
For two-line phone with two cords and
a single jack adapter
(requires a single jack adapter)
1 Plug the single jack adapter into the dual
outlet adapter.
2 Plug the cords from the phone into the
single jack adapter.
3 Plug the cord from the L1 OR L1/L2
jack on the answering system into the
dual outlet adapter.
4 Plug the dual outlet adapter into the wall
jack.
CONNECTING THE POWER CORD
Use only the power cord supplied
!
with your system. If you need a
replacement cord, call 1 800 722-9125.
Fit the power cord behind the strain relief
tab. Then plug the smaller end of the power
cord into the POWER jack at the back of
the system. Plug the other end of the power
cord into an electrical outlet that is not
controlled by a wall switch.
SETTING THE CLOCK
1 Press G. The Message Window
displays CH.
2 Press C. You hear a day, and the
Window displays a number (1-7 for
Sunday - Saturday).
3 Hold down F or R until the
correct day is displayed, then release.
4 Press C. You hear an hour, and the
Window displays it.
5 Hold down F or R until the
correct hour is displayed, then release.
6 Press C. You hear a minutes setting,
and the Window displays it.
7 Hold down F or R until the
correct minutes setting is displayed, then
release.
8 Press C. The system announces the
new day and time setting.
To review the setting, press C.
Page 4

IN CASE OF DIFFICULTY
If this answering system does not work
properly, try the following suggestions
before seeking repair assistance.
MESSAGE WINDOW IS BLANK
Make sure the power transformer is
securely plugged into an electrical outlet
not controlled by a wall switch.
Use only the power cord supplied
with your system. If you need a
!
replacement cord, call 1 800 722-9125.
Press O to make sure the system is
turned on.
MESSAGES ARE INCOMPLETE
❥ The system accepts messages only up to
4 minutes long.
❥ If the caller pauses for more than 7
seconds, the system stops recording and
disconnects the call.
❥ If the system’s memory fills up during a
message, the system stops recording and
disconnects the call.
SYSTEM DOES NOT ANSWER AFTER
CORRECT NUMBER OF RINGS
❥ If the T oll Saver feature is on, the number
of rings changes from four to two when
you have new messages waiting. See
“Ring Select.”
❥ In some cases, the system might be
affected by the ringing system used by the
local telephone company.
❥ If the system’s memory is filled with
messages, or the system is off, or no AO
announcement is recorded, the system
answers after 10 rings.
LO BATT DISPLAYED
The batteries might be missing, low on
power, or incorrectly installed.
SYSTEM DOES NOT DISCONNECT
WHEN PHONE IS ANSWERED
To stop the system, press and release the
phone switchhook, or press S on the
system.
SYSTEM DOES NOT RESPOND TO
REMOTE COMMANDS
❥ When you dial a number from a touch
tone phone, you should hear tones. If you
hear clicks instead, the phone is not a touch
tone telephone. In that case, you can use
voice-activated commands.
❥ The answering system might not detect
the Remote Access Code while your
announcement is playing. Try waiting until
the announcement is over before entering
the code.
❥ There might be noise interference on the
phone line you are using. Press dial buttons
firmly .
❥ Make sure you are entering your Remote
Access Code correctly.
❥ Your Remote Access Code might have
reverted to the factory setting of 10. This
happens if there is an AC power failure at
your home and the system’s battery is
either low on power or not installed.
NUMBER IN MESSAGE WINDOW
FLASHES
Check your announcement; announcements might have been lost in a power failure when battery power was low.
OTHER PROBLEMS
❥ If the system malfunctions, make sure
you have followed all the instructions in
this manual to try to correct the problem.
❥ If you cannot correct the problem, press
r.
❥ If there is a problem with the system,
pressing r will reset the system and
delete any messages as well as your
announcement. Reset the clock and
rerecord the announcement, and your
system should be ready to answer calls and
record messages.
❥ If the system is okay, pressing r has
no effect.
Page 5

ANSWERING SYSTEM OPERATION
ANNOUNCEMENT OPTIONS
The Answering System 1772 lets you
record up to 4 different announcements —
A, B, C, and AO. Each can be presented
to callers on either Line 1 or Line 2. You
can assign the same announcement to be
presented on both lines, or you can choose
different announcements for each line.
NOTE: A total of about 24 minutes of
recording time is available for your
announcements and callers’ messages.
Use announcements A, B, and C when you
want the system to record callers’
messages. Use announcement AO
(Announce Only) when you want the
system to play an announcement and then
hang up. If you do not want to record your
own announcement, or if a recorded
announcement is lost in a power failure,
the system provides a brief pre-recorded
announcement.
NOTE: There is no pre-recorded
announcement for AO. If you choose AO,
you must record an announcement for it.
RECORD AN ANNOUNCEMENT
1 Move both ANNC SELECT switches,
located under the cover, to the
announcement you want to record (A,
B, C, or AO).
2 Prepare your announcement (up to 4
minutes).
3 Press G. The Message Window
displays CH.
4 Press A. The system beeps once and
begins to record.
5 Speak toward the microphone in a
normal tone from about 9 inches away.
6 Press S when you are finished.
The system automatically plays back your
announcement. Use + or to adjust the volume.
REVIEW ANNOUNCEMENT
Move both ANNC SELECT switches to
the announcement that you want to play,
then press A. The announcement plays
and the Message Window displays AP.
NOTE: T o delete an announcement, pr ess
D while the announcement is playing.
SELECT ANNOUNCEMENTS
Set the Line 1 ANNC SELECT switch to
A, B, C, or AO to select the announcement
callers to Line 1 will hear.
Set the Line 2 ANNC SELECT switch to
A, B, C, or AO to select the announcement
callers to Line 2 will hear.
TURN SYSTEM ON/OFF
The L1 and L2 lights indicate which lines
the system is set to answer. To choose
which line(s) the system will answer, or to
turn the system off, press O repeatedly .
This turns the lines on and off in the following order:
Line 1 on only
Line 2 on only
Both lines on
Entire system off (no answering system
features can be used)
RING SELECT/TOLL SAVER
Use the Line 1 and Line 2 Ring Select
switches on the side of the unit to set the
answering system to answer after 2 or 4
rings. Set to Toll Saver (TS) if you want
the system to answer after 4 rings when
you have no new messages and after 2 rings
when you have new messages.
NOTE: If the system is answering a call
on one line and a call comes in on the other
line, the second call will not be answered
until the first call is completed.
MESSAGE WINDOW
The Message Window displays the total
number of recorded messages. If the
number is flashing, either a power failure
occurred when batteries were low or
missing, or r was pushed.
The Message Window also displays OFF
when the system is off, a flashing F when
memory is full, and — when the system is
answering a call.
MESSAGE LIGHTS
The message lights for each line indicate
whether that line has messages. A steady
light indicates messages, but no new ones.
A flashing light indicates new messages.
If the light is off, the line has no messages.
MESSAGE ALERT
You can set the system to beep every 15
seconds to notify you when you have new
messages. Set the MSG ALERT switch
(under the cover) to ON.
MESSAGE VOLUME CONTROL
Use + or - to adjust the sound
of incoming messages or message
playback. This does not affect the volume
of the announcement your callers hear.
LISTEN TO MESSAGES
To hear all messages for both lines,
press P.
To hear only new messages for both
lines, hold down P until the system
begins playing.
To hear all messages for a single line,
press L or l.
To hear only new messages for a single
line, hold down L or l until the
system begins playing.
DELETE MESSAGES
1 Press D. The message lights flash.
2 Press P to delete all messages on both
lines
— OR —
Press L or l to delete all
messages for a single line.
The system announces “Messages
deleted.”
If you try to delete all messages on a line where
there are new messages, the system beeps 5
times and does not delete any messages.
To delete only a specific message, press
D while the message is playing. The
make sure you are deleting the right
message, you can press R to replay
the message, then press D while the
message is playing.
REPEAT/REVIEW MESSAGES
To hear a message again, tap R.
T o return to an earlier message, press and
release R until the number of that
message is displayed.
To repeat part of a message (review),
hold
down R for a few seconds, then
release it to resume playing. (The
system beeps while R is held down.)
Page 6
ANSWERING SYSTEM OPERATION
FORWARD/SKIP MESSAGES
T o skip to the next message, press F.
To skip part of a message (cue), hold
down F for a few seconds, then
release it to resume playing. (The
system beeps while F is held down.)
To stop playing messages, press S.
RECORD A MEMO
You can record a memo (which is stored
as a message) up to 4 minutes long.
1 Press M. The message Lights
flash rapidly and the Message Window
displays 1-.
2 Press L or l to choose where the
memo is stored. The system beeps and
begins recording. Speak toward the
microphone.
3 Press S when you are finished.
RECORD A PHONE CONVERSATION
NOTE: This unit does not sound warning
beeps to let the other party know that the
call is being recor ded. To ensure that you
are in compliance with any state and
federal regulations concerning recording
a telephone call, you should start the
recording process and then inform the
caller that you are recording the call.
1 Press M twice at any time during
a phone conversation. The Message
Lights flash rapidly, and the Message
Window displays 2-. Y ou can record for
up to 4 minutes.
2 Press L or l to select which line
will store the conversation. The system
beeps and begins recording.
3 Press S to stop recording. The
conversation is saved with messages,and
played back as a message.
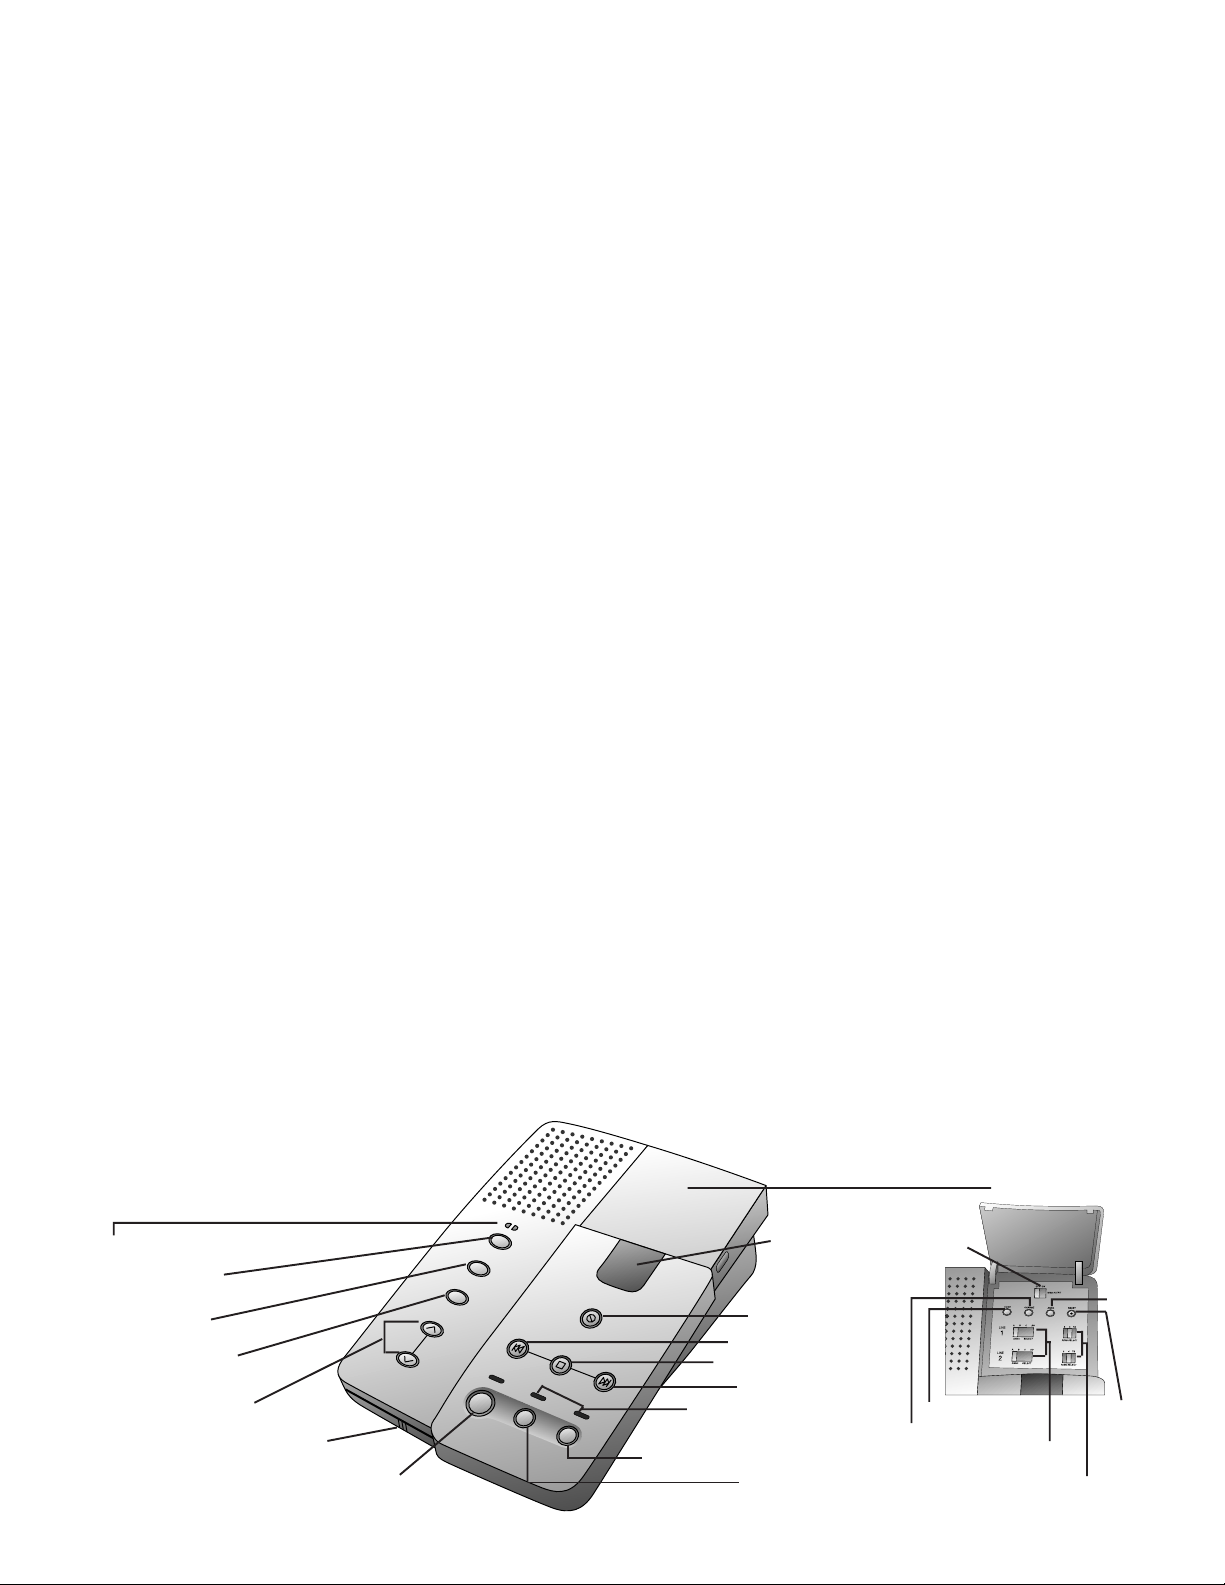
ON/OFF Lights
Turn system on or off
Record Memo or
Phone Conversation
Set or Review Time/Day
Speaker Volume Control
Microphone
Play Messages
PRIORITY CALLING
The priority call tone is preset to 99.
Callers to whom you have given the
Priority Calling Code will be able to
signal you that they are calling. Callers
must use a touch tone phone.
Your caller should
1 Dial your telephone number.
2 When the announcement begins to play ,
enter the current Priority Calling Code.
3 The system beeps three times, then
pauses. This pattern repeats until you
answer the phone. The beeps are audible
at both ends. If you do not answer the
call within 30 seconds, the caller hears
two beeps, and can then press * to leave
a message.
CHANGE PRIORITY CALLING CODE
1 Press G. The screen displays CH.
2 Press c. The screen displays the
current Remote Access Code.
3 Press P. The screen displays the
current Priority Calling Code.
4 Hold down F or R until the
Message Window displays the Priority
Calling Code you want. You can choose
any number between 10 and 99, except
the number assigned to the Remote
Access Code.
5 Press S when you are finished.
NOTE: If AC power fails and there is
insufficient battery power, the Priority
Calling Code reverts to 99.
L1 L2
ON/OFF
MEMO
2 WAY
CLOCK
VOLUME
MIC
REPEAT
PLAY
LINE 1
DELETE
STOP
FORWARD
LINE 2
Line 2
Message Window
shows number of
messages waiting
Delete messages
Repeat/Review messages
Stop message playback
Forward/Skip messages
Lights blink when
messages are waiting
Line 1
CALL SCREENING
CALL INTERCEPT
Set the volume to 2 or above so you can
hear a caller’s voice on the speaker . If you
decide to take the call, lift the handset of
any telephone on the same line. The
system stops recording and resets to
answer calls. If the announcement does
not stop immediately, press the telephone
switchhook, or press S at the
answering system.
ANNOUNCEMENT MONITOR
Y ou can change the setting so that you will
hear only your caller’s voice, and not your
outgoing announcement when you are
screening calls.
1 Hold down A. The Message Window
alternately displays AP (Announcement
Play) and AS (Announcement Silent).
2 Press A when the Window displays
the setting you want.
BYPASSING THE ANNOUNCEMENT
Callers can press * during the announcement to skip it and leave a message. Even
if the system is set to AO (Announce
Only), callers can press * to leave a message.
WHEN MEMORY IS FULL
The Message Window flashes F when
memory is full (24 minutes of announcements and messages or 50 messages).
When memory is full, the system will answer calls after 10 rings and present 2
beeps instead of your announcement. To
make room for more messages, delete
some or all of the recorded messages.
Access Cover
Message
Alert
ANNC
CHANGE
CODE
Select announcements
for Line 1 & Line 2
Select Ringer setting
for Line 1 & Line 2
RESET
Page 7

ANSWERING SYSTEM OPERATION
Away From Home
You can operate the answering system
while away from home using the telephone
keypad (touch tone phone only), or voiceactivated commands.
CONNECT WITH THE ANSWERING
SYSTEM
1 Dial your telephone number.
2 When the system answers, enter your
Remote Access Code during or after the
announcement. The system announces
the number of messages received, and
beeps twice, indicating it is ready to
receive commands.
YOUR REMOTE ACCESS CODE
The Remote Access Code is preset to 10.
To view the current code, press c.
To change the Remote Access Code at
home
1 Press G. The Window displays CH.
2 Press c. The Window displays the
current Remote Access Code.
3 Hold down F or R until the
Window displays the code you want.
Choose any number between 10 and 99,
except for the current Priority Calling
Code.
4 Press S when you are finished.
To change the Remote Access Code
remotely
1 Connect with the answering system.
2 After the 2 beeps, press 99. The system
announces “Enter new code.”
3 Enter the new Remote Access Code. If
you enter a valid code, the system
announces the new Remote Access
Code. If you enter an invalid code, you
hear five rapid beeps, followed by two
beeps. Repeat Steps 2 and 3.
NOTE: If AC power fails and battery
power is insufficient, the Remote Access
Code reverts to 10.
PLAY MESSAGES
To play all messages on both lines, wait
4 seconds, or press 7.
T o play all messages on Line 1, press 17.
T o play all messages on Line 2, press 27.
T o play only new messages on both lines,
press 6.
To play only new messages on Line 1,
press 16.
To play only new messages on Line 2,
press 26.
SAVE MESSAGES
The system automatically saves all
messages you do not delete.
DELETE MESSAGES
To delete all messages on both lines,
press 03.
To delete all messages on Line 1,
press 13.
To delete all messages on Line 2,
press 23.
To delete only a selected message,
press 3 while that message is playing.
If you try to delete all messages on a line
which has new messages, the system beeps
5 times and does not delete any messages.
REPEAT
To repeat an entire message, press 2
while that message is playing.
To repeat part of a message, hold down
2. To resume playback, release 2.
FORWARD
T o skip an entire message, press 5 while
that message is playing.
To skip part of a message, hold down 5.
To resume playback, release 5 .
STOP
Press # to stop message playback.
RECORD A MEMO
1 Press 1* to record on Line 1
— OR —
Press 2* to record on Line 2.
2 Begin speaking after the beep.
3 Press # when you are finished.
CHANGE ANNOUNCEMENTS
1 Press 14* to choose Line 1
— OR —
Press 24* to choose Line 2.
2 Speak into the phone in a normal voice.
3 Press # when finished. The system
beeps and plays the new announcement.
To review your announcement, press
141 for Line 1, or 241 for Line 2.
TURNING OFF THE SYSTEM
Press 88 to turn off both lines
— OR —
Press 188 to turn off only line 1
— OR —
Press 288 to turn off only Line 2.
The system announces which lines are off,
and beeps twice.
TURNING ON THE SYSTEM
This feature does not require your Remote
Access Code.
Press 00 to turn on both lines
— OR —
Press 10 to turn on only Line 1
— OR —
Press 20 to turn on only Line 2.
The system announces which lines are on,
and beeps twice. If you hear 5 rapid beeps
instead of the two-beep signal, either memory
is full, or no announcement is recorded.
VOICE HELP MENU
You can use many system features remotely when you cannot remember the
touch tone commands. After you have
heard your messages, the system announces “End of messages,” and then lists
several commands. As soon as you hear
the command you need, press the corresponding buttons. You can access the command list by pressing # any time after the
two beeps.
Page 8

ANSWERING SYSTEM OPERATION
Away From Home
MEMORY FULL/NO ANNOUNCEMENT
If the system answers after 10 rings, and
presents 2 beeps but no announcement, the
system might be off for one or both lines,
memory might be full, or the system is set
to AO and your announcement was lost.
T o reset the system to answer and r ecord
1 Enter your Remote Access Code after the
2 beeps.
2 Listen to any recorded messages, and
delete some or all of them.
3 Press 141 to review the Line 1
announcement. If there is none, press
14* to record a new announcement.
4 Press 241 to review the Line 2
announcement. If there is none, press
24* and record a new announcement.
5 Before hanging up, make sure that at
least one line is set to answer calls.
Press 10 to turn on Line 1
— OR —
Press 20 to turn on Line 2
— OR —
Press 00 to turn on both lines.
VOICE-ACTIVATED COMMANDS
When a touch tone telephone is not available, you can still call your system to
listen to your messages. You use your
voice to enter the Remote Access Code, to
repeat messages, and to delete messages.
Speak in response to the prompts presented
by the system as described below. You
must speak quickly and loudly in order for
the system to detect your voice.
The system does not recognize the actual
words you are saying; it responds to any
sufficiently intense auditory signal. For
example, instead of “Enter code,” you can
substitute any phrase or word that is easy
for you to remember.
1 Dial your telephone number, listen for
the announcement, and then remain
silent after the beep.
NOTE: If the system answers after 10
rings (because it is off or the memory is
full), remain silent after the two-beep
signal.
2 After about ten seconds, the system
prompts “Enter remote access code.”
Immediately respond by saying “Enter
code.”
3 You then hear “First digit,” followed by
“Enter zero,” “Enter four,” “Enter five,”
and so forth. When you hear the first
digit of the Remote Access Code,
immediately respond by saying “Enter
code.”
For example, if your Remote Access
Code is 53, wait to hear “Enter five,”
then say “Enter code.”
4 You then hear “Second digit,” followed
by “Enter zero,” “Enter one,” “Enter
two,” and so forth. When you hear the
second digit of the Remote Access Code,
say “Enter code.”
5 If you enter the code correctly, the
system announces how many messages
have been received, and begins playing
all messages recorded on both lines.
If no messages have been received, the
system disconnects the call.
6 At the end of each message, the system
prompts “Repeat message?” T o hear the
message again, say “Repeat message.”
If you remain silent, the system plays
the next message. You can repeat each
message once.
7 After the last message plays, the system
announces “End of messages” followed
by the prompt “Replay messages?”
To replay all of the messages, say
“Replay messages.” If you remain
silent, the system prompts “Delete all
messages?”
8 T o delete all of the messages, say “Delete
messages.” The system then repeats the
“Delete all messages?” prompt to
confirm your choice.
To confirm the delete, say “Delete
messages.” The system announces
“Messages deleted” and disconnects the
call.
If you remain silent after the “Delete all
messages?” prompt, the system
disconnects the call and the messages are
not deleted.
If you do not enter the correct
Remote Access Code
If you enter an incorrect Remote Access
Code, the system beeps five times and begins the sequence of prompts again. If you
enter the wrong code on the second try, the
system disconnects the call.
If you do not respond to the correct digit
while entering the Remote Access Code (or
if the system fails to detect your response),
you can remain silent after you hear the
“Enter nine” prompt. The system beeps
five times and begins the sequence of
prompts again. If you do not respond correctly during the second sequence of
prompts, the system disconnects the call.
Page 9

2
ANSWERING SYSTEM 1772
1 Dial telephone number and wait for
system to answer.
2 Enter Remote Access Code.
3 Listen for messages
— OR —
Enter touch tone command.
4 Hang up to save messages.
Your Remote Access Code _______
© 1998 Philips Consumer Communications L.P.
All rights reserved. Printed in Mexico.
Issue 1AT&T 848229274
Page 10

OPTION PRESS
Play messages 7, 17, or 27
Play only new messages 6, 16, or 26
Repeat message 2
Skip message 5
Delete selected message 3
Delete all messages 03, 13, or 23
Record announcement 14* or 24*
Record memo 1 * or 2*
End a recording #
Turn system on 00, 10, 20
Turn system off 88, 188 or 288
OPTION PRESS
Play messages 7, 17, or 27
Play only new messages 6, 16, or 26
Repeat message 2
Skip message 5
Delete selected message 3
Delete all messages 03, 13, or 23
Record announcement 14* or 24*
Record memo 1 * or 2*
End a recording #
Turn system on 00, 10, 20
Turn system off 88, 188 or 288
 Loading...