

Page 1

DIVA8M
User Manual
Version 1.1
Ateïs International
Ch. du Dévent, 1024 Ecublens, Switzerland.
Phone : +41 21 881 25 10
Page 2

1 ................................................................................................................................................. 5 WELCOME
..................................................................................................................................... 5 PRESENTATION
1.1
1.2 .............................................................................................................................................. 6 CONTACT
1.3 ...................................................................................................................................... 6 INSTALLATION
1.4 .............................................................................................................................. 7 SYSTEM OVERVIEW
1.4.1 ............................................................................................................................................ 7 General
............................................................................................................................................... 7 Audio
1.4.2
..................................................................................................................................... 7 Connectivity
1.4.3
...................................................................................................................... 7 System Configuration
1.4.4
................................................................................................................................7 System Control
1.4.5
......................................................................................................................... 7 SAFETY DECLARATION
1.5
2 ................................................................................................................ 10 HARDWARE DESCRIPTION
....................................................................................................................... 11 DIVA8M FRONT VIEW
2.1
2.2 ......................................................................................................................... 12 DIVA8M REAR VIEW
2.3 ........................................................................................................................ 13 DIVA8S FRONT VIEW
2.4 .......................................................................................................................... 14 DIVA8S REAR VIEW
3 .............................................................................................................................................. 15 SOFTWARE
..................................................................................................................... 15 INSTALLATION PROCESS
3.1
3.2 ......................................................................................................................................... 18 UNINSTALL
3.3 ......................................................................................................................... 18 SOFTWARE UPGRADE
4 ............................................................................................................................ 19 EXTERNAL DEVICES
...................................................................................................................... 19 FIREMAN MICROPHONE
4.1
4.2 ..................................................................................................................................................... 19 PSS
................................................................................................................................................... 20 PSM
4.3
............................................................................................................................ 20 JB (JUNCTION BOX)
4.4
5
...............................................................................................................................22 DIVA PHILOSOPHY
..................................................................................................................................... 22 FRONT PANEL
5.1
5.2 .......................................................................................................................................... 22 SOFTWARE
5.3 ................................................................................................................................................ 22 EVENT
6 ............................................................................................................. 23 FRONT PANEL OPERATIONS
................................................................................................................................................. 23 MENU
6.1
6.1.1 ................................................................................................................................23 Reset Monitor
........................................................................................................................................... 23 Logout
6.1.2
.................................................................................................................................. 24 Mac Number
6.1.3
..................................................................................................................................... 24 IP Address
6.1.4
.......................................................................................................................................... 25 Set time
6.1.5
................................................................................................................................25 Speaker Level
6.1.6
......................................................................................................................................... 25 Log files
6.1.7
........................................................................................................................................ 25 Mic/Line
6.1.8
.............................................................................................................................. 26 Stop All Events
6.1.9
....................................................................................................................... 26 Ethernet Settings
6.1.10
............................................................................................................................ 26 Music 1 Level
6.1.11
............................................................................................................................ 26 Music 2 Level
6.1.12
........................................................................................................................... 26 Get Reference
6.1.13
................................................................................................................................................. 27 MUSIC
6.2
6.2.1 ............................................................................................................................... 27 Zone Selection
............................................................................................................................ 27 Source Selection
6.2.2
...................................................................................................................................... 27 Attenuator
6.2.3
.................................................................................................... 27 MESSAGE AND MICROPHONE CALL
6.3
6.3.1 ....................................................................................................................................... 27 Messages
..................................................................................................................... 28 Fireman Microphone
6.3.2
7
................................................................................................... 29 DIVA SOFTWARE PRESENTATION
.......................................................................................................................................... 30 TITLE BAR
7.1
Ateïs International
Ch. du Dévent, 1024 Ecublens, Switzerland.
Phone : +41 21 881 25 10
2
Page 3

7.2 ............................................................................................................................... 30 MAIN MENU BAR
7.2.1 ................................................................................................................................................ 30 File
................................................................................................................................................ 31 Edit
7.2.2
............................................................................................................................................... 31 View
7.2.3
............................................................................................................................................... 33 User
7.2.4
...................................................................................................................................... 33 Operation
7.2.5
.............................................................................................................................................. 34 Tools
7.2.6
............................................................................................................................................... 34 Lock
7.2.7
.......................................................................................................................................... 35 Window
7.2.8
............................................................................................................................................... 35 Help
7.2.9
.......................................................................................................................................... 36 TOOLBARS
7.3
7.4 ............................................................................................................................................. 37 TAB BAR
7.5 ........................................................................................................... 37 DESIGN COMPONENT SECTION
7.6 ........................................................................................................................... 39 DESIGN VIEW AREA
7.7 ............................................................................................................ 39 PROPERTY CONTROL SECTION
7.8 ....................................................................................................................................... 40 STATUS BAR
8 ..................................................................................................................................................41 HOW TO?
......................................................................................................................................... 41 SAVE/OPEN
8.1
8.1.1 .............................................................................................................................................. 42 Open
............................................................................................................................................... 42 Save
8.1.2
........................................................................................................................................... 42 Save as
8.1.3
........................................................................................................................................ 42 Autosave
8.1.4
................................................................................................................................... 43 PRINT PROJECT
8.2
8.3 ...................................................................................................................... 44 START A NEW PROJECT
8.4 ................................................................................................................... 46 CHANGE COLOR SCHEME
8.5 ......................................................................................................... 46 CONFIGURE NETWORK OPTIONS
8.6 ............................................................................................................ 47 USE THE USER MANAGEMENT
8.6.1 ......................................................................................................................... 48 Add User Account
...................................................................................................................... 49 Delete User Account
8.6.2
............................................................................................................ 49 Explanation on User Level
8.6.3
..............................................................................................................................50 ENTER PASSWORD
8.7
8.8 ..................................................................................................................................... 51 UPDATE DIVA
8.9 ............................................................................................................................................. 51 COMPILE
8.10 ................................................................................................................................................. 51 STORE
8.11 .............................................................................................................................................52 REVERSE
8.12 .................................................................................................................. 53 ADD DESIGN COMPONENT
8.13 ................................................................................................................................. 54 SEARCH DEVICE
8.14 ................................................................................................................................. 55 SET IP ADDRESS
8.15 ............................................................................................... 55 PERFORM A DIVA MASTER NETWORK
8.16 ............................................................................................................... 56 ADD MESSAGES INTO DIVA
.......................................................................................... 58 TO SET SPEAKER PARAMETERS SETTINGS
8.17
8.18 ......................................................................................................................................... 59 USE EVENT
8.18.1 ...................................................................................................................... 61 Common Options
......................................................................................................................... 62 Event Sequence
8.18.2
................................................................................................................................65 Event Type
8.18.3
....................................................................................................... 81 SET UP FRONT PANEL MESSAGES
8.19
8.20 ............................................................................................................... 83 USE FIREMAN MICROPHONE
8.21 ........................................................................................................................... 85 USE MUSIC SOURCE
8.21.1 ............................................................................................................... 87 From the Front Panel
...................................................................................................... 88 With Modulation Detection
8.21.2
.................................................................................................................. 89 In Permanent Mode
8.21.3
.................................................................................................................................. 89 From PSS
8.21.4
...................................................................................................................... 91 From Logic Input
8.21.5
...................................................................................................................... 94 Software Control
8.21.6
....................................................................................................................... 95 USE PSS MICROPHONE
8.22
8.22.1 ............................................................................................................................ 95 General Page
................................................................................................................................. 97 Keys Page
8.22.2
.......................................................................................................................... 99 USE MIC/LINE INPUT
8.23
8.23.1 .................................................................................................... 102 With Modulation Detection
Ateïs International
Ch. du Dévent, 1024 Ecublens, Switzerland.
Phone : +41 21 881 25 10
3
Page 4

8.23.2 .................................................................................................................... 103 From Logic Input
........................................................................................................................ 105 From Software
8.23.3
............................................................................................................................ 106 USE LOGIC INPUTS
8.24
8.24.1 ............................................................................................................... 107 Normal Logic Inputs
................................................................................................................... 108 Evacuation Inputs
8.24.2
.............................................................................................................. 109 External Fault Inputs
8.24.3
.............................................................................................................................110 USE MONITORING
8.25
8.25.1 ..................................................................................................................... 111 Zone Monitoring
.............................................................................................................. 112 Amplifier Monitoring
8.25.2
....................................................................................................................... 112 USE THE SCHEDULER
8.26
8.27 ..................................................................................................................................... 116 USE FILTERS
8.27.1 ................................................................................................................................117 On Inputs
............................................................................................................................. 119 On Outputs
8.27.2
......................................................................................................................................... 121 USE PEQS
8.28
8.28.1 ................................................................................................................................122 On Inputs
............................................................................................................................. 124 On Outputs
8.28.2
.............................................................................................................. 125 USE COMPRESSOR/LIMITER
8.29
8.30 ...................................................................................................................................... 129 USE PRESET
8.31 ......................................................................................................................... 129 USE OUTPUT RELAY
8.32 ................................................................................................... 130 CREATE A MONITORABLE BUTTON
8.33 ....................................................................................................................................131 WIRE THINGS
8.33.1 .......................................................................................................................... 131 Power Supply
.............................................................................................................. 132 Fireman Microphone
8.33.2
..................................................................................................................... 132 PSS Microphone
8.33.3
......................................................................................................................... 133 Music Sources
8.33.4
................................................................................................................................. 133 Mic/Line
8.33.5
................................................................................................................................. 134 Amplifier
8.33.6
......................................................................................................................... 135 Speaker Lines
8.33.7
............................................................................................................... 135 Normal Logic Inputs
8.33.8
................................................................................................................... 136 Evacuation inputs
8.33.9
................................................................................................................................... 136 Outputs
8.33.10
.......................................................................................................................... 137 100V Outputs
8.33.11
................................................................................................................................137 Computer
8.33.12
..................................................................................................................................... 139 RS232
8.33.13
................................................................................................................................... 139 DIVA8S
8.33.14
.......................................................................................................................... 140 Remote Panel
8.33.15
........................................................................................................................... 140 Basic Wiring
8.33.16
.................................................................................................................... 140 USE TONE GENERATOR
8.34
9 .................................................................................................... 140 COMMUNICATION PROTOCOLS
....................................................................... 141 EXPLANATION ABOUT MONITORING PROCESS
10
11
............................................................................................... 142 CANCEL ALL AND COEXIST MODE
Ateïs International
Ch. du Dévent, 1024 Ecublens, Switzerland.
Phone : +41 21 881 25 10
4
Page 5

1 Welcome
Thank you for choosing ATEÏS DIVA8M . We (at ATEÏS) hope you will enjoy to use this exciting piece
of technology as much as we enjoy developing and building it.
This Help file version is: Ver.EN.1.1
This files has been written for the ATEIS DIVA software version: VER1.0.1.19
This manual can be updated at any time without prior notice in order to keep this manual up to date.
In case of errors in this manual or not clear process description, feel free to submit us mistakes,
suggestions or questions by sending an email
This document intends to be a complete manual and we hope that this Help file will provide you all
information or answers needed. However if you have any questions, feel free to contact us.
.
1.1 Presentation
With more than twenty years of experience, ATEÏS has quickly established itself as a leading
manufacturer of Public Address, Voice Alarm systems and counter intercoms. The constant growth of
market share in Europe provides confirmation of the quality of ATEÏS’s commercial and technical
approach.
Products:
The company now offers a full range of sound equipment: microphones, preamplifiers, digital
processors, digital audio matrixes, loud-speaker monitoring systems, amplifiers, etc. ATEÏS designs
and manufactures leading products in the voice alarm systems market which have been certified
EN60849 compliant by the TÜV.
Development:
Thanks to a development team that includes thirty engineers, and to constant investment, we are able
to respond rapidly to the demands of our various markets with specific solutions and cutting edge
technology. We have distributors in more than fifteen countries in Europe and the Middle East, with
whom we have carried out major projects. In choosing ATEÏS, you are guaranteed a trustworthy
partner that can be counted on for the long term.
ATEÏS Field:
ATEÏS's audio systems have been installed in the following markets :
- Railways
- Subways
- Airports
- High raise buildings
- Hotels
- Restaurants
- Shopping malls
- Theme parks
Ateïs International
Ch. du Dévent, 1024 Ecublens, Switzerland.
Phone : +41 21 881 25 10
5
Page 6

- Places of worship
- Stadia.
- Museums.
- Industrial buildings
- Industrial plants
- Commercial buildings
1.2 Contact
Ateïs International S.A.
Chemin du Dévent, 1024 Ecublens -Switzerland
Phone: +41 (0)21/ 881 25 10
Fax: +41 (0)21/ 881 25 09
Mail: [email protected]
http://www.ateis-international.com
1.3 Installation
DIVA8M Package Content:
Opening the box you should find the following items:
• DIVA Master Unit
• Rack rounting brackets, 2 pcs
• Metal screws Philips M3x6, 6 pcs
• 12-way euroblock connectors, 1 pcs
• 10-way euroblock connectors, 3 pcs
• 5-way euroblock connectors, 2 pcs
• 4-way euroblock connector, 11 pcs
• 230V/24 VDC power supply
• CD-ROM
• Fireman Microphone
If you realize anything missing, please contact your distributor.
Rack mounting:
If needed, fit the rack mounting brackets to each side of the DIVA by using the 6 pcs Phillips M3x6
screws supplied with the package.
Ateïs International
Ch. du Dévent, 1024 Ecublens, Switzerland.
Phone : +41 21 881 25 10
6
Page 7

Sitting:
The DIVA takes a 2U 19’’ rack space and generates little heat itself. Consider leaving enough
ventilation space above and below the unit. Do not mount the LAP directly above heat generating
devices like power supplies or power amplifiers.
Power connection:
DIVA only accepts 24 VDC power supply. Use the power supply furnished with DIVA or use an
external 24VDC power supply like the PS24 and connect it on a 4-way euroblock connector respecting
the polarity.
1.4 System Overview
This paragraph intend to briefly described the main DIVA properties.
1.4.1 General
The DIVA8M module unit houses: audio digital processing (DSP), a matrix, a digital message player, a
fully monitored fireman microphone, amplifiers monitoring with switchover to backup amplifier and
loudspeaker lines monitoring. It can process and route one PSSxxDT security microphone console or
up to eight cascaded PSM paging microphones and two 0 dB audio inputs into 2 different channels
(Music + Voice). Each input is fitted with volume controls and equalizers. The two audio inputs feature
contact and VOX activation (ideal when using the cordless microphone, for example).
1.4.2 Audio
There are 5 audio inputs. Two are 0 dB line inputs for tuner, cd player, etc. One gain adjustable
MIC/LINE inputs for using a third 0 dB source or an external microphone. One input for PSS or PSM
microphone and one fireman microphone input. Built in DIVA8M, a front panel fireman microphone
input that is fully monitored.
There are eight monitored loudspeaker zones (A+B) feed by two amplifier channel Voice and Music.
1.4.3 Connectivity
The DIVA master is designed to be networked with slave DIVA on RS485 using CAT5 cables. The
DIVA master is connected to the computer upon Ethernet protocol. Third party control can be
achieved via the RS232.
Adding slave increase the number of zone as well as input/output contacts.
1.4.4 System Configuration
The DIVA8M/S configuration is done with the DIVA Windows® based graphical design and operating
environment software. This is an all in one software with configurable option for each DIVA’s features.
1.4.5 System Control
The DIVA software allows user to real-time control features like PEQs, filtering, level adjustment. But
DIVA has also been defined to be a standalone device once configured. The front panel offers controls
like, zone selection, music routing, zone attenuator knob, message launching buttons and different
indicators LED.
1.5 Safety Declaration
Ateïs International
Ch. du Dévent, 1024 Ecublens, Switzerland.
Phone : +41 21 881 25 10
7
Page 8
• Do not expose the DIVA to extreme temperatures, direct sunlight, humidity, or dust, which
could cause fire or electrical shock hazard.
• Keep away water or other liquids from the DIVA. Otherwise fire or electrical shock may result.
• Connect the power cord only to an AC outlet of the type stated in this Owner's Manual or as
marked on the unit. Otherwise fire and electrical shock hazard results.
• When disconnecting the power cord from an AC outlet always grab the plug. Never pull the
cord. A damaged power cord is a potential risk of fire and electrical shock hazard.
• Avoid touching power plugs with wet hands. Doing so is a potential electrical shock hazard.
• Take care for correct polarity when operating the DIVA from a DC power source. Reversed
polarity may cause damage to the unit or the batteries.
• Avoid placing heavy objects on power cords. A damaged power cord is a fire and electrical
shock hazard.
• Do not cut, scratch, bend, twist, pull, or heat the power cord. A damaged power cord is a fire
and electrical shock hazard. Ask your ATEÏS dealer for replacement.
• Turn off immediately the unit, remove the power cord from the AC outlet and consult your
ATEÏS dealer in any of the following circumstances:
• Smoke, odor, or noise getting out of the unit.
• Foreign objects or liquids get inside the DIVA.
• The unit has been dropped or the shell is damaged.
• The power cord is damaged.
If you continue using the DIVA, fire and electrical shock may result.
• Do not drop or insert metallic objects or flammable materials into the unit as this may result in
fire and electrical shock.
• Do not remove the DIVA's cover, as there are exposed parts inside carrying high voltages that
may cause an electrical shock. Contact your ATEÏS dealer if internal inspection, maintenance,
or repair is necessary.
• Do not try to make any modifications to the DIVA. This is a potential fire and electrical shock
hazard.
• Avoid the DIVA's ventilation slots to be blocked. Blocking the ventilation slots is a potential fire
hazard.
• To prevent the unit from falling down and causing personal injury and/or property damage,
avoid installing or mounting the unit in unstable locations.
• Leave enough space above and below the unit to provide good ventilation of the DIVA. If the
airflow is not adequate, the DIVA will heat up inside and may cause a fire.
• Operate the DIVA in an environment with a free-air temperature of between 0 °C and 40 °C
(32 °F and 104 °F).
• Turn off all audio equipment when making any connections to the DIVA, and make sure to use
adequate cables.
Ateïs International
Ch. du Dévent, 1024 Ecublens, Switzerland.
Phone : +41 21 881 25 10
8
Page 9

• Do not use benzene, thinner, or chemicals to clean the DIVA. Use only a soft, dry cloth.
• If the DIVA is moved from a cold place (e.g., overnight in a car) to a warmer environment,
condensation may form inside the unit, which may affect performance. Allow the DIVA to
acclimatize for about one hour before use.
Ateïs International
Ch. du Dévent, 1024 Ecublens, Switzerland.
Phone : +41 21 881 25 10
9
Page 10
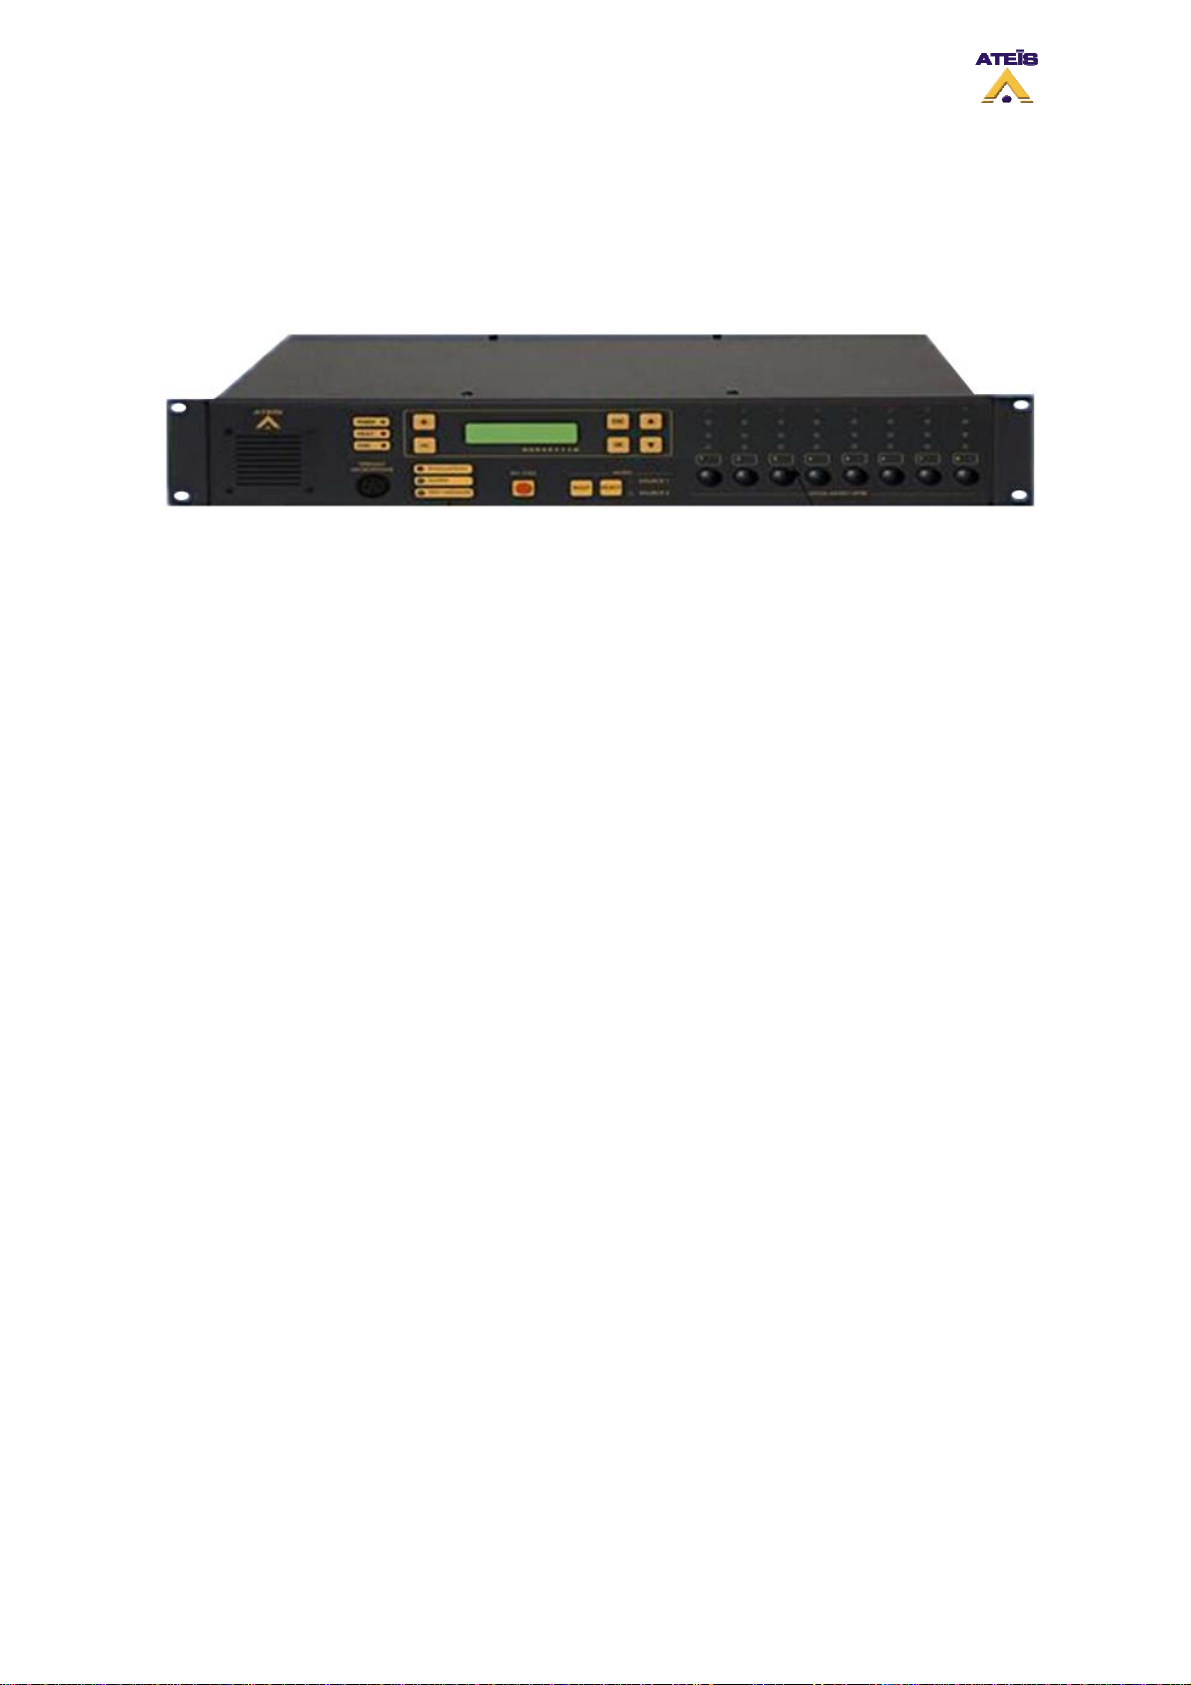
2 Hardware Description
DIVA's conception lead to a very intuitive front panel as well as very complete connection solutions on
the back panel. In the next four paragraph, the DIVA8M/S front panel and the rear panel connection
board are detailed.
Ateïs International
Ch. du Dévent, 1024 Ecublens, Switzerland.
Phone : +41 21 881 25 10
10
Page 11
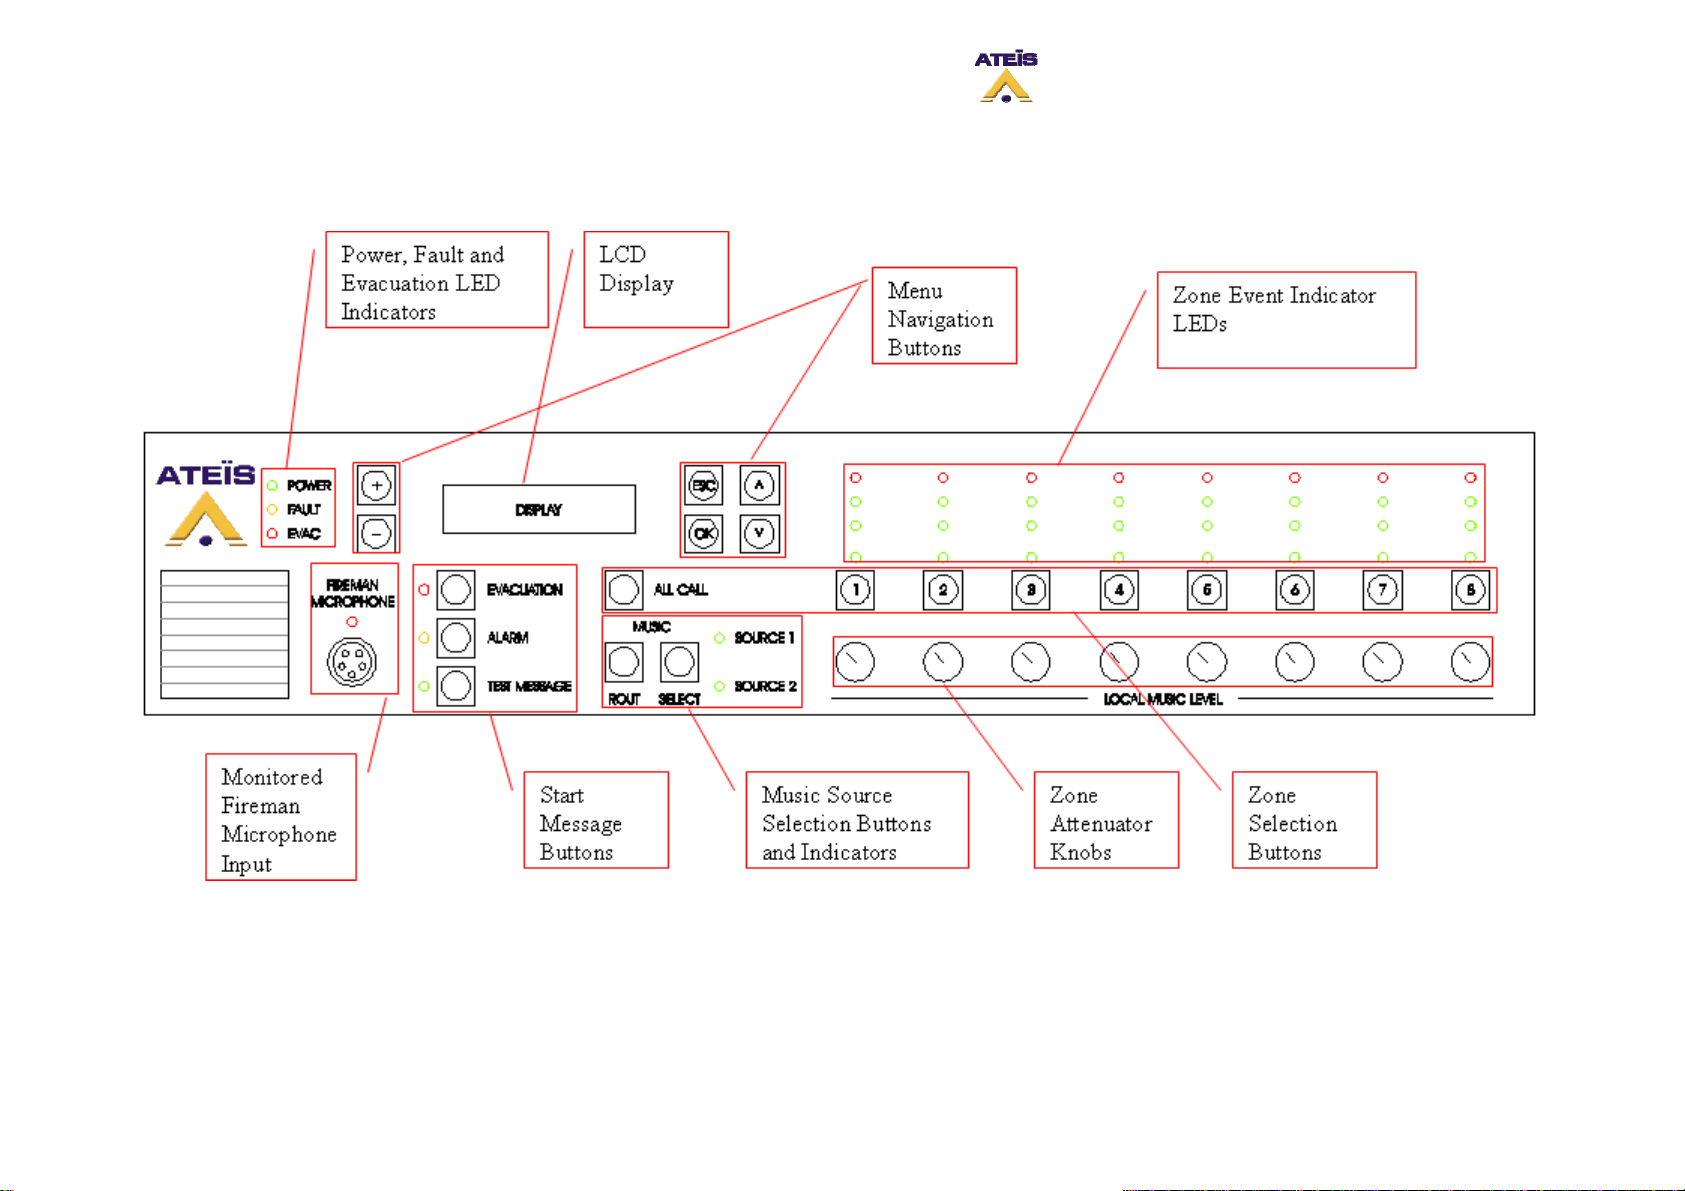
2.1 DIVA8M Front view
Ateïs International
Ch. du Dévent, 1024 Ecublens, Switzerland.
Phone : +41 21 881 25 10
11
Page 12
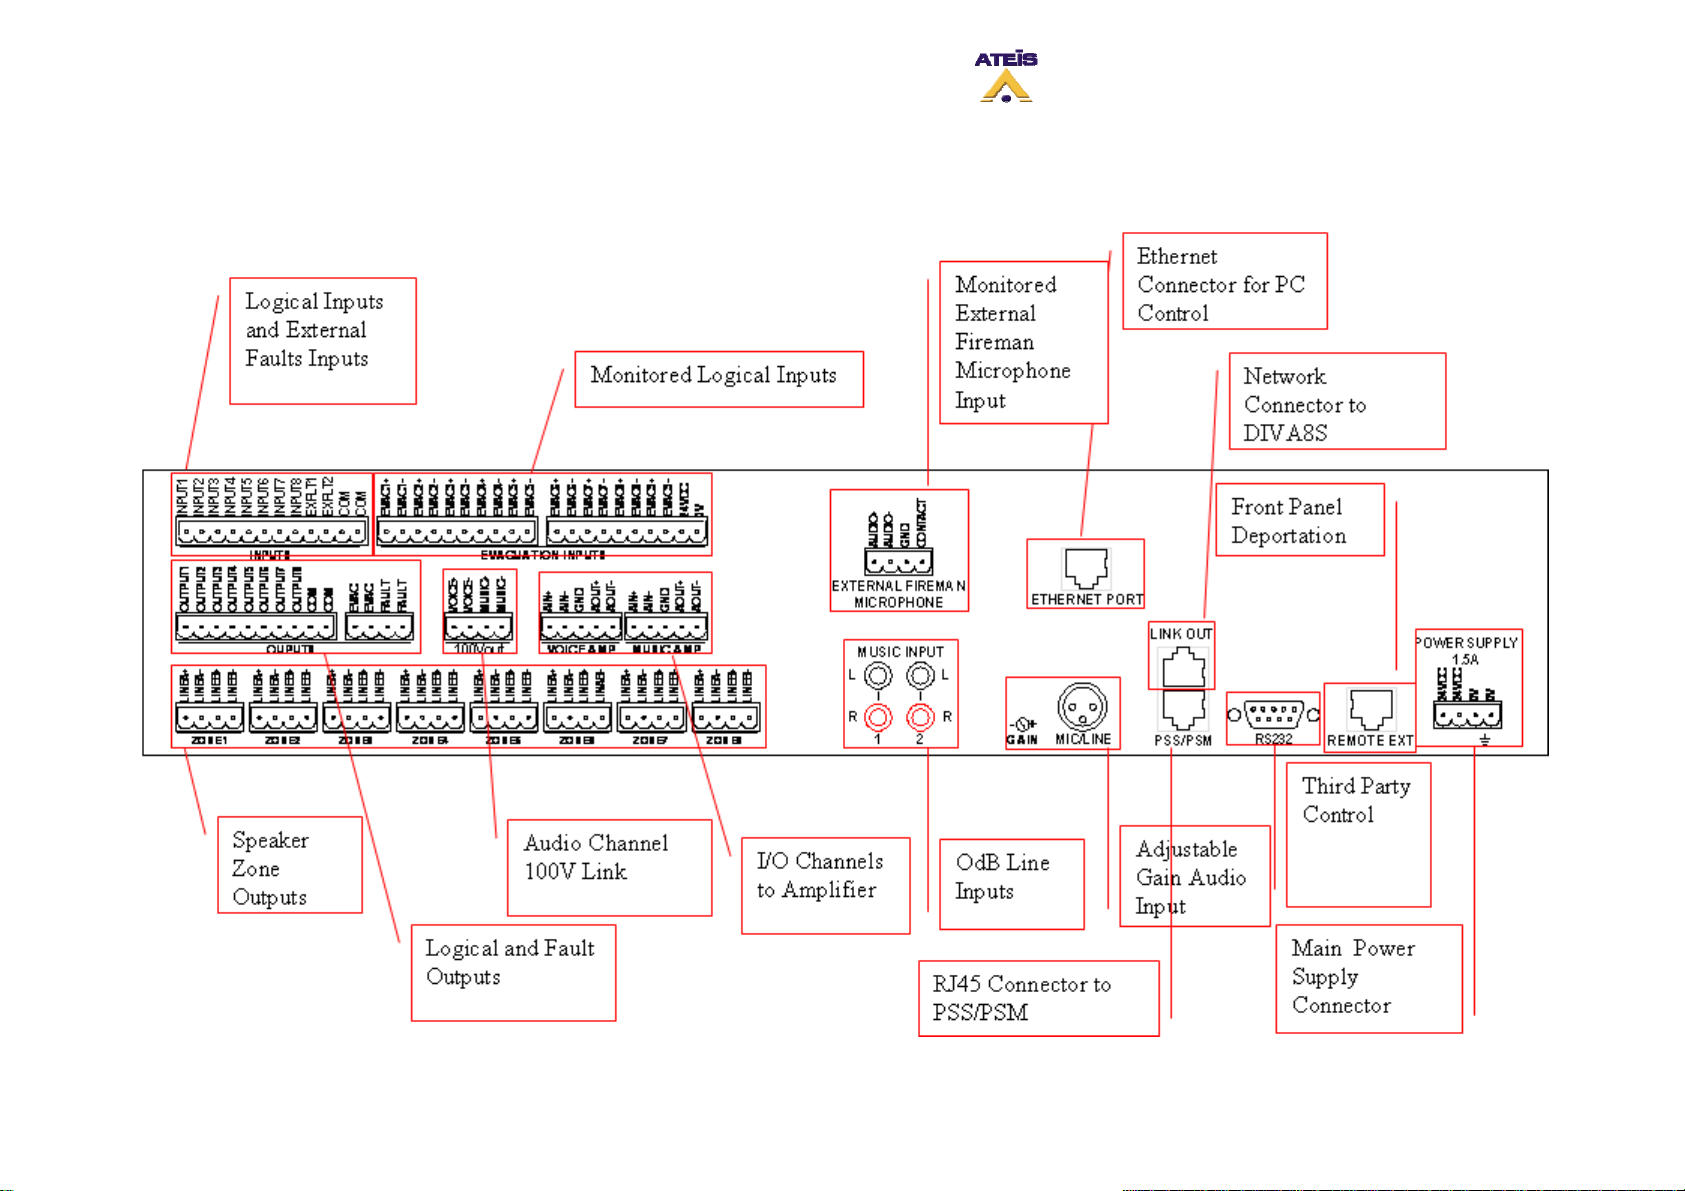
2.2 DIVA8M Rear view
Ateïs International
Ch. du Dévent, 1024 Ecublens, Switzerland.
Phone : +41 21 881 25 10
12
Page 13
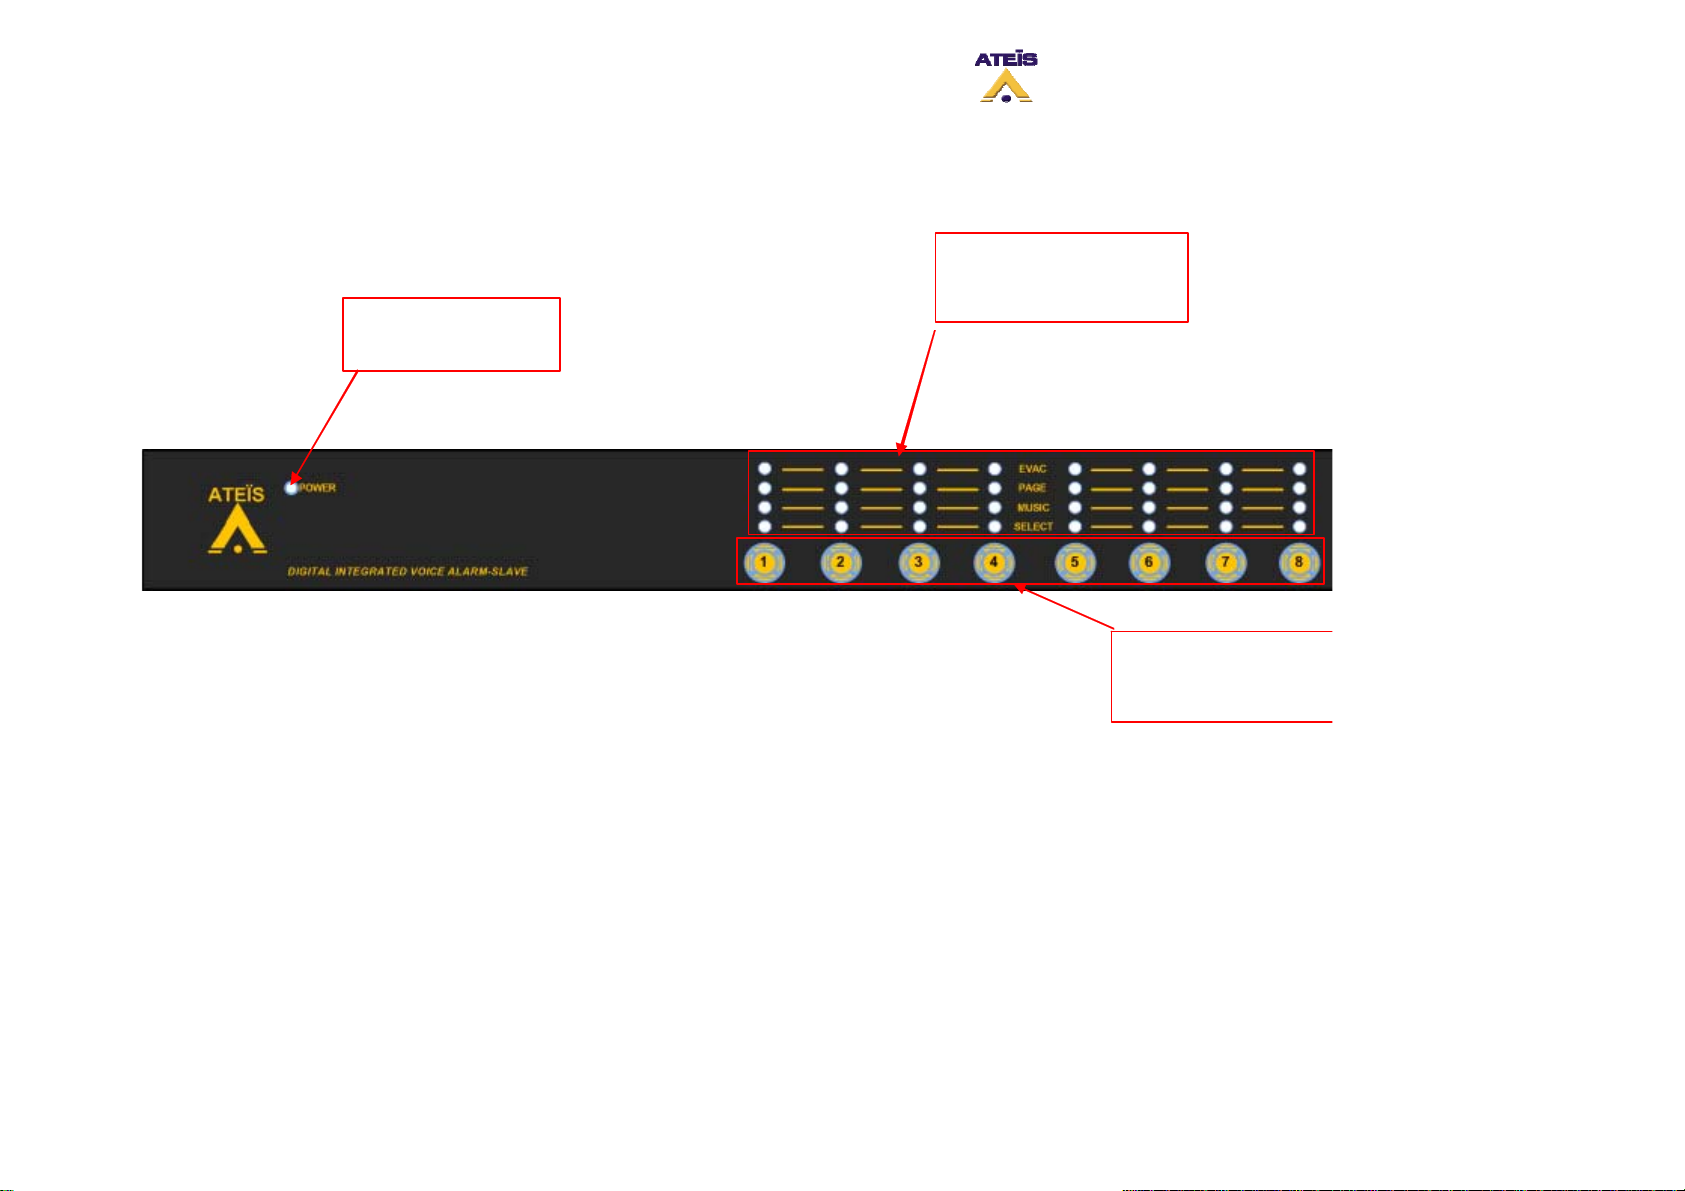
2.3 DIVA8S Front view
Zone Event Indicator
LEDs
Po w e r Indi ca tor
LED
Zone Selection
Buttons
Ateïs International
Ch. du Dévent, 1024 Ecublens, Switzerland.
Phone : +41 21 881 25 10
13
Page 14
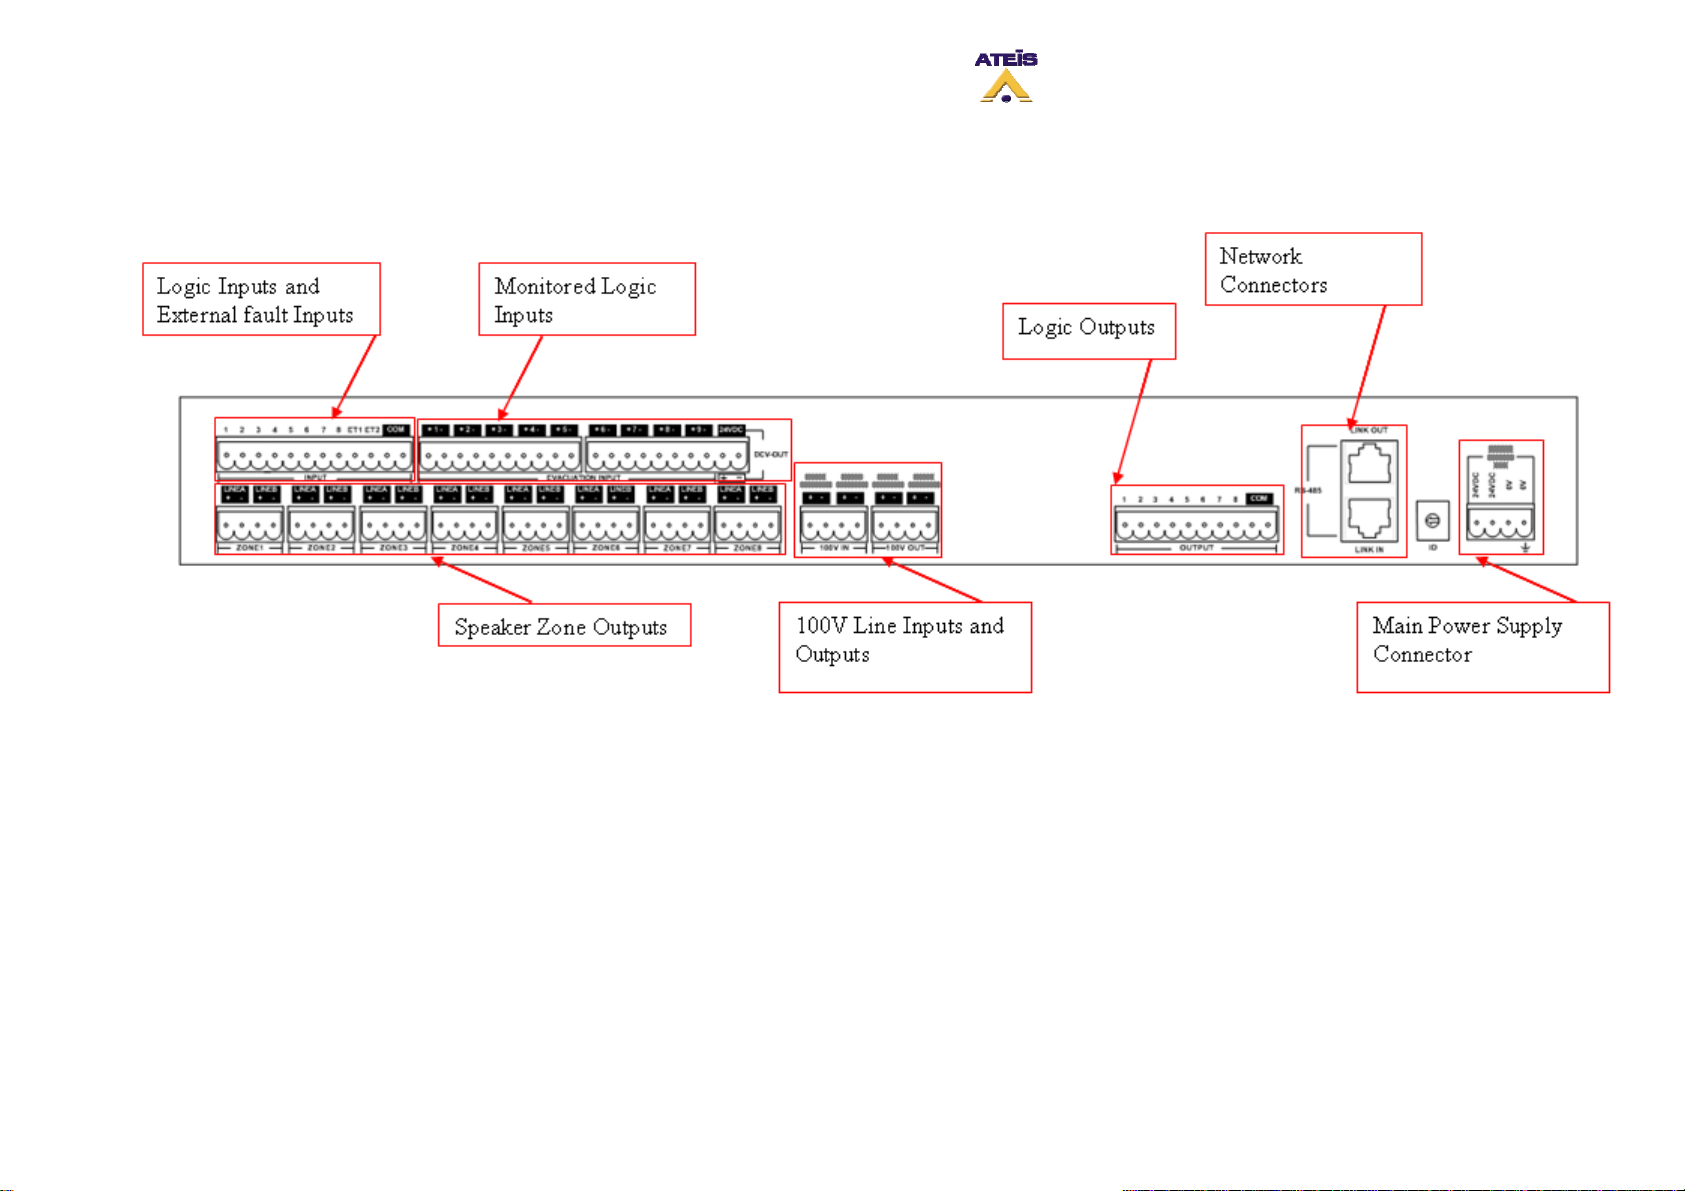
2.4 DIVA8S Rear view
Ateïs International
Ch. du Dévent, 1024 Ecublens, Switzerland.
Phone : +41 21 881 25 10
14
Page 15
3 Software
As briefly mentioned in the Installation paragraph, DIVA8M package hold a CD-Rom. The CD contain
the DIVA8M Quick Start Manual (.pdf), User Manual (Microsoft® HTML Help Executable .chm, HTML
.htm). and DIVA software.
It could happen that the software on the CD-Rom is not the last release. In that case, please visit
ATEÏS website
Installation Process
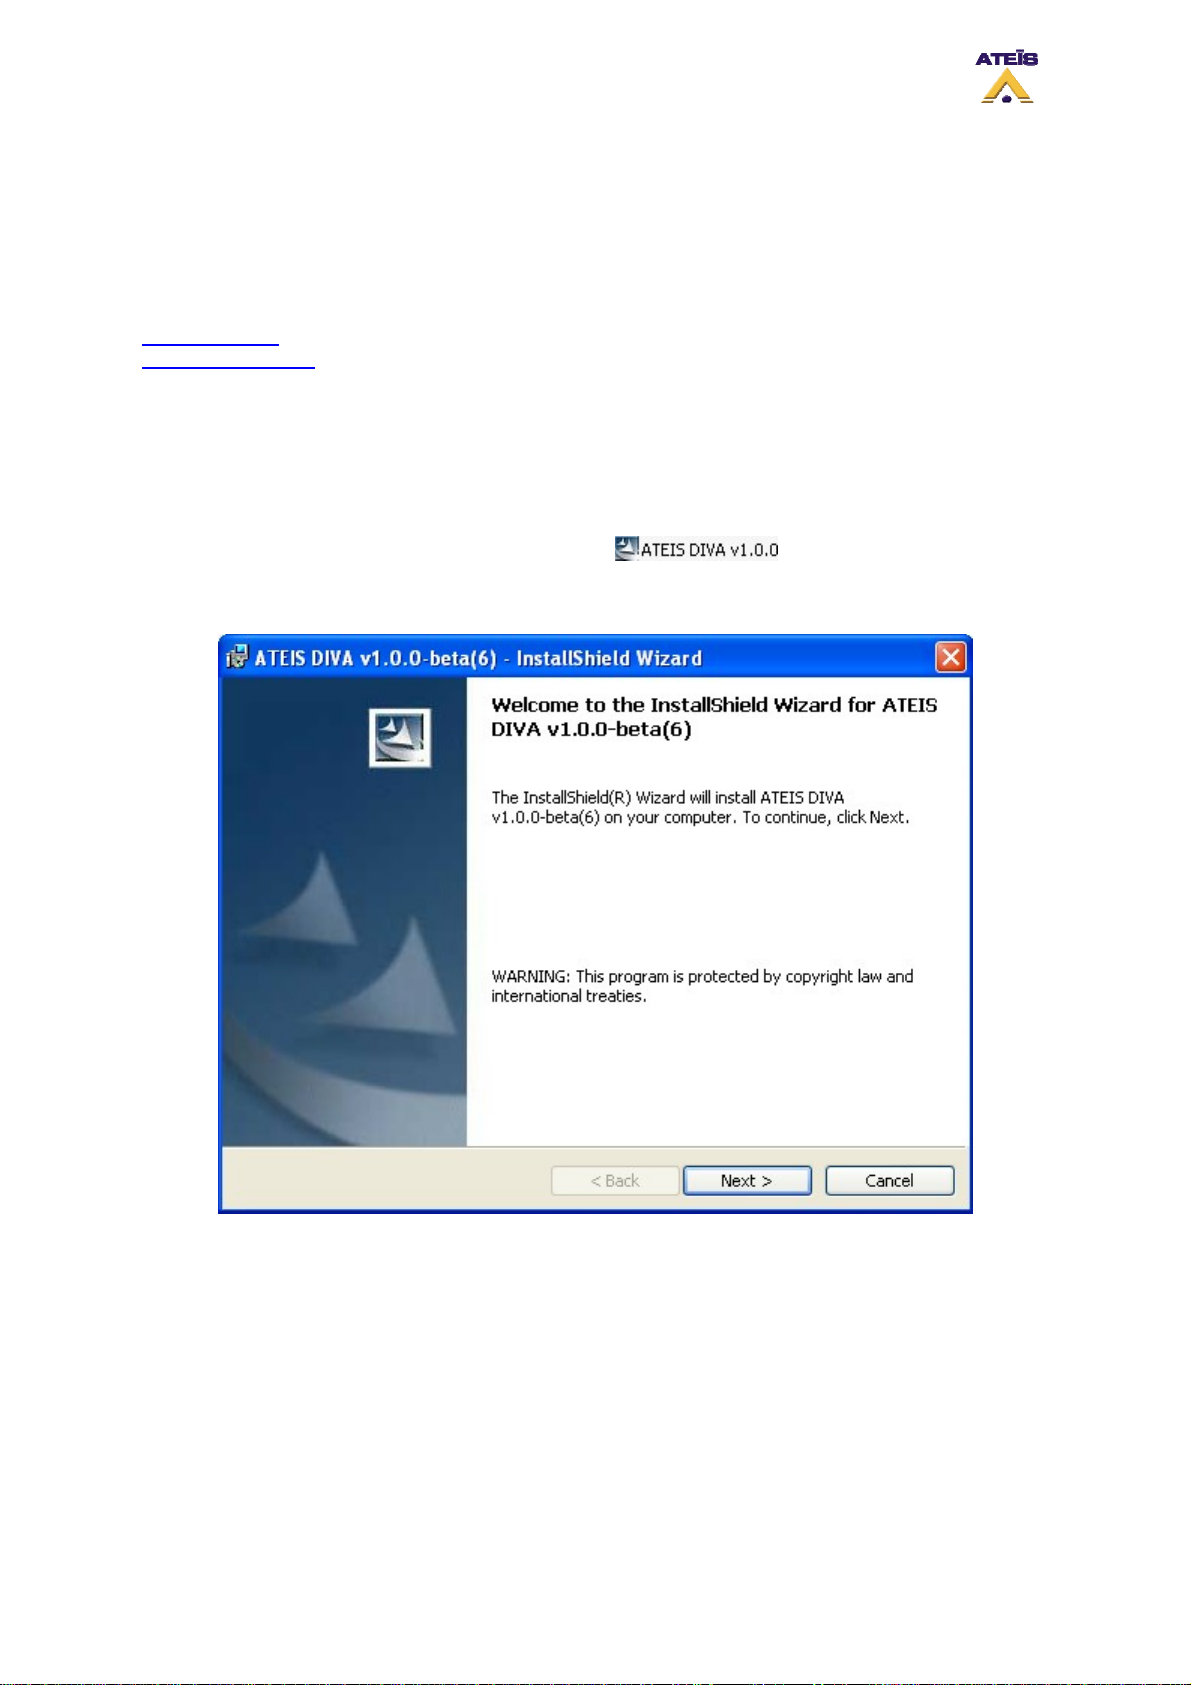
3.1 Installation Process
• Insert the CD-Rom in your computer.
• Double Click on the "My Computer" on the desktop. Open the CD-ROM submenu.
• Double Click on the DIVA software icon .
The DIVA installshield wizard will prompt. Please follow the install instruction that are displayed.
to download the latest release and follow the steps described in the Software
.
Change the User Name and the Organization's name at your convenience.
Ateïs International
Ch. du Dévent, 1024 Ecublens, Switzerland.
Phone : +41 21 881 25 10
15
Page 16
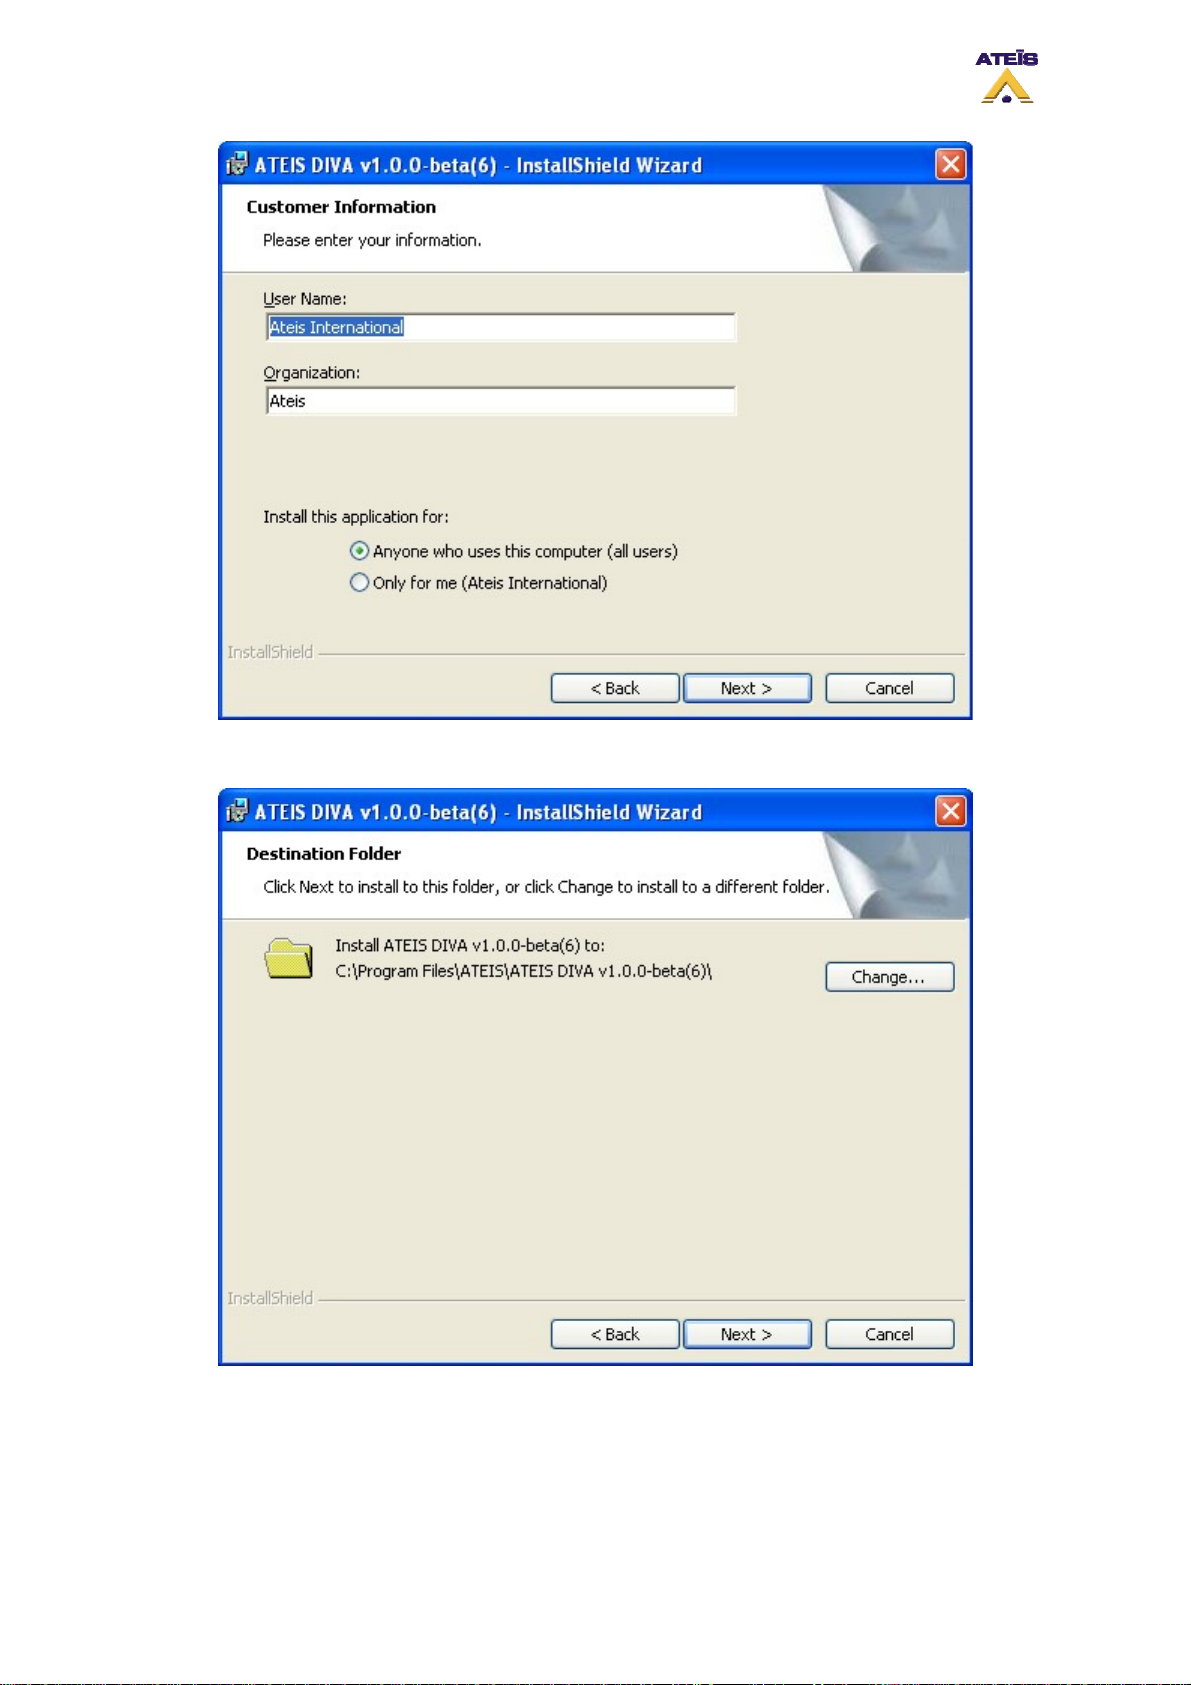
Choose an installation folder, by default, it will be install in C:\Program Files
Then launch the installation process by clicking "Install".
Ateïs International
Ch. du Dévent, 1024 Ecublens, Switzerland.
Phone : +41 21 881 25 10
16
Page 17
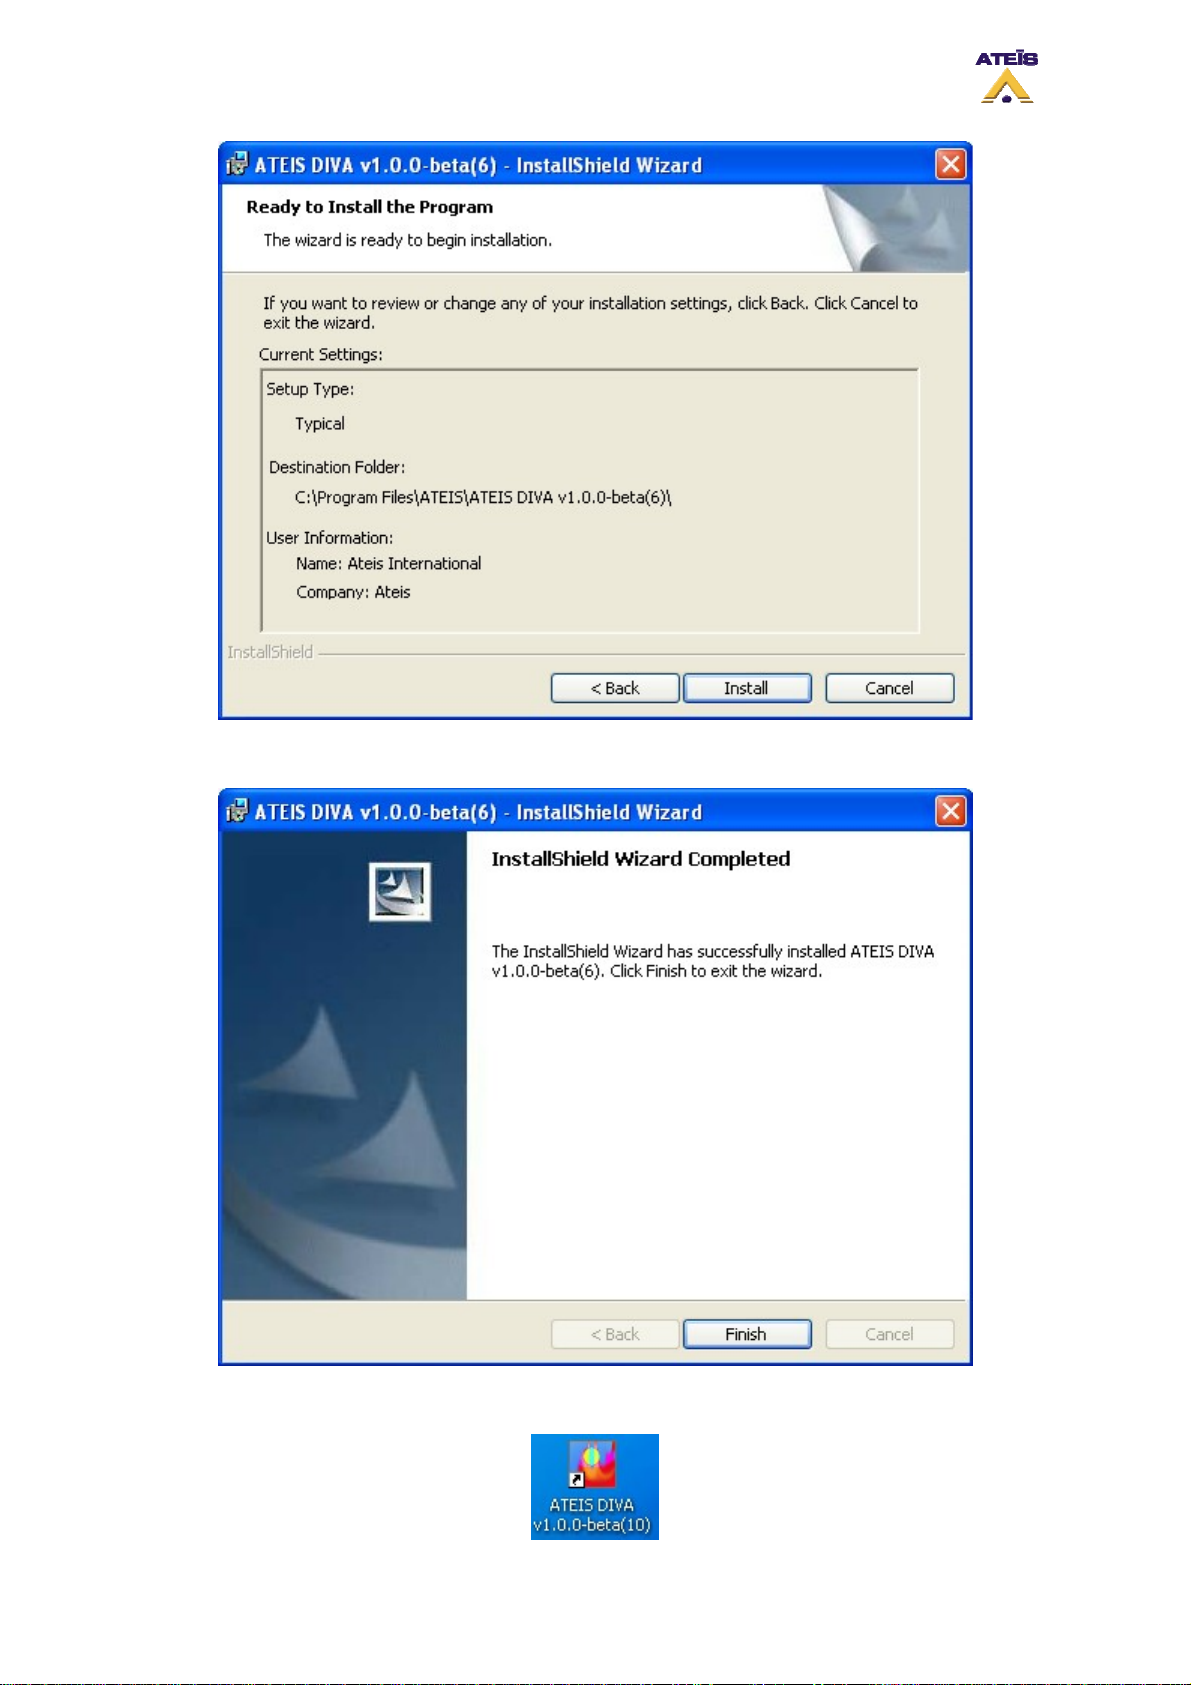
To finish the Installation process, just cli ck "Finish".
The installation process will automatically create a Desktop Icon like the one under.
Ateïs International
Ch. du Dévent, 1024 Ecublens, Switzerland.
Phone : +41 21 881 25 10
17
Page 18

3.2 Uninstall
To uninstall a current version of the DIVA software, please follow the next few steps:
Click on "start" -> "Program" -> ATEIS -> DIVA -> ATEIS DIVA v1.0.0-Uninstall
Windows Installer will ask you if you are really sure to remove this program, click "Yes".
3.3 Software Upgrade
In case of a new release of the DIVA software:
Please go to the ATEÏS website
Before installing the new software, please uninstall
Double click the new software version icon.
Follow the installation
process.
in order to download the last software version.
the current version.
Ateïs International
Ch. du Dévent, 1024 Ecublens, Switzerland.
Phone : +41 21 881 25 10
18
Page 19
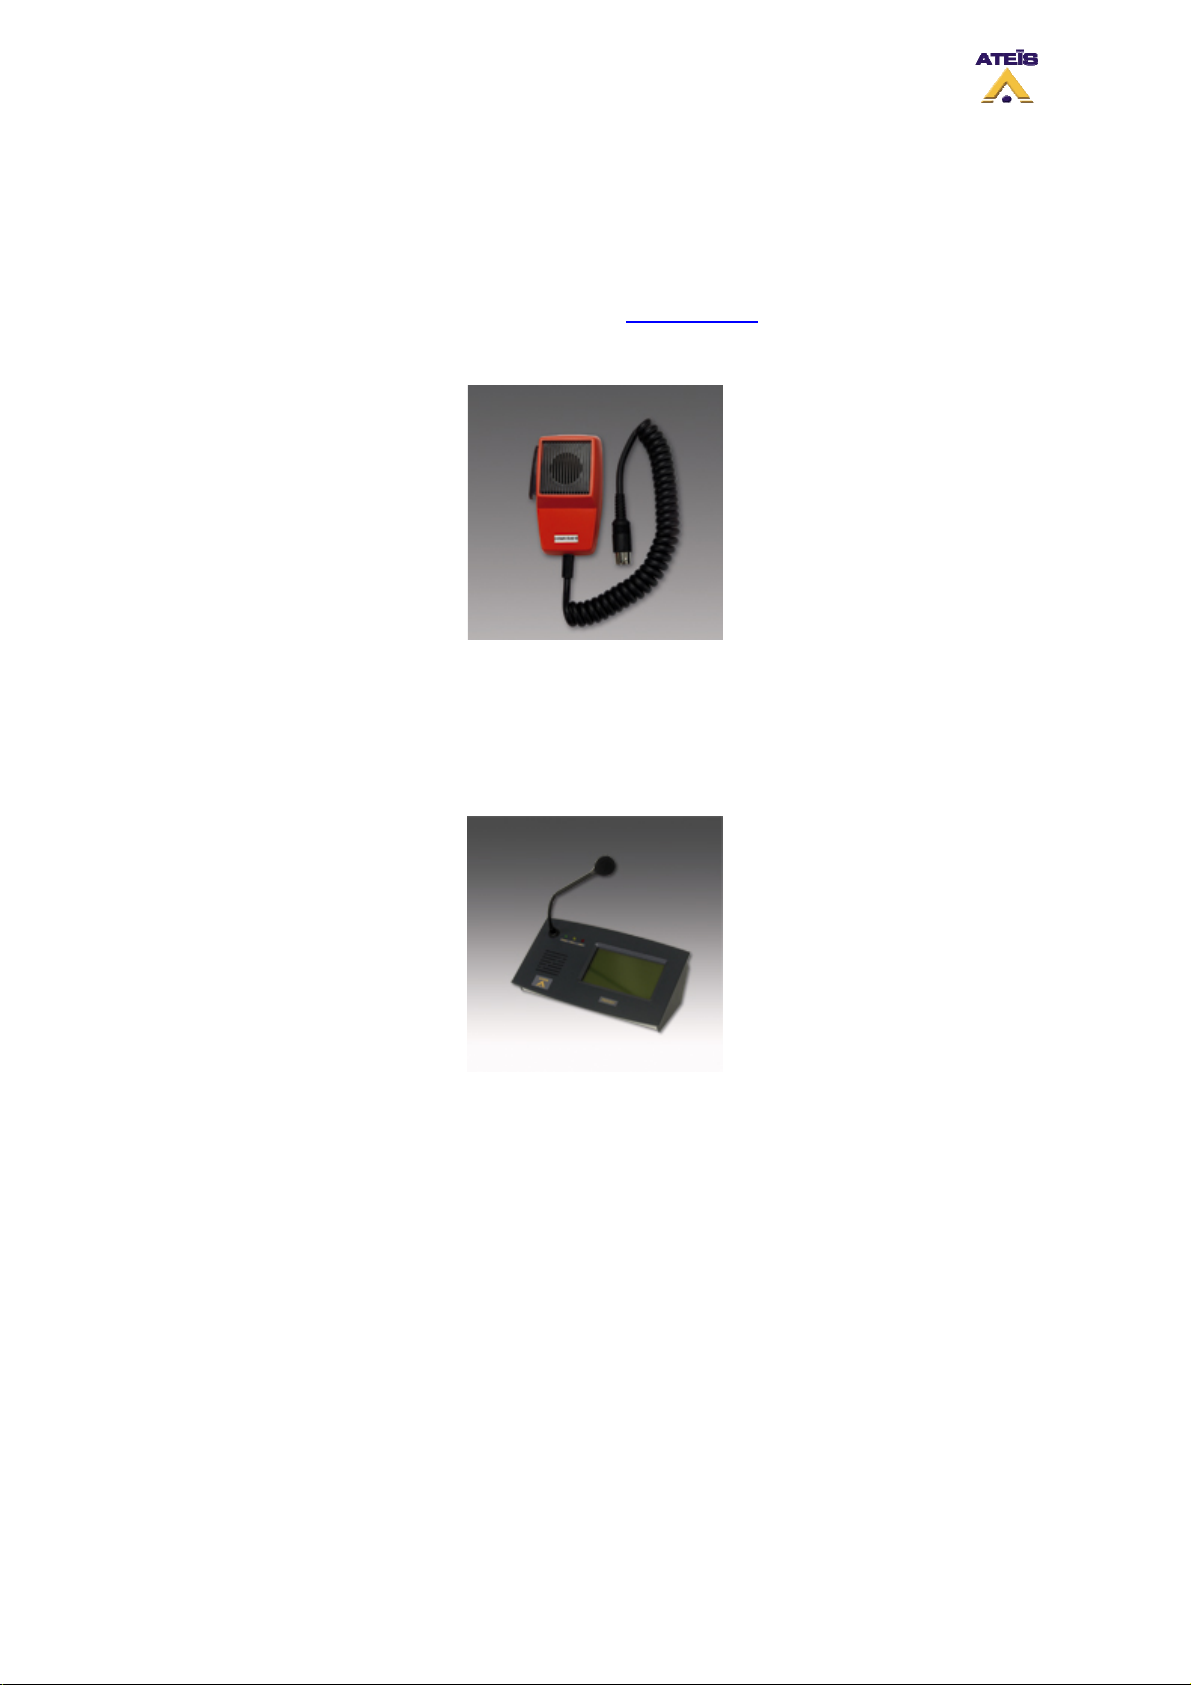
4 External Devices
This chapter will quickly describe the external devices that could be connected to a DIVA unit. It won't
speak about external contact or button that also could be used.
For more information about those devices, please visit ATEÏS website
4.1 Fireman Microphone
.
The Fireman Microphone SHM 1 is a small compact microphone dedicated to security calling. It is a
totally monitored microphone with internal resistor network to detect four different states (Shortcut,
Closed Contact, Open Contact, Absent). Firemen Microphone SHM 1 for All call, group or zone calls.
The EN 60849 surveillance is realised thanks to the DIVA SEC interface.
4.2 PSS
The PSSDT paging microphone can be configured either using a PC computer, or by using control
keys and the front LCD screen of the SINAPS module to which it is connected. Access can be
password-protected.
All parameters needed for site operating can be programmed: zones assigned to the different buttons,
name of zones, zone groups, priorities, access to different messages, levels adjustments, pre-call
chime, press-to-talk, music ON/OFF and music routing.
Its large LCD screen provides an overall view of busy zones and active sources. A VU meter controls
the microphone presence and modulation level.
A built-in loudspeaker makes it possible to listen to all system-generated messages and
announcements.
The PSSDT console is SINAPS security system interface and is fully monitored (microphone capsule,
power supply, touchscreen, audio and RS485 connections). Any system faults are detected, located
and indicated clearly on the screen.
Different product references are available to suit all site sizes:
Ateïs International
Ch. du Dévent, 1024 Ecublens, Switzerland.
Phone : +41 21 881 25 10
19
Page 20
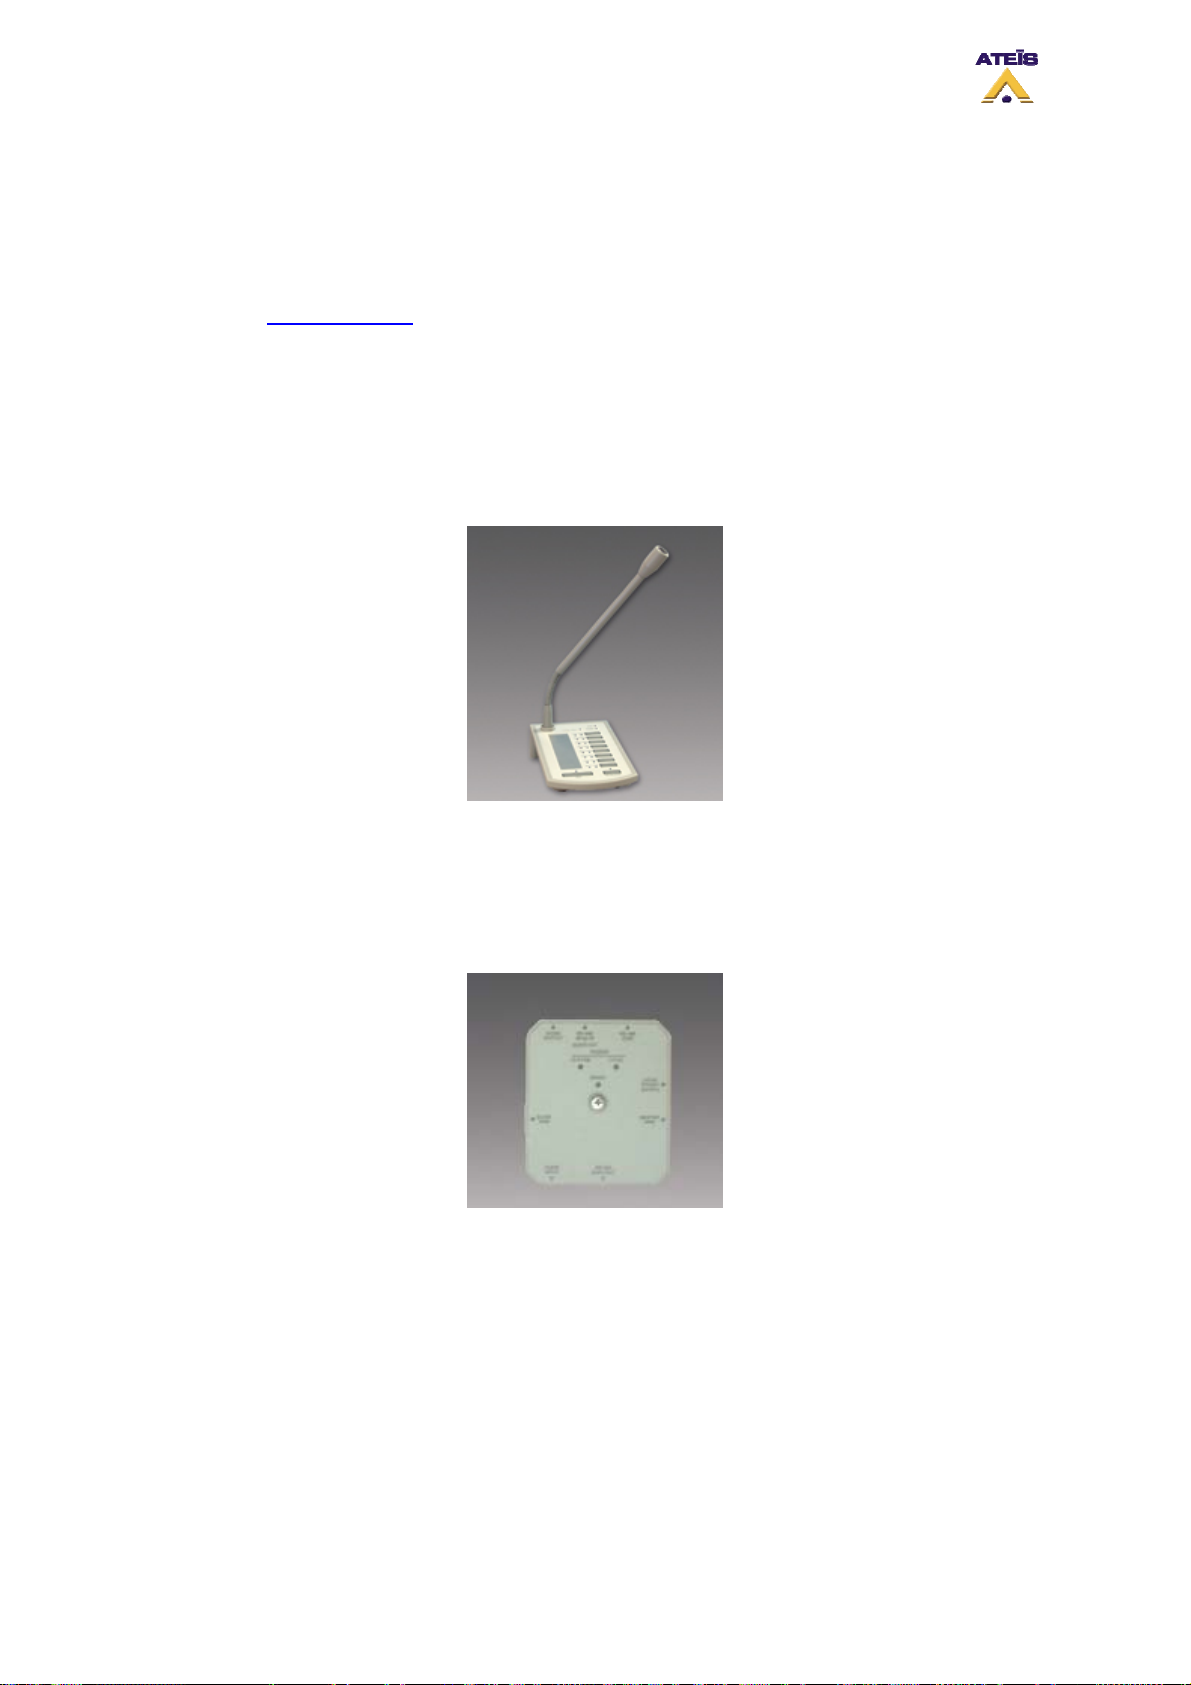
PSS849: 4 zones for SINAPS-Compact (IDA4)
PSS12DT: 12 zones for SINAPS-M and SINAPS-XM
PSS24DT: 24 zones for SINAPS-M and SINAPS-XM
PSS48DT: 48 zones for SINAPS-M and SINAPS-XM
PSS72DT: 72 zones for SINAPS-M and SINAPS-XM
PSS96DT: 96 zones for SINAPS-M and SINAPS-XM
Access to the PSS Data Sheet
.
4.3 PSM
The PSM8 is a 10 keys call station of which 8 are programmable with microphone, integrated
loudspeaker and buzzer. It can be used with either IDA4(X)(M)(s) or DIVA8M. it is possible
to add up to 11 extensions to the PSM8 increasing programmable keys number to 96.
Extensions are call stations without microphone.
The PSM8 can be cascade in order to increase the number of call station. In that case, the first
PSM8 will become a Master PSM8 and the rest will become slave PSM8.
4.4 JB (Junction Box)
Easy chain-connection of LAP peripherals (URC and PPM), using standard CAT5 cables.
KEY FEATURES:
• 5 x RJ45:
• Connection to previous JB (or LAP bus on the first JB)
• RS485-SIDE for URC connection
• Easy connection to a Master PPM using the supplied 10 pins cable.
• Connection to first Slave PPM (Slave features are not available for the moment)
• MAIN OUT connection to next JB
Ateïs International
Ch. du Dévent, 1024 Ecublens, Switzerland.
Phone : +41 21 881 25 10
20
Page 21

• 2 internal screw connectors for 0 dB audio:
• audio output from PPM microphone --> Audio Output (connect to the Audio In of the
LAP)
• audio input to PPM speaker --> Audio Input (connect to the Audio Output of the LAP,
if needed)
• 1 input for additional 24V power supply. (Depending on distance between LAP and PPM/URC
you will have to put an external powe supplyr)
• 1 internal switch for PPM Master or Slave selection. (Slave features are not available for the
moment)
• 1 internal switch for System or Local power supply selection.
Ateïs International
Ch. du Dévent, 1024 Ecublens, Switzerland.
Phone : +41 21 881 25 10
21
Page 22

5 DIVA Philosophy
Before going any further, the philosophy of DIVA have to be exposed. This chapter will be split in three
parts:
• Front Panel
• Software
• Events
5.1 Front Panel
The DIVA front panel have been made for basic controls operation as well as to define basic settings.
Some features of the front can be disabled in case of advanced configuration.
The Front Panel is designed to start three different messages, toggle between two music sources or
none, zone selection and Fireman Microphone call, access different menus
attenuation for each speakers zone.
5.2 Software
The DIVA software is designed to perform a complete configuration as well as to real time control
some parameters.
Some software features activation can induced the corresponding front panel controls to be disabled.
Mostly, real time controls are related to audio settings, you will have control on parameters like, PEQs,
level and filters.
and to add level
5.3 Event
DIVA is a multi-functional device that can be use with several external sources and trigger command.
In order to associate any action to an external command, you will have to define Event.
Event can be compare to an action. Each action or event can be started by a multiple of different
ways: external trigger, modulation detection, etc. Those events are hierarchically organized by priority
levels set for each one of them. You also can set permanent event like playing music. More
information about Events can be found here
.
Ateïs International
Ch. du Dévent, 1024 Ecublens, Switzerland.
Phone : +41 21 881 25 10
22
Page 23

6 Front Panel Operations
This chapter will describe all the operations that can be achieved from the front panel. In order to be
clear as possible, this chapter will be divider by theme:
• Menu
• Music
• Messages
Some operation from the front panel required an higher level than level 1, in that case you will have to
enter a valid user name and password. Please check the user level explanation
Enter Password.
6.1 Menu
The menu display offers the possibility to access different controls and system information. Here are
the list of menu topic you will be able to access:
• Reset Monitor
• Logout
• Mac Number
• IP Address
• Set Time
• Speaker Level
• Log files
• Mic/Lines
• Stop All Events
• Ethernet Setting
• Music 1 Level
• Music 2 Level
• Get Reference
The front panel buttons are described in the hardware description -> Front View
as well as How To
.
6.1.1 Reset Monitor
The reset monitor menu allows user to reset the speaker line monitoring after fixing an eventual line
problems.
• Press the arrow keys to acess the Reset Monitor menu
• Click Ok, it will display "Are you sure to rest monitoring?"
• Click OK
• Press ESC to go out of the menu
6.1.2 Logout
In case of multiuser levelling, you can logout from the current user session in order to login in an other
one.
• Use arrow keys to access the Logout menu
• Click OK, it will display "Are you sure to Logout?"
• Click OK
• You will be prompt to login.
Ateïs International
Ch. du Dévent, 1024 Ecublens, Switzerland.
Phone : +41 21 881 25 10
23
Page 24

• Enter your user name
• Enter your password
• You will be log in a your user account
• Press ESC to go out of the menu
6.1.3 Mac Number
In the world of computer networking, there is one common way to set an quasi-unique identifier to a
network device. This is the MAC address (Media Access Control Address). This number act like a
name for one particular network device. This cannot be change.
To see the MAC address just follow this steps:
• Use the arrow keys to access the MAC ADRESS menu
• click OK, the MAC Address number is display
• Press ESC to go out of the menu
The MAC address value's can be changed, please change the MAC address only if it's needed.
• Use the arrow keys to access the MAC ADRESS menu
• click OK, the MAC Address number is display
• Use Arrow Key to go on the number to change
• Us +/- key to change the number's value
• Press OK to accept the changes, you will be prompt to validate the changes
• Press OK if you accept the changes
In the world of computer networking, there is one common way to set an quasi-unique identifier to a
network device. This is the MAC address (Media Access Control Address). This number act like a
name for one particular network device. This cannot be change.
To see the MAC address just follow this steps:
• Use the arrow keys to access the MAC ADRESS menu
• click OK, the MAC Address number is display
• Press ESC to go out of the menu
The MAC address value's can be changed, please change the MAC address only if it's needed.
• Use the arrow keys to access the MAC ADRESS menu
• click OK, the MAC Address number is display
• Use Arrow Key to go on the number to change
• Us +/- key to change the number's value
• Press OK to accept the changes, you will be prompt to validate the changes
• Press OK if you accept the changes
6.1.4 IP Address
The IP address (Internet Protocol Address) is a common way of using an address in order to identify
and communicate into a computer network. This IP address is mostly used to be a locator to a device
in order to communicate with it. This is most frequently an unique address into a specific network.
This address can be seen and modified (see How to Set IP Address
• Use the arrow key to access the IP Address menu
• Click OK, you will see the current IP address
Ateïs International
Ch. du Dévent, 1024 Ecublens, Switzerland.
Phone : +41 21 881 25 10
).
24
Page 25

• Press ESC to go out of the menu
6.1.5 Set time
On DIVA front panel, you can set the current location time format as well as the current date and time.
• Use arrow keys to access the set time menu
• Press OK
• Use the arrow keys to access the format submenu
• Press OK, you will have the choice between the 24 hours format or the AM/PM format. Select the
one you need
• Press OK
• Use arrow keys to go to the Time, Data submenu
• Press OK, you will see the date and time stored into DIVA. Data and time are display as follow:
Month/Day hour/minutes/second.
• Use the arrow keys to go on the number you need to change
• Use + or - keys to adjust the number value
• Press OK, you will be prompt to validate the time/data changes "Validate the Time/Data
changes?"
• Press OK
• Press ESC to go out of the menu
6.1.6 Speaker Level
You can adjust the integrated front panel speaker level to avoid high level disturbance.
• Use arrow keys to access the Speaker Level menu
• Press OK
• Adjust the level with the +/- or arrow keys
• Press ESC to go out of the menu
6.1.7 Log files
In the menu section of DIVA, you read the Log File as well as delete it if needed.
• Use arrow keys to access the Log Files menu
• Press OK
• Use arrow keys to access DELETE submenu.
• If you want to delete the Log Files, Press OK. It will ask you "Are you sure to delete Log Files?".
• If Yes, Press OK
• If No, Press ESC
• Use arrow keys to go on the VIEW submenu
• Click OK
• Use arrow keys to display different Log Files information
• Press ESC to go out of the menu
6.1.8 Mic/Line
With this menu, you can adjust the level of the external microphone or the third music source.
• Use arrow keys to access MIC/LINE menu
• Press OK
• Adjust level either with +/- or arrow keys
• Press ESC to go out of the menu
Ateïs International
Ch. du Dévent, 1024 Ecublens, Switzerland.
Phone : +41 21 881 25 10
25
Page 26

6.1.9 Stop All Events
From the front panel of DIVA, you are able to stop all the running events (events are discussed in How
to use events).
• Use arrow keys to access the STOP ALL EVENTS menu
• Press OK, it will ask you "Are you sure to Stop all events?"
• If yes, Press OK
• If no, press ESC
• Press ESC to go out of the menu
6.1.10 Ethernet Settings
From the front panel menu, you can set all parameters concerning the network. If not already log in,
DIVA will ask you to enter a valid username and password to be able to modify Ethernet parameters.
• Use the arrow keys to access the Ethernet Setting menu
• Press OK twice
• Choose between DHCP enable or disable. Enable DHCP means that the IP configuration will be
automatically set by your network, be careful when using this option. In most of the case, you will
have to enter manually your network prameters, to achieve this choose disable.
• Press OK
• Enter the IP address value using arrow keys and +/- keys to change the IP address value. Default
address is 192.168.100.1000
• Press OK
• Enter the Submask value using arrow keys and +/- keys to change the IP address value. Default
Submask is 255.255.255.0
• Press OK
• Enter the Gateway value using arrow keys and +/- keys to change the IP address value. Default
Gateway is 192.168.100.1
• Press OK
• You will be prompt: Are you sure?
• Press OK, if yes or no if not
6.1.11 Music 1 Level
You can adjust the level of the music source 1.
• Use arrow keys to access the Speaker Level menu
• Press OK
• Adjust the level with the +/- or arrow keys
• Press ESC to go out of the menu
6.1.12 Music 2 Level
You can adjust the level of the music source 2.
• Use arrow keys to access the Speaker Level menu
• Press OK
• Adjust the level with the +/- or arrow keys
• Press ESC to go out of the menu
6.1.13 Get Reference
From the front panel menu, you can get monitoring references by accessing the Get Reference menu.
You can get reference individually for each speaker zones and amplifiers.
Ateïs International
Ch. du Dévent, 1024 Ecublens, Switzerland.
Phone : +41 21 881 25 10
26
Page 27

• Use the arrow keys to access the Get Reference menu
• Press OK
• Choose between zone 1 - 8 or Music Amplifier - Voice Amplifier
• Press OK
The new monitoring reference is now made and stored.
6.2 Music
On DIVA front panel, you have the possibility to assigned music sources to a zone (or multiple), set up
attenuation for each speaker zone and to toggle between music sources. This will be possible in the
case you set music in Route Key mode, see How To Use Music Source
6.2.1 Zone Selection
The zone selections have been designed to be simple. In order to select a zone, please follow the next
steps:
• Press the zone button(s) you want to activate. The corresponding green selection LED(s) should
light(s) up
• Choose the music source you want to route
• Press the Route button
.
6.2.2 Source Selection
The DIVA front panel offers the possibility to toggle between two music sources or none.
• Press the SELECT button to go from Source 1 to Source 2
• Press SELECT button to go from Source 2 to no selection
• Press SELECT button to re-select Source 1
6.2.3 Attenuator
In each zone, the music level can be attenuated depending your needs.
• Adjust the corresponding zone(s) ATTENUATOR KNOBS to the desired level
Note: if two music sources are used, keep in mind that attenuator will only have effect on only one of
them (music 1). This is due to the fact that the amplifier used for the music source 2 is the one
dedicated for voice call.
6.3 Message and Microphone Call
From the front panel, you have the choice two start three different messages or do a zone call with the
fireman microphone. See those two chapter for more information about how to set up messages
how to configure the Fireman Microphone
.
6.3.1 Messages
Next steps are for zone selection in case of starting a message:
• Press the zone button(s) where you want the message to be played. The corresponding green
selection LED(s) should light(s) up
• Press the desired message button, the message will start performing in the zone. If EVAC
message, the corresponding EVAC LED(s) should light(s) up. If Test or Alarm message, the
corresponding PAGE LED(s) should light up
Note: If the message set on the front panel have been defined with pre-defined zone, pressing only
the message button will result in starting the message in the pre-defined zones.
and
Ateïs International
Ch. du Dévent, 1024 Ecublens, Switzerland.
Phone : +41 21 881 25 10
27
Page 28

6.3.2 Fireman Microphone
Next steps are for zone call with the fireman microphone:
• Press the zone button(s) where you want the call to be played. The corresponding green selection
LED(s) should light(s) up
• Press the fireman microphone contact to start speaking in the selected zone(s), the corresponding
EVAC LED(s) should light(s) up
Note: If the fireman microphone paging event has pre-defined zones, pressing the microphone button
will start a call in the pre-defined zone. In case of doing a call in manually selected zone, the next
microphone call will take place in the pre-defined zones after a adjustable delay, see How To Use
Fireman Microphone.
Ateïs International
Ch. du Dévent, 1024 Ecublens, Switzerland.
Phone : +41 21 881 25 10
28
Page 29
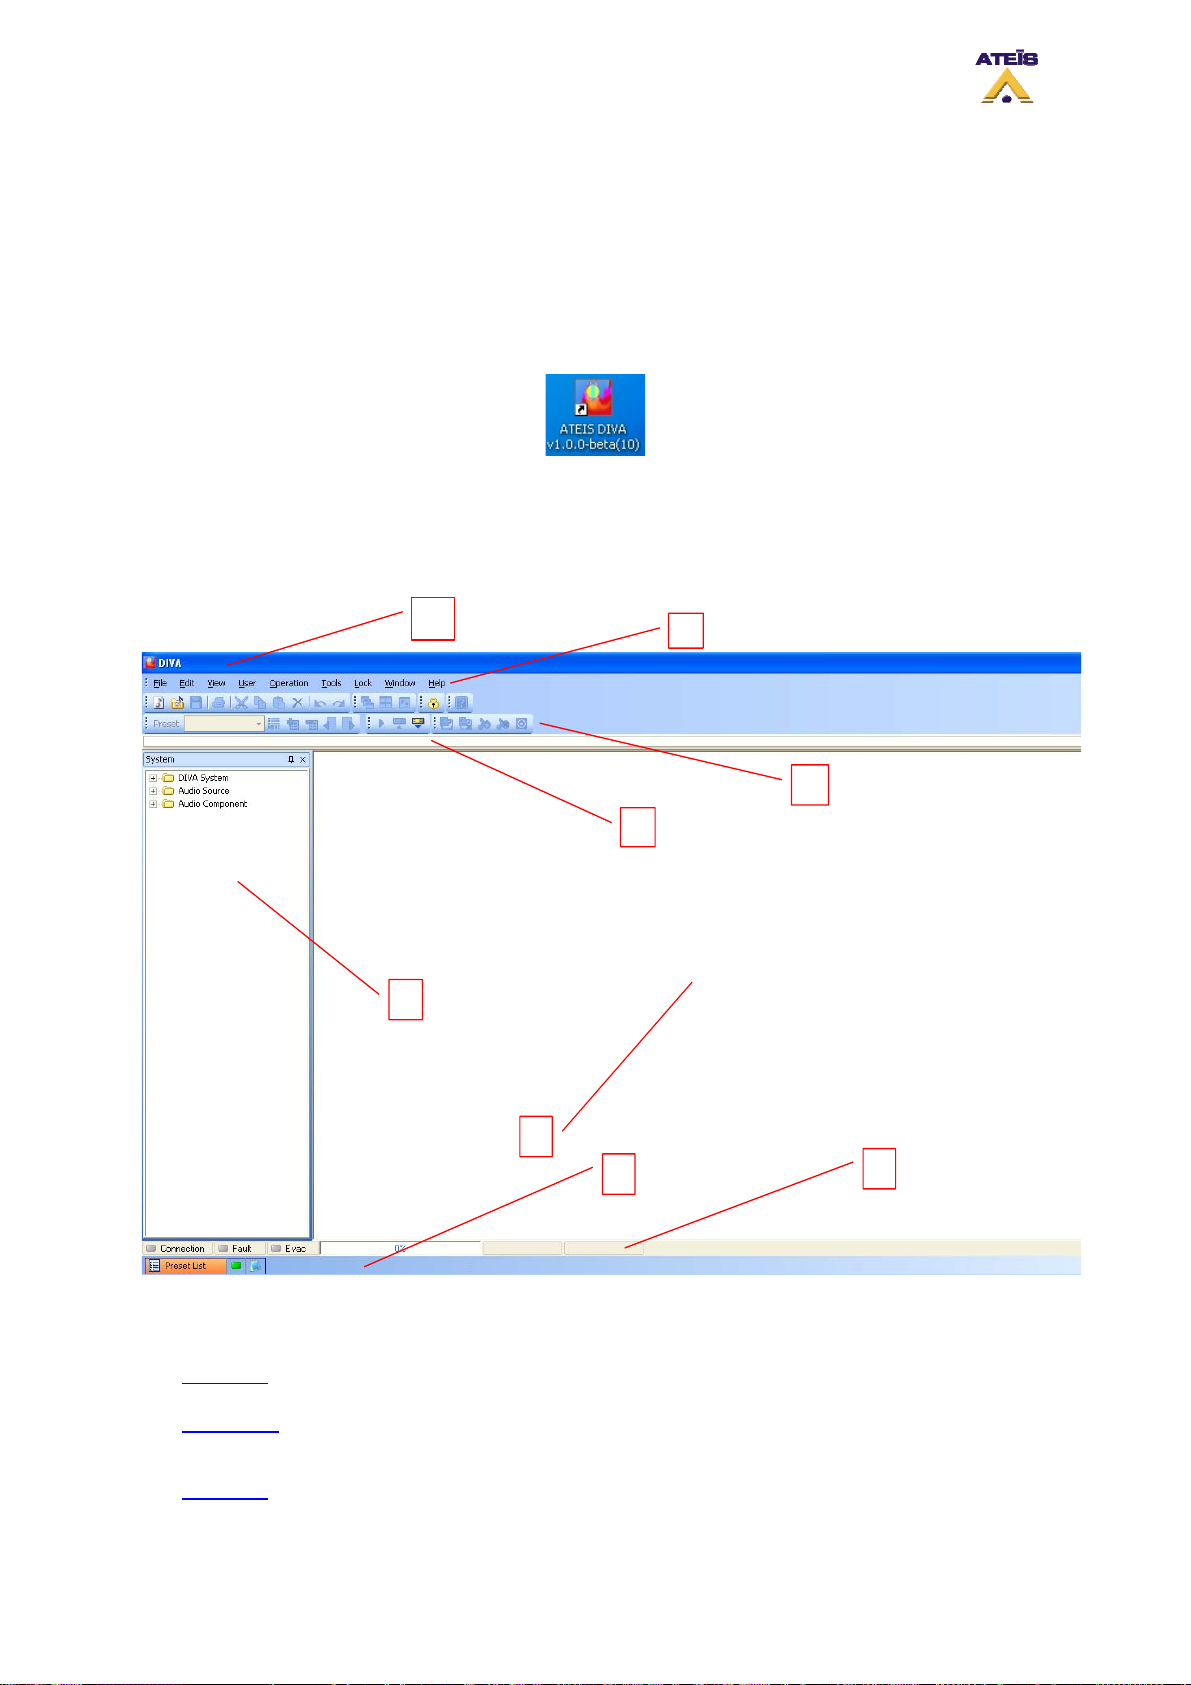
7 DIVA Software Presentation
The chapter will introduce to you the DIVA software. This is a visual presentation in order to let you
know where you can find the needed tools.
After installing the DIVA software, you can access it:
• Either by double-clicking on the Desktop icon:
• Or by start -> program files -> Ateis -> ATEIS DIVA v1.x.x.
The DIVA software starts with no file loaded and a blank worksheet looking as follow:
1
5
2
3
4
6
7
8
Startup View Elements:
(1) Title Bar
(2) Menu Bar
(3) Toolbars
Ateïs International
Ch. du Dévent, 1024 Ecublens, Switzerland.
Phone : +41 21 881 25 10
Displays the path name of the active file.
Holds the main menu commands arranged into functionality
groups.
Toolbar items act like a shortcut to their corresponding menu
command.
29
Page 30
(4) Tab Bar
(5)
Design Component
Shows the window title of all open design and component
control windows for quick access.
Holds all design component libraries.
Section
(6) Design View Area
(7)
Property Control
This area is your work space showing all design windows and
component control windows.
This section slides up for 'System Status', 'LED Display'.
Section
(8) Status Bar
Displays useful status, communication and compiler information.
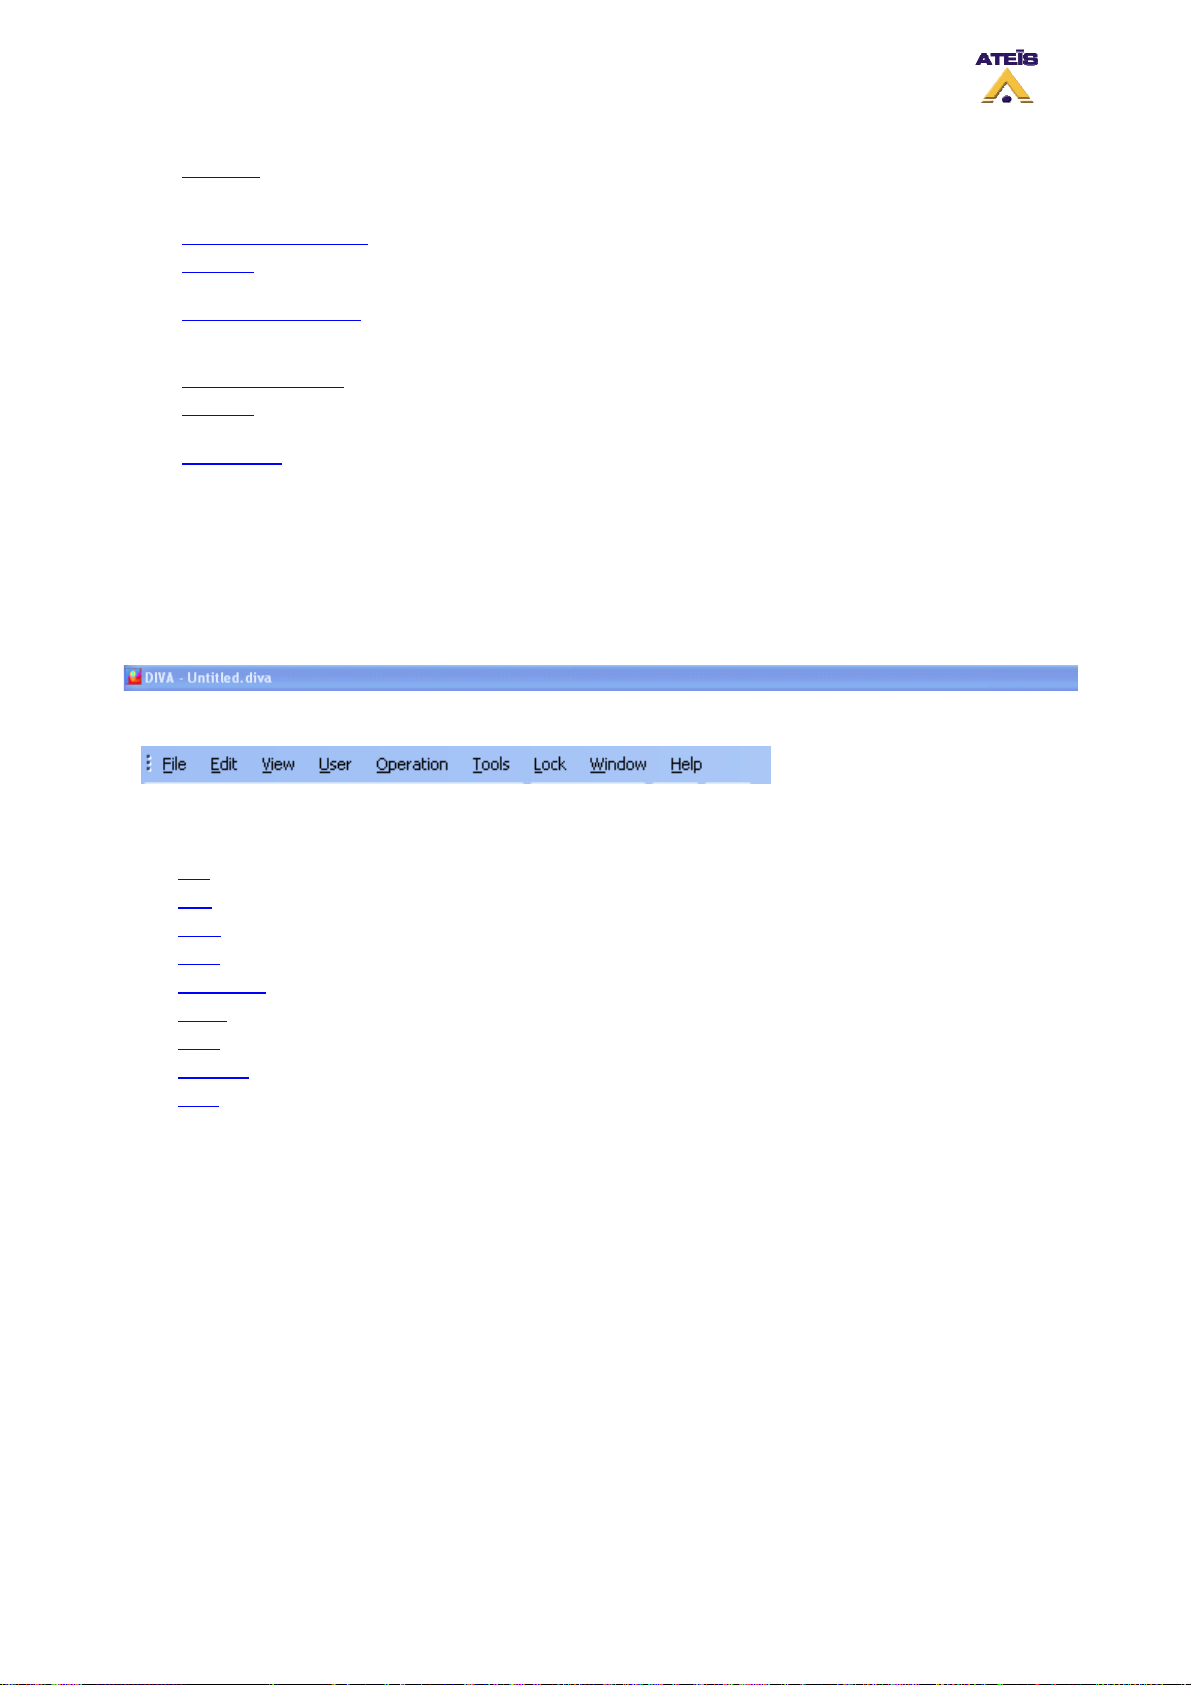
7.1 Title Bar
The title bar displays 'DIVA', 'Untitled' if you start a new system design, or the full path name of the
saved file. At the right hand corner you can find the usual Windows minimize button and the close box,
which exit the program.
7.2 Main Me nu Ba r
The main menu bar contains the following menus:
• File
• Edit
• View
• User
• Operation
• Tools
• Lock
• Window
• Help
7.2.1 File
In this paragraph, you will find everything related to system files as well as printing command. All the
DIVA files are saved under the .diva extension.
Ateïs International
Ch. du Dévent, 1024 Ecublens, Switzerland.
Phone : +41 21 881 25 10
30
Page 31
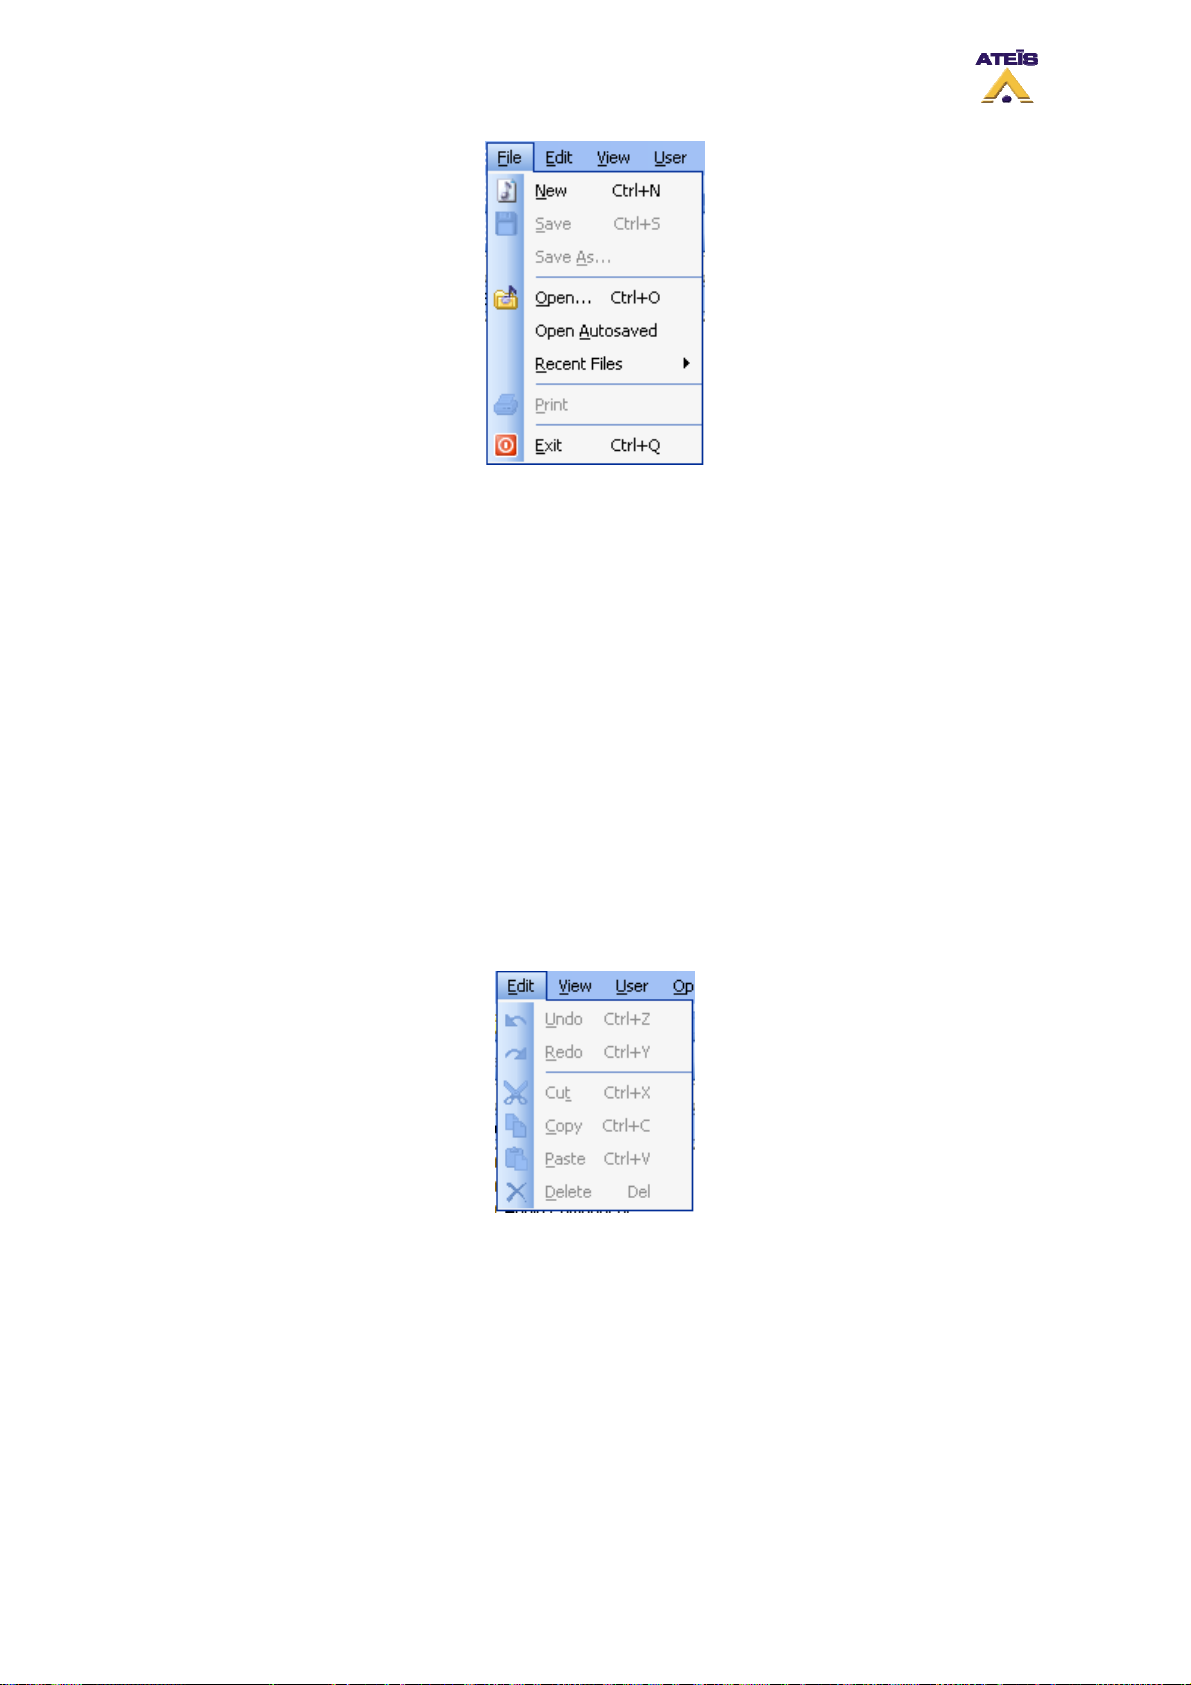
• New: Opens a new system file
• Save: Saves the current system file
• Save as: Opens the 'Save As...' dialog window to choose file path and name
• Open: Opens the 'Open...' dialog window to choose an existing file path and name
• Open autosaved: Opens the last automatically saved file
• Recent files: Pathname>> Quick access to recently used files
________________
• Print: Starts printing
________________
• Exit: Terminates the current LAP session after asking to save modified files
7.2.2 Edit
Here you will find all the common basic edition tools of windows based software.
• Undo/ctrl+z: Will undo the last actions
• Redo/ctrl+y: Will redo the last action or will retrieve the last state in case undoing too far
• Cut/ctrl+x: Cuts out the active selection and copies it to the operating system’s clipboard
• Copy/ctrl+c: Copies the active selection to the operating system’s clipboard
• Paste/ctrl+v: Pastes the content of the operating system’s clipboard
• Delete/Del.: Deletes the active selection
7.2.3 View
The commands in this group are used to call closed or invisible control windows and toolbars.
Ateïs International
Ch. du Dévent, 1024 Ecublens, Switzerland.
Phone : +41 21 881 25 10
31
Page 32
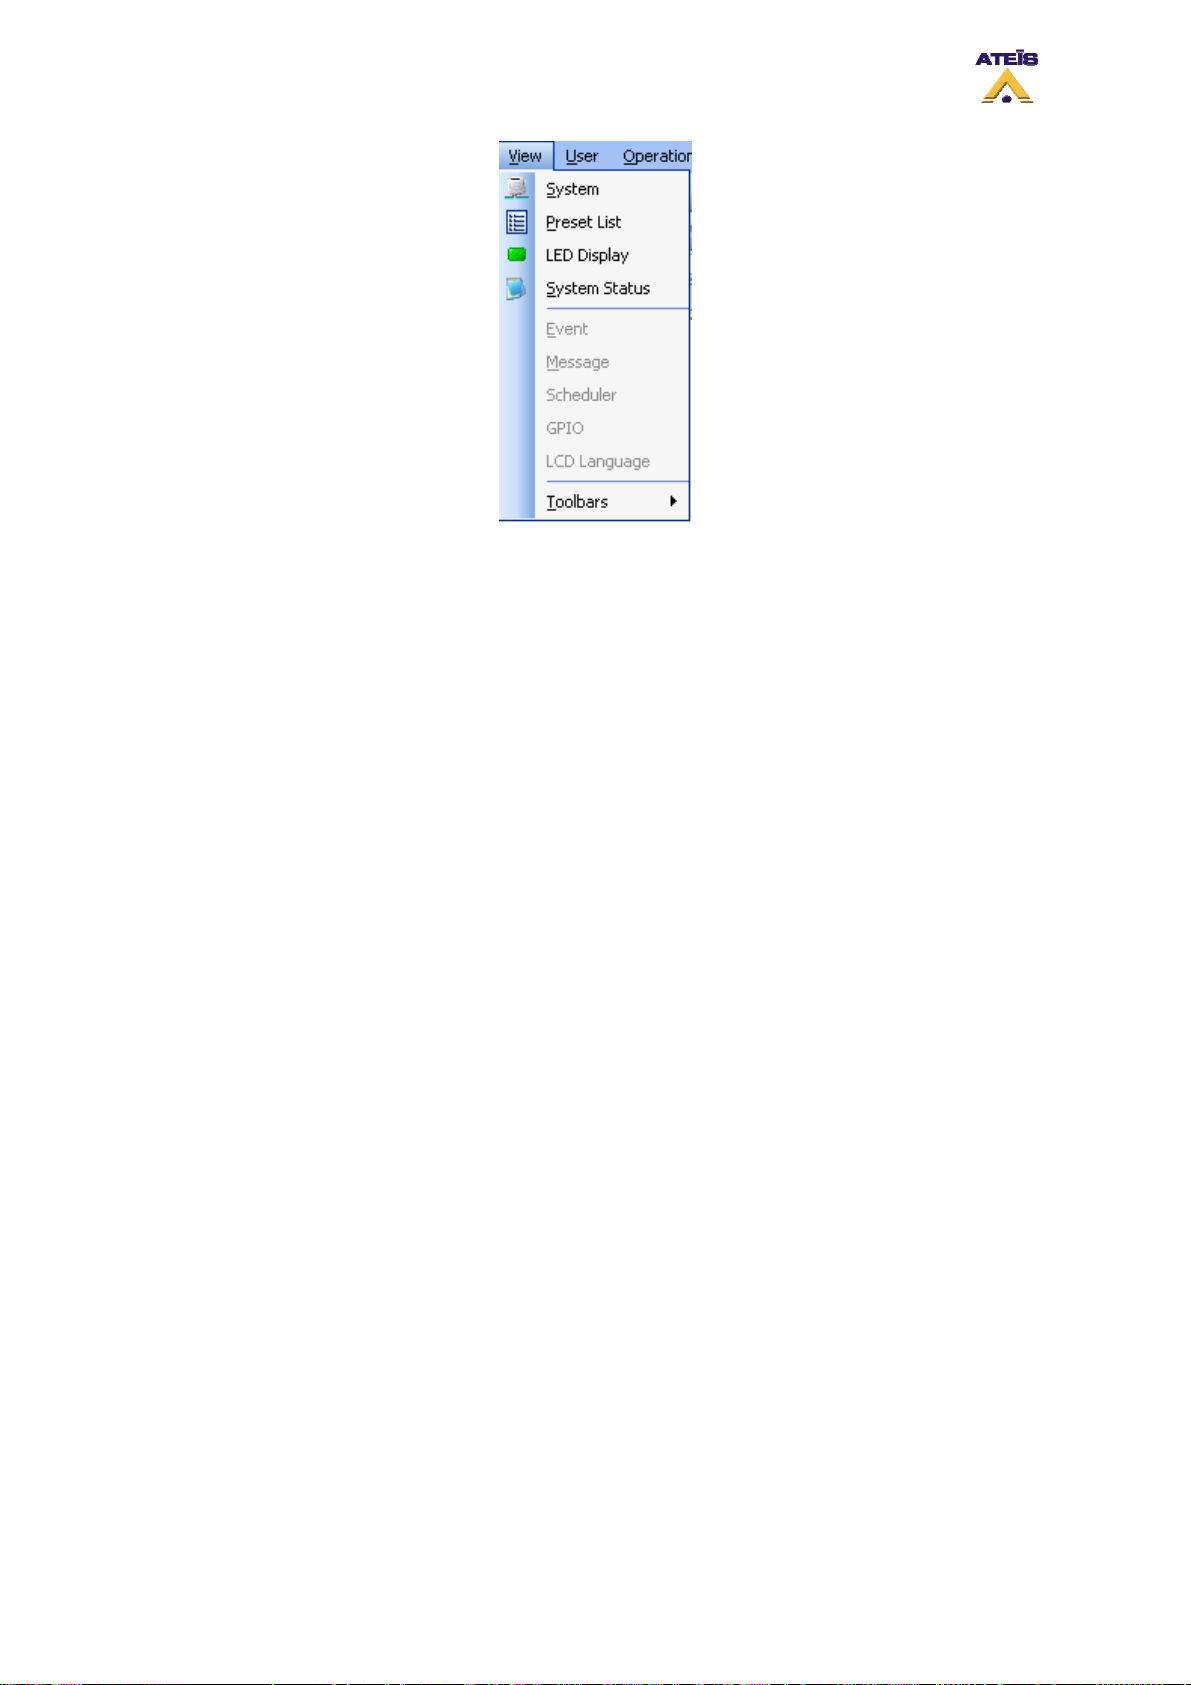
System: Calls the 'System' library control window to add and create a network system
•
• Preset List: Calls the 'Component' library control window to choose DSP components
• LED Display: Calls the 'System Status' control window
• System Status: Calls the 'PPM Chime' control window for assigning pre- and post-announcement
chimes
________________
• Event: Calls the 'Logic In' control window to edit and monitor TTL input properties
• Message: Calls the 'Logic In' control window to edit and monitor TTL output propertie s
• Scheduler: Calls the 'Logic In' control window to edit and monitor analog control input properties
• GPIO: List Calls the 'Subpreset Elements' control window to monitor parameters registered with
the current subpreset
• LCD: Calls the 'Remote device List' where you can search for and register URCs or PPMs in the
system
________________
Ateïs International
Ch. du Dévent, 1024 Ecublens, Switzerland.
Phone : +41 21 881 25 10
32
Page 33
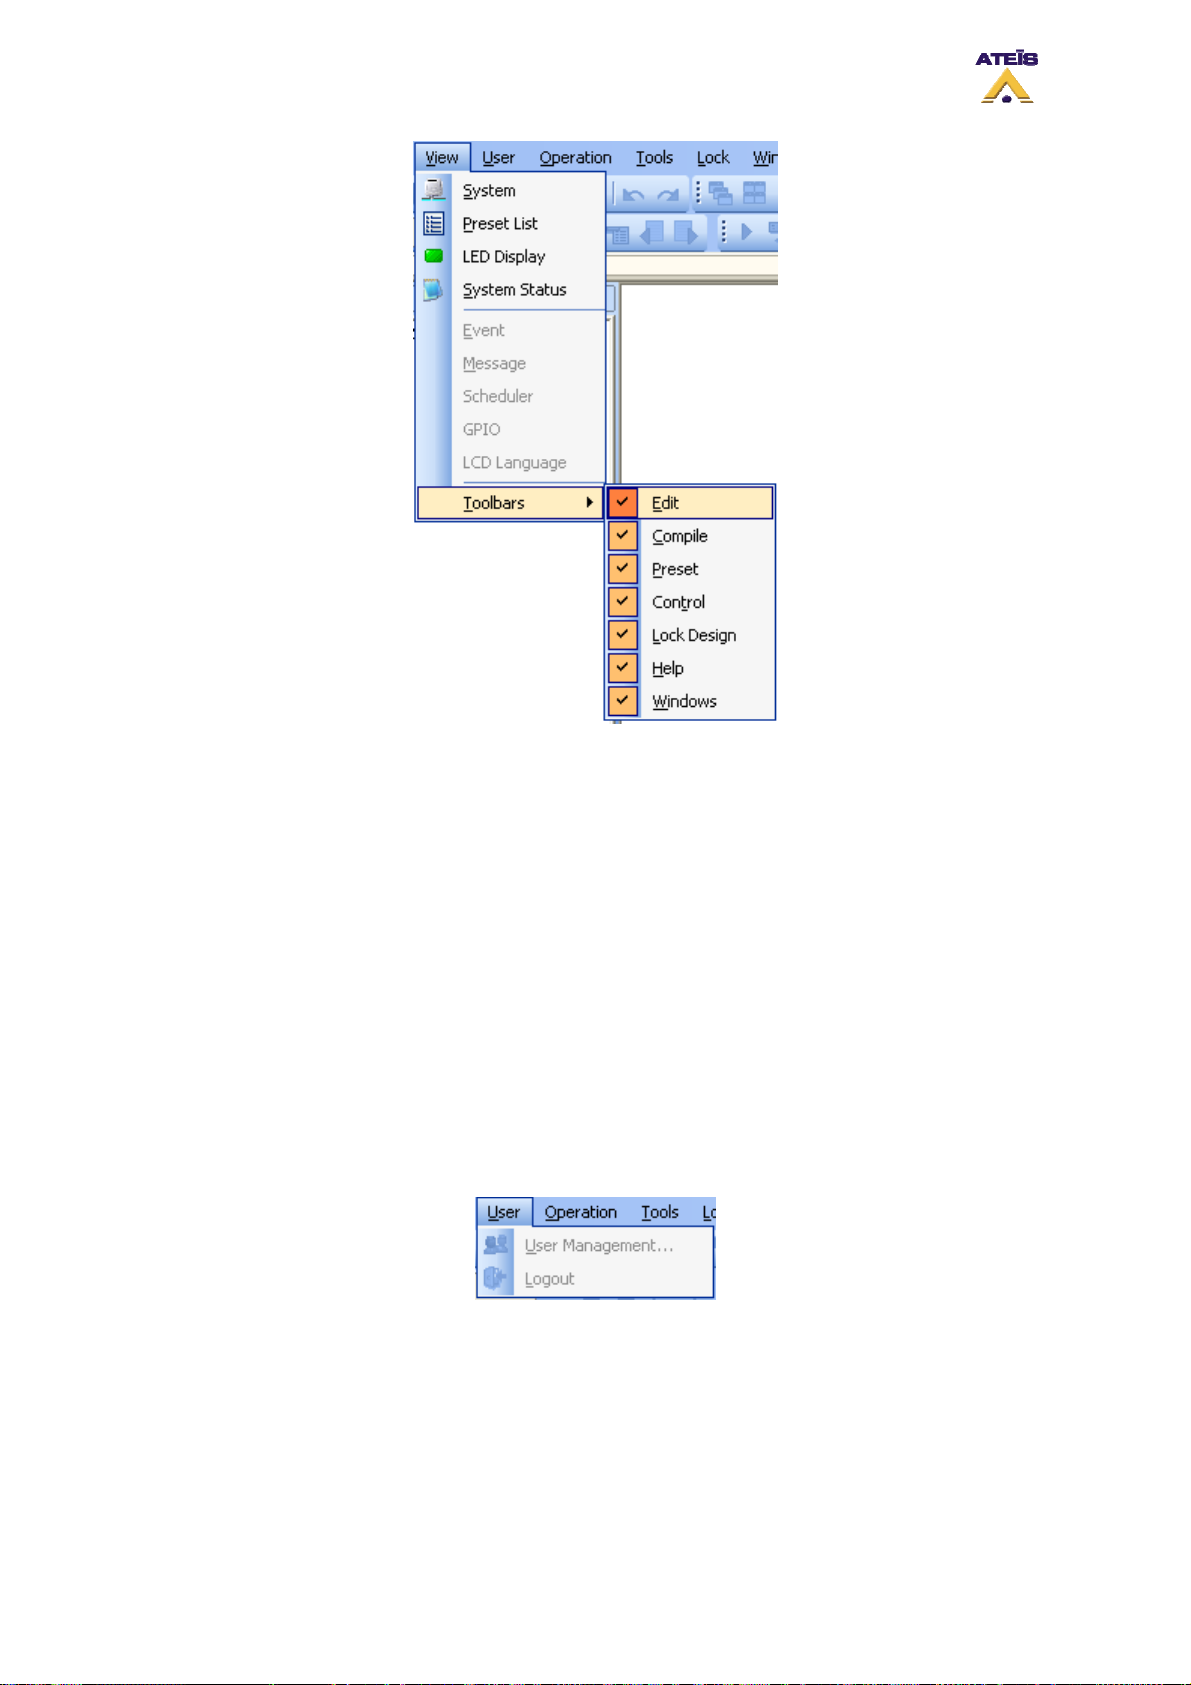
• Toolbars: Within this menu subgroup you'll find the commands to call closed or hidden toolbars
or floating toolbox items
> Edit
> Compile
> Preset
> Control
> Function Link
> Help
> Win dows Manager
7.2.4 User
Here you are able to manage the user right: add users with a password and restrict access only to
needed features.
User Management: Calls the 'User Management' window to set up users or user groups and their
•
individual privileges
• Logout: Opens the 'User Login' window
7.2.5 Operation
Here you can find all data communication commands.
Ateïs International
Ch. du Dévent, 1024 Ecublens, Switzerland.
Phone : +41 21 881 25 10
33
Page 34
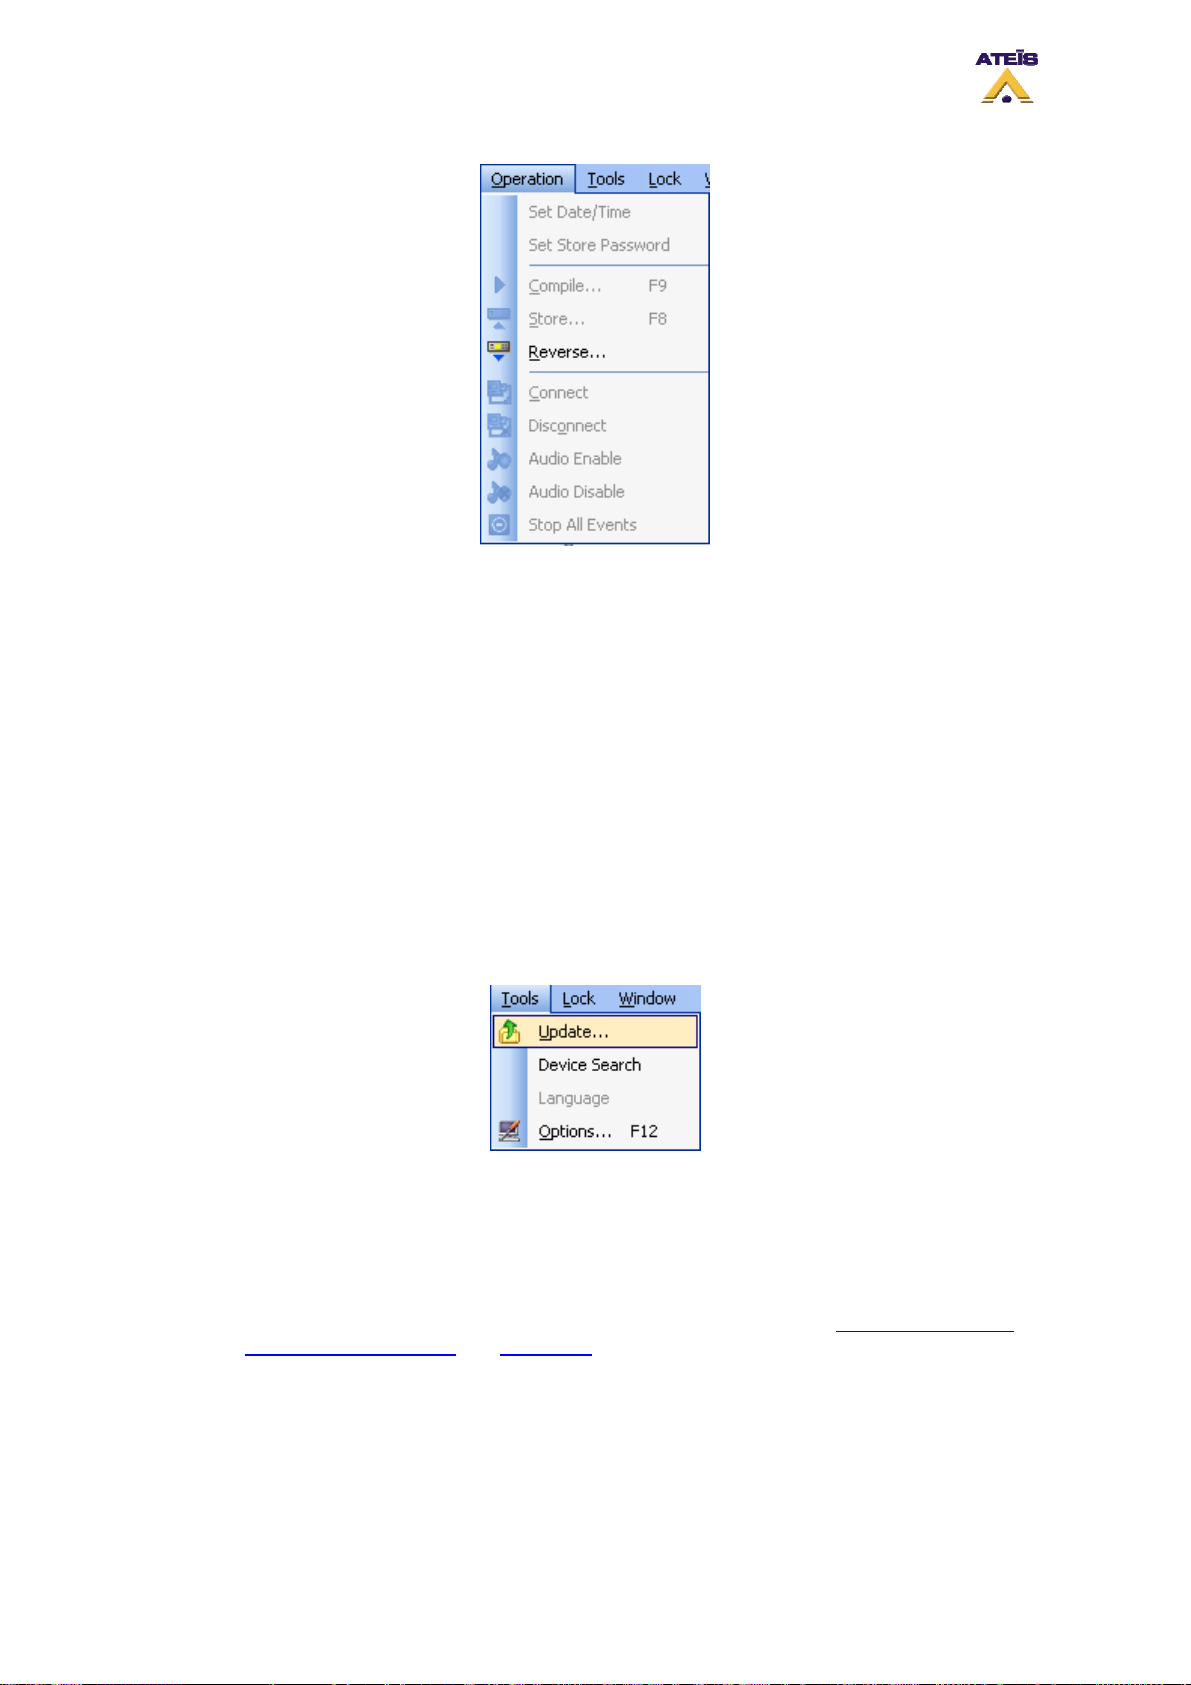
• Set Date/Time: Allow user to set the time and date of the DIVA unit
• Set Store Password: Offers a store process protection, password management
• Compile: Compiles the current configuration and displays eventual errors
• Store: Upload configuration parameter into the DIVA's parameter memory
• Reverse: Downloads the DIVA configuration in the computer
• Connect: Establishes data connection to the machine(s) in order to monitor or adjust parameters
online
• Disconnect: Disconnects DIVA software from the machine(s)
• Audio Enable: Enables DIVA's audio processing
• Audio Disable: Disables DIVA's audio processing
• Stop All Events: Stops all running events
7.2.6 Tools
Here you will find command related to communication with DIVA units.
• Update: Will update the DIVA Firmware to the one corresponding to your current software
version. NOTE: Upgrading from a too old version to the current one could cause
configuration files compatibility issues.
• Device Search: Will search and display all the DIVA Master IP connected to the TCP/IP network.
• Language: Allows user to change the software language.
• Options: Will open the Options window in which you will be able to set network parameters, as
well as software colour scheme
and autosaved function. See Pictures below.
7.2.7 Lock
The Lock menu allow you to lock the software with a password in order to avoid another user to
manipulate your configuration.
Ateïs International
Ch. du Dévent, 1024 Ecublens, Switzerland.
Phone : +41 21 881 25 10
34
Page 35
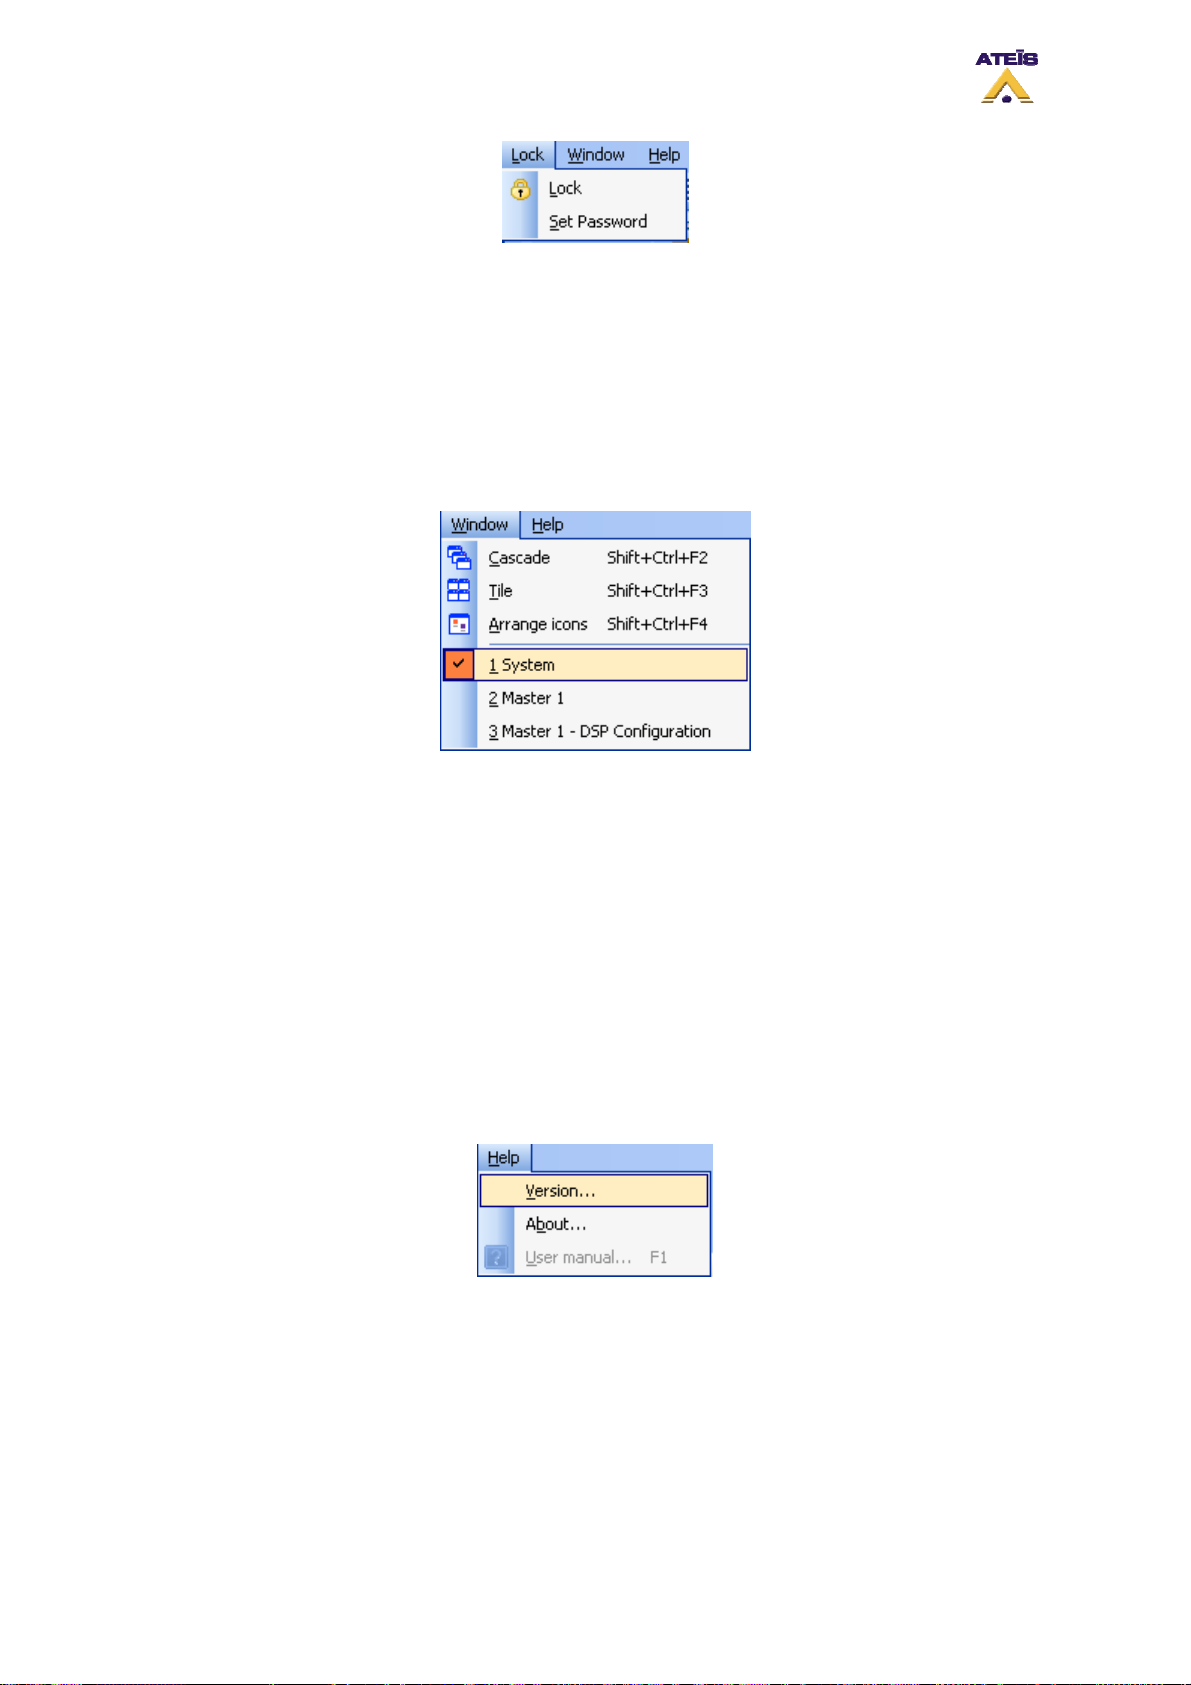
• Lock: Locks the software. Note: if no password were specified, every user can unlock the
software
• Set Password: Offers the possibility to set a password for unlocking the software. If set, as soon
as you press the unlock button, it will prompt you to enter the last password set
7.2.8 Window
This menu provides window arrangement commands, and quick access to open design or component
control windows
• Cascade: Cascades the current opened windows
• Tile: Tiles the screen with the current opened windows
• Arrange Icons: Arranges Icons in a window where possible
________________
Here you can find a list of all currently opened windows
> System
> Master 1
> Master 1 - DSP Configuration
7.2.9 Help
Here you will be able to check that the software version corresponds to the one into DIVA units access
to software information as well as the help user manual document.
• Version: Shows the software version and checks the DIVA unit embedded version. See below
Ateïs International
Ch. du Dévent, 1024 Ecublens, Switzerland.
Phone : +41 21 881 25 10
35
Page 36
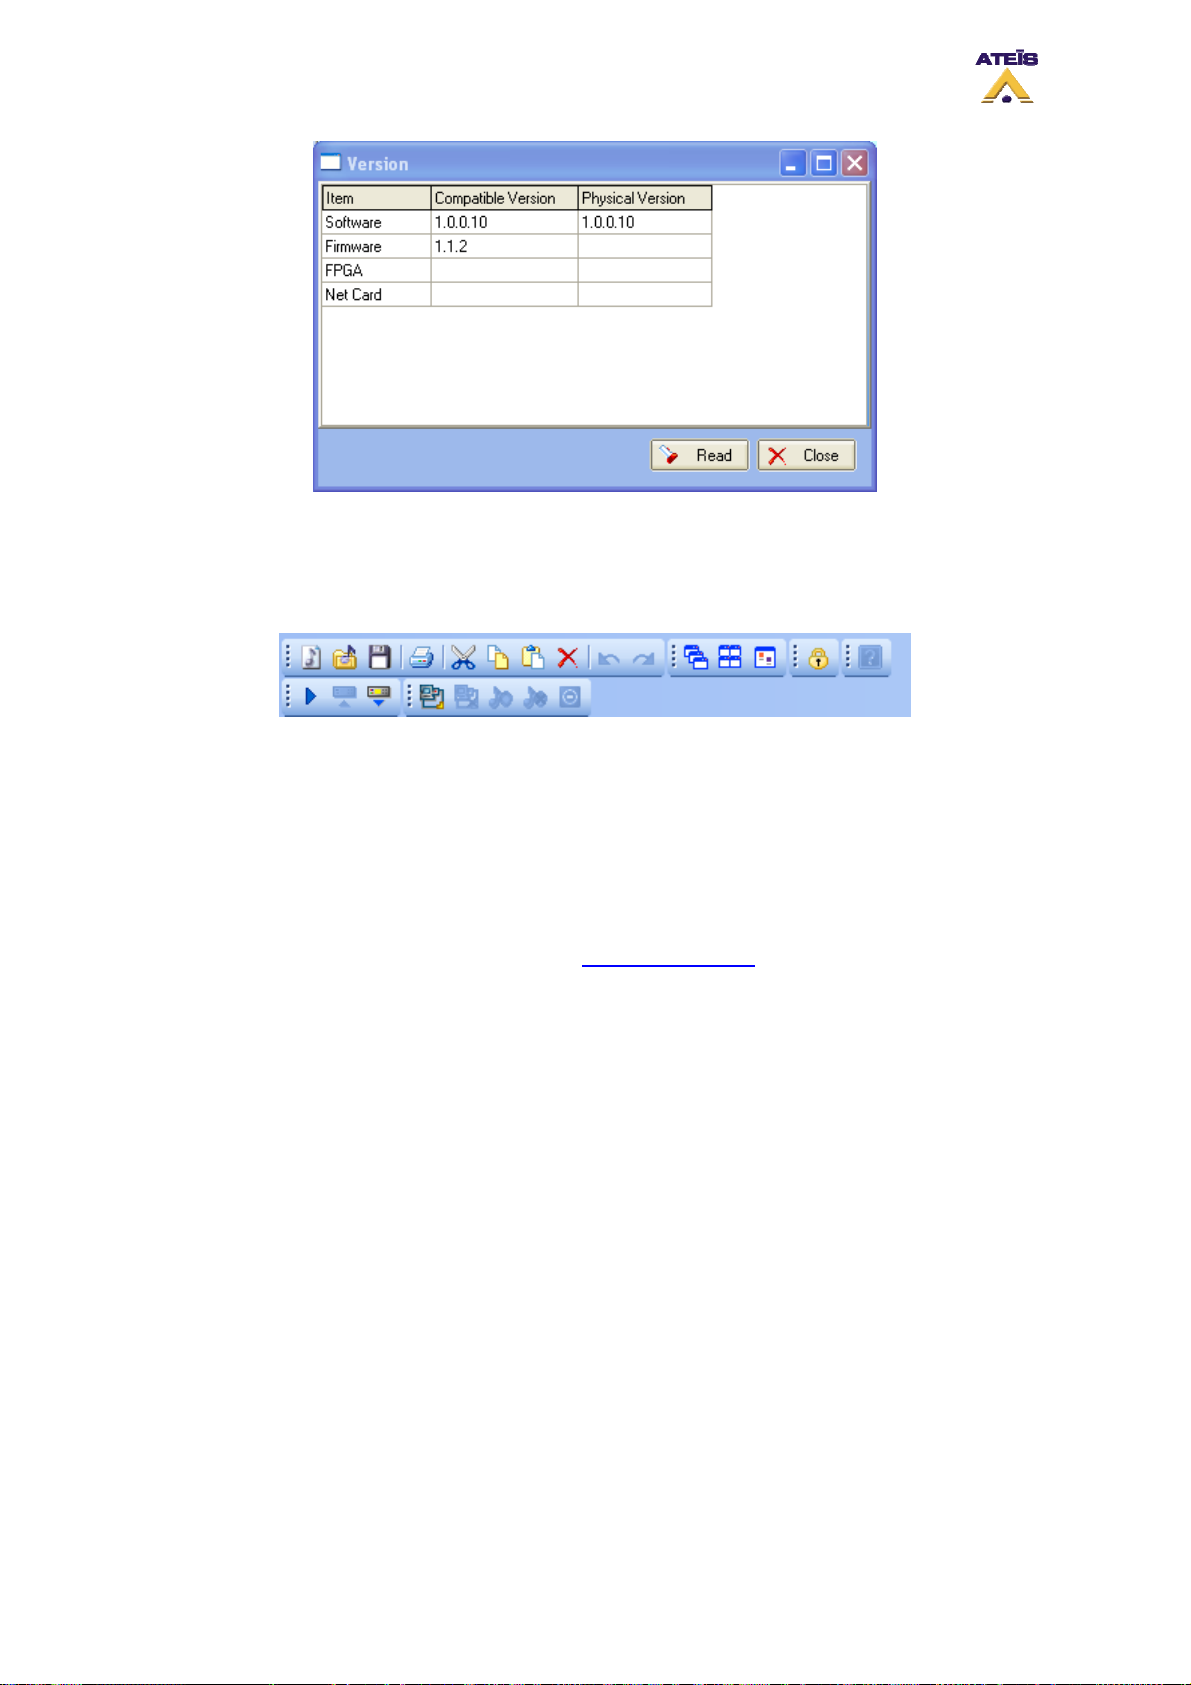
• About: Opens a information windows about copyrights, software re lease version, etc.
• User Manual: Opens the complete help user manual
7.3 Toolbars
In the DIVA software, the different toolbars offers shortcut to main menu items. Here are the list of
them from left to right and up to down:
• New Project: Opens a new project
• Open: Opens existing project
• Save: Saves current project
____________________
• Print: Opens the print preview window. See "How to print project" to learn more about the printing
options.
____________________
• Cut: Cuts out the active selection and copies it to the operating system’s clipboard
• Copy: Copies the active selection to the operating system’s clipboard
• Paste: Pastes the content of the operating system’s clipboard
• Delete: Deletes the active selection
____________________
• Undo: Will undo the last actions
• Redo: Will redo the last actions or will retrieve the last state in case undoing too far
_________________________________________________________________________________
• Cascade: Cascades the current opened windows
• Tile: Tiles the screen with the current opnened windows
• Arrange Icon: Arranges Icons in a window where p ossible
_________________________________________________________________________________
• Lock: Locks the software. Note: if no password were specified, every user can unlock the
software
_________________________________________________________________________________
• Compile: Compiles the current configuration and displays eventual errors
Ateïs International
Ch. du Dévent, 1024 Ecublens, Switzerland.
Phone : +41 21 881 25 10
36
Page 37

• Store: Upload configuration parameter into the DIVA's parameter memory
• Reverse: Downloads the DIVA configuration in the computer
_________________________________________________________________________________
• Connect: Establishes data connection to the machine(s) in order to monitor or adjust parameters
online
• Disconnect: Disconnects DIVA software from the machine(s)
• Audio Enable: Enables DIVA's audio processing
• Audio Disable: Disables DIVA's audio processing
• Stop All Events: Stops all running events
7.4 Tab Bar
Opening design or component control windows creates a new tab within the tab bar. The active
window is orange highlighted and can be closed by clicking the close box at the right side of the bar.
As the tab bar gets full, additional orange colored arrow control boxes will appear at the right side of
the tab bar. Click on the left or right arrow to move the content of the tab bar to the left or the right.
7.5 Design Component Section
The Design Component Section shows, in a tree folder arrangement, all element that can be
connected or added in a DIVA configuration. All the component are drag and drop component, errors
are avoid thanks to the emplacement identification. See How to Add Design Component
.
Ateïs International
Ch. du Dévent, 1024 Ecublens, Switzerland.
Phone : +41 21 881 25 10
37
Page 38
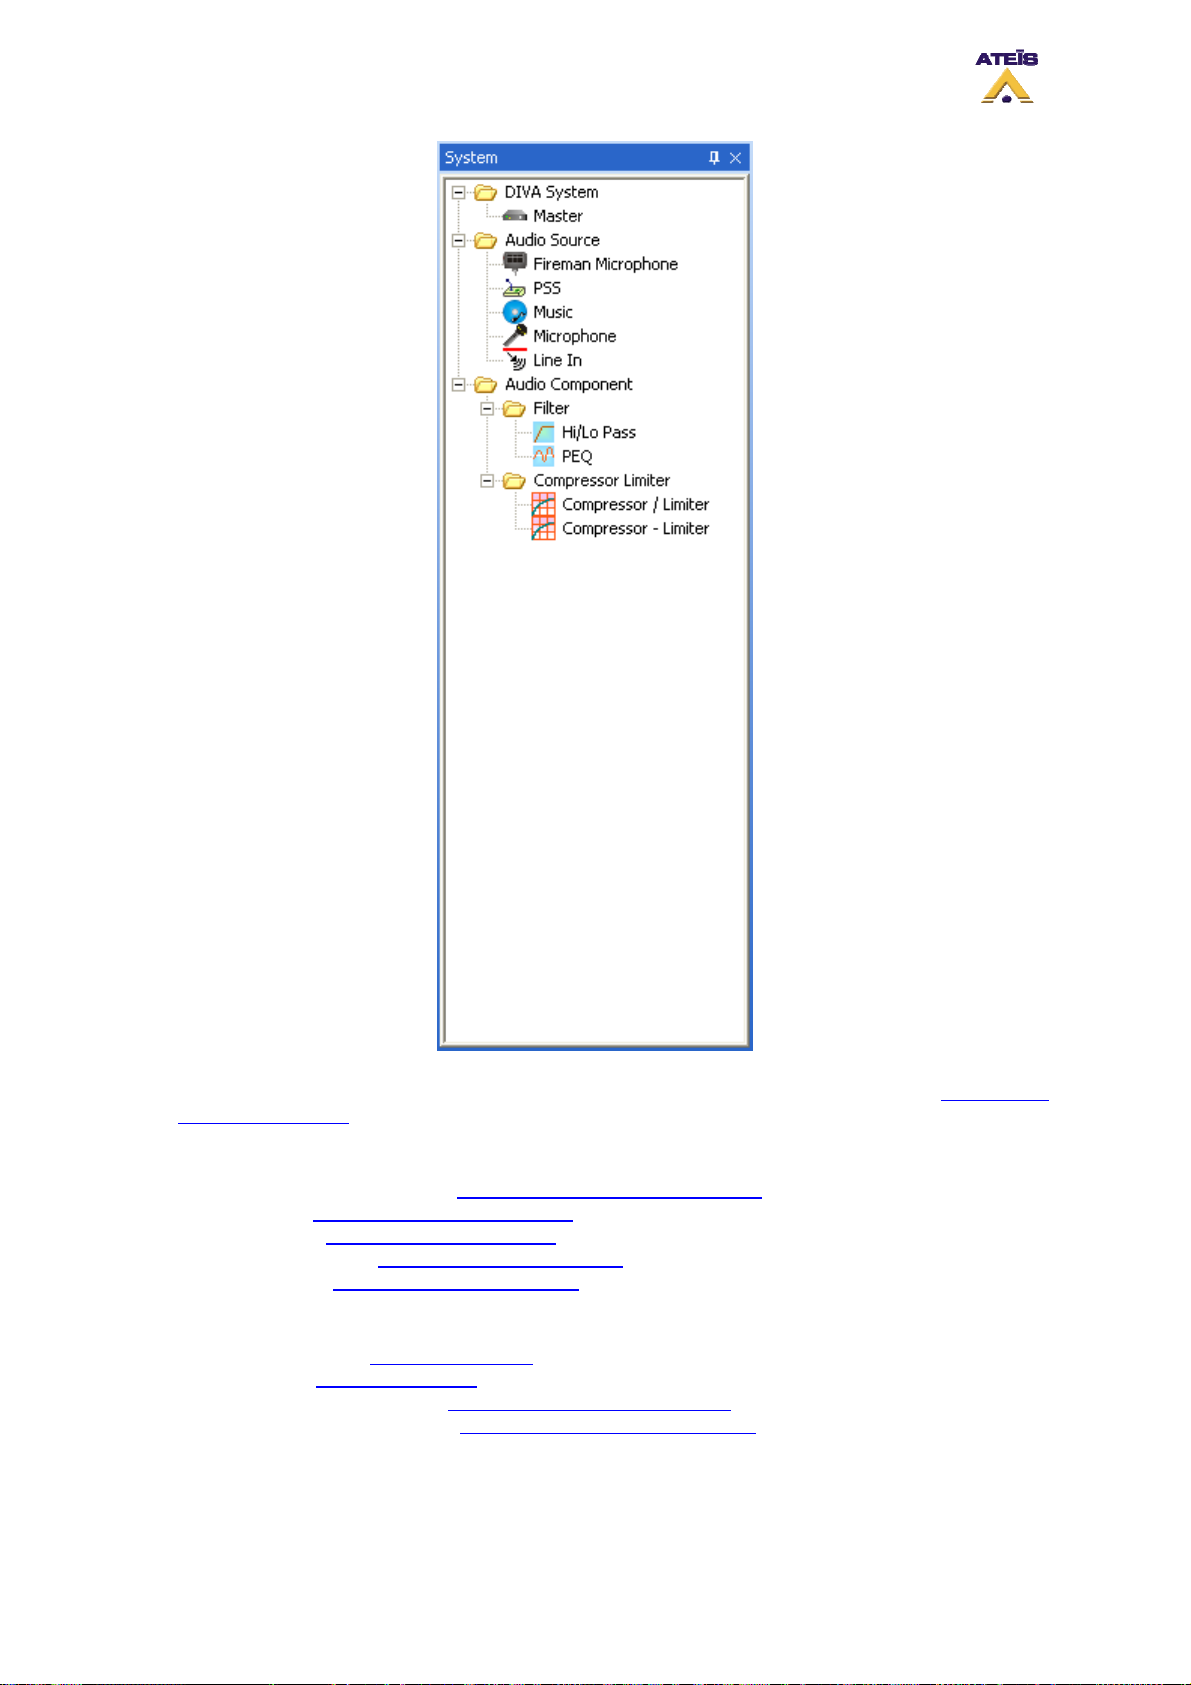
• DIVA System: In the DIVA System folder, you will find DIVA Master unit icon. See How to Add
Design Component
• Audio source: In Audio Source folder, you will find audio elements that can be connected to a
master DIVA unit.
>Fireman Mi crophone: see How to use a Fireman Microphone
>PSS: see How to Use PSS Microphone
>Music: see How to Use Music Source
>Microphone: see How to Use MIC/LINE Input
>Line In: see How to Use MIC/LINE Input
• Audio Component: Audio Component contains high/low pass filters, PEQ equalizer and
compressor limiter components.
>Hi/Lo Pass: see How to Use Filters
>PEQ: see How to Use PEQs
>Compressor/Limiter: see How to Use Compressor/Limiter
>Compressor - Limiter: see How to Use Compressor - Limiter
Ateïs International
Ch. du Dévent, 1024 Ecublens, Switzerland.
Phone : +41 21 881 25 10
38
Page 39
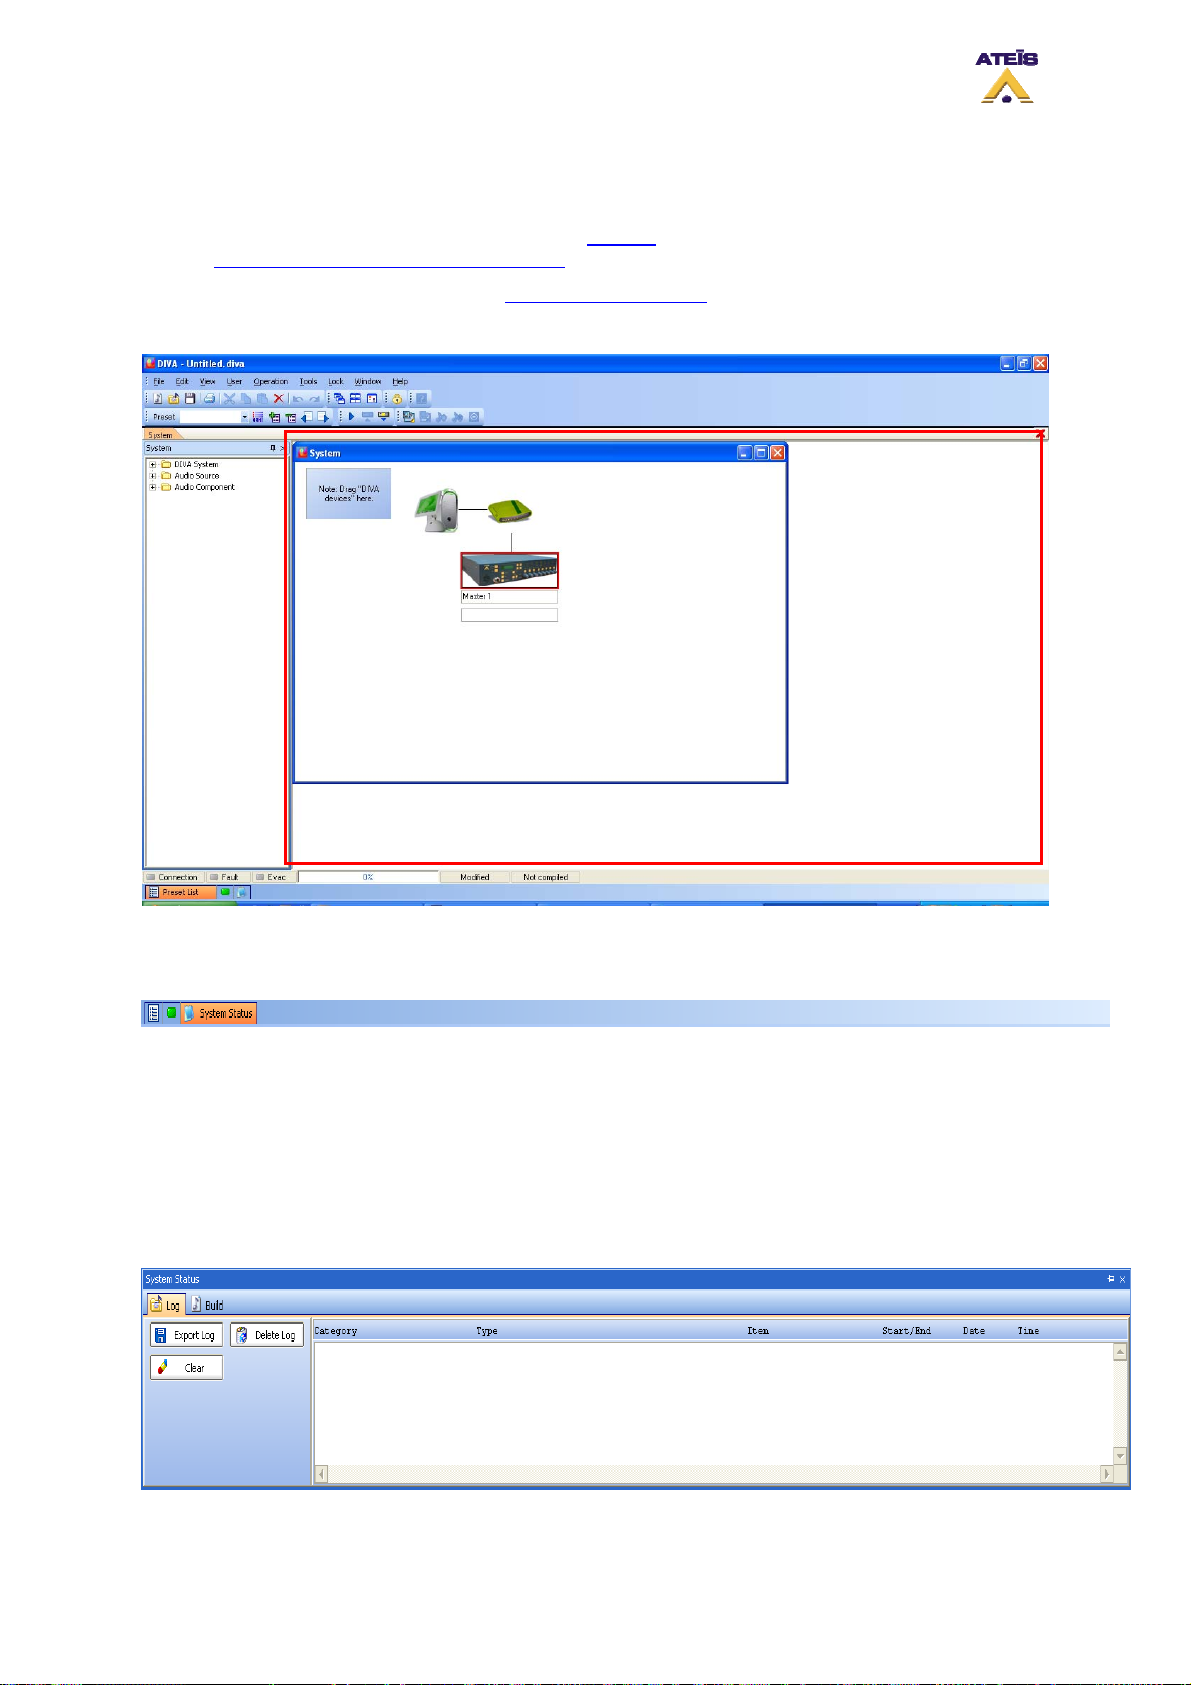
7.6 Design View Area
In this area, you will:
• Develop your DIVA configuration (see the How To chapter) and DIVA master network (see
How to perform a DIVA master Network
)
• Access the monitor window, see How to Use Monitoring
• Access to DIVA element and their adjustments
7.7 Property Control Section
In this section you can find several control windows docked together into a sliding control panel. You
can look at the different control windows by bringing the cursor over their tabs at the bottom of the
very bottom of the main window. The corresponding control window will slide up allowing you to quickexamine or quick-modify settings without selecting it from the Menu Bar.
The control panel will automatically slide down again if you move the cursor out of it's space giving
again the whole view to the Design View Area.
The two accessible sub-bar windows are listed below:
• System Status: Gives access to Log files management as well as project build historic
Ateïs International
Ch. du Dévent, 1024 Ecublens, Switzerland.
Phone : +41 21 881 25 10
39
Page 40
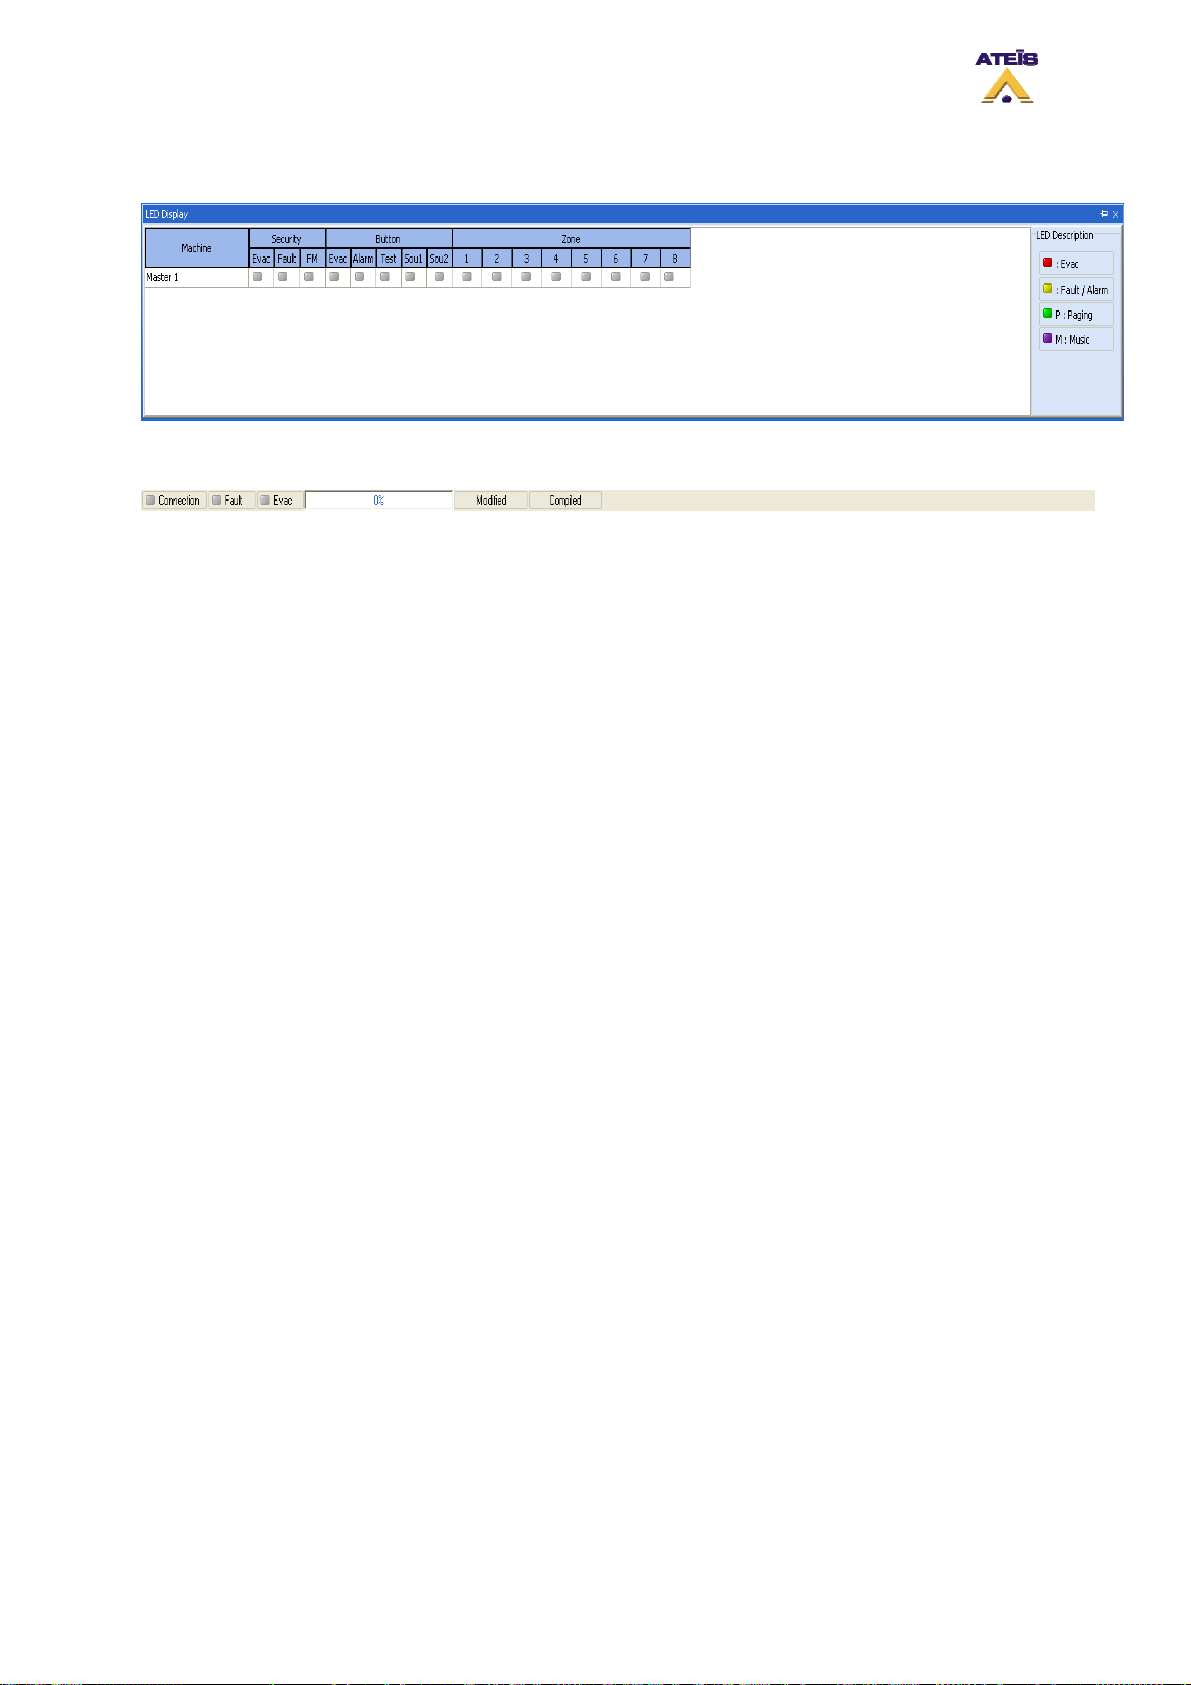
• LED Display: offers real time status LED display, only if connected to DIVA units. It is a replic of
the front panel LED display
7.8 Status Bar
The status bar shows quick look status information about:
• Connection: Lights up when connected to DIVA
• Fault: Lights up when a faults status is detect onto DIVA
• Evac: Lights up when a Evac state is detected
Additional Status Information
• Timeline: Shows the progress of commands like opening component control
windows
• Modified: Indicates if the current file has been modified since last save
• Compiled: Indicates if the current file has been compiled
Ateïs International
Ch. du Dévent, 1024 Ecublens, Switzerland.
Phone : +41 21 881 25 10
40
Page 41

8 How To?
The How To section is divided by theme. Each Theme discusses about how to perform an action or
multiple action in order to build a configuration.
The Philosophy of this chapter is that if you read it from A to Z, you will be able to perform a full
advanced DIVA configuration. But it has been written to offer quick navigation so that you can find
specific information about one theme. Here under, you will find a complete list of the How To topics:
• Save/Open
• Print Project
• Start a New Project
• Change Colour Scheme
• Configure network Options
• Use the User Management
• Enter Password
• Update DIVA
• Compile
• Store
• Reverse
• Add design Component
• Search Device
• Set IP Adress
• Perform a DIVA Master Network
• Add Messages Into DIVA
• To Set Speaker Parameters Settings
• Use Events
• Set up Front Panel Messages
• Use a Fireman Microphone
• Use Music Source
• Use PSS Microphone
• Use Mic/Line Input
• Use Logic Inputs
• Use Monitoring
• Use the Scheduler
• Use filters
• Use PEQs
• Use Compressor/Limiter
• Use Preset
• Use Output Relay
• Create a Monitorable Button
• Wire things
• Use Tone Generator
Note: Some topics could be divided in sub-topics as the procedure could induce multiple procedure to
achieve the main goal.
8.1 Save/Open
The Save/Open procedure is quite identical to most of the Microsoft Windows based software. The
icon used as well as keyboard shortcuts are well-known for Microsoft Windo ws users.
Ateïs International
Ch. du Dévent, 1024 Ecublens, Switzerland.
Phone : +41 21 881 25 10
41
Page 42
Here you will find procedures to:
• Open a file
• Save a file
• Save a file as
• Set an Autosave process
8.1.1 Open
Open a DIVA file:
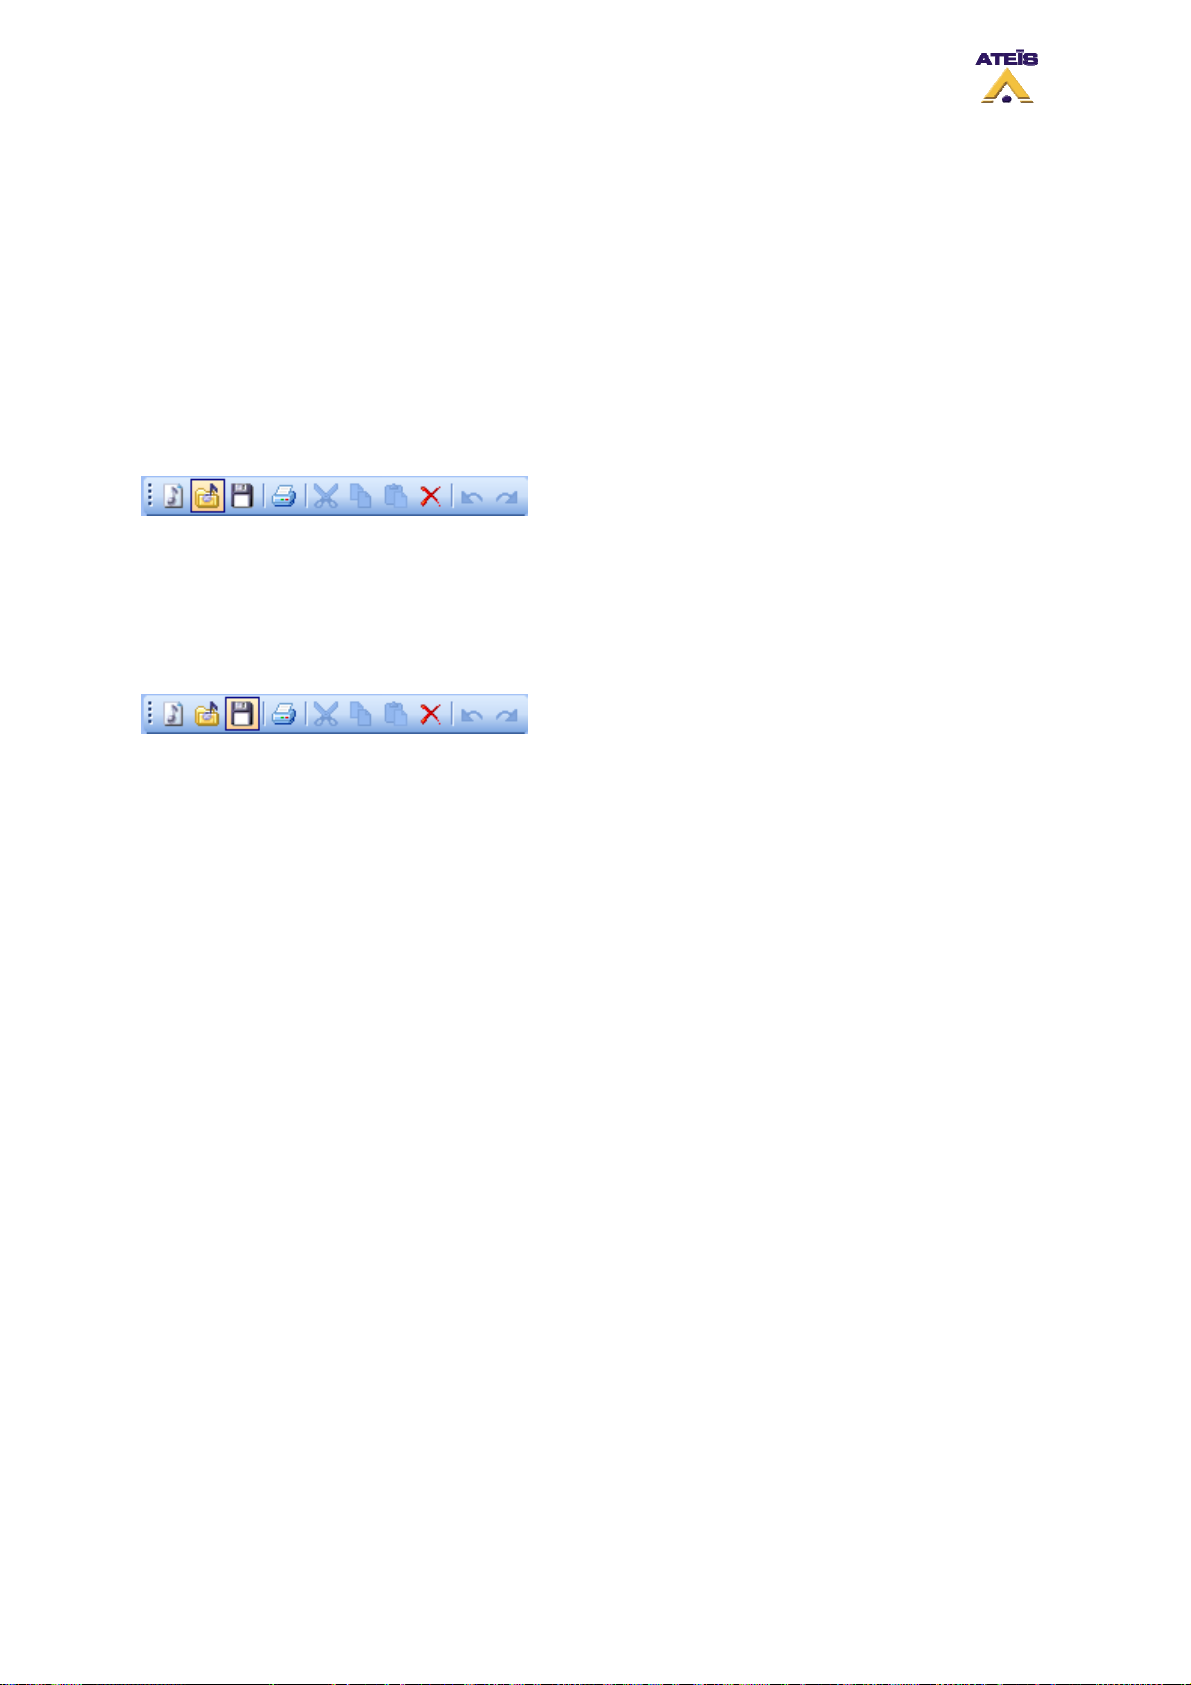
Click on the Open Icon (Highlighted in picture below) in the Edit toolbar or go to menu File -> Open or
even press ctr+o.
8.1.2 Save
Save a DIVA file:
Click on the Save Icon (Highlighted in picture below) in the Edit toolbar or go to menu File -> Save or
even press ctr+s.
The first time you will be saving a project, you will be prompt to enter a name for that file. The 'Save'
command is used to save current project under the current name.
Note: DIVA's configuration files are saved in .diva extension.
8.1.3 Save as
The 'Save As' option can be used to save a configuration under a different name.
Simply go to the menu File -> Save As
8.1.4 Autosave
In the Options page under File tab, you have the possibility to set an autosave procedure. You also
can set the number of recent files visible in the file menu -> recent files.
Ateïs International
Ch. du Dévent, 1024 Ecublens, Switzerland.
Phone : +41 21 881 25 10
42
Page 43
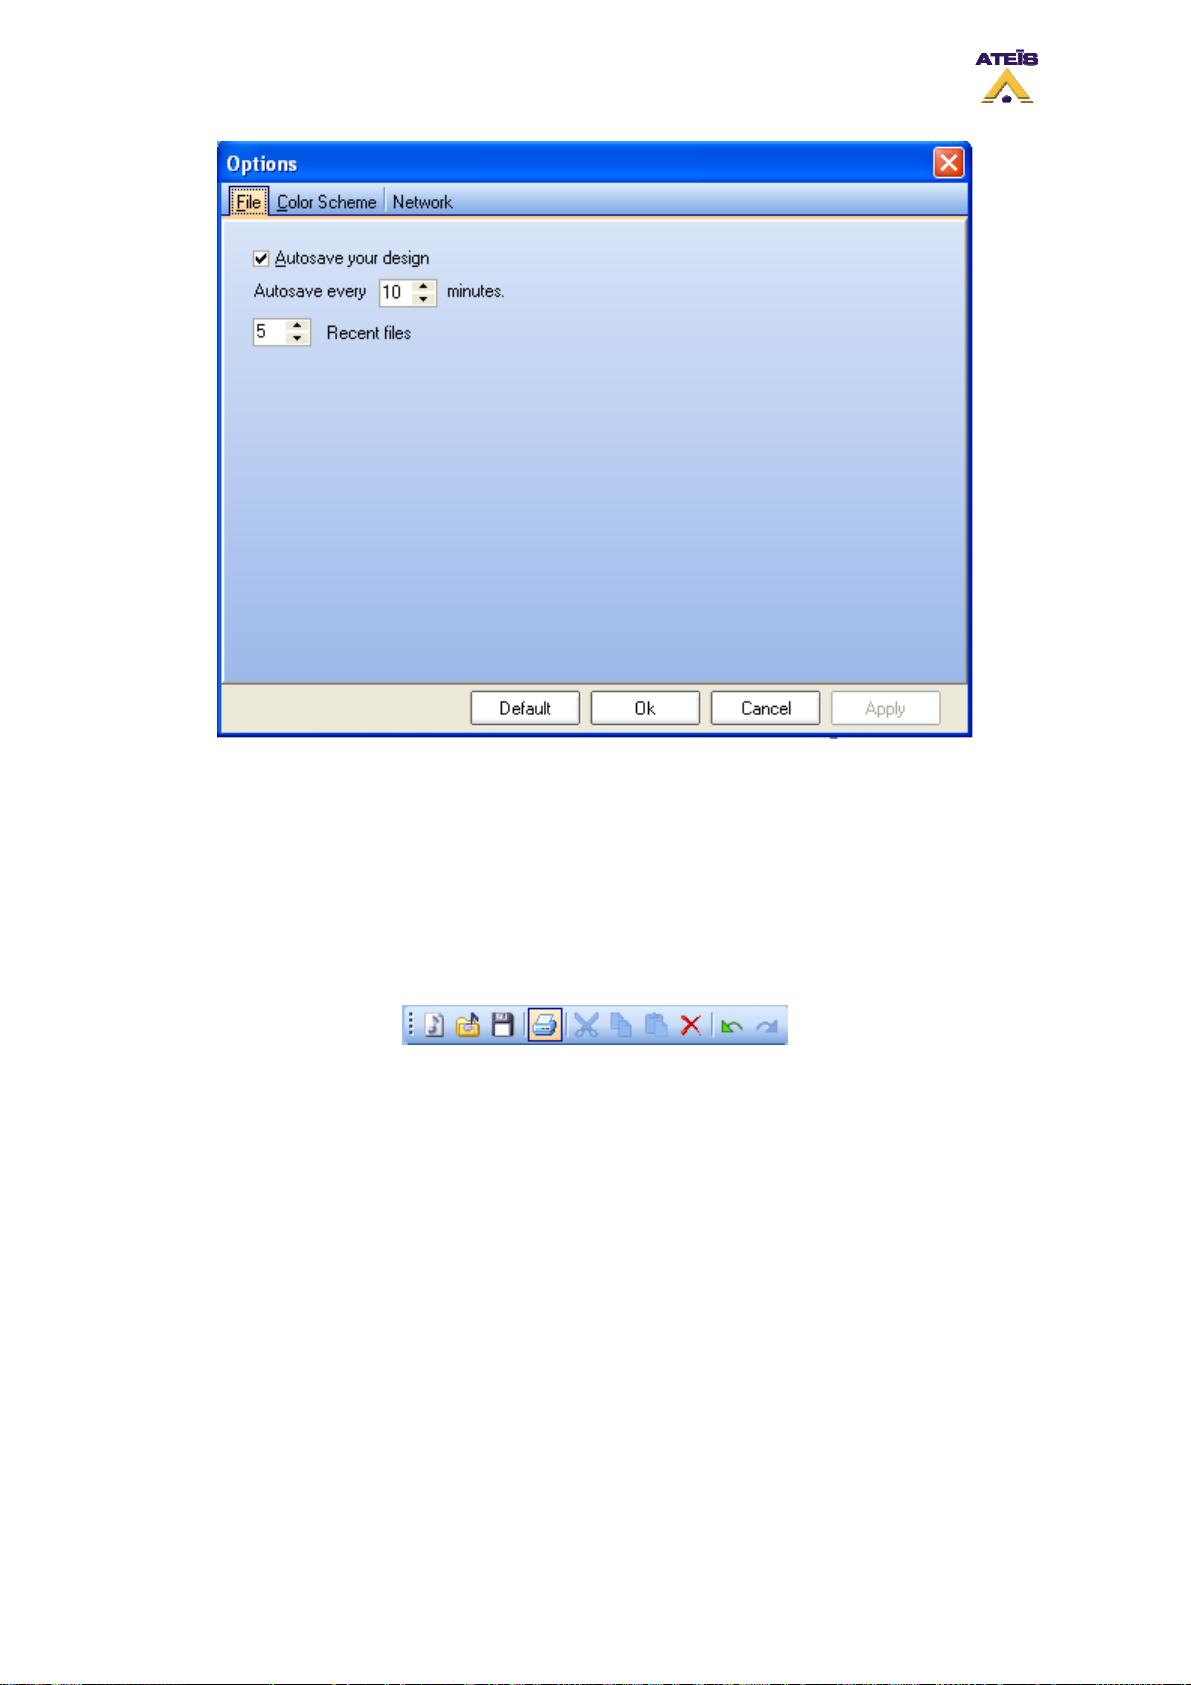
• Tick the "Autosave your design" option in order to activate the autosave option
• Choose after how much time the "autosave" will automatically run.
• Choose how many recent files would be visible in the menu file -> recent
8.2 Print Project
In order to print a project, you need to access the print preview page. To access this page, go in the
menu: File -> Print or click on the print shortcut (highlighted on picture below) in the edit toolbar.
Once you launch the print command, you will enter the "Print Preview" window, see below. The print
preview offer you the possibility to print DIVA main windows separately. In case of DIVA master
Network, you can select which master window you want to print.
Ateïs International
Ch. du Dévent, 1024 Ecublens, Switzerland.
Phone : +41 21 881 25 10
43
Page 44
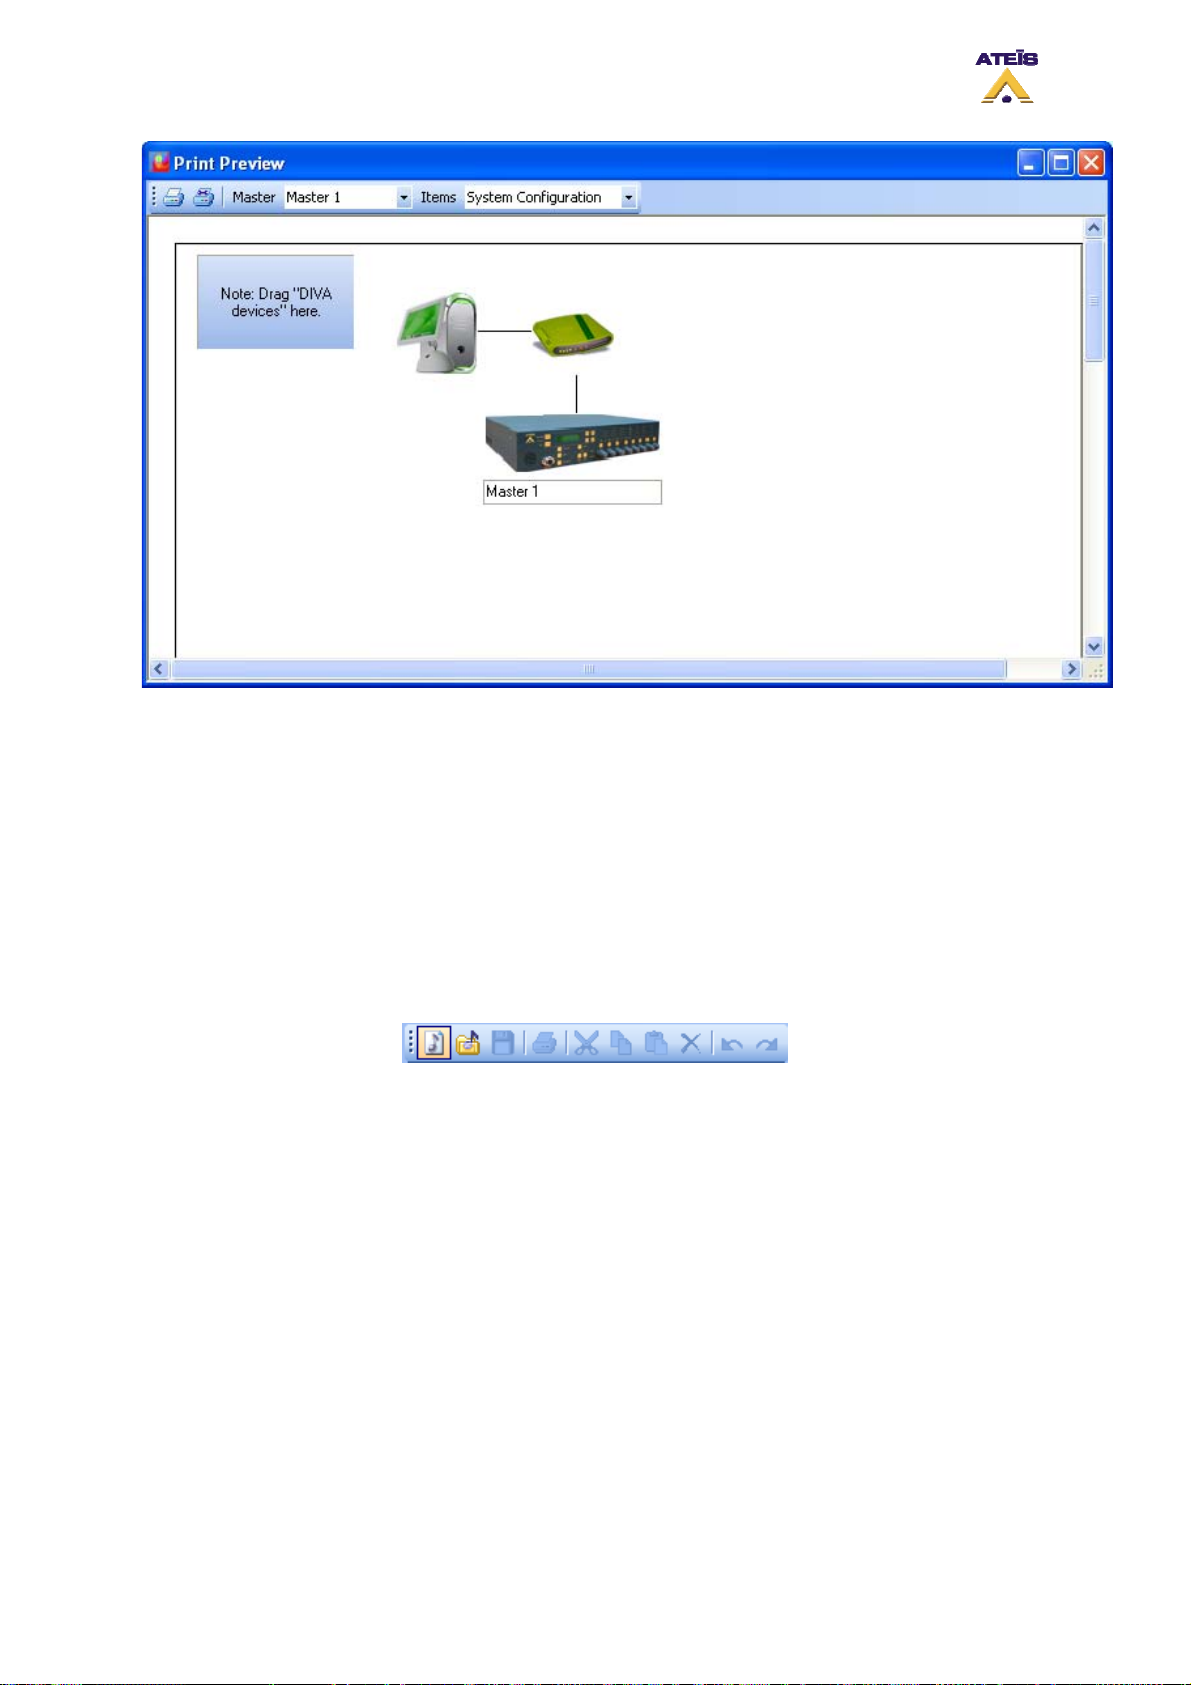
The print toolbar include:
• Print Button: in order to send the print request
• Print Setting Button: in order to set your printer parameters
• Master Drop-Down Menu: here you can change the DIVA master unit
• Items Drop-Down Menu: Here you can select which window have to be print, choose between
'System configuration', 'Master Configuration' and 'DSP Configuration'
8.3 Start a New Project
In order to start a new project, go to the menu: File -> New, or click on the 'New' shortcut on the edit
toolbar (see below) or even type ctrl+n.
After launching a new project, the DIVA software start a new system window looking like the one on
the picture below.
Ateïs International
Ch. du Dévent, 1024 Ecublens, Switzerland.
Phone : +41 21 881 25 10
44
Page 45
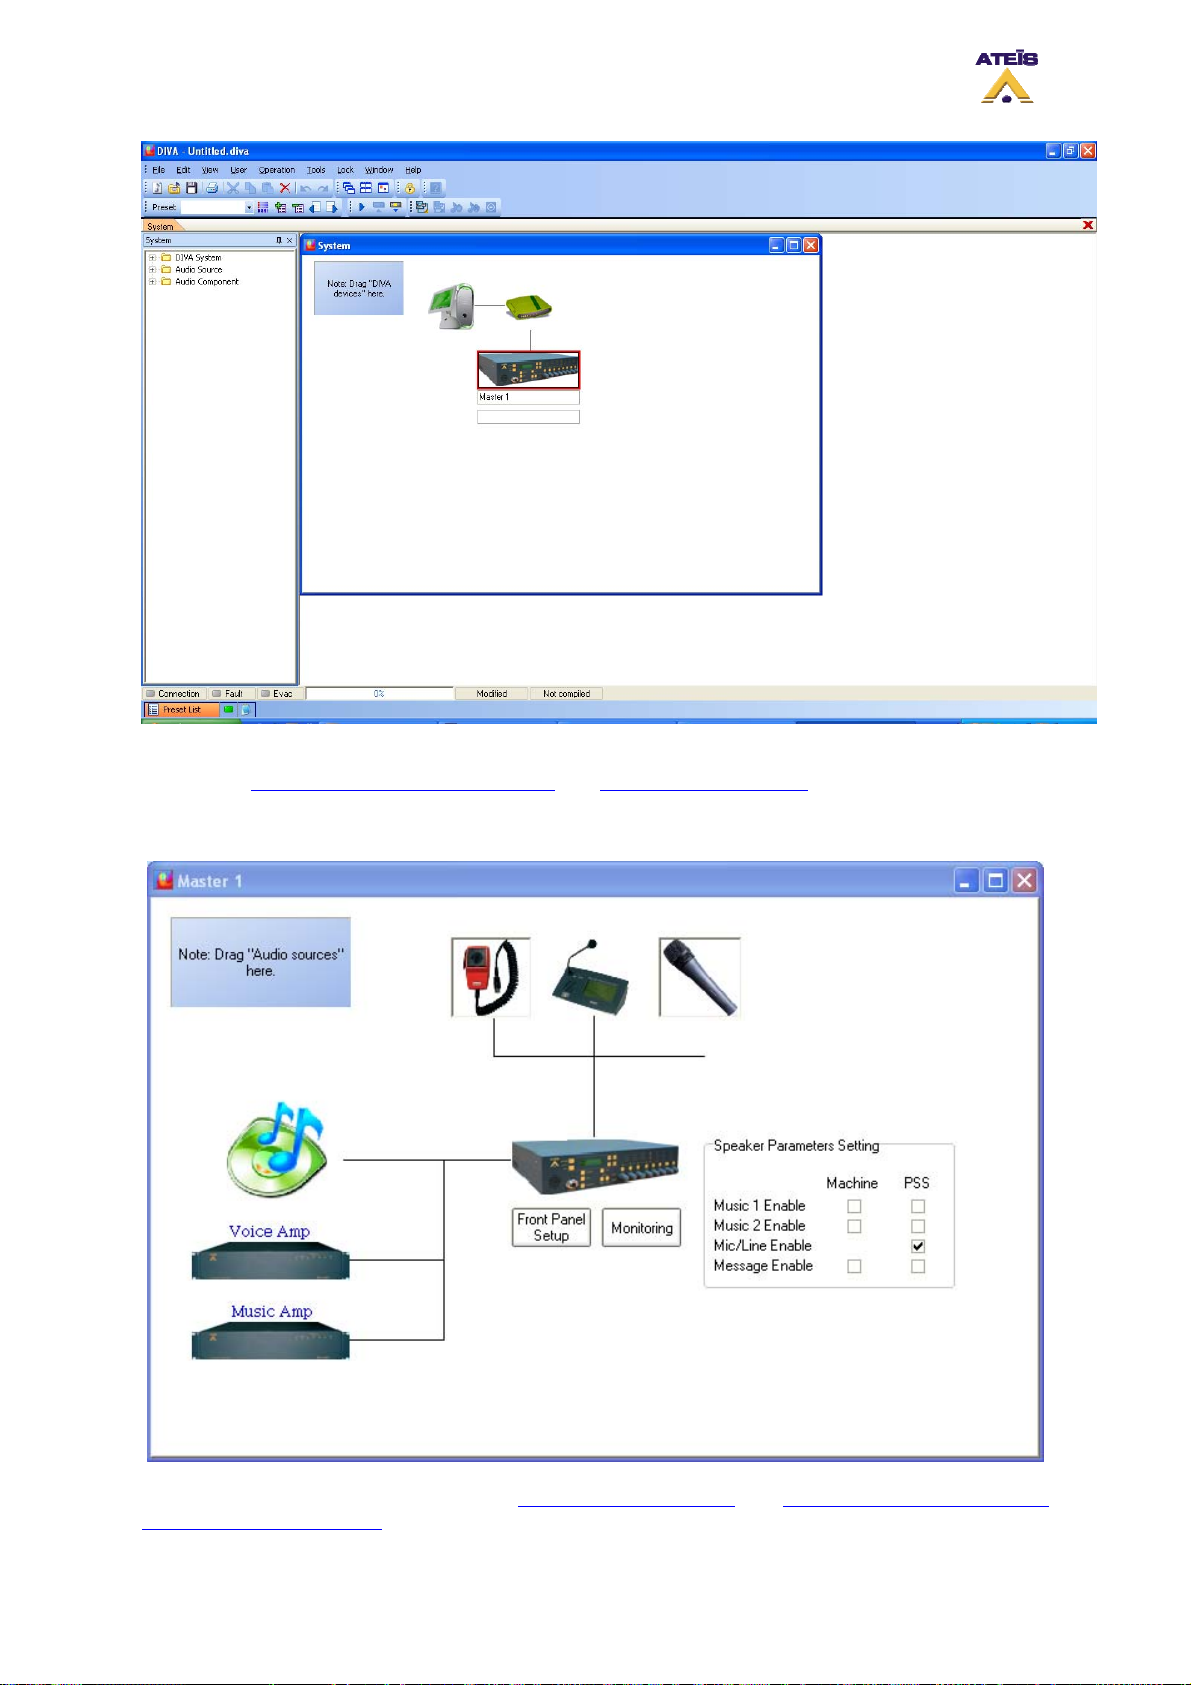
Once the new project is started, you will need to set up the network otpion as well as the correct IP
adress, see How To Configure Network Option
By double-clicking the DIVA icon, you will enter the master window page, see below.
and How To Set IP Address.
In the Master window you will be able to add design components
speakers of DIVA and PSS.
Ateïs International
Ch. du Dévent, 1024 Ecublens, Switzerland.
Phone : +41 21 881 25 10
and set settings for the integrated
45
Page 46
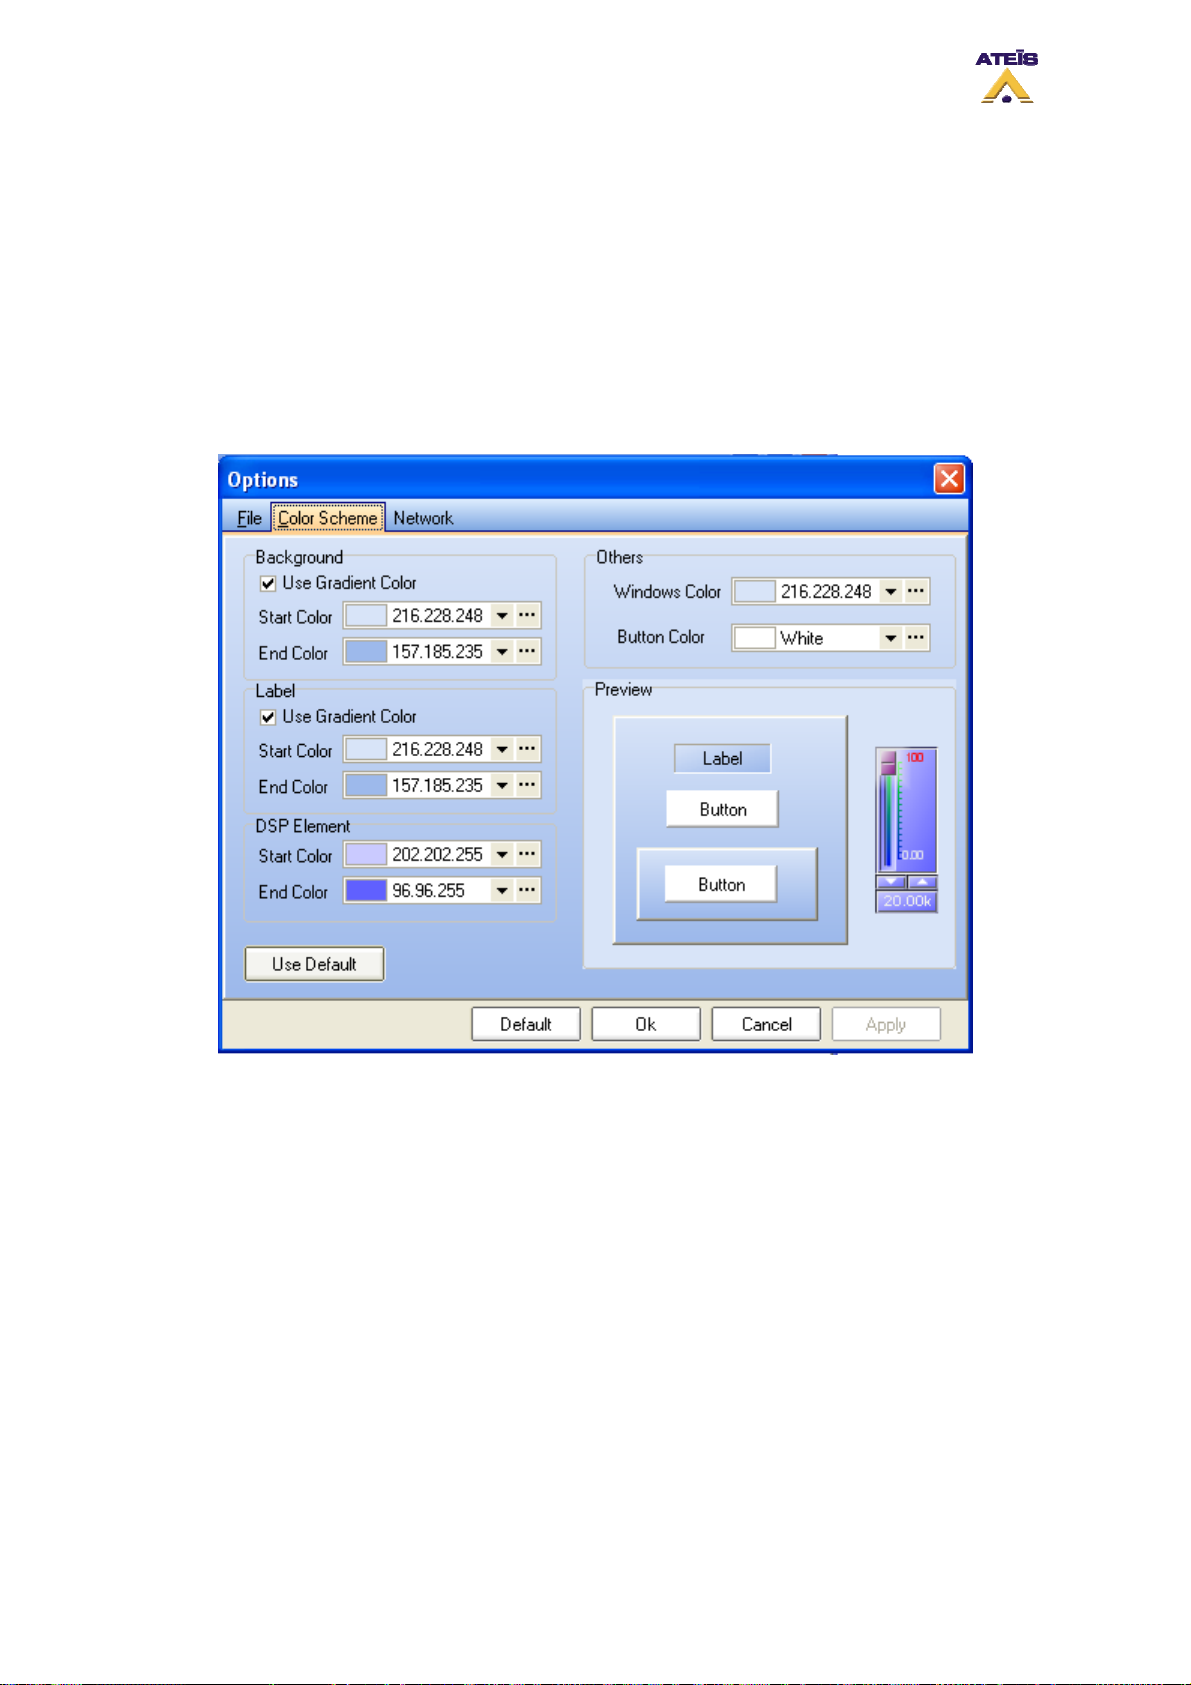
8.4 Change Color Scheme
In the Color Scheme Options page, you will be able to personalize the colour scheme of DIVA
software. You can change colour for:
• Background
• Label
• DSP element
• Other (Windows and Buttons)
By using the "Use Default" button, you can retrieve default color scheme.
8.5 Configure Network Options
In order to be able to communicate with DIVA master units, you have to set your network parameters.
In the Network options page, you can specify your network card, the UDP port value as well as the
RS232 port number.
Ateïs International
Ch. du Dévent, 1024 Ecublens, Switzerland.
Phone : +41 21 881 25 10
46
Page 47
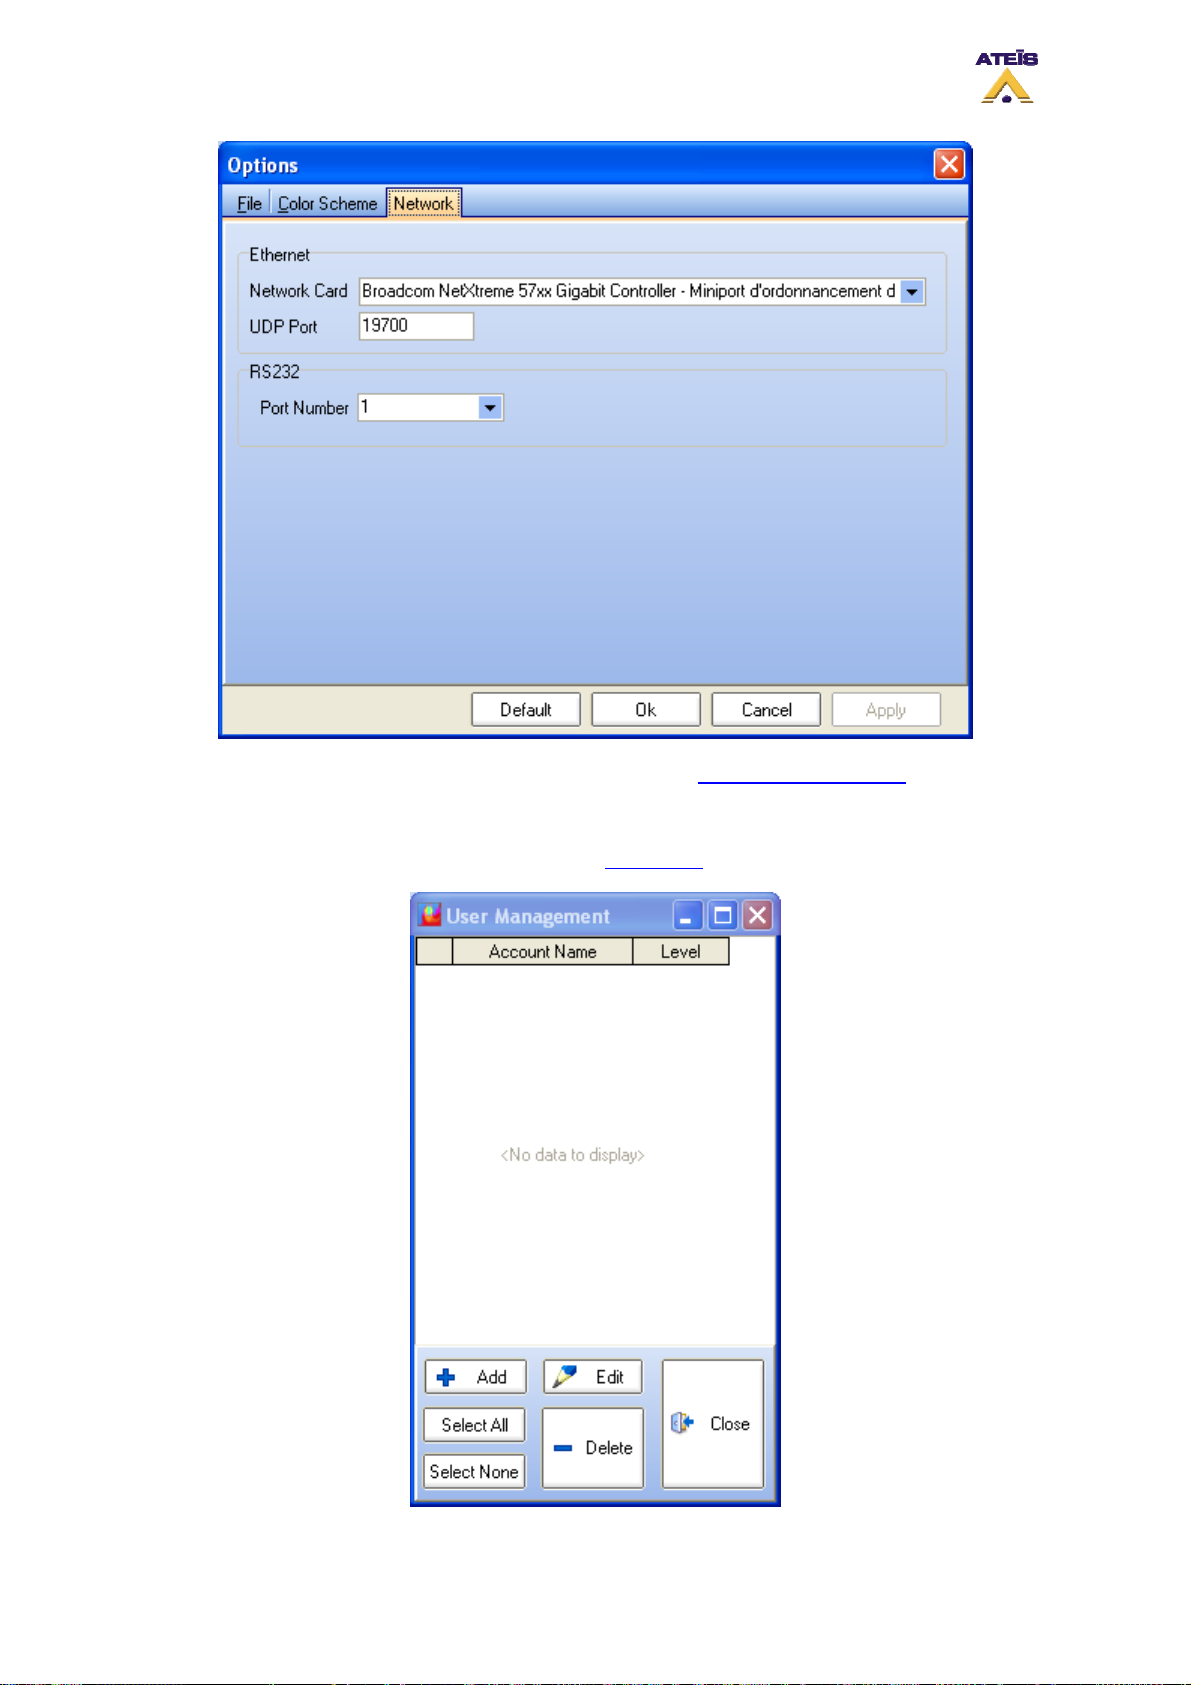
After all the network options have been set, please refer to the How To Set IP Address
8.6 Use the User Management
To access the user management window, go on the menu User -> User Management.
paragraph.
Ateïs International
Ch. du Dévent, 1024 Ecublens, Switzerland.
Phone : +41 21 881 25 10
47
Page 48
The picture above shows the main page of the user manager. In this page you will be able to add new
user account, delete account and modify account settings. The list below explains how the button
works:
• Add: allows to add new user account
• Edit: allows to edit existing account parameters
• Select All: can instantaneously select all the existing account
• Select none: instantaneously unselect the previously selected account
• Delete: allows to delete accounts
• Close: closes the User Management window
8.6.1 Add User Account
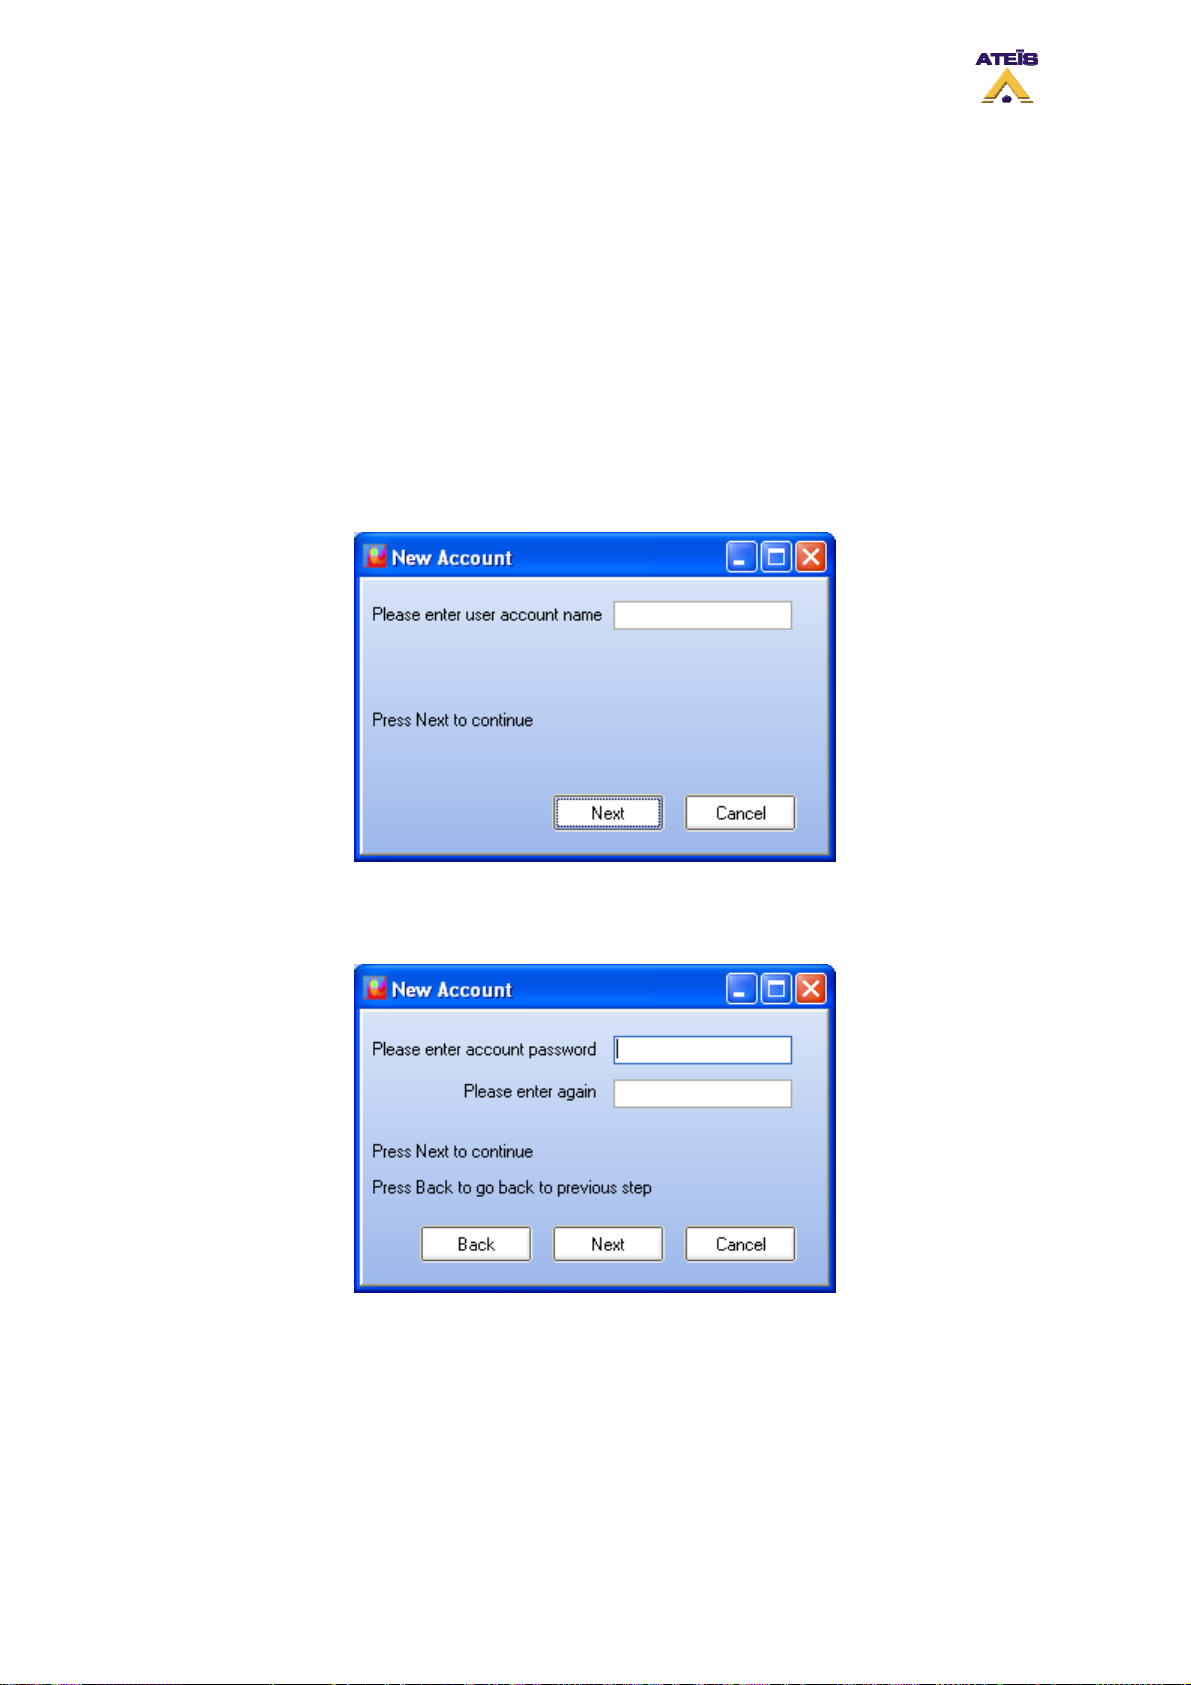
To add a new user account, simply click on the add button. A New Account pop-up window like the
one below will appear.
• Enter the user name for the new account
• Click next
• Enter a password for the account created
• Confirm password
• Click Next to continue the process of creating an account
• Click Back to go back to the previous step
Ateïs International
Ch. du Dévent, 1024 Ecublens, Switzerland.
Phone : +41 21 881 25 10
48
Page 49
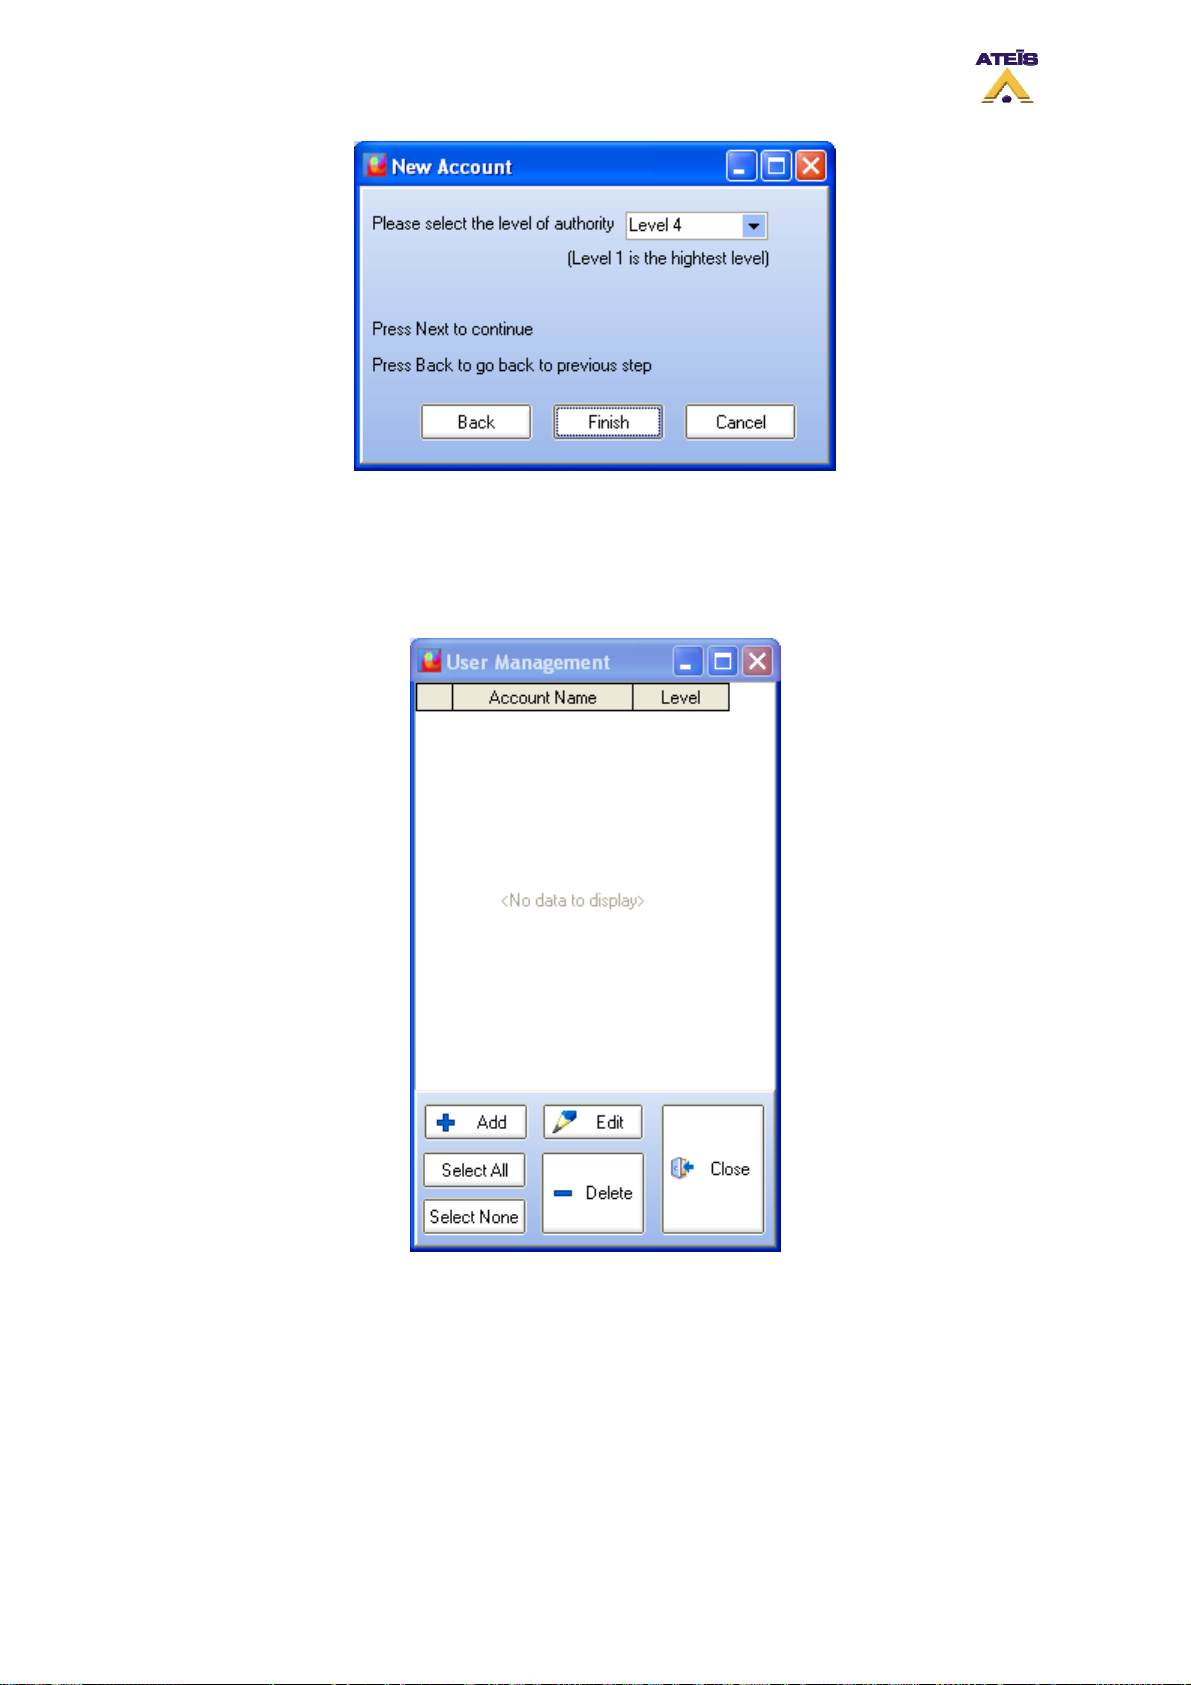
• Select an Level for this user account, explanation on user level can be found here.
• Click Finish to finish the process
• Click Back to go back to the previous step
8.6.2 Delete User Account
• Select an account in the list of the User Management
• Click on delete
• it will prompt you "Delete User account?", click OK to delete or Cancel if stop the delete process
8.6.3 Explanation on User Level
In order to comply to the European standard EN 54-16, the user level have been set as described:
• Level 1 is the lowest level.
Ateïs International
Ch. du Dévent, 1024 Ecublens, Switzerland.
Phone : +41 21 881 25 10
49
Page 50

Level 1 has the right to use real-time software control (music level, filters and PEQ), real-time
front panel control (music level, speaker level) and indicators.
Level 1 is always accessible without password.
Can do reverse procedure and connect from software.
• Level 2 is defined to be for person having a specific responsibility for safety.
Level 2 has all right, except:
o Storing config + messages
o Change Ethernet settings as well as MAC address
o Update firmware
To enter level 2, a password is needed.
• Level 3 is for specific maintenance operator and trained persons. Level 3 has all the right of level
2.
o Store a new configuration file
o Manage messages
o Maintenance operation
To enter level 3, a password is needed.
• Level 4 is for authorized by the manufacturer to either repair the unit and/or alter its firmware.
Level 4 has all the level 3 rights.
o Update firmware
o Repair
To enter level 4, a password is needed.
8.7 Enter Password
For process like storing and updating, you will need a username and a password, see How To Use
User Management.
There are two different way of connecting to your account, from front panel or from software.
• From front panel:
When trying to attempt protected operations, you will have to enter you user name and your
password.
Use the arrow keys to select the right letter or number
click OK
enter the next letter or number repeating the same procedure
Once you have enter the right user name, press once the down arrow key to find
"APL". Press OK, this will validate you entry
DIVA will ask to enter your password, repeat the same procedure to enter
password
• From software:
You will be automatically login after first store, update, network options change, ethernet
settings change. Effectively, DIVA software will ask you to enter a valid user name and password and
will remember your username and password until you exit or logout of the current configuration file.
Ateïs International
Ch. du Dévent, 1024 Ecublens, Switzerland.
Phone : +41 21 881 25 10
50
Page 51
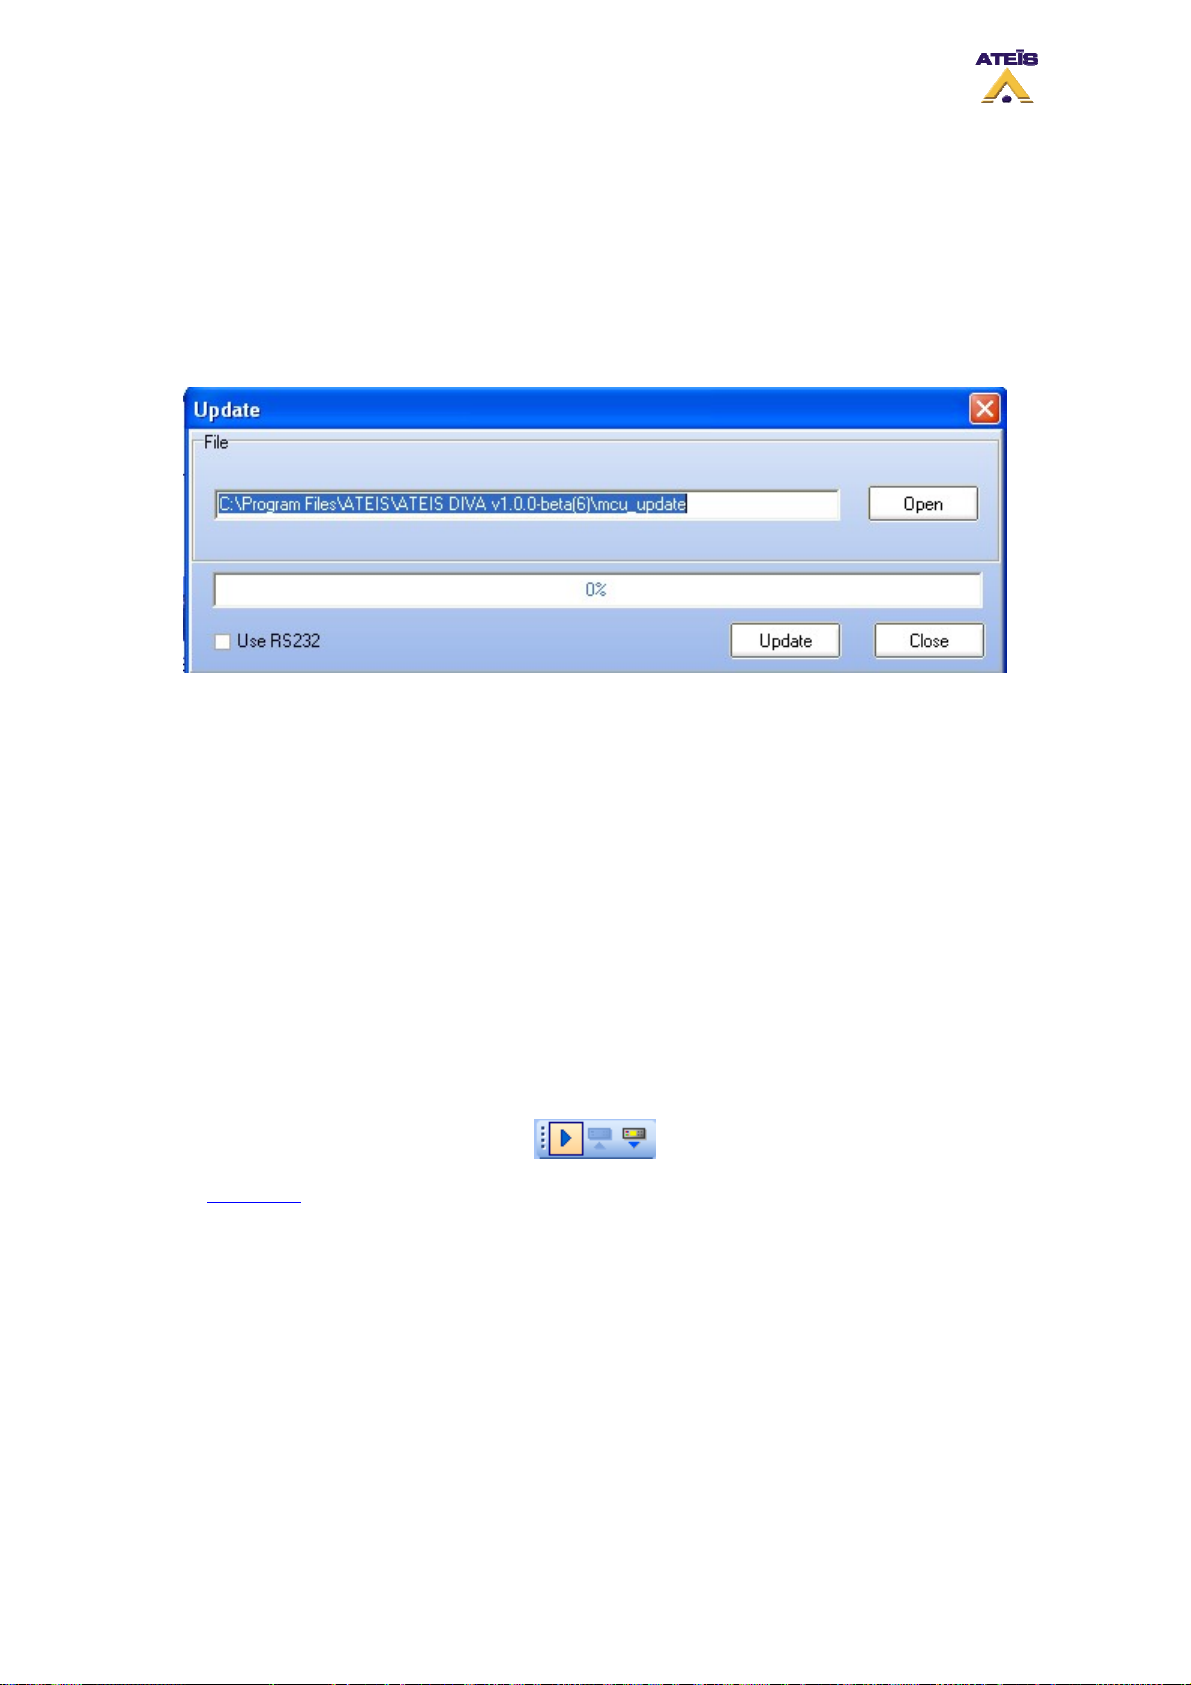
To log out, go to the menu User -> Logout.
8.8 Update Diva
The update command allow user to upgrade the DIVA internal software to the version delivered by the
Windows based software. This is one of the first things to do when starting a new project or using a
DIVA unit for the first time. This could really save time and avoid communication and store problem.
To activate this command, go the menu: Tools -> Update. The Update window look like the one below:
• Open: Here you can specify the path of the mcu update file. By default, the path specified
correspond to the software release version.
• Update: will start the update process
• Close: closes the window
A timeline display shows the update process progression.
Once clicked on update, DIVA will prompt you to enter a valid user name and password. This will
happen the first time you want to update if you are not already log in.
8.9 Compile
Compiling your current project will inform you in case of configuration errors or warnings. In order to
be able to store a configuration into DIVA, you will have to compile your project first.
To compile go in the menu: Operations -> Compile or Click on the Compile icon in the compile toolbar
(view picture below) or even type F9.
On the Status Bar
, you can permanently see the compile status of your project:
• Compiled: means the current state of your project have been checked
• Not Compiled: means that your current project has not been checked
8.10 Store
The store command, menu Operations -> Store or the Store shortcut or even F8, open the store
window, see below.
Ateïs International
Ch. du Dévent, 1024 Ecublens, Switzerland.
Phone : +41 21 881 25 10
51
Page 52
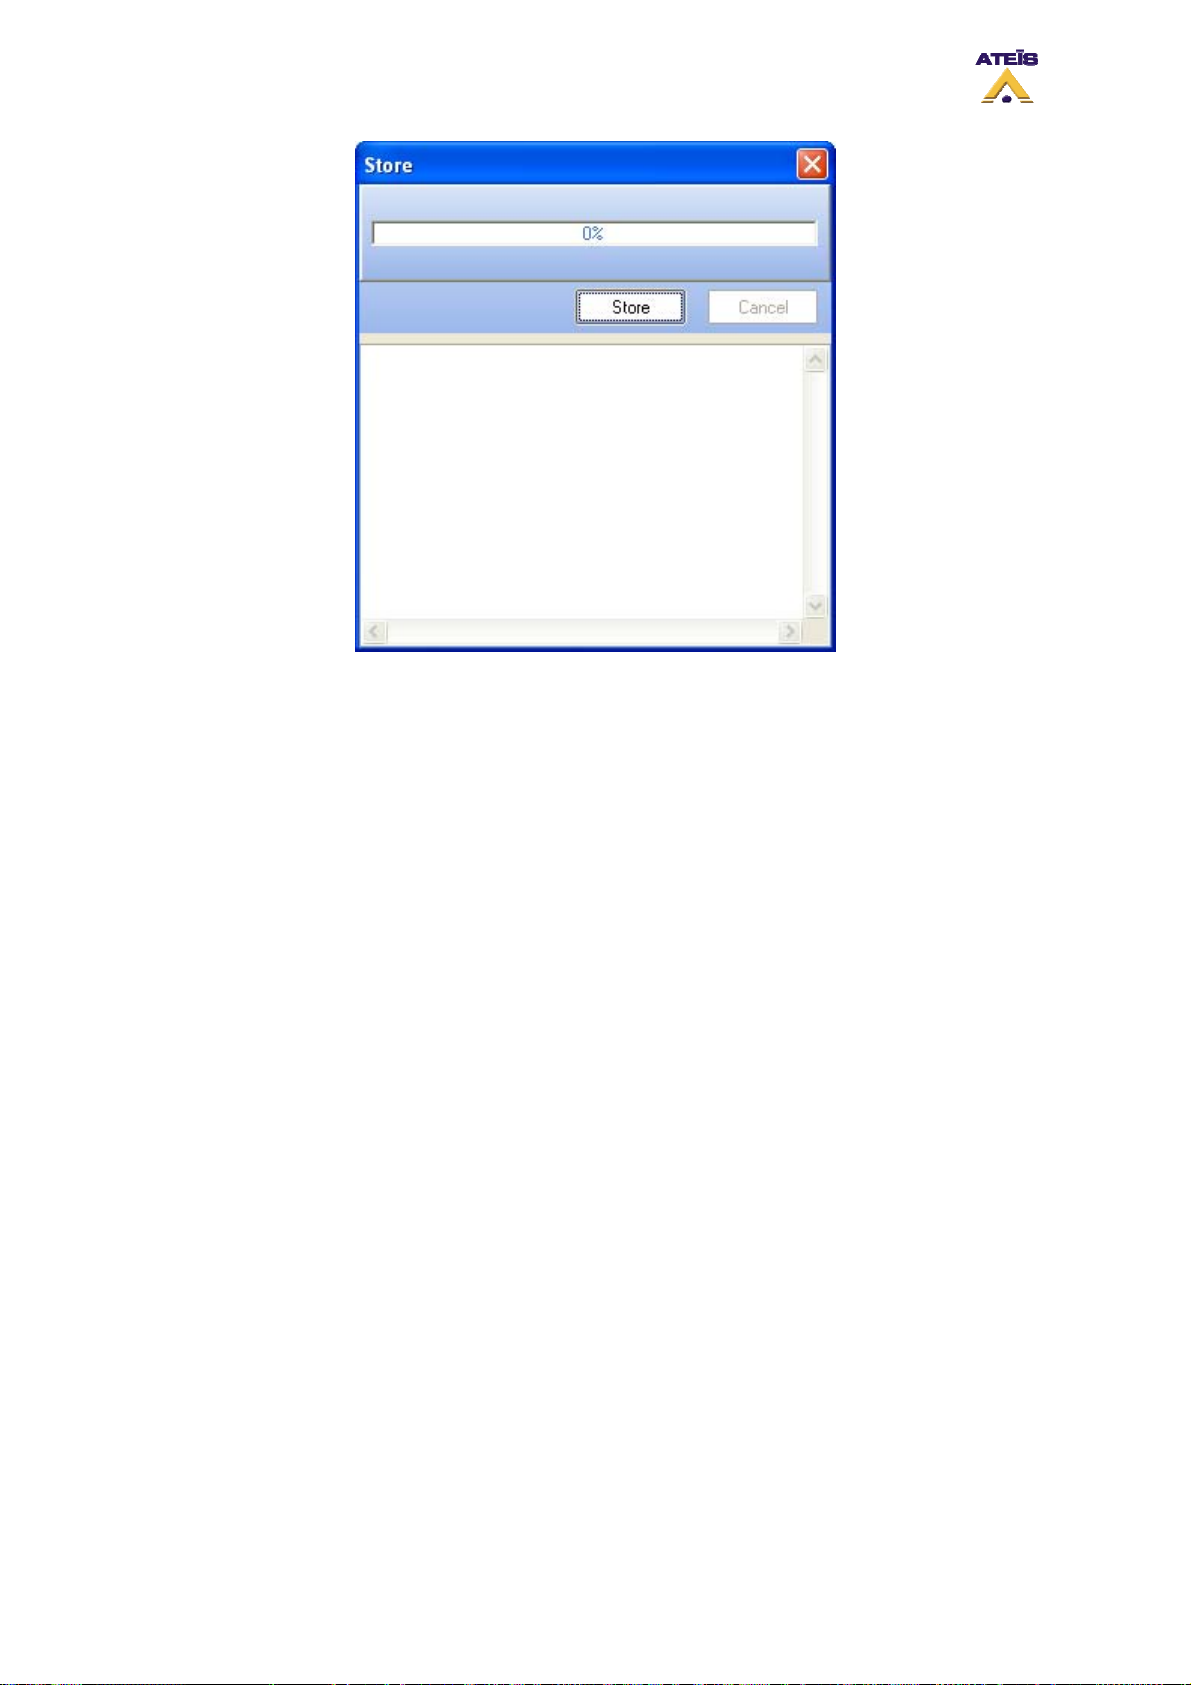
To start storing, click on the "Store" button.
A timeline display the status of the process. The different state of the store process are written in the
Store Status Area.
If not already log in, DIVA software will ask you to enter a valid user name and password.
Once the store process is finished, you will be prompt to:
• Connect to DIVA? choose Yes or No
• Enable Audio on DIVA? choose Yes or No
8.11 Reverse
The reverse command allow to download from DIVA to the software the current configuration stored
into DIVA.
• To start the reverse process, go to the menu Operations -> Reverse or use the Reverse Shortcut
on the compile toolbar
• Click Reverse, you can follow the advancement of the process on the timeline display
The reverse window will be open, see below.
Ateïs International
Ch. du Dévent, 1024 Ecublens, Switzerland.
Phone : +41 21 881 25 10
52
Page 53
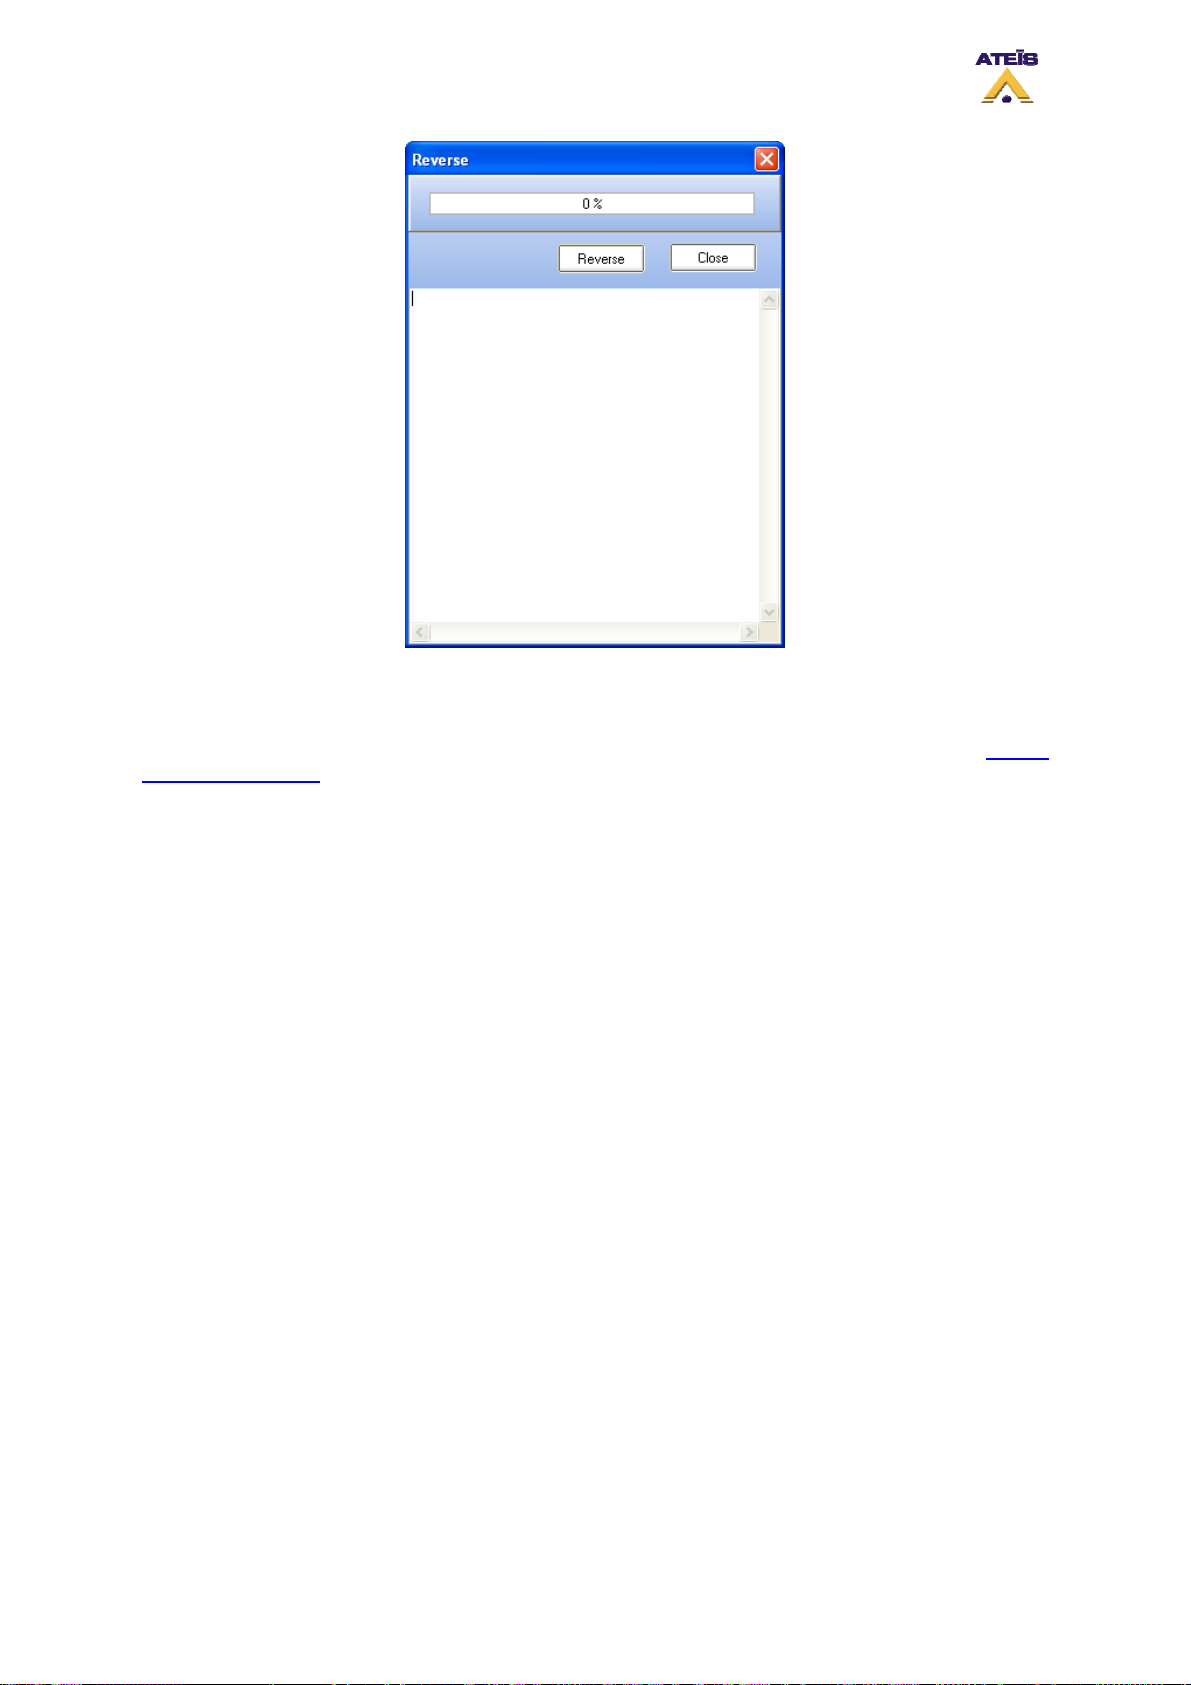
8.12 Add design Component
After starting a new project, the "System" window is opened. On the left, you will find the Design
Component Section. The DIVA software have been made to simply add/remove component. All the
component are 'drag & drop' items. Each component can only be dropped in its own place.
Ateïs International
Ch. du Dévent, 1024 Ecublens, Switzerland.
Phone : +41 21 881 25 10
53
Page 54
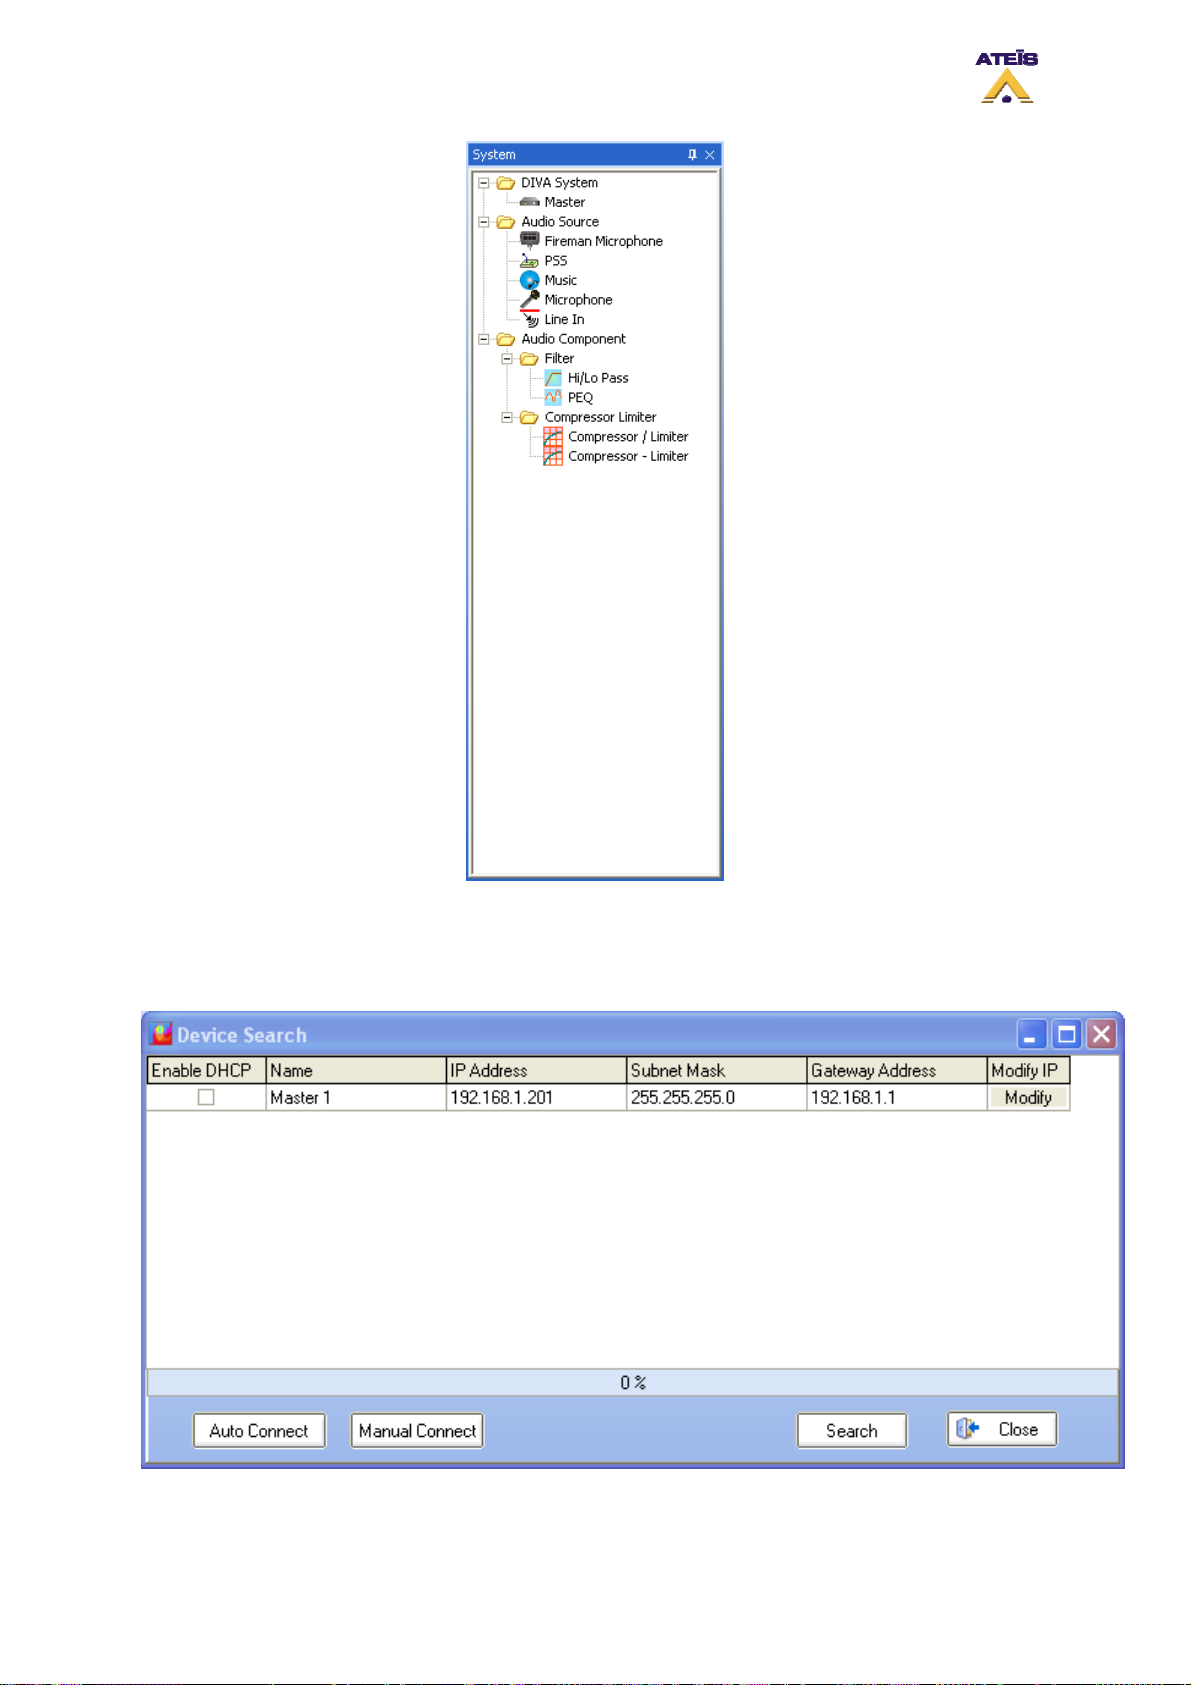
8.13 Search Device
To perform a device search, go to the menu Tools -> Device Search. The Device search window will
open, see below.
Ateïs International
Ch. du Dévent, 1024 Ecublens, Switzerland.
Phone : +41 21 881 25 10
54
Page 55
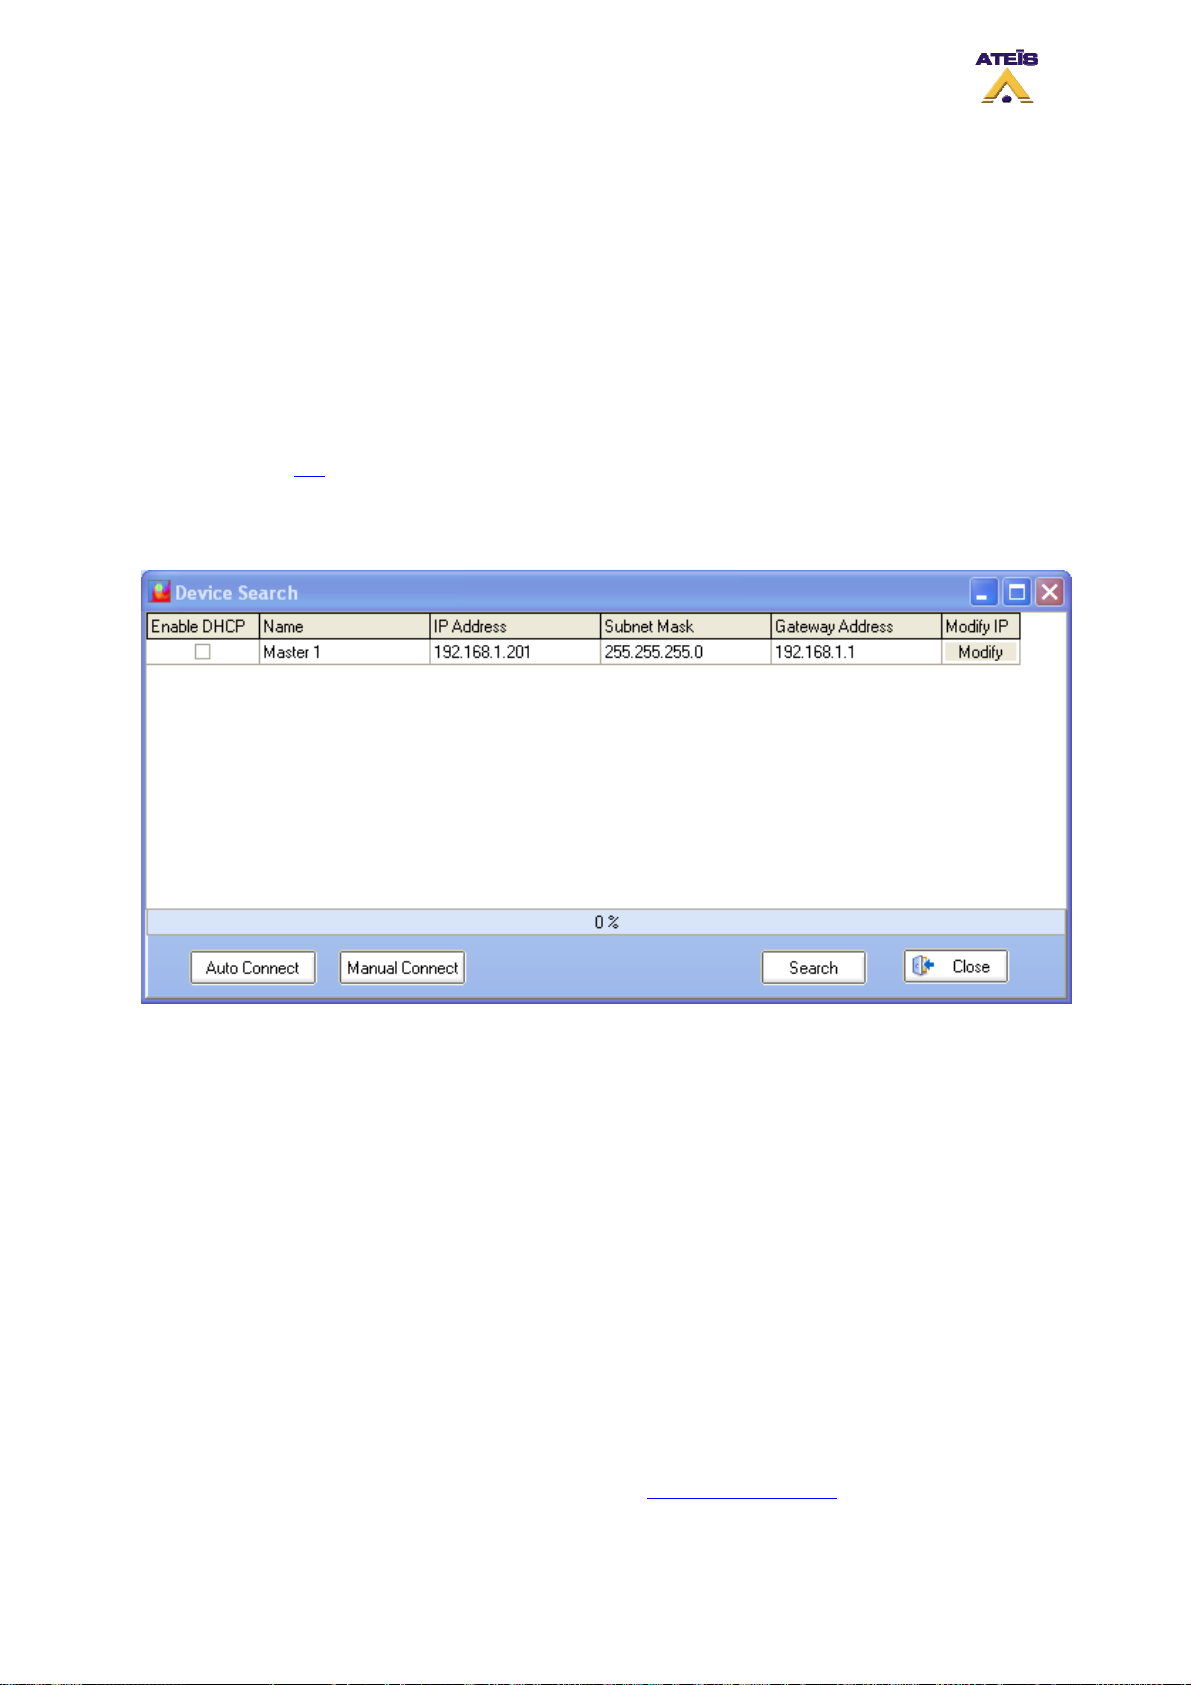
Buttons explanation:
• Search: starts the search process. A progression bar indicates when the search is finished
• Auto Connect: allows to connect to a master DIVA that have been found. Select a master in the
list by just clicking on the corresponding line. Note: attention do not select Enable DHCP when
clicking on the line, it could cause connection problem.
• Manual Connect: allows to quickly connect to a known master DIVA IP without doing the search
process
• Close: closes the Device Search window
8.14 Set IP Address
From the front panel of DIVA, you can change the address from the LCD menu display. In order to do
this, please read this
IP, submask and gateway address can also been changed from the software by going in the device
search menu: Tools -> Device Search.
.
Once a DIVA unit has been found, click in the IP Address, Subnet Mask or Gateway Address field to
be able to change the current value. To save the new settings, click on Modify.
Note: you have to keep in mind that setting TCP/IP parameters not related to the one set for your
network card, could lead to communication problems.
8.15 Perform a DIVA Master Network
As briefly explained before, you can put several DIVA master on a same network. The DIVA master
network is based on Ethernet protocol. Keep in mind that DIVA slave unit are not on Ethernet network.
In order to complete a DIVA network you will need the following devices:
• Ethernet Switch/Hub
• Multiple DIVA8M units
• A computer
Before connecting those devices on the network, you need to check the IP address of each DIVA
master units and set each DIVA IP address corresponding to your project's network. By default, a new
DIVA8M unit has the following IP: 192.168.100.100. See How to Set IP Adress
Ateïs International
Ch. du Dévent, 1024 Ecublens, Switzerland.
Phone : +41 21 881 25 10
.
55
Page 56
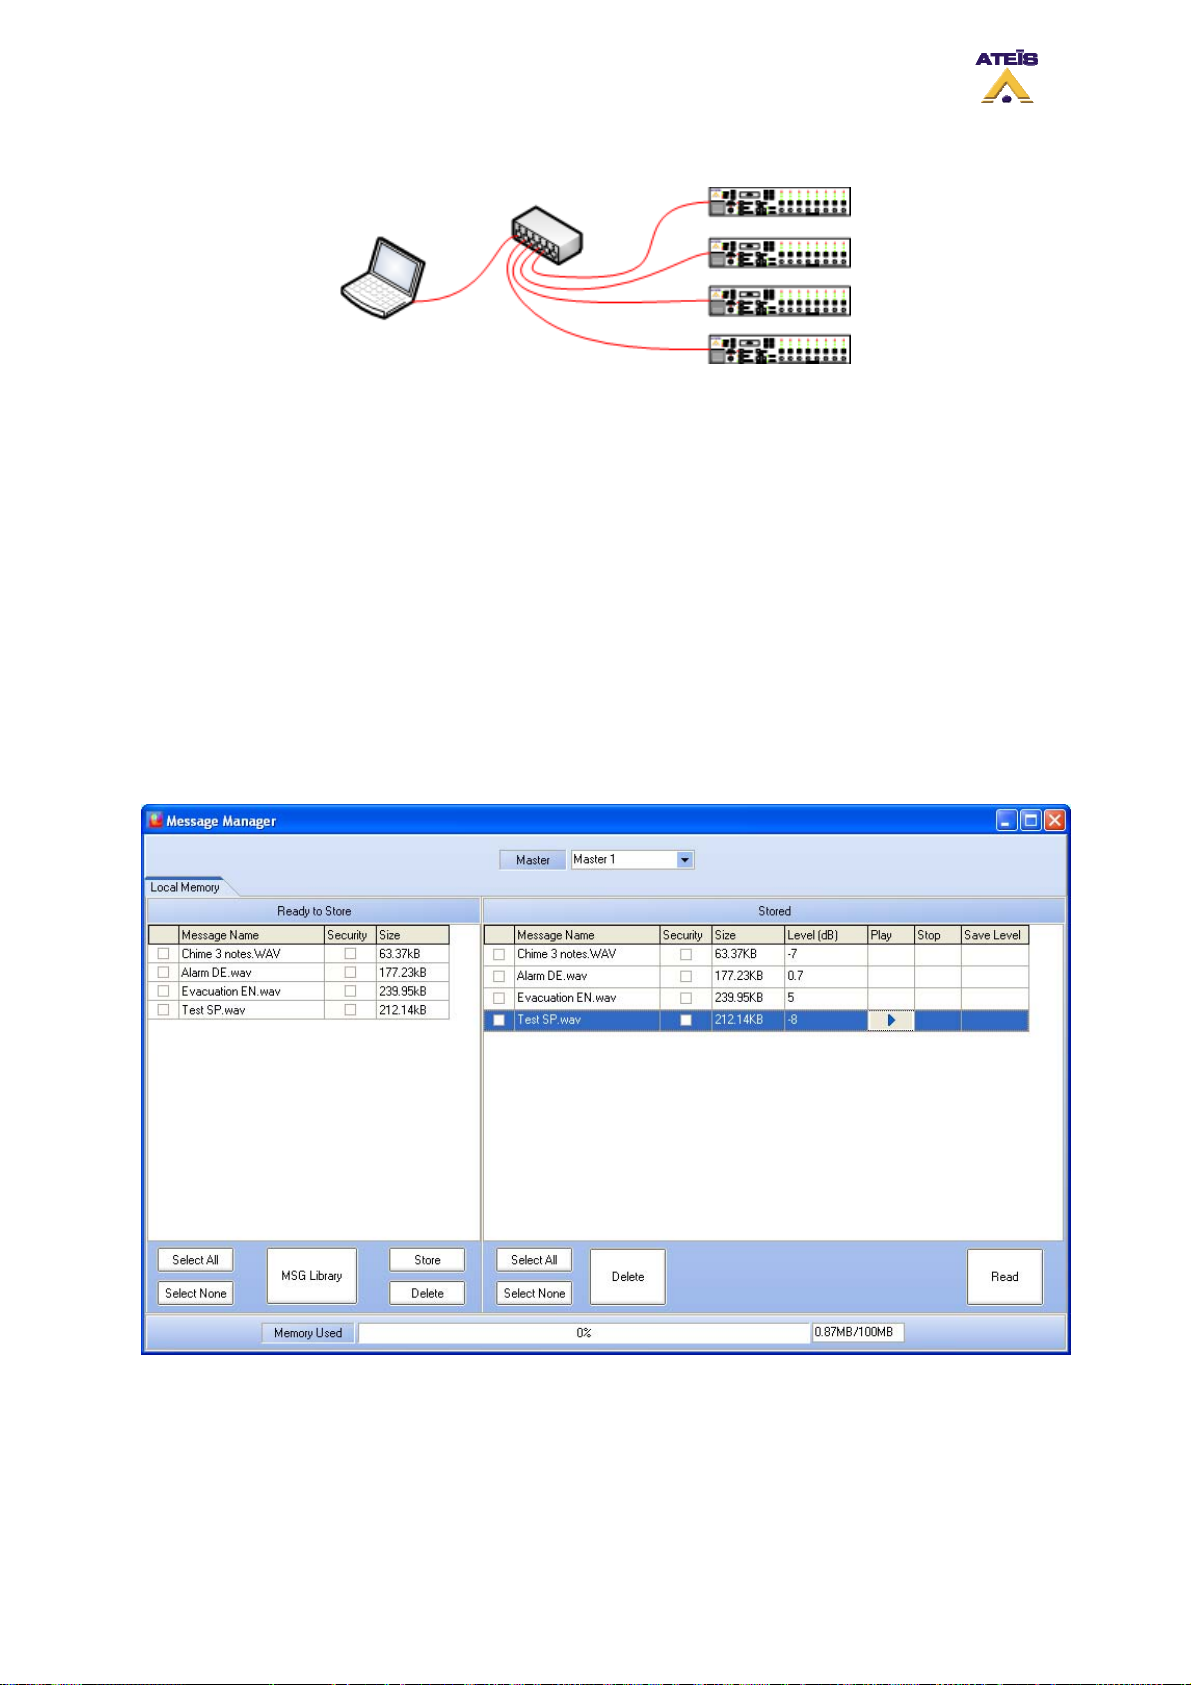
Link the DIVA master units and the computer to the Ethernet switch, see diagram below.
After the devices have been connected and in order to know if your network is well configured, go to
the "Device Search" window: Tools -> Device Search and start a search.
If some DIVA master aren't visible, please check wiring and/or IP address settings. Also check your
computer network card parameter and be sure they are set in accordance to the DIVA network
builded.
NOTE: DIVA master won't be able to communicate with each other through the network. This
network only intend to offer quick configuration solution over IP.
8.16 Add Messages into DIVA
In order to store messages into DIVA memory, you have to use the message manager window.
• Go under menu: View -> Message. The message window will pop up, see below
• In the upper part of the Message window, you can select the DIVA master unit you want to work
on for messages
The message window is divided in two section, one for the message taken from the message library
(left one) and one for the messages stored in DIVA (right one). Here is a list of buttons and their
corresponding function.
• Select All: allows to instantaneously select all the messages from the list
• Select None: instantaneously deselect all the selected message
Ateïs International
Ch. du Dévent, 1024 Ecublens, Switzerland.
Phone : +41 21 881 25 10
56
Page 57
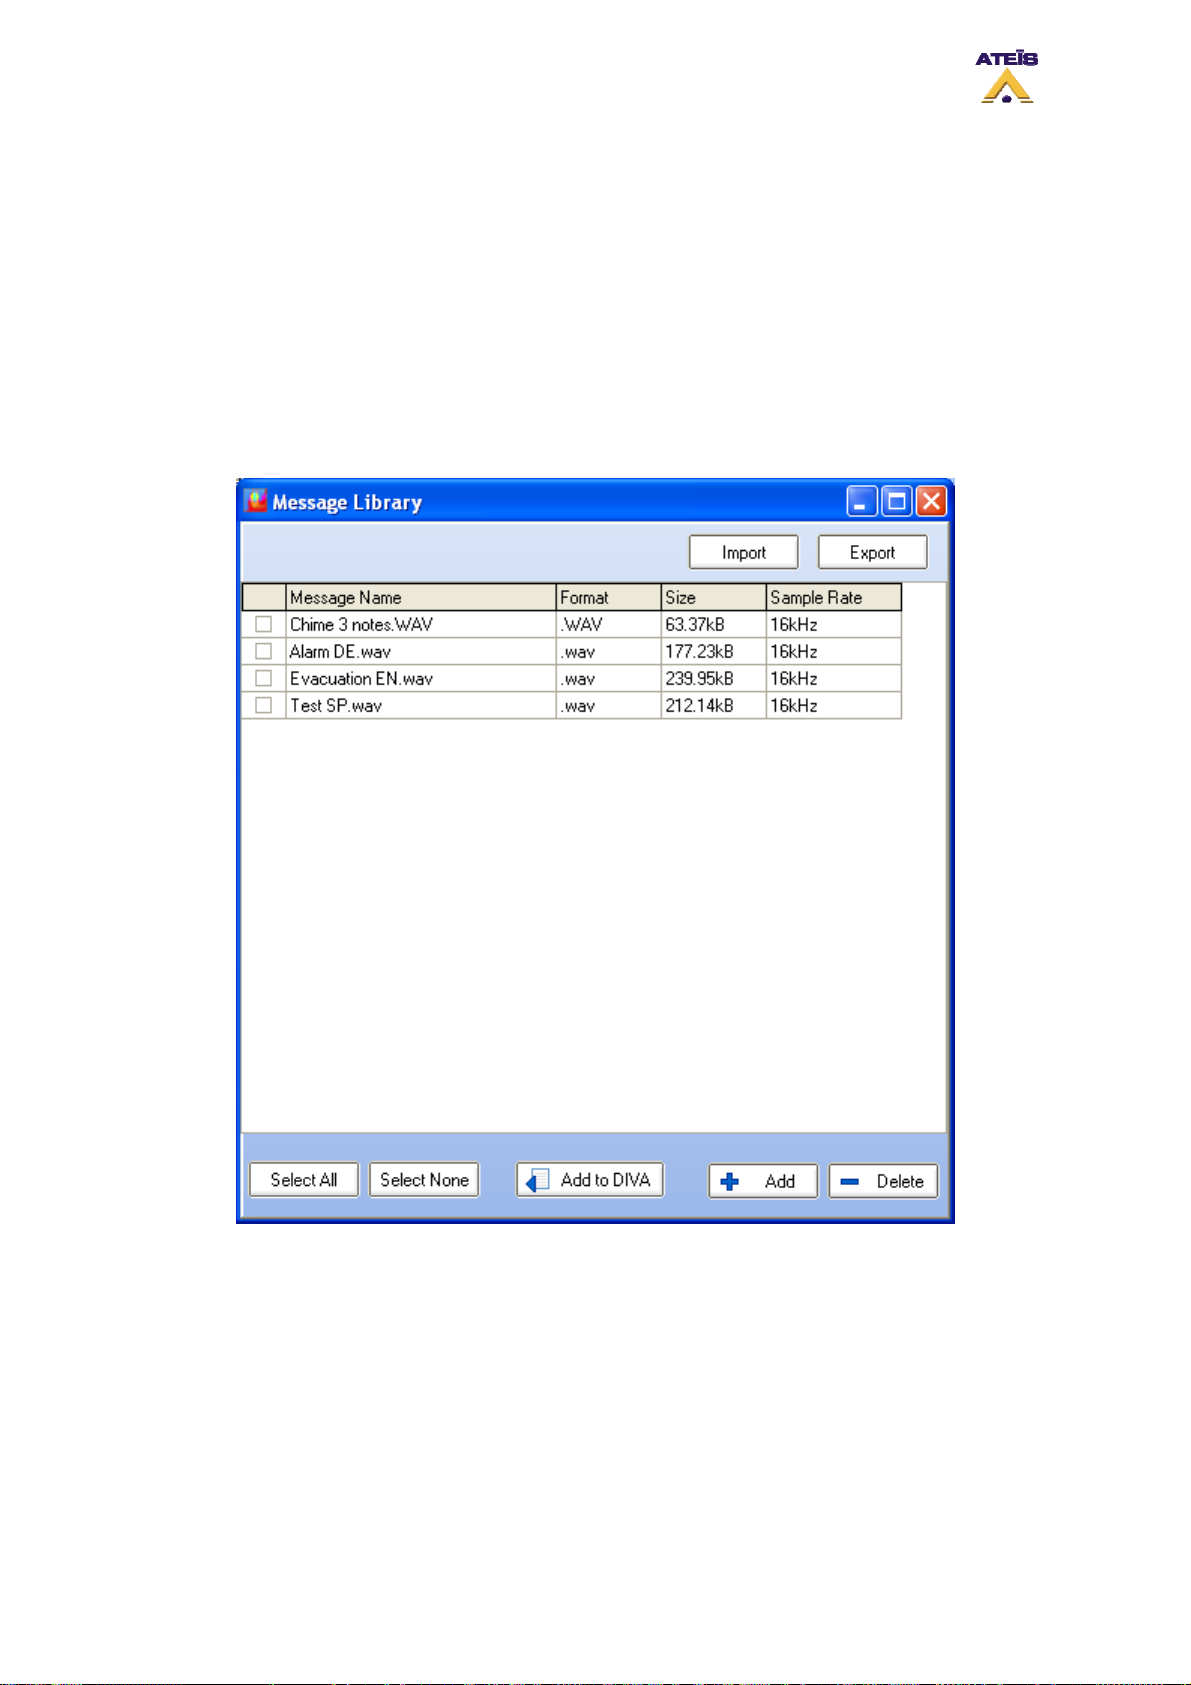
• MSG Manager: will open the message manager
• Store: Stores permanently the selected messages into DIVA's memory
• Delete: deletes selected messages from the store list
_____________________
• Read: reads messages stored into DIVA unit
• Delete: deletes messages from DIVA memory
• Select All: allows to instantaneously select all the messages from the list
• Select None: instantaneously deselect all the selected message
To add messages to DIVA, you need to access the message manager Library by clicking on "MSG
Manager". The message manager window will prompt, see below.
Select the message by ticking the square at their left and by clicking the "Add to Diva" button.
In the message library window, you can add and delete messages. Clicking the Add button will open a
new window, see below. In this window you can select any wave file to be a message. Note: Only 16
kHz 16 Bits format will be stored. DIVA can handle up to 45 minutes of messages at this format.
Ateïs International
Ch. du Dévent, 1024 Ecublens, Switzerland.
Phone : +41 21 881 25 10
57
Page 58
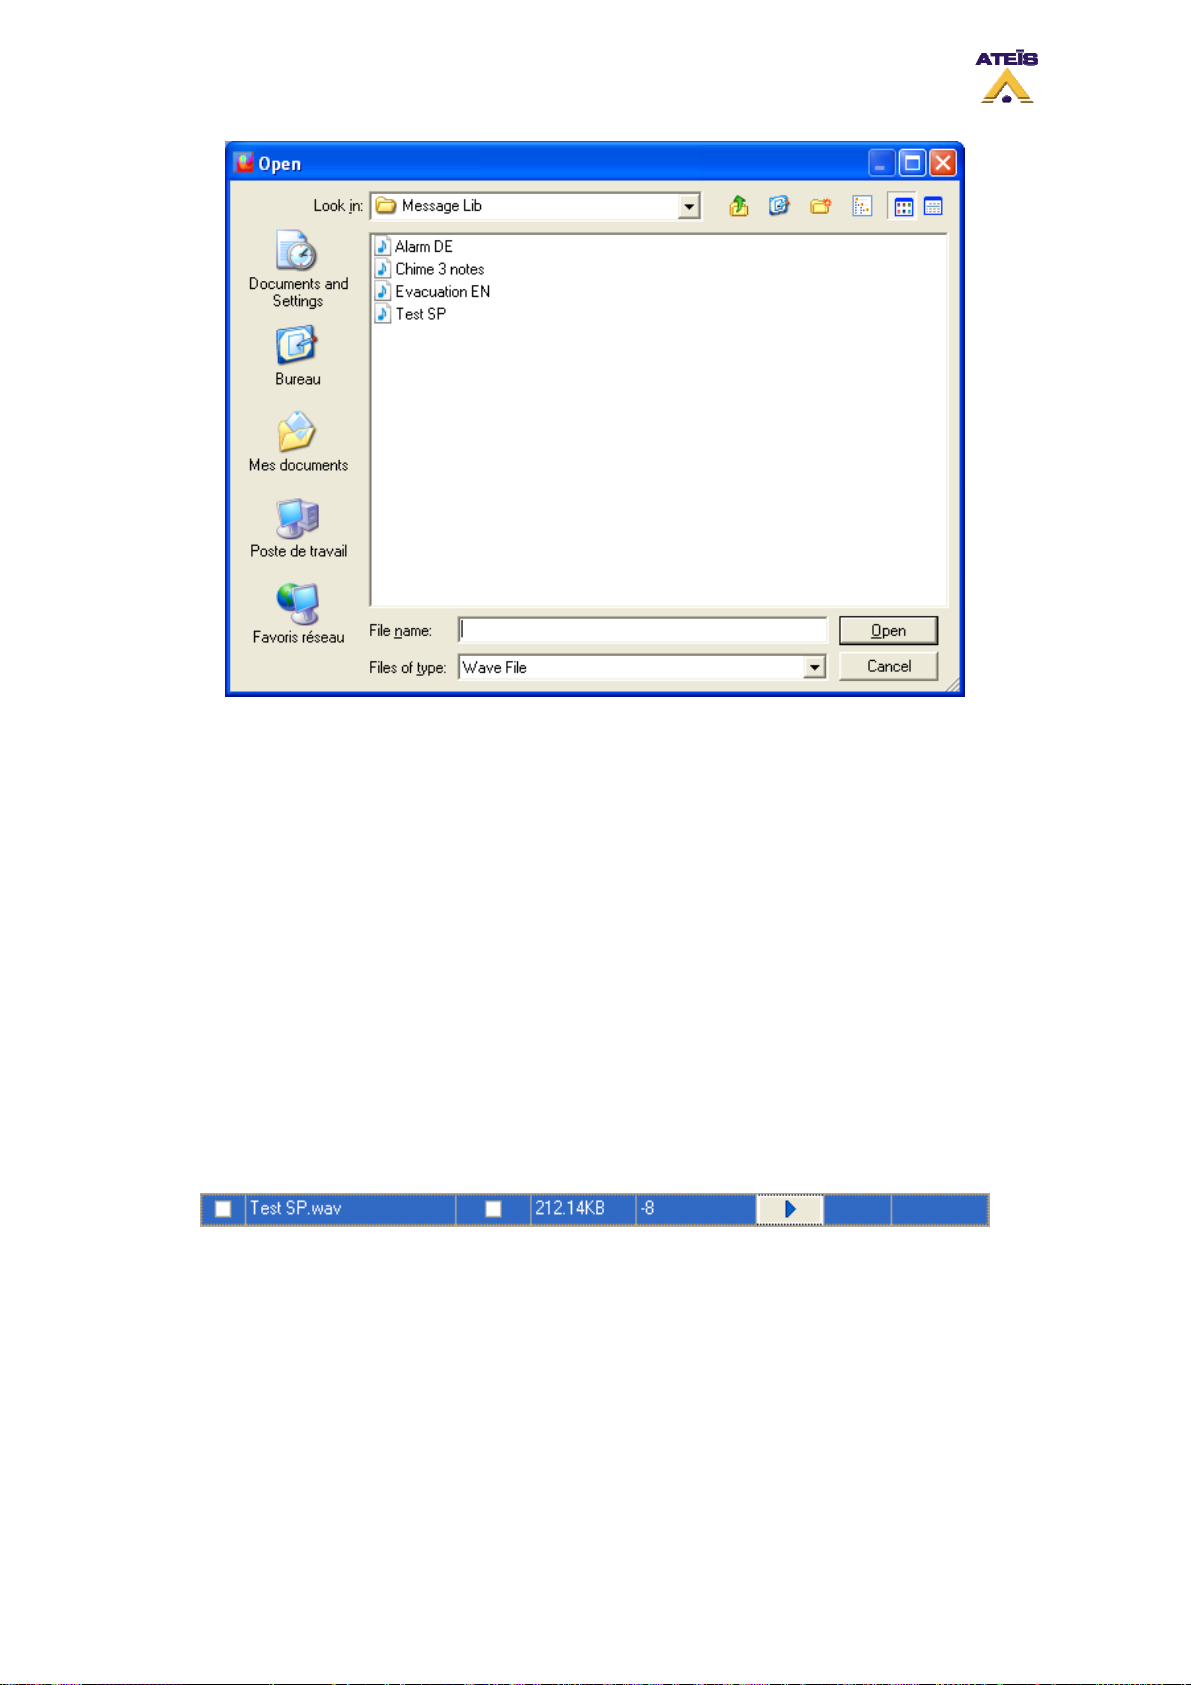
By using the Import/Export buttons on the Message Library page, you are able to import and export
complete message library.
After adding messages from the library to the message manager, the procedure to store them into
DIVA is as follow:
• tick the messages you want to store and specify wheather they are security messages or not
• Click Store to start the store process
Once messages are stored into DIVA, you can adjust independantly their level. Follow the next few
steps:
• Click on the level field
• With arrow keys adjust the level
• Clicking the Play button will start playing the message at the current level (see below)
• Clicking the Stop button will stop playing the message
• Clicking the Save Level button will save the current message level
8.17 To Set Speaker Parameters Settings
The speaker parameters setting allow to route to the PSS internal speaker and to the DIVA internal
speaker music sources, mic/line and messages. In order to route those different devices, go on the
Master window and tick the corresponding sources to be route to the DIVA and/or the PSS.
Ateïs International
Ch. du Dévent, 1024 Ecublens, Switzerland.
Phone : +41 21 881 25 10
58
Page 59
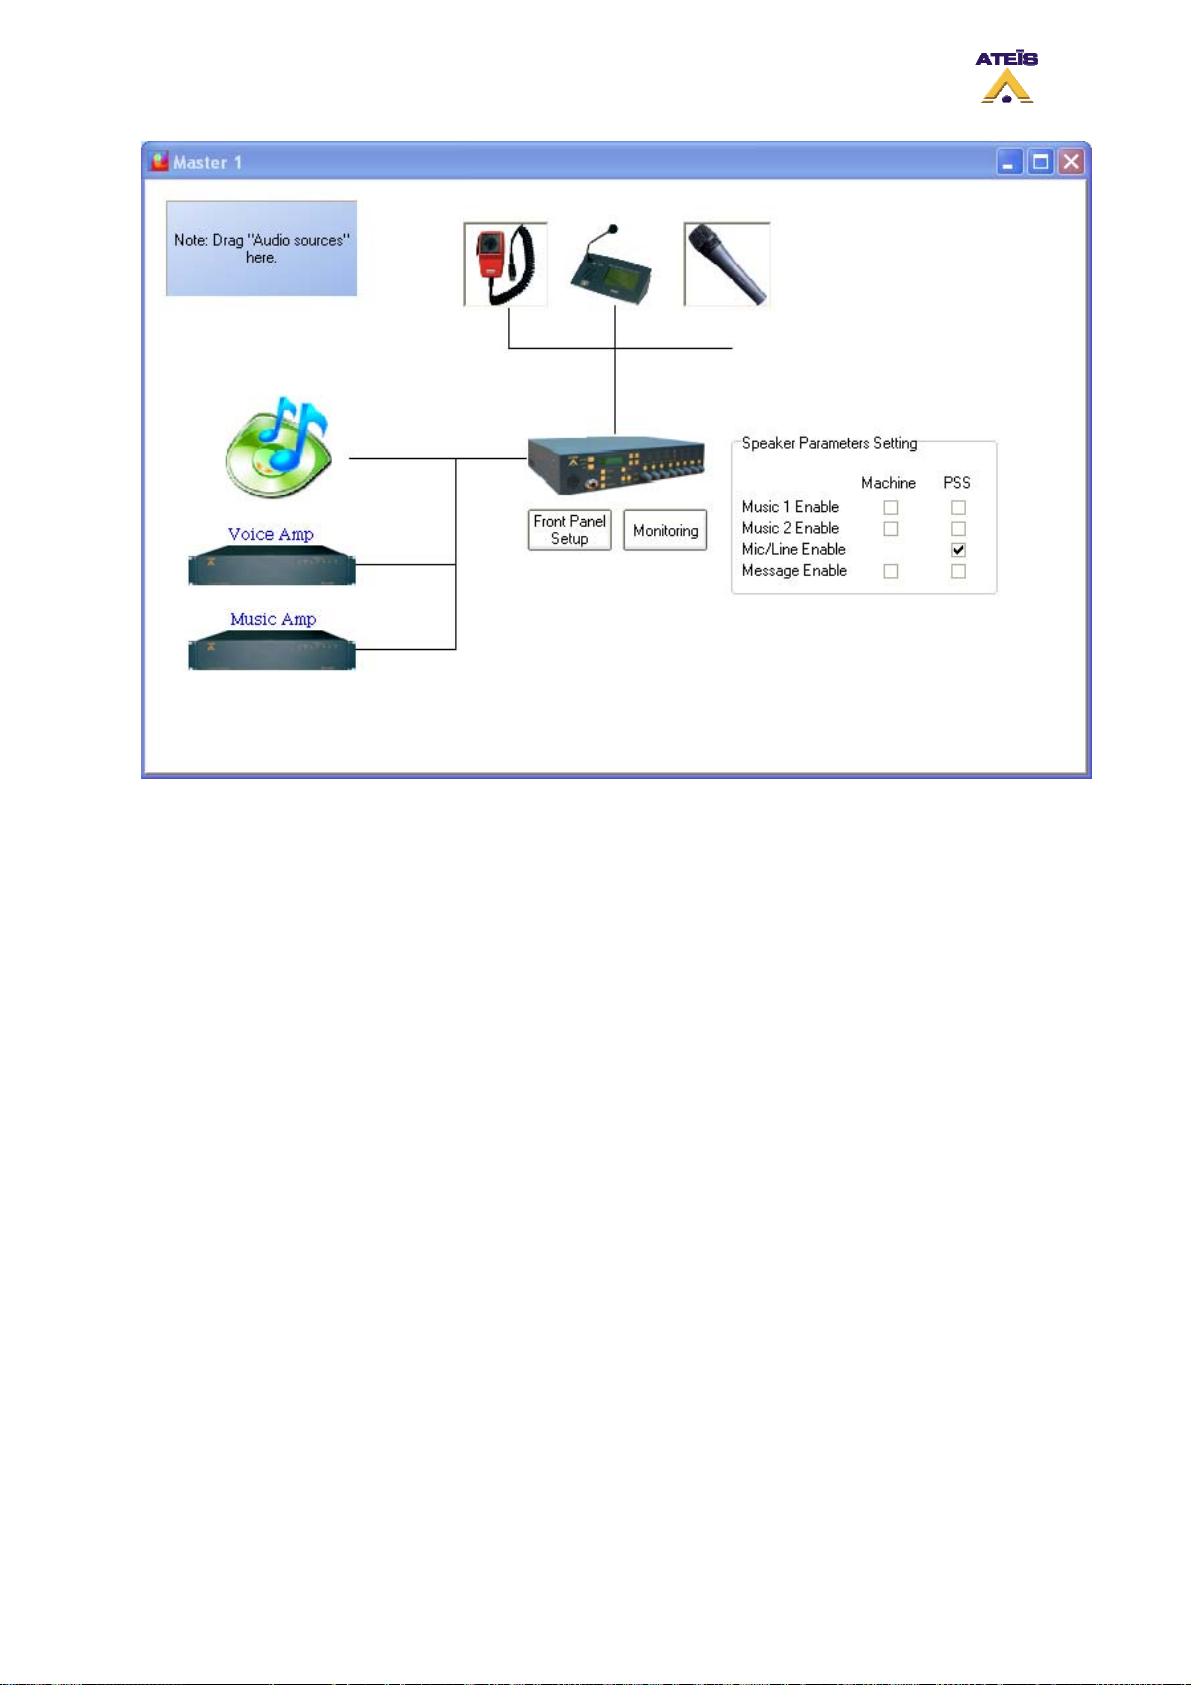
• Music 1 Enable: by ticking this option, the music source 1 will be routed either on the DIVA
speaker or PSS speaker.
• Music 2 Enable: by ticking this option, the music source 2 will be routed either on the DIVA
speaker or PSS speaker.
• Mic/Line Enable: by ticking this option, the Mic/Line source will be routed either on the DIVA
speaker or PSS speaker.
• Message Enable: by ticking this option, the messages will be played either on the DIVA speaker
or PSS speaker.
8.18 Use Event
As briefly explained before, the DIVA action is based on event philosophy. Each action is described in
event. Event can be started by different type of trigger.
The event created by any manner are all listed in the event page window. To access this window, go
to the menu View -> Event. In the Event window, you can managed all the event created and see the
priority hierarchy, next event called, sequences and calling event.
Ateïs International
Ch. du Dévent, 1024 Ecublens, Switzerland.
Phone : +41 21 881 25 10
59
Page 60
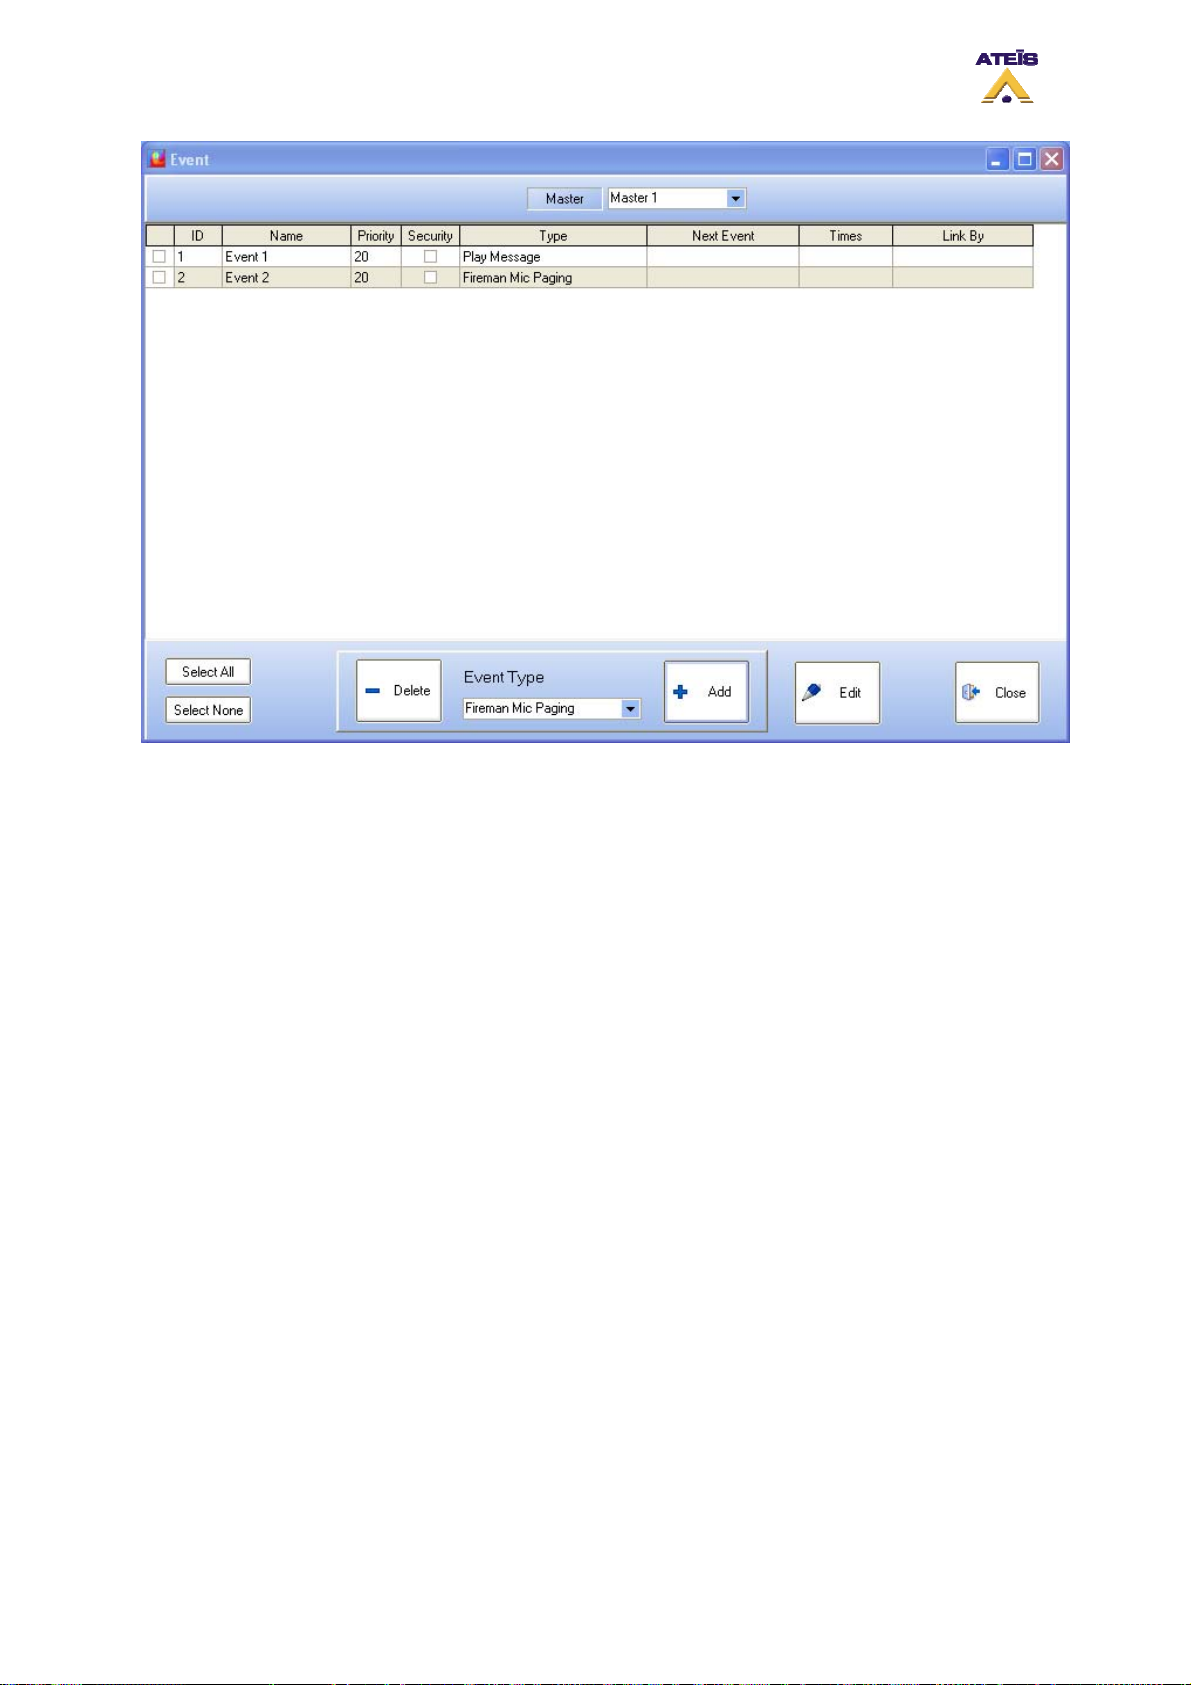
• Master: here you can select which master events' list you wan to work on
_____________________________________
• Square Selector: you can select event(s) by ticking the square selector at their right
• ID:
• Name: displays the event's name. You can specify a name for an event when editing the event.
By default the name is set to Event X
• Priority: displays the priority level of an event
• Security: displays if the event is a security one or not
• Type: displays the type of the event
• Next Event: displays which event is called after this event
• Time: if an event loop have been created, displays the number of time the loop is made
• Link By: displays the previous event in the sequence or loop
_____________________________________
• Select All: select instantaneously all events in the list
• Select None: deselect instantaneously all selected events
• Delete: delete selected event from the list
• Event Type: here you can select the event type that you want to create. This have to be made
before press the Add button
• Add: after the event type selection, pressing the Add button will create the new event in the list
• Edit: after creating an event, you will have to edit all its parameters. By clicking the edit button,
you will enter the different event setting windows
• Close: closes the Event window
There are different type of event and here is a list of all event that can be created. Note: some event
created by accessing the music, fireman microphone and MIC/LINE windows are automatically named
and offer settings that could differ from those described in this chapter.
Ateïs International
Ch. du Dévent, 1024 Ecublens, Switzerland.
Phone : +41 21 881 25 10
60
Page 61
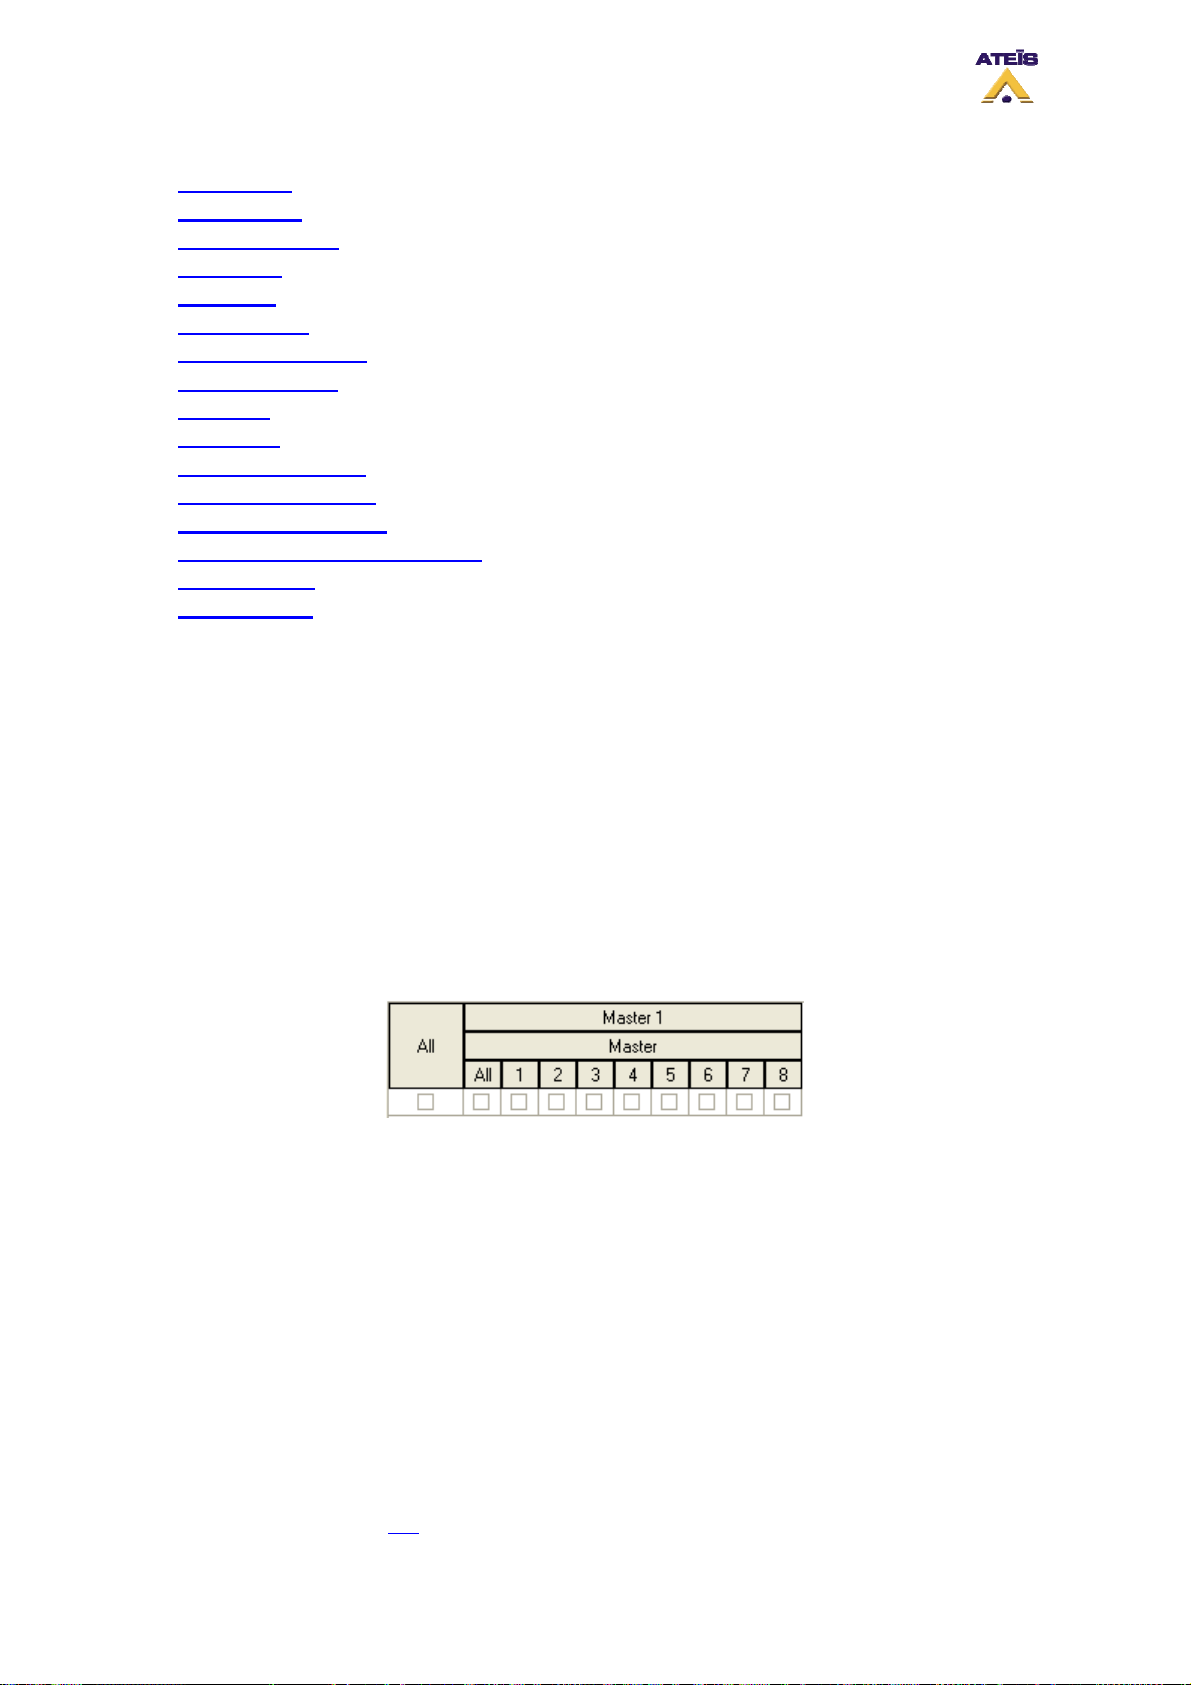
• Load Preset
• Logic Output
• Command String
• Stop Event
• Stop Zone
• Play Message
• Fireman Mic Paging
• MIC/LINE Paging
• Music ON
• Music OFF
• Music ON By Zones
• Music OFF By Zones
• Toggle Music ON/OFF
• Toggle Music ON/OFF By Zones
• Security Mode
• Stop All Event
8.18.1 Common Options
Security Option:
The Security option is common to all event type. If the security option is selected, this event will be
able to be started when DIVA has entered the security mode.
This mode have been created to enter a power safe mode in case of power supply failure, in order to
save energy when supply by emergency battery. This mode is automatically launched when using
External Fault Inputs.
Zone Selection:
In many event you will be able to choose some pre-defined zones. Here is the zone selector display
and explanation.
From Left to right and up to down
Master 1: correspond to your project name (master unit plus slave ones)
o All: selects all zones of master and slave(s) units
Master: means master unit
o All: selects all zone of the master unit
o 1-8: allows to select independently zone 1 to 8 from a master and/or slave unit
Cancel All and Coexist options
The Cancel All and Coexist options have been created to manage conflict when two events use a
common zone.
The higher priority event always overwrite the lowest priority event in the common zone. But regarding
to the option chosen, the behaviour is different.
To learn more, please read this
Ateïs International
Ch. du Dévent, 1024 Ecublens, Switzerland.
Phone : +41 21 881 25 10
.
61
Page 62
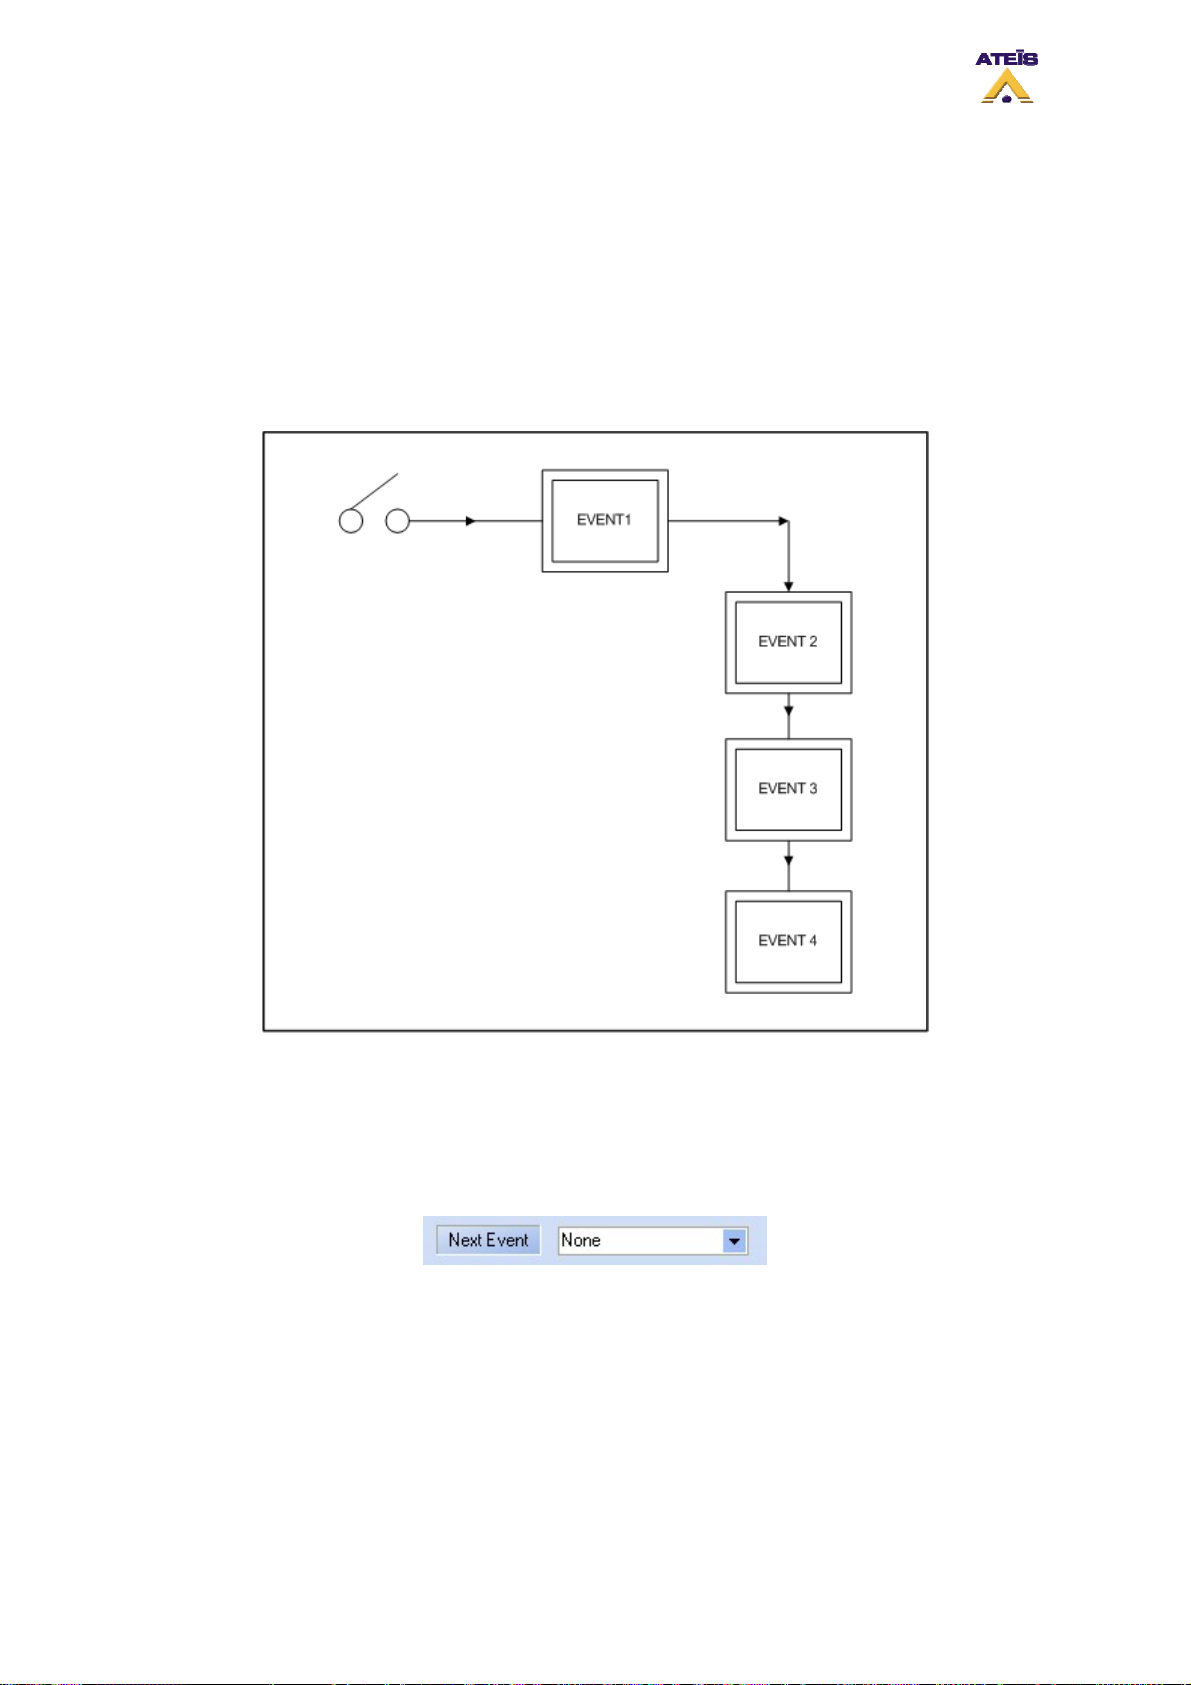
8.18.2 Event Sequence
You can define multiple events by accessing the event window (menu “View -> Event”). In this
window, all the existing event are listed. You can add/delete events.
Before adding a new event, choose in the “Event Type” drop-down menu the desire event’s type. Click
on the new event then “Edit” to be able to set up parameters for this new event.
You can declare event with the same action, like playing a message (even playing the same
message). You just have to give them different names.
The event can be cascaded. An explanation diagram is visible on the next figure.
An action like closing a contact could induce to start an event. But the first event, as soon as it will be
finished or stopped could launch an other event. The second event could activate the start of a third
event, and so on.
In each event edit page, there is a next event drop down menu, see below. In this menu you will be
able to choose between all the existing events.
Events could also be looped. The diagram on figure below explains it visually.
Ateïs International
Ch. du Dévent, 1024 Ecublens, Switzerland.
Phone : +41 21 881 25 10
62
Page 63
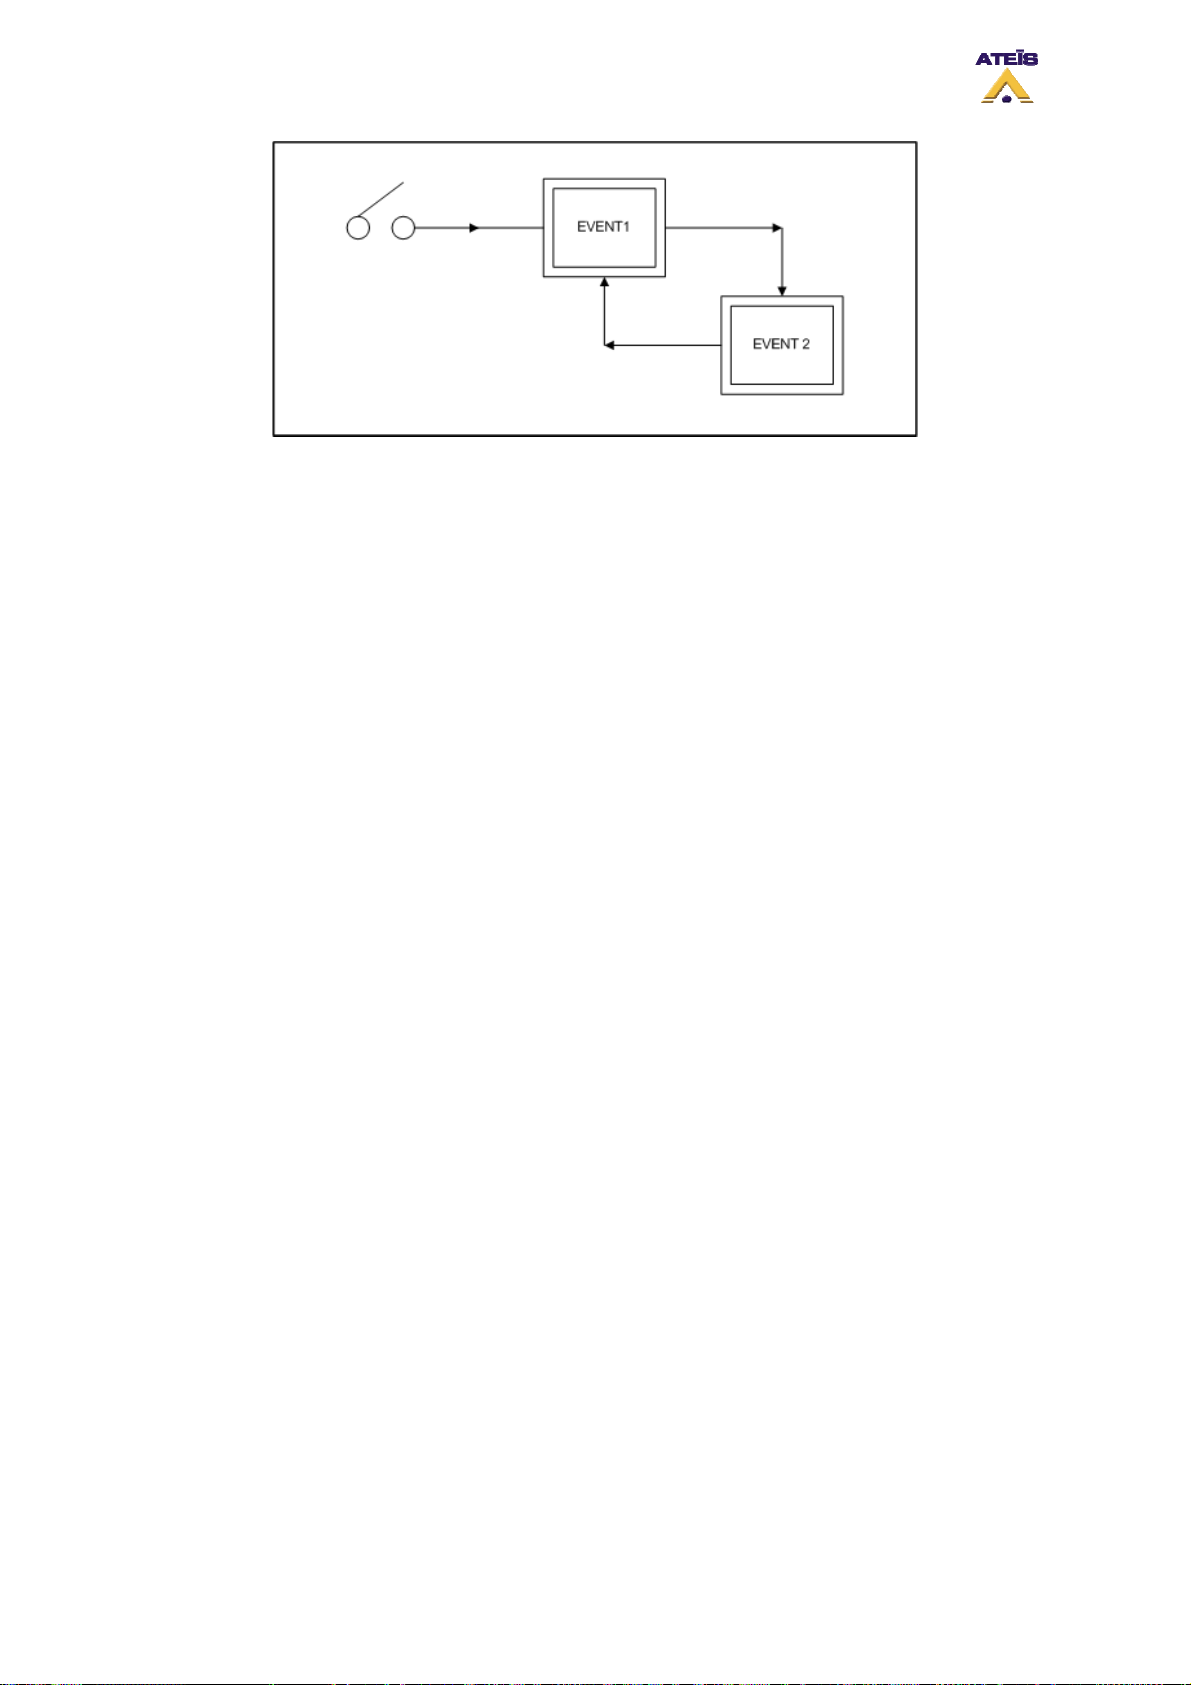
According to the looping event diagram, when selecting next event for “Event 2”, choose “Event 1”. As
soon as you select a event that is before in the chain, a new “Circular Times” selector is visible just
beside the next event drop-down menu (see below). This selector permits to define how many time the
events’ loop will be repeat or to make it continuously repeating.
This is a quick way to loop different language evacuation messages for example.
Ateïs International
Ch. du Dévent, 1024 Ecublens, Switzerland.
Phone : +41 21 881 25 10
63
Page 64
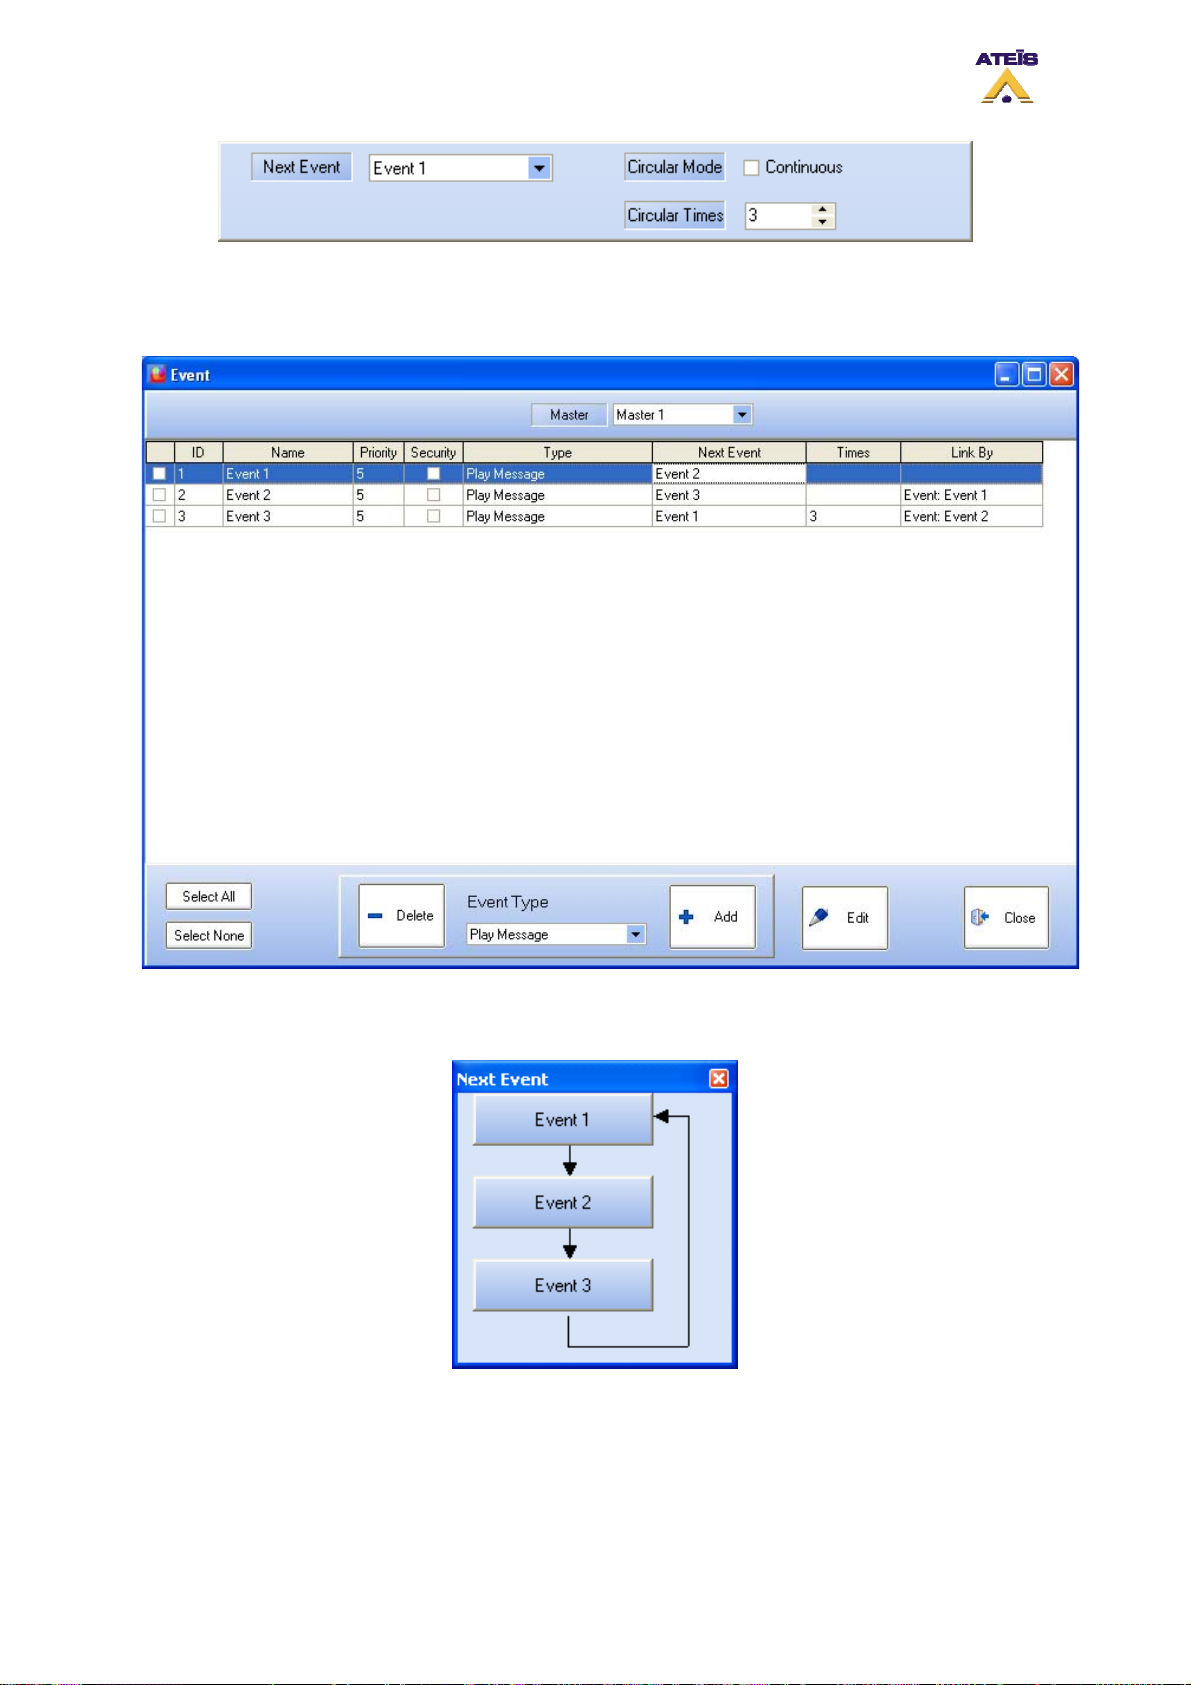
Once you go back in the event window. You can see multiple information about sequences like the
next event that is called (Next event), the number of time the loop is repeated (Times) and the event or
action that is linked to one event (Link By), see picture below.
By clicking at the right of the Next Event box, you will be able to graphicaly display the event sequence
or loop,see below.
Ateïs International
Ch. du Dévent, 1024 Ecublens, Switzerland.
Phone : +41 21 881 25 10
64
Page 65
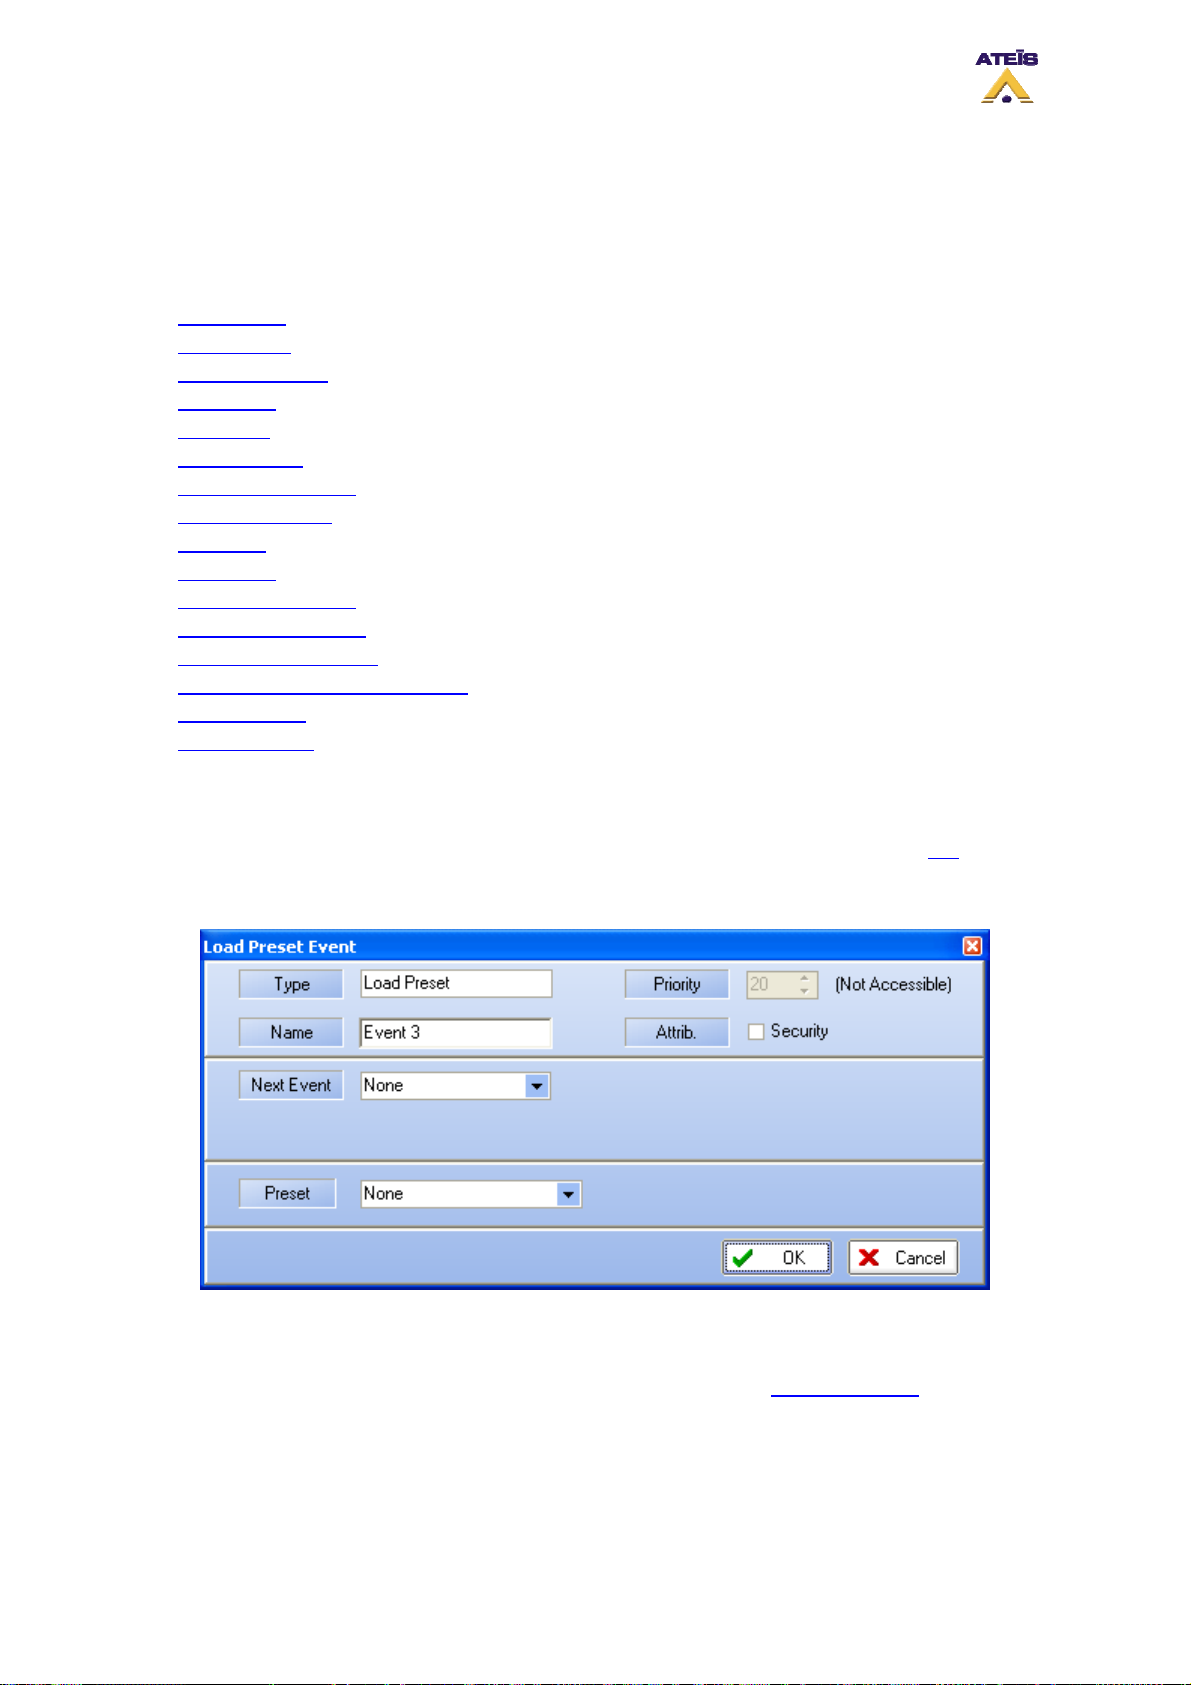
8.18.3 Event Type
In the Next paragraph, you will fin a description of all the different event that could be found in DIVA
programming. You will by this way learn how to use them and when to use them.
• Load Preset
• Logic Output
• Command String
• Stop Event
• Stop Zone
• Play Message
• Fireman Mic Paging
• MIC/LINE Paging
• Music ON
• Music OFF
• Music ON By Zones
• Music OFF By Zones
• Toggle Music ON/OFF
• Toggle Music ON/OFF By Zones
• Security Mode
• Stop All Events
8.18.3.1 Load Preset
In DIVA, you have the possibility to set preset. To learn more about presets, please read this.
The event load preset can be used as soon as there are existing preset.
• Type: displays the type of event that is created, in this case Load Preset
• Name: here you can specify a name for the event created
• Attrib: here you can choose between security event or not. See Common Option to learn more
about the security option
__________________________________________
• Next Event: you can specify an event that will be started as soon as this event has finished
__________________________________________
Ateïs International
Ch. du Dévent, 1024 Ecublens, Switzerland.
Phone : +41 21 881 25 10
65
Page 66
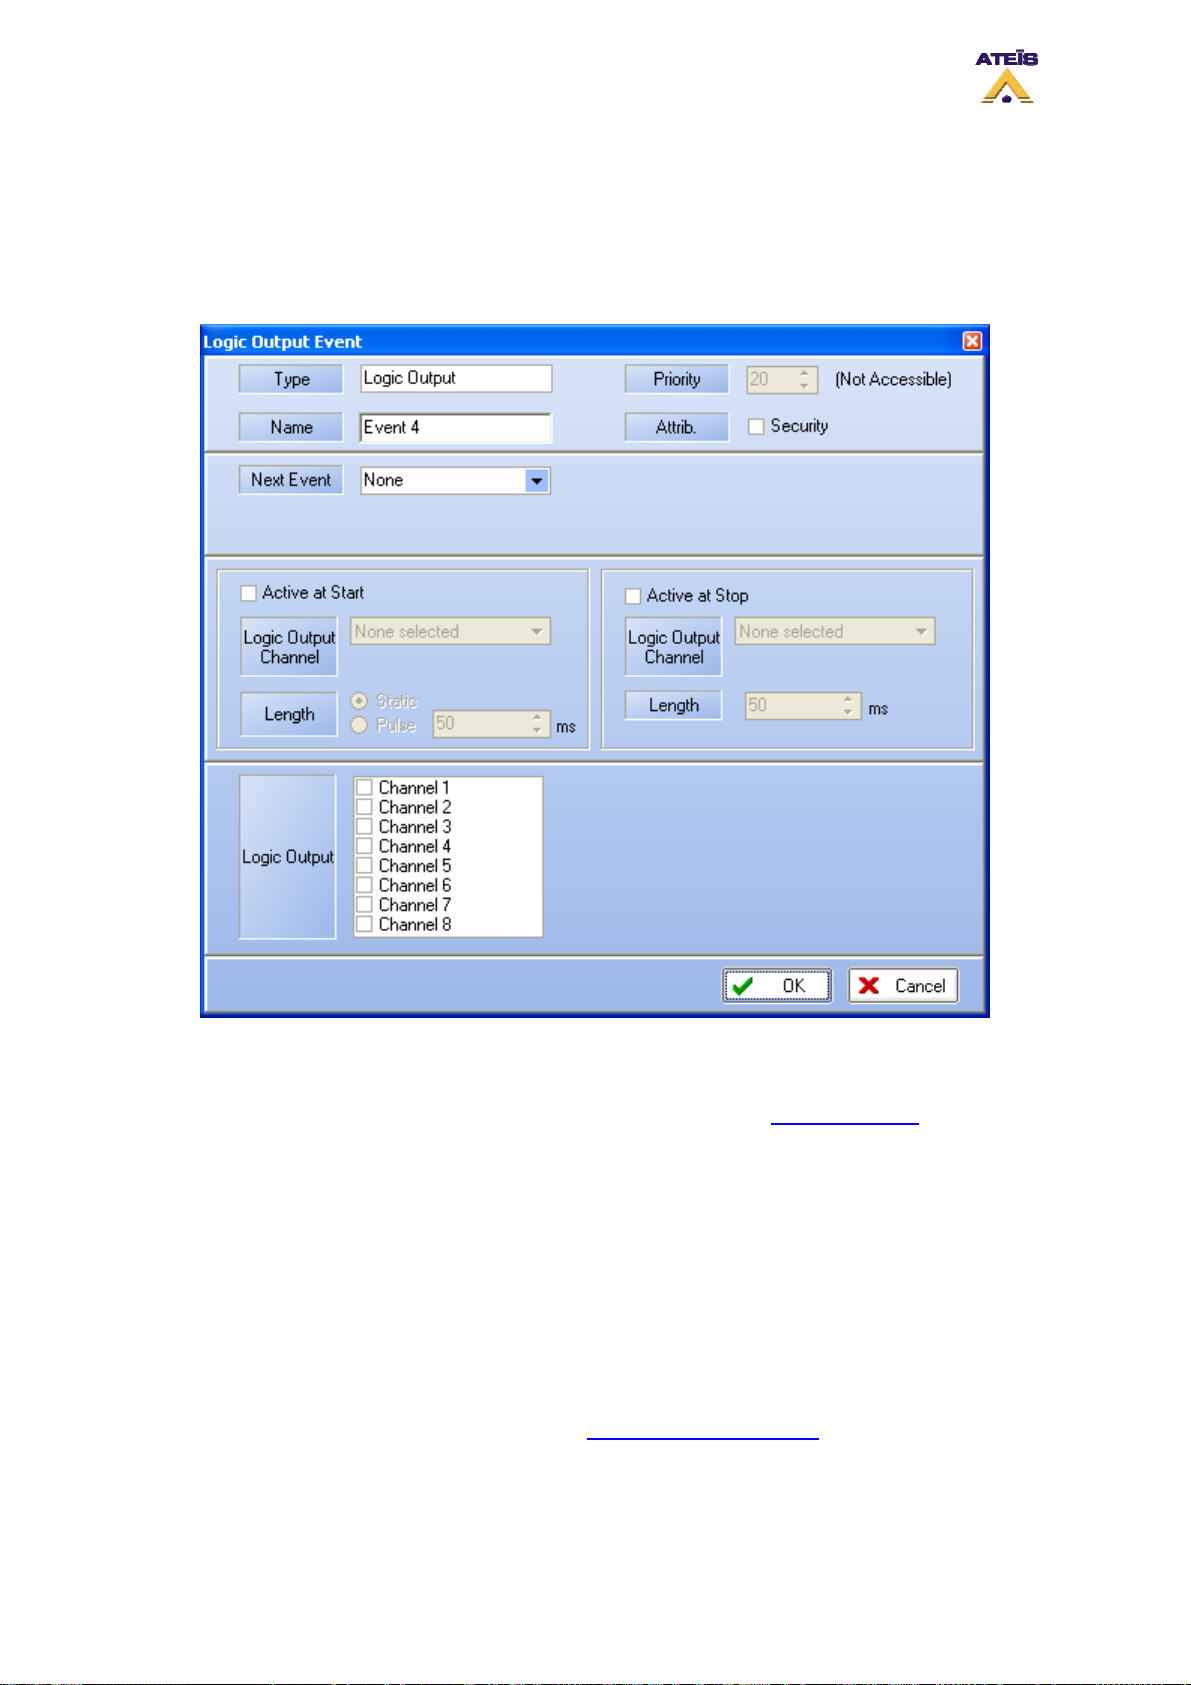
• Preset: here you can specify the preset to be loaded
8.18.3.2 Logic Output
As described before, DIVA has 8 output channels that can be commanded by several trigger type.
When using the Logic Output Event, you can associate to a trigger the closing of an output.
• Type: displays the type of event that is created, in this case Load Preset
• Name: here you can specify a name for the event created
• Attrib: here you can choose between security event or not. See Common Option to learn more
about the security option
_________________________________________
• Next Event: you can specify an event that will be started as soon as this event has finished
_________________________________________
• Active at Start: Ticking this option allows user to close an output contact (Logic Output channel)
in two different manner. Static will close it until the event stop and Pulse will generate a closing
pulse whose length can be defined from 50 to 60000 ms.
• Active at Stop: This option is used to create a closing contact pulse when the event is finished.
The length of the pulse can be defined from 50 to 60000 ms.
To learn more about output relay, please read the How To Use Output Relay
_________________________________________
.
• Logic Output: here you can specify which output(s) you want to close when a trigger has been
detected.
Ateïs International
Ch. du Dévent, 1024 Ecublens, Switzerland.
Phone : +41 21 881 25 10
66
Page 67
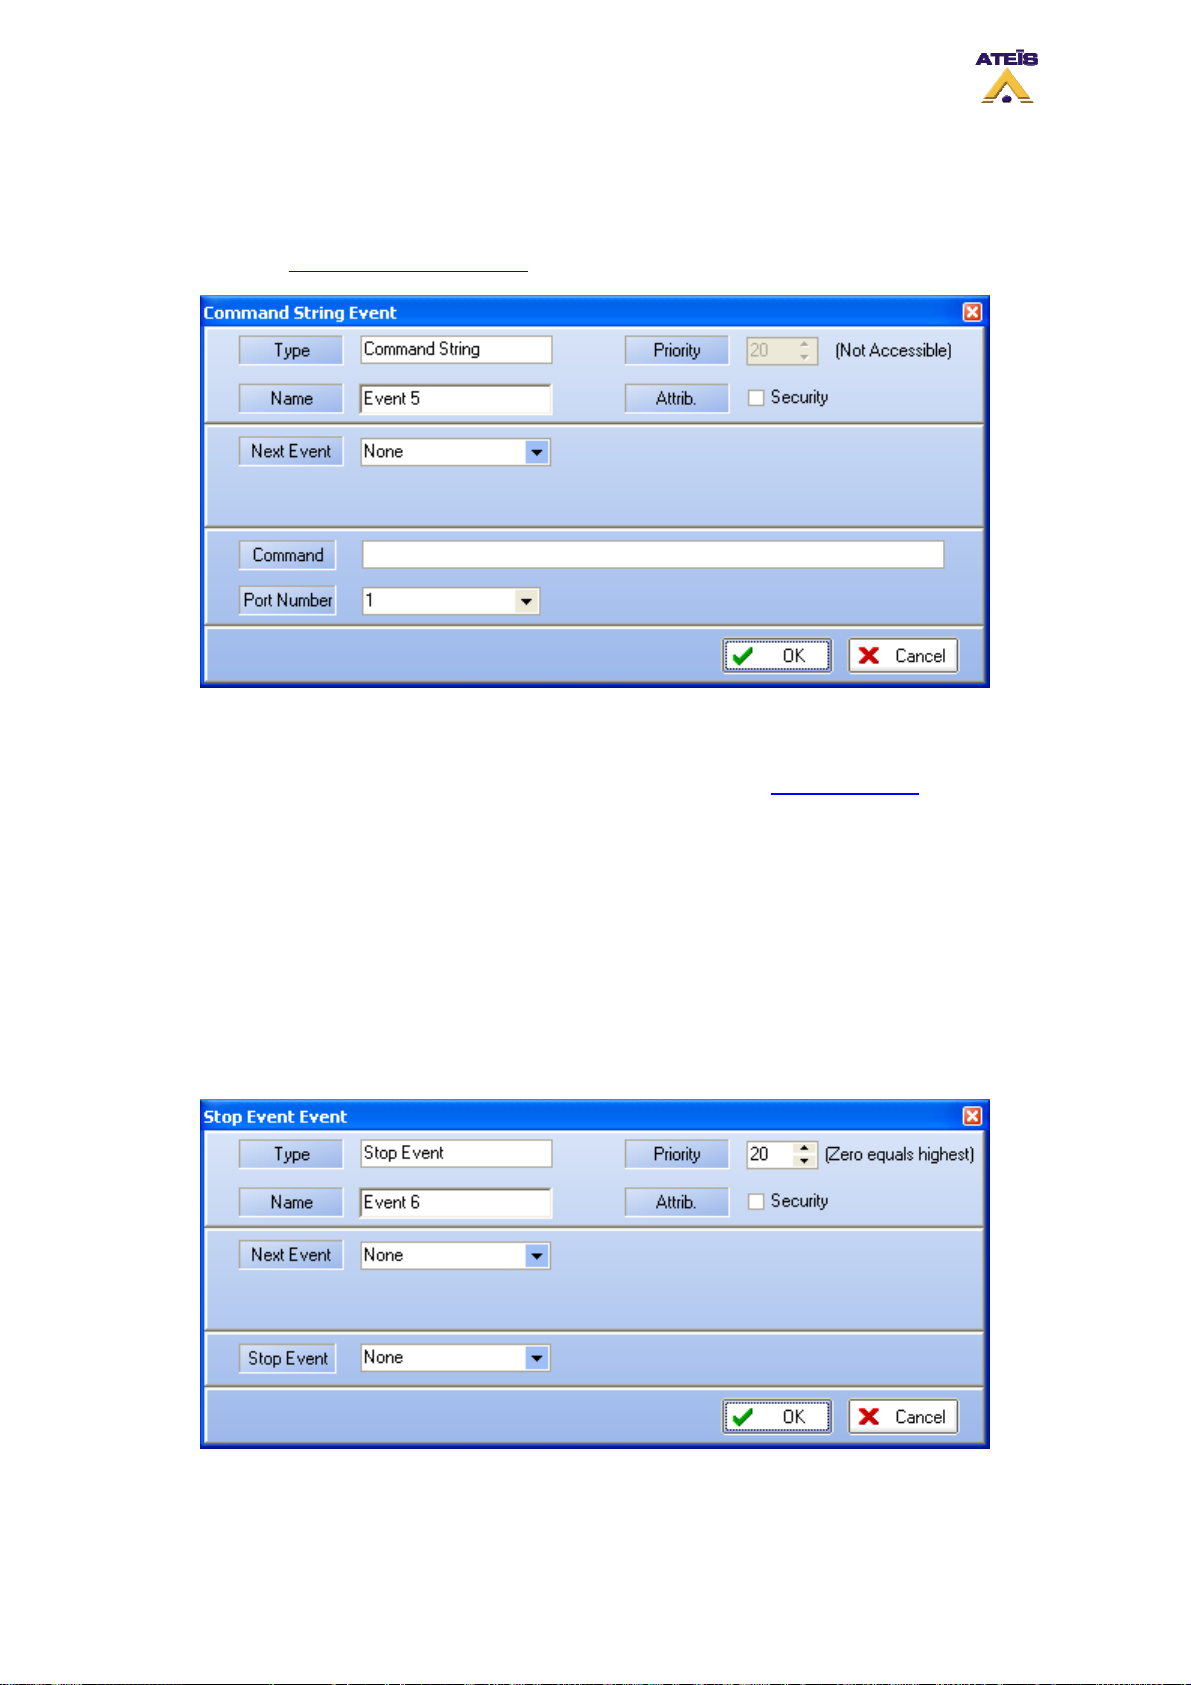
8.18.3.3 Command String
With this event you can send by RS232 commands to third party devices. Valid commands are
described in the Communication Protocoles
chapter.
• Type: displays the type of event that is created, in this case Load Preset
• Name: here you can specify a name for the event created
• Attrib: here you can choose between security event or not. See Common Option to learn more
about the security option
_________________________________________
• Next Event: you can specify an event that will be started as soon as this event has finished
_________________________________________
• Command: here you can type in the command to send
• Port Number: here you have to specify on which port the command have to be sent
8.18.3.4 Stop Event
This event have been created in order to be able to stop any event by the means of a trigger.
• Type: displays the type of event that is created, in this case Load Preset
• Name: here you can specify a name for the event created
Ateïs International
Ch. du Dévent, 1024 Ecublens, Switzerland.
Phone : +41 21 881 25 10
67
Page 68
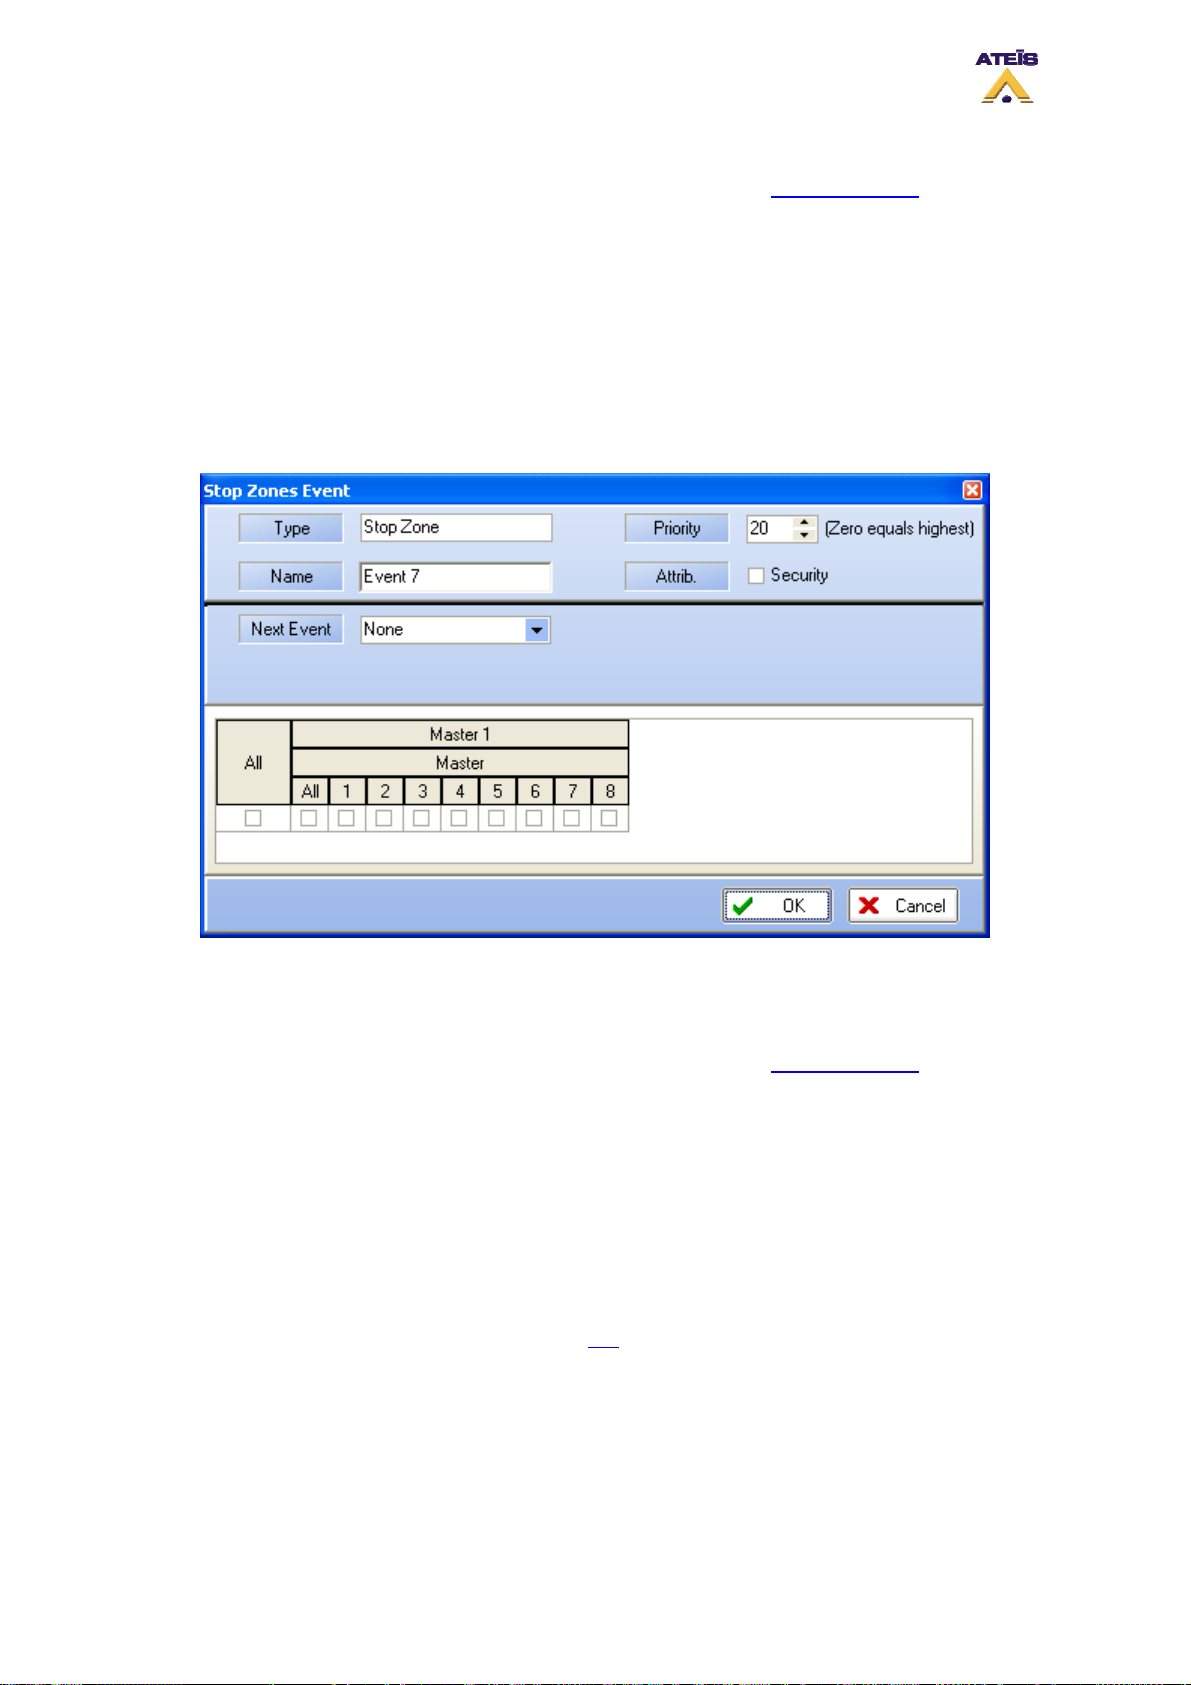
• Priority: here you can choose a priority level for this event
• Attrib: here you can choose between security event or not. See Common Option to learn more
about the security option
_________________________________________
• Next Event: you can specify an event that will be started as soon as this event has finished
_________________________________________
• Stop Event: here you can select from the existing event list, the event to stop
8.18.3.5 Stop Zone
The Stop Zones event can interupt every paging, music events in pre-defined zone(s).
• Type: displays the type of event that is created, in this case Load Preset
• Name: here you can specify a name for the event created
• Priority: here you can choose a priority level for this event
• Attrib: here you can choose between security event or not. See Common Option to learn more
about the security option
_________________________________________
• Next Event: you can specify an event that will be started as soon as this event has finished
_________________________________________
• Zone Selection: here you can choose in which zones lower priority events will be interrupted
8.18.3.6 Play Message
Play message event can start playing messages in pre-defined zones after trigger. For more
information about use of output relay, please read this
.
Ateïs International
Ch. du Dévent, 1024 Ecublens, Switzerland.
Phone : +41 21 881 25 10
68
Page 69
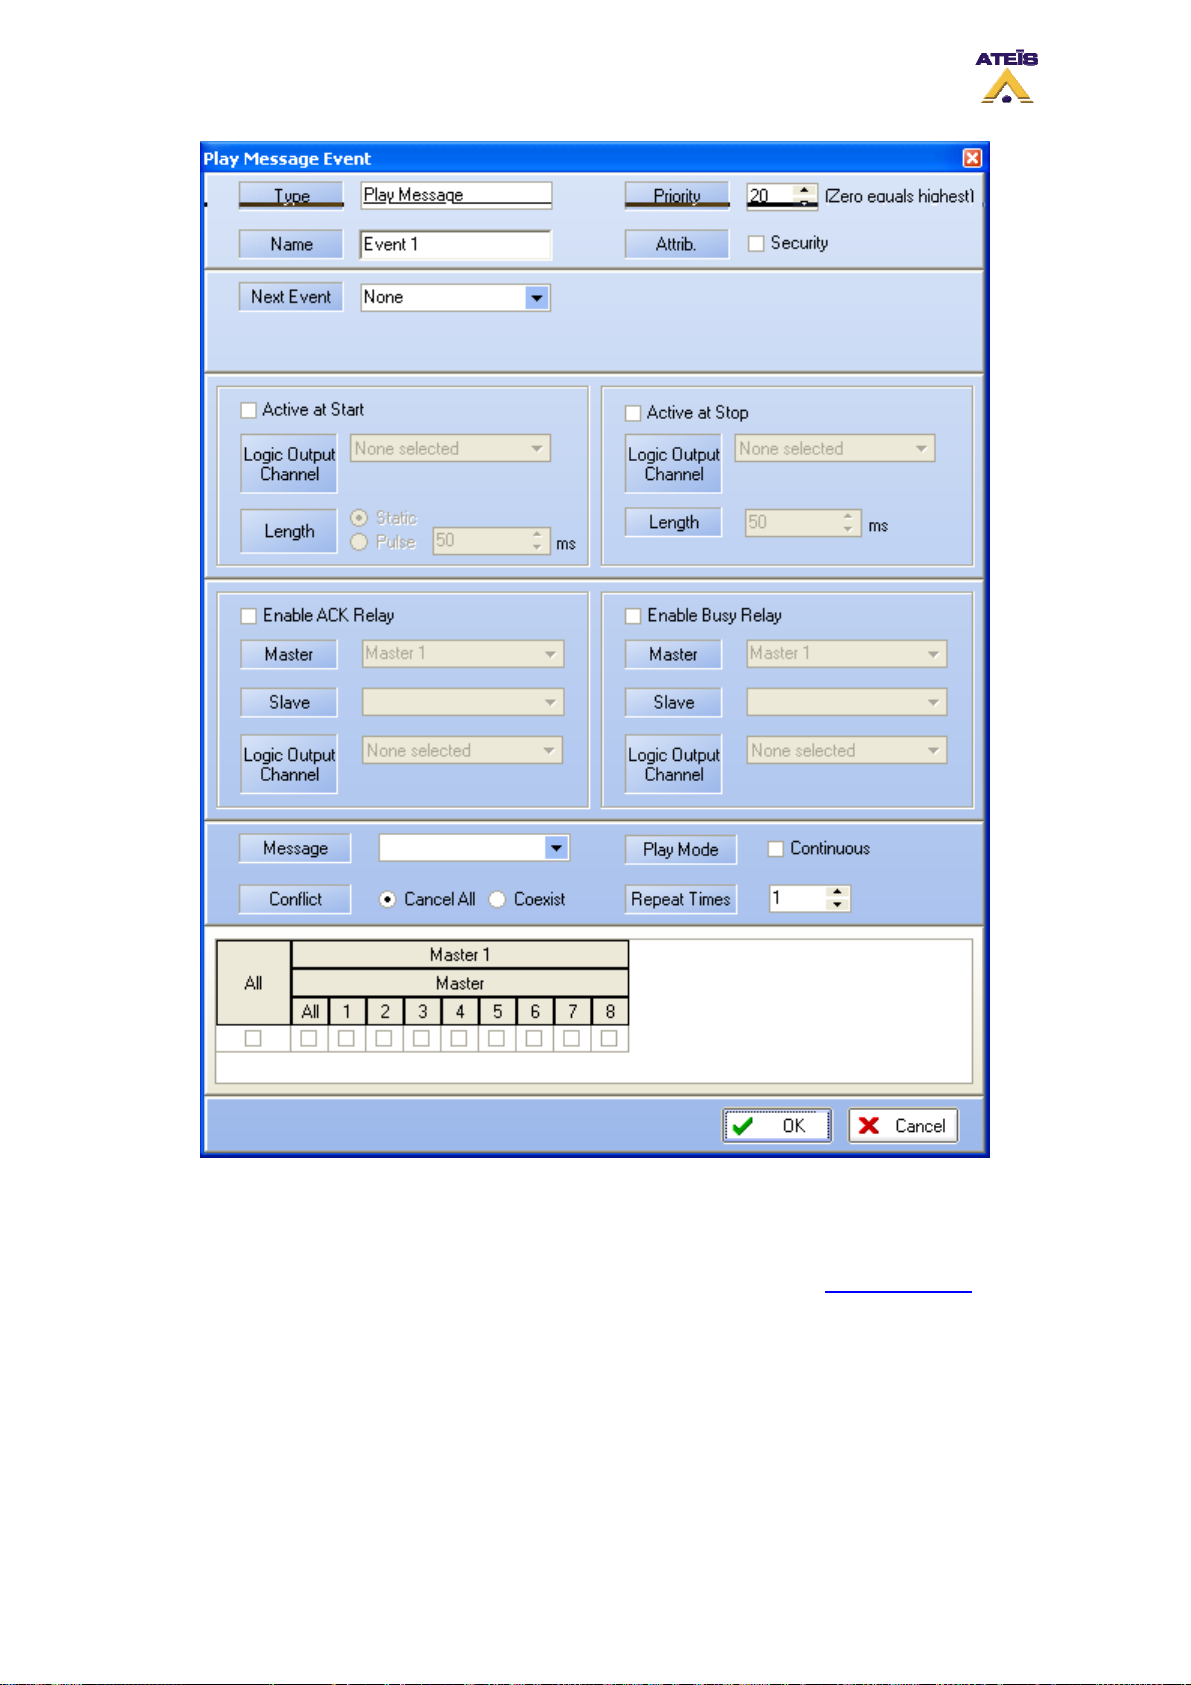
• Type: display the type of event you are creating or modifying
• Name: here you can specify a name for the event created. Default is Event X
• Priority: here you can adjust the priority of the event. 20 is the lowest, 0 is the highest
• Attrib: here you can specify if this event is a security one or not. See Common Option to learn
more about the security option
______________________________________
• Next Event: here you can select the event to start after the current on is finished
______________________________________
• Active at Start: Ticking this option allows user to close an output contact (Logic Output channel)
in two different manner. Static will close it until the event stop and Pulse will generate a closing
pulse whose length can be defined from 50 to 60000 ms.
Ateïs International
Ch. du Dévent, 1024 Ecublens, Switzerland.
Phone : +41 21 881 25 10
69
Page 70

• Active at Stop: This option is used to create a closing contact pulse when the event is finished.
The length of the pulse can be defined from 50 to 60000 ms.
• Enable ACK Relay: here you can set the closing of a Logic Output Channel relay as soon as
zones where an event has to be played are freed from higher priority events.
• Enable Busy Relay: here you can specify an Logic Output Channel relay that will be closed as
soon as you will trying to speak in zones where a higher priority event currently playing.
To learn more about output relay, please read the How To Use Output Relay
______________________________________
.
• Message: by using the drop down menu, you can select, in the list of stored message, a
message to assign to the event
• Play Mode: by ticking continous, the message will be played until a trigger happen
• Conflict: you can choose between Cancel All or Coexist
• Repeat Time: if continous not ticked, you can choose a number of time this event will be repeated
______________________________________
• Zone Selection: here you can specify the zone(s) where the message will be played
8.18.3.7 Fireman Mic Paging
A Fireman Mic Paging event can be declare in order to be used with any type of trigger. The one that
can be declared in the Fireman Mic window
Ateïs International
Ch. du Dévent, 1024 Ecublens, Switzerland.
Phone : +41 21 881 25 10
70
Page 71
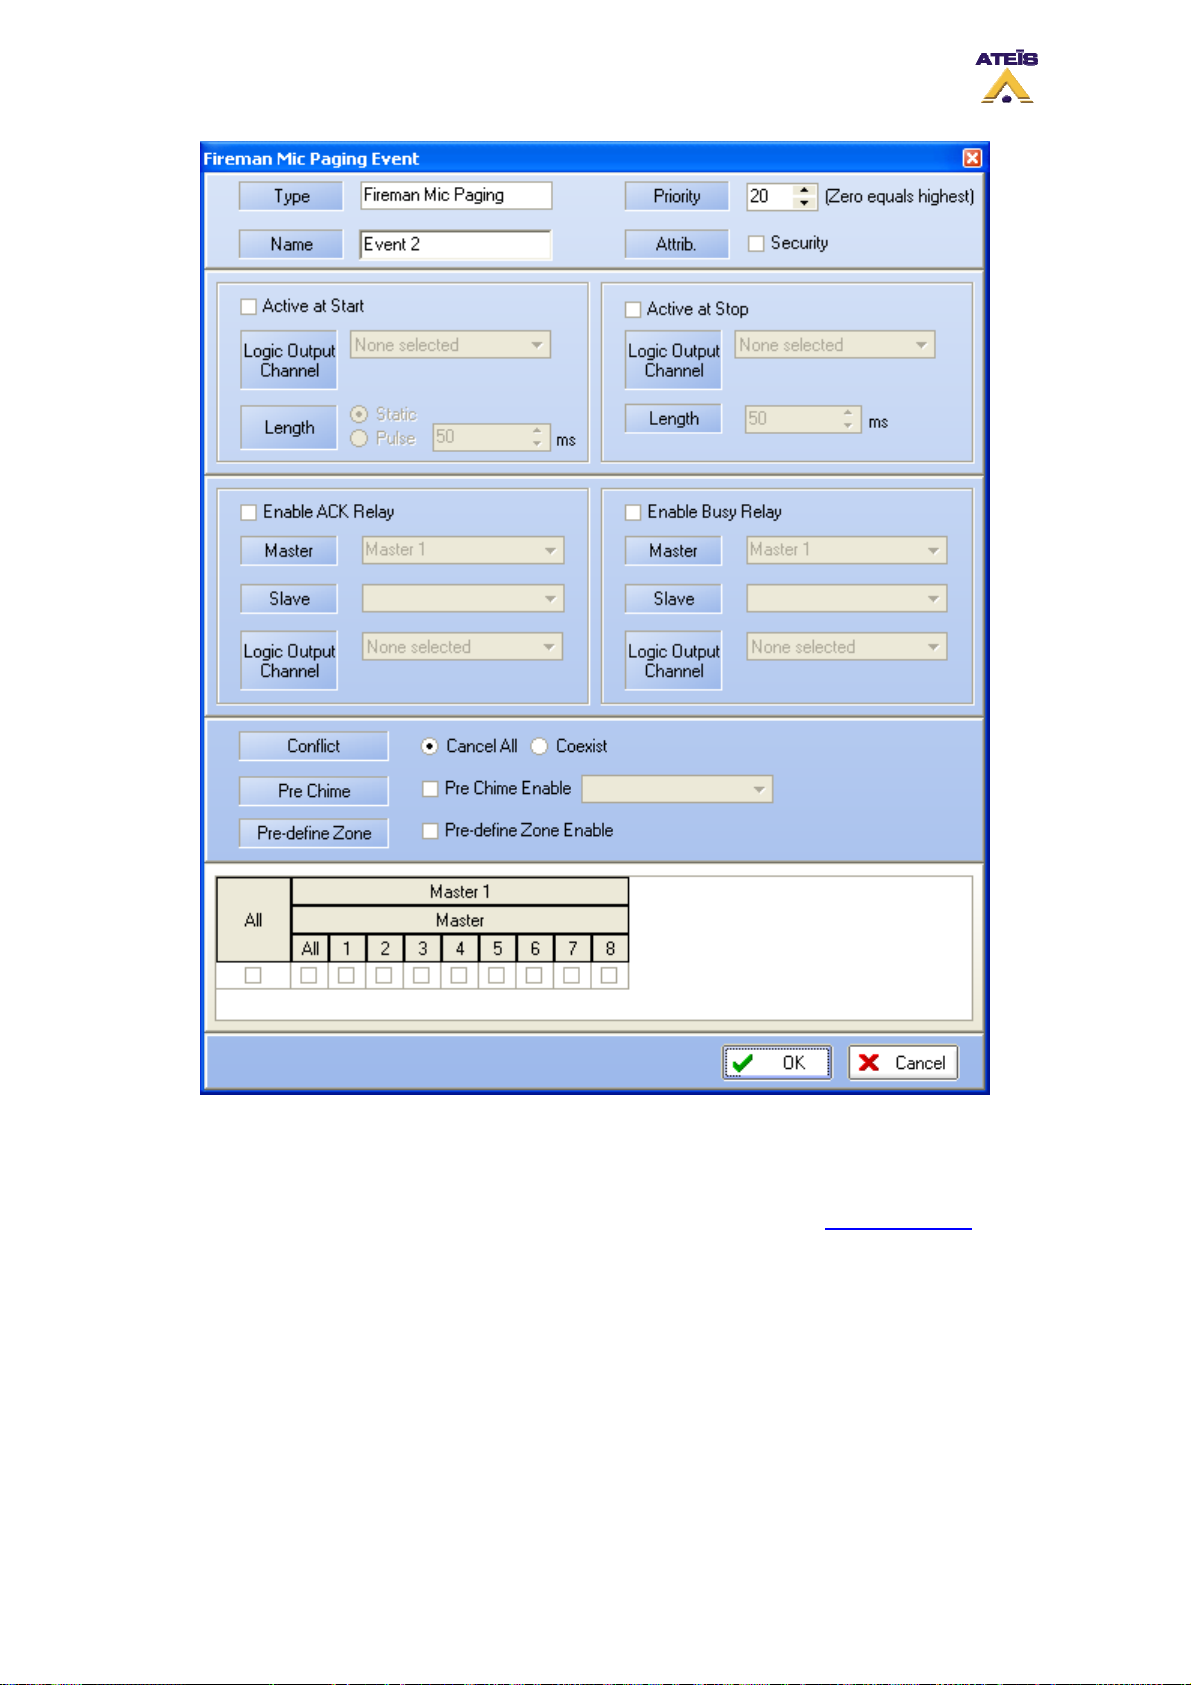
• Type: display the type of event you are creating or modifying
• Name: here you can specify a name for the event created. Default is Event X
• Priority: here you can adjust the priority of the event. 20 is the lowest, 0 is the highest
• Attrib: here you can specify if this event is a security one or not. See Common Option to learn
more about the security option
______________________________________
• Next Event: here you can select the event to start after the current on is finished
______________________________________
• Active at Start: Ticking this option allows user to close an output contact (Logic Output channel)
in two different manner. Static will close it until the event stop and Pulse will generate a closing
pulse whose length can be defined from 50 to 60000 ms.
• Active at Stop: This option is used to create a closing contact pulse when the event is finished.
The length of the pulse can be defined from 50 to 60000 ms.
Ateïs International
Ch. du Dévent, 1024 Ecublens, Switzerland.
Phone : +41 21 881 25 10
71
Page 72
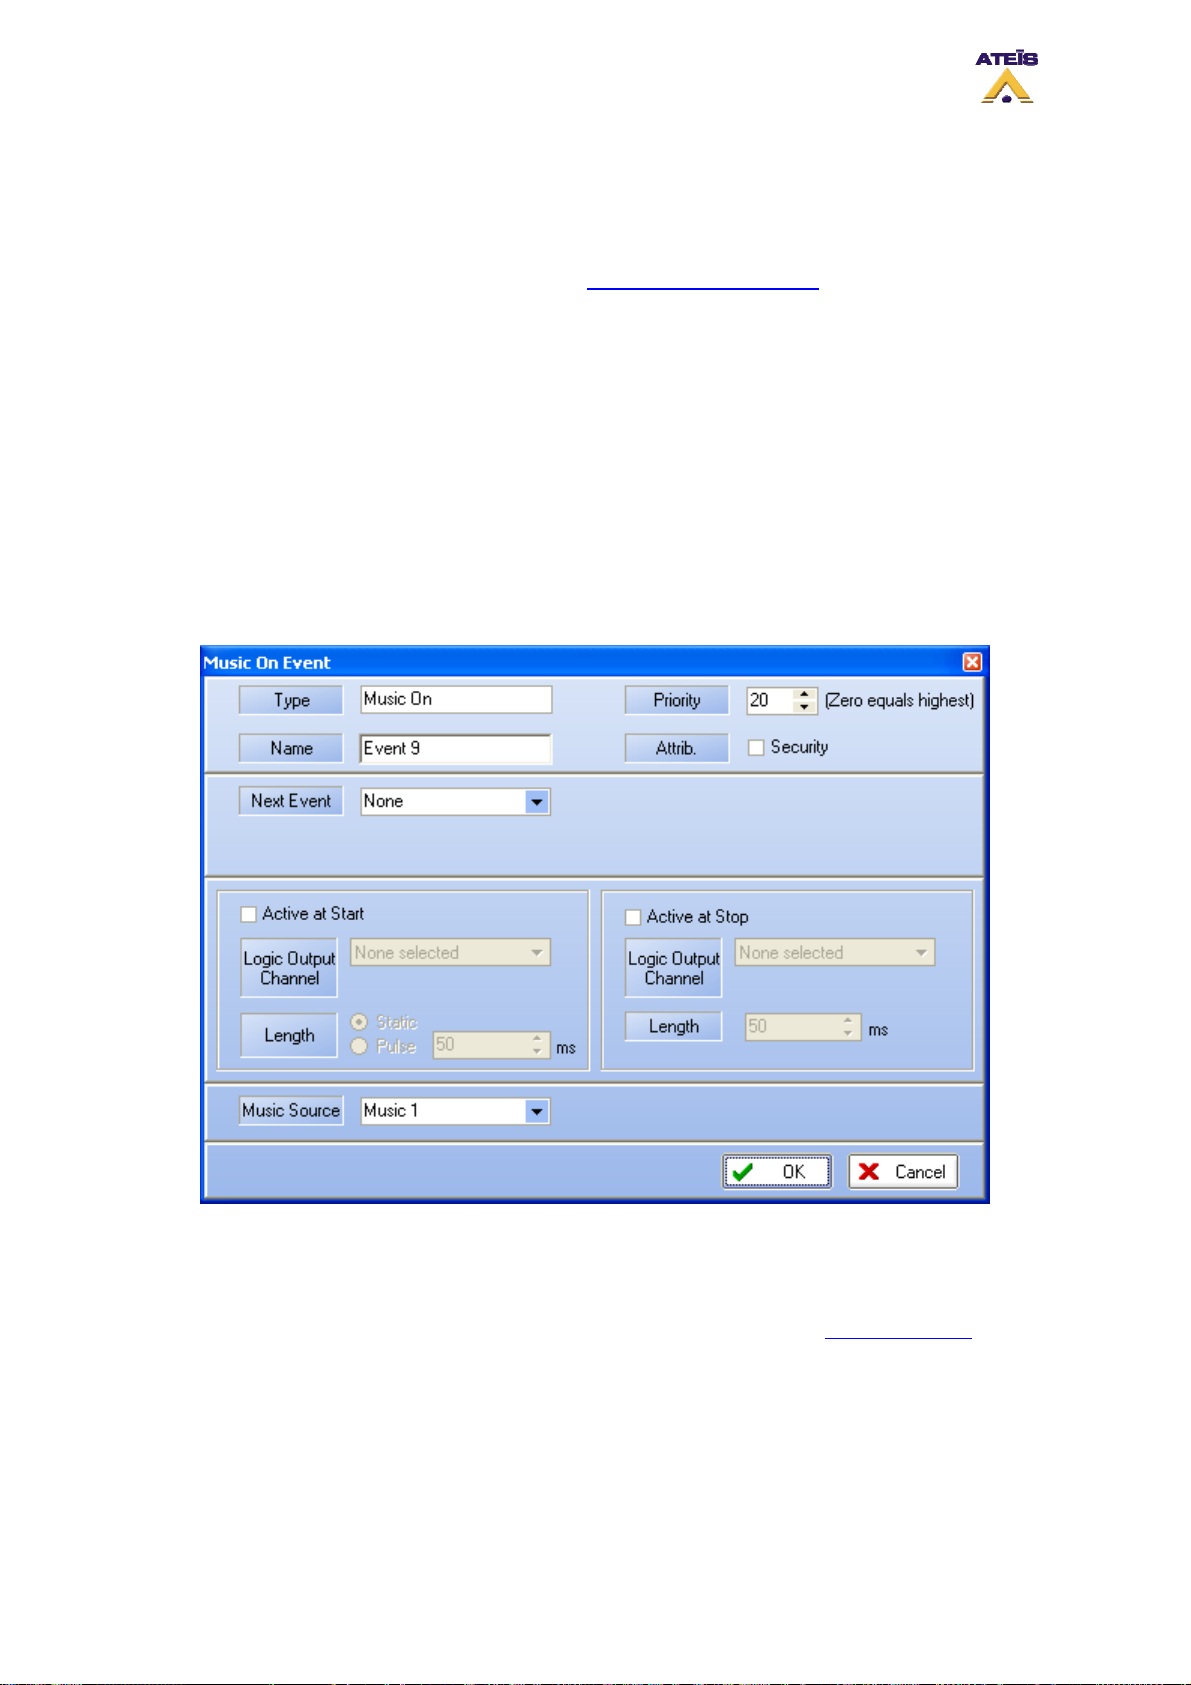
• Enable ACK Relay: here you can set the closing of a Logic Output Channel relay as soon as
zones where an event has to be played are freed from higher priority events.
• Enable Busy Relay: here you can specify an Logic Output Channel relay that will be closed as
soon as you will trying to speak in zones where a higher priority event currently playing.
To learn more about output relay, please read the How To Use Output Relay
______________________________________
.
• Conflict: you can choose between Cancel All or Coexist
• Pre Chime: Before a call you can add a chime message. Here, if Pre Chime Enable is selected,
you can select which message will be used as pre chime
• Pre-define Zone: if ticked, you can choose pre defined zone with the zone sel ector
______________________________________
• Zone Selection: here you can specify the zone(s) where the call will be played
8.18.3.8 Music On
The Music On event allows to start music source 1 or 2 with any type of trigger. Music sources will
start playing in pre-defined zone(s) chosen in the Music Event window.
• Type: display the type of event you are creating or modifying
• Name: here you can specify a name for the event created. Default is Event X
• Priority: here you can adjust the priority of the event. 20 is the lowest, 0 is the highest
• Attrib: here you can specify if this event is a security one or not. See Common Option to learn
more about the security option
______________________________________
• Next Event: here you can select the event to start after the current on is finished
______________________________________
Ateïs International
Ch. du Dévent, 1024 Ecublens, Switzerland.
Phone : +41 21 881 25 10
72
Page 73
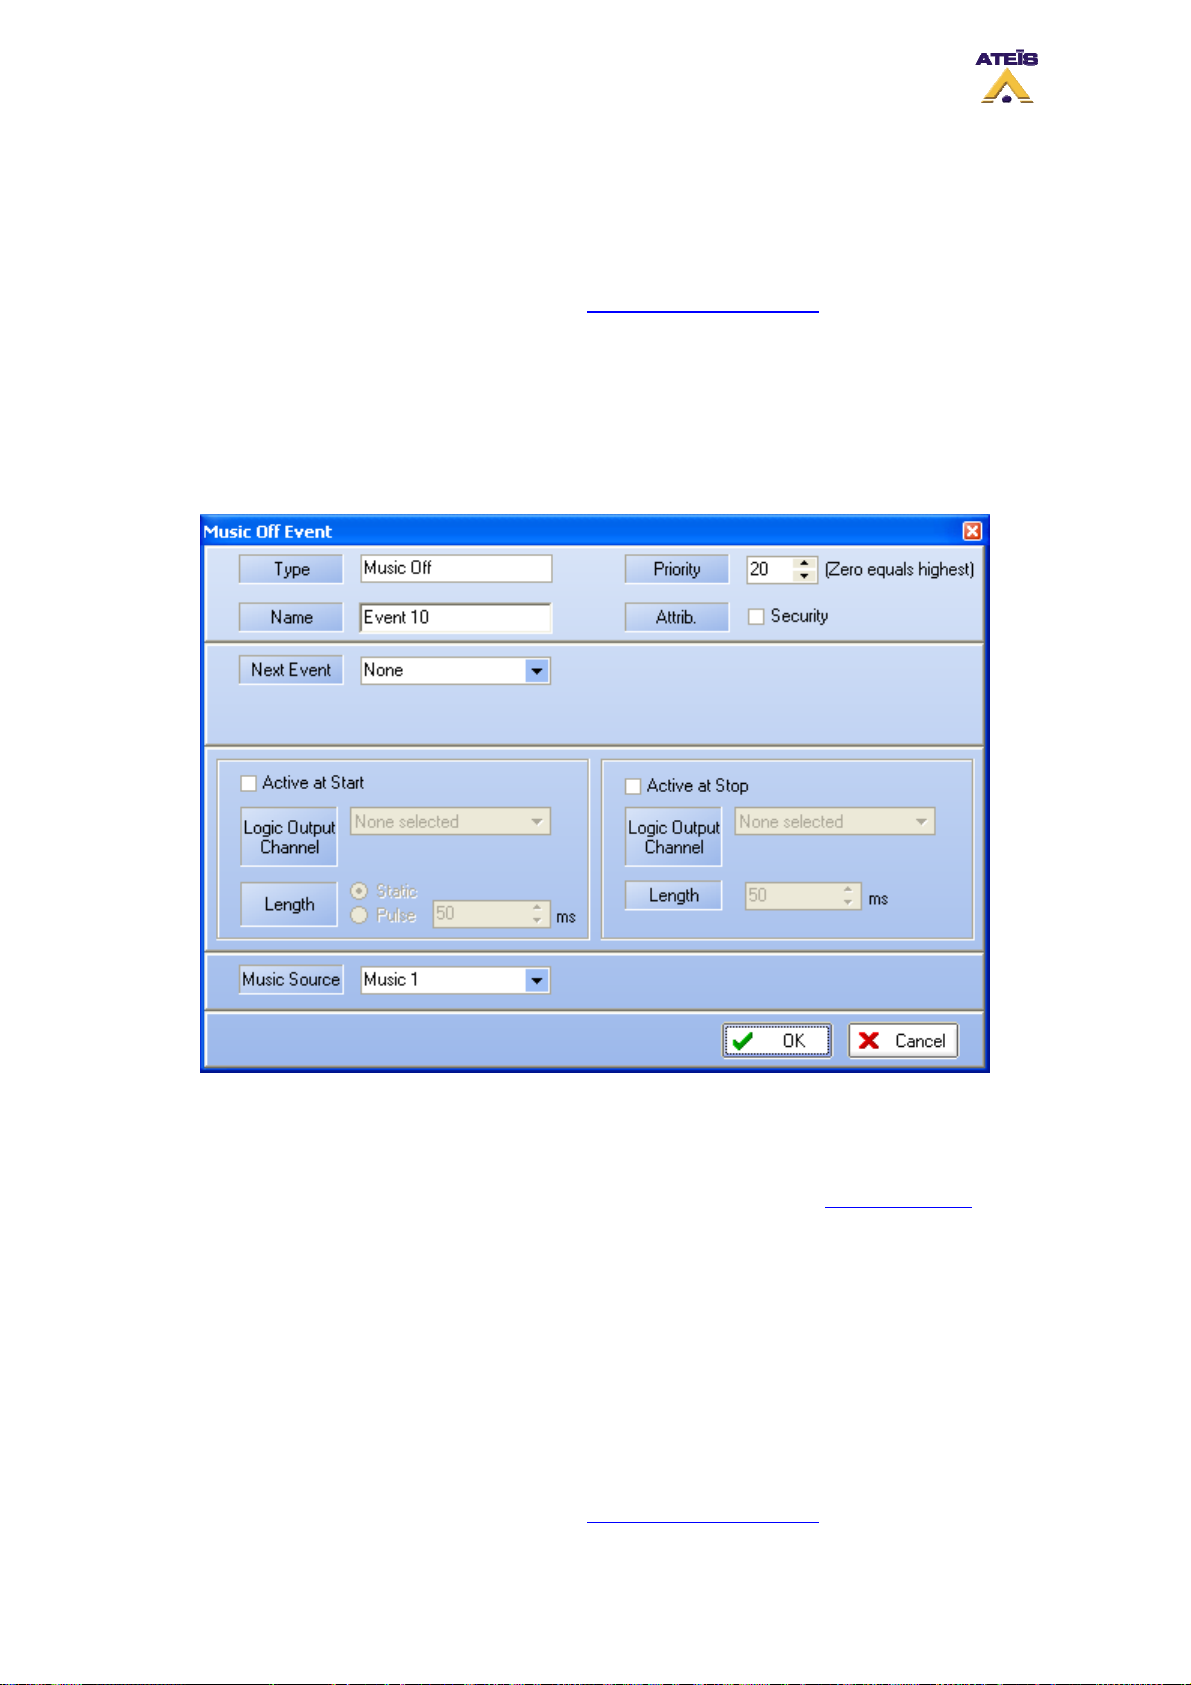
• Active at Start: Ticking this option allows user to close an output contact (Logic Output channel)
in two different manner. Static will close it until the event stop and Pulse will generate a closing
pulse whose length can be defined from 50 to 60000 ms.
• Active at Stop: This option is used to create a closing contact pulse when the event is finished.
The length of the pulse can be defined from 50 to 60000 ms.
To learn more about output relay, please read the How To Use Output Relay
______________________________________
.
• Music Source: here you can choose the music source you want to switch on
8.18.3.9 Music Off
The Music On event allows to stop music source 1 or 2 with any type of trigger. Music sources will
stop playing in pre-defined zone(s) chosen in the Music Event window.
• Type: display the type of event you are creating or modifying
• Name: here you can specify a name for the event created. Default is Event X
• Priority: here you can adjust the priority of the event. 20 is the lowest, 0 is the highest
• Attrib: here you can specify if this event is a security one or not. See Common Option to learn
more about the security option
______________________________________
• Next Event: here you can select the event to start after the current on is finished
______________________________________
• Active at Start: Ticking this option allows user to close an output contact (Logic Output channel)
in two different manner. Static will close it until the event stop and Pulse will generate a closing
pulse whose length can be defined from 50 to 60000 ms.
• Active at Stop: This option is used to create a closing contact pulse when the event is finished.
The length of the pulse can be defined from 50 to 60000 ms.
To learn more about output relay, please read the How To Use Output Relay
Ateïs International
Ch. du Dévent, 1024 Ecublens, Switzerland.
Phone : +41 21 881 25 10
.
73
Page 74
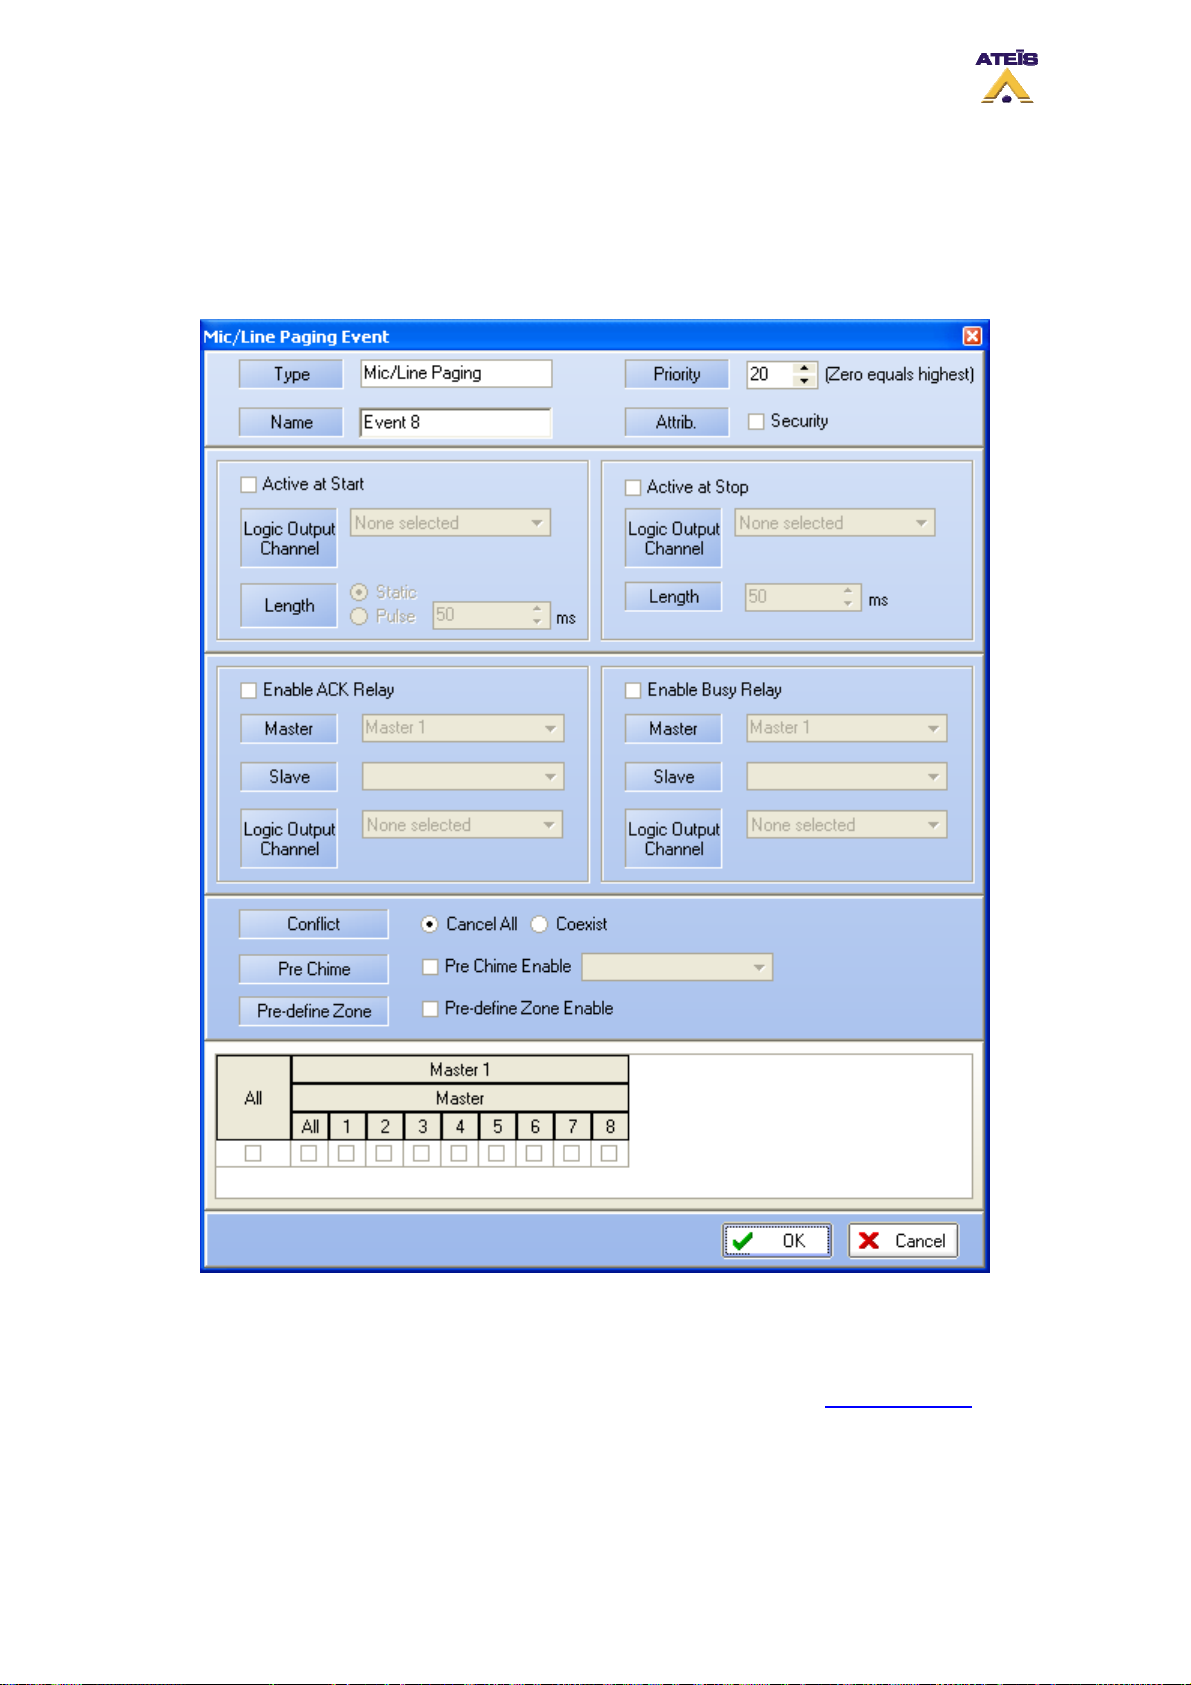
______________________________________
• Music Source: here you can choose the music source you want to switch off
8.18.3.10 MIC/LINE Paging
• Type: display the type of event you are creating or modifying
• Name: here you can specify a name for the event created. Default is Event X
• Priority: here you can adjust the priority of the event. 20 is the lowest, 0 is the highest
• Attrib: here you can specify if this event is a security one or not. See Common Option to learn
more about the security option
______________________________________
• Next Event: here you can select the event to start after the current on is finished
______________________________________
Ateïs International
Ch. du Dévent, 1024 Ecublens, Switzerland.
Phone : +41 21 881 25 10
74
Page 75
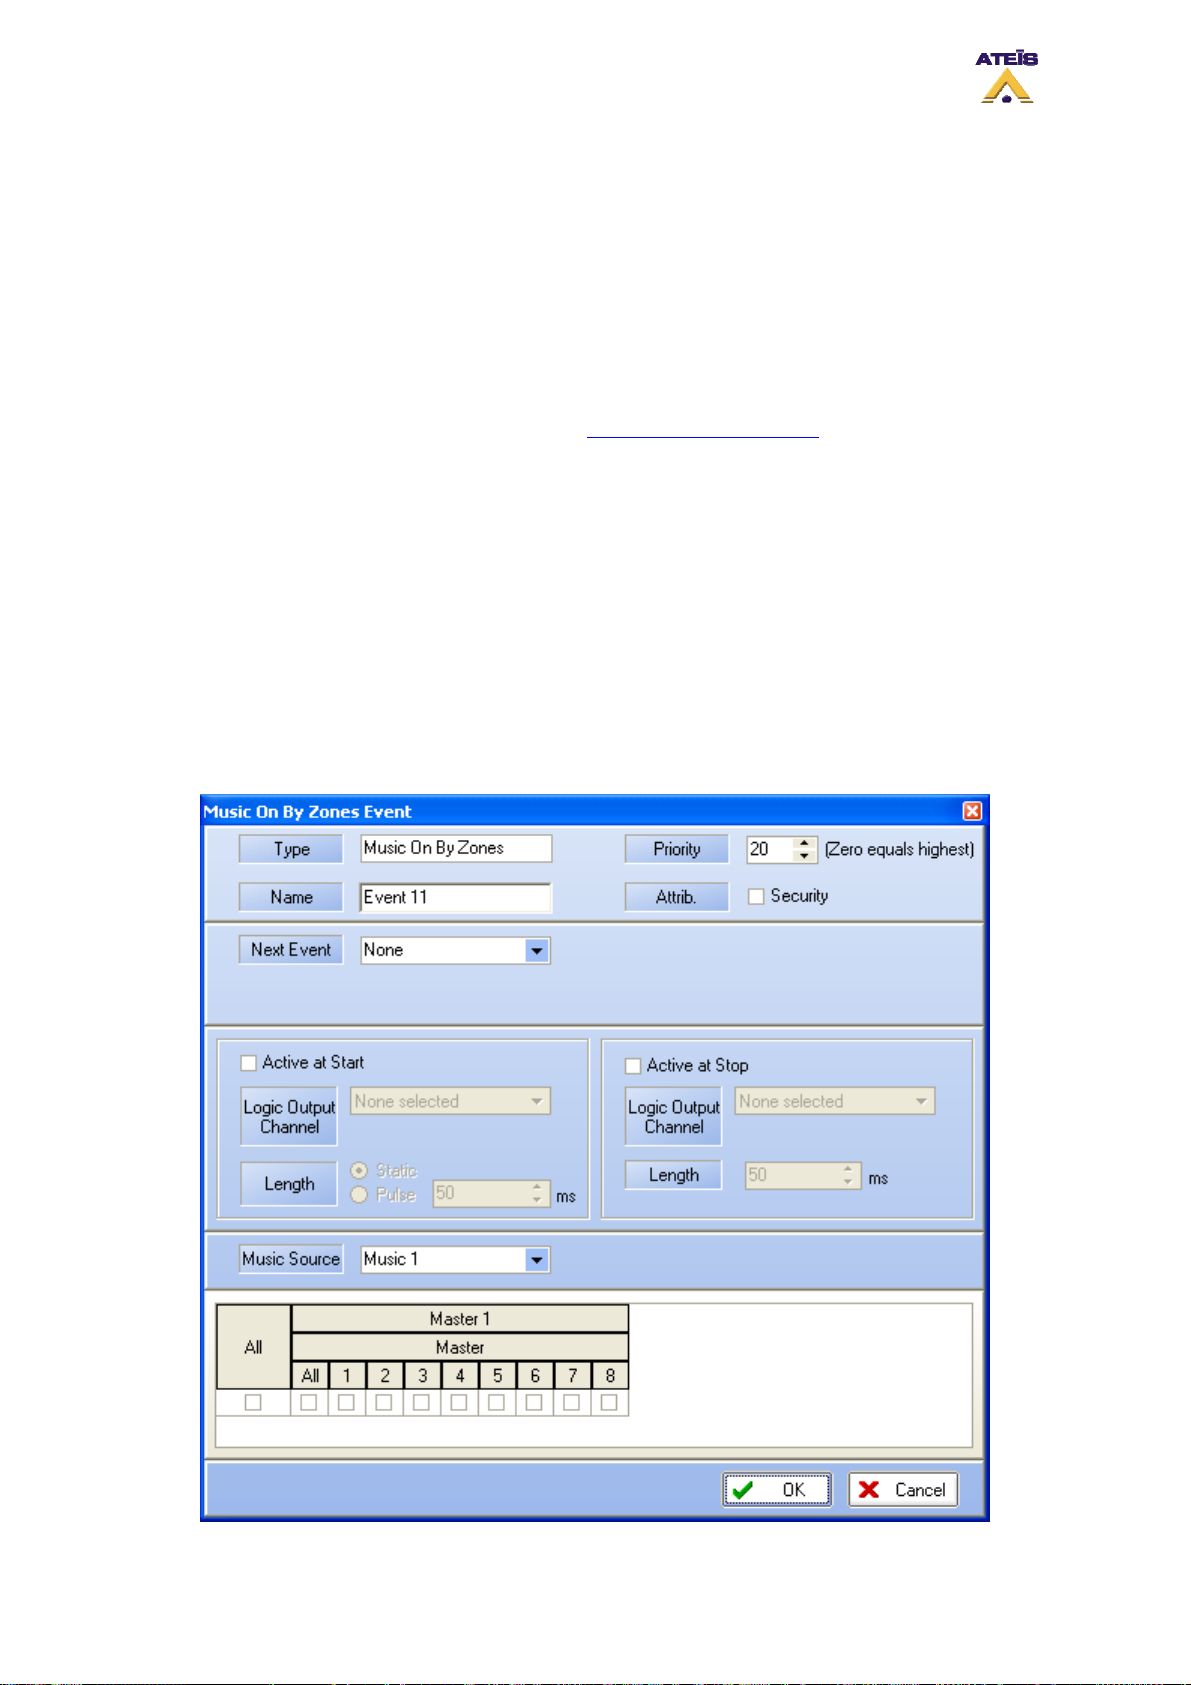
• Active at Start: Ticking this option allows user to close an output contact (Logic Output channel)
in two different manner. Static will close it until the event stop and Pulse will generate a closing
pulse whose length can be defined from 50 to 60000 ms.
• Active at Stop: This option is used to create a closing contact pulse when the event is finished.
The length of the pulse can be defined from 50 to 60000 ms.
• Enable ACK Relay: here you can set the closing of a Logic Output Channel relay as soon as
zones where an event has to be played are freed from higher priority events.
• Enable Busy Relay: here you can specify an Logic Output Channel relay that will be closed as
soon as you will trying to speak in zones where a higher priority event currently playing.
To learn more about output relay, please read the How To Use Output Relay
______________________________________
.
• Conflict: you can choose between Cancel All or Coexist
• Pre Chime: Before a call you can add a chime message. Here, if Pre Chime Enable is selected,
you can select which message will be used as pre chime
• Pre-define Zone: if ticked, you can choose pre defined zone with the zone sel ector
______________________________________
• Zone Selection: here you can specify the zone(s) where the call will be played
8.18.3.11 Music On By Zone
The Music On By Zones event allows to start music source 1 or 2 with any type of trigger in predefined zone(s).
Ateïs International
Ch. du Dévent, 1024 Ecublens, Switzerland.
Phone : +41 21 881 25 10
75
Page 76

• Type: display the type of event you are creating or modifying
• Name: here you can specify a name for the event created. Default is Event X
• Priority: here you can adjust the priority of the event. 20 is the lowest, 0 is the highest
• Attrib: here you can specify if this event is a security one or not. See Common Option to learn
more about the security option
______________________________________
• Next Event: here you can select the event to start after the current on is finished
______________________________________
• Active at Start: Ticking this option allows user to close an output contact (Logic Output channel)
in two different manner. Static will close it until the event stop and Pulse will generate a closing
pulse whose length can be defined from 50 to 60000 ms.
• Active at Stop: This option is used to create a closing contact pulse when the event is finished.
The length of the pulse can be defined from 50 to 60000 ms.
To learn more about output relay, please read the How To Use Output Relay
______________________________________
.
• Music Source: here you can choose the music source you want to switch on
______________________________________
• Zone Selection: here you can specify the zone(s) where the music will be played
8.18.3.12 Music Off By Zone
The Music Off By Zones event allows to stop music source 1 or 2 with any type of trigger in predefined zone(s).
Ateïs International
Ch. du Dévent, 1024 Ecublens, Switzerland.
Phone : +41 21 881 25 10
76
Page 77
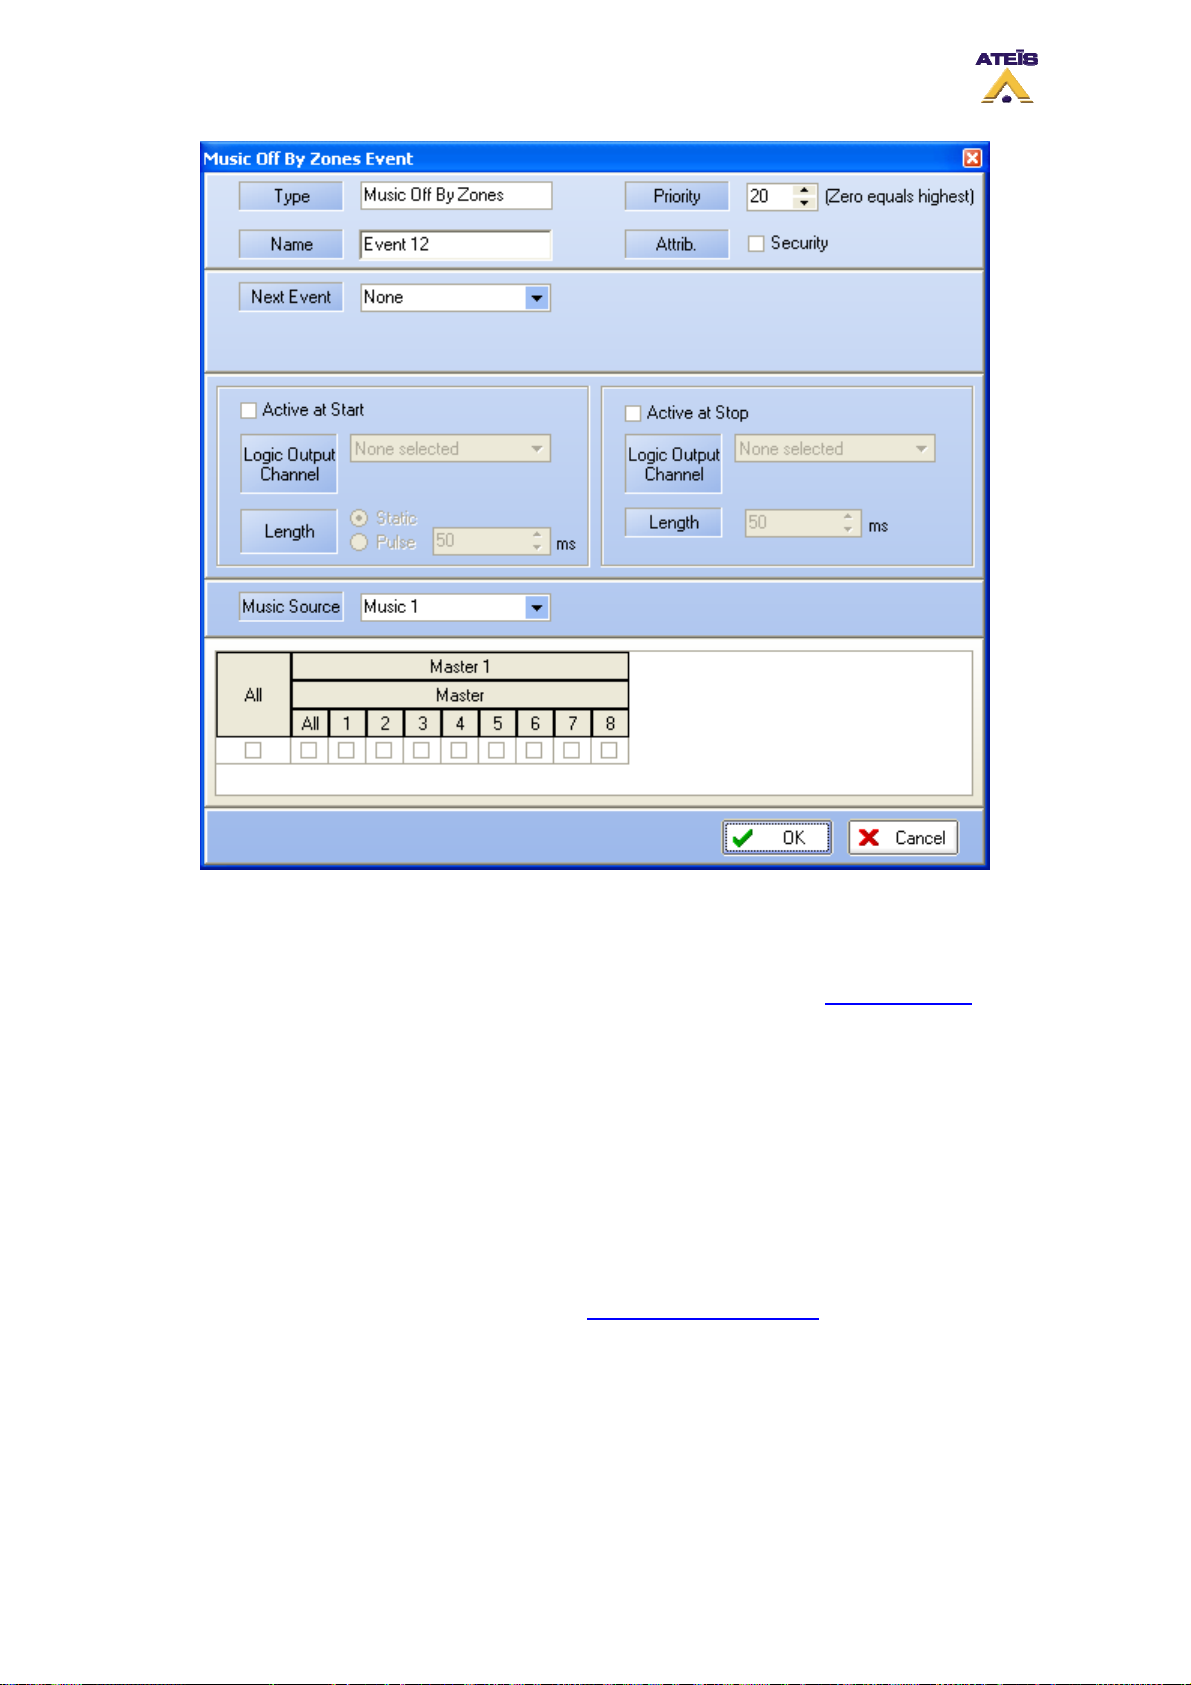
• Type: display the type of event you are creating or modifying
• Name: here you can specify a name for the event created. Default is Event X
• Priority: here you can adjust the priority of the event. 20 is the lowest, 0 is the highest
• Attrib: here you can specify if this event is a security one or not. See Common Option to learn
more about the security option
______________________________________
• Next Event: here you can select the event to start after the current on is finished
______________________________________
• Active at Start: Ticking this option allows user to close an output contact (Logic Output channel)
in two different manner. Static will close it until the event stop and Pulse will generate a closing
pulse whose length can be defined from 50 to 60000 ms.
• Active at Stop: This option is used to create a closing contact pulse when the event is finished.
The length of the pulse can be defined from 50 to 60000 ms.
To learn more about output relay, please read the How To Use Output Relay
______________________________________
.
• Music Source: here you can choose the music source you want to switch off
______________________________________
• Zone Selection: here you can specify the zone(s) where the music will stop playing
Ateïs International
Ch. du Dévent, 1024 Ecublens, Switzerland.
Phone : +41 21 881 25 10
77
Page 78
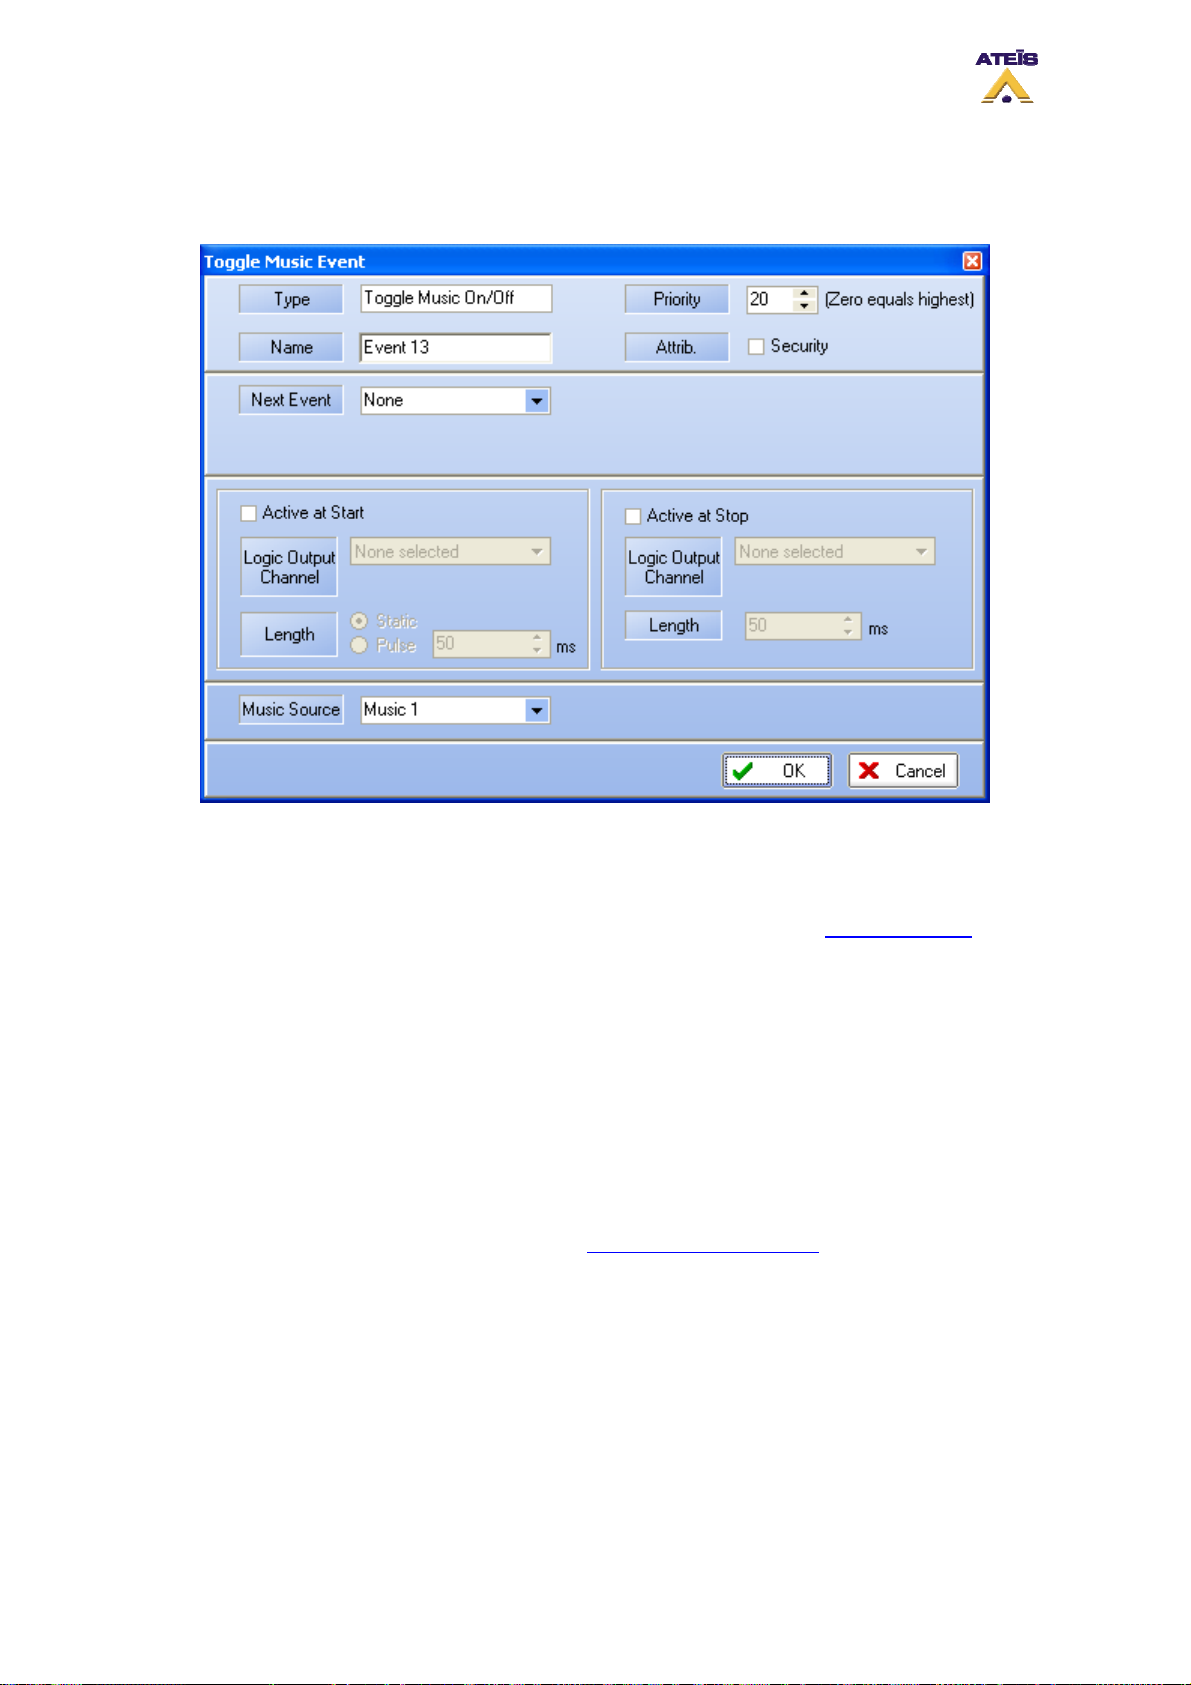
8.18.3.13 Toggle Music On/Off
The Toggle Music On/Off event have been created to turn music on or off with one same trigger. As
example, using a contact, one closing will switch on music, one more closing will switch off music.
• Type: display the type of event you are creating or modifying
• Name: here you can specify a name for the event created. Default is Event X
• Priority: here you can adjust the priority of the event. 20 is the lowest, 0 is the highest
• Attrib: here you can specify if this event is a security one or not. See Common Option to learn
more about the security option
______________________________________
• Next Event: here you can select the event to start after the current on is finished
______________________________________
• Active at Start: Ticking this option allows user to close an output contact (Logic Output channel)
in two different manner. Static will close it until the event stop and Pulse will generate a closing
pulse whose length can be defined from 50 to 60000 ms.
• Active at Stop: This option is used to create a closing contact pulse when the event is finished.
The length of the pulse can be defined from 50 to 60000 ms.
To learn more about output relay, please read the How To Use Output Relay
______________________________________
.
• Music Source: here you can choose the music source you want to switch on/off
8.18.3.14 Toggle Music On/Off By Zone
The Toggle Music On/Off By Zone event have been created to turn music on or off with one same
trigger in some zones. As example, using a contact, one closing will switch on music, one more
closing will switch off music in pre-defined zone(s).
Ateïs International
Ch. du Dévent, 1024 Ecublens, Switzerland.
Phone : +41 21 881 25 10
78
Page 79
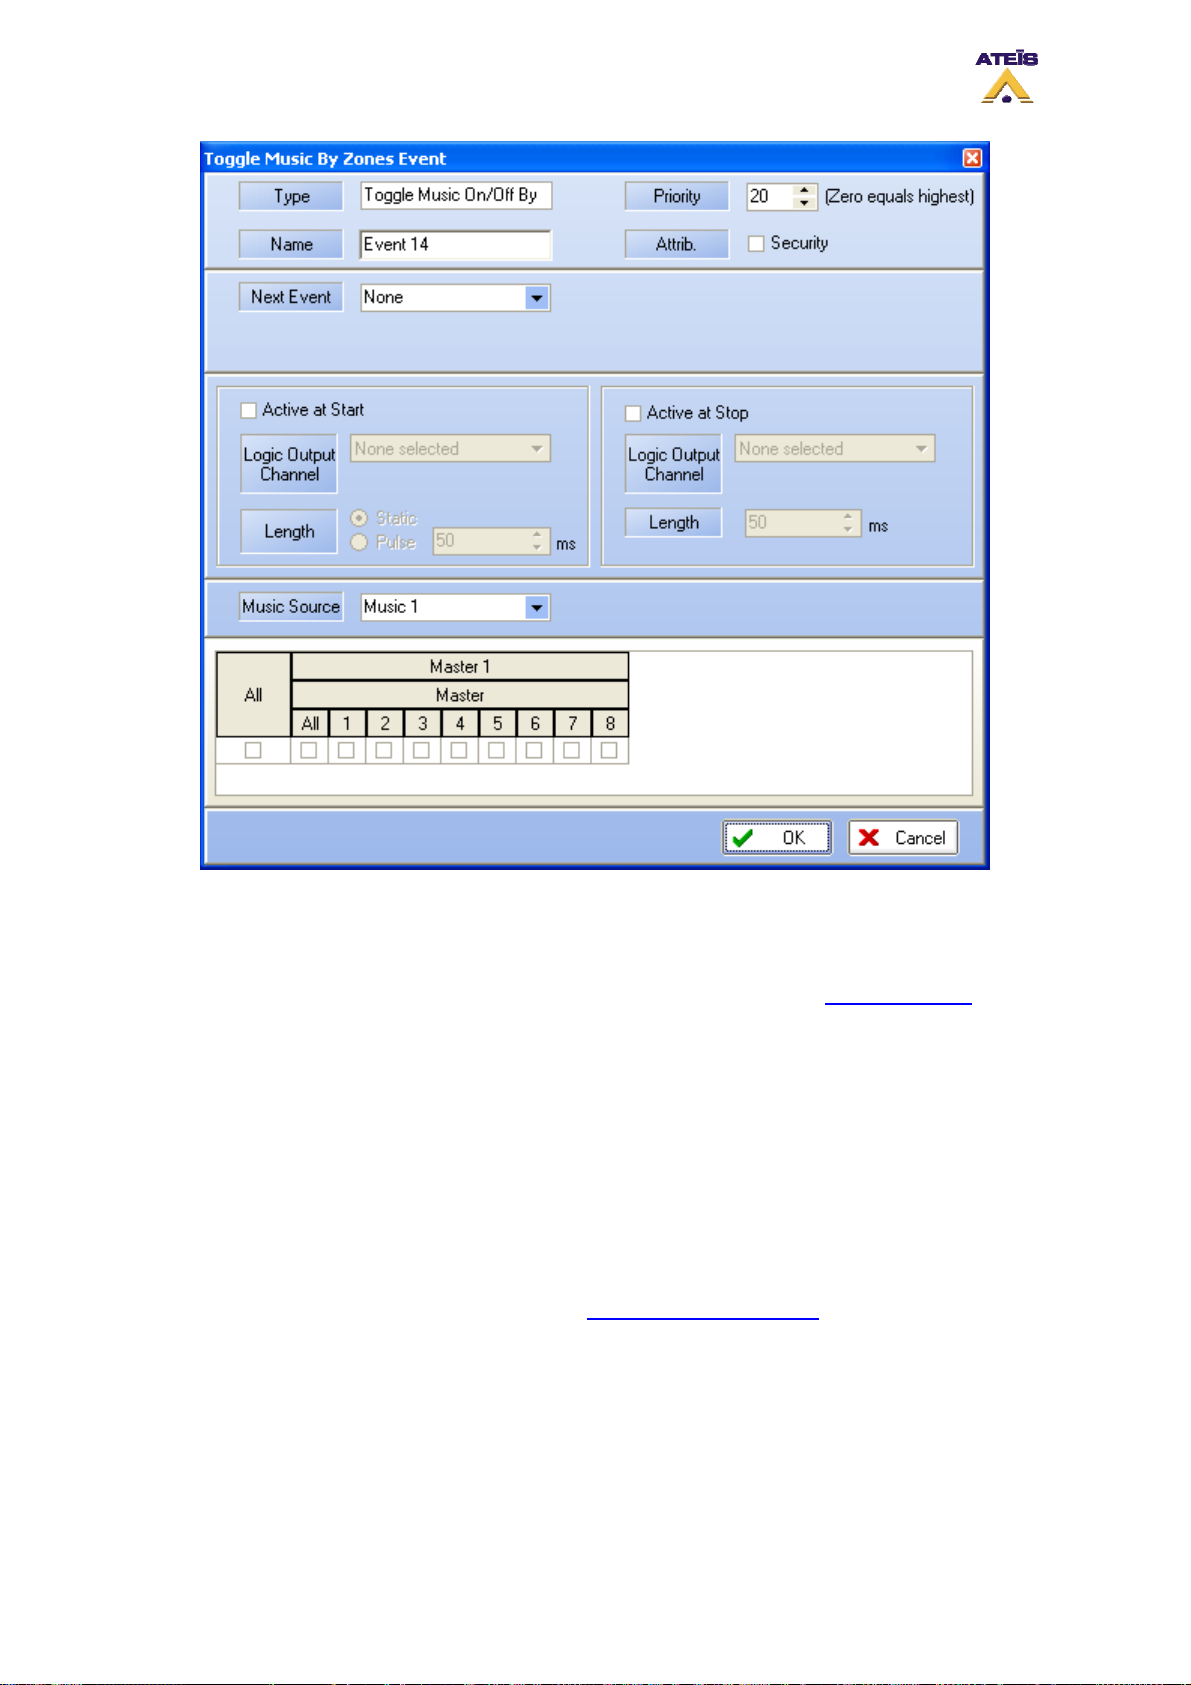
• Type: display the type of event you are creating or modifying
• Name: here you can specify a name for the event created. Default is Event X
• Priority: here you can adjust the priority of the event. 20 is the lowest, 0 is the highest
• Attrib: here you can specify if this event is a security one or not. See Common Option to learn
more about the security option
______________________________________
• Next Event: here you can select the event to start after the current on is finished
______________________________________
• Active at Start: Ticking this option allows user to close an output contact (Logic Output channel)
in two different manner. Static will close it until the event stop and Pulse will generate a closing
pulse whose length can be defined from 50 to 60000 ms.
• Active at Stop: This option is used to create a closing contact pulse when the event is finished.
The length of the pulse can be defined from 50 to 60000 ms.
To learn more about output relay, please read the How To Use Output Relay
______________________________________
.
• Music Source: here you can choose the music source you want to switch on/off
______________________________________
• Zone Selection: here you can specify the zone(s) where the music will be played and stopped
Ateïs International
Ch. du Dévent, 1024 Ecublens, Switzerland.
Phone : +41 21 881 25 10
79
Page 80
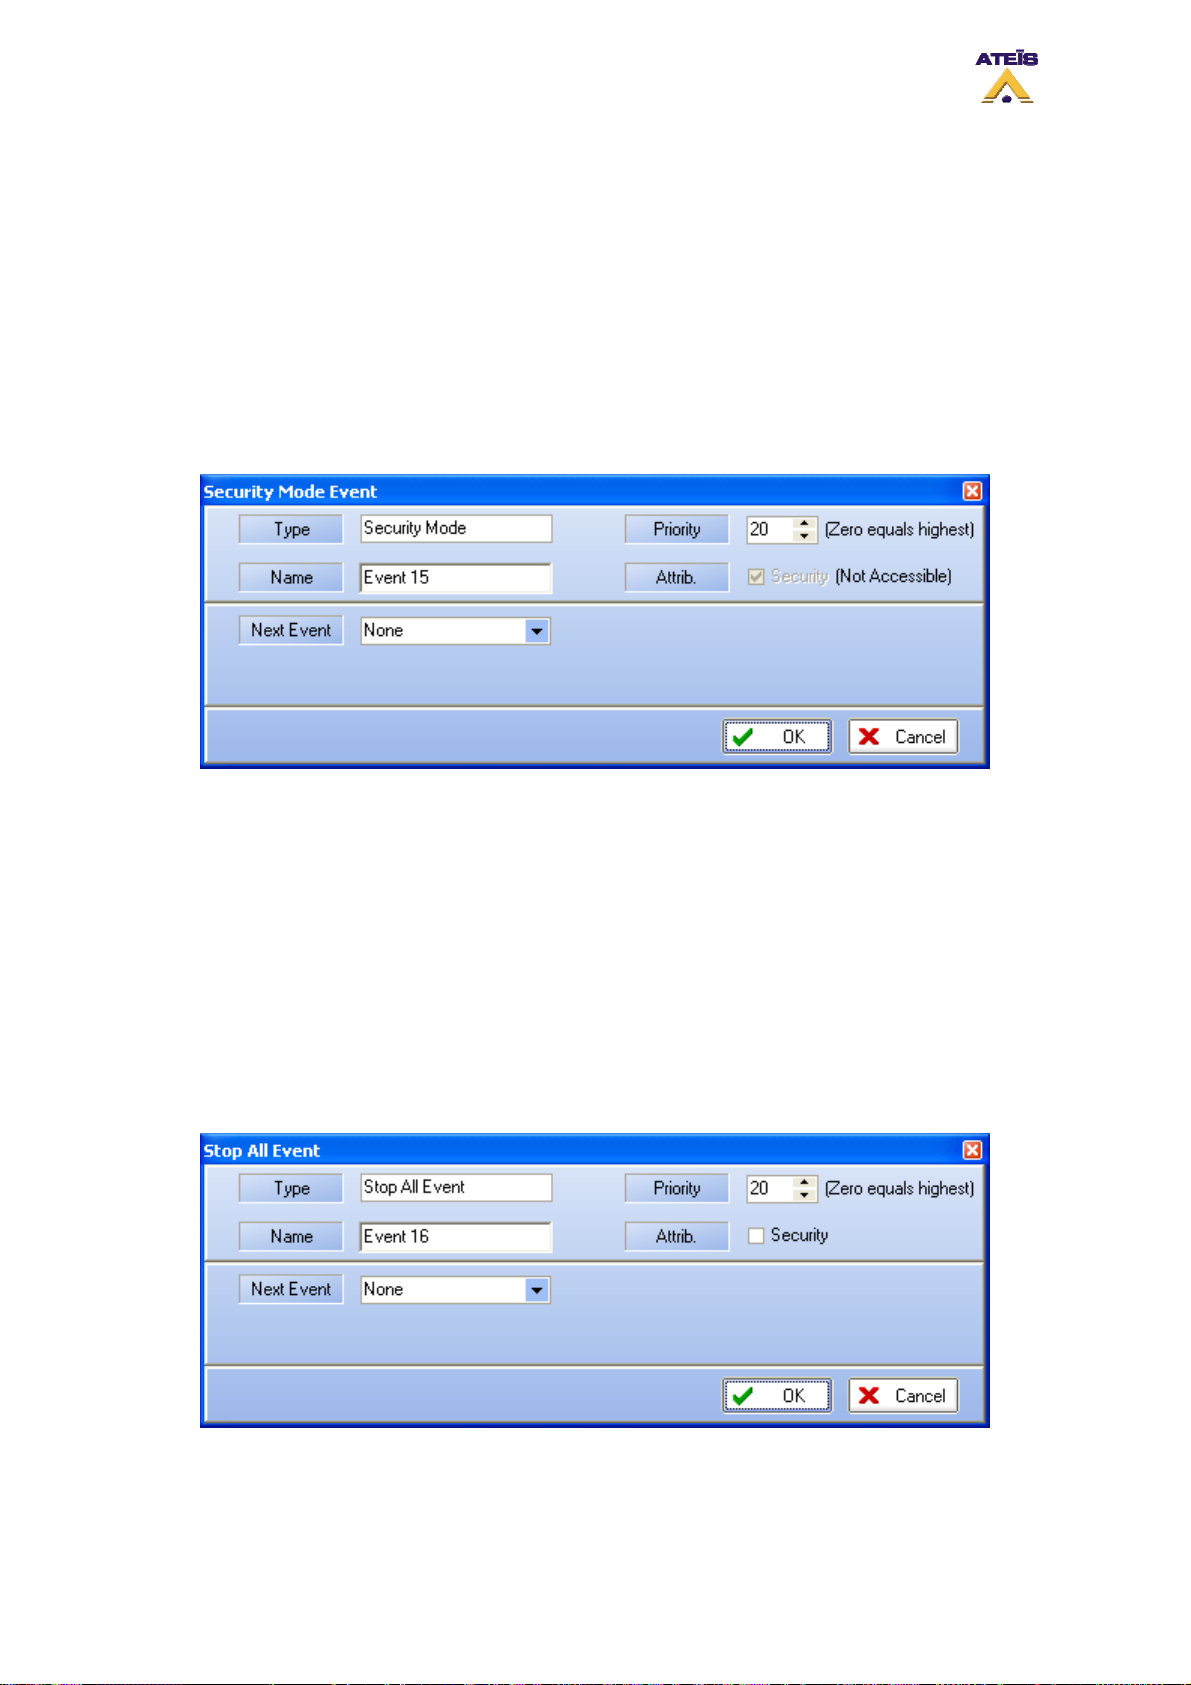
8.18.3.15 Security Mode
In order to be compliant to standard and to save energy, DIVA has to working mode: Normal and
Security.
Normal: normal mode is when DIVA is supplied by the electricity network. In normal mode, any type
of event could be started
Security: security mode is when DIVA is supplied by backup batteries after a power supply failure. In
security mode, only security event could be started, Music is automatically desactivated. This have
been made to save energy and to increase DIVA working state under batteries.
In order to fit the event philosophy, you can force DIVA to enter the security mode with the Security
Mode event. Be carefull when using such an event, all non security event will be unavailable.
• Type: display the type of event you are creating or modifying
• Name: here you can specify a name for the event created. Default is Event X
• Priority: here you can adjust the priority of the event. 20 is the lowest, 0 is the highest
• Attrib: not accessible
______________________________________
• Next Event: here you can select the event to start after the current on is finished
8.18.3.16 Stop All Events
This event has been design in order to stop event that are currently running in the system with one
trigger action.
• Type: display the type of event you are creating or modifying
• Name: here you can specify a name for the event created. Default is Event X
• Priority: here you can adjust the priority of the event. 20 is the lowest, 0 is the highest
Ateïs International
Ch. du Dévent, 1024 Ecublens, Switzerland.
Phone : +41 21 881 25 10
80
Page 81
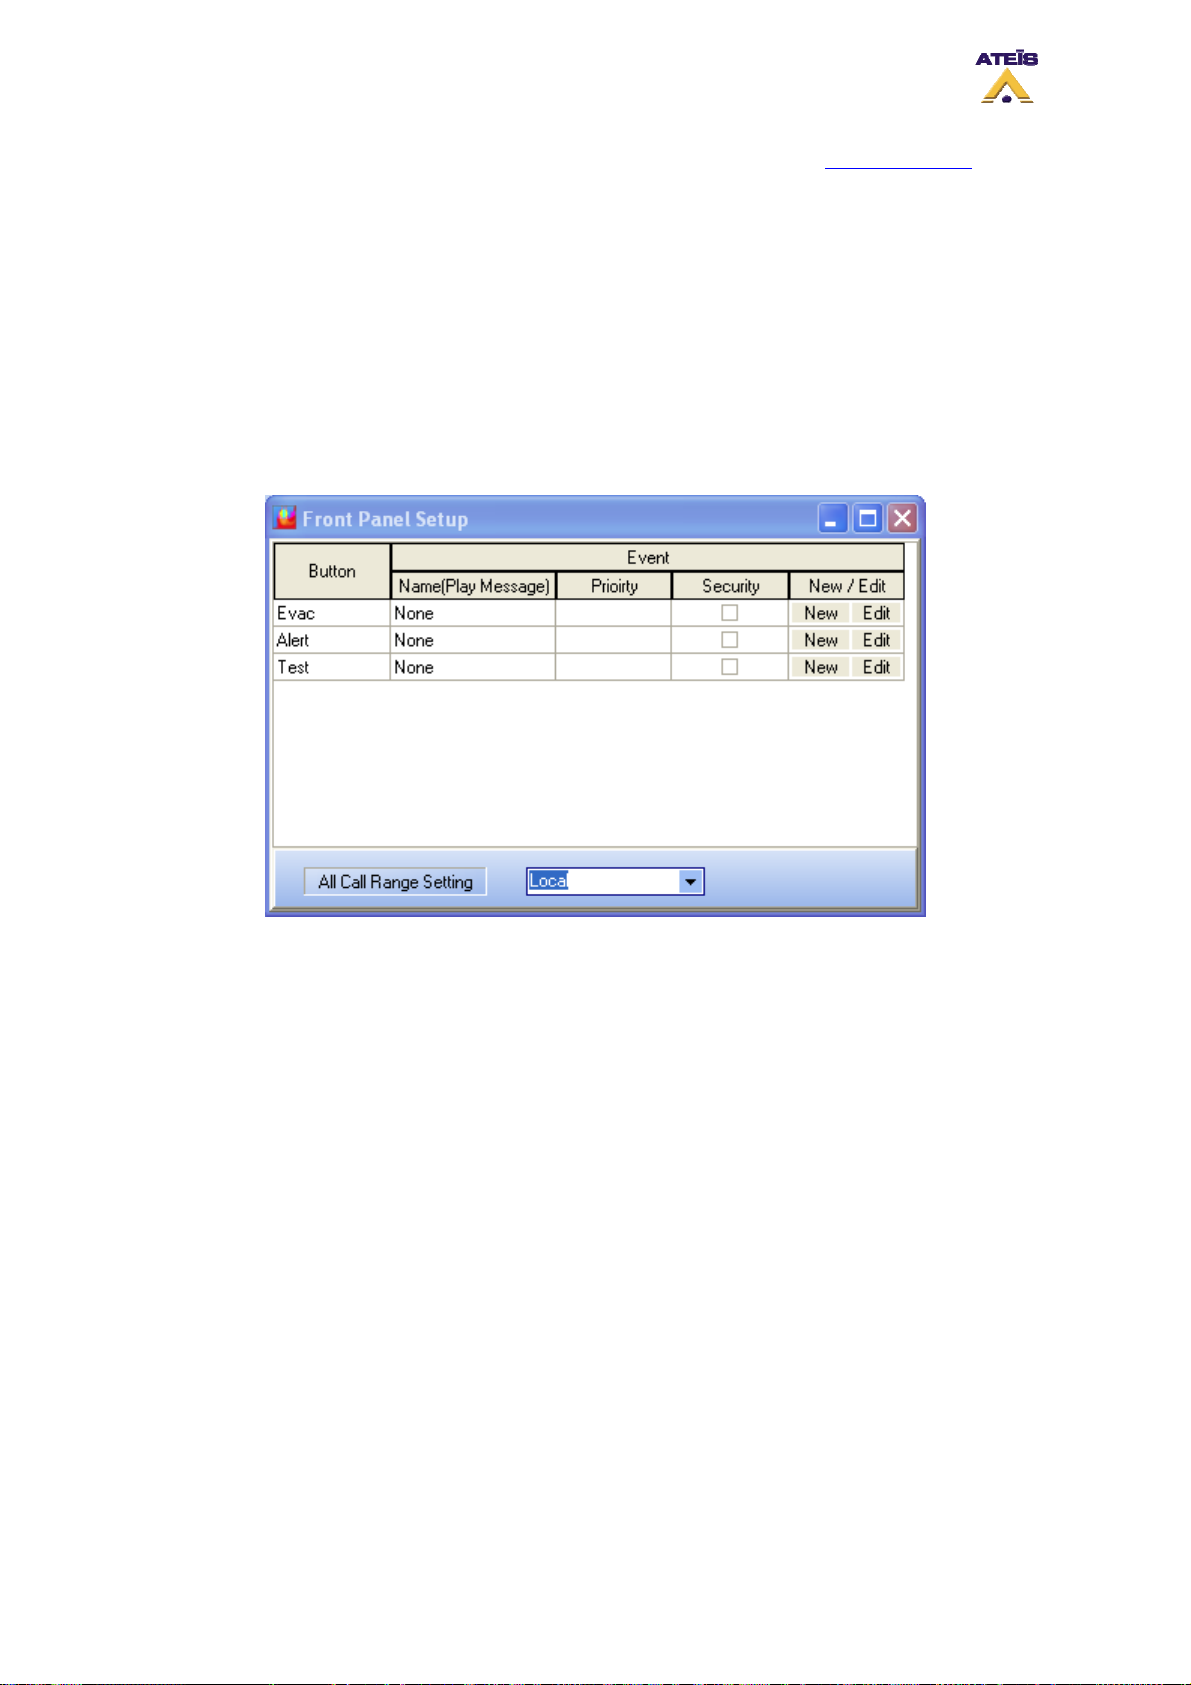
• Attrib: here you can specify if this event is a security one or not. See Common Option to learn
more about the security option
______________________________________
• Next Event: here you can select the event to start after the current on is finished
8.19 Set up Front Panel Messages
There are three message button on the front panel: Evacuation, Alarm and Test. In order to assign
play message events to those buttons, follow the next steps.
Access the front panel setup window by clicking on the Front Panel Setup button in the master page,
see below.
At the left of the window, you will find the button name. You can set an event for only one button, two
or all.
• In the corresponding line, click on New to assign a new play message event to the button. Event
created is by default named Event X.
• Click the Edit button of the corresponding line to enter the play message event window, see
below.
Ateïs International
Ch. du Dévent, 1024 Ecublens, Switzerland.
Phone : +41 21 881 25 10
81
Page 82
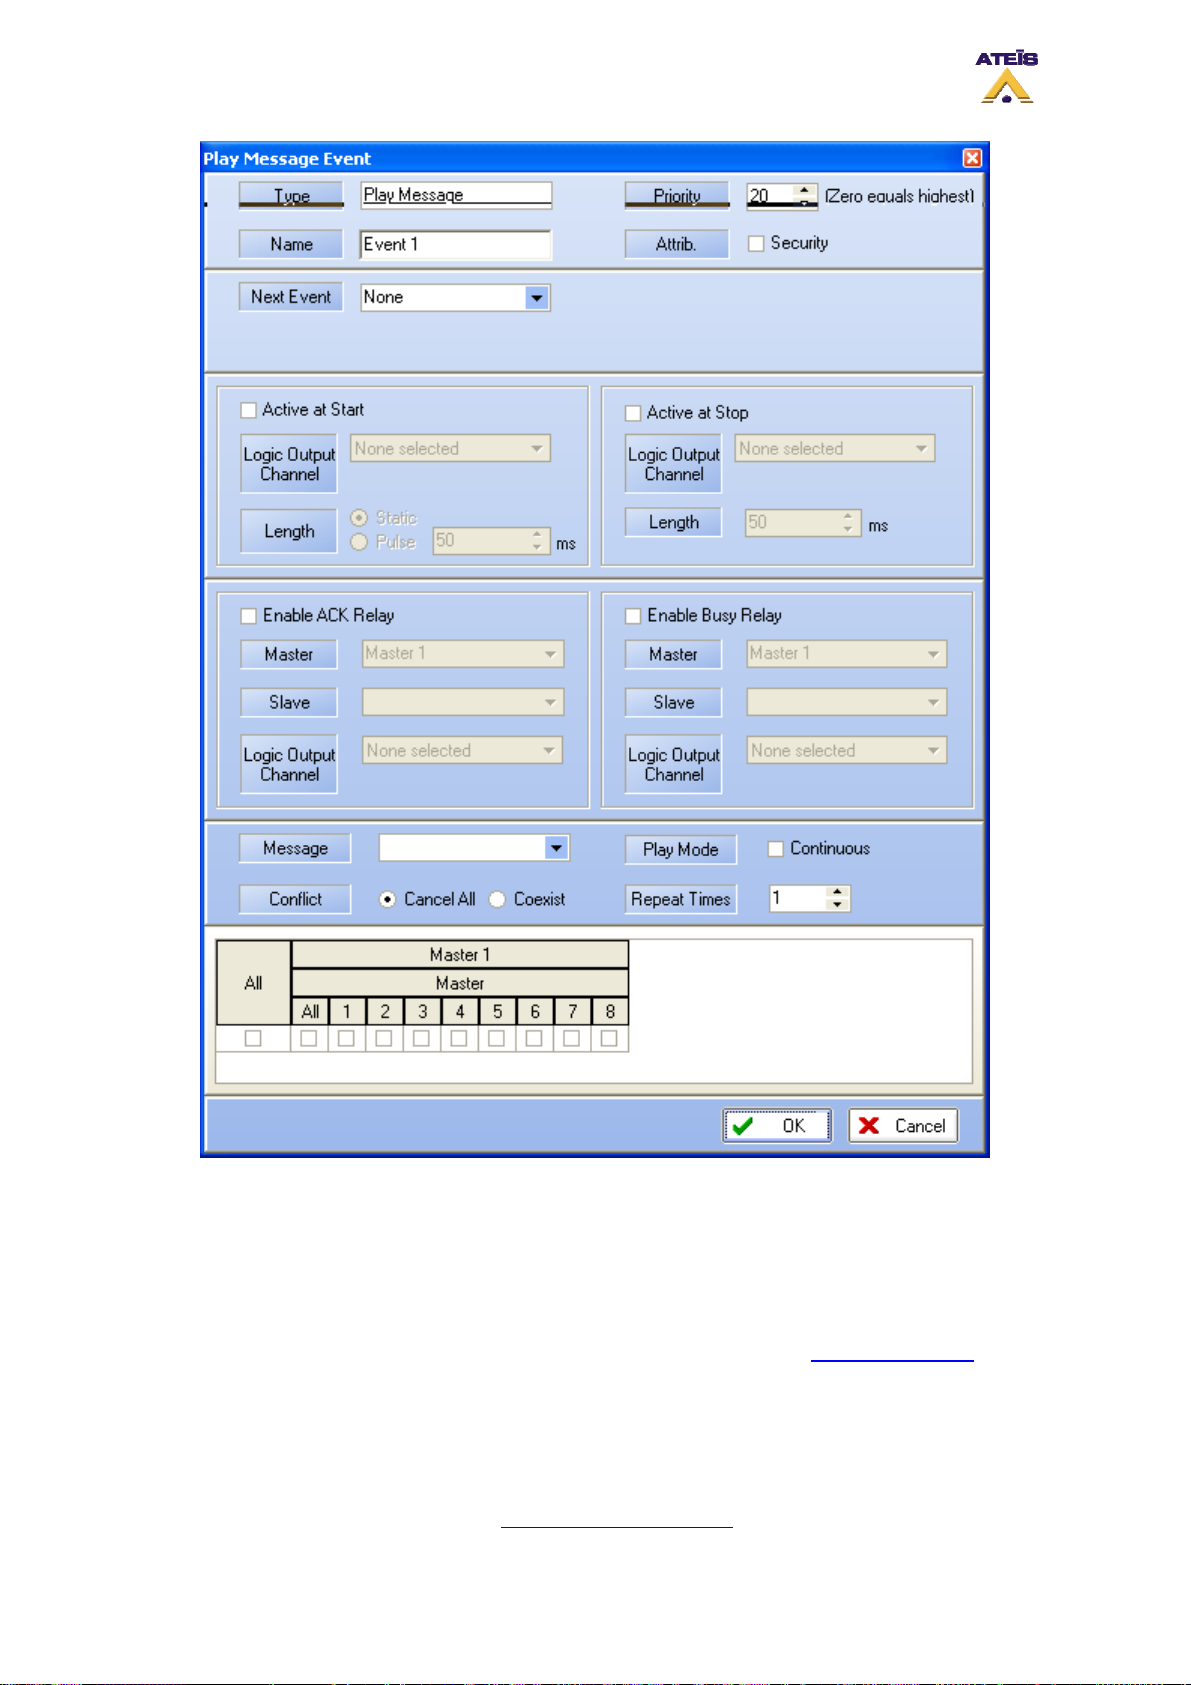
In the Play Message Event window, you will find controls and indicators, please refer to the following
list:
• Type: display the type of event you are creating or modifying
• Name: here you can specify a name for the event created. Default is Event X.
• Priority: here you can adjust the priority of the event. 20 is the lowest, 0 is the highest.
• Attrib: here you can specify if this event is a security one or not. See How to Use Event to learn
more about the security option.
______________________________________
• Next Event: here you can select the event to start after the current on is finished
______________________________________
The output relay part is discussed in the How To Use Output Relay
Ateïs International
Ch. du Dévent, 1024 Ecublens, Switzerland.
Phone : +41 21 881 25 10
, please read it.
82
Page 83
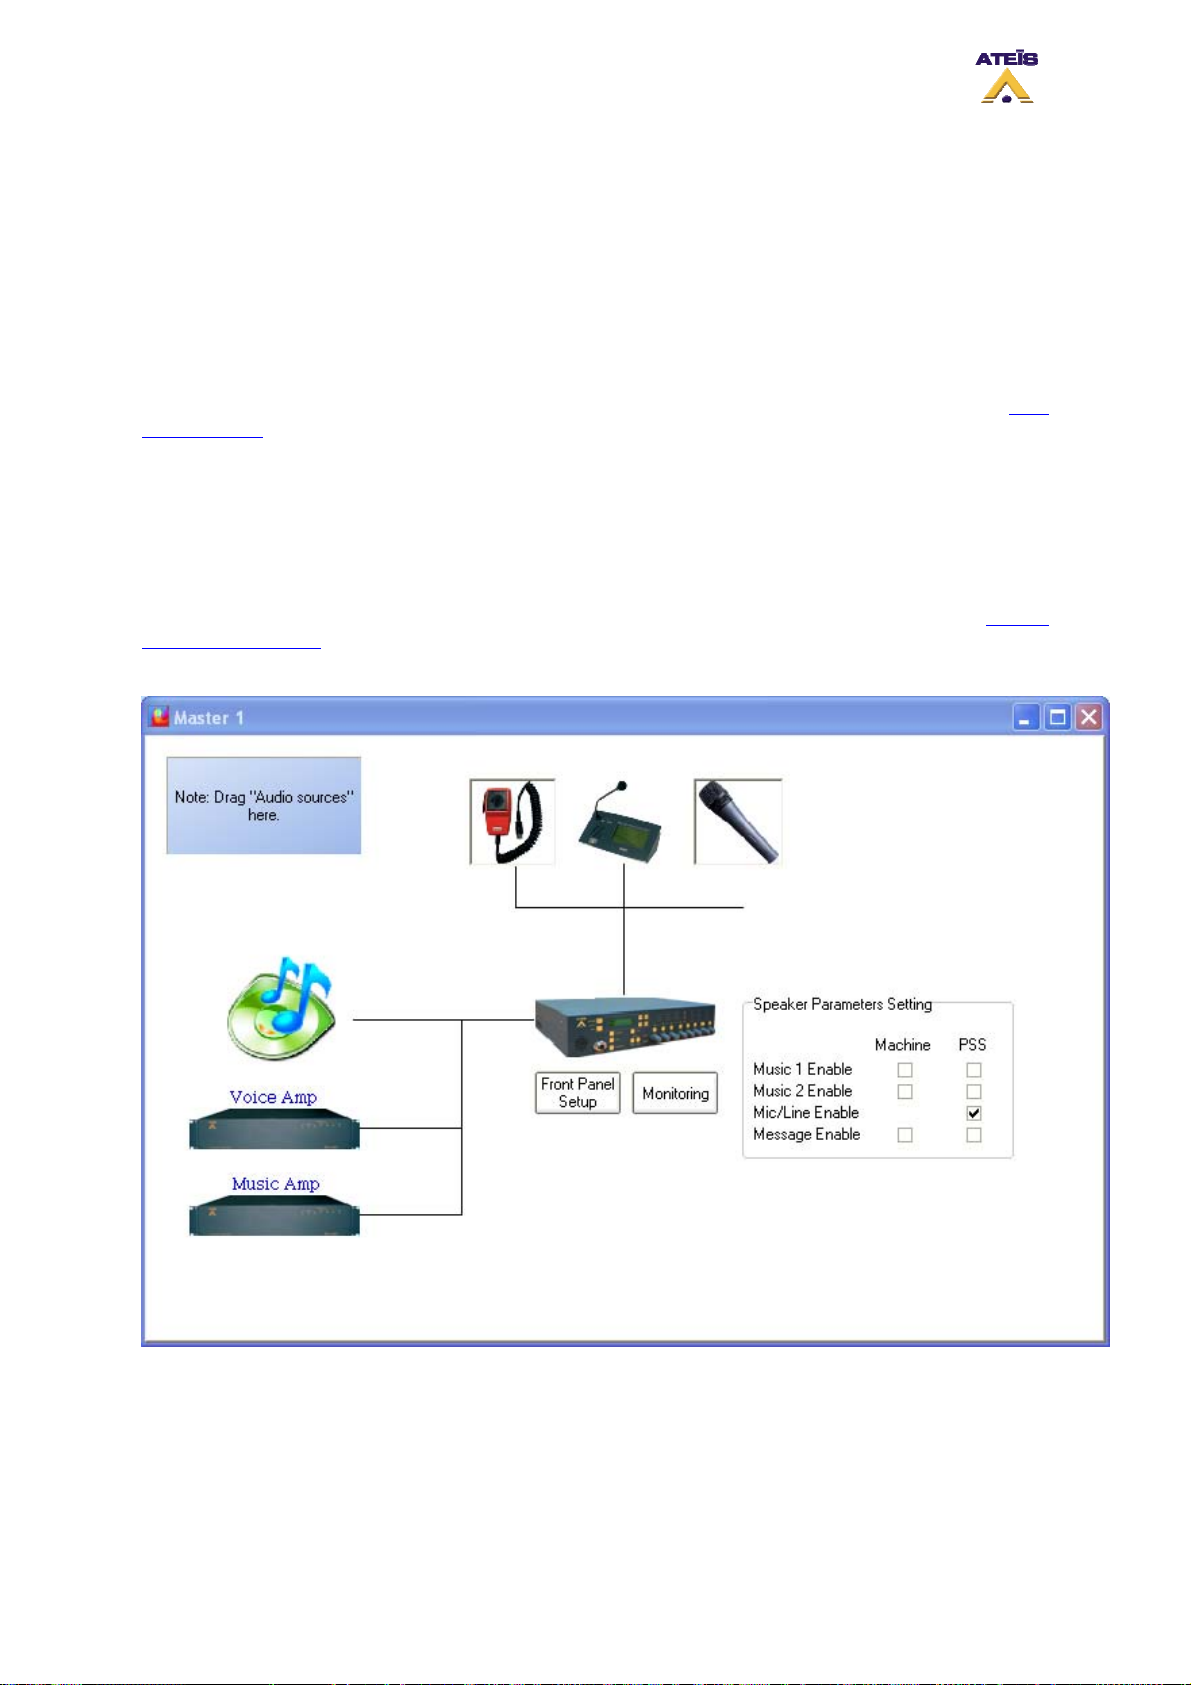
______________________________________
• Message: by using the drop down menu, you can select, in the list of stored message, a
message to assign to the event
• Play Mode: by ticking continuous, the message will be played until a trigger happen
• Conflict: you can choose between Cancel All or Coexist
• Repeat Time: if continuous not ticked, you can choose a number of time this event will be
repeated
______________________________________
In the last section, you can specify in which zone this event should take act. Please refer to the How
To Use Event to learn more.
______________________________________
• OK: will accept the current setting and close the window
• Cancel: will annulled the current settings and close the window
8.20 Use Fireman Microphone
In order to use the fireman microphone, first drag and drop the fireman microphone from the Design
Component Section to the Master window. Double click the fireman microphone icon to enter the
Fireman Microphone window (see below).
Here is a list of controls and indicator in the fireman microphone window:
• Advance Setting: by clicking the Edit button you will enter the fireman microphone event setting
window. Please see below.
Note: the fireman microphone paging mode is always push to talk. By default, the priority of the
fireman microphone is set to zero, the highest priority available, and the security event is ticked. The
Ateïs International
Ch. du Dévent, 1024 Ecublens, Switzerland.
Phone : +41 21 881 25 10
83
Page 84
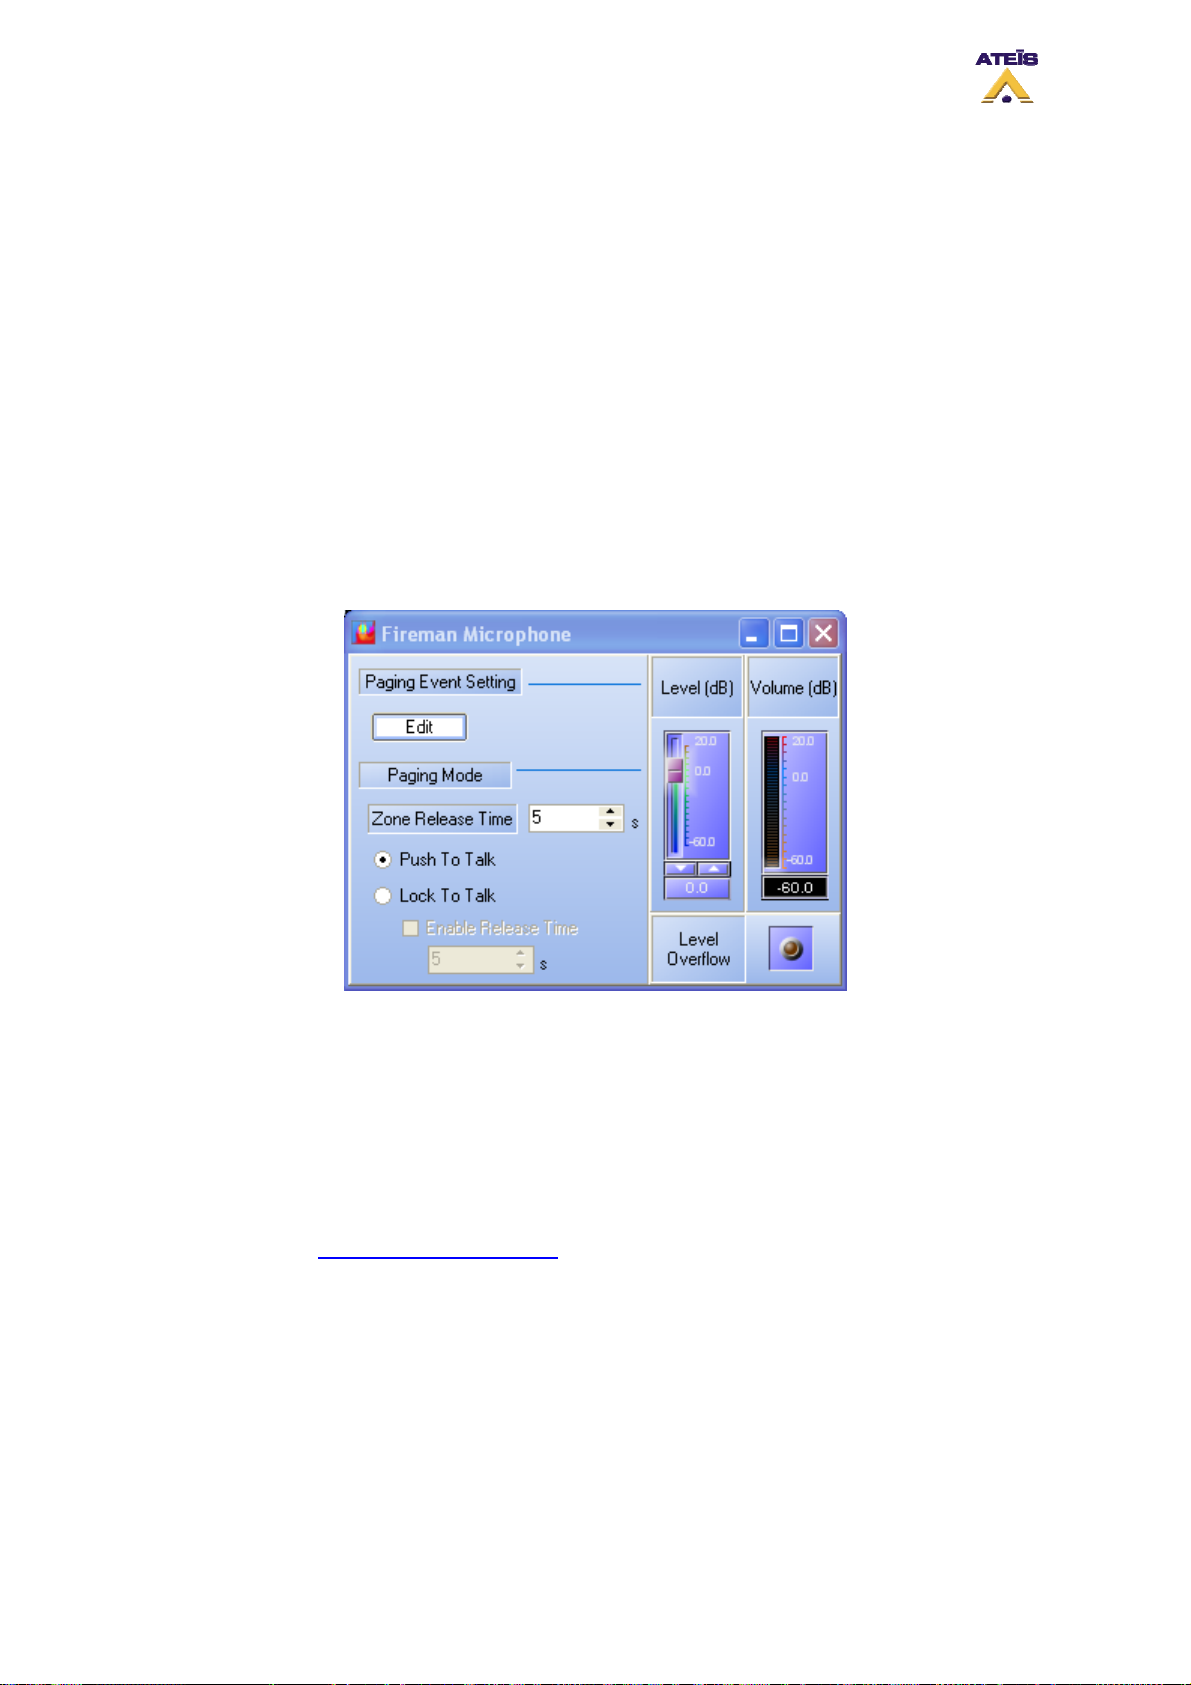
fireman microphone have been designed to be an emergency paging element, so be careful when
changing priority and security settings.
• Level (dB): When connected to DIVA, you can adjust, real time mode, the level of the fireman
microphone
• Volume (dB): Indicates the current output level of the fireman microphone
• Level Overflow: This is a LED indicators that light up when a too high level is detected on the
fireman microphone
______________________
• Zone Release Time: here you can set a time for which the manually zone selection is kept in
memory. Since this time has passed, the next fireman microphone called will be routed in the pre-
define zone
• Push to talk: with this option ticked, you will need to keep the microphone button pressed in order
to be able to talk
• Lock To Talk: with this option ticked, one pressure on the microphone button will start the call and
one more pressure will stop the call. For safe operations, you can set a time after which the call is
automatically stopped
The Fireman Microphone Paging Event window (see below) is divided in several section where you
will be able to set:
• Priority: you can specify a priority level between 20 and zero. The highest priority level is 0 when
20 is the lowest
• Security: by ticking security, you will allow user to make a call when DIVA is in security mode
______________________
• The next portion of the window is dedicated to the output relay management. In order to find out to
use please see "How to Use Output Relay"
______________________
.
• Conflict: here you can choose how to manage priority conflict. “Cancel All” consists of cancelling
all the messages or events, with a lower priority, that are currently playing in the selected zone.
“Coexist” permit to momentarily disable the current message or event and to retrieve it as soon as
the one with a higher priority has finished.
• Pre-Chime: the pre-chime option allows to play a chime message before each call. You can
choose the chime message using the drop-down menu.
• Pre-define Zone: by ticking this option you will be able to select pre-define zone in which the call
will be made. Pre-defining zones don't disable the front-panel zones selector. As soon as a call in
Ateïs International
Ch. du Dévent, 1024 Ecublens, Switzerland.
Phone : +41 21 881 25 10
84
Page 85
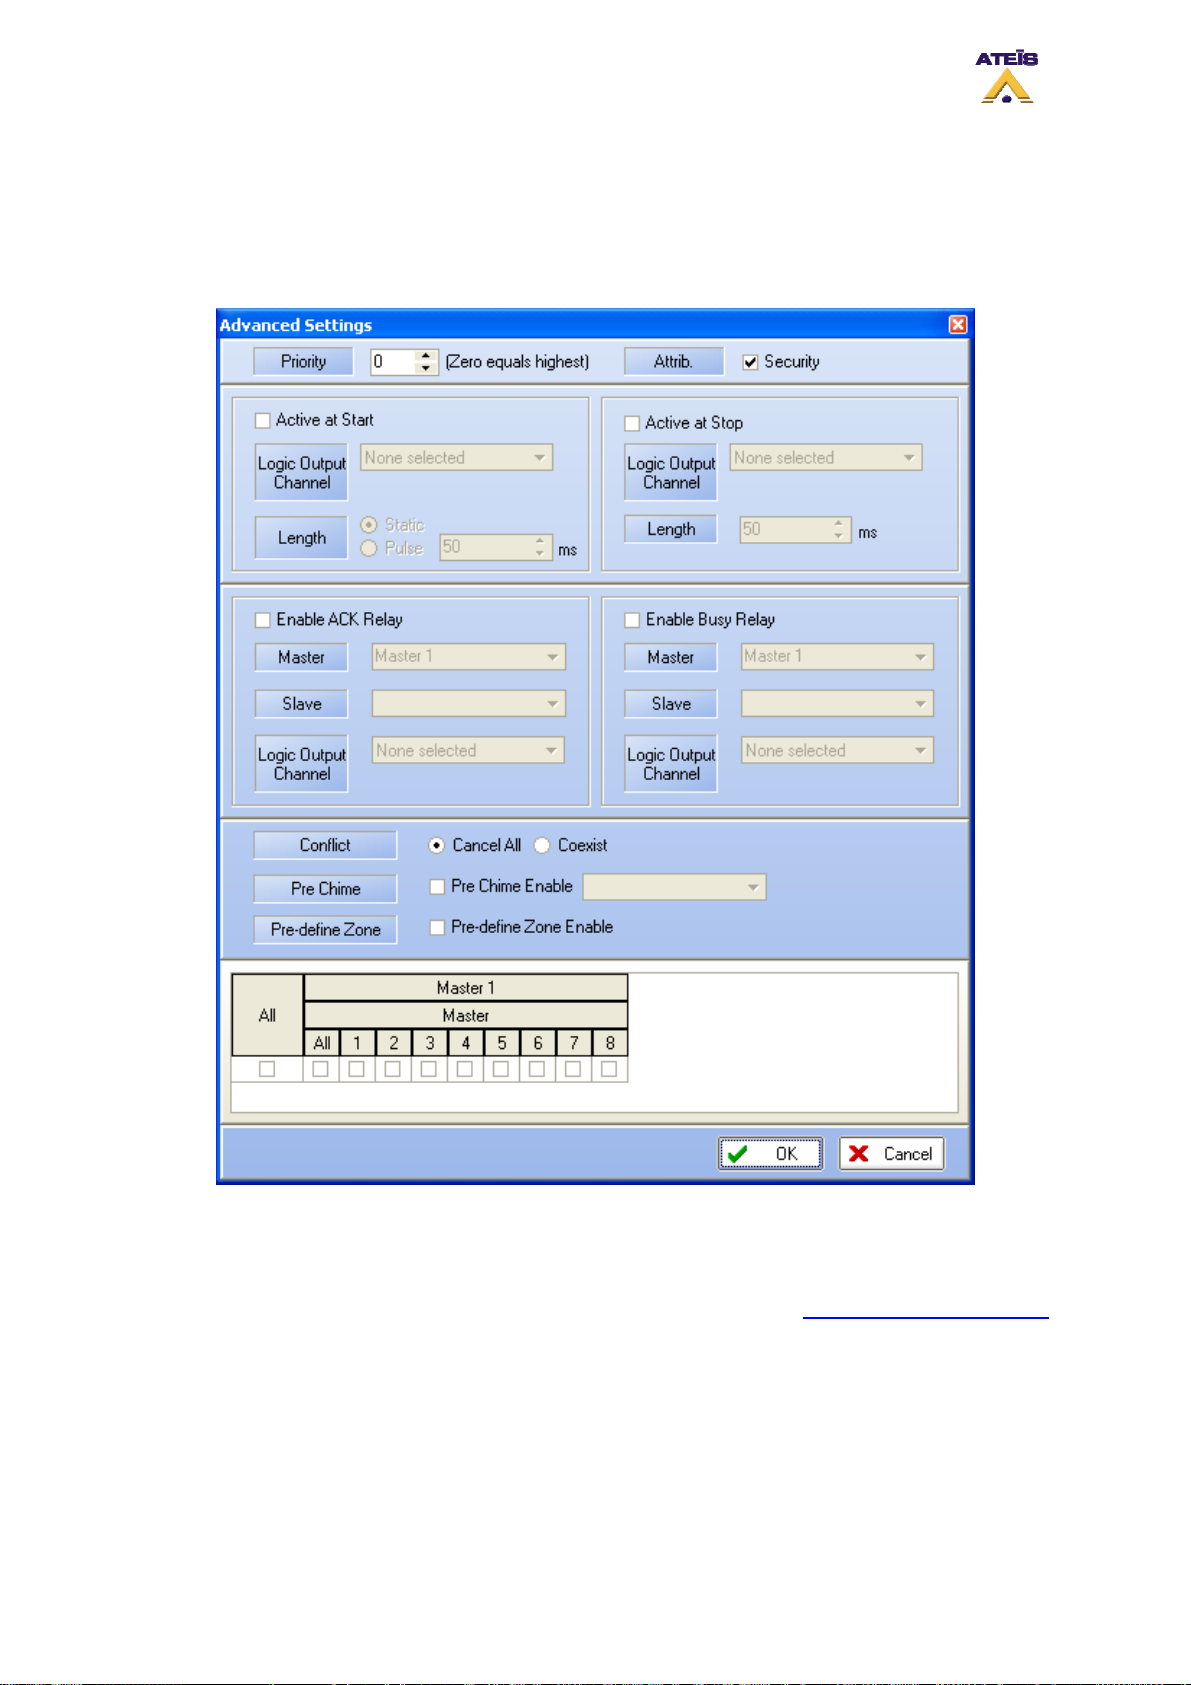
non pre-defined zone is finished, the next call will be automatically rerouted in the pre-defined
zone after the amount of time set in the fireman microphone main window.
______________________
• By clicking Ok you will validate your settings, Cancel will annulled the current settings.
8.21 Use Music Source
In order to use music sources, first drag and drop music source from the Design Component Section
to the Master window. Double-click the music source Icon to enter the Music Source window, see
below.
Music sources routing can be managed from front panel, from PSS and from logic input. You can also
use real-time control and indicators in order to adjust the music sources' level, to mute sources
independently and to check music sources status.
See the following chapter to learn more:
Ateïs International
Ch. du Dévent, 1024 Ecublens, Switzerland.
Phone : +41 21 881 25 10
85
Page 86
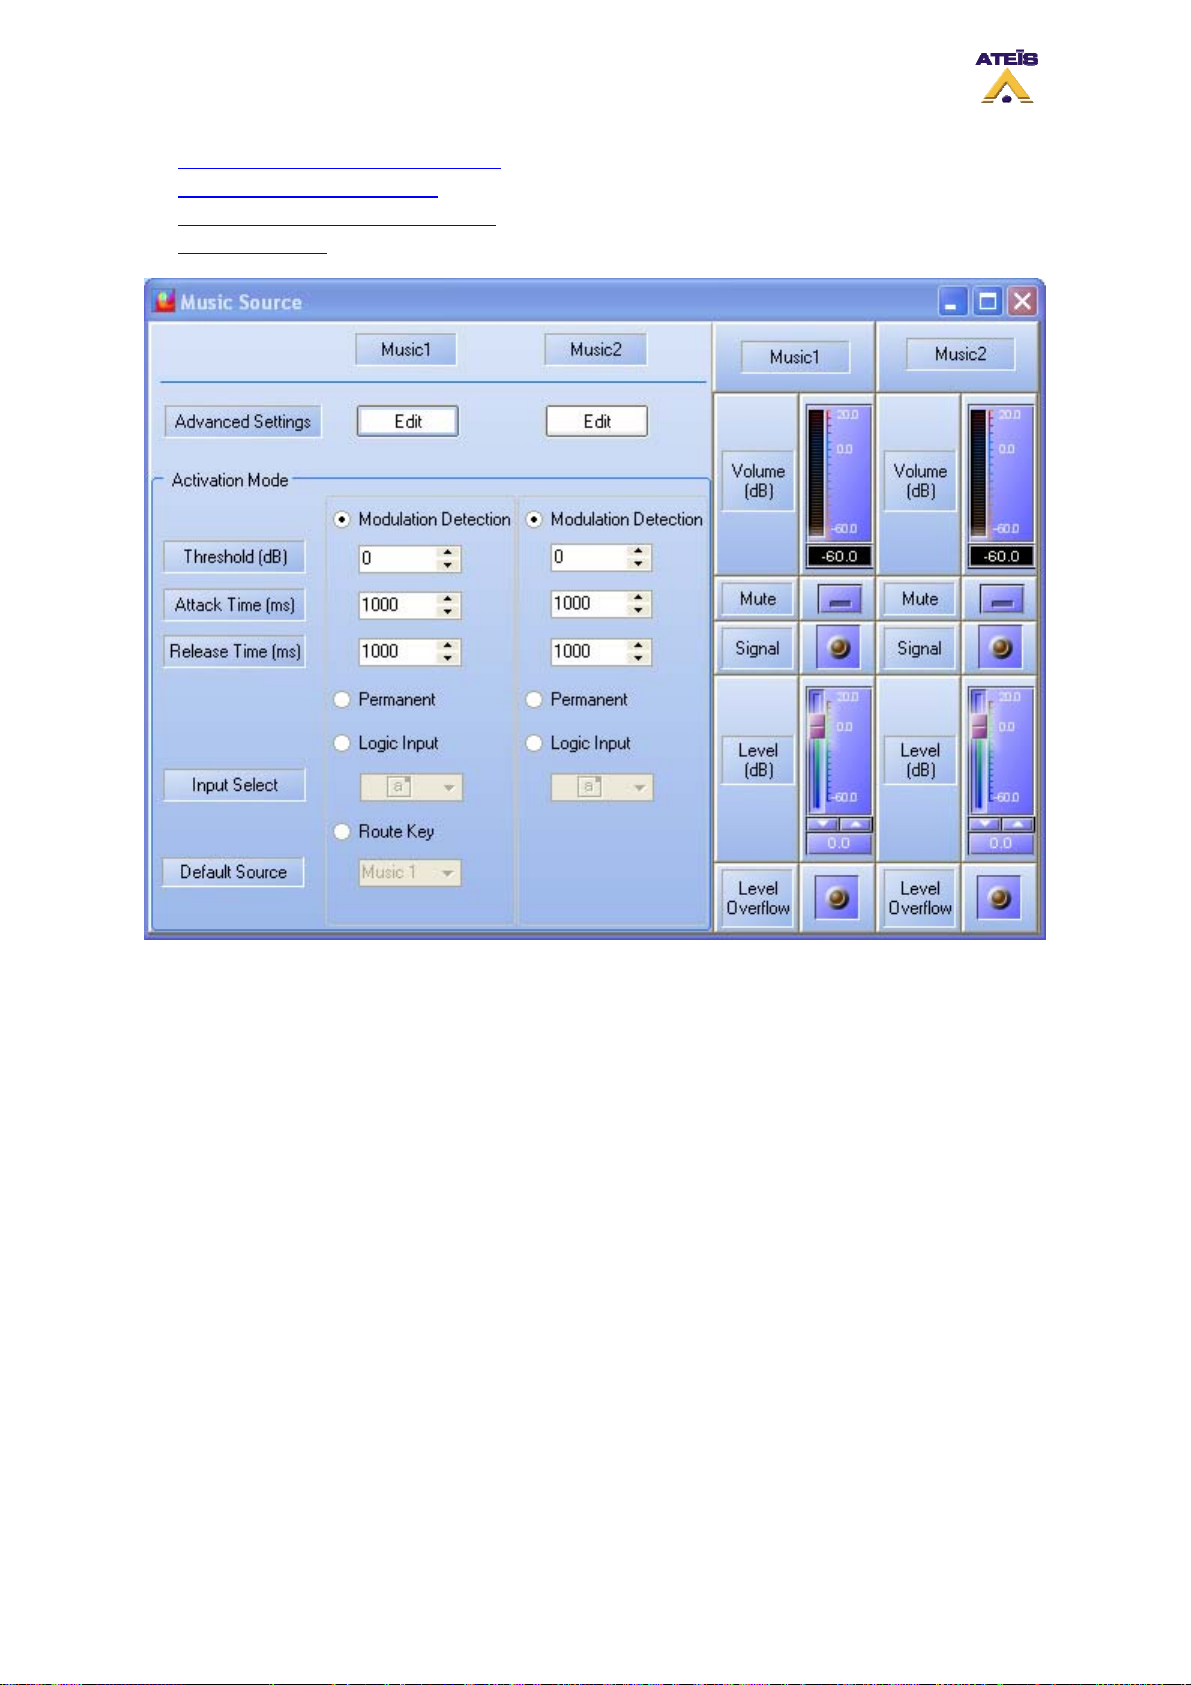
• Use Music Source From Front Panel
• Use Music Source From PSS
• Use Music Source From Logic Input
• Software Control
The Music Source main window allows user to select in which mode the music sources are used. You
can find:
• Modulation Detection
The modulation detection mode is like the VOX mode. It allows you to activate a source as
soon as a certain amount of signal is detected.
• Permanent
Permanent mode allows to set up both music sources' routing. It will deactivate all the front
panel music controls
• Logic Input
Using music from logic input allows user to manage external trigger to control the routing of
music sources.
• Route Key
The route key mode will activate all the music button on the front panel. It has to be used
when music should be controlled directly from the machine.
Ateïs International
Ch. du Dévent, 1024 Ecublens, Switzerland.
Phone : +41 21 881 25 10
86
Page 87
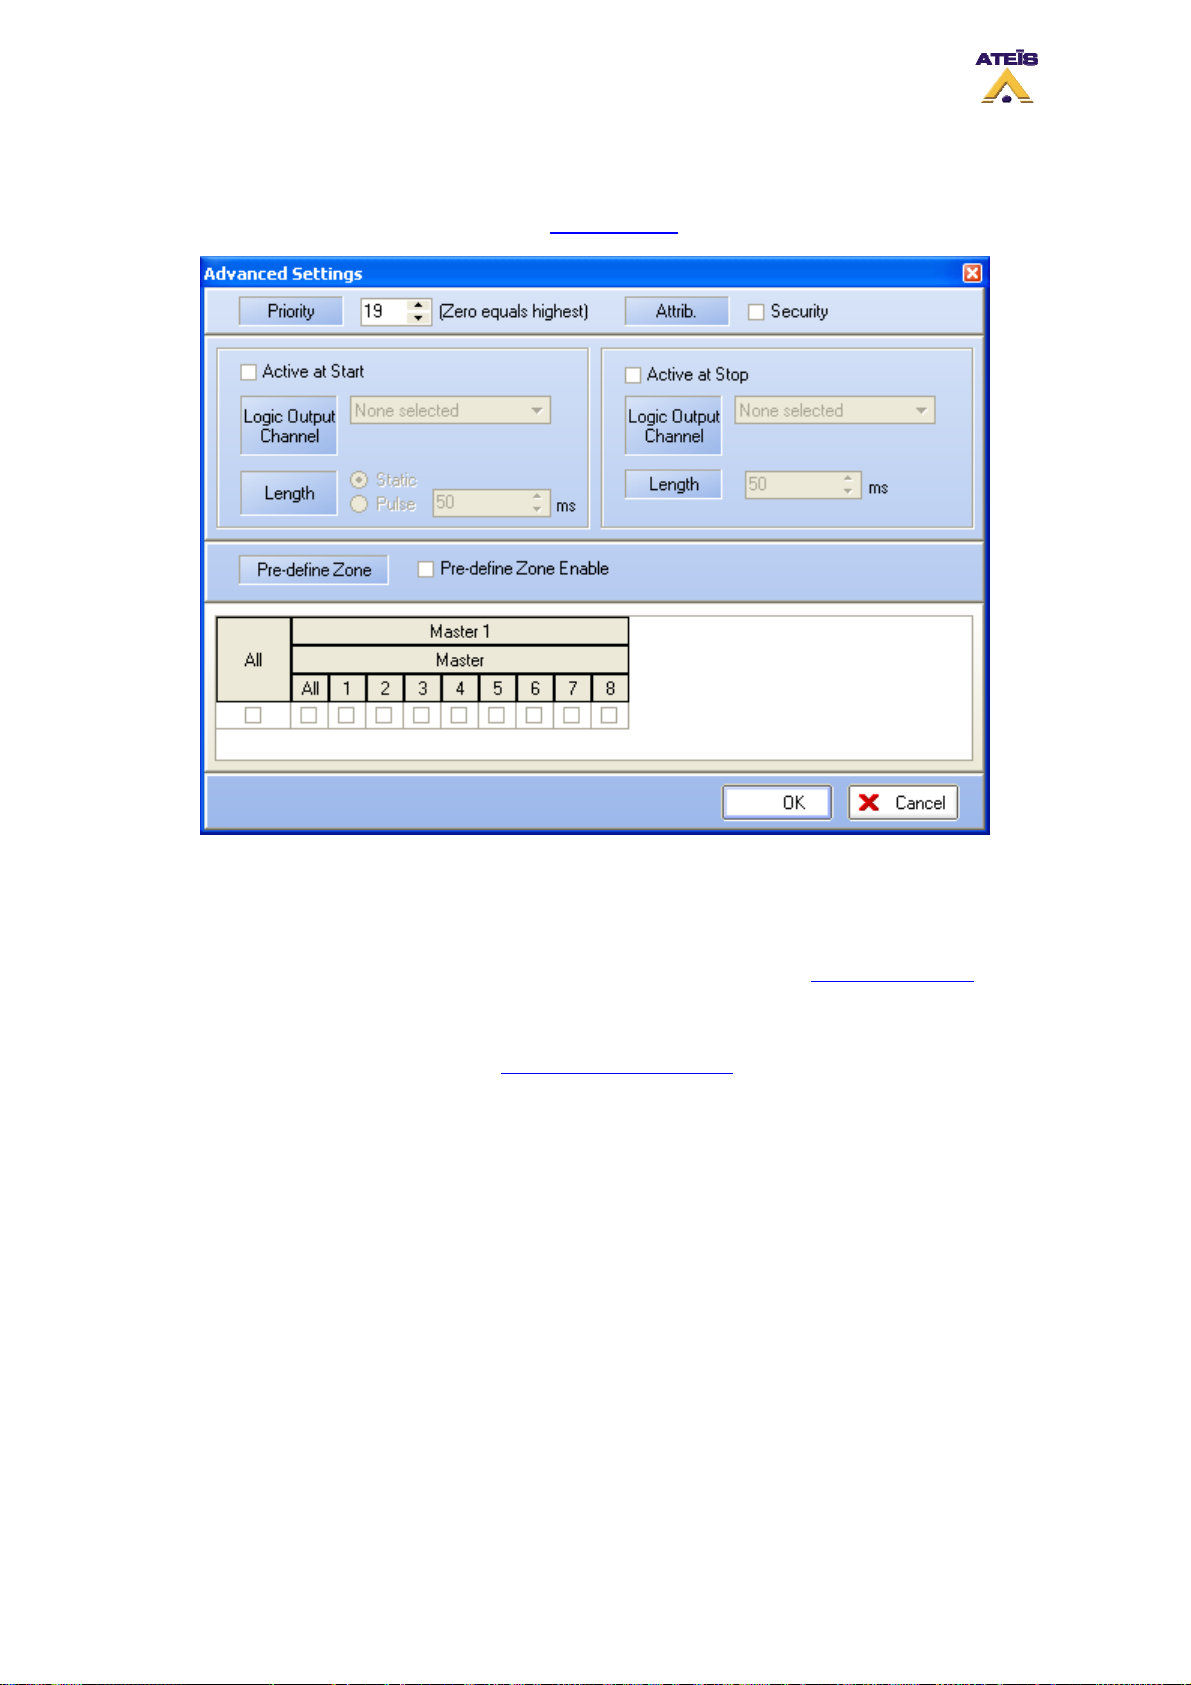
For all those different mode, you will have to set up the music sources setting by clicking the Edit
button for both sources. When clicking on the Edit button for music source 1 or 2, you will enter the
music source Advanced setting, see below. Note: for music used with logic inputs, the music
sources settings have to be made with the Music Events
.
• Priority: here you can adjust the priority of the event. 20 is the lowest, 0 is the highest. Note: be
carful when setting priority for both sources, conflict may appeared if both sources have
the same priority level.
• Attrib: here you can specify if this event is a security one or not. See How to Use Event to learn
more about the security option.
______________________________________
The output relay part is discussed in the How To Use Output Relay
______________________________________
, please read it.
• Pre-define Zone: here you can specify in which zone music will be routed. Note: In Route Key
mode, you don't have to pre-define zones as everything is controlled from the front panel.
However, you can specify zone in Route Key mode but keep in mind that the routing will
only be activated for default music source.
______________________________________
• OK: will accept the current setting and close the window
• Cancel: will annulled the current settings and close the window
8.21.1 From the Front Panel
On the front panel (see below), the buttons that are used for managing music sources routing are the
following:
• Route: validates the music source and zone(s) selection
• Select: toggles between Source 1, Source 2 and none
Ateïs International
Ch. du Dévent, 1024 Ecublens, Switzerland.
Phone : +41 21 881 25 10
87
Page 88
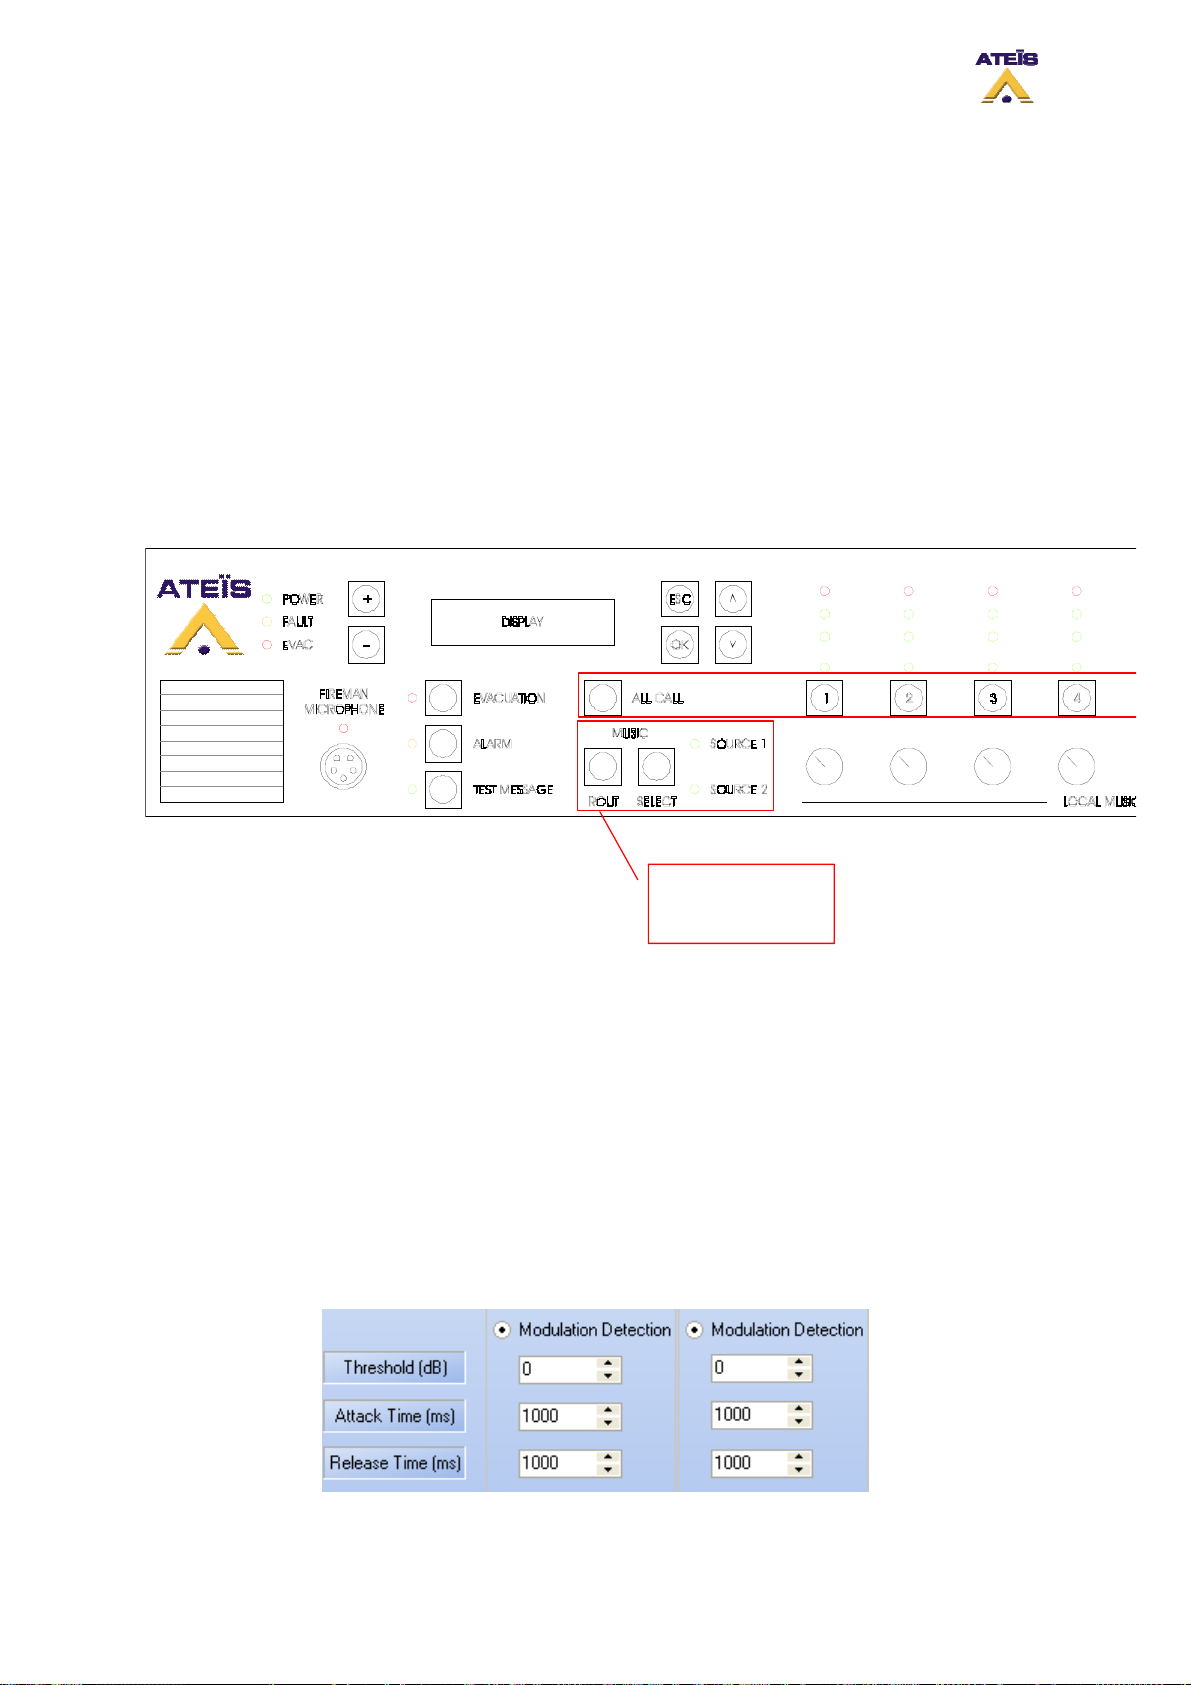
r
• Zone Selector: allows to select each zone one by one or a group of zones
• All Call: instantaneously select all zone
• Attenuator: sets an attenuation for a zone
To assigned a music source to a zone, please follow the next steps:
• Select zone(s) where you want to route music
• With the select button, choose which mu sic source will be routed to the selected zone(s)
• Press the Route button in order to validate the selections
Note: You can independently route music source 1 and music source 2.
To disable music in zone(s):
o Select zone(s)
o With the select button choose none (no Source LED are lit)
o Press the Route button to validate selections
Music Source
Selection Buttons
and I ndicato
For each zone, you can set an attenuation. The attenuation are from 0dB to -20dB. Note: if two music
sources are used, keep in mind that attenuator will only have effect on only one of them (music 1).
This is due to the fact that the amplifier used for the music source 2 is the one dedicated for voice call.
s
8.21.2 With Modulation Detection
The modulation detection mode allows to automatically route music sources in case of signal
presence. You can set up both source one and two in modulation detection as well as only one
source.
The normal use of this options is to set up one source in permanent mode and the other one in
modulation detection (example tuner in permanent and CD player in mod.det.). Keep in mind that in
that mode, the music front panel buttons are disable.
Ateïs International
Ch. du Dévent, 1024 Ecublens, Switzerland.
Phone : +41 21 881 25 10
88
Page 89

In order to use the modulation detection, tick the Modulation Detection option for the source you want
to use that way. Once the option selected, you will have access to detection settings:
• Threshold (dB):
The threshold setting will set the trigger point for activation of the music source. If the
threshold is set to -10 dB, the music source activation will take place when the signal received
from that source will be over -10 dB.
• Attack Time (ms):
The Attack time can be understood like the amount of time that the signal have to be over the
threshold point before music source will be activated. A correct setting of the attack time can
avoid inopportune activation of the music source (peak signal activation). The Attack time can be set
from 0 ms to 5000 ms.
• Release Time (ms):
As opposed to the Attack time, the Release time is the amount of time for which the signal
have to stay under the threshold point before deactivation of the music sources. A correct Release
Time can avoid inopportune deactivation of the music source (blank in CD). The release time can be
set from 0 ms to 5000 ms.
Setting those parameter correctly needs some experience, so be careful and please test it to learn
more about the behaviour of this option.
Once your modulation detection parameters are adjusted, you have to edit the advance setting for the
music sources, please refer to the Us e Music Source
general chapter.
8.21.3 In Permanent Mode
In Permanent mode, the music sources are set once and cannot be manage anymore from front
panel. However, real-time controls are still useable. To change the sources routing, you will have to
change the DIVA configuration.
In permanent mode, you only have to Edit the music sources parameters, see this
when setting priority for both music sources. Same priority for the two music sources can
result in conflict.
. Note: be carful
8.21.4 From PSS
The PSS microphone is able to operate on music sources. In order to do so, you have to define PSS
keys to suit your need. See How To Use PSS Microphone
Note: Routing music from the PSS can only be operated if the music source mode is Route
Key.
PSS keys, for music operations, can be set to different type using the drop-down menu, see below:
to learn more about the PSS.
Ateïs International
Ch. du Dévent, 1024 Ecublens, Switzerland.
Phone : +41 21 881 25 10
89
Page 90
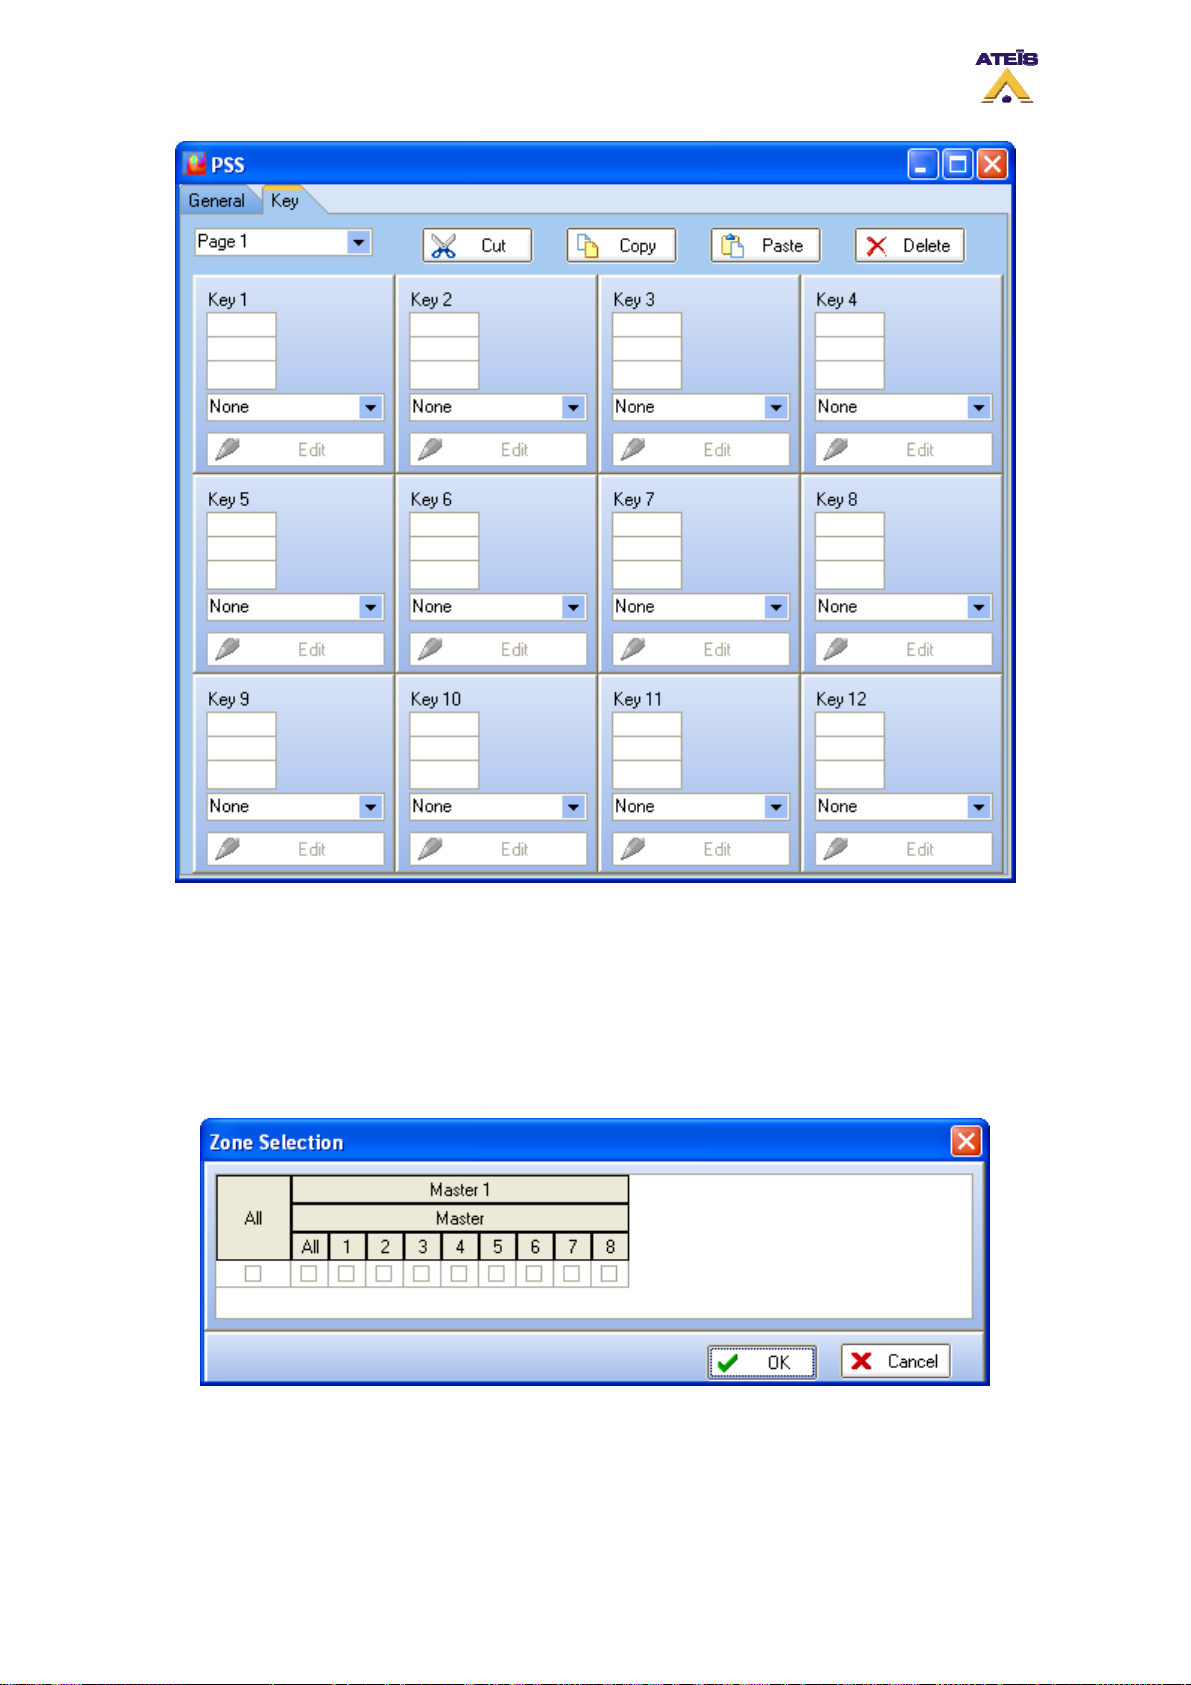
• Zone Selection
By creating a "Zone Selection" key, you can make a selection of zones in which music will be
routed. Note: Zone Selection keys are not exclusively for music. Zone selection for
paging are made the same way.
As soon as you select "Zone Selection", a new "Zone Selection" window will pops up. In this
window, choose the zone(s) to associate to the key (see below).
• Music Source Selection
When creating a "Music Source Selection" key, you will have to choose between music source
1 and music source 2 with the "Key Setting" pop-up window.
Ateïs International
Ch. du Dévent, 1024 Ecublens, Switzerland.
Phone : +41 21 881 25 10
90
Page 91
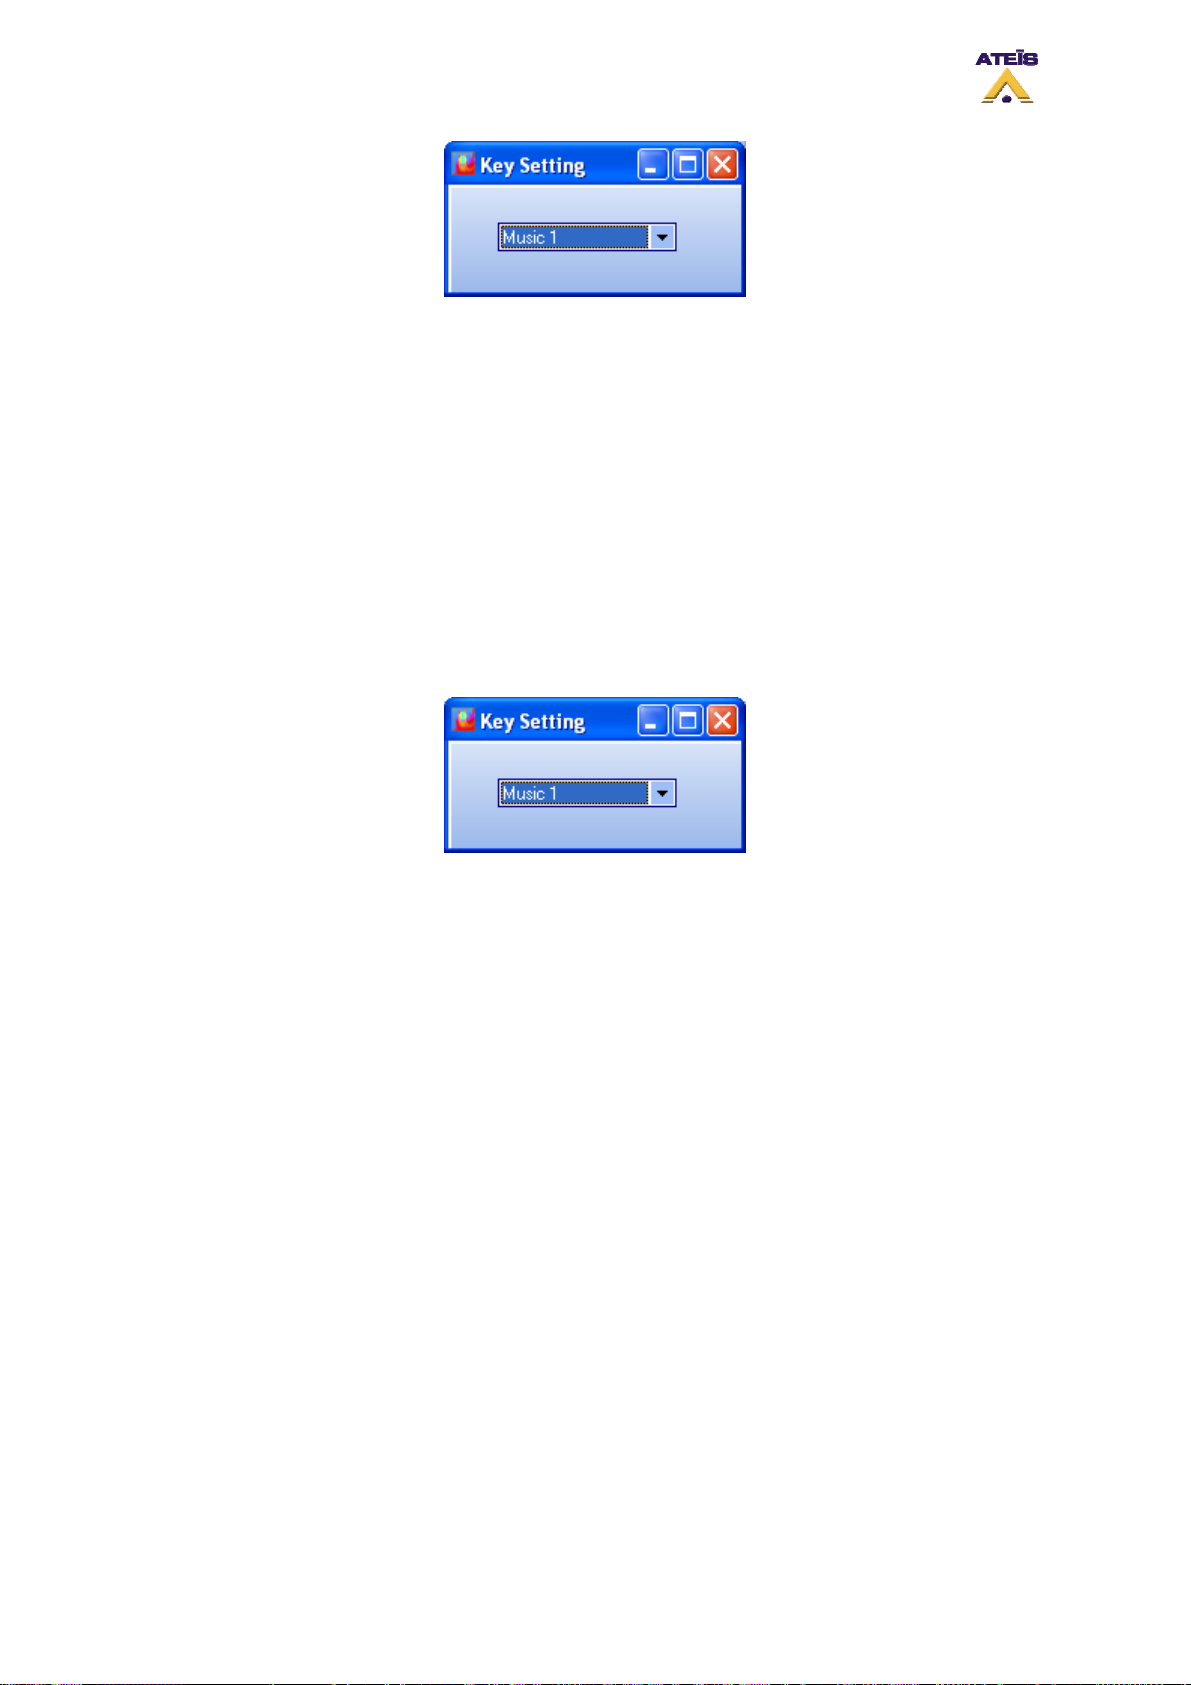
This type of key is used as the front panel select button. You have to select the music source
before you can route it to some zones. Note: this key is not a music source toggle type,
you will have to create two music source selection key in order to be able to route both
sources.
• Route
The ROUTE key act exactly as the front panel route button. It is the way to validate a music
source and zone selection.
• Music Level +/ Music Level -
From the PSS you can create keys to control the music sources level. The Key c reated that
way is affiliated to one source. So for Controlling both sources level, you will have to create four
keys, two for source one and two for source two.
Example 1: procedure to route music source 1 to zone 2, 4 and 6 and music source 2 to zone 3, 5
and 7
• Create "Zone Selection" key type for zone 2, 3, 4, 5, 6 and 7. Named them accordingly
• Create a "ROUTE" key
• Create two "Music Sources Selection" keys. Named them "Music 1" and "Music 2"
• Store your configuration into DIVA
• To route "Music 1" in zone 2, 4 and 6, press the "Music 1" key then press the zone 2, 4 and 6 and
finally press the "ROUTE" key
• To route "Music 1" in zone 3, 5 and 7, press the "Music 2" key then press the zone 3, 5 and 7 and
finally press the "ROUTE" key
Example 2: procedure to increase and decrease music source 1 level
• Create a "Music Level +" key and a "Music Level -" key. Named them "Music1 Level+" and
"Music1 Level-"
• To increase music source 1 level, simply press the "Music1 level+" key
• To decrease music source 1 level, simply press the "Music1 level-" key
8.21.5 From Logic Input
Like with the PSS, music sources routing can be operate by external trigger, that means with the help
of the logic, evacuation or even external fault inputs. In order to access the logic inputs menu, go on
menu View -> Logic Inputs. The Logic Inputs page will pops up, see below.
Ateïs International
Ch. du Dévent, 1024 Ecublens, Switzerland.
Phone : +41 21 881 25 10
91
Page 92
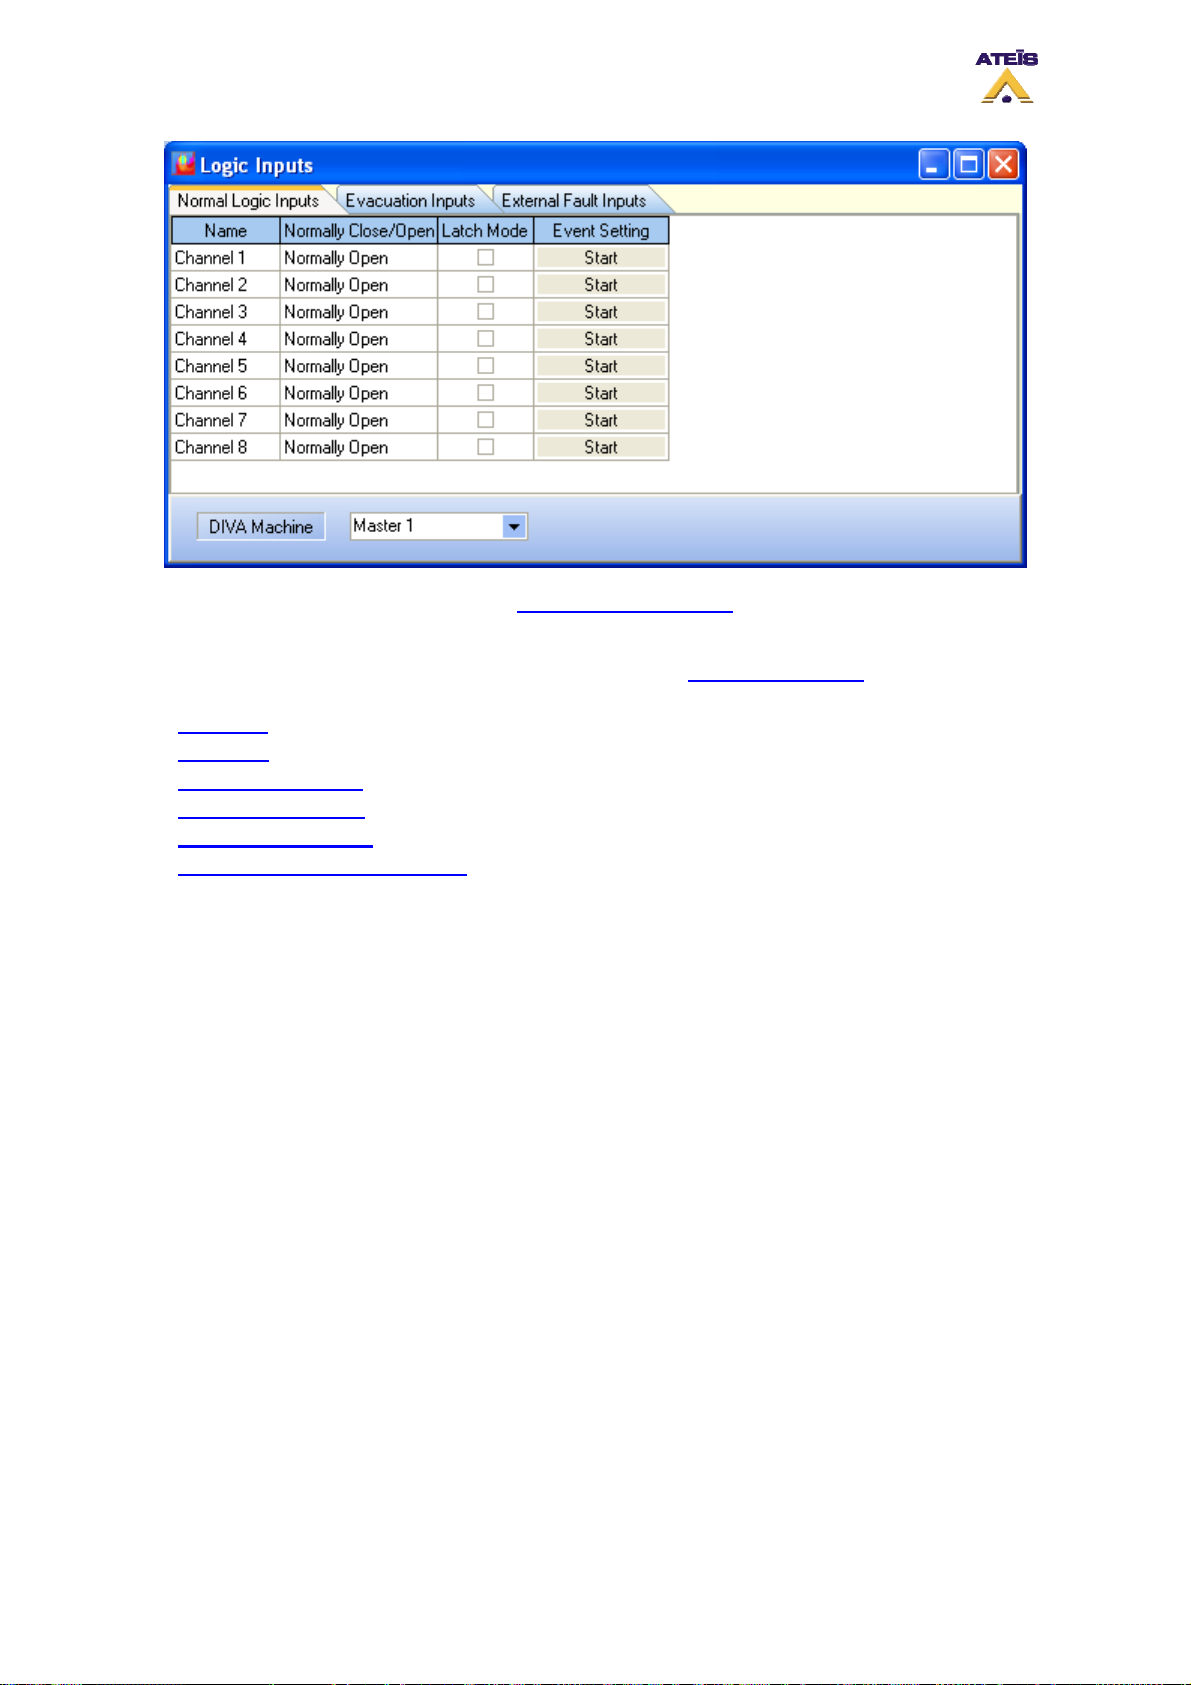
To learn more about the Logic inputs, see How to Use Logic Inputs
The idea is to use logical trigger to start an event. Event type for operation on music are listed below.
You can find more information on those events in the chapter How To Use Events
.
.
• Music On
• Music Off
• Music On By Zones
• Music Off By Zones
• Toggle Music On/Off
• Toggle Music On/Off by Zones
In order to associate a event to a logic input trigger, click on the "Start" button under "Event Setting".
The Events Selection window will be open, see below.
Ateïs International
Ch. du Dévent, 1024 Ecublens, Switzerland.
Phone : +41 21 881 25 10
92
Page 93
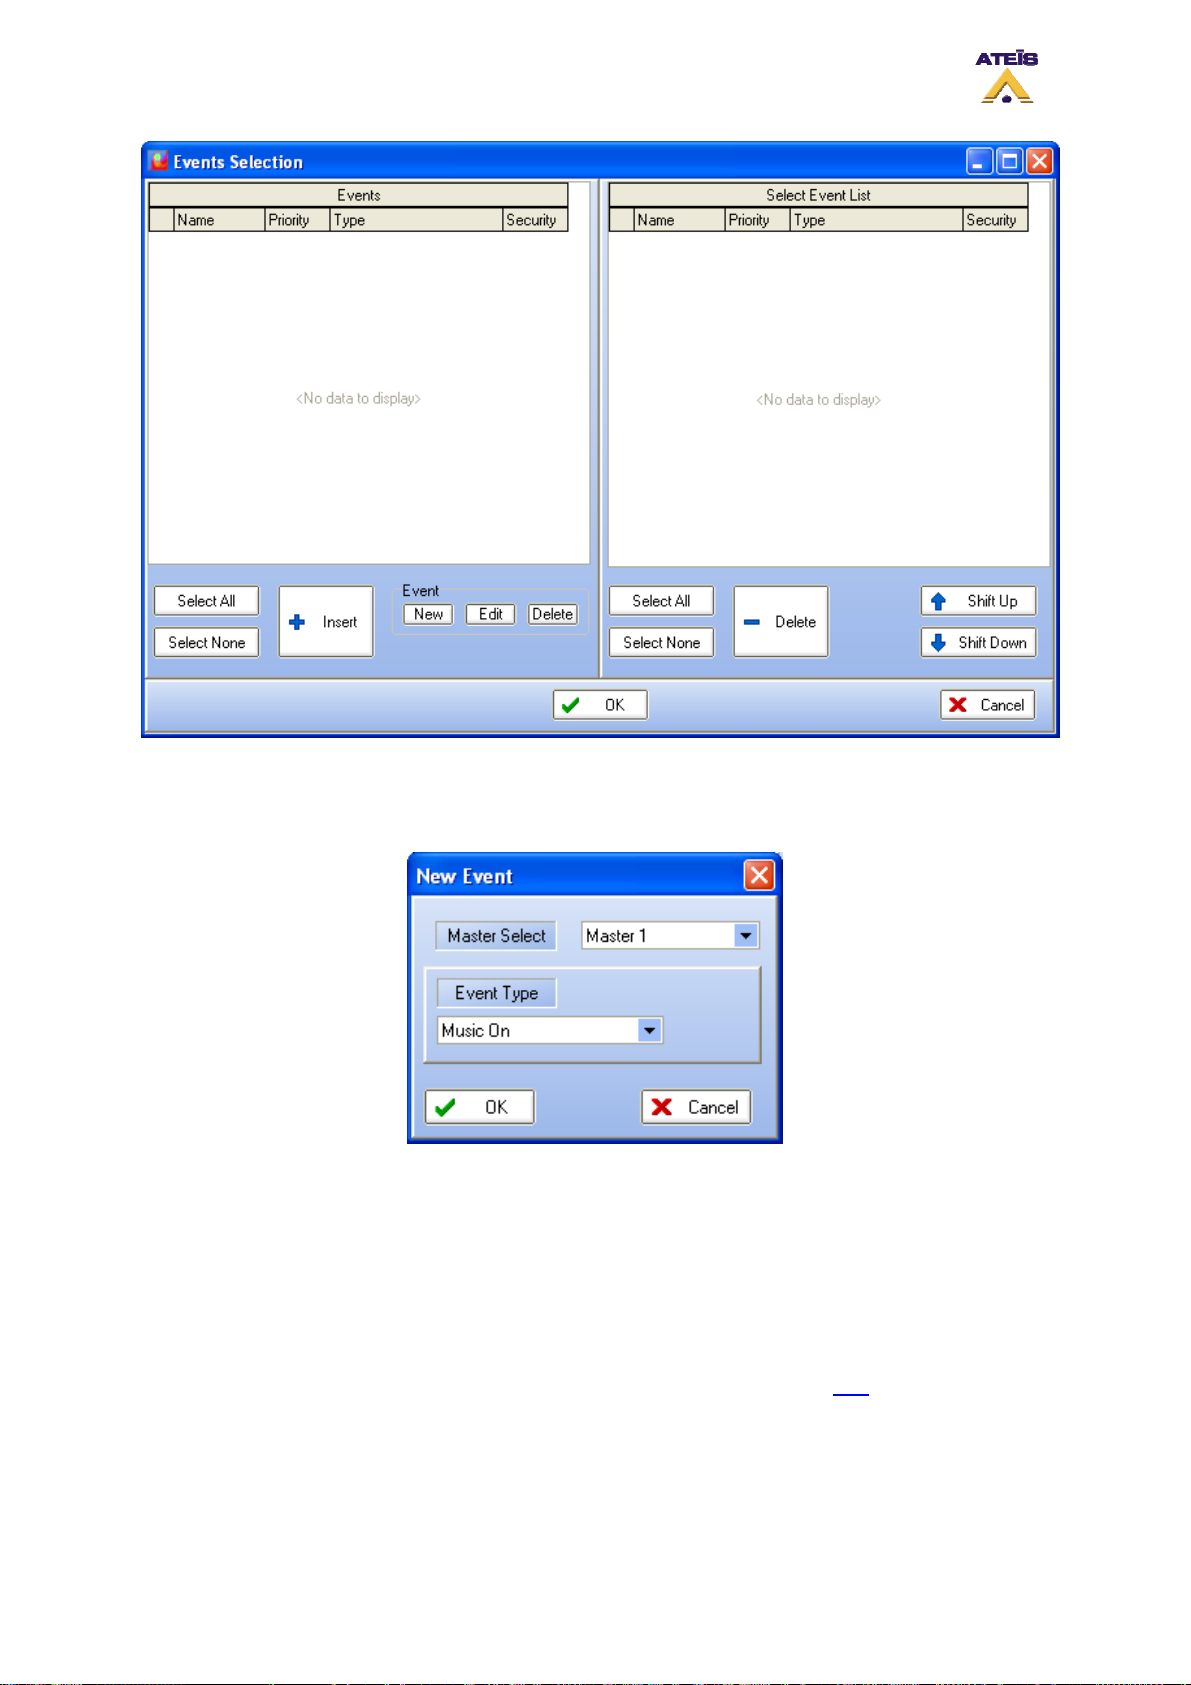
On the left side, you will find the list of existing event. To create a new event, simply click on New
under Event. As soon as you click on the New button, the software will ask to choose a event's type,
see below.
In order to select an event's type, use the drop-down menu. Then click OK. After you have press OK,
you will return to the Events Selection window.
To edit your new event settings, select it by clicking on the right line and then click Edit. Note: don't
click in the square selector. The corresponding event's type window will pop up. After your event
settings are complete, click OK.
The last step is to affiliate the event created with the logical input. In order to do so, tick the square
selector and click on insert. Note: you can associate more than one event to an external trigger
as well as creating event sequences. To learn more about it, please read this
When logic input have set for music sources, you can find a list of logic input associated to music
source on the music source window in Logic Input drop-down menu .
.
Ateïs International
Ch. du Dévent, 1024 Ecublens, Switzerland.
Phone : +41 21 881 25 10
93
Page 94
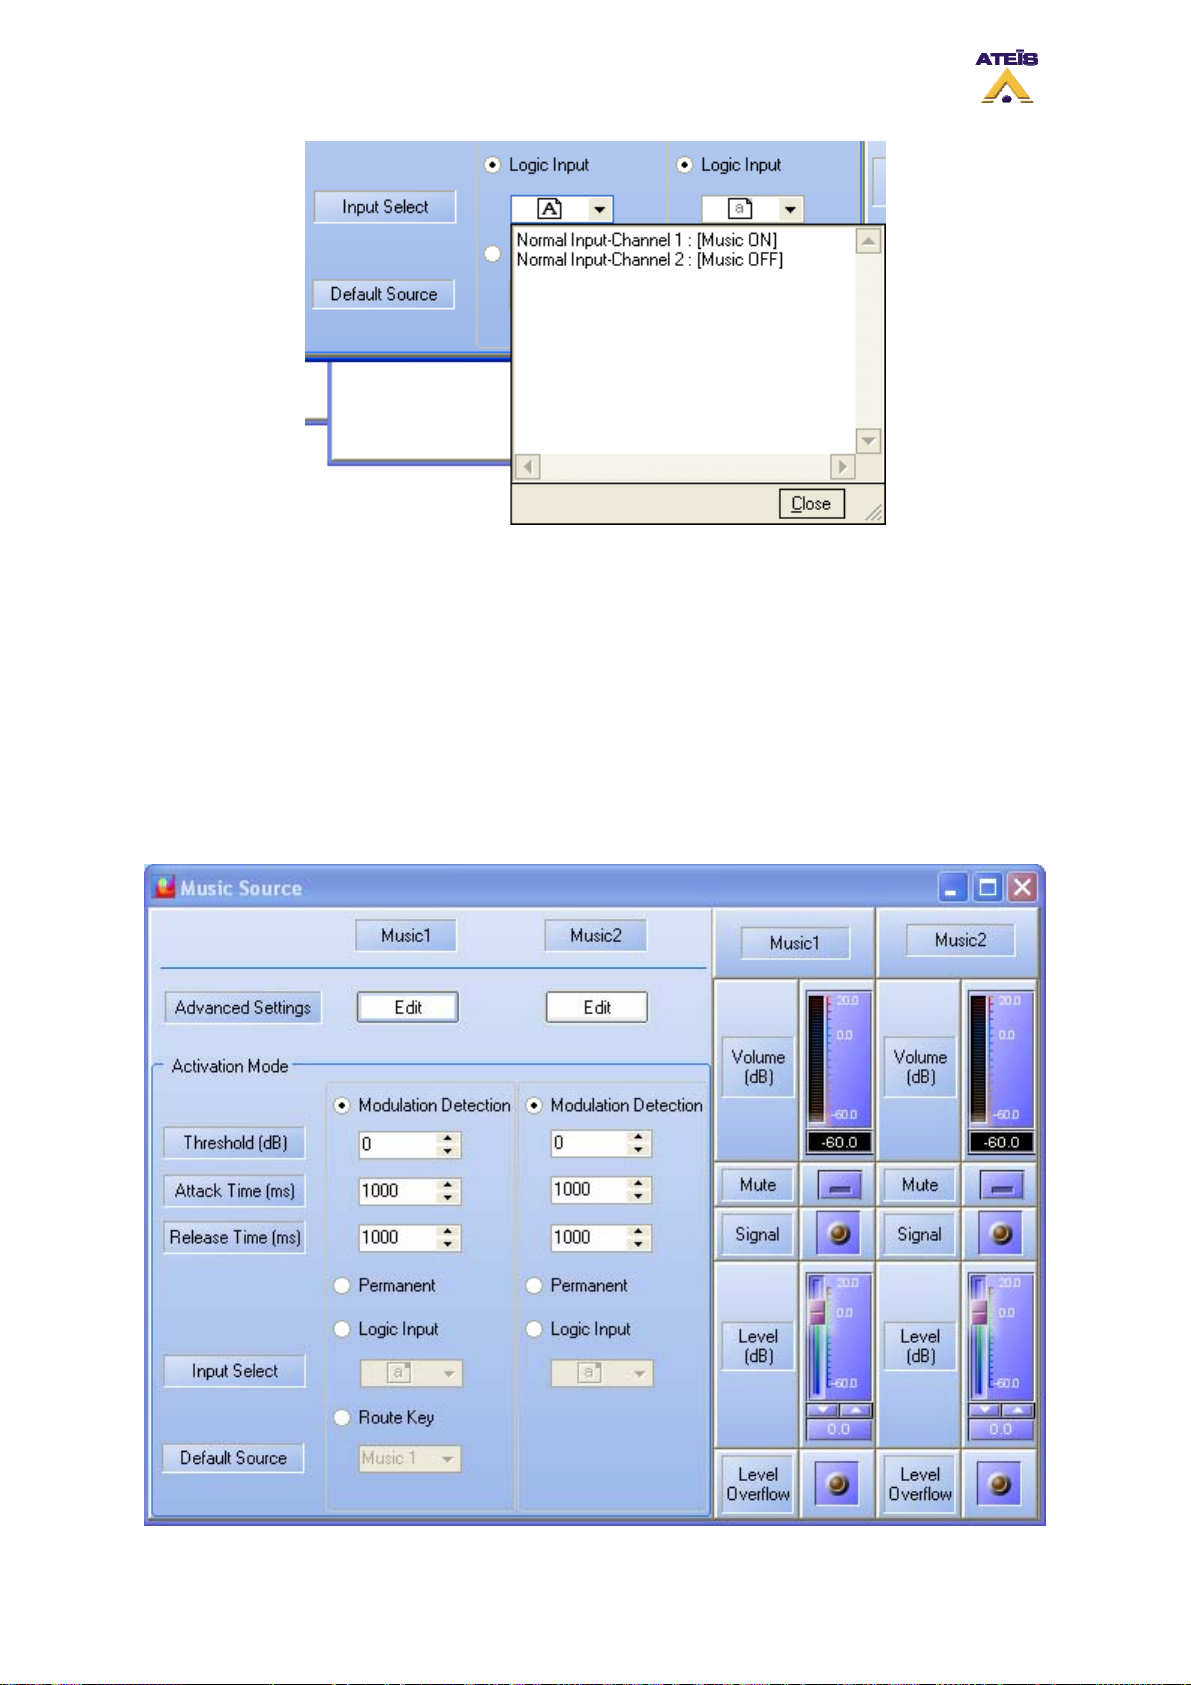
8.21.6 Software Control
The DIVA software allows to control and monitor music sources. Once you have enter the music
source window, by double clicking on the music source icon, you will be able to read and control some
parameters (right part of the window, see below):
• Music 1 and 2 level (controls)
• Music 1 and 2 mute (controls)
• Music 1 and 2 overflow (indicators)
• Music 1 and 2 signal presence (indicators)
• Music 1 and 2 volume (indicators)
Ateïs International
Ch. du Dévent, 1024 Ecublens, Switzerland.
Phone : +41 21 881 25 10
94
Page 95
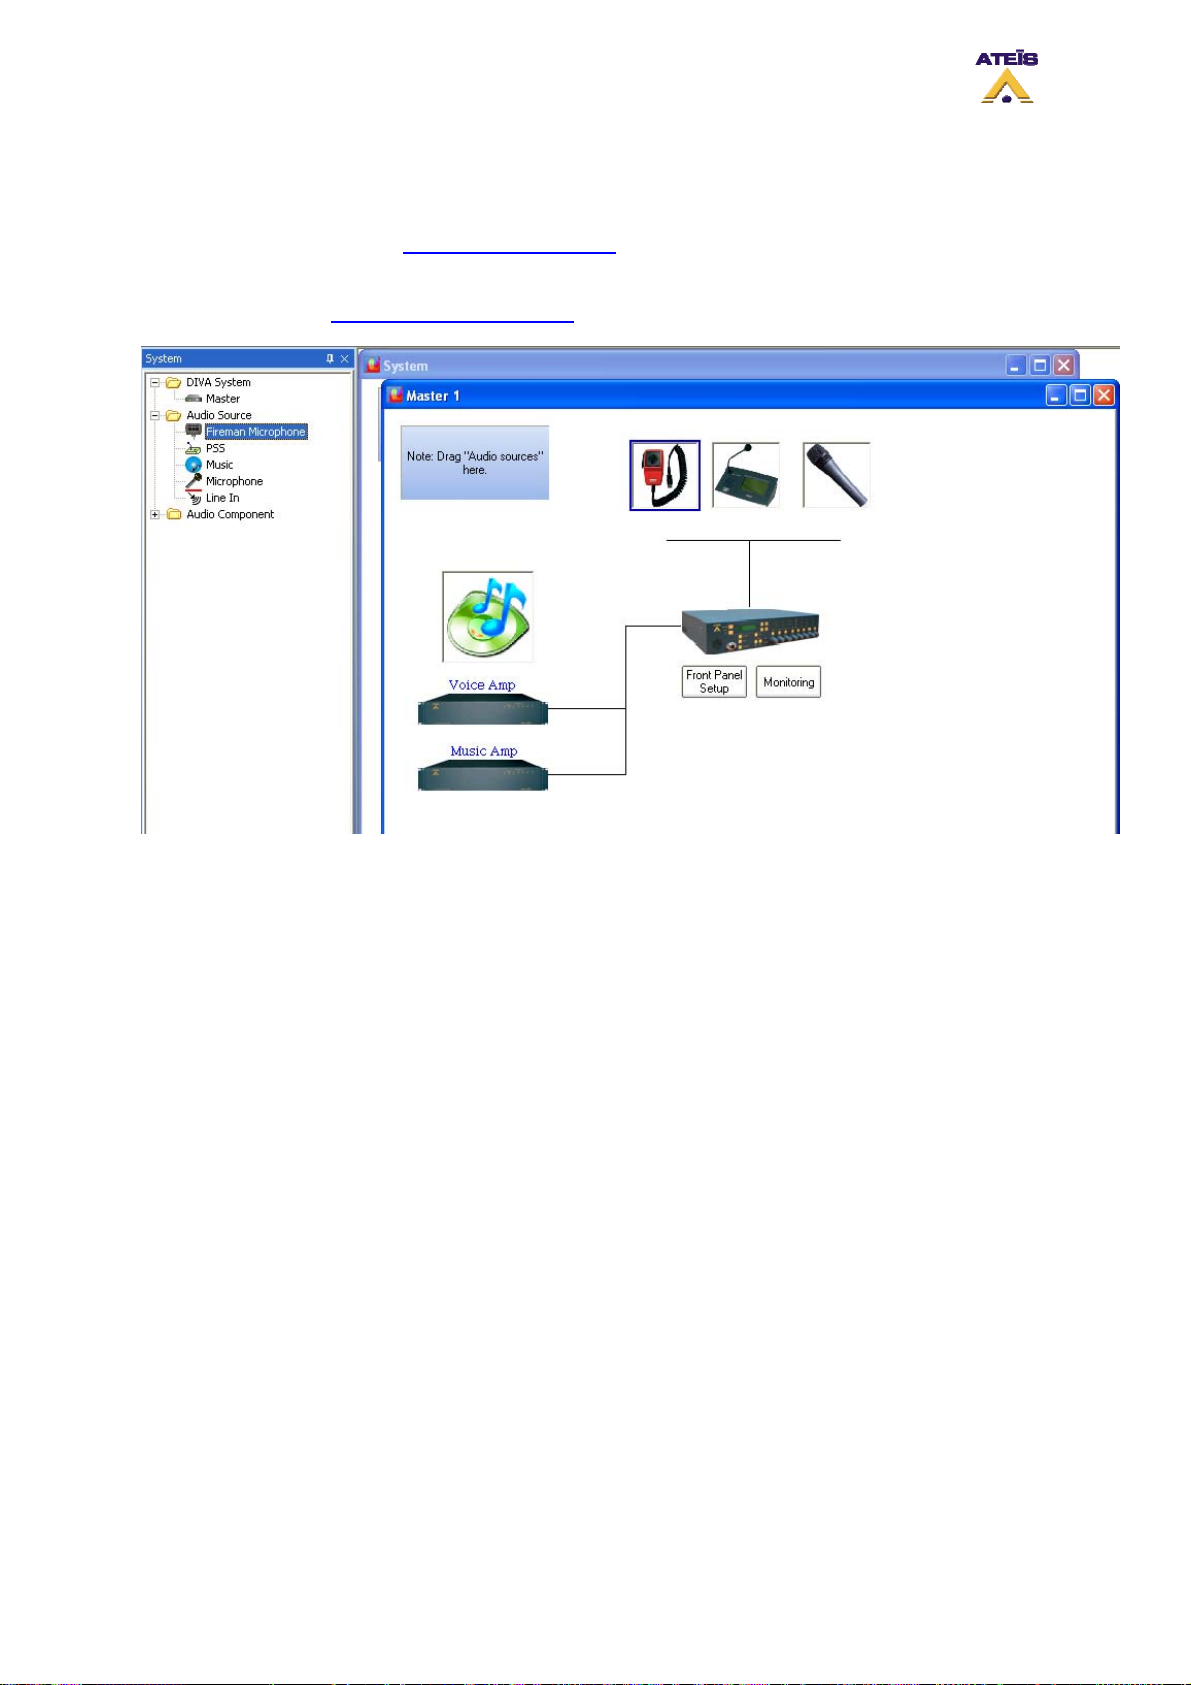
8.22 Use PSS Microphone
As described briefly in the External Device - PSS chapter, the PSS microphone is an advance
touchscreen paging microphone. The PSS touches (Keys) can be set by the user using the PSS
window in DIVA software. In order to use a PSS microphone with DIVA, simply drag and drop the PSS
microphone from the Design Component Section
to the master window.
To access the PSS window simply double click on the PSS icon on the master page. In the PSS
window, you will find two different tabs, one for property settings (General) and one for Keys
configuration (Key).
8.22.1 General Page
Here is a list of what you can parameter in the General tab:
Properties Section:
• Name: here you can set a name for your PSS
• Priority: here you can set the PSS priority. Take care when choosing a priority as the PSS could
be a security microphone as well as a evacuation source.
• Access Code: you can specify an access code, only number, in order to be able to use the PSS
screen.
• Language: allows user to set the PSS screen language between French, English, Russian,
Romanian, Polish and German.
Ateïs International
Ch. du Dévent, 1024 Ecublens, Switzerland.
Phone : +41 21 881 25 10
95
Page 96
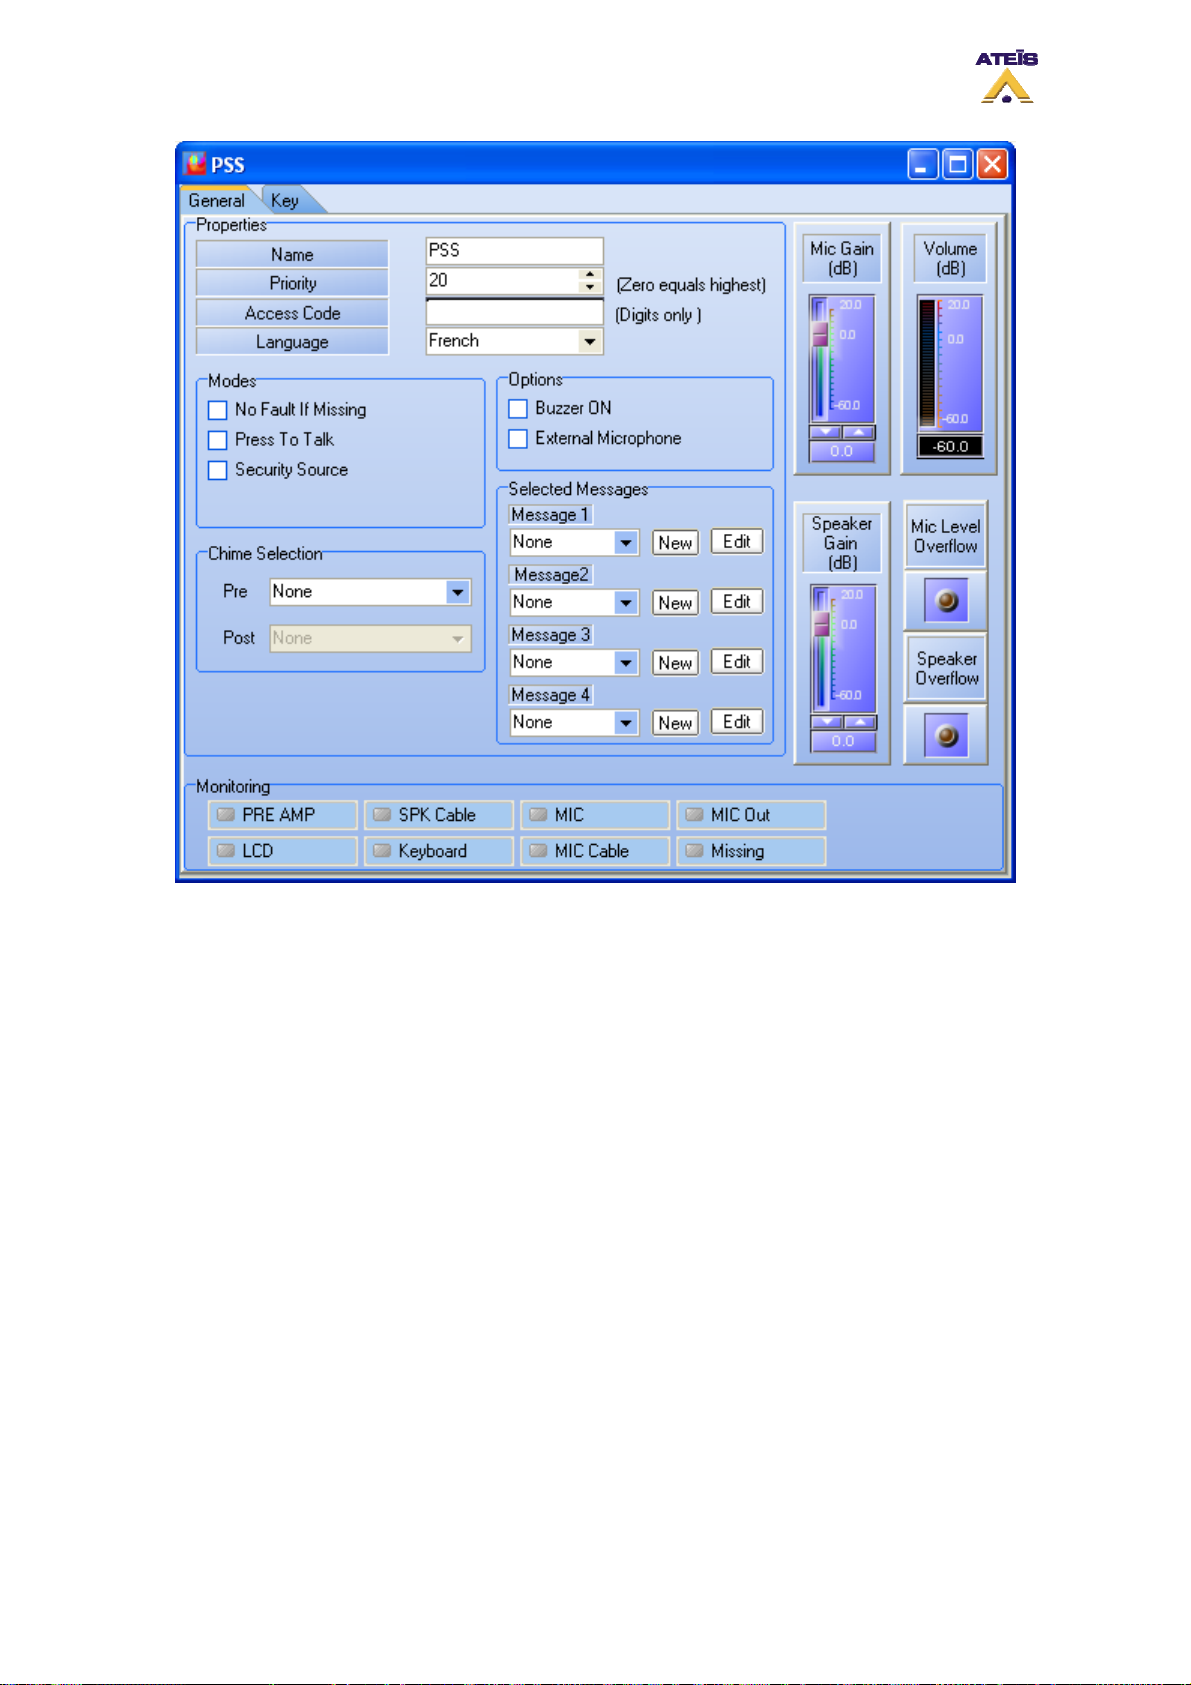
Mode:
• No Fault If Missing: if ticked, DIVA won't display a fault if the PSS is not physically connected
• Press To Talk: this option change the behaviour of the Mic key on the PSS screen from "Lock to
Talk" to "Push to Talk". For calling in "Push to Talk" mode, you have to keep the PSS Mic key
press as long as you want to talk
• Security source: if ticked, you will be able to use the PSS microphone when DIVA has entered
into the security mode. When ticked, it adds the option Evacuation Source. If evacuation source is
selected, the paging from the PSS will act like an evacuation event. So the front panel EVAC LED
will light up.
Options:
• Buzzer On: this options allows user to enable the PSS buzzer. It will beep for any DIVA fault
status and for PSS internal fault
• External Microphone: in case of using an other microphone that the gooseneck you will have to
tick this option
Chime selection:
• Pre: allows to add a chime message at the beginning of a microphone call. Simply choose the
pre-chime message from the drop down menu
• Post: allows to add a chime message at the end of a microphone call. Simply choose the post-
chime message from the drop down menu
Selected Messages:
Ateïs International
Ch. du Dévent, 1024 Ecublens, Switzerland.
Phone : +41 21 881 25 10
96
Page 97
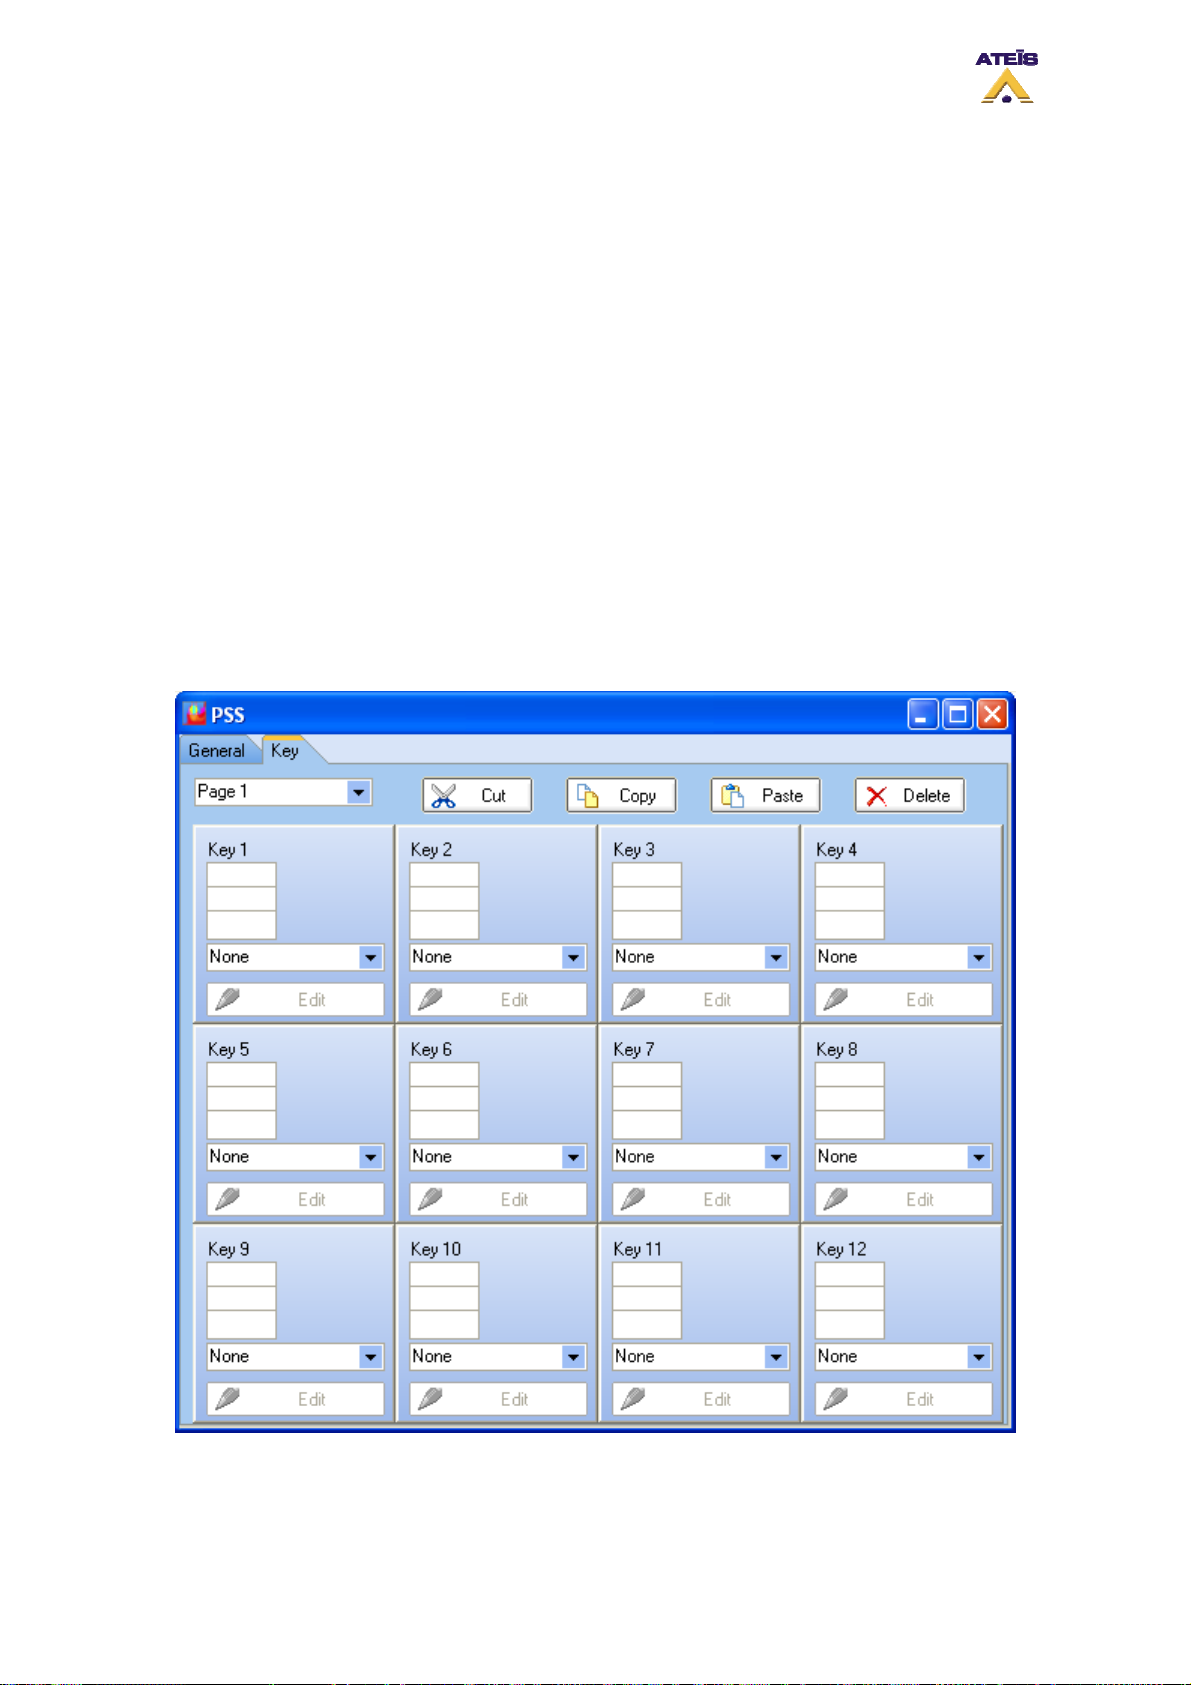
• Message 1 to Message 4: with the use of the drop down menu you can add to the PSS up to 4
event buttons that will launch the corresponding selected events. Please only use Play Message
type of event for that application.
Monitoring:
• Pre Amp: virtual LED that will light up in case of PSS microphone pre amplifier failure
• SPK Cable: virtual LED that will light up in case of PSS integrated loudspeaker connection failure
• MIC: virtual LED that will light up in case of microphone capsule issue
• MIC Out: virtual LED that check the state of the microphone output
• LCD: virtual LED that indicates any LCD screen fault
• Keyboard: virtual LED that light up in case of touchpad issue
• MIC Cable: virtual LED that will light up in case of microphone cable issue
• Missing: virtual LED that light up if the PSS is not plug into DIVA
8.22.2 Keys Page
The Key page is where you will define touches for the PSS and their associated action. Depending on
the PSS model, you can specify up to 96 keys so 96 actions.
It's important to notice that you can only visualize 12 key at the same time. To see up to 96 keys, you
have to jump to pages with the drop-down menu at the upper left corner. You also can cut, copy, paste
and delete keys with the upper corresponding button.
Ateïs International
Ch. du Dévent, 1024 Ecublens, Switzerland.
Phone : +41 21 881 25 10
97
Page 98
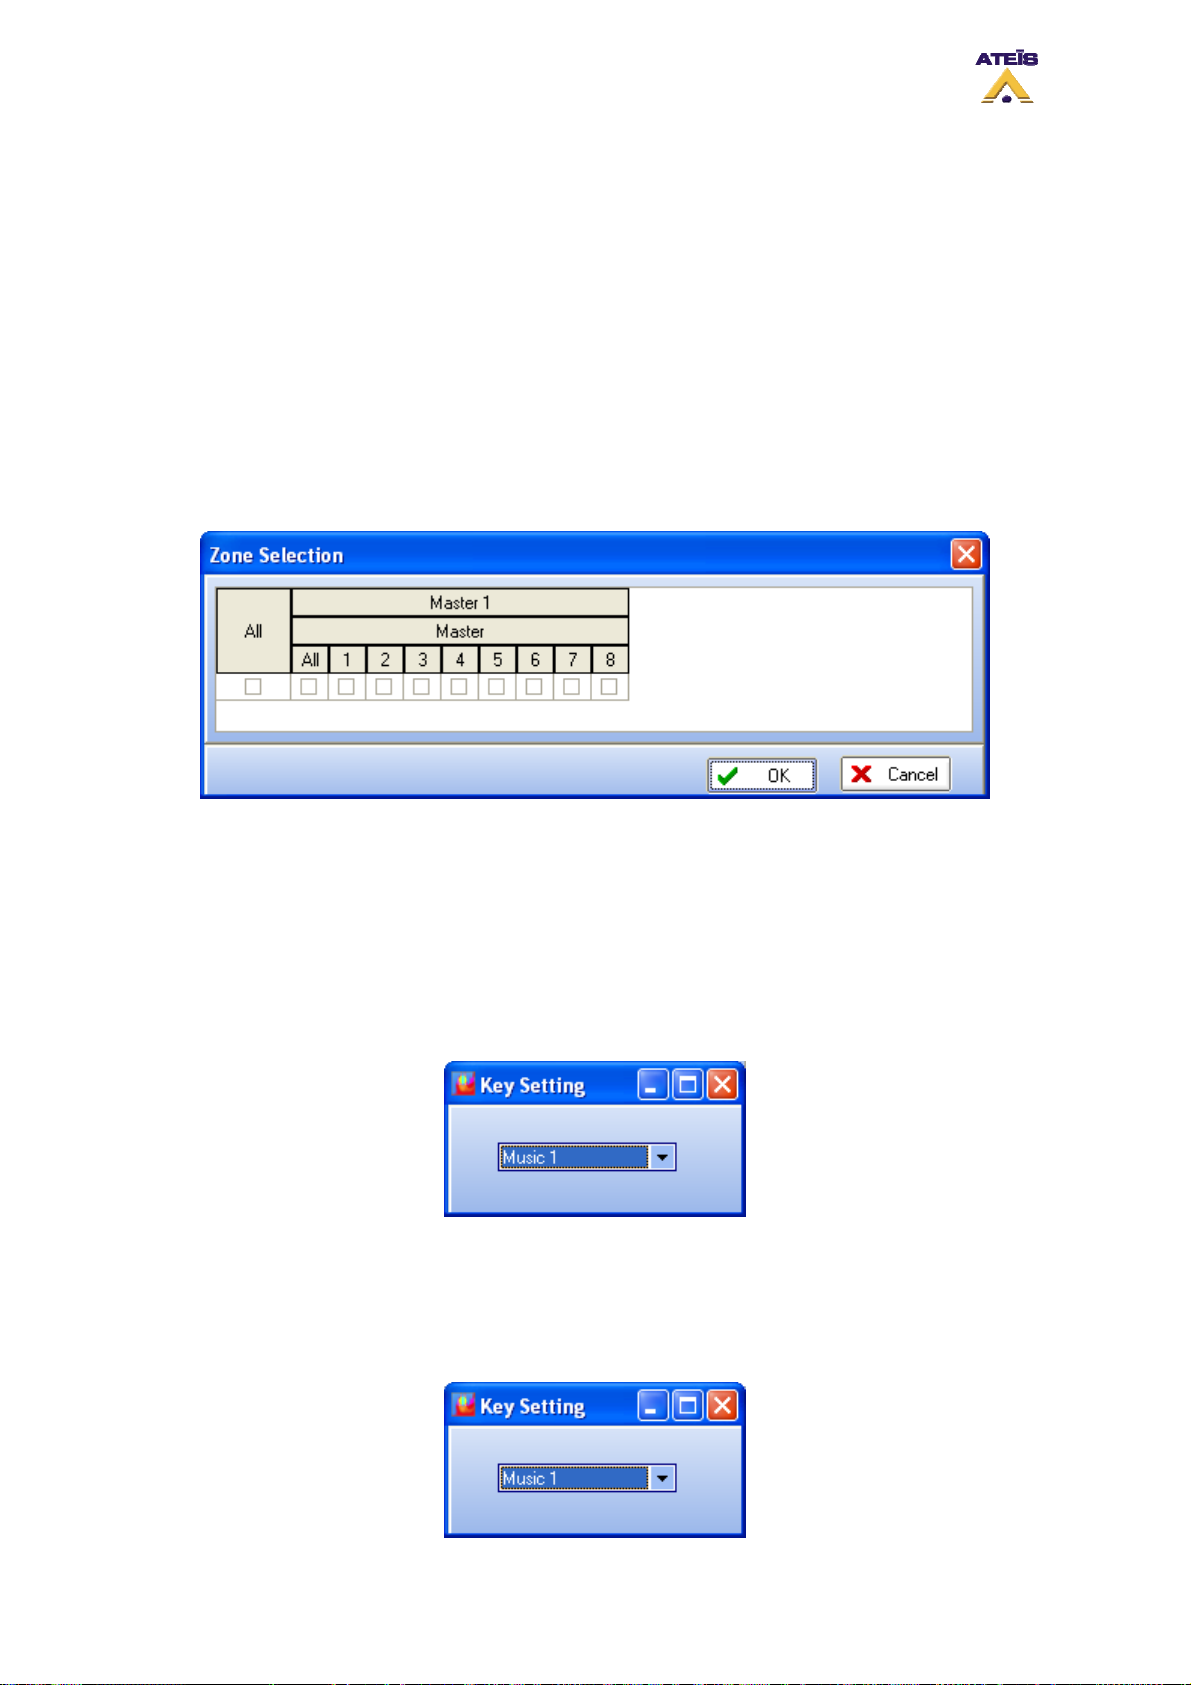
In order to create a key, follow the next few steps:
• In the three square, enter a key label (3x 6 digits)
• With the drop-down menu, select a key type (some keys type will automatically open a popup
window for parameters setting), see below for the complete list ok key functions
• Edit your key settings by clicking on the Edit button
Key functions:
• Zone Selection:
The zone selection key allows user to arrange to his will the selection of the zone. As soon as
the zone selection type has been selected, the zone selection window will appear. Simply tick
the zone corresponding to your needs and click OK.
• Route:
The Route key act like the one on the front panel, it has to be used to validate the routage of a
music source in some zones.
• Music Source Selection:
When creating a music source selection key, you will have to specify the corresponding music
source with the help of the musis source selection window.
• Music Level + / Music Level -:
The Music Level + and - need to be associated with a music source. The selection of the
music source is made with the music source selection window. Note: Music Level + and
Music Level - are two distinct keys.
Ateïs International
Ch. du Dévent, 1024 Ecublens, Switzerland.
Phone : +41 21 881 25 10
98
Page 99
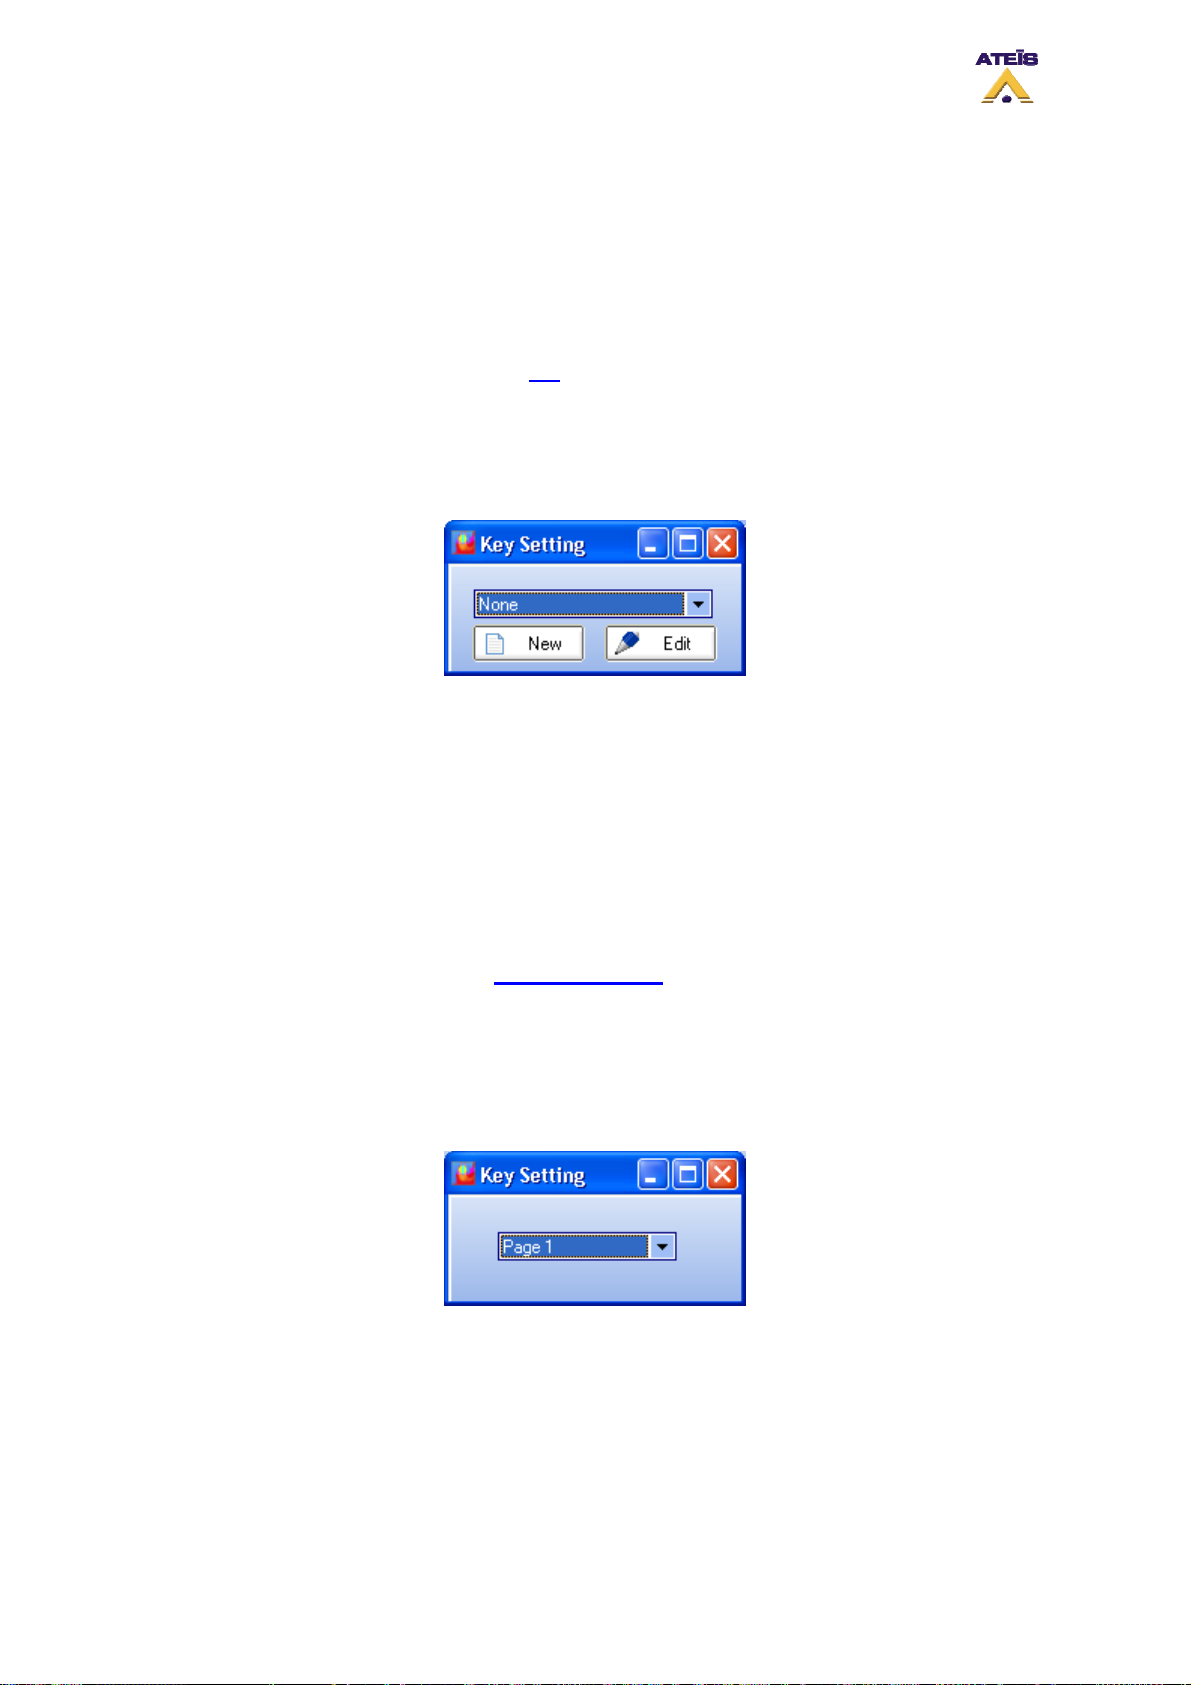
• Speaker Level + / Speaker Level -
The Speaker Level keys act on the PSS internal speaker. You can adapt PSS speaker level
to your desire. Note: Speaker Level + and Speaker Level - are two distinct keys.
• Event Start / Event Stop
Those two keys are an additional way of starting and stoping events that are not selected in
the message section (please read this
careful to the fact that you will need a stop event key for each start event key for play
message type of event.
When creating an Event Start/Stop key, you will have to select in the existing event list the one
to associate to the key.
). You can start and stop any kind of event. Please be
• Push-To-Talk Microphone Call
The Push-To-Talk Microphone Call key allows to change the behaviour of the microphone
call. The default behaviour for the microphone (Mic Key) is the locked to talk. To use this
key in order to make a microphone call, you will have to keep your finger on the key while
speaking.
• Push-To-Talk Chime Call
The Push-To-Talk Chime Call key has to be used like the Push-To-Talk Microphone Call. The
difference is that for each call, a pre-chime message will be played. Note: don't forget to
load a chime message in the general PSS page
• Jump To Page
When using a PSSXXDT that has over 12 keys, it could be really helpful to create key that
allows to jump from page to page. As soon as you select the Jump To Page type of key, a
page selection window will pops up, please select the page where you want to jump.
.
8.23 Use Mic/Line Input
The Mic/Line input can be used as a direct input for one external hand microphone and as an
additional music input. The input gain can be adjusted by the means of the screw on the back panel of
DIVA.
Ateïs International
Ch. du Dévent, 1024 Ecublens, Switzerland.
Phone : +41 21 881 25 10
99
Page 100
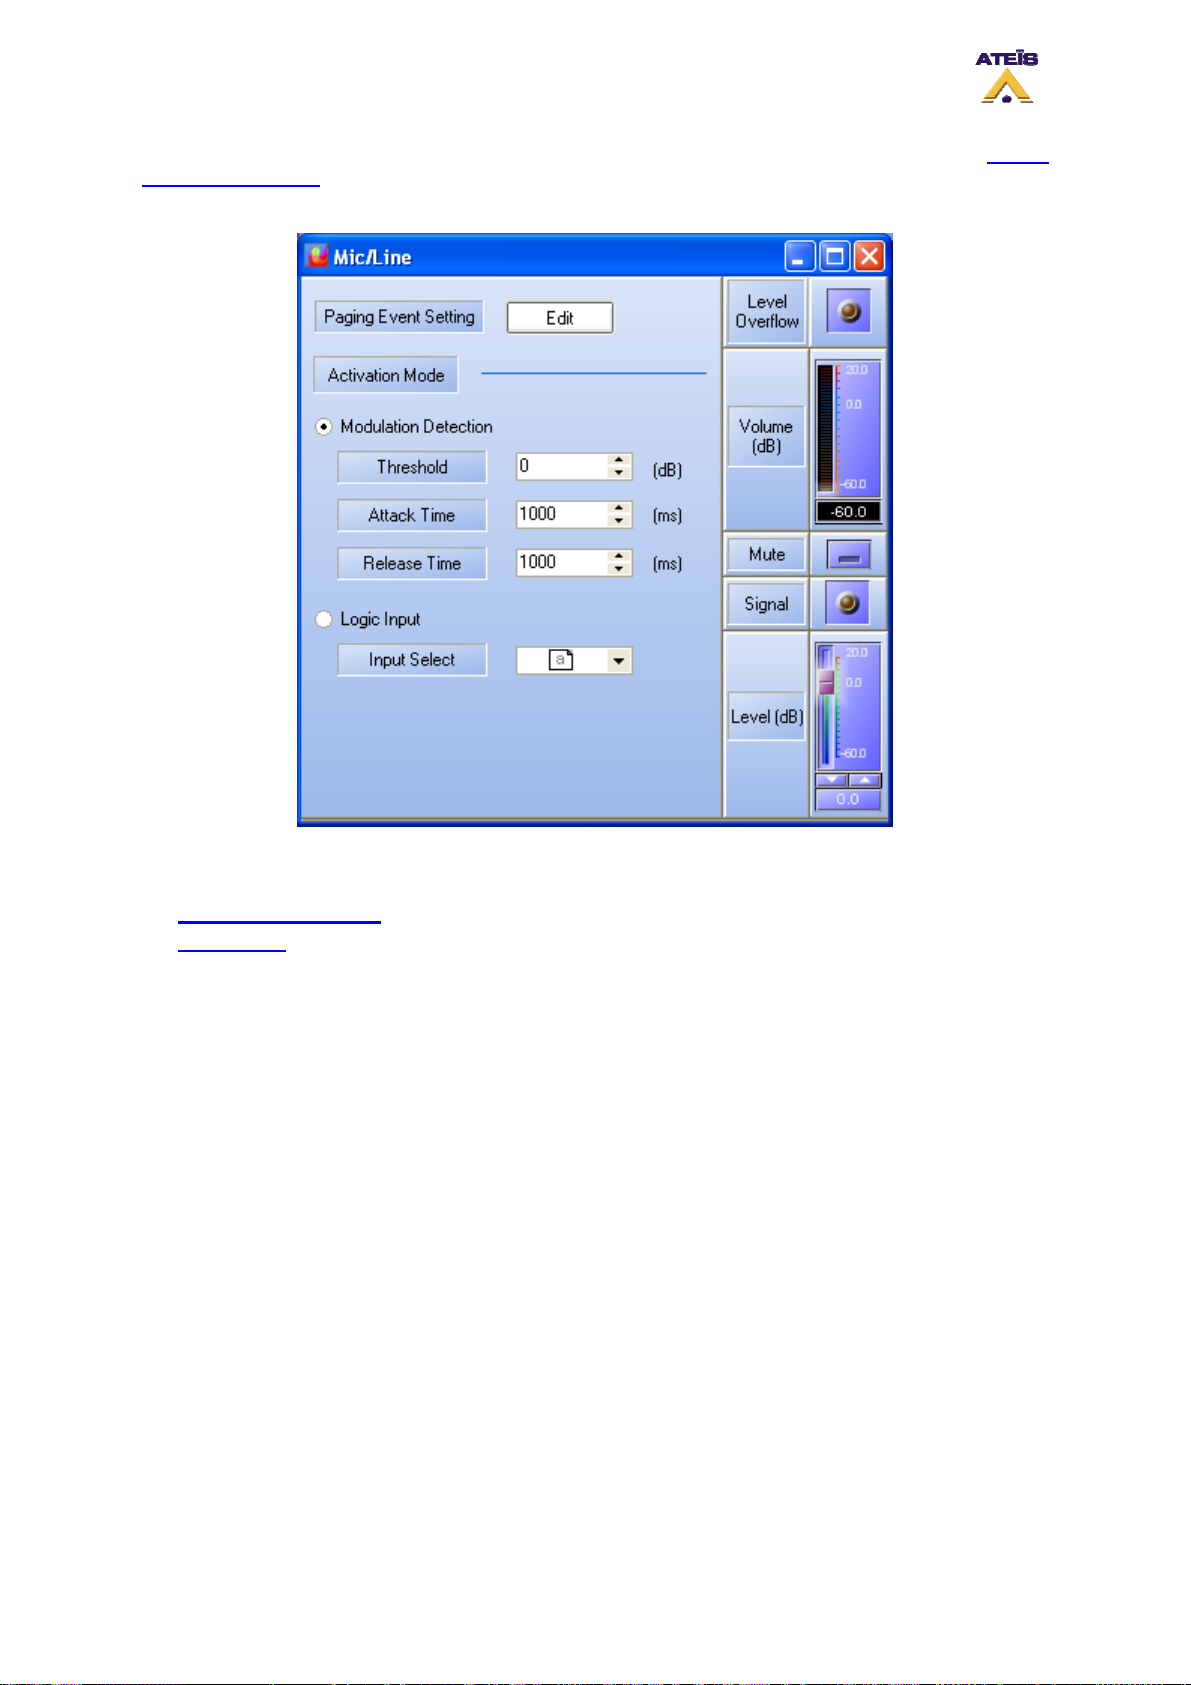
In order to use the Mic/Line input, first drag and drop Microphone or Line In from the Design
Component Section to the Master window. Double-click the Microphone or Line In icon to enter the
Mic/Line window, see below.
The Mic/Line has two activation mode:
• Modulation Detection
• Logic Input
By clicking the Edit Button you will enter the Mic/Line Paging Event window. Her you will be able to set
up parameters of this event, see below.
Ateïs International
Ch. du Dévent, 1024 Ecublens, Switzerland.
Phone : +41 21 881 25 10
100
 Loading...