

Page 1
®
Prodigy
Book Size Barebone System
User’s Guide
Page 2

Disclaimer/Copyrights
Checklist
No part of this manual, including the products and software described in it, may be
reproduced, transmitted, transcribed, stored in a retrieval system, or translated into any
language in any form or by any means, except documentation kept by the purchaser for
backup purposes, without the express written permission of ASUSTeK COMPUTER INC.
(“ASUS”).
ASUS PROVIDES THIS MANUAL “AS IS” WITHOUT WARRANTY OF ANY KIND, EITHER
EXPRESS OR IMPLIED, INCLUDING BUT NOT LIMITED TO THE IMPLIED WARRANTIES
OR CONDITIONS OF MERCHANTABILITY OR FITNESS FOR A PARTICULAR PURPOSE.
IN NO EVENT SHALL ASUS, ITS DIRECTORS, OFFICERS, EMPLOYEES OR AGENTS BE
LIABLE FOR ANY INDIRECT, SPECIAL, INCIDENTAL, OR CONSEQUENTIAL DAMAGES
(INCLUDING DAMAGES FOR LOSS OF PROFITS, LOSS OF BUSINESS, LOSS OF USE
OR DATA, INTERRUPTION OF BUSINESS AND THE LIKE), EVEN IF ASUS HAS BEEN
ADVISED OF THE POSSIBILITY OF SUCH DAMAGES ARISING FROM ANY DEFECT OR
ERROR IN THIS MANUAL OR PRODUCT.
Product warranty or service will not be extended if: (1) the product is repaired, modified or
altered, unless such repair, modification of alteration is authorized in writing by ASUS; or (2)
the serial number of the product is defaced or missing.
Products and corporate names appearing in this manual may or may not be registered
trademarks or copyrights of their respective companies, and are used only for identification or
explanation and to the owners’ benefit, without intent to infringe.
The product name and revision number are both printed on the product itself. Manual
revisions are released for each product design represented by the digit before and after the
period of the manual revision number. Manual updates are represented by the third digit in
the manual revision number.
For previous or updated manuals, BIOS, drivers, or product release information, contact
ASUS at http://www.asus.com.tw or through any of the means indicated on the following
page.
SPECIFICATIONS AND INFORMATION CONTAINED IN THIS MANUAL ARE FURNISHED
FOR INFORMATIONAL USE ONLY, AND ARE SUBJECT TO CHANGE AT ANY TIME
WITHOUT NOTICE, AND SHOULD NOT BE CONSTRUED AS A COMMITMENT BY ASUS.
ASUS ASSUMES NO RESPONSIBILITY OR LIABILITY FOR ANY ERRORS OR
INACCURACIES THAT MAY APPEAR IN THIS MANUAL, INCLUDING THE PRODUCTS
AND SOFTWARE DESCRIBED IN IT.
Copyright © 2002 ASUSTeK COMPUTER INC. All Rights Reserved.
Product Name: Prodigy Book Size Barebone System
Manual Revision: 1.01 E1099
Release Date: August 2002
2
Page 3

ASUS contact information
ASUSTeK COMPUTER INC. (Asia-Pacific)
Address: 150 Li-Te Road, Peitou, Taipei, Taiwan 112
General Tel: +886-2-2894-3447
General Fax: +886-2-2894-3449
General Email: info@asus.com.tw
Technical Support
MB/Others (Tel): +886-2-2890-7121 (English)
Notebook (Tel): +886-2-2890-7122 (English)
Desktop/Server (Tel): +886-2-2890-7123 (English)
Support Fax: +886-2-2890-7698
Support Email: tsd@asus.com.tw
Web Site: www.asus.com.tw
Newsgroup: cscnews.asus.com.tw
ASUS COMPUTER INTERNATIONAL (America)
Address: 6737 Mowry Avenue, Mowry Business Center,
Building 2, Newark, CA 94560, USA
General Fax: +1-510-608-4555
General Email: tmd1@asus.com
Features
Technical Support
Support Fax: +1-510-608-4555
General Support: +1-502-995-0883
Web Site: www.asus.com
Support Email: tsd@asus.com
ASUS COMPUTER GmbH (Europe)
Address: Harkortstr. 25, 40880 Ratingen, BRD, Germany
General Fax: +49-2102-442066
General Email: sales@asuscom.de (for marketing requests only)
Technical Support
Support Hotline: MB/Others: +49-2102-9599-0
Notebook (Tel): +49-2102-9599-10
Support Fax: +49-2102-9599-11
Support (Email): www.asuscom.de/de/support (for online support)
Web Site: www.asuscom.de
3
Page 4

Safeguards
Notices
Federal Communications Commission Statement
This device complies with FCC Rules Part 15. Operation is subject to the
following two conditions:
• This device may not cause harmful interference, and
• This device must accept any interference received including
interference that may cause undesired operation.
This equipment has been tested and found to comply with the limits for a
Class B digital device, pursuant to Part 15 of the FCC Rules. These limits
are designed to provide reasonable protection against harmful interference
in a residential installation. This equipment generates, uses and can
radiate radio frequency energy and, if not installed and used in
accordance with manufacturer’s instructions, may cause harmful
interference to radio communications. However, there is no guarantee that
interference will not occur in a particular installation. If this equipment does
cause harmful interference to radio or television reception, which can be
determined by turning the equipment off and on, the user is encouraged to
try to correct the interference by one or more of the following measures:
• Reorient or relocate the receiving antenna.
• Increase the separation between the equipment and receiver.
• Connect the equipment to an outlet on a circuit different from that to
which the receiver is connected.
• Consult the dealer or an experienced radio/TV technician for help.
WARNING!
The use of shielded cables for connection of the monitor to the graphics
card is required to assure compliance with FCC regulations. Changes
or modifications to this unit not expressly approved by the party
responsible for compliance could void the user’s authority to operate
this equipment.
Canadian Department of Communications Statement
This digital apparatus does not exceed the Class B limits for radio noise
emissions from digital apparatus set out in the Radio Interference
Regulations of the Canadian Department of Communications.
This class B digital apparatus complies with Canadian ICES-003.
4
Page 5

Table of contents
Disclaimer/Copyrights .................................................................... 2
ASUS contact information .............................................................. 3
Notices ........................................................................................... 4
Table of Contents ........................................................................... 5
System package contents .............................................................. 6
About this guide.............................................................................. 7
Chapter 1: System Introduction............................................ 9
1.1 Front panel features ............................................................ 10
1.2 Rear panel features..............................................................11
1.3 Internal features .................................................................. 12
Chapter 2: System Assembly.............................................. 13
2.1 Opening the chassis............................................................ 14
2.2 Remove the disk drive assembly......................................... 16
2.3 Install the hard disk drive..................................................... 17
2.4 Install system memory......................................................... 18
2.5 Install a CPU ....................................................................... 19
2.6 Closing the chassis ............................................................. 21
Chapter 3: Optional Procedures ......................................... 23
3.1 Removing the PCI I/O cover................................................ 24
3.2 Installing a PCI expansion card........................................... 25
Chapter 4: System Placement............................................. 27
4.1 Vertical placement ............................................................... 28
4.2 Horizontal placement........................................................... 29
5
Page 6

System package contents
This checklist enumerates all the built-in components and all the support
materials included with the standard system package.
1) System Chassis: 305 x 88 x 385mm.
2) ASUS motherboard
3) Switching Power Supply, 165W with active PFC
4) CD or DVD Drive
5) 1.44MB Floppy Disk Drive
6) PCI Riser Card
7) CPU Heatsink
8) Motherboard Support CD
9) 1 UltraDMA/33/66 IDE Cable
10) 1 Floppy Cable
11) Powered-by ASUS name plate
12) 56K PCI Modem Card (optional)
13) TV Connector Module (optional)
14) 2 Foot Stands
15) 4 Rubber Footpads
16) Motherboard User’s Manual
17) Prodigy Book Size Barebone System User’s Guide
If assembling the Prodigy system by yourself, read through the guide and
prepare all the components before starting.
NOTE: The ASUS Prodigy is shipped in barebone style: it does not
include a CPU, a hard disk drive, DRAM, or any other peripherals
except those listed above. If users have any problems with the
hardware or software, please contact your dealer or distributor.
6
Page 7

About this guide
Audience
This guide provides general information and installation instructions about
the ASUS Prodigy Book Size Barebone System. This guide is intended for
experienced users and integrators with hardware knowledge of personal
computers.
How this guide is organized
This document contains the following parts:
1. Chapter 1: System Introduction
All about the ASUS Prodigy Book Size Barebone System: the front
and rear panel features, and the internal layout and design.
2. Chapter 2: System assembly
Step-by-step instructions on how to install basic components.
3. Chapter 3: Optional procedures
How to install optional components.
4. Chapter 4: System placement
Two system placement options help to maximize work space and
afford more convenience.
7
Page 8

89ASUS Prodigy Book Size Barebone System
Page 9

Chapter 1
All about the ASUS Prodigy Book Size Barebone
System: the front and rear panel features, and the
internal layout and design.
System Introduction
Page 10

1.1 Front Panel Features
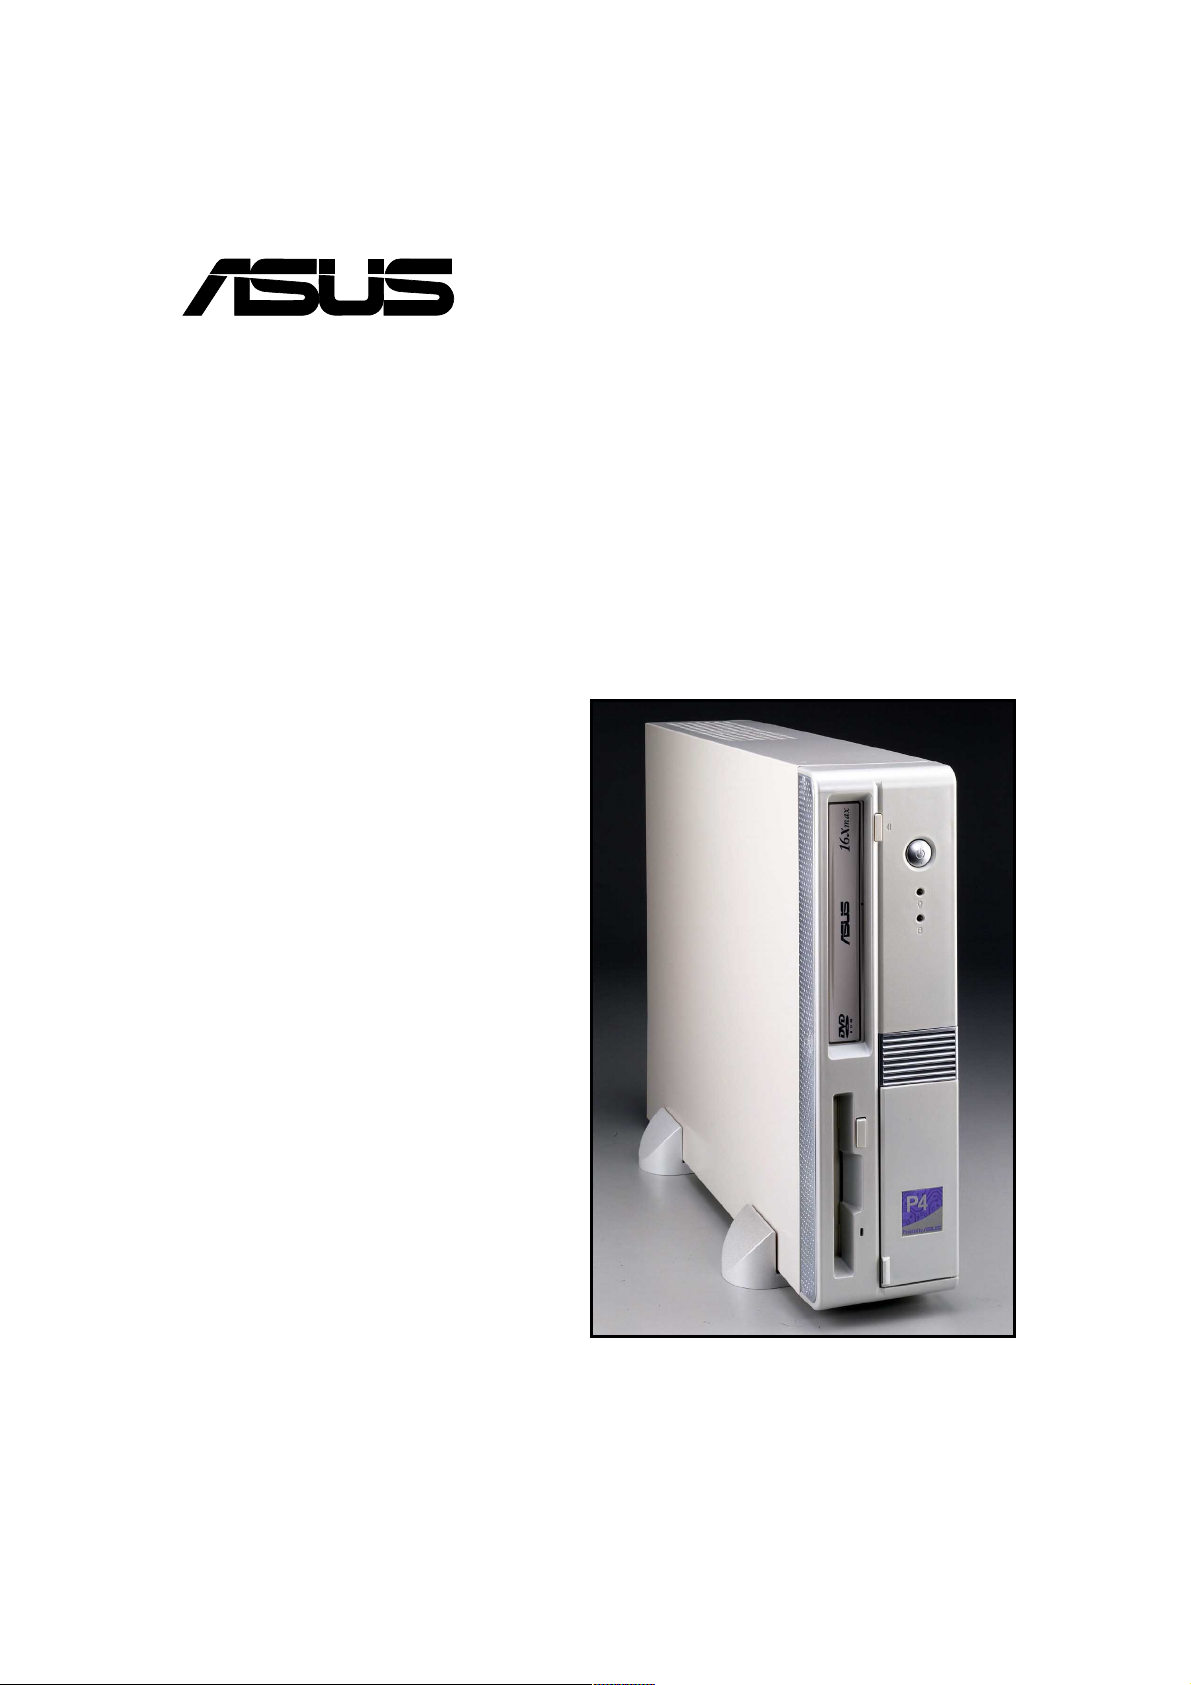
The ASUS Prodigy Book Size Barebone System includes the ASUS
motherboard, a power supply, a CD-ROM or DVD drive and a floppy disk
drive built into in a dual-positional chassis.
The front panel features:
CD/DVD Control Button
Power Button
Power LED
HDD LED
USB Ports (2&3)
SPDIF out (optional)
PCMCIA (optional)
Microphone
Headphone
6-pin 1394 (optional)
4-pin 1394 (optional)
CD-ROM / DVD Drive
Floppy Drive
I/O Panel,
(behind door)
“Powered by ASUS”
name plate
On the lower right of the front panel
a small door conceals
Output
features: a fiber optical
Input
and
SPDIF out connector, two USB
connectors (Ports 2&3),
headphone and microphone
connectors. Optional connectors
include: a 4 or 6 pin 1394 and a
PCMCIA slot.
Pull the door to open it.
10
Chapter 1: System Introduction
Page 11

1.2 Rear Panel Features
The rear panel of the ASUS Prodigy Book Size Barebone System includes
the standard PC99 I/O connectors for external devices, power supply
socket, and optional feature connectors.
The rear panel features:
PS/2 Keyboard
USB (0&1)
Serial Port
VGA Port
Line Out
Line In
Microphone
DVI-Out (optional)
TV-Out (optional)
Power Supply
PS/2 Mouse
LAN Port
Parallel Port
Game/MIDI
Modem
(optional)
DVI-Out (optional)
S/PDIF (optional)
NOTE
The rear panel optional features may vary as shown in the above
pictures.
ASUS Prodigy Book Size Barebone System
11
Page 12

1.3 Internal Features
The figure below shows the system from above. The standard components
are already installed.
ASUS Motherboard
CD / DVD ROM DriveCPU Cooler
Power Supply PCI Riser Card 3.5” Floppy Drive
12
Chapter 1: System Introduction
Page 13

Chapter 2
Step-by-step instructions on how to install basic
components.
IMPORTANT: ASUS has designed the
Prodigy to accept an ASUS “Flex ATX”
motherboard with dimensions between
19.1 x 22.9 cm, (or 7.5 x 9 inches). It is
not advisable to install other boards.
Before installing any motherboard other
than the original supplied by ASUS,
make sure that it fits into the case and
the I/O connectors correspond to the
openings on the back panel.
Prodigy Book Size Barebone System
System Assembly
13
Page 14

2.1 Opening the chassis
1. Remove the two screws
on each end of the back
panel. This frees the the
top cover from the
chassis.
2. Seperate the case and
top cover: use your
thumbs to pull it off, from
the front to the back,
then lift it off the chassis.
3. Open the case, lifting
the top cover.
14
Chapter 2: System Assemby
Page 15

4. Lift the link-up bar to
gain access to the
components.
5. Gently detach the three
front bezel hooks from
the case front so that it
may be removed.
6. Remove the front bezel
and set it aside.
Prodigy Book Size Barebone System
15
Page 16

2.2 Remove the disk drive assembly
1. Press your right thumb
firmly down on the right
edge of the chassis
while gripping your
fingers under both sides
of the CD and floppy
disk drive assembly. It
will come loose. Firmly
lift the assembly up and
out.
2. Lift out the CD/floppy
drive module.
16
3. Slide the hard disk drive
cage from right to left
and lift it up to install a
hard disk.
Chapter 2: System Assemby
Page 17

2.3 Install the hard disk drive
1. Carefully slip the hard
2. Slide the hard drive
disk drive into the cage.
Ensure that the four
screw holes are properly
aligned. Tighten in the
screws.
cage back into its
original place. Connect
the IDE cable to the
primary IDE connector
on the hard disk drive.
Locate the P3 power
cable and connect it to
the hard disk drive.
IDE Cable
(Red strip to Pin 1)
Prodigy Book Size Barebone System
Power Cable (P3)
17
Page 18

2.4 Install system memory
1. Set the CD and floppy disk drive assemply on the side of the chassis.
2. Locate the two DDR SDRAM DIMM sockets on the ASUS
motherboard.
104 Pins
80 Pins
®
184-Pin DDR DIMM Sockets
3. Unlock a DIMM socket
by pressing the retaining
clips outward.
CAUTION
A DDR DIMM is keyed with a notch
so that it fits in only one direction.
DO NOT force a DIMM into a socket
to avoid damaging the DIMM.
4. Align a DIMM on the
socket such that the
notch on the DIMM
matches the break on
the socket.
5. Firmly insert the DIMM
into the socket until the
retaining clips snap back
in place and the DIMM is
properly seated.
6. After installing the
DIMM, place the CD and
floppy drive assembly
back into its original
position. Then, replace
the front bezel; take care
to insert the three plastic
tabs without stress.
18
Chapter 2: System Assemby
Page 19

2.5 Install a CPU
Metal retaining clip
1. To install the CPU, it is
necessary to remove the
pre-installed heatsink
assembly.
2. Press down and unhook
the metal retaining clips
on both sides of the
metal heatsink.
3. Disconnect the CPU fan
power cable if it is too
short.
4. Lift the heatsink
assembly up and out.
CPU Fan power cable
5. Locate the CPU Socket
478 on the motherboard.
Prodigy Book Size Barebone System
19
Page 20

Socket Lever
6. Unlock the socket by
pressing the socket lever
sideways, then lift it up to
a 90°-100° angle.
90 -100
NOTE
Make sure that the socket
lever is lifted up to 90°-100°
angle, otherwise the CPU
does not fit in completely.
7. Position the CPU above
the socket such that its
marked corner matches
the base of the socket
lever.
Gold Mark
into the socket until it fits
in place.
8. Carefully insert the CPU
CAUTION
The CPU fits only in one
correct orientation. DO
NOT force the CPU into the
socket to prevent bending
the pins and damaging the
CPU!
9. When the CPU is in place, press it firmly on the socket while you push
down the socket lever to secure the CPU. The lever clicks on the side
tab to indicate that it is locked.
20
Chapter 2: System Assemby
Page 21

2.6 Closing the chassis
1. Replace the heatsink
assembly. Ensure that
the black fan faces
towards the front of the
unit.
2. Re-attach the CPU fan
power cable.
3. Re-attach the metal
retaining clips: hook on
one side then press the
spring retainer down on
the other until it clicks
into the slot.
4. Replace the front bezel.
Prodigy Book Size Barebone System
21
Page 22

5. Lower the link-up bar
and snap it gently into
place.
6. Replace the top cover.
To make sure the inner
tabs slide into place
properly, lay the cover
down flush on top of the
chassis about one
centimeter behind the
edge of the front bezel.
Then, slide the cover
forward while pressing in
on the lower edges of
the cover to engage
the inner tabs.
22
Chapter 2: System Assemby
Page 23

Chapter 3
How to install optional components.
Prodigy Book Size Barebone System
Optional Procedures
23
Page 24

3.1 Removing the PCI I/O cover
The Prodigy chassis accommodates two PCI expansion card through a
PCI riser card. Before installing a new PCI card, it is necessary to detach
the I/O cover.
1. To remove the I/O cover
from the chassis,
unfasten the screw with
a Philips (cross)
screwdriver.
2. After removing the I/O
cover, the back panel
exposes the external I/O
port to permit external
access for component
connections, like a VGA
card connector.
24
Chapter 3: Optional Procedures
Page 25

3.2 Installing a PCI expansion card
1. A PCI card is precisely
sized for for easy
alignment with both the
onboard notches and
the external I/O port.
2. Align and firmly plug the
PCI card into the slot.
3. For card stability, make
sure that the card
bracket end goes into
the cleft on the slot
frame.
Prodigy Book Size Barebone System
25
Page 26

26
Chapter 3: Optional Procedures
Page 27

Chapter 4
Two system placement options help to
maximize work space and afford more
convenience.
Prodigy Book Size Barebone System
System Placement
27
Page 28

4.1 Vertical placement
Normally, the Prodigy Book Size Barebone System is placed upright on
the desk. If you desire to position the system this way, fit the two foot
stands on the bottom of the system chassis. A “Powered by ASUS”
nameplate is supplied, too.
Position the foot stands beneath
the chassis.
28
The “Powered by ASUS” nameplate can be
placed on the I/O panel door. The
nameplate snaps onto the chassis in both
placement positions.
Chapter 4: System Placement
Page 29

4.2 Horizontal placement
The Prodigy may also be set-up in a horizontal position. The Prodigy is
supplied with four rubber footpads to protect the chassis and the surface
below.
If you wish to place the system in the
horizontal position, attach the four
rubber footpads to the bottom of the
chassis.
Rubber footpad
Prodigy Book Size Barebone System
29
Page 30

30
Chapter 4: System Placement
 Loading...