

ASUS WLAN mini-PCI card
WL-120
User Manual

Copyright Information
No part of this manual, including the products and software described in it,
may be reproduced, transmitted, transcribed, stored in a retrieval system,
or translated into any language in any form or by any means, except documentation kept by the purchaser for backup purposes, without the express
written permission of ASUSTeK COMPUTER INC. (“ASUS”).
ASUS PROVIDES THIS MANUAL “AS IS” WITHOUT WARRANTY
OF ANY KIND, EITHER EXPRESS OR IMPLIED, INCLUDING BUT
NOT LIMITED TO THE IMPLIED WARRANTIES OR CONDITIONS
OF MERCHANTABILITY OR FITNESS FOR A PARTICULAR PURPOSE. IN NO EVENT SHALL ASUS, ITS DIRECTORS, OFFICERS,
EMPLOYEES OR AGENTS BE LIABLE FOR ANY INDIRECT, SPECIAL, INCIDENTAL, OR CONSEQUENTIAL DAMAGES (INCLUDING DAMAGES FOR LOSS OF PROFITS, LOSS OF BUSINESS, LOSS
OF USE OR DAT A, INTERRUPTION OF BUSINESS AND THE LIKE),
EVEN IF ASUS HAS BEEN ADVISED OF THE POSSIBILITY OF SUCH
DAMAGES ARISING FROM ANY DEFECT OR ERROR IN THIS
MANUAL OR PRODUCT.
Product warranty or service will not be extended if: (1) the product is repaired, modified or altered, unless such repair, modification of alteration is
authorized in writing by ASUS; or (2) the serial number of the product is
defaced or missing.
Products and corporate names appearing in this manual may or may not be
registered trademarks or copyrights of their respective companies, and are
used only for identification or explanation and to the owners’ benefit, without
intent to infringe.
SPECIFICATIONS AND INFORMATION CONTAINED IN THIS
MANUAL ARE FURNISHED FOR INFORMATIONAL USE ONL Y, AND
ARE SUBJECT T O CHANGE AT ANY TIME WITHOUT NOTICE, AND
SHOULD NOT BE CONSTRUED AS A COMMITMENT BY ASUS. ASUS
ASSUMES NO RESPONSIBILITY OR LIABILITY FOR ANY ERRORS
OR INACCURACIES THAT MAY APPEAR IN THIS MANUAL, INCLUDING THE PRODUCTS AND SOFTWARE DESCRIBED IN IT.
Copyright © 2003 ASUSTeK COMPUTER INC. All Rights Reserved.
Product Name: ASUS WLAN mini-PCI card (WL-120)
Manual Revision: 1 E1219
Release Date: March 2003
2 ASUS WLAN mini-PCI card

Copyright Information
ASUSTeK COMPUTER INC. (Asia-Pacific)
Address: 150 Li-Te Road, Peitou, Taipei, Taiwan 112
General Tel: +886-2-2894-3447
General Fax: +886-2-2894-3449
General Email: info@asus.com.tw
Technical Support
MB/Others (Tel):+886-2-2890-7121 (English)
Notebook (Tel): +886-2-2890-7122 (English)
Desktop/Server: +886-2-2890-7123 (English)
Support Fax: +886-2-2890-7698
Support Email: tsd@asus.com.tw
Web Site: www.asus.com.tw
ASUS COMPUTER INTERNATIONAL (America)
Address: 44370 Nobel Drive, Fremont, CA 94538, USA
General Fax: +1-510-608-4555
General Email: tmd1@asus.com
Technical Support
Support Fax: +1-510-608-4555
General Support: +1-502-933-8713
Web Site: www.asus.com
Support Email: tsd@asus.com
ASUS COMPUTER GmbH (Germany & Austria)
Address: Harkortstr. 25, 40880 Ratingen, BRD, Germany
General Fax: +49-2102-442066
General Email: sales@asuscom.de (for marketing requests only)
Technical Support
Support Hotline: MB/Others: +49-2102-9599-0
Notebook (Tel): +49-2102-9599-10
Support Fax: +49-2102-9599-11
Support (Email): www.asuscom.de/de/support (for online support)
Web Site: www.asuscom.de
ASUS WLAN mini-PCI card 3

Quick Start Guide
Welcome
The ASUS WLAN mini-PCI card is designed to be fully compliant with the
IEEE 802.11b wireless local area network (Wireless LAN) standard. The
ASUS WLAN mini-PCI card comes with two antenna connectors, which
are individually connected to the built-in antennas in your notebook. The
two antennas allow your notebook to have the best communication when
you are enjoying the wireless link.
Verifying the TCP/IP Protocol
Windows 98/Me
Right-click My Network Placeon the desktop and select properties.
Scroll down and look for "TCP/IP -> ASUS 802.11b Network Adapter". Make sure that
way, and subnet mask) are set correctly.
the TCP/IP protocal parameters (IP adress, gate-
Chapter 1
Windows 2K/XP
Open the Control Panel through the Start menu. Double-click Network
Connection icon. Right click " ASUS 802.11b Network Adapter" and sel-
ect Properties. Look for "Internet Protocal (TCP/IP)". Make sure that
the TCP/IP protocal parameters (IP adress, gateway, and subnet mask) are
set correctly.
ASUS WLAN mini-PCI card 4

Quick Start Guide
Installing the WLAN mini-PCI card Utilities
After you have installed the WLAN mini-PCI card driver, you can install
WLAN mini-PCI card utilities. Refer to the User's manual for detailed
information.
1. Insert the ASUS WLAN mini-PCI card support CD and an autorun
menu will appear. If your autorun is disabled, double click SETUP.EXE
in the root directory of the support CD.
2. From the autorun menu, click Install ASUS WLAN mini-PCI card
Utilities.
3. Follow the on-screen instructions to complete the installation.
Chapter 5
ASUS WLAN mini-PCI card 5

Statement
This device is intended only for OEM integrators under the following
conditions:
1. The antenna must be installed such that 20 cm is maintained between the
antenna and users.
2. The transmitter module may not be co-located with any other transmitter
or antenna.
3. For laptop installations, the antenna must be installed to ensure that the
proper spacing is maintained in the event the device is used in held-onlap positions (i.e. positioning of antennas must be placed in the upper
portion of the LCD panel only to ensure 20 cm will be maintained if the
user places the device on their lap for use).
The card must cease to transmit with the lid shut to prevent transmission
in portable operating conditions.
As long as the conditions above are met, further transmitter test will not be
required. However, the OEM integrator is still responsible for testing their
end-product for any additional compliance requirements required with this
module installed (for example, digital device emissions, PC peripheral
requirements, etc.).
IMPORTANT NOTE: In the event that these conditions can not be met
(for example certain laptop configurations or co-location with another
transmitter), then the FCC authorization is no longer considered valid and
the FCC ID can not be used on the final product. In these circumstances,
the OEM integrator will be responsible for re-evaluating the end product
(including the transmitter) and obtaining a separate FCC authorization.
End Product Labeling
This transmitter module is authorized only for use in devices where the
antenna may be installed such that 20 cm may be maintained between the
antenna and users (for example access points, routers, wireless ADSL
modems, and similar equipment). The final end product must be labeled in
a visible area with the following: "Contains TX FCC ID:
MSQPCCWL120".
ASUS WLAN MiniPCI Card 6

Statement
Manual Information for End Users:
The end user must not have manual instructions to remove or install the
device. The user manual for end users must include the following
information in a prominent location
"IMPORTANT NOTE: To comply with FCC RF exposure compliance
requirements, the antenna used for this transmitter must be installed to
provide a separation distance of at least 20 cm from all persons and must
not be co-located or operating in conjunction with any other antenna or
transmitter."
ASUS WLAN MiniPCI Card 7

Reference
Software Reference
1. Overview
The ASUS WLAN mini-PCI card software includes five groups of utilities.
• Control Center – Makes it easy to launch applications and activate
network location settings.
• Wireless Settings – Allows users to control the ASUS WLAN mini-PCI
card.
• Mobile Manager – A convenient tool to setup and manage network
location settings.
• Site Monitor – Measures the signal-to-noise (SNR) values of all wire-
less networks. This tool is used for determining the best placement of
Access Points to provide the most efficient coverage in a wireless network.
• Live Update – Provides automatic driver and firmware update through
the Internet.
Chapter 3
ASUS WLAN mini-PCI card 8
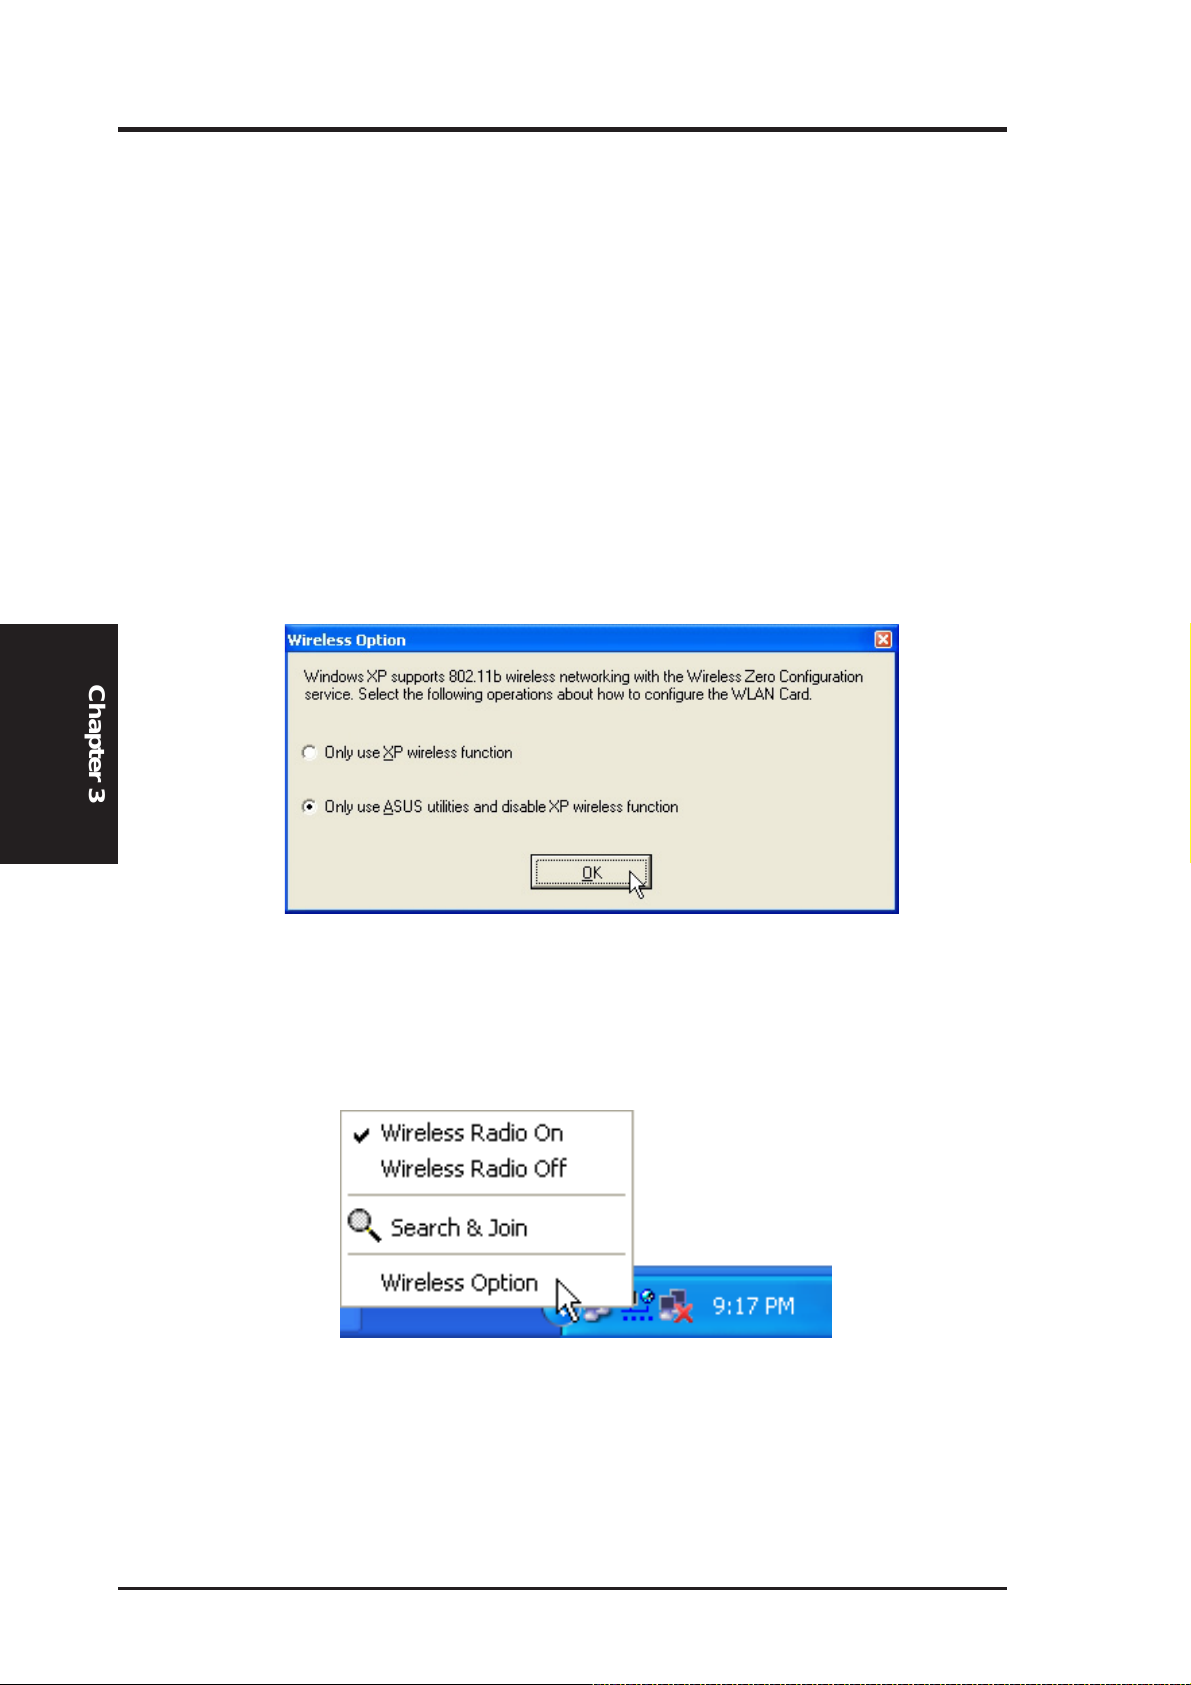
2. Windows XP Wireless Options
The wireless options shown below is only available for Windows XP. The
first time you run the Control Center utility, it will automatically show.
Select one of the radio buttons to decide your Windows XP wireless networking environment.
Only use XP wireless function – Only use W indows XP wireless network
settings to configure the ASUS WLAN mini-PCI card.
Only use ASUS utilities and disable XP wir eless function – Only use ASUS
WALN mini-PCI card utilities to configure the ASUS mini-PCI card.
Chapter 3
Reference
You can return to the Wireless Option setting at any time by left clicking
the control center icon and choosing “Wireless Option”.
9 ASUS WLAN mini-PCI card
Reference
3. Control Center
Control Center is an application that makes it easy to launch applications
and activate network location settings. Control Center starts automatically
when the system boots. Whenever Control Center is running, you will see
a Control Center icon displayed on the Windows taskbar.
Starting the Control Center manually
• Click the Windows Start button, select Programs, select ASUS Utility, select WLAN Card, and click ASUS WLAN Control Center.
or
• Double click the Control Center icon on the desktop.
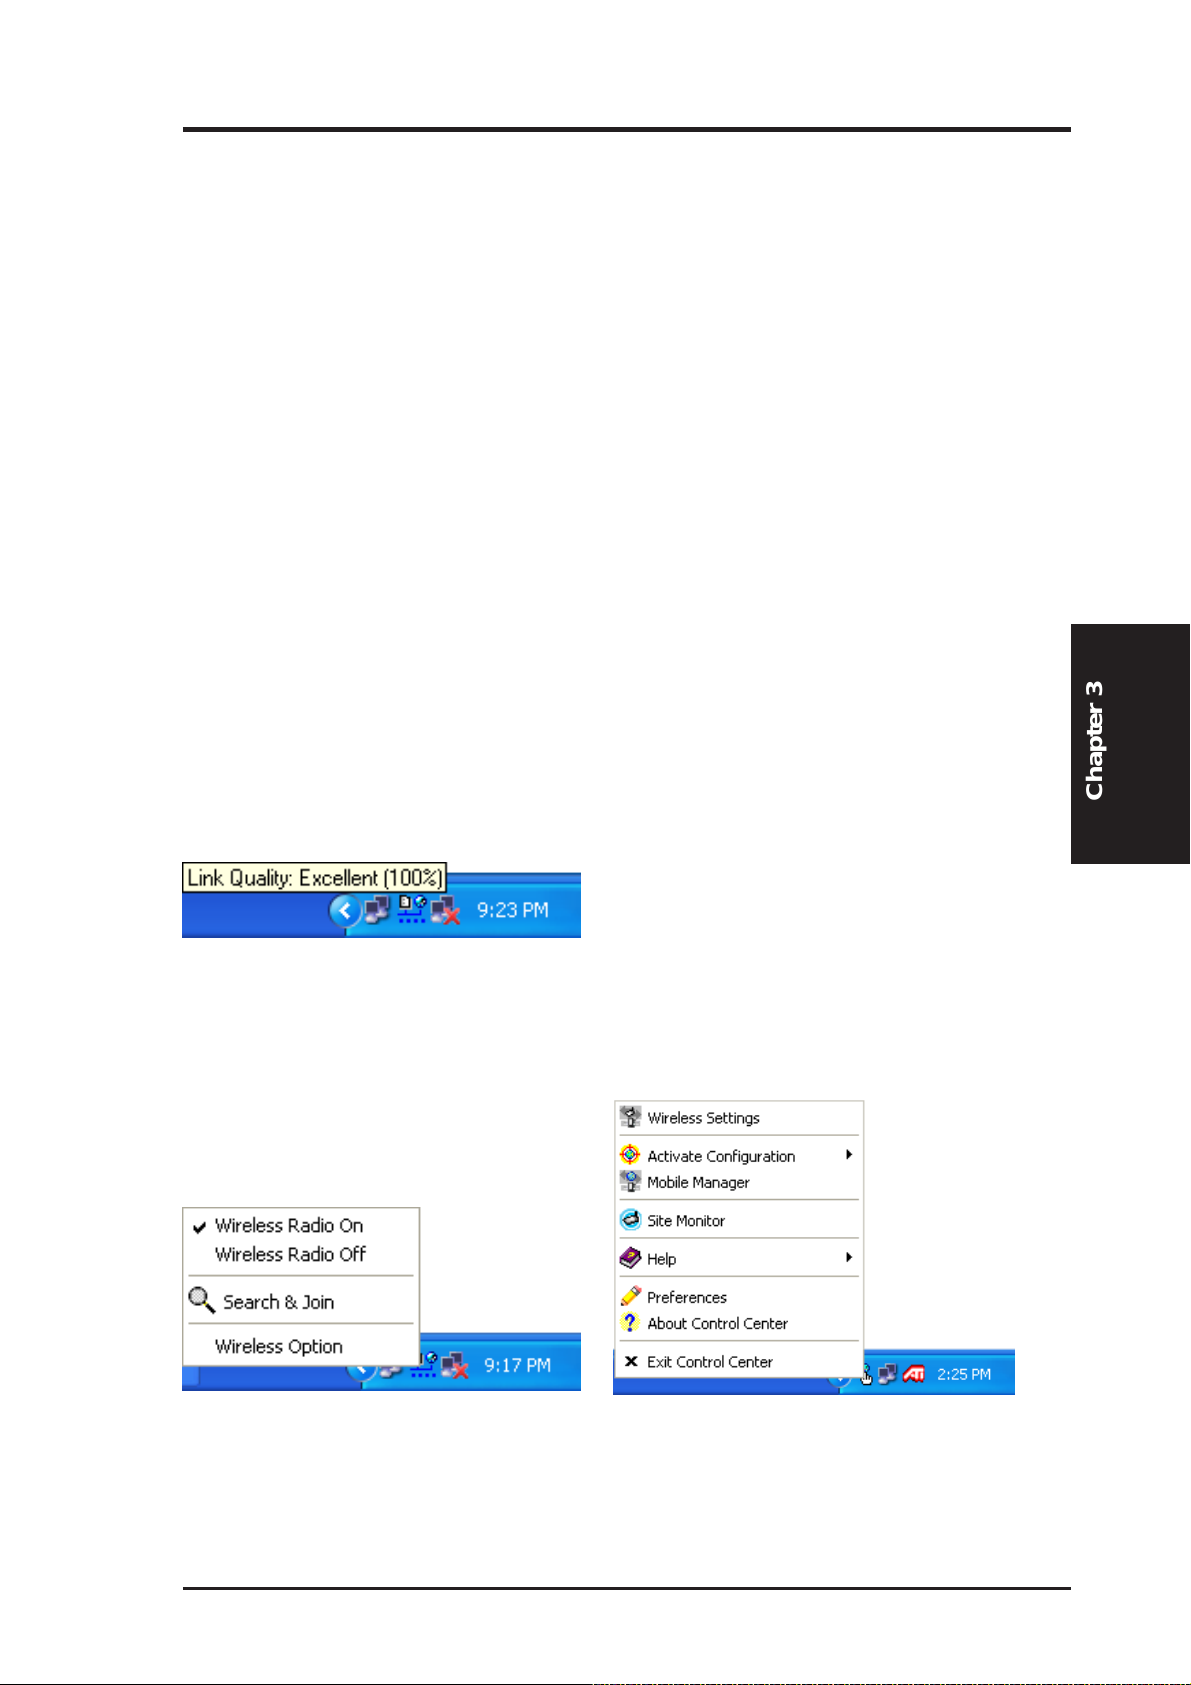
Using the Control Center Taskbar
1. The Control Center Taskbar menu display the following information:
• The link quality of the ASUS WLAN mini-PCI card (Excellent,
Good, Fair, Poor, Not Linked)
• Whether the ASUS WLAN mini-PCI card is connected to the In-
ternet (Blue: Connected, Gray: Not Connected)
Taskbar Icon and Status
Chapter 3
Taskbar Left-Click Menu
ASUS WLAN mini-PCI card 10
Taskbar Right-Click Menu
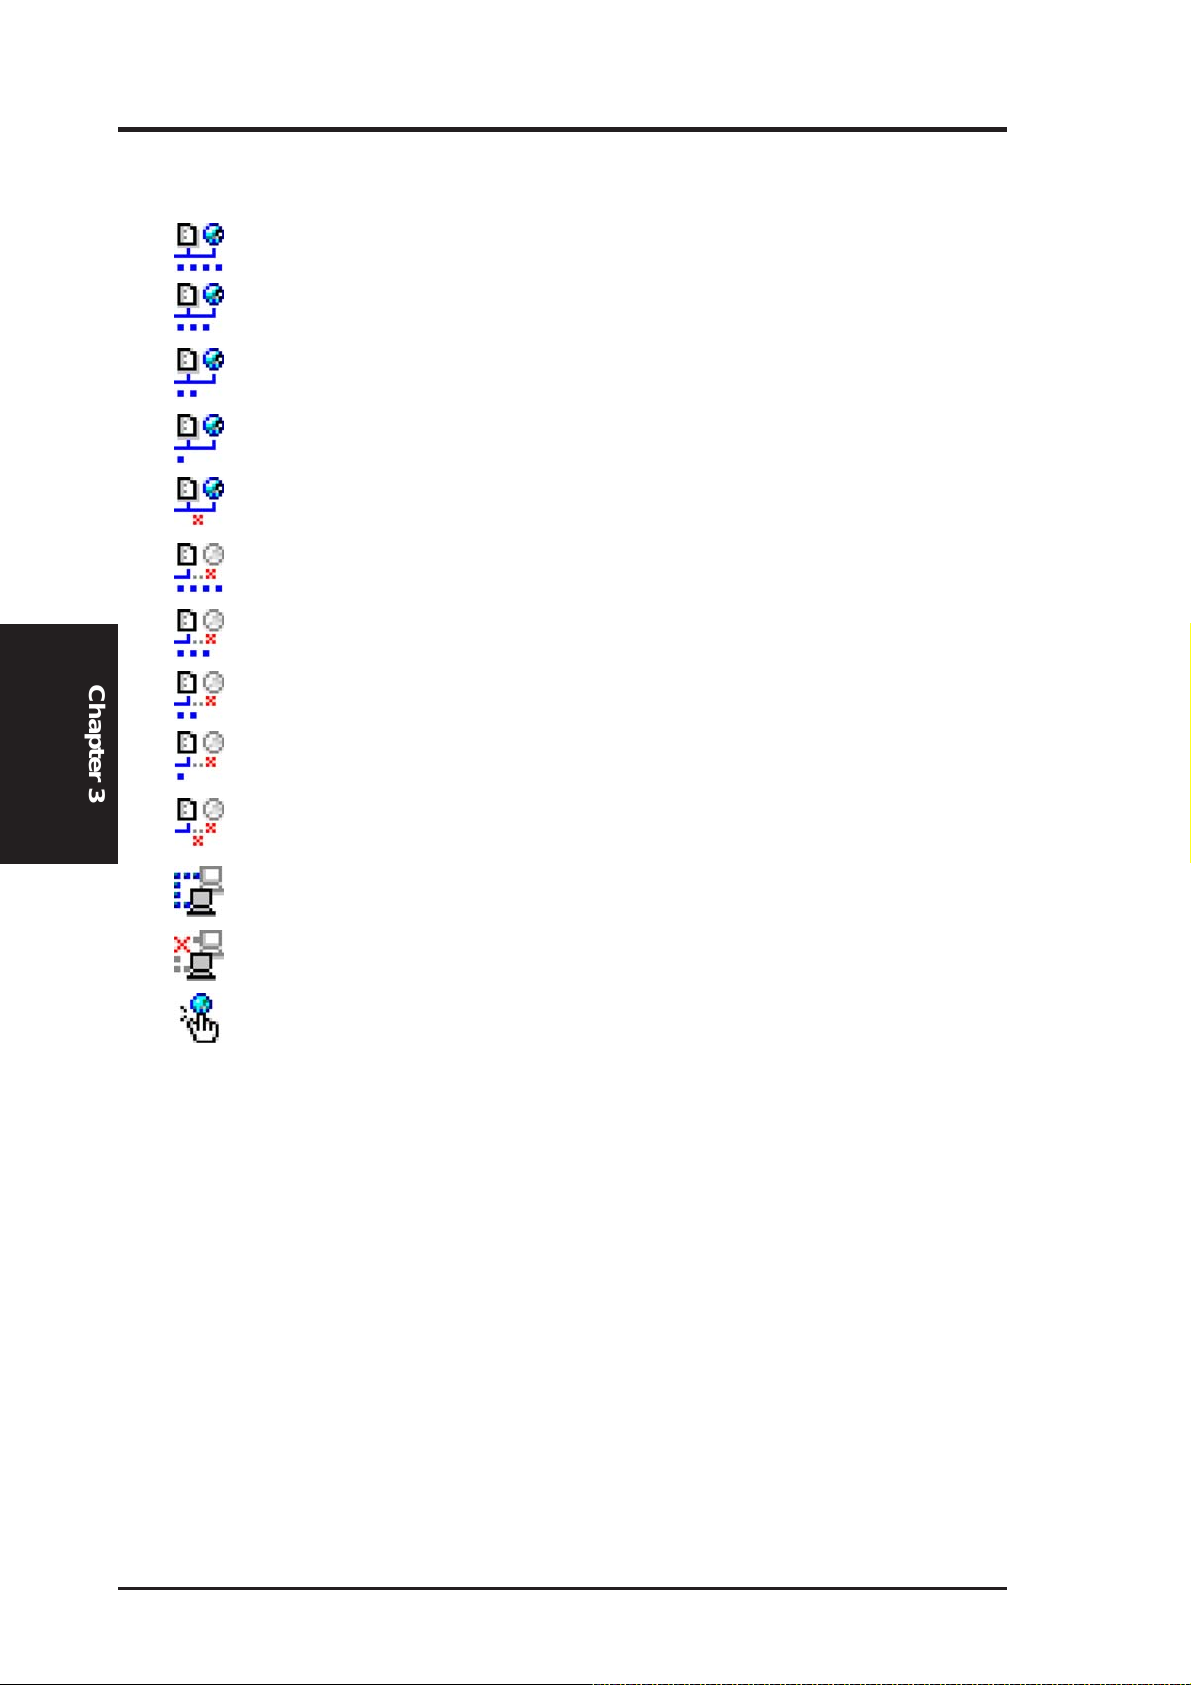
Wireless Status Icons (on the taskbar)
Chapter 3
Reference
Excellent link quality and connected to Internet (Infrastructure)
Good link quality and connected to Internet (Infrastructure)
Fair link quality and connected to Internet (Infrastructure)
Poor link quality and connected to Internet (Infrastructure)
Not linked but connected to Internet (Infrastructure)
Excellent link quality but not connected to Internet (Infrastructure)
Good link quality but not connected to Internet (Infrastructure)
Fair link quality but not connected to Internet (Infrastructure)
Poor link quality but not connected to Internet (Infrastructure)
Not linked and not connected to Internet (Infrastructure)
Linked (Ad Hoc)
Not Linked (Ad Hoc)
Connected to Internet
2. Right-clicking the taskbar icon shows the following menu:
• Wireless Settings – Launches Wireless Settings application.
• Activate Configuration – Allows you to set which profile to use.
• Mobile Manager – Launches Mobile Manager application.
• AP Manager – Launches AP Manager application installed with
the Wireless LAN Utilities.
• Preferences – Customizes the way the Control Center program be-
haves. You can create a Control Center shortcut on the desktop. You
can also set whether Control Center starts up with Windows.
• Exit – Closes the Control Center program.
11 ASUS WLAN mini-PCI card

Reference
3. Left-clicking the taskbar icon shows the following menu:
• Wireless Radio On – Turns the wireless radio ON.
• Wireless Radio Off – Turns the wireless radio OFF.
• Search and Join – View the properties of available Access Points
within range.
• Wireless Option (W indows XP only) – Sets your Windows XP wire-
less networking environment.
4. Double-clicking the taskbar icon:
• Launches the Wireless Settings application.
4. Wireless Settings
Wireless Settings is an application that allows you to control your ASUS
WLAN mini-PCI card. Use Wireless Settings to View or Modify the configuration settings and monitor the operational status of your PC Card.
Once W ireless Settings is launched, you can see the tabbed property sheet.
This property sheet is composed of tabbed “pages”, each with its own group
of feature-specific settings.
Starting Wireless Settings
• Open the W indows Control Panel, and then double-click the icon ASUS
WLAN Card Settings icon.
or
• Click the Windows Start button, select Programs, select ASUS Util-
ity, select WLAN Card, and then click Wireless Settings.
or
• Click the Control Center icon on the W indows taskbar, a popup menu
appears, and then click Wireless Settings.
Chapter 3
ASUS WLAN mini-PCI card 12
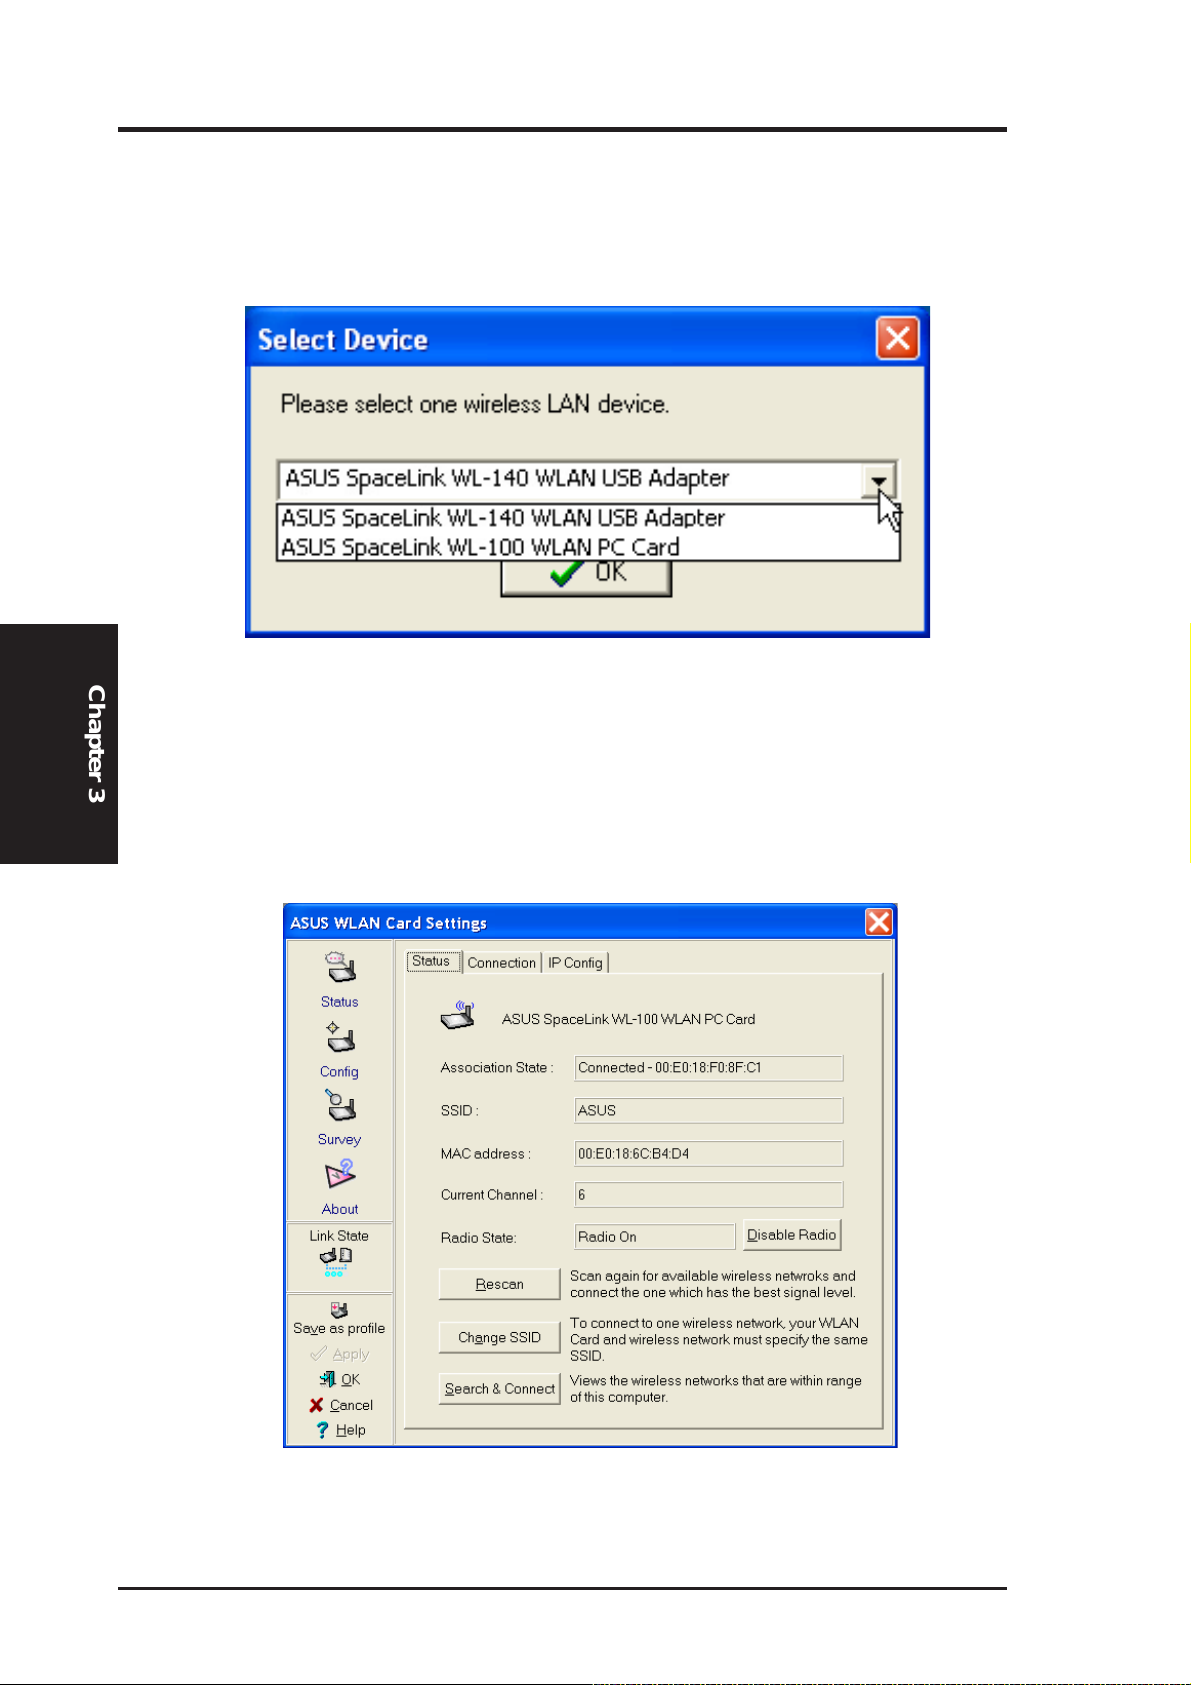
More than one ASUS WLAN Card
If you have more than one ASUS WLAN Card. You will be given a
device selection window when you launch the “Wireless Settings” utility.
Chapter 3
Reference
4.1 Status - Status Tab
You can view the information about the ASUS WLAN mini-PCI card from
the general menu. These fields are blank if the ASUS WLAN mini-PCI
card does not exist.
13 ASUS WLAN mini-PCI card
Reference
Association State
Shows the ASUS WLAN mini-PCI card association status as follows:
Connected – The station is now associated with one wireless LAN
device. Also, indicates the MAC address of this device.
Scanning... – The station is now attempting to authenticate and associate with the desired Access Point.
Disconnected – If the link is connected and no beacon received, then
the set adapter is no longer connected.
INT_TEST_FAIL – Interrupt test failed.
NOT_AVAILABLE – Cannot get PC Card status.
SSID
Shows the SSID that the ASUS WLAN mini-PCI card is currently using.
MAC address
Indicates the hardware address of the ASUS WLAN mini-PCI card. MAC
address is a unique identifier for networking devices (typically written as
twelve hexadecimal digits 0 through 9 and A through F, six hexadecimal
numbers separated by colons, i.e. 00:01:24:F0:05:C0). This parameter is
read-only and unique.
Current Channel
Shows the radio channel that the ASUS WLAN mini-PCI card is currently
using.
Radio State
Shows whether the wireless radio is ON or OFF.
When the wireless radio is turned OFF, the following icon ap-
pears in the upper left of the “Settings” property page.
When the wireless radio is turned ON, the following icon ap-
pears in the upper left of the “Settings” property page.
Chapter 3
ASUS WLAN mini-PCI card 14

Button
Enable Radio/Disable Radio – You can click the Disable Radio button to
turn OFF the wireless radio. When you click this button, the Radio State
field indicates that the radio has been turned OFF and the remaining fields
in this window display either a “0” or “Not Applicable”. Click this button
again to turn the radio back ON.
Rescan – Force the radio to rescan all available channels. If your link quality or signal strength is poor, rescanning can be used to push the radio OFF
a weak Access Point and search for a better link with another Access Point.
This function will take some time.
Change SSID – Click on this to set the SSID.
Search & Connect – Click on this to connect to an available network.
Chapter 3
Reference
15 ASUS WLAN mini-PCI card
Reference
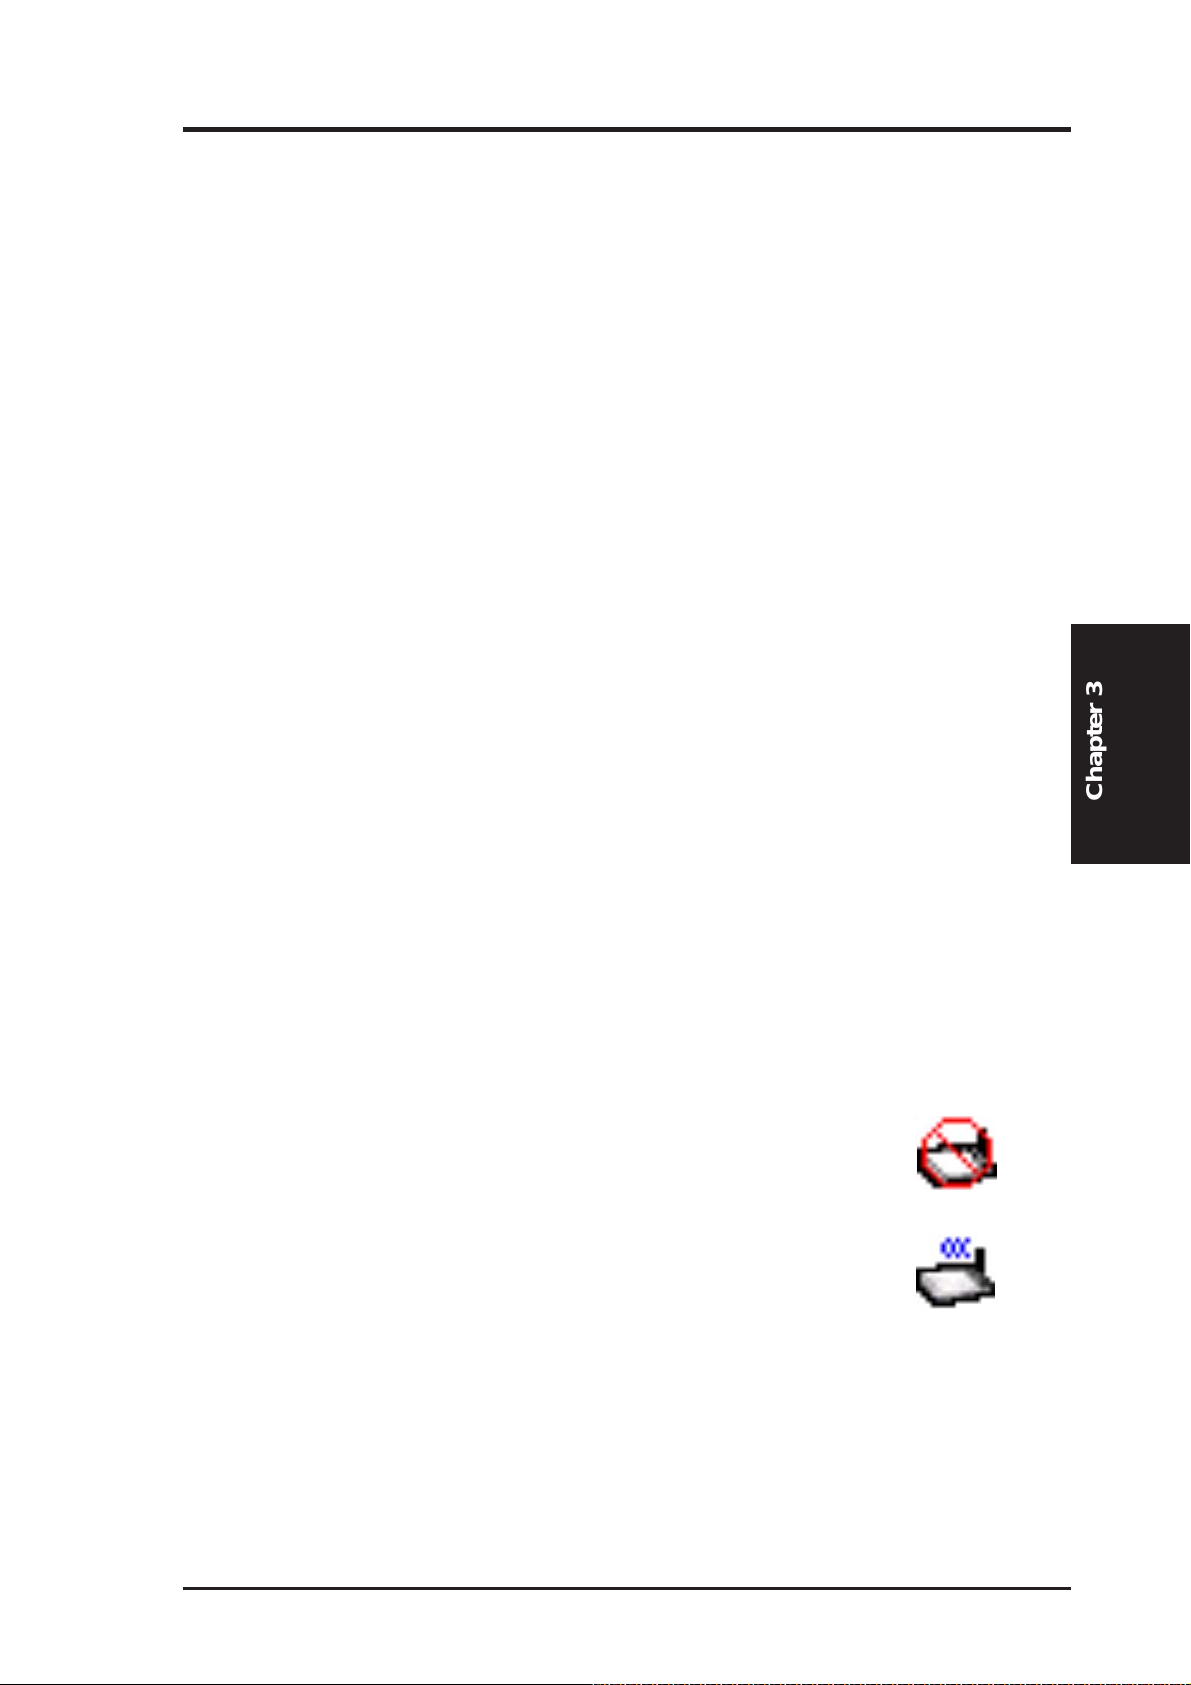
4.2 Status - Connection Tab
You can view the current link statistics about the ASUS WLAN mini-PCI
card. These statistics are updated once per second and are valid only if the
ASUS WLAN mini-PCI card exists.
Throughput
Transmitted – The number of bytes in frames that were transmitted.
Received – The number of bytes in frames that were received.
Frame Error
Transmitted – The number of frames that were not successfully transmitted.
Received – The number of frames that were not successfully received.
Connection Quality
Link Quality – Reflects the quality level related to the Access Point the
station is currently connected to. Ratings are: Excellent, Good, Fair, and Poor .
Signal Strength – Reflects the signal level related to the Access Point the
station is currently connected to. Ratings are: Excellent, Good, Fair, and Poor .
Chapter 3
Overall Connection Quality
Derives from the current “Link Quality” and the current “Signal Strength”.
A graph displays a connection quality range between 0 and 100 percent.
ASUS WLAN mini-PCI card 16
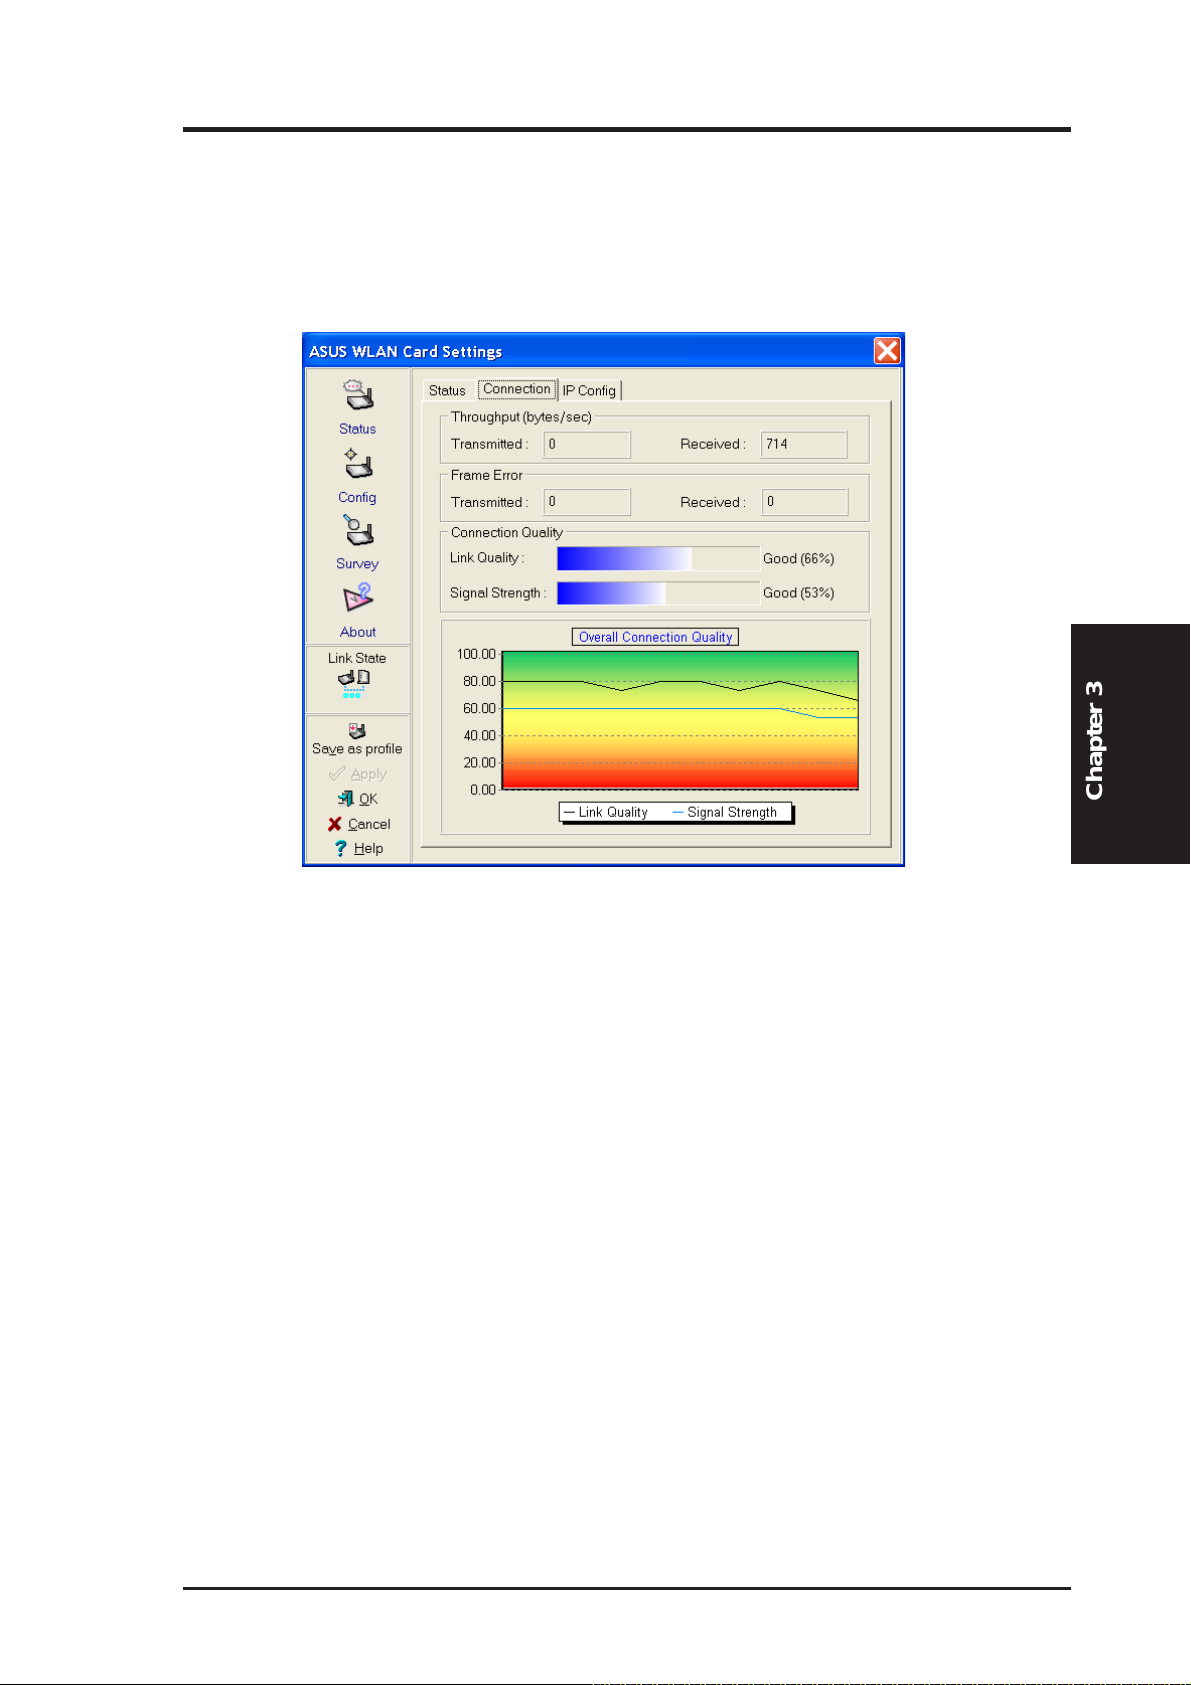
4.3 Status - IP Config Tab
IP Config tab shows all the current network configuration information for
the ASUS WLAN mini-PCI card. Use it to verify your network settings.
IP CONFIG will display all the current TCP/IP configuration values including the IP address, subnet mask, default gateway and Windows Internet Naming Service (WINS) and DNS configuration.
Chapter 3
Reference
Button
IP Release - Releases the DHCP IP address for the ASUS WLAN mini-PCI
card.
IP Renew - Renews the DHCP IP address for the ASUS WLAN mini-PCI
card.
NOTE : The IP Release and IP Renew buttons can only be used on the
ASUS WLAN mini-PCI card that is configured with DHCP.
17 ASUS WLAN mini-PCI card
 Loading...