


Index |
|
|
1. |
English.................................................................. |
1 |
2. |
Bahasa Indonesia................................................. |
6 |
3. |
................................................................. |
10 |
4. |
..................................................................... |
14 |
5. |
Türkçe................................................................. |
18 |
6. |
............................................................. |
22 |
7. |
.............................................................. |
26 |
A4151_FX-D1161.indb 1 |
|
|
9/26/08 12:28:15 PM |
|
|

FX-D1161
Fast Ethernet Switch
Quick Start Guide
Copyright © 2008 ASUSTeK COMPUTER INC. All Rights Reserved.
A4151_FX-D1161.indb 1 |
|
|
9/26/08 12:28:17 PM |
|
|
English
Package contents
Before installing the switch, check your package for the following items.
•ASUS FX-D1161 x 1
•Power adapter x 1
•Quick Start Guide x 1
•Mounting screws x 2; screw size: M3*19mm (B) W-NI 2#
Contact your retailer if any of the items is damaged or missing.
Features
•16 10/100Mbps auto-detect Half/Full duplex switch ports
•Up to 200Mbps for all ports in full duplex mode
•Plug-and-play: Auto MDI/MDIX and auto-sensing for speed and duplex mode on all ports.
•Flow control schemes (802.3x in full duplex mode) to support zero loss under temporary network congestion.
•4K MAC address learning and aging
•Supports Store and Forward architecture
•Buffer memory: 203KB
•Switch Fabric: 3.2Gbps
•Packet Forwarding (10Mbps port): 14,880 packets/sec
(100Mbps port): 148,880 packets/sec
•Easy to read indicators provide quick indication of link status.
Technical specifications
|
|
Dimension |
280 x 103 x 29.3 mm (L x W x H) |
(approximate) |
|
Net Weight |
372g |
(approximate) |
|
Adapter |
DC 12V 1A switching adapter |
Temperature |
Operating: 0oC ~ 40oC ambient |
|
Storage: 0oC ~ 70oC |
Humidity |
5% ~ 95% (non-condensing) |
Certification |
CE/FCC/LVD/VCCI/C-Tick |
Quick Start Guide
A4151_FX-D1161.indb 2 |
|
|
9/26/08 12:28:19 PM |
|
|

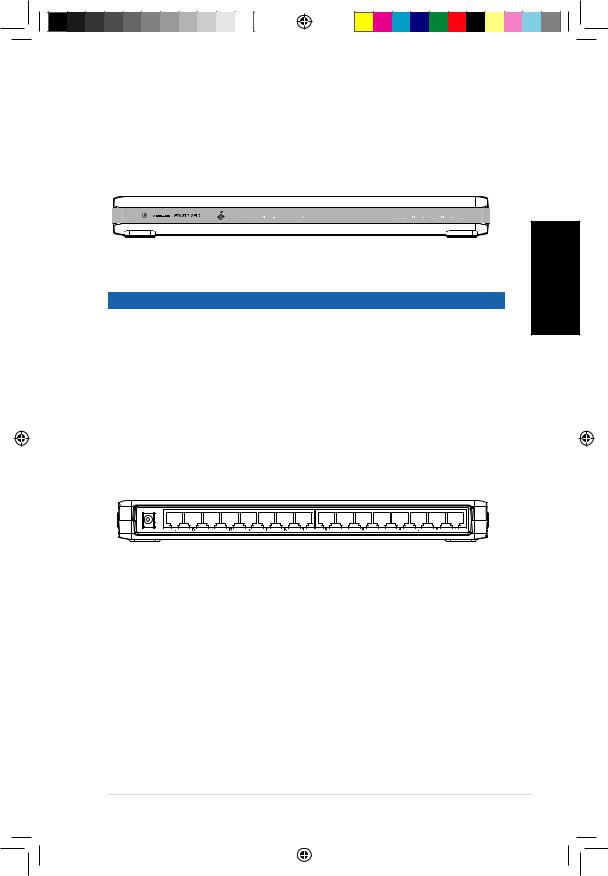
Hardware
Front panel
The front panel includes LED indicators that show realtime status of the switch.
LED indicators
|
|
|
|
LED |
Color |
Status |
Description |
POWER |
Green |
ON |
The switch is ON. |
|
|
OFF |
The switch is OFF. |
Status |
Green |
ON |
A valid link is established. |
|
|
Blinking |
Receiving or transmitting data |
|
|
|
packets. |
Rear panel
The rear panel includes Ethernet ports and the DC IN input port.
DC12V
Quick Start Guide
English
A4151_FX-D1161.indb 3 |
|
|
9/26/08 12:28:20 PM |
|
|
English
Placement options
• DO NOT place any device on top of the switch.
• Leave enough space around the switch for adequate ventilation. Ensure that the switch is placed in a location that meets the environmental specifications. See page 2 for details.
Desktop placement
Put the switch on a flat and stable surface.
Wall mounting
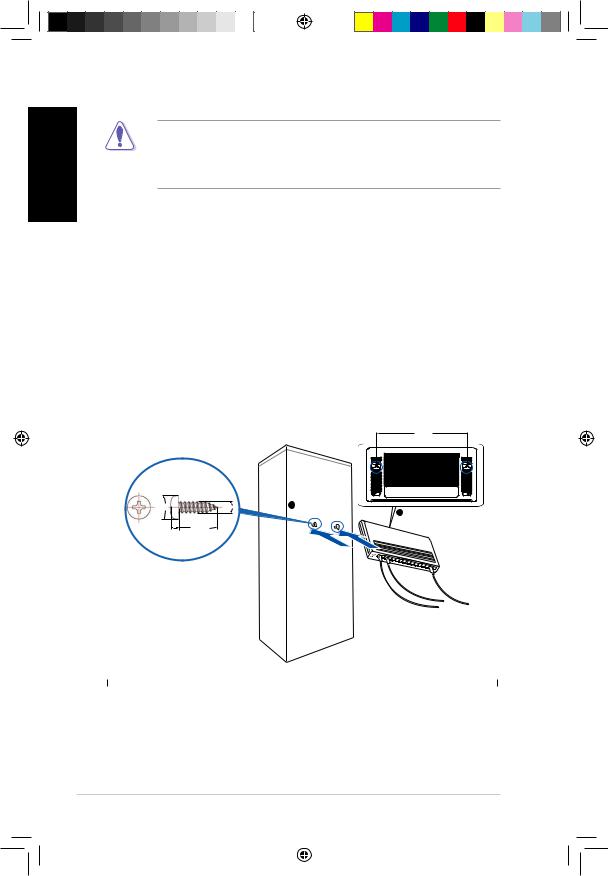
Mount the switch on a wall with the supplied mounting screws. To mount the switch on a wall:
1.Secure the two supplied screws into the wall.
2.Latch the hooks of the switch onto the screws.
Bottom Side
117.0mm
5.3mm |
2.95mm |
1 |
screws on the wall |
2 |
Latch the switch |
|
|
|
|
onto the screws. |
|
|
18.75mm |
|
|
|
|
|
2mm |
|
|
|
|
Quick Start Guide
A4151_FX-D1161.indb 4 |
|
|
9/26/08 12:28:23 PM |
|
|

Connecting network devices
To connect network devices to the switch.
1. Connect one end of the Ethernet cable to an Ethernet port on the back of the switch. Connect the other end to the Ethernet port on the network device. Repeat this step to connect additional network devices.
• Use Category 5 (CAT5) Ethernet straight-through cables to ensure proper connection between the switch and other network devices.
• The length of the network cables should not exceed 100 meters (328 feet).
2.Plug the AC adapter to an electrical outlet, then plug the other end to the power connector on the back of the switch.
3.The power indicator and active port indicators will light up indicating that the device is turned ON and in use.
Troubleshooting
This troubleshooting guide provides answers to some common problems that you may encounter while installing and/or using the switch. These problems require some simple troubleshooting that you can perform by yourself. Contact your retailer if you encounter problems that are not mentioned here.
The POWER indicator does not light up.
•Check if the power cable is properly connected to the switch, and to an electrical outlet with the correct voltage output.
The STATUS indicator does not light up even after an Ethernet cable is connected.
•Check if the Ethernet cable is properly connected to the switch and to the network device.
•Ensure that the switch and your network devices are turned ON.
•Check if the Ethernet cable supports your network speed. Ensure that you are using at least Category 5 cables. You can use lower quality cables if your network speed is only 10 Mbps.
Quick Start Guide
English
A4151_FX-D1161.indb 5 |
|
|
9/26/08 12:28:23 PM |
|
|
Indonesia Bahasa
Isi kemasan
Sebelum memasang switch, pastikan kemasan berisi item sebagai berikut.
•ASUS FX-D1161 x 1
•1 unit adaptor daya
•1 Panduan Ringkas
•2 sekrup pemasangan berukuran M3*19 mm (B) W-NI 2#
Jika terdapat item yang rusak atau salah satu item tidak ada, hubungi peritel Anda.
Kelengkapan
•16 port switch dupleks lengkap atau sebagian 10/100 Mbps dengan deteksi otomatis
•Hingga 200 Mbps untuk semua port dalam mode dupleks lengkap
•Plug-and-play: MDI/MDIX otomatis dan sensor otomatis untuk mode dupleks dan kecepatan di semua port.
•Skema kontrol alur (802.3x dalam mode dupleks lengkap) agar tidak terjadi kehilangan saat kongesti jaringan sementara berlangsung.
•Pengenalan dan pengoptimalan alamat MAC 4K
•Mendukung arsitektur Store (Penyimpanan) dan Forward (Penerusan)
•Memori buffer: 203 KB
•Switch Fabric: 3,2Gbps
•Penerusan Paket: (port 10Mbps): 14.880 paket/detik
(port 100Mbps): 148.880 paket/detik
•Indikator mudah dibaca menyediakan petunjuk cepat tentang status link.
Spesifikasi teknis
|
|
Dimensi |
280 x 103 x 29,3 mm (P x L x T) |
(perkiraan) |
|
Berat bersih |
372 gr |
(perkiraan) |
|
Adaptor |
Adaptor DC switch 12V 1A |
Temperatur |
Pengoperasian: 0oC ~ 40oC temperatur ruang |
|
Penyimpanan: 0oC ~ 70oC |
Kelembaban |
5% ~ 95% (tanpa kondensasi) |
Sertifikasi |
CE/FCC/LVD/VCCI/C-Tick |
Panduan Ringkas
A4151_FX-D1161.indb 6 |
|
|
9/26/08 12:28:25 PM |
|
|
Perangkat keras
Panel depan
Panel depan dilengkapi indikator LED yang akan menampilkan status switch secara real-time.
Indikator LED
|
|
|
|
LED |
Warna |
Status |
Keterangan |
DAYA |
Hijau |
MENYALA |
Switch dalam kondisi AKTIF. |
|
|
MATI |
Switch dalam kondisi NONAKTIF. |
Status |
Hijau |
MENYALA |
Link yang valid telah tersedia. |
|
|
Berkedip |
Menerima atau mengirim paket |
|
|
|
data. |
Panel belakang
Panel belakang dilengkapi port Ethernet dan port input DC IN.
DC12V
Panduan Ringkas
Bahasa Indonesia
A4151_FX-D1161.indb 7 |
|
|
9/26/08 12:28:26 PM |
|
|

Indonesia Bahasa
Pilihan penempatan
•JANGAN letakkan perangkat apapun di atas switch.
• Sisakan ruang yang cukup di sekitar switch agar ventilasi memadai. Pastikan switch telah diletakkan di lokasi yang memenuhi spesifikasi lingkungan. Untuk informasi rinci, lihat halaman 2.
Penempatan di atas meja
Letakkan switch di atas permukaan yang rata dan kokoh.
Pemasangan di dinding
Pasang switch di dinding menggunakan sekrup pemasangan yang tersedia. Untuk memasang switch di dinding:
1.Pasang kedua sekrup yang tersedia ke dinding.
2.Pasang pengait switch ke sekrup.
Bottom Side
117.0mm
5.3mm |
2.95mm |
1 |
screws on the wall |
2 |
Latch the switch |
|
|
|
|||
|
|
|
|
onto the screws. |
|
|
18.75mm |
|
|
|
|
|
2mm |
|
|
|
|
Panduan Ringkas
A4151_FX-D1161.indb 8 |
|
|
9/26/08 12:28:28 PM |
|
|
 Loading...