

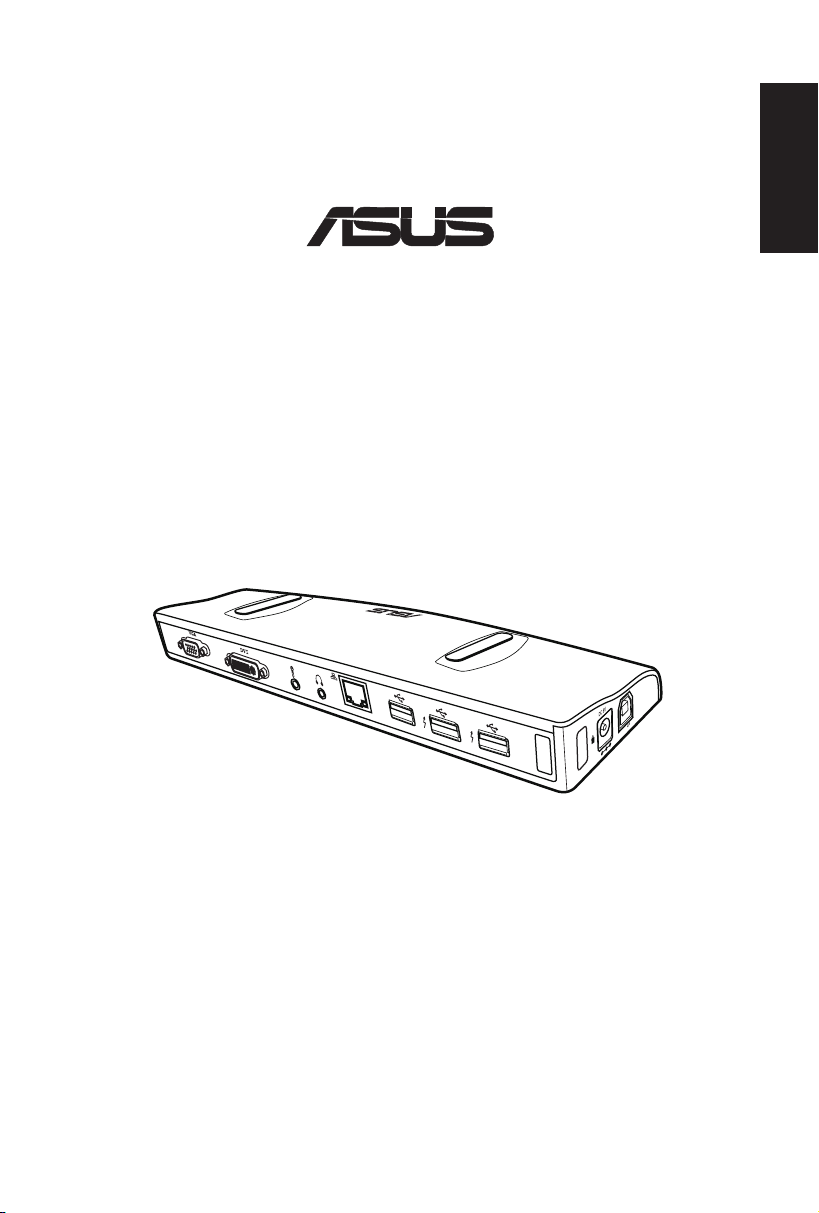
USB 2.0 Docking Station
®
English
User Guide
E5389 / January 2010

2
English
USB 2.0 Docking Station User Guide
Table of contents
Knowing your USB 2.0 docking station ............................................... 3
Package contents ............................................................................................3
Specications summary .................................................................................3
Hardware features ...........................................................................................4
Installing your USB 2.0 docking station ............................................... 5
Installing the drivers .......................................................................................5
Installing the drivers on Windows® OS ..........................................................5
Installing the drivers on Mac OS X ................................................................5
Setting up your docking station ....................................................................6
Using your USB 2.0 docking station ..................................................... 7
Connecting an external monitor ....................................................................7
Extending your desktop to an external monitor .............................................8
Mirroring your desktop to an external monitor ...............................................10
Connecting to the Internet .............................................................................11
Disconnecting your USB 2.0 docking station ...................................... 12
3
English
USB 2.0 Docking Station User Guide
Knowing your USB 2.0 docking station
Package contents
• ASUS Docking Station x1
• Power adapter x1
• Driver CD x1
• USB 2.0 cable x1
• User Guide x1
NOTE: If any of the items is damaged or missing, contact your retailer.
Specications summary
USB 2.0 downstream port for a USB 2.0 device
(Type A receptacle) x4
* Powered port supplying up to 1000 mA of current x2
Standard port supplying up to 500 mA of current x2
Microphone port x1
Ports
Security solution
USB power mode
Power adapter
Physical dimensions
Weight
Operating temperature
Storage temperature
Humidity
OS support
Headphone port x1
10/100Mbps LAN (RJ-45) port x1
Dual Link DVI-I port x1
VGA port x1
DC IN port x1
USB 2.0 upstream port for a notebook/desktop computer
(Type B receptacle) x1
Security lock hole x2
Self power mode
Input: AC 100-240V Output: DC 5V/2.6A
264 x 87 x 23 mm (L x W x H)
285g
0ºC ~ 40ºC
-10ºC ~ 80ºC
90% RH
Windows® 2000(SP4) / XP(SP2/SP3) / Vista(SP1/SP2) / 7
Intel® CPU based computer running Mac OS X v10.4 or
later
NOTE: Specications are subject to change without prior notice.
4
English
USB 2.0 Docking Station User Guide
DVI
VGA
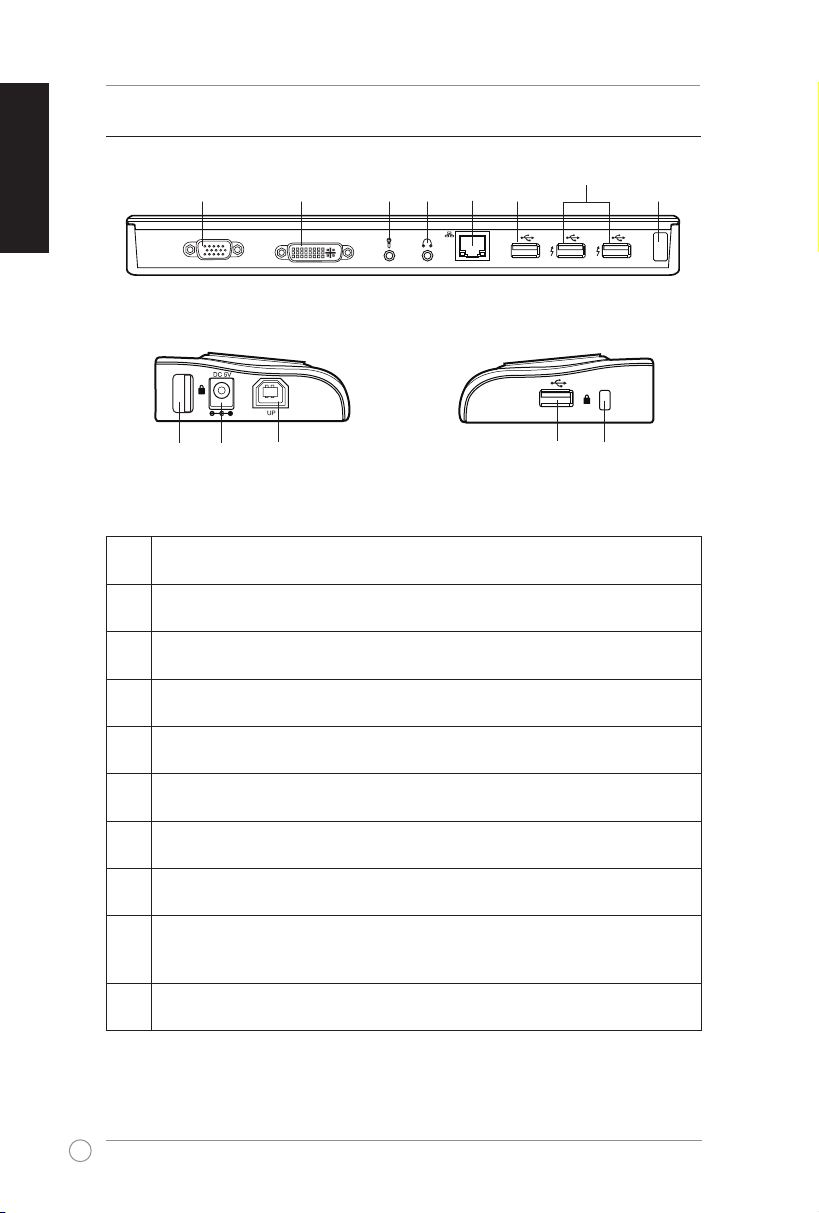
Hardware features
1 2 3
5 6
4
Back view
8
Left side view
10
9
Right side view
1 VGA port
Connects to a VGA monitor or other VGA compatible devices.
2 Dual Link DVI-I port
Connects to a DVI-I monitor or other DVI-I compatible devices.
3 Microphone port
Connects to a microphone.
4 Headphone port
Connects to a pair of headphones or a speaker.
5 10/100Mbps LAN (RJ-45) port
Connects to a cable/DSL modem or a local area network (LAN).
6 Standard USB 2.0 downstream port
Connects to a USB 2.0 device such as a mouse and joystick.
7 Powered USB 2.0 downstream port
Connects to a USB 2.0 device and supplies more power than the standard port.
8 Security lock hole
Secure your docking station to an immovable object using a security lock.
9 DC IN port
Insert the power adapter into this port to supply power to your docking station and
the devices connected to it.
10 USB 2.0 upstream port
Connects and passes data to your computer.
7
6
8
8
5
English
USB 2.0 Docking Station User Guide
Installing your USB 2.0 docking station
Installing the drivers
Installing the drivers on Windows® OS
To install the drivers on Windows® OS:
1. Place the Driver CD into your computer's optical drive.
2. Click USB Docking Install.
3. Select your language and click I Accept.
4. Wait until the drivers are installed successfully on your computer.
NOTE: It is normal if your computer screen goes black or ashes temporarily during the driver
installation process.
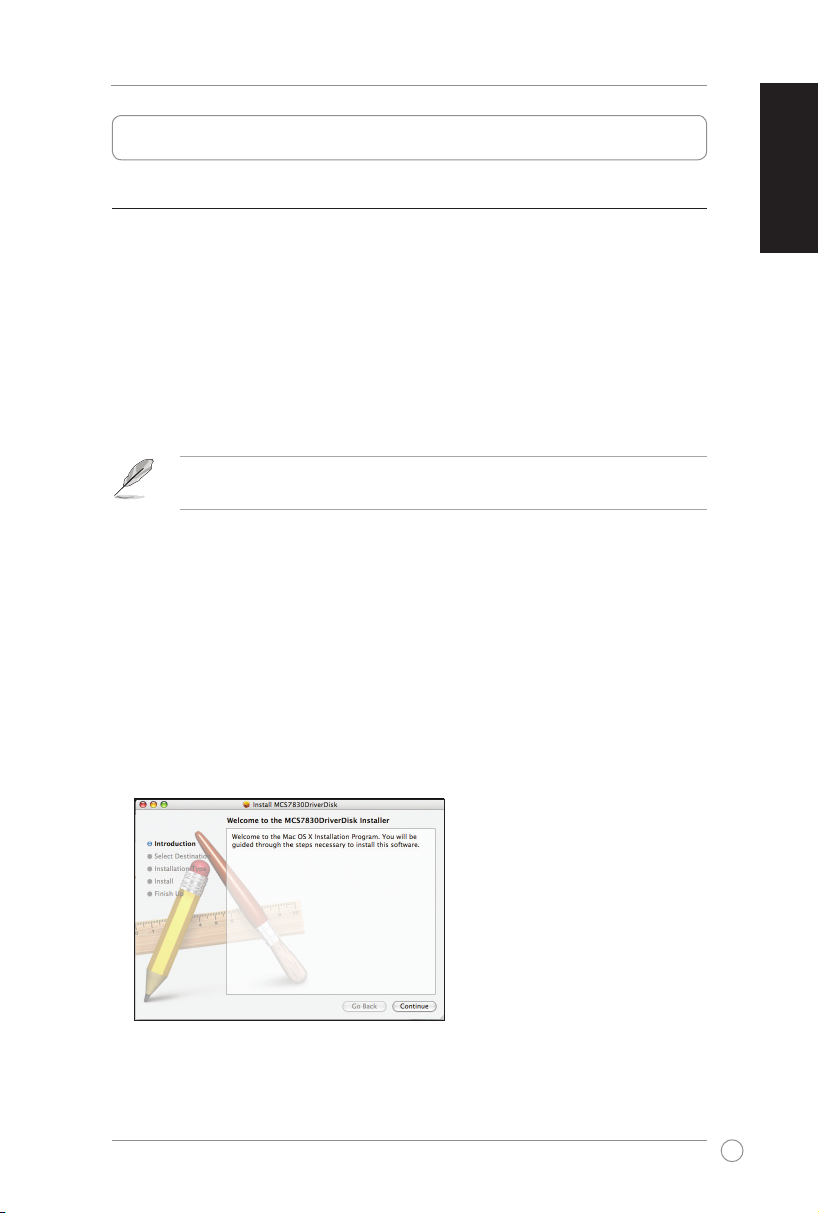
Installing the drivers on Mac OS X
To install the drivers on Mac OS X:
1. Place the Driver CD into your computer's optical drive.
2. Double-click the CD icon on the Mac desktop.
3. Double-click Mac > USB Ethernet > MCS7830DriverDisk.pkg.
4. Follow the onscreen instructions to install the USB Ethernet driver and restart your
computer when done.

6
English
USB 2.0 Docking Station User Guide
1
2
5. Double-click the CD icon on the Mac desktop.
6. Double-click Mac > USB Video > DisplayLink-OSX-1.1.dmg > DisplayLink Software
Installer.
7. Follow the onscreen instructions to install the USB Video driver and restart your computer
when done.
Setting up your docking station
To set up your docking station:
1. Connect one end of the supplied
power adapter to the DC IN port
on your docking station and the
other end to a 100-240V AC
power outlet.
CAUTION: Use only the
supplied power adapter.
Using other power adapters
may damage your device.
2. Connect the square end of the
supplied USB 2.0 cable to the
USB 2.0 upstream port on your
docking station and the other end
to your computer's USB 2.0 port.

7
English
USB 2.0 Docking Station User Guide
Using your USB 2.0 docking station
IMPORTANT: While using your docking station, keep it connected to a power outlet.
Otherwise, the devices connected to it will not function properly.
Connecting an external monitor
Use a VGA or a DVI-I cable to connect an external monitor to your docking station.
NOTE:
• The VGA / DVI-I cable is purchased separately.
• We recommend that you connect one external monitor (VGA or DVI-I) at a time. When
you use the VGA and DVI-I ports simultaneously, the screen resolution of the VGA monitor
is automatically adjusted to that of the DVI-I monitor, which may cause undesirable display
on the VGA monitor.
• Refer to Release Note.txt in the Driver CD for more information on the video feature of
your docking station.

8
English
USB 2.0 Docking Station User Guide
Extending your desktop to an external monitor
Use an external monitor to extend your desktop and have an additional workspace. This
allows you to:
• Display one document or application across your computer monitor and external
monitor;
• Use each monitor to display a different document or application.
NOTE: It is normal if your computer screen goes black or ashes temporarily after you change
the display mode of your external monitor.
To extend your desktop to an external monitor:
Windows® OS
NOTE: Each time you connect an external monitor to the docking station, a DisplayLink
software icon is shown in the Windows® notication area. The DisplayLink software allows
you to connect and manage an external display.
1. Right-click in the notication area to open the DisplayLink
menu.
2. Click Extend.
NOTE:
• In Extend mode, the external monitor cannot be set
as the main monitor.
• From the DisplayLink menu:
- Click Extend To to specify the position for the
display of your external monitor.
- Click Screen Resolution, Color Quality, and
Screen Rotation to adjust the properties for
your external monitor.
- Click Off to disable the display of your external
monitor. Click Set as Main Monitor to enable it.
- Click Advanced to manage your displays using
the Windows® utility.

9
English
USB 2.0 Docking Station User Guide
Mac OS X
1. From the Mac menu bar, Click > System Preferences > Displays to open the display
conguration windows for your computer and external monitor.
For your computer
For your external monitor
2. From the display conguration window for your computer, select Arrangement.
3. Ensure that Mirror Displays is not ticked.
NOTE:
• From the Arrangement page of the display conguration window for your computer:
- To set a display as the main display, drag and drop the white bar into it.
- To specify the position for a display, drag it to the desired positon.
• From the display conguration window for your external monitor, adjust its display
properties.
• From the Driver CD folder, double-click Mac > USB Video to nd a detailed guide about
managing displays on Mac OS X.

10
English
USB 2.0 Docking Station User Guide
Mirroring your desktop to an external monitor
Use an external monitor to duplicate your desktop area.
NOTE: It is normal if your computer screen goes black or ashes temporarily after you change
the display mode of your external monitor.
To mirror your desktop to an external monitor:
Windows® OS
1. Right-click in the notication area to open the
DisplayLink menu.
2. Click Mirror.
NOTE:
• In Mirror mode, the screen resolution and color quality
for your external monitor are not user-congurable. The
docking station automatically adjusts the settings.
• From the DisplayLink menu:
- Click Off to disable the display of your external
monitor. Click Set as Main Monitor to enable it.
- Click Advanced to manage your displays using the
Windows® utility.
Mac OS X
1. From the Mac menu bar, Click > System Preferences > Displays to open the display
conguration windows for your computer and external monitor.
2. From the display conguration window for your computer, select Arrangement.
3. Check Mirror Displays.
NOTE:
• From the display conguration window for your external monitor, adjust its display
properties.
• From the Driver CD folder, double-click Mac > USB Video to nd a detailed guide about
managing displays on Mac OS X.

11
English
USB 2.0 Docking Station User Guide
RJ-45
RJ-45
Modem
LAN
A
B
Connecting to the Internet
Use an RJ-45 cable to connect the LAN port on your docking station to a local area network
(LAN) (A) or a DSL/cable modem (B).
The yellow LED on the LAN port lighs up when there is an Internet connection. The green
LED lights up when there is Internet activity.
NOTE: The RJ-45 cable is purchased
separately.
NOTE:
• If you fail to connect to the Internet using the docking station at your ofce, check with the
network administrator if the MAC address of the docking station is blocked by your
company's rewall.
• Check the bottom of your docking station for its MAC address. You may also obtain the
MAC address through the following ways:
Windows® OS
1. From the Windows® desktop, click Start > All programs > Accessories > Command
prompt.
2. At the command prompt, key in ipcong -all and then Press <Enter>.
3. Locate HighSpeed USB-Ethernet Adapter.
Mac OS X
1. From the Mac menu bar, Click > About This Mac > More Info to display the
System Prole window.
2. From the Contents pane, click Network > Ethernet Adaptor (en2).

English
USB 2.0 Docking Station User Guide
Disconnecting your USB 2.0 docking station
You can connect and disconnect the docking station while your computer is running.
IMPORTANT:
DO NOT disconnect the docking station while data is being transferred between your
computer and the docking station. Wait until data transfer has completed.
DO NOT disconnect the docking station while you are connecting to the Internet via its LAN
port. Disconnect the Internet connection rst.
To disconnect your USB 2.0 docking station:
Windows® OS
1. Use the Safely remove hardware feature from the notication area to eject the
USB-Ethernet adapter and the connected devices such as a USB ash drive and USB
hard disk drive.
2. Unplug the docking station from your computer and the power outlet.
Mac OS X
1. Drag and drop the icons for the connected devices on the Mac desktop to Trash.
2. Unplug the docking station from your computer and the power outlet.
12

ASUS contact information
ASUSTeK Computer Inc.
Address 15 Li-Te Road, Peitou, Taipei, Taiwan 11259
Telephone +886-2-2894-3447
Fax +886-2-2890-7798
E-mail info@asus.com.tw
Web site www.asus.com.tw
Technical Support
Telephone +86-21-38429911
Online support support.asus.com
ASUS Computer International (America)
Address 800 Corporate Way, Fremont, CA 94539, USA
Telephone +1-510-739-3777
Fax +1-510-608-4555
Web site usa.asus.com
Technical Support
Telephone +1-812-282-2787
Support fax +1-812-284-0883
Online support support.asus.com
ASUS Computer GmbH (Germany and Austria)
Address Harkort Str. 21-23, D-40880 Ratingen, Germany
Fax +49-2102-959911
Web site www.asus.de
Online contact www.asus.de/sales
Technical Support
Telephone (Component) +49-1805-010923
Telephone (System/Notebook/Eee/LCD) +49-1805-010920
Support Fax +49-2102-9599-11
Online support support.asus.com

 Loading...