

Page 1

Exclusive Boot Features
Fast Boot ...................................................................................................................... 2
ASUS Boot Setting ...................................................................................................... 2
Windows® 8 BIOS Boot settings ................................................................................ 5
Direct BIOS access ................................................................................................... 11
DirectKey button (DirectKey)..........................................................................11
Direct connector (2-pin DRCT)...................................................................... 12
Fast Boot switch (FAST_BOOT) ................................................................... 13
DE119
Page 2
Fast Boot
Fast Boot allows you to shorten the system bootup time in as fast as two* seconds for a
smoother Windows® 8 experience.
Before installing or upgrading your system’s operating system into Windows® 8, ensure
that your motherboard’s BIOS and packaged software are updated to their latest versions.
Check the latest BIOS and software versions at www.asus.com.
You can congure the Fast Boot feature from the Boot menu in BIOS setup or ASUS Boot
Setting.
• Download ASUS Boot Setting from the ASUS Support site at http://support.asus.com
and install in your system.
• *Bootup time may vary on selected models.
• Fast Boot is also supported for systems running on Windows® XP, Windows® Vista, or
Windows® 7.
• Refer to sections ASUS Boot Setting and Windows® 8 BIOS Boot Settings for more
information in using Fast Boot.
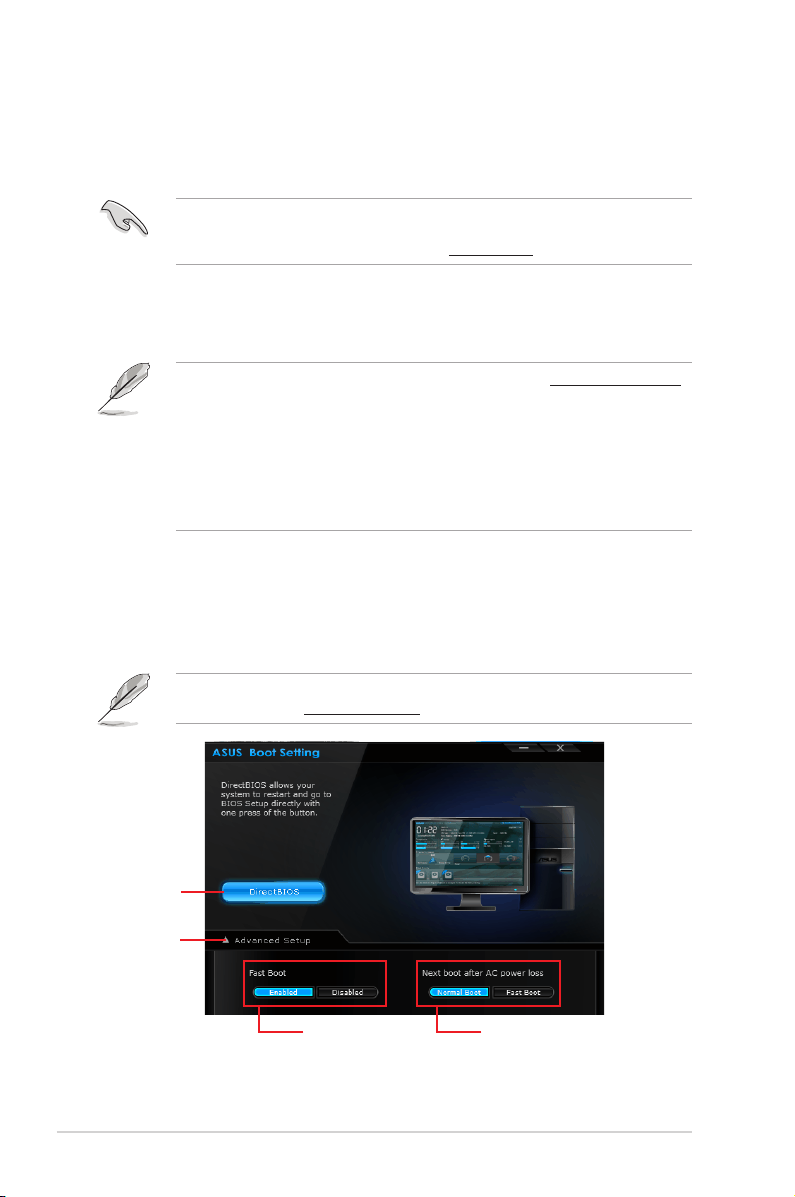
ASUS Boot Setting
ASUS Boot Setting utility allows you to quickly enter the BIOS setup with a click of the
DirectBIOS button. It also allows you to select the system bootup process using Normal Boot
or Fast Boot.
To fully support ASUS Boot Setting on your motherboard, download the latest BIOS from
ASUS Support site at http://www.asus.com and update the BIOS in your system.
Advanced Setup
2
Click to enter
BIOS Setup
directly.
Click to show
settings
Click to enable or
disable Fast Boot
Click to select the
bootup setting
Republic of Gamers
Page 3
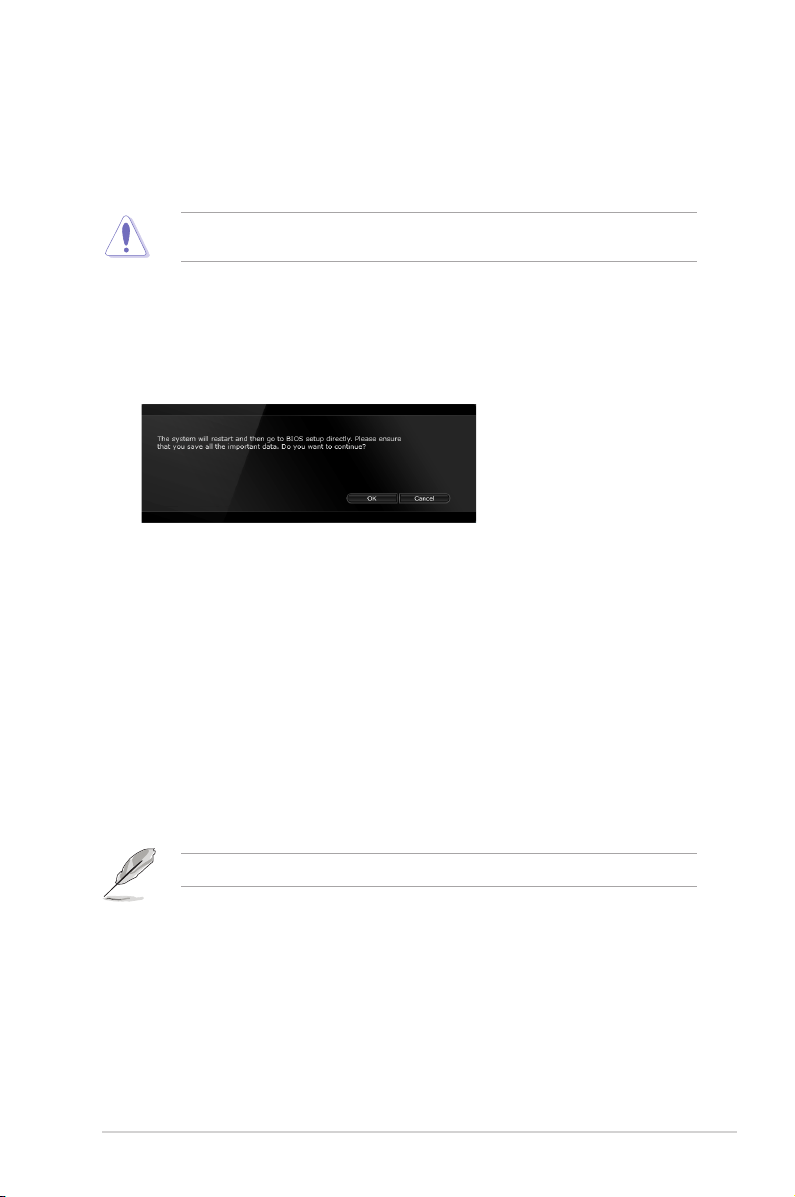
Using DirectBIOS button
This button allows you to restart your system and directly enter the BIOS Setup program
without having to press the <DEL> key during POST.
Using the DirectBIOS function may result to data loss. Ensure that you backup your data
before clicking this button.
To use DirectBIOS:
1. From the ASUS Boot Setting screen, click DirectBIOS.
2. On the conrmation message, clickOn the conrmation message, click OK to restart your system and go to the BIOS
setup directly.
Using Advanced setup
Advanced setup allows you to congure your system’s bootup process in any of these two
settings: Fast Boot and Next boot after AC power loss.
Enabling or disabling Fast Boot
This setting allows your system to quickly boot up.
To enable or disable Fast Boot:
1. Click Advanced Setup to show the boot setup settings.
2. In Fast Boot, click Enabled. If you want to turn off Fast Boot function, click Disabled.
3. On the conrmation message, clickOn the conrmation message, click Yes to apply the setting.
When enabled, Fast Boot takes effect after a normal system shutdown or restart.
ASUS Exclusive Boot Features
3
Page 4

Using Next boot after AC power loss
This setting allows your system to boot up in Fast Boot or Normal Boot on the next boot up
after a power failure.
To use Fast Boot under AC power loss:
1. Click Advanced Setup to show the boot setup settings.
2. In Fast Boot, click Enabled.
3. In Next boot after AC power loss, click Fast Boot.
4. On the conrmation message, clickOn the conrmation message, click Yes to apply this setting.
To use Normal Boot under AC power loss:
1. Click Advanced Setup to show the boot setup settings.
2. In Next boot after AC power loss, click Normal Boot.
3 . On the conrmation message, clickOn the conrmation message, click Yes to apply this setting.
4
Republic of Gamers
Page 5

Windows® 8 BIOS Boot settings
Windows® 8 BIOS boot settings allow you to congure the new items of boot options for
systems running in Windows® 8 operating system.
Fast Boot [Enabled]
[Enabled] Select to accelerate the boot speed.
[Disabled] Select to go back to normal boot.
The following four items appear when you set Fast Boot to [Enabled].
USB Support [Partial Initialization]
[Disabled] All USB devices will not be available until OS boot up for the
[Full Initialization] All USB devices will be available during POST. This process will
[Partial
Initialization]
ASUS Exclusive Boot Features
fastest POST time.
extend the POST time.
For a faster POST time, only the USB ports with keyboard and
mouse connections will be detected.
5
Page 6

PS/2 Keyboard and Mouse Support [Auto]
Select any of these settings when PS/2 keyboard and mouse are installed. These
settings only apply when Fast Boot is enabled.
[Auto] For a faster POST time, PS/2 devices will only be available
when the system boots up or rebooted when the PS/2 devices
have not been reconnected or changed. If you disconnect
or change PS/2 devices before restarting the system, PS/2
devices will not be available and BIOS setup program will not be
accessible via PS/2 devices.
[Full Initialization] For full system control, PS/2 devices will be available during
POST at any circumstances. This process will extend POST
time.
[Disabled] For the fastest POST time, all PS/2 devices will not be available
until your computer enters the operating system.
Network Stack Driver Support [Disabled]
[Disabled] Select to skip the network stack driver from loading during POST.
[Enabled] Select to load the network stack driver during POST.
Next Boot after AC Power Loss [Normal Boot]
[Normal Boot] Returns to normal boot on the next boot after AC power loss.
[Fast Boot] Accelerates the boot speed on the next boot after AC power loss.
DirectKey [Go to BIOS...]
[Disabled] Disables the DirectKey function. The system will only power on or off
when you press the DirectKey button.
[Go to BIOS
Setup]
Allows the system to power on and go to BIOS Setup directly when you
press the DirectKey button.
Full Screen Logo [Enabled]
[Enabled] Enables the full screen logo display feature.
[Disabled] Disables the full screen logo display feature.
Set this item to [Enabled] to use ASUS MyLogo 2™ feature.
POST Delay Time [3 sec]
This item appears only when you set Full Screen Logo to [Enabled]. This item allows
you to select the desired additional POST waiting time to easily enter the BIOS setup.
You can only execute the POST delay time during Normal Boot. The values range from
1 to 10 seconds.
This feature will only work under normal boot.
6
Republic of Gamers
Page 7

Post Report [5 sec]
This item appears only when you set Full Screen Logo to [Disabled]. This item allows
you to select a desired post report waiting time.
Conguration options: [1] - [10] [Until Press ESC]
CSM (Compatibility Support Module)
Allows you to congure the CSM (Compatibility Support Module) items to fully support the
various VGA, bootable devices and add-on devices for better compatibility.
Launch CSM [Auto]
[Auto] The system automatically detects the bootable devices and the
[Enabled] For better compatibility, enable the CSM to fully support the non-
[Disabled] Disable the CSM to fully support the Windows® Security Update
The following four items appear when you set Launch CSM to [Enabled].
add-on devices.
UEFI driver add-on devices or the Windows® UEFI mode.
and Security Boot.
Boot Devices Control [UEFI and Legacy OpROM]
Allows you to select the type of devices that you want to boot up.
Conguration options: [UEFI and Legacy OpROM] [Legacy OpROM only]
[UEFI only
Boot from Network Devices [Legacy OpROM rst]
Allows you to select the type of network devices that you want to launch.
Conguration options: [Legacy OpROM rst] [UEFI driver rst] [Ignore]
Boot from Storage Devices [Legacy OpROM rst]
Allows you to select the type of storage devices that you want to launch.
Conguration options: [Both, Legacy OpROM rst] [Both, UEFI rst]
[Legacy OpROM rst] [UEFI driver rst] [Ignore]
Boot from PCIe/PCI Expansion Devices [Legacy OpROM rst]
Allows you to select the type of PCIe/PCI expansion devices that you want
to launch.
Conguration options: [Legacy OpROM rst] [UEFI driver rst]
ASUS Exclusive Boot Features
7
Page 8

Secure Boot
Allows you to congure the Windows® Secure Boot settings and manage its keys to protect
the system from unauthorized access and malwares during POST.
OS Type [Windows UEFI mode]
Allows you to select your installed operating system.
[Windows UEFI mode] Executes the Microsoft® Secure Boot check. Only
[Other OS] Get the optimized function when booting on Windows®
Secure Boot Mode [Standard]
Allows you to select how the Secure Boot prevents unauthorized rmware, operating
systems, or UEFI drivers from running during boot time.
[Standard] Allows the system to automatically load the Secure Boot keys from
the BIOS database.
[Custom] Allows you to customize the Secure Boot settings and manually
load its keys from the BIOS database.
This item only appears when you set OS Type item to [Windows UEFI mode]
Key Management
This item appears only when you set Secure Boot Mode to [Custom]. It allows you to
manage the Secure Boot keys.
Manage the Secure Boot Keys (PK, KEK, db, dbx)
Install Default Secure Boot keys
Allows you to immediately load the default Security Boot keys, Platform key
(PK), Key-exchange Key (KEK), Signature database (db), and Revoked
Signatures (dbx). The Platform Key (PK) state will change from Unloaded
mode to Loaded mode. The settings are applied after reboot or at the next
reboot.
select this option when booting on Windows® UEFI
mode or other Microsoft® Secure Boot compliant OS.
non-UEFI mode, Windows® Vista/XP, or other
Microsoft® Secure Boot non-compliant OS. Microsoft®
Secure Boot only supports Windows® UEFI mode.
Key-exchange Key (KEK) refers to Microsoft® Secure Boot Key database (KEK).
Clear Secure Boot keys
This item appears only when you load the default Secure Boot keys. This
item allows you to clear all default Secure Boot keys.
8
Republic of Gamers
Page 9

PK Management
The Platform Key (PK) locks and secures the rmware from any permissible changes.
The system veries the PK before your system enters the OS.
Load PK from File
Allows you to load the downloaded PK from a USB storage device.
Copy PK to File
Allows you to store the PK to a USB storage device.
Delete PK
Allows you to delete the PK from your system. Once the PK is deleted, all
the system’s Secure Boot keys will not be active.
Conguration options: [Yes] [No]
The PK le must be formatted as a UEFI variable structure with time-based authenticated
variable.
KEK Management
The KEK (Key-exchange Key or Key Enrollment Key) manages the Signature database
(db) and Revoked Signature database (dbx).
Key-exchange Key (KEK) refers to Microsoft® Secure Boot Key-Enrollment Key (KEK).
Load KEK from File
Allows you to load the downloaded KEK from a USB storage device.
Copy KEK to File
Allows you to store the KEK to a USB storage device.
Append KEK from le
Allows you to load the additional KEK from a storage device for an
additional db and dbx loaded management.
Delete the KEK
Allows you to delete the KEK from your system.
Conguration options: [Yes] [No]
The KEK le must be formatted as a UEFI variable structure with time-based authenticated
variable.
db Management
The db (Authorized Signature database) lists the signers or images of UEFI
applications, operating system loaders, and UEFI drivers that you can load on the
single computer.
Load db from File
Allows you to load the downloaded db from a USB storage device.
Copy db from le
Allows you to store the db to a USB storage device.
ASUS Exclusive Boot Features
9
Page 10

Append db from le
Allows you to load the additional db from a storage device so that more
images can be loaded securely.
Delete the db
Allows you to delete the db le from your system.
Conguration options: [Yes] [No]
The db le must be formatted as a UEFI variable structure with time-based authenticated
variable.
dbx Management
The dbx (Revoked Signature database) lists the forbidden images of db items that are
no longer trusted and cannot be loaded.
Load dbx from File
Allows you to load the downloaded dbx from a USB storage device.
Copy dbx from le
Allows you to store the dbx to a USB storage device.
Append dbx from le
Allows you to load the additional dbx from a storage device so that more
db’s images cannot be loaded.
Delete the dbx
Allows you to delete the dbx le from your system.
Conguration options: [Yes] [No]
The dbx le must be formatted as a UEFI variable structure with time-based authenticated
variable.
10
Republic of Gamers
Page 11

Direct BIOS access
DirectKey button (DirectKey)
This feature allows your system to go to the BIOS Setup program with the press of a button.
With DirectKey, you can enter the BIOS anytime without having to press the <Del> key during
POST. It also allows you to turn on or turn off your system and conveniently enter the BIOS
during bootup.
Ensure to save your data before using the DirectKey button.
• Only selected models support DirectKey button
• The motherboard’s layout and the DirectKey button’s location are for reference only
and may vary in different models.
• When the system is on and you press the DirectKey button, your system will shut
down. Press the DirectKey button again or the Power-on button to reboot and enter
the BIOS directly.
• Turn off your system using the power-on button to allow your system to go through
POST (without entering the BIOS) when you reboot your system.
• Refer to section Boot Menu of your user manual for details about setting the
DirectKey default function.
ASUS Exclusive Boot Features
11
Page 12

Direct connector (2-pin DRCT)
This connector is for the chassis-mounted button that supports the DirectKey function.
Connect the button cable that supports DirectKey from the chassis to this connector on the
motherboard.
• Only selected models support Direct connector.
• The motherboard’s layout and the DRCT connector’s location are for reference only
and may vary in different models.
• Ensure that your chassis comes with the button cable that supports the DirectKey
feature. Refer to the technical documentation that came with the chassis for details.
If your chassis does not have a button cable for DirectKey feature, you can connect the
Reset button cable to the DRCT connector to support the DirectKey function on your
chassis.
12
Republic of Gamers
Page 13

Fast Boot switch (FAST_BOOT)
This feature allows you to accelerate your system’s boot speed with the use of a switch,
allowing the system to skip POST and enter the OS at its fastest time.
• Only selected models support Fast Boot switch.
• The motherboard’s layout and the Fast Boot switch’s location are for reference onlyFast Boot switch’s location are for reference only’s location are for reference only
and may vary in different models.
• When you enable the Fast Boot in OS mode, your system will only initiate the Fast
Boot function after you restart your system.
• When you set the Fast Boot state (enable/disable state) in BIOS Setup or ASUS Boot
Setting utility, the Fast Boot state that you set via the Fast Boot switch will be replaced.
ASUS Exclusive Boot Features
13
 Loading...