

Page 1

User's Manual
Macintosh & Windows
English
May 2004
Version 3.0
Page 2

Programming:
Fabrice Bourgeois
Nicolas Bronnec
Sylvain Gubian
Xavier Oudin
Gilles Pommereuil
Cedric Rossi
Lionel Tirant
Anthony Garcia
Arnaud Aune
Laurent Eyraud
Renaud Chassande
Sound Design:
Jean-Michel Blanchet
Graphics:
Mickael Acoca
Yannick Bonnefoy
Manual:
Frédéric Brun
Tom Healy
Yuji Sano
Takashi Uesugi
Sven Steglich
Till Pape
Gilles Pommereuil
David Poncet
Special thanks to:
Vanessa Giraudet, Anissa Brazane, Celestin Kouate, Nicolas Dupont, Régis Monte, Stéphane Boissieux,
Benjamin Abrial, Katsunori Ujiie, Takashi Uesugi, Mitsuru Sakaue, Frank Orlich, Bryan Borcherds, Vincent
Nonnenmacher, Christophe Martin de Montagu, Houston Haynes, Franck Selbmann, Dominique Coussy, Tyson
Thomas, Alessandro Camanini, Vincent Gagnon.
© ARTURIA SARL – 1999-2004 – All rights reserved.
1, rue de la Gare
38950 Saint-Martin le Vinoux
FRANCE
http://www.arturia.com
Information contained in this manual is subject to change without notice and does not represent a commitment on the part of Arturia. The software described in this manual is provided under the terms of a license agreement or non-disclosure agreement. The software license agreement specifies the terms and conditions for its lawful use. No part of this manual may be produced or transmitted in any form or by any purpose other than purchaser's personal use, without the express written permission of ARTURIA.
Other products, logos or company names quoted in this manual are trademarks or registered trademarks of their respective owners.
Page 3

TABLE OF CONTENTS
First steps
INSTALLATION............................................................................................................................5
REGISTRATION............................................................................................................................6
QUICK START............................................................................................................................11
COMPOSITION ASSISTANT..............................................................................................................23
Basic Use
THE EXPLORER..........................................................................................................................27
THE RACK ...............................................................................................................................29
THE MIXING TABLE......................................................................................................................31
THE SEQUENCER........................................................................................................................35
KEPLER ...................................................................................................................................39
STATIC MODE COMPOSITION..........................................................................................................41
USING SAMPLES..........................................................................................................................43
LOADING-SAVING .......................................................................................................................47
AUDIO EXPORT ..........................................................................................................................51
Advanced Use
MIDI CONTROL AND SYNCHRONIZATION ............................................................................................55
IMPORTING MIDI FILES..................................................................................................................57
THE PIANO ROLL........................................................................................................................59
REWIRE ..................................................................................................................................67
THE HALL ................................................................................................................................69
CONFIGURATION .......................................................................................................................75
KEYBOARD SHORTCUTS................................................................................................................79
Instruments
SYNTHESIZER BASICS...................................................................................................................81
ARSENIC..................................................................................................................................83
BASS 52...................................................................................................................................89
EQUINOXE................................................................................................................................92
ORPHEUS ................................................................................................................................95
GMSynth................................................................................................................................101
SHADOW ...............................................................................................................................104
DRUM MACHINE BASICS...............................................................................................................111
TSUNAMI ...............................................................................................................................113
METEOR ................................................................................................................................119
PSION ...................................................................................................................................121
PUMA ...................................................................................................................................123
HORK....................................................................................................................................125
SAMPLE MODULES BASICS............................................................................................................127
EZTRACK................................................................................................................................128
H3OPLUS................................................................................................................................132
SCRATCH ...............................................................................................................................137
Effects
EFFECTS BASICS........................................................................................................................139
CHORUS.................................................................................................................................141
COMPRESSOR...........................................................................................................................142
DISTORSION ............................................................................................................................146
DUAL DELAYS...........................................................................................................................147
FLANGER ...............................................................................................................................150
LPFILTER................................................................................................................................151
REVERB..................................................................................................................................152
RING MOD ..............................................................................................................................154
SEQ FILTER ............................................................................................................................155
VOCODER...............................................................................................................................157
Page 4

Page 5
INSTALLATION
Warning: before running the Storm Music Studio installer, please temporarily disable any virus protection utilities
running in the background, as they may cause problems with the installer.
Minimum requirements
In order to use STORM Music Studio 3.0, you must have a computer equipped with the following:
WINDOWS Mac OS X
• Pentium III 600 MHz
• Windows 98 SE / 2000 / XP
• 256 MB of RAM
• Any DirectX, ASIO compatible soundcard, or CoreAudio for Mac OSX
Installation
• G3 800 MHz
• Mac OS X version 10.3.1 or later recom-
mended
Storm 3.0 is shipped with 2 CD's. The first CD-ROM contains the Windows installer whereas the second CD contains the Mac installer.
WINDOWS:
• Insert the Storm CD-ROM into your drive
• If the installer does not automatically launch after CD-ROM insertion, use the Windows Explorer to
browse the CD-ROM contents and double click on Setup_PC.exe.
• Then follow the instructions that appear on the screen.
Mac OS X:
• Insert the Storm installation CD-ROM into your drive
• Double-click on the installation program called Storm3.pkg. The setup program will ask you for a system
administrator password if needed.
• Then follow the instructions that appear on the screen.
Technical support
Before calling or writing to our technical support staff, be sure to do the following:
• Make sure that you have registered your license number with Arturia.
• Check to see if the information you need is not already contained in:
• The Support section of our web site, located at: http://www.arturia.com/en/support.lasso
• Arturia Forums: http://forums.arturia.com
• Storm Music NewsGroup: http://groups.yahoo.com/group/storm_music
• Have your serial number and key available to you. Write down the hardware and software configuration
you use with Storm (processor, RAM, OS, sound card).
• Choose one the following methods to get in touch with Arturia:
• Web: http://www.arturia.com/en/techsupport.html
• E-mail: support@arturia.com
• Fax: +33 (0)4 38 02 05 25
ARTURIA – STORM MUSIC STUDIO 3.0 – USER'S MANUAL 5
Page 6
REGISTRATION
Remark
Registration only concerns the full version of Storm. It unlocks access to the software and allows registered users to benefit from supplementary services such as downloading updates and new modules.
If you are using a trial version of Storm, or a “light” version that you received bundled with a sound card
for example, this procedure does not concern you, unless you upgrade to the full version. Buying procedures for the software and getting a license number can be found in the Help > About Storm menu.
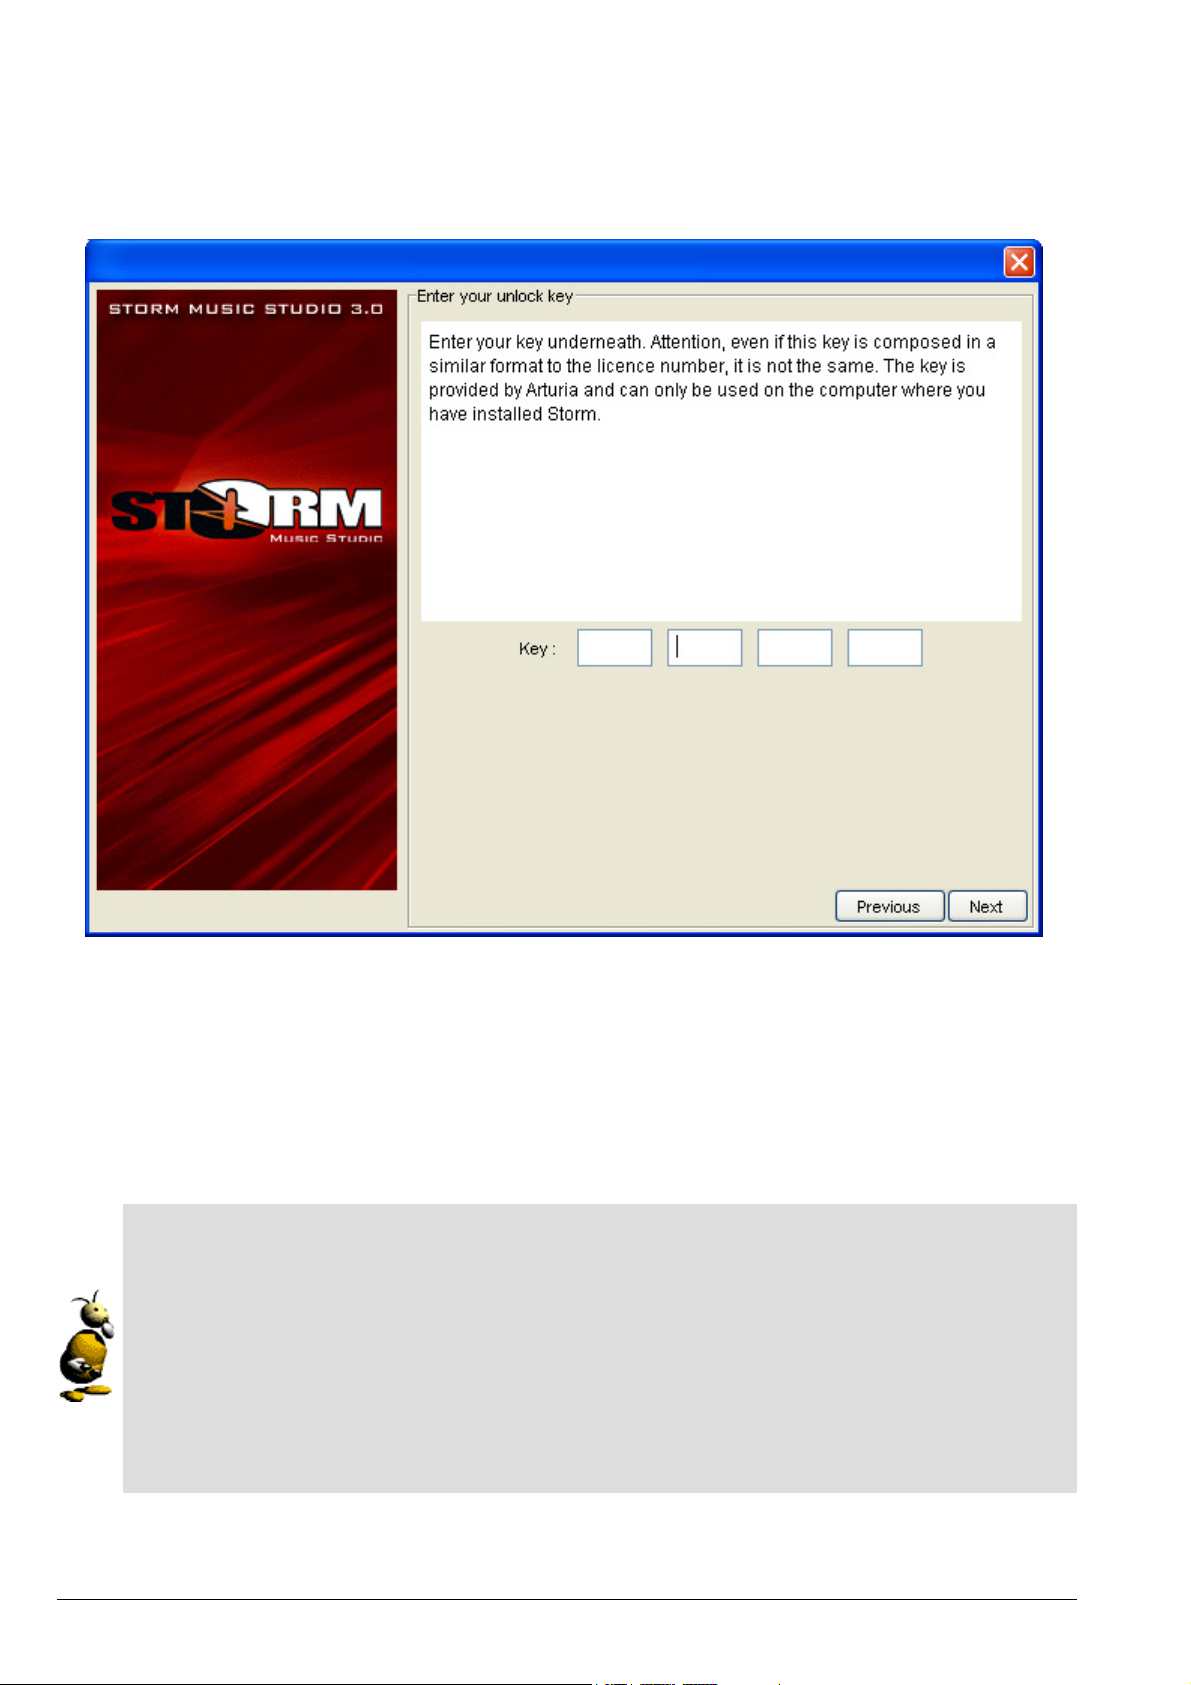
To have full and definitive use of Storm, you need to register with Arturia. This registration will allow you to obtain an unlock-key which is essential to continue using Storm after your first 20 tries. Here is the procedure to
follow:
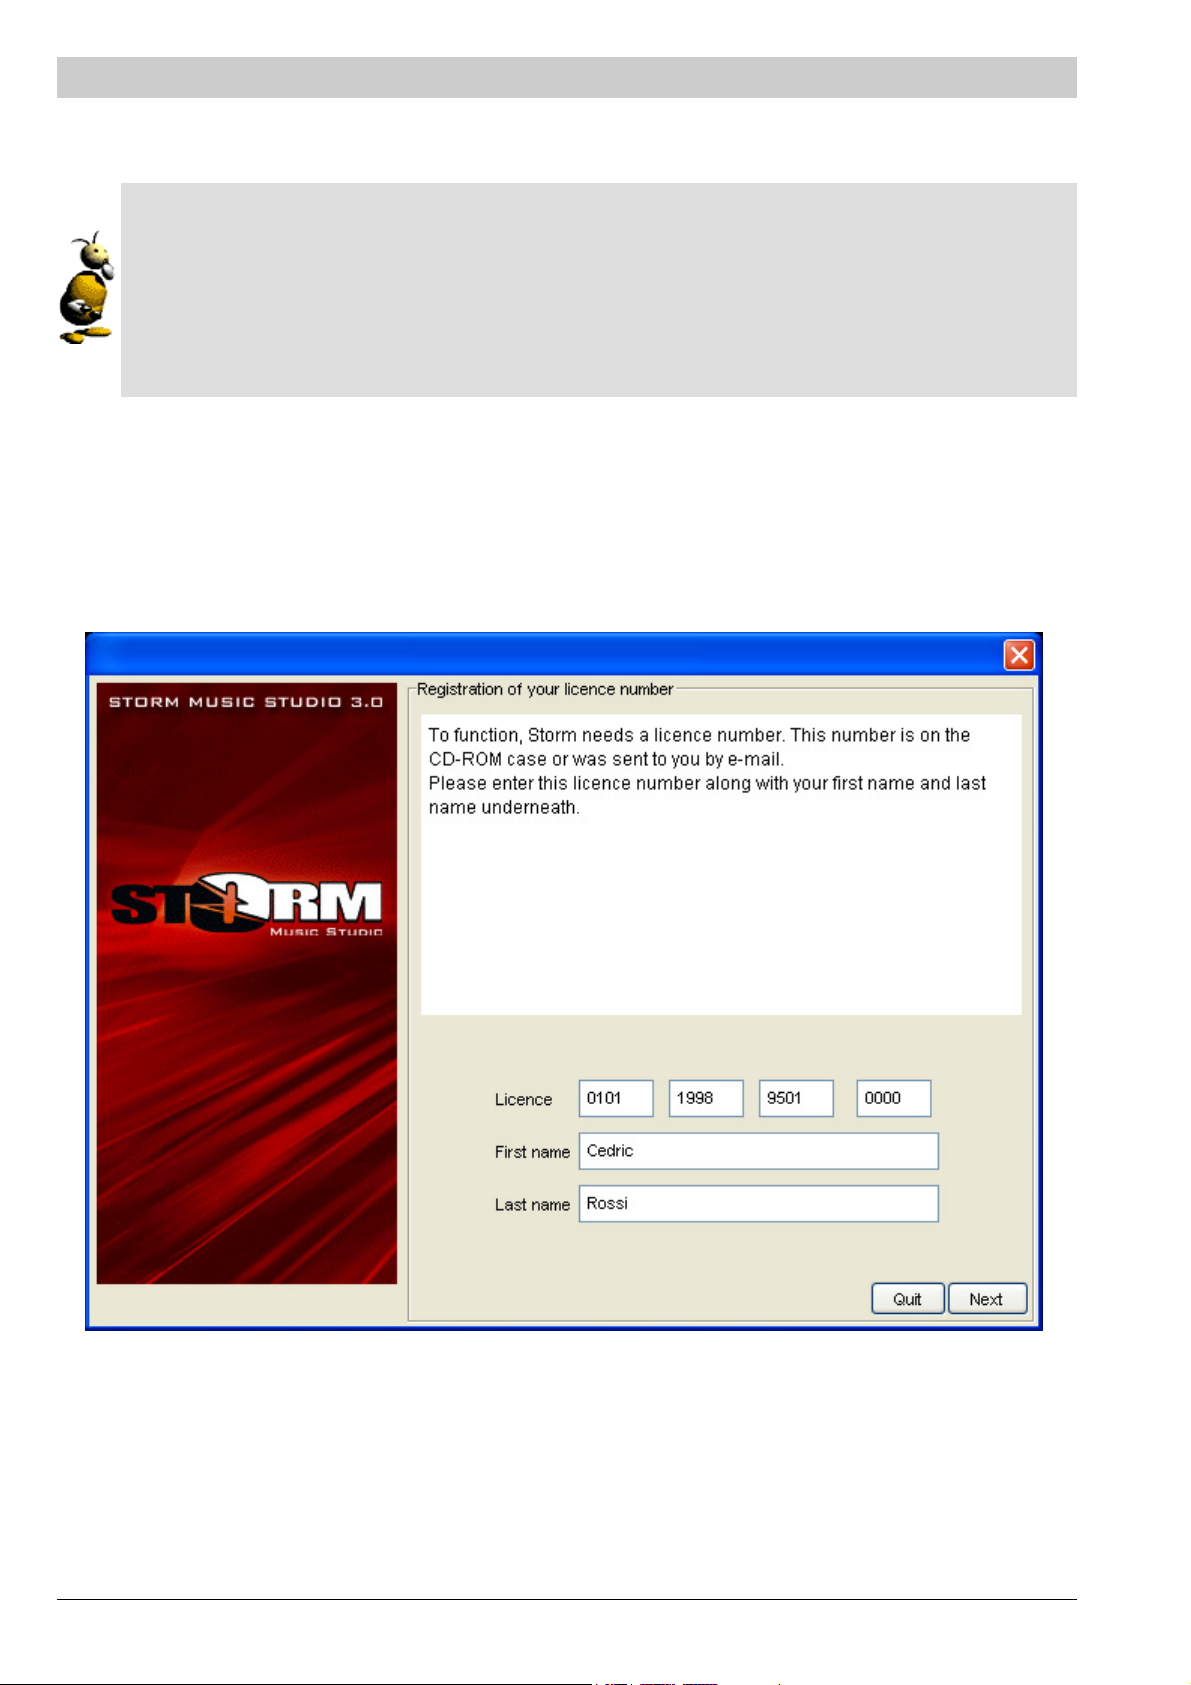
When the program is launched, a window will ask you to enter the license number of your program, your first
name and your last name.
Registration window upon first launch of Storm.
Recopy the number on the sticker on the case of the Storm CD-ROM, or the one sent to you by e-mail by Arturia
technical support. This number is essential in the registration procedure.
ARTURIA – STORM MUSIC STUDIO 3.0 – USER'S MANUAL 6
Page 7
English lesson
For the users installing Storm in English but for whom it is not their mother tongue, be careful not to invert your First Name and Last Name:
ENGLISH FRANCAIS DEUTSCH DUTCH ITALIANO ESPAÑOL PORTUGÊS
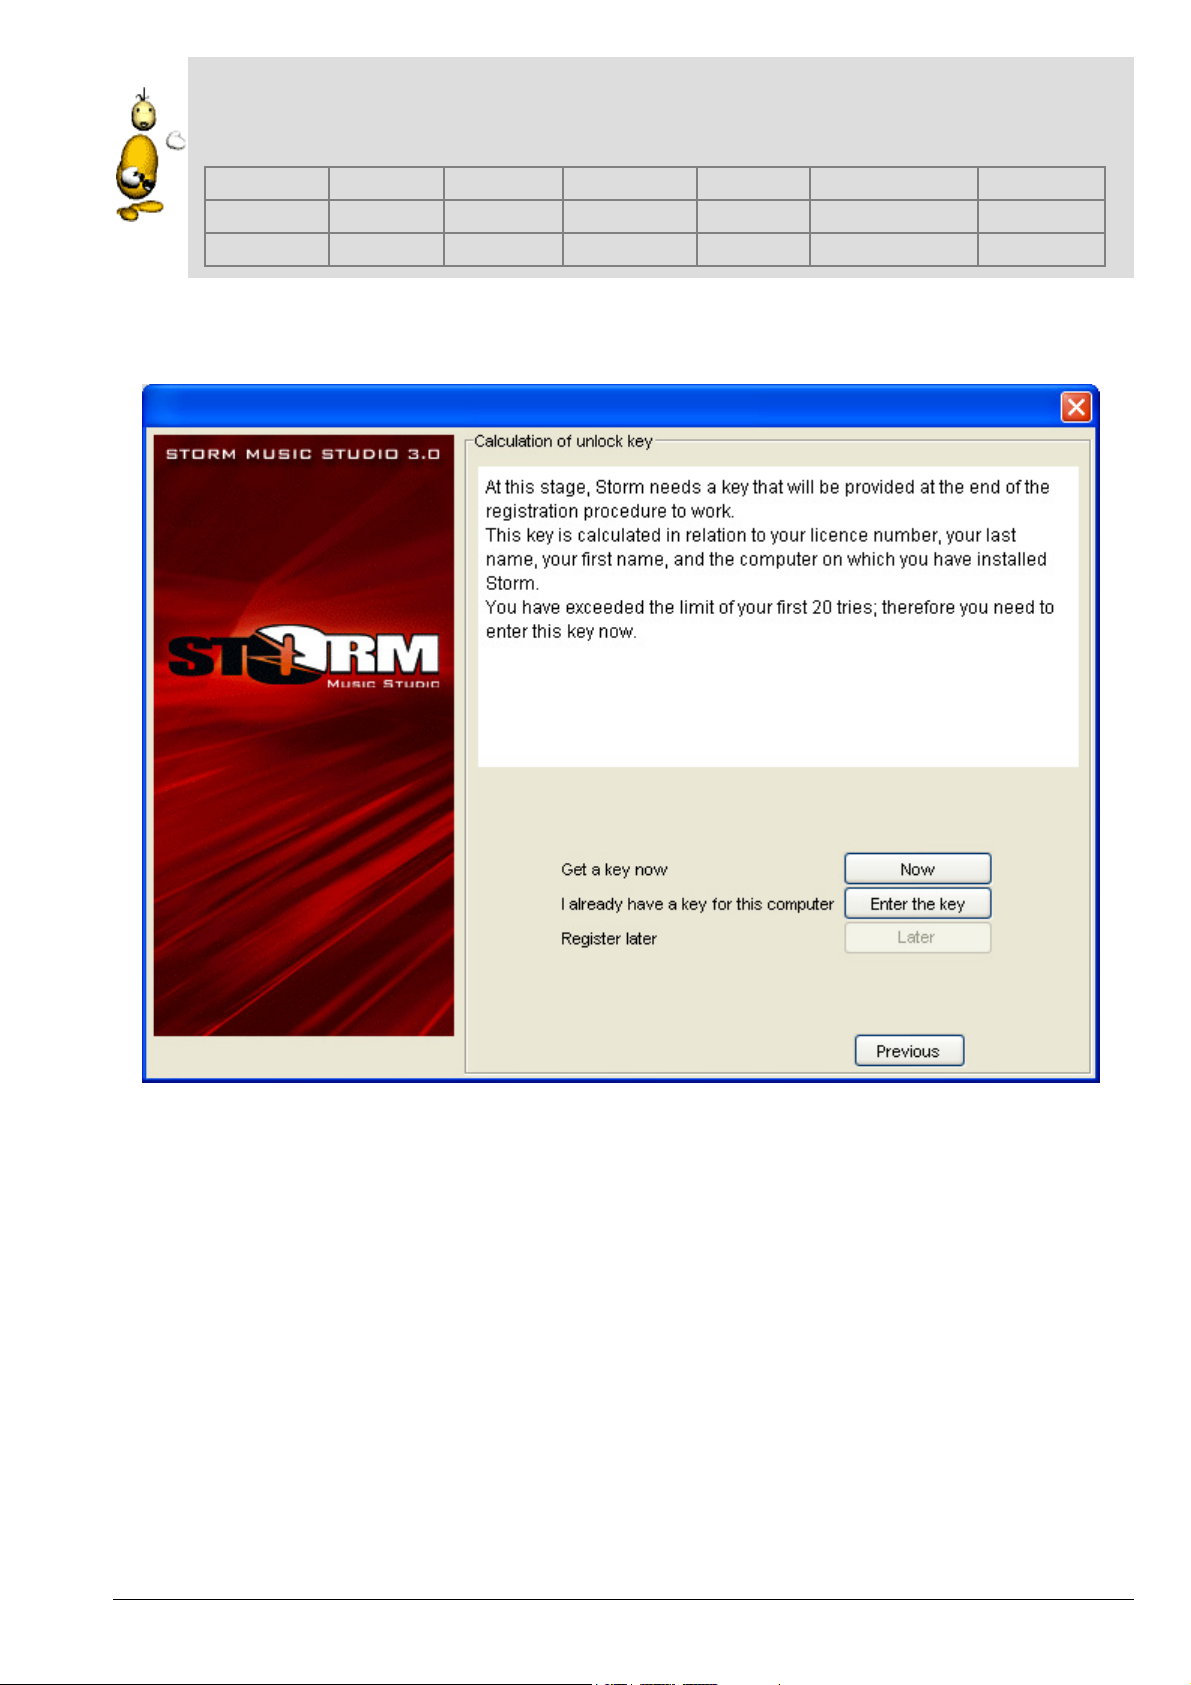
Click next, now you have 3 choices:
First Name Prénom Vorname Voornaam Prenome Nombre de pila Prenome
Last Name Nom Nachname Achternaam Cognome Apellido Sobrenome
First possibility
Click on the Now button.
A form will appear asking you to provide certain information on top of your first name and last name: address, email address, etc.
ARTURIA – STORM MUSIC STUDIO 3.0 – USER'S MANUAL 7
Page 8

Click on Next. On the following screen you have two registration options:
ARTURIA – STORM MUSIC STUDIO 3.0 – USER'S MANUAL 8
Page 9
• The computer where you have installed Storm is connected to the Internet.
Click on this option if you have an Internet connection and it is currently active. In this case the registration is automatic and you have nothing else to do.
In this case, the Arturia server will send the program its key which is essential for Storm to run.
During the connection, the only information received by Arturia is that which you have previously entered (license number, name, first name, address, e-mail). Nothing else is touched on your hard drive.
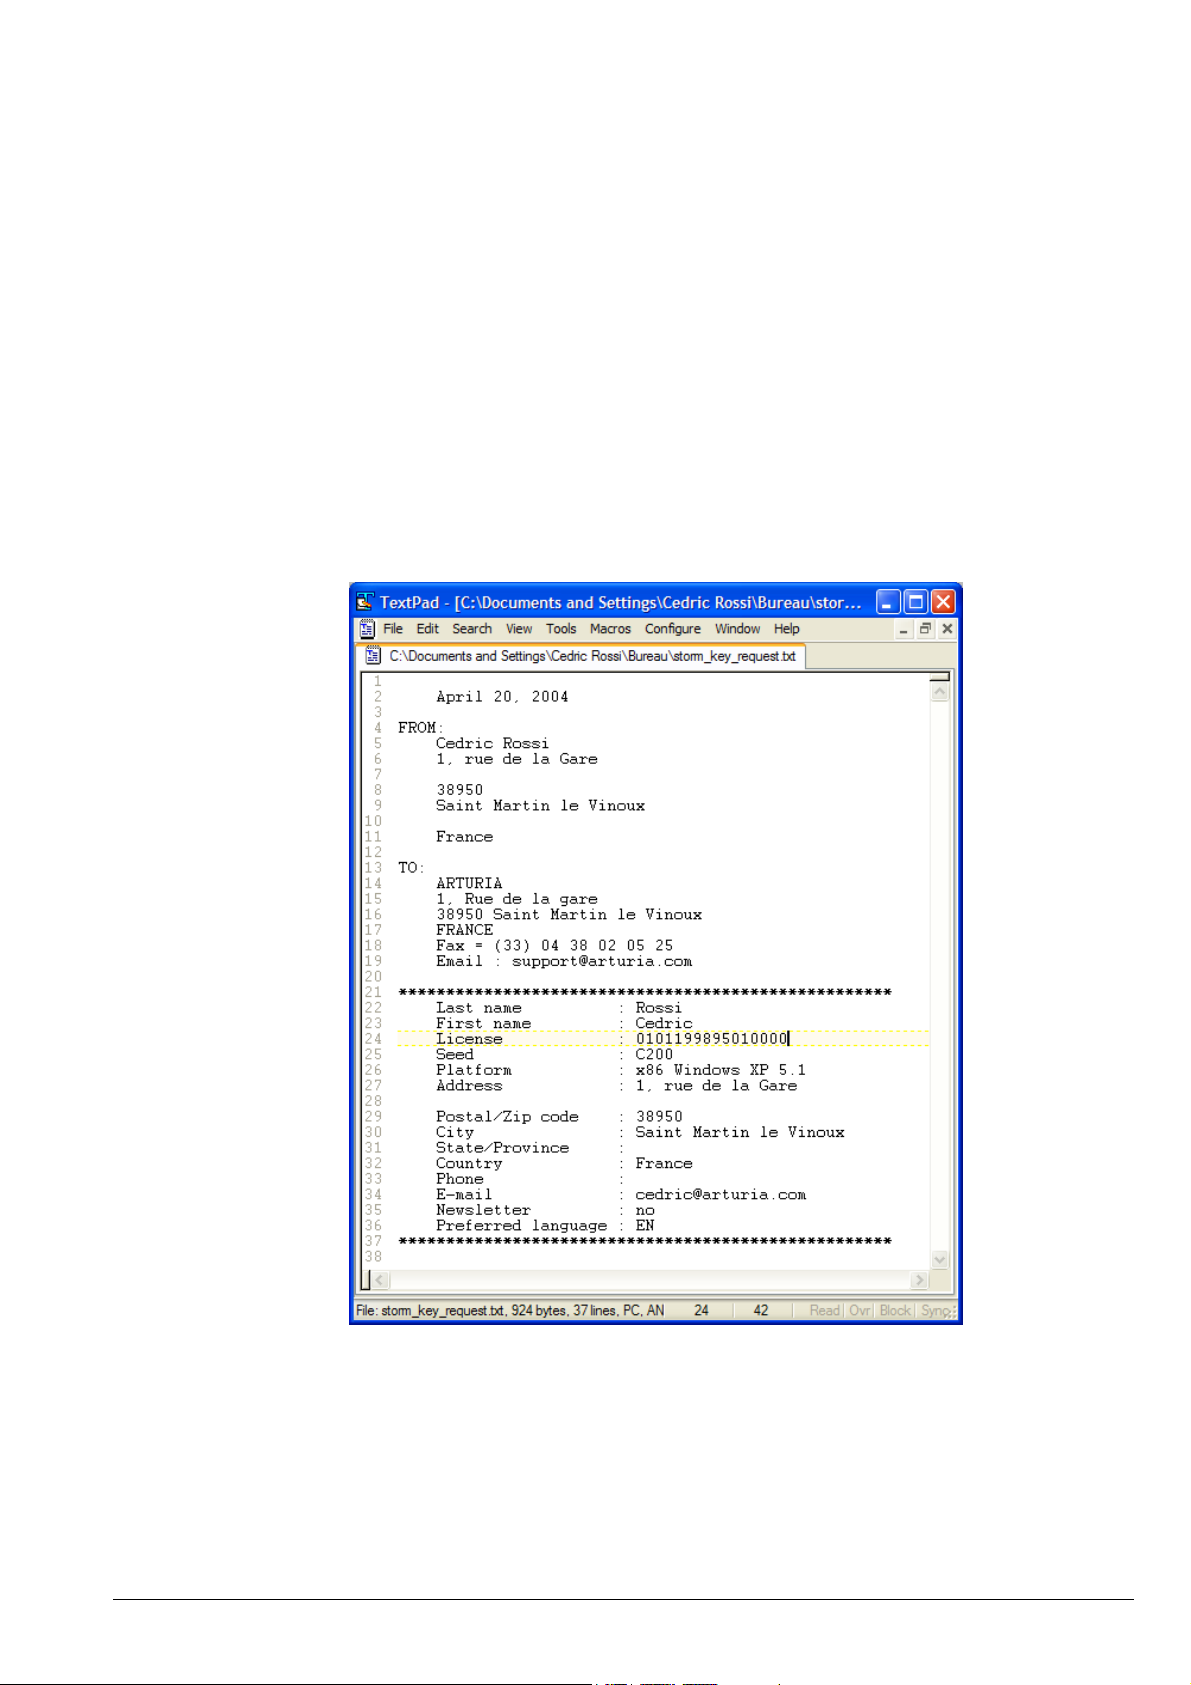
• The computer is not connected to the Internet.
Click on this option if the computer on which you are installing Storm does not have an Internet connection.
The following screen will suggest that you save a text file that you can print and send to Arturia. Your
unlock key will be sent to you within 4 days of the receipt of your mail. You can also send this file by fax
or e-mail in order to get your unlock key sooner (postal address, fax and e-mail address are indicated in
the file).
The text file to send to Arturia
When you have received your key, you can then relaunch Storm, and at startup, select the second choice
described underneath: You already have your unlock key.
ARTURIA – STORM MUSIC STUDIO 3.0 – USER'S MANUAL 9
Page 10
Second possibility: You already have your unlock key.
This is the case if you are reinstalling your software or you have received your unlock key by postal mail. You just
need to provide this key to unlock Storm and have all its functionalities. Attention, this key will work on one
computer with a precise operating system. If reinstalling Storm, you will need to get another key from Arturia
if in the mean time you have changed computer or operating system.
Third possibility: You don't want to register right away.
For this click on the Later button. You have 20 tries before the software is locked and will continually ask for the
unlock key. If this happens, the only choice you will have is to click on the Now button. We advise that you register as soon as possible, especially if you count on doing so by postal mail if you don't have an Internet connection. Once the procedure is fully complete, it will be proposed that you save a file with all of the registration information. We highly recommend that you save and print this just in the case you might need to reinstall the application.
A little jargon
To install Storm, the software needs 2 numbers that while constructed in a similar manner do not have
the same use. To avoid confusion:
• The license number is on a white sticker stamped with the Arturia logo, and stuck to the installa-
tion CD-ROM case. This number is to identify you as the user (and owner, as stipulated in the license agreement) of Storm.
• The unlock key, which is calculated during the installation, and which will depend on the license
number, is used to protect the license number. It prevents the installation of Storm on several
machines or different operating systems, when outside of the cases agreed in the license.
ARTURIA – STORM MUSIC STUDIO 3.0 – USER'S MANUAL 10
Page 11
QUICK START
In this chapter, you are going to compose your first song using the basic functions of Storm.
Building a studio, playing in real time, recording settings and saving compositions are operations that will no
longer hold any secrets after you have read this first chapter.
Creating a Studio
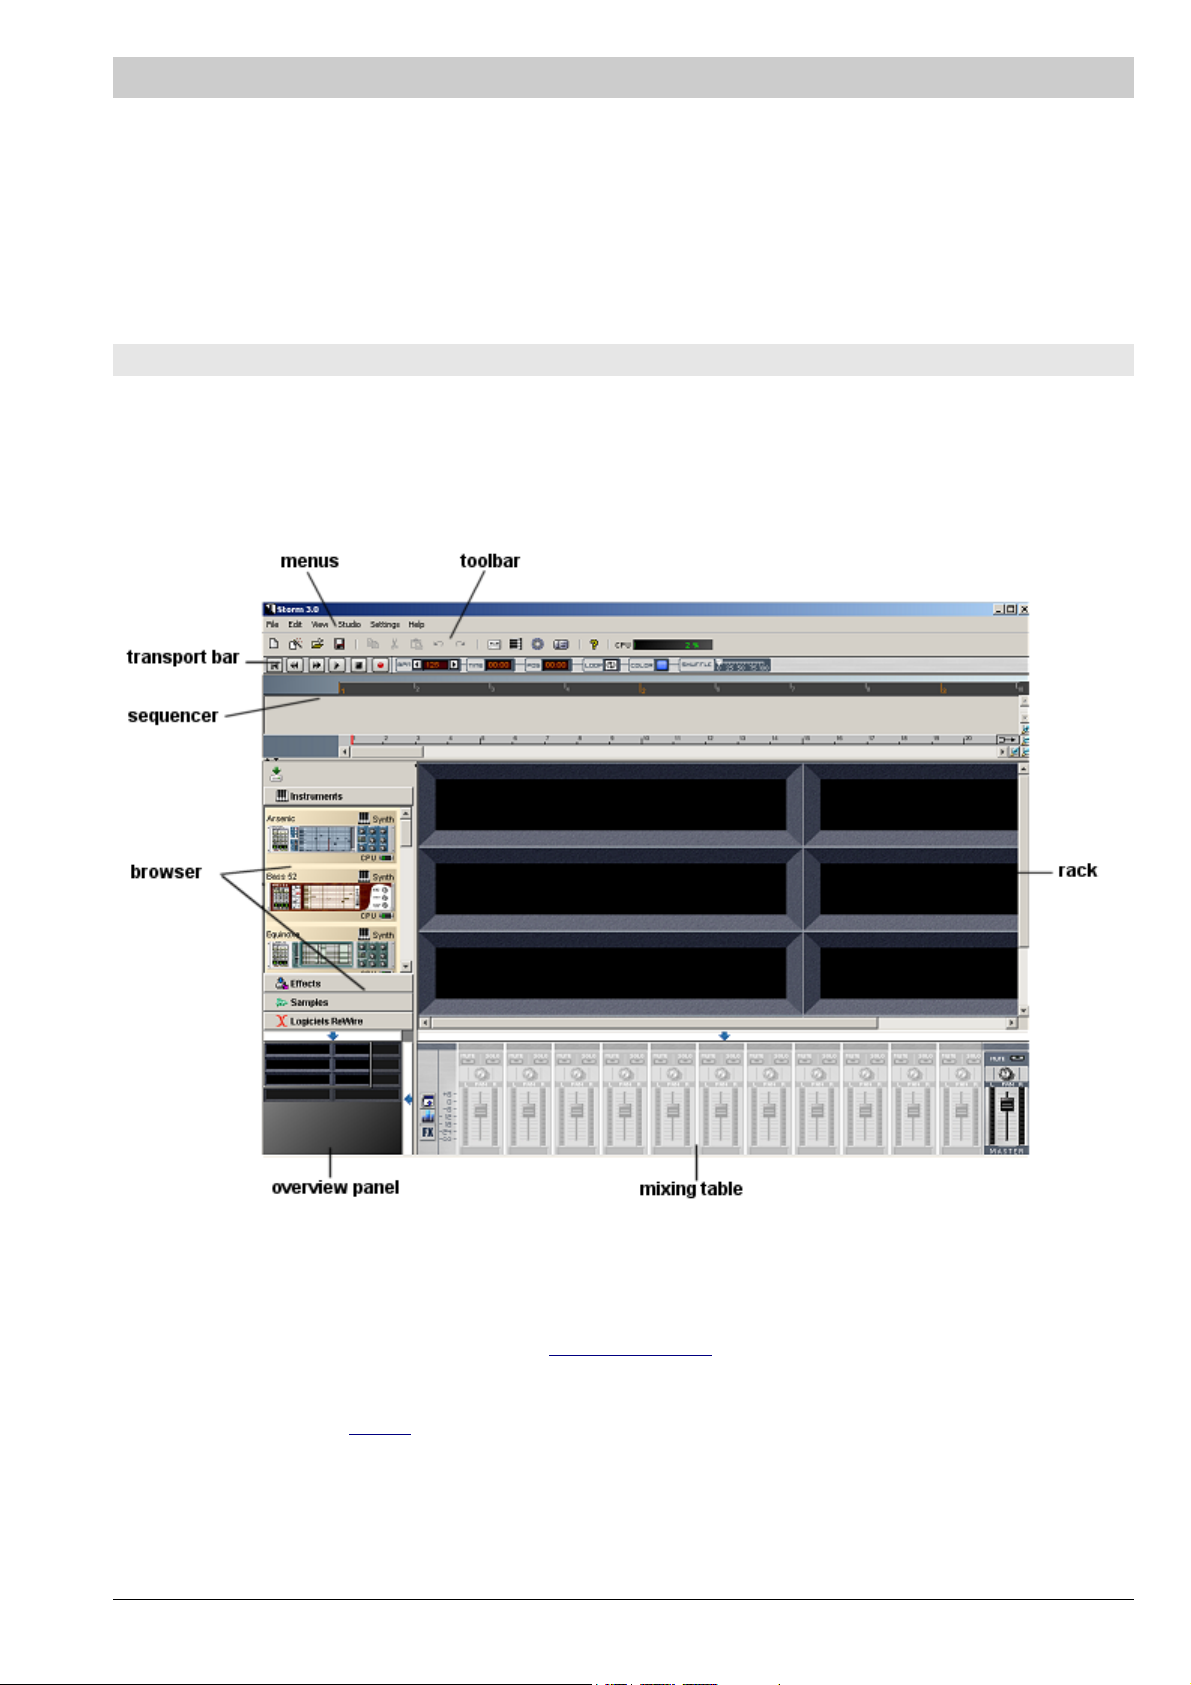
When you launch Storm, you will find yourself in front of the studio screen.
In the central part of the screen, you can see two vertical sections of a dark color, separated by metallic bars.
This is the rack in which you will place the effects and instruments that you have chosen.
Global view of the Storm studio
In the section on the left called the explorer, you will see a number of tabs which present resources that can be
loaded into the studio. The first tab opens the virtual instrument
explorer to navigate.
The second tab opens the effects
ARTURIA – STORM MUSIC STUDIO 3.0 – USER'S MANUAL 11
library. Again browse with the scroll bar.
library. Use the scroll bar on the right of the
Page 12
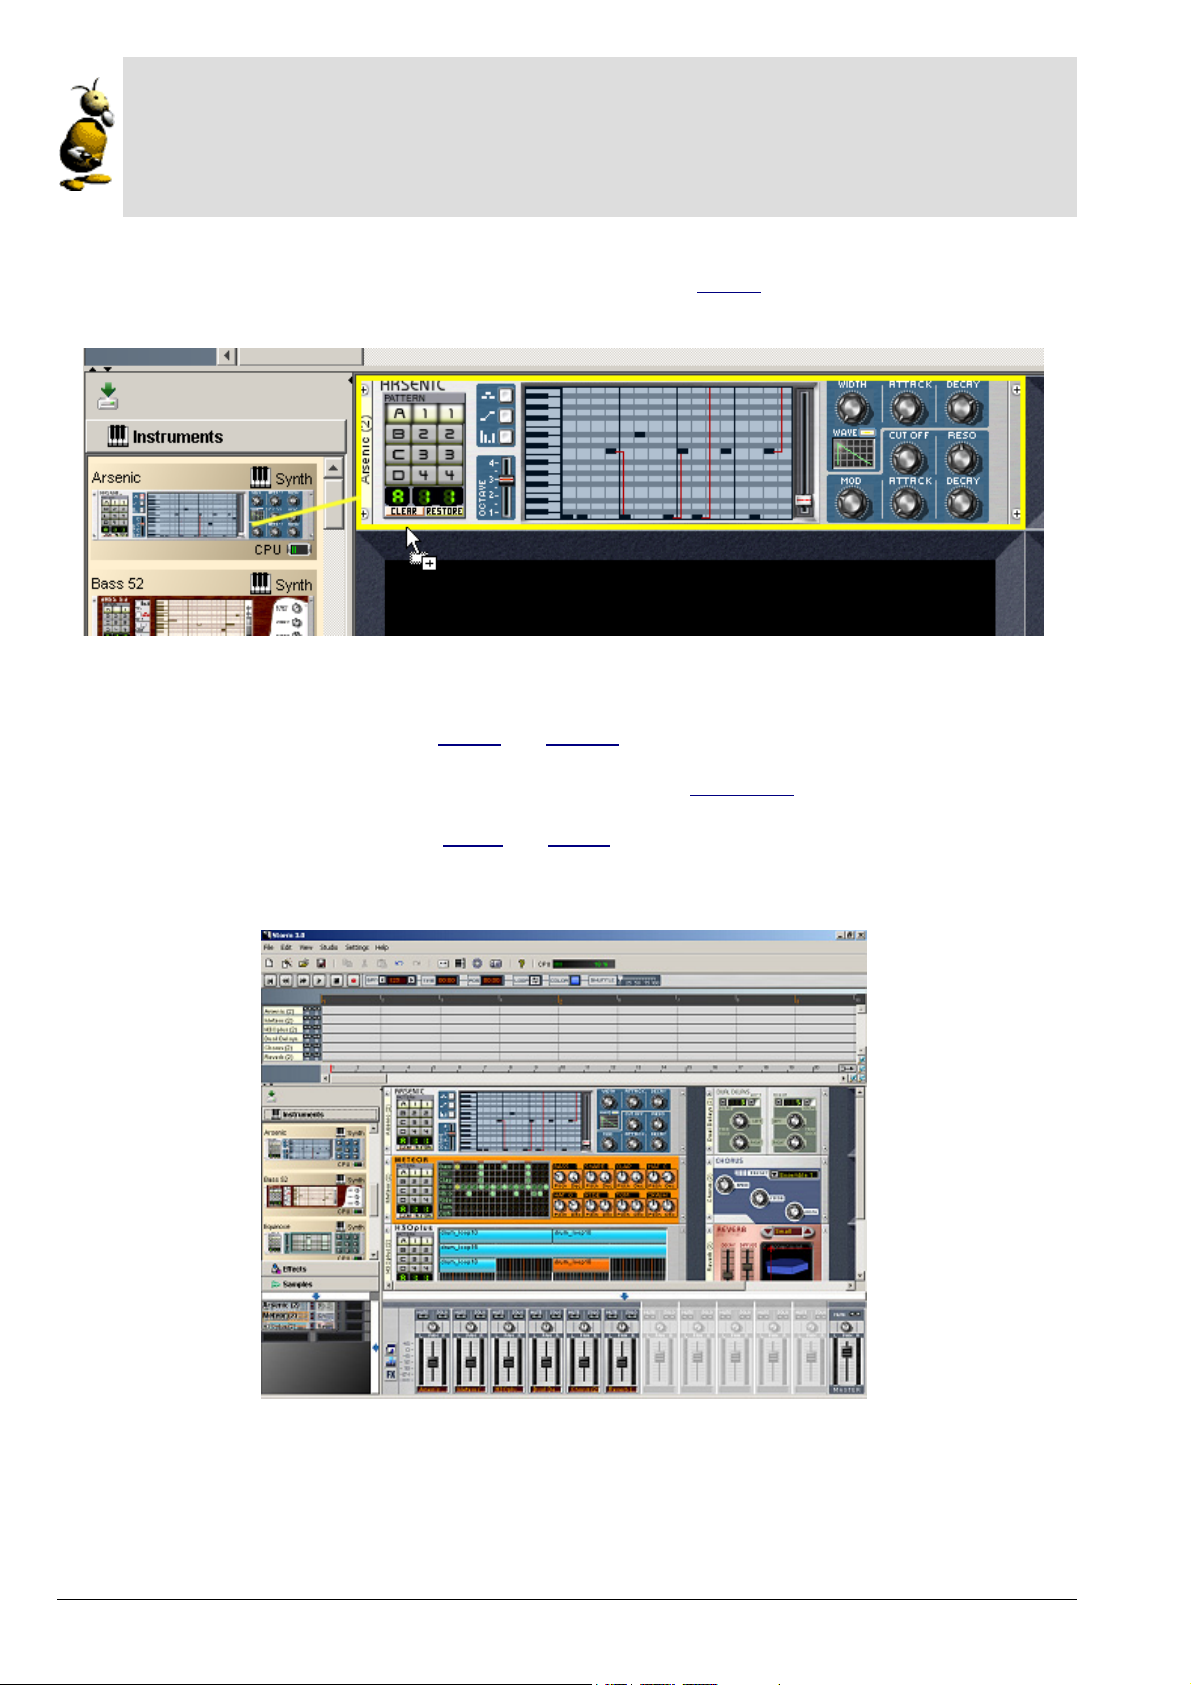
Storm, a real “à la carte” studio
The main idea of Storm is the creation of a compositional environment comparable to that of professional composers. In the studio, the professionals put synthesizers, drum machines, effects, etc, on a rack
(the metallic structure in the studio). The studio is created in relation to the style of music that they
wish to create, just like Storm.
• From the library on the left, choose the sound module called Arsenic and using “drag and drop”, put it
onto the virtual rack. It will take the first empty space in the rack.
Drag and drop onto the rack.
• In the same way, next choose the Meteor and H3Oplus modules. You have just built the first part of your
studio.
• From the library on the left, choose the sound effect called Dual Delays. As you have previously done,
drag and drop it onto the virtual rack.
• Repeat the same operation for the Chorus and Reverb effects.
You can drop as many instrument modules (or effects) as you wish to the rack.
The configuration of the studio you have just built.
ARTURIA – STORM MUSIC STUDIO 3.0 – USER'S MANUAL 12
Page 13
Unlimited modules in the rack?
As mentioned above, Storm allows an unlimited number of synthesizer and effect modules in the studio
but to be more precise: the capacity of modules is directly related to the power of the processor in your
computer. The more powerful the processor, the more modules you can place! Certain modules are more
demanding than others (an icon placed on the right of each module indicates the amount of CPU power
used).
And there it is, you have just built your first studio. Now let's go on to the second phase, composition in realtime.
Composing in real time
Your studio is ready. In a few moments, you will discover the infinite possibilities that Storm software offers in
terms of musical creation.
At first sight, the screen you have in front of you looks fairly complicated. There are lots of buttons, sliders, dials, and geometric shapes. But don't worry, everything is simpler than it seems and soon all its secrets will be revealed.
• Start by clicking on the arrow located at the top left of the screen. This is the PLAY button that com-
mands all of the sound modules. You will hear a looped melody.
Click on the PLAY button
• Click on the button to activate the selection of the loop. Next set the loop length by dragging
the green bar above the sequencer tracks.
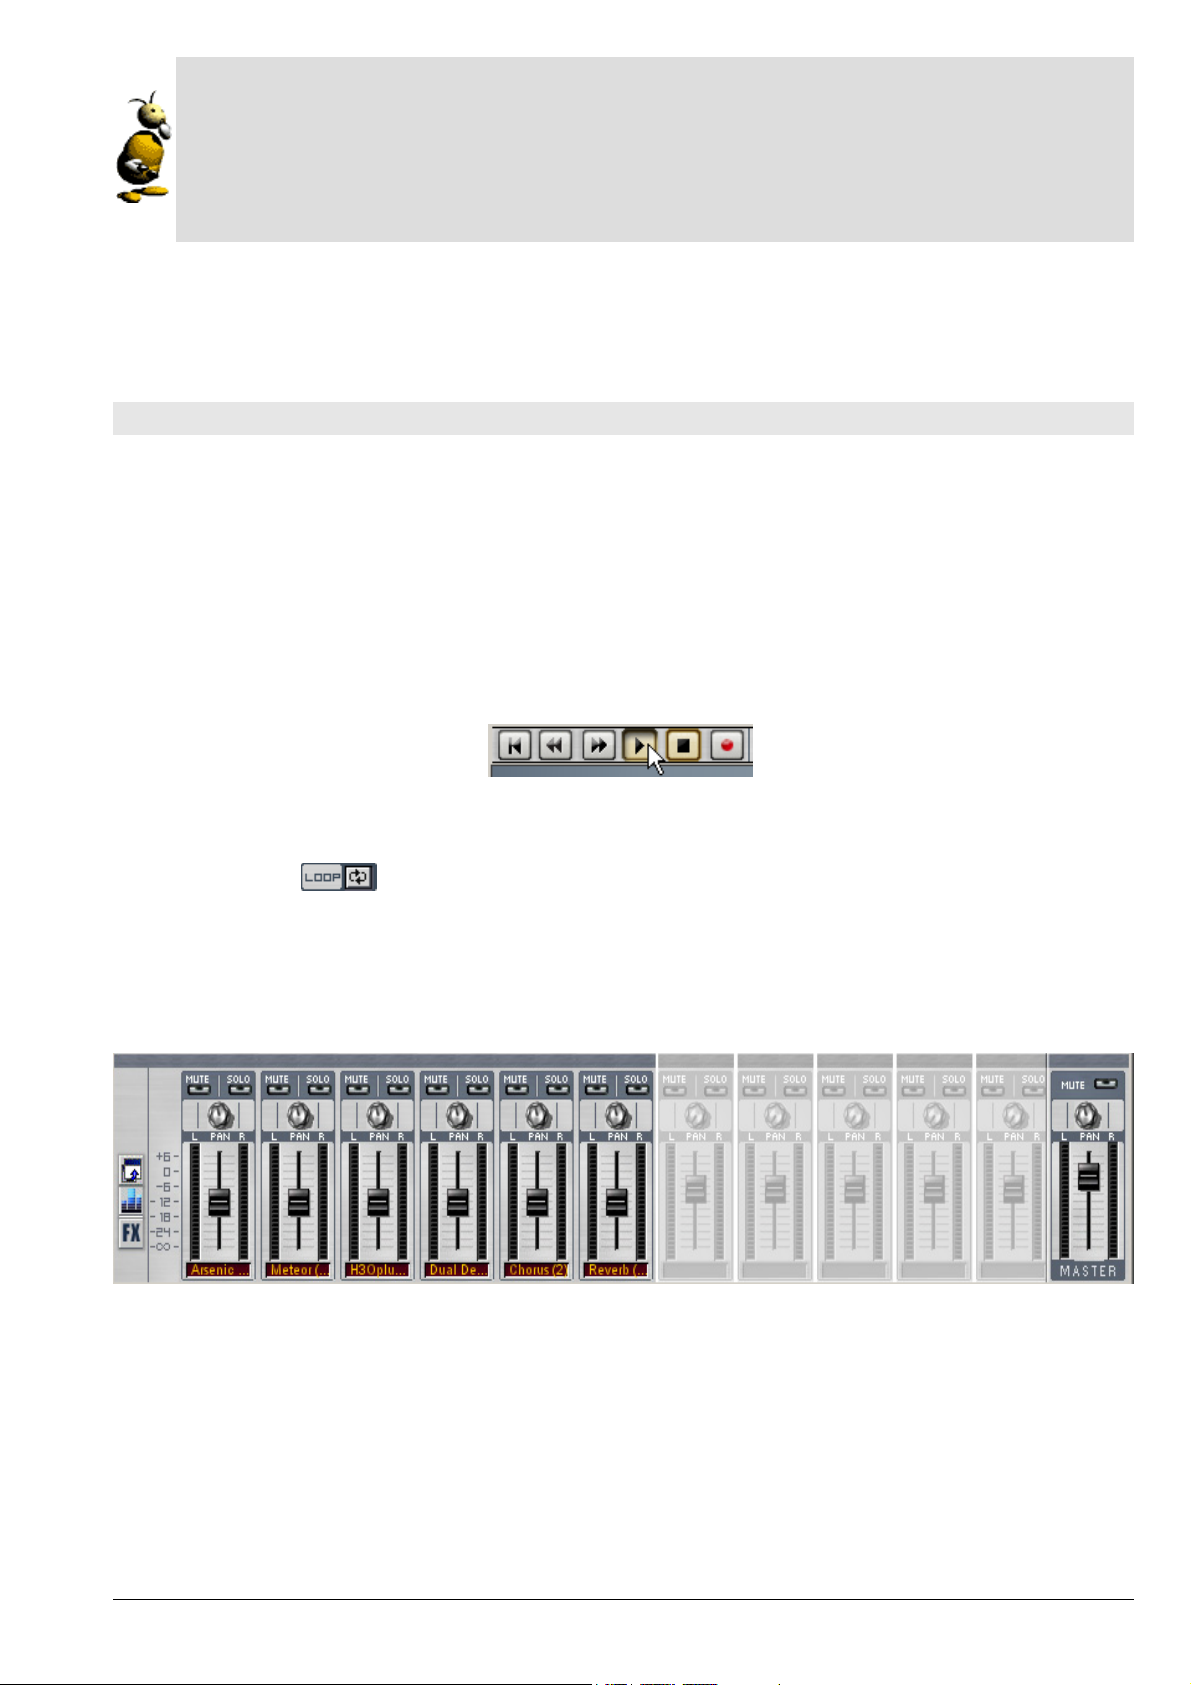
• In the lower zone, there is a stereo mixing table. This table controls the output of different sound mod-
ules. Click on the MUTE button of the master. The sound stops immediately. Click again and try out the
various sliders that control the output levels of the sound modules.
The mixing table lets you set
the output level for each module.
• Click on the MUTE button of modules 2, 3 and 4, we are now going to learn a little about our first instru-
ment: Arsenic.
• The zone on the left lets you select the current pattern. When you click on the numbers and letters of
the pattern selector, you change the melodic theme played. Try to program themes A11, A12, B21 in succession.
ARTURIA – STORM MUSIC STUDIO 3.0 – USER'S MANUAL 13
Page 14
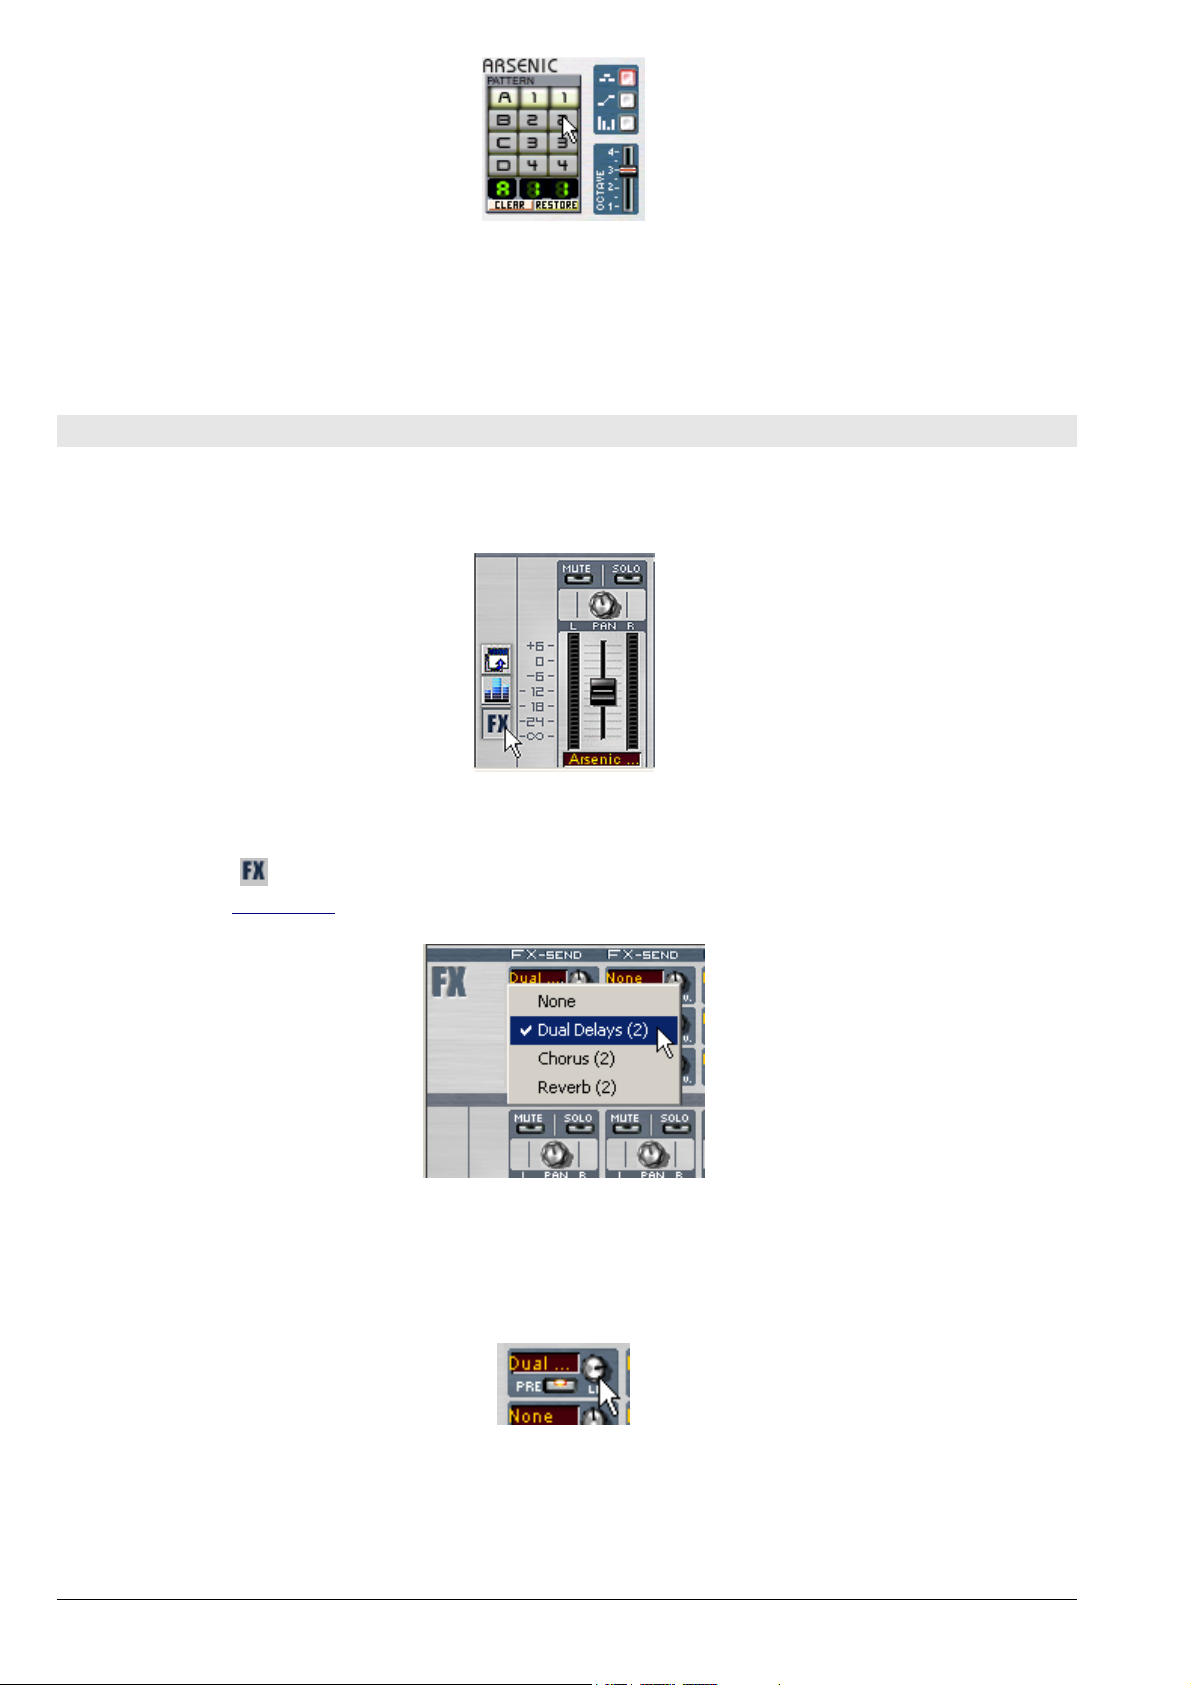
Click on the Pattern selector.
Later on, you will be able to compose your own patterns, but for the moment, let's see how to manage the sound
of this module by using one or two effects.
Using effects
On the left hand limit of the mixing table, you will see 3 icons corresponding to the three states of the mixing table. This will allow you to access the dosing of effects, equalization and detachment of the mixing table.
The three mixing table icons
• Click on the icon to make the effect setting extension appear.
• Choose the Dual Delays effect by clicking on the LCD display in Arsenic.
Choose the Dual delays effect.
• Click on the potentiometer to dose the output from the synthesizer going to the effect.
• Keep the button pressed down and move the mouse up.
Click on potentiometer a, sending the sound
from the instrument to the Dual Delays effect.
ARTURIA – STORM MUSIC STUDIO 3.0 – USER'S MANUAL 14
Page 15
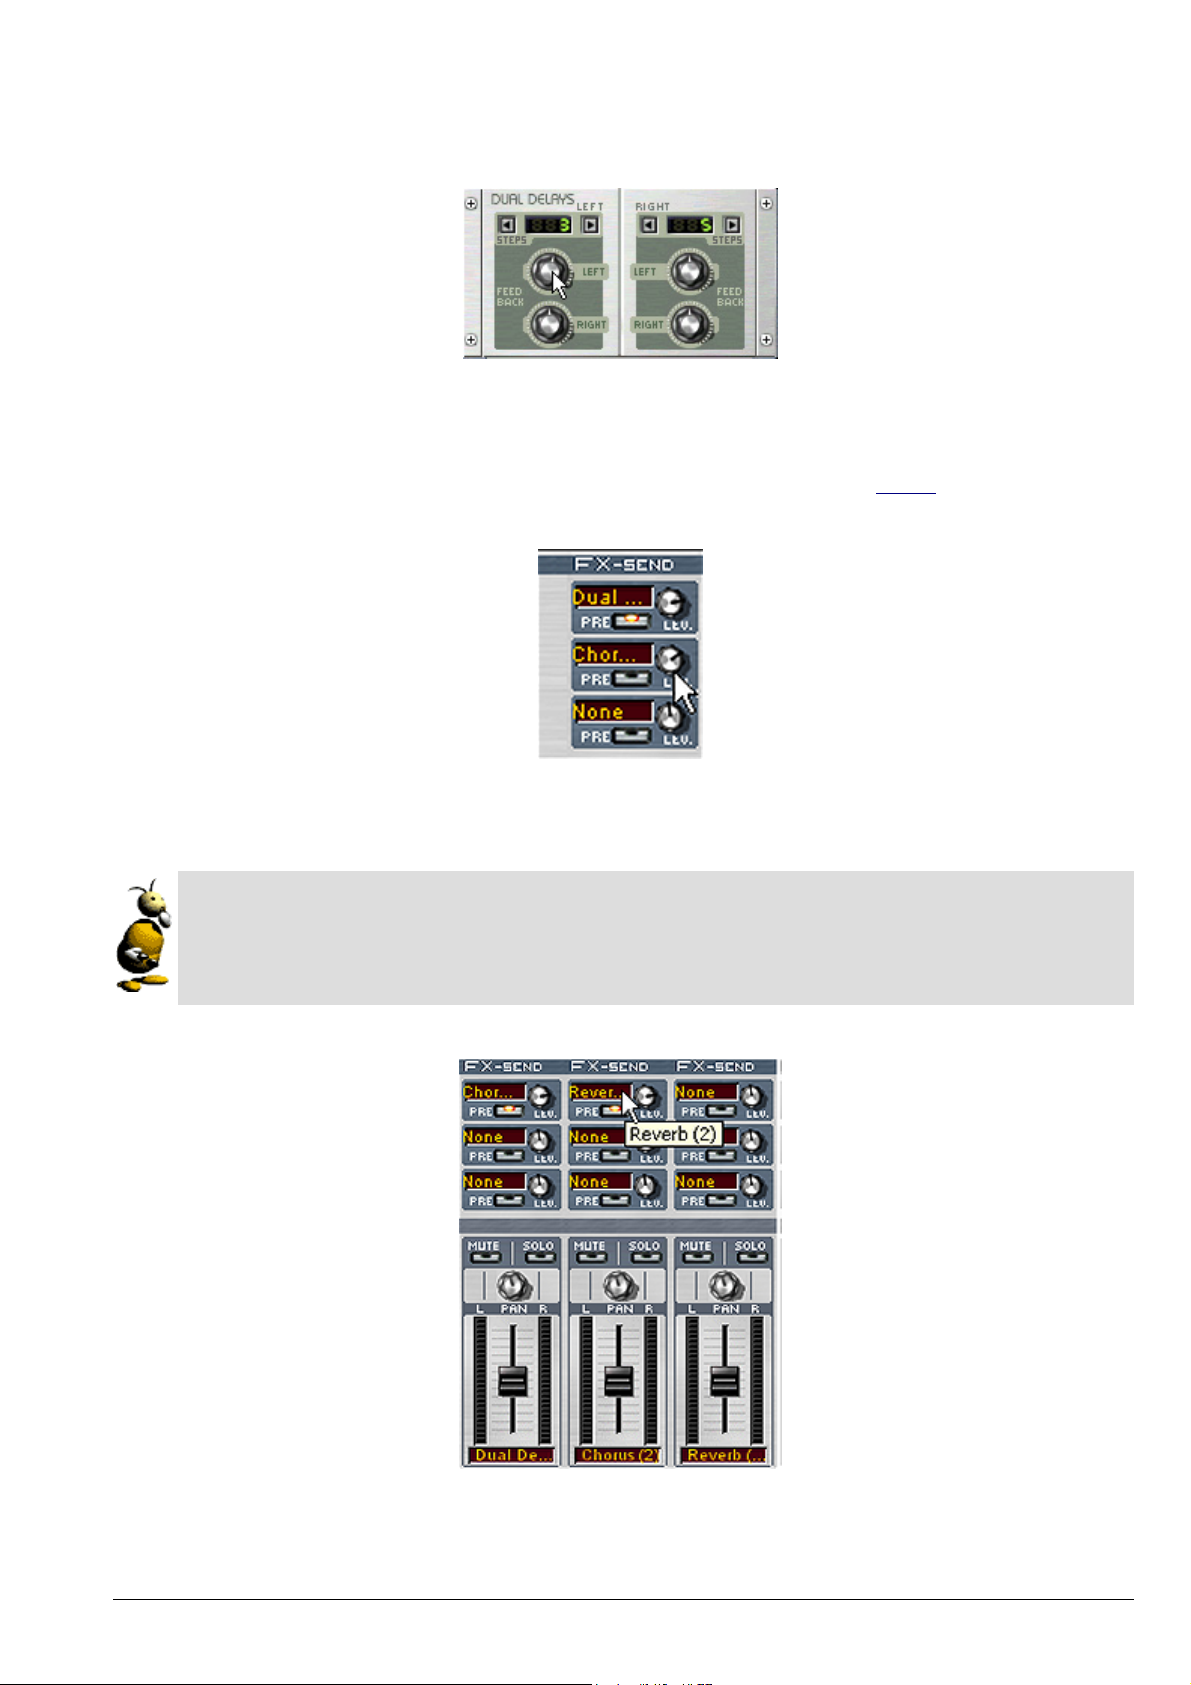
Dual Delays creates a stereo delay effect between the left and right speakers of your machine.
• To have a better idea of how it works, increase the amount of the delay on the left loud speaker by click-
ing on the LEFT feedback dial of the left channel.
Increase the delay on the left speaker.
• The number 1 instrument is still the only one turned on. Thus, it is the only one whose sound you can
hear. Now let's try to apply the second effect to the sound. For this choose Chorus
in the second display
and click on the potentiometer to increase the effect dosage in the sound from Arsenic.
Click on the Lev. potentiometer
of the second effect send
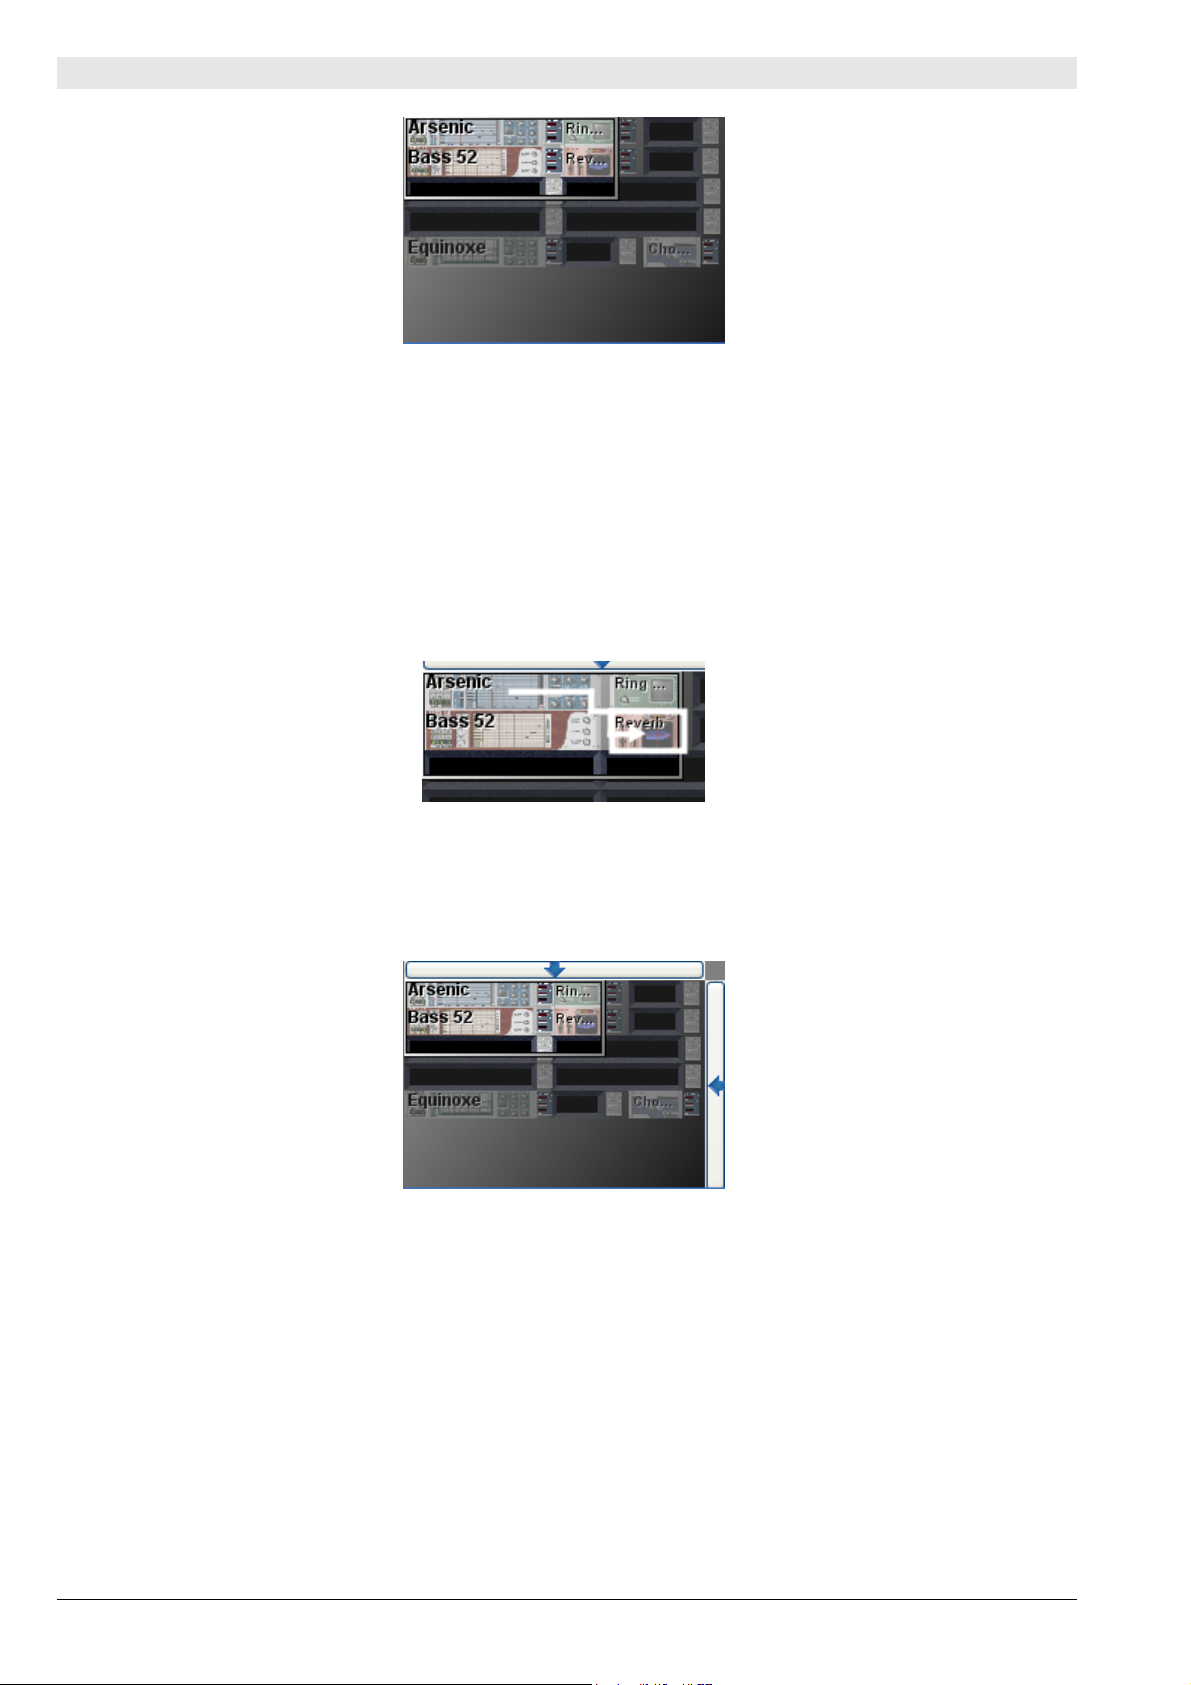
Linking effects
You can link the sound effects between each other. So for example, the output from a synthesizer can be
sent to the delay which will then be directed to the chorus and then on to the reverb. It is nonetheless
essential that you avoid re-injecting an effect into itself. This will bring about a saturation of the sound.
Directing the sound from chorus to the reverb.
ARTURIA – STORM MUSIC STUDIO 3.0 – USER'S MANUAL 15
Page 16
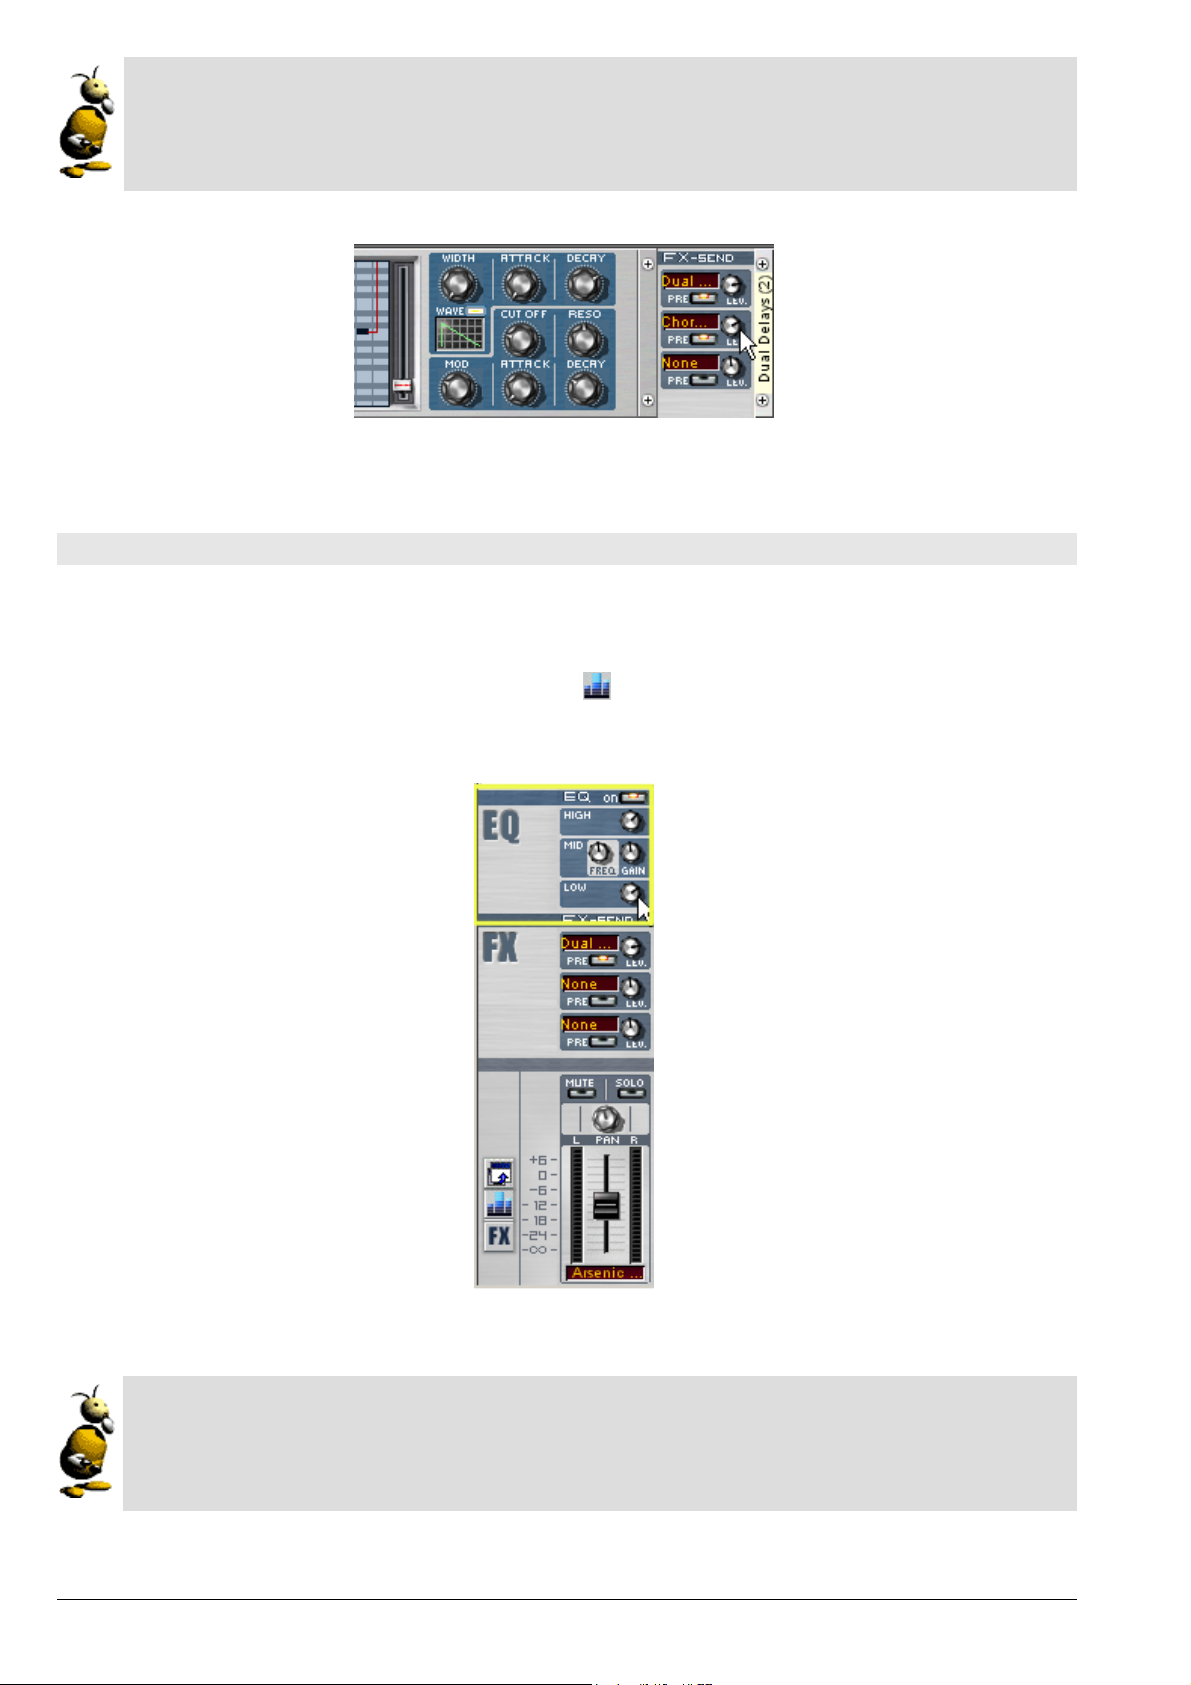
The effect sends on the rack
It is possible to have the effect sends on the rack, on the right of each instrument and effect module. To
do this go to the menu View > rack > effect control. Opening these effect sends is the same as in the
mixing table extension.
Turn the effect send potentiometers
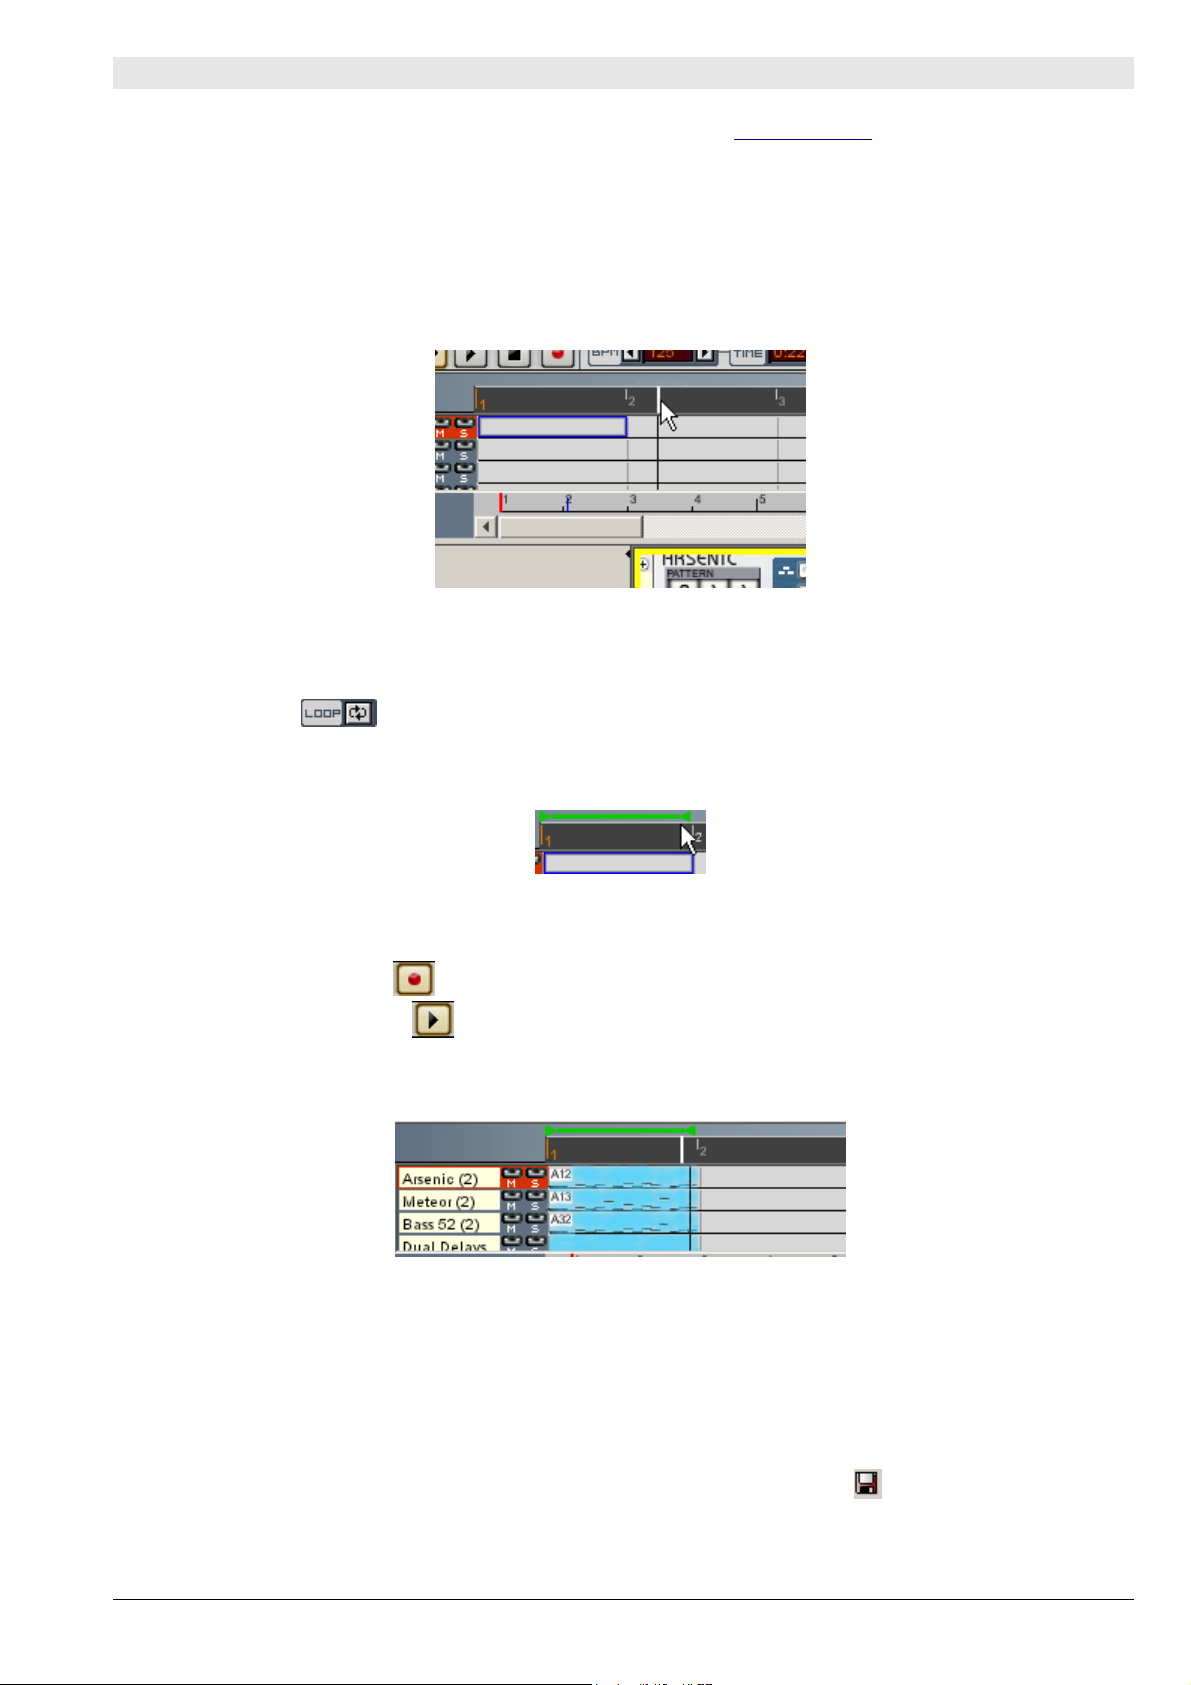
Using the equalization
It is possible to set the equalization of a sound coming from a synthesizer (or an effect) with the equalizer section on the mixing table:
• To have the equalizer section appear, click on the icon on the left of the mixing table.
• On the equalizer in the Arsenic section, try turning the different potentiometers to appreciate the
changes reflected in the sound from the synthesizer.
the equalizer section for Arsenic
The different equalizations
The equalizer section lets you increase or diminish high, medium and low frequencies. The FREQ potentiometer finely sets the position of the medium frequency band (deeper or higher), for more precision in
the equalization.
ARTURIA – STORM MUSIC STUDIO 3.0 – USER'S MANUAL 16
Page 17
Recording your first composition
We are now going to see how to record in .stm format. This is the internal format in Storm which allows us to
record real-time manipulations.
• Lets start by opening the outputs of all of the modules. To do this, click on the MUTE buttons of the 2nd
and 3rd instruments on the mixing table.
• Click on the button on the far left of the control bar which sets the immediate return of the cursor to the
beginning of the song. You can equally click on the upper zone of the sequencer, where the graduations
by bar and group are displayed to bring the cursor back to the desired position.
Come back to the beginning of the group of bars
by moving the cursor with the mouse.
• Click on the button. you should see a loop bar appear which corresponds to the loop program-
ming mode. Drag this bar across the whole of group 1 so that the cursor runs indefinitely (in a loop) over
this group.
Group 1 with the cursor and loop above.
• To record, click on the button which is placed on the control bar at the top left of the screen.
• Click on the play button . The cursor crossing the sequencer underneath sweeps the squares of the
sequencer causing them to change color. This signifies that the manipulations made during the bars corresponding to each of the squares are recorded.
Click on the Rec button.
The sequencer squares change color.
• To be convinced, modify potentiometers and patterns during the recording. While re-crossing the modi-
fied bars, you will notice that the controllers move in the same manner that they did when you first modified them. Small horizontal lines will also appear on the sequencer lines: they indicate a pattern change
on a module or the recording of notes in MIDI.
• When you have created a composition that you wish to save, click on the save icon in the toolbar, or
use the command Save in the File menu. A window will open and suggest a name, destination, and format for the file to be saved.
ARTURIA – STORM MUSIC STUDIO 3.0 – USER'S MANUAL 17
Page 18
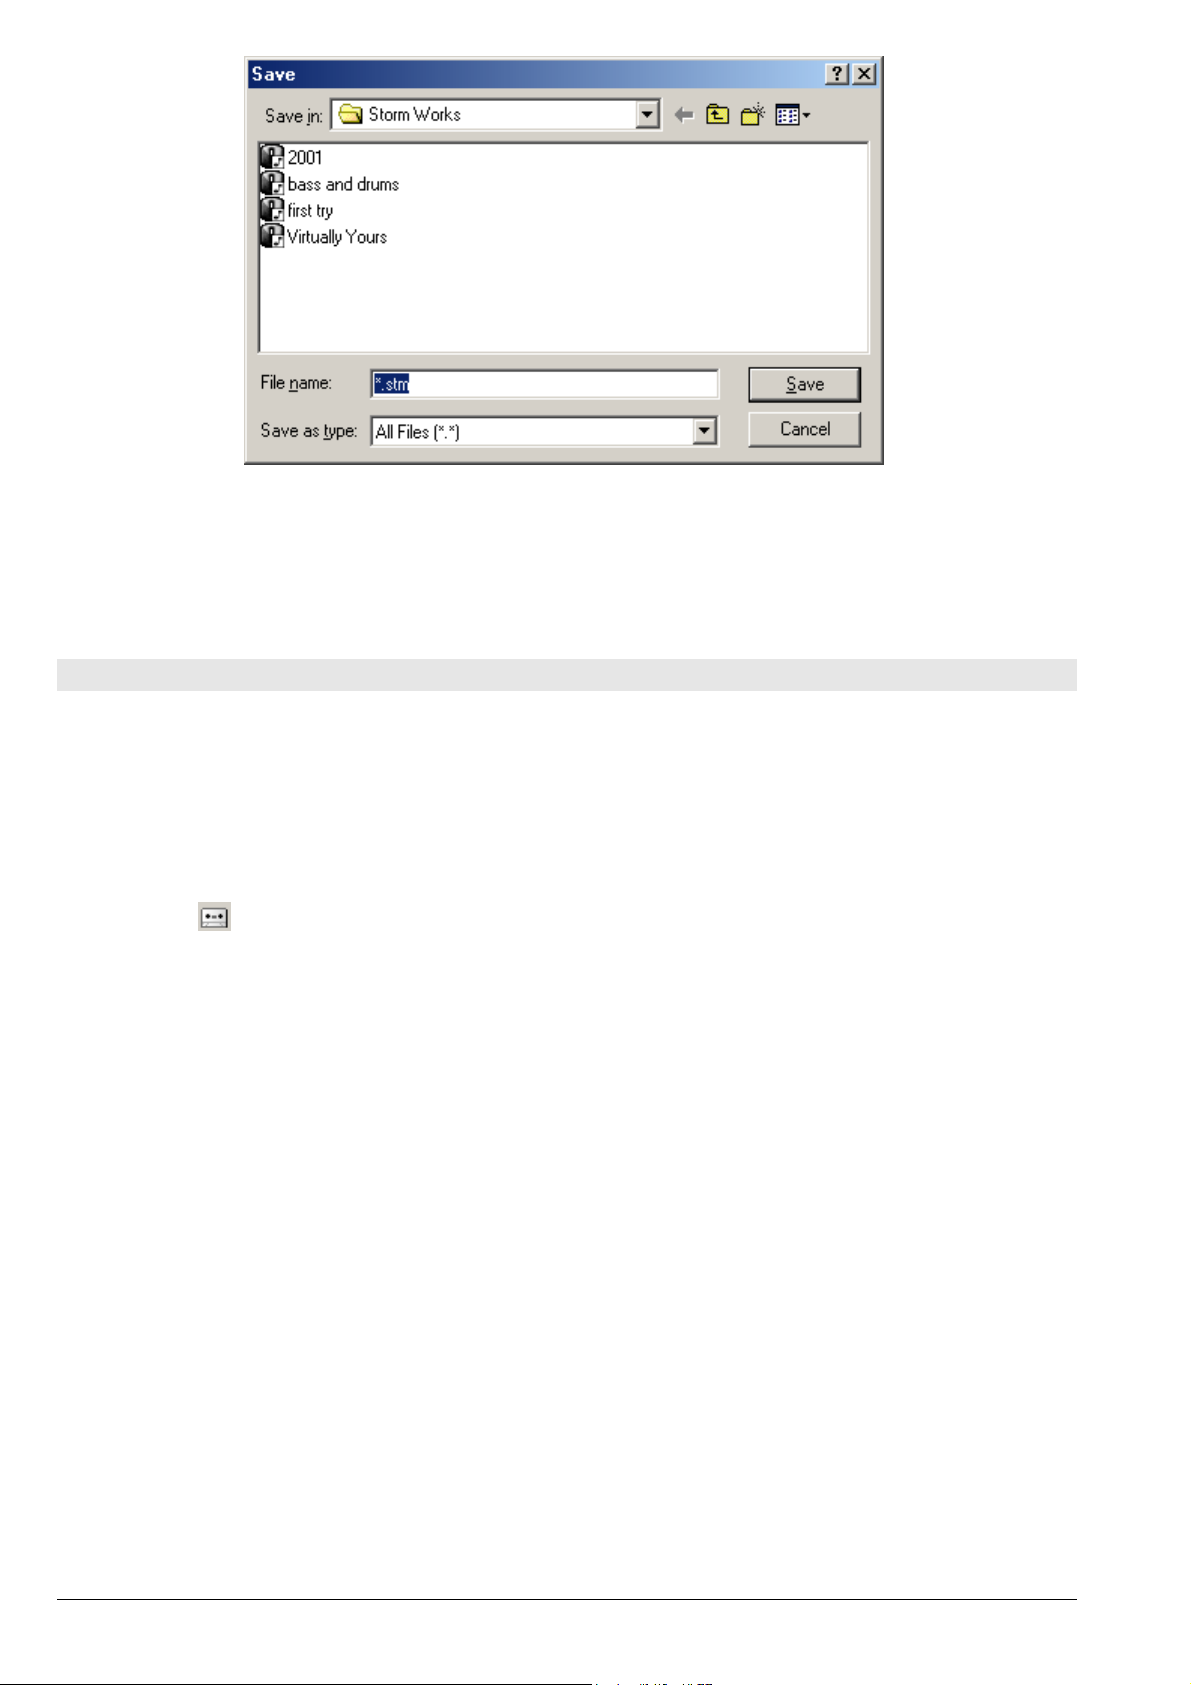
Select the folder in which
you wish to save your song
• When you are in the desired folder, click on Save. Your first Storm song is now on your hard drive.
Exporting an audio file
We saw how to create a studio, how to play in real-time while modifying the patterns and controllers, how to apply effects to the sounds. We have also seen how to save a song as .stm. We will now see how we can save a
song as a WAV or AIFF file.
You have two options:
• Use the menu option File > Audio Export.
• use the recorder icon in the toolbar.
If you use the Export option, a window will prompt you for the desired audio format and which section you wish
to export.
If you use the recorder:
• To make a recording, you must open the recorder by clicking on the recorder icon which is found in the
toolbar at the top of the screen.
• The recorder is now open. It is conceived in a manner which allows the recording of one instrument, or
the recording of numerous instruments independently of one another and the recording of the master mix
(all studio tracks together). We are going to record the sound from synthesizer 1. To do this, click on the
first button of the recorder to activate the recording of this track.
ARTURIA – STORM MUSIC STUDIO 3.0 – USER'S MANUAL 18
Page 19

The recorder.
• The recorder can perform a recording fixed between two bar numbers. Select a loop length by clicking on
the
button or select the parts of the sequencer tracks that you wish to record. Next click on the
Record button at the bottom of the recorder to begin the recording.
• The recording begins and a dialog indicates the advancement of the recording. This will automatically
stop at the end of the selection. A tape with the name of the module appears in the Current Song folder
in the sample library.
A tape with the name of the module appears in the
Current Song folder in the sample library.
Recording formats
There are two save formats in Storm: the formats WAV, and AIFF. These formats are completely different to the .stm internal format. For the first two it is only audio which is saved, whereas the .stm for-
mat memorizes the movements of controllers, patterns, sliders, etc.).
ARTURIA – STORM MUSIC STUDIO 3.0 – USER'S MANUAL 19
Page 20
Using samples
We have just created two sound samples. These samples, will appear in the sample library and can be used di-
rectly in the studio. Storm offers vast possibilities for the use and management of samples. Here we are going to
talk about one of them.
• Instrument number 3, named H3Oplus, allows us to play samples in a loop. Begin by using drag and drop
to move what you have just recorded to the first track of the synthesizer.
• Mute the other instruments by clicking on MUTE buttons 1 and 2 of the mixing table. You are now hearing
a loop of the first 4 bars of the sample you have just recorded.
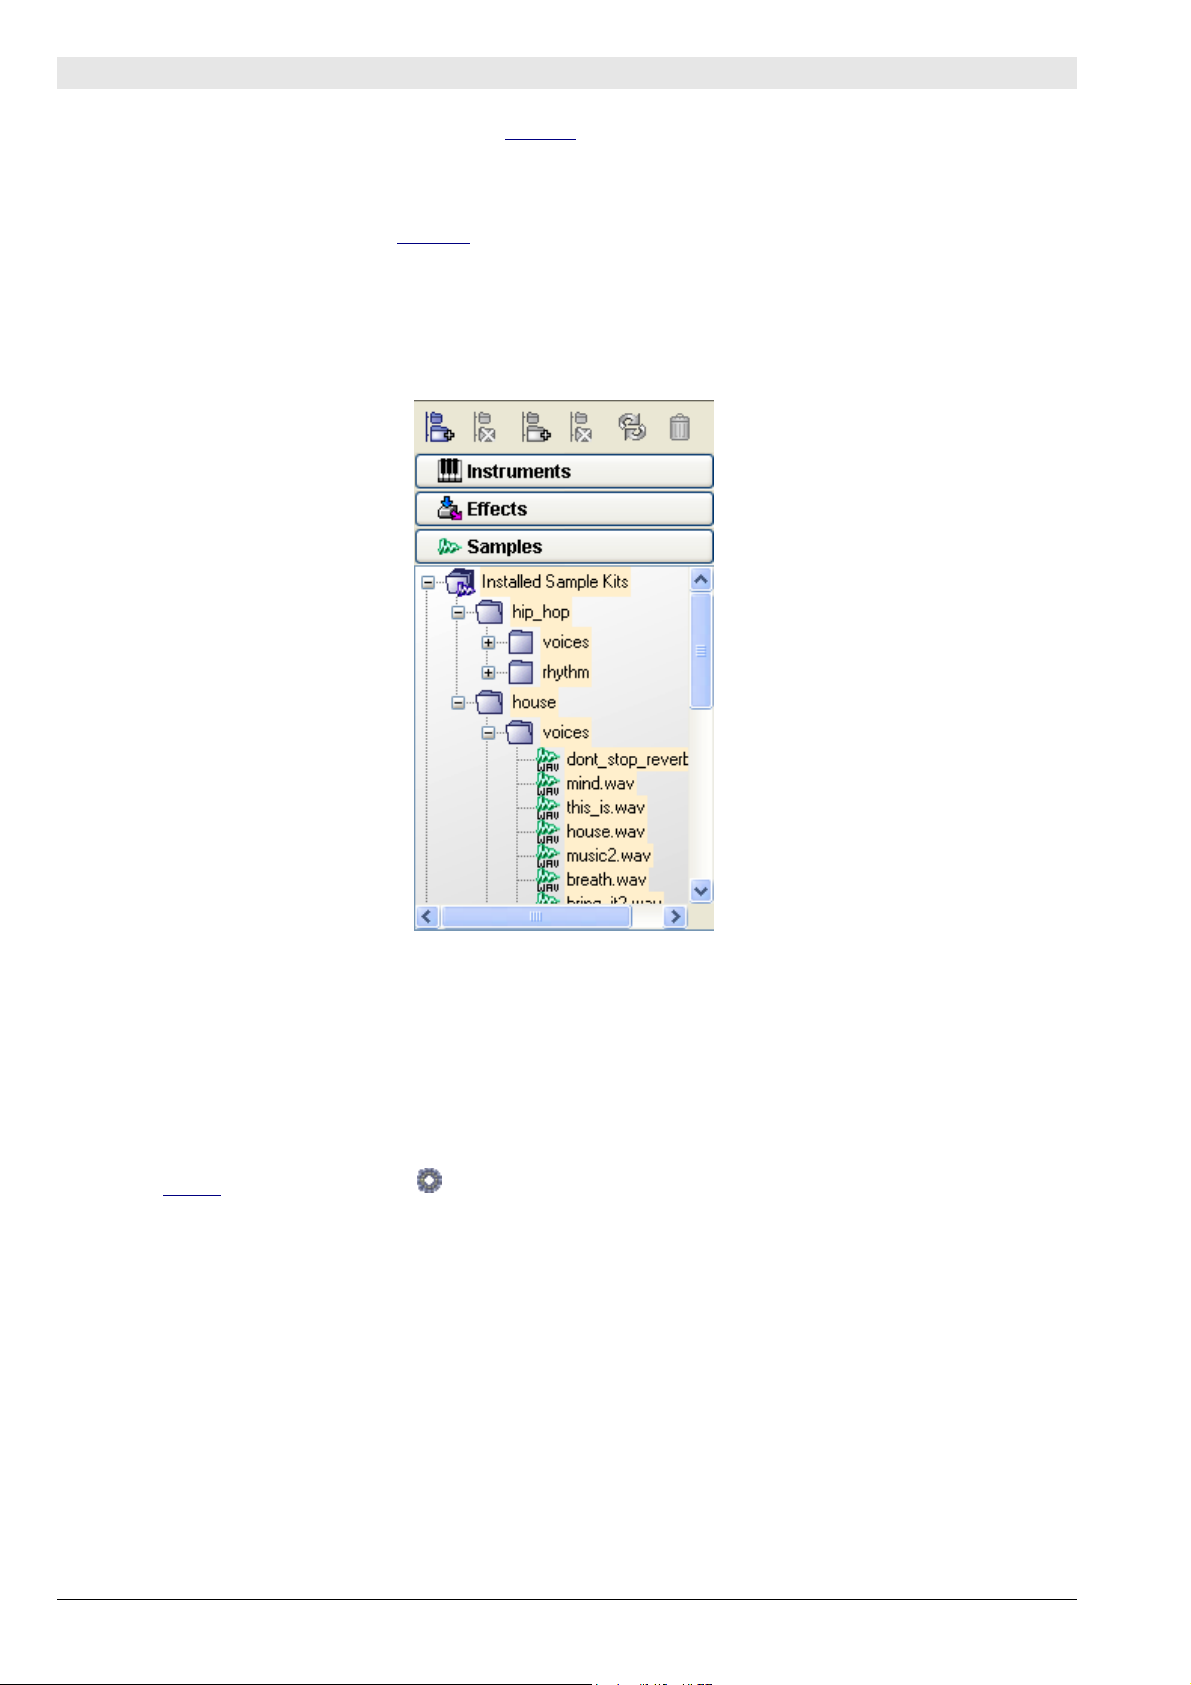
• We will now add some more samples by using to the sample library. Open the sample library by clicking
on the Samples tab in the explorer.
Click on the Samples tab in the explorer.
• Storm is provided with a base of several hundreds of samples in the sample library. Click on the folder In-
stalled sample kits. Here you have a choice between a wide range of instruments. Select the library
hip_hop/rhythm. This library contains typical Hip Hop samples. By drag and drop, move the sample
called hip_hop_drums onto track 2 of H30plus.
• Before finishing, you may wish to discover the real-time time-stretching options that Storm offers. To do
this, increase the tempo on the transport bar. You could also try modifying the tone of samples by using
the Kepler
module. Click on the to use this module.
ARTURIA – STORM MUSIC STUDIO 3.0 – USER'S MANUAL 20
Page 21

• Next click on the spheres which make up a circular network. Each one corresponds to a different tone,
and their chaining is normally applied to samples.
Click on the spheres to change the tone.
• Play with the tempo, the sample speeds are increased or decreased without modifying their height.
Change the tempo.
About samples
You can import samples into Storm in the following formats: WAV, AIFF or MP3. The system will handle
all of these file formats in the same manner.
Storm automatically adapts the tempo and tone of each imported sample to the tone and tempo of
the current studio. The automatic sample tempo modification is called time-stretching. The automatic
sample tone modification is called pitch-shifting.
ARTURIA – STORM MUSIC STUDIO 3.0 – USER'S MANUAL 21
Page 22

ARTURIA – STORM MUSIC STUDIO 3.0 – USER'S MANUAL 22
Page 23
COMPOSITION ASSISTANT
Upon launch of Storm
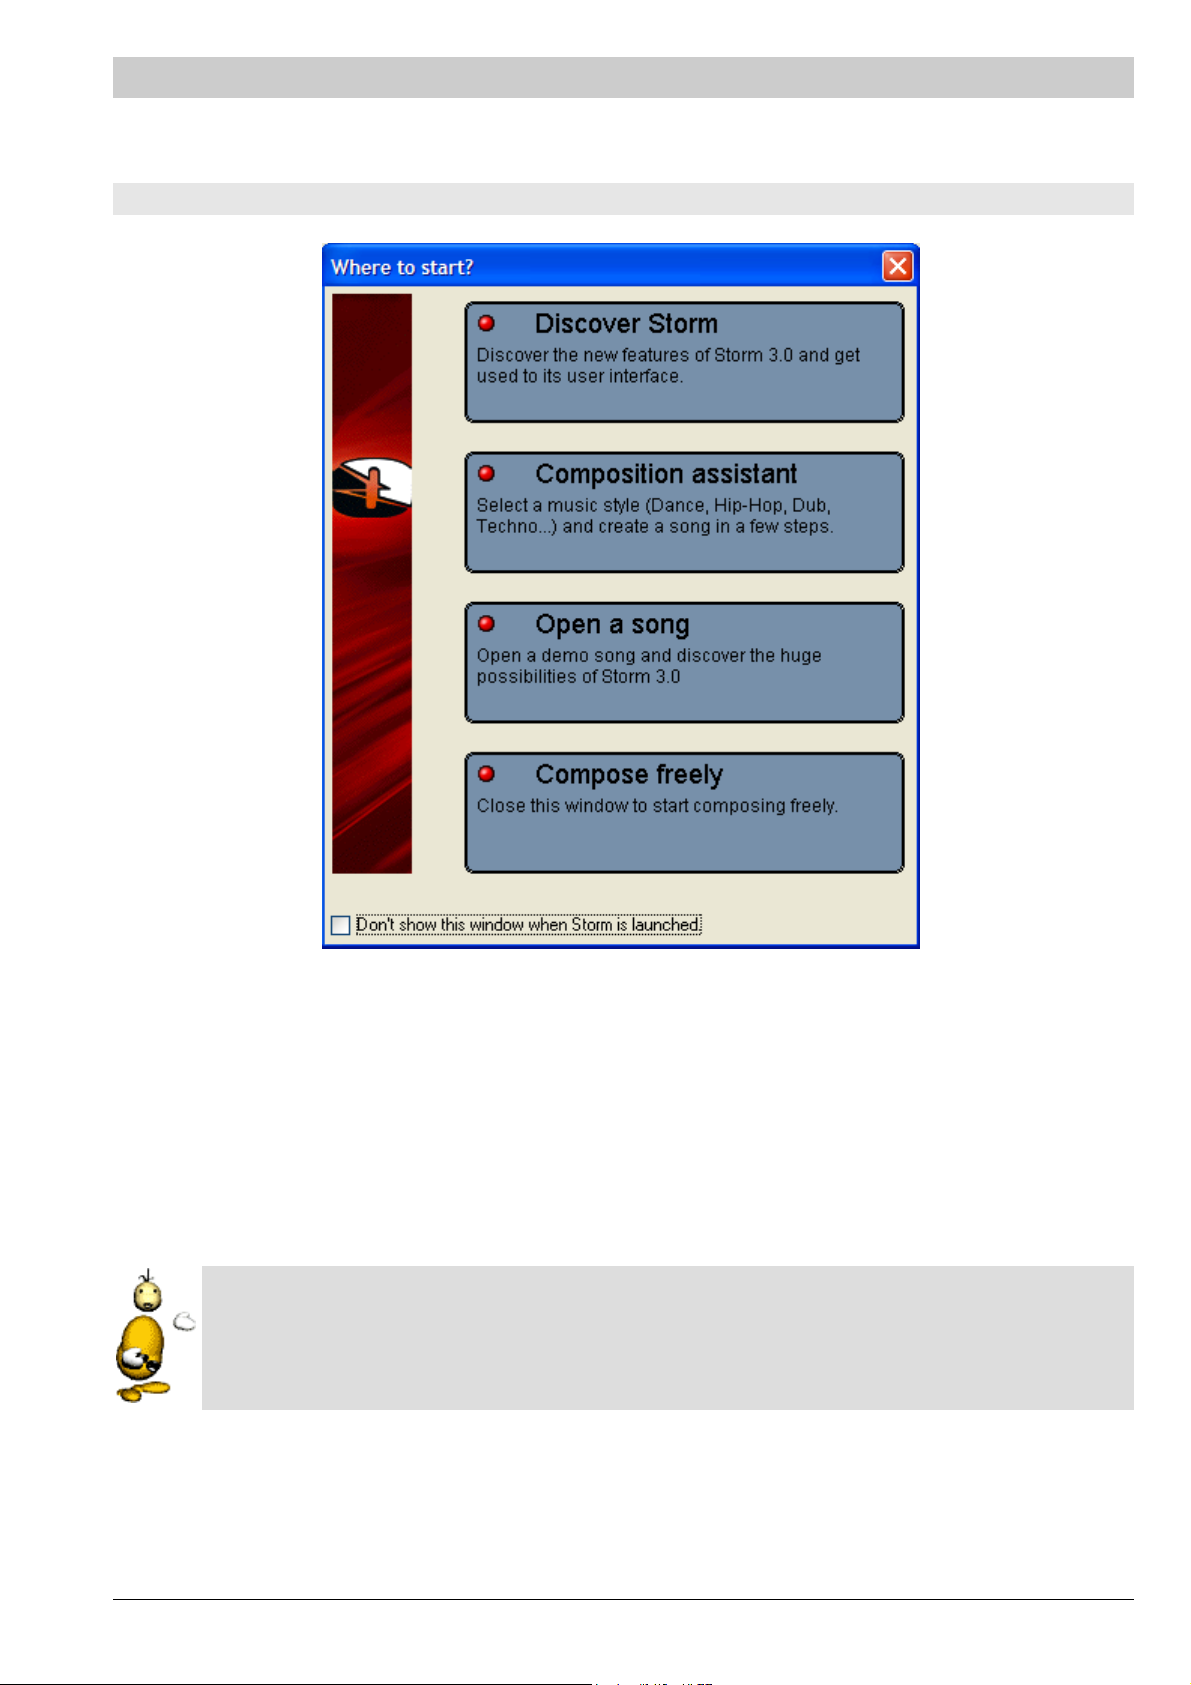
Upon launch of Storm, you can:
• Discover the Storm environment: the synthesizers, the effects, the mixing table and the sequencer. This
will allow you to quickly understand the general manner in which Storm works.
• Use the composition assistant: you can pick an assistant in the style of your choice (Dance, House, Hip
Hop, etc.). This assistant will be very useful if you have never composed before or you wish to compose
in a style that you are not familiar with.
• Open a song: demonstration songs are provided with the program. They will allow you to see what you
can do with the software and give you a few good examples of professional quality.
• Compose freely: pick your own instruments and effects and go for it.
If you don't wish to see this window on startup, simply click on Don't show this window when Storm is
launched (you can also do this from the Settings > General menu).
ARTURIA – STORM MUSIC STUDIO 3.0 – USER'S MANUAL 23
Page 24
Composition Assistant
There are several ways to launch the Assistant:
• You can choose to use a composition assistant in the startup window described above.
• You can also activate it by selecting it in the menu File > Composition Assistant.
• The button on the toolbar is another method.
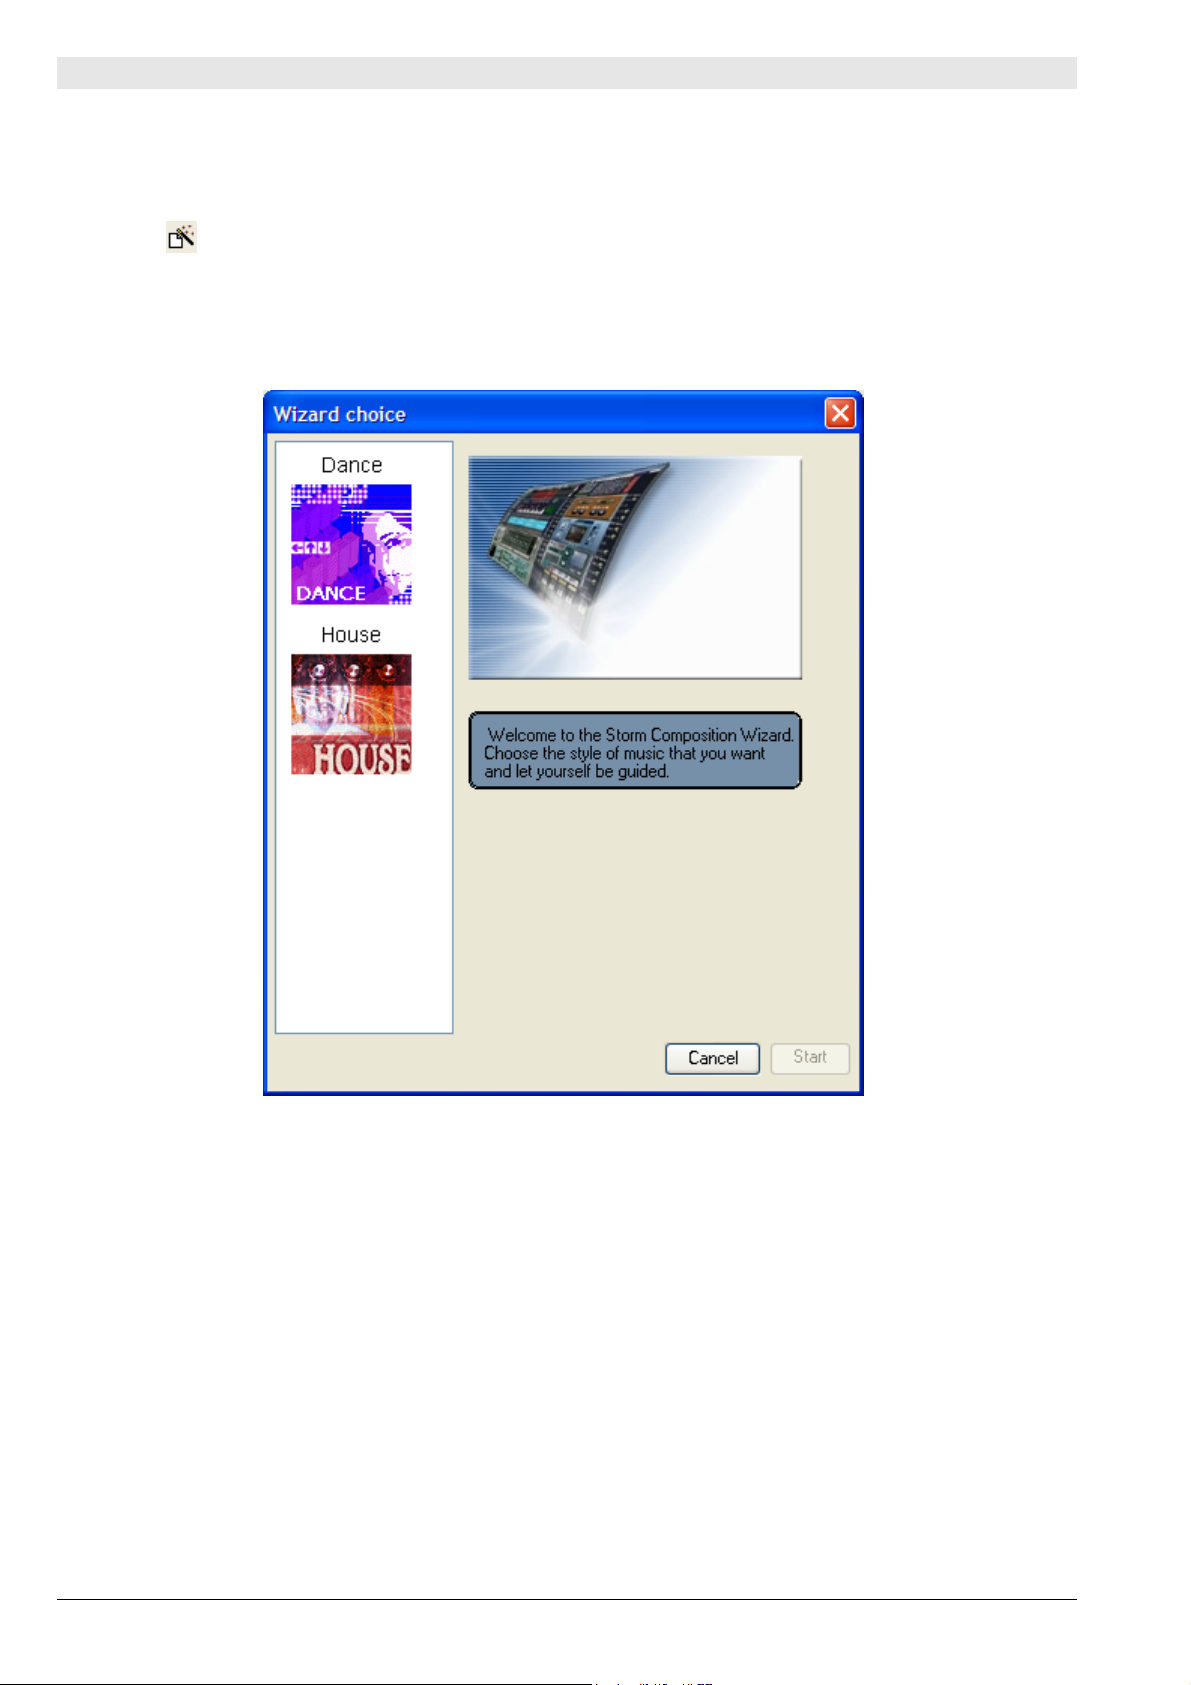
When the Wizard is launched, it offers you a certain number of musical styles represented by icons: House, Electro Pop, R'n'B, Hard Rock, Tribal Trance, Ambient, Drum & Bass, Jazz Funk, Dub/Reggae, Dance, Hip Hop (other
composition assistant styles can be downloaded from our web site).
First step: choice of musical style for the Assistant
Choose the style of music that you want by clicking on the icons. You will see information relative to the selected tutorial: the style of music, the number of steps for the composition of the song, a musical extract (click on
the “speaker” icon) and a reduced image of the studio which will be proposed for your song.
Once have decided on the musical style, click on the Start button to begin composing your song.
ARTURIA – STORM MUSIC STUDIO 3.0 – USER'S MANUAL 24
Page 25
Using the Assistant
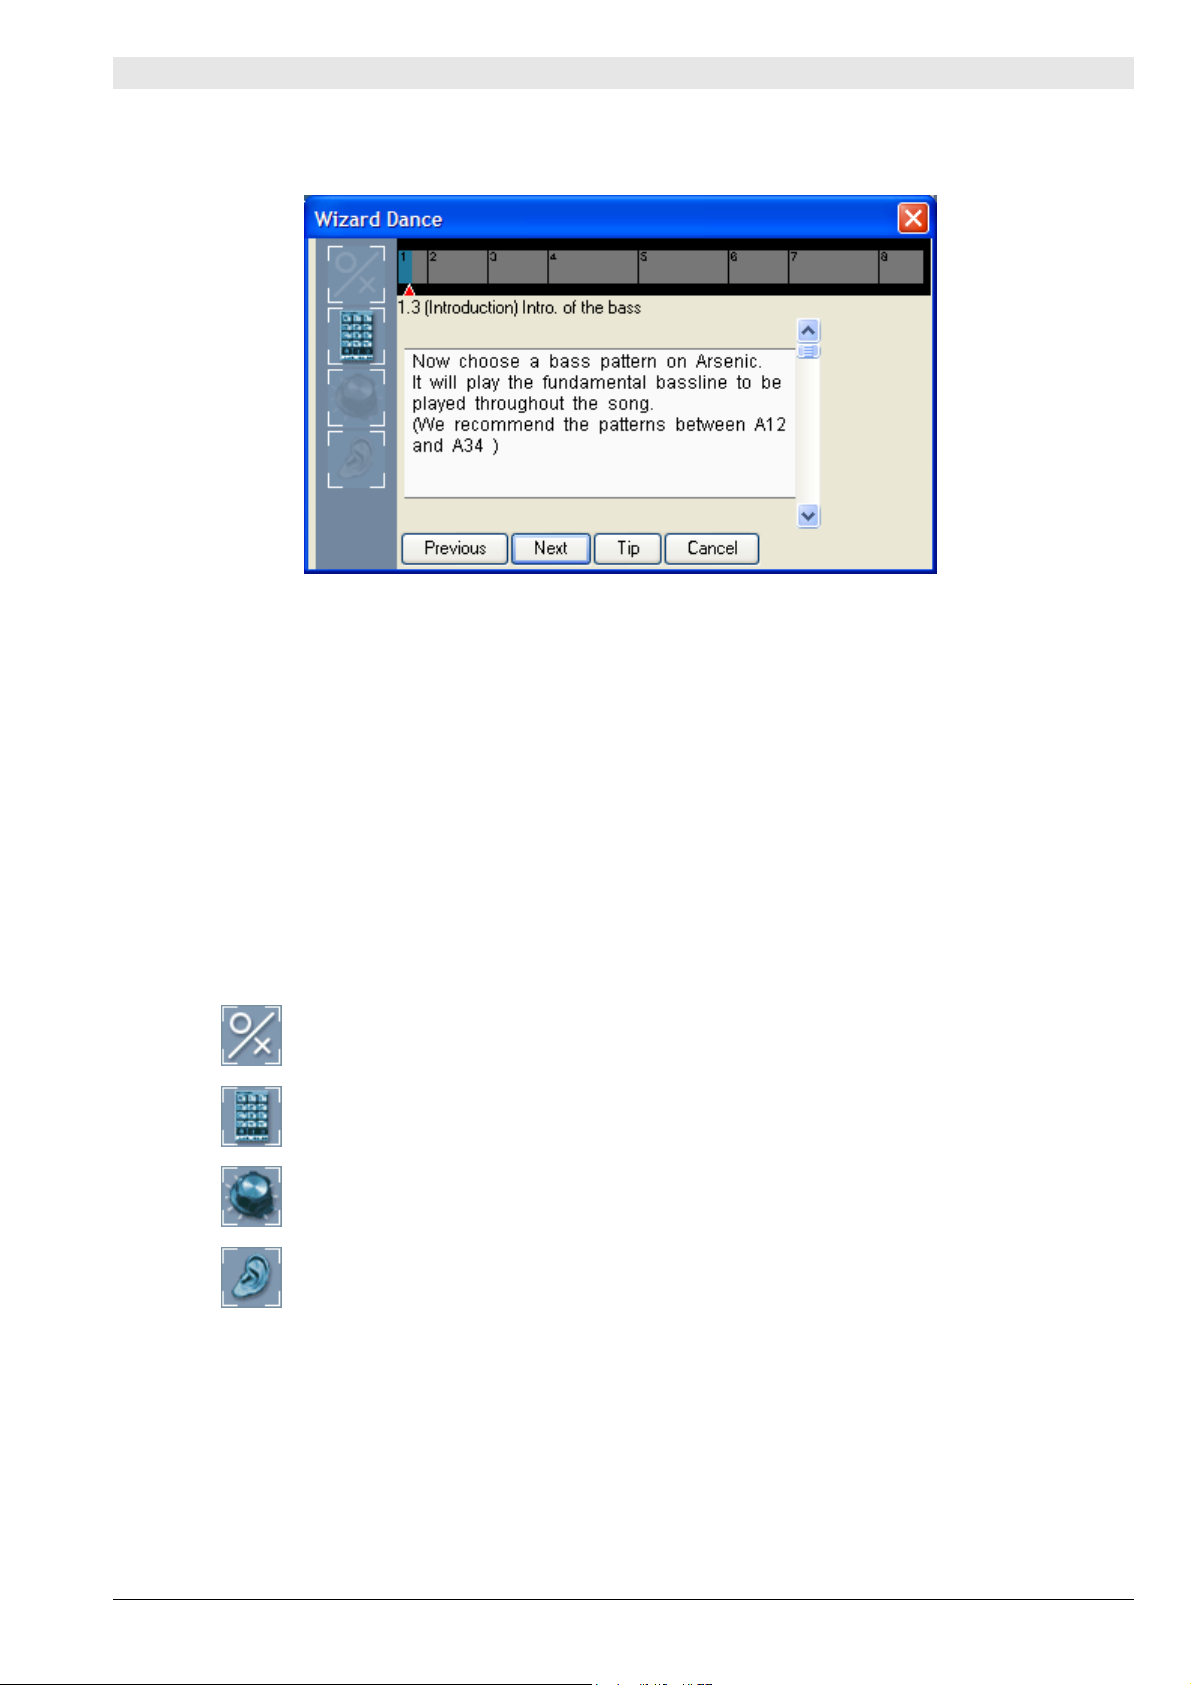
Once you have decided on the style of music, you will find a series of buttons and icons allowing you to easily advance in the composition of your song in the second window of the Assistant:
The Assistant window which will guide you step by
step in the composition of your song.
At the top of the window, a bar indicates how far you have advanced in the composition of the song:
• The sections of the song are identified by a title, and are numbered. They are of different lengths: the
bigger the section, the more programming steps there are.
• As the Assistant continually advances, the sections will be colored, meaning that the steps have been
completed. You will find the same titles and colors in the Storm sequencer. The bar of the Assistant is a
miniature sequencer.
• You can move to the different parts of the song already completed by moving the red cursor above the
desired section or by clicking on Previous.
On the left, a series of icons tell you what type of step you are currently on:
Confirm a choice or an operation
Choose a pattern
Record a modification of a parameter or potentiometer
Listen to a passage
ARTURIA – STORM MUSIC STUDIO 3.0 – USER'S MANUAL 25
Page 26

The Tip button can also (depending on the step) give you a description of a precise point or a more general subject concerning the style of the song.
To exit the Wizard, you can perform any of the following steps:
• Simply click on the Cancel button in the window.
• Create a new studio
• Load a new song.
• Quit Storm.
After one of the above steps, the program will ask you if you wish to save the position of the Assistant. This is
not systematically saved with the Storm file that you are composing:
• If you answer no, you will lose the ability to be able to work on your song again with the Assistant. To
later work on the song, you're on your own with the sequencer...!
• If you answer yes, you will be able to do this. When you open the Storm file, you will be able to continue
where you left off or even go back along the steps.
ARTURIA – STORM MUSIC STUDIO 3.0 – USER'S MANUAL 26
Page 27
THE EXPLORER
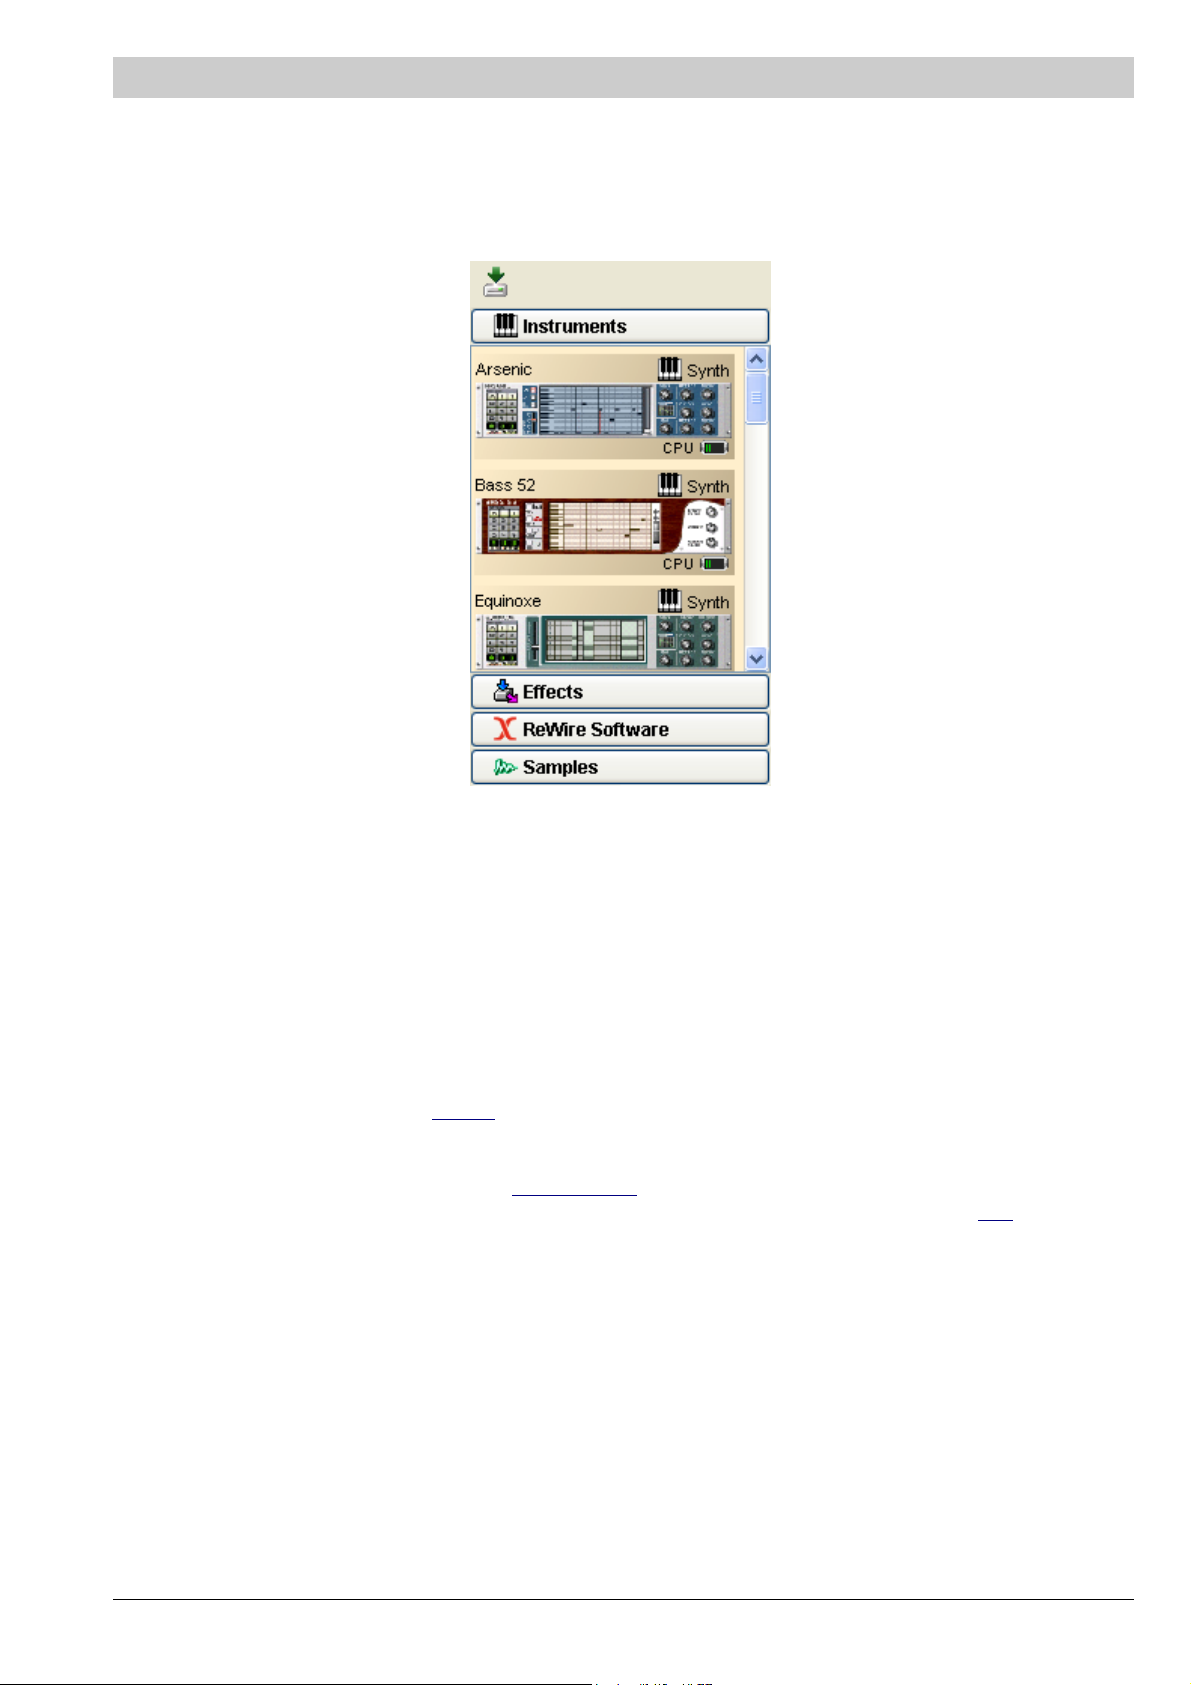
The Explorer is found on the left of your virtual studio. It contains all of the base modules for the creation of music: instruments, effects, samples.
It contains four sections. To go from one to another, just click on the corresponding tab.
The sections are:
• The instruments
These are the “sound generators” for your songs.
• The effects
These let you modify the sound from an instrument. All of the instruments and effects are described in
detail in Chapters 4 and 5 of this manual.
• The ReWire instruments
If Storm has been launched as a ReWire Mixer, and if ReWire Instruments are present in your system, they
will be listed here. See the ReWire
• The sample bank
This lists all of the samples that you can use in the Storm sample readers, as well as the audio tracks that
you have recorded. See the Chapter Using samples
This sections holds a particular toolbar, identical to the one contained in the section on Hall
chapter for more information.
for more information.
Navigation.
ARTURIA – STORM MUSIC STUDIO 3.0 – USER'S MANUAL 27
Page 28
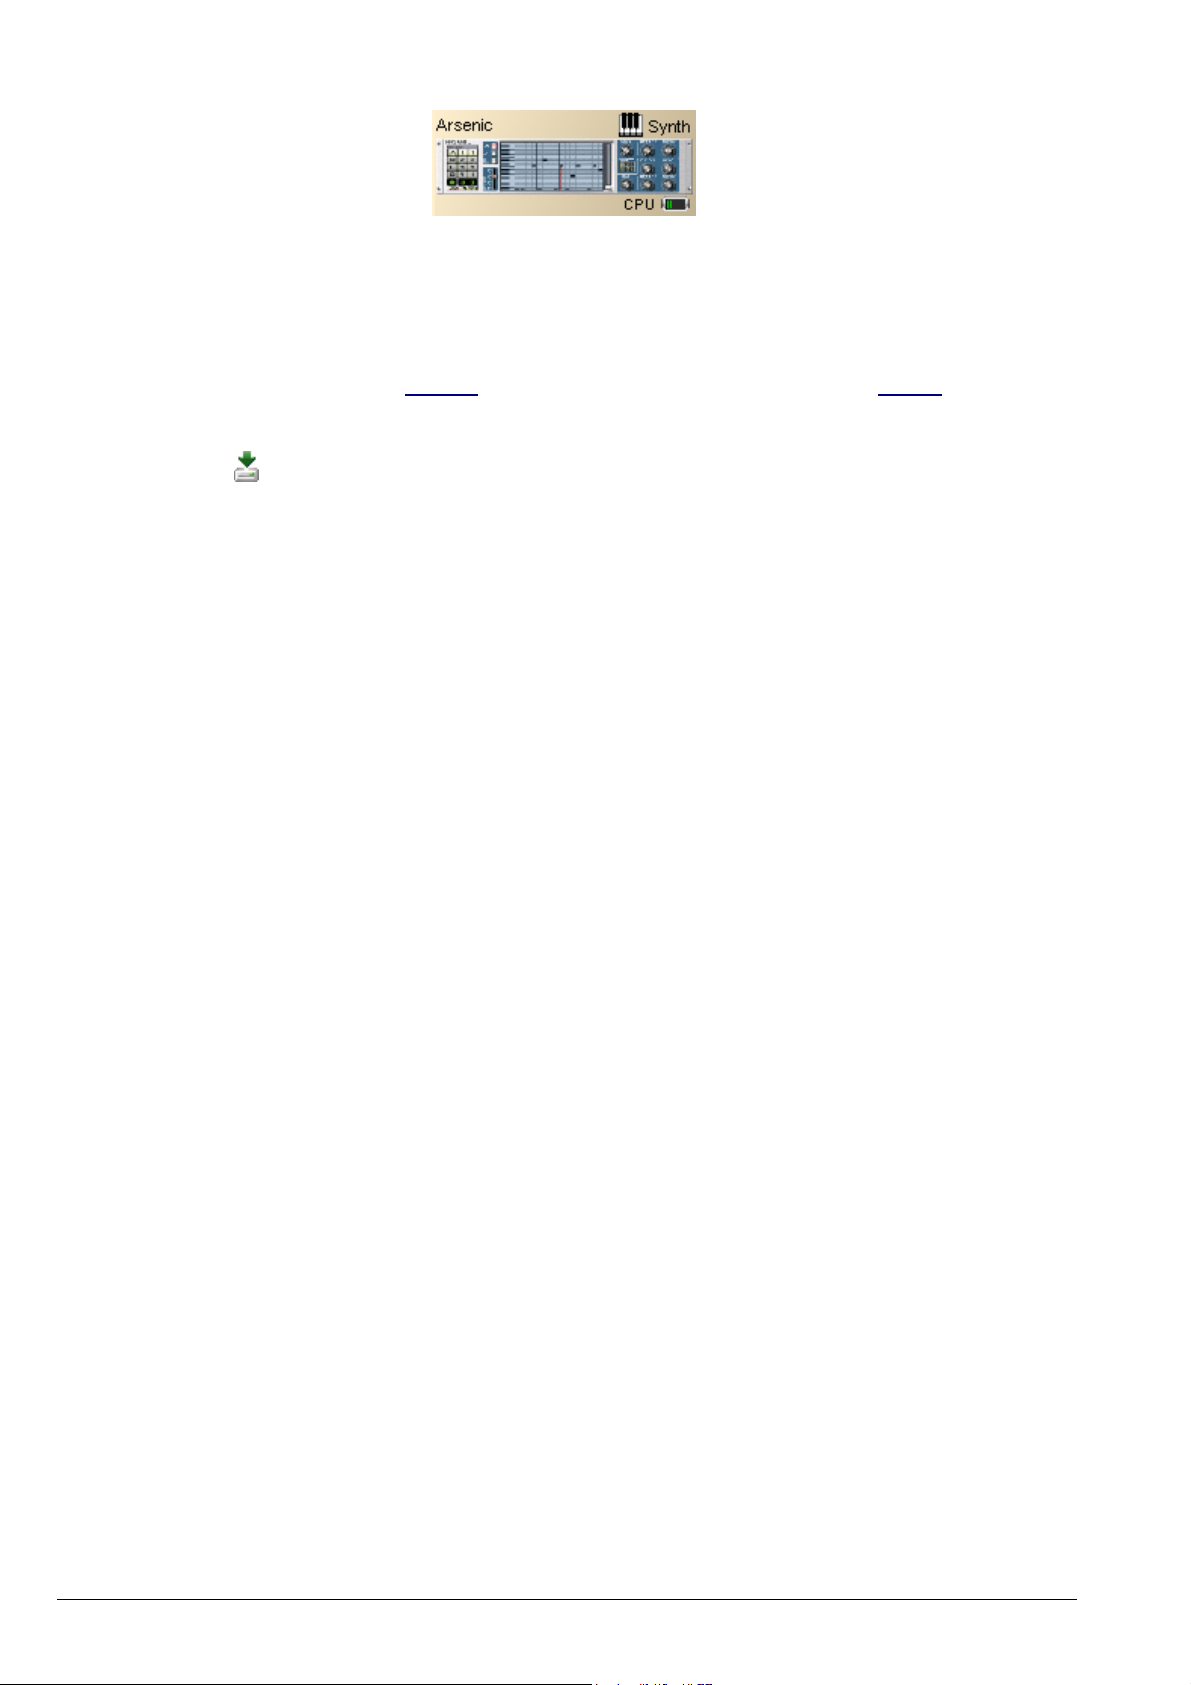
Instruments and effects (what we call “modules”) are presented in the following form:
A typical module, Arsenic.
• The top left, the module name.
• The top right, the type of module (for example Synthesizer, Drum Machine or Effect).
• The bottom right, a small display called CPU. This represents an estimation of the power required for this
module. You can thus see that Orpheus
is much more demanding on resources than Arsenic.
To use a module in your song, you must insert it into the rack. For this, drag and drop it to the desired location,
or click on the icon
.
Note that you can hide the Explorer by selecting the menu: View > Explorer > Hide.
ARTURIA – STORM MUSIC STUDIO 3.0 – USER'S MANUAL 28
Page 29
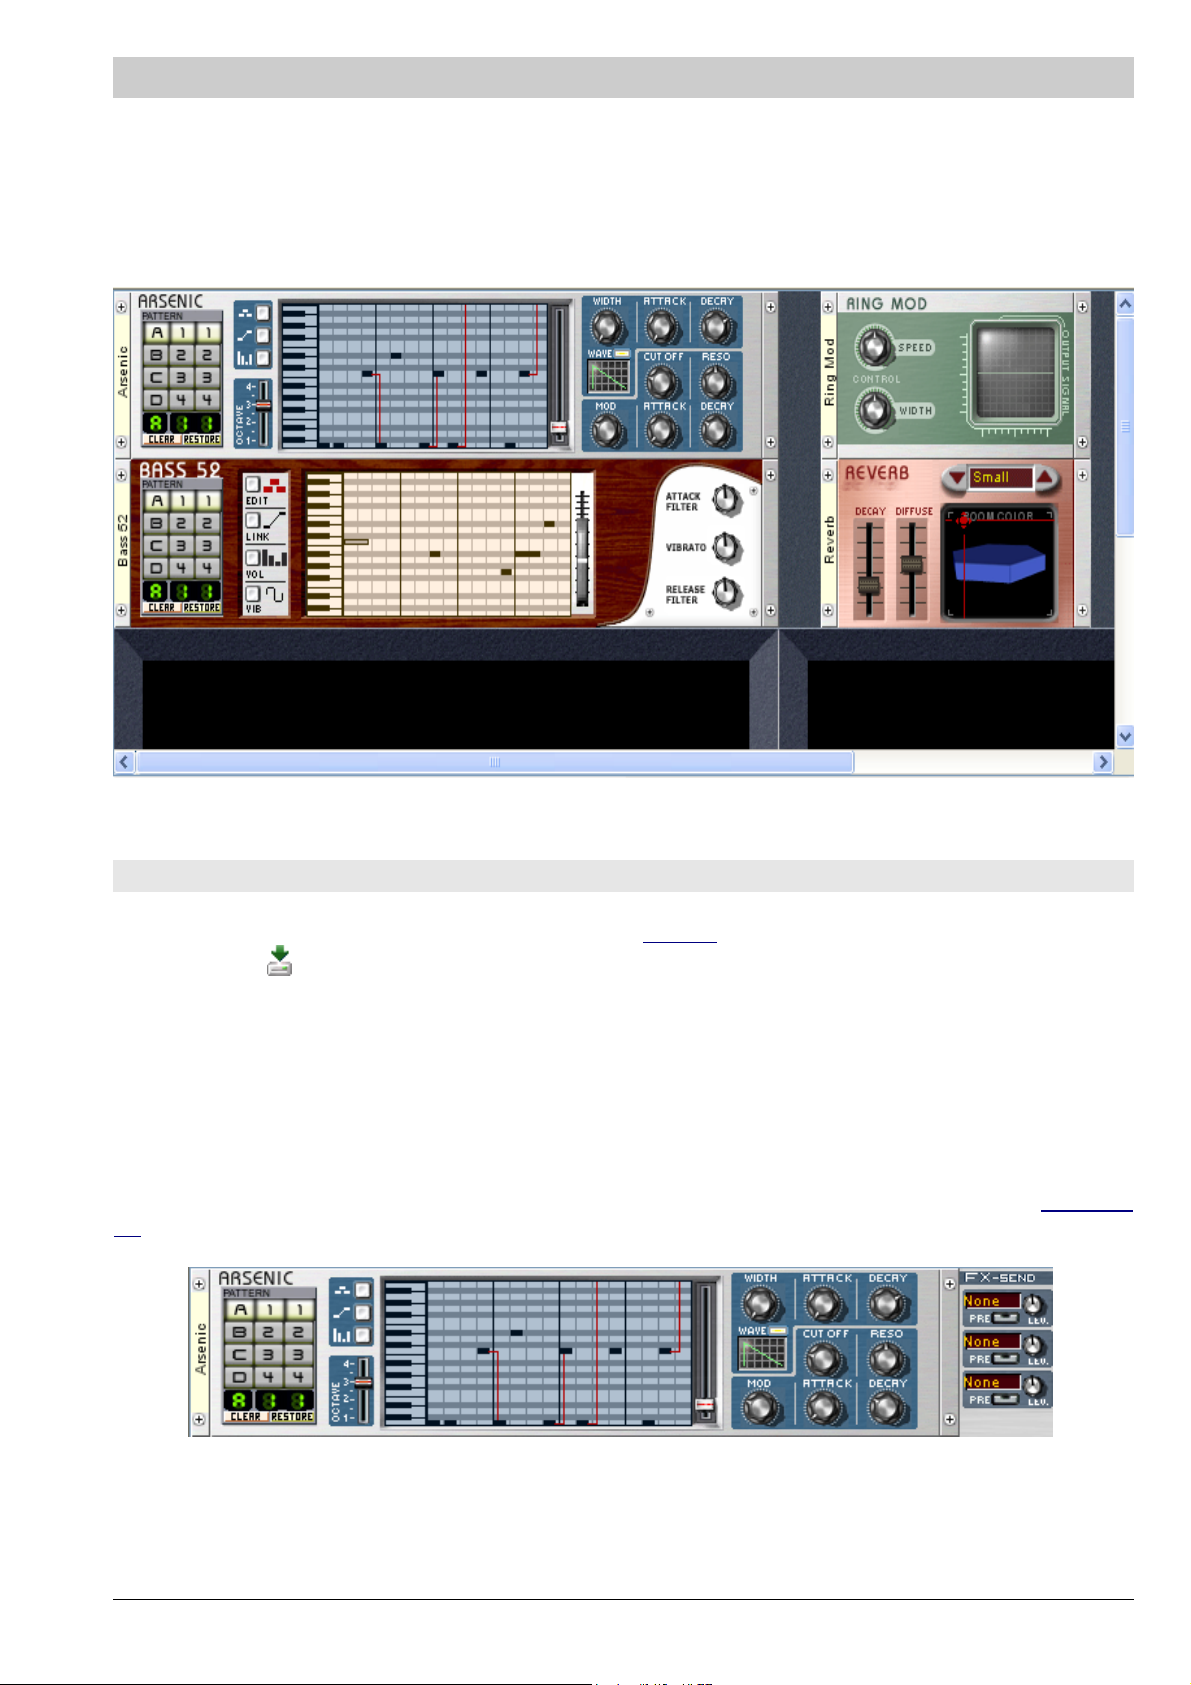
THE RACK
The Rack allows you to stock instruments and effects that you are going to use in your song, just like a rack in
the real world. The main difference is that there is no limit aside from the power of your computer, to the number of effects and instruments that you can use !
The Rack
To add a module to the rack, just drag and drop from the Explorer. You can also select a module in the Explorer
and click on the
and drop.
To remove a module present on the Rack, perform a right-click (control-click for Macintosh) on it and select Re-
move module. If you have no space left to add more modules, right click anywhere on the Rack and select Add a
line or Add a column. If your Rack is too big to see its entirety on the screen, you can move using the scroll bar
or the Minirack (see following section).
You can see the effect send controls by selecting the menu: View > Rack > Effect controls. This will make an effect settings section appear on the right of each module, identical to the one described in the chapter Mixing Ta
ble. You can use either use this one or the section of the mixing table to the same ends.
button. It is thus possible to place the modules where you want on the Rack simply by drag
-
The effects section, identical
to that of the mixing table.
ARTURIA – STORM MUSIC STUDIO 3.0 – USER'S MANUAL 29
Page 30
The Minirack
The Minirack gives you an
overview of your Rack.
The Minirack gives you an overview of your Rack. All of the modules that you have installed in the rack will be
represented in a reduced scale.
It also contains a section showing the currently visible part of the Rack. You can drag this selection to quickly see
another part of the Rack.
Finally, if you connect a module to an effect, the link between the two will temporarily blink in the Minirack.
Visualization of effect sends.
If necessary you can hide the Minirack by clicking either on the arrow on the right (which will give more space to
the mixing table), or the arrow above (which will make the Explorer bigger).
Click on one of the arrows to hide the Minirack.
ARTURIA – STORM MUSIC STUDIO 3.0 – USER'S MANUAL 30
Page 31

THE MIXING TABLE
The mixing table is found at the bottom of the composition window. It controls the volume for each of the instruments and effects in your song as well as the overall volume. You also have a semi-parametric equalizer
available for each track.
The mixing table.
The mixing table is composed of three sections. By default, only the volume is visible, but two buttons on the
left allow access to the other sections. The
equalizers. The third button,
You can also hide it by clicking on the arrow pointing down above it.
These options are also available in the menu View > Mixing table.
opens the mixing table in an independent window.
Click on the arrow to hide the mixing table.
button opens the effect send section, while the opens the
It is also possible for you to change the order of the sections on the mixing table, simply drag them where you
want. This at the same time changes the track order on the sequencer.
ARTURIA – STORM MUSIC STUDIO 3.0 – USER'S MANUAL 31
Page 32

The volume section.
The volume section.
This section is composed of a section for each instrument and effect contained in your song. If there is not
enough space to display all of them, a scrolling bar appears below. Completely to the right you will see a section
called MASTER, which corresponds to the global volume of your song.
In each section we find
• At the bottom, the name of the instrument. You can rename it by double-clicking on it; this will also up-
date the name in the Rack.
The instrument name.
• Above, a fader which sets the instrument volume.
• On both sides of the fader, displays indicating the volume of left and right channels.
The fader and displays
• Above, a potentiometer sets the panoramic of your instrument; completely to the left it will only allow
sound from the left track past; fully to the right, only sound from the right; centered (the default position), the two tracks are represented equally.
Panoramic settings.
Tip
Try not to leave the panoramic centered for all of your instruments ! Your final mix will have more of a
“stereo” sound...
• Finally, the MUTE button lets you completely cut the volume from this track, while the SOLO button cuts
the volume for all of the other tracks to only hear this one.
ARTURIA – STORM MUSIC STUDIO 3.0 – USER'S MANUAL 32
Page 33

Setting effect sends
The effects section.
If you have used effect modules in your song, you can define here how to affect them to instruments or each other.
You can affect up to three effects to a mixing section. For this, click on one of the three effects selectors: a
menu appears, allowing you to choose one of the effects in your song.
Choose an effect.
Linking effects
You can also route effects to each other. Effects have their own mixing section so you can direct the
sound from an effect to another... Attention not to create loops!
On the right of this selector, a potentiometer allows you to define the level of effect sent. Completely to the
left, no sound is sent to the effect, and completely to the right, all of the sound is sent.
Set the level to be sent.
The
button determines if the sound is sent to the effect before passing through the volume section or not.
PRE
In other terms, if PRE is active, the instrument sound is sent to the effect without taking settings on the
volume section into account. Even if the instrument volume is set to zero, it will still be sent! This is very
useful if you want only the sound modified by the effect in your mix.
ARTURIA – STORM MUSIC STUDIO 3.0 – USER'S MANUAL 33
Page 34

The equalizer
The equalizer.
Finally, the equalizer section lets you influence the sound of your instruments. For this, you need to activate it
by clicking on the button
frequencies (in the LOW part), and the medium (in the MID part).
In each of these sections, the potentiometer at the middle signifies that the sound in this frequency range has
not been modified; to the right it is increased, and reduced to the left.
In the MID part you can also set the frequency upon which you wish to act. By turning this potentiometer to the
left you act only on the medium-basses, to the right on the medium-high.
. You can independently set the high frequencies (in the upper HIGH part), the low
Use the FREQ potentiometer to set the frequency
on which you wish to act.
ARTURIA – STORM MUSIC STUDIO 3.0 – USER'S MANUAL 34
Page 35

THE SEQUENCER
The Sequencer is the central nervous system for your song. It directs the instruments and effects, and allows you
to record the evolution of your song.
The Sequencer
The different elements of Storms sequencer
The Sequencer is made up of three main parts:
• the control bar is used to move within the song and act in a global manner on the sequencer settings.
• the position bar indicates your current position in the song.
• the instrument tracks represent the location where your pattern variations are recorded, instrument or
effect settings, etc.
the control bar
• Moves the cursor to the beginning of the song.
• Moves the cursor back by a group (or four bars).
• Moves the cursor forward by a group.
• Starts playback of the song from the current cursor position.
• Stops playback of the song.
• 1 click: stops the song, the cursor remains in its current position.
• 2 clicks: returns the cursor to the beginning of the loop (see below).
• 3 clicks: returns the cursor to the beginning of the song.
ARTURIA – STORM MUSIC STUDIO 3.0 – USER'S MANUAL 35
Page 36

• Triggers the recording mode. The recording will begin as soon as you click on . All of the parame-
ters that you change will be recorded on the sequencer tracks (change of instrument pattern, of parameters like the filter, the volume, etc.).
• The tempo indicator (number of beats per minute). You can modify the tempo by clicking
on one of the arrows on the indicator, or by double clicking and entering a new value on the keyboard.
• Cursor position (in minutes:seconds). You can modify this position by double clicking on the
indicator and entering a new value.
• Cursor position (in groups:bars). You can modify this position by double clicking on the indica-
tor and entering a new value on the keyboard.
• Loop indicator. The sequencer goes to “loop” mode when this button is active.
• The color indicator. When we record manipulations, the bars covered by the cursor change col-
or. This makes it easier to find bars already recorded. This button will let you choose several colors so as
to be able to class your different recordings by color. For this, just click on the button, and the recording
color is automatically modified.
• Shuffle. Changes the rhythmic groove and delays the off beat rhythm on all mod-
ules. The more we drag the cursor to the right, the more the off beat rhythms are shifted.
the position bar
By clicking and moving in the upper zone, you can define a loop. If the
button on the control bar is active, Storm will return to the beginning of this loop as soon as it reaches the end. This will allow you for example
to repeatedly listen to a part of your song so as to fine tune it.
play a part of your song in a loop
By clicking on one of the extremities of the loop, you can make it bigger or smaller. By clicking on the outside of
the loop you can create another.
In the lower part of the position bar we find the positions expressed in groups and bars. The orange bars mark
the groups while the small gray bars mark the bars. A group is an ensemble of four bars, while a bar is (by default) and ensemble of four beats.
Position of the playback cursor in the song
The large vertical bar represents the position of the cursor: it is the location in the song currently being played.
You can click anywhere on the position bar to move this cursor.
ARTURIA – STORM MUSIC STUDIO 3.0 – USER'S MANUAL 36
Page 37

The tracks
the instrument tracks represent the location where your pattern changes are recorded
You have one track for each instrument present in your Rack, one track for Kepler, and one master track. If you
cannot see all of the tracks at the same time, a scroll bar will appear on their right. Underneath this scroll bar
you will find four small magnifying glass symbols.
Zoom on the tracks
By clicking on the (+) magnifying glasses you zoom the display (either horizontally or vertically), and vice-versa
with the (-) magnifying glasses. If you zoom vertically enough, above the names of each of the tracks you will
find controls like those present on the mixing table. You can thus change the volume or the panoramic for a
track, or use the Mute and Solo functions of the mixing table directly from the sequencer track for an instru-
ment.
Reminder of mixing table functions
You will also find (although only on instrument tracks) a MIDI button and a scrolling list letting you choose the
MIDI channel which controls this instrument. When the track is selected, the MIDI button becomes red, which signifies that this track can be controlled with a MIDI keyboard.
Assign a MIDI channel
The pattern indicators: When you are in Recording mode, the sequencer automatically records all of your pattern
changes, which are indicated at the start of each bar by a small white rectangle containing the pattern number.
ARTURIA – STORM MUSIC STUDIO 3.0 – USER'S MANUAL 37
Page 38

The pattern indicators
You can act on the tracks themselves with the contextual menu that appears with a right click (control-click for
Macintosh) at the desired location. These actions always apply to at least a full bar for an instrument. If you wish
to apply them to a larger selection, you can select the desired zone by clicking and dragging your mouse.
The actions available are as follows:
• Mute/Unmute: This function mutes the bars selected on the sequencer. The selected bars will be marked
with a cross to signify that the mute is active. The instruments will automatically be muted on the selected bars when the song is played back. You can cancel this by reselecting Mute/Unmute on the muted
bars.
• Set bar tempo: This menu lets you change the tempo of the selected bars.
• Set bar length: Here you can change the length of the bars selected on the sequencer (the unit being the
semiquaver).
• Set bar color: Here you can change the color of the bars selected on the sequencer during a recording.
You can in the same manner use the button situated on the control bar, before a recording.
• Edit: Opens the Piano Roll on the selected bar.
• Copy / Cut / Paste: These three options let you copy / cut and paste a selection on the sequencer. It is
also possible to access these functions with the keyboard shortcuts Ctrl+C / X or V or via the Edit menu.
• Create a MIDI sequence: Creates an empty MIDI sequence in the selected bars. You can then record MIDI
events inside (what you play on the keyboard for example).
• Convert to MIDI: Convert the selected bars to a MIDI sequence. If the bars contain patterns, the pattern
notes are also converted to MIDI notes.
• Record in Static mode: see the chapter Static mode composition.
• Make an audio recording: This function lets you make an audio recording of what is selected on the se-
quencer. See the chapter Audio export
.
ARTURIA – STORM MUSIC STUDIO 3.0 – USER'S MANUAL 38
Page 39

KEPLER
The Kepler module
Kepler is one of the most original modules in Storm: it's function is to manage the harmony of a song.
To access Kepler, you can either click on the
To ensure the harmony of a song, all of the modules must function according to the same tone. Kepler allows you
to define this tone, and even program a sequence of tones.
icon in the toolbar, or select the menu View> Kepler.
The Kepler module.
How does Kepler work?
There are two concentric circles which are made up of spheres. Each sphere represents a tone: on the inner circle the tones are minor, on the outer circle the tones are major. This is what we call a cycle of fifths: each of
the spheres is one fifth from the one that follows (following the hands of a clock).
The tones are presented in the Anglo-German nomenclature, which today is the most widely used.
French system DO RE MI FA SOL LA SI Major Minor
Anglo-German system C D E F G A B M m
On the right of the two circles, two columns each containing eight boxes are visible. The first column shows the
sequence of tones.
Thus, the first box at the top of the column shows the dominant tone of the sound modules at the beginning of
the group. The next box shows the dominant tone in the middle of the first bar. The third box shows the tone of
the beginning of bar 2.
Tone of the piece at the be-
Two columns located on the right of the circles
show the sequencing of tones.
ginning of the first bar
Tone of the piece at the mid-
dle of the first bar
Tone of the piece at the be-
ginning of the second bar
ARTURIA – STORM MUSIC STUDIO 3.0 – USER'S MANUAL 39
Page 40

The tone sequence is therefore created every half bar, and stays visible for each group in the first column of the
Kepler module.
The second column allows the transposition of the tone to a higher octave. By clicking in one of the boxes, it
lights up in red indicating that the transposition has is active.
Selection of the tones is done by using the concentric circles. By clicking on one of the spheres in the circle, select a tone corresponding to that sphere from one of the boxes in the column on the right.
In this column, you should see a red border and a yellow border surrounding a box. A red border surrounding a
box means that you can change the tone. A yellow border surrounds the box corresponding to the bar or half bar
where the cursor is on the sequencer.
The Kepler module allows you to create modulations that will enrich your compositions.
Kepler can be applied to most instruments in Storm, (aside from drum machines, which are not melodic, EZ
Track, Scratch and the ReWire instruments). If you are using H3Oplus, a slight manipulation may be necessary.
Kepler needs to know the tone of the samples used in order to be able to transpose them, see the chapter Using
samples to learn how to define the tone of a sample.
In any case, you can deactivate Kepler's influence on the synthesizers. This can be done for each independent
synthesizer module. You will find the Kepler Connection function in the contextual menu of each synthesizer,
accessible with a right click (PC) or Control + click (Mac) on the synthesizer.
-
ARTURIA – STORM MUSIC STUDIO 3.0 – USER'S MANUAL 40
Page 41

STATIC MODE COMPOSITION
What is static mode composition?
Static mode (also called “step by step” mode) allows you to record a series of manipulations which would prove
difficult in real-time. For example, a quick succession of pattern changes, instantaneous variations to the volume, a radical change to the cut off... With static mode, you can program all of these movements directly from
the sequencer in the stop position. Whether at the beginning or in the middle of a composition (it is of course
possible to alternate between real-time recording and static mode during the progression of your song).
How to record in static mode ?
• The first step is to select the static recording mode. You can do this either by selecting the menu option
Studio > Record in Static mode, or by clicking on the grid of the sequencer with the right mouse button
(Control + click for Mac), and selecting Record in Static mode.
The Record in Static Mode dialog then appears. A red flashing label and STOP button also appear on the
extremity of the transport bar.
The Record in Static Mode dialog.
Note
The
• Once this is done, select the area on the sequencer corresponding to the instrument and the bars that
you wish to edit. A red outline will surround this zone.
button on the transport bar will be deactivated during the static mode session.
A red outline will surround the selected bars.
ARTURIA – STORM MUSIC STUDIO 3.0 – USER'S MANUAL 41
Page 42

• You can now calmly program the changes to the pattern or parameter corresponding to the instrument
selected on the sequencer (or a volume change or an effects parameter if it is an effect track). A red
flash coloring this section indicates that the recording has taken effect. This parameter change will last
for the duration of the selection.
• Next, select another section of the sequencer, and enter another parameter value or another pattern
number, in the same manner as above. It is of course possible to listen in real-time to the changes you
make !
• Once the static mode session is finished, click on Studio > End Static recording or close the text box
Static record mode which is found to the right of the composition window to return to normal mode.
ARTURIA – STORM MUSIC STUDIO 3.0 – USER'S MANUAL 42
Page 43

USING SAMPLES
Storm lets you use samples in WAV, AIFF or MP3 formats in your songs. The samples can be used, adapted, and
modified in diverse manners with the modules H3Oplus
ples in a general manner in Storm: importing, exporting, settings.
Using samples in a song
The sample library is the place where the sound samples are stored in the program. It contains:
• all of the samples supplied with the software
• what you yourself have imported to the studio
• what you have recorded in the studio with the recorder
, EZtrack and Scratch. This chapter deals with using sam-
The sample library can be accessed via the sample bank tab of the Explorer
notice that the sample library is in the Navigation tab of the Hall.
. If you are using the Hall, you will
The sample bank tab.
Including a sample in your song.
Among the accessible folders in the sample library, one of them is called Current song (this folder will take the
name of your song if it has already been saved). This library contains a list of samples being used in your song.
Sample banks
The Installed Sample Kits folder contains several folders of samples classed by style and by instrument which are
part of the Storm installation. To use these samples, simply open one of the folders (by double-clicking), select
one of the samples, and drag-and-drop it onto one of the sample modules of your studio (H3Oplus grid, Scratch
table, EZtrack editing zone).
ARTURIA – STORM MUSIC STUDIO 3.0 – USER'S MANUAL 43
Page 44

Samples outside of Storm
In the same manner you can use a WAV, AIFF, or MP3 format file on your hard drive. For this, you just need to
find the file with the Windows Explorer on PC or the Finder on Mac, and to copy it by drag-and-drop on one of
the sample modules of your studio. Once it has been dropped on the module, a reference to the sample will appear in the Current song folder. This gives you quick access to external samples used in your song, and to modify
their properties or delete them from the song.
Equally, you can do it in two steps: import the sample with the menu option Studio > Import a sample.... The
sample is then referenced in the Current song folder. You can now select it in this folder and drag-and-drop onto
one of the sample modules in your studio.
Saving the samples used in a Storm song.
When a song is saved, the program also saves all of the samples that have been used in the same file. You can
find more information on this subject in the chapter Loading-Saving
Exporting samples.
.
Proceed like the exportation of recorded sequences, described in the chapter Audio export
.
Listening to or deleting a sample
It is possible to preview a sample before using it in an instrument like H3Oplus or Scratch. To do this, right click
(Control + click for Mac) on the sample and select the Listen option in the menu, or click on the icon
can interrupt the playback by right clicking on the sample for a second time and selecting the option Stop.
To delete a sample from the library :
• Open the sample library
• Select the sample that you wish to delete by clicking with the right mouse button (Ctrl + click for Macin-
tosh)
• Next click on Delete.
. You
ARTURIA – STORM MUSIC STUDIO 3.0 – USER'S MANUAL 44
Page 45

The sample properties window
This pop-up window displays available information on a sample.
The sample properties window.
How to open it?
Just apply a right click on the sample and select Properties in the contextual menu.
What does it consist of?
• Name: the sample name
• Listen: click to have a preview of the sample
• Sample rate: The recording frequency in Hertz (for example, 44100 Hz)
• Resolution: the internal precision of the recording (i.e. 16 bits)
• Channels: the number of audio channels (1 Mono, 2 Stereo)
• Tempo: the tempo of the sample
• Steps: size of the sample in semi-quavers, or steps (16 semi-quavers represent one bar of 4 beats)
• Key: the key of the sample (click on the arrow to choose the note defining the sample key)
• Deactivate Time Stretching: if the option is selected, the sample will be played with its original tempo
in H3O+ and will not be adjusted to match the studio tempo
• Deactivate Time Stretching: if the option is selected, the sample will be played with its original tempo
in H3O+ and will not be adjusted to match the studio tempo
• Fine tune: fine tuning of the sample
• Gain: Sets the volume level of the sample
ARTURIA – STORM MUSIC STUDIO 3.0 – USER'S MANUAL 45
Page 46

ARTURIA – STORM MUSIC STUDIO 3.0 – USER'S MANUAL 46
Page 47

LOADING-SAVING
What is a .stm song?
In Storm, the word song has a particular meaning. It represents a series of manipulations.
When you work in Storm, changing a pattern, moving a controller or modifying the position of a slider are the actions which will bring about audible changes.
However, it is not possible to write a score that would take into account all of these modifications. Nevertheless,
they can be stored in a .stm file. This file represents the score.
This .stm file is the saved configuration of the studio and the series of operations performed in that studio.
The sequencer at the top of the screen gives a representation of the .stm file and gives, as we have seen, several editing options.
What is the point in saving all of the manipulations and not just the sound ?
The goal is to later reopen a song, to rework it or to extract a motif for another composition.
It also allows us to stock much smaller files than classic audio files (WAV, AIFF or MP3).
Does a song simply keep a trace of operations performed ?
As we will see at the end of this chapter, not only does Storm create a synthesis of sound, it also offers the opportunity to work on existing samples. These samples are part of the software database but they can also be imported into the software using the sample library
song.
To summarize, a Storm file saves:
the studio configuration + the manipulations made during the song + the samples used in the song.
. When saved, the .stm file also contains samples present in the
Saving a song
When the composition is finished, you may want to give it a name and store it on the hard drive, on a diskette or
on another suitable device. To do this:
• select the menu option File > Save as...
• Storm will request different information about your song (Title, Style, Author...). All of this information
is optional, but could be useful to other Storm users if you send them your song.
ARTURIA – STORM MUSIC STUDIO 3.0 – USER'S MANUAL 47
Page 48

The song information window.
• next click on OK; in the following window select where and under which name you want to save and click
Save.
The song is now saved in Storm format (.stm file extension).
To save this song under a different name, select the option File > Save as..., confirm the name and click on
Save.
You can directly access the save by clicking on the
If your song uses samples (with the modules H3Oplus
the first save of your song:
When saving, select your options concerning the samples in the song
• Include the samples in the Storm format
• If you choose not to include your samples in the Storm format, the saved file will be much small-
er, as it will only memorize the location of the audio samples used on your hard drive. When you
reload the song, Storm will expect to find the samples at the same location. If you move the samples in the mean time, Storm will try to help you find them so as to reconstitute the entire song.
• If you choose to include the samples in the Storm format, the audio files used in your song will be
fully saved in the STM file, and you will have no trouble opening the song even if the samples
have been moved or deleted in the mean time. In this case, the STM file will be much bigger.
This type of saving is especially useful when you have finished the song and want to save it
definitively, send it to other users or load it onto another computer.
icon .
, EZtrack et Scratch), Storm will offer several options upon
ARTURIA – STORM MUSIC STUDIO 3.0 – USER'S MANUAL 48
Page 49

• Compress the samples
In the case where you include the samples, if you choose to compress the samples in the Storm format,
the audio files archived in the .stm format will be automatically compressed. This allows us to reduce
the size of the STM file by around 10, but of course the quality of the samples will be slightly lowered.
Loading a song
• In the menu bar, select File > Open. Browse your hard drive and indicate where your compositions are
stocked.
• Next click on the name of the song that you wish to load.
• And click on Open.
You can go directly to the File > Open menu by clicking on the
icon.
If Storm has not been launched, it is also possible to load a song by double-clicking on the .stm file on your computer or even directly on a Web site.
When loading your song it is possible that Storm will return the following error message:
Sample cannot be found.
This means that the song loaded had not included the samples in the STM file (see previous paragraph), and that
some of the samples used cannot be found. These samples have probably been moved, renamed, or deleted from
the hard drive since you last saved.
If you know where to find the file or the new name, you can indicate the location to Storm by clicking on each
sample and on the Select the file in... option.
• If the samples have just been moved and you know their new location, you can indicate the new folder to
Storm by clicking on the Search for all of the files in... option. Storm will look for the samples of the
same name in the folder and subfolders.
• Finally, if you don't know where to find the missing files, you can choose the option Ignore the problem.
In this case, the song will surely be incomplete as it will be missing samples, but you can still read it, and
save it again without loosing the references of the missing samples that you can look for at a later stage.
ARTURIA – STORM MUSIC STUDIO 3.0 – USER'S MANUAL 49
Page 50

ARTURIA – STORM MUSIC STUDIO 3.0 – USER'S MANUAL 50
Page 51

AUDIO EXPORT
Saving a song in the Storm (.stm) format allows us to later load a song and continue to work on it in the studio.
This format cannot be read by other software. On the other hand it is possible to export a complete song, or an
extract from this song in the WAV or AIFF audio standards: these formats can be read by most digital-audio applications, notably by multimedia players and by programs for burning audio CD's on both PC and Macintosh.
Storm offers 2 main choices for the audio export format:
• Use of the recorder, which is useful for short extracts and separate instruments and the audio export of
the full song. The samples recorded can be directly reused on the sample modules in Storm.
• The audio export of the full song.
Using the recorder
Click on the icon in the icon bar situated on the top of the screen or go to View > Recorder. The recorder
will open.
• On the two controllers select the starting point and ending for the recording.
• Select the outputs that you wish to record. You can then record as many samples as you want at the
same time.
The first tracks correspond to the instruments installed in the rack without their respective effect sends.
This signifies that you are recording these modules without effects. The last track corresponds to the
master record, which is to say all of the modules (except those muted on the mixing table) including
their volume control and the effect returns.
• Click on the Record button, the recording will automatically begin.
After recording, the tapes corresponding to the tracks recorded on the recorder will appear in the sample library
in Current song folder (this folder will take the name of the song if that song has already been saved).
ARTURIA – STORM MUSIC STUDIO 3.0 – USER'S MANUAL 51
Page 52

After recording tapes represent
recorded sequences.
Using and exporting saved sequences
The recorded sequences can be used in different manners: within the program or outside.
Using sequences recorded internally
The recorded sequences will appear in the form of tapes in the Current song folder in the sample library.
the tapes can be moved by drag and drop to instruments using samples (for example the sample sequencer H3O
plus or the scratch module).
Exportation of recorded sequences
To export for use in an external program (for example audio treatment or CD burning):
• Select the tape that you wish to export by clicking on it with the right mouse button (Ctrl + click for Mac-
intosh)
• Click Export
• Choose the exportation format
• a browser will appear to ask you where you wish to export the sample to. Choose a folder and enter the
name you wish to use. When you click on OK, the sample will be saved to your hard drive at the selected
location.
-
ARTURIA – STORM MUSIC STUDIO 3.0 – USER'S MANUAL 52
Page 53

Audio exportation
To export a finished song, click on the menu File > Audio Export.
• Choose the exportation format (Wave 16/24 bits or Aiff 16/24 bits)
• A browser will appear and prompt you to specify a destination for the file.
• Choose a location and name the file you wish to create.
• The exportation will start and a progression bar will indicate the exportation speed and the time remain-
ing.
Click on export and choose the format for exportation.
ARTURIA – STORM MUSIC STUDIO 3.0 – USER'S MANUAL 53
Page 54

ARTURIA – STORM MUSIC STUDIO 3.0 – USER'S MANUAL 54
Page 55

MIDI CONTROL AND SYNCHRONIZATION
MIDI control of potentiometers
If you have a MIDI keyboard or controller surface, it is possible to associate these physical controllers to Storm
potentiometers.
The method for this is simple:
• The first step is to make sure the MIDI device is connected to your computer.
• Also check that you have correctly selected a MIDI input device in the Storm preferences (Settings > Au-
dio & MIDI menu).
• On the Storm sequencer, select the instrument track which is to receive MIDI control. For more informa-
tion on assigning a MIDI channel to an instrument or forcing MIDI reception to it, go to the chapter on the
Sequencer
Once these verifications have been made:
• Place the mouse on the Storm potentiometer that you wish to physically control.
• Hold down the Ctrl key while clicking on the potentiometer.
• The selected potentiometer is highlighted and a window will open displaying the state of the MIDI con-
trol:
.
• Check box On: check this box if you wish to activate MIDI control for the potentiometer.
• Control number indicator: select the MIDI control number that you wish to assign to this poten-
tiometer (from 0 to 119).
• Learn button: this is another manner to assign MIDI parameters to a potentiometer. Click on
Learn, Storm will now wait until you have manipulated the physical controller that you wish to
assign to the potentiometer selected in Storm. The MIDI control number detected will be indicated upon reception of MIDI messages of the “Control Change” type.
1.
The mouse is placed on the controller you
wish to manipulate physically.
3.
A MIDI control window opens under the se-
lected controller.
2.
4.
Assign the MIDI parameters or use the As-
sign function.
ARTURIA – STORM MUSIC STUDIO 3.0 – USER'S MANUAL 55
Page 56

As long as you keep this control window open, you can set as many potentiometers as you like, one after the other. To do this, click on a potentiometer, configure it with the Control number for this potentiometer (or use the
Learn function), select another and begin the same operation. When you are finished, close the MIDI control window.
Throughout this operation, the selected potentiometers positions are blocked: you can therefore assign MIDI controllers without worrying about loosing your potentiometer settings.
Piloting instruments through MIDI
It is possible to play Storm instruments with a physical MIDI keyboard. Just select the channel number on the top
of the track corresponding to this instrument in the Storm sequencer. The simplest method is to choose Omni
(reception on all channels), and to select the track by clicking on it. The sound of the selected instrument will
immediately be available on the keyboard (attention, make sure that the MIDI input device is correctly selected
in the Audio and MIDI preferences of Storm).
You can record what you are playing as a MIDI sequence. For this, select a group of bars on the track corresponding to the instrument chosen in the Storm sequencer. Right click (control + click for Macintosh) on the selection
and choose the option Create a MIDI sequence in the contextual menu. When the MIDI sequence is created,
place the playback head in front of the sequence and click on the record button on the Control bar. Now click on
Play and start to play on the keyboard: everything that you play will be recorded in the MIDI sequence.
For the drum machines, each instrument of the drum machine will have its own space on the MIDI keyboard (for
more information see introduction to drum machines chapter
).
MIDI Synchronization
You can synchronize Storm with hardware or software through the MIDI protocol.
to configure the synchronization, click on the Settings > MIDI Sync menu.
Then a window opens asking you to indicate whether Storm should be the master of the second device, i.e., the
user controls both devices from Storm - or the slave - and Storm is directed by the other device.
Also, two MIDI devices can have a different latency when started. This will bring about an audible delay between
the two devices. To allow the synchronization despite this, the Latency setting will compensate for this delay so
as to obtain a perfect synchronization.
The Synchronization window
ARTURIA – STORM MUSIC STUDIO 3.0 – USER'S MANUAL 56
Page 57

IMPORTING MIDI FILES
Storm 3.0 can import MIDI files (extension “.mid”). The very common MIDI file format is a standard format for
stocking musical partitions. A MIDI file generally defines a group of tracks (MIDI sequences) which must be played
simultaneously by different instruments. A full song including rhythms, basses, accompaniments and melodies
can be stocked inside a single and very compact MIDI file. A MIDI file never has any audio information (no audio
recordings, in other words no samples). It simply defines the notes which must be played, the type of instrument
which is to interpret them (trumpet, piano, synth, etc.), as well as the different parameters for interpretation:
volume, modulations, etc. Thankfully, Storm 3.0 also offers the GMSynth
ment capable of producing all of the sounds defined by the general MIDI norm with very high audio quality. All
MIDI files are done justice with Storm 3.0.
Opening a MIDI file
You can import a MIDI file at any moment:
• either after having created a new empty studio: in this case after importation, a certain number of GM-
Synth instruments will be created on your rack, this, depending on the number of instruments contained
in the MIDI file. You can then add your own instruments and effects to complete the song or do a remix.
• or if you are already working on a song with several instruments and effects on the rack. In this case, the
importation of the MIDI file will have as effect the addition of a certain number of GMSynth instances in
the rack without affecting the other instruments which are already present. The work already done on
the current song will not be lost, but certain general settings may be changed by the importation: new
tempo changes any appear in the sequencer, and the automation of the master section of the mixing table can also be changed.
module, which is a generalist instru-
In the two cases, to import a MIDI file, go to the Storm File menu and choose Import a MIDI file. In the file selection dialog that appears, choose the MIDI file to be imported.
Working on the imported song
Once the MIDI file has been imported, you can see that all of the GMSynth instances created are in the “MIDI sequence” mode, which means that the patterns are inactive. On each sequencer track corresponding to a GMSynth, a MIDI sequence has been inserted and replaces the patterns. You can edit the MIDI sequences at your convenience with the piano roll to modify the imported song. You can also add effects, or instruments, and program
them using patterns or creating new MIDI sequences on the global Storm sequencer.
Each instance of GMSynth receives a MIDI sequence replacing the patterns
ARTURIA – STORM MUSIC STUDIO 3.0 – USER'S MANUAL 57
Page 58

ARTURIA – STORM MUSIC STUDIO 3.0 – USER'S MANUAL 58
Page 59

THE PIANO ROLL
The Piano Roll allows advanced editing of MIDI sequences and melodic patterns. It can also edit the continuous
controls recorded in the song (like the volume and pan for example).
The Piano Roll can be accessed through the View > Piano Roll menu or by clicking on the corresponding icon on
the toolbar:
quencer, or through a right click on an instrument to select the pattern, the MIDI sequence, or continuous control
to edit.
Depending on the function edited (melodic pattern, rhythmic pattern, MIDI sequence, continuous control), the
Piano Roll presents up to three different editing zones:
• The melodic editing zone (in the case of a melodic pattern or MIDI sequence). This zone is also active for
the edition of a rhythmic pattern, but the presentation differs slightly:
. It can also be opened with a double click on a pattern visualization or a MIDI sequence in the Se-
The melodic editing zone.
• The velocity editing zone, which is generally active simultaneously with the melodic editing. This zone
sets the velocity for each note of a melodic or rhythmic grid:
Velocity editing zone
• The continuous control editing: this zone is available either in the case of the direct editing of a continu-
ous control (volume, panoramic, cut-off, etc.) which is done for the entire duration of the song, or in the
case of the edition of a rhythmic pattern (Meteor, Hork, etc.) as in this case the Pitch and Decay controls
are part of the edited pattern:
ARTURIA – STORM MUSIC STUDIO 3.0 – USER'S MANUAL 59
Page 60

The editing zone for a continuous control
Piano Roll toolbar
The Piano Roll toolbar contains a certain number of tools which will be useful for the editing of your patterns,
sequences or continuous controls:
The Piano Roll toolbar
The buttons on the left select the editing tool:
- Drawing tool
- Eraser tool
- Selection tool
These three tools function in the same manner in the editing of a continuous controller: the drawing tool allows
you to draw a curve that the edited continuous controller will follow, the eraser tool allows us to remove a part
of this curve, and the selection tool allows us to select a portion of a curve (to copy it to another location for example).
The fourth button on the toolbar is to show or hide the velocity edition zone (in the case of the edition of a
melodic or rhythmic sequence) :
The following choice called Resolution is to select the resolution wanted for the edit. The resolution defines the
detail of the editing, which is to say the division of the bar into sub-divisions called steps. This parameter cannot
be modified when dealing with the edition of a simple pattern. The patterns in Storm are generally 16 steps per
bar. On the other hand, this parameter can be modified for a MIDI sequence, which allows the use of an editing
detail superior to the semiquaver.
: this tool is used to insert notes, and modify their length and height.
: this tool removes notes.
: this tool draws a rectangle to select a group of notes.
.
The “previous”
They also give access to the pattern or sequence history through a click on the
The two following buttons contain the name of the instrument being edited, and the name of the pattern/MIDI
sequence/continuous controller being edited. We can easily select a new element to edit in another instrument
with the first button, or another element in the same instrument by clicking on the second button.
ARTURIA – STORM MUSIC STUDIO 3.0 – USER'S MANUAL 60
and “next” buttons allow us to easily return to a pattern or sequence already edited.
button.
Page 61

Click on one of the buttons to edit an element
Melodic editing of a pattern or MIDI sequence
The melodic editing zone of the Piano Roll lets us visualize and modify the sequence of notes recorded in a
melodic pattern or MIDI sequence. The vertical scale represents the height of the notes, with the keyboard on
the left giving the pitch reference. The horizontal scale represents the time, in bars and sub-divisions, depending
on the graduations displayed in the upper part.
The range of the editing zone (number of available octaves) depends directly on the type of pattern or sequence
edited. For a bass pattern (Arsenic, Bass52), the range will typically be 3 octaves, while for a MIDI sequence or
an Orpheus pattern, the range will be of 128 notes or 12 octaves and one half. The number of bars edited depends on the pattern (Arsenic : 1 bar, Orpheus: from 1 to 8 bars), or the length of the MIDI sequence edited.
The melodic editing zone responds differently for mouse actions depending on the tool selected (in the toolbar) :
Drawing tool
With the drawing tool, a click on the melodic grid adds a note. This note can then be dragged with the mouse
button held down and moving the cursor to the right. Thus, with a single click we can add a note and define the
length. Equally, if you move the mouse cursor up or down (all while moving towards the right), you will create a
new note each time you change graduation along the vertical scale of the tone height.
In this mode, you can also modify the length of an existing note. For this, move the mouse cursor to the extreme
right of a note. The cursor transforms into a double-ended arrow pointing left and right. If you now click and
move the mouse to the right or left (while holding the mouse button down), you will change the duration for the
note. Attention, in certain instrumental patterns, those on Arsenic for example, the note duration cannot be
modified.
It is also possible in this mode to change the height of a note. For this, move the mouse cursor to a note (but not
to the extreme right of the note which changes the length), the cursor takes the form of a double-ended arrow
pointing up and down. If you click at this time and move the mouse up or down (while holding the mouse button
down) you will change the height of the note.
Eraser tool
With the eraser tool, you can remove a note by clicking on it. You can also remove several notes but holding
down the mouse button and using the mouse like an eraser.
Selection tool
The selection tool is used to group the notes together, and apply changes to this group of notes in order to transpose them, change their duration, or move them. To select a group of notes, click on the selection tool in the
toolbar, then click on the grid and drag the mouse to make your selection (keeping the mouse button held
down). All of the notes within the rectangle will be selected. You can now add or remove notes in the selection
by clicking on it while holding the Shift key down. You can cancel the selection by clicking on the grid.
ARTURIA – STORM MUSIC STUDIO 3.0 – USER'S MANUAL 61
Page 62

When the notes have been selected in this manner, you can click on the extreme right of a note (mouse cursor
showing a double-ended arrow left-right) and move the mouse while keeping the button held to simultaneously
change the length of the selected notes. You can also click on one of the selected notes and move all of the selection to the melodic grid, to transpose or move it to another time (with the mouse button still held). By returning to the eraser tool, you can delete the selection with a single click on one of the participating notes.
The selection can equally be duplicated, to the same melodic sequence or another. For this, select Copy in the
Edit menu. Next click on the area of the melodic grid that you wand to copy your selection, and select Paste in
the Edit menu.
Editing the velocity
The velocity of a note represents it's intensity or force (or audio volume). The term comes from piano playing,
where the faster the finger hits the key, the heavier the impact of the hammer on the string, the louder and
brighter the sound. The velocity is generally detected by MIDI keyboards, and has become an essential form of
expression in playing a synthesizer keyboard. As a consequence, the editing of MIDI sequences or melodic patterns in Storm brings access to this setting for every recorded note.
The visualization and editing zone of the velocity can be found under the melodic editing zone. It can be hidden
or activated by clicking on the velocity
grid corresponds to a bar in the velocity editing zone. This bar by its height expresses the velocity associated to
each note. The higher the bar, the louder the note. Each velocity bar can be edited by placing the mouse cursor
on the superior part, clicking and holding the mouse button while moving up or down.
button in the Piano Roll toolbar. Each note on the melodic editing
Editing a continuous controller
All potentiometers and sliders in Storm which are used to set a value (volume, filter frequency, etc.) are here
called continuous controllers. Their variations can be recorded continually throughout the song, simply by setting
the setting the sequencer to record mode and manipulating the controllers in real time. The static recording
mode also allows you to set a fixed value for a continuous controller for a group of bars.
The Piano Roll allows the visualization and graphical editing continuous controller variation throughout the song.
It can easily help program a fade-out for example at the end of the song, to make the music “disappear” into silence: just progressively diminish the volume setting over a few bars until you reach zero volume.
To edit a continuous controller, you can:
- either open Piano Roll (with the View > Piano Roll menu or with the icon in the global Storm toolbar), and click
on the button indicating the choice of module being edited (on the Piano Roll toolbar this time). A menu will appear, allowing you to choose the module to be edited, the pattern, the MIDI sequence, or controller to be edited.
Select one of the controllers offered on the module that you wish to edit.
- or by a right click on the instrument or effect to be edited, follow the Edit option in the menu that appears and
choose the appropriate controller.
ARTURIA – STORM MUSIC STUDIO 3.0 – USER'S MANUAL 62
Page 63

Choice of element to edit using the buttons on the Piano roll toolbar
- or by double click, directly on the controller (potentiometer or slider) that you wish to edit. Attention, with a
double click you run the risk of modifying the value of controller that you have chosen, this is why the two previous options are preferable.
Choice of element to edit using a right click
on the instrument or effect (Apple + click for Mac)
ARTURIA – STORM MUSIC STUDIO 3.0 – USER'S MANUAL 63
Page 64

The continuous controller editing zone responds differently to mouse action depending on the tool selected (in
the toolbar):
Drawing tool
The evolution of the value for the continuous controller is represented by a blue curve. The yellow points mark
the points where a value is effectively recorded. Everywhere else, no signal is recorded, and the curve is flat
(same value for a whole period) until another eventual yellow point. Once the drawing tool is selected, we can
click on the grid to add a value, and draw a curve by keeping the mouse button held down. By positioning the
mouse on a defined value (yellow point) of the curve, the cursor transforms into a double-ended up-down arrow:
by clicking, we can modify the value of this particular point of the curve.
By clicking anywhere on the grid with the Shift key held down, we create a rectilinear curve between the last
value edited with the mouse and the value corresponding to the new position of the mouse.
Eraser tool
With the eraser tool, you can cancel the recording of value changes for the continuous controller you are editing.
Position yourself at the start of the zone that you want to erase, and hold down the button while moving the
mouse. The removal of the data can be seen with the removal of the yellow points. Where you have removed
recorded values, the blue curve is now horizontal, fixed at the closest previous value that you have not deleted.
Selection tool
Here, this tool defines a selection: click on the grid, and drag your selection holding the mouse button down. You
can use the Copy, Cut and Paste options contained in the Storm Edit menu.
Attention: The potentiometers available on drum machines are not like the others: their variations are not
recorded throughout the song, but are part of the data in a rhythmic pattern. Editing these controllers is done
through editing the rhythmic pattern as explained in the following paragraph.
ARTURIA – STORM MUSIC STUDIO 3.0 – USER'S MANUAL 64
Page 65

Editing a rhythmic pattern
When editing a pattern on a drum machine (Meteor, Hork, Psion, Puma, Tsunami), you can at the same time edit
the rhythmic sequence (trigger of percussive sounds over time). and the simultaneous variation of each of the instrument controllers: “Pitch” and “Decay” for a sampled drum machine, or a group of synthesis parameters for
Tsunami. The editing space for the continuous controller is very short, as it a single bar for each pattern. A selection box allows you to choose a controller to edit among those available on the current instrument:
Editing a rhythmic pattern:
rhythmic grid, velocity, and continuous controllers
ARTURIA – STORM MUSIC STUDIO 3.0 – USER'S MANUAL 65
Page 66

ARTURIA – STORM MUSIC STUDIO 3.0 – USER'S MANUAL 66
Page 67

REWIRE
What is ReWire?
ReWire™ is a software interface developed by Propellerhead Software™ to transfer MIDI and audio data between
different applications. This protocol allows to connect several ReWire compatible applications, and to get the
sound of all the applications in just one of them, by synchronizing their sequencers. The application that mixes
the sound of these interconnected applications is called a ReWire mixer, the others are ReWire instruments.
Storm can be used either as a ReWire instrument or mixer. Thus it is possible to:
• use Storm as a ReWire instrument in a ReWire mixer such as Steinberg Cubase™ or Ableton Live™.
• use Storm as a ReWire mixer and to mix the sound of ReWire instruments such as Reason™ or Rebirth™
from Propellerhead Software.
Using Storm as a ReWire mixer
To use Storm as a ReWire mixer, you must launch Storm before any other ReWire application. The first application launched is the mixer.
To open a ReWire instrument, go to the ReWire Instruments tab of the explorer and drag the instrument of your
choice to the Rack. If this tab does not appear, make sure that the option Settings > General/Activate ReWire
mixer on launch of Storm option is active, and that you have launched Storm before any other ReWire compatible application.
The ReWire tab.
ARTURIA – STORM MUSIC STUDIO 3.0 – USER'S MANUAL 67
Page 68

The ReWire instrument will thus behave like the Storm internal instruments: it will have its place on the mixing
table, and you can direct it to the effects in Storm. On the rack instrument, you can determine which audio
channels are used.
Note
Attention, certain ReWire instruments are not launched automatically. It can be therefore necessary to
launch the corresponding application after having dragged the instrument to the Storm rack.
Once the application has been launched, the two synthesizers are synchronized, and the sound of the two applications is mixed in the ReWire mixing table in Storm. You can indifferently play, stop, change the tempo, etc. in
one or the other.
It is possible to open the same ReWire instrument several times, they are connected to the same application.
You can thus differently mix several channels of this application.
When exporting audio in Storm with the File > Audio Export menu, the ReWire instruments are included in the
audio file produced.
To remove a ReWire instrument, do so as you would any of Storm's other instruments: right click on the instrument in the Rack (Control + click for Mac), and select Remove Module.
Finally, before quitting Storm, you need to quit all ReWire instruments.
Using Storm as a ReWire instrument
To use Storm as a ReWire instrument, you just need to select Storm in the instruments proposed by your sequencer (look at the documentation of your sequencer). Storm is thus generally automatically launched and connected via ReWire; if this is not the case (particularly in Cubase), launch Storm manually, after having launched
your sequencer.
The sequencers in Storm and your mixer application are then synchronized, and the sound from Storm is mixed
by the mixer application.
Storm can export up to 64 audio tracks to the ReWire mixer; you can use the Settings > Audio Connections dialog box to choose the output channels for the different Storm instruments.
Remark: The audio preferences are inactive and remain so as long as Storm is used with ReWire.
Storm is also capable of receiving MIDI events coming from your sequencer. These events will be routed depending on the settings selected in the Storm Sequencer
through ReWire.
. Note that not all sequencers are capable of sending MIDI
ARTURIA – STORM MUSIC STUDIO 3.0 – USER'S MANUAL 68
Page 69

THE HALL
The Hall in Storm 3.0 allows you to join the Storm users “community” by using your Internet connection.
It is in fact a set of functions grouped together in a window independent of the studio. This Hall will help you to
exchange samples and files for your compositions, chat, be informed of all of the latest news concerning Storm,
or even to share hints and tips
Launch
To launch the hall, click on the icon in the Storm toolbar. The main Hall window will open and you can connect by clicking on the Connect button. You will be asked for a login name and password, and you will use this to
identify yourself with the server for your future connections. To make your login to the server automatic, have a
look at the hall configuration
Once you are connected, a click on the News tab will bring you to the Arturia news section. In this zone you will
find information concerning Storm, the users community, new modules... This zone acts like a web page, and the
links are clickable. In the same manner the Tips tab gives you access to a list of tips available on the use of
Storm. To get to a tip, simply click on the one you want.
section.
News and tips
The
and will bring you back to the last page consulted.
button is the welcome page, it brings you back to the available tips list. The button is “Previous”
ARTURIA – STORM MUSIC STUDIO 3.0 – USER'S MANUAL 69
Page 70

Sharing and searching for files
On your computer, you store samples, .stm files in folders. You can decide if you wish to let other users use
them for their compositions. To configure the sharing of your folders, go to the Storm configuration chapter.
Most hall users will also have shared samples and .stm files. A large quantity of resources is thus available thanks
to the Hall, and you will be able to benefit from this with a resources “search engine”.
To search for a resource, click on the Search tab, and type a complete word in the find files field. You can
choose if your search is to be processed concerning samples, Storm files or all criteria. You can also perform a
more precise search by choosing Advanced.... With this search mode, you can search for files by file format, ti-
tle, the tempo and maybe find the files you need in other users resources.
Search tab
Once you have filled out your search criteria, click on Search. The Hall will then connect you to the Arturia serv-
er which will sift through the other users shared resources. The results sent by the server will progressively ap-
pear in the list of files. If you are searching for samples, you can listen to a preview by clicking on the
or by selecting the file, right clicking it and selecting Preview. The preview functions by the quick download of a
compressed version of the sample that interests you. This lets you listen to several samples before choosing the
ones that you want to download. As a result of the compression, the sound quality of the preview is a little lower
than the sample itself. The preview is not always possible depending on whether or not there is a compressed
version of the sample on the computer of the user sharing the resource or not.
You can equally, with the
to the selected file. If you are interested by one or several files, you can select the files concerned and click on
or use a right click to Download the selection. Download will let you to download the selected file to the
folders managed by the Hall Navigator
you wish to download the file.
button or thanks to a right click (Ctrl + click for Mac) display information relative
. With the sub-menu you can choose the folder on your hard drive to which
button
ARTURIA – STORM MUSIC STUDIO 3.0 – USER'S MANUAL 70
Page 71

Tips
By drag-and-drop, you can directly drop a sample in the search list to your studio on modules such as
Scratch, H3O+ or EZtrack.
For the downloading of a file/files selected, the server will help you to connect to the computer from which the
file is being shared. You can monitor the status of your download with the Transfers tab.
Transfers tab
This window represents in its upper section the state of the file downloads from the computers with whom you
are connected to exchange files. For every file currently being downloaded, you can stop the download by click-
ing on the
by using the
button. This can equally be done by right clicking on the file concerned. In this Transfers window,
button, you can make the list easier to read by removing the stopped or completed downloads.
Once the download is finished, the files are available on your computer. The choice of download folder can be
made in the Hall configuration options.
Warning
The files you are sharing will be visible and available to download for Hall users who access the files and
information present in the folders you will share. Please ensure that these folders contain no elements
that you do not wish to share with other people.
ARTURIA – STORM MUSIC STUDIO 3.0 – USER'S MANUAL 71
Page 72

The Navigator
Like the Windows explorer which allows you to navigate in the file system of your computer, the Hall navigator
lets you browse the resources elements available in Storm 3.0. To use this “Navigator”, simply click on the Navi-
gation tab. You will then see a two part window.
Navigation tab
The left side shows a list of resources regrouping the resources available on your computer. If the Storm samples
CD-ROM is present in your drive, you will see the CD sample banks appear in a sample banks folder on the CD.
The third folder lets you access the samples used in the Storm song that is currently open or in the song you are
currently composing. Next you have access to all of your shared folders
The
stop sharing a shared folder.
In the right part of the navigator, you can see AIFF format samples represented by
represented by
You can listen to a sample by clicking on the
sample and selecting Listen. You can get information concerning the sample by clicking on
click.
button lets you add a folder on your computer to your navigator shared folders. The button lets you
icons, MP3 format samples represented by and finally icons for STM format samples.
button in the toolbar, or right clicking (Ctrl + click for Mac) the
.
icons, WAV format samples
or with a right
ARTURIA – STORM MUSIC STUDIO 3.0 – USER'S MANUAL 72
Page 73

The toolbar can also help you to delete a sample after having selected it with the
you refresh the list displayed and the
in the chat room (see Chat
room can download it. The
for it to be posted in lets you do this. Finally, it is possible to send a sample to a user with the
), so that this sample is available in the discussion window and that the users in this
button or a right click (or Ctrl + click) on Post on room, and choosing the room
button is to go back to the parent folder. You can also “post” a sample
button, the button lets
button.
The Hall Chat
This is the main function of the Hall, the chat will not only help you chat with a classic discussion system, but it
is also associated to a system for resource sharing described in section 2. To launch a chat, click on the Chat tab
and you have access to the main chat window. The left side of the window represents the HotList, and here you
can add the users that you have had discussions with by using the
in your friends list with the
the user a file (
user in the HotList.
button). You can also access these functions by right clicking (or Ctrl + click for Mac) on the
button. You can propose a private dialog with a user with the button, send
button. You can get information on a user
ARTURIA – STORM MUSIC STUDIO 3.0 – USER'S MANUAL 73
Page 74

The right side of the main window lets you see all of the discussion rooms created by users. You can update this
list with the
the name and theme for the room. In the list of rooms, the rooms represented by the
rooms, and the rooms with the
To join a chat room, select the room of your choice and click on
button. To create a discussion room, click on the button and enter in the following window
icon are the locked
icon represent the rooms which can be joined.
. As many new tabs as rooms joined will appear at the bottom of the Chat window. With these tabs, you can navigate from room to room and return to the
room list (HotList tab).
In a chat room, the chat window is composed of several distinct sections:
• The left section shows the list of users connected to the room, and you can get information for each user
of this list (
• The upper section shows the name of the current room. The lets you lock or unlock entry for other
button), you can add the user to the hot list.
users for the room. If the button shows an open lock, other users can join the room, if the lock is closed,
then you have locked access to the room for other users. The
button lets you to quit the current
room.
• The central section shows the current discussion.
• Underneath is the input zone for your text (hit the enter key to send your text).
• The lower section of the chat window shows a list of resources shared by the users that you can down-
load.
Files shared during a discussion
ARTURIA – STORM MUSIC STUDIO 3.0 – USER'S MANUAL 74
Page 75

CONFIGURATION
The 5 configuration options for software and hardware in Storm can be found in the Settings menu. Here you will
find the audio configurations, MIDI, general, and the Hall settings. The configuration settings can be found in the
menu bar. The three first options are grouped in a system of tabs, which allows the fast navigation in most of the
program settings.
General options
This window contains the information concerning choice of language, the type of keyboard, sample compression
and the studio startup options.
The General Settings window.
• Language: The choice of language used in the menus and functions of the program.
• Save options: configure Storm to include samples in the .stm files, so as to manage their size.
• Ask to include samples: Storm will ask for confirmation of inclusion of samples every time you
save a STM file.
• Include samples... : Samples will always be included and Storm will not ask for confirmation.
• Compress samples... : If this option is selected, the samples are compressed when included in an
STM file.
• Studio options:
• Show the “Where to Start?”...: allows you to activate/deactivate the automatic launch of the
Where to Start window when Storm is started.
• Auto start playing: if this option is activated, the studio will automatically play after the Start
button is clicked. In the contrary case, the sequencer will remain in the Stop position, and you
will need to click on the Play button.
• Clear all patterns: this option lets you create a new studio without the default patterns, and this
is for all instruments.
ARTURIA – STORM MUSIC STUDIO 3.0 – USER'S MANUAL 75
Page 76

• Activate ReWire mixer...: select this option to set up the activation of Storm as a Rewire mixer
at each launch.
• Default tempo: here you can set the default tempo of the new studios created
Audio and MIDI options
Here you will find the parameters concerning your audio configuration.
• Audio out: This is the choice of sound card to be used for the audio output of Storm, and of the associat-
ed driver (ASIO or DirectX). We recommend the use of the ASIO protocol if you own a compatible card:
this will help obtain a weaker latency.
• Audio in: The choice available will depend on the output device selected. Storm will use the input se-
lected as the source for recording, with the EZtrack module for example.
• Latency: sets the synthesis engine delay in relation to operations within the software. The latency time
that you can get depends on your sound card and the power of your computer.
• CPU load tolerance: sets the maximum load tolerated by the CPU before the interruption of the synthe-
sis engine.
• ASIO config: accesses the sound card control panel.
Audio and MIDI configurations
• MIDI output device: This is the choice of MIDI drivers to which the Storm MIDI output will be sent (essen-
tially in a case of MIDI Sync with Storm as master). Several MIDI devices can be checked.
• MIDI input device: This is the choice of MIDI interface connected as input. Several interfaces can be
checked, which allows you, for example, to use several MIDI control keyboards simultaneously with
Storm.
ARTURIA – STORM MUSIC STUDIO 3.0 – USER'S MANUAL 76
Page 77

CPU error
When the CPU load is too heavy, Storm is interrupted and a dialog box will be opened. It proposes the
setting of a tolerable maximum CPU load.
It should be noted that a CPU load around 80 % will strongly slow your computers reactions! It is then
recommended that you remove some of the “heavier” modules from your studio: Shadow, GMSynth,
Vocoder or Reverb. When the load is too heavy, you have the choice to Continue or to Stop to allow you
to remove modules from the rack.
Hall options
This tab is just for the Storm Hall and will help you to set your connection parameters, your download options,
and your folders.
• Login/Password: indicate your login and password to identify yourself in the Hall.
• Connection speed: indicate your connection type so as to optimize the Hall depending on your band-
width.
• Max uploads: indicate the number of downloads that users can perform simultaneously on your shared
folders (select a reasonable number depending on your Internet connection).
• Max search results: indicate the maximum number of results displayed when searching for files.
• Behind firewall: indicate if you a behind a firewall. The Hall will adapt itself to this particular configura-
tion.
• Auto connect to server: check this option if you want to automatically connect with your login when the
Hall is launched.
• Refuse private chat requests: check this option if you want to automatically refuse all offers of private
chats from other Hall users.
• Shared folders: list of all shared folders on your local hard drive, and accessibility for Hall users. Use the
Add button to include a new folder in the list, and the Unshare button to remove this folder from the
list.
• Download directory: lets you choose, among your shared folders, where you want to download your files
to.
ARTURIA – STORM MUSIC STUDIO 3.0 – USER'S MANUAL 77
Page 78

Audio connections
You can configure the routing of audio input and output for each Storm instrument towards those of your sound
card. This function is especially interesting if you have an ASIO sound card with multiple outputs or when you are
working in VST mode.
lick on the menu Settings > Audio connections. The window that opens will present you with:
• The graphical representation of the instruments present on the Storm rack, plus the representation of
the MASTER, which is the main output from the mixing table.
• On either side of the MASTER and the different instruments we find scrolling lists. These are for connect-
ing the different audio channels of the sound card as output or input of each instrument individually, and
the MASTER.
Example of connections
Imagine that you have a sound card with 8 inputs and as many outputs. It is possible to send each module to a
different output on your sound card. You could therefore apply audio treatment coming from your hardware mixing desk (equalization and effects for example) on each of Storms instruments separately.
To establish a connection between the output of an instrument and a sound card output, choose an audio channel available in one of the two scrolling lists for this instrument. The first list chooses the audio output for the
left instrument track, and the second for the right track.
To select the audio channels to be directed to the audio input of the EZtrack module, choose them in the two
scrolling lists on the left of EZtrack in the audio connections panel.
The audio connections settings
MIDI Synchronization
You will find the parameters concerning your MIDI configuration and MIDI synchronization (with an external drum
machine or a sequencer for example). It can only be opened from the composition screen and not the studio
builder.
For configuration of MIDI synchronization, see the MIDI
ARTURIA – STORM MUSIC STUDIO 3.0 – USER'S MANUAL 78
chapter.
Page 79

KEYBOARD SHORTCUTS
ACTION WINDOWS MACINTOSH
Play/Stop (playback or recording) Space bar
Recording mode ON/OFF * (numerical keypad)
Delete a module Del
Open a Studio Ctrl + O
New Studio Ctrl + N
Save a Studio Ctrl + S
Save as... Ctrl + Shift + S
Cut a pattern/a bar Ctrl + X
Copy a pattern/a bar Ctrl + C
Paste a pattern/a bar Ctrl + V
Restore a pattern/ a bar Ctrl + Z
Mute ON/OFF bars selected on the sequencer
Select and activate a module Numerical keypad arrows
Song information Ctrl + I
Quit the Studio Ctrl + Q
M
O
N
S
S
X
C
V
Z
I
Q
ARTURIA – STORM MUSIC STUDIO 3.0 – USER'S MANUAL 79
Page 80

ARTURIA – STORM MUSIC STUDIO 3.0 – USER'S MANUAL 80
Page 81

SYNTHESIZER BASICS
What is a synthesizer?
A Synthesizer is a piece of electronic equipment capable of producing a sound. In this manner it represents a new
type of musical instrument as it does not reproduce the sound but creates its own. In Storm, this category is represented by the following modules: Arsenic
drum machine. A synthesizer can also be characterized by acting upon multiple sound parameters, to modify the
tone, the frequency or the resonance for example.
, Bass 52, Equinoxe, Orpheus, Shadow, GMSynth and the Tsunami
In Storm Music Studio, we also find sample modules
chines, which will be used to trigger rhythmic sounds at regular intervals. All of the elements present in the syn-
thesizer library will be called instruments or instrument modules even if they are not synthesizers in the strict
sense of the term.
, used to record, play or mix sound files, as well as drum ma-
The pattern selector
The pattern selector is on
the left of the synthesizers.
On nearly all of the synthesizers, you will see a pad with numbers and letters. (The only ones without this are the
scratch and EZtrack modules).
As you may have seen in regard to pattern selectors, patterns are pre-recorded. You can compose your song by
using provided patterns.
Patterns are coded by a letter between A and D and two numbers between 1 and 4. For example B12. This means
that 64 different patterns are available.
Initially all of the instruments will be set to the first pattern, A11. The control window under the selection keypad indicates the pattern number.
To change patterns, click on the other letters or numbers in the grid. The new key you have selected is going to
blink until the end of the current bar. The change in pattern will take place at the end of that bar
The keys selected blink
until the end of the current bar.
You can modify existing patterns on all synthesizers. However, the technique to do this differs for each one and
will be described later for each case. If you wish to return to the original pattern, click on the RESTORE button.
ARTURIA – STORM MUSIC STUDIO 3.0 – USER'S MANUAL 81
Page 82

Click on the RESTORE button to go back to the original pattern.
If you wish to completely erase a pattern, click on the CLEAR button.
Click on the CLEAR button to erase the current pattern.
ARTURIA – STORM MUSIC STUDIO 3.0 – USER'S MANUAL 82
Page 83

ARSENIC
The Arsenic bass line has the same features as the vintage synthesizers from the 1970's. A square oscillator is
modulated by a low pass resonant filter.
The instrument module interface can be divided up into two parts:
• The Piano Roll for the programming of a melodic loop.
• The potentiometers which allow you to work on the sound produced.
The Piano Roll
The Piano Roll (or pattern composition grid)
The Piano Roll, which is a note grid and a piano keyboard lets us create melodic loops.
As you can see, the grid is composed of 16 bars each representing one of the 16 beats of the bar. These bars are
for the programming. The keyboard is a reduced piano which allows the visualization of the note programmed on
the grid.
The Arsenic Piano Roll.
This system helps us to create melodic loops. To position a note, click on the grid. To delete it, click on the note
with the right mouse button (
down.
Two octaves are represented on the keyboard. To vertically move and see the notes that you have placed on the
other octaves, slide the lift on the right of the screen up or down.
+ click for Mac). To move it, click on the middle of the note and drag it up or
Elsewhere, on the left of the Piano Roll, you have a slider between 1 and 4 which can help you to transpose the
song to another octave. Each step corresponds to an octave: by going from 2 to 3, all of the notes will be played
on the next octave.
The different editing modes
The 3 different icons which give access to these modes are on the left of the Piano Roll: from top to bottom, you
will find: edit the notes, edit the liaison between notes, and edit the velocity (or volume).
ARTURIA – STORM MUSIC STUDIO 3.0 – USER'S MANUAL 83
Page 84

• Editing the notes represented by the icon is how to (as we have seen in the previous paragraph)
place notes on the Piano Roll. To vertically and horizontally zoom on the notes, and to move within the
pattern, use the scroll bar on the right of the Piano Roll.
• Editing the slide between notes represented by the icon is to link a note to another and create a
legato effect (one single attack for the two notes). To create the link, click on the icon, click on the first
note of the two to link, and without letting go of the button, drag to the second and release. A red line
will appear between the two notes to confirm the liaison. These links modify the attack of the notes: the
attack and delay applied will be on the two notes together and not individually.
A link between two notes
• Editing the volume represented by the icon allows us to set the velocity of each note. When you
are in this mode, all of the velocities are set to average. To modify the velocity, lower or raise the column above the desired note and thus change the volume.
Editing on the piano roll
It is also possible to edit Arsenic patterns and parameters with the Piano roll. This will allow you to more comfortably edit the different notes and controllers on Arsenic.
• To open the piano roll, right click (Control + click for Mac) on the instrument and select the menu Edit >
Pattern and choose the pattern that you wish to edit from the list.
• To edit the pattern, use the “drawing” tool and click on the grid to display the notes corresponding
to the instruments.
• To remove a note use the “eraser” tool and click on the note.
• It is also possible to change the volume for each note on the volume editor just under the piano roll.
Raise or lower the column under the note.
ARTURIA – STORM MUSIC STUDIO 3.0 – USER'S MANUAL 84
Page 85

The piano roll
A second section on the piano roll lets you graphically edit the curve of an Arsenic potentiometer.
• Perform a right click ( + click for Mac) on the edge of the synthesizer and choose the setting that you
wish to edit with the menu: Edit > Controller.
• Shape the curve with the drawing tool. This curve will be copied to the sequencer at the same time as
the notes you would have edited on the pattern.
• Remove the curve (or a part of it) with the eraser tool.
The graphic edition of the cut-off curve on Arsenic
ARTURIA – STORM MUSIC STUDIO 3.0 – USER'S MANUAL 85
Page 86

The potentiometers
The signal
• An LCD screen which graphically represents the wave form used is located on the right side of the instru-
ment. By clicking on the WAVE button, you can define the wave shape of the signal: square or saw tooth
.
Click on the WAVE button
to change the wave shape
• By turning the WIDTH potentiometer, you can modify the width of the signal in the following manner:
In the case of a square signal, you will progressively
move from “impulse” form to “square”:
In the case of a saw-tooth signal, you will progressively
move from a “saw-tooth” to a “double-saw-tooth” form:
• The signal is amplitude modulated by an envelope. This envelope can be divided up into two parts: at-
tack and decay.
• The potentiometer on the left bearing the name ATTACK allows us to set the attack duration
(the expansion phase of the sound).
• The potentiometer on the right bearing the name DECAY allows us to set the decay duration (the
decay phase of the sound).
Two potentiometers which set
the attack and decay of the amplitude
The filter
The 5 other buttons allow the configuration of the filter parameters.
What is a filter?
A sound can be broken up into a set of sinus waves with various amplitudes and multiple frequencies of the fundamental. These sine waves are called harmonic waves; the sound spectrum follows this breakdown.
On the first graphic you see the saw-tooth wave and on the second one its spectral representation.
ARTURIA – STORM MUSIC STUDIO 3.0 – USER'S MANUAL 86
Page 87

a
a
t
f Hz
The filter will cut off all frequencies above the cut-off filter frequency:
• The CUTOFF potentiometer lets you choose the filter cut-off frequency. i.e. the level from which higher
frequencies will be cut/deleted from the signal. By turning this potentiometer clockwise you can “open
the filter”, i.e. you increase the value of the cut-off frequency:
a
Filter cut-off frequency
f Hz
The CUTOFF potentiometer allows
you to modify the filter cut-off frequency.
ARTURIA – STORM MUSIC STUDIO 3.0 – USER'S MANUAL 87
Page 88

• The second potentiometer called RESO characterizes the filter resonance. The resonance allows the defi-
nition of the position of the peak. The more the potentiometer is turned clockwise, the higher the filter's
peak.
• The third potentiometer bearing the letters MOD defines the filter's frequency modulation. As we have
just seen, the filter shows an F
cut-off frequency from which the signal is cut and it is interesting to
0
make this cutoff frequency vary during the note. The value given by the MOD potentiometer defines the
variation amplitude. The greater the value the stronger the amplitude.
• The ATTACK potentiometer controls the attack duration of the variation curve of the cut-off.
The ATTACK potentiometer shows the attack length
of the variation curve of the cut-off frequency.
• The last potentiometer called DELAY allows us to set the decay phase length in the variation curve of the
cutoff frequency.
F
F0
t
attack
decay
The Arsenic contextual menu
When you right click on this module, you will access a contextual menu:
• Edit > Pattern and Edit > Control: open the piano roll to edit the patterns or continuous controls for the
module.
• Kepler connection: connection to or disconnection from the Kepler module.
• Help: sends you straight to the help for the module.
• Clear all patterns: removes all of the patterns on the module (we can cancel this action with the Undo
function).
• Add a column: adds a column to the rack.
• Add a line: adds a line to the rack.
• Remove a module: remove the module from the rack.
• Effect controls: adds the effects section on the right of the module.
ARTURIA – STORM MUSIC STUDIO 3.0 – USER'S MANUAL 88
Page 89

BASS 52
Bass 52 is a synthesizer which reproduces the characteristics of sound and playing of a fretted electric bass guitar. It will allow you to recreate for example, round and heavy sounds for reggae/dub or R&B bass lines, or more
aggressive (metallic or slap) for funk, rock or fusion. This module uses the concept of synthesis by physical modeling. This means that the types of sounds and playing of the instrument (strings muted or slapped, positions of
the pick-ups, etc...) were studied and recalculated by computer to allow them to be re-synthesized. This type of
synthesis provides a sound faithful to the instrument in its full range and in all forms of expression: change of
playing style (soft or aggressive), use of vibrato, etc...
Bass 52 has 64 patterns preprogrammed (or sequences). It consists of two parts:
• The Piano Roll which allows us to program the melody.
• The part on the right of the Piano Roll which lets us configure the sound.
The melody
This section can be broken into two parts: the pattern selector and Piano Roll.
The pattern selector
It functions in the same manner as the other instrument modules of Storm. You can of course modify existing
patterns. To do this, you can either take the notes already in the Piano Roll or start from scratch by clicking on
the CLEAR button. If you wish to return to the original pattern, just click on the RESTORE button. If you have already saved your song, the last saved pattern will be the one taken into account.
The pattern selector
You can also copy an existing pattern onto one or numerous others (to create evolutions of the original pattern
for example). To do this, select the number of the pattern that you want, hit Ctrl+C, select another number and
then hit Ctrl+V.
The Piano Roll (or pattern composition grid)
This screen helps you to compose a melodic loop. To place a note, click on the grid. To delete, click on the note
with the right mouse button (
the center of the note and drag it up or down.
ARTURIA – STORM MUSIC STUDIO 3.0 – USER'S MANUAL 89
+ click for Mac). To stretch it click on the extreme right, and to move it click on
Page 90

The Piano Roll and its four editing modes
To move vertically, slide the vertical bar on the right of the screen up and down. You can also zoom on particular
parts of the keyboard to make the notes bigger by shrinking the bar. To do this, click on the top of the bar and
slide it downwards.
The different editing modes
The four icons which give access to these are found on the left of the Piano Roll: from top to bottom, you will
find volume editing, note editing, the note-link mode and vibrato editing. These different modes appear in the
lower part of the Piano Roll.
• Note editing, represented by the icon is, as we have seen in the previous paragraph, to place
notes on the Piano Roll. To vertically or horizontally zoom and to move in the pattern, use the lift at the
bottom of the Piano Roll.
• Note link editing, represented by the icon allows you to link one note to another creating a legato
effect (one attack for the two notes). To create links, click on the icon, and then on the first note that
you want to link and, without letting go of the left mouse button drag to the second note and release. A
red line will appear between the two notes indicating that the link has been formed.
A link between two notes
• Vibrato editing, represented by the icon allows you to choose the vibrato level for each note.
When you enter this mode, all vibrato levels are at zero. To activate one, raise the column under the
note that you wish to modulate.
Vibrato editing
• Volume editing, represented by the icon allows you to choose the velocity level for each note.
When you enter this mode, all velocity levels are set at an average level. To modify a velocity, move up
or down the column under the note for which you wish to change the volume.
Editing on the piano roll
It is also possible to edit Bass 52 patterns and parameters more comfortably with the Piano roll.
To open the piano roll, right click (Control + click for Mac) on the instrument and select the menu Edit > Pattern
and choose the pattern that you wish to edit from the list.
ARTURIA – STORM MUSIC STUDIO 3.0 – USER'S MANUAL 90
Page 91

Configuration of sound
Three parameters allow you to radically change the sound of Bass 52: Attack filter, Vibrato and Release filter.
The sound editing parameters
• ATTACK FILTER allows you to configure the absorption of the attack of the note: the more we turn the
knob towards the right, the more the attack becomes present, even aggressive (for the “slap” bass
sound).
• VIBRATO allows you to choose the speed of the vibrato.
• RELEASE FILTER allows you to configure the string absorption (the length of the note): the more you
turn the knob to the right the more the resonance becomes present, metallic.
The Bass 52 contextual menu
When you right click on this module, you will access a contextual menu:
• Edit > Pattern and Edit > Control: open the piano roll to edit the patterns or continuous controls for the
module.
• Kepler connection: connection to or disconnection from the Kepler module.
• Help: sends you straight to the help for the module.
• Clear all patterns: removes all of the patterns on the module (we can cancel this action with the Undo
function).
• Add a column: adds a column to the rack.
• Add a line: adds a line to the rack.
• Remove a module: remove the module from the rack.
• Effect controls: adds the effects section on the right of the module.
ARTURIA – STORM MUSIC STUDIO 3.0 – USER'S MANUAL 91
Page 92

EQUINOXE
The Equinoxe chord synthesizer and Arsenic are cousins. They use the same signal generator and the same filter.
The main difference lies in the use of the sound. In the case of Equinoxe the sound is held and several notes can
be superposed. This is the reason why three oscillators are offered.
We have to make the difference between the controllers allowing you to work on the sound and the melody control tools, in this case the grid
.
The sound
The signal
The Equinoxe synthesizer produces three-note chords. This is why three independent oscillators are used in parallel.
• The LCD screen located under the WIDTH button lets us visualize the wave shape of each signal from the
3 oscillators.
• To go from a saw-tooth shape to a square shape you only need to click on the WAVE button.
The wave form
visualization screens
• To modify the width of the three signals, use the WIDTH potentiometer.
The filter and volume envelope
The filter is the same as in Arsenic. The control parameters are the same: CUTOFF, RESO, MOD, ATTACK and DE-
CAY.
We also find the potentiometers DECAY and RELEASE. Here we control the envelope parameters applied to the
volume of the three signals which are added before they pass into the filter.
• DECAY sets the fall time of the volume envelope while the note is held (when the chord is stretched on
the grid).
• RELEASE sets the fall time of the volume envelope once the note is released.
Given that the length of the notes is defined on the grid, as we are going to see it, the Decay potentiometer sets
their toning down.
ARTURIA – STORM MUSIC STUDIO 3.0 – USER'S MANUAL 92
Page 93

The melody
Editing on the programming grid.
The chords are present on the grid located in the middle of the instrument.
The chords are present on the grid
located in the middle of the instrument.
The vertical lines represent the 16 beats of the bar.
We are now going to create a chord:
Click on a part of the grid
and you will see a chord appear.
• Click on the grid and you will see a 3 note chord representing one beat.
• Click on this chord and stretch it to the right. It is then held on the number of beats between the 2 verti-
cal bars.
Click on this chord and stretch it to the right.
• To erase a chord you only need to click it with the right mouse button ( + click for Mac).
The chord defined is a perfect chord, that is to say that it superposes the 1
st
, 3rd and 5th notes starting from the
root note. But you can distort it. For this the procedure is very simple:
• Click on one of the 3 notes making up the chord and move it vertically. The figures located left of the
grid define the positions of the notes from the root note. The Kepler
defines the root note. (example C
Major: C)
• If for instance, you click on the highest note and move it completely up to the upper edge of the grid,
you will get a 1-3 -8 type chord, meaning that the upper and lower squares define notes by octave.
ARTURIA – STORM MUSIC STUDIO 3.0 – USER'S MANUAL 93
Page 94

Moving the higher note increases the chord's highest note.
The chord being defined, you should be able to transpose it, that is to say to make it higher or lower.
To that end you only need to move the cursor located left of the grid. This cursor offers a 5-octave range.
Moving the cursor located left of the grid transposes the chord.
Major chords, minor chords
Equinoxe does not allow you to define if a chord is major or minor. The Kepler module
provides for
that. If you select a minor tone with the Kepler, the 1-3-5 chord becomes minor. For instance:
in A minor, 1-3-5 = A-C-E
in A major, 1-3-5 = A-C#-E
Editing on the piano roll
It is also possible to edit Equinox patterns and parameters more comfortably with the Piano roll.
To open the piano roll, right click (Control + click for Mac) on the instrument and select the menu Edit > Pattern
and choose the pattern that you wish to edit from the list.
The Equinoxe contextual menu
When you right click on this module, you will access a contextual menu:
• Edit > Pattern and Edit > Control: open the piano roll to edit the patterns or continuous controls for the
module.
• Kepler connection: connection to or disconnection from the Kepler module.
• Help: sends you straight to the help for the module.
• Clear all patterns: removes all of the patterns on the module (we can cancel this action with the Undo
function).
• Add a column: adds a column to the rack.
• Add a line: adds a line to the rack.
• Remove a module: remove the module from the rack.
• Effect controls: adds the effects section on the right of the module.
ARTURIA – STORM MUSIC STUDIO 3.0 – USER'S MANUAL 94
Page 95

ORPHEUS
The Orpheus module is a synthesizer based on the wave table concept, a type of synthesis that appeared at the
beginning of the 80's.
It is a multi-purpose synthesizer which allows us to create melodies (leads for example) and evolving accompaniments, special effects or bass lines.
Orpheus has 64 preprogrammed patterns (or sequences) and 128 presets (or sounds). It is polyphonic for 16
notes, which means that we can program chords containing up to 16 notes.
Orpheus is made up of two major parts:
• the top half which lets us program the melody
• the bottom half which is for programming the sound
The melody
This part can be divided into two sub-sections: the pattern selector and the Piano Roll.
The pattern selector
It works in exactly the same manner as the other Storm instruments. You can of course modify the existing patterns. To do this, you can either build on an existing pattern or start from scratch by clicking on CLEAR. If you
wish to return to the original pattern, just click on the RESTORE button. If you have already saved the current
song, the last saved pattern is the one that will be taken into account.
The Orpheus patterns are, by default, associated with preset sounds. If you wish to modify the sound of a melodic pattern, choose another in the pattern selector and then click on the LINK button for this pattern to be taken
into account with yours. For the functions of the sound presets controller, see below.
ARTURIA – STORM MUSIC STUDIO 3.0 – USER'S MANUAL 95
Page 96

The Piano Roll (or pattern composition grid)
The Piano Roll.
This screen allows us to compose a sequence of chords (up to 16 simultaneous notes) or a melody. To place a
note, click in the grid. To delete it, right-click it. To stretch it, click on the extreme right of the note, and to
move it, click in the middle and drag it up or down. To zoom vertically or horizontally on the notes or to move in
the pattern, use the scroll-lifts on the bottom (horizontal zoom) and right (vertical zoom) of the Piano Roll.
Use the scroll-lift below the grid
to zoom horizontally on the notes
The Piano Roll equally allows the configuration of a certain number of options for each note. To do this, you
must begin by clicking on the
columns appearing under the programmed notes. By modifying the height of a column, you influence the control
parameters of the corresponding note. These parameters are found by clicking on vol situated at the bottom
right of the screen. This mode allows you to edit the values of the volume, filter, and the balance of the oscillators for each note. To return to the note edit mode click on the
icon. The melodic composition zone of the Piano Roll is reduced to a series of
icon.
Setting the volume of Orpheus notes.
The sound
The work on the sound is done on:
• a group of sound presets
• a two dimension control surface
• a group of preset parameters under the trap
ARTURIA – STORM MUSIC STUDIO 3.0 – USER'S MANUAL 96
Page 97

The preset selector
By clicking on the preset selector, you have access to 64 preprogrammed sounds in the synthesizer as well as the
64 in the user presets.
The preset selector.
The wave form control surface
Moving the arrow cursor allows you to progressively change the 4 wave forms of the two oscillators. This permits
the creation of progressive and continuous changes to the tone which gives either a subtle or radical evolution to
the sound. Without going into detail on the algorithms used, the horizontal movements influence the wave
shapes of oscillator 1 and the vertical movements influence oscillator 2.
Configuration of MIDI control
To move among the wave shapes with the help of an external MIDI controller: Ctrl + click (or + Click for Macintosh).
The sound creation parameters
You will find them under the Piano Roll, once the trap door is opened (with the help of the OPEN/CLOSE button
situated above and to the left of these parameters):
• Oscillators 1 and 2
• The filter
• The filter envelopes and the amplitude
• The LFO's (low frequency modulation oscillators)
The parameters of Orpheus
Oscillator 1
The parameters of oscillator 1
ARTURIA – STORM MUSIC STUDIO 3.0 – USER'S MANUAL 97
Page 98

• Its frequency will be directly linked to the note placed on the Piano Roll. To select one of the 32 families
of wave shapes (which each have 4 wave shapes), click on the selector, and a menu will appear containing the 32 families .
• To configure the volume balance of the two oscillators, turn the BAL knob to the left to have just oscilla-
tor 1, and to the right to have just the sound from oscillator 2. Place it in the middle to have them both.
To synchronize the frequency of oscillator 2 with oscillator 1, click on the SYNC button.
Oscillator 2
The parameters of oscillator 2
• The FM button allows the configuration of the rate of modulation of the frequency of oscillator 1 by that
of oscillator 2.
• COARSE allows you to choose the note by semi-tone (from - 2 octaves to + 2 octaves).
• FINE allows the fine-tuning or detuning of oscillator 2 in relation to the frequency of oscillator 1 (by 1/4
tones). A light detuning creates warmer and thicker sounds, particularly for accompaniments.
The filter
The filter parameters
This is a resonant multi-mode filter with a break slope of 12 DB / Octaves.
• The CUTOFF button permits the configuration of the filter break.
• RES defines the resonance rate on the break frequency.
• ENV configures the rate of envelope action on the frequency of the filter break.
• KEYBOARD triggers the keyboard follow for the filter break frequency (This allows us to make the sound
more and more bright depending on what is done on the keyboard).
The 4 filter modes: selection of different types of filter. Click until you find what you are looking for.
• LOW PASS cuts the frequencies situated above the frequency of the filter break.
• BAND PASS cuts the frequencies situated below and above the frequency of the filter break.
• HIGH PASS cuts the frequencies underneath the frequency of the filter break.
• NOTCH cuts the frequency of the filter break.
The ADSR envelopes (of filter and amplitude)
The parameters of the two ADSR envelopes
ARTURIA – STORM MUSIC STUDIO 3.0 – USER'S MANUAL 98
Page 99

The envelopes represent the route that the signal takes from its beginning to its end. This is how we recognize a
short percussive sound in a long and stretched sound. It is brought down to a number of steps:
• A (Attack) sets the attack time of a filter envelope or of the volume of a note upon its introduction.
• D (Decay) sets the fall time of the filter envelope or of the volume while the note is held.
• S (Sustain) sets the level of hold (how long the note will ring) for the filter envelope or volume.
• R (Release) sets the fall time of the filter envelope or volume once the note is released.
The 2 LFO's (low frequency modulation oscillators)
The two LFO parameters
An LFO is an oscillator which emits a sound on very low frequency (inaudible). This serves as a cyclic modulator
for another sound source. More exactly: a vibrato is an LFO in the form of a sinusoidal wave applied on the pitch
of a principal oscillator (the one we hear), it is also the base principle of FM! A Wah Wah effect is an LFO in the
form of a sinusoidal wave applied on the cut-off of a resonant filter and a tremolo is the result of an LFO in the
form of a sinusoidal wave on the amplitude of a sound.
LFO 1:
• The RATE button sets the modulation speed.
• AMOUNT sets the modulation rate of LFO 1.
• The destination selector of LFO 1 allows us to choose the modulation destination:
• CUT: varies the cut off filter
• VOL: varies the volume
• OSC 1: varies the frequency of oscillator 1
• FM: varies the FM rate on oscillator 2
LFO 2:
• The RATE button sets the modulation speed.
• AMOUNT sets the modulation rate of LFO 2.
• The destination selector of LFO 2 allows us to choose the modulation destination:
• BAL: varies the balance of the 2 oscillators
• OSC 2: varies the frequency of oscillator 2
• WAV2: varies the wave form of oscillator 2
• LFO 1: varies the speed of LFO 1
• 2 OSC: varies the frequency of oscillators 1 and 2
Controlling parameters from an external MIDI source
As is the case for all of Storm modules, you can assign all of the knobs of Orpheus to a MIDI controller: to do this,
hold Ctrl and click on the potentiometer.
Editing on the piano roll
It is also possible to edit Orpheus patterns and parameters more comfortably with the Piano roll.
To open the piano roll, right click (Control + click for Mac) on the instrument and select the menu Edit > Pattern
and choose the pattern that you wish to edit from the list.
ARTURIA – STORM MUSIC STUDIO 3.0 – USER'S MANUAL 99
Page 100

The Orpheus contextual menu
When you right click on this module, you will access a contextual menu:
• Edit > Pattern and Edit > Control: open the piano roll to edit the patterns or continuous controls for the
module.
• Kepler connection: connection to or disconnection from the Kepler module.
• Help: sends you straight to the help for the module.
• Clear all patterns: removes all of the patterns on the module (we can cancel this action with the Undo
function).
• Add a column: adds a column to the rack.
• Add a line: adds a line to the rack.
• Remove a module: remove the module from the rack.
• Effect controls: adds the effects section on the right of the module.
ARTURIA – STORM MUSIC STUDIO 3.0 – USER'S MANUAL 100
 Loading...