

Page 1
Page 2

2
Information contained in this manual is subject to change without notice and does not represent a
commitment on the part of ARTURIA. The hardware unit and the software product described in this
manual are provided under the terms of a license agreement or non-disclosure agreement. The
license agreement specifies the terms and conditions for its lawful use. No part of this manual may
be reproduced or transmitted in any form or for any purpose other than purchaser’s personal use,
without the explicit written permission of ARTURIA S.A. All other products, logos or company
names quoted in this manual are trademarks or registered trademarks of their respective owners.
© ARTURIA SA – 1999-2014 – All rights reserved.
30, Chemin du Vieux Chêne
38240 Meylan
FRANCE
http://www.arturia.com
March 2014 – 2.0 edition
ARTURIA – SPARK CREATIVE DRUM MACHINE – USER’S MANUAL
Page 3

3
PROJECT MANAGER
Kevin Molcard (Lead Developer)
Philippe Wicker
Emilie de Fouchecour
Vincent Travaglini
Bruno Pillet
Niccolo Comin
Adrien Courdavault
Tobias Carpenter
Guillaume Piolat
Noritaka Ubukata
Pierce Warnecke
Jean-Michel Blanchet
Oliver Fauque
Christian Lafitte (Cigale Prod)
Thomas Koot
William Talgorn
Sebastien Rochard
Randy Lee
Tomoya Fukuchi
Pierce Warnecke
Jérome Parrod
Sébastien Rochard
Kevin Molcard
PRODUCT MANAGER
Glen Darcey
PROGRAMMING
ELECTRONICS
Laurent Baret
Bruno Pillet
DESIGN
Glen Darcey
Sebastien Rochard
Morgan Perrier
Shaun Ellwood (Decoder Design)
SOUND DESIGN
Mike Hosker Glen Darcey
Kevin Shröder Hernan Velasco
Greg Savage Stéphane Schott
INDUSTRIALIZATION
Nicolas Dubois
Richard Phan
Gerard Buracchini
MANUAL WRITING
MANUAL TRANSLATION
ARTURIA – SPARK CREATIVE DRUM MACHINE – USER’S MANUAL
Page 4
4
SPECIAL THANKS
Sean Weitzmann, Gérard Buracchini, Cedric Pallier, Elodie Cao, Denis
Frouin, Philippe Girard-Buttoz, Yannick Bonnefoy, Peter Gelhaus (acoustic
drum kit photo), Kevin Lamb, Patrick Kunz, Frank Orlich, Miguel Silva,
Houston Haynes, Cristian Kreindler, Paul Steinway Sébastien Rochard,
Tobias Carpenter, Hung Lee, Jason Huang, Wenyu Huang, Matty Yuan,
Chen Xiaomai
SOUND SAMPLES
ARTURIA – SPARK CREATIVE DRUM MACHINE – USER’S MANUAL
Page 5
5
Thank you for purchasing Spark!
This user manual covers three distinct products:
Spark software, a highly creative beat production center
Spark Creative Drum Machine controller
SparkLE controller
The manual concentrates on two main areas (hardware and software) with occasional
“side-chains” to focus on the specific functionality of each controller and its unique
approach to controlling the software.
In most cases, the information in one chapter will be sufficient to cover both controllers.
Occasionally a chapter will be split into two sections: one describing the Spark Creative
Drum Machine controller and a second describing the SparkLE controller, with all other
sections describing the Spark software they both were designed to control (hereafter
referred to as the Spark Engine).
Package Contents (hardware version)
In this package you will find:
A DVD-ROM containing Spark Creative drum machine installer for Mac OS X
and Windows 7/Vista/XP
A registration card with the Serial Number and Unlock Code (Spark Creative),
or a sticker inside the Quick Start guide with that information (SparkLE).
The User’s Manual for Spark Creative Drum Machine software and the Spark
Controller
Spark Creative controller or SparkLE controller (depending on the model)
USB cable
Be sure to store your registration information carefully! It contains the serial
number and unlock code that are required to register and authorize the Spark Engine, so
these codes are valuable.
It’s important to register because this identifies you as the legitimate owner and ensures
that you’ll receive the latest news and updates for your software and hardware.
See chapter 2 “Registration & Authorization” for more information about the
authorization process.
ARTURIA – SPARK CREATIVE DRUM MACHINE – USER’S MANUAL
Page 6

6
Special Message Section
The Spark controller uses USB or an external power adapter. Do not connect this product
with any other power supply or adapter than the one specifically recommended by
Arturia in this manual.”
WARNING:
Do not place this product in a position where someone could walk on, trip over or roll
anything over power or connecting cords.
The use of an extension cord is not recommended! If you must use one, make sure the
cord has the ability to handle the maximum current needed by this product. Please
consult a local electrician for more information on your power requirements.
This product should be used only with the components supplied or recommended by
Arturia. When using this product with any approved components, please observe all
safety markings and instructions that accompany the accessory products.
SPECIFICATIONS SUBJECT TO CHANGE:
The information contained in this manual is believed to be correct at the time of printing.
However, Arturia reserves the right to change or modify any of the specifications without
notice or obligation to update existing units.
IMPORTANT:
Always follow the basic precautions listed below to avoid the possibility of serious injury
or even death from electrical shock, damages, fire or other risks.
The product used either alone or combined with an amplifier, headphones or speakers,
may be able to produce sound levels that could cause permanent hearing loss. DO NOT
operate for long periods of time at a high level or at a level that is uncomfortable.
If you encounter any hearing loss or ringing in the ears, you should consult an
audiologist.
NOTICE:
Service charges incurred due to a lack of knowledge relating to how a function or feature
works (when the unit is operating as designed) are not covered by the manufacturer’s
warranty, and are therefore the owner's responsibility. Please study this manual carefully
and consult your dealer before requesting service.
ARTURIA – SPARK CREATIVE DRUM MACHINE – USER’S MANUAL
Page 7

7
PRECAUTIONS INCLUDE, BUT ARE NOT LIMITED TO, THE FOLLOWING:
Read and understand all the instructions.
Before cleaning the instrument, always remove the electrical plug from the
outlet, and detach the USB cable.. When cleaning, use a soft and dry cloth.
Do not use gasoline, alcohol, acetone, turpentine or any other organic
solutions; do not use a liquid cleaner, spray or cloth that's too wet.
Do not use the instrument near water or moisture, such as a bathtub, sink,
swimming pool or similar place.
Do not place the instrument in an unstable position where it might
accidentally fall over.
Do not place heavy objects on the instrument. Do not block openings or
vents of the instrument; these locations are used for air circulation to prevent
the instrument from overheating. Do not place the instrument near a heat
vent or any place with poor air circulation.
Only use the recommended specified AC adaptor (9 Vdc, 800 mA)
Make sure the line voltage in your location matches the input voltage
specified on the AC power adaptor.
Do not open and insert anything into the instrument that may cause a fire or
electrical shock.
Do not spill any kind of liquid onto the instrument.
Always take the instrument to a qualified service center. You will invalidate
your warranty if you open and remove the cover, and improper assembly
may cause electrical shock or other malfunctions.
Do not use the instrument with thunder and lightning present; it may cause
long distance electrical shock.
Do not expose the instrument to hot sunlight.
Do not use the instrument if there is a gas leak nearby.
Arturia is not responsible for any damage or data loss.
HANDLING CD-ROMS:
Avoid touching or scratching the shiny underside (encoded surface) of the disc. A
damaged or dirty CD-ROM disc may not read properly. Keep your CD-ROMs clean using a
commercially available CD cleaner.
ARTURIA – SPARK CREATIVE DRUM MACHINE – USER’S MANUAL
Page 8

8
Table of Contents
1 INTRODUCTION ......................................................................................................................................... 9
1.1 WELCOME TO SPARK ................................................................................................................................. 9
1.2 HISTORY.................................................................................................................................................... 9
2 REGISTRATION & AUTHORIZATION ................................................................................................ 11
3 THE SPARKLE CONTROLLER: AN OVERVIEW .............................................................................. 12
3.1 THE FRONT PANEL .................................................................................................................................. 12
3.2 SIDE PANEL (OVERVIEW) ........................................................................................................................ 14
4 THE SPARK CREATIVE CONTROLLER: AN OVERVIEW .............................................................. 15
4.1 THE FRONT PANEL .................................................................................................................................. 15
4.2 REAR PANEL (OVERVIEW) ...................................................................................................................... 17
5 USING SPARK: The Software Interface ................................................................................................... 18
5.1 THE TOOLBAR ......................................................................................................................................... 18
5.2 THE MAIN PANEL (SPARKLE).................................................................................................................. 19
5.3 THE MAIN PANEL (SPARK CREATIVE) ................................................................................................... 30
5.4 THE SEQUENCER PANEL .......................................................................................................................... 45
5.5 THE SONG PANEL .................................................................................................................................... 50
5.6 THE STUDIO ............................................................................................................................................ 52
5.7 THE MODULAR ........................................................................................................................................ 56
5.8 THE MIXER ............................................................................................................................................. 66
5.9 THE LIBRARY .......................................................................................................................................... 79
5.10 PREFERENCES PANEL ............................................................................................................................. 81
6 MODES OF OPERATION ......................................................................................................................... 83
6.1 STANDALONE MODE ............................................................................................................................... 83
6.2 PLUG-IN MODE ........................................................................................................................................ 85
6.3 VST ........................................................................................................................................................ 86
6.4 AUDIO UNIT (MAC OS X ONLY) ............................................................................................................. 88
6.5 PRO TOOLS .............................................................................................................................................. 91
6.6 RECORDING MIDI OUT FROM SPARK INTO A HOST DAW ........................................................................... 92
6.7 CONTROLLING SPARK WITH AN EXTERNAL MIDI CONTROLLER ...................................................... 95
7 THE SPARK CONTROLLERS ................................................................................................................. 96
7.1 USING THE CONTROLLER WITH THE SPARK ENGINE ................................................................................ 96
7.2 USING THE CONTROLLER WITH HOST APPLICATIONS OR MIDI DEVICES ................................................. 97
7.3 MIDI CONTROL CENTER ....................................................................................................................... 98
8 SPARK LEGAL INFORMATION ............................................................................................................ 99
8.1 SOFTWARE LICENSE AGREEMENT ............................................................................................................ 99
8.2 FCC INFORMATION (USA) .............................................................................................................. 101
8.3 CANADA ............................................................................................................................................. 102
8.4 EUROPE .............................................................................................................................................. 102
9 NOTES ........................................................................................................................................................ 103
ARTURIA – SPARK CREATIVE DRUM MACHINE – USER’S MANUAL
Page 9

9
1 INTRODUCTION
1.1 WELCOME TO SPARK
BEAT THE FUTURE
Combining the power of analog synthesis, physical modeling and samples through the
intuitive workflow of a hardware drum machine, Spark is a highly creative beat
production center. Spark will save you time when looking for the right drum kit and will
get you hooked by its amazing ease-of-use and sonic possibilities.
Spark embeds vintage analog drum machines, sample based beatboxes and REX loop
playback. Spark’s engine further allows you break through their sonic boundaries thanks
to a highly tweakable controller.
With in-depth control over your sounds, an advanced loop mode and an XY touchpad
with 8 real time effects, Spark will allow you to create unique beat experiments and
constantly feed your creativity with innovative ideas.
Spark’s sonic power is nothing but huge, embedding three distinctive drum engines:
analog synthesis, sampling and physical modeling. Thanks to the automations available
on all parameters, every kit is very tunable and customizable, bringing a fun and
complementary approach to sample browsing while making it more interactive and userfriendly than similar products.
Incorporating a 16-step sequencer and 8 velocity-sensitive touch pads into a sturdy beat
station, Spark is your weapon of choice to bring the best groove into your tracks
whether you are working in the studio or performing on stage.
1.2 HISTORY
Early in 2001 Arturia began working on advanced algorithms for the digital emulation of
analog circuit audio characteristics. They are known as TAE®, standing for True Analog
Emulation. In non-technical terms, this is an unprecedented way of creating the very
unique sound one finds in a synthesizer such as the Bob Moog’s ones. Nearly a year after
they began work on the algorithms, Arturia was ready for feedback. At the 2002 NAMM
show in California, Arturia shared an early version of what would later be the Modular V
with the renowned maker of the original synthesizer, Doctor Bob Moog.
In seeking insight from sound production experts such as Dr. Moog, as well as avid
synthesizer users, Arturia was able to ensure the quality of the instruments they made;
so well in fact that Dr. Moog himself endorsed the Modular V. The launch of this sound
powerhouse was an instant success, winning awards from several top magazines, and
leading to the development of other synth recreations.
Shortly thereafter, Arturia started receiving many requests from musicians, producers
and bands. Many of them explained how they were planning to replace their original
hardware synthesizers with virtual instruments. Artists around the globe were beginning
to see the advantages of a software alternative to hardware-based synthesizers.
The CS-80V emulated the legendary Yamaha CS-80, considered by many as "the
ultimate polyphonic" synthesizer, and was launched at the AES 2003 in New York.
Imagine some of your favorite music from diverse artists such as Keith Emerson or
Stevie Wonder, and you'll get an idea of the capabilities of CS-80V.
ARP 2600V was launched at the Winter NAMM Show 2005 in Anaheim. This is a faithful
reproduction of the ARP 2600 and is great for just about any sound one might wish to
ARTURIA – SPARK CREATIVE DRUM MACHINE – USER’S MANUAL
Page 10

10
create: everything from drum n’ bass stabs to Star Wars’ R2-D2 sounds have been made
with the ARP.
At the Winter NAMM Show 2006, ARTURIA announced the release of its seventh product:
the Prophet V. This powerful hybrid gives you two instruments in one: it combines the
warmth of the legendary Prophet 5 programmable analog synth with the unique Vector
Synthesis textures of the digital Prophet VS.
The next year at the summer 2007 NAMM Show Arturia launched the Jupiter-8V. In
terms of sonic possibilities, it complemented its “Arturian siblings” by bringing something
different to the table. The Jupiter-8V is capable of creating very versatile sounds: You
could easily make ‘fat’ or ‘crystal’ sounds with it. In fact, Jupiter-8V sounds the way it
originally looked: ‘sleek and polished’.
The electro-pop community quickly became convinced by the qualities of the original
Jupiter-8. Artists that have used the Jupiter-8 include: Thomas Dolby, Tangerine Dream,
Jean Michel Jarre, Depeche Mode, Prince, Kitaro, Elvis Costello, Duran Duran, Huey Lewis
and the News, Journey, Yes, Devo, Billy Idol, Jan Hammer and BT, to name a few!
Recognizing the commitment artists the world over had to the sound of the Jupiter-8,
Arturia took great pains with Jupiter-8V to maintain absolute faithfulness to the sonic
characteristics of the beloved instrument while also following our penchant to allow users
to venture well beyond its original capabilities.
Then in the year 2011 Arturia introduced the SPARK Creative Drum Machine. This
powerful hybrid instrument was aimed at the producer and the live beat maker. It
proposed a unique workflow mixing the 16-step style of programming with the live
approach of pads, filtering, slicing and looping functions. Taking advantage of its
expertise in virtual analog, Arturia not only integrated emulations of classic analog drum
machines, but also acoustic drums, physical models, and powerful electronic kits all
rolled up in one easy-to-use interface. Spark was quickly and widely used by top
producers and artists such as Sandy Vee, the Glitch Mob, the Mars Volta, Vitalic, DJ
Quick, and Yeasayer.
In 2013 Arturia continued its innovative streak with the introduction of the SparkLE
hardware controller and version 1.6 of the SPARK Creative software. This powerful
combination offers all of the acclaimed features of SPARK Creative software while
maintaining an intuitive workflow all its own.
Finally, at the 2014 winter NAMM show, Arturia announced the version 2.0 of Spark
software, with a totally new GUI interface as well as many new features including an
improved sequencer, song mode, and a full modular synthesis interface for infinite sound
creation possibilities.
We are certain the SPARK Creative Drum Machine will take its place at the heart of your
creative endeavors.
ARTURIA – SPARK CREATIVE DRUM MACHINE – USER’S MANUAL
Page 11

11
2 REGISTRATION & AUTHORIZATION
Once the Spark has been installed, the next step is to register the software.
The registration process will require you to enter the serial number and the
unlock code you received with the product.
In order to proceed, go to this web page and follow the instructions:
http://www.arturia.com/register
Note: If you don’t have an Arturia account yet, you will need to create one. The
process is quick, but it does require that you can access your e-mail address
during the registration process.
Once you have acquired an Arturia account you will be able to register the product.Once
you have acquired an Arturia account you will be able to register the product.
ARTURIA – SPARK CREATIVE DRUM MACHINE – USER’S MANUAL
Page 12
12
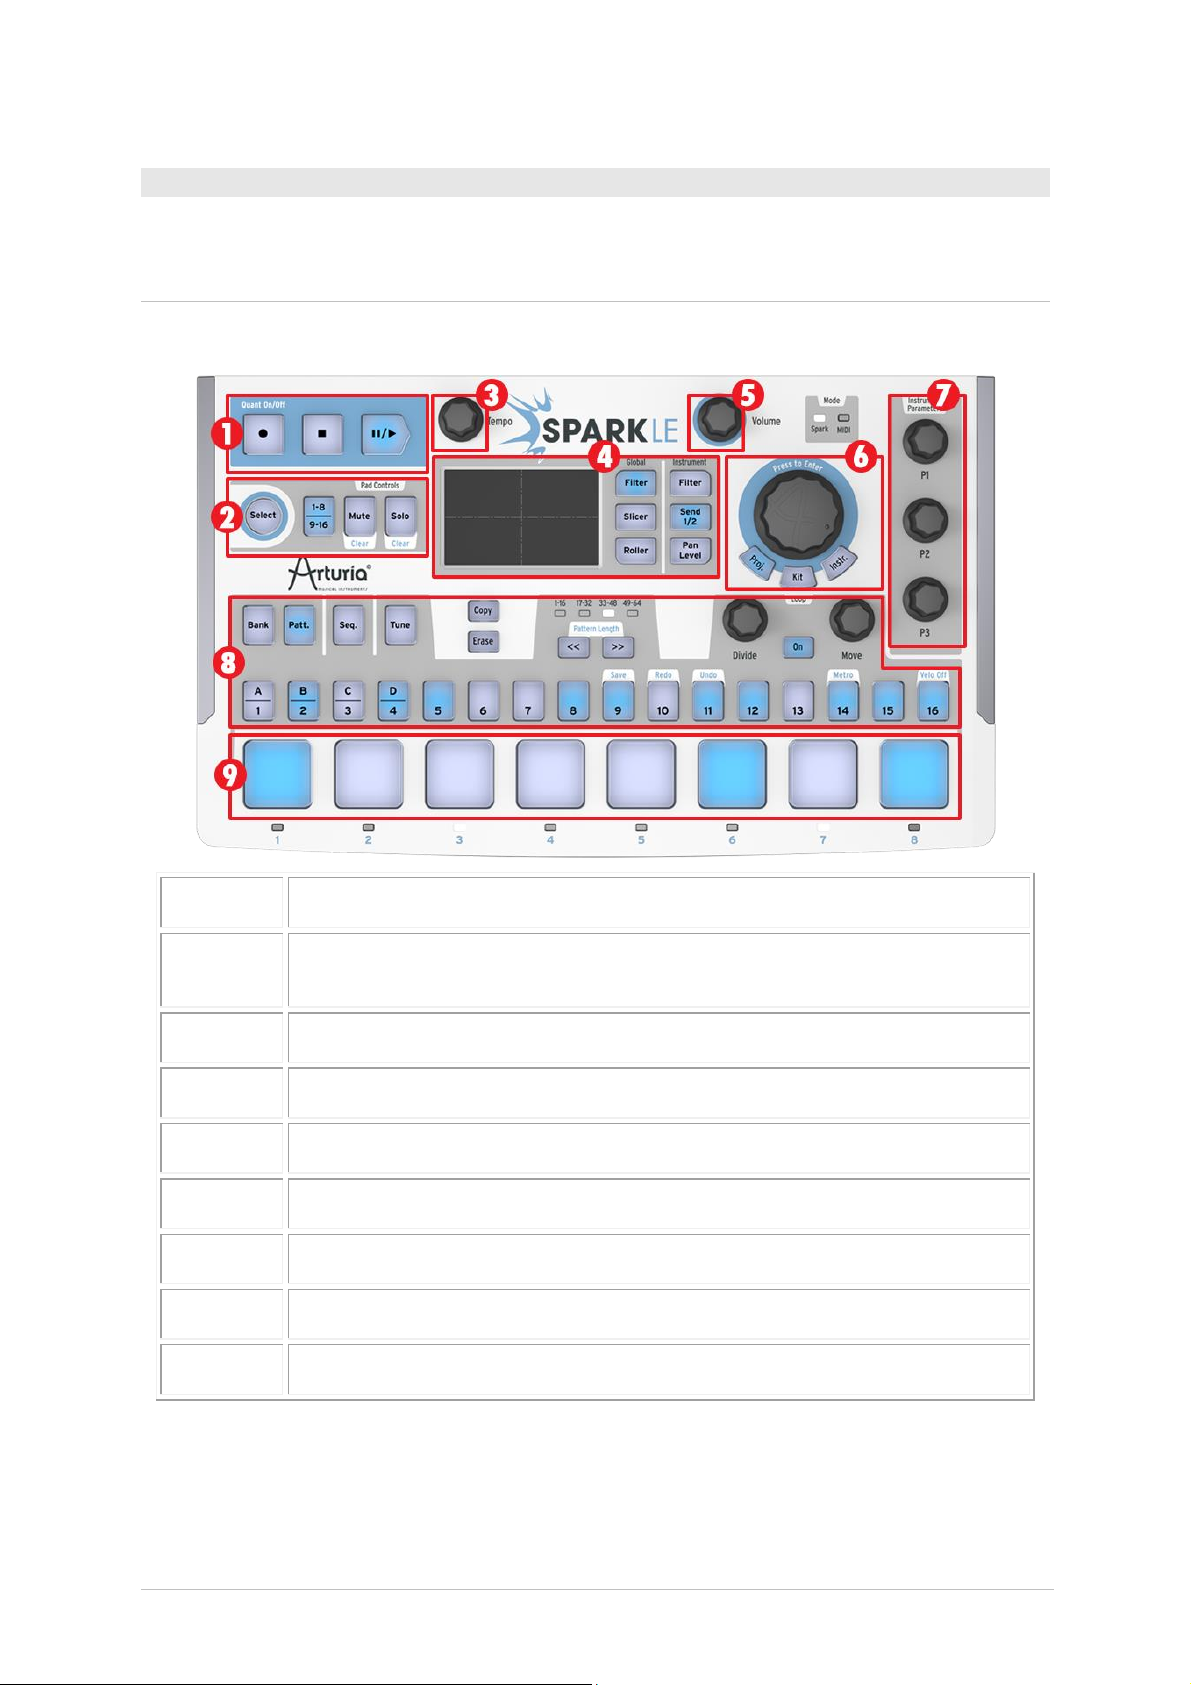
3 THE SPARKLE CONTROLLER: AN OVERVIEW
1.
Transport zone
2.
Pad controls: Select Instrument / Shortcut, Toggle Instrument page
(1-8, 9-16), Mute and Solo buttons
3.
Tempo knob
4
FX Live pad and FX Selection buttons
5.
Master Volume control knob
6.
Jog Dial and Project / Kit / Instrument mode buttons
7.
Instrument parameter knobs
8.
Sequencer zone
9.
Instrument pads
3.1 THE FRONT PANEL
In this overview we will focus on the features specific to the hardware controller.
3.1.1 The Transport zone
Record, play, pause or stop a pattern or song with these buttons.
ARTURIA – SPARK CREATIVE DRUM MACHINE – USER’S MANUAL
Page 13

13
3.1.2 The Pad controls
The buttons in this zone can select an Instrument, execute a Shortcut, switch between
two pages of Instruments in the kit, and Mute and/or Solo instruments on the fly.
3.1.3 The Tempo knob
Use this knob to adjust the tempo of your pattern or song.
3.1.4 The FX Live pad
Real-time control of performance effects on an X/Y axis. Three buttons toggle Global
effects (Filter, Splicer, Roller) and three more control effects for the selected Instrument.
The Select button can lock one effect’s position while a second effect is performed.
3.1.5 The Master Volume knob
This knob controls the overall output level.
3.1.6 The Jog Dial and Mode buttons
The Jog Dial allows you to access the library and load Instruments, Kits and Projects.
Used with the Select button you can apply search filters while selecting Instruments.
Use the Project, Kit and Instrument buttons to access the according library browser
directly. Use the jog dial and the select button to browse kits, projects, instruments or
samples:
Scrolling the Jog Wheel will let you navigate the result list. Clicking on the Jog Wheel will
load the highlighted element.
Scrolling the jog wheel while the “Select” button is pushed will navigate the list of filters.
Clicking on the jog wheel will activate/deactivate the current filter.
Click and hold the Jog Wheel, then scroll it to select a different browser (Project, Kit,
Instrument or Disk).
Hold the “Select” button and click on the Jog Wheel for 1 second to close the browser
window without loading anything.
3.1.7 The Instrument parameter knobs
Select three parameters per instrument to tweak during recording or playback.
3.1.8 The Sequencer zone
Used for selecting and editing patterns and assembling and editing songs, the Sequencer
zone also gives you the ability to alter loops in real time. You can also make quick
chromatic tuning adjustments to the selected Instrument.
3.1.9 The Instrument pads
The pads allow you to play multiple instruments at the same time from one set of eight
instruments, and the 1-8 / 9-16 page button can toggle between the other set of eight
instruments in the current kit. Use the Mute and Solo buttons to silence one or more
Instrument tracks or bring others to the forefront of the mix.
ARTURIA – SPARK CREATIVE DRUM MACHINE – USER’S MANUAL
Page 14

14
1.
USB Mini-B connector
2.
Kensington lock slot
3.2 SIDE PANEL (OVERVIEW)
3.2.1 USB connector
Use the supplied USB cable to connect the SparkLE controller to your computer’s USB
2.0 port. SparkLE is bus-powered, so no additional power supply is needed.
3.2.2 Kensington lock slot
SparkLE is highly portable, so this slot will allow an added degree of security.
ARTURIA – SPARK CREATIVE DRUM MACHINE – USER’S MANUAL
Page 15
15
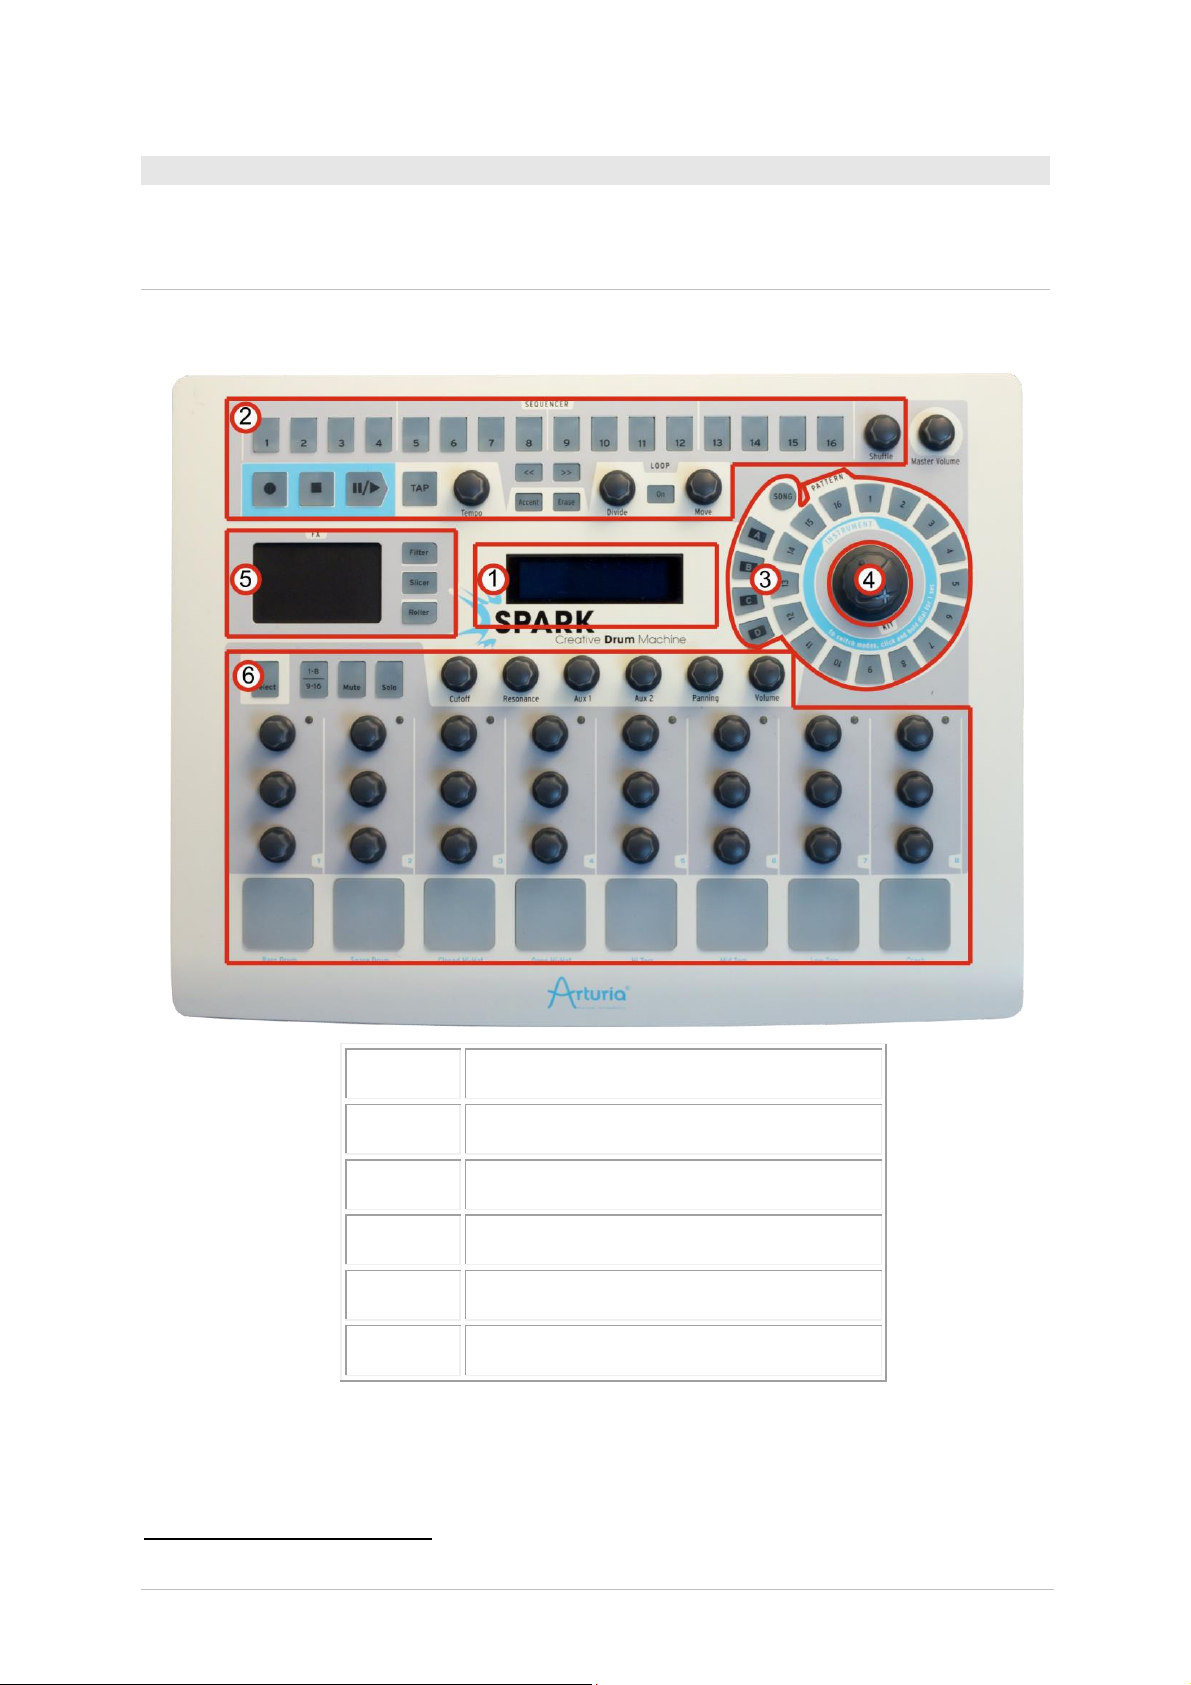
4 THE SPARK CREATIVE CONTROLLER: AN OVERVIEW
1
1
1.
Display
2.
Sequencer zone
3.
Song/Pattern zone
4.
Jog Dial
5.
FX Live pad
6.
Instrument control zone
4.1 THE FRONT PANEL
The Spark Creative controller looks the same as its Center panel in the Spark Engine. In
this overview we will focus on the features specific to the hardware controller.
ARTURIA – SPARK CREATIVE DRUM MACHINE – USER’S MANUAL
Page 16

16
4.1.1 The display
Fittingly placed at the center of the Spark Creative controller, the display is the central
source for all information about what the controller is doing.
4.1.2 The Sequencer zone
Used for viewing, assembling and editing patterns and songs, the Sequencer zone also
gives you the ability to alter loops in real time.
4.1.3 The Song/Pattern zone
All of Spark Creative’s 64 patterns can be accessed quickly from this zone. They are
arranged in four banks of 16 patterns each (A-D and 1-16). The buttons also light up to
tell you which pattern is currently playing.
4.1.4 The Jog Dial
The Jog Dial allows you to access the library and load Instruments, Kits and Projects.
When used with the Select button, you can apply search filters while selecting
Instruments.
Use the jog dial and the select button to browse kits, projects, instruments or samples:
Scrolling the Jog Wheel will let you navigate the result list. Clicking on the Jog Wheel will
load the highlighted element.
Scrolling the jog wheel while the “Select” button is pushed will navigate the list of filters.
Clicking on the jog wheel will activate/deactivate the current filter.
Click and hold the Jog Wheel, then scroll it to select a different browser (Project, Kit,
Instrument or Disk).
Hold the “Select” button and click on the Jog Wheel for 1 second to close the browser
window without loading anything.
4.1.5 The FX Live pad
Real-time control of a ton of performance effects such as filter and resonance, volume
and panning, aux sends, bit reduction, stutter effects, etc. Three buttons in this zone
toggle the Filter, Splicer and Roller effects and cycle through their many variations. One
effect can be locked in mid-modulation by the Select button while a second effect is
performed.
4.1.6 Instrument Control zone
Play the pads and tweak the parameters of one or more instruments at the same time,
either while recording a track or while playing back a pattern or song. Select between
two banks of instruments and mute or solo them using the buttons in this zone.
ARTURIA – SPARK CREATIVE DRUM MACHINE – USER’S MANUAL
Page 17
17
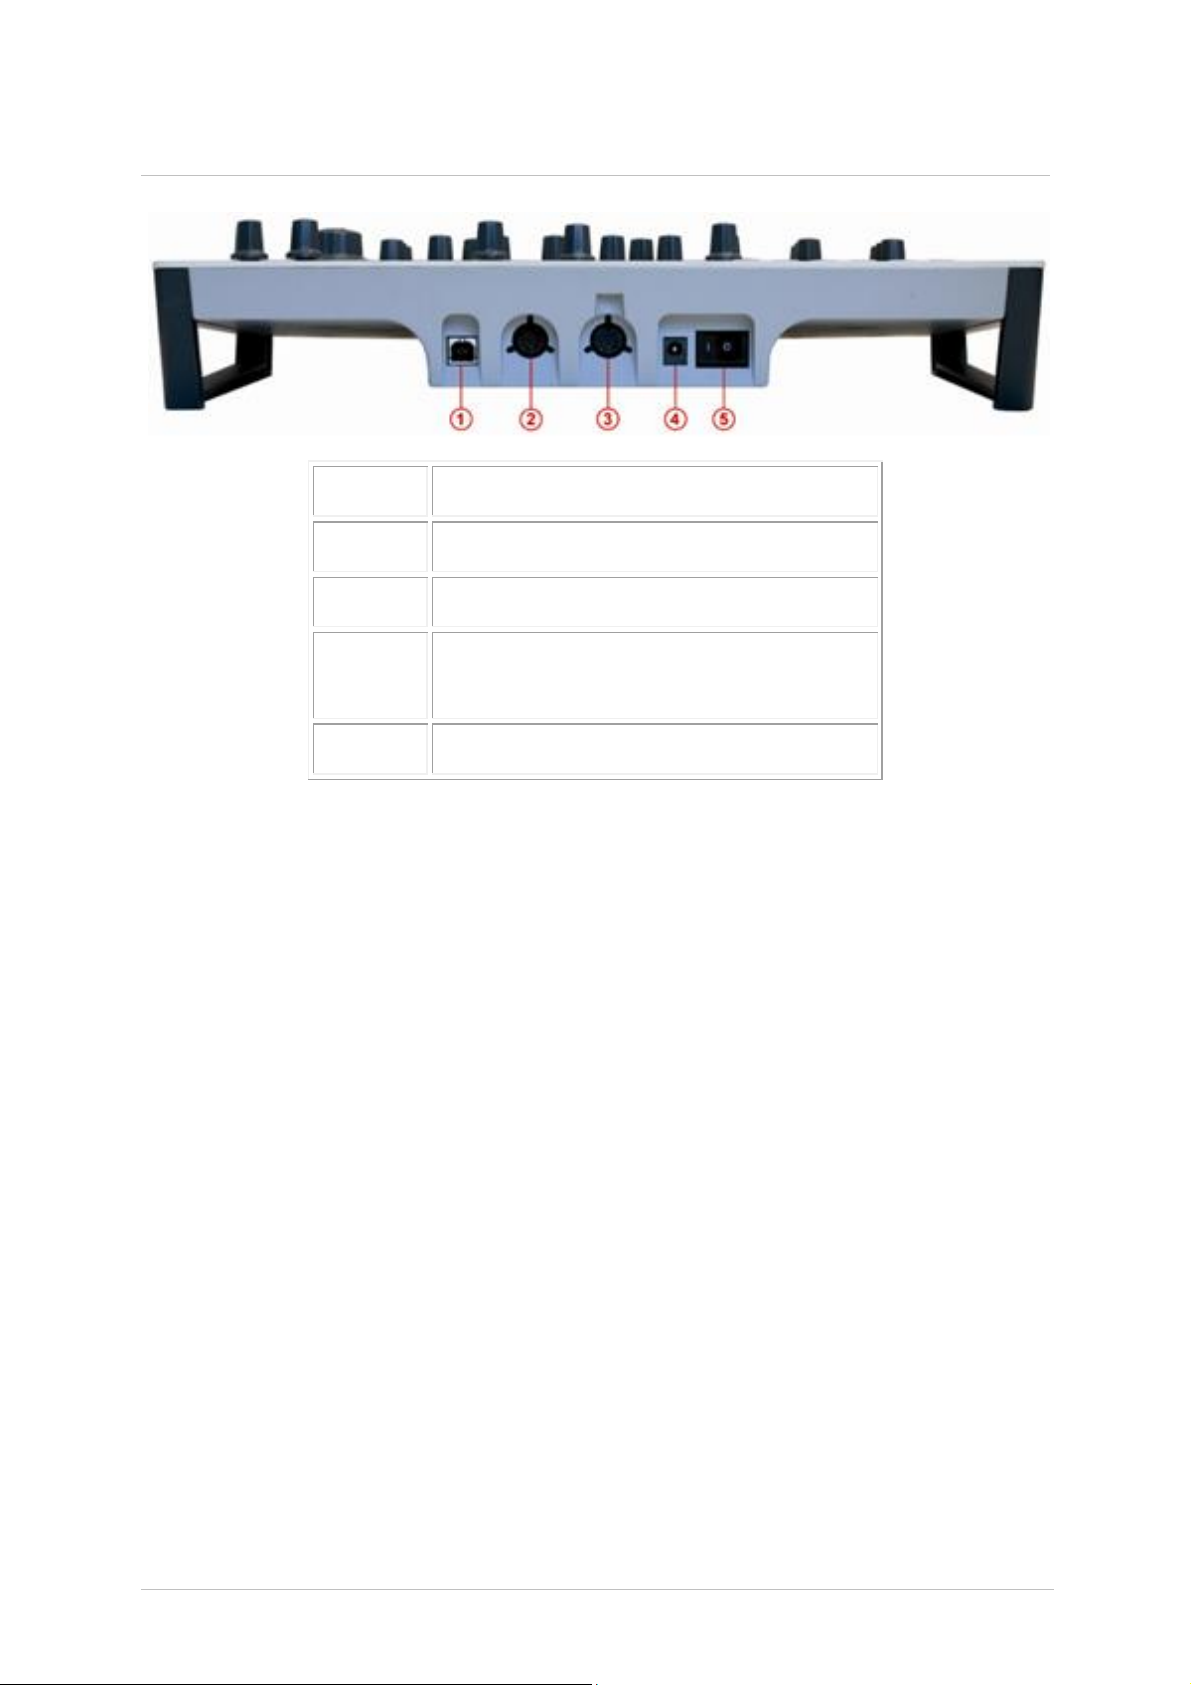
4.2 REAR PANEL (OVERVIEW)
1.
USB connector
2.
MIDI IN port
3.
MIDI OUT port
4.
Power supply
9Vdc, 800 mA, center positive
5.
Power on/off switch
4.2.1 USB connector
This connects to your computer’s USB 2.0 port for the exchange of data and for electrical
power. In addition to allowing you to control the Spark Engine this port can also take
MIDI data from the outside world and feed it to your computer, and vice versa.
4.2.2 MIDI In port
Use this port to send MIDI data from an external device into your computer.
4.2.3 MIDI Out port
This port not only sends MIDI data from your computer to external devices, it allows you
to use the Spark Creative controller to control those external devices via MIDI.
4.2.4 Power supply (optional)
Connect the Spark controller to a powered USB 2.0 port. That will supply enough power
to run the controller.
Note: You should not use the controller with a non-powered USB hub.
If you prefer to power your Spark Creative controller with a separate power supply, plug
it in here. Be sure to use one with the right specifications, though: 9 volts DC, 800 mA,
and center positive.
4.2.5 Power on/off switch
Use this to toggle the Spark Creative controller on or off.
ARTURIA – SPARK CREATIVE DRUM MACHINE – USER’S MANUAL
Page 18
18
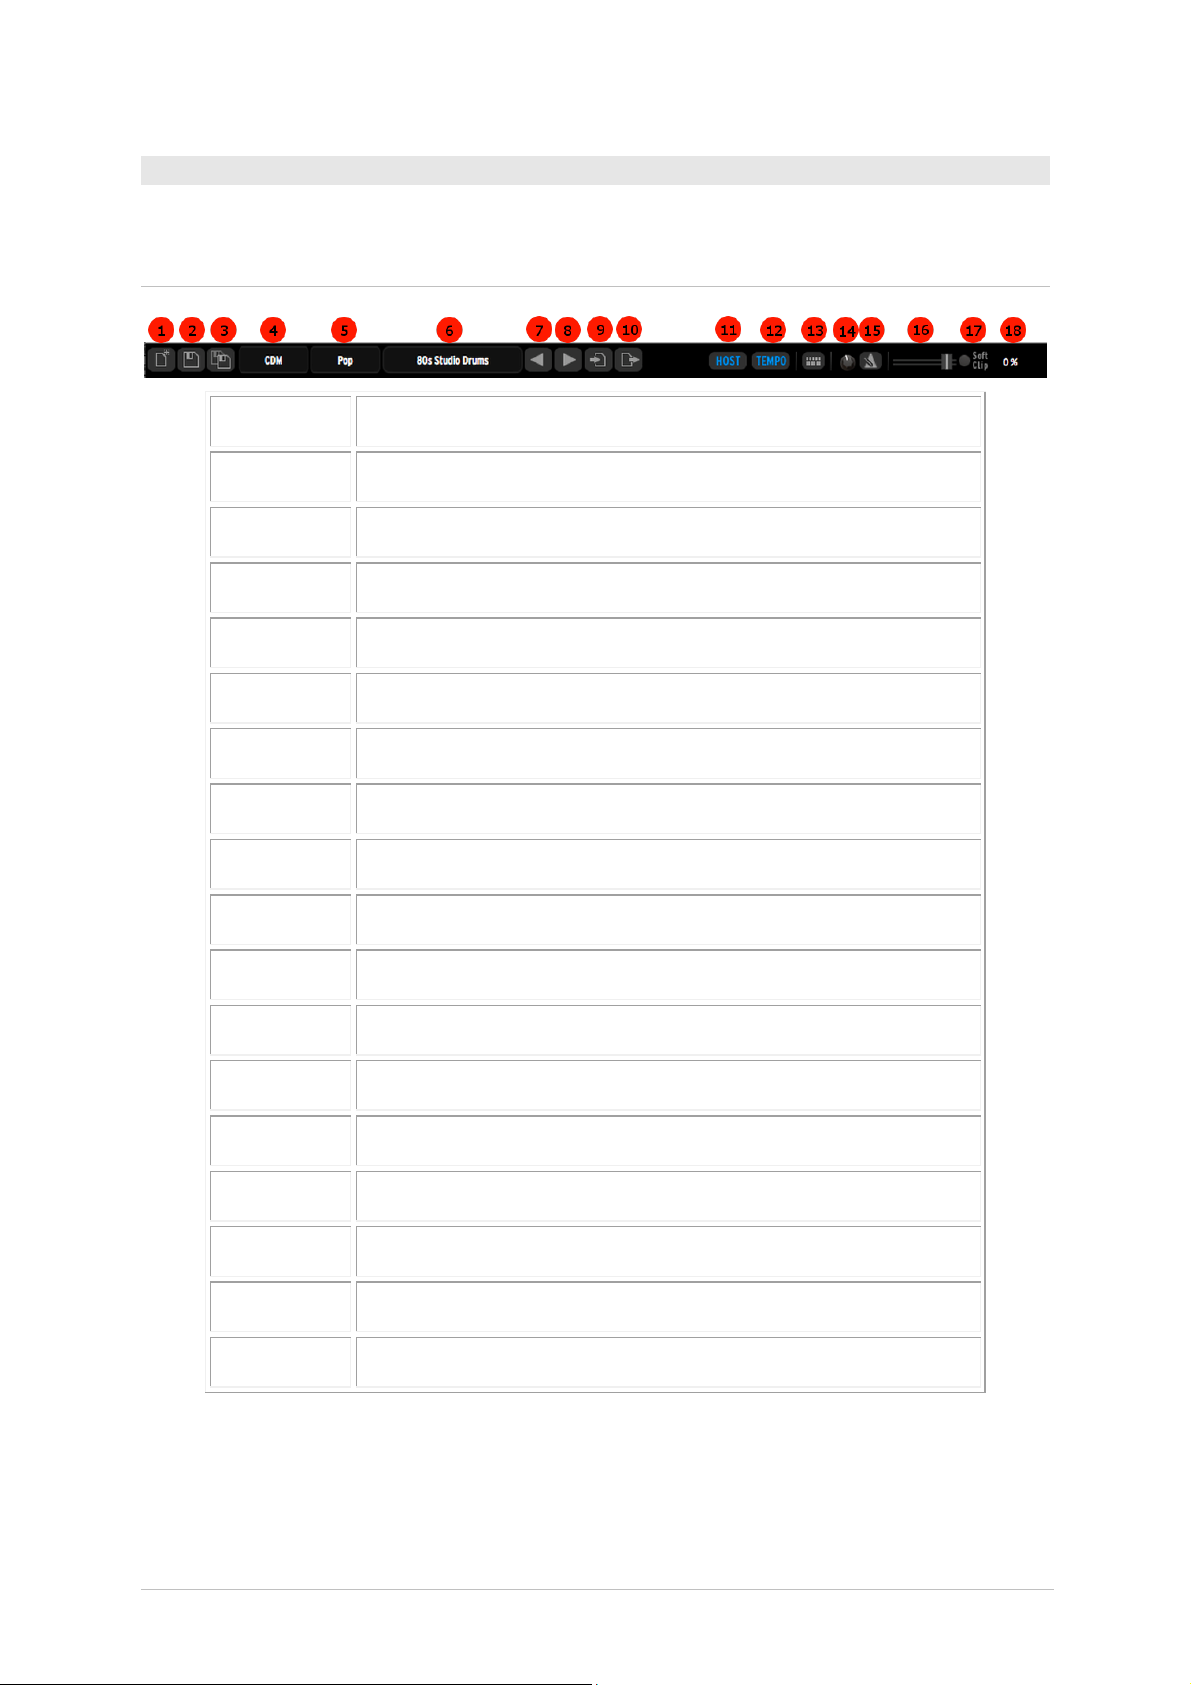
5 USING SPARK: The Software Interface
1.
New project
2.
Save
3.
Save as
4.
Bank selection
5.
Musical genre selection
6
Project selection
7.
Previous project
8.
Next project
9.
Import project
10.
Export project
11.
Sync playback with Host (only in Host mode)
12.
Sync tempo with Host (only in Host mode)
13.
‘Connect hardware’ switch (only in Host mode)
14.
Metronome volume
15.
Metronome on/off
16.
Main volume fader and vu meter
17.
Soft clipping on/off
18.
CPU consumption
5.1 THE TOOLBAR
ARTURIA – SPARK CREATIVE DRUM MACHINE – USER’S MANUAL
Page 19
19
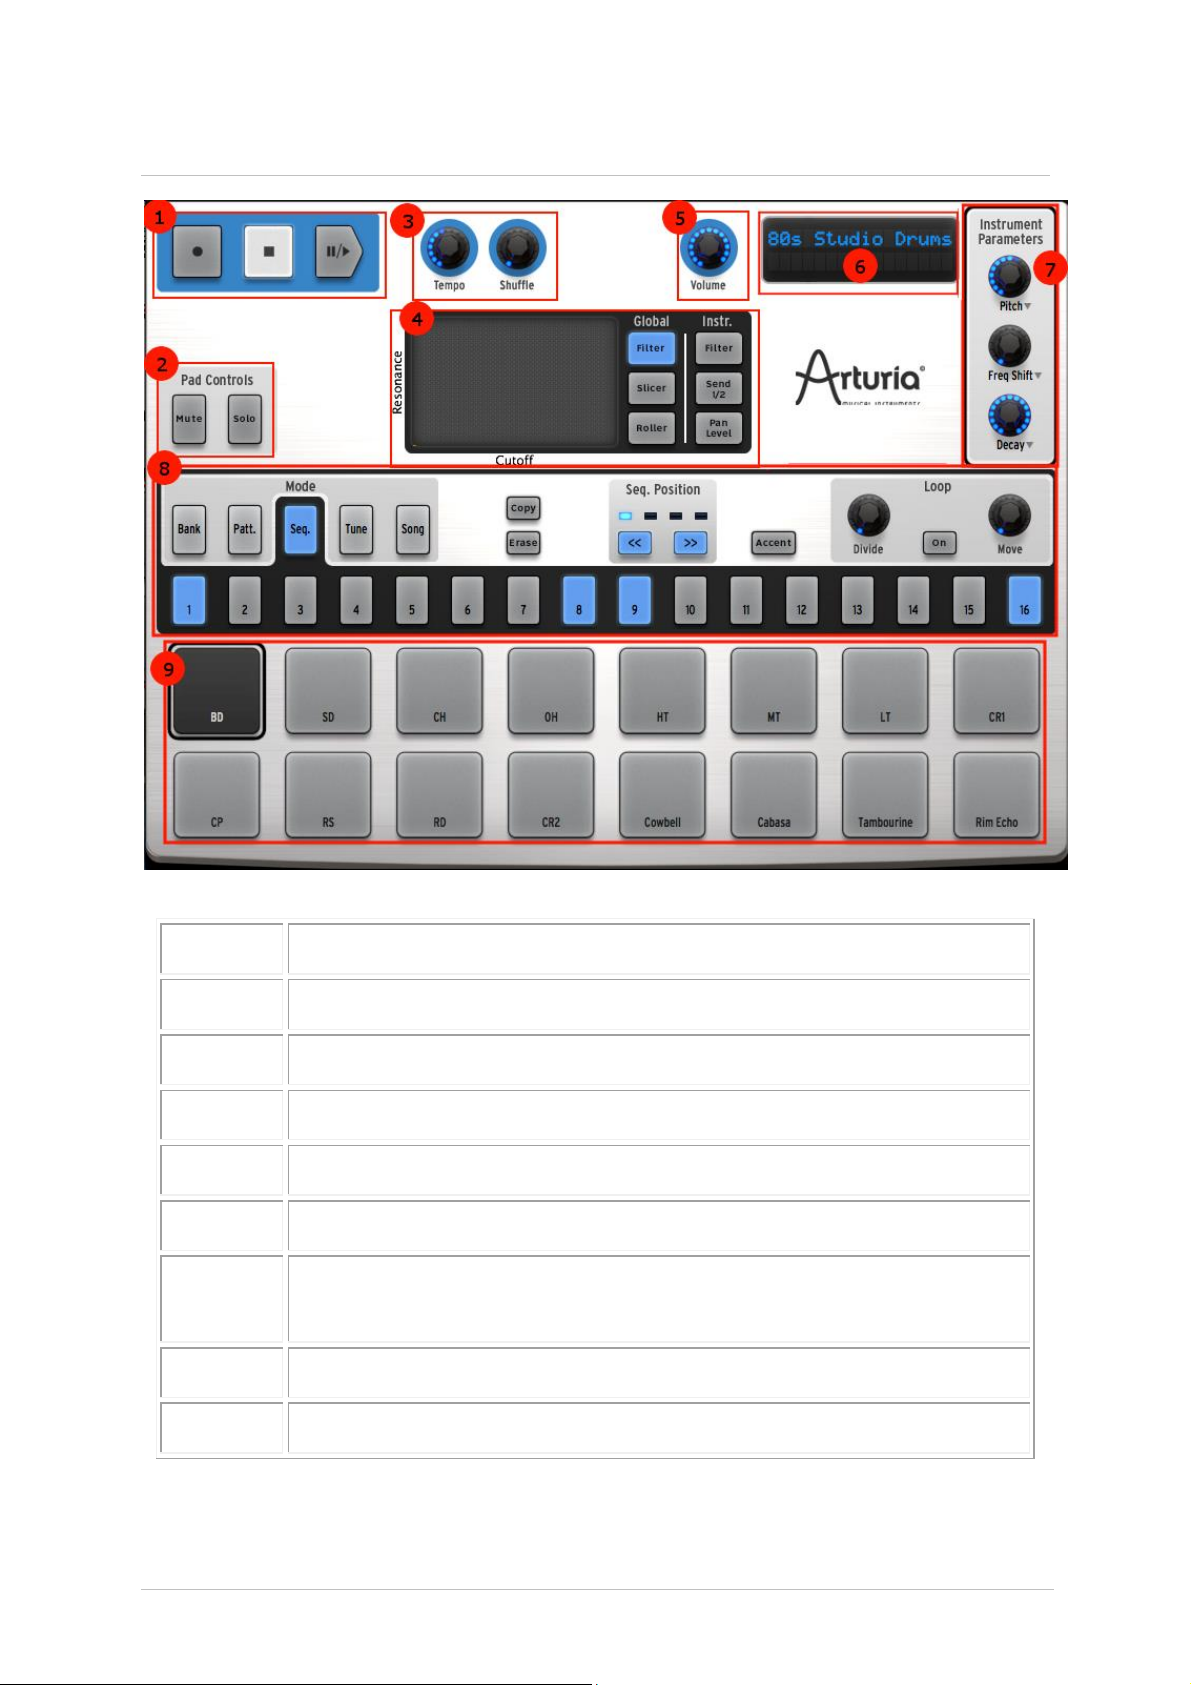
5.2 THE MAIN PANEL (SPARKLE)
1.
Transport zone
2.
Mute and Solo buttons
3.
Tempo and Shuffle control knobs
4
FX Live pad and FX Selection buttons
5.
Master Volume control knob
6.
Current project display
7.
Instrument parameter knobs
(right-click: edit motion/disable motion)
8.
Sequencer zone
9.
Instrument pads (right-click to edit the instrument)
ARTURIA – SPARK CREATIVE DRUM MACHINE – USER’S MANUAL
Page 20

20
5.2.1 The Transport zone
1.a
Record button (right-click to select quantized/unquantized
recording)
1.b
Stop button
1.c
Play / Pause button
2.a
Mute button (click Mute, then select one or more
instruments)
2.b
Solo button (click Solo, then select one or more
instruments)
3.a
Tempo control knob
Record, Stop, Play & Pause: the functions seem obvious. But this is a Transport with a
twist: Right-click the Record button and you can select whether you want the next pass
to be recorded with quantization or without.
5.2.2 The Pad Controls zone
Mute Click this button and then one or more Instrument pads to mute them.
Click Mute again to unmute those pads. Use Select + Mute to clear all
mutes.
Solo Click the Solo button and then select one or more pads to silence the other
tracks so you can focus on the ones you want to hear. Click Solo again to
return the pads to their previous state. Use Select + Solo to clear the solo
status.
5.2.3 The Tempo / Shuffle zone
ARTURIA – SPARK CREATIVE DRUM MACHINE – USER’S MANUAL
Page 21

21
3.b
Shuffle amount knob
(right-click: Swing range / Velocity emphasis)
Tempo For slower tempos turn this knob to the left; for faster tempos turn the
4.a
FX Live pad (X/Y axis control surface)
4.b
Global Filter button (right-click: Latch or Touch operation)
4.c
Global Slicer button (right-click: Latch or Touch operation)
4.d
Global Roller button (right-click: Latch or Touch operation)
4.e
Instrument Filter button
4.f
Instrument Aux Send 1 / 2 button
4.g
Instrument Pan / Level button
knob to the right.
Shuffle Sets the amount of shuffle applied to a pattern. Shuffle is a rhythmic
effect in which the duration of the first note in a series of two notes is
lengthened and the duration of the second note is shortened. This is also
known as setting the “swing amount.”
For a higher shuffle amount turn this knob to the right; for less shuffle
turn the knob to the left.
Right-click on the Shuffle knob to define the timing value on which the
shuffle will be applied (1/8, 1/16, or 1/32 note).
The right-click menu also shows the Velocity emphasis option, which
increases the dynamic range between the shuffled notes and ‘fixed’ notes.
5.2.4 The FX Live pad and Effect buttons
5.2.4.1 FX Live pad
The FX Live pad is an amazing performance tool that will apply real-time effects to your
song or patterns. It features three main effect buttons (Filter, Slicer and Roller) with an
amazing variety of options. When your cursor enters the FX Live pad area it becomes a
cross; click and hold the cursor and drag it around while a pattern is playing and you’ll
begin to get an idea of what this zone can do for your music.
By right-clicking any of the Global effect buttons you can choose between "Latch" or
"Touch" performance for that effect. "Latch" will hold the effect at its current value when
ARTURIA – SPARK CREATIVE DRUM MACHINE – USER’S MANUAL
Page 22
22
you release the cursor; "Touch" will cut off the effect when the cursor is released (i.e.,
the effect is only active when you are clicking on the Pad).
You can also enable Latch mode from the hardware controller by pressing and holding
the Select button and then pressing the Filter, Slicer or Roller button.
In Latch mode you can combine the Filter and Slicer effects: To “slice” the filtered sound,
set the filter effect to Latch mode. Now you can touch the pad and change your filter to
the desired setting. Next enable the Slicer button. The Filter will remain at its last value
while you play the Slicer on the FX Live pad.
Note that the Roller effect is not active when Slicer is set to Latch mode.
5.2.5 Live effects: Global
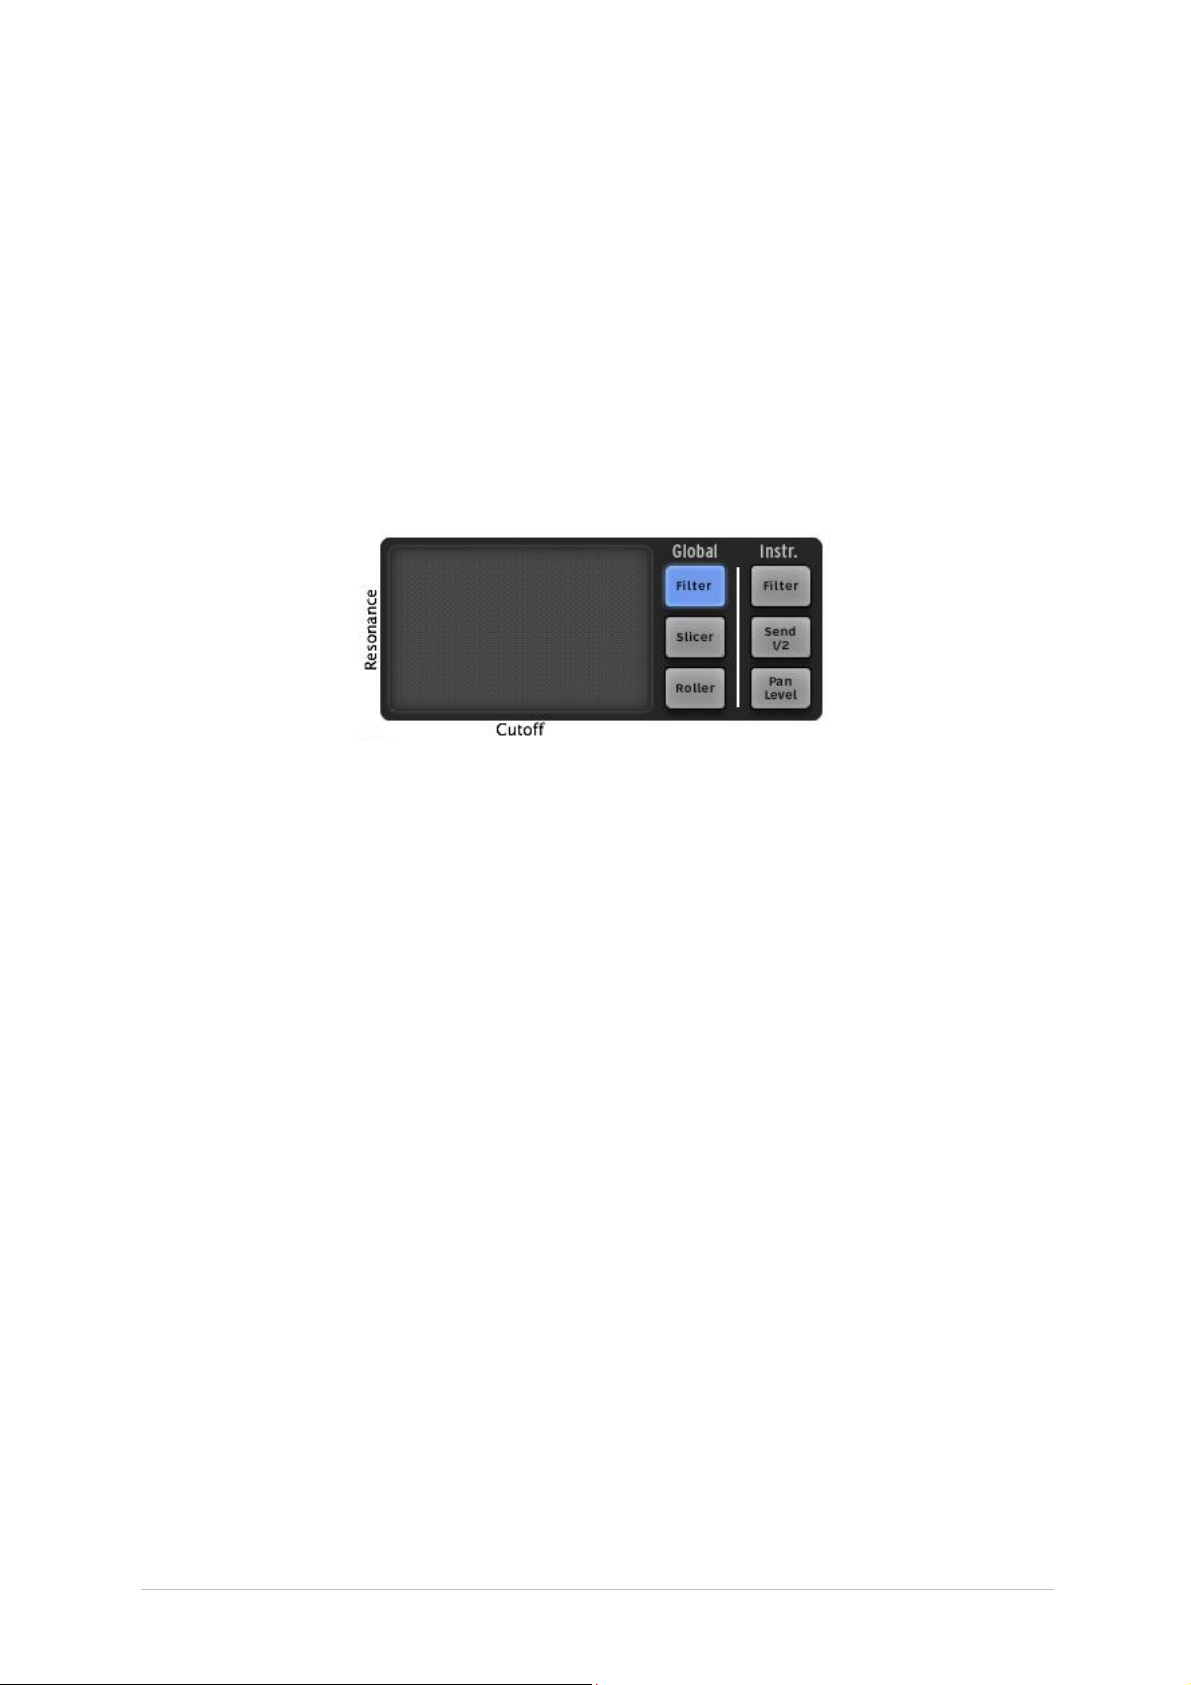
5.2.5.1 The Filter Button
The Filter button offers proprietary Low pass, Band pass and High pass filters, plus
Oberheim-style Low, High, Band pass and Multi-mode filters, each with cutoff and
resonance.
To select a filter type, click on the Filter button repeatedly. You’ll see the display cycle
through the options; just stop clicking when you reach the one you want. You can also
access the one you want directly by keeping the Filter button pressed and moving your
cursor or finger to the filter type you want to select.
The cutoff frequency and resonance can be modulated with the mouse in the Spark
Engine or with your finger on the FX Live pad of the hardware controller.
The resonance is modulated vertically (up and down, or along the Y axis), and the cutoff
frequency is modulated horizontally (from right to left, or along the X axis).
Play a pattern and click or touch anywhere on the right edge of the FX pad while
maintaining your click or touch; draw a straight horizontal line towards the left side of
the FX pad. You will hear the cutoff frequency sweeping downward. The amount of
modulation applied can be seen on the center display panel.
Now place the cursor somewhere on the right half of the FX pad and trace a line straight
up to the top edge of the pad. You are modulating the resonance.
Of course, both cutoff and resonance can be modulated simultaneously by moving your
finger or the mouse in any direction and at any speed you wish.
5.2.5.2 The Slicer button
The Slicer will grab a portion of the pattern and apply the effect you have chosen
repeatedly at the timing value you select with the FX Live pad (except for the Tape
effect, which only happens once per press). Multiple presses of the Slicer button will
allow you to choose between the following effects:
ARTURIA – SPARK CREATIVE DRUM MACHINE – USER’S MANUAL
Page 23
23
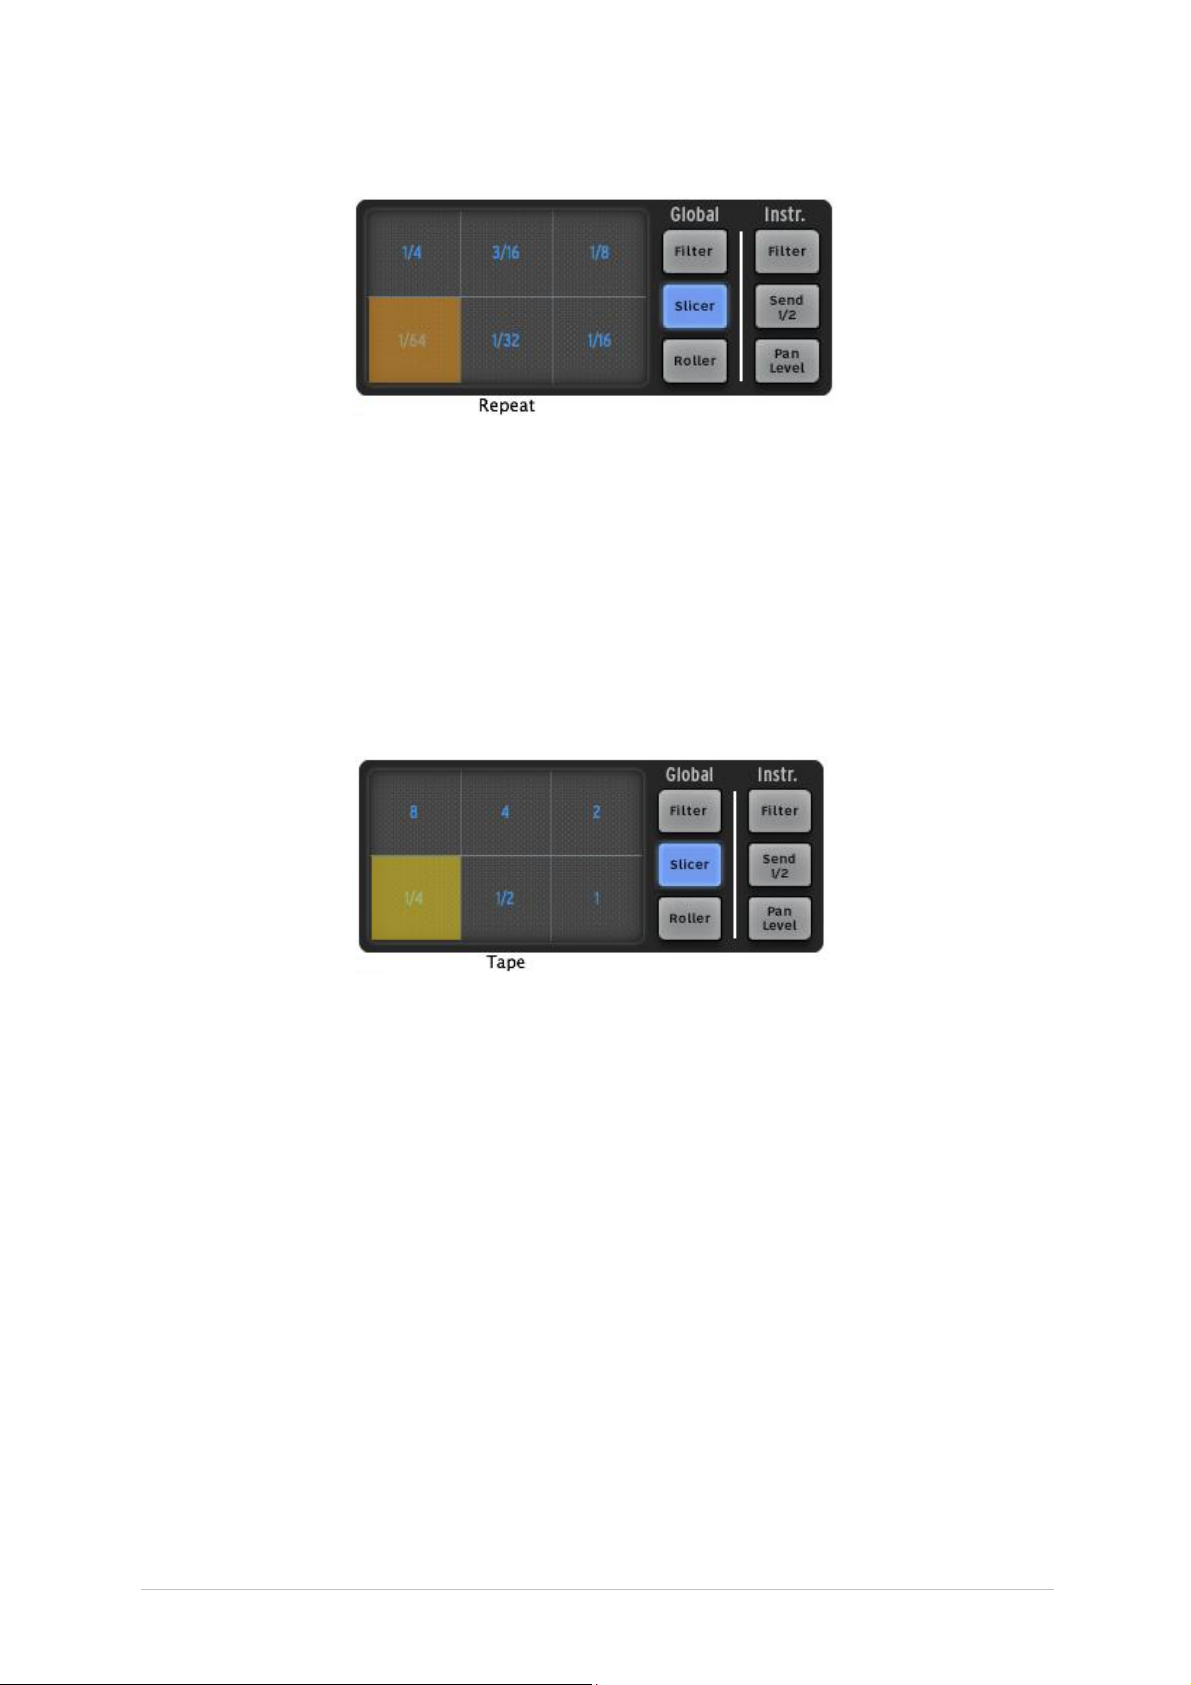
Repeat
Slicer example 1: Repeat effect options
Click to choose a timing value for the Repeat effect. If you click 1/16, for example, a
sixteenth-note-sized chunk of the pattern will be looped until you select another value or
let go of the pad. Results will vary based on where you were when you triggered the
effect.
Note that the Repeat effect is similar to the Repeat mix effect, except that Repeat does
not continue to play the entire pattern underneath the repeated section.
Tape
Click the Slicer button again to select the next effect, which will be the Tape effect:
Slicer example 2: Selecting the Tape FX
The Tape effect simulates the effect of slowing down a tape player. The different values
inside the FX Live pad grid represent the amount of time it will take the pattern to slow
to a stop.
Reverse
The Reverse effect simulates the effect of playing a tape recording backwards.
Strobe
The Strobe effect will play and shut off the sound alternately at the rate of the selected
note value.
Pan
The Pan effect will move the sound from the left speaker to the right speaker at the rate
of the selected note value.
Bit Crush
ARTURIA – SPARK CREATIVE DRUM MACHINE – USER’S MANUAL
Page 24
24
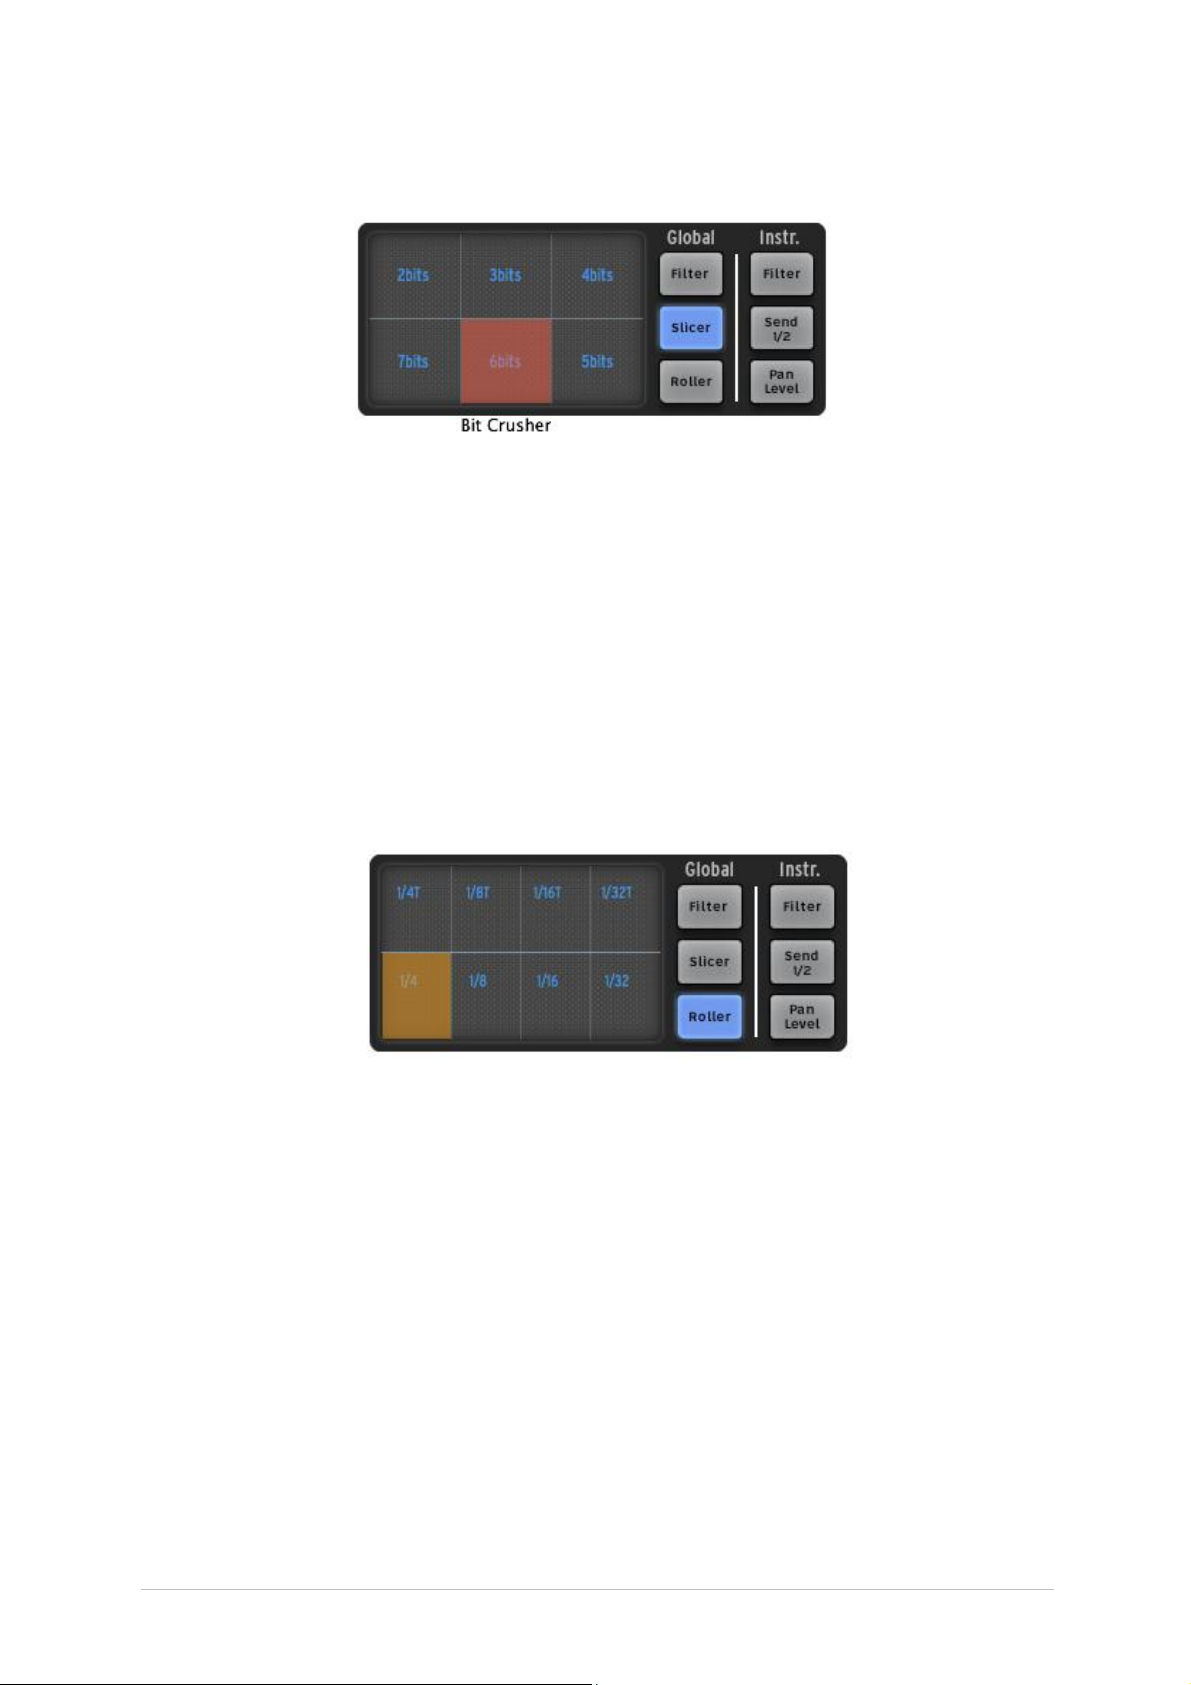
The Bit Crush effect allows you to reduce the audio bit rate, creating a bit-reduction or
bit-crushing sound effect. Reduce the audio anywhere from 7 bits down to 2 bits.
Slicer example 3: Bit crusher options
Repeat mix
Click to choose a timing value for the Repeat mix effect. The effect will be applied for the
amount of time your mouse click is maintained. Release your click to cancel and resume
normal playing.
The Repeat Mix effect is different from the Repeat effect in that it will continue playing
the entire pattern underneath the looped section.
5.2.5.3 The Roller button
The roller could be described as a "Drum roll" tool. It allows you to perform perfectly
timed drum rolls easily from the pads, while also changing from one timing value to
another by clicking on different areas of the FX Live pad.
Roller effect options
Choose the note value for the Roller effect from the choices in the FX Live pad area.
Then, click and hold the snare drum pad. The snare drum will play a basic drum roll.
You can play any instrument pad using this effect.
The beginning point of the roll is quantized by default.
A swing effect (dotted or triplet) can be added by selecting one of the upper set of note
values, while the bottom set of values will be played ‘straight’.
When Swing dotted effect is on, a dotted beat is added after the first beat.
When Triplet is on, three notes are played per note value.
‘Roller Swing Mode’ preference let you choose between dotted notes or triplet notes.
The Roller effect can be Latched to “On” by right-clicking on the Roller button. Now any
pad you play will have the roll effect applied. This is a great way to enter notes into a
pattern.
Note: The only way to trigger the Roller effect when the SparkLE controller is not
connected is to use the Latch feature.
ARTURIA – SPARK CREATIVE DRUM MACHINE – USER’S MANUAL
Page 25
25
5.2.6 Live effects: Instrument
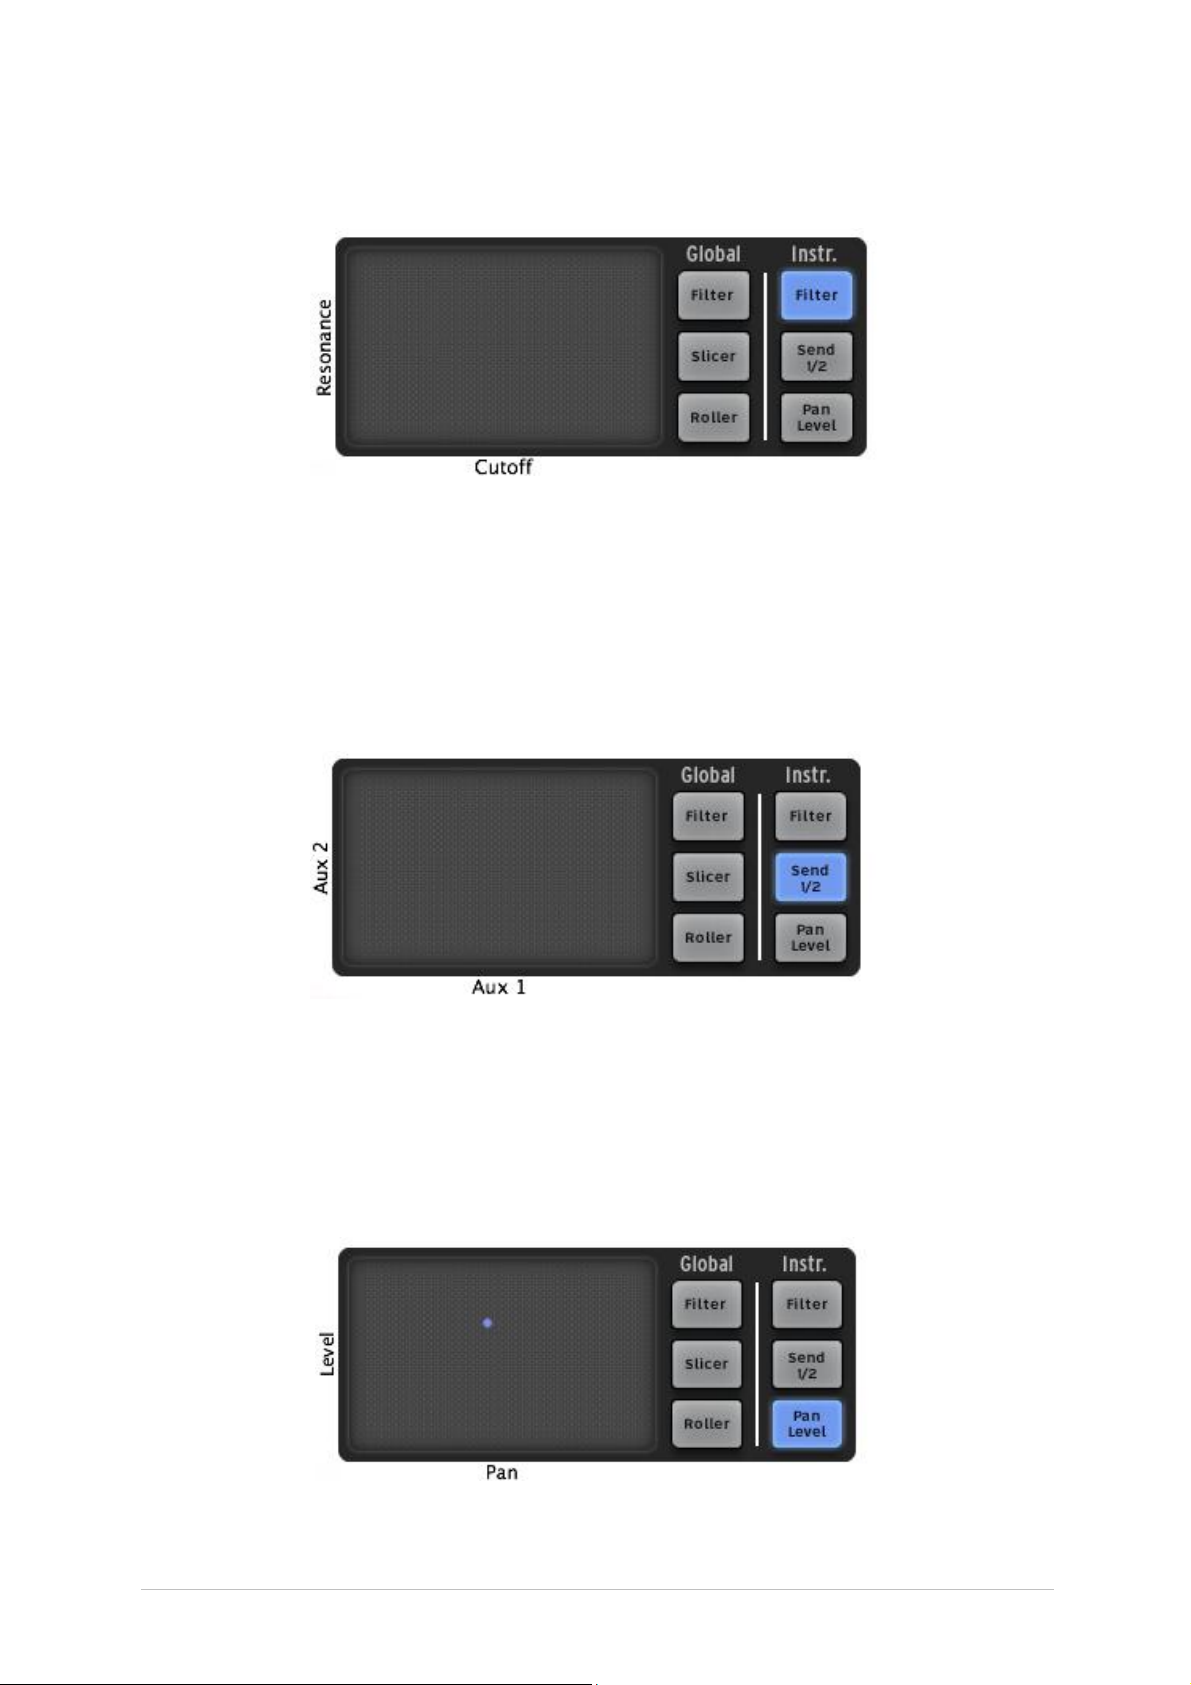
5.2.6.1 The Filter button
The Filter type for the kit is determined by the setting for the Global Filter button, but
SparkLE allows you to apply this effect to one instrument at a time rather than the entire
kit, if you like. To do this, select an instrument such as the snare (press Select +
Instrument pad 2), then press the Instrument Filter button (pictured). Now the Live FX
pad will alter the filter frequency and resonance for the snare only.
As you can see in the picture above, the X axis controls the filter’s cutoff frequency and
the Y axis controls the resonance.
5.2.6.2 The Send 1 / 2 button
Similar to the process described above, you can single out one instrument for the live
alteration of its Aux 1 and Aux 2 effect sends. If you want Tom 1 to have a sudden burst
of reverb and/or delay, use the Select button to choose Instrument pad 5 and then press
the Send 1 / 2 button (pictured). Then sweep your finger or cursor around inside the FX
Live pad area and boost or cut Send 1 and/or Send 2 until you get the desired results.
The Y axis controls Send 1 and the X axis controls Send 2.
5.2.6.3 The Pan / Level button
The Instrument effect Pan / Level button allows you to control the stereo position and
volume of a single Instrument inside a kit. So if you want to sweep the closed hi-hat
ARTURIA – SPARK CREATIVE DRUM MACHINE – USER’S MANUAL
Page 26
26
from the left side of the mix to the right, for example, press Select + Instrument pad 3
and then press the Pan / Level button. Then use the FX Live pad to place the hi-hat
where you want it to be in the stereo field.
The X axis controls the instrument level and the Y axis controls the stereo position.
5.2.7 Song Mode in the Center panel
5.2.7.1 The Song button
Click on the Song button to enter the Song mode. The Song button will flash
continuously to let you know that you are now in Song mode. Click on the Play button in
the transport zone.
Listen! Your patterns are now chained together and played one after another in the
sequence defined in the song panel.
The Step pads (numbered from 1 to 16 at the top of the Center Panel) are used to
trigger the 16 pattern chains.
To edit your Song, refer to section 5.5 “The Song Panel”.
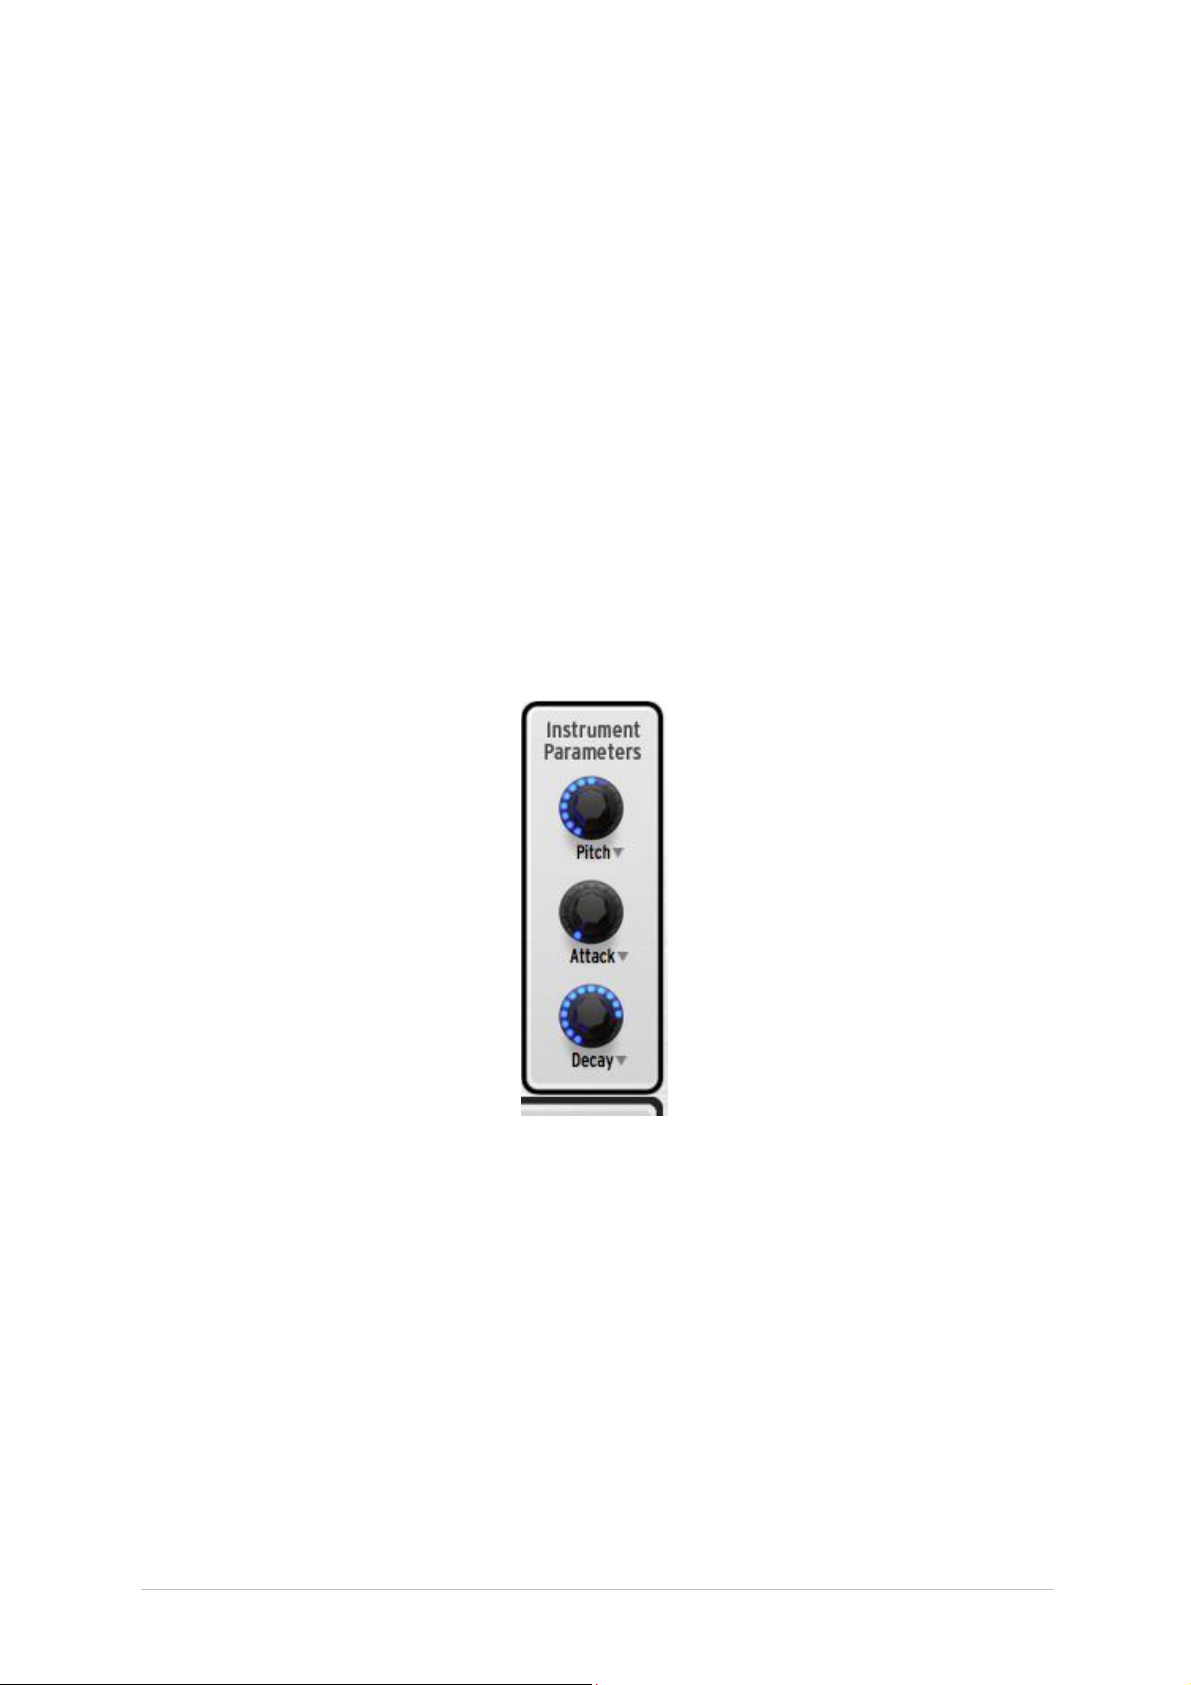
5.2.8 The Instrument Parameter knobs
The three knobs on the right side of the Center panel control the selected instrument's
parameters. Let’s say you want to change the pitch of the bass drum. Click the bass
drum pad. After this the Instrument Parameter knobs will show which three parameters
have been selected for the bass drum: in this case, Pitch, Attack and Decay.
With a pattern playing, click and hold the "Pitch" knob and then move your cursor up
and down. This will rotate the "Pitch" knob and change the pitch of the bass drum. The
display will show the amount of change being applied to the pitch in terms of semitones.
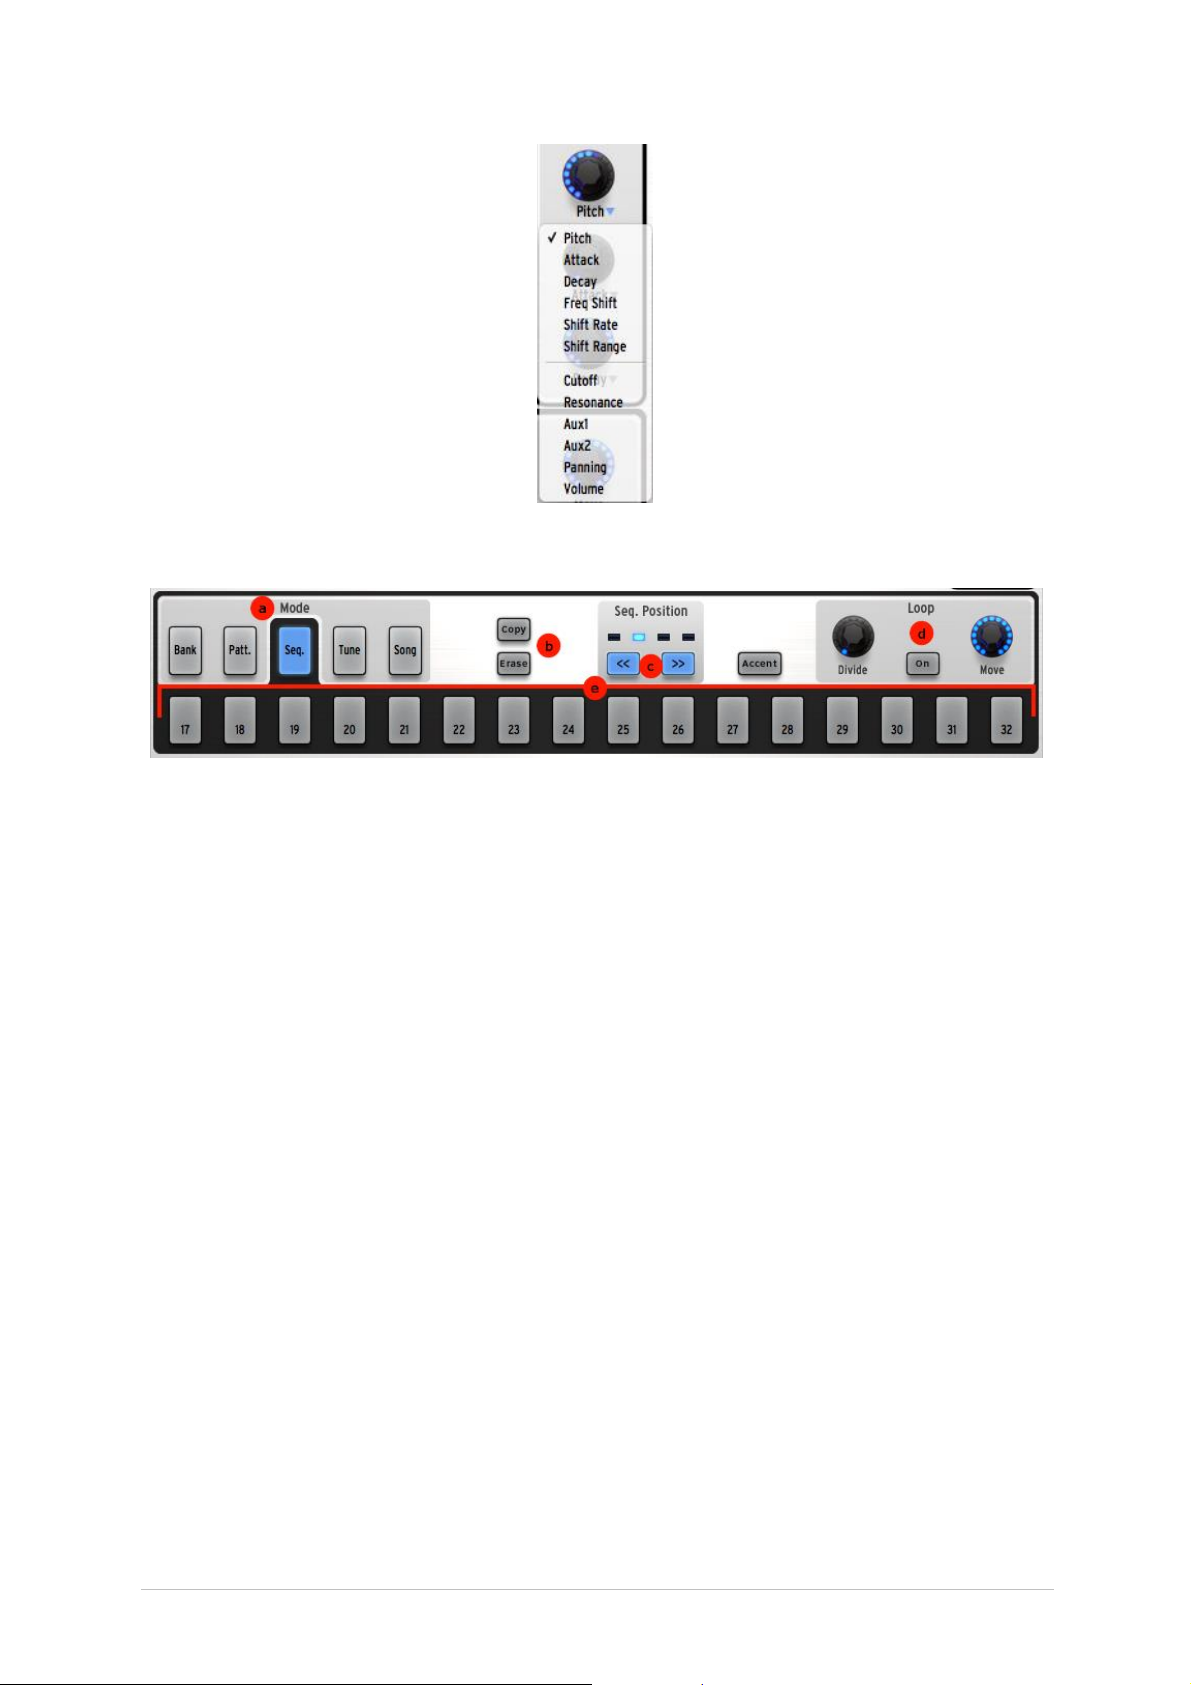
5.2.8.1 Altering the Instrument Parameter assignments
It is possible to assign completely different parameters to the Instrument Parameter
knobs. To change the assignment for the first knob, for example, click on the word
“Pitch”. A drop-down list will appear. Make a selection from the list by clicking on one of
the parameters. The list will disappear and the name of the new parameter will be visible
under the knob.
ARTURIA – SPARK CREATIVE DRUM MACHINE – USER’S MANUAL
Page 27
27
5.2.9 The Sequencer zone
The Sequencer zone is divided into several zones:
5.2.9.1 The Step Pad Function Select buttons (a)
When they are selected, these four buttons change what the Sequencer Step pads do:
Bank The first four Sequencer Step pads will be labeled A-D and the others will
have no labels. This allows you to select between four different banks of 16
patterns
Patt. All 16 Sequencer Step pads will be numbered, and each will select one of
16 patterns
Seq. Each Sequencer Step pad will represent the presence or absence of a
musical event in the selected instrument track, as well as the current position of
the sequencer within the pattern (see section 5.2.9.3).
Tune The Sequencer Step pads will be labeled with numbers from -8 to +7, with
each number representing the amount of tuning change that will be applied to the
selected instrument after pressing its pad. The ‘0’ pad will return the instrument
to its default pitch.
5.2.9.2 The Copy / Erase buttons (b)
These two buttons have very different functions:
Copy Allows you to copy a pattern from one location to another inside the same
bank, or to a different bank to the same pattern number location. First click
‘Copy’ and select the source bank and pattern, and then select the destination
pattern or bank and Spark will do the work. Press the Copy button again to
cancel the operation.
Erase When pressed, the display will prompt you to select a pad, a pattern or a
bank of patterns to erase.
o To erase a bank, press Erase and then select one of the banks (A-D)
o To erase a pattern, make sure you’re inside the proper bank before you
press the Erase button. Then press Erase and select the pattern
ARTURIA – SPARK CREATIVE DRUM MACHINE – USER’S MANUAL
Page 28

28
o When a pad is selected, its entire sequencer track will be erased inside the
current pattern
o For “spot erase” while a pattern is playing, press the Record button, then
the Erase button, and then press the instrument pad at the proper time.
5.2.9.3 The Pattern Length buttons (c)
These buttons fulfil two functions: while the pattern is not playing they can toggle
between the currently selected set of steps and the next (1-16 or 17-32, etc.). But when
used in conjunction with the Select button they allow you to change the pattern length
(which can be done while the pattern is running).
When a pattern contains more than 16 steps the Sequencer Step pads can follow the
position of the pattern when it crosses over from steps 1-16 to steps 17-32, and then to
steps 33-48, etc. This is called “Sequencer Follow mode”. To toggle this feature on or
off, simply press the << and >> buttons at the same time.
5.2.9.4 The Loop mode controls (d)
Patterns are always looping, so “Loop mode” means something else: It allows you to set
up a “loop within a loop” and experiment with different portions of the pattern, either for
editing or performing. Here are its components:
On Will engage or disengage Loop mode.
Divide Allows you set the loop size. Moving it one notch will cut the loop in half
or double its size (when possible). The settings are 1/2, 1/4 and 1/8 of the
pattern size, all the way down to the minimum loop size: one step.
Move Will move the loop start in one of two ways. Right-click on the Move knob
to choose an option:
o “Shift by one step” will shift the loop start point to any given step of the
pattern
o "Shift by one loop size" will move the loop start point in increments of the
loop size (as defined by the Divide knob).
5.2.9.5 The Sequencer Step pads (e)
The 16 Sequencer Step pads can be numbered from 1-16, 17-32, 33-48, or 49-64
depending on the length of the pattern and the timing value assigned to each step.
These pads offer a lot of information about the selected pattern. When a pattern is
playing you will know the real-time playing position at a glance because it is indicated by
a pad that is brighter than the others. When a pad has a constant blue light it means the
sequencer will trigger the selected instrument at this position in the pattern. If a pad is
not lit, it means no note will be played by that instrument at that point. You can decide
to add a note-on event or remove one by toggling the state of these pads.
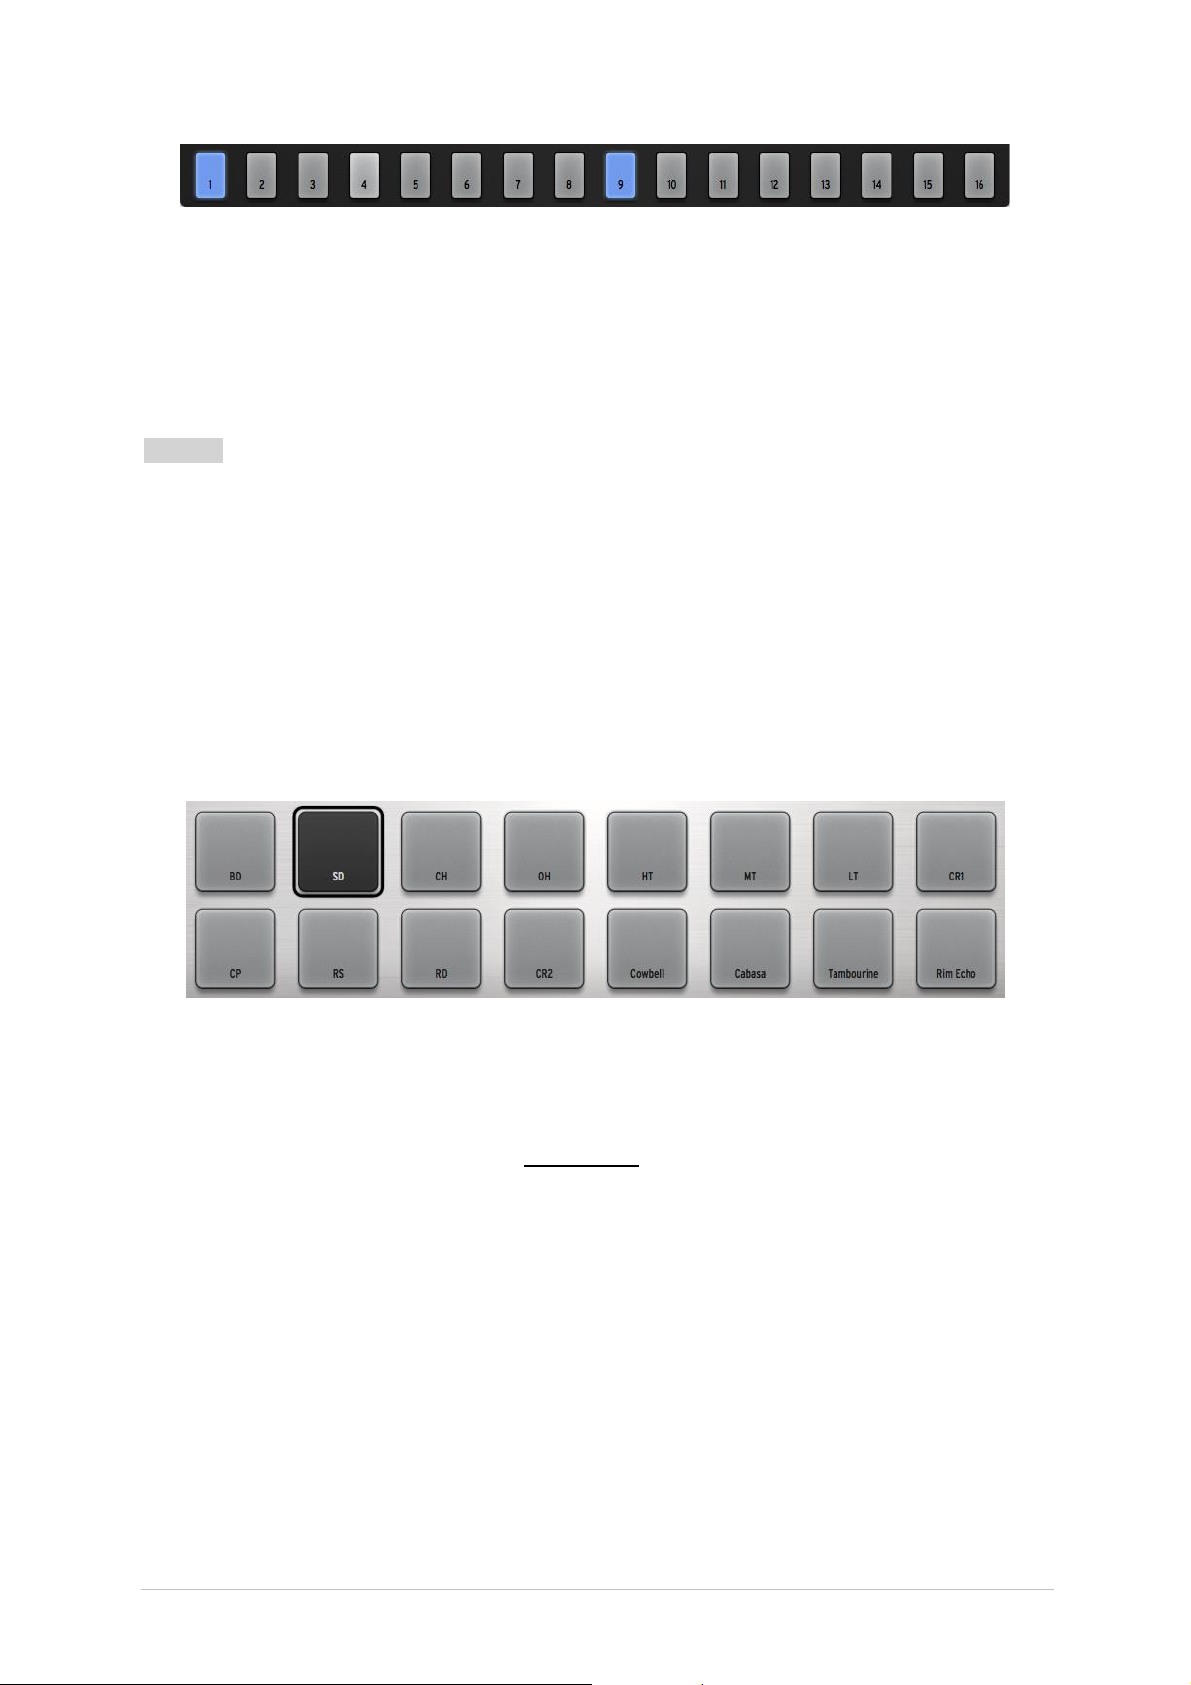
A simple example is the bass drum track on pattern A1, which is pictured below. The
bright blue lights on pads 1 and 9 indicate bass drum events on beats 1 and 3 of the first
bar. The gray light on pad 4 is lighter than the others, which indicates the current realtime playing position.
ARTURIA – SPARK CREATIVE DRUM MACHINE – USER’S MANUAL
Page 29
29
You can edit this track by pressing a pad to add a bass drum event to the pattern. While
the pattern plays, click on pads 7 and 15. They will become lit, and you will hear new
bass drum events during the first bar of the pattern. Now click on pad 9: the blue light
turns to darker gray, and that note has been removed from the pattern.
5.2.9.6 Copying or Swapping Patterns
You can also use the Sequencer Step pads to copy or swap patterns in the currently
selected bank.
To copy a pattern to another location, click on a pattern number and then drag it on top
of another pattern and drop it. A confirmation window will appear. Remember, this will
replace the destination pattern with the source pattern, so if you’re sure it’s okay to lose
the destination pattern, click OK.
To swap two patterns, click on a pattern number while holding [Option/Alt in Mac OSX
or [Ctrl in Windows and then drag it on top of another pattern and drop it. A
confirmation window will appear. Click Ok.
The exact same procedure applies to copying or swapping entire banks of patterns.
To export a pattern as a MIDI file to your system or to your DAW, drag the pattern
outside the Spark window and drop it on a system folder or one of the DAW windows.
5.2.10 The Pads
An instrument is assigned to each of the 16 pads. The far left pad is by default the Bass
Drum; next to it is the Snare drum, and so on; but you can set the pads up in any order
you like.
To edit an instrument, right-click on the pad and then click Edit. This will take you to the
"Studio" inside the Bottom panel where you will be able to edit the instrument with a full
array of parameters. (See section 5.6 The Studio).
One really cool feature is the ability to import your own samples into the Spark Engine
by dragging them from a folder on your computer and dropping them onto one of the
sixteen pads. From there you can right-click as described above so you can shape the
sound of the new sample using the powerful voice architecture of the Spark Engine.
5.2.10.1 Tune Mode
Pressing “Tune” allows you to play the selected instrument at different pitches using the
Sequencer Step pads, numbered from -8 to +7.
To do this, locate the Tune mode preference in the Top panel’s Preference section and
set it to “Pads” instead of “Sequencer Steps.”
You can now use the pads as a keyboard to play notes on the current instrument. The
pads offer a range of 16 semi-tones by using the 1-8 / 9-16 button:
With the 1-8 / 9-16 button unlit you can play notes from the current instrument
tuned from -8 semi-tones to -1 semi-tone.
ARTURIA – SPARK CREATIVE DRUM MACHINE – USER’S MANUAL
Page 30

30
With the 1-8 / 9-16 button lit you can play notes from current instrument pitch
1.
Play instruments with pads (right-click: edit the instrument)
2.
Instrument parameter knobs
(right-click: edit motion/disable motion)
3.
Instrument Select / Shortcut Select button (Hold select, then press an
instrument pad or sequencer step pad)
4
Instrument page button (Instruments 1-8 and 9-16)
5.
Mute button (Click Mute, then select one or more instruments)
6.
Solo button (Click Solo, then select one or more instruments)
7.
FX – Aux 1 and 2 – Pan and volume Knobs
(right-click: edit motion/disable motion)
8.
Click within a zone to select instrument track
upward to +7 semi-tones.
You can offset the starting pitch by moving the Jog Dial when you are in Tune mode.
5.3 THE MAIN PANEL (SPARK CREATIVE)
ARTURIA – SPARK CREATIVE DRUM MACHINE – USER’S MANUAL
Page 31

31
9.
FX display window
10.
Filter button (right-click: Latch or Touch operation)
11.
Slicer button (right-click: Latch or Touch operation)
12.
Roller button (right-click: Latch or Touch operation)
14.
Jog Dial
15.
Bank select buttons (A-B-C-D)
16.
Pattern select Buttons (1 to 16)
17.
Pre-1.7 instrument browsing selector
18.
Pre-1.7 kit browsing selector
19.
Song select button
ARTURIA – SPARK CREATIVE DRUM MACHINE – USER’S MANUAL
Page 32

32
20.
Record button (right-click to select quantized/unquantized recording)
21.
Stop button
22.
Play/Pause button
23.
Tap button (Tap tempo)
24.
Tempo knob (Change tempo)
25.
Display previous/next 16 pattern steps
26.
Set accent mode button (On patterns or steps)
27.
Erase/Cancel Erase button
(Use to erase Instruments, tracks or patterns)
28.
Divide loop size knob
29.
Loop On/Off button
30.
Move loop locator knob
(right-click: Shift by one step/Shift by one loop size)
31.
Sequencer Steps: ON/OFF pads
32.
Shuffle knob
(right-click: Swing range / Velocity emphasis)
33.
Master volume knob
ARTURIA – SPARK CREATIVE DRUM MACHINE – USER’S MANUAL
Page 33

33
5.3.1 The Display
The display is the central hub for all the information needed while using SPARK (i.e.
Project name, parameter value changes, etc.).
5.3.2 The Sequencer zone
The Sequencer zone is divided into several zones:
5.3.2.1 The Sequencer Step pads
The 16 Sequencer Step pads are numbered from 1 to 16 or from 17 to 32 depending on
the length of the pattern and the timing value assigned to each step.
These pads allow you to edit your pattern by triggering note-on messages on your
instrument track. Patterns have a maximum number of 64 steps. If your pattern has
more than 16 steps, use the << or >> buttons to navigate to the previous or next page.
If you click on the >> next page button, you will see the numbering on the pads switch
from 1-16 to 17-32 for the second page, and so on.
You may choose to follow the cursor as it advances on the step pads (the pages will
change automatically) by right clicking on the >> button. A contextual menu will appear
allowing you to check or uncheck the “follow current step” option. If this option is
activated, both << and >> buttons will be lit. If the follow option is deactivated, the
buttons will not be lit up.
The step resolution is a sixteenth note by default. You can change the resolution in the
pattern panel (see section 5.4.1).
5.3.2.2 The Shuffle Knob
ARTURIA – SPARK CREATIVE DRUM MACHINE – USER’S MANUAL
Page 34

34
This knob sets the amount of shuffle applied to a pattern. Shuffle is a rhythmic shifting
of a Pattern in which the first note in a series of two plays for a longer time than the one
that follows.
When the Shuffle knob is turned all the way up, the first note in a series will play twice
as long as the one that follows.
Right click on the shuffle knob to set the swing range (1/4, 1/16, 1/32 of a note). This
will define the value of the note on which the swing will be applied.
The right-click window also shows the Velocity emphasis option, which increases the
dynamic range between the shuffled notes and the ‘fixed’ notes.
Shuffle is a function better heard than described. Try it!
5.3.2.3 The Transport Zone
These buttons, from left to right, are:
Record
Stop
Play/Pause
To record, click on the Record button and then on the Play/Pause button. The Record
button will turn to red to indicate recording mode is on.
To stop recording, click on the Stop button.
To disable recording mode, click on the Record button again.
While a pattern plays, clicking on the Play/Pause button will pause the playing. Click
again on Play/Pause to resume playing.
Click on Stop to reset current position to the beginning of the pattern.
Right-click on the Record button to choose between quantized or unquantized recording
function.
In Quantize mode; the recorded notes will be set exactly to the nearest step position.
When quantize mode is disabled, the recorded notes will keep the exact position they
were played on. Spark uses the Shift parameter (see section 5.4.2.2 to remember the
exact triggering time relative to a step position.
5.3.2.4 The Tap Button
The Tap button allows you to define the tempo of your pattern by simply tapping this
pad at the desired tempo. It is a beat/minute counter, so you have to tap the beats.
ARTURIA – SPARK CREATIVE DRUM MACHINE – USER’S MANUAL
Page 35

35
5.3.2.5 The Tempo knob
The Tempo knob allows you to set the tempo for your pattern when SPARK is not
externally synced to a host. The internal Tempo range is 10BPM to 300BPM.
To temporarily push or pull tempo like a DJ might, hold the SELECT button and turn
Tempo knob. This will temporarily increase or decrease the tempo, just like a dj pushing
or pulling a turntable, in order to synchronize Spark to an external audio source.
5.3.2.6 The Accent Button
The accent button allows you to set accents onto steps. Setting accents is very similar to
writing a "forte" on a music score. The accented steps will be played with more strength
that the unaccented ones. This allows for a very "natural" feel when listening to a
pattern.
Click on the accent button to set the sequencer steps to Edit accent mode. Now the
sequencer's steps in the main panel show the accents set on each step (not to be
confused with the note-ons in the normal Step mode).
Set an accent by clicking on the step: the step will light up. Remove the accent by
clicking on a highlighted step.
To exit accent mode, click on the accent button again.
Accent ON sets velocity to 127, Accent OFF sets velocity to 64.
5.3.2.7 The Erase Button
Click on the erase button to set Erase mode.
You can erase Instrument tracks, Banks, Patterns and Automations.
For example, to erase pattern 1 in Bank A, make sure Bank A is selected then click on
Erase and then on 1 in the Pattern section.
To erase Instrument 1 track, make sure Instrument 1 is the current instrument then
click on Erase and then on pad 1.
To erase a selection in a track, set Rec on, click on Erase, then press the pad at the time
you want to start to delete the selection, and release it when you want to stop erasing.
To delete an automation you created, click on Erase then turn the knob of the parameter
whose automation you want to delete.
ARTURIA – SPARK CREATIVE DRUM MACHINE – USER’S MANUAL
Page 36

36
5.3.2.8 The Loop zone
Click on the button "ON" to set Loop mode on.
The Divide knob allows you set the loop size.
Moving the knob one notch will halve the loop size.
The settings are 1/2, 1/8 and 1/4 of the pattern size, all the way down to the minimum
loop size: one step.
The Move knob allows you to move the beginning of the loop in one of two ways. Using
“Shift by one step” mode will shift the loop start to any given step of the pattern
(stepwise). Alternatively, you can move the loop in increments of the loop size (defined
with the divide knob) by using "shift by one loop size" mode. Right click on the Move
knob to choose the Move Loop mode: “Shift by one step” or “Shift by one loop size”.
5.3.3 The Song/Pattern zone
The Song/Pattern zone is where you can trigger the Song mode, select and play your
patterns, load Instruments or load a kit into your project.
5.3.3.1 Song Mode
Click on the Song button to enter the Song mode. The Song button will flash
continuously to let you know that you are now in Song mode. Click on the Play button in
the transport zone.
Listen! Your patterns are now chained together and played one after another in the
sequence defined in the song panel.
The Step pads (numbered from 1 to 16 at the top of the Center Panel) are used to
trigger the 16 pattern chains.
ARTURIA – SPARK CREATIVE DRUM MACHINE – USER’S MANUAL
Page 37

37
To edit your Song, refer to section Error! Reference source not found. “The Song
Panel”.
5.3.3.2 Editing Songs from the Center panel
The song mode in Spark is a powerful tool designed to build longer sequences or an
entire song by combining individual patterns.
When in Song mode, each step pad from 1 to 16 represents a pattern chain. A pattern
chain is a list of up to 8 patterns that will play one after the other.
When the Song plays, the step pads will light up successively showing you which pattern
chain is currently being played.
Pattern chains can be linked together to build longer chains or full songs. Refer to
section 5.5 “The Song Panel” to learn how to build your song.
Clicking on a step button will play the corresponding chain from its beginning, and loop
on the consecutive chains that are linked together.
5.3.3.3 Banks and Patterns
The patterns are organized in 4 banks (labeled from A to D) of 16 patterns each
(numbered from 1 to 16).
To select pattern number 6 of Bank B, click on Bank B and then on pattern 6. The
selected pattern can now be played when clicking on the Play button in the transport
zone.
But you can also use the Song/Pattern zone to copy or swap patterns in the currently
selected Bank.
To swap a pattern, drag and Drop a pattern number while holding [Option/Alt on Mac
OSX or [Ctrl on Windows and drop it on another pattern number. A pop-up menu will
ask you to confirm your choice. Click Ok.
To copy patterns, simply drag and Drop a pattern number onto another one. A pop-up
menu will ask you to confirm your choice.
The exact same procedure applies to copying or swapping Banks.
To export a pattern to a MIDI file on your system or in your host, drag the pattern
outside Spark window and drop it on your system window or host window.
5.3.4 The Jog Dial
5.3.4.1 Loading Kits, Projects, Instruments or Samples
Use Select+Step 7 or click on the interface to switch to the library panel. Use the jog dial
and the select button to browse kits, projects, instruments or samples :
ARTURIA – SPARK CREATIVE DRUM MACHINE – USER’S MANUAL
Page 38

38
Scrolling the Jog Wheel will let you navigate the result list. Clicking on the Jog Wheel will
load the highlighted element.
Scrolling the jog wheel while the “Select” button is pushed will navigate the list of filters.
Clicking on the jog wheel while Select is held will activate/deactivate the current filter.
Click and hold the Jog Wheel, then scroll it to select a different browser (Project, Kit,
Instrument or Disk)
Hold the “Select” button and click on the Jog Wheel for 1 second to close the browser
window without loading anything.
To browse the list, you can choose to switch to infinite or non-infinite mode in the
preferences. Default mode is infinite Mode. In non-infinite Mode the Jog Dial will stop
scrolling at the end of the instrument, kit, or project list when scrolling forward and at
the beginning of the list when scrolling backward.
5.3.5 The FX Live pad
The FX Live pad is an amazing performance tool, especially if you plan on playing live.
Its touch sensitive screen will apply live effects in real time to your song or patterns,
allowing you to shape your sound with great precision. When your cursor enters the FX
pad zone, it turns from an arrow to a cross.
The FX Pad features 3 main effect buttons called Filter, Slicer and Roller. By rightclicking on any of them, you can choose between "Latch" or "Touch" options. "Latch" will
hold the effect at its current value when you release the cursor; "Touch" will cut off the
effect when the cursor is released (i.e., the effect is only active when you are clicking on
the Pad).
You can also enable Latch mode from the hardware by pressing and holding the Select
button and then pressing the Filter, Slicer or Roller button.
In Latch mode you can combine the Filter and Slicer effects: To “slice” the filtered sound,
set the filter effect to Latch mode. Now you can touch the pad and change your filter to
the desired setting. Next enable the Slicer button. You will have the Filter set to your last
setting and can play the slicer on the FX Live pad.
Note that the Roller effect is not active when Slicer is set to Latch mode.
ARTURIA – SPARK CREATIVE DRUM MACHINE – USER’S MANUAL
Page 39

39
5.3.6 The Filter / Slicer / Roller Buttons
5.3.6.1 The Filter Button
The Filter button offers a Low pass, a Band pass and a High pass filter, Oberheim Low,
High, Band and Multi-mode filters with cutoff and resonance.
To select your filter click on the FILTER button repeatedly. Your choice will be displayed
on the center display window. Alternatively you can use the direct access keeping the
Filter button pressed to show the current filter, and moving your cursor or finger on the
sub-effect you want to select.
The Cutoff and resonance can be modulated with the mouse on the software version or
your finger on the FX Live pad.
The resonance is modulated vertically from the bottom of the pad to the top of the pad.
Cutoff is modulated horizontally, from the right side of the pad to the left side of the
pad.
Play a pattern of your choice and click or touch anywhere on the right edge of the FX
pad while maintaining your click or touch; draw a straight horizontal line towards the left
side of the FX pad. You will hear the cutoff modulating. The amount of modulation
applied can be seen on the center display panel.
Now place the cursor close to the bottom right corner of the FX pad and trace a line
straight up to the top edge of the pad. You are modulating the resonance.
Of course, both Cutoff and Resonance can be modulated simultaneously by moving your
finger or the mouse in any direction and at any speed you wish.
5.3.6.2 The Slicer button
The Slicer will repeat the value of the note selected while applying an effect. You can
choose between the following effects:
Repeat mix
Click to choose the value of the note to be repeated with the Repeat mix effect. The
effect will be applied for the amount of time your mouse click is maintained. Release
your click to cancel and resume normal playing.
ARTURIA – SPARK CREATIVE DRUM MACHINE – USER’S MANUAL
Page 40

40
Repeat mix will continue playing the pattern while the effect is applied.
Repeat
The Repeat effect is the same as Repeat mix, except the pattern is not played while
applying the effect.
Tape
The Tape effect simulates the effect of slowing down a tape player.
Reverse
The Reverse effect simulates the effect of playing a tape recording backwards.
Strobe
The Strobe effect will play and shut off the sound alternatively at the rate of the selected
note value.
Pan
The Pan effect will move the sound from the left speaker to the right speaker at the rate
of the selected note value.
Bit Crush
The Bit Crush effect allows you to reduce the audio bit rate, creating a Bit Reduction or
Bit crushing sound effect. Reduce the audio anywhere from 7 down to 2 bits.
5.3.6.3 The Roller button
The roller could be described as a "Drum roll" tool.
Choose the note value for the Roller effect. Then, click and maintain your click on the
snare drum pad. The snare drum will play a basic drum roll. The roll speed depends on
the selected note value.
You can play, of course, any instrument pad using this effect.
The beginning of the roll is quantized by default.
A swing (dotted or triplet) effect can be added by simply clicking on the upper note
values for Swing on, or on the bottom values for Swing off. When swing is off, one beat
is played per note value.
When Swing dotted effect is on, a dotted beat is added after the first beat.
When Triplet is on, three notes are played per note value.
ARTURIA – SPARK CREATIVE DRUM MACHINE – USER’S MANUAL
Page 41

41
Roller Swing Mode’ preference let you choose between dotted notes or triplet notes.
The ROLLER can be LATCHED on by pressing and holding SELECT + ROLLER button. Now
any pad you play will have the roll effect played. This is a great way to enter notes into a
pattern.
On the Roller, other functions are available to control the selected instrument main
parameters:
Pressing Roller button once will set the pad to control the Roller.
Pressing Roller once again will set the pad to control Cutoff and resonance on the
selected instrument.
Pressing Roller once again will set the pad to control Aux1 and Aux2 on the
selected instrument.
Pressing Roller once again will set the pad to control Volume and Pan on the
selected instrument.
Pressing Roller button once again will set the pad to control the Roller again.
5.3.7 The Instrument control zone
The instrument control zone is made up of:
5.3.7.1 The Instrument pads
There are 16 Instrument pads but only 8 of them are shown on SPARK's interface. To
navigate to the next set of 8, click on the 1-8/9-16 button.
An instrument is assigned to each pad. The far left pad is by default the Bass Drum, next
to it is the Snare drum, and so on; but you can of course personalize this arrangement.
To edit an instrument, right click on the pad, and then Click on edit. This will take you to
the "STUDIO" bottom panel where you will be able to edit a full array of instrument
parameters. (See section 5.6 The Studio).
Tune mode
Alternatively, you can use Pads for the pitch of the current instrument when setting Tune
mode to ‘on’. Hold Select button and press step sequencer 13 to enter Tune mode.
You can now use the pads as a keyboard to play notes on the current instrument. You
can play 16 semi-tones using the 1-8 / 9-16 button:
ARTURIA – SPARK CREATIVE DRUM MACHINE – USER’S MANUAL
Page 42

42
With 1-8 / 9-16 button off you can play notes from current instrument pitch minus 8
semi-tones to current instrument pitch minus 1 semi-tone.
With 1-8 / 9-16 button on you can play notes from current instrument pitch to current
instrument pitch plus 7 semi-tones.
You can offset the starting pitch moving the jog dial when you are in Tune mode.
To exit Tune mode, Hold Select button and press step sequencer 13 again.
Alternatively you can choose to use the sequencer steps for playing notes on the current
instrument setting the 16 Tune mode preference in the preferences panel.
Step 9 will play the current instrument pitch.
Step one will play the current instrument pitch minus 8 semi-tones and step 16 will play
the current instrument pitch plus 7 semi-tones.
5.3.7.2 The Parameter Knobs
Each instrument pad has 3 parameter knobs above it.
These parameters act on the sound generator to modify the sounds in real time so as to
give each sound its own color. Each instrument has 6 parameters (3 of which are
mapped to the knobs).
You may choose which parameter each knob modifies by clicking on the name
underneath the knob. A contextual menu will appear listing the 6 parameters available in
addition to the Filter, Mixer and available Fx parameters (if an effect is set as insert on
the instrument’s mixer track).
Click on a different parameter name to assign the knob to that parameter. To select
different parameters via the hardware controller, Press and hold SELECT and turn the
knob that you want to change assignment on. You will see the different parameters in
the LCD screen and on the software screen.
ARTURIA – SPARK CREATIVE DRUM MACHINE – USER’S MANUAL
Page 43

43
Common instrument parameters are tuning/pitch, filter cutoff, envelop decay, attack and
release, different effect depths and rates (ring, shift, etc).
Filter parameters are Cutoff and Resonance. You can set the filter type for each
instrument in the studio panel.
Mixer parameters are Aux1 effect amount, Aux2 effect amount, Panning and Volume.
Fx parameters depend on the chosen insert effect set on the instrument mixer track.
Each effect has its own parameters exposed as well (dry/wet, feedback, delay time…)
You do not need to select a specific instrument to change its parameter. Any effect is
applied in real time while the pattern is playing.
The parameter motion can be recorded as an automation into the pattern and edited
later accurately using the automation editor (see section 5.4.2.2).
Right click on a parameter knob to edit the corresponding automation. You can also
choose to momentarily disable a Motion parameter in this way.
You can also record step automation for parameters that can be automated : With Spark
or SparkLE, hold a sequencer step button and tweak a knob. This will create automation
of the parameter controlled by this knob, only for the selected step. You can tweak
multiple knobs, once you release the step button the values of the parameters you
edited will be applied as automation to that step.
5.3.7.3 Select Button
The Select button allows you to easily select an instrument. Just click or press [Select
and then on the instrument pad of your choice to specifically select the corresponding
instrument.
This function was designed to select an instrument quickly when using the Spark
controller.
The Select button is also used to access many other secondary functions of buttons and
knobs.
5.3.7.4 1-8 / 9-16 Button
The main panel interface shows 8 instrument pads while a kit contains 16 instruments.
To navigate to the next set of 8 instruments, click on this button.
5.3.7.5 Mute button
This button allows you to bypass the audio sound of a specific instrument. Click on the
Mute button and then choose the instrument you wish to mute. You will no longer hear
that instrument when playing your pattern. When in mute mode, you can select multiple
instruments to mute them together. Use Select + Mute to clear all mutes.
5.3.7.6 Solo button
The Solo button mutes the other instruments besides the one(s) selected. Click on the
Solo button and then choose the instrument you wish to solo. You will only hear that
instrument when playing your pattern. When in solo mode, you can select multiple
instruments in order to solo them together. Use Select + Solo to clear the solo status.
5.3.7.7 Filter/Mixer parameters
A specific filter is applied to each instrument of a kit. The filter type can be changed in
the Studio Edit instrument view. (See next chapter 5.6 The Studio).
To change the filter and/or the mixer parameters, first select an instrument and simply
click on one of the filter or mixer parameter knobs and while maintaining your click,
ARTURIA – SPARK CREATIVE DRUM MACHINE – USER’S MANUAL
Page 44

44
move your mouse up or down to change the parameter. The Digital display window in
the center of the main panel shows you the changes applied to the selected parameter in
real time.
These motion parameters can be recorded as automations into the pattern and edited
later accurately using the automation editor (see section 5.4.2.2).
Right-click on a Filter or Mixer knob to edit or disable its Motion.
Cutoff: Set Filter cutoff on current instrument
Resonance: Set Filter resonance on current instrument.
Aux1/Aux2: Set Aux1 or Aux2 amount on current instrument.
Pan: Set amount of Pan on current Instrument
Volume: Set the volume on current Instrument
ARTURIA – SPARK CREATIVE DRUM MACHINE – USER’S MANUAL
Page 45

45
5.4 THE SEQUENCER PANEL
1
Export current pattern as WAV file
2
Export current pattern as MIDI file
3
Delete entire pattern or all active automations
4
Click to select bank A to D
5
Click to display patterns 1 to 16
6
Change upper part
7
Change lower part
The Sequencer panel is both a composing tool as well as a powerful editing tool.
5.4.1 The Toolbar
ARTURIA – SPARK CREATIVE DRUM MACHINE – USER’S MANUAL
Page 46

46
8
Change number of bars
9
Change number of steps
10
Change step resolution
11
View steps 1-32 or 33-64
The time signature is a notational convention used in musical notation to specify how
many beats are in each measure and which note value constitutes one beat.
Time signatures consist of two numerals, one stacked above the other: the lower
numeral indicates the note value that represents one beat (the "beat unit").
The upper numeral indicates how many such beats there are in a bar.
For instance, 4/4 means four quarter-note (quarter note) beats; 3/8 means three
eighth-note (quaver) beats, etc.
1. Export pattern as WAV file. Click on the icon and keep the mouse pressed. The
Audio file will be generated, a progress bar will appear. Once the export is finished, the
file will automatically be on your mouse pointer. Hold the mouse pressed, and drag and
drop the created audio file where you want.
2. Export pattern as MIDI file. Click on the icon and keep the mouse pressed. The
MIDI file will be generated. The file will automatically be on your mouse pointer. Hold the
mouse pressed, and drag and drop the created MIDI file where you want.
3. Delete the content of the sequencer: Click on this icon, a drop-down menu will
appear with two options to erase either all the content of the current pattern or all the
automation content contained in the current pattern.
4. Select the bank A to D that you wish to edit
5. Select the pattern 1 to 16 that you wish to edit
6. Click to change the upper part of the time signature of the current pattern. This
defines the number of notes (units) in one bar: Setting the signature to 4/4 means that
there are 4 quarter notes in a bar, if signature is 3/4 (waltz) it means there are 3
quarter notes in a bar.
7. Click to change the lower part of the time signature of the current pattern. This
defines the note value (unit): 1=whole - 2=half note - 4=quarter note - 8=eighth note.
8. Click to change the number of bars in the current pattern.
9. Click to change the total number of steps in the current pattern. The number of
steps is automatically calculated by Spark using the step resolution, the number of bars
in the pattern, and the time signature. But you can adjust it if you want to work with
your own bar calculation.
10. Click to change the Step resolution. The step resolution is the value of one step:
1/16=sixteenth note - 1/8=eighth note - 1/4=a quarter note, etc. A pattern has from 1
to a maximum of 64 steps.
11. Click to display Steps 1 to 32 or steps 33 to 64 in the current pattern.
ARTURIA – SPARK CREATIVE DRUM MACHINE – USER’S MANUAL
Page 47

47
5.4.2 The Sequencer area
1.
Currently selected track. Click on the track name to select it
2.
Set track volume
3.
Set track panning
4.
Set Solo on/off on one sequencer track in the current pattern. The
solo button in the center panel will flash to indicate that a solo has
been set from another panel (studio, mixer or sequencer).
5.
Set Mute on/off on one sequencer track in the current pattern. The
Mute button in the center panel will flash to indicate that a mute has
been set from another panel (studio, mixer or sequencer).
6.
Sequencing area. Write your patterns for all 16 instruments here
7.
Automation area.
8.
Currently editable automation
Underneath the toolbar described 5.4.1, the sequencer panel shows the 16 instrument
tracks as well as an automation edition area for the currently selected instrument.
ARTURIA – SPARK CREATIVE DRUM MACHINE – USER’S MANUAL
Page 48

48
9.
Delete automation lane
10.
Deactivate automation lane
11.
Add a new automation lane
12.
Automation tools
5.4.2.1 How to select a track
To select a track, move your cursor over the track. When the track lights up, click to
select.
ARTURIA – SPARK CREATIVE DRUM MACHINE – USER’S MANUAL
Page 49

49
5.4.2.2 The Automation editor
7
Automation area: Click and drag to draw automation on a single parameter
using the pen or line tool or erase drawing. Except for velocity, repeat and
shift parameters, you can use up to 4 sub-values per single step.
Use Cmd on MAC and Ctrl on WINDOWS to erase or move the four
automation sub-values of a single step note together
8
Current parameter shown in the automation area.
9
Remove automation for this parameter
10
Bypass automation for this parameter
11
Add a new automation lane . You can add as many automated parameters as
you want, among the instrument and effects parameters of the current track
12
Automation tools: See below
Pen tool lets you draw automation freely.
Line tool will let you draw a line: Click and hold from the starting point of
your line, and move to the end point of your line.
Eraser will remove automation.
The Global automation tool can be used to increase/decrease all automation
points simultaneously. You can choose to apply this effect to the 16 current
steps or to the entire pattern length via the Preferences option : “Global
automation tool applies to”
The Smart automation tool combines all the other tools into one via a list of
keyboard shortcuts :
Click to draw automation
Right click to erase
Shift+click to draw a line
Alt+click to draw a global automation
Cmd+click (mac) or Ctrl+click (win) to draw values at smaller resolution
(sub-values)
ARTURIA – SPARK CREATIVE DRUM MACHINE – USER’S MANUAL
Page 50

50
5.5 THE SONG PANEL
The Song panel allows you to chain patterns together to create longer sequences, or a
full song.
Activate the Song mode by clicking on the button found In [1]. Alternatively, you can
use the Song button found on the Main panel.
The Song mode contains 16 chains. Each of these chains can contain up to 16 patterns.
The patterns used in a chain are the ones you create in the Sequencer panel, or in the
Main panel. To add patterns to a chain, first select a bank from the four slots found in
[2]. Then you can select a pattern from the 16 slots found in [3], and drag and drop it
in one of the 16 chains found for example in [4], [5] and [9]. If a chain already
contains patterns, you can drop new patterns anywhere in the chain. Previously
contained patterns will move to show you where the pattern will be placed.
A chain will play from top to bottom, starting with the first pattern contained in it, up to
the last one. It will then jump back to the first pattern in the chain.
Chains can be triggered using the 16 buttons at the bottom of the interface [6]. When
you click on one of these buttons, the corresponding chain will start at the end of the
previously playing pattern. Alternatively, you can trigger the chains from the Main panel,
using the 16 step buttons. Step buttons on both Spark CDM and SparkLE will trigger
chains as well when Song mode is active.
Consecutive chains can also be linked together. This is done by clicking on the arrows
found between the chain [7]. In this example, chain 2-3 are linked together, so are
chain - 4, 7-8, and 10-11-12 [9]. Indeed, you can link as many consecutive chains as
you want, up to the 16 chains. Note that chain 16 and chain 1 can not be linked
together. When chains are linked together, they will play one after the other, from left to
right. In this example, when chain 2 finishes playing, chain 3 will play. When chain 3
finishes playing, chain 2 will play again.
ARTURIA – SPARK CREATIVE DRUM MACHINE – USER’S MANUAL
Page 51

51
Even if chain 2 and 3 are linked together, you can still decide to trigger chain 3 anytime
you want. When the currently playing pattern will end, chain 3 will start, and when chain
3 finishes, it will move to chain 2.
You can select patterns in a chain: Clicking on a pattern will select it. Clicking on a
pattern and holding [Shift] lets you select multiple patterns. You can then drag and drop
these patterns to another chain, or copy them using [Ctrl]+Drag and Drop on Windows
or [Alt]+Drag and Drop on Mac. You can also delete them using the [Del] key or the
Delete button [9].
ARTURIA – SPARK CREATIVE DRUM MACHINE – USER’S MANUAL
Page 52

52
5.6 THE STUDIO
a.
Instrument name
b.
Instrument icon
Clicking on this icon will trigger the instrument's sound. You may drag the
icon to another instrument icon to make a swap operation or hold Ctrl +
drag it to another instrument icon to make a copy.
c.
Set volume
Click and drag to set volume.
A small window appears next to the knob to let you know the amount and
direction of volume applied.
Double clicking the VOLUME knob will reset it to a default value
The studio panel displays all your 16 instruments as well as their parameters.
From here you can load instruments into slots, apply filters and effects, etc.
Let’s look at the Closed Hat window:
ARTURIA – SPARK CREATIVE DRUM MACHINE – USER’S MANUAL
Page 53

53
d.
Set Pan
Click and drag to set panning.
A small window appears next to the knob to let you know the amount and
direction of pan applied.
Double clicking the PAN knob will reset it to its center default value
e.
Mute an instrument
The Mute button on the center panel will flash to indicate that a Mute has
been set from another panel (studio, mixer or sequencer).
f.
Set solo on an instrument
The solo button on the center panel will flash to indicate that a solo has
been set from another panel (studio, mixer or sequencer).
g.
Edit mode button
Click on the Edit mode button to enter the instrument edit Mode.
5.6.1.1 Instrument Edit Window
1
Rename instrument.
ARTURIA – SPARK CREATIVE DRUM MACHINE – USER’S MANUAL
Page 54

54
2
Turn Mute on (M) / Turn solo on (S) / Set choke
group.
A 'Choke Group' lets you specify instruments that will cut
each other off when triggered. In the edit instrument view,
select the choke group for each instrument. The choke
group combo is near the solo button. You can set up 8
choke groups.
3
Play edited instrument
4
Edit instrument parameters : Mixer, filter, and
individual instrument controls
5
For sample instruments : select the layer you wish to
edit. Up to 6 samples can be loaded on a pad. The
playing mode is described in 8
6
Load a sample on the selected layer – Unload a
sample
7
Sample waveform
8
Playing mode : reverse on/off, choose the layering
mode from Velocity, Stack, Random or Circular.
9
Gain knob for each layer
10
Effect unit 1. See 5.8.1.3 for a full detail of effects.
11
Effect unit 2. See 5.8.1.3 for a full detail of effects.
12
The selected instrument as described in 6.4.1
ARTURIA – SPARK CREATIVE DRUM MACHINE – USER’S MANUAL
Page 55

55
5.6.1.2 The REX player
You can load REX files onto a pad. An instrument that contains a REX file will be editable
like any other instrument: You will have access to the modular patch and all the usual
instrument controls.
The REX player has specific controls: For each slice you will be able to specify the pitch,
and whether the slice will play in normal or reverse mode.
SLICE - The Slice parameter is automatable, which means that you will be able to
change the playing slice in realtime or via automation.
MODE - Two playing modes are available, using the Mode knob. Mode 1 will play the
entire REX file starting from the first slice. Mode 2 will play the slices independently,
depending on the Slice automation parameter.
RANDOM - You will also be able to control a Random parameter. The more randomness
you add, the more often Spark will play a different slice from the one it was supposed to
play.
ARTURIA – SPARK CREATIVE DRUM MACHINE – USER’S MANUAL
Page 56

56
5.7 THE MODULAR
Each instrument in Spark is made in a fully modular environment. This means
that all sample instruments, and obviously analog instruments rely on a modular
patch. This should not frighten you because all instruments have dedicated
“macro” parameters, which means that you will still be able to edit an
instrument in depth without having to rely on the modular panel. But for those
who want to go deeper into editing, the modular panel provides endless
possibilities for sound design!
5.7.1 The modular editor area
A modular patch will require four vital modules to work:
[1] The Pad module: It corresponds to the pad that you will play, either on the
controller or on the main panel. Its two core controls are Trig which sends a
message anytime the pad is triggered, and Velocity, which corresponds to the
velocity at which the pad is played.
[2] and [3] are the two outputs of your patch, respectively the Left and Right
outputs. Any audio you have in your patch will need to go in those modules in
order to obtain sound.
[4] can be considered as your main VCA envelope: It needs to be activated by
the pad so the [Trig] output of the Pad module must be connected to the [Trig]
ARTURIA – SPARK CREATIVE DRUM MACHINE – USER’S MANUAL
Page 57

57
input of this envelope. The [Output] of the envelope needs to be connected to
the [Env] input of the Output modules 1 and 2.
Once these elements are connected, you can start building your instrument.
You will need an audio source. It can be either one or more Oscillators, a
Sampler module or a REX player module. In this case, we have a Sampler
module connected [5]. When you load either the Sampler module or the REX
module, the main connections required for it to work will automatically be
created. Since this is a fully modular environment, you are free to remove those
connections, but if you do so, you may have no sound coming out, we warned
you!
You can add other modules to build the patch you want. Those can be
modulators (envelopes, LFOs, …) or audio processors (filters, mixers, Bode
Shifter [6], …).
To add a new module, select the one you want from the list found in [7] and
drag and drop it in the modular area.
Navigate in the modular editor
Click and drag in an empty area of the modular editor to move around the
interface. Use the scroll wheel to zoom.
Connecting modules
To connect your modules together, you need to create cable connections [8]. To
do that, click and hold from one of the output of a module, and drag your cable
to one of the appropriate input of another module. When a connection is
possible, you will notice that your cable has a “sticky” behavior; it will
automatically place itself on the connector when you get close to it. Not all
connections are possible.
Depending on the type of connection, you will be able to edit the amount of
modulation defined by this cable. To do that, you
must double click on the cable. A small window will
appear at the middle of the knob. From there, you
will be able to set the amount of modulation (gain
knob) and the type of modulation (unipolar: only
positive modulation – or bipolar: both positive and
negative modulation)
ARTURIA – SPARK CREATIVE DRUM MACHINE – USER’S MANUAL
Page 58

58
While building your patch, you can preview your instrument by clicking on the
instrument icon found in [9]
5.7.2 The instrument parameters area
Once you built your patch, you have the possibility to assign the parameters
found in the modules of your patch to 6 Macro knobs. These Macros are the ones
you can control elsewhere in the Spark project, for instance in the Studio:
Each Macro knob can control up to four of the parameters found in your patch.
To achieve this, you need to select which module you want to control, for
instance in [11] we control Envelope 1.
ARTURIA – SPARK CREATIVE DRUM MACHINE – USER’S MANUAL
Page 59

59
Then you need to select which parameter you want to control, among those
found in the selected module. In [12] we control the Attack of Envelope 1.
Then you can specify the Min [13] and Max [14] values for each control. The
Min value is the value that the parameter will have when the knob is at its
minimum (fully turned counter clockwise); the Max value is the value that it will
have when the knob is at its maximum (fully turned clockwise).
As soon as a Macro knob controls a parameter, using the method described
above, you will not be able to edit that parameter from the modular editor area.
In the modular editor area, the parameter knob will be colored in the same color
as the Macro knob found below. This is an easy way to know which knob controls
which parameter.
If you wish to use the Tune Mode on the instrument patch you create, you will
need to follow this rule: The first of the 6 Macro knobs needs to control the
Coarse tune parameter in the case of an Oscillator, or the Pitch parameter in the
case of the Sampler. The ranges need to be Min=0 and Max=1.
ARTURIA – SPARK CREATIVE DRUM MACHINE – USER’S MANUAL
Page 60

60
5.7.3 Description of the modules
12 different modules are available in Spark to create your patch. Some are used
to generate sound, others to modify the sound. Finally, some modules are here
to modulate the parameters.
5.7.3.1 The Sampler
The Sampler is the module that you will need in order to load samples onto a
pad. Inserting a Sampler module will clear your current patch and create a new
one with the basic connections already built in. These connections will be
required for the Sampler to work.
The essential functions of the Sampler will be accessible from the Studio panel :
Load samples, edit their start/end points, tweak the gain, …
From the Modular panel, you will have access to these functions:
Trig input will trigger the sample player
FM input will control the pitch (Frequency Modulation)
AM input will control the amplitude (Amplitude Modulation)
Output L and Output R are the Left and Right outputs.
5.7.3.2 The REX player
The REX player is the module that you will need in order to load REX files onto a
pad. Inserting a REX player module will clear your current patch and create a
new one with the basic connections already built in. These connections will be
required for the REX player to work.
ARTURIA – SPARK CREATIVE DRUM MACHINE – USER’S MANUAL
Page 61

61
The essential functions of the REX player will be accessible from the Studio panel
: Load a REX file, tweak the individual slices… A more detailed description of the
REX player can be found in 5.6.1.2
From the Modular panel, you will have access to these functions:
Trig input will trigger the REX player
FM input will control the pitch (Frequency Modulation)
AM input will control the amplitude (Amplitude Modulation)
Output L and Output R are the Left and Right outputs.
5.7.3.3 The Oscillator
The Oscillator is a module that will create basic waveforms. The available
waveforms are Saw, Square, Triangle, Sine waveforms, and White and Pink
noises.
You will be able to control the OCTAVES, COARSE TUNE in semitones, as well as
a FINE TUNE for more precise detuning. The WIDTH parameter controls the
pulse width in the case of the Square waveform.
The input connections are FREQUENCY MODULATION, AMPLITUDE MODULATION,
PULSE WIDTH MODULATION, and a Sync input that will retrigger the oscillator
waveform based on the frequency of the sync source.
The output connections are a mono Audio output, and a Sync output.
5.7.3.4 The Filter
The Filter module is a mono multimode filter. You will find controls for CUTOFF
frequency and RESONANCE amount, and a FILTER MODE selector.
The modes available are:
ARTURIA – SPARK CREATIVE DRUM MACHINE – USER’S MANUAL
Page 62

62
2 Pole (12db per octave) and 4 Pole (24db per octave) Low Pass, Band Pass and
High pass filters. There is an additional 1Pole (6db per octave) Hgh pass and a
NOTCH filter.
Input connections are the audio input, Cutoff frequency modulation, Resonance
amount modulation, and Amplitude modulation.
Output connection is the audio coming out of the filter.
5.7.3.5 The Stereo Filter
The Stereo Filter module is a stereo multimode filter. You will find controls for
Cutoff frequency and Resonance amount, and a filter mode selector.
Input connections are the audio input, Cutoff frequency modulation, Resonance
amount modulation, and Amplitude modulation.
Output connection is the audio coming out of the filter.
It has fewer modes compared to the mono filter but it will be more conveninent
when processing a stereo source such as samples or REX files.
5.7.3.6 The Minimixer
The Minimixer is a basic audio mixer. You will be able to mix 5 different audio
sources with individual gains for each.
The Input connections are the 5 audio sources and an Amplitude modulation.
The Output connection is the mixed audio.
This mixer is a mono mixer.
ARTURIA – SPARK CREATIVE DRUM MACHINE – USER’S MANUAL
Page 63

63
5.7.3.7 The Ring Modulator
The Rind Modulator will process two audio signals. The source signal is the input
named Audio.
From there, you can decide which signal to multiply it with. If you connect
another audio source to the Mult input, then the Audio signal’s amplitude will be
multiplied by the Mult input.
If you don’t connect anything to the Mult input, then a basic sine wave will be
used as the carrier. You can define the depth and the rate of this sine from the
two knobs.
The output is the processed audio.
5.7.3.8 The Bode Shifter
The Bode Shifter is a frequency shifter. That means that it will shift the
frequency of the Audio input by a certain amount. This amount is defined by the
Shift parameter and the Scale parameter. The Scale parameter can be either
linear (5, 50, 500 and 5k), or exponential (Exp)
Output A carries only the downshifted signal, output B carries only the upshifted
signal. The MIX output contains the mixture of down- and upshifted signals and
their relationship can be set with the MIX control.
5.7.3.9 The Karplus Strong module
The Karplus Strong module is a physical modeling tool that will emulate the
behavior of a plucked string. You can define the frequency of the string, a
ARTURIA – SPARK CREATIVE DRUM MACHINE – USER’S MANUAL
Page 64

64
damping amount, and add some noise. The damping type can be selected as
well.
The exciter of the string will be the Audio input. You also have input controls for
frequency modulation and damping modulation.
The output is the processed audio.
5.7.3.10 The Spring-Mass module
The Spring-Mass module is another physical modeling tool that will emulate an
array of springs and weights. The Audio input will resonate when connected to
this module.
You can define the input and output gains, the stiffness of the springs, the mass
of the weights and the damping amount. A non-linear parameter will make your
signal sound more unconventional by bringing non-linearity to the effect.
The input connections are Audio In, Amplitude Modulation, Mass modulation,
Stiffness modulation and Damping modulation.
The output is the processed audio.
5.7.3.11 The Envelope module
The Envelope in Spark is a multi stage envelope. To make the interface clearer,
only essential parameters are displayed on the module itself: Attack, Decay and
Release. Other parameters are accessible using the Macro knob assignations.
See 5.7.2 for an explanation on how to do that.
Here is the full list of parameters contained in the envelope, taken from the
Macro knob assignation drop down:
ARTURIA – SPARK CREATIVE DRUM MACHINE – USER’S MANUAL
Page 65

65
The input connections are: Trig input to trigger the envelope, modulation for
Attack, Decay, Release time and Sustain volume.
The output connections are: The envelope output (It can be connected to any
modulation input, in blue, or to an envelope input, in green), and the End
output, which sends a Trig signal as soon as the envelope ends.
5.7.3.12 The LFO module
The LFO module will let you create a waveform at low frequencies. You can
define the following parameters:
The Shape of the waveform
The Rate at which it will oscillate
The Width in the case of a square waveform
The Delay which is the duration before the LFO becomes active
The Fade In parameter which controls the time it takes for the LFO to reach its
full amount.
You can also activate the Sync function to sync the LFO frequency to the tempo
of Spark.
The Input connections are:
Trig to retrigger the LFO waveform
Amplitude Modulation
Frequency Modulation
Pulse Width Modulation for the square waveform.
ARTURIA – SPARK CREATIVE DRUM MACHINE – USER’S MANUAL
Page 66

66
5.7.3.13 The CV Modulator
The CV Modulator will take a modulation as CV Input. It could be the output of
an LFO for instance. It will then modulate it in various ways:
The AM input is an Amplitude Modulation input. The AM knob will add a constant
offset to this AM input.
The Gain will multiply the CV Input by a certain amount.
The Offset will then add a constant value to it.
The CV Output is the resulting modulation after these operations.
5.8 THE MIXER
Click on "Mixer" to display the Mixer panel
This panel is your 16-channel mixer panel. This is where all your instruments will be
mixed together. Here, the modified signals will be summed to produce the combined
output signals.
Each track is numbered from 1 to 16 at the top of the window. To the right of the mixer
window are Return1 – Return 2 and finally the Master track.
Let's take a close look at the Mixer.
ARTURIA – SPARK CREATIVE DRUM MACHINE – USER’S MANUAL
Page 67

67
5.8.1.1 The Instrument tracks
1
Instrument name
2
Open FX1 and FX2 window for this track
3
Set Aux1 and Aux 2 amounts for instrument/Channel
4
Set Pan for instrument/Channel 1
5
Mute/Solo track
6
Track volume and vu meter
7
Assign an output for instrument 1 (available when Spark
is inserted into a host sequencer with Multi-output Mode.
See section 6.2 “Plug-in mode” for more details)
ARTURIA – SPARK CREATIVE DRUM MACHINE – USER’S MANUAL
Page 68

68
5.8.1.2 The Return and master tracks
1
Open FX window for this
track
2
Set volume for AUX return
1
Open Master FX 1 and 2
window
2
Set Master volume
ARTURIA – SPARK CREATIVE DRUM MACHINE – USER’S MANUAL
Page 69

69
5.8.1.3 The Effects
1
Bypass FX1/FX2 for one instrument /channel-Aux-Master insert
2
Change/Remove FX (Inst./Channel, Aux or Master insert)
3
Load an FX preset
4
Save FX preset
5
Delete FX preset
6
Set Dry/Wet mix (Inst./Channel, Aux or Master insert)
7
Effect parameters
When you click on one of the Aux FX buttons, a scroll up window will appear: this is the
AUX FX window.
To select an effect, click on [SELECT EFFECT.
Choose one from the list, for example Compressor. The compressor window appears.
You can now set the parameters for the Compressor FX.
FX parameters
ARTURIA – SPARK CREATIVE DRUM MACHINE – USER’S MANUAL
Page 70

70
Compressor parameters
A compressor evens out differences in gain by reducing dynamics (difference in volume
between quiet sounds and loud sounds). This effect is often used to ‘fatten’ a sound by
making every individual element of the sound closer to the same volume. Every time a
sound goes over a certain volume (Threshold), it is reduced by a specified amount
(Ratio). Attack and Release determine how quickly the reduction is added and how
quickly it disappears. Makeup boosts the compressed signal’s level.
Bit Crusher parameters
A bit crusher reduces the bit depth and sample rate of the audio signal. The result is a
very digital sounding distortion.
Chorus parameters
Chorus is a classic effect that uses small delay times (that are modulated by an LFO) to
double a sound, making it seem fatter and thicker. Shape, rate and depth refer to the
LFO. Delay is the delay time and feedback is the amount of delayed signal added back to
the dry signal. Both of these parameters emphasize the effect when increased. Spread
refers to the width of the sound in the stereo field.
ARTURIA – SPARK CREATIVE DRUM MACHINE – USER’S MANUAL
Page 71

71
Delay parameters
Use the Link function to apply the same
parameters to the left and right channels.
Use the Sync button to sync to the host tempo
A delay repeats a sound, giving it more space and depth. Linking channels applies the
left channel’s delay time and feedback to the right channel. For separate parameters on
both channels Link should be deactivated. Ping Pong alternates the delayed signal
between the left and right channel (for an increased stereo effect), and dampening
reduces high frequencies by adding a Lowpass filter to the feedback chain.
Distortion parameters
A distortion saturates and distorts a sound by increasing the volume of a signal then
clipping the excess. This effect can add strength, high-end and volume to a sound.
Parametric EQ parameters
Parametric EQ allows one to boost or reduce the volume of frequency bands. FREQ
selects the frequency and GAIN allows one to remove or add volume to that band. Width
(MID only) determines the width of the middle band around the specified FREQ.
ARTURIA – SPARK CREATIVE DRUM MACHINE – USER’S MANUAL
Page 72

72
Phaser parameters
A phaser is similar to a chorus effect, in that it uses small delay times to affect a signal,
the result is a sweeping comb-filter sound.
Plate Reverb parameters
The Plate Reverb is only available for Aux and Master tracks
A reverb emulates the reflections of a sound in a different space (room, hall, etc).
Reverb adds depth and richness to a sound by ‘placing’ it in a separate physical space.
The size knob changes the size of the space. Predelay adds a small amount of delay to
the sound to imitate early reflections. Stereo refers to the width of the stereo field of the
reverb. Dampening sets how much the reverb should be filtered using the Lo and Hi Cut
filter settings.
ARTURIA – SPARK CREATIVE DRUM MACHINE – USER’S MANUAL
Page 73

73
Reverb parameters
The Reverb is only available for Aux and Master tracks
A reverb emulates the reflections of a sound in a different space (room, hall, etc). The
material section (HF Dampening and brightness) sets the timber for the reverb (dark or
bright sounding). The shape section (Diffusion and Decay time) sets the size and
duration of the reverb. The pre-delay section (Feedback and Delay) adds a small delay to
the reverb to emulate early reflections.
Destroyer parameters
A Destroyer is a digitizer effect which produces a distortion by the reduction of the
resolution or bandwidth of digital audio data. The resulting bit reduction may produce a
“warmer” sound impression, or a harsh one, depending on the amount of bit reducer and
resampler. Harmonic distortion adds overtones that are whole number multiples of a
sound wave's frequencies.
ARTURIA – SPARK CREATIVE DRUM MACHINE – USER’S MANUAL
Page 74

74
Flanger parameters
Flanging effect by mixing two identical signals together, with one signal delayed by a
small and gradually changing period. Varying the time delay causes these to sweep up
and down the frequency spectrum. The delay time between signals is
modulated: Flanging can create both subtle and extreme effects, depending on the rate
and depth of the modulation. High values for Feedback will create repeated echoes.
Space Pan parameters
Space panning is the spread of a sound signal into a new 3D sound field. The sound will
automatically be centered (pan set to 0), or the user can specify a different
position. The motion parameter will modulate the sound’s position in space.
Space pan must be used on stereo sounds.
ARTURIA – SPARK CREATIVE DRUM MACHINE – USER’S MANUAL
Page 75

75
Sub Generator parameters
Sub Generator adds low frequency to your signal. Sub Oscillator adds a decaying boom.
Subgrunge and Subgrunge -1 Oct have a similar effect to compress low frequencies.
Subgrunge -1 Oct works at an octave below like an octave pedal guitar. Vintage SubHarm adds a smooth sub-octave using the release time parameter. Tune is the
maximum boosted frequency, at low value it helps reduce distortion. Threshold is used
to gate the low frequency effect and stop unwanted background rumbling.
Limiter parameters
A Limiter is a compressor with a high ratio and a fast attack time. A limiter reduces the
level of an audio signal if its amplitude exceeds a certain threshold. Attack and Release
determine how quickly the reduction is added and how quickly it disappears. Hard or
Soft Knee controls whether the bend in the response curve is a sharp angle or has a
rounded edge. A soft knee reduces the audible change from uncompressed to
compressed.
ARTURIA – SPARK CREATIVE DRUM MACHINE – USER’S MANUAL
Page 76

76
Analog Chorus parameters
For a description of the Analog Chorus, see “Chorus”. The Analog chorus has a different
sound which might suit better in some circumstances.
Analog Delay parameters
The Analog Delay is a different algorithm from the “delay” effect plugin. The sound might
suit better in some circumstances.
ARTURIA – SPARK CREATIVE DRUM MACHINE – USER’S MANUAL
Page 77

77
Pitch-Shift Chorus parameters
1
Leslie rotation speed
2
High horn depth
3
High horn width
4
High horn shape
5
Low speaker width
6
Low speaker shape
7
Rate
8
Output level
Leslie parameters
The Leslie speaker is an amplifier/loudspeaker combination that is used to create a
modulation effect based on the Doppler effect. Both the treble horn and the woofer
speaker have rotating parts, giving that particular tone.
ARTURIA – SPARK CREATIVE DRUM MACHINE – USER’S MANUAL
Page 78

78
Vocal filter parameters
1
LFO on/off
2
LFO rate
3
Resonance
4
Formant placement
The Vocal filter is a formant filter that recreates the sound of vowels.
Graphic Equalizer
The 10 band graphic equalizer allows you to shape the frequency content of your sound
by choosing the individual gains of each frequency band.
ARTURIA – SPARK CREATIVE DRUM MACHINE – USER’S MANUAL
Page 79

79
5.9 THE LIBRARY
5.9.1 Library overview
In the Library tab, you will be able to load Projects, Kits and Instruments or to access a
Disk browser. The Project, Kit and Instrument browsers will display factory and user
elements. The Disk browser will let you find your samples via a file browser tree.
The top toolbar will let you access the different browsers :
The middle column will show the results list :
Click on an element to display related information in the right column; included fields are
Author, Genre, Bank, BPM for Projects and Kits. For instruments, you will have access to
the containing project, the musical genre, bank, the drum type and the sound engine
(Analog / Physical modeling / Sampling).
If you want to load an instrument, you can select the pad on which you want to load it.
You can also activate the “Auto Preview” feature, which will let you hear the instruments
automatically as you browse through the results list.
ARTURIA – SPARK CREATIVE DRUM MACHINE – USER’S MANUAL
Page 80

80
The Project and Kit browsers have two categories:
Banks and Musical genres.
The Instrument browser has three: Sound engine
(analog/physical/sample), drum type (bass drum, snare
drum, closed hi-hat…) and banks.
Inside each category, selecting multiple filter elements
will display the results that are in any of the elements.
For instance, in the Instrument browser, if you select
the “Analog” and “Physical model” filters, the result list
will show instruments that are either based on the
TAE® analog emulation engine, or on the physical
modeling engine.
Selecting filter elements from different categories will
restrict the result list: For example, if you select the
Analog engine filter and Snare Drum drum type filter,
the result will show all the snare drums that use the
analog engine.
Use the Jog Wheel on Spark CDM and SparkLE to
browse the result list, and Select+Jog Wheel to browse
the filter list.
Double click on a result, or click the “Load” button to load the project, the kit, or the
instrument on the currently targeted Instrument.
For disk browsing, if you select an appropriate file (.wav or .aiff), you will obtain
information such as file type, duration, sample rate/bit depth. You will also be able to
select the instrument and the layer on which you want to load this sample. The ”in patch
preview” feature, which lets you hear the sample the way it will sound in the current
instrument patch is also available. Even for sample based instruments, the synthesis
patch that contains it may affect the sound drastically and your sample could sound
totally different. Use this function to check if it sounds how you want it to.
5.9.2 Filtering the result list
The left column of the browser displays filters. Applying the filters will affect the results
list, displaying only the corresponding presets.
The filters are activated and deactivated by simply clicking on them.
There are different categories of filters, depending on the browser:
ARTURIA – SPARK CREATIVE DRUM MACHINE – USER’S MANUAL
Page 81

81
5.10 PREFERENCES PANEL
The preferences are divided into:
Sequencer
Interface
File
Jog Dial
MIDI Import/Export
Controller
5.10.1.1 Sequencer and interface preferences
Tune mode: Choose Step sequencer pads or Instrument Pads to trigger notes on the
current instrument when Tune mode is active.
Switch pattern instantaneously: If set to "Yes", a new pattern will play instantaneously
when it is selected. If set to "No", it will be played when the current pattern is finished
playing.
Follow current step: When set to "Yes", and when on Sequencer panel, the step pads on
the center panel will automatically display the step part that contains the current played
step.
Quantize record: When set to "Yes", all pads playing as well as any recordings will be
quantized.
Auto-start song: When on, clicking on the Song button in the center panel will start
playing the song automatically.
Click Output: Selects output for metronome click.
Roller Swing Mode: Lets you choose between swing notes or triplet notes when using
Roller first raw note values.
Next Bank/Pattern switch mode: When set to immediately, clicking a different bank will
directly play the same pattern number in the new bank. Otherwise, one must first select
the new bank, then specify the pattern of this new bank, even if it's the same pattern
number as the currently played pattern.
ARTURIA – SPARK CREATIVE DRUM MACHINE – USER’S MANUAL
Page 82

82
Choose your Controller GUI: Select between the Spark CDM GUI and the Spark 2 GUI.
Spark CDM GUI is identical to the Spark CDM hardware.
5.10.1.2 File preferences
Save a copy of Audio samples in Library: When importing .wav/.aiff files to Spark, the
source file will be copied in the library. You have the choice between:
Always: always copy files in the library
Ask: ask the user
Never: never copy files in the library
Library path: Changes the path to SPARK's library.
5.10.1.3 MIDI Import/Export preferences:
Wave export size: When saving a pattern as a .wav file, you can choose between
exporting the pattern in its initial size, or doubling the size of the pattern. Doubling the
size will avoid losing an effect playing beyond the end of the pattern (i.e. a reverb or a
delay).
Choose Drum map model for MIDI pattern import: When importing a MIDI pattern, you
have the choice to import it as a SPARK, General MIDI or ADDICTIVE Drum map.
Choose MIDI map model for Pads: You can choose an existing mapping for the pads
being controlled by an external MIDI controller. Spark Option is the mapping used by
Spark controller, General Midi is a standard MIDI mapping, and you can define your own
mapping using “Custom” Option and assigning MIDI notes on pads using Cmd-Click on
OSX or Ctrl on Windows on pads. This mapping is used for the MIDI bank and pattern
export. A default CC assignment for the instrument automations is set. By default the 6
instrument parameters, Pan and Volume are assigned. You can then customize those
assignments depending on the automations you’ve used. Automations are then exported
in the MIDI file.
“Enable default Pad velocity” preference is used to trigger pads with a constant velocity
defined with the “Default Pad Velocity” preference. Hit intensity is ignored when this
preference is set to “Yes”.
Use the Send Midi preferences to select which kind of MIDI data has to be sent from
Spark to your host or from Spark to the selected Output Midi port:
Choose “Send Midi From Pads” for sending MIDI data from Spark pads, and pattern
changes to your host.
Choose “Send Midi From Sequencer” for sending MIDI data coming from Spark’s
sequencer to your host.
Choose “Send Midi Clock out” for sending Spark Midi Clock to a Midi output and
synchronize another device or application capable of receiving Midi Clock.
5.10.1.4 Controller Preferences
Knobs speed sets the reactivity of the knobs in Spark, and can vary between slow,
normal and fast.
Set ‘Controller Detection’ to off, if you want to disable the automatic detection of the
hardware at startup, or on if you want to enable it.
ARTURIA – SPARK CREATIVE DRUM MACHINE – USER’S MANUAL
Page 83

83
6 MODES OF OPERATION
6.1 STANDALONE MODE
Spark can be used as an independent application on your computer even if you don’t
own any sequencer software. This is known as “Standalone mode”.
When Spark is operating in Standalone mode you have access to additional parameters
for setting up your audio and MIDI connections. To access these:
6.1.1 Launch the application
To launch the Spark application:
Windows: Start menu > Programs > Arturia > Spark… and choose Spark.
OS X: Finder > Applications > Arturia > Spark… and double-click on the
Spark application icon.
6.1.2 Configuration of Audio & MIDI settings
6.1.2.1 Windows
To access the Audio & MIDI preferences navigate to the Spark menu > Setup > Audio &
MIDI Settings. Here you are able to configure the global preferences of Spark. These
settings are saved automatically.
ARTURIA – SPARK CREATIVE DRUM MACHINE – USER’S MANUAL
Page 84

84
6.1.2.2 Mac OS X
(Windows)
AUDIO DEVICE TYPE
Selects the appropriate driver for your audio device.
(Mac OS X) OUTPUT
(Windows) DEVICE
Chooses which audio output SPARK will send sound out of.
Default is “Built-in Output” on the Mac; for Windows we highly
suggest to use an adequate ASIO driver for your sound card.
Test
Send out a short sine wave tone to help make sure sound is
being sent out the correct device.
Sample Rate
Choose the sample rate: default is 44,100 Hz. Increasing the
sample rate increases the quality of sound, but adds a bigger
load to CPU.
Audio Buffer size
Chooses the audio buffer size, displayed in samples and
milliseconds. Default is 512 samples. Decreasing this number
lowers latency, but adds more load to CPU. Increasing lessens
load on CPU but increases latency (latency is the delay between
a note played and actual sonic output).
MIDI Output
Displays the available MIDI outputs that can be used to send
Midi data out or Midi Clock out from Spark Sequencer and Pads
in Standalone Mode.
MIDI Clock sample
offset
Set an offset on internal Spark Midi Clock to compensate audio
driver latency errors.
Active MIDI inputs
Displays the available MIDI inputs that can be used to control
SPARK.
To access the Audio & MIDI preferences navigate to the Spark menu > Preferences. The
Audio & MIDI settings window will appear. Here you are able to configure the global
preferences of SPARK. These settings are saved automatically.
ARTURIA – SPARK CREATIVE DRUM MACHINE – USER’S MANUAL
Page 85

85
MIDI Clock inputs
Displays the available MIDI Inputs for receiving Midi Clock to
control Spark Sequencer. When a port is used as a Midi clock
receiver, it can’t be used as Midi Inputs for controlling Spark.
CLOCK FOLLOWS
STOP/CONTINUE
Sequencer will start and stop playing according to the Start and
stop Command received with the Midi clock signal when the
preference is on.
6.1.3 Updating the Spark Controller
1.
Host button
When on, the current Spark pattern will start and stop along with the host
sequencer transport.
To access the Update Spark Controller menu item navigate to SPARK menu > Update
Spark Controller.
When you update the Spark Engine your controller firmware may need to be updated as
well. Spark will alert you to this when you start the application with the controller
connected. Be sure to update your controller when you see this message so you can take
advantage of the latest features.
6.2 PLUG-IN MODE
For specific use in VST, Audio Unit and RTAS please refer to sections 6.3, 6.4 and 6.5.
In order for the Spark controller to work correctly with Spark used in plug-in mode, it is
necessary to turn off some MIDI connections in your sequencer software. Go to your
sequencer's MIDI settings and turn off 'Spark Private In' and 'Spark Private Out'. Without
this configuration:
- Spark controller will not connect to Spark on Windows.
- Spark controller will not behave correctly on OS X.
You can use Spark as plugin in stereo or Multi Output Mode. The host will show one
stereo output from Spark when used in Stereo Mode. When used in Multi output mode
the host will show 16 stereo channels available. You can modify the track output routing
in Spark in the mixer panel. Default routing sends all tracks to the master stereo output,
the first output. You can assign a track output to another stereo output of the 16
available outputs (see section 5.8.1.1).
6.2.1 Toolbar Extra Buttons
When using the Spark Engine as a plug-in within a DAW the tool bar will show two
additional buttons:
ARTURIA – SPARK CREATIVE DRUM MACHINE – USER’S MANUAL
Page 86

86
2.
Tempo button
When on, the current Spark tempo will match the host tempo.
6.2.2 Saving a project
When the project is saved the Spark Engine is saved in its last mode of operation, with
all modifications intact. For instance, if you are working on a project in which you have
modified parameters (without saving this as a separate preset in the plug-in itself), the
next time you open the project the Spark Engine will load the project and the
modifications as well.
You can use the drop-down “Save” menu of the VST sequencer with Spark, of course.
However, it is highly advisable to use SPARK LE’s internal menu: Projects saved in this
way are usable in any other mode (standalone or with another sequencer), and can be
exported and exchanged more easily. Most importantly, doing this also will maintain
compatibility with future versions of SPARK.
6.2.3 Configuring the Spark Sequencer or Pads to Send MIDI to a host
MIDI information generated by Spark can be recorded into the host software, both from
the pads and from the patterns. This includes all parameter automation activity.
Use the preferences to select which kind of MIDI data is to be sent:
The “Send Midi from Pads” setting will send MIDI data from the controller’s pads
and also transmit pattern changes to your host (see Chapter 6.6).
The “Send Midi from Sequencer” setting will send Midi note data generated by the
Spark sequencer to your host.
For more precise timing, we recommended not using both options at the same time:
First record Midi from the pads by setting the “Send Midi from Pads” option to Yes and
setting “Send Midi from Sequencer” to No, and then record Midi from the sequencer by
setting “Send Midi from Pads” to No and “Send Midi from Sequencer” to Yes.
6.3 VST
6.3.1 Installation
6.3.1.1 Windows
During installation, select the box “VST” among the proposed format choices of plug-ins.
The installer will automatically detect the VST folder of the instruments shared by
Cubase or any another compatible VST sequencer.
6.3.1.2 Mac OS X
The VST plug-in is automatically installed in the folder of the system corresponding to
the VST instruments: /Library/Audio/Plug-Ins/VST/
The VST plug-in will be usable by all your VST host applications.
ARTURIA – SPARK CREATIVE DRUM MACHINE – USER’S MANUAL
Page 87

87
6.3.2 Instrument use in VST mode
Opening the Spark VST plug-in is the same as opening all other VST plug-ins. Please
consult the instruction manual of your favorite host sequencer for more specific
information.
For instance, under Cubase, open the menu “VST Instruments”, and choose Spark in the
rack.
6.3.3 Connection to an instrument track
In order for SPARK to play information coming from an Instrument track, you have to
choose an Instrument track and select Spark as the output of this track. See the picture
below for more detail on how this is accomplished.
The events played on a MIDI keyboard are recorded by your host sequencer, and you
can now use the MIDI editing possibilities of the sequencer to control any parameter in
SPARK.
ARTURIA – SPARK CREATIVE DRUM MACHINE – USER’S MANUAL
Page 88

88
6.3.4 Multi Output Mode
Create an instrument using the VST Instrument Menu then click on Spark; then select
the output you want to enable by clicking on the button just on the left of the instrument
name in this menu.
6.4 AUDIO UNIT (MAC OS X ONLY)
6.4.1 Installation
The Audio Unit plug-in is automatically installed and by default in the following folder:
/Library/Audio/Plug-Ins/Components/
6.4.2 Use in Logic Pro
From version 7 and on, Logic Pro features an Audio Unit plug-in manager. To launch the
Audio Unit plug-in manager, click on the menu Preferences > Audio Units Manager.
This Manager will show you the list of available plug-ins, test their compatibility with
Logic, and then allow you to activate or de-activate them.
ARTURIA – SPARK CREATIVE DRUM MACHINE – USER’S MANUAL
Page 89

89
If an Arturia plug-in poses problem in Logic, start by checking that this plug-in has
passed the compatibility test, and that it is actually selected.
6.4.2.1 Stereo Mode
Select an Instrument track. On the mixer portion of the corresponding track, click on the
button “I/O” to obtain the list of plug-ins, then select AU Instruments > Arturia > Spark
> Stereo.
6.4.2.2 Multi Output Mode
To use the separate outputs:
Select an Instrument track. On the portion of the mixer corresponding to the selected
track, click on the button “I/O” to obtain the list of plug-ins, then select AU Instruments
> Arturia > Spark > Multi Output (16xStereo).
Then go to the mixer view and click on the “+” button at the bottom of the instrument
track to add Aux tracks.
ARTURIA – SPARK CREATIVE DRUM MACHINE – USER’S MANUAL
Page 90

90
You can choose the output number of each Spark instrument in the Mixer view (see
section 5.8).
6.4.3 Use in Digital Performer
6.4.3.1 Stereo Mode
To add an instrument, choose the menu Project > Add Track > Instrument Track >
Arturia > Spark (stereo)
Once you have added this instrument, it’s possible to assign a MIDI track to it. In the
connection menu of the MIDI track, select the instrument and the MIDI channel that you
want to use. Make sure you activate the track before starting to play or record.
6.4.3.2 Multi Output Mode
To use the separate outputs, create the number of new Audio tracks you want, and then
choose the correct OUT of the Spark plugin.
ARTURIA – SPARK CREATIVE DRUM MACHINE – USER’S MANUAL
Page 91

91
6.4.3.3 Assign Midi Track
Once you have added this instrument, it’s possible to assign a MIDI track to it. In the
connection menu of the MIDI track, select the instrument and the MIDI channel that you
want to use. Make sure you activate the track before starting to play or record.
6.4.4 Stereo Mode and Multi Output Mode
6.4.4.1 Stereo Mode
To add an instrument, choose the menu Project > Add Track > Instrument Track >
Arturia > SPARK.
Once you have added this instrument, it’s possible to assign a MIDI track to it. In the
connection menu of the MIDI track, select the instrument and the MIDI channel that you
want to use. Make sure you activate the track before starting to play or record.
6.4.4.2 Multi Output Mode
To use separate outputs: select an Instrument track. Then on the portion of the mixer
corresponding to the selected track, click on the button “I/O” to obtain the list of plugins, then select AU Instruments > Arturia > SPARK > Multi Output (16xStereo).
6.5 PRO TOOLS
6.5.1 Installation
In Mac OS X, the plug-in is directly installed in the folder reserved for the ProTools plugins in:
/Library/Application Support/Digidesign/Plug-Ins
In Windows, at the time of the installation procedure, select the RTAS plug-in among the
proposed choices of plug-ins. Then, when the system asks, indicate the folder in which
the other RTAS plug-ins are located.
Usually, this path is:
C:\Program Files\CommonFiles\Digidesign\DAE\Plug-Ins\
6.5.2 Utilization and opening of the Plug-in
Access to the SPARK plug-in is like all other plug-ins; simply create a stereo Instrument
track:
ARTURIA – SPARK CREATIVE DRUM MACHINE – USER’S MANUAL
Page 92

92
In order for SPARK to play the information coming from the Instrument track, you have
to associate it to an Insert channel via the appropriate menu.
More information on plug-in connections can be found in the Pro Tools User’s Manual.
6.5.3 Saving the project
When the session is saved, the status of SPARK is saved as it is, even if its programming
does not correspond to the preset. For example, you are working on a project in which
you have modified the parameters (without saving them in the plug-in itself), the next
time you open the session SPARK will load the project plus the modifications.
The Librarian Menu of Pro Tools can be used with SPARK as with any other plug-in.
Nevertheless, it is highly recommended to use the internal SPARK menu: with the
presets saved this way, they are usable no matter which mode is used (standalone or
other sequencer), and they can be exported and exchanged more easily. They will stay
compatible with the future versions of SPARK.
6.5.4 Automations under Pro Tools
The automation in SPARK works as with all RTAS/HTDM plug-ins.
Please refer to the Pro Tools documentation for more details on automation plug-ins.
6.6 RECORDING MIDI OUT FROM SPARK INTO A HOST DAW
6.6.1 Recording MIDI out to a VST or RTAS host
Here’s an example of a VST Host configuration for recording Midi out from Spark using
LIVE.
Note: Configuration for Pro Tools (RTAS) will be handled in a similar manner:
- Add the Spark VST plug-in on a Live track.
- Add a Midi track for recording Midi from Spark LE
- Configure the new Midi track (the left track in the image below)
. Set ‘Midi From’ to ‘Spark’ and change ‘Pre FX’ to ‘Spark’ in the drop-down menu
. Set Monitor to ‘Auto’
. Arm the session recording
ARTURIA – SPARK CREATIVE DRUM MACHINE – USER’S MANUAL
Page 93

93
- Configure the Spark track (the right track in the image below):
. Set ‘Midi From’ to the new Midi track (2 MIDI in this example)
. Set Monitor to ‘Auto’
Press the Record button in Live. Note that the Host and Tempo buttons must be
activated in the Spark LE plug-in window.
Display the Arrangement view in Live (press Tab) to confirm that you’ve recorded some
Midi notes.
Set Monitor to ‘In’ on the Spark track
Set the Spark LE Host button to off (this means that pressing the Play button in Live will
not start the Spark sequencer anymore)
Press Play in Live from the beginning of your arrangement. You should hear Spark
playing notes previously recorded from Spark and now sent by Live.
Note: For Cubase users: use Menu > Devices > VST Instrument to load Spark LE in
order to be able to select Spark as a Midi source. Creating a VST instrument track will
not display Spark as a Midi source.
6.6.2 Recording MIDI out to an audio units host (AU)
For more precise timing, we recommended not using both of the “Send Midi” Preference
options at the same time: First record Midi from the pads by setting the “Send Midi from
Pads” option to Yes and setting “Send Midi from Sequencer” to No, and then record Midi
from the sequencer by setting “Send Midi from Pads” to No and “Send Midi from
Sequencer” to Yes.
- Launch ‘Audio MIDI Setup’ to configure the IAC Driver that will be used for sending
Midi data to the AU host. Double-click on the IAC Driver Icon in the MIDI Studio view
ARTURIA – SPARK CREATIVE DRUM MACHINE – USER’S MANUAL
Page 94

94
- Check the ‘Device is online’ box
- Rename the first port to ‘Spark1 Midi OUT’. This is case-sensitive, so be sure to type
it exactly like that or it won’t work.
- Launch Logic and create a software instrument track
- Add the Spark LE plug-in by navigating to I/O > AU Instruments > Arturia > Spark
- Activate the Host and Tempo buttons in the Spark LE plug-in’s Tool bar window
- Open Window > Environment
- Select ‘Click & Ports’ in the upper left menu
- In the Physical Input box, draw a cable from Spark1 MIDI OUT’ to Sequencer Input
- Select the Spark track
- Set ‘Record’ OFF on the Spark track in Logic (to prevent a MIDI echo)
- Deactivate the Host button the Spark LE plug-in window
- Press Record in Logic (hit the ‘R’ key)
- Play the Spark pattern
ARTURIA – SPARK CREATIVE DRUM MACHINE – USER’S MANUAL
Page 95

95
6.7 CONTROLLING SPARK WITH AN EXTERNAL MIDI CONTROLLER
6.7.1 Assign a MIDI note to pads
Click holding [Cmd] on Mac / [Ctrl] on Windows on [Pads] #115 to #122 and press a
button or key on your MIDI controller.
6.7.2 Assign a MIDI note to bank buttons
Same as previous on corresponding button/pad.
6.7.3 Assign a MIDI note to pattern buttons
Same as previous on corresponding button/pad.
6.7.4 Assign a MIDI note to loop on button
Same as previous on corresponding button/pad.
6.7.5 Assign a MIDI CC to Loop divide knob
Click holding [Cmd] on Mac / [Ctrl] Win on [Loop] #49 and move knob or fader on your
MIDI controller.
6.7.6 Assign a MIDI CC to Loop Move knob
Same as previous on corresponding knob.
6.7.7 Assign a MIDI CC to shuffle knob
Same as previous on corresponding knob.
6.7.8 Assign a MIDI CC to master Volume knob
Same as previous on corresponding knob.
6.7.9 Assign a MIDI CC to cutoff/res/Pan/Aux1/Aux2/Volume knobs
Same as previous on corresponding knob.
6.7.10 Assign a MIDI CC to instrument parameters knobs
Same as previous on corresponding knob.
6.7.11 Assign a MIDI CC to tempo knob
Same as previous on corresponding knob.
6.7.12 Assign a MIDI CC to stop and play functions using Cmd+Click
Same as previous on play and stop buttons.
ARTURIA – SPARK CREATIVE DRUM MACHINE – USER’S MANUAL
Page 96

96
7 THE SPARK CONTROLLERS
7.1 USING THE CONTROLLER WITH THE SPARK ENGINE
7.1.1 Set Move Knob Mode
Right-click the Move knob and turn it to switch from “Shift by one step” mode to “Shift
by one loop size” mode.
7.1.2 Set Sequencer Follow Mode On / Off (Spark Creative)
When you have a pattern containing 32 steps the Sequencer Step pads have the option
to follow the position of the pattern when it crosses over from steps 1-16 to steps 17-32.
This is called “Sequencer Follow mode”. To toggle this feature on or off, simply press the
<< and >> buttons at the same time.
7.1.3 Roller Fx
When using the Roller effect in the Spark software the Roll effect can be applied only to
one instrument at a time, for the obvious reason that you are using your mouse to play
the instrument.
When using the hardware controller, you are free to apply the Roll effect to any number
of instruments simultaneously. You can also start a roll on one instrument and press
another instrument pad while maintaining your initial roll. Enjoy!
The Roll velocity is triggered on the software version by clicking on a pad, holding it, and
moving the cursor up and down on the pad. However, the instrument pads on the
hardware controller are pressure-sensitive, so you can change the velocity output of the
Roll effect in real time.
ARTURIA – SPARK CREATIVE DRUM MACHINE – USER’S MANUAL
Page 97

97
7.2 USING THE CONTROLLER WITH HOST APPLICATIONS OR MIDI
DEVICES
7.2.1 Device ports (Spark Creative only)
The Spark controller is displayed within a host application as consisting of two sets of
MIDI ports.
The first set of MIDI ports will present these labels to your computer:
- On Windows Vista and 7: "MIDIIN2(Spark Controller)"
- On Windows XP: "Spark Controller [2]"
- On Mac: “Spark Private IN” and “Spark Private OUT”
Note: These MIDI ports SHOULD NEVER BE USED by any application; they are used for
internal communication between SPARK and the Controller. Telling the host software to
use these ports would impair the efficiency of the controller.
The second set of MIDI ports will present these labels to your computer:
- On Windows Vista, 7 and XP: "Spark Controller"
- On Mac: “Spark Public IN” and “Spark Public OUT”
These are the public ports that are available for your applications to use.
All messages sent to these ports will also be sent to the Spark Creative controller's
physical MIDI Out port. All messages sent to the Spark Creative controller’s physical
MIDI In port by an external device will be transmitted to the host software internally by
the public port. When using Spark Creative as a MIDI controller, the data flow from the
controller will be sent on the USB public port to the host, as well as to the MIDI OUT
port, adding itself to any other existing MIDI information.
7.2.2 Use as MIDI Controller (Spark Creative only)
To use your SPARK Controller as MIDI controller, press [Filter + [Slicer + [Roller (then
open public MIDI port or connect a MIDI cable to MIDI Out).
7.2.3 Use as USB/MIDI interface (Spark Creative only)
To use your SPARK Controller as USB/MIDI interface, open the public MIDI port in your
host program and connect the MIDI cable(s) to your Spark Creative controller.
ARTURIA – SPARK CREATIVE DRUM MACHINE – USER’S MANUAL
Page 98

98
7.3 MIDI CONTROL CENTER
Our free MIDI Control Center software allows you to customize the functions of the
Pads, Knobs and Buttons of your Spark or SparkLE hardware according to your needs.
You can download the software from the Arturia.com web page
A full manual of MIDI Control Center features is available from inside the MIDI Control
Center software. Open the MIDI Control Center and go to Help -> Open Manual
ARTURIA – SPARK CREATIVE DRUM MACHINE – USER’S MANUAL
Page 99

99
8 SPARK LEGAL INFORMATION
8.1 SOFTWARE LICENSE AGREEMENT
1. General
1.1 In consideration of payment of the Licensee fee, which is a portion of the price
you paid, Arturia, as Licensor, grants to you (hereinafter termed “Licensee”) a
nonexclusive right to use this copy of the Matrix 12 V (hereinafter the “Product”).
All intellectual property rights in the software belong to Arturia SA (hereinafter:
“Arturia”).
1.2 The following editions of the Product are available: “Demo”, “Standard”, “EDU”
and “NFR”. Whilst each edition equips the User with the same software, the editions
vary as regards both the scope of functions activated in the Product, and the rights
of use granted under this EULA.
1.3 By installing the software on your computer you agree to these terms and
conditions. If you do not approve these terms and conditions, you must not install
this software.
1.4 If you do not approve these terms and conditions, please return the complete
Product (including all written matter, packaging and similar material) to the dealer
from whom it was originally bought within 14 (fourteen) days after the day of
purchase. For purchases from the Arturia Online Store, please contact Arturia on the
internet website: www.arturia.com/support/askforhelp/purchase.
1.4 Arturia reserves all rights not expressly granted in the EULA.
2. Right of use
2.1 The Product is protected by copyright. The Licensee may not lease, loan or sub-
license the software. The Licensee is not authorized to modify the software.
2.2 Owning any product provided to the Licensee as “Standard” version grants the
Licensee a non-exclusive right to use the Product in perpetuity including commercial
purposes. The Licensee can activate the Product on up to five computers, as long as
only one installation is used at any given time. The Licensee must register the
Product to Arturia to get access to client support, and to activate his Product. (An
internet connection is required to register and activate the Product, either on the
computer on which the Product is installed, either on another device able to
exchange files with the computer on which the Product is installed). Owning a
license of the Products entitles the Licensee to get access to the future updates of
this Product.
2.3 Any Products provided to you as "NFR" (Not For Resale) version grants the
Licensee a non-exclusive right to use the Product for a limited period of time. The
Product shall only be used for demonstration, testing and evaluation purposes. NFR
Products must not be used for commercial purposes, and must not be resold or
transferred. The Licensee can activate the Product on up to five computers, as long
as only one installation is used at any given time. The Licensee must register the
ARTURIA – SPARK CREATIVE DRUM MACHINE – USER’S MANUAL
Page 100

100
Product to Arturia to get access to client support, and to activate his Product. (An
internet connection is required to register and activate the Product, either on the
computer on which the Product is installed, either on another device able to
exchange files with the computer on which the Product is installed). NFR Products
are exempt from update, upgrade or crossgrade offers, and cannot be purchased
with or exchanged for vouchers or coupons. Furthermore, as an owner of a NFR
Product, you are not entitled to any vouchers that ship with the standard version of
the Product.
2.4 Any Products labelled or otherwise provided to you as an “Educational” version
grants the Licensee a non-exclusive right to use the Product in perpetuity. The
Product shall only be used by students or those working in educational institutions.
This definition includes students, faculty, staff and administration attending and / or
working at an educational institutional facility: private / public schools, colleges,
universities and similar. These Products must not be used for commercial purposes,
and must not be resold or transferred. The Licensee can activate the Product on up
to five computers, as long as only one installation is used at any given time. The
Licensee must register the Product to Arturia to get access to client support, and to
activate his Product. (An internet connection is required to register and activate the
Product, either on the computer on which the Product is installed, either on another
device able to exchange files with the computer on which the Product is installed).
These Products are exempt from upgrade or crossgrade offers, and cannot be
purchased with or exchanged for vouchers or coupons. Furthermore, as an owner of
an educational Product, you are not entitled to any vouchers that ship with the
standard version of the Product.
2.5 Any Products labelled or otherwise provided to you as a “Demo” version grants
the Licensee a right to use the Product only for demonstration and evaluation
purposes. These Products must not be used for commercial purposes, and must not
be resold or transferred. These Products are exempt from upgrade or crossgrade
offers, and cannot be exchanged for vouchers or coupons.
3. No Unbundling
Bundles (product bundles are an association of software and hardware or software-
only products) can only be resold / transferred as a whole. The individual
components of a bundle must not be resold / transferred separately.
4. Resell
4.1 Renting or lending the licensed Software to a third party is expressly forbidden.
Apart from that and if not provided otherwise within this EULA.
4.2 Except if otherwise stated within this EULA, Licensee may resell the software to
a third party or transfer the software permanently free of charge, provided the third
party agrees in writing with this EULA and Licensee ceases all use of the software,
completely removes all installed copies of the software from his computers and – if
the software was not purchased via download – deletes or transfers the original
media delivered with the software to the third party. In addition, Licensee is
required to de-register the purchased software with Arturia (more information
available on www.arturia.com).
ARTURIA – SPARK CREATIVE DRUM MACHINE – USER’S MANUAL
 Loading...